
WH-UD12CE5 - Heat pump PANASONIC - Free user manual and instructions
Find the device manual for free WH-UD12CE5 PANASONIC in PDF.

| Product type | Air-to-water heat pump split |
| Brand | Panasonic |
| Model | WH-UD12CE5 |
| Operating mode | Heating, Heating + Tank, Tank |
| Water outlet temperature | 25 °C to 55 °C |
| Outdoor ambient temperature (heating) | -20 °C to 35 °C |
| Recommended water pressure | 0.05 MPa to 0.2 MPa |
| Backup heating | Yes, automatic or manual activation |
| Silent mode | Yes, outdoor unit noise reduction |
| Sterilization function | Yes, adjustable (40 °C to 75 °C), weekly timer |
| Programmable timer | Yes, up to 6 programs per day, by day of the week |
| Display | Water outlet temperature, outdoor temperature, clock, error codes |
| Safety device | Residual current circuit breaker (RCCB), mandatory grounding |
| External filter cleaning | At least once a year, by a professional |
| Maintenance | Seasonal inspection recommended by an authorized dealer |
| Automatic restart | Yes, after a power outage |
| Tank compatibility | Panasonic tank recommended |
| Number of manual pages | 76 pages |
Frequently Asked Questions - WH-UD12CE5 PANASONIC
User questions about WH-UD12CE5 PANASONIC
0 question about this device. Answer the ones you know or ask your own.
Ask a new question about this device
Download the instructions for your Heat pump in PDF format for free! Find your manual WH-UD12CE5 - PANASONIC and take your electronic device back in hand. On this page are published all the documents necessary for the use of your device. WH-UD12CE5 by PANASONIC.
USER MANUAL WH-UD12CE5 PANASONIC
Operating Instructions Air-to-Water Heatpump
Model No.
Indoor Unit
Outdoor Unit
WH-SDH12C6E5
WH-UD12CE5
WH-SDH14C6E5
WH-UD14CE5
WH-SDH16C6E5
WH-UD16CE5

ENGLISH
2~9
Before operating the unit, read these operating instructions thoroughly and keep them for future reference.
Before operating the unit, make sure the installation has been carried out correctly by authorized dealer correctly and precisely following the installation instructions given.
FRANCAIS
10~17
Thank you for purchasing Panasonic Product
TABLE OF CONTENTS
SAFETY PRECAUTIONS
2~3
CONTROL PANEL
4~7
INDOOR UNIT
8
TROUBLESHOOTING
9
INFORMATION
74~76
NOTE
The illustrations in this manual are for explanation purposes only and may differ from the actual unit. It is subjected to change without notice for future improvement.
OPERATION CONDITION
| Water outlet Temperature (°C) | Indoor | |
| HEATING | Max. | 55 |
| Min. | 25 | |
| Ambient Temperature (°C) | Outdoor | |
| HEATING | Max. | 35 |
| Min. | -20 | |
NOTICE : When the outdoor temperature is out of the above temperature range, the heating capacity will drop significantly and outdoor unit might stop for protection control.
SAFETY PRECAUTIONS
- Panasonic Air-to-Water Heatpump is a split system consisting only of an indoor unit and an outdoor unit. This system designed for combination with Panasonic Tank Unit. In case of non-Panasonic Tank Unit is being used with Panasonic Air-to-Water Heatpump System, Panasonic cannot guarantee neither good operation nor reliability of the system.
- This manual describes how to operate the Heatpump system between indoor and outdoor units only.
- Other operation such as water tank, radiator, external thermo controller and underfloor system, please refer to respective manufacturer operation manuals.
To prevent personal injury, injury to others, or property damage, please comply with the following.
Incorrect operation due to failure to follow instructions below may cause harm or damage, the seriousness of which is classified as below:

WARNING
This sign warns of death or serious injury.

CAUTION
This sign warns of injury or damage to property.
The instructions to be followed are classified by the following symbols:

This symbol denotes an action that is PROHIBITED.


These symbols denote an action that is COMPULSORY.

WARNING
INDOOR UNIT AND OUTDOOR UNIT

This appliance is not intended for use by persons (including children) with reduced physical, sensory or mental capabilities, or lack of experience and knowledge, unless they have been given supervision or instruction concerning use of the appliance by a person responsible for their safety. Children should be supervised to ensure that they do not play with the appliance.
Please consult authorized dealer or specialist to repair, install, remove and reinstall the unit. Improper installation and handling will cause leakage, electric shock or fire.

Do not install the unit in a potentially explosive or flammable atmosphere. Failure to do so could result in fire.
Do not insert your fingers or other objects into the indoor or outdoor unit, rotating parts may cause injury.

Do not touch the outdoor unit during lightning, it may cause electric shock.
Do not attempt to repair the unit by yourself. Otherwise, it may cause injury if it is mishandling.
Do not install the indoor unit at outdoor. This is designed for indoor installation only.
| WARNING | |
| POWER SUPPLY | |
| Do not use modified cord, joint cord, extension cord or unspecified cord to prevent overheating and fire. | |
| Do not share the same power outlet with other equipment to prevent overheating and fire. | |
| Do not operate with wet hands to prevent electric shock. | |
| If the supply cord is damage, it must be replaced by the manufacturer, its service agent or similarly qualified persons in order to avoid a hazard. | |
| This unit is equipped with Residue Current Circuit Breaker (RCCB). It is strongly recommended to check the operation of the RCCB after installation and periodically after servicing or maintenance by authorized dealer to ensure it is in good working order. Otherwise, it may cause electrical shock or fire in case of malfunction. | |
| It is strongly recommended to be installed with Earth Leakage Circuit Breaker (ELCB) or Residual Current Device (RCD) to prevent electric shock or fire. | |
| It is recommended to wear gloves during servicing or maintenance in order to avoid hazard. | |
| This equipment must be earthed to prevent electrical shock or fire. | |
| Prevent electric shock by switching off the power supply when: - Before cleaning or servicing. - Extended non-use. - Abnormally strong lightning activity. | |
| This appliance is for multiple uses. All power supply circuits must be turn off before access to any of the terminals in the indoor unit, to avoid electrical shock, burn or fatal injury. | |
| Stop using the product when any abnormality/failure occurs and disconnect the power plug or turn off the power switch and breaker. (Risk of smoke/fire/electric shock) | |
| Examples of abnormality/failure | The RCCB switches off by itself. Burning smell, abnormal noise or vibration sound is observed when the unit is in use. Hot water keeps on coming off the unit. |
| Contact immediately your local dealer for maintenance/repair. | |
| CAUTION | |
| INDOOR UNIT AND OUTDOOR UNIT | |
| Do not wash the indoor unit with water, benzene, thinner or scouring powder. | |
| Do not install the unit close to any combustible equipment or at bathroom. Otherwise, it may cause electric shock or fire. | |
| Do not touch the water discharge pipe at the indoor unit during operation. | |
| Do not place anything on top or beneath of the unit. | |
| Do not sit or step on the unit, you may fall down accidentally. | |
| Do not touch the sharp aluminium fin, sharp parts may cause injury. | |
| Ensure drainage pipe is connected properly. Otherwise, leakage may occur. | |
| Check the installation rack periodically to make sure that it is not damaged. After long periods of use, the strength of the installation rack may have deteriorated. | |
| CONTROL PANEL | |
| Do not let the control panel get wet. Otherwise, it may cause electric shock or fire. | |
| Do not press the buttons on the control panel with hard, pointed objects. Otherwise, it may damage the unit. | |
| Do not wash the control panel with water, benzene, thinner or scouring powder. | |
| Do not inspect or service the control panel by yourself. Please consult authorized dealer. Otherwise, it may cause injury if mishandling. | |

- Some functions described in this manual may not be applicable to your unit.
- Consult your nearest authorized dealer for further information.
For normal operation, the RESET FORCE PUMPOW buttons are not in use.

OFF/ON Button
Operation LED
3 Operation Mode Button
4 QuietOperationButton
5 Indoor Unit Backup Heater Operation Button
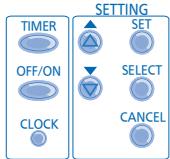
6 System Setting Mode Buttons
7 Timer Setting Group Buttons
8 Force Heater Mode Button
9 System Pumpdown Mode Button
10 System Status Check Mode Buttons
11 Error Reset Button
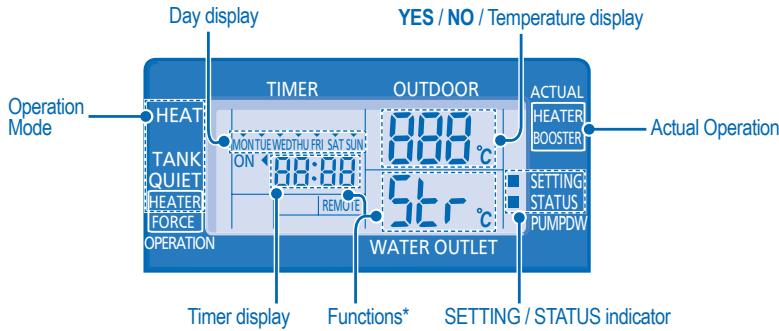
12 Heat Mode OFF/ON Indicator
Tank Mode OFF/ON Indicator
14 Quiet Operation OFF/ON Indicator
15 Backup Heater Request OFF/ON Indicator
16 Force Heater Request OFF/ON Indicator
17 Backup Heater Actual Operation (OFF/ON) Indicator
18 Booster Heater Actual Operation (OFF/ON) Indicator
19 System Setting Mode OFF/ON Indicator
20 System Status Check Mode OFF/ON Indicator
21 System Pumpdown Mode OFF/ON Indicator
22 Timer/Clock Setting Display
23 Remote Display
24 Outdoor Ambient Temperature Display
25 Water Outlet Temperature Display
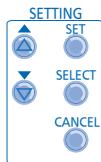
CONTROL PANEL PREPARATION
Setting Current Day and Time
CLOCK
-
Press
-
Press or to set current day.

- Press to confirm.
- Repeat steps 2 and 3 to set the current time.
Notes:
The current day and time need to be set when:
- The power is turned on for the first time.
- After a long time has elapsed since the power was last turned on.
- The current time that has been set will be the standard time for all the Timer operations.
SETTING UP THE SPECIAL FUNCTIONS
- After initial installation, you can manually adjust the settings. The initial setting remains active until the user changes it.
- The control panel can be used for multiple installations. Some functions may not be applicable to your unit.
- Ensure the operation LED is in OFF condition before setting.

SELECT FUNCTIONS AND SET YOUR DESIRED TIMER
- Press SET and CHECK simultaneously for 5 seconds to enter special setting mode. "SETTING" and "STATUS" indicator is ON.
- Press or to browse functions.
SELECT 3. Press to enter the function.
- Press or to enable YES or disable NO function, or set your desired day and time.
- Press SET to confirm.
Function *
Operation Mode/ Actual Operation
Description
| con | ra qn | External Thermo Controller (YES / NO) |
| To set external thermo controller connection. | ||
| con | TANK | Tank Connection (YES / NO) |
| To set tank connection. | ||
| Pry | HEAT | Heating Priority (YES / NO) |
| To choose the heat pump only use for Heating side during HEAT + TANK mode. | ||
| int | HEAT | Heating Heat-up Interval Set |
| To set timer for Heating during HEAT + TANK mode (0.5hour ~ 10hours). | ||
| int | TANK | Tank Heat-up Interval Set |
| To set timer for Tank during HEAT + TANK mode (5minutes ~ 1hour 35minutes). | ||
| dL | BOOSTER | Booster Heater Delay Time Set |
| To set delay timer for booster heater to ON if tank temperature is not reached (20minutes ~ 1hour 35minutes). |
Fun 与 Strl
Sterilization (YES / NO)
To set sterilization, if required.
Sterilization Day & Time Set
To set timer for sterilization (only once a week).
Sterilization Temperature Set
To set temperature for sterilization function (40^ 75^) .
Sterilization Continue Time
To set timer to maintain heating temperature in order to complete the sterilization function (5minutes ~ 1hour).

CAUTION
Do not use the system during sterilization to prevent burnt or overheat during shower.

TO TURN ON OR OFF THE UNIT
- When unit is ON, operation LED is lit and the actual temperature for water outlet and outdoor ambient are shown on the control panel display.

- To turn ON or OFF the panel/floor heating operation.
- In this mode, the outdoor unit will provide heating capacity to the indoor unit.
- HEAT + TANK MODE
- In this mode, the outdoor unit will provide heating capacity to the sanitary tank and indoor unit.
- This operation is not used when the sanitary water tank is not installed.
TANK MODE
- To turn ON or OFF the sanitary tank operation.
- In this mode, the outdoor unit will provide heating capacity to the sanitary tank.

TO ENJOY QUIET ENVIRONMENT
- This operation reduces outdoor unit noise. In this condition, it may cause decrease in heating capacity.

- The backup heater provides extra heating capacity during cold outdoor temperature and only can operated at heat mode operation for indoor unit.
- The backup heater will automatically turn ON when the setting conditions is fulfilled.
- To cancel the Heater operation manually, press the respective button again.

SYSTEM STATUS CHECK MODE
- Press CHECK for 5 seconds to enter STATUS mode.
- Press or to check the Water Inlet Temperature, Tank Temperature, Compressor Running Frequency or Error History.

to exit STATUS mode.
- Once STATUS mode is entered, "STATUS" indicator is ON.
- STATUS mode cannot be activated when the "SETTING" indicator is ON.
ADVANCE OPERATION
It is strongly recommended to contact the nearest authorized dealer to change the water temperature range.
- Using the control panel could set the temperature range for water outlet temperature and outdoor ambient temperature.
SYSTEM SETTING MODE
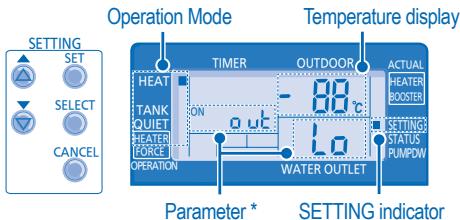
- Press SET for 5 seconds to enter "SETTING" mode. SETTING"indicator is ON.
- Press or to choose a parameter.
- After selecting the desired parameter, press to enter the parameter.
- Press or to set the desired temperature.
- Press SET again to confirm the setting.
- Repeat steps 2 to 5 to set other parameters.
| Operation Mode | Parameter * | Description |
| HEAT | out lo | Outdoor ambient set temperature at low water outlet temperature (-15°C ~ 15°C). |
| HEAT | out H | Outdoor ambient set temperature at high water outlet temperature (-15°C ~ 15°C). |
| HEAT | H20 L | Water outlet set temperature at low outdoor ambient temperature (25°C ~ 55°C). |
| HEAT | H20 H | Water outlet set temperature at high outdoor ambient temperature (25°C ~ 55°C). |
| HEAT | OFF | Set temperature for turning OFF heating operation (5°C ~ 35°C). |
| HEATER | out ON | Outdoor ambient set temperature for turning ON heater operation (-15°C ~ 20°C). |
| TANK | SET | Sanitary tank set temperature (40°C ~ 75°C). |
WATER TEMPERATURE THERMO SHIFT SETTING
- Press SET within 5 seconds.
- Repeat steps 3 to 5 to set the desired shift temperature (-5^ 5^) .
Notes:
CANCEL
- Press or wait 30 seconds to exit "SETTING" mode.
- The setting temperature will be stored in the system once confirm.
- "SETTING" mode cannot be activated when the "PUMPDW" and "STATUS" indicator is ON.
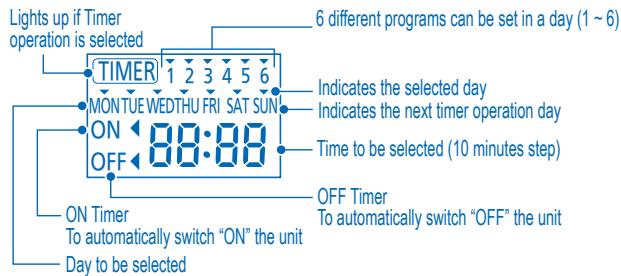
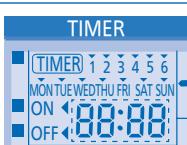
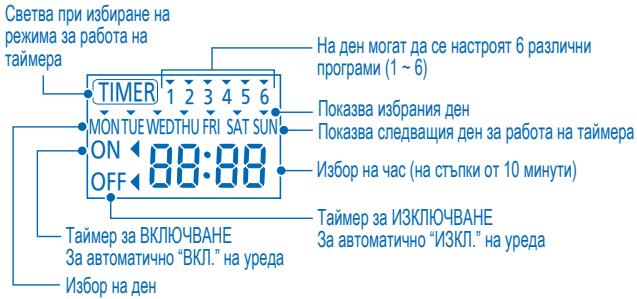
Timer Display
| Function | Step |
| Enter timer mode | Press TIMER. |
| Set day & time | 1. Press or to select your desired day. |
| SELECT | |
| 2. Press to confirm | |
| 3. "1" will be blinking, press to set program 1. | |
| OFF/ON | |
| 4. Press to select ON or OFF timer. | |
| 5. Press or to select your desired time. | |
| If you want to set the timer together with other operations, press MODE and QUIET. | |
| 6. Press to confirm program 1. The selected day will be highlighted with ▼. | |
| • After 2 seconds, the display will move to the next program. | |
| 7. Repeat steps 4 to 7 to set programs 2 to 6. | |
| • During timer setup, if no button is pressed within 30 seconds, or if the SET button is pressed the setting at that moment is confirmed and timer setup is ended. | |
| Add/Modify timer | Repeat the steps above. |
| Disable timer | Press TIMER, then press CANCEL. |
| Enable timer | Press TIMER, then press SET. |
| Check timer | 1. Press TIMER. |
| 2. Press or until your desired day is shown, press SELECT to confirm your selection. | |
| 3. Press or to check the set programs. | |
| Cancel timer | 1. Press TIMER. |
| 2. Press or until your desired day is shown. | |
| SELECT to enter program setting. | |
| 3. Press to cancel the program. | |
| 4. Press or until your desired program is shown. | |
| 5. Press to cancel the program. |
Notes:
- You can set the Timer for each day of the week (Monday to Sunday) with 6 programs per day.
- When the unit is switched on by the ON TIMER, it will use the previously set temperature to control the room temperature.
- Same timer program cannot be set in the same day.
- You may also select collective days with same timer setting.
- Promotes energy saving by allowing you to set up to 6 programs in any given day.

CAUTION
- Switch off the power supply before cleaning.
CLEANING INSTRUCTIONS
- Do not use benzene, thinner or scouring powder.
- Use only soap ( pH7) or neutral household detergent.
- Do not use water hotter than 40^ .
HINT
To ensure optimal performance of the unit, cleaning maintenance has to be carried out at regular intervals. Please consult authorized dealer.
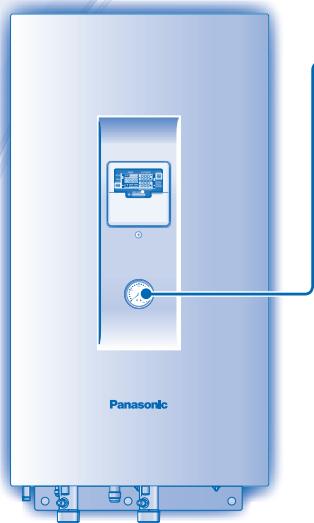
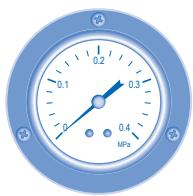
WATER PRESSUREGAUGE
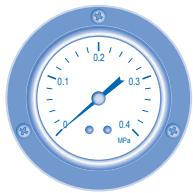

- Do not press or hit the glass cover with hard, pointed objects. This may damage the unit.

-
Ensure that the water pressure is between 0.05 to 0.2MPa .
-
In case the water pressure is out of the above range, please consult authorized dealer.
INDOOR UNIT & CONTROL PANEL
- Do not splash water directly.
- Wipe the unit gently with a soft, dry cloth.
EXTERNAL FILTER
- Please clean the external filter at least once a year. Fail to do so might cause filter clogged, consequent system breakdown. Please consult authorized dealer.
OUTDOOR UNIT
- Do not obstruct the air inlet and air outlet vents, it may cause low performance or breakdown. Please remove obstacles to assure the ventilation.
- During winter, please clean and remove the snow near outdoor unit so that the snow does no cover the air inlet and air outlet vents.
INSPECTION
- In order to ensure optimal performance of the unit, seasonal inspections on the unit, external filter and field wiring have to be carried out at regular intervals. This maintenance should be carried out by authorized dealer.
- Clear any obstruction at the air inlet and air outlet vents of outdoor unit.
FOR EXTENDED NON-USE
- Turn off the power supply.
NON SERVICEABLE CRITERIAS
TURN OFF POWER SUPPLY then please consult authorized dealer under the following conditions:
Abnormal noise during operation.
Water/foreign particles have entered the control panel.
Water leaks from Indoor unit.
- Circuit breaker switches off frequently.
- Power cord becomes unnaturally warm.
TROUBLESHOOTING
The following symptoms do not indicate malfunction.
| SYMPTOM | CAUSE |
| Flowing sound during operation. | · Refrigerant flow inside the unit. |
| Operation is delayed a few minutes after restart. | · The delay is a protection to the unit's compressor. |
| Outdoor unit emits water/steam. | · Condensation or evaporation occurs on pipes. |
| Outdoor unit emits steam during heating mode. | · This is due to defrost operation happens at the heat exchanger. |
| Outdoor unit does not operate. | · When the outdoor temperature is out of the operation condition range, the heat pump system enter protection control. |
| Air-to-Water Heatpump system operation will turn off. | · If indoor unit water inlet temperature is lower than 20°C. Backup heater power will turn on to heat up the water. |
| System difficult to heat-up. | · When heating is operated by indoor unit together with floor heating or panel heater simultaneously, there may be case where warm water temperature is getting lower and cause floor heating or panel heater heat-up is weaken. · When outdoor air temperature is low, it may be difficult to get warm. · Is the snow pile blocking the discharge outlet or intake inlet of outdoor unit. · When water outlet set temperature is low, it may be difficult to get warm. |
| System cannot get warm instantly. | · Due to the nature of the heatpump system, it may take some time to heat-up the water if the unit is operated from cold-start. |
| Operation starts after power resumes. | · Unit is operates under auto restart function. |
Check the following before calling for servicing.
| SYMPTOM | CHECK |
| Heating operation is not working efficiently. | • Set the temperature correctly. • Is the panel heater valve closed. • Clear any obstruction at the air inlet and air outlet vents of outdoor unit. |
| Noisy during operation. | • Check if the unit has been installed at an incline or the cover is not closed properly. |
| The unit does not work. | • Check if the circuit breaker is tripped. |
| Operation LED is no lit or control panel display is blank. | • Is the power supply off or power failure. |
The operation LED blinks and error code appear on control panel display.
- Turn the unit off and reveal the error code to authorized dealer.
- Timer operation cancel when error code occur.
Force Heater Mode Button
FORCE

- In case of a failure of the Air-to-Water Heatpump system, the backup heater can be used to heat up the heating water. Press FORCE to switch on the backup heater.
- Press OFF/ON to stop the force heater operation.
- During Force Heater mode, all other operations are not allowed.
UNITÀ INTERNA E UNITÀ ESTERNA
| Temperatura ambiente (°C) | Esterna | |
| RISCALDAMENTO | Max. | 35 |
| Min. | -20 | |
INSTRUCTIE VOOR SCHOOLMAKEN
BINNEN-UNIT & CONTROLEPANEL
Prima TIMER, depots prima SET
TIA NA ENEPTOIOIHSETE (ON) TH NA AIIENEPTOIOIHSETE (OFF) TH ΣYΣKEYH
Otau n ova d eivai evpyoioinjev (ON), n luxvia leuoyiac (LED) eivai avaupevi kai npexoua oepukpaia via ny efo to vepou kai to eoxepiko nepiBalov deixvetai otnv obov tov tiva k aevyoo.
MODE
PpOoBfKn/ToPtoTIOoinanXpvOoiAokottn
ATIEVEpyOTIOINOTe TovXPOVoiAIOKTTN
Eepyoiojntote tvxpoovdiakotttn
EaeyTovXpovoiakottn
AkupwotetovxpvobiaokmT
Etavalabate ta avwepwu bmuata.
TIMER CANCEL
Pntane,uotepa pntane
TIMER TIPATOTAPATEPA TIPOTET SET
E'YPOZ I'IEZHZE NEPO'Y

Mny tietcKaun xutntate to ualivo kauumu je oKAnpa, auiunavtikejEuva Mtopei va trokpange Baaon ot movda.

BeBaIomegaEte 6n triaou vepou p e a1 metaU0,05kai 0,2MPa.
HACTPOIBAHE HA CEDMNUEHTAIMEP
Ducnne3a TaMepa

Функця
CTblnka
Bne3e B peximna TaMepa
HaTnchete

HacptpoTe DeHЯ & Yaca
- Hatnche 7n, 3a da n36pepe Te jeaHnaJe DeH.
- HatncheTe ,3a da nToTbvpdnte.
- Ha ekpana ñe 3aNoUHe da Mira "1", HataChete , 3a da 3aadTe nporpama 1.
- Hatachete OFF/ON Na taimepa, 3a da n3sepeTe BKJI. IINI N3KJI.
- HatncheTe nIe, 3a da n36peTe jeelaHnaY cac. Ako nckate da hactpoite taHmepa 3aeDNo C dpyu onepauun, HatncheTe MODE qIET
- Hatnche T SET, 3a da notbypnite nporpama 1. N36paHnT den ue ce npoeptae c V Cne2 2ckyndi ncipeTt ue npemHe KbM cnedeBaata nporpama.
- Повторе сълки OT 4do 7,за наhaltponite nporpamn OT 2do6. Ako NO Врeme Ha NahtpoBaHe Ha taMepa He HATNCHE NHTO eINH bTOB INJKeHne Ha 30 cekyHdIn nIln aKO NahtcHETe 6byToHa SET,3adaJeHaTb MOMeHTa HAcTPOKa ce NOTBbPjDaBa nHaCtpoBaHETo Ce ppeKpaTBA.
Taimep DobaBAreHe/ MoDnPhiuPanae
NoBTopeTe ropeonncanHe CTbIKN.
OTMHa Ha TaMep
HaTnCHete , cIeK KOeTo HATnCHete
CANCEL
3aabaheHa TaMep
HATNCHETE TIMER SET. cneI KOETHO HATNCHETE
Поверка на
Таимера
- Hattichete
- HATNCHETe ⅢI N,doKATO ce nOKaKe CbOTBeTHNt DeH, cIeD KOEt HO HATNCHETe SELECT NOTBbprnTE I360pa cn.
- Hatnchete nI, 3a da npobepnte hactpoehnte nporpamM.
OTMHa Ha TaMep
- Hattichete
2.HatncheTe 1IIN 7,IOkato Ce nokajce CbOTBeTHnAIT DeH. SELECT - HatncheTe , 3a Da Bne3eTb H actpoikata Ha nporpaMaTa.
- HatncheTe nIIN CANCEL,doKato ce nokaxe keJenaHata nporpama.
- Hatnche , 3a da OTMeHte nporpaMaTata.
3a6eJexKn:
- MoxkeTe da hactponTe taMepa 3a BCEkI DeH OT cEdmucata (OT noHeJeJIHK DO HeJeJIa) C 6 nporpaMa Na DeH.
- Пи Вклочваны на моуна оТ ON TIMER се синолзва заадената преши това Temперatype за Контролирени настайна Temперatype.
- Edha n cbua nporpama Ha taimepa He moke da sbde hacptoeHa hKoIko Tbtn 3a eDHN Cbui DeH.
Mokete da n36peTe HЯKoJIko DnH c eDHa N CbUa Na HAcTpoKa Ha TaIMepa. - Повшиа весенeto на сеньг,在 Кат Ви позвява ду有很大点点头 do 6 порамп за дден.

BHHMAHNE
- N3kJIoucTe 3axpaHbaHeTo npedn nouchTbaHe.
KPINTEPIN 3A IIOBPEDA
U3KJIIOUYETE 3AXPAHBAHETO, cIe KoeTo ce o6bprHeTc bM OTOpN3npaHna DInIb B CJIeHNTE Clyua:
Heo6nuaen 3Byk no BpeMe Ha pa60ta.
Boda/yyxqn qactuicna nonaHaJIb naneJa 3a ynpabIeHne.
- ɪn'tɪya ɑːbɒəɒt Bʌtpeɪshɪŋ yɛpɪd.
-П配电ьсвачт ha eJ. Верига ce ИЗКЛЮЧВа чecTo.
3axpaHbauT Ka6e Ce 3aqrBa HeoBuHaNo.
OTCTPAHRABAHE HA IPIOBJEMN
CneHNHTe CmHITOMn npn pa6oTata Ha ypea He 03Haayabat HEn3npaBHOCT.
| СИМПТOM | ПИЧИHA |
| Тech no врeme на是我国. | • Охлajдашиа чуност вътpe в урEDA. |
| РавOTATA с забався сълкю минутси садп рectorтураиме. | • 3akbchenetaо сухуз 3a Заша на komпесора на урEDA. |
| Вьншата часотделя ВODа/napa. | • Ро тьбITE с пооча вондэнзашия пллэпая. |
| Вьнш�яг моул оtmеляnapа при равOTа в ржим на отолени. | • ПrimpINA за ТОВа e равOTATA по размразвае, каяTO сизвьшва в толлобменка. |
| Вьнш�яг моул не равOTI. | • КогATO вьншна т EMретатура e ИЗын равOTИй OБхВAT, сисемага на 툆monомпага визза в зашп�о управлике. |
| РавOTATA на 툆monомпага тип вьздун-ВODа顺着сп.e | • АкTo EMретатура на ВODА, каяTO виззa BьB вьтешниarperaT, e по-NИСКА OT 20°C.ДовлнITEноте сlementл eльк'tpo3axphaВане на harpeBaTeЯ顺着сп.а da загпee ВODATA. |
| Сисемага се затруdnява д затоня. | • КогATO вьтreneшия моул 3atONПЯ 3aEDHOC NODOBO OТПОЕНИЕ ИЛ ПANELEH HargeВATEЛ, можеда Има счuaïн, в каяTO EMретатура на толлatura ВODДа на hamaljee IN TOBA DA HAAMAN CINATA Na OTOПLEHETO OT NOLOBOTO OTOПLEHNE IIL NAI PANEH NARPEBATEЛ. |
| • КогATO вьншна т EMретатура на Визздуна e ИССКА,TOBA можеда 3atPydNHa 3aTOnPJIHETO. | |
| • Далун Натупянгся СНЯ БLOКИРа OTВORITE 3A BXODIÀME IN I3XODIÀSU R B3DUX Na Bьншно MОДУЛ. | |
| • КогATO настwoнен�а т EMретатура на ИЗХODA 3a ВODATA e ИССКА,TOBA можеда 3atPydNHa 3aTOnPJIHETO. | |
| Сисемага не може д затоня веднaria. | • Порадиособеньостпte на сисемага на 툆monомпага мочеда OТHEME ИЗБЕСТНВЕМЕ 3a ATOnPJIHNE Ha BODATA, akO моултс SE ИЗПOL3BA B CTUDEHO CBCTOЯнne. |
| РавOTATA започа саддьзстановявае на замpanванeto. | • МоултВТ равOTI с Функция 3a AVTomATNUH Opeстартурае. |
PpOBepe cIeHNHea, npei da ce obaHte Ha otOpn3npaH cepBn3.
Information for Users on Collection and Disposal of Old Equipment

These symbols on the products, packaging, and/or accompanying documents mean that used electrical and electronic products should not be mixed with general household waste.
For proper treatment, recovery and recycling of old products, please take them to applicable collection points, in accordance with your national legislation and the Directives 2002/96/EC and 2006/66/EC.
By disposing of these products correctly, you will help to save valuable resources and prevent any potential negative effects on human health and the environment which could otherwise arise from inappropriate waste handling.
For more information about collection and recycling of old products, please contact your local municipality, your waste disposal service or the point of sale where you purchased the items.
Penalties may be applicable for incorrect disposal of this waste, in accordance with national legislation.

For business users in the European Union
If you wish to discard electrical and electronic equipment, please contact your dealer or supplier for further information.
[Information on Disposal in other Countries outside the European Union]
These symbols are only valid in the European Union. If you wish to discard these items, please contact your local authorities or dealer and ask for the correct method of disposal.
Pursuant to at the directive 2004/108/EC, article 9(2)
Panasonic Testing Centre
Panasonic Service Europe, a division of
Panasonic Marketing Europe GmbH
Winsberging 15, 22525 Hamburg, F.R. Germany
- Operating Instructions Air-to-Water Heatpump
- ENGLISH
- FRANCAIS
- TABLE OF CONTENTS
- SAFETY PRECAUTIONS
- CONTROL PANEL
- INDOOR UNIT
- TROUBLESHOOTING
- INFORMATION
- NOTE
- OPERATION CONDITION
- INDOOR UNIT AND OUTDOOR UNIT
- CONTROL PANEL PREPARATION
- Setting Current Day and Time
- Notes:
- SETTING UP THE SPECIAL FUNCTIONS
- SELECT FUNCTIONS AND SET YOUR DESIRED TIMER
- Function *
- Operation Mode/ Actual Operation
- Description
- Fun 与 Strl
- TO TURN ON OR OFF THE UNIT
- - HEAT + TANK MODE
- TANK MODE
- TO ENJOY QUIET ENVIRONMENT
- SYSTEM STATUS CHECK MODE
- ADVANCE OPERATION
- SYSTEM SETTING MODE
- WATER TEMPERATURE THERMO SHIFT SETTING
- Timer Display
- CAUTION
- - Switch off the power supply before cleaning.
- CLEANING INSTRUCTIONS
- HINT
- WATER PRESSUREGAUGE
- INDOOR UNIT & CONTROL PANEL
- EXTERNAL FILTER
- OUTDOOR UNIT
- INSPECTION
- FOR EXTENDED NON-USE
- NON SERVICEABLE CRITERIAS
- The following symptoms do not indicate malfunction.
- Check the following before calling for servicing.
- The operation LED blinks and error code appear on control panel display.
- Force Heater Mode Button
- INSTRUCTIE VOOR SCHOOLMAKEN
- BINNEN-UNIT & CONTROLEPANEL
- TIA NA ENEPTOIOIHSETE (ON) TH NA AIIENEPTOIOIHSETE (OFF) TH ΣYΣKEYH
- PpOoBfKn/ToPtoTIOoinanXpvOoiAokottn
- Etavalabate ta avwepwu bmuata.
- E'YPOZ I'IEZHZE NEPO'Y
- HACTPOIBAHE HA CEDMNUEHTAIMEP
- Ducnne3a TaMepa
- Функця
- CTblnka
- 3a6eJexKn:
- BHHMAHNE
- KPINTEPIN 3A IIOBPEDA
- OTCTPAHRABAHE HA IPIOBJEMN
- CneHNHTe CmHITOMn npn pa6oTata Ha ypea He 03Haayabat HEn3npaBHOCT.
- PpOBepe cIeHNHea, npei da ce obaHte Ha otOpn3npaH cepBn3.
- Information for Users on Collection and Disposal of Old Equipment
- For business users in the European Union
- [Information on Disposal in other Countries outside the European Union]
Brand : PANASONIC
Model : WH-UD12CE5
Category : Heat pump