Neo 4 - Tent Zempire - Free user manual and instructions
Find the device manual for free Neo 4 Zempire in PDF.


| Product Type | Tent (4-person) |
| Brand | Zempire |
| Model | Neo 4 |
| Capacity | 4 persons |
| Pole Colors | Red (diagonal), Blue (front/rear) |
| Fly Attachment | Orange webbing loops (front), Velcro loops inside |
| Guy Ropes | Recommended to peg out at all times |
| Ventilation | Open windows whenever possible |
| Pegging Angle | 45° angle |
| Inner Tent Material | White fabric (polyester/nylon) |
| Fire Safety | Fabric treated with fire retardant, not fireproof. No open flames. |
| Mildew Care | Wash with warm water and soft brush, no detergents |
| Storage | Never pack wet; dry completely before storage |
| Pole Maintenance | Clean before storing |
| Peg Maintenance | Clean before storing |
| Country of Origin | New Zealand (100% NZ owned) |
| Included Components | Inner tent, fly, poles, pegs, guy ropes |
Frequently Asked Questions - Neo 4 Zempire
User questions about Neo 4 Zempire
0 question about this device. Answer the ones you know or ask your own.
Ask a new question about this device
Download the instructions for your Tent in PDF format for free! Find your manual Neo 4 - Zempire and take your electronic device back in hand. On this page are published all the documents necessary for the use of your device. Neo 4 by Zempire.
USER MANUAL Neo 4 Zempire
- Clear your site making sure there are no sharp objects where you are going to pitch your tent. Try to get a site that is as flat as possible. Spread out the inner tent (White), the round door is located at the front.

-
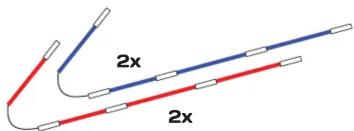
Assemble the 4 pole sections. Ensure that the poles do not snap together.
-
Thread the RED poles through the pole sleeves that run diagonally across the centre of the tent. Insert the ends of the poles into the pins located below each pole sleeve.


natural_image
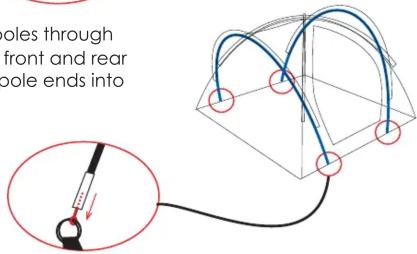
Pure geometric diagram with intersecting lines and red circles, no text or symbols present- Thread the BLUE poles through the pole sleeve at the front and rear of the tent. Insert the pole ends into rings.
- Peg out all the peg points around the inner tent. The peg points at the base of each pole should be pegged through the webbing loop rather than the ring.


natural_image
Diagram showing a folded fabric or material structure with directional arrows and an inset close-up of a blue object (no text or symbols)-
Pull the fly over the inner tent. The ORANGE webbing loops indicate the front of the fly. Connect the velcro loops inside the fly around the cut outs on the corresponding pole sleeve.
-
Attach the elastic loop over the existing inner pegs. Where there is no existing peg, peg the fly directly into the ground ensuring there is significant space between the inner and fly.

natural_image
Illustration of a camping tent with a highlighted section showing a small structure (no text or symbols present)
natural_image
Illustration of a camping tent with visible tent edges and red measurement lines (no text or symbols)- It is recommended that guy ropes are pegged out at all times and windows are opened whenever possible to allow adequate ventilation.
Insert pegs at a 45irc angle
PITCHING INSTRUCTIONS - NEO 4
- Ensure guy ropes are pegged out at all times during use
- Never pack your tent away wet. If you must take your tent down when wet, ensure that you dry you tent completely as soon as possible to prevent mildew forming.
- If mildew does form on your tent wash off pours with warm water and a soft brush to prevent further growth. Do not use detergents.
- Do not use an open flame inside your tent. The fabric has been treated with a fire retardant but is in no way fire proof
- Clean all pegs and poles before storing
Freedom zempire
Freedom Zempire is proud to be a 100% New Zealand owned and operated business.
For more information about this and other great products we offer please visit our website.
pitching
NEO 4 instructions

Brand : Zempire
Model : Neo 4
Category : Tent