
TF-MID702G - Tablet TELEFUNKEN - Free user manual and instructions
Find the device manual for free TF-MID702G TELEFUNKEN in PDF.


| Product Type | Tablet |
| Brand | Telefunken |
| Model | TF-MID702G |
| Display | 7-inch TFT LCD, 800x480 resolution |
| Processor | 1 GHz ARM Cortex-A8 |
| RAM | 512 MB |
| Internal Storage | 4 GB, expandable via microSD up to 32 GB |
| Operating System | Android 4.0 Ice Cream Sandwich |
| Battery | 3000 mAh Li-ion |
| Connectivity | Wi-Fi 802.11 b/g/n, Bluetooth 2.1 |
| Camera | Front-facing VGA camera |
| Ports | micro USB, 3.5mm headphone jack, microSD slot |
| Dimensions | 190 x 120 x 10 mm |
| Weight | 350 g |
| Power Input | DC 5V via USB charger |
| Key Functions | Web browsing, apps, games, video playback, e-books |
| Care & Cleaning | Clean with soft, lint-free cloth; avoid liquids |
| Safety Warnings | Do not expose to water or extreme temperatures; no user-serviceable parts |
| Spare Parts & Repairability | Contact authorized service center; not user-repairable |
Frequently Asked Questions - TF-MID702G TELEFUNKEN
User questions about TF-MID702G TELEFUNKEN
0 question about this device. Answer the ones you know or ask your own.
Ask a new question about this device
Download the instructions for your Tablet in PDF format for free! Find your manual TF-MID702G - TELEFUNKEN and take your electronic device back in hand. On this page are published all the documents necessary for the use of your device. TF-MID702G by TELEFUNKEN.
USER MANUAL TF-MID702G TELEFUNKEN
natural_image
Black tablet with red flower graphics displayed on screen (no text or symbols visible)7" TABLET PC/
7" ПЛАНШЕТ
TF-MID702G
Instruction manual
Руководство по
эксплуатации

Table of contents
Dear customer!
Thank you for purchasing our product. For safety, it is strongly recommended to read this manual carefully before connecting, operating and/or adjusting the product and keep the manual for reference in the future.
Table of contents 2
Before you start 3
Important safeguards 3
General provisions.... 3
Health and safety of the user 3
Power adapter, ports and connectors .... 3
LCD 4
Cleaning and maintenance 4
Utilization of the product 4
Battery 4
Operation 5
Control elements 5
Front panel 5
Rear panel 5
General operation 5
Power on/off 6
The main screen 6
Status Bar 6
Adding/Removing objects to the desktop 6
Wallpaper 6
Upgrade basic software (OS) 7
Connections 7
Connecting to Wi-Fi 8
3G connectivity 8
A-GPS 8
Connect the external USB-drive 8
Connect the memory card 8
Connecting in USB-drive mode 9
HDMI-out 9
Applications 9
Installing applications 9
Deleting applications 9
List of applications 10
System setup 11
The setting menu 11
The menu «Wireless & Networks»...... 11
Menu «Device» 11
Menu «Personal» 11
The menu «System» 12
General information 14
Troubleshooting guide 14
Accessories 15
Warranty 15
Specifications 16
Important safeguards
General provisions
- Read attentively this manual to familiarize yourself with the device.
- Keep this manual handy as a reference for operating procedures and precautions. Do not allow the use of the device by unauthorized persons who have not read and understood this instruction manual.
- Usage of the device at temperatures beyond the operating temperature range significantly reduces the life of the screen and other components of the device and can lead to failure of the device.
- Avoid strong hitting or shaking of the housing of the unit.
- Do not use the device in conditions of electromagnetic radiation. Do not place the device near credit cards, tickets, etc., otherwise the magnetic cards may be damaged.
- Make sure the power supply is turned off if you are not going to use the device for a long time or during a thunderstorm.
- Make sure the power supply is turned off if some incorrect operation of the device is detected or the device is overheated, makes uncharacteristic sounds, smell, emitting smoke or liquid has been spilled onto it. In these cases a qualified technical maintenance is required.
- Do not use the unit while driving. Observe the law and traffic rules of the country of your residence.
- The device must be turned off during takeoff or landing when used in an airplane.
- Do not use the device in locations subject to electronic interference or static electricity. This can cause data loss.
- In case the unit fails, contact a sales representative or nearest service center.
Health and safety of the user
- Electrical equipment can be dangerous if used improperly, so any operation with this device should always be supervised by adults. Do not allow children to touch the internal parts and cables of this device.
- To ensure complete safety, do not disassemble the casing and do not try to get inside the unit. Repairs should be performed by qualified personnel only.
- Do not spill liquids on the device. This can cause electric shock. Besides, if liquid or dust get inside the unit, it may cause failure, overheating and smoke. Keep the unit dry.
- Make sure there are no foreign objects inside the device. They can cause malfunctions or fire.
- Using headphones at high volumes can lead to permanent hearing loss. You can increase the volume to a level at which sound is perceived normally and does not lead to irritation and damage to your hearing. Set the volume at a safe level.
- If you have a regular ringing in your ears, reduce volume or stop using the device.
Power adapter, ports and connectors
- Do not touch the power adapter with wet hands. This can lead to electric shock.
- Use only the supplied power adapter. Using other power adapters with this unit may cause damage to it.
- The adapter can be connected only to the type of electrical network the parameters of which are specified on the rating label. If you are not sure of the parameters of power supply and power adapter, please contact one of the manufacturer's authorized service centers.
- Ensure that the plug the power adapter is securely inserted into the power supply socket. Otherwise it may cause fire.
-
Do not step on the AC adapter cord or place heavy objects on it.
-
Do not stretch or tangle the cable.
• After charging, disconnect the adapter from the wall outlet. - When unplugging the AC adapter from the wall pull the plug, do not pull the cable itself.
- Do not connect the adapter to any other devices.
Before you start
- Keep the power adapter out of the reach of children.
- Do not insert connector plugs into ports with force. If a plug can not be easily inserted into the port, maybe the connector and port do not match. Make sure that the connector matches the port and the connector is aligned with the port.
LCD
Liquid-cristal isplay (LCD) is a delicate device that requires careful handling.
- Do not touch the screen with sharp objects.
- Do not exert strong pressure on the screen and do not place any objects on it. This can cause damage to the display and failure of the device.
- Do not expose the display to direct sunlight.
Cleaning and maintenance
- Before cleaning the device, make sure it is switched off.
- To clean the LCD screen and casing of the device use a soft cloth, special tissue and special cleaners. Do not use aerosol sprays, solvents, alcohol or abrasives.
The manufacturer reserves the right to make changes in specifications, appearance, contents of SW and equipment of the goods unilaterally, without prior notice.
Utilization of the product
If you want to dispose this product, do not mix it with general household waste. There is a separate collection system for used electronic products in accordance with legislation that requires proper treatment, recovery and recycling.
Please contact your local authorities for the correct method of disposal. By doing so, you will ensure that your disposed product undergoes the necessary treatment, recovery
and recycling and thus prevent potential negative effects on the environment and human health.
Battery
Connect the power adapter to the electric supply network and insert the adapter plug into the power connector of the device. While charging the process is displayed as an additional "lightning" symbol in the power icon: 📄We recommend not to disconnect the device until the battery is fully charged. When the battery is fully charged, the power icon on the screen will be completely filled.
In order to maintain efficiency and prolong the battery life, follow the instructions described below:
- Before first use, it is recommended to attach the device to the electric mains for 8-12 hours to fully charge the battery.
- Do not charge the device at high temperature.
- Do not recharge the device too often: you can do this at a time when the display shows a low level of charge.
- If you are not using the device for a long time, recharge the battery at least once in two weeks, do not wait for the moment of complete discharge.
Control elements
Rear panel

Front panel
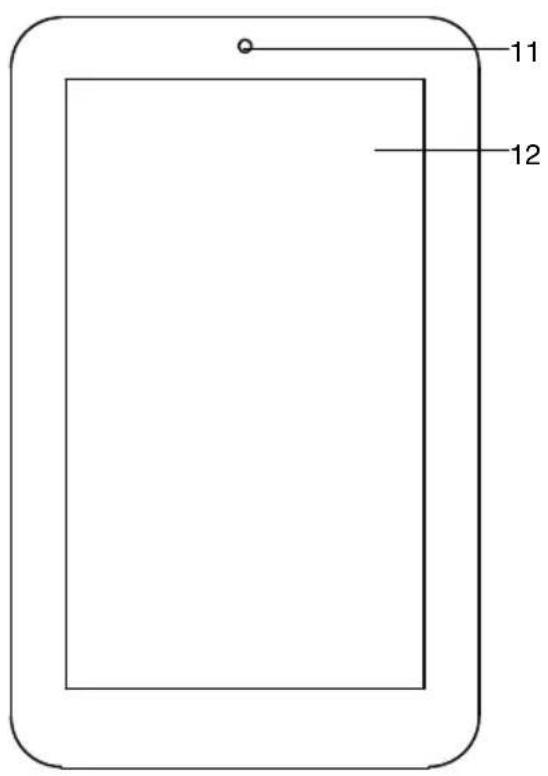
- MiniUSB port
- HDMI output
- 3G SIM card slot
- Reset button(hole)
- Memory card slot
- Headphone output
- Speakers
- VOL+/VOL- buttons
- Power button
- Main camera
- Secondary camera
- Display
General operation
Power on/off
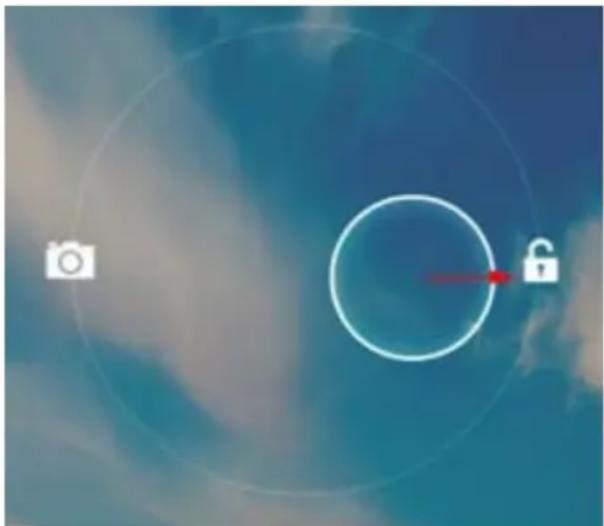
- Power on: Press and hold the power button until the logo appears. Then there will be splash screen and main screen. Hold down the icon and drag it to the right onto the icon representing an open lock to unlock the device.
natural_image
Abstract digital interface with camera and lock icons on a blue gradient background (no text or symbols)- Sleep Mode: Sleep mode is convenient for regular use of the device. In this mode, the device is active, but the display is turned off at the same time, and the main screen is locked. This allows you to instantly access your operating system, while at the same time excludes accidental pressing on the display and saves energy. To go into sleep mode or out of it, briefly press the power button.
- Turn off: Press and hold the power button until a prompt appears asking to switch off the device. Click "OK" to shut down.
In case of low battery the unit can be switched off automatically after notifying the user about the problem. Moreover, all unsaved data may be lost. To avoid this, save your open documents, close all applications and connect the computer to a power source.
The main screen
After unlocking the main screen opens that provides access to operating the device.
The screen has the status bar (bottom), the desktop, which can be extended by pressing a finger on the screen and moving it left or right, and icons for access to applications. Elements of the main screen (Fig. 1):
- Google Search. Click to go to the search page of Google.
- Voice search.
- Alarm clock
- Click to call the list of all installed applications.
- "Back" button. Click to return to the previous page/screen.
- "Home" button. Click to go to home page.
- Click here to quickly switch between active applications.
- Application icons
- Bluetooth connection
- Clock
- Status of Wi-Fi connection
- Battery charge indicator.
Status Bar
At the bottom of the screen there is the status bar containing the controls, the area of system alerts, indicators, wireless connections, battery indicator and clock. To access the Quick menu or see the details of the system when receiving a notification, click on the status bar at the bottom right corner, then click on the icon.
Adding/Removing objects to the desktop
- Adding a shortcut: Click the applications menu button (4) in the top right corner of the main screen, select the item you wish to place on your desktop. Click on the icon for the item and hold for 3 seconds. Do not take off your finger from the screen, drag the icon to a blank space of the active desktop, release the icon, and it will lock on the desktop.
You can move any object in the space of the active screen. You can not add a new object on the desktop screen, if the space is

filled. Remove unused objects from the active screen, or add a new object to another screen desktop.
- Removing an object from the desktop: On the Home screen, click the unwanted item and hold for 3 seconds, the top of the desktop screen appears white cross. Do not take off your finger from the screen and drag and drop it on the cross when the cross turns red.
Deleting an object from the desktop will not delete it from your system. Any object can be restored on the desktop as described above.
Wallpaper
There are two ways to set the background image on your desktop and screen lock:
- On the Home screen, click on a blank area of the desktop and hold for 3 seconds, select the image available on the device. Click "Set Wallpaper".
- On the Home screen, click the applications menu button (4) in the top right corner of the main screen, in the tab
"Applications" select "Settings". In section "Display" select "Wallpaper". Select a picture available on the device. Click "Set Wallpaper".
Upgrade basic software (OS)
- In the page of this model on the manufacturer's website you can find the current version and update the OS (if any). Do not use the OS from other models, because they are incompatible and cannot provide full and stable operation of the device.
- If your device is working properly, do not update the software, since it is quite possible, the device has a newer version of the software.
- Before upgrading/replacing the OS make sure that the OS is designed for models with the same serial numbers as your device (the serial number is on the back panel of your device). To perform the upgrade/replacement of the OS, follow the instructions posted on the page model on the manufacturer's website.
Screenshot function
Press and hold VOL- and POWER buttons
simultaneously to make a screenshot.
Connections
Connecting to Wi-Fi
- Click the applications menu button (4) in the top right corner of the main screen, in the tab "Applications" select "Settings". In section "Wireless & Networks" click Wi-Fi to set into the ON position.
- Connecting to the network: The system automatically detects available Wi-Fi-networks and displays their names; select a network you want to connect and, if necessary, enter the password. When the connection is successful, the display shows the Wi-Fi icon (11) in the notification area. The number of blue sectors of the icon shows the level of Wi-Fi signal.
To add a Wi-Fi network to the list, click "Add Network" in the top right corner, then use the pop-up keypad to enter the network name and click "Save".
3G connectivity
Insert a 3G SIM-card into the appropriate slot of the unit. Click the applications menu button (4) in the top right corner of the main screen, in the tab "Applications" select "Settings". In "Wireless & Networks" select "More ...". Click on "Mobile Networks", put a tick next to «Modem power» and enter the PIN-code. In the "Mobile network settings", select "Access Point". Select your access point from the list or adjust manually. When a successful connection is performed, icon appears in the system tray.
- When using a device with 3G, while out of network coverage, you must disable the transmission of data in order to free the system from constant attempts to register in the network. This is recommended to prevent braking system and a long battery life.
- Impossibility of 3G-connection can be caused by the lack of 3G coverage in place where you are staining, and in this case it is not
a defect of the device.
A-GPS
- A-GPS function enables you to determine the coordinates of the location of mobile devices and display it on the map. Determination of location is performed via cellular connection channel and/or Wi-Fi.
- Click the applications menu button (4) in the top right corner of the main screen, in the tab "Applications" select "Settings". In "Location services" put a tick next to the option "Google's location service" and remove the tick for the option "GPS satellites". Now when you start working with map application (Google Maps), after clicking on the icon on the map will display the location of your device.
This unit is equipped with a GPS module, that allows to determine your coordinates without connection to a Wi-Fi network or cellular connection.
Connect the external USB-drive
- Connect an external USB-drive with a miniUSB cable to the MiniUSB or USB (Host) port of this unit. Run the application “Explorer” and select «USB» to access the contents of the connected drive.
- You can connect other peripheral USB-devices (e.g. mouse, keyboard, external hard drives). It's enough to connect the peripheral device to the tablet, the device will be recognized and connected automatically.
According to the USB 1.1/2.0 Standard, usage of a USB device with power current consumption exceeding 500 mA is not recommended without supplementary power supply. Failure to use supplementary power for connected USB drives with power consumption exceeding this value as well as defective USB drives may cause mechanical or thermal changes of elements of this unit as well as failure of internal elements of the USB port. Such damages are not warrantee cases.
Warning: usage of external USB drives containing BIN files in the root directory may
cause malfunction of the unit or damage to the software.
Connect the memory card
The tablet PC is equipped with a slot for TF memory cards. The maximum supported card capacity - 32 Gb. After properly installing a memory card, this device detects it automatically. To safely remove the memory card, follow these steps: click the applications menu button (4) in the top right corner of the main screen, in the tab "Applications" select "Settings", select "Storage", click on "Eject TF-card" and complete the transaction. Press on the card until it clicks, then pull it out of the slot.
Install the card into the slot in the proper direction and side. For proper operation of the device, use licensed TF cards of well-known manufacturers. Avoid the use of counterfeit cards by dubious brands.
Connecting in USB-drive mode
- Connect the USB connector of a PC to the MiniUSB port of this unit with a miniUSB cable. Click “Turn on USB storage” at the bottom of the screen. After a while the device is detected as a removable USB-drive, and you will have access to the internal memory of the tablet and the memory card.
- To turn off the tablet connected in USB-drive node, click "Turn off USB storage" at the bottom of the screen.
HDMI-out
Connect the HDMI output of the device to the HDMI input of an external device (e.g., TV) with a HDMI-cable (not supplied). Now, the tablet PC can be used as a source of high-quality digital signal for the connected external device.
When you connect the tablet via HDMI to an external device, the screen turns off, and in this case, to perform operations you can use both the touch screen and a computer mouse connected to the tablet.
Applications
Installing applications
In addition to the basic application package by Android, you can install additional software on your own. Programs can be installed from memory cards or USB-flash drives, downloaded from the Internet or from the official online catalog of Android Market.
- Installing applications from Android Market: Installation of applications from Android Market Internet service is only available to registered users. Play Market application comes as standard software, and it is in general list of installed applications. After the first running of the application you will be prompted to set up an account. On the first page «Setting up an account Google», press «Next». If you already have a Google account, click «Login», enter your user name and password and click «Enter» again. If you do not have a Google account, it should be created. To do this, click «Create» and follow the instructions on the screen. All applications in the Android Market catalog are grouped by category («Widgets», «Multimedia», «News & Weather», «Tools» etc.). To install an application it is enough to click «Install» (or «Buy» if the application is not free).
To use the Android Market it is necessary to connect to the Internet. Before working with the Android Market application, make sure that your device has correct current date and time setting, otherwise connection to the server can fail;
- Installing on your own: Record the setup file (the file format is .apk) on a memory card, flash drive or internal memory. Locate the file in the «Explorer». Open the file and confirm the installation.
For safety reasons, installation of applications received not the Android Market is disabled by default. If you still need to install an application, activate the item «Unknown sources» under the «Settings» => «Security».
Deleting applications
Click the applications menu button (4) in the top right corner of the main screen, in the tab «Applications» select «Settings». Open the «Apps»; find and select the application from the list, click «Uninstall» and confirm the action.
Applications that are part of the system can not be deleted.
List of applications
- Google Maps - a set of applications based on mapping service and technology provided by «Google» company.
- Gmail (from Google Mail) - e-mail service from Google. Provides access to mailboxes via a web interface.
- Email (Electronic Mail) - technology that provides services for sending and receiving electronic messages distributed in network.
- Browser (Web browser) - software for viewing Web sites, that is requesting a Web page (mainly from the Internet), processing, and page navigation. Entering addresses and requests is performed by using pop-up keyboard accessible by clicking on the search bar in the browser interface.
- Calendar - software that emulates the functions of the calendar and allows you to see dates and set event reminders.
- Calculator - software that emulates the functions of the calculator and allows you to perform operations on numbers or algebraic formulas.
- Camera - an application that allows you to perform video and photography recording with both cameras of the device. You can also activate the camera application by holding and dragging the icon to the left on the icon representing a camera in screen-lock mode.
- Cool reader - an application for reading electronic books in various formats.
- Documents - a programm designed for operating various MS office documents.
-
ES explorer - an application that implements a GUI user access to files in the operating system.
-
Firefox - a web browser, designed for viewing Web sites.
- Flash Player - an application for operating flash files.
Camera application interface(7)

- Selecting front/rear camera
- Press to record
- Adjusting white balance
- Photo mode
-
Video mode
-
Gallery - a program enabling you to view and edit image files contained in this unit and external devices. Menu of operations with images (cropping, rotation, ability to set image as wallpaper, etc.) is available by clicking the icon in the upper right corner of the gallery interface.
-
Google translate - an online dictionary.
- Music - software player that can play audio files contained in this unit and external devices, including operations such as rewind, stop, pause, change the playback order, repeat. The menu of additional functions (setting track as ringtone, delete tracks, equalizer, etc.) is available by clicking the icon in the status bar of the audio player interface.
- Media - software video player that play audio files contained in this unit and external devices, including operations such as rewind, stop, pause, adjust the brightness, select the format of the video. To call/hide the operation menu, click on the screen during playback. The menu of additional functions (language subtitles and audio language selection, etc.) is available by clicking the icon in the
lower right corner of the operation menu in the interface of the video player.
- Clock - a program that emulates the functions of a clock and allows to set an alarm.
- Google reader - a program with which you can chat in social networks.
- Play market - a program that allows you to browse through the applications, buy and download them to your tablet. Also this program allows to automatically update already installed applications.
- Screenshot ER - a program for making screenshots of your tablet desktop/applications.
- Explorer - an application that implements a GUI user access to files in the operating system.
- Skype - software enabling you to transfer encrypted voice and video calls between computers over the Internet (VoIP), as well as services for calls to mobiles and landlines.
- Youtube - an application that provides video hosting services. Users can add, view and comment on videos.
- Google talk - an online messenger, designed for quick and easy chat.
- Google latitude - An application that allows to see your friends on a map – find out who's nearby and meet up.
- Contacts - an application that allows to store and view the phone contacts data.
- Telephone - allows you to call and recieve calls by using the inserted SIM-card.
- SMS/MMS - this service allows you to send text messages and images using the inserted SIM-card.
- Google drive - a service that provides the possibility of storing and uploading various data to the storage.
- Downloads - an application that allows to see the list of all the downloaded data.
System setup
The setting menu
The settings menu of the operating system (Figure 2) allows you to connect to WiFi, adjust the display settings and sound, set the language settings, date and time, manage installed applications and much more. There are two ways to call settings menu:

- On the Home screen, press Application menu button (4) top right corner, in the tab «Applications» select «Settings».
- Tap the status bar at the bottom right corner, then from the menu, click on the icon, menu, select quick setup «Settings».
The menu «Wireless & Networks»
Menu => Settings => Wireless & Networks
- Wi-Fi. See section «Connecting to Wi-Fi» above.
- Bluetooth. If you select «ON» for this item, you can connect the tablet to another device via Bluetooth with an intuitive menu.
- Data usage. This section allows you to enable/disable the account of mobile traffic, set a limit and view traffic statistics.
Menu «Device»
Menu => Settings => Device
- Sound
Volumes: Adjust the playback volume of music and the notifications.
Default notification: select the melody for notifications.
Touch sounds: Enable/disable the sound of pressing on the screen.
Screen lock sounds: turn on/off the clicking sound of screen lock.
- Display
Brightness: adjust the screen brightness. Wallpaper: select a background image for your desktop.
Auto-rotate screen: Enable/disable the automatic change screen orientation.
Sleep: Set the time after which the device automatically switches to sleep mode if no operations.
Font size: Set font size.
• Storage. This section allows you to view

Fig. 2
information about available total and free space in memory, as well as operation with memory cards, if connected.
- Battery. This section allows you to view status information and battery level and time of its operation.
- Apps. This section allows you to manage installed applications to view information about installed programs, and if necessary uninstall them. Section «Running» will show a list of running applications and services.
Menu «Personal»
Menu => Settings => Personal
- Accounts & sync. This section allows you to create and edit accounts in mail, Android Market and other Internet services.
- Location services. This section allows you to adjust the indentification of a user's location through wireless networks, as well as synchronize data with the Google for optimization of search and other services.
- Security
Screen lock: choose how to lock the screen (slide, face unlock, pattern, PIN, password, disable the lock).
Owner info: enable/disable the display owner information on the lock screen.
Device Administrators: List of administrators of the device.
Unknown sources: put a tick to allow the installation of third-party applications that are not received from Android Market.
• Language and input
Language: select the preferred language in which you will operate the device.
Spelling correction: enable/disable spell checking in text input.
User Dictionary
By default
Google speech-to-text
Keyboard Android: configure the keyboard.
Voice Search
Speech Synthesis
Speed index: Adjust the speed of the mouse.
- Backup & Reset. This section allows you to enable or disable backing up passwords, access point of Wi-Fi, bookmarks and other settings, applications and also reset to the factory settings.
The menu «System»
Menu => Settings => System
• The date and time
Automatic date and time: remove the tick if you want to the device to display user-configured time. If the tick is put the network time will be displayed.
Set date: If the date and time of the the network is disabled, set the current date.
Set time: If the date and time the the network is disabled, set the current time.
Select time zone: Select the time zone.
Use 24-hour format: Remove the tick to display time in the 12-hour format.
Select date format: Select the date display format.
- Accessibility
Large text: Increase the font label on the screen.
Auto-rotate Screen: Enable/disable the automatic change screen orientation.
Touch-and-hold delay: set the delay time for operations to be performed by pressing and holding your finger on an item.
Install Web Scripts: install/remove the prohibition on the installation scripts to improve the availability of Google Web content.
- For the developers. This menu page is only intended for developers of the device.
- About Tablet. This section allows you to
view information about the model, firmware version and the kernel, battery status, IP-address and other data.
Troubleshooting guide
The following information will help you identify and eliminate common problems of hardware and software of the device with which you may encounter. If you experience the following symptoms you should first try to resolve them yourself, using the given recommendations. In case the advice given will not help, contact your support personnel or an authorized service center.
| Problem Reason | and solving |
| Power, start-up | |
| The PC tablet cannot be turned on | Check the battery; if it is discharged, attach the power adapter and wait at least 5 minutes.Press and hold the power button on the device for at least 5 seconds.If the battery is still charged, connect the power adapter and repeat the procedure again.If the unit does not turn on even after charging, please contact support or an authorized service center. |
| The PC tablet turns off immediately after turning on | It is possible that the battery is very low. In this case, the system automatically prevents the complete discharge to avoid loss of information and stored data. Before you make an attempt to re-enable the device, charge it for at least 5 minutes and disconnect the power adapter from the wall outlet during operation. |
| The battery discharges quickly | You may use programs that require a large expenditure of energy. Most energy is spent on viewing the video.Try to establish a better screen brightness.Install the latest firmware.The battery is discharged during operation at low temperatures. |
| The battery cannot be charged | Make sure the power adapter is plugged into a working outlet. When you connect the power adapter to the device, the power indicator should be lit.Make sure you are using the power adapter supplied.Battery may not charge during operation at high temperature. |
| Sound | |
| The sound is not heard | Ensure that the sound reproduction is enabled in the basic system settings Make sure that the volume is set to the maximum or your desired level.Many of the problems with the playback of audio are associated with the software. If the previous audio problems were not observed, perhaps, its absence is due to incorrect software installation or configuration of the installed program. To resolve the problem, contact the manufacturer of the software.Check for damaged files. Try to play another file in another directory. |
| Problems with sound recording | Make sure that the device's microphone is directed towards the sound source, and that the record displayed on the desired volume level. The forces of the sound source can be distinct enough to record.Make sure that the correct software installed for the audio device.Reinstall the software if necessary. |
| Miscellaneous | |
| USB operation problems | Make sure that the USB-device properly. If you use an external hard drive, make sure that the drive is connected to the power supply and outlet works. |
| The device cannot read the memory card | Make sure that the card is inserted into the slot designed for it until it stops.Make sure that the card is inserted into the slot in the proper direction.The card may be damaged. Try to test the card on another device.Try to remove or re-insert the card, try restarting your computer.Refer to the installation of the card. |
| Problems with file copying | Check whether the connection was made desktop computer / laptop and the device.The device memory is full and you want to remove unused files.The problem is the application in which you are trying to copy files.Reinstall the application or use both. |
| Problems with auto-rotation of the screen | Make sure that this feature is enabled on the device. Next to «Auto Rotate Screen» must be set the box (see «System Setup»). |
Accessories
- Tablet PC 1 pc
- Power adaptor 1 pc
- USB cable 1 pc
- Headphones 1 pc
- Consumer Information 1 pc
- Warranty Card 1 pc
- Instruction Manual 1 pc
Warranty
Manufacturer's warranty does not cover:
- Cases of unauthorized reinstallation of the internal software, except for the OS update from the official developer's website, of the mechanical damage, and damage due to overheating of the device, flooding it with liquids, presence of foreign objects and insects inside.
- Third-party programs that are installed by the user, including the damage they can cause to the basic software.
- Unstable operation of the device due to power quality, wireless connectivity, the negative external effects (high humidity, hypothermia, overheating by direct sunlight).
Specifications
Unit dimensions/Net weight 194 x 123 x 11 mm/0.35 kg
Processor MTK6577 Cortex A9; 1,0 GHz
Operation system Android 4.0.4
Display 7" capacitive IPS panel, 5-point multi-touch
Main camera 2 MP
Supplementary (front) camera 2 MP
Supported audio formats MP3, WMA, WAV, APE, FLAC, AAC, OGG
Supported video formats AVI, WMV, MP4, MKV, RM, RMVB, FLV, MOV, 3GP
Supported photo formats JPEG, BMP, GIF, PNG
Supported text formats PDF, TXT, EPub
Memory built-in flash 8Gb + up to 32 Gb TF memory card
RAM LPDDR II, 1 Gb
Wi-Fi 802.11 b/g/n
Bluetooth 2.1 +EDR
3G WCDMA
GPS +
Connectors and terminals HDMI, miniUSB, USB, TF slot, earphone output, SIM-3G card slot
Power battery 4500 mAh (3.7 V)
Operation temperature range -20^-+60^
Storage temperature range -20^-+60^
Compatible operation systems Windows XP, 2000, ME, MacOS, Linux
Specifications are subject to change without notice. Dimensions are approximate.
natural_image
Abstract digital interface with camera and lock icons on a blue sky background (no text or symbols)
- 7" TABLET PC/
- 7" ПЛАНШЕТ
- TF-MID702G
- Table of contents
- Dear customer!
- Table of contents 2
- Before you start 3
- Operation 5
- General information 14
- Important safeguards
- General provisions
- Health and safety of the user
- Power adapter, ports and connectors
- Before you start
- LCD
- Cleaning and maintenance
- Utilization of the product
- Battery
- Control elements
- General operation
- Power on/off
- The main screen
- Status Bar
- Adding/Removing objects to the desktop
- Wallpaper
- Upgrade basic software (OS)
- Screenshot function
- Connections
- Connecting to Wi-Fi
- 3G connectivity
- A-GPS
- Connect the external USB-drive
- Connect the memory card
- Connecting in USB-drive mode
- HDMI-out
- Applications
- Installing applications
- Deleting applications
- List of applications
- System setup
- The setting menu
- The menu «Wireless & Networks»
- Menu «Device»
- - Sound
- - Display
- Menu «Personal»
- - Security
- • Language and input
- The menu «System»
- • The date and time
- - Accessibility
- Troubleshooting guide
- Accessories
- Warranty
- Specifications
Brand : TELEFUNKEN
Model : TF-MID702G
Category : Tablet