MMAO2088 - Deep fryer Mayer - Free user manual and instructions
Find the device manual for free MMAO2088 Mayer in PDF.

| Product Type | Deep Fryer |
| Model | MMAO2088 |
| Brand | Mayer |
| Dimensions (W x D x H) | Approximately 280 x 240 x 220 mm |
| Weight (net) | Approximately 2.5 kg |
| Power Supply | 220-240 V ~ 50/60 Hz |
| Power Consumption | 1500 W |
| Oil Capacity | 2.5 L |
| Basket Capacity | 1.2 kg (food) |
| Temperature Control | Adjustable thermostat (130-190 °C) |
| Features | Cool-touch handle, non-stick coated tank, viewing window, removable basket |
| Safety | Auto shut-off with overheat protection, safety switch |
| Cleaning and Maintenance | Removable oil tank and basket are dishwasher safe; wipe exterior with damp cloth |
| Spare Parts | Replacement baskets, oil filters, thermostats available |
| Repairability | Designed for easy disassembly; spare parts available from manufacturer |
| General Information | Ideal for home use; fries, chicken, fish, and more |
Frequently Asked Questions - MMAO2088 Mayer
User questions about MMAO2088 Mayer
0 question about this device. Answer the ones you know or ask your own.
Ask a new question about this device
Download the instructions for your Deep fryer in PDF format for free! Find your manual MMAO2088 - Mayer and take your electronic device back in hand. On this page are published all the documents necessary for the use of your device. MMAO2088 by Mayer.
USER MANUAL MMAO2088 Mayer
• 2 hard-boiled eggs
• 150g minced meat
• 10g flour
• Egg wash, a moderate amount
• 15g bread crumbs
• Black pepper, adequate amount
• Salt, adequate amount
Method:
- Remove the shells of the hard-boiled eggs.
- Add black pepper and salt into the minced meat and mix well.
- Take an adequate amount of meat and flatten it on a surface. Put the egg on the meat, then wrap the egg up with the meat. Make sure the egg is fully concealed and covered.
- Cover the meat with flour, then egg wash, then followed by bread crumbs. Let it sit for 5 minutes.
- Cook the scotch eggs at 230^ C for 25 minutes.
- After cooking, take out the scotch eggs and leave it to cool for a while before serving.
Note:
- Ingredients and its quantity can be adjusted according to personal preference.
Warranty & Customer Service
SCAN FOR

e-Warranty
e-Warranty Registration at https://www.mayer.sg
MAYER MARKETING PTE LTD
Customer Service Hotline: 6542-8383 (Mon - Fri 9:00am to 5:00 pm)
Service Centre Operating Hours:
Mon - Fri: 9:00am to 5:00pm
Sat: 9:00am to 12:00pm
Closed on Sunday & Public Holidays
71 Ubi Crescent, #06-02, Excalibur Centre, Singapore 408571.
mayer
Digital Air Oven MMAO2088
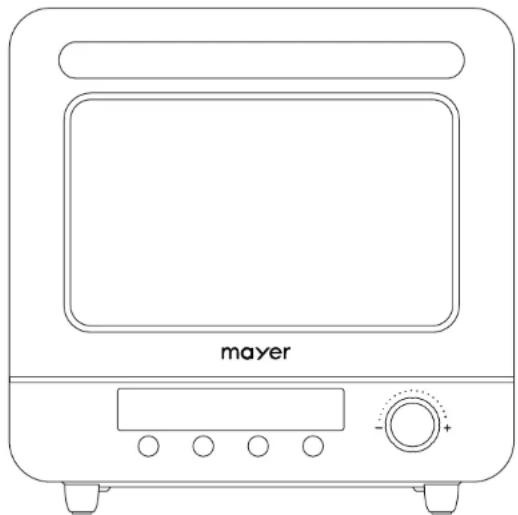
natural_image
Line drawing of a mayer microwave oven with control panel and door (no text or symbols)TOASTER OVEN
Please read this instruction manual thoroughly before operating and keep it for future reference
IMPORTANT SAFETY INSTRUCTIONS
- This appliance is not intended for use by persons (including children) with reduced physical, sensory or mental capabilities, or lack of experience and knowledge unless they have been given supervision or instruction concerning the use of the appliance by a person responsible for their safety.
• Children should be supervised to ensure that they do not play with the appliance. - Do not operate any appliance with a damaged cord or plug or after the appliance malfunctions, or has been dropped or damaged in any manner. If the supply cord is damaged, it must be replaced by the Service Centre to avoid a hazard.
- When using electrical appliances, basic safety precautions should always be followed to reduce the risk of fire, electric shock, and/or injury.
- Do not immerse appliance, cord or plug in water or other liquid.
• Unplug from the outlet when not in use and before cleaning. - Do not unplug the appliance by pulling on the cord.
- Use the accessories from the appliance only, as other accessories not from the appliance may cause fire, electric shock or injury.
• Do not touch hot surfaces. Always use handles or knobs.
• Do not let the cord hang over the edge of the table or counter, or touch hot surfaces.
• Do not place on or near a hot gas or electric burner. - When operating the oven, keep at least 10cm of free space on all sides of the oven to allow for adequate air circulation. A fire may occur if the oven is covered or touching flammable material, including the curtain, draperies, walls, and the like, when in operation. Do not store any item on top of the appliance when in operation.
- Allow the appliance to cool before putting on or taking off parts, and before cleaning.
• To disconnect, turn the time control to OFF, then remove the plug. - Use extreme caution when moving or removing accessories, or disposing of hot grease, hot oil, or other hot liquids.
- Do not cover the accessories or any part of the oven with aluminium foil. This may cause the oven to overheat.
- Do not clean the inside of the oven with with abrasive sponge or metal scouring pads, pieces can break off the pad and touch electrical parts, creating a risk of electric shock.
- Oversized foods or metal utensils must not be inserted in the appliance as they may create a fire or risk of electric risk.
- Extreme cautions should be exercised when using cooking or baking containers constructed of anything other than metal or ovenproof glass.
- Be sure that nothing touches the top or bottom elements of the oven.
- Do not place any of the following materials in the oven: cardboard, plastic, paper, or anything similar.
Chinese-Style Garlic Ribs
Ingredients:
- 500g ribs
• 1 tbsp soy sauce
• 2 tbsp oyster sauce
• 2 tsp white sugar
• 2 tsp minced ginger
• Red pepper chili slice, adequate amount
• 2 cloves of garlic, minced
Method:
- Combine soy sauce, oyster sauce, white sugar, ginger, red pepper chilli and 14 serving of minced garlic together to make the sauce. Mix well.
- Pour the sauce into the ribs and mix together. Leave it to marinate for about 3 – 4 hours.
- Put some aluminium foil on the baking tray
- Put the marinated ribs onto the aluminium foil on the baking tray. Pour the remaining marinade sauce on the ribs.
- Fry the remaining 34 serving of minced garlic with some oil then pour the minced garlic and the oil over the marinated ribs.
- Cover up the ribs with the same aluminium foil and seal it.
- Cook the ribs at 230°C for 25 minutes.
- After that, take out the baking tray, open up the sealed aluminium foil, then put the ribs back into the oven and cook for another additional 10 minutes.
Note:
• Ingredients and their quantity can be adjusted according to personal preference.
Egg Cookies
Ingredients:
2 eggs
- 50g fine sugar
- 80g low gluten flour
Method:
- Mix eggs and fine sugar together in a mixer. Mix at high speed until the mixture is combined. Then change to low speed and mix until the small bubbles are smoothen out.
- Add in the sifted flour into the mixture and fold the mixture until all the flour has been incorporated in and the texture of the mixture is consistent.
- Transfer the mixture into a piping bag and remove all the air inside.
- Line the baking tray with baking paper.
- Pipe out the cookies in about 1 - 2 cm diameter size onto the baking paper on the baking tray.
- Bake the cookies at 150^ C for 30 minutes.
Note:
• Ingredients and their quantity can be adjusted according to personal preference.
Cajun Baked Chicken Wings
Ingredients:
• 500g mid-joint chicken wings
• 35g cajun spice seasoning powder
• 35ml water
Method:
- Make small cuts on the wings and score them.
- Mix the seasoning powder with water together until incorporated.
- Pour the sauce into the wings and mix together. Set aside to marinate.
- Line the baking tray with baking paper.
- Put the marinated wings on baking paper on the baking tray. Pour the remaining marinade sauce on the wings.
- Put the wings into the oven to bake after preheating the oven.
- Use Chicken Function to cook chicken.
Note:
• Ingredients and their quantity can be adjusted according to personal preference.
- For a softer, more moist and less drying outside texture, you can place the detachable water tank filled with water when baking or cooking.
• Always wear protective, insulated oven gloves when inserting or removing items from the hot oven.
- This appliance has a tempered, safety glass door. The glass in stronger than ordinary glass and more resistant to breakage. Tempered glass can still break around the edges. Avoid scratching the door surface or nicking edges.
• This appliance is OFF when the Timer Control button is in the "OFF" position.
• Do not use the appliance outdoors or for other than intended use.
PRODUCT TECHNICAL PARAMETERS
| MODEL. | RATED VOLTAGE | RATED POWER | GROSS CAPACITY |
| MMAO2088 | 220-240V~, 50/60Hz | 1250W | 20L |
INTRODUCTION OF PARTS
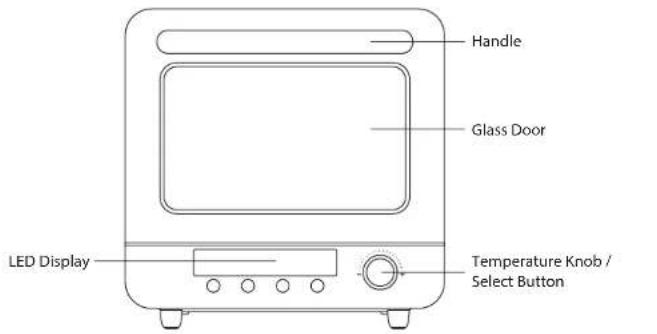
Bake Tray Wire Rack
Mesh Basket Tray
Tray Handle Detachable Water Tank

CONTROLS AND OPERATIONS
Before first use:
• Wash all accessories in hot, soapy water.
- Thoroughly dry all accessories and re-assemble in oven, plug oven into outlet and you are ready to use your new toaster oven.
• After re-assembling your oven, it is recommended to heat up the oven at the highest temperature (230°C) for approximately 15 minutes to eliminate any packing residue that may remain, and also remove all traces of odour which may be initially present in the oven.
Note:
- The heating up of the oven for the first time may result in minimal smell and smoke for about 15 minutes. This is normal and harmless. It is due to burning of the protective layer that is applied to the heating elements during manufacturing.
Before operating the oven:
- Plug oven into outlet and turn on main switch.
- Place food ingredients onto accessories that will be used for cooking.
- You can put the ingredients into the oven before operating the oven or after preheating, depending on your personal preference.
- Proceed to operating the oven.
Operating the oven:
- Selecting cooking functions: This air oven comes with 12 preset functions. For cooking time and temperature information for the individual functions, please refer to the table in page 5.
Banana Cranberry Muffins
Ingredients:
• 1 banana
• 50g dried cranberries
• 1 egg, approximately 65g
• 100g low gluten flour
• 3g baking powder
• 30g corn oil
• 30g milk
- 55g white sugar
Method:
- Remove the banana skin and mash the banana.
- Combine milk, sugar, egg and mashed banana together and mix.
- Sift flour and baking powder, then add into the mixture and mix together.
- Chop 35g of dried cranberries finely and add them into the batter. Mix well together.
- Pour the batter into muffin cups. Do not fill more than 34 of the muffin cups.
- Add the remaining 15g of dried cranberries onto the muffin batters in the muffin cups.
- Put the muffin batter into the oven to bake after preheating the oven.
- Use Cake Function to bake muffins for 20 – 25 minutes, or until golden brown.
Note:
• Ingredients and their quantity can be adjusted according to personal preference.
- For a softer, more moist and less drying outside texture, you can place the detachable water tank filled with water when baking or cooking.
Yogurt Buns
Ingredients:
400g flour
• 100g yogurt
- 80g milk
• 4g salt
- 50g sugar
- 5g yeast
- 60g whipping cream
• Approximately 55g egg wash
• 30g room temperature butter
• Some almond flakes
Method:
- Combine flour, yogurt, 45g egg wash, salt, sugar, yeast, whipping cream and milk together. Mix till smooth and soft texture. Then add in butter and continue kneading. Make sure the
- dough is well kneaded. Do windowpane test.
- Take out the dough and cut it into 16 equal parts and roll them into small balls. Make sure they are roll till smooth. Put the 16 balls of bread dough into the baking pan.
- Put the baking pan into the oven to proof until the dough size increases to about 1.5 times the current size. Use Ferment function, together with the water tank inside the oven filled with water.
- After proofing, take out the bread from the oven and spread a layer of egg wash on the bread dough.
- Sprinkle the almond flakes onto the bread dough.
- Put the bread dough into the oven to bake after preheating the oven.
- Use Bread Function to bake bread until golden brown.
Note:
- For a softer, more moist and less drying outside texture, you can place the detachable water tank filled with water when baking or cooking.
- Press the "Menu" button and turn the Select knob to the desired function.
- The LED display will light up the selected preset function with the default temperature and time.
• Once you have chosen your preset function, press the select button.
• After selecting the function, the temperature display will blink. - Turn the "Select" knob to adjust to your desired temperature and press the Select button to confirm.
• After selecting the temperature, the time display will blink. Turn the "Select" knob to adjust to your desired cooking time.
• Once the temperature and timer are set, press the "Start/Stop" button to start the cooking. - The appliance will start to pre-heat and the display will show the current temperature and the pre-heat indicator will turn on.
- When the appliance reaches the set temperature, the Preheating Indicator will switch off and the Ready Indicator lights up, the timer will then start the count down till the cooking is finished.
Note:
• If needed, lightly spray the food with oil or cooking spray so they don't stick to the basket.
• Place food on the wire rack, frying basket or bake tray
- Ensure food items have plenty of space so that air can circulate easily and give well cooked and crispy results.
2. DIY Function
- To customize or DIY your cooking time and temperature, press the DIY, then turn the Select knob to adjust the temperature.
• The LED display will light up the default temperature and time. - The temperature display will blink. Turn the "Select" knob to adjust to your desired temperature and press the Select button to confirm.
- After selecting the temperature, the time display will blink. Turn the "Select" knob to adjust to your desired cooking time.
• Once the temperature and timer are set, press the "Start/Stop" button to start the cooking. - The appliance will start to pre-heat and the display will show the current temperature and the pre-heat indicator will turn on.
- When the appliance reaches the set temperature, the Preheating Indicator will switch off and the Ready Indicator lights up, the timer will then start the count down till the cooking is finished.
Cooking function information
| Default Time (H:MM) | Time Range (H:MM) | Temperature Range | ||
| Bread 0:20 | 0:01 - 2:00 | 170°C | 26 - 230°C | |
| Cake 0:50 | 160°C | |||
| Puff 0:25 | 190°C | |||
| Pizza 0:15 | 200°C | |||
| Tart 0:25 | 180°C | |||
| Ferment 0:40 | 26 - 42°C | 28°C | ||
| Dehydrate 1:00 | 120°C | 26 - 230°C | ||
| Cookie 0:20 | 160°C | |||
| Steak | 0:10 | 230°C | ||
| Yogurt | 6:30 | 0:10 - 9:50 | 42°C | 38 - 42°C |
| Chicken | 0:40 | 0:01 - 2:00 | 200°C | 26 - 230°C |
| Fries | 0:20 | 200°C | ||
Note
• Cake Function: Ideal for baking cakes, muffins, brownies, and pastries.
- Pizza Function: The type of pizza will influence cooking time. Pizzas with a thick crust may require slightly more cooking time, and pizzas that are frozen may require even more cooking time. Types of pizza: fresh, frozen, thin or thick crust, deep-dish.
- Dehydrate Function: This function combines low and stable heat with automatic airflow to evenly dry out foods without cooking. Ideal for drying fruit or vegetable chips. The general recommended temperatures for dehydration are 38^ - 80^ , but you may follow your recipe accordingly.
- Cookie Function: This function is ideal for baking homemade or commercially prepared cookies and other baked treats. Also ideal for ready-to-bake croissants, cinnamon rolls, biscuits, and strudels.
- Yogurt Function: This is used for making yogurt with an appropriate recipe (using 42°C temperature and up to 9.5 hours cooking time).
- Fries Function: It is recommended to use frozen fries for this function. Do not defrost before cooking.
Caterpillar Red Bean Bun
Ingredients:
200g flour
• 7g milk powder
- 90g water
• Approximately 30g egg wash
• 2g salt
• 28g sugar
• 20g room temperature butter
• 3g yeast
• 180g red bean paste
Method:
- Combine flour, milk powder, 20g egg wash, salt, sugar, yeast and water together. Mix till smooth and soft texture. Then add in butter and continue kneading. Make sure the dough is well kneaded. Do windowpane test.
- Put the bread dough into a bowl, wrap it tightly with a cling wrap and set aside to let proof until the dough size increases to about 1.5 to 2 times the current size.
- Once the bread dough has finished the 1st proofing, punch down the dough to remove any air. Take out the dough and cut it into 6 equal parts and roll them into balls. Put the 6 balls of bread dough into a bowl or baking pan, wrap it tightly with a cling wrap and set aside to let proof for 15 minutes.
- In the meantime, prepare the red bean paste for the fillings. Split the red bean paste into 6 portions, approximately 30g each portion.
- After 2nd proofing, add the red bean paste into each ball of bread dough. Make sure to fold in the dough after putting the filling in, and roll the bread dough into a round shape. Be gentle when doing this to prevent the fillings from coming out.
- Make even cuts openings along the top of bread dough. Do not cut too near the edges or too close to each cut. Be careful not to cut and damage the bottom layers.
- Flip over the cut area of the bread, and gently roll the bread dough from the sides until it looks like a longer shape, like a caterpillar.
- Line the baking tray with baking paper and put the bread dough onto the baking paper.
- Put into the oven to proof until the dough size increases to about 1.5 to 2 times the current size. Use Ferment function, together with the water tank inside the oven filled with water.
- After 3rd proofing, take out the bread from the oven and spread a layer of egg wash on the bread dough. Put the bread dough back into the oven to bake after preheating the oven.
- Use Bread Function to bake bread.
Note:
- For a softer, more moist and less drying outside texture, you can place the detachable water tank filled with water when baking or cooking.
RECIPES - ANNEX
Japanese Condensed Milk Bread
Ingredients:
• 20g flour
• 20g fine sugar
• 120 - 130g milk
• 3g salt
• 35g condensed milk (set aside 20g for condensed milk sauce)
• 40g room temperature butter (set aside 20g for condensed milk sauce)
• 3g yeast
Method:
- Knead all ingredients except butter till smooth and soft texture. Then add in butter and continue kneading. Make sure the dough is well kneaded. Do windowpane test.
- Put the bread dough into a bowl, wrap it tightly with a cling wrap and set aside to let proof until the dough size increases to twice the current size.
- Prepare the condensed milk sauce. Melt the butter and mix it with the condensed milk until it is well combined. Set aside.
- Once the bread dough has finished the 1st proofing, punch down the dough to remove any air. Take out the dough and cut it into 4 equal parts. Apply a layer of condensed milk sauce onto the bread.
- Stack the 4 pieces of bread dough together, then cut into 8 small pieces of equal parts.
- Take an 8-inch chiffon cake tin and coat the thin with a thin layer of butter. Then put the 8 pieces of bread dough into the cake tin, and arrange them spaced out with an equal amount of spacing distance. The bread dough should be turned in a perpendicular direction, 90^ angle standing position instead of its initial lying down position.
- Wrap the cake tin tightly with a cling wrap and set it aside to let proof until the dough size increases to twice the current size.
- After 2nd proofing, add dry toppings of your choice if you want, and spread the condensed milk sauce around the bread dough. Dry toppings can be chocolate chips, dried nuts, or dried fruits like raisins, dried cranberries, etc.
-
Put the cake tin on a wire rack or baking tray, and put it into the oven to bake after preheating the oven.
-
Use Bread Function to bake bread.
Note:
- For a softer, more moist and less drying outside texture, you can place the detachable water tank filled with water when baking or cooking.
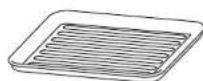
Bake Tray
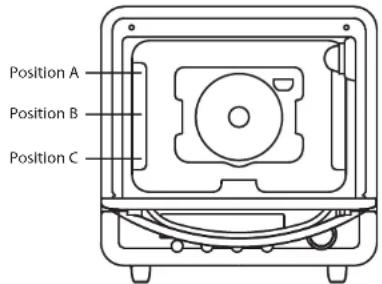
• Used when making grilling or roasting meat, poultry, fish and various foods. It can be placed on cavity Position A, B, or C.
- When making cakes and cookies, it can be placed on Position B.
- When cooking, please ensure food is placed on the bake tray.
- When using the bake tray, it must be placed in the shelf position.
- When taking out the bake tray after the food is cook, please us oven mittens as the bake tray may be very hot. To avoid scalding, do not touch it directly with your bare hands.
- To avoid damaging the oven door, do not drag the bake tray on the oven doors when handling.
- For easier cleaning, it is recommended to use an aluminium foil or baking paper on the bake tray, before placing food on the bake tray.
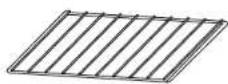
Wire Rack
• Used when making grilling or roasting meat, poultry, fish and various foods. It can be placed on cavity Position A, B, or C.
- When using the wire rack, it must be placed in the shelf position.
• Wire rack cannot be used individually. It should always be used together with the bake tray.
- Place the bake tray at the below shelf position, under wire rack. This can help to keep the base of the oven dry. Any water, oil or fats will drip down onto the bake tray.
- When taking out the wire rack after the food is cook, please us oven mittens as the bake tray may be very hot. To avoid scalding, do not touch it directly with your bare hands.
• To avoid damaging the oven door, do not drag the wire rack on the oven doors when handling.
- For foods without any kitchenware bring used, use aluminium foil to wrap the wire rack first before placing food on the wire rack.
- For easier cleaning, it is recommended to use an aluminium foil and/or baking paper on the wire rack, before placing food on the wire rack.
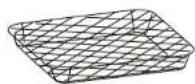
Mesh basket tray
- Used when making potato chips, fish chips and other similar food. It should be placed on cavity Position B.
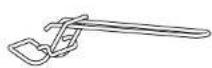
Tray handle
• Used to move out the wire rack and bake tray when they are hot.
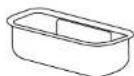
Water Tank
- Recommended when grilling or roasting meat, poultry, fish and various foods, to keep your food moist and humid, not to dry or crisp on the outside.
- To use it, fill up the water tank with water. There is a slot to insert the water tank at the back of the oven cavity, towards the right side and nearer to the top of the cavity. Place the water tank in before you start heating up the oven.
CLEANING AND MAINTENANCE
Cleaning
- Cleaning of the appliance should only be carried out when the appliance has cooled down to room temperature.
• Turn off the main switch and disconnect the power plug from the main power supply.
• Ensure that oven is thoroughly cooled down before cleaning.
• Do not use any steam cleaner to clean this appliance. - To avoid corrosion which would shorten the useful life of the appliance, always keep it clean. Always clean the appliance after use.
- Do not immerse or soak the appliance into the water to clean. Please clean the appliance using a damp cloth.
• Only oven accessories can be soaked, immerse and rinse under water with detergent when washing.
• If accessories are oily, soak them in warm detergent water first before washing. - To avoid damage to the appliance body, control panel, oven walls and accessories, do not use any cleaning cloth that contains metal, scrubbing cleaners, steel brush or cloth with a rough surface for cleaning.
- Use a soft and gentle cloth soaked in water or a kitchen paper towel to clean the appliance. You may also soak the cloth in detergent water if the appliance is very oily, but please ensure that all the soap substances are thoroughly cleaned off.
-
Use a soft and gentle sponge, and wash the accessories gently to prevent scratches or damages of the accessories.
• Dry up the appliance completely with dry cloth to prevent any possibility of mold growth.
• Always make sure the cavity (including the bottom base and crumb tray) is completely dried after use. -
Salt is a corrosive substance that would result in rust stains if left to build up inside the oven. Acidic sauces, such as ketchup, mustard and preserves, contain chemicals like chlorine and acids which would damage the cavity surface.
- Do not allow grease and food debris to remain on the oven door and door seal. If the door seal is not kept clean, the oven door may fail to close when the appliance is in operation.
• This would cause damage to the front and sides of the appliance.
After each use:
- Use a soft sponge or cloth and soaked in gentle detergent to wash the crumb tray and accessories used. Dry up completely with dry cloth before putting back into the oven to prevent any mold growth.
- Disconnect the plug from main power when the appliance is not in use. Keep the oven clean at all times. When not in use for a long period of time, put the appliance in a dry place away from corrosive gases.
• After every use, clean and dry the oven body and cavity thoroughly.
TROUBLESHOOTING
| Problem Cause of Issue Solution | ||
| The appliance is not switching on | The appliance is not plugged in | Plug in the appliance into a grounded wall socket |
| The “Start” button was not pressed | Press the “Start” button after choosing the desired preset function, time, and temperature | |
| The ingredients are not fully cooked | The amount of ingredients being cooked is too much | Place smaller amount of ingredients at one time |
| The set temperature is too low | Press the “Select” knob, turn clockwise to increase the cooking temperature and press again to start | |
| The set time is too short | Press the “Select” knob, turn clockwise to increase the cooking time and press again to confirm | |
| The ingredients are not evenly cooked | Certain types of ingredients need to be turned over halfway during the cooking time | Halfway of the cooking time, press “Stop” to switch off the appliance, and carefully turn the food over, then re-cook the food with the same recipe and temperature with 1/2 the time |
| White smoke comes out of the appliance | It is normal for white smoke to appear when prepping greasy ingredients | When cooking greasy ingredients in the appliance, some oils will leak onto the bake tray. The oil produces white smoke and the tray may heat up more than the usual. This does not affect the appliance or the end result |
| The bake tray has grease residues | Please make sure the oven cavity is thoroughly cleaned after every use. | |