MMO38D - Oven Mayer - Free user manual and instructions
Find the device manual for free MMO38D Mayer in PDF.


| Product Type | Built-in Electric Oven |
| Model | MMO38D |
| Brand | Mayer |
| Energy Source | Electric |
| Power Consumption | 2500 W |
| Oven Capacity | 38 Liters |
| Dimensions (H x W x D) | 595 x 595 x 550 mm |
| Weight | 30 kg |
| Control Type | Mechanical knobs and timer |
| Oven Functions | Conventional, Grill, Fan-assisted, Defrost |
| Temperature Range | 50°C - 250°C |
| Interior Material | Enamel with catalytic lining |
| Door Type | Cool-touch triple glass door |
| Cleaning Method | Manual cleaning with non-abrasive products |
| Safety Features | Child lock, automatic shut-off, overheating protection |
| Installation | Built-in, requires professional installation |
| Spare Parts Availability | Heating elements, thermostat, door gasket, control knobs |
| Warranty | 2 years |
| User Manual Format | PDF download from manufacturer website |
Frequently Asked Questions - MMO38D Mayer
- Conventional: baking cakes and pastries.
- Fan-assisted: even cooking on multiple shelves.
- Grill: browning and grilling meats.
- Defrost: gentle thawing of frozen food.
User questions about MMO38D Mayer
0 question about this device. Answer the ones you know or ask your own.
Ask a new question about this device
Download the instructions for your Oven in PDF format for free! Find your manual MMO38D - Mayer and take your electronic device back in hand. On this page are published all the documents necessary for the use of your device. MMO38D by Mayer.
USER MANUAL MMO38D Mayer
Digital Electric Oven MM038D
natural_image
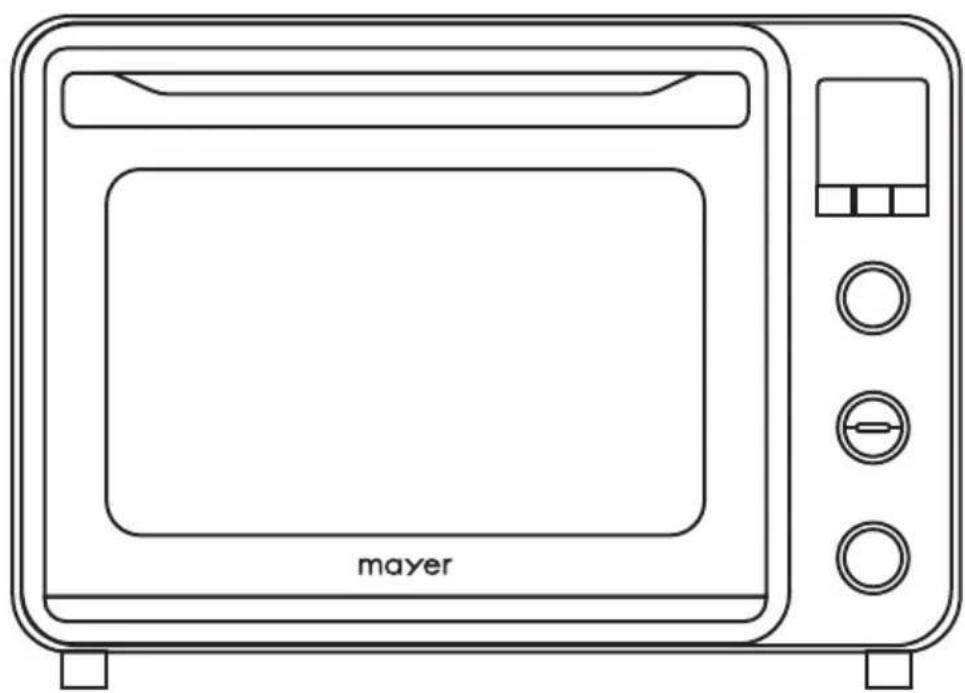
Line drawing of a mayer microwave oven with control panel and buttons (no text or symbols on main body)Please read this instruction manual thoroughly before operating and keep it for future reference
IMPORTANT SAFETY INSTRUCTIONS
- Warning: Do not touch the accessories, surface of heating element and appliance which has extremely high temperature when using and a short period of time after using.
- If white smoke appears when using the appliance for the first time, it is neither an issue nor is the appliance faulty. This is because the protective layer of oil components on the heating element is volatilized, causing it to generate white smoke due to heating.
- This appliance is designed solely for indoor and domestic use. Follow the cooking instructions indicated in the manual. Do not use this appliance for outdoor, commercial or any other purposes.
- Check that the voltage on the rating label corresponds to the voltage in your home.
- Ensure that the appliance is not damaged. Do not operate the appliance if it has a damaged main cord or plug. If it is not working properly, or it has been damaged or dropped, please contact Service Centre.
- Do not immense the power cord or plug in water. Keep the power cord away from hot surfaces to avoid electrical shock, fire or other accidents.
- Do not immense the whole appliance in water. Appliance can only be cleaned with a damp cloth before and after use.
- Allow adequate ventilation space on all sides and do not place any object on top. Keep a minimum distance of 20cm between the appliance and any overhead wall cabinet; and a minimum distance of 20cm between both sides of the appliance and the walls or objects.
- Place at a position more than 85cm above the ground.
- Do not remove the non-slip feet of the oven, located at the bottom.
• Do not block the air inlet and outlet. - Use heat resistant utensils for cooking. Only containers and kitchenware with heat resistant >250°C can be used.
- Odour will be emitted from the cavity when using different baking functions for the first time. It is normal.
- If the door or door seal is damaged, stop using the appliance and immediately contact Service Centre.
- If the power cord is damaged, it must be replaced at the Service Centre in order to avoid a hazard.
- To avoid fire hazard or explosion, do not heat or use flammable materials in or near the appliance.
• Do not overcook food as they may burn and catch fire. - The oven is used for heating food. Drying of food or clothing and heating of warming pads, slippers, sponges, damp cloth may lead to the risk of injury or ignition.
- Never leave the appliance unattended when in use. If any object inside or outside the appliance is ignited or emits smoke, close the appliance door and switch off the appliance.
-
Disconnect the power supply and turn of the main switch.
-
After cooking, clean the appliance only when it has completely cooled down. Wipe away any food debris or waste inside the oven. Top of the oven cavity gets burned easily and care should be taken to keep it clean. Keep the appliance completely dry by opening the door every time after cooking.
- Do not touch the door and door frame when using the appliance.
- To avoid temperature drops, do not open the oven door when cooking unless it is absolutely necessary. If you have opened the oven door, extend the cooking time accordingly.
- If it is necessary to open the oven door to turn the food or for other purposes during cooking, keep a distance from the oven door (particularly the face) to prevent scalding.
- Accessible parts of the appliance may become hot during use. Children should be kept away.
- When the appliance is plugged, never touch the appliance, the power cord or plug with wet hands or other wet body parts.
- Do not place or hang any objects on the oven door or the door handle. It may affect door's opening and closing or damage the door hinges.
- The appliance, its parts and accessories should be kept clean at all times. Failure to do so will result in deterioration of the appliance surface and affect its life cycle. It may also cause danger.
- Remove the power supply plug before cleaning. Do not use corrosive cleaners as they may cause damage or corrosion.
- Clean dust from the power supply plug on a regular basis. If the product will not be used for a long time, remove the power supply cord. Do not pull the power supply cord but hold the plug to remove it.
• Overheated fat and oil catch fire easily. Except grilling meat, heating oil during cooking is dangerous. Such practices should never be allowed.
• To avoid damaging the appliance, do not place food or heavy objects on the oven door.
• To prevent fire, do not block the air outlet. Maintain the product regularly and prevent foreign matter and dust from blocking the air outlet - This appliance must be earthed. In case of electric leakage, the ground can provide a current loop to avoid electric shock.
• Ensure that the appliance is placed on a firm, flat and solid surface at all times.
• Do not modify, disassemble or repair this appliance.
• Do not bend, pull or twist the power plug and cord.
• Do not use extension cord or share the power plug with other electrical appliances
• Always switch off this appliance after use, and unplug it from the power socket.
• Always grasp the plug while unplugging, please do not pull the power cord.
• Do not wrap the cord around this appliance
• Please keep this appliance properly and away from baby and children. - Avoid dropping or knocking this appliance with other objects.
• Children being supervised not to play with the appliance.
- Do not touch hot surfaces. Always use oven mitt when handling hot material, and allow metal parts to cool before cleaning. Allow the appliance to cool thoroughly before putting in or taking off parts.
PRODUCT TECHNICAL PARAMETERS
| MODEL | RATED VOLTAGE | RATED POWER | GROSS CAPACITY |
| MMO38D | 220-240V~ 50Hz | 1800W | 38L |
INTRODUCTION OF PARTS
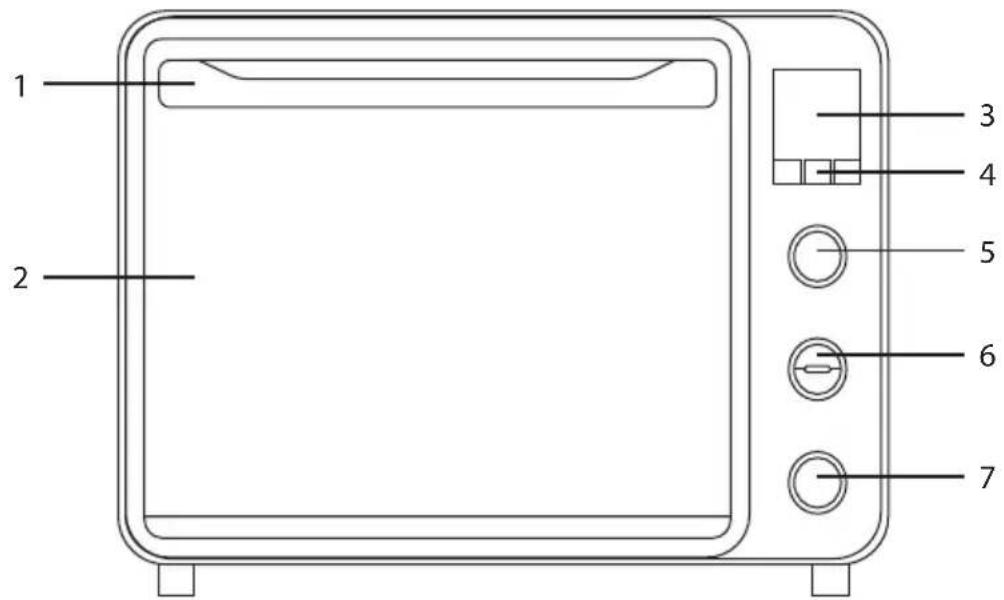
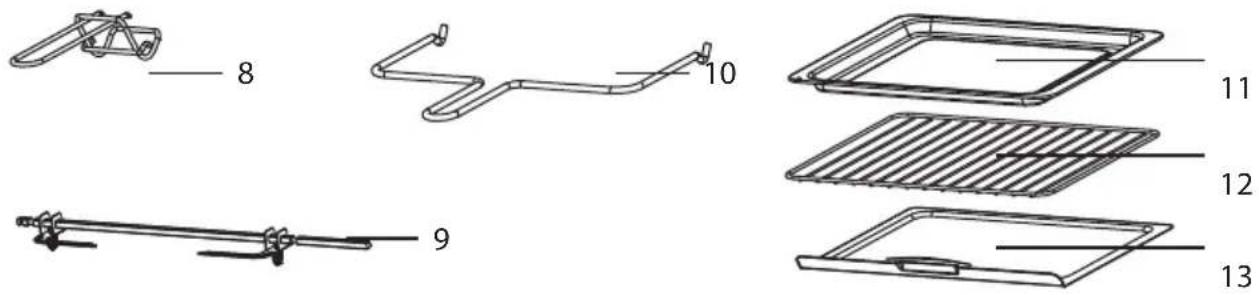
- Handle
- Double glass door
- LED display
- Sensor touch control button
- Function knob
- Temperature control knob & heating control button
-
Timer knob & Start / Stop button
-
Tray Handle
- Rotisserie
10 Rotisserie Handle - BakeTray
- Wire Rack
- Crumb Tray
Control Panel
LED Display & Sensor Touch Control Buttons:
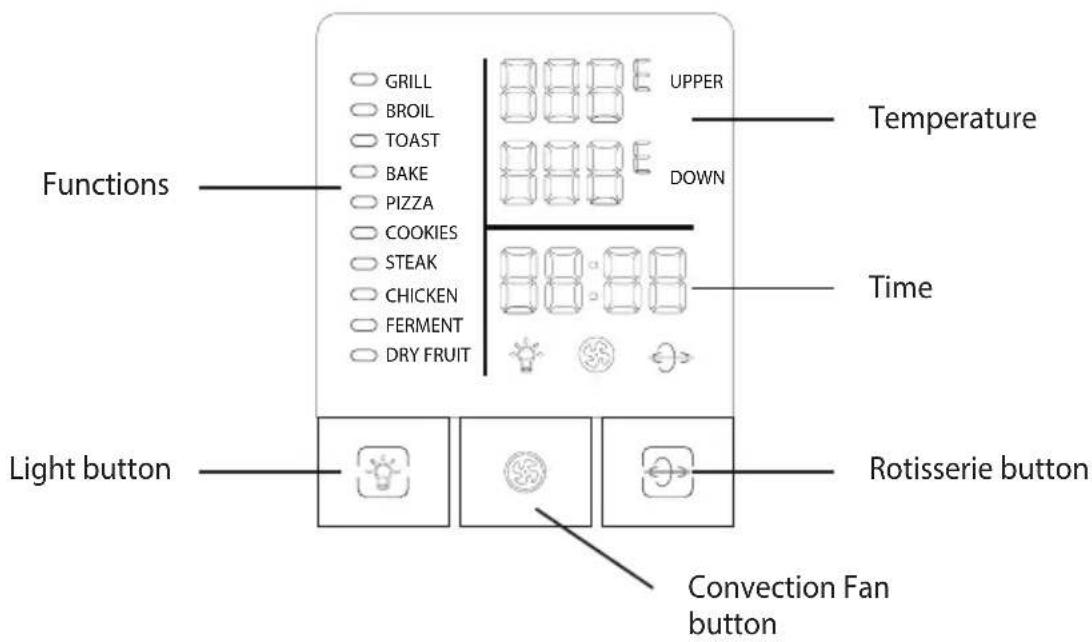
Control Knobs & Buttons:
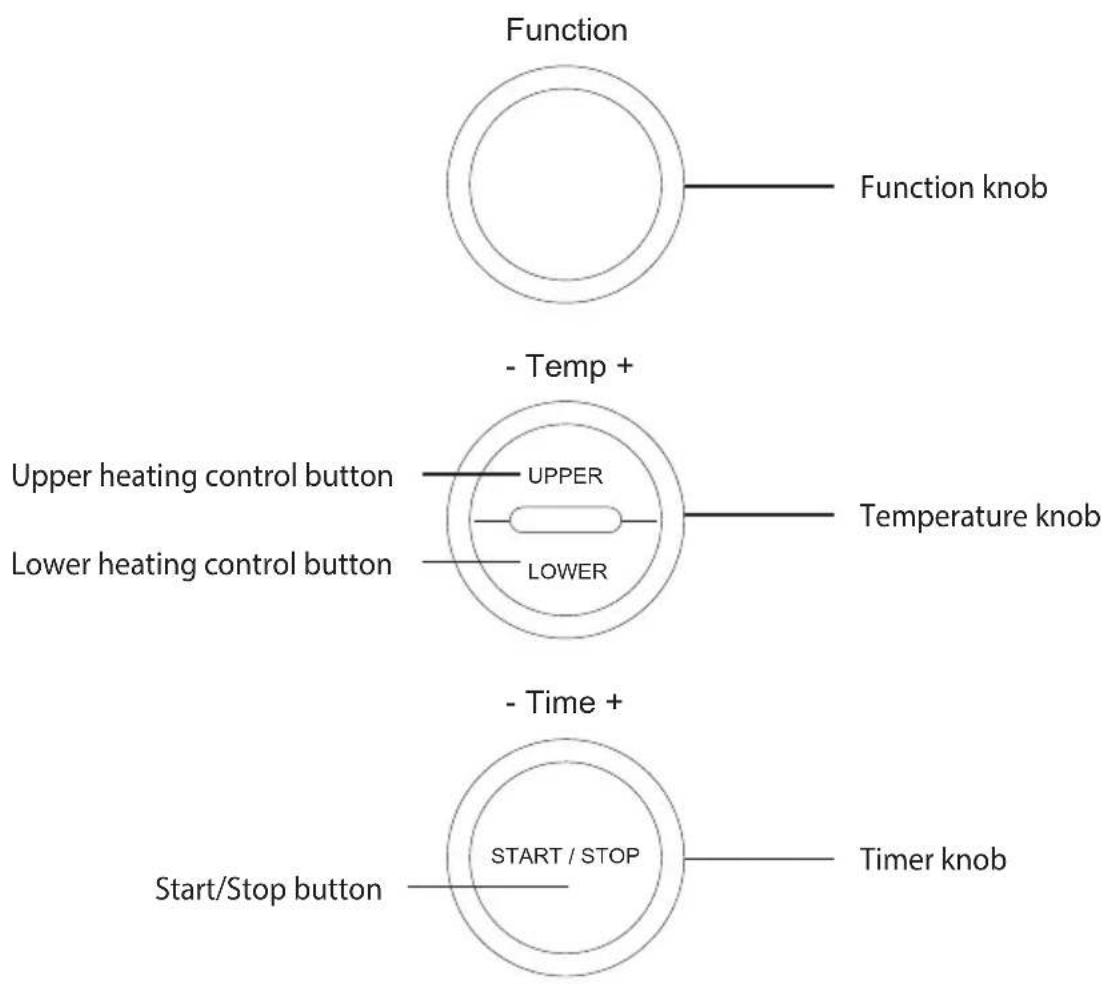
CONTROLS AND OPERATIONS
Before first use:
- Wash all accessories in hot, soapy water.
- Thoroughly dry all accessories and re-assemble in oven, plug oven into outlet and you are ready to use your new toaster oven.
- After re-assembling your oven, it is recommended to heat up the oven at the highest temperature (230°C) for approximately 15 minutes to eliminate any packing residue that may remain, and also remove all traces of odour which may be initially present in the oven.
Note:
- The heating up of the oven for the first time may result in minimal smell and smoke for about 15 minutes. This is normal and harmless. It is due to burning of the protective layer that is applied to the heating elements during manufacturing.
Before operating the oven:
- Plug oven into outlet and turn on main switch.
- Place food ingredients onto accessories that will be used for cooking.
- Place accessories and food ingredients into the oven.
- Proceed to operating the oven.
Operating the oven:
1. Selecting cooking functions:
This oven comes with 10 preset functions. Turn the function knob to choose your preset function and the selected function will start blinking on the LED display. For cooking time and temperature information for the individual functions, please refer to the table in page 9.
For DIY function:
• Turn function knob slowly until none of the functions on the LED display is blinking.
- When the functions on the LED display is not blinking, this means that the DIY function has been selected.
- To only use either top or bottom heating, only when using DIY function, press and hold the button of the heating which you would like to turn off. For example, if you would like to turn off the top heating, press and hold the upper heating control button. When the LED display for the upper heating indicates "OFF", this means that the top heating element has been turned off. To turn back on the upper heating, press the upper heating control button again, and the LED display for the upper heating will change from "OFF" to the temperature display.
Note:
- When the oven is turned on, the function by default is DIY function.
2. Selecting the temperature:
• To control top and bottom temperature together, turn the temperature knob without pressing the heating control buttons, and select your desired temperature.
• To control and select the upper and lower heating temperature separately:
a. Press the upper heating control button, then turn the temperature knob to select your desired upper heating temperature.
b. Press the lower heating control button, then turn the temperature knob to select your desired lower heating temperature.
3. Selecting cooking time:
• Turn the timer knob to select your cooking time.
4. Starting/ stop the oven:
- Press Start / Stop button, and the oven will start operating.
- When the cooking time is completed, oven will make a beep sound.
- If you need to pause the cooking at any point of time, press the Start / Stop button once, and the oven timer will pause. Press the Start / Stop button again to resume cooking.
• To stop or cancel the oven from operating or cooking, press and hold the Start / Stop - button. There will be a beep sound and the oven will stop operating.
5. Preheat function feature:
- This oven comes with a preheat function feature. When you start operating the oven, the cooking time on the LED display will blink first, and the timer will not start to countdown yet.
- This is because the oven has not reached the selected temperature. Once the timer stops blinking and the “:” between the timer starts to blink, this means that the oven has reached the selected temperature at the timer will start to activate and countdown.
Note:
- You can put your food into the oven before or after preheating, only if you are using the bake tray or wire rack for cooking.
- If you do not wish to activate this preheat function feature, press and hold either of the heating control buttons ("UPPER" or "LOWER") for at least 2 seconds. The cooking time on the LED display will stop blinking, and the ":" between the timer will start to blink. The timer will start to activate and countdown.
- When only either top / bottom heating only, during preheat, both top and bottom heating elements will be turned on. This is normal as it is to preheat the oven efficiently. Once the oven has been preheated, the not selected heating element will turn off by itself.
Sensor Touch Control Buttons
For summary of which buttons can work for which functions, please refer to the table in page 9.
- Light button:
By default, the oven light will be turned on for all functions. Press the light button to turn on and off the oven light at any point of time. Press the light button to turn on the light, the oven light will turn on and the light button icon on the LED display will be lighted up; vice versa.
- Convection fan button:
By default, the convection fan is turned off for all functions, except for Dry Fruit function. The convection fan can be used for all functions. If you require to use the convection fan for cooking, press the convection fan button to turn on and off the convection fan at any point of time. Press the convection fan button to turn on the convection fan, the convection fan will turn on and the convection fan button icon on the LED display will be lighted up; vice versa.
- Rotisserie button:
By default, the rotisserie is turned off for all functions, except for Chicken function. The rotisserie can only be used for two functions – Chicken and DIY function. If you require to use the rotisserie for cooking, press the rotisserie button to turn on and off the rotisserie at any point of time. Press the rotisserie button to turn on the rotisserie, rotisserie will turn on and the rotisserie button icon on the LED display will be lighted up; vice versa.
Bake Tray
- When cooking, please ensure food is placed on the bake tray. Do not put any food on the crumb tray.
- When using the bake tray, it must be placed in the shelf position.
- When taking out the bake tray after the food is cook, please us oven mittens as the bake tray may be very hot. To avoid scalding, do not touch it directly with your bare hands.
- To avoid damaging the oven door, do not drag the bake tray on the oven doors when handling.
- The maximum weight of food that can be placed on the bake tray is 3.5kg, this is weight includes both the food and bake tray.
- For easier cleaning, it is recommended to use an aluminium foil or baking paper on the bake tray, before placing food on the bake tray.
Wire Rack
- When using the wire rack, it must be placed in the shelf position.
• Wire rack cannot be used individually. It should always be used together with the bake tray. - Place the bake tray at the below shelf position, under wire rack. This can help to keep the crumb tray and base of the oven dry. Any water, oil or fats will drip down onto the bake tray.
- When taking out the wire rack after the food is cook, please us oven mittens as the bake tray may be very hot. To avoid scalding, do not touch it directly with your bare hands.
- To avoid damaging the oven door, do not drag the wire rack on the oven doors when handling.
- The maximum weight of food that can be placed on the wire rack is 3.5kg, this is weight includes both the food and wire rack.
- For foods without any kitchenware bring used, use aluminium foil to wrap the wire rack first before placing food on the wire rack.
- For easier cleaning, it is recommended to use an aluminium foil and/or baking paper on the wire rack, before placing food on the wire rack.
Operating Steps to Bake / Cook:
- Open the oven door.
- Place bake tray and/or wire rack into the desired shelf position in oven.
- Close the oven door.
- Turn function knob to select cooking function.
- Turn temperature knob and press heating control buttons to adjust temperature.
- Turn timer knob to adjust temperature.
- If needed, press convection fan button to turn on convection fan.
- Press Start / Stop button to start operating the oven.
- When finished cooking, oven will ring / have a beep sound to signal the end of the cooking cycle.
Operating Steps for Rotisserie:
- Insert the first thumbscrew onto the rotisserie shaft by pointing inward. Secure the first rotisserie fork with thumbscrew provided.
- Place the rotisserie shaft across the middle of the food ingredient (e.g. whole chicken). Make sure the rotisserie shaft is secured and in the middle of the food ingredient before inserting the second rotisserie fork onto the rotisserie shaft.
- Secure the second rotisserie fork with the second thumbscrew.
- Insert the end-points of the rotisserie shaft into the drive socket in the oven, and rest the other end (square-shape) on the shaft support in the oven.
- Insert bake tray on a lower shelf position below the food ingredient to catch the water / oil / fat that may drip when cooking.
-
Turn the function knob to select cooking function (Chicken or DIY function).
-
Turn temperature knob and press heating control buttons to adjust temperature.
- Turn timer knob to adjust temperature.
- If needed, press rotisserie button to turn on rotisserie (especially when using DIY function).
- If needed, press convection fan button to turn on convection fan.
- Press Start / Stop button to start operating the oven.
- When finished cooking, oven will ring / have a beep sound to signal the end of the cooking cycle.
- To remove the food in the oven, please lift up the rotisserie shaft by using the rotisserie handle.
- Make sure that both hooks are evenly place at the edge of the rotisserie shaft. Please lift up the end which rest on the support first (square-shape end) and slowly remove the rotisserie shaft out of the drive socket.
- Place the food on a cutting board or plate and remove the rotisserie shaft by taking out the thumbscrews and rotisserie forks.
Cooking Function Information:
| FUNCTION | DEFAULT TIME (H:MM) | DEFAULT UPPER TEMP (°C) | DEFAULT LOWER TEMP (°C) | TEMP RANGE (°C) | TIME RANGE (H:MM) | LIGHT | CONVECTION FAN | ROTISSERIE |
| GRILL | 0:30 | - | 160 | 50 - 180 | 0:01 - 2:00 | ON (CAN BE TURNED OFF) | OFF (CAN BE TURNED ON) | OFF |
| BROIL | 0:30 | 160 | - | 50 - 180 | 0:01 - 2:00 | |||
| TOAST | 0:05 | 200 | 200 | 150 - 230 | 0:01 - 2:00 | |||
| BAKE | 0:30 | 170 | 170 | 120 - 230 | 0:01 - 2:00 | |||
| PIZZA | 0:18 | 200 | 200 | 150 - 230 | 0:01 - 2:00 | |||
| COOKIES | 0:12 | 170 | 165 | 120 - 230 | 0:01 - 2:00 | |||
| STEAK | 0:20 | 170 | 170 | 45 - 230 | 0:01 - 2:00 | |||
| CHICKEN | 1:00 | 200 | 200 | 150 - 230 | 0:01 - 2:00 | ON (CAN BE TURNED OFF) | ||
| 1:00FERM | MENT 35 - 25 | 50 0:30 - 15 | 00 OFF | OFF | ||||
| 5:00DRY | FRUIT 68 68 30 | - 120 0:30 | 15:00 | ON (CAN BE TURNED OFF) | ||||
| 0:30DIY | 180 180 | 50 - 230 0:0 | - 2:00 | OFF (CAN BE TURNED ON) | OFF (CAN BE TURNED ON) |
Note:
To activate DIY Function, turn the function knob until the Functions on the LED screen does not blink, then turn the temperature and timer knob to adjust your cooking time accordingly.
CLEANING AND MAINTENANCE
Cleaning
- Cleaning of the appliance should only be carried out when the appliance has cooled down to room temperature.
• Turn off the main switch and disconnect the power plug from the main power supply.
• Ensure that oven is thoroughly cooled down before cleaning.
• Do not use any steam cleaner to clean this appliance. - To avoid corrosion which would shorten the useful life of the appliance, always keep it clean. Always clean the appliance after use.
- Do not immerse or soak the appliance into the water to clean. Please clean the appliance using a damp cloth.
• Only oven accessories can be soaked, immerse and rinse under water with detergent when washing.
• If accessories are oily, soak them in warm detergent water first before washing. - To avoid damage to the appliance body, control panel, oven walls and accessories, do not use any cleaning cloth that contains metal, scrubbing cleaners, steel brush or cloth with a rough surface for cleaning.
- Use a soft and gentle cloth and soaked in water or kitchen towel paper to clean the appliance. You may also soak in detergent water if it is very oily, but please ensure that all soap substances are thoroughly removed.
- Use a soft and gentle sponge, and wash the accessories gently to prevent scratches or damages of the accessories.
• Dry up the appliance completely with dry cloth to prevent any possibility of mold growth.
• Always make sure the cavity (including the bottom base and crumb tray) is completely dried after use. - Salt is a corrosive substance that would result in rust stains if left to build up inside the oven. Acidic sauces, such as ketchup, mustard and preserves, contain chemicals like chlorine and acids which would damage the stainless steel surface.
- Do not allow grease and food debris to remain on the oven door and door seal. If the door seal is not kept clean, the oven door may fail to close when the appliance is in operation.
• This would cause damage to the front and sides of the appliance.
After each use:
- Use a soft sponge or cloth and soaked in gentle detergent to wash the crumb tray and accessories used. Dry up completely with dry cloth before putting back into the oven to prevent any mold growth.
- Disconnect the plug from main power when the appliance is not in use. Keep the oven clean at all times. When not in use for a long period of time, put the appliance in a dry place away from corrosive gases.
• After every use, clean and dry the oven body and cavity thoroughly.
TROUBLESHOOTING
| PROBLEM CAUSE SOLUTION | ||
| DISPLAY E1 | Appliance PCB is faulty. | Please bring appliance to the Service Centre for repairs and maintenance. |
| DISPLAY E2 | ||
| DISPLAY E3 Appliance is over heated | Turn off and unplug the appliance and leave it to cool down. Once appliance has been fully cooled down, you may plug in the appliance to turn on and use again. | |
- Digital Electric Oven MM038D
- IMPORTANT SAFETY INSTRUCTIONS
- Control Panel
- CONTROLS AND OPERATIONS
- Before first use:
- Note:
- Before operating the oven:
- Operating the oven:
- Selecting cooking functions:
- For DIY function:
- Selecting the temperature:
- Selecting cooking time:
- Starting/ stop the oven:
- Preheat function feature:
- Sensor Touch Control Buttons
- Bake Tray
- Wire Rack
- Operating Steps to Bake / Cook:
- Operating Steps for Rotisserie:
- CLEANING AND MAINTENANCE
- Cleaning
- After each use:
Brand : Mayer
Model : MMO38D
Category : Oven