
DSP8000 XE - Loudspeaker MERIDIAN - Free user manual and instructions
Find the device manual for free DSP8000 XE MERIDIAN in PDF.


| Product Type | Digital Active Loudspeaker (DSP) |
| Dimensions (W x D x H) | 400mm (top) tapering to 158mm (bottom) x 528mm (front) tapering to 210mm (rear) x 1350mm (with feet/spikes) |
| Weight | 110.5 kg (243 lbs) per speaker |
| Power Supply | Mains AC (voltage specific per region); Fuse T5AH 250V (230V) or T10AH 250V (100/115V) |
| Amplifier Power | Tweeter: >150W (Class-AR), Mid-range: >150W (Class-AR), Bass: 6 bridged pairs of Class-D each >240W |
| Frequency Response | 18Hz – 40kHz (in room within 3dB) |
| Peak SPL | 120dB @ 1m (single speaker) |
| Drivers | Tweeter: 25mm beryllium dome; Mid-range: 160mm; Bass: 6 x 200mm polypropylene long-throw |
| Inputs | 1x Meridian SpeakerLink (RJ45), 1x Digital Co-ax (RCA, up to 192kHz/24bit), 1x Optical Toslink (up to 96kHz/24bit), 1x USB-C (up to 384kHz/24bit), Bluetooth via B-Link; Also via IA21 module: 1x Balanced XLR, 1x Unbalanced RCA |
| Outputs | 1x Meridian SpeakerLink (RJ45) for daisy-chaining |
| Control Options | Meridian Comms via SpeakerLink, Bluetooth via B-Link & Meridian Control app, IR receiver (front badge), external IR input (3.5mm), RS232 via SpeakerLink, USB for firmware |
| Bluetooth | Built-in B-Link module (supports audio streaming and speaker configuration via Meridian Control app) |
| MQA Support | Yes (Master Quality Authenticated) |
| Included Accessories | B-Link Bluetooth adapter, 2 grille removal tools, microfibre cloth, 1 SpeakerLink cable, 1 power cord, 1 IA21 Analogue Input Module with 4 screws |
| Maintenance | Clean with damp cloth; grilles removable with supplied tools; head-unit detachable for transport; avoid contact with tweeter dome |
| Front Panel Indicator | Illuminated badge: Blue (standby), White (operating), Flashing blue (booting), Red (error), Cyan (configuration), Green (firmware update success), Magenta (erasing memory) |
| Rear Panel Controls | Power On/Off, Channel selector (Left/Right/Centre/L+R), Factory Reset button, Mains fuse, IR input (3.5mm), Maintenance USB-B |
| Channel Modes | Left, Right, Centre, L+R mix; Image Focus (horizontal), Image Focus Plus (vertical) via app/controller |
| System Integration | Works with Meridian controllers (818v3, 218, 271, 861v8) or standalone with B-Link; supports up to 12 sources |
Frequently Asked Questions - DSP8000 XE MERIDIAN
User questions about DSP8000 XE MERIDIAN
0 question about this device. Answer the ones you know or ask your own.
Ask a new question about this device
Download the instructions for your Loudspeaker in PDF format for free! Find your manual DSP8000 XE - MERIDIAN and take your electronic device back in hand. On this page are published all the documents necessary for the use of your device. DSP8000 XE by MERIDIAN.
USER MANUAL DSP8000 XE MERIDIAN
natural_image
Interior scene with a brick wall, potted plants, and wooden furniture (no text or symbols visible)
natural_image
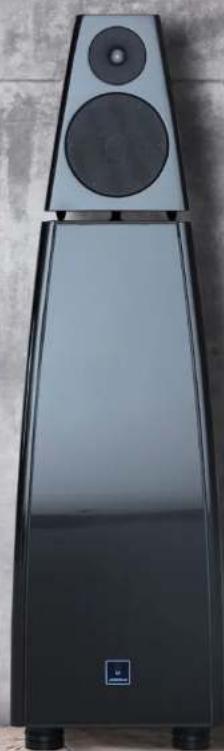
Exterior view of a modern black electronic speaker tower with two speakers and a logo on the base (no visible text or symbols)DSP8000 XE
USER & SYSTEM
APPLICATIONS GUIDE
CONTENTS
01
INTRODUCTION
02
UNPACKING AND ASSEMBLY
03
CONNECTIONS AND CONTROLS
05
MASTER AND SLAVE
06
B-LINK
07
IR CONTROL
08
IA21 ANALOGUE INPUT MODULE
09
SPECIFICATION
10
MAINTENANCE AND CLEANING
11
TROUBLESHOOTING
12
SYSTEM APPLICATIONS

natural_image
Technical line drawing of a speaker tower with circular components and ventilation grilles (no text or symbols)
natural_image
Technical line drawing of a mechanical device with circular components and mounting brackets (no text or symbols)1. INTRODUCTION
This guide is intended to assist with the installation and use of the DSP8000 XE loudspeakers. The first part of the guide covers information specific to the loudspeakers and the accessories supplied with them. The second part of the guide explains how the loudspeakers are installed, configured and used within several differing system applications.
System applications
The user-interface of the DSP8000 XE itself is limited to the illuminated badge on its front panel. As a result, many settings and features can be accessed and adjusted only via other Meridian equipment connected to the loudspeakers. This additional user-interface may come from a comprehensive controller product, such as the Meridian 818v3, or it may be provided by just the Meridian B-Link module used in conjunction with a smartphone or tablet running the Meridian Control app.
Aside from the combination of just the loudspeakers and the B-Link module, every installation use-case requires additional equipment to be connected to the loudspeakers.
The DSP8000 XE can be used with Meridian products, non-Meridian products or, more typically, a mixture of the two. Different products require different set-up methods, so installing a system can involve several different processes. To that end, this guide covers several typical set-up scenarios for the loudspeakers. It explains which processes and methods are required in each case.
This guide does provide advice relating to other Meridian products where it is relevant to their being installed, configured and used with DSP8000 XE loudspeakers. However, to avoid over-complicating the guide, pointers to user guides for other products are given. The intention is to provide a description which is concise enough to follow, and yet detailed enough to lead you to success.
Sales and service
All direct support for Meridian products, systems and associated software is provided through our authorised distribution network. If you require any such advice or information, you should contact your Meridian dealer.
Product registration
Register your DSP8000 XE Digital Active Loudspeakers at: meridian-audio.com/my-meridian


INTRODUCTION
01
UNPACKING AND ASSEMBLY
CONNECTIONS AND CONTROLS
MASTER AND SLAVE
B-LINK IA21 ANALOGUECONTROL SPECIFICATION MAINTENANCE INPUT MODULE
AND CLEANING
TROUBLESHOOTING SYSTEM
APPLICATIONS
2. UNPACKING AND ASSEMBLY
Before you begin installation you should ensure that your loudspeakers are the correct voltage for your local mains AC supply. If they are not, do not try to install them, and contact your dealer. You should not make any connections to the loudspeakers, or to any other component in your system, while the mains power supply is connected and switched on.
Care when unpacking
Take great care when unpacking or re-packing the loudspeakers that you do not put undue pressure on the drive units, as they may be damaged if pressed. Particular care should be taken to avoid any contact with the dome at the centre of the tweeter. To help achieve this, the tweeter is covered by a protective foam cover when packed. The tweeter cover should be removed only once the loudspeaker has been fully unpacked, positioned in its intended location and the head-unit has been mounted onto the main cabinet.
The head-units and main cabinets are supplied in separate cartons. The weight of the main cabinets requires that they be lifted only with assistance from at least one other person.
Unpacking the main cabinets
The outer packaging comprises of four cardboard sections which are held together by removable plastic clips. End-pieces form the top and bottom of the packaging, and a two-piece sleeve forms the sides of the box.
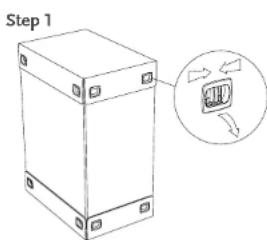
Ensure the packed cabinet is standing on its base; this can be confirmed by checking that the information printed on the box is the right-way up.
Remove all 18 plastic clips from the packaging. To do this, the two fins in the centre of each clip should be pinched firmly together between thumb and forefinger. This allows the clip to be pulled out of location. There are eight clips on each cardboard end-piece and two more on the main cardboard sleeve holding the two halves together. The force required to remove the clips can vary and some may require considerable pressure to release.
Step 2
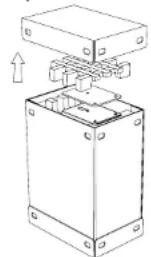
Lift off the top cardboard end-piece.
Step 3

natural_image
Technical line drawing of an electrical enclosure with directional arrows indicating motion (no text or symbols)Lift out the multi-piece foam packing and flat foam pad which are fitted over the top of the cabinet.
Remove the two halves of the main sleeve. When doing this, bear in mind that one loudspeaker in each pair is packed with an accessories pack held in a folded section with the sleeve. Take care that the accessories pack does not slide out of its recess and fall to the ground.
Locate the accessories pack from the relevant cabinet packaging, remove it and and keep it for use later.
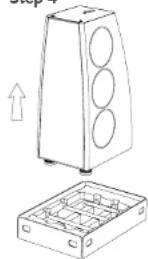
With the assistance of at least one other person, lift the main cabinet out of bottom cardboard end-piece and place it carefully onto the floor.
Remove the protective foam sheeting which covers the cabinet.
It is advised that the empty packaging is reassembled with all packing pieces contained within it so it can be reused should there be any need to transport the loudspeakers at a later date.
INTRODUCTION
UNPACKING
AND ASSEMBLY
02
POSITIONING THE
LOUDSPEAKERS
CONNECTIONS
AND CONTROLS
MASTER
AND SLAVE
B-LINK IA21 ANALOGUECONTROL SPECIFICATION MAINTENANCE
INPUT MODULE
AND CLEANING
TROUBLESHOOTING SYSTEM
APPLICATIONS
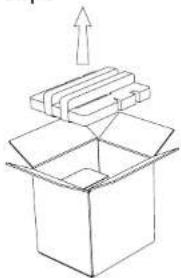
Unpacking the head-units:
Step 1
natural_image
Simple line drawing of an open box with a stack of papers above it and an upward arrow above it (no text or symbols)Ensure the carton is standing on its base; this can be confirmed by checking that the information printed on the carton is the right-way up.
Using a box-opener tool, or with careful use of a blade, open the carton by splitting the tape on its top surface. Take care not to allow any blade to penetrate the cardboard by more than a few millimeters.
Once the carton is open, remove the top packing piece.
Step 2

natural_image
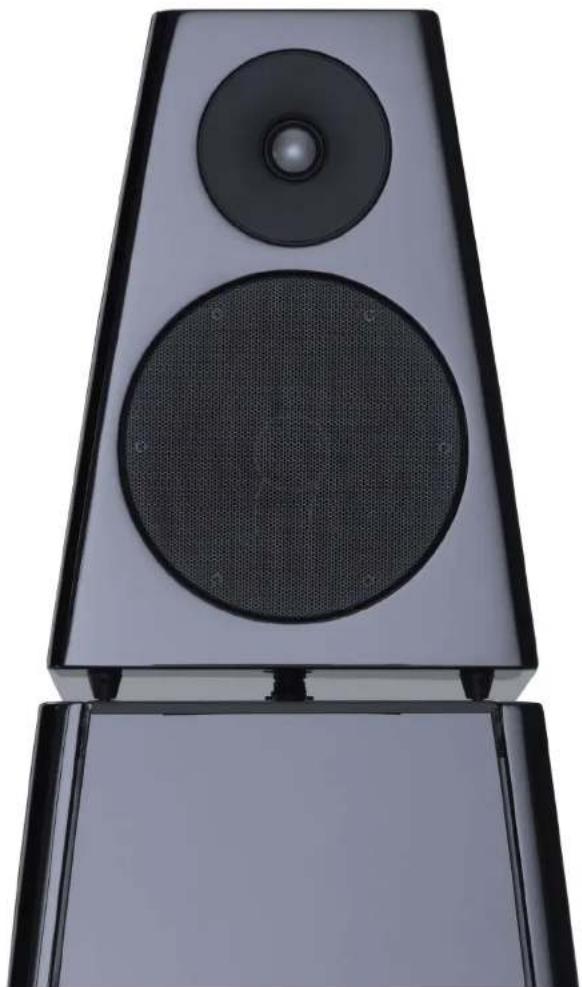
Simple line drawing of an open box with a speaker and upward arrow, no text or symbols present.Taking care not to apply pressure to the drive units, the head-unit can now be lifted out of the carton and placed carefully on an appropriate surface.
Step 3

Remove the protective foam sheeting which covers the head-unit. It is strongly advisable to leave the foam tweeter cover in place to protect the tweeter until the loudspeakers are fully installed and ready to be used.
It is advised that the empty packaging is reassembled with all packing pieces contained within it so it can be reused should there be any need to transport the loudspeakers at a later date.
natural_image
Exterior view of a modern speaker tower with two speakers and a circular head (no text or symbols visible)INTRODUCTION
UNPACKING
AND ASSEMBLY
02
POSITIONING THE
LOUDSPEAKERS
CONNECTIONS
AND CONTROLS
MASTER
AND SLAVE
B LINK A2 ANALOGUECONTROL SPECIFICATION MAINTENANCE
INPUT MODULE
AND CLEANING
TROUBLESHOOTING SYSTEM
APPLICATIONS
Fitting the head-units to the main cabinets
Each head-unit sits on three steel spikes protuding from the top of the main cabinet; two spikes towards the front of the cabinet, one towards the rear. These fit into three matching "spike-cups" on the underside of the head-unit. A short connecting cable, which emerges from the top surface of the main cabinet, plugs into a socket on the underside of the head-unit.
It is strongly advised that the task of fitting the head is performed by two people working together. Particular care should be taken to avoid any contact with the dome at the centre of the tweeter. It is strongly advised that the foam tweeter cover is left in place on the head-unit until the loudspeakers are fully installed and ready to be used.
Step 1

natural_image
Line drawing of a mechanical component with arrows indicating motion or assembly (no text or symbols)Hold the head-unit at a slight forward angle above the main cabinet and lower it carefully, so that the front two spike-cups fit over the front two spikes on the main cabinet. Carefully lower the rear of the head-unit so the rear spike-cup locates onto the rear spike.
Step 2

natural_image
Line drawing of a lampshade with an open lid and stand (no text or symbols)Next, lift the rear of the head-unit slightly to allow the short connecting cable to be located and plugged into the socket on the underside of the head-unit. This connection is latched, so a click should be felt as the cable is pushed fully home.
Step 3
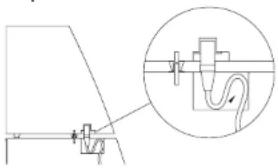
natural_image
Technical line drawing of a mechanical assembly with an inset showing a close-up of a component (no text or symbols)Carefully lower the rear of the head-unit so the rear spike-cup locales onto the rear spike, while simultaneously manipulating the cable so it is tucked into the recess towards the top rear edge of the main cabinet.
Step 4

When the loudspeaker is ready to be used, remove the tweeter-cover and retain it so it can be used if required at a later date.
Accessories supplied with the loudspeakers
- One B-link Bluetooth adapter (not supplied with the vertical centre Version of the DSP8000 XE)
- Two grille extractor tools
• One microfibre clearing cloth
• One short Speakerlink cable per loudspeaker
• One power cord per loudspeaker
• One IA21 Analogue Input Module per loudspeaker - Four M3 x 6mm fixing screws for each IA21 Analogue Input Module
If any of these items is missing, please contact your dealer.
INTRODUCTION
UNPACKING AND ASSEMBLY
02
POSITIONING THE
LOUDSPEAKERS
CONNECTIONS
AND CONTROLS
MASTER
AND SLAVE
B-LINK IA21 ANALOGUECONTROL SPECIFICATION MAINTENANCE
INPUT MODULE
AND CLEANING
TROUBLESHOOTING SYSTEM
AND CLEANING
APPLICATIONS
3. POSITIONING THE LOUDSPEAKERS IN THE ROOM
The enormous variety of dimensions, design and construction methods used in domestic rooms means that there are no hard and fast rules for exactly where the loudspeakers should be located to maximise sonic performance. In many cases, aesthetics will come into play and the visual appeal of the DSP8000 XE can influence the decision on where they are located. There is also the important matter of personal preference. Beauty can be in the ear of the beholder, meaning that listening tests are invariably the most successful method for achieving the best results.
There are, however, some guidelines to use as a starting point for where to place the loudspeakers. Listening tests can then be used to experiment with different adjustments to find the final positioning which suits the installation in question.
TWO-CHANNEL SYSTEMS
A starting point
If possible, position the loudspeakers in front of the most acoustically absorbent wall in the room. Ideally, have each loudspeaker at least 50cm (20 inches) from any corner, and position them at least 25cm (10 inches) away from the wall behind them.
A well-proven starting point for a two-channel system is to have the two loudspeakers and the centre of the listening position all equidistant from each other. In other words, when viewed from above, the two loudspeakers and the centre of the listening position form an equilateral triangle. This guideline can be used regardless of the distance of the listening position from the loudspeakers, meaning it can be applied in rooms where certain dimensions cannot be changed; for example, the seating is in a pre-determined position.
As mentioned, this is a starting point and it is often worthwhile experimenting with having the loudspeakers moved slightly further apart or slightly closer together. Naturally, the two loudspeakers should be kept at an equal distance from the centre of the listening position to maintain ideal stereo balance between the left and right loudspeakers.
If circumstances dictate that the equilateral triangle layout cannot be used, the next best thing is to ensure the two loudspeakers are still positioned so that they are equidistant from the listening position. This gives us a triangle with two sides of equal length and one side which is either longer or shorter than that length. As you may remember from your school geometry, this is known as an isosceles triangle. In general, the closer this is to being equilateral, the better.
Further apart?
As the loudspeakers are moved slightly further apart in comparison to the distance to the listening position, the width of the stereo image can be increased, and this may produce desirable results by increasing the impression of being immersed in the sound. However, having the sound spread too wide can also seem unnatural and, if the loudspeakers are moved too far apart, sound quality can really suffer.
One aim of correctly positioning loudspeakers is so they can form a three-dimensional "soundstage" which portrays the original event. A sonic image with depth, width and even height is produced. This is done by accurately reproducing subtle cues within the recording in the same proportions as they existed in the original event. Having the loudspeakers spread too far apart can cause the subtlety of these cues to be lost. Sounds just seem to come directly from either one or other of the loudspeakers, with none of the nuances present in a good soundstage.
Closer together?
As the loudspeakers are moved slightly closer together in comparison to the distance to the listening position, the ability for the loudspeakers to create a solid, three-dimensional soundstage can be increased. However, this can come at a price. Unsurprisingly, the width of the stereo image is reduced and, if the loudspeakers are moved too close together, this narrowing of the sound can mean a noticeable loss of scale and impact on direction cues within the image.
| INTRODUCTION | UNPACKING AND ASSEMBLY | POSITIONING THE LOUDSPEAKERS03 | CONNECTIONS AND CONTROLS | MASTER AND SLAVE | B-LINK1A21 ANALOGUECONTROL SPECIFICATION MAINTENANCE INPUT MODULE | AND CLEANING | TROUBLESHOOTING SYSTEM APPLICATIONS | ||
Toe-in: Angling for the best image
Toe-in is the term used from the way the loudspeakers are angled in relation to the listening position. If a pair of loudspeakers are angled inwards so that they are pointing directly at the listening position, they are said to be fully toed-in. If loudspeakers are positioned without being angled in, so that their front panels are perpendicular to the side walls (in a rectangular room), they are said to have no toe-in.
Adjusting toe-in can affect the definition of the stereo image as well as the apparent size of the soundstage. This is due to fact that the "off-axis" frequency response of a loudspeaker tends to differ from its "on-axis" response. This variation is usually most marked in regard to the output of the tweeter. In addition, changing the angle of the loudspeakers changes the pattern of reflected sound within the room. Given these variables, the effect of toe-in is more pronounced with some loudspeaker models than others, and it is invariably room-dependent.
The Meridian DSP8000 XE loudspeaker is designed to have excellent off-axis characteristics, but there is still merit in using listening tests to experiment with the amount of toe-in used. Start by listening to the loudspeakers with them pointing directly down the room. Then, try them with their front-panels angled slightly inwards towards the listening position. Gradually increase the inwards angle, listening to them each time. Ensure the angles are equal for both loudspeakers for each test. It may be necessary to move back and forth between positions to ascertain where the optimum image and soundstage are attained.
Off-centre listening? Image Focus
Circumstances can dictate that the listener is positioned off-centre, rather than being equidistant from the two loudspeakers. This could be a permanent arrangement due to the layout of the seating in the room, or it may be that there is an alternative listening position which is used from time-to-time. The DSP8000 XE loudspeakers feature Meridian's Image Focus® technology which can compensate for such situations. Image Focus is adjusted in the same way as a "Balance" control but, unlike a conventional balance control which simply varies the left and right volume levels, Image Focus combines gains and delays between the two loudspeakers to steer the stereo image. When sitting off-centre, the user is able to adjust the setting so that the image snaps into focus, allowing a realistic soundstage to be experienced.
Is it all going over your head? Image Focus Plus
Most loudspeakers are designed to have the tweeters at the same height, or slightly higher than, the listener's ears. This maintains the relative timing of sound travelling from the tweeter and the mid-range driver.
This is often a moot point because seating is usually selected for reasons other than the sitting height relative to the sound system! This can mean that if the tweeters are much too high or too low, the listener is stuck with the situation. However, the DSP8000 XE loudspeakers feature Meridian's Image Plus Focus® technology which can compensate for such differences in heights. The Image Focus Plus setting adjusts the delay between the tweeter and the mid-range driver to steer the image up or down to the height of the listener's ears.
The loudspeakers are designed to stand on the floor spikes within their feet. As supplied, the spikes are covered by sturdy protective discs to help reduce the risk of damage when unpacking and moving the loudspeakers. The protective discs are a push-fit on the spikes and they can be removed by pulling the disc firmly away from the base of the loudspeaker with a twisting motion. Tip: Twist clockwise to avoid unscrewing the entire foot assembly.
If the loudspeakers are to be used on a carpeted floor, the spikes will penetrate through the carpet, to create a solid mechanical coupling between the loudspeaker and the floor. To avoid damaging floor surfaces such as ceramic tiles or wooden boards, suitable metal discs (not supplied) should be used under the spikes. The spikes and feet are threaded to allow for adjustment to level the loudspeaker if the floor is not completely level.
| INTRODUCTION | UNPACKING AND ASSEMBLY | POSITIONING THE LOUDSPEAKERS03 | CONNECTIONS AND CONTROLS | MASTER AND SLAVE | B-LINK (A2) ANALOGUECONTROL SPECIFICATION MAINTENANCE | AND CLEANING | TROUBLESHOOTING SYSTEMAPPLICATIONS | ||
| INPUT MODULE | |||||||||
In surround-sound systems, the display screen plays a large part in deciding where to position the front three loudspeakers, for the left, centre, and right channels. However, several aspects come into play and these factors can conflict with each other. Many systems require a degree of compromise between the various constraints.
Guidelines for positioning loudspeakers in surround systems usually refer to the angle of each loudspeaker (when viewed from above) in relation to a central listening position. In such cases, the centre of the screen is said to be at zero degrees, whereas a position directly to the left or the right side of the listener would be at 90 degrees.
Both Dolby and THX advise that the left and right loudspeakers should be positioned symmetrically at an angle which is between 22° and 30° from the centre-line. This may or may not be achievable, depending on other factors.
Ideally, each loudspeaker should be at least 50cm (20 inches) from any corner and positioned at least 25cm (10 inches) away from the wall behind them.
Soundtracks are created with the intention that the left and right loudspeakers are positioned just inside the edge of the screen.
This is feasible with acoustically transparent screens, but a complication arises if the screen features adjustable masking on its sides. The loudspeakers need to just inside the masking material when the screen is masked to its narrowest.
For non-acoustically transparent screens, the left and right loudspeakers should be positioned just beyond the outside edges of the screen.
If a DSP8000 XE is used as a centre-channel, it should be placed centrally and equidistant from the main left-right pair. If possible, arrange for the tweeters of the three loudspeakers to be at approximately the same height. Ideally, this height should match the "ear-height" of the listeners.
In a system which uses a DSP8000 XE as a centre-channel, Meridian's Image Focus Plus control can be used to steer the image towards seating positions which are higher or lower than the height of the tweeter of the centre-channel.
For obvious reasons, the centre-channel should not be positioned behind a non-acoustically transparent screen!
Meridian's authorised distribution network has access to the Meridian Design and Specification Service which assists with the specification and installation of surround-sound systems featuring Meridian products.
| INTRODUCTION | UNPACKING AND ASSEMBLY | POSITIONING THE LOUDSPEAKERS03 | CONNECTIONS AND CONTROLS | MASTER AND SLAVE | B-LINK1A21 ANALOGUECONTROL SPECIFICATION MAINTENANCE INPUT MODULE | AND CLEANING | TROUBLESHOOTING SYSTEM APPLICATIONS | ||
4. CONNECTIONS, CONTROLS AND INDICATOR LIGHT
FRONT PANEL INDICATOR
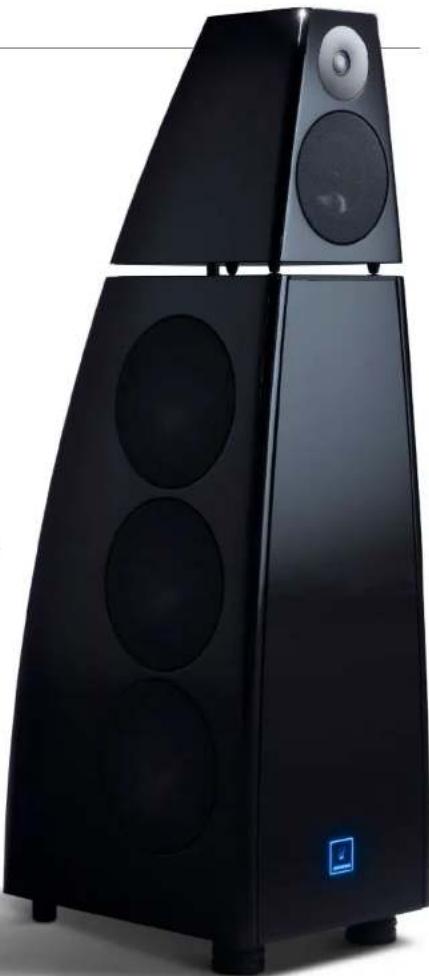
The status of the DSP8000 XE is shown by the illuminated badge on the front of the loudspeaker.
| During normal use During a firmware update | |||
| COLOUR STATUS | COLOUR STATUS | ||
| Flashing blue Loudspeaker powering up Magenta Erasing non-volatile memory | |||
| Blue Loudspeaker in Standby Flashing White Updating non-volatile memory | |||
| White Loudspeaker operating Red Error during update | |||
| Not lit | Loudspeaker not powered, or loudspeaker operating but with indicator switched off | Green | Update successful |
| Cyan | Loudspeaker in Configuration mode | ||
IR RECEIVER
The loudspeaker features an infra-red receiver. This is integrated into the illuminated badge on the loudspeaker's front-panel. Only a Master loudspeaker can use its IR receiver. Slave loudspeakers cannot receive infra-red. See the section Master and Slave on page 13 and IR Control on page 15. Only one Meridian product within a system should be controlled by IR commands from the remote control. If two or more Meridian products receive IR commands, problems can arise with control of the system. For this reason, it may be necessary to disable the IR receiver on one or more products in the system. Instructions for how to achieve this in various system scenarios are given in the system set-up sections towards the end of this guide.
REAR PANEL
The connection panel on the back of the loudspeaker

natural_image
Exterior view of a modern black multi-tiered speaker tower with visible sound waves and a blue-lit button (no text or symbols)| INTRODUCTION | UNPACKING AND ASSEMBLY | POSITIONING THE LOUDSPEAKERS | CONNECTIONS AND CONTROLS04 | MASTER AND SLAVE | BLINK | IR CONTROL | IAZI ANALOCUE INPUT MODULE | SPECIFICATION | MAINTENANCE AND CLEANING | TROUBLESHOOTING | SYSTEM APPLICATIONS |
SpeakerLink connections
SpeakerLink is a proprietary interface used by Meridian products. On the DSP8000 XE, SpeakerLink carries audio and control signals into and out of the loudspeaker. SpeakerLink cables are constructed using RJ45 connections and network cables of Cat5e (or higher) specification.
DSP8000 XE loudspeakers are factory configured so that the SpeakerLink connections are active and ready to be connected to other Meridian products. This means that, in many system scenarios, no additional configuration of the loudspeakers required.
Meridian Controller products feature a SpeakerLink output for each of the output channels in the system. In systems featuring a Meridian Controller product, each loudspeaker typically has its SpeakerLink input connected to the Controller product while its SpeakerLink output remains unused. This is known as a "star-wired" or "home run" arrangement. To facilitate this, Meridian two-channel controllers have two SpeakerLink outputs, while Meridian surround-sound controllers have eight outputs to support loudspeaker layouts of up to 71 channels.
An alternative to star-wiring is to have pairs of loudspeakers connected in a "daisy-chain" arrangement with the SpeakerLink output of the first loudspeaker connected to the SpeakerLink input on the second. However, within surround-sound systems, only specified pairs of loudspeakers can be daisy-chained. Refer to the surround-sound controller's User Guide for details.
Other connections
In addition to its SpeakerLink input, the DSP8000 XE features three other audio inputs. These inputs can be fed directly from digital audio sources with the appropriate output types.
Note: All three of these other inputs are available on the Master loudspeaker in the system. A Slave loudspeaker can be configured to accept audio via either its Digital Input or its SpeakerLink input, but not both. An explanation of the Master loudspeaker is given in the section Master and Slave on page 13.
Digital In
Co-axial digital audio input (RCA phono) supporting sampling rates up to 192KHz @ 24-bit resolution.
Opt In
Optical digital audio (Toslink) supporting sampling rates up to 96kHz @ 24-bit resolution.
USB Audio
USB digital audio [type C] supporting sampling rates up to 384kHz @ 24-bit resolution.
IR Input
3.5mm three-pole "minijack" socket for the connection of a Meridian G12 IR Sensor or a third-party IR receiver which uses 12V and is wired as shown here. Note: the loudspeaker has an infra-red receiver integrated into the badge on its front-panel. A separate IR receiver is required only if the receiver on the front-panel is obscured, for example, if the loudspeaker is used behind a projection screen or a stretched fabric wall-covering.
Tip: +12v DC
Ring: Sensor Output
Sleeve: Ground

Maintenance
USB-B socket for use with third-party control systems Also used for uploading firmware to the loudspeaker.
| INTRODUCTION | UNPACKING AND ASSEMBLY | POSITIONING THE LOUDSPEAKERS | CONNECTIONS AND CONTROLS04 | MASTER AND SLAVE | B-LINK IA2T ANALOGUECONTROL SPECIFICATION MAINTENANCE INPUT MODULE | AND CLEANING | TROUBLESHOOTING SYSTEM APPLICATIONS | |||
Channel selector switch
When used in a Meridian system, the SpeakerLink input of the DSP8000 XE is always fed with a two-channel digital audio signal. Typically, this is a left and right channel pair. The Channel Selector switch determines which of these channels the loudspeaker will play, or it can be set to play a mix of both channels.
Using the loudspeaker on the left of the system
- Set the Channel Selector switch to Left or Centre.

In a multichannel system this applies to all loudspeakers on the left-hand side of the room.
Using the loudspeaker on the right of the system
- Set the Channel Selector switch to Right.

In a multichannel system this applies to all loudspeakers on the right-hand side of the room.
Using the loudspeaker as a centre channel
- Set the Channel Selector switch to Left or Centre.
- If required, enable Image Elevation by switching on Centre Mode using the Meridian Control app in conjunction with the B-Link adapter (see opposite).
Using the loudspeaker to play a mix of left and right audio
- Set the Channel Selector switch to L+R.

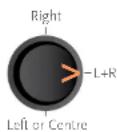
This will play a balanced mix of left and right audio, allowing a single loudspeaker to reproduce all the audio present in a stereo recording. It also provides a useful option for systems using multiple loudspeakers where the listening area does not have clearly-defined left and right loudspeaker positions.
Power switch
The On/Off power switch controls the mains power supply to the loudspeaker. When initially powered-up, the DSP8000 XE goes through a short boot-up process indicated by the front-panel indicator flashing blue. The loudspeaker then goes into its Standby mode. It is then switched between its Standby and operating modes by the appropriate communication signals from another Meridian product or, when the loudspeaker is configured accordingly, from the IR receiver on the front of the loudspeaker. Signals from the other Meridian product are received on the SpeakerLink input socket of the loudspeaker when the rest of the system is switched between Standby and operating modes.
Factory Reset button
Sets the loudspeaker back to its factory defaults. This includes assigning all sources to the SpeakerLink input.
Mains fuse
Removable mains fuse. Replace with same type fuse: T5AH 250V for 230V, T10AH 250V for 100/115V.
The DSP8000 XE features Image Elevation technology. As well as improving the sense of dialogue coming from centre-stage, Image Elevation can enhance the integration of sounds that pan from left and right in a multichannel system. Once Image Elevation is enabled by switching on Centre Mode in the AUDIO MENUS section of the Configuration options available on the Meridian Control app, it can be activated and adjusted using the Centre Elevation control on the Meridian Surround Controller product
| INTRODUCTION | UNPACKING AND ASSEMBLY | POSITIONING THE LOUDSPEAKERS | CONNECTIONS AND CONTROLS04 | MASTER AND SLAVE | B-LINK IA2T ANALOGUECONTROL SPECIFICATION MAINTENANCE INPUT MODULE | AND CLEANING | TROUBLESHOOTING SYSTEM APPLICATIONS | |||
5. MASTER AND SLAVE
In a system featuring any Meridian loudspeakers, one of the Meridian loudspeakers is designated as the "Master" loudspeaker, the others are designated as "Slaves" ^4 . When each DSP8000 XE is powered up, it automatically senses how it is connected within the system and assigns itself as either Master or Slave. In most system set-ups, there is no need for the installer or user to be aware of these roles. The exceptions are explained below.
*This does not apply when using the IA21 Analogue Input Modules with DSP8000 XE. See the section on IA21 on page 16.
SITUATIONS WHERE IT IS NECESSARY TO IDENTIFY WHICH LOUDSPEAKER IS THE MASTER
When the loudspeakers are to be controlled using IR remote control. Only a Master loudspeaker can respond to infra-red commands received by the IR receiver on the front-panel, or via a remote IR sensor connected to the IR Input socket on the back-panel.
When any source is to be connected to the Optical Input or USB Audio input. This applies to systems with no Meridian Controller product, or systems with a Meridian Controller product but also one or more sources connected directly to the loudspeakers. Only a Master loudspeaker can have either of these audio inputs activated.
When sources are to be connected to the Digital Input as well as the SpeakerLink input.
A Slave loudspeaker can be configured to accept audio via either its Digital Input or its SpeakerLink input, but not both.
HOW A DSP8000 XE IS ASSIGNED AS THE MASTER
In systems featuring a Meridian two-channel controller product, e.g. 818v3 or 218
The controller product carries two SpeakerLink output sockets; one labelled "Master", the other "Slave". The DSP8000 XE which is connected to the Master socket will assume the role of Master.
In systems featuring a Meridian surround-sound controller product, e.g. 861v8 or G65
The Meridian surround-sound controller must be configured to tell it which loudspeaker is the Master. By default from the factory, the front-left loudspeaker is assigned the role of
Master. This setting can be changed on the controller using the Meridian set-up program, "MConfig". In addition, whichever loudspeaker is assigned as Master must be connected to the appropriate SpeakerLink output socket on the controller. The SpeakerLink outputs comprise of four pairs of sockets arranged in two rows. The Master must be connected to one of the four sockets in the row labelled as "Master" (a green band runs through this row), with the specific socket determined by the role of the Master in the system:
| Role Socket pair to be used | |
| Left or right front L + R | |
| Centre channel C + Sub | |
| Side surround Side L + R | |
| Rear surround Rear L + R |
In systems with no Meridian controller product
When the Master loudspeaker is being fed audio from source products, the physical location of the source(s) in relation to the two loudspeakers may affect the choice of Master. The SpeakerLink output of the Master is then connected to the SpeakerLink input of the other loudspeaker.
| INTRODUCTION | UNPACKING AND ASSEMBLY | POSITIONING THE LOUDSPEAKERS | CONNECTIONS AND CONTROLS | MASTER AND SLAVE05 | B-LINK IA2T ANALOQUECONTROL SPECIFICATION MAINTENANCE INPUT MODULE | AND CLEANING | TROUBLESHOOTING SYSTEM APPLICATIONS | ||
6. B-LINK
OVERVIEW
The B-Link supplied with the DSP8000 XE loudspeakers supports Bluetooth® wireless technology. When combined with the Meridian Control app, the B-Link performs the following tasks:
- It allows access to set-up menus for the configuration of the loudspeaker during installation. Such installation settings are stored in the loudspeaker's non-volatile memory, so they are retained even if the B-Link is disconnected.
- It provides an intuitive interface for control of the loudspeakers from a smartphone or tablet; to adjust the volume level, to switch the loudspeakers on and off, and to access other settings, such as treble and bass.
In addition, the B-Link can act as a high-quality source of audio streamed wirelessly from a Bluetooth device such as a smartphone, tablet or computer.
THE MERIDIAN CONTROL APP
The Meridian Control app is available for download for iOS devices from the Apple App Store and for Android devices from the Google Play Store. In either case, search for Meridian to find the app or scan the QR code shown below.
When run for the first time, the app includes a simple step-by-step installation process. Once installed, the B-Link can be used to configure and control the DSP8000 XE loudspeakers, or to stream audio using Bluetooth.
Scan this QR code to get the Meridian Control app

The status of the B-Link is shown by the illuminated band which runs around the device.
| Colour Status | |
| Blue with steady blinking Powering up | |
| Blue Standby | |
| White Normal mode | |
| White with heartbeat blinking Pairing mode | |
| Blue with heartbeat blinking Pairing disabled | |
| Cyan Configuration mode |

natural_image
3D rendering of a gray medical device with network ports and a black top labeled 'MEDIDIAN' (no additional text or symbols visible)| INTRODUCTION | UNPACKING AND ASSEMBLY | POSITIONING THE LOUDSPEAKERS | CONNECTIONS AND CONTROLS | MASTER AND SLAVE | B-LINK06 | IR CONTROL SPECIFICATION/CONTENANCE INPUT MODULE | AND CLEANING | TROUBLESHOOTING SYSTEM APPLICATIONS |
7. IR CONTROL
The loudspeakers can be controlled using infra-red commands from a Meridian System Remote. However, this feature needs to be activated. By default, the loudspeakers will not respond to IR commands. Only a Master loudspeaker can have its IR reception activated. For further explanation of the Master loudspeaker, refer to the section Master and Slave on page 13.
When the loudspeakers are used in a system which features any other Meridian products capable of receiving IR commands, it is important that only one of the products has its IR receiver activated. If two or more Meridian products receive IR commands, problems can arise with control of the system.
The configuration setting relating to activating the IR receiver on Meridian products has three options:
- Controller
- Not controller
- Auto (or "Automatic" on some products)
When set to Controller, the product's IR receiver is active and is ready to receive commands.
When set to Not controller, the product's IR receiver is disabled and will not receive commands.
When set to Auto, the product's IR reception capability can be set using the Auto IR Set-up process described below.
On the DSP8000 XE, the setting for Controller/Not controller/Auto is accessed using the Meridian Control app in conjunction with the B-Link module.
Auto IR Set-up
This process requires the use of a Meridian System Remote (MSR, MSR+ or MSR2). The products should be connected together using SpeakerLink cables (or other appropriate comms cables) so that they are able to receive and transmit Meridian comms.
Ensure all the products in the system are in Standby and they are set to "Auto" as described above. From a position which is in direct line-of-sight with all the IR receiving "eyes", point the Meridian System Remote at the products and press the "Clear" key once. The products will communicate with one other and the most appropriate product will be set to have its IR receiver enabled. All the other products will disable their IR receivers. The products store how they are set in non-volatile memory, so they can be powered off and on without losing the settings.
Notes
The products must be connected as they are to be used in the installed system. SpeakerLink leads or other appropriate Meridian comms cables must be in place.
All the products should be set to "Auto". Products set to "Not controller" will not participate in the process and will remain with their IR receivers disabled. Having any products set to "Controller" leads to a risk that two products will end up with enabled IR receivers. This will result in problems with inconsistency in control functionality.
The product which has its IR receiver enabled is chosen according to a hierarchy which is pre-programmed into the products. The Auto IR Set-up process will always select the product which is highest in this hierarchy. If, for some reason, this product is not the most appropriate to be the IR receiver, the products should be set manually to Controller or Not controller, and the Auto process should not be used.
If it is not possible for all the IR receivers on the products to be in line-of-sight of the remote control when the "Clear" key is pressed, the process should not be used.
| INTRODUCTION | UNPACKING AND ASSEMBLY | POSITIONING THE LOUDSPEAKERS | CONNECTIONS AND CONTROLS | MASTER AND SLAVE | R-LINK | IR CONTROL07 | IA21 ANALOGUE INPUT MODULE | SPECIFICATION MAINTENANCE AND CLEANING | TROUBLESHOOTING SYSTEM APPLICATIONS |
8. IA21 ANALOGUE INPUT MODULE
OVERVIEW
The IA21 is designed to allow the DSP8000 XE to be fed from an analogue pre-amplifier or an analogue source which features a volume control.
The IA21 carries a balanced analogue input on an XLR socket and an unbalanced analogue input on an RCA phono socket. Either of these inputs can be used, but not both simultaneously.
The IA21 connects to the SpeakerLink input of the loudspeaker. In addition to supplying power to the module, this SpeakerLink connection carries digital audio from the IA21 to the loudspeaker. The high-quality analogue-to-digital conversion built into the IA21 outputs a 192kHz signal when used with DSP8000 XE. When the loudspeaker is powered up, the IA21 configures the loudspeaker so that the module and loudspeaker adopt the same external functionality as an analogue active loudspeaker. This includes setting the loudspeaker gain to an appropriate fixed level and disabling the loudspeaker's internal volume control. The other audio inputs (Digital Input, Optical Input and USB Audio) and the IR receiver are also disabled. As the IA21 connects to the SpeakerLink input, the B-Link module cannot be used to directly control the loudspeakers. This means that both loudspeakers in a pair must be filled with the IA21 and each should be fed independently from the analogue pre-amplifier or volume-controllable source.

FITTING THE IA21 TO THE LOUDSPEAKERS
IA21 module is designed to be bolted to the underside of the loudspeaker using the four screws supplied. The connections and controls should face rearwards, below those on the loudspeaker itself.
Once fitted, the SpeakerLink output of the module connects to the SpeakerLink input on the loudspeaker using the SpeakerLink cable supplied with the loudspeakers.
Alternative, the IA21 can be positioned remotely from the loudspeaker and connected using a suitably long SpeakerLink cable.
INPUT SENSITIVITY SWITCH
The three-way input sensitivity switch should be set to suit the output level of the equipment feeding the module. If the sensitivity is set too low, the input of the IA21 could be overdriven, resulting in distorted sound. If the sensitivity is set too high, the maximum attainable volume level of the system may be lower than desired. Having the sensitivity set correctly also maximises the usable range of the volume control of the pre-amp, allowing fine adjustment of the listening level. The sensitivity can be set to either 0.5v, 1.5v or 2.5v.
STATUS LED
When connected to the DSP8000 XE, the LED shows the following: Blue = Standby, White = On, Yellow = Clipping.
TRIGGER IN
The trigger input connection is a mono 3.5mm minijack socket which allows the loudspeaker to be switched in and out of Standby from third-party equipment equipped with a trigger output which delivers 5-30v DC.
SIGNAL SENSE
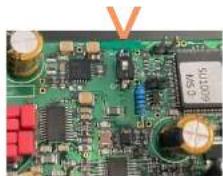
The IA21 features circuitry which automatically switches the loudspeaker out of Standby when audio is received on the analogue input. By default, the loudspeaker reverts to Standby mode if no audio is received for approximately 20 minutes. Signal sense can be disabled via a small switch within the module.

Remove the four Torx
T10 screws from the top
of the IA21
natural_image
Close-up of a green printed circuit board with various electronic components (no visible text or symbols)Switch set to "On"-Signal Sense enabled

natural_image
Close-up of a green printed circuit board with various electronic components (no visible text or symbols)Switch set to "Off" - Signal Sense disabled


| INTRODUCTION | UNPACKING AND ASSEMBLY | POSITIONING THE LOUDSPEAKERS | CONNECTIONS AND CONTROLS | MASTER AND SLAVE | R-LINK | IR CONTROL | INPUT MODULE08 | SPECIFICATION MAINTENANCE AND CLEANING | TROUBLESHOOTING SYSTEMAPPLICATIONS |
9. SPECIFICATION
| INPUT CONNECTIVITY | 1x Meridian SpeakerLink connector [R]451x co-axial digital audio [RCA phono] supporting up to 192kHz @ 24-bit1x optical digital audio [Toslink] supporting up to 96kHz @ 24-bit1x USB digital audio [type C] supporting up to 384kHz @ 24-bitBluetooth via the Meridian B-Link (supplied)1x balanced analogue audio [XLR] on analogue input module1x unbalanced analogue audio [RCA phono] on analogue input module |
| OUTPUT CONNECTIVITY | 1x Meridian SpeakerLink connector [R]45 |
| CONTROL OPTIONS WITHOUT ANALOGUE INPUT MODULE | Meridian comms via SpeakerLinkBluetooth via Meridian B-Link module and the Meridian Control appIntegrated IR receiverExternal IR receiver connectionRS232 via SpeakerLink inputUSB via Maintenance connection |
| CONTROL OPTIONS WITH ANALOGUE INPUT MODULE | Automatic signal-sense detect. Switch on detect time less than three seconds; switch to Standby time-out approximately 20 minutes.Trigger input on analogue input module [3.5mm minijack] |
| PERFORMANCE | Peak SPL: 120dB@1m for a single speakerFrequency response in room within 3dB: 18Hz - 40kHz |
| FRONT-PANEL INDICATOR | Blue in Standby. White in use (can also be unfit in use) |
| REAR-PANEL CONTROLS | Power On/Off, channel selector switch, input sensitivity switch [on analogue input module] |

MQA
MQA (Master Quality Authenticated) is an award-winning British technology that delivers the sound of the original master recording. An MQA file is fully authenticated and is small enough to stream or download.
Visit mqa.co.uk for more information.
DSP8000 XE includes MQA technology, which enables you to play back MQA audio files and streams, delivering the sound of the original master recording.
| TWEETER AMPLIFIER | Class-AR, capable of greater than 150W into 40, < 1% THDTHD – noise @ 1kHz < 0.005%Bandwidth >100kHz | |
| MID-RANGE AMPLIFIER | Class-AR, capable of greater than 150W into 40, < 1% THDTHD – noise @ 1kHz < 0.005%Bandwidth >100kHz | |
| BASS AMPLIFIERS | Six bridged pairs of Class-D amplifiers - each pair capable of greaterthan 240W into 40, < 1% THD.THD – noise @ 1kHz < 0.008% | |
| TWEETER | 25mm beryllium dome with silver voice-coil, steel custom waveguide | |
| MID-RANGE DRIVERS | 1 x 160mm with non-conductive voice-coil former and anti-resonanceclamp-ring mounting system | |
| BASS DRIVERS | 6 x 200mm polyorapylene long-throw [up to 24mm excursion] with anti-resonance clamp-ring mounting system | |
| DIMENSIONS/WEIGHT | WIDTH: 400mm [15.2in ] tapering to 158mm [6.2in]DEPTH: 528mm [20.8in] tapering to 210mm [8.3in]WEIGHT: 110.5kg [243lbs] | HEIGHT ^a :1350mm[53.2in] ^b |
| HEAD UNIT PACKED | WIDTH: 490mm [19.3in]DEPTH: 490mm [19.3in]WEIGHT: 20.0kg | HEIGHT ^c :400mm[5.7in] |
| MAIN UNIT PACKED | WIDTH: 650mm [25.6 in]DEPTH: 800mm [31.5in]WEIGHT: 107.0kg | HEIGHT ^d :1350mm[53.1in] |
*With feet/spikes fitted
The Bluetooth® word mark and logos are registered trademarks owned by Bluetooth SIG, Inc. and any use of such marks by Meridian Audio Limited is under license. Other trademarks and trade names are those of their respective owners.
| INTRODUCTION | UNPACKING AND ASSEMBLY | POSITIONING THE LOUDSPEAKERS | CONNECTIONS AND CONTROLS | MASTER AND SLAVE | R-LINK | IR CONTROL | IA2)ANALOGUE INPUT MODULE | SPECIFICATION09 | MAINTENANCE AND CLEANING | TROUBLESHOOTING SYSTEM APPLICATIONS |
10. MAINTENANCE AND CLEANING
FITTING AND REMOVING THE GRILLES
The loudspeakers are designed to be used with their grilles fitted over the bass-drivers and the mid-range driver. If preferred for cosmetic reasons, the grilles can be removed using the two grille-removal tools supplied with the loudspeakers.
To remove a grille, insert the hooked ends of the extractor tools into the grille mesh close to the outer edge of the grille, at the 3 o'clock and 9 o'clock positions. Grip the tools so that slight finger pressure can be used to restrain the grille as it is removed. Pull the grille out of the groove around the drive-unit before lifting the grille away from the loudspeaker.
DISMANTLING THE LOUDSPEAKERS
When dismantling the loudspeakers, always first disconnect the mains power supply.
It is advisable to remove the head-units when moving the loudspeakers. While doing this, great care should be taken to avoid any contact with the dome at the centre of the tweeter. To assist with this, it is advised that the foam tweeter cover supplied with the loudspeaker is refitted over the tweeter.
To remove the head-unit, carefully tilt the head-unit forward far enough to allow access to the lead which plugs into the underside of the head-unit.
Important: The socket for the lead features a latched connection, so it is necessary to depress the latch tab on the socket in order for the lead to be unplugged.
The head-unit can then be lifted clear of the main cabinet.
Take care while the head is not in position on the main cabinet as the mounting spikes on the main cabinet are exposed. Also avoid placing the head-units directly onto delicate surfaces as the spike-cups on their underside could cause damage.
CLEANING
Small marks on the lacquer surface can usually be removed with a damp cloth.
Deeper scratches can be removed by treating with additional polyester lacquer filler and then polishing carefully. Consult your authorised Meridian dealer for advice before attempting any repair.

natural_image
Exterior view of a modern black speaker tower with three circular speakers (no text or symbols visible)| INTRODUCTION | UNPACKING AND ASSEMBLY | POSITIONING THE LOUDSPEAKERS | CONNECTIONS AND CONTROLS | MASTER AND SLAVE | R-LINK | IR CONTROL | INDI ANALOGUE INPUT MODULE | SPECIFICATION | MAINTENANCE AND CLEANING10 | TROUBLESHOOTING SYSTEM APPLICATIONS |
11. TROUBLESHOOTING
ILLUMINATED BADGE ON FRONT PANEL NOT LIT
If the loudspeaker is in Standby mode, the illuminated badge on front of the loudspeaker will illuminate blue. When the loudspeaker is activated, the indicator illuminates white. However, if the DSP8000 XE receives the relevant control command from another Meridian product, the indicator can be switched off, so it is not lit even though the loudspeaker is activated and out-of This situation could lead to doubt about the status of the loudspeaker.

The loudspeaker always reverts to Standby when power is first applied. So, to return the loudspeaker to a known state, simply switch off mains power and then switch on again. The indicator should light up blue. If it does not light up, the mains supply and the mains inlet fuse should be checked.
ONE OF THE LOUDSPEAKERS COMES ON, THE OTHER REMAINS IN STANDBY
Check that the Slave loudspeaker is connected to the system via its SpeakerLink Input socket.
If a pair of loudspeakers are connected in a "daisy-chain" arrangement, check that the SpeakerLink Output of the first loudspeaker is connected to the SpeakerLink Input of the second.
If one of the loudspeakers has had its mains power switched off since the system was last used, cycle the system in and out of Standby in order to get both loudspeakers into the same state. Once the loudspeakers are out-of-Standby, it is also advisable to adjust the volume control to bring both loudspeakers to the same volume level. Even a change of just one step ensures both loudspeakers are synchronised with each other.
DRIVE UNITS MOVE WHEN THE SPEAKER IS SWITCHED ON OR OFF
Movement of the drive units is normal at these times and relates to the loudspeaker's electronic circuitry powering up or down.
THERE IS RADIO INTERFERENCE
The DSP8000 XE loudspeaker is a digital audio and computing device which has been designed to very high standards of electromagnetic compatibility. If this equipment does cause or suffer from interference to/from radio or television reception then the following measures should be tried:
- Reorient the receiving aerial (or antenna) or route the antenna cable of the receiver as far as possible from the DSP loudspeaker and its cabling.
- Ensure that the receiver uses well-screened antenna cable.
- Relocate the receiver with respect to the DSP loudspeaker.
- Connect the receiver and this product to different AC outlets.
If the problem persists contact your dealer.
SOUND IS ODD OR MONO
Check the Channel Selector switch on each loudspeaker is set appropriately. See the section on page 12.
THE LOUDSPEAKERS DO NOT RESPOND TO IR COMMANDS FROM A MERIDIAN SYSTEM REMOTE CONTROL
Only the Master loudspeaker can be controlled via IR from a remote control so the remote commands must be directly at the Master loudspeaker.
The loudspeakers can be configured to have the IR receiver disabled. Check the configuration of the Master loudspeaker to ensure it is set to "Controller". Refer to the section IR Control on page 15.
UNIT GOES SILENT WHEN PLAYED HARD
The DSP8000 XE features protection technology which prevents overheating of the electronics. Sound will resume once when the loudspeaker has cooled.
| INTRODUCTION | UNPACKING AND ASSEMBLY | POSITIONING THE LOUDSPEAKERS | CONNECTIONS AND CONTROLS | MASTER AND SLAVE | R LINK | IR CONTROL | (42)ANALOGUE INPUT MODULE | SPECIFICATION | MAINTENANCE AND CLEANING | 11 | SYSTEM APPLICATIONS |
20
12. SYSTEM APPLICATIONS

natural_image
Black electronic speaker tower with large speaker grille and circular head (no visible text or symbols)INTRODUCTION
UNPACKING
AND ASSEMBLY
POSITIONING THE
LOUDSPEAKERS
CONNECTIONS
AND CONTROLS
MASTER
AND SLAVE
B_INX
IR CONTROL
(A2)ANALOGUE
INPUT MODULE
SPECIFICATION
(1) 本次股东大会的召集和召开程序
MAINTENANCE
AND CLEANING
TROUBLESHOOTING
SYSTEM
APPLICATIONS
DSP8000 XE WITH 218 ZONE CONTROLLER
Overview
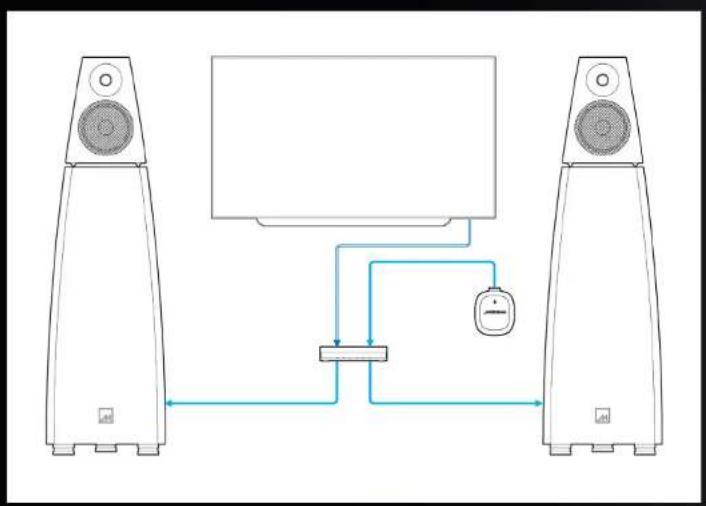
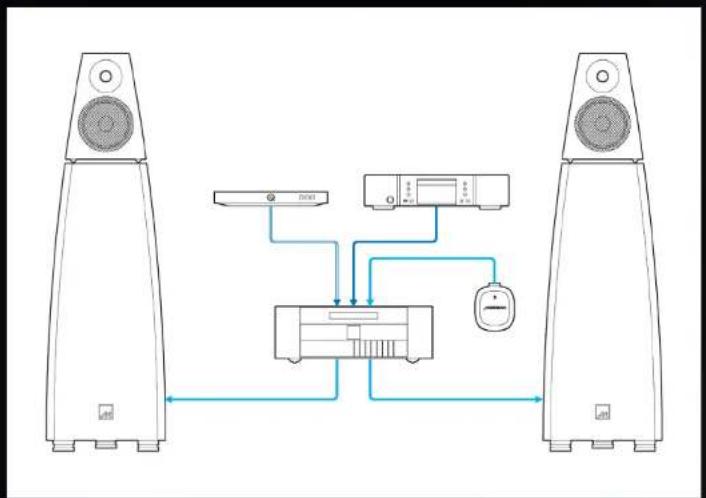
When using the 218 with a pair of DSP8000 XE loudspeakers, the 218 acts as the hub for the sources within the system. Source products are connected to the inputs on the 218 and the 218 is connected to the loudspeakers using SpeakerLink cables; one cable if the loudspeakers are "daisy-chained", two if they are "star-wired". In addition, the B-Link Bluetooth module supplied with the loudspeakers can be connected to the 218 to provide a means of streaming audio from a Bluetooth device such as a smartphone, tablet or PC.
The Channel Selector switch on the back-panel of each loudspeaker must be set appropriately to play either the left or right audio channel.
For advice on where to locate the loudspeakers within the room, refer to Positioning the loudspeakers to obtain the best sound on page 7.
Example system
218 Zone Controller, 2 x DSP8000 XE, Flat-screen TV, Meridian B-Link
flowchart
graph TD
    A["Speaker 1"] --> B["Monitor"]
    C["Speaker 2"] --> B
    B --> D["Device"]
    D --> E["Switch"]
    style A fill:#f9f,stroke:#333
    style C fill:#f9f,stroke:#333
    style B fill:#ccf,stroke:#333
    style D fill:#cff,stroke:#333
    style E fill:#ffc,stroke:#333


natural_image
Close-up of a speaker tower with two circular discs (no text or symbols visible)INTRODUCTION
UNPACKING
AND ASSEMBLY
POSITIONING THE
LOUDSPEAKERS
CONNECTIONS
AND CONTROLS
MASTER
AND SLAVE
B_INX
IR CONTROL
(A2) ANALOGUE
INPUT MODULE
SPECIFICATION
MAINTENANCE
AND CLEANING
TROUBLESHOOTING
SYSTEM
APPLICATIONS
Configuring a system based on 218
By default, the 218 has its sources assigned as follows:
| Source label Input on 218 Description | ||
| CD Digital In Digital co-ax connection on RCA phono socket | ||
| Radio Analogue In Left + right pair of analogue line-level RCA phono sockets | ||
| SLS Network | Internal networked audio endpoint connected to network via ethernet cable | |
| TV Optical In Digital optical connection on Toslink socket | ||
| Tape Analogue In Left + right pair of analogue line-level RCA phono sockets | ||
| Sat Optical In Digital optical connection on Toslink socket | ||
| Disc | SpeakerLink In | Digital audio and Meridian comms connections on SpeakerLink socket (RJ45) |
| Cable Optical In Digital optical connection on Toslink socket | ||
| DVD SpeakerLink In Digital audio and Meridian comms connections on SpeakerLink socket (RJ45) | ||
| USB Digital In Digital co-ax connection on RCA phono socket | ||
| Game | Optical In | Digital optical connection on Toslink socket |
If changes to the default settings are required, the 218 can be reconfigured using the Meridian Control app or from the 218's Configuration Web Page.
Configuration using the Meridian Control app
The Control app communicates with the 218 via the Network connection on the product. Hence, the device running the app must be connected to the same network as the 218. It is recommended that an unmanaged network switch is inserted between the 218 and the network router.
Download the Meridian Control app from the Apple App Store or Google Play Store. Once open, the app will automatically detect any network-connected Meridian products and display them in a list showing their current status. Without selecting the 218 (or any other product), Tap on the menu icon in the top left-hand corner and the options available within the app will be shown. This is where the app can be switched between Control and Configuration of products. Tap on "Configuration" and the app will display a list of the products which are available to be configured. Tap on the 218 to reveal its configuration settings. Tap on "SOURCES" to access the Audio Input options. Changes made within the app need to be transferred to the product by tapping on "Store Settings" at the bottom of the page. Exit the 218 Configuration page by tapping on the "Back" button. Tap on the Menu icon to return to the main options within the app.
Configuration using the 218 Web Page
The 218 features a built-in web page which allows the product to be configured. To access the page, browse to the IP address of the 218 on a device connected to the same network as the 218. Changes can be made and then stored to the product.
| INTRODUCTION | UNPACKING AND ASSEMBLY | POSITIONING THE LOUDSPEAKERS | CONNECTIONS AND CONTROLS | MASTER AND SLAVE | R-LINK | IR CONTROL | (2)ANALOGUE INPUT MODULE | SPECIFICATION | MAINTENANCE AND CLEANING | TROUBLESHOOTING |
natural_image
Close-up of a speaker emitting sound waves, with a CD and ring visible (no text or symbols)
natural_image
Close-up of a metallic panel or cover with a dark gradient background and no visible text or symbols.SYSTEM
Additional local sources connected directly to the loudspeakers
In addition to the SpeakerLink input, the loudspeakers feature three other audio inputs; digital co-ax, optical and USB-C. One of the loudspeakers can be configured so that these other inputs are available for use with sources connected directly to the loudspeaker. This can be useful if up to three sources are located close to the loudspeakers, while the 218 and other source products are located elsewhere.
In such a set-up, the loudspeaker which is to act as the hub for these local sources must have its SpeakerLink input connected to the "Master" SpeakerLink output on the rear of the 218. The local sources can then be connected to the other audio inputs on the loudspeaker. This loudspeaker is designated as the Master. Further explanation regarding the Master loudspeaker is given in the section Master and Slave on page 13 of this guide.
As an example, imagine there is a TV on the wall between the loudspeakers, but the 218 and other sources are far away at the back of the room. The TV can be connected via its optical output directly to the Master loudspeaker while other sources would be routed via the 218.
Up to twelve sources can exist in a Meridian system. These sources exist in a "global" fashion across the system so that more than one Meridian product can react simultaneous from a single command. This avoids the need for multiple key-presses to change settings on various products.
In the example above with our local TV source, selecting TV causes the 218 to change to the TV source. It switches to whichever input is assigned to TV, but this is of no consequence as the Master loudspeaker switches away from its SpeakerLink input and instead switches to its optical input. All of this happens from a single key-press and is invisible to the user.
Setting the loudspeakers for use with local sources in this way requires the Master loudspeaker to be configured using the B-Link module. (See section relating to the B-Link on page 14).
natural_image
Close-up of a speaker tower with two circular discs (no text or symbols visible)INTRODUCTION
UNPACKING
AND ASSEMBLY
POSITIONING THE
LOUDSPEAKERS
CONNECTIONS
AND CONTROLS
MASTER
AND SLAVE
B_INX
[Non-Text]
IR CONTROL
(A2) ANALOGUE
INPUT MODULE
SPECIFICATION
MAINTENANCE
AND CLEANING
TROUBLESHOOTING
SYSTEM
APPLICATIONS
Configuration for IR remote control
The DSP8000 XE has an IR receiver eye integrated into the illuminated badge on the front of the loudspeaker. By default the IR receiver is disabled. The 218 and the loudspeakers also feature a connection for an external IR receiver.
Although neither the 218 nor the loudspeakers themselves have a digital display to provide visual feedback of volume level or other parameters, it may be desirable to provide IR control of the system. Settings are shared across the various control interfaces available from the system, so a change to the volume level made from an IR remote control will be displayed within the Meridian Control app, or it could be passed to a third-party control system.
Within a Meridian system, the product which receives and acts upon IR commands is designated as the "Controller". In this case, either the 218 or the Master loudspeaker (but not both), can be selected to be the Controller. Naturally, if the 218 is to be the Controller, it must have an external IR receiver eye connected to its "IR in" socket.
Please note: Having only one Controller in a Meridian system is essential to avoid conflicts in command and control. Having more than one Controller, even inadvertently, can cause the system to behave erratically and inconsistently.
To ensure there is only one Controller, two settings are required in all cases. Whichever product is to use its IR eye should be set to "Controller", while the other product should be set to "Not Controller". Both settings are available from the Meridian Control app. The app can be used directly with the 218 to set it to be Controller or Not Controller within the "Comms" section of its configuration menus. To use the app to set the Master loudspeaker to Controller or Not Controller, the B-Link module must be connected to the loudspeaker's SpeakerLink input. The app can be used to set the loudspeaker to be Controller or Not Controller within the "Comms" section of its configuration menus. Once the settings are made, they are stored in non-volatile memory, so the app can be closed and, in the case of the Master loudspeaker, the B-Link can be disconnected and put to one side if no longer required.
Further details for configuration using the B-Link can be found in the section Configuration using B-Link on page 14.
Using DSP8000 XE with 218
When the loudspeakers are connected to a Meridian Controller product, the products communicate with each other via the SpeakerLink connections so they work in unison as a fully integrated system. Commands are automatically executed transparently across the products making up the system. This gives the user the ability to access and adjust all relevant settings via their preferred control method, whether that is the Meridian Control app, an IR remote control, or a third-party control system. In addition, changes made on one interface are passed to the others so, for example, turning the volume up using an IR remote control will increase the volume number shown on the Control app.
natural_image
Close-up of a speaker tower with two circular discs (no text or symbols visible)INTRODUCTION
UNPACKING
AND ASSEMBLY
POSITIONING THE
LOUDSPEAKERS
CONNECTIONS
AND CONTROLS
MASTER
AND SLAVE
B_INX
IR CONTROL
(A2) ANALOGUE
INPUT MODULE
SPECIFICATION
MAINTENANCE
AND CLEANING
TROUBLESHOOTING
SYSTEM
APPLICATIONS
Using the Meridian Control app
The Control app communicates with the 218 via the Network connection on the product. Hence, the device running the app must be connected to the same network as the 218. It is recommended that an unmanaged network switch is inserted between the 218 and the network router.

Download the Meridian Control app from the Apple App Store or Google Play Store. Once open, the app will automatically detect the 218 providing access to control source selection, volume, and more.
Settings available while listening to the system
The Meridian Control app gives access to these settings:
| Setting Range Default Notes | |||
| Treble -10dB to +10dB +0.0dB Tills the frequency response across the higher frequencies | |||
| Bass -5dB to +5dB 10.0dB Lifts or cuts the low frequency response of the system | |||
| Image Focus Left 10 to Right 10 <o> Directs the sound image for off-centre listening positions | |||
| Phase 1 or -1 The absolute phase of the audio played by the system | |||
| Image Focus Plus | 2 to +3 | -1 | Adjust the height of the sound image to suit the listening position |
| FFA | On/Off | On | Enables Meridian's FFA (Full Frequency Alignment) technology |
| Extension Limit | On/Off | Off | Limits the extreme low-frequency extension of the loudspeakers |
| Free-Q | Free/Wall/Corner/Shelf | Free | Options for Free-Q compensation for location of loudspeakers |
| Resonance Control | Off/M in/Med/Max | Off | Room-dependent compensation for certain Meridian loudspeakers |
| Sub Mode | Music/Movie | Music | Changes response of any connected Meridian subwoofers |
| Sub Filter | Off/Sub 1/Sub 2/Wide | Off | Selects the low pass filter for any connected Meridian subwoofers |
| Sub Gain | +/- 15dB | +0.0dB | Controls the relative level of any connected Meridian subwoofers |
| Perfect Balance | On/Off | On | Perfect Balance maintains spectral balance at all volume levels. |
| LipSync | 0ms to 85ms | 0ms | Audio delay to align video with sound |
Using IR remote control
The system can be controlled using a Meridian system remote, such as the MSR2 remote control. Instructions for activating IR reception are given in the above section IR remote control. Neither the 218 nor the loudspeakers feature a display capable of showing the status of settings such as volume level. This lack of visual feedback means that care should be taken not to inadvertently set the volume level too high!
| INTRODUCTION | UNPACKING AND ASSEMBLY | POSITIONING THE LOUDSPEAKERS | CONNECTIONS AND CONTROLS | MASTER AND SLAVE | R-LINK | IR CONTROL | IA21 ANALOGUE INPUT MODULE | SPECIFICATION | MAINTENANCE AND CLEANING | TROURISHOOTING |
SYSTEM
APPLICATIONS
DSP8000 XE WITH 818V3 REFERENCE AUDIO CORE
Overview
When using the 818v3 with a pair of DSP8000 XE loudspeakers, the 818v3 acts as the hub for the sources within the system. Source products are connected to the inputs on the 818v3 and the 818v3 is connected to the loudspeakers by one SpeakerLink cable if the loudspeakers are "daisy-chained", or by two cables if they are "star wired". In addition, the B-Link Bluetooth module supplied with the loudspeakers can be connected to the 218 to provide a means of streaming audio from a Bluetooth device such as a smartphone, tablet or PC.
The Channel Selector switch on the back-panel of each loudspeaker must be set appropriately to play either the left or right audio channel.
For advice on where to locate the loudspeakers within the room, refer to Positioning the loudspeakers to obtain the best sound on page 7.
Example system
818v3 Reference Audio Core, 2 x DSP8000 XE, Satellite Receiver, Blu-Ray Player, Meridian B-Link.
flowchart
graph TD
    A["Speaker 1"] --> B["Device"]
    C["Speaker 2"] --> B
    B --> D["Audio Device"]
    B --> E["Monitor"]
    style A fill:#f9f,stroke:#333
    style C fill:#f9f,stroke:#333
    style B fill:#ccf,stroke:#333
    style D fill:#cff,stroke:#333
    style E fill:#ffc,stroke:#333
Key
SpeakerLink
Optical
Digital co-ax

natural_image
Circular dark textured object with no visible text or symbols
natural_image
Circular metallic object with a textured surface and central highlight (no visible text or symbols)
natural_image
Circular metallic object with textured surface and central spot (no visible text or symbols)INTRODUCTION
UNPACKING
AND ASSEMBLY
POSITIONING THE
LOUDSPEAKERS
CONNECTIONS
AND CONTROLS
MASTER
AND SLAVE
B_INX
IR CONTROL
(A2) ANALOGUE
INPUT MODULE
SPECIFICATION
MAINTENANCE
AND CLEANING
TROUBLESHOOTING
SYSTEM
APPLICATIONS
Configuring a system based on 818v3
By default, the 818v3 has its sources assigned as follows:
| Source label Input on 818 Description | ||
| CD D1 Digital co-ax connection on RCA phono socket | ||
| Radio A1 + A2 Left + right pair of analogue line-level RCA phono sockets | ||
| SLS Net Internal networked audio endpoint connected to network via ethernet cable | ||
| TV A3 + A4 Left + right pair of analogue line-level RCA phono sockets | ||
| Tape B1 + B2 Left + right pair of analogue line-level RCA phono sockets | ||
| Sat O1 Digital optical connection on Toslink socket | ||
| Disc | SLI | Digital audio and Meridian comms connections on SpeakerLink socket (RJ45) |
| Cable | A5 - A6 | Left + right pair of analogue line-level RCA phono sockets |
| DVD D2 | Digital co-ax connection on RCA phono socket | |
| USB | U1 | Digital audio from a personal computer on USB Type-A socket |
| Game | O2 | Digital optical connection on Toslink socket |
If changes to these default settings are required, the 818v3 must be reconfigured using the Meridian configuration program "MConfig".
The Meridian Control app and the ID41 Configuration Web Page
The source settings of the 818v3 can be checked using either the Meridian Control app or the ID41's configuration web page. However, neither interface allows these settings to be changed.
MConfig
This program runs on a PC and allows settings to be transferred between the PC and the 818v3 via the RS232 socket on the product. A suitable RS232 cable is supplied with the 818v3 for this purpose, but a USB-to-serial adapter will also be required if using a USB connection from the PC. The program is the only method for re-assigning system sources to non-default inputs on the 818v3.
Please note: Although the settings file created by MConfig refers to the loudspeakers on its Products page, the program is not used to configure the loudspeakers themselves
| INTRODUCTION | UNPACKING AND ASSEMBLY | POSITIONING THE LOUDSPEAKERS | CONNECTIONS AND CONTROLS | MASTER AND SLAVE | LINK | IR CONTROL | IATANALOGUE INPUT MODULE | SPECIFICATION | MAINTENANCE AND CLEANING | TROUBLESHOOTING |
SYSTEM
APPLICATIONS
Additional local sources connected directly to the loudspeakers
In addition to the SpeakerLink input, the loudspeakers feature three other audio inputs; digital co-ax, optical and USB-C. One of the loudspeakers can be configured so that these other inputs are available for use with sources connected directly to the loudspeaker. This can be useful if up to three sources are located close to the loudspeakers, while the 818v3 and other source products are located elsewhere.
In such set-up, the loudspeaker which is to act as the hub for these local sources must have its SpeakerLink input connected to the "Master" SpeakerLink output on the rear of the 818v3. The local sources can then be connected to the other audio inputs on the loudspeaker. This loudspeaker is designated as the Master. Further explanation of the Master loudspeaker is given in the section Master and Slave on page 13 of this guide.
As an example, imagine there is a TV on the wall between the loudspeakers, but the 818v3 and other sources are far away at the back of the room. The TV can be connected via its optical output directly to the Master loudspeaker while other sources would be routed via the 818v3.
Up to twelve sources can exist in a Meridian system. These sources exist in a "global" fashion across the system so that more than one Meridian product can react simultaneously from a single command. This avoids the need for multiple key-presses to change settings on various products.
In the example above with our local TV source, selecting TV causes the 818v3 to display TV on its front-panel. The 818v3 also switches to whichever input is assigned to TV, but this is of no consequence as the Master loudspeaker switches away from its SpeakerLink input and instead switches to its optical input. All of this happens from a single key-press and is invisible to the user.
Configuring the loudspeakers for use with local sources in this way requires the Master loudspeaker to be set-up using the B-Link module. (See section relating to configuration using B-Link on page 14).
INTRODUCTION
UNPACKING
AND ASSEMBLY
POSITIONING THE
LOUDSPEAKERS
CONNECTIONS
AND CONTROLS
MASTER
AND SLAVE
B_INX
[Non-Text]
IR CONTROL
(A2)ANALOGUE
INPUT MODULE
SPECIFICATION
The 818v3 features an IR receiver eye built into its front-panel and the DSP8000 XE has an IR receiver eye integrated into the illuminated badge on the front of the loudspeaker. By default, the IR receiver on the 818v3 is enabled and the IR receiver on the loudspeakers is disabled. However, due to the way control is integrated across a Meridian system, all relevant settings can be accessed by directing all IR commands to the 818v3. Commands which are actually carried out within the loudspeakers are seamlessly passed across SpeakerLink to where they take effect.
In this case, the 818v3 is said to be the "Controller" of the Meridian system.
It is possible to override the default settings and make the Master loudspeaker the Controller of the system so that it receives IR commands instead of the 818v3. This requires the relevant setting to be changed on both the 818v3 and the Master loudspeaker. An explanation of the Master loudspeaker is given in the section Master and Slave on page 13 of this guide. The setting in the loudspeaker is accessed via the Configuration section of the Meridian Control app. To do this, the B-Link module must be connected to the loudspeaker's SpeakerLink input. Once the loudspeaker is set as "Controller" within its Configuration menus, the setting is stored in the loudspeaker's non-volatile memory. Hence, the B-Link can be disconnected and put to one side if no longer required.
The setting on the 818v3 is set using the MConfig program. The 818v3 should be set as "Not Controller" under the "Setup" tab within "Properties" for the 818v3.
Please note; Having only one Controller in a Meridian system is essential to avoid conflicts in command and control. Having more than one Controller, even inadvertently, can cause the system to behave erratically and inconsistently.
INTRODUCTION
UNPACKING
AND ASSEMBLY
POSITIONING THE
LOUDSPEAKERS
CONNECTIONS
AND CONTROLS
MASTER
AND SLAVE
B_INX
[Non-Text]
IR CONTROL
(A2)ANALOGUE
INPUT MODULE
SPECIFICATION
(1)基因通过控制 通过控制
MAINTENANCE
AND CLEANING
TROUBLESHOOTING
SYSTEM
APPLICATIONS
Using DSP8000 XE with 818v3
When the loudspeakers are connected to a Meridian Controller product, the products communicate with each other via the SpeakerLink connections so they work in unison as a fully integrated system. Commands are automatically executed transparently across the products making up the system. This gives the user the ability to access and adjust all relevant controls via their preferred control method, whether that is the Meridian Control app, the front-panel of the Controller, the IR remote control, or a third-party control system. In addition, changes made on one interface are passed to the others so, for example, turning the volume up using an IR remote control will increase the volume number shown on the Control app.
Settings available while listening to the system
By default, the 818v3 gives access to these settings from its front-panel keys or via IR remote control:
| Setting Range Default | Notes | ||
| Treble -10dB to +10dB +0.0dB Tilts the frequency response across the higher frequencies. | |||
| Bass -5dB to +5dB +0.0dB Lifts or cuts the low frequency response of the system. | |||
| Balance | Left 10 to Right 10 | <0> | The horizontal component of Meridian's Image Focus Plus technology. |
| Axis | -2 to +3 | -1 | The vertical component of Meridian's Image Focus Plus technology. |
| Phase | + or - | + | The absolute phase of the audio played by the system. |
| Contrast | 0 to 15 | 0 | Contrast of the 818v3 front-panel display. |
| Brightness | 0 to 15 | 0 | Brightness of the 818v3 front-panel display. |
In addition, the following settings are available if enabled within the front-panel Set-up mode on the 818v3.
| Setting Range Default | Notes | ||
| Loudness | On/Off | On | Meridian's Perfect Balance technology. |
| Sub Mode | Music/Movie | Music | Changes response of any connected Meridian subwoofers. |
| Sub Filter | Off/Sub 1/Sub 2/Wide | Off | Selects the low-pass filter for any connected Meridian subwoofers. |
| Sub Gain | +/- 15dB | odB | Control's the relative level of any connected Meridian subwoofers. |
| FBC | Off/Min/Med/Max | Off | Resonance Control used by relevant Meridian loudspeakers. |
| Position | Free/Wall/Corner/Shelf | Free | Free-Q compensation for location of loudspeakers. |
| EBA | On/Off | On | Meridian's FFA technology. |
| Input Gain | 0.5v/1.0v/2.0v/2.5v | 2.0v | Adjusts the gain offset of the analogue inputs. |

| INTRODUCTION | UNPACKING AND ASSEMBLY | POSITIONING THE LOUDSPEAKERS | CONNECTIONS AND CONTROLS | MASTER AND SLAVE | LINK | IR CONTROL | I021 ANALOGUE INPUT MODULE | SPECIFICATION | MAINTENANCE AND CLEANING | TROUBLESHOOTING |

31
For a full explanation of the settings available in Set-up mode, refer to the 818v3 User-Guide.
To enter front-panel Set-up mode:
- Put the 818v3 into Standby mode by pressing Off (front-panel or remote).
- Press and hold down the Setup key on the front-panel.
• The display shows a countdown in seconds:
Setup in... 3
- Keep holding down Setup until the countdown finishes.
- The display will show the first of the set-up menus.
To exit front-panel Set-up mode
- Put the 818v3 into Standby mode by pressing Off (front-panel or remote). Any changes that have been made to the set-up menus will be stored to non-volatile memory within the product.
Using the Meridian Control app
The Control app communicates with the 818v3 via the Network connection on the product. Hence, the device running the app must be connected to the same network as the 818v3. It is recommended that an unmanaged network switch is inserted between the 818v3 and the network router.
Download the Meridian Control app from the Apple App Store or Google Play Store. Once open, the app will automatically detect the 818v3 providing access to primary functions such as source selection and volume level. The app does not provide access to the settings listed in the tables above.
Note: The network connection on the 818v3 resides on the ID41 card within the product. Hence, the name "ID41" is used within the app to represent the 818v3.
INTRODUCTION
UNPACKING
AND ASSEMBLY
POSITIONING THE
LOUDSPEAKERS
CONNECTIONS
AND CONTROLS
MASTER
AND SLAVE
B-LINK
IR CONTROL
IA21 ANALOGUE
INPUT MODULE
SPECIFICATION
MAINTENANCE
AND CLEANING
TROUBLESHOOTING
SYSTEM PUSATIO
APPLICATIONS
DSP8000 XE WITH 861V8 SURROUND CONTROLLER
Overview
When using the 861v8 with DSP8000 XF loudspeakers, the 861v8 acts as the hub for the sources within the system. Source products are connected to the inputs on the 861v8 and the loudspeakers are connected using SpeakerLink cables.
The loudspeakers must be set to play the appropriate audio channel. On the DSP8000 XE, this is done using the Channel Selector switch on the back panel. In the example below, the DSW.2 should have its Channel Selector switch set to "2". Meridian loudspeakers featuring a digital display, such as the DSP7200 SE, must be set using a Meridian remote control. Refer to the User Guide for how to do this.
Each Meridian loudspeaker can be connected to an individual SpeakerLink output on the G65 as shown above, or specific pairs can be "daisy-chained" from a single SpeakerLink output. The pairs which can be daisy-chained are as follows:
- Left main and right main channels
- Left side and right side channels
- Left rear and right rear channel
- Centre-channel and Meridian subwoofer (acting as the LFE or Mono sub)
Additional Meridian subwoofers can be used in conjunction with any of the eight output channels above to complement or to augment bass output.
For advice on where to locate the loudspeakers within the room, refer to Positioning the loudspeakers to obtain the best sound on page 7.

flowchart
graph TD
    A["Speaker 1"] --> B["Device"]
    C["Speaker 2"] --> B
    D["Speaker 3"] --> B
    E["Speaker 4"] --> B
    F["Speaker 5"] --> B
    B --> G["Control Panel"]
    G --> H["Sensor"]
    H --> I["Display"]
    I --> J["Output"]
Key

INTRODUCTION
UNPACKING
AND ASSEMBLY
POSITIONING THE
LOUDSPEAKERS
CONNECTIONS
AND CONTROLS
MASTER
AND SLAVE
B_INX
IR CONTROL
(A2)ANALOGUE
INPUT MODULE
SPECIFICATION
MAINTENANCE
AND CLEANING
TROUBLESHOOTING
SYSTEM
APPLICATIONS
Configuring a system based on a Meridian 861v8
The configuration options available from the front panel of the 861v8 are very limited. The product can be set via its front-panel to one of several standard settings, called "Types", and the Calibration process can be run on the system.
Any further configuration requires the use of a PC running the Meridian Configuration program, MConfig.
MConfig
This program runs on a PC and allows settings to be transferred between the PC and the 861v8 via the RS232 socket on the product. A suitable RS232 cable is supplied with the 861v8 for this purpose, but a USB-to-serial adapter will also be required if using a USB connection from the PC. The program is the only method for re-assigning system sources to non-default inputs on the 861v8.
Please note: Although the settings file created by MConfig refers to the loudspeakers on its Products page, the program is not used to configure the loudspeakers themselves.
Meridian Control App and the ID40/41 Configuration Web Page
If the 861v8 is fitted with a networked audio streaming card (designated ID40 or ID41), either the Meridian Control app or the ID40/ID41 configuration web page can be used to check the source settings of the 861v8. However, neither interface allows these settings to be changed.
IR remote control
The 86lv8 features an IR receiver eye built into its front-panel and the DSP8000 XE has an IR receiver eye integrated into the illuminated badge on the front of the loudspeaker. By default, the IR receiver on the 86lv8 is enabled and the IR receiver on the loudspeakers is disabled. However, due to the way control is integrated across a Meridian system, all relevant settings can be accessed by directing all IR commands to the 86lv8. Commands which are actually carried out within the loudspeakers are seamlessly passed across SpeakerLink to where they take effect.
In this case, the 861v8 is said to be the "Controller" of the Meridian system.
It is possible to override the default settings and make the Master loudspeaker the Controller of the system so that it receives IR commands instead of the 861v8. This requires the relevant setting to be changed on both the 861v8 and the Master loudspeaker. Refer to the section Master and Slave on page xx for an explanation of the Master loudspeaker. The setting in the loudspeaker is accessed via the B-Link module which must be connected to the loudspeaker's SpeakerLink input. Once the loudspeaker is set as "Controller", the setting is stored in the loudspeaker's non-volatile memory, so the B-Link can be disconnected and put to one side if no longer required.
The Controller setting on the 86lv8 is accessed using the MConfig program. The 86lv8 should be set as "Not Controller" under the "Setup" tab within "Properties" for the 86lv8.
Please note; Having only one Controller in a Meridian system is essential to avoid conflicts in command and control. Having more than one Controller, even inadvertently, can cause the system to behave erratically and inconsistently.
INTRODUCTION
UNPACKING
AND ASSEMBLY
POSITIONING THE
LOUDSPEAKERS
CONNECTIONS
AND CONTROLS
MASTER
AND SLAVE
B_INX
IR CONTROL
(A2) ANALOGUE
INPUT MODULE
SPECIFICATION
MAINTENANCE
AND CLEANING
TROUBLESHOOTING
SYSTEM
APPLICATIONS
Additional local sources connected directly to the loudspeakers
Within a surround-sound system, there are situations where it is possible to take advantage of additional functionality offered by the DSP8000 XE by connecting one or more sources directly to the main left and right loudspeakers, thus bypassing the surround controller. This table illustrates these scenarios:
| Additional functionality Reason for doing this Advantage offered | ||
| Playing audio via the loudspeaker's USB input from a source such as a PC. | The maximum sampling rate supported by the USB input on the 861v8 is 192 kHz @ 24-bit. | The DSP8000 XE accepts audio at sampling rates of up to 384kHz @ 24-bit on its USB input. |
| Playing authenticated MQA streams from an MQA decoder product via the loudspeaker's Digital In co-ax input. | The 861v8 does not support bit-perfect playback, so it cannot pass authenticated MQA streams onto the DSP8000 XE. | MQA audio streams can be fully rendered and played back by the main left and right loudspeakers. |
| Digital audio inputs located on the loudspeakers. | If a digital source is located in the room, close to the main loudspeakers, but far from the 861v8. | A convenient place to connect the source without having to run a cable to the 861v8. |
Disadvantages of connecting local sources directly to the loudspeakers:
- It removes the option to listen to these sources using surround-sound presets such as Trifield.
- There is no way to apply Meridian Room Correction to the audio from these sources.
Connecting and configuring for the use of local sources:
The front left or the front right loudspeaker must be selected as the connection point for the local source(s). This loudspeaker must have its SpeakerLink input connected to the "Master" SpeakerLink output on the rear of the 86iv8. The local sources can then be connected to other audio inputs only on this loudspeaker. This loudspeaker is designated as the Master. Further explanation of the Master loudspeaker is given in the section Master and Slave on page 13 of this guide.
The front loudspeaker pair must be connected in a "daisy-chain" arrangement. i.e. the Master loudspeaker must have its SpeakerLink output connected to the SpeakerLink input of the Slave loudspeaker.
The Source Configuration of the 861v8 and Master loudspeaker must be carried out in conjunction with each other so that when the local sources are listened to through the main left and right loudspeakers, the other loudspeakers fall silent. To do this, any source assigned to one of the local inputs on the Master loudspeaker must be assigned on the 861v8 to an unused input, this could be an analogue input with nothing plugged into it. For example, if CD is assigned to the USB input on the Master loudspeaker, the 861v8 must be configured with CD assigned to an unused socket.
Configuring the loudspeakers for use with local sources in this way requires the Master loudspeaker to be set-up using the B-Link module. Refer to the B-Link section on page 14.
If a Meridian product, such as 218, 210 or 818v3, is used as a local source, the product should be connected via SpeakerLink to either of the SpeakerLink inputs on the 86lv8 in order for Meridian comms to be passed between the two products. No additional configuration is required for this connection.
| INTRODUCTION | UNPACKING AND ASSEMBLY | POSITIONING THE LOUDSPEAKERS | CONNECTIONS AND CONTROLS | MASTER AND SLAVE | R-LINK | IR CONTROL | IA21ANALOGUE INPUT MODULE | SPECIFICATION | MAINTENANCE AND CLEANING | TROURISHOOTING |
Using DSP8000 XE with 861v8
When the loudspeakers are connected to a Meridian Controller product, the products communicate with each other via the SpeakerLink connections so they work in unison as a fully integrated system. Commands are automatically executed transparently across the products making up the system. This gives the user the ability to access and adjust all relevant settings via their preferred control method, whether that is the Meridian Control app, the front-panel of the Controller, the IR remote control, or a third-party control system. In addition, changes made on one interface are passed to the others so, for example, turning the volume up using an IR remote control will increase the volume number shown on the Control app.
| Setting Range Default | Notes | ||
| Treble* -10dB to +10dB +0.0dB Tills the frequency response across the higher frequencies | |||
| Bass* -5dB to +5dB +0.0dB Lifts or cuts the low frequency response of the system | |||
| Phase* + or - + The absolute phase of the audio played by the system | |||
| Axis | -2 TO +3 | -1 | The vertical component of Meridian's Image Focus Plus technology |
| Balance | Left TO to Right TO | <0> | The horizontal component of Meridian's Image Focus Plus technology |
| HS Out* | Y or No | Y | Selects whether High-Speed audio sampling rates are fed to the loudspeakers |
| Centre | -3.0dB to +3.0dB | +0.0dB | The relative level of the centre-channel loudspeaker |
| Depth | -2.5ms to +5ms | 0.0MS | The relative delay applied to the centre-channel loudspeaker |
| C. Elev | Off, Min, Med, Max | Off | Psychoacoustically raises the sound image to the centre of a screen |
| Rear | 30dB TO +10dB | -0dB | The relative level of the rear-channel loudspeakers |
| Sides | 30dB TO +10dB | -0dB | The relative level of the side-channel loudspeakers |
| R. Delay | oms to 3oms | Varies | The relative delay applied to the rear-channel loudspeakers |
| S. Delay | oms to 3oms | Varies | The relative delay applied to the side-channel loudspeakers |
| EBA | On, Off | On | Enables or disables Meridian's FFA technology |
| LipSync | oms to 85ms | oms | Audio delay to align video with sound |
| RC | As defined | Bypassed | The selected Room Correction profile, or Bypassed for no room correction |
* These parameters apply to all DSP presets.
| INTRODUCTION | UNPACKING AND ASSEMBLY | POSITIONING THE LOUDSPEAKERS | CONNECTIONS AND CONTROLS | MASTER AND SLAVE | R LINK | IR CONTROL | INJANALOGUE INPUT MODULE | SPECIFICATION | MAINTENANCE AND CLEANING | TROUBLESHOOTING |
36
Using the Meridian Control app
The Control app communicates with the 861v8 via the Network connection on the product. Hence, the device running the app must be connected to the same network as the 861v8. It is recommended that an unmanaged network switch is inserted between the 861v8 and the network router.
Download the Meridian Control app from the Apple App Store or Google Play Store. Once open, the app will automatically detect the 861v8, tapping on it will allow control of source selection, volume, and more.
Note: The network connection on the 86lv8 resides on the ID41 card within the product. Hence, the name "ID41" is used within the app to represent the 86lv8.
INTRODUCTION
UNPACKING
AND ASSEMBLY
POSITIONING THE
LOUDSPEAKERS
CONNECTIONS
AND CONTROLS
MASTER
AND SLAVE
B_INX
[Non-Text]
IR CONTROL
(A2)ANALOGUE
INPUT MODULE
SPECIFICATION
(1)基因通过控制 通过控制
MAINTENANCE
AND CLEANING
TROUBLESHOOTING
SYSTEM
APPLICATIONS
DSP8000 XE WITH G65 SURROUND CONTROLLER
Overview
When using a G65 with DSP8000 XE loudspeakers, the G65 acts as the hub for the sources within the system. Source products are connected to the inputs on the G65 and the loudspeakers are connected using SpeakerLink cables. In addition, the B-Link Bluetooth module supplied with the loudspeakers can be connected to the G65 to provide a means of streaming audio from a Bluetooth device such as a smartphone, tablet or PC.
Each loudspeaker must be set to play the appropriate audio channel. On the DSP8000 XE, this is done using the Channel Selector switch on the backpanel. In this example, the DSW.2 should have its Channel Selector switch set to "2". Meridian loudspeakers featuring a digital display, such as the DSP7200 SE, must be set using a Meridian remote control. Refer to the User Guide for how to do this.
Each Meridian loudspeaker can be connected to an individual SpeakerLink output on the G65 as shown above, or specific pairs can be "daisy-chained" from a single SpeakerLink output. The pairs which can be daisy-chained are as follows:
• Left main and right main channels
- Left side and right side channels
- Left rear and right rear channel
• Centre-channel and Meridian subwoofer (acting as the LFE or Mono sub)
Additional Meridian subwoofers can be used in conjunction with any of the eight output channels above to complement or to augment bass output.
For advice on where to locate the loudspeakers within the room, refer to Positioning the loudspeakers to obtain the best sound on page 7.

INTRODUCTION
UNPACKING AND ASSEMBLY
CONNECTIONS AND CONTROLS
MASTER AND SLAVE
B_INK
IR CONTROL
(12) ANALOGUE INPUT MODULE
SPECIFICATION
MAINTENANCE AND CLEANING
TROUBLESHOOTING

38
Example system
C65 Surround Controller, 3 x DSP8000 XE as left, centre and right front channels, 2 x DSP7200SE as left and right rear channels, DSW.2 Subwoofer, Satellite Receiver, Blu-Ray Player, Meridian B-Link.

flowchart
graph TD
    A["Speaker Tower 1"] --> B["Audio System"]
    C["Speaker Tower 2"] --> D["Audio System"]
    E["Speaker Tower 3"] --> F["Audio System"]
    G["Speaker Tower 4"] --> H["Audio System"]
    I["Speaker Tower 5"] --> J["Audio System"]
    K["Speaker Tower 6"] --> L["Audio System"]
    M["Speaker Tower 7"] --> N["Audio System"]
    O["Speaker Tower 8"] --> P["Audio System"]
    Q["Speaker Tower 9"] --> R["Audio System"]
    S["Speaker Tower 10"] --> T["Audio System"]
    U["Speaker Tower 11"] --> V["Audio System"]
    W["Speaker Tower 12"] --> X["Audio System"]
    Y["Speaker Tower 13"] --> Z["Audio System"]
    AA["Speaker Tower 14"] --> AB["Audio System"]
    AC["Speaker Tower 15"] --> AD["Audio System"]
    AE["Speaker Tower 16"] --> AF["Audio System"]
    AG["Speaker Tower 17"] --> AH["Audio System"]
    AI["Speaker Tower 18"] --> AJ["Audio System"]
    AK["Speaker Tower 19"] --> AL["Audio System"]
    AM["Speaker Tower 20"] --> AN["Audio System"]
Key

Configuring a system based on C65
The G65 features a front-panel Configuration Wizard which offers set-up menus for many of the product's configuration options. Full details can be found in the G65 User Guide.
For complete control over all aspects of the product's configuration, it is necessary to set up the unit from a PC using the Meridian configuration program, "MConfig". The program is the only method for configuring the following:
- Meridian Room Correction
• The full range of bass-management options - Front-panel "Soft" keys

INTRODUCTION
UNPACKING
AND ASSEMBLY
POSITIONING THE
LOUDSPEAKERS
CONNECTIONS
AND CONTROLS
MASTER
AND SLAVE
BINK
IR CONTROL
(2)ANALOGUE
INPUT MODULE
SPECIFICATION
MAINTENANCE
AND CLEANING
TROUBLESHOOTING
APPLICATIONS
MConfig
This program runs on a PC and allows settings to be transferred between the PC and the G65 via the RS232 socket on the product. A suitable RS232 cable is supplied with the G65 for this purpose, but a USB-to-serial adapter will also be required if using a USB connection from the PC.
Please note: Although the settings file created by MConfig refers to the loudspeakers on its Products page, the program is not used to configure the loudspeakers themselves.
IR remote control
The G65 features an IR receiver eye built into its front-panel and the DSP8000 XE has an IR receiver eye integrated into the illuminated badge on the front of the loudspeaker. By default, the IR receiver on the G65 is enabled and the IR receiver on the loudspeakers is disabled. However, due to the way control is integrated across a Meridian system, all relevant settings can be accessed by directing all IR commands to the G65. Commands which are actually carried out within the loudspeakers are seamlessly passed across SpeakerLink to where they take effect.
In this case, the G65 is said to be the "Controller" of the Meridian system.
It is possible to override the default settings and make the Master loudspeaker the Controller of the system so that it receives IR commands instead of the G65. This requires the relevant setting to be changed on both the G65 and the Master loudspeaker. An explanation of the Master loudspeaker is given in the section Master and Slave on page 13. The setting in the loudspeaker is accessed via the B-Link module which must be connected to the loudspeaker's SpeakerLink input. Once the loudspeaker is set as "Controller", the setting is stored in the loudspeaker's non-volatile memory, so the B-Link can be disconnected and put to one side if no longer required.
The G65 must be set to "Not Controller" using either the front-panel Configuration Wizard or the MConfig program. Within the Wizard, the setting is "IR", which by default is set to "Auto". It can be found on the home screen of the Wizard and also in section "4. Other settings", Within MConfig, the setting for Controller can be found under the "Setup" tab within "Properties" for the G65.
Please note; Having only one Controller in a Meridian system is essential to avoid conflicts in command and control. Having more than one Controller, even inadvertently, can cause the system to behave erratically and inconsistently.

INTRODUCTION
UNPACKING
AND ASSEMBLY
POSITIONING THE
LOUDSPEAKERS
CONNECTIONS
AND CONTROLS
MASTER
AND SLAVE
BINK
IR CONTROL
(82) ANALOGUE
INPUT MODULE
SPECIFICATION
MAINTENANCE
AND CLEANING
TROUBLESHOOTING
APPLICATIONS
40
Additional local sources connected directly to the loudspeakers
Within a surround-sound system, there are situations where it is possible to take advantage of additional functionality offered by the DSP8000 XE by connecting one or more sources directly to the main left and right loudspeakers, thus bypassing the surround controller. This table illustrates these scenarios:
| Additional functionality Reason for doing this Advantage offered | ||
| Playing audio via the loudspeaker's USB input from a source such as a PC. | The G65 does not feature a USB input. | The DSP8000 XE accepts audio at sampling rates of up to 384KHz @ 24-bit on its USB input. |
| Playing authenticated MQA streams from an MQA decoder product via the loudspeaker's Digital In co-ax input. | The G65 does not support bit-perfect playback, so it cannot pass authenticated MQA streams onto the DSP8000 XE. | MQA audio streams can be fully rendered and played back by the main left and right loudspeakers. |
| Digital audio inputs located on the loudspeakers. | If a digital source is located in the room, close to the main loudspeakers, but far from the G65. | A convenient place to connect the source without having to run a cable to the G65. |
Disadvantages of connecting local sources directly to the loudspeakers:
- It removes the option to listen to these sources using surround-sound presets such as Trifield.
- There is no way to apply Meridian Room Correction to the audio from these sources.

INTRODUCTION
UNPACKING
AND ASSEMBLY
POSITIONING THE
LOUDSPEAKERS
CONNECTIONS
AND CONTROLS
MASTER
AND SLAVE
BINK
IR CONTROL
(A2)ANALOGUE
INPUT MODULE
SPECIFICATION
MAINTENANCE
AND CLEANING
TROUBLESHOOTING
SYSTEM
ICATIONS
Connecting and configuring for the use of local sources:
The front left or the front right loudspeaker must be selected as the connection point for the local source(s). This loudspeaker must have its SpeakerLink input connected to the "Master" SpeakerLink output on the rear of the G65. The local sources can then be connected to other audio inputs only on this loudspeaker. This loudspeaker is designated as the Master. Further explanation of the Master loudspeaker is given in the section Master and Slave on page 13 of this guide.
The front loudspeaker pair must be connected in a "daisy-chain" arrangement, i.e. the Master loudspeaker must have its SpeakerLink output connected to the SpeakerLink input of the Slave loudspeaker.
The Source Configuration of the G65 and Master loudspeaker must be carried out in conjunction with each other so that when the local sources are listened to through the main left and right loudspeakers, the other loudspeakers fall silent. To do this, any source assigned to one of the local inputs on the Master loudspeaker must be assigned on the G65 to an unused input, this could be an analogue input with nothing plugged into it. For example, if CD is assigned to the USB Input on the Master loudspeaker, the G65 must be configured with CD assigned to an unused socket.
Configuring the loudspeakers for use with local sources in this way requires the Master loudspeaker to be set-up using the B-Link module. Refer to the B-Link section on page 14.
If a Meridian product, such as 218, 210 or 818v3, is used as a local source, the product should be connected via SpeakerLink to either of the SpeakerLink inputs on the C65 in order for Meridian comms to be passed between the two products. No additional configuration is required for this connection.
USING DSP8000 XE WITH G65
When the loudspeakers are connected to a Meridian Controller product, the products communicate with each other via the SpeakerLink connections so they work in unison as a fully integrated system. Commands are automatically executed transparently across the products making up the system. This gives the user the ability to access and adjust all relevant settings via their preferred control method, whether that is the front-panel of the Controller, the IR remote control, or a third-party control system. In addition, changes made on one interface are passed to the others so. for example, turning the volume up using a third-party control system will increase the volume number shown on the front-panel of the Controller.

INTRODUCTION
UNPACKING AND ASSEMBLY
CONNECTIONS AND CONTROLS
MASTER AND SLAVE
BINK
IR CONTROL
(12) ANALOGUE INPUT MODULE
SPECIFICATION
MAINTENANCE AND CLEANING
TROUBLESHOOTING

Settings available while listening to the system
The G65 provides access to the following menu settings where they are applicable for the currently selected DSP preset. Individual DSP presets provide additional settings, to allow you to adjust specific features provided by that preset. For full details refer to the G65 User-Guide.
Note: Settings not relevant to the system configuration in use are omitted from the sequence of menus.
| Setting Range Default | Notes | ||
| Treble* -10dB to +10dB +0.0dB Tilts the frequency response across the higher frequencies | |||
| Bass* -5dB to +5dB +0.0dB Lifts or cuts the low frequency response of the system | |||
| Phase* + or - + The absolute phase of the audio played by the system | |||
| Axis | 2 to 13 | T | The vertical component of Meridian's Image Focus Plus technology |
| Balance | Left 10 to Right 10 | <0> | The horizontal component of Meridian's Image Focus Plus technology |
| HS Out** | Y or No | Y | Selects whether High-Speed audio sampling rates are fed to the loudspeakers |
| Centre | -3.0dB to +3.0dB | +0.0dB | The relative level of the centre-channel loudspeaker |
| Depth | -2.5ms to +5ms | 0.0ms | The relative delay applied to the centre-channel loudspeaker |
| C. Elev | Off, Min, Med, Max | Off | Psychoacoustically raises the sound image to the centre of a screen |
| Rear | 30dB to +10dB | +0dB | The relative level of the rear-channel loudspeakers |
| Sides | 30dB to +10dB | +0dB | The relative level of the side-channel loudspeakers |
| R. Delay | oms to 30ms | Varies | The relative delay applied to the rear-channel loudspeakers |
| S. Delay | oms to 30ms | Varies | The relative delay applied to the side-channel loudspeakers |
| EBA | On, Off | On | Enables or disables Meridian's FFA technology |
| LipSync | oms to 85ms | oms | Audio delay to align video with sound |
| RC | As defined | Bypassed | The selected Room Correction profile, or Bypassed for no room correction |
* These parameters apply to all DSP presets.

| INTRODUCTION | UNPACKING AND ASSEMBLY | POSITIONING THE LOUDSPEAKERS | CONNECTIONS AND CONTROLS | MASTER AND SLAVE | LINK | IR CONTROL | INLANAL ENGINEER INPLIT MODULE | SPECIFICATION | MAINTENANCE AND CLEANING | TROUBLESHOOTING |

DSP8000 XE WITH NO CONTROLLER PRODUCT
Overview
In systems which do not include a Meridian Controller product, one of the loudspeakers can act as a hub for up to four digital audio sources. The connections available for the sources are described in the Rear panel section on page 10. This loudspeaker is designated as the "Master" and it connects to the other loudspeaker, designated as the "Slave", using a SpeakerLink cable of the appropriate length. Further explanation of the Master and Slave roles is given in the section Master and Slave on page 14.
The Channel Selector switch on the back-panel of each loudspeaker must be set as appropriate to play either the left or right audio channel.
For advice on where to locate the loudspeakers within the room, refer to Positioning the loudspeakers to obtain the best sound on page 7.
Example system
2 x DSP8000 XE, Flat-screen TV, Blu-Ray player, Media PC, Meridian B-Link.
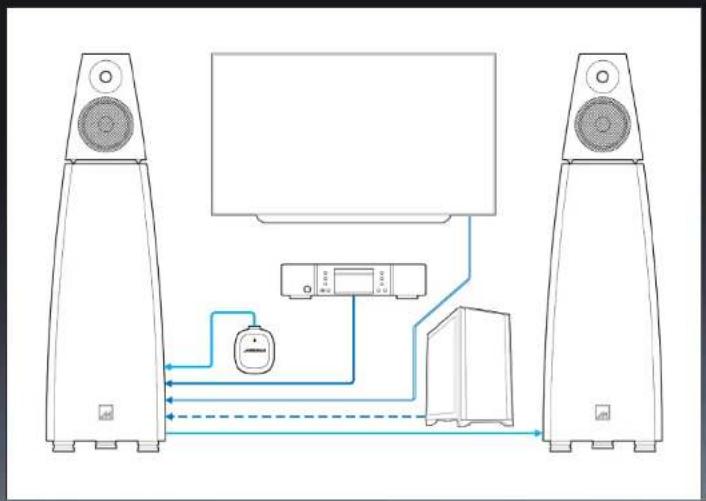
flowchart
graph TD
    A["Speaker 1"] --> B["Monitor"]
    C["Speaker 2"] --> B
    B --> D["Computer"]
    D --> E["Switch"]
    E --> F["Device"]
    F --> G["Switch"]
    G --> H["Switch"]
    H --> I["Switch"]
    I --> J["Switch"]
    J --> K["Switch"]
    K --> L["Switch"]
    L --> M["Switch"]
    M --> N["Switch"]
    N --> O["Switch"]
    O --> P["Switch"]
    P --> Q["Switch"]
    Q --> R["Switch"]
    R --> S["Switch"]
    S --> T["Switch"]
    T --> U["Switch"]
    U --> V["Switch"]
    V --> W["Switch"]
    W --> X["Switch"]
    X --> Y["Switch"]
    Y --> Z["Switch"]
Key

INTRODUCTION
UNPACKING
AND ASSEMBLY
POSITIONING THE
LOUDSPEAKERS
CONNECTIONS
AND CONTROLS
MASTER
AND SLAVE
BINK
IR CONTROL
(2)ANALOGUE
INPUT MODULE
SPECIFICATION
(1)基因通过控制 通过控制
MAINTENANCE
AND CLEANING
TROUBLESHOOTING
SYSTEM
APPLICATIONS
44
Configuring a system with no Controller product
By default, the SpeakerLink input is the only active audio input on the DSP8000 XE. If source products are to be connected to the Digital Input, the Optical Input or the USB Audio input of the Master loudspeaker, the relevant input(s) need to be activated. Note: sources cannot be connected directly to the Slave loudspeaker, so its other inputs cannot be used. Further explanation of the Master and Slave roles is given in the section Master and Slave on page 13 of this guide.
MERIDIAN CONTROL APP
The B-Link module supplied with the loudspeakers is used in conjunction with the Meridian Control app to configure the sources on the Master loudspeaker. To do this, the B-Link must be connected to the SpeakerLink input of the Master loudspeaker using a SpeakerLink cable.
The Meridian Control app is available for download for iOS devices from the Apple App Store and for Android devices from the Google Play Store. In either case search for Meridian to find the app or scan the QR code shown below/here.

When the app is run for the first time it will automatically detect the B-Link and walk you through the installation process. This shows which connections should be made and allows you to specify which sources on the loudspeakers will select each of the connected audio devices.
Once configuration is complete, the B-Link can be left connected to the Master loudspeaker in order to allow audio to be streamed from a paired Bluetooth device such as a phone, table or computer.
IR remote control
The DSP8000 XE has an IR receiver eye integrated into the illuminated badge on the front of the loudspeaker. By default the IR receiver is disabled. The loudspeakers also feature a connection for an external IR receiver.
Although the loudspeakers do not have a digital display to provide visual feedback of volume level or other parameters, it may be desirable to provide IR control of the system. Settings are shared across the various control interfaces available from the system, so a change to the volume level made from an IR remote control will be displayed within the Meridian Control app, or it could be passed to a third-party control system.
Within a Meridian system, the product which receives and acts upon IR commands is designated as the "Controller". Only the Master loudspeaker can be selected to be the Controller and hence, the Slave loudspeaker cannot use its IR receiver.
The IR receiver on the Master loudspeaker can be activated by using the Meridian Control app in conjunction with the B-Link module, which must be connected to the loudspeaker's SpeakerLink input. Within the app, setting the loudspeaker to be Controller or Not Controller within the "Comms" section of its configuration menus activates the IR receiver. Once the setting is made, it is stored in non-volatile memory, so the app can be closed and the B-Link can be disconnected and put to one side if no longer required.
INTRODUCTION
UNPACKING
AND ASSEMBLY
POSITIONING THE
LOUDSPEAKERS
CONNECTIONS
AND CONTROLS
MASTER
AND SLAVE
BINK
IR CONTROL
(A2)ANALOGUE
INPUT MODULE
SPECIFICATION
表决情况:本次会议的议案
MAINTENANCE
AND CLEANING
TROUBLESHOOTING
SYSTEM
APPLICATIONS
Using a system with no Controller product
The system can be controlled using the Meridian Control app, an IR remote control, or a third-party control system. Any changes to the settings made on one interface are passed to the others so, for example, turning the volume up using an IR remote control will increase the volume number shown on the Control app.
Using the Meridian Control app
The Control app communicates with the loudspeakers via the B-Link which must be connected to the SpeakerLink input of the Master loudspeaker.
Download the Meridian Control app from the Apple App Store or Google Play Store. If the B-Link is connected to the Master loudspeaker, and both are powered, the app will automatically detect the presence of the B-Link and will provide access to control source selection, volume, and more.
Settings available while listening to the system
The Meridian Control app gives access to these settings:
| Setting Range Default | Notes | ||
| Treble -10dB to +10dB +0.0dB Tiltis the frequency response across the higher frequencies | |||
| Bass -5dB to +5dB +0.0dB Lifts or cuts the low frequency response of the system | |||
| Image Focus Left 10 to Right 10 <0> Directs the sound image for off centre listening positions | |||
| Phase + or - - The absolute phase of the audio played by the system | |||
| Image Focus Plus | -2 to +3 | -1 | Adjust the height of the sound image to suit the listening position |
| FFA | On/Off | On | Enables Meridian's FFA (Full Frequency Alignment) technology |
| Extension Limit | On/Off | Off | Limits the extreme low-frequency extension of the loudspeakers |
| Free-Q | Free/Wall/Corner/Shelf | Free | Options for Free-Q compensation for location of loudspeakers |
| Resonance Control | Off/Min/Med/Max | Off | Room-dependent compensation for certain Meridian loudspeakers. |
| Sub Mode | Music/Movie | Music | Changes response of any connected Meridian subwoofers |
| Sub Filter | Off/Sub 1/Sub 2/Wide | Off | Selects the low-pass filter for any connected Meridian subwoofers |
| Sub Gain | +/- 15dB | +0.0dB | Controls the relative level of any connected Meridian subwoofers |
| Perfect Balance | On/Off | On | Perfect Balance maintains spectral balance at all volume levels. |
| Display Brightness | 1 to 16 | 8 | Adjusts brightness of the DSP8000 XE front-panel badges |
Using IR remote control
The loudspeakers can be controlled using a Meridian system remote, such as the MSR2 remote control. Instructions for activating the IR receiver are given in the above section IR remote control. The loudspeakers do not feature a display (other than their illuminated badge) to show the status of settings such as volume level and which source is selected. This lack of visual feedback means that care should be taken not to inadvertently set the volume level too high!
| INTRODUCTION | UNPACKING AND ASSEMBLY | POSITIONING THE LOUDSPEAKERS | CONNECTIONS AND CONTROLS | MASTER AND SLAVE | LINK | IR CONTROL | IA2) ANALOGUE INPLIT MODULE | SPECIFICATION | MAINTENANCE AND CLEANING | TROUBLESHOOTING |
SYSTEM
APPLICATIONS
DSP8000 XE WITH 271 DIGITAL THEATRE CONTROLLER
Overview
The 271 allows Meridian loudspeakers to be used with third-party surround processors. It accepts multichannel audio signals of up to 16 channels in either digital or analogue form, enabling it to be used with any non-Meridian processor on the market. The inputs are fed through the 271 to a full set of 16 SpeakerLink outputs for use with Meridian loudspeakers, and 16 analogue (RCA phone) outputs for use with conventional analogue loudspeakers. In addition, two sets of four additional outputs (four SpeakerLink and four analogue) can be independently configured to duplicate any of the 16 input channels.
The surround processor acts as a hub for the source products in the system, although the 27f features one SpeakerLink input which can be used with a Meridian source product. The Meridian B-Link (supplied with DSP8000 XE) can be connected to this input to provide a means of streaming audio from a Bluetooth device such as a smartphone, tablet or PC.
The Channel Selector switch on the back-panel of each loudspeaker must be set appropriately to play either the left or right audio channel.
For advice on where to locate the loudspeakers within the room, refer to Positioning the loudspeakers to obtain the best sound on page 7.
Example system
271 Digital Theatre Controller, non-Meridian Surround-Sound Processor, 3 x DSP8000 XE as left, centre, right front channels, 4 x DSP750 as surround channels, 4 x DSP320 as height channels, 2 x DSW600 Subwoofer, Meridian B-Link.

flowchart
graph TD
    A["Speaker 1"] --> B["Switch"]
    C["Speaker 2"] --> D["Switch"]
    E["Speaker 3"] --> F["Switch"]
    G["Speaker 4"] --> H["Switch"]
    I["Speaker 5"] --> J["Switch"]
    K["Speaker 6"] --> L["Switch"]
    M["Speaker 7"] --> N["Switch"]
    O["Speaker 8"] --> P["Switch"]
    Q["Speaker 9"] --> R["Switch"]
    S["Speaker 10"] --> T["Switch"]
    U["Speaker 11"] --> V["Switch"]
    W["Speaker 12"] --> X["Switch"]
    Y["Speaker 13"] --> Z["Switch"]
    AA["Speaker 14"] --> AB["Switch"]
    AC["Speaker 15"] --> AD["Switch"]
    AE["Speaker 16"] --> AF["Switch"]
    AG["Speaker 17"] --> AH["Switch"]
    AI["Speaker 18"] --> AJ["Switch"]
    AK["Speaker 19"] --> AL["Switch"]
    AM["Speaker 20"] --> AN["Switch"]
Key

SpeakerLink

Analogue or digital
multichannel audio
INTRODUCTION
UNPACKING
AND ASSEMBLY
POSITIONING THE
LOUDSPEAKERS
CONNECTIONS
AND CONTROLS
MASTER
AND SLAVE
BINK
IR CONTROL
(182) ANALOGUE
INPUT MODULE
SPECIFICATION
Configuring a system based on 271
The 271 is configured using the Meridian Control app or from the 271's configuration web-page.
Meridian Control app
The Control app communicates with the 271 via the Network connection on the product. Hence, the device running the app must be connected to the same network as the 271. It is recommended that an unmanaged network switch is inserted between the 271 and the network router.
Download the Meridian Control app from the Apple App Store or Google Play Store. Once open, the app will automatically detect any network-connected Meridian products and display them in a list showing their current status. Without selecting the 271 (or any other product), tap on the menu icon in the top left-hand corner and the options available within the app will be shown. This is where the app can be switched between Control and Configuration of products. Tap on "Configuration" and the app will display a list of the products which are available to be configured. Tap on the 271 to reveal its configuration settings. Tap on "SOURCES" to access the Audio Input options. Changes made within the app need to be transferred to the product by tapping on "Store Settings" at the bottom of the page. Exit the 271 Configuration page by tapping on the "Back" button. Tap on the Menu icon to return to the main options within the app.
271 Configuration Web Page
The 271 features a built-in web page which allows the product to be configured. To access the page, browse to the IP address of the 271.
IR remote control
The DSP8000 XE has an IR receiver eye integrated into the illuminated badge on the front of the loudspeaker. By default the IR receiver is disabled. The 271 and the loudspeakers also feature a connection for an external IR receiver.
Although neither the 271 nor the loudspeakers themselves have a digital display to provide visual feedback of volume level or other parameters, it may be desirable to provide IR control of the system. Settings are shared across the various control interfaces available from the system, so a change to the volume level made from an IR remote control will be displayed within the Meridian Control app, or it could be passed to a third-party control system.
Within a Meridian system, the product which receives and acts upon IR commands is designated as the "Controller". In this case, either the 271 or the Master loudspeaker (but not both), can be selected to be the Controller. Naturally, if the 271 is to be the Controller, it must have an external IR receiver eye connected to its "IR in" socket.
Please note: Having only one Controller in a Meridian system is essential to avoid conflicts in command and control. Having more than one Controller, even inadvertently, can cause the system to behave erratically and inconsistently.
To ensure there is only one Controller, two settings are required in all cases. Whichever product is to use its IR eye should be set to "Controller", while the other product should be set to "Not Controller". Both settings are available from the Meridian Control app. The app can be used directly with the 271 to set it to be Controller or Not Controller within the "Comms" section of its configuration menus. To use the app to set the Master loudspeaker to Controller or Not Controller, the B-Link module must be connected to the loudspeaker's SpeakerLink input. The app can be used to set the loudspeaker to be Controller or Not Controller within the "Comms" section of its configuration menus. Once the settings are made, they are stored in non-volatile memory, so the app can be closed and, in the case of the Master loudspeaker, the B-Link can be disconnected and put to one side if no longer required.
INTRODUCTION
UNPACKING
AND ASSEMBLY
POSITIONING THE
LOUDSPEAKERS
CONNECTIONS
AND CONTROLS
MASTER
AND SLAVE
B_INX
IR CONTROL
(A2) ANALOGUE
INPUT MODULE
SPECIFICATION
Using a system with no Controller product
The system can be controlled using the Meridian Control app or a third-party control system. Control via IR remote control is also available, but is limited by the lack of a digital display on the 271 and the loudspeakers – see details above in the section IR remote control. Any changes to the settings made on one interface are passed to the others so, for example, turning the volume up using an IR remote control will increase the volume number shown on the Control app.
Using the Meridian Control app
The Control app communicates with the loudspeakers via the B-Link which must be connected to the SpeakerLink input of the Master loudspeaker.
Download the Meridian Control app from the Apple App Store or Google Play Store. If the B-Link is connected to the Master loudspeaker, and both are powered, the app will automatically detect the presence of the B-Link and will provide access to control source selection, volume, and more.
Settings available while listening to the system
The Meridian Control app gives access to these settings:
| Setting Range Default | Notes | ||
| Treble -10dB to +10dB | +0.0dB Tills the frequency response across the higher frequencies | ||
| Bass -5dB to +5dB | +0.0dB Lifts or cuts the low frequency response of the system | ||
| Image Focus | Left to Right to | <0> | The horizontal component of Meridian's Image Focus Plus technology |
| Phase + or - + The absolute phase of the audio played by the system | |||
| Image Focus Plus | -2 to +3 | -1 | The vertical component of Meridian's Image Focus Plus technology |
| FFA | On/OFF | On | Enables Meridian's FFA (Full Frequency Alignment) technology |
| Free-Q | Free/Wall/Corner/Shelf | Free | Options for Free-Q compensation for location of loudspeakers |
| Resonance Control | Off/Min/Med/Max | Off | Room-dependent compensation for certain Meridian loudspeakers. |
| Image Elevation | Off/Min/Med/Max | Off | Psychoacoustically raises the sound image to the centre of a screen. |
| Sub Mode | Music/Movie | Music | Changes response of any connected Meridian subwoofers |
| Sub Filter | Off/Sub 1/Sub 2/Wide | Off | Selects the low-pass filter for any connected Meridian subwoofers |
| Sub Gain | +/- 15dB | +0.0dB | Controls the relative level of any connected Meridian subwoofers |
| Perfect Balance | On/OFF | On | Perfect Balance maintains spectral balance at all volume levels. |
| LipSync | oms to 85ms | oms | Audio delay to align video with sound |
Using IR remote control
The loudspeakers can be controlled using a Meridian system remote, such as the MSR2 remote control. Instructions for activating the IR receiver are given in the above section IR remote control. The loudspeakers do not feature a display (other than their illuminated badge) to show the status of settings such as volume level and which source is selected. This lack of visual feedback means that care should be taken not to inadvertently set the volume level too high!
| INTRODUCTION | UNPACKING AND ASSEMBLY | POSITIONING THE LOUDSPEAKERS | CONNECTIONS AND CONTROLS | MASTER AND SLAVE | LINK | IR CONTROL | INJANALOGUE INPUT MODULE | SPECIFICATION | MAINTENANCE AND CLEANING | TROUBLESHOOTING |
SYSTEM
APPLICATIONS
DSP8000 XE WITH IA21 ANALOGUE INPUT MODULES
Overview
With the IA21s fitted, DSP8000 XE loudspeakers have the functionality of analogue active loudspeakers. This means that the loudspeakers can be fed solely with line-level analogue audio signals. As the volume control within the loudspeaker is completely disabled, the equipment feeding the loudspeakers must feature a volume control. Refer to the section IA21 Analogue Input Module on page 7 for further information regarding the module.
For advice on where to locate the loudspeakers within the room, refer to Positioning the loudspeakers to obtain the best sound on page xx.
Example system
2 x DSP8000 XE (each fitted with IA21 module), non-Meridian two-channel pre-amplifier.

flowchart
graph TD
    A["Speaker 1"] --> B["Central Display"]
    C["Speaker 2"] --> B
    B --> D["Output Line"]
    style B stroke:#ff0000,stroke-width:2px
    style D stroke:#ff0000,stroke-width:2px
Key
SpeakerLink
Balanced analogue audio
Configuring the DSP8000 XE when fitted with IA21
Fitting the IA21 removes all configuration options from within the loudspeaker itself. The only configuration available is the choice of setting for the input sensitivity switch, the option of using an external trigger and the option to override the automatic audio sensing circuitry by adding a plug-in jumper to the board inside the IA21. Refer to the section IA21 Analogue Input Module on page 7 for further details.
Using the DSP8000 XE when fitted with IA21
No controls are available to the user when the loudspeakers are used with IA21. The volume control, source selection and any other settings are supported by the equipment feeding the loudspeakers.
| INTRODUCTION | UNPACKING AND ASSEMBLY | POSITIONING THE LOUD SPEAKERS | CONNECTIONS AND CONTROLS | MASTER AND SLAVE | R-LINK | IR CONTROL | (IV)ANALOGUE INPUT MODULE | SPECIFICATION | MAINTENANCE AND CLEANING | TROUBLESHOOTING | APPLICATIONS |
SYSTEM
MERIDIAN AUDIO LTD.
E: info@meridian.co.uk
T: +44 (0)1480 445678
meridian-audio.com
© 2024. Meridian Aucio Ltd.

natural_image
Exterior view of a modern black speaker tower with two speakers and a circular head (no visible text or symbols)
natural_image
Black electronic speaker tower with three circular speakers, no visible text or symbols

- CONTENTS
- INTRODUCTION
- System applications
- Sales and service
- Product registration
- UNPACKING AND ASSEMBLY
- Care when unpacking
- Unpacking the main cabinets
- Fitting the head-units to the main cabinets
- Accessories supplied with the loudspeakers
- POSITIONING THE LOUDSPEAKERS IN THE ROOM
- TWO-CHANNEL SYSTEMS
- A starting point
- Further apart?
- Closer together?
- Toe-in: Angling for the best image
- Off-centre listening? Image Focus
- Is it all going over your head? Image Focus Plus
- CONNECTIONS, CONTROLS AND INDICATOR LIGHT
- FRONT PANEL INDICATOR
- IR RECEIVER
- REAR PANEL
- SpeakerLink connections
- Other connections
- Digital In
- Opt In
- USB Audio
- IR Input
- Maintenance
- Channel selector switch
- Using the loudspeaker on the left of the system
- Using the loudspeaker on the right of the system
- Using the loudspeaker as a centre channel
- Using the loudspeaker to play a mix of left and right audio
- Power switch
- Factory Reset button
- Mains fuse
- MASTER AND SLAVE
- SITUATIONS WHERE IT IS NECESSARY TO IDENTIFY WHICH LOUDSPEAKER IS THE MASTER
- When sources are to be connected to the Digital Input as well as the SpeakerLink input.
- HOW A DSP8000 XE IS ASSIGNED AS THE MASTER
- In systems featuring a Meridian two-channel controller product, e.g. 818v3 or 218
- In systems featuring a Meridian surround-sound controller product, e.g. 861v8 or G65
- In systems with no Meridian controller product
- B-LINK
- OVERVIEW
- THE MERIDIAN CONTROL APP
- IR CONTROL
- Auto IR Set-up
- Notes
- IA21 ANALOGUE INPUT MODULE
- FITTING THE IA21 TO THE LOUDSPEAKERS
- INPUT SENSITIVITY SWITCH
- STATUS LED
- TRIGGER IN
- SIGNAL SENSE
- SPECIFICATION
- MQA
- MAINTENANCE AND CLEANING
- FITTING AND REMOVING THE GRILLES
- DISMANTLING THE LOUDSPEAKERS
- CLEANING
- TROUBLESHOOTING
- ILLUMINATED BADGE ON FRONT PANEL NOT LIT
- ONE OF THE LOUDSPEAKERS COMES ON, THE OTHER REMAINS IN STANDBY
- DRIVE UNITS MOVE WHEN THE SPEAKER IS SWITCHED ON OR OFF
- THERE IS RADIO INTERFERENCE
- SOUND IS ODD OR MONO
- THE LOUDSPEAKERS DO NOT RESPOND TO IR COMMANDS FROM A MERIDIAN SYSTEM REMOTE CONTROL
- UNIT GOES SILENT WHEN PLAYED HARD
- SYSTEM APPLICATIONS
- DSP8000 XE WITH 218 ZONE CONTROLLER
- Example system
- Configuring a system based on 218
- Configuration using the Meridian Control app
- Configuration using the 218 Web Page
- Additional local sources connected directly to the loudspeakers
- Configuration for IR remote control
- Using DSP8000 XE with 218
- Using the Meridian Control app
- Settings available while listening to the system
- Using IR remote control
- DSP8000 XE WITH 818V3 REFERENCE AUDIO CORE
- Configuring a system based on 818v3
- The Meridian Control app and the ID41 Configuration Web Page
- MConfig
- Using DSP8000 XE with 818v3
- To enter front-panel Set-up mode:
- Setup in... 3
- To exit front-panel Set-up mode
- DSP8000 XE WITH 861V8 SURROUND CONTROLLER
- Configuring a system based on a Meridian 861v8
- Meridian Control App and the ID40/41 Configuration Web Page
- IR remote control
- Disadvantages of connecting local sources directly to the loudspeakers:
- Connecting and configuring for the use of local sources:
- Using DSP8000 XE with 861v8
- DSP8000 XE WITH G65 SURROUND CONTROLLER
- Configuring a system based on C65
- USING DSP8000 XE WITH G65
- DSP8000 XE WITH NO CONTROLLER PRODUCT
- Configuring a system with no Controller product
- MERIDIAN CONTROL APP
- Using a system with no Controller product
- DSP8000 XE WITH 271 DIGITAL THEATRE CONTROLLER
- Configuring a system based on 271
- Configuration Web Page
- DSP8000 XE WITH IA21 ANALOGUE INPUT MODULES
- Configuring the DSP8000 XE when fitted with IA21
- Using the DSP8000 XE when fitted with IA21
Brand : MERIDIAN
Model : DSP8000 XE
Category : Loudspeaker