Proto CX - Toy Revell - Free user manual and instructions
Find the device manual for free Proto CX Revell in PDF.

| Product Type | Plastic Model Kit |
| Brand | Revell |
| Model | Proto CX |
| Scale | 1:25 |
| Skill Level | Intermediate |
| Number of Parts | 120 |
| Recommended Age | 12+ |
| Dimensions (Box) | 35 x 20 x 5 cm |
| Weight (Box) | 0.4 kg |
| Power Source | None (display model) |
| Assembly Required | Yes |
| Glue Required | Yes (sold separately) |
| Paint Required | Yes (sold separately) |
| Tools Required | Sprue cutters, hobby knife, file |
| Estimated Assembly Time | 4-6 hours |
| Material | Polystyrene plastic |
| Product Features | Detailed engine, opening hood, rotating wheels |
| Decals | Included |
| Instructions | Included (8 pages) |
| Warranty | Manufacturer's defect warranty |
Frequently Asked Questions - Proto CX Revell
User questions about Proto CX Revell
0 question about this device. Answer the ones you know or ask your own.
Ask a new question about this device
Download the instructions for your Toy in PDF format for free! Find your manual Proto CX - Revell and take your electronic device back in hand. On this page are published all the documents necessary for the use of your device. Proto CX by Revell.
USER MANUAL Proto CX Revell
text_image
PROTO™ Revell www.revell.comContents
text_image
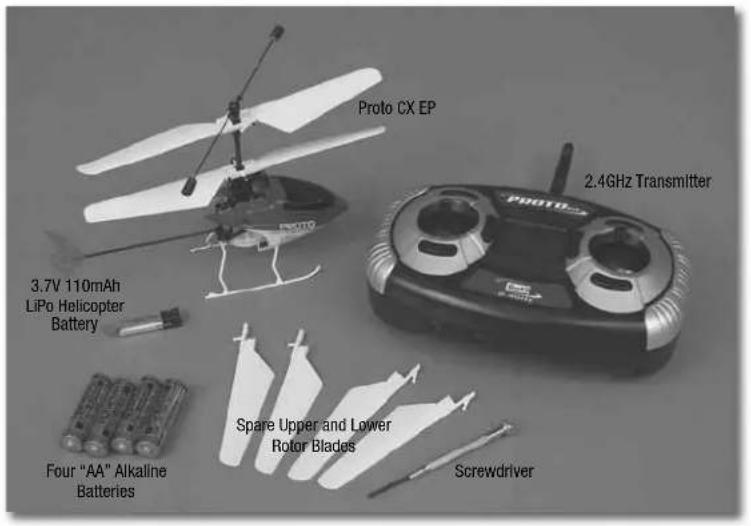
Proto CX EP 3.7V 110mAh LiPo Helicopter Battery 2.4GHz Transmitter Four "AA" Alkaline Batteries Spare Upper and Lower Rotor Blades ScrewdriverDo not touch the spinning blades or fly over another person's head. Adult supervision is required.
Safety Precautions:
Warning: Do not modify or alter this unit. Changes or modifications to this unit not expressly approved by the party responsible for compliance could void the user's authority to operate the equipment.
- Do not turn on the Proto CX helicopter unless the controller has been turned on first.
- Keep hands, hair and loose clothing away from the spinning blades.
- Turn off the controller and Proto CX when not in use.
- Remove the battery from the controller when not in use.
-
Parental guidance is recommended while flying.
• Always keep your Proto CX in sight while fl ying. -
For the best performance, use new alkaline batteries in the controller.
- Replace the batteries in the controller with new ones as soon as any function becomes diminished.
- Keep these instructions for future reference.
- Follow the operating instructions exactly.
- Your controller's built-in charger is made specifically for the rechargeable Proto CX LiPo battery. Do not use it to charge any other battery.
text_image
Revell www.revell.com PROTO Revell, Inc., a subsidiary of Hobbico®, Inc., Champaign, IL 61826Main Features
• Counter-rotating rotor blades for ultimate stability
• Full, four-channel control
• Interference-free 2.4GHz operation
- Interchangeable Mode 1 or Mode 2 configuration
• Built-in LiPo battery charger
- Computer display screen

FCC REQUIREMENT
NOTE: This equipment has been tested and found to comply with the limits for Class B digital device, pursuant to part 15 of the FCC rules. These limits are designed to provide reasonable protection against harmful interference
in a residential installation. This equipment generates, uses and can radiate radio frequency energy and, if not installed and used in accordance with the instructions, may cause harmful interference to radio or television reception, which can be determined by turning the equipment off and on. The user is encouraged to try to correct the interference by one or more of the following measures:
• Reorient or relocate the receiving antenna.
- Increase the separation between the equipment and receiver.
- Connect the equipment into an outlet on a circuit different from that to which the receiver is connected.
- Consult the dealer or an experienced radio/TV technician for help.
Care and Maintenance:
- Always remove the batteries from the controller when it is not being used for a long period of time.
- Wipe the toy gently with a clean, damp cloth.
- Keep the toy away from direct heat.
- Do not submerge the toy into water. This could damage the electronic assemblies.
Adult supervision is required.
This device complies with Part 15 of the FCC rules. Operation is subject to the following two conditions: (1) This device may not cause harmful interference, and (2) this device must accept any interference received, including interference that may cause undesired operation.
Battery Cautions:
• Non-rechargeable batteries are not to be recharged.
- If the controller uses rechargeable batteries, remove them before recharging.
- Rechargeable batteries should be recharged only by an adult.
- Do not power the controller by mixing different types of batteries, or old and new batteries.
- Use only batteries of the same or equivalent type as those recommended.
• Install batteries following the correct polarity.
- Remove exhausted batteries from the controller.
- Do not short-circuit the supply terminals.
The Proto CX is equipped with a rechargeable LiPo battery. Please pay attention to the following cautions for safe use:
- Do not dispose of the battery into fire or heat.
- Do not use or leave the battery near a heat source, such as fire or a heater.
- Do not strike the battery or throw it against a hard surface.
- Do not immerse the battery into water. Keep the battery cool and dry.
- When recharging the battery, use only the charger designed for that purpose.
• NEVER leave the battery unattended while charging. - Do not over-discharge the battery.
- Do not connect the battery to an electrical outlet.
- Do not directly solder the battery or pierce it with a nail or other sharp object.
- Do not transport or store the battery together with metal objects such as necklaces, hairpins, etc.
- Do not disassemble or alter the battery.
- Charge the battery every six months.
- Turn off your equipment power switch after use.
- Recycle used batteries after covering the battery terminals with insulation tape or inserting the battery into an individual polybag.
Note:
- Parental guidance is recommended when installing or replacing batteries.
- Static electricity may cause the toy to malfunction, requiring you to turn it off and back on before flying again.
Note Specifically for Adults:
- Regularly examine all parts of the toy for damage. If any is found,
do not use the toy again until the damage has been repaired.
• This toy is not intended for children under 8 years old. - This toy must be used only with the recommended charger.
- Do not try to charge other batteries with the controller's charger.
Battery Requirement for Proto CX:
Requires: 3.7V LiPo Rechargeable Battery Pack (included and installed)
Battery Requirements for Controller:
Requires: 4 x 1.5V "AA" size batteries (included)
CAUTION: Changes or modifications to this product not expressly approved by the party responsible for compliance may void the user's authority to operate the equipment.

WARNING:
CHOKING HAZARD — Small parts.
Not for children under 3 years of age.
"This product is in compliance with the essential requirements and other relevant provisions of Directive 1999/5/EC."


Do not touch the spinning blades or fly over another person's head. Adult supervision is required.
Proto CX and Controller Parts
text_image
Stabilizer bar Upper rotor blades Lower rotor blades Main shaft Tail fin Canopy Tail boom Landing gear Transmitter antenna Power/charge switch Status display screen PROTOex Throttle/yaw control stick (Mode 2) Trim buttons Pitch/roll control stick (Mode 2) Trim buttons Antenna mounting screws Battery compartment Charge indicator light Battery charge port Battery compartment cover Battery charge port coverFind a Suitable Flying Area
Before preparing your Proto CX EP for flight, now would be a good time to think about where you are going to fly it. Experienced pilots may have the skill to fly in confined areas with obstacles (such as a living room or garage), but beginners should find a larger area with a smooth floor free from obstacles (such as a gymnasium or a large basement with a tall ceiling). If the winds are calm, experienced pilots may also be able to fly the Proto CX EP outdoors, but even the slightest wind will make it too difficult for beginners.
Now that you have identified a suitable flying area, there are a few procedures that must be followed to prepare your Proto CX EP for flight.
Confi rm the Operational Mode of the Transmitter
The transmitter included with your Proto CX EP may be configured so the control sticks operate the helicopter in two different "Modes." Your transmitter is already configured in Mode 2, which is the way nearly everybody in the United States flies their helicopters and airplanes. In Mode 2, the left control stick operates the throttle (or rotor speed for helicopters) and yaw direction, and the right control stick operates pitch (forward and backward) and roll (right and left banking). When you graduate to larger airplanes and helicopters, you will find that they will also be operated in Mode 2.

text_image
Yaw PROTO-xxIn Mode 2, moving the throttle/yaw control stick to the left and right controls the helicopter's yaw direction.
natural_image
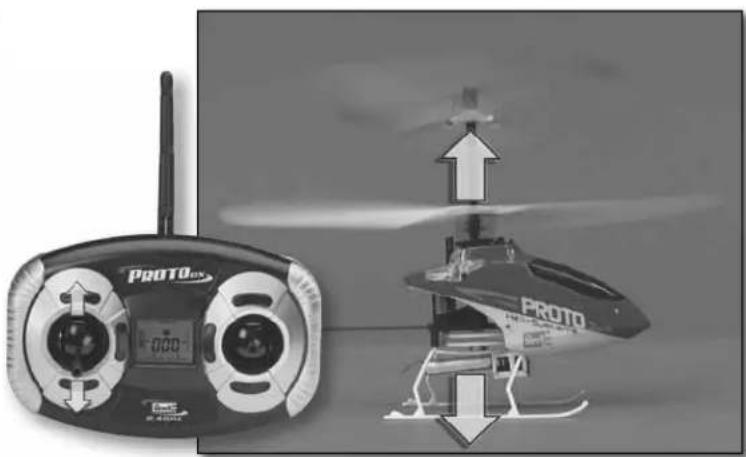
Two-panel image showing a PROTO drone controller and a helicopter with airflow arrows (no text or symbols)Moving the throttle/yaw control stick forward and back controls the helicopter's rotor blade speed which makes the helicopter climb or ascend.
natural_image
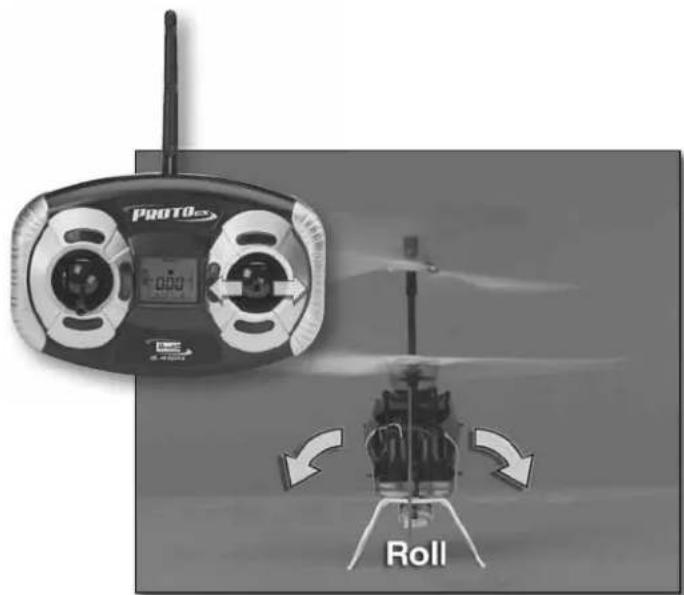
Black-and-white photo of a PROTO-er helicopter with visible propeller and rotor blades, no text or symbols present.Moving the pitch/roll control stick to the left and right controls the helicopter's roll.

text_image
PROTO Pitch PROTO CSCMoving the pitch/roll control stick forward and back controls the helicopter's pitch.
Reconfigure the Mode of the Transmitter
Unless you are flying in a country where Mode 1 is prevalent, there is no reason to change the mode. If you have decided to operate your helicopter in Mode 1, perform the following procedure to reconfi gure the transmitter.
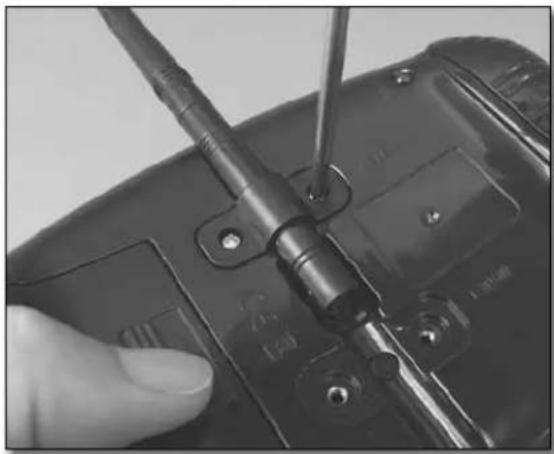
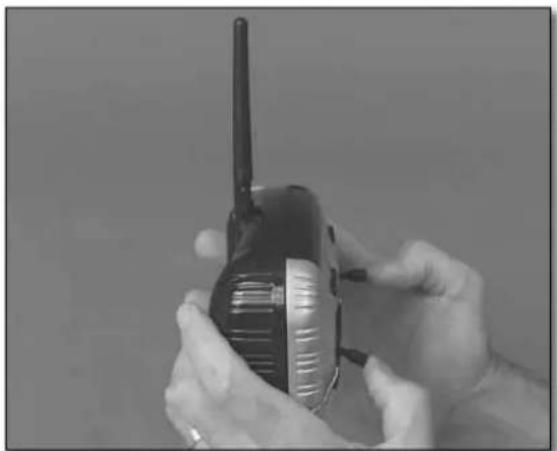
natural_image
Close-up of a hand holding a black electronic device with a screwdriver inserted, no visible text or symbolsUse a #1 Phillips screwdriver to loosen the antenna mounting screws.
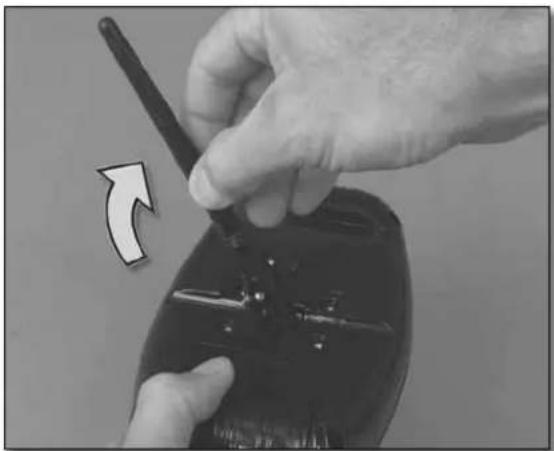
natural_image
Close-up of hands using a walkie-talkie to adjust a device (no visible text or symbols)Rotate the antenna upward until it is vertical.
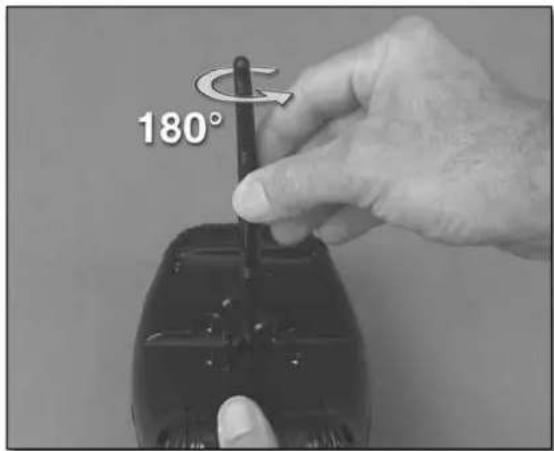
text_image
180°Rotate the antenna 180^ , allowing it to be folded down the other way.
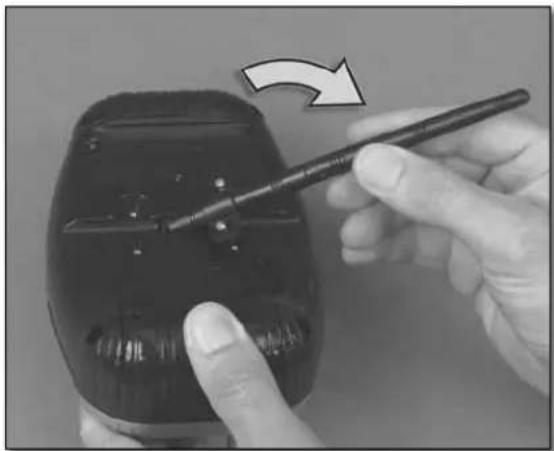
natural_image
Close-up of a hand holding a black plastic bottle with a pen, showing a curved arrow indicating rotation (no text or symbols visible)Fold the antenna back down into the other side. Tighten the mounting screws.
Now your transmitter has been reconfigured to operate in Mode 1 and you will be holding the transmitter 180° (seemingly upside down) from when it was set up in Mode 2. The control sticks will operate the helicopter accordingly. The rest of the instructions illustrate the transmitter configured in Mode 2.
Charge the LiPo Helicopter Battery
The LiPo (lithium polymer) helicopter battery usually takes approximately one hour to charge. This may seem like a long time, but due to the powerful chemistry of LiPo batteries they must be handled with great care and cannot be charged too quickly. The maximum charge rate of a LiPo battery is 1C, or one times capacity. Since the capacity of your LiPo helicopter battery is 110mA (110 mili Amperes), and the charging system in the transmitter charges the helicopter battery at approximately 110mAh (110 mili Apmeres per hour), this works out to one hour for charging time. Even the most powerful LiPo batteries in super-expensive radio controlled models cannot be charged faster than 1C without possibly causing damage. Actual charging times for your battery will depend on how much the LiPo battery was discharged from flying and the condition of the four AA batteries in the transmitter. Please note: Your LiPo battery arrives in a protective case. Always store and carry your LiPo battery in this protective case.
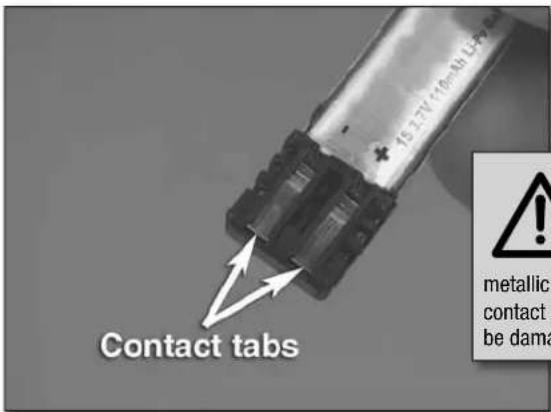
text_image
Contact tabs metallic contact t be damaCAUTION: LiPo batteries must ALWAYS be handled with extreme caution. Never place the LiPo helicopter battery in your pocket or in your tool box where the contact tabs could inadvertently be connected to each other via. coins, keys, tools or any other metallic objects. If anything metallic happens to complete the circuit across the contact tabs—even if just for a fraction of a second—the batteries will likely be damaged and could become hot enough to burn or even cause a fi re.
natural_image
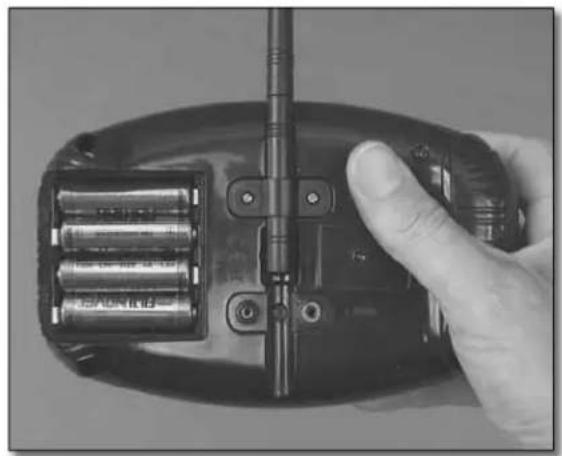
Hand holding a black remote control device with three batteries and a stand (no visible text or symbols)Remove the battery compartment cover from the back of the transmitter. Install four AA batteries according to the “+” and “−” polarity markings imprinted into the battery compartment. Replace the cover.
text_image
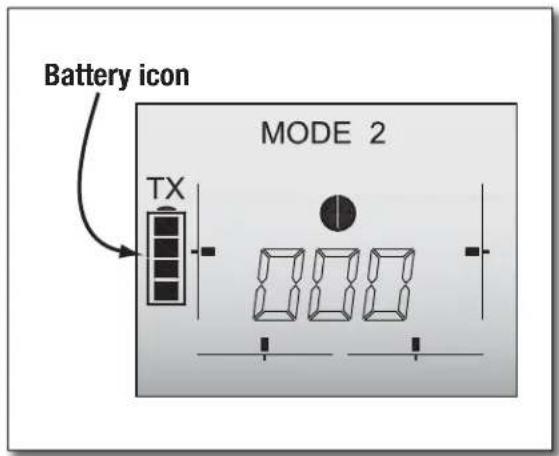
Battery icon MODE 2 TXTurn on the power/charge switch on the transmitter and observe the battery icon in the status display. When the battery icon is blinking this indicates that the batteries are too low and should be replaced. Four squares inside the battery icon indicates that the batteries are at full power.
flowchart
graph TD
    A["Flying mode"] --> B["MODE 2"]
    B --> C["TX"]
    C --> D["Car with circular head"]
    D --> E["Car with four boxes"]
    E --> F["Car with four boxes"]
    F --> G["Car with one box"]
    G --> H["Car with three boxes"]
    H --> I["Car with one box"]
    I --> J["Car with four boxes"]
    J --> K["Car with one box"]
    K --> L["Car with four boxes"]
    L --> M["Car with one box"]
    M --> N["Car with four boxes"]
    N --> O["Car with one box"]
    O --> P["Car with four boxes"]
    P --> Q["Car with one box"]
    Q --> R["Car with four boxes"]
    R --> S["Car with one box"]
    S --> T["Car with four boxes"]
    T --> U["Car with one box"]
    U --> V["Car with four boxes"]
    V --> W["Car with one box"]
    W --> X["Car with four boxes"]
    X --> Y["Car with one box"]
    Y --> Z["Car with four boxes"]
    Z --> AA["Car with one box"]
    AA --> AB["Car with four boxes"]
    AB --> AC["Car with one box"]
    AC --> AD["Car with four boxes"]
    AD --> AE["Car with one box"]
    AE --> AF["Car with four boxes"]
    AF --> AG["Car with one box"]
    AG --> AH["Car with four boxes"]
    AH --> AI["Car with one box"]
    AI --> AJ["Car with four boxes"]
    AJ --> AK["Car with one box"]
    AK --> AL["Car with four boxes"]
    AL --> AM["Car with one box"]
    AM --> AN["Car with four boxes"]
    AN --> AO["Car with one box"]
    AO --> AP["Car with four boxes"]
    AP --> AQ["Car with one box"]
    AQ --> AR["Car with four boxes"]
    AR --> AS["Car with one box"]
    AS --> AT["Car with four boxes"]
    AT --> AU["Car with one box"]
    AU --> AV["Car with four boxes"]
    AV --> AW["Car with one box"]
    AW --> AX["Car with four boxes"]
    AX --> AY["Car with one box"]
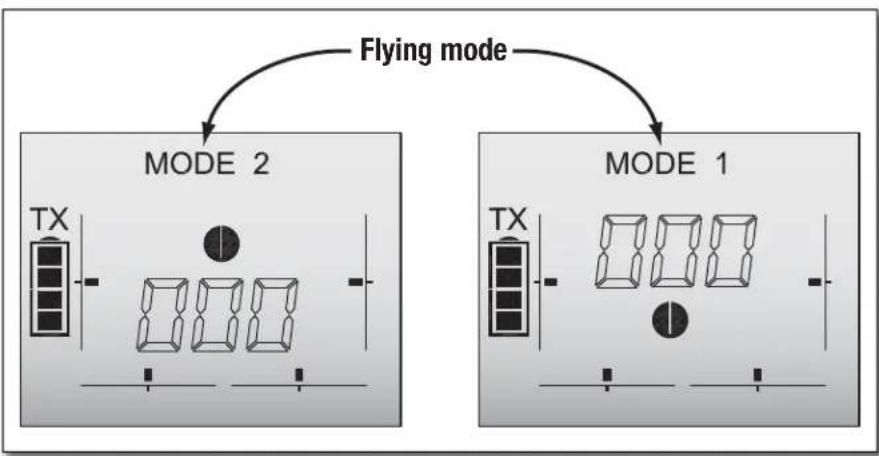
Also note the fl ying mode in the status display and make sure your transmitter is configured in the desired mode.
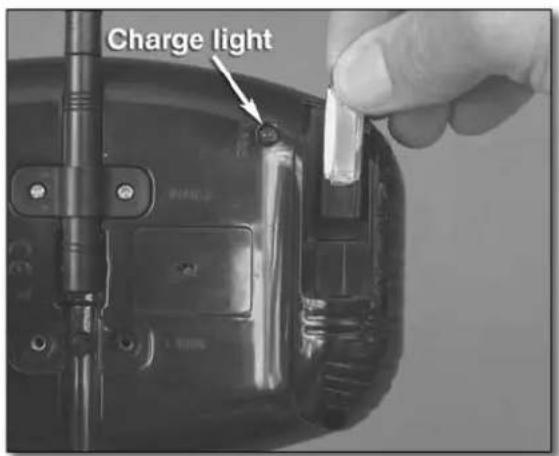
text_image
Charge lightWith the transmitter on, remove the battery charge port cover and fully install the rechargeable LiPo helicopter battery—note that the exposed contact tabs face toward the front of the transmitter. Make certain the green charge indicator light is glowing, indicating that the battery is being charged. Note: The power/charge switch must be "on" to charge the batteries.
Monitor the charge indicator light. Note when it goes out, indicating that charging is complete. Remove the battery. If not flying immediately, turn off the transmitter and set the battery aside, noting all battery precautions written in the front of this instruction manual.
Set Up the Transmitter
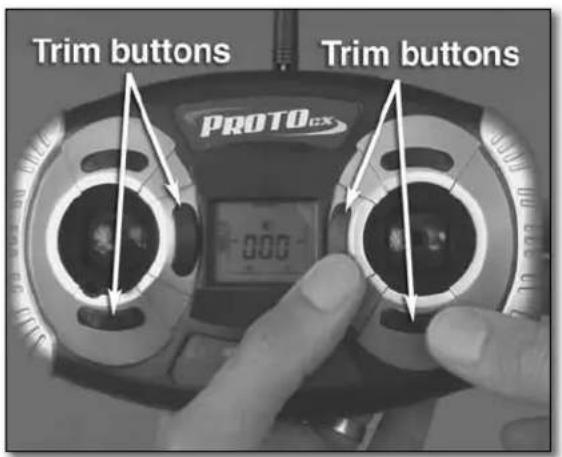
text_image
Trim buttons PROTO CX Trim buttons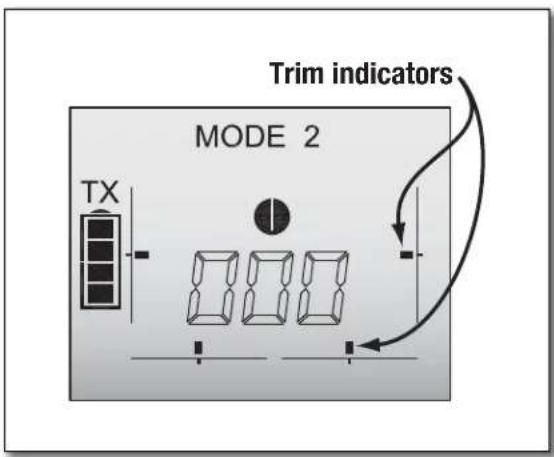
text_image
Trim indicators MODE 2 TXWith the power/charge switch on the transmitter turned on, press the trim buttons as necessary to center the trim indicators in the status display.

text_image
Press inward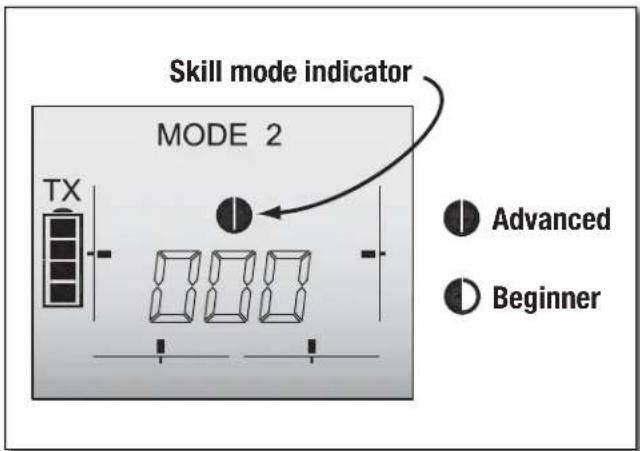
text_image
Skill mode indicator MODE 2 TX Advanced BeginnerSelect the desired skill mode by pressing inward onto the pitch/roll control stick. If this is your first time flying an R/C helicopter, select the Beginner mode. This will allow the helicopter react to your control inputs more gradually than Advanced mode, providing more time to think and react.
natural_image
Close-up of hands holding a black flip phone with a white antenna (no visible text or symbols)Be certain the transmitter antenna is in its vertical position and that the power switch on the transmitter has been turned on. Note: Unless performing the "Binding" procedure described on page 7, never allow the battery to be connected to the helicopter without the transmitter turned on. This means you should always turn on the transmitter first before inserting the battery and remove the battery before turning off the transmitter.
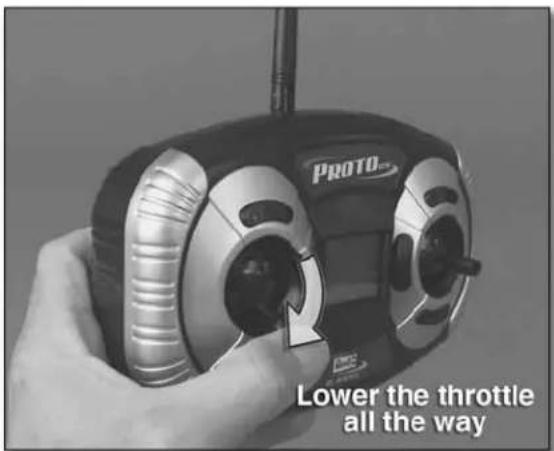
text_image
PROTO Lower the throttle all the wayAlso be certain the throttle control stick is fully down so the rotors will not rotate when you connect the battery. Note: If you inadvertently connect the battery with the transmitter off, or with the transmitter on but the throttle stick not all the way down, the rotors should not turn until you turn on the transmitter or move the throttle stick all the way down.
Install the LiPo Helicopter Battery

natural_image
Close-up of hands assembling a small white electronic device with visible internal components (no text or symbols)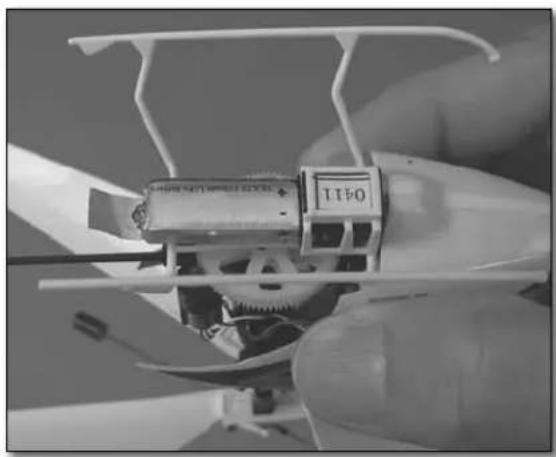
natural_image
Close-up of a hand holding a small white model airplane with visible gears and control panel (no text or symbols)With the transmitter turned on and without touching the any of the control sticks, insert the LiPo helicopter battery into the helicopter with the tabs facing toward the bottom.
Make certain the red light on the bottom of the helicopter inside the canopy is steadily glowing. This indicates that the receiver is receiving a signal from the transmitter. Proceed to the "Flying" section on page 8. If the red light is flashing, refer to the "Binding" procedure that follows.
BIND THE HELICOPTER TO THE TRANSMITTER
When the receiver is able to read signals from the transmitter, the two are said to be "bound." Until the receiver in the helicopter is programmed to read the transmitter's signals, the helicopter cannot be controlled. Follow the procedure below to bind the receiver to the transmitter:
Disconnect the LiPo battery from the helicopter.
Turn on the transmitter. Lower the throttle control stick all the way down. Adjust the throttle trim tab until the throttle trim indicator is centered and the throttle position indicator reads "000."
Turn off the transmitter.
Connect the LiPo battery to the helicopter. Turn on the transmitter while pressing inward on the throttle control stick until the blinking red light in the helicopter remains steady, indicating that the receiver is reading signals from the transmitter—this should happen within a few seconds.
If it doesn't work the first time, disconnect the LiPo battery from the helicopter and turn off the transmitter. Repeat the binding procedure again by reconnecting the LiPo batter and turning on the transmitter with the throttle stick depressed.
Now the receiver is "bound" to the transmitter and the helicopter is ready to fly.

text_image
Throttle position indicator MODE 2 TXFlight
PREFLIGHT PRECAUTIONS
- Following are a few precautions you should keep in mind while learning to fly your Proto CX.
- Stop flying when the batteries become too low. This will be noted by the blinking battery icon in the display or when response of the helicopter to the controls becomes erratic.
- When a crash is impending, or during a crash, always immediately lower the throttle control stick to stop power to the motor. This will reduce the possibility of damage to the gears or other parts of the drive train.
FLYING YOUR PROTO CX
Turn on the transmitter and confirm that all the trims are centered by viewing the display screen.
Connect the LiPo battery to the helicopter and confirm that the receiver is bound to the transmitter.
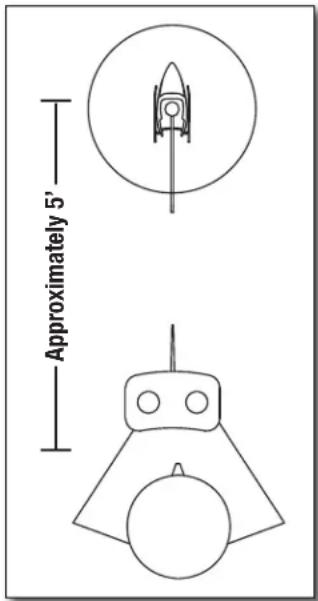
Place the helicopter on the ground approximately 5 feet [1.5m] in front of you. The front of the helicopter (canopy) should also be facing away from you so the helicopter will respond in the same direction as your control inputs. When flying, concentrate on the front, or nose of the helicopter, not the tail.
Gradually advance the throttle and operate the controls to, as best as you can, keep the helicopter facing the same direction as you—in the beginning, the yaw control will require the most effort and concentration. Continue to advance the throttle until the helicopter becomes airborne while constantly operating all of the controls. For now, keep the helicopter low to the ground (no more than one foot [.3m]) so it is less likely to become damaged in case of a crash.
Once you are able to hold the helicopter in one location ("hovering"), adjust the trims as necessary so it will stay in the same place with little or no control inputs ("hands off"). Suggestion: To make trim adjustments, it is usually easiest to land the helicopter, make the minor trim changes, then resume a hover to see the effect.
Continue to lift the helicopter off the ground and establish a hover if you can, then land, take a breath and try again. Continue practicing until you can consistently and confidently control the helicopter. This may take several lights.
text_image
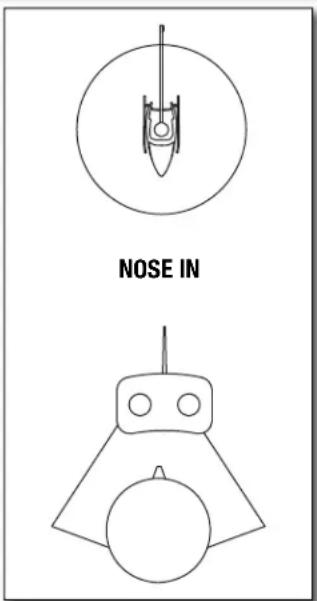
Approximately 5'Once you are able to establish a controlled hover near the ground, it's time to hover higher—approximately 3' [1m]. After you have accomplished this, it's time to start learning to control the helicopter in different orientations—beside you and facing you. Maintaining a safe distance, move the helicopter to your left side, then to your right side. Also practice rotating the helicopter 90° while maintaining a hover in front of you. Finally, and most difficult, learn to control the helicopter with the nose facing you. Gradually rotate the helicopter a few degrees at a time learning to control it each step of the way. Finally, rotate the helicopter 180° until you are "nose-to-nose" (at a safe distance). When you have mastered the nose-in hover you will have complete control of your Proto CX!

text_image
HOVER LEFT SIDE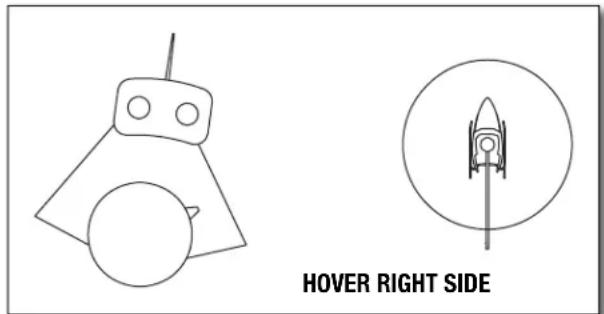
text_image
HOVER RIGHT SIDE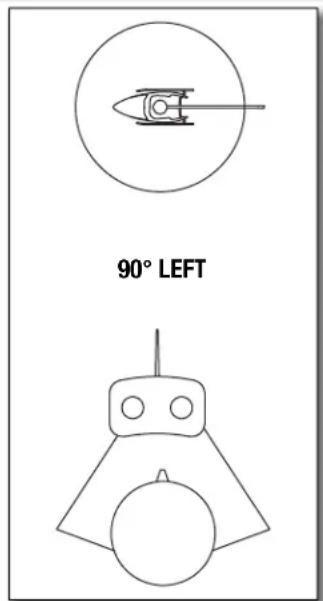
text_image
90° LEFT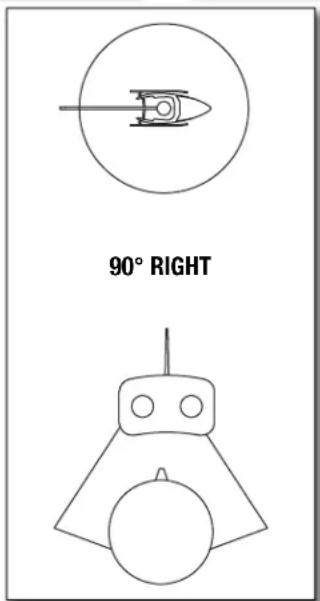
text_image
90° RIGHT