Drive Proof DP-210 - Dash cam KJB Security Products - Free user manual and instructions
Find the device manual for free Drive Proof DP-210 KJB Security Products in PDF.

| Product Type | Dash Cam (Car Camera) |
| Brand | KJB Security Products |
| Model | Drive Proof DP-210 |
| Dimensions | Approximately 2.5 x 1.5 x 1.0 inches (63 x 38 x 25 mm) |
| Weight | ~3.5 oz (100 g) |
| Power Source | 12V/24V DC car cigarette lighter adapter (included) |
| Video Resolution | Full HD 1080p at 30 fps |
| Field of View | 140° wide angle lens |
| Loop Recording | Yes, with automatic overwrite of oldest footage |
| G-Sensor | Built-in gravity sensor for incident detection and auto-lock |
| Parking Mode | Motion detection recording when parked (requires hardwire kit, sold separately) |
| Storage | Supports microSD cards up to 32GB (Class 10 recommended, not included) |
| Display | 2.0-inch LCD screen |
| Night Vision | WDR (Wide Dynamic Range) for low-light performance |
| Mount | Windshield suction cup mount |
| Battery | Built-in rechargeable battery (approx. 200 mAh) for short-term backup |
| Audio | Built-in microphone and speaker |
| Installation | Attach mount to windshield, plug into 12V/24V socket |
| Maintenance | Clean lens with soft, dry cloth; do not use liquid cleaners |
| Safety Precautions | Do not install in area that obstructs driver's view; keep away from heat sources |
| Spare Parts / Repairability | Spare mounts and cables available; internal parts not user-serviceable |
| General Information | Designed for continuous recording while driving; includes user manual |
Frequently Asked Questions - Drive Proof DP-210 KJB Security Products
User questions about Drive Proof DP-210 KJB Security Products
0 question about this device. Answer the ones you know or ask your own.
Ask a new question about this device
Download the instructions for your Dash cam in PDF format for free! Find your manual Drive Proof DP-210 - KJB Security Products and take your electronic device back in hand. On this page are published all the documents necessary for the use of your device. Drive Proof DP-210 by KJB Security Products.
USER MANUAL Drive Proof DP-210 KJB Security Products
Thank you for purchasing this product.
For proper usage and application,
please read this instruction manual thoroughly.
PRINTED IN KOREAVER. 1.0
* Design and Specifications are subject to change without notice.

Contents
Safeguard Instructions 3
- Feature 4
- Box Contents .... 5
- Installing the recorder in your vehicle 6
- Components and their functions .... 7
- Preparations for use & operation 9
Power ON/OFF 10
Basic operation 10
Video recording 12
6. PC VIEWER MANAGER .... 13
How to install & execute PC VIEWER MANAGER 13
About user interface 14
File list 16
File Attribute 18
Mode Change 19
Checking GPS info. 19
Configuration 20
7. Specifications 22

Safeguard Instructions
GPS antenna must be free of any obstructions, ex. navigation systems.
- It may cause problem with GPS signal reception.

GPS function requires acquisition time when powered on.
- Signal acquisition may take a few seconds or longer depending on operating environment.

Metallic tinting on front window may cause reception problems, poor recording quality or GPS reception problems.

Do not place product in location that is subjected to rapid temperature changes or high humidity. Always use optimum voltage. Failure to do so may result in electronic shock or malfunction.

Please Note: We are not responsible for Loss or damaged data caused by improper use, see below.

SD Card must be rated at class 6 or higher to function properly.
- This product supports up to 64GB.

Do not pull out SD card while working status such as data backup and format.
- It may cause a serious damage on SD card.

Please insure power is off prior to removing SD Card.
- If you pull SD card out during power on status, it may cause malfunction or data loss.

SD card is consumable. SD Card will become worn or damaged with prolonged use.

SD Card has a limited life expectancy and will vary from manufacturer to manufacturer.
- If you find data lose after long time usage, please replace with a new SD card.

Important data should be backed up on a separate storage device.
- Data will be overwritten with long term use.
1
Feature
- Car accident recorder.
- Dual mode recording (interior / exterior)
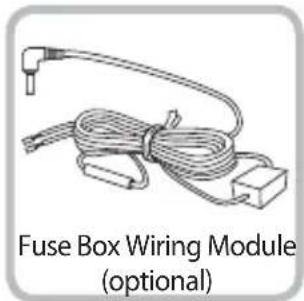
- Parking mode: Requires fuse box wiring module
· Wide angle of view supported : Interior : 104°(H)72°(V)125°(D) / Exterior(*WDR) : 95°(H)70°(V)125°(D) - Internal IR-LED / Ambient light sensor built-in
- Audio recording embedded with primary video file.
- Speaker Alert
- Integrated GPS module
· Integrated 3G-Sensor (Front/Rear, Left/Right, Up/Down shock sensing and recording) - SD CARD compatibility (Max. 64GB ; Class 6 or higher)
· Emergency battery equipped (with Super capacitor)
.SOUND ON/OFF
.Voltage (DC 12V\~24V / Max. 32V)
*WDR : Wide Dynamic Range
2
Box Contents
* Before using this product, please make sure the contents below are included. If any parts are missing, please contact sales agent.
natural_image
Line drawing of a DVD projector with front panel and control panel (no text or symbols on the device itself)
natural_image
Simple line drawing of a kitchen utensil with two small objects nearby (no text or symbols)
natural_image
Illustration of five identical 3D folder icons arranged in a scattered pattern, labeled 'Accessories' below (no other text or symbols)
natural_image
Line drawing of an AV-out cable with a terminal connector (no text or symbols on the cable itself)
natural_image
Illustration of a power cord with coiled cable (no text or symbols on the device itself)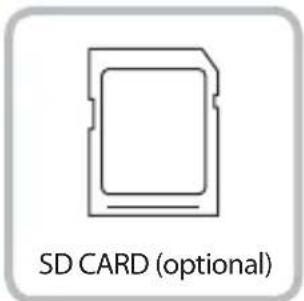
3
Installing the recorder in your Vehicle
Prior to installation, check the following :
- DO NOT use any other cables than the included power cable.
- For vehicles with excessive window tinting, the recorded images may appear dark.
- Do not install the Black Box Car Camera in such a manner as to have reflective feedback emitting from the IR LEDs reflecting off of the rear view mirror.
- Always install this device so that it is level as shown in the figure above. Otherwise, you cannot obtain normally recorded images.
- If installed at the center of the glass window in the front of the rear view mirror, optimal recorded images can be obtained.
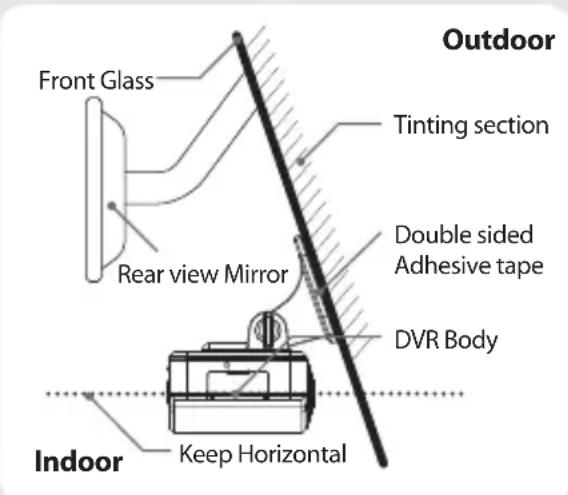

Once wiring and installation have been completed, check the following:
- After installation, start the vehicle. Then, the LED on the POWER will light up, which indicates normally completed installation.
- If the LED on the POWER fails to light up, check the cable connections and remove dust or impurities from the cigarette socket.
4
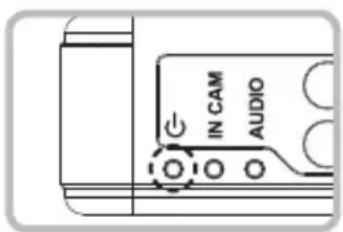
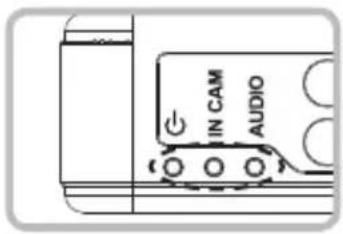
Components and their functions
- Exterior camera lens
- Interior camera lens
- IR-LED, Ambient light sensor
- Status indicator LED
- Microphone
- SD-card slot
- VIDEO-OUT
- DC IN
- Speaker
- Mounting bracket Bolt
- Mounting Bracket
- Integrated GPS
- MUTE button
Lens intended for exterior imaging (H: 95° / V: 70° / D: 125°)
Lens intended for interior imaging (H: 104° / V: 72° / D: 125°)
IR-LED(x7) and ambient light sensor for low light
Power / In-CAM / Audio LED
Integrated Microphone
A Slot to insert the SD card
Connection with monitor
A port to connect the power cable
Output speaker for auditory warning signals (mono)
Camera tilt adjustment.
Camera mount with double side adhesive tape.
Internal GPS
Each alarm will be muted
5
Preparations for use & operation
Before using the SD card, check the followings :
- Please use only recommended SD card. Manufacturer is not responsible for use of non-recommended SD Card.
- To remove the SD card, first turn off the vehicle engine, and check that the POWER LED light is off (not more than 10 sec. required). Then, remove the SD card. Please wait for audible tone and all indicators lights to be off prior to removing the SD Card. Failure to do so may result in loss of data or damaged SD Card.
- Incorrectly inserting SD Card may cause malfunction. Do not subject card to impurities as data loss may occur.
- If the SD card has not been formatted in 1 week (168 hours), the "Format" text will show when the viewer is executed. The "Format" text will also show on the monitor when the SD card is inserted in the camera. Please format the SD card at viewer setup.

These are the precautions for 64GB SD card use. Please note below.
* Please use new 64GB SD card, to insure proper operation with the DP-210.
- The DP-210 must be formatted with FAT32 file system.
- When SD card is formatted on PC in advance, normally, it is formatted with FAT32 system up to 32GB SD card. But, 64GB SD card is formatted with exFAT system unlike 32GB SD card.
- If the SD card has other formatting, the SD card is auto-formatted on PC and the setting value will be initialized and recorded data will be deleted.

Before operating this product, please note the following.
- Do not operate while driving.
- Recording is possible only when the SD card is inserted.
- If the SD Card is removed while in operation, some or all of the data may be lost.
Power ON/OFF
This product has no power on/off button. To power on, start the engine while the power cable has been connected to the vehicle. After powering on, the POWER / IN CAM / AUDIO LEDs will come on, and the camera will make a beeping sound. Recording will start in approximately 10 - 15 seconds with beep sound.
* If all 3 LED are blinking quickly with continuous beeping sound, the recording is not working. Please check SD card or camera connection.
Once the engine is stopped, the power maintains for 3 \~ 5 seconds by internal super capacitor and after audible tone, the last file saves with beep sound.
Basic Operation
This product is a model integrated with GPS antenna. If powered on, GPS signals will be first detected with signal sounds. Then, GPS functions will be enabled to capture the user's driving route, speed, duration and distance.
• GPS RECEPTION : Power LED is slowly blinking green.
- NO GPS RECEPTION : Power LED is slowly blinking red.
• Event : Power LED is quickly blinking green.
Video recording
Recording mode has driving and parking modes. Driving mode operates once powered on and basically, it is a constant recording broken into 2 minute files. Parking mode operates if there is no shock for 10 minutes with connection of the fuse box wiring module.
Recording mode & time
* Ordinary Recording : Independent of events, it continues recording at intervals of 2 min.
* Event/Motion Recording : It performs recording just for 10 seconds before and 20 seconds after an event (accident) happens. (30 seconds in total)
Event recording starts with beep sound.
10 sec. before an event

20 sec. afer an event

Normal recording section Event recording section
For example, if an event happens 1 minute and 40 seconds after starting recording:

flowchart
graph LR
    A["Event recording Ordinary recording"] --> B["90 sec."]
    B --> C["10 sec. 2 min Event"]
    C --> D["2 min."]
    D --> E["2 min. 2 min"]
Save as a Ordinary recording file (2 min.)
1min. and 40 sec.
The portion other than images before 10 seconds from 1 minute and 40 seconds after an event happens will be saved as a file of normal recording (1 minute and 30 seconds).
* When the recordings exceed the SD card capacity, it deletes image orderly from the oldest one.
Depending on the mode of recording, LED blinks.
- Ordinary Recording: The POWER LED blinks at very short intervals once per second.
- Within the GPS coverage(Green) / Out of the GPS coverage(Red)
• Event Recording : The POWER LED blinks five times per second (Red).
- MUTE: AUDIO LED flickers and melody sound will be muted.
• Voice Recording : AUDIO LED lights up.
(The texts on monitor with connection of video)
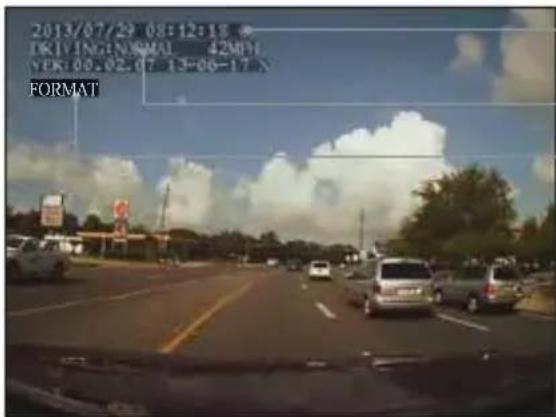
Date O (O : GPS Connection / X : GPS no connection)
(Event : Output "GSENSOR" on monitor)
(If the SD card has not formatted more than 1 week)
(1) If the DP-210 is powered on after the SD card has been inserted, the current status is displayed on the monitor.
(2) If the SD card is removed after the DP-210 is powered on, DP-210 is re-working. After that, DP-210 will be same status with below (3).
(3) If DP-210 is power on without SD card, beep is sounded continuously and current status of DP-210 is not showing on monitor.
6
PC VIEWER MANAGER
\* Recommended PC specifications for PC VIEWER MANAGER
CPU : Pentium 2.0GHz or more
OS: WINDOW 98/ME/2000/XP/VISTA/WINDOW7/8
VIDEO : Geforce 4 or more
Memory : 1GB RAM or more
HDD : 1GB or more supported
How to install & Execute PC VIEWER MANAGER
Installation of PC VIEWER MANAGER.
Please insert the included installation CD into PC and click the file "SETUP.EXE".

When installation is finished, an icon is created. Double click the icon to execute the program.
Open data
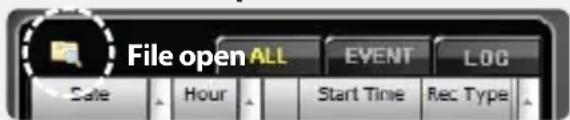
Please press open file button at the top of the file list. Then the open disk screen will show up and confirm the connected drive. Please open saved video list by pressing "OK"
* If connected drive can't be checked, please try to open "open other folder".
* If user's password is set, the password window shows up but, video can't be played with password input error.
Playback Video
Please click video's date and time on file list. If the play button is pressed, the selected video with yellow on list will be played.

About User Interface
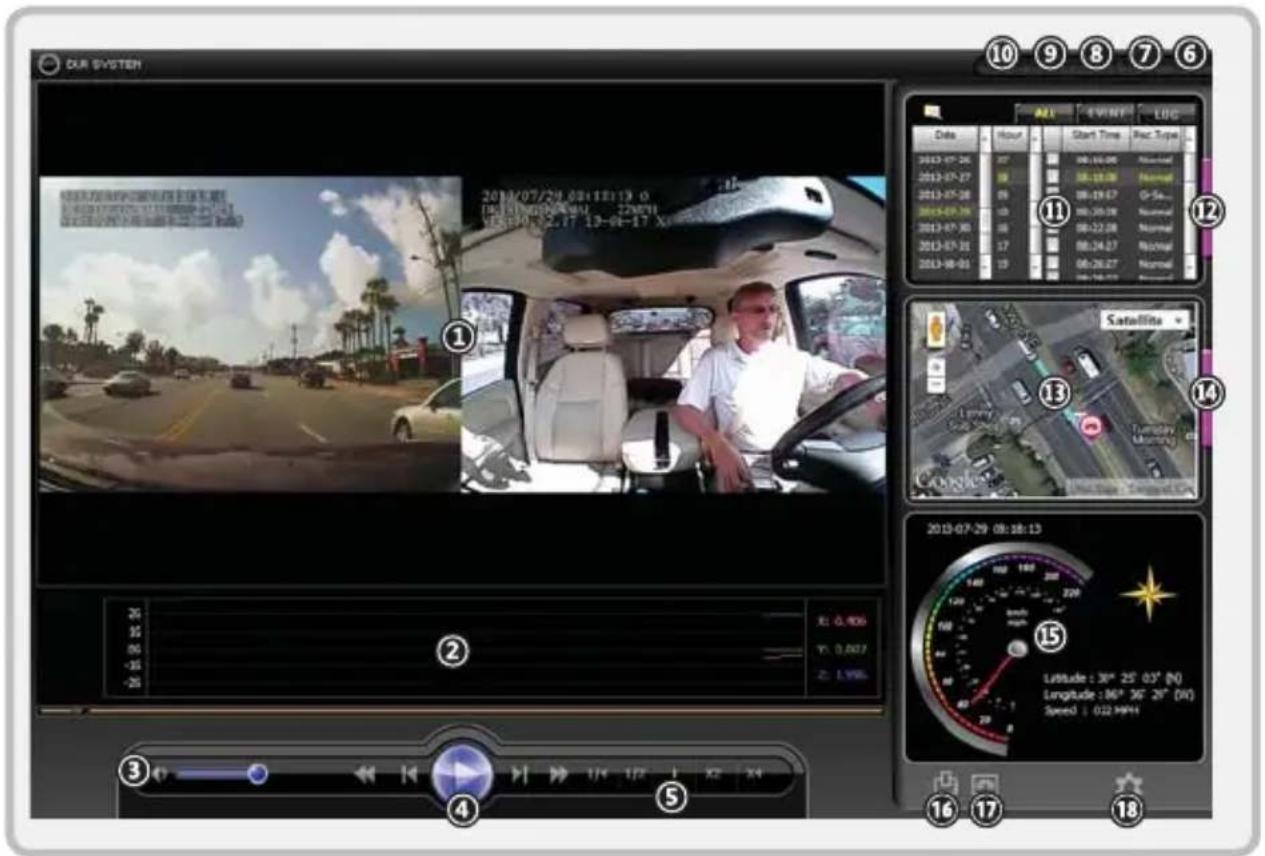
- Play Screen
2.3G-sensor - Volume Control
- Image Control
- Play Speed Control
- Exit
- Maximize
- Full Screen
- Keep/Off the Aspect Ratio
- Minimize
- File List
- Extend File List
- Map Info.
- Extend Map Info.
- GPS Info.
- Output of Event Report
- Backup
- Conf i guration
A fi eld where recorded images are viewed
Indicates 3G-sensor information display.
Controls the volume. (Mute / Volume +,-)
Previous File/Backward/Play(Pause)/Forward/Next File
Controls play speed. (1/4 x speed \~ 4 x speed)
Exits the program.
Maximize the program
Displays full screen video.
Video maintain / release in 1:1 ratio.
Minimizes the program window. (into the Task Bar)
Displays a list of the playable files saved on the SD card.
Shows additional fi le lists.
Displays the driving route on the map.
Shows additional map info.
Displays the current GPS info. received during driving.
Captures and outputs the video being played to a report.
Backs up video or saves playing video as an image file.
Displays configuration window where the user can select detailed settings.
File list
Normal file list screen Extend file list screen
1. Import file
- Click [File open] button in the file list.
- Select the file to be imported, and then click the [OK] button.
- If connected drive can't be checked, please try to open "open other folder".
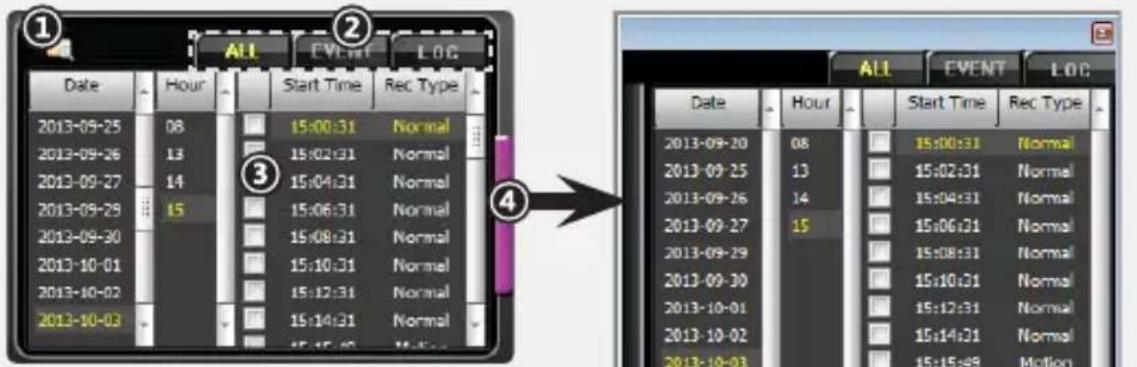
2. Sort file
- A file list can be divided into all files, event files, and log files for sorting.
- Click [ALL], and all the files on the SD card will be displayed in the list.
- Click [EVENT], and event files on the SD card will be displayed in the list.
* The event is divided into G-sensor and motion. - The log data such as power, recording ON/OFF, time information of recovered file will be displayed by clicking [LOG].
3. File Play
- Please click the required file by date and time for playback.
4. Extend file list
- Click [Extend List] button to view more files at a time.
- Click [Extend List] button to extend the list, and a separate window of file list will appear on the right side. Click it again, and normal file list screen will be returned.

The recorded file is made up CH_NO_YEAR, MONTH, DAY_HOUR, MINUTE, SECOND_N/A_N/A_RECORDING MODE. It displays normal recording file as N, recording file by shock as G, recording file by motion as M.
EX) CH1_0183_20130528_180426_753_56991_N.avi: This is the normal recording file on ch1 at 18:04:26 in 2013.05.28.
File Attribute
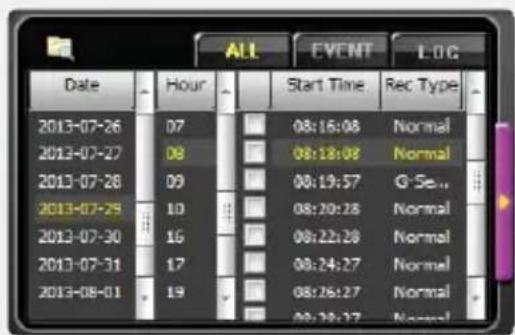
[ALL]
All recorded files are displayed and will be classified as normal or event files.
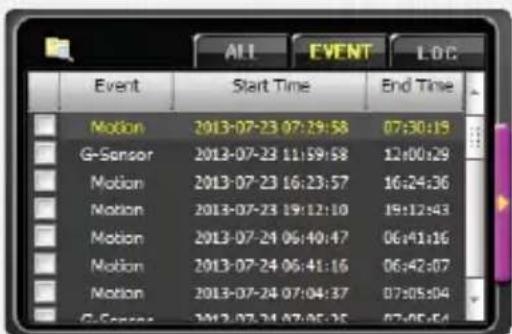
[EVENT]
All event files are displayed and classified by type.
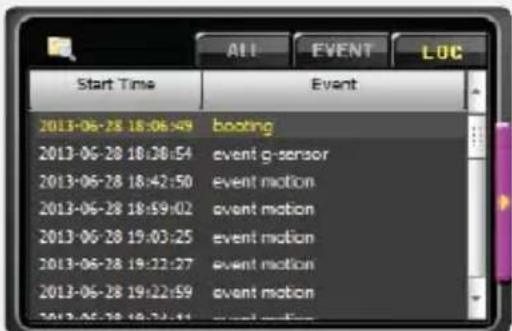
[LOG]
Power, Recording ON/OFF, time information of recovered file, etc. are displayed.
Mode Change
natural_image
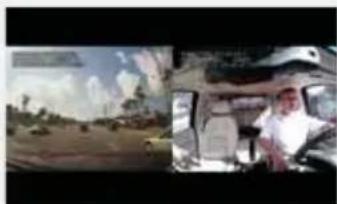
Interior view of a car with driver and landscape background (no visible text or symbols)- Once PC Viewer is displayed, both interior and exterior views are shown simultaneously. (see photo)
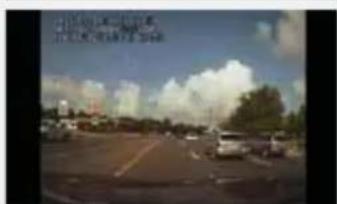
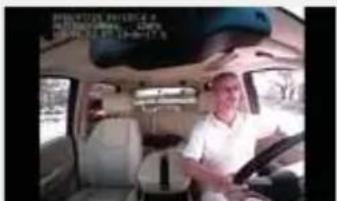
- Clicking on an image will allow you to toggle between full screen and split screen views. (see photos)
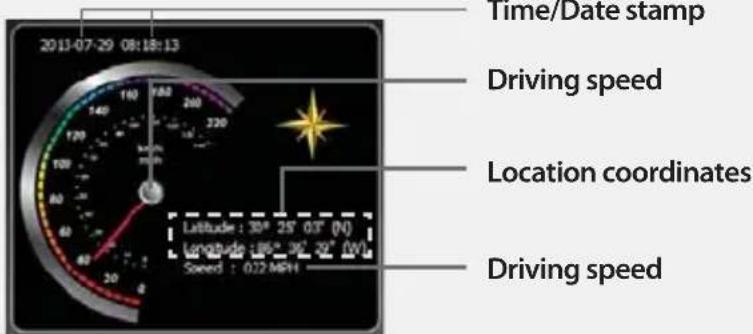
Checking GPS information
It is possible to view the driving speed, time, direction and location information at the time video was recorded.
Configuration
Click Configuration button to open the Configuration Window.

- Speedometer Unit
- Recording Quality
- Shock Sensitivity
- Audio Recording
- UTC
Selects the indication units for GPS information speedometer.
Sets the quality of recording. (High/Normal/Low)
Sets sensitivity of the 3G sensor into 1\~5steps.
Selects whether audio recording is included
Selects the Universal Time Coordinated.
-
World Standard Time
-
Summer Time Apply
-
User password setting
-
Car Number setting
-
Version Info.
-
Firmware
-
SD card Format
-
Default Setup
-
Save
Selects the world standard time.
Applies daylight savings time.
Sets password in the PC-viewer. (up to 8 digits, special characters/numbers/letters available)
Sets the user car number to be viewed in the screen at recording.
Displays version and information of the program.
Updates latest firmware.
Formats connected SD card.
Restores all settings to factory default.
Saves the setting(s).

- The optimal sensitivity of shock sensor varies with the kind of vehicle. Accordingly, first perform driving test with the three levels of sensitivity, and then set the appropriate sensitivity.
- It may be different from real time because the time information from checking "Apply to RTC" is applied after SD card inserting.
- Even after adjusting the time in the setting mode, if it receives GPS signal, the time will be set as GPS time.
7
Specifications
| Camera | IN | 0.3M pixel CMOS sensor (H: 104° / V: 72° / D: 125°) |
| OUT | 0.3M pixel WDR(Wide dynamic Range) CMOS sensor (H: 95° / V: 70° / D: 125°) | |
| Recording | Resolution | VGA (640x480) |
| Frame | 30fps*2 (Parking: 1fps) | |
| Mode | Ordinary / Event (Motion / G-sensor) | |
| Time | Ordinary : It continues recording at intervals of 2min.Event : 10 sec. before and 20 sec. after an event happens (30 sec. in total) | |
| Compression | AVI (H.264) | |
| Memory | SD Card (max.64GB) | |
| G-Sensor | Internal (5 step) | |
| GPS | Internal (or supported external GPS) | |
| Power | Voltage | DC 12~24V (with super cap) @max.32V |
| consumption | 12V / 350mA | |
| Operating Temperature | -50°F ~ 140°F (-10°C ~ 60°C) | |
| Storage Temperature | -68°F ~ 158°F (-20°C ~ 70°C) | |
| Dimension (W/H/D) | 4.13 x .87 x 2.64 / lens 1.52 in (105 x 22 x 67 / Lens 38.5 mm) | |
| Weight | 5.5 oz / 156 g (with Bracket) | |

FCC Compliance Statement
This equipment has been tested and found to comply with the limits for Class A digital device, pursuant to part 15 of the FCC Rules. These limits are designed to provide reasonable protection against harmful interference when the equipment is operated in a commercial environment.
This equipment generates, uses, and can radiate radio frequency energy and if not installed and used in accordance with the instruction manual, may cause harmful interference to radio communications. Operation of this equipment in a residential area is likely to cause harmful interference in witch case the user will be required to correct the interference at his own expense.
CAUTION
Any changes or modifications in construction of this device which are not expressly approved by the party responsible for compliance could void the user's authority to operate the equipment.
INSTRUCTION MANUAL

- Contents
- Safeguard Instructions 3
- PC VIEWER MANAGER .... 13
- Specifications 22
- Safeguard Instructions
- 1
- Feature
- 2
- Box Contents
- 3
- Installing the recorder in your Vehicle
- Prior to installation, check the following :
- Once wiring and installation have been completed, check the following:
- 4
- Components and their functions
- 5
- Preparations for use & operation
- Before using the SD card, check the followings :
- These are the precautions for 64GB SD card use. Please note below.
- Before operating this product, please note the following.
- Power ON/OFF
- Basic Operation
- Video recording
- Recording mode & time
- For example, if an event happens 1 minute and 40 seconds after starting recording:
- Depending on the mode of recording, LED blinks.
- (The texts on monitor with connection of video)
- 6
- PC VIEWER MANAGER
- \* Recommended PC specifications for PC VIEWER MANAGER
- How to install & Execute PC VIEWER MANAGER
- Playback Video
- About User Interface
- File list
- Import file
- Sort file
- File Play
- Extend file list
- File Attribute
- [ALL]
- [EVENT]
- [LOG]
- Mode Change
- Checking GPS information
- Configuration
- 7
- Specifications
- FCC Compliance Statement
- CAUTION
- INSTRUCTION MANUAL
Brand : KJB Security Products
Model : Drive Proof DP-210
Category : Dash cam