Duet KFS-600 - Pregnant Klip Xtreme - Free user manual and instructions
Find the device manual for free Duet KFS-600 Klip Xtreme in PDF.

| Product Type | Wireless Speaker |
| Brand | Klip Xtreme |
| Model | Duet KFS-600 |
| Dimensions (approx.) | 200 x 100 x 100 mm |
| Weight (approx.) | 1.0 kg |
| Power Supply | Built-in rechargeable battery (2000 mAh) |
| Battery Life | Up to 6 hours at 50% volume |
| Charging Time | 3 hours via included micro-USB cable |
| Wireless Connectivity | Bluetooth 4.2 with 10m range |
| Audio Input | 3.5mm AUX jack |
| Output Power | 10W RMS |
| Frequency Response | 80Hz - 18kHz |
| Driver Size | 2 x 40mm full-range drivers |
| Microphone | Built-in for hands-free calls |
| Control Buttons | Power, Volume +/-, Play/Pause, Pair, Microphone |
| Indicators | LED Bluetooth pairing, battery level |
| Material | Plastic with fabric grille |
| Water Resistance | Not rated (keep dry) |
| Maintenance | Wipe with soft dry cloth; do not use solvents |
| Safety | Keep away from heat, moisture, and water |
| Spare Parts | Not available separately |
| Repairability | Limited; contact support for issues |
| General | Model year 2020; original packaging |
Frequently Asked Questions - Duet KFS-600 Klip Xtreme
User questions about Duet KFS-600 Klip Xtreme
0 question about this device. Answer the ones you know or ask your own.
Ask a new question about this device
Download the instructions for your Pregnant in PDF format for free! Find your manual Duet KFS-600 - Klip Xtreme and take your electronic device back in hand. On this page are published all the documents necessary for the use of your device. Duet KFS-600 by Klip Xtreme.
USER MANUAL Duet KFS-600 Klip Xtreme
natural_image
Abstract green logo with white interlocking X-like shapes (no text or symbols)klipxtreme
Duet
natural_image
Exterior view of a black multi-tiered audio amplifier tower with green sound waves and control knobs, set against a solid green background (no text or symbols visible)KFS-600
1. Introduction
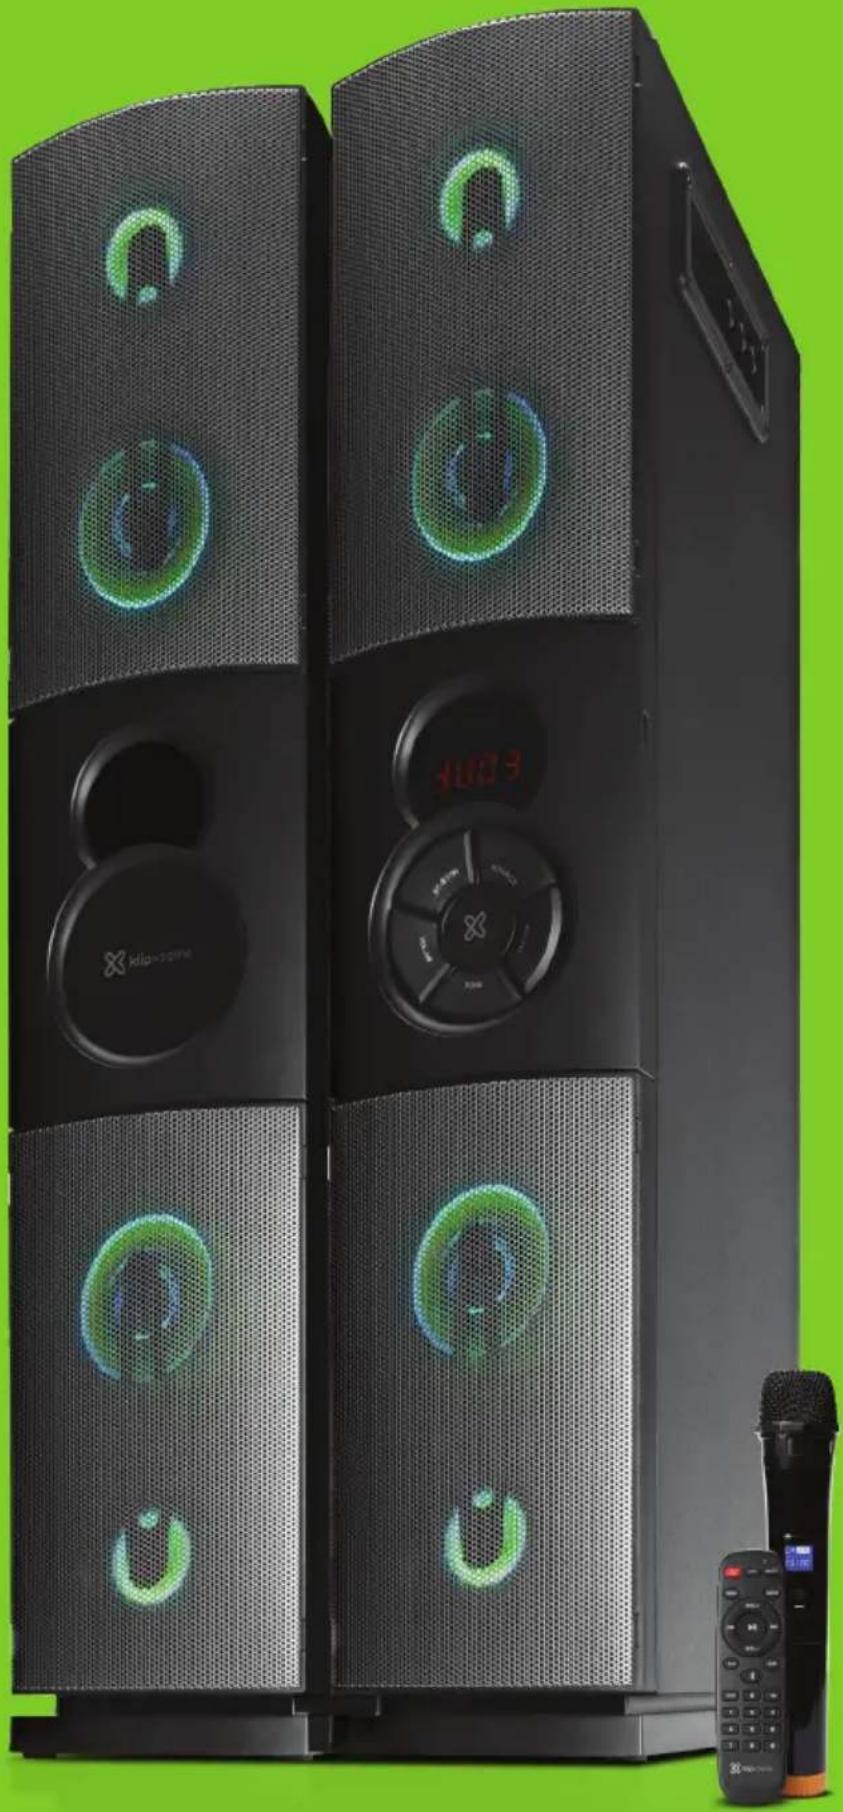
Thank you for purchasing the Klip Xtreme KFS-600 Floor Standing Speaker System with wireless technology.
We encourage you to read this installation guide thoroughly to get the most of this innovative wireless speaker system. You can visit us at www.klipxtreme.com for support and to find out more about other new and exciting products.
Main features
• 2800W of PMPO through four 5.25in subwoofers and four 2.5in tweeters
• USB and two 3.5mm auxiliary ports seamlessly integrate multiple audio sources
- Pairs easily with any Bluetooth®-enabled devices
- Adjustable LED lights with multiple illumination modes to choose from
- Front control panel in the main speaker
• Digital LCD display and convenient remote to control the system
- Includes a high quality wireless microphone and two 14-in ports for additional wired microphones
- Radio tuner
II. Package contents
Open the box and check the contents. Before setting up the device, make sure that the following items are included in the box:
- Speaker system (two units) (1)
• 3.5mm auxiliary cable (1)
• Remote control (with batteries) (1) - Antenna cable (1)
- Wireless microphone (with batteries) (1)
- Quick installation guide (1)
Unpack your unit carefully. We recommend that you save the box and all original packing materials, in case you wish to store the unit, or if you ever need to return it for service.
III. Product overview
Front panel
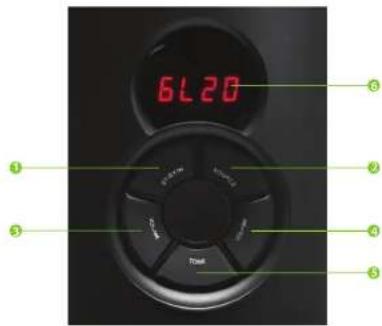
| Buttons Description | |
| 1. Standby / ▶ | Press this button to change the device from standby to active mode, and vice versa.In USB Bluetooth®, auxiliary and DVD mode press is briefly to play or pause media. |
| 2. Source | Press this button to cycle through the different audio sources. AUX (Au) / DVD (cu) / USB (ud) / FM (f) / BT (bl).Note: As there is no default mode assigned, the system starts playing automatically the last media source being used. For USB mode: a compatible storage device with audio files has to be inserted when this mode is selected. Bluetooth® mode: two devices can't be connected at the same time. |
| 3. Vol - / ◆ | Press and hold Vol - to lower the audio level in all modes.Press the ◆ button to play the previous song or track on your play list in any mode. |
| 4. Vol +/ ▶ | Press and hold Vol + to increase the audio level in all modes.Press the ◆ button to play the next song or track on your play list in any mode. |
| 5. Tone | This button controls the high (treble) or low (bass) frequencies.Note: To control the bass level from -6 to +6 and treble level from -6 to +6 press and hold the volume button on the speaker panel. These functions can also be controlled from the remote control by pressing volume + or volume -. |
| 6. LCD display | It exhibits the input mode, volume level, the track being played, and the current radio station selected. |
Side panel
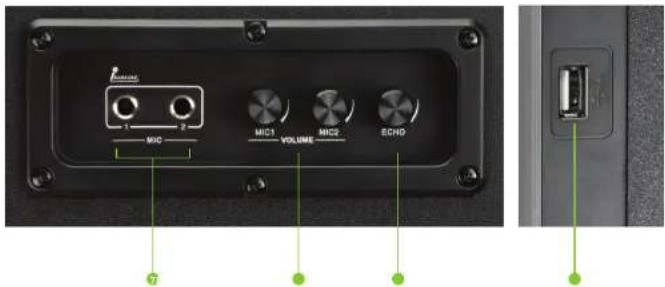
| 7. Mic. 1 and Mic. 2 | These 1⁄4in microphone inputs will be used to connect a wired microphone, which will work in all modes.Note: a wireless microphone is provided with this unit. |
| 8. Mic. 1 / Mic. 2 volume knob | If a wired or wireless microphone is used, turn these knobs to adjust the corresponding microphone volume in all modes. |
| 9. Echo knob | Use this button to enable the reverberation effect of the microphone. |
| 10. USB port | Allows music playback from a USB storage device. |
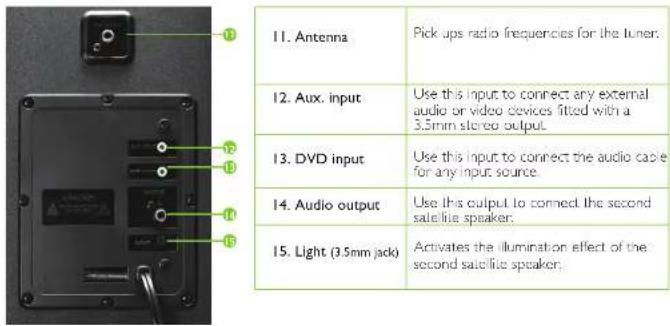
Back panel
Remote control
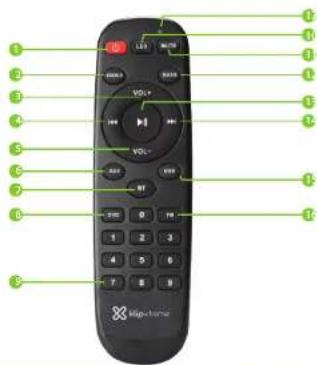
| Control Description | |
| 1. Power | Press and hold this button to put the unit into Stand By mode. Press it again to turn the Stand By function OH. This applies to all modes. |
| 2. Treble button | Increases or decreases the treble (high) frequencies of the speaker. |
| 3. Volume + | Press this button to increase the master volume. |
| 4. 🖼 | Takes you back to the previous track on your play list when using any of the modes. |
| 5. Volume - | Press this button to decrease the master volume. |
| 6. AUX.7. BT8. DVD | Press any of these buttons to select the corresponding input mode. |
| 9. Numbered keypad | Press any key from 0 to 9 on the remote control to choose directly the tracks you want to play. In tuner mode, it allows the manual input of frequencies or the selection of any of the previously stored channels. |
| 10. LED button | Press this button to select the different LED effects from LED1, LED2, LED3, LED4, LEDs, LED6, LEDF (OH). |
| 11. Mute button | Cancels the audio coming from the speaker. Press it again to unmute the speaker. |
| 12. Bass button | Increases or decreases the bass (low) frequencies of the speaker. |
| 13. 🖼 | In USB and Bluetooth® modes press it briefly to play or pause media. In FM mode, press and hold this button to scan radio stations automatically. |
| 14. 🖼 | Press this button to play the next song or crack on your play list in the USB and Bluetooth® modes. |
| 15. USB16. FM | Press these buttons to select the corresponding input mode. |
| 17. Indicator light | This light will flash one time indicating that one of the buttons is being used. |
IV. Initial setup
- Start by installing the two AAA batteries supplied inside the remote control.
- Plug the AC cable into a wall outlet.
- Next, insert the 3.5mm plug cable of the second satellite speaker into the 3.5mm jack labeled 'light' located on the back panel of the main unit.
- Connect the RCA plug cable of the second satellite speaker into the RCA jack labeled 'output' located on the back panel of the main unit.
- Connect the 3.5mm plug cable into the corresponding auxiliary and/or DVD port of the main speaker's back panel
- Proceed to connect the other side of the 3.5mm jack into the media device of choice, such as a laptop.
television set MP3/4 player, smartphone or tablet - Connect the antenna to the RCA jack labeled 'Antenna' on the main speaker's back panel.
- Turn on the speaker by pressing the red power button on the remote control.
- Select the input mode of choice using the SOURCE button on the main unit or by pressing the corresponding button on the remote control.
- Use the controls on the front of the main unit or the remote control to start enjoying the speaker system.
- Press and hold the Power button on the remote control to put the unit in Stand By mode.
V. Advanced operation
Pairing the speaker with your Bluetooth ^® device
Note: Before installing this product, please make sure your device is compatible with Bluetooth ^9 . The speaker will connect to only one device at a time. In order to connect to the unit verify that there is no other device already paired with it.
- Press the Power button ⏻ on the remote control to turn ON the unit
- Enable the Bluetooth® function on the device of choice and set it to discover the wireless speaker.
- Next, press the SOURCE button on the speaker or on the remote control to enable the Bluetooth® feature.
The bl icon appears on the screen to indicate that the system has entered into the pairing mode. - Once the speaker appears listed under the newly found Bluetooth® devices (KFS-600), select it and wait a few seconds for pairing.
- If pairing is successful, it will indicate that the speaker system is connected. If after 60 seconds the pairing process fails, please repeat steps 2 through 5 described above.
-
You can now start streaming audio through the speaker wirelessly from your favorite Bluetooth® enabled devices.
-
The speaker will re-pair automatically to the memorized device when the BT mode is selected on the unit after being turn off and on again.
Technical specifications
| MPN KFS-600 | |
| Device | |
| Type | Floor standing speaker system (set of two) |
| Maximum power output (PMPO) | 2800W |
| Reference RMS power | 300W |
| DC input | 20V |
| Bullons | ST-BY/PLAY PAUSE, SOURCE, VOL14-NEXT TRACK, VOL-PREVIOUS TRACK/TONE |
| AC input | 110V-240V (autosensing) |
| Driver | |
| Driver unit | Four 5.25in subwooters Four 7.5in tweeters |
| Reference RMS power | 300W |
| Frequency | Twiceur: 60Hz-20kHz Subwoofer: 20Hz 170Hz |
| Impedance | Subwoofer: 8Ω Tweeter: 8Ω |
| Sensitivity | 8/70mV |
| Signal to noise ratio | ≥ 60dB |
| Total harmonic distortion (THD) | ≤ 1% |
| Microphone | |
| Directivity | Unidirectional |
| Frequency | 75Hz 14kHz |
| Impedance | 530Ω 1.30% (at 1kHz) |
| Sensitivity | -71dB 1.3dB |
| Connectivity | |
| Connection type | Biennorth® compatible, two 3.5mm auxiliary ports and HM |
| Memory card slot | USB |
| Auxiliary port | Two 3.5mm jacks |
| Others | Two 1⁄4in ports |
| Additional information | |
| LED illumination | Adjustable multicolor patterns: LED1, LED2, LED3, LED4, LEDs, LED6, LEDF (OFF) |
| Dimensions (WxHxD) | 6.7×33×13.1in |
| Weight | 40s |
| Cable length | 4.9L |
| Warranty | One year |
Precautions
- Do NOT drop, hit or shake the device.
- Do NOT disassemble, repair or modify the speaker system yourself.
- Do NOT use cleaning products that contain benzene, solvents or alcohol.
- Do NOT expose the speaker system to excessive heat or to direct sunlight for long periods of time.
- Do NOT place heavy objects on top of the speaker system.
- Do NOT use near a microwave oven or wireless LAN products.
FCC statement
This equipment has been tested and found to comply with the limits for a Class B digital device, pursuant to part 15 of the FCC rules. These limits are designed to provide reasonable protection against harmful interference in a residential installation. This equipment generates uses and can radiate radio frequency energy and, if not installed and used in accordance with the instructions, may cause harmful interference to radio communications.
However, there is no guarantee that interference will not occur in a particular installation. If this equipment does cause harmful interference to radio or television reception, which can be determined by turning the equipment off and on, the user is encouraged to try to correct the interference by one or more of the following measures:
• Reorient or relocate the receiving antenna.
- Increase the separation between the equipment and receiver.
- Connect the equipment into an outlet on a circuit different from that to which the receiver is connected.
- Consult the dealer or an experienced radio/TV technician for help.
I. Introducción
KlipXtreme® is a registered trademark. All rights reserved. The Bluetooth® word mark is a registered trademark owned by Bluetooth SIG, Inc. Other trademarks and trade names are those of their respective owners. Any mention of such is only intended for identification purposes, and is not to be construed as a claim to any rights pertaining to, sponsorship by, or affiliation with, those brands. Made in China.
Brand : Klip Xtreme
Model : Duet KFS-600
Category : Pregnant