
DVD 4404 HC - Home Theater AEG - Free user manual and instructions
Find the device manual for free DVD 4404 HC AEG in PDF.


| Product Type | Home Theater System |
| Model | DVD 4404 HC |
| Brand | AEG |
| Dimensions (W x H x D) | 430 x 80 x 350 mm |
| Weight | 5.2 kg |
| Power Consumption | 100 W |
| Power Supply | 220-240 V AC, 50/60 Hz |
| DVD Playback | DVD-Video, DVD-R/RW, DVD+R/RW, CD, CD-R/RW |
| Audio Decoders | Dolby Digital, DTS, Dolby Pro Logic II |
| Total Output Power | 5 x 100 W (RMS) |
| Speaker Configuration | 5.1 channel |
| FM Tuner | Yes, with RDS |
| AM Tuner | Yes |
| Inputs | Composite Video, S-Video, Audio L/R, Coaxial Digital |
| Outputs | Component Video, Composite Video, Audio L/R, Subwoofer |
| USB Port | Yes, for media playback |
| Card Reader | SD/MMC |
| Remote Control | Included |
| Cleaning Instructions | Wipe with a soft, dry cloth. Do not use solvents. |
| Safety | Class I laser product; do not open the casing. |
| Repairability | Refer to qualified service technician for repairs. |
Frequently Asked Questions - DVD 4404 HC AEG
User questions about DVD 4404 HC AEG
0 question about this device. Answer the ones you know or ask your own.
Ask a new question about this device
Download the instructions for your Home Theater in PDF format for free! Find your manual DVD 4404 HC - AEG and take your electronic device back in hand. On this page are published all the documents necessary for the use of your device. DVD 4404 HC by AEG.
USER MANUAL DVD 4404 HC AEG
natural_image
Black-and-white photo of a set of audio equipment including a microwave, two speakers, and a remote control unit (no visible text or symbols)natural_image
Pure technical line drawing of a mechanical component with no text or symbolsCD-Fach
X
CD
natural_image
Simple diagram with a circle containing a central arrow and two arrows, above a circle with a top circle (no text or symbols)natural_image
Diagram of two batteries with one shown in a simple line drawing (no text or symbols)D-47906 Kempen/Germany
General safety instructions
To avoid the risk of fi re or an electric shock, you should not expose the device to rain or moisture. Consequently, do not use the device in the immediate vicinity of water - for example near a bath tub, a swimming pool or in a damp cellar.
Use the device only for the intended purpose.
Only connect the device at a properly installed plug socket. Pay attention that the specified voltage corresponds to the voltage of the plug socket.
When using external mains supply, pay attention to the correct polarity and voltage. Always place the batteries in the correct direction.
Assemble the device in such a way that the available ventilation openings are not covered.
Never open the housing of the device. Incorrect repairs can constitute a considerable risk for the user. Should the device become damaged, in particular the mains supply cable, do not operate the device any longer, but rather have it repaired by an expert. Check the mains supply cable regularly for damage.
For safety reasons a broken or damaged mains lead may only be replaced by an equivalent lead from the manufacturer, our customer service department or a similar qualified person.
If the device is not used for a longer period, remove the plug connector from the plug socket or take out the batteries.
These symbols may be found on the machine and are intended to indicate the following:

The lightning symbol should advise the user of parts in the inside of the device which carry dangerously high voltage levels.

The symbol with an exclamation mark should advise the user of important operation or maintenance instructions in the accompanying documentation.

Devices bearing this symbol work with a „class 1 laser“ for tracing the CD. The built-in safety switches should prevent the user being exposed to dangerous laser light, which is
invisible to the human eye, when the CD compartment is opened.
Under no circumstances should these safety switches be bypassed or manipulated, as this could result in a danger of exposure to the laser light.
Precautions
Please read these precautions carefully before using the device.
Protection of the Mains Lead
In order to prevent the device from malfunctioning and to protect against electric shocks, fire or injury, please note the following:
- Always remove the plug by pulling the plug itself and not the lead.
- Never touch the mains plug or lead with wet hands.
- Keep the mains lead away from heaters.
- Never put a heavy object on the electric lead.
- Never try to repair or replace the mains lead yourself. The mains lead may only be replaced by a qualified electrician!
Positioning
Please avoid setting up the device in the following surroundings:
- In direct sunshine, where there is exposure to heaters or in closed vehicles.
- In high temperatures (over 35°C) or high humidity (over 90%).
• In extremely dusty surroundings.
Otherwise internal parts may be seriously damaged
When the device is not being used:
- Please turn the device off when it is not being used.
- Should you not use the device for a prolonged period, please remove the mains plug from the socket.
Do not insert your fingers or other objects into the device
- Touching internal parts of this device is dangerous and may result in serious damage to the device. Do not try to take the device apart.
- Do not insert any foreign bodies into the CD drawer.
Keep away from water, fire and magnets
- Keep the device away from vases, baths, wash basins etc. If liquid enters the device this may cause serious damage.
- Open sources of fi re, such as burning candles, must not be placed on the device.
- Never place magnetic items, such as loudspeakers, in the vicinity of the device.
Ventilation
- Please maintain a free space of 5 cm around the device to ensure adequate ventilation.
- Do not cover any ventilation slits with objects such as magazines, tablecloths, curtains etc.
- Please set up the device in a horizontal position and do not place any objects on it.
- Do not place the device on amplifiers or other devices which may heat up.
Condensation
In the following situations moisture may develop on the lens:
- Immediately if a heater is switched on.
• In a steaming or very damp room. - If the device is transferred from cold to warm surroundings.
- If moisture has formed inside the device, it is possible that the device will no longer function correctly. In this case please turn off the power and wait for approximately one hour until the moisture has evaporated.
What to do if there is television interference while you are watching a programme.
Depending on the reception conditions there may be interference to the television picture when you are watching a television programme and the device is switched on. This is not a malfunction of the device or television. Switch the device off if you want to watch a television programme.
Table of contents
General safety instructions .... 18
Precautions 18
How to Handle and Care for your CDs 20
Maintenance 20
For your Information 20
Operating Controls....21-22
Remote Control 23
Connections.... 23
Operation 23
Functions....24-25
General setup.... 26
Speaker setup.... 26
Audio setup 26
Preferences....27-29
Radio Operation 29
MP3 Playback 30
Guarantee.... 30
After the expiry of the guarantee 30
How to Handle and Care for your CDs Handling Precautions
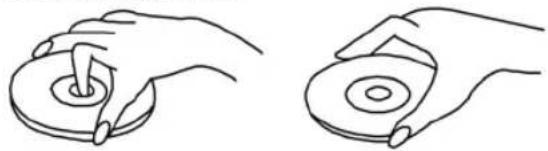
- Hold the CD by the edges so that the surface is not covered in fingerprints.
natural_image
Line drawings of two hands holding circular objects, no text or symbols present- Fingerprints, dirt and scratches may cause the CD to jump and distort the sound.
- Do not write on the label side with a ballpoint pen or other writing utensil.
- Do not use any record cleaning spray, petrol, diluting agent, antistatic fluid or any other kind of solvent.
- Please ensure that you do not bend or drop the CD.
- Never insert more than one CD into the CD compartment.
- Do not try to close the door if the CD has not been correctly inserted into the CD compartment.

natural_image
Pure technical line drawing of a mechanical component with no text or symbolsCD COMPARTMENT X CD
- Please make sure that you always store the CD in its original case when not being used.
If the Surface is Dirty
- Wipe the CD gently with a soft, moist (water only) cloth.
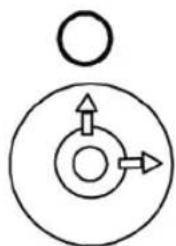
- When wiping CDs always move the cloth from the centre of the CD to the outer edge.

natural_image
Simple diagram with a circle containing a central arrow and two arrows, no text or symbols present.(If you wipe the CD in a circular manner you will cause circular scratches which will produce noises on the CD.)
- If a CD is moved from cold to warm surroundings it is possible that moisture will form on the CD. Wipe off the moisture with a soft, dry cloth that is free of fluff before inserting the CD.
Incorrect CD Storage
You may damage the CD if you store it in the following locations:
- exposed to direct sunlight
- damp or dusty locations
- locations exposed to a direct source of heat or heating.
Maintenance
- Please ensure that before any maintenance is carried out the device is switched off and the plug removed from the power supply.
- Wipe the device with a dry, soft cloth.
- Should the surfaces become extremely dirty, please wipe them with a cloth that has been immersed in a weak soapy water solution and then wrung out before wiping off with a dry cloth.
- Never use alcohol, petrol, diluting agent, cleaning liquid or other chemicals. Do not use any compressed air to remove dust.
For your Information:
This product is equipped with copyright protection technology which is itself protected by specific American patent claims and other intellectual copyrights in the possession of the Macrovision Corporation and other holders of rights. Use of this copyright protection technology is only permitted with the authorisation of the Macrovision Corporation and is limited to home and other restricted performance situations unless express approval is given by the Macrovision Corporation. Dismantling or disassembly of this protection technology is prohibited.
Operating Controls
Front

ENGLISH
1 STANDBY display
2 STANDBY button
3 VOL- reduce volume
4 FUNCTION button
5 VOL+ increase volume
6 BAND button
7 MUTE button
8 ENTER button
9 Infrared sensor
10 Display
11 TUNING - I◀◀ reverse SKIP button
12 CHANNEL - ◀◀ reverse search button
13 CHANNEL + ▶ forward search button
14 TUNING + ▶▶I forward SKIP button
15 ▶ / II PLAY/PAUSE button
16 ■ STOP button
17 OPEN/CLOSE button
Rear
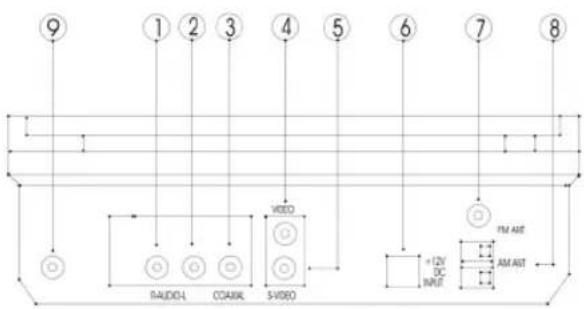
1 AUDIO output R
2 AUDIO output L
3 COAXIAL output
4 VIDEO output
5 S-VIDEO output
6 12 V DC input ⊖-⊕-⊕
7 FM aerial connection
8 AM aerial connection
9 OPTICAL OUT
Subwoofer Rear

1 BASS control
2 TREBLE control
3 AUX input R
4 AUX input L
5 Loudspeaker connection R
6 Loudspeaker connection L
7 DC output (+12V/1.3A)
8 POWER on/off switch
9 Mains power cable
Operating Controls
Remote Control
1 STANDBY button
2 BAND button
3 FUNCTION button
4 SHUFFLE button
5 DISPLAY button
6 GOTO button
7 AUDIO button
8 PBC button
9 PROGRAM button
10 RETURN button
1 SETUP button
12 ▲ Arrow button
13 Arrow button
14 TITLE button
5 STEP button
6 RESUME button
7 MUTE button
18 SLOW button
9 CHANNEL + button
20 CHANNEL - button
21 TUNING + button
2 TUNING - button
23 ■ STOP button
24 ▶ / II PLAY/PAUSE button
25 N/P button
26 L/R button
27 MENU button
28 ▼ Arrow button
29 ▶ Arrow button
30 ENTER button
31 ZOOM button
32 VOL - button
33 A-B button
34 VOL + button
35 REPEAT button
36 Number buttons (0-9 and +10)
37 SUBTITLE button
38 ANGLE button
39 MEMORY button
40 FM MODE button
1 EJECT button

Remote Control
Battery Mode

natural_image
Diagram of two batteries with one shown in a simple line drawing (no text or symbols)- Open the battery compartment on the rear side.
- Insert the batteries (2x 1.5 V, AA, not supplied).
- Match the polarities correctly (see the inside of the battery compartment or the marking on the outside).
- If the device is not used for a long period of time, remove the batteries to avoid the „spilling“ of battery acid.
Warning: batteries are not to be disposed of together with domestic wastes. Dispose of the used batteries at the relevant collection bin or at your dealer's.
Never throw batteries into the fire.
Notes:
- Do not leave the remote control unit in the extremely hot or humid place.
- Do not use a new battery with an old one.
- Do not expose the remote sensor to direct light from the sun or lighting apparatus. Doing so may cause a malfunction in controlling the player.
- If you do not use the remote control unit for an extended period of time, remove the batteries to avoid possible damage from battery leakage and corrosion.
Range of Operation of the Remote Control
The remote control can be used up to approximately 7 meters in a straight line. It can also be operated at a horizontal angle of up to 30^ from the remote sensor.

Connections
Before connecting the DVD player
- Before connecting a device please ensure that all devices are switched off and not connected to the mains power supply.
- Please also note the operating instructions of your television set.

- Connect the 12V connection cable to the DC output of the subwoofer and the 12V input of the DVD player.
- Now use a cinch cable to connect the VIDEO output of your DVD player to the video input of your television set (you may also need a Scart adapter for 2X cinch to Scart. This is not supplied!).
- Now connect the AUDIO outputs R and L to the corresponding AUX inputs on the subwoofer (insert the white plug into the white socket and the red plug into the red socket).
- Then connect the loudspeakers to the loudspeaker sockets on the subwoofer.
- Insert the mains plug into the mains socket. Ensure that the mains voltage is the same as the information printed on the type plate.
Operation
Preparation
- Only when all connections have been properly made should you turn on your television set and DVD player.
- Turn on your television set and select the corresponding AV input signal (please note the operating instructions of your television set).
- You can now switch on your DVD player using the POWER on/off switch on the rear of the subwoofer.
Functions
PLAY/ PAUSE
- Press the STANDBY button. If there is a disc in the tray, the player will begin to play it once the STANDBY button is on.
- To change or insert a disc, press the OPEN/CLOSE button (EJECT button).
- As soon as you have inserted a disc, press the OPEN/CLOSE button (EJECT button) again. Once the CD compartment is closed, the player starts to play back the disc.
- If the PLAY button is pressed during playback, the disc stops until the PLAY button is pressed again.
- If the STANDBY button is pressed, the player switches to standby mode and the STANDBY display on the front of the device lights up.
Note: It is not possible to guarantee that CDs/DVDs created by the user can be played back due to the large variety of software and CD/DVD media available.
STOP
If the STOP button is pressed, playback is interrupted.
FUNCTION
- Press the FUNCTION button to switch between DVD and TUNER mode.
- In tuner mode it is possible to switch between AM and FM using the BAND button.
TUNING+ / TUNING-
- In radio mode you can set the transmission frequency with these buttons.
- In DVD/CD mode each press of the button jumps forwards or backwards one track or chapter.
CHANNEL+ / CHANNEL-
- In radio mode pressing these two buttons jumps forwards or backwards through the station storage locations.
- Press CHANNEL+ button to fast forward through the disc. The speed can be selected by pressing the key further (2x, 4x, 6x, 8x, normal) for DVD / (1x, 2x, 3x, 4x, normal) for CD.
- Press PLAY button to resume normal playback.
- Press CHANNEL- button to fast reverse through the disc. The speed can be selected by pressing the key further (2x, 4x, 6x, 8x, normal) for DVD / (1x, 2x, 3x, 4x, normal) for CD.
- Press PLAY to resume normal playback.
Note: The search function is not supported when MP3s are played.
Number Buttons (0-9 and +10)
With the number buttons it is possible to put numbers into the menu fi elds directly or select a track directly during CD operation. In the case of track numbers greater than 10, please press the +10 button fi rst and then the corresponding number button for the units.
MUTE
During playback the MUTE button can be pressed to switch off the sound. Press the MUTE button again to switch the sound back on.
VOL+ /VOL-
With these two buttons you can increase or reduce the volume.
DISPLAY
By pressing the DISPLAY button repeatedly it is possible to display various information relating to the disc, such as „elapsed time“, „remaining time“ etc.
ZOOM
- Press ZOOM button repeatedly during playback to select zoom 1.5x, 2x, 3x to change the size of the picture.
- While an image is enlarged, you can use UP/DOWN, LEFT/RIGHT buttons to shift the view and display the part you wanted.
SLOW
During playback press the SLOW button to slow down playback. Pressing this button repeatedly selects various speeds (double, fourfold, eightfold forwards, double, fourfold, eightfold reverse, normal (for DVDs). In the case of CDs the „Slow“ function can only be used forwards).
REPEAT
DVD
Press the REPEAT button during playback to repeat a chapter. If the REPEAT button is pressed a second time, a title is repeated. Pressing this button a third time switches off the repeat function.
CD
If the REPEAT button is pressed once during playback, one track is repeated. Press the REPEAT button a second time to repeat the entire CD. Pressing this button a third time switches off the repeat function.
Note: Some DVDs or MP3s do not support the repeat function.
A-B
- Press A – B button once at the beginning of the segment (point A) you want to play repeatedly.
- Press A – B button again at the end of the segment (point B).
- The player automatically returns to point A and starts repeat playback of the selected segment (A - B).
- Press A – B button a third time to disable repeat A – B playback and allow playback to continue in normal.
RETURN (only for VCDs)
During the playback of a VCD with the PBC switched on you can press the RETURN button to return to the menu, provided that the VCD has a menu.
ANGLE
- Press the ANGLE button during playback to select the desired angle.
- This function only works with discs on which multiple scenes were shot from different angles.
AUDIO
Press AUDIO button to select different audio languages (eg. English, French, Spanish, German, ending on the number of languages recorded on a DVD disc).
SUBTITLE
Press SUBTITLE button to select different subtitle languages (eg. English, French, Spanish, German, ..... depending on the number of languages recorded on a DVD disc).
PROGRAM
- Press the PROGRAM button in stop mode. A display now opens on the screen in which you can enter the tracks to be stored one after the other using the number buttons.
- It is possible to program up to 99 tracks.
- Some CDs and MP3s do not support the programming function.
- The function is only possible for CDs and VCDs.
TITLE ( only for DVDs)
- For DVD's containing multiple titles, you can view the title of each movie.
- If and how this function is working depends on the respective DVD.
MENU
The MENU button is used to access the disc menu (depending on the CD/DVD).
L/R
For CDs/VCDs:
Press the L/R button repeatedly to switch between „Stereo“, „Mono Left“ and „Mono Right“.
For DVDs:
If the L/R button is pressed during DVD operation you can switch between AUDIO 01 and AUDIO 02. With AUDIO 02 you hear only music, but no spoken language (this function depends on the DVD).
N/P
With the N/P button you can switch between the PAL and the NTSC colour system or turn your device to AUTO.
STEP
During the playback of VCDs or DVDs it is possible to move one picture forward with each press of the STEP button.
Arrow Buttons ◀ / ▶ / ▲ / ▼
Use the arrow buttons to move the cursor within a menu.
PBC
If your disc has a PBC menu, this can be called up by means of the PBC button and a menu item then selected with the number buttons. It is also possible to use the TUNING + or - button to jump one track forwards or backwards.
GOTO
For VCDs:
If the GOTO button is pressed the symbol "GOTO ____ appears on the screen. Now you can enter a time using the number buttons. The fi lm is now played back from this point (depending on the CD).
For DVDs:
Press the GOTO button once to select a chapter using the number buttons. Press the GOTO button twice to jump to a specific time.
SHUFFLE
In stop mode you can press the SHUFFLE button on the remote control to start random playback. Press the TUNING+ button to jump to the next randomly selected track. With the STOP- button random playback is switched off.
SETUP
The SETUP menu allows you to set up your DVD player according to your wishes, for example by selecting your favourite languages, setting up parental controls, activating or deactivating a screensaver, setting the type of television screen you have etc.
- Press the SETUP button.

- You can move through the menus using the arrow buttons.
- In order to confirm the selected item, press the ENTER button.
GENERAL SETUP
ANGLE MARK

Some DVD disc is record by serval video camera from the different angles to take, when playback, can select the one of the angle to watch.
ON
OFF
The disc must have the angle mark, the set up can work.
OSD LANGUAGE
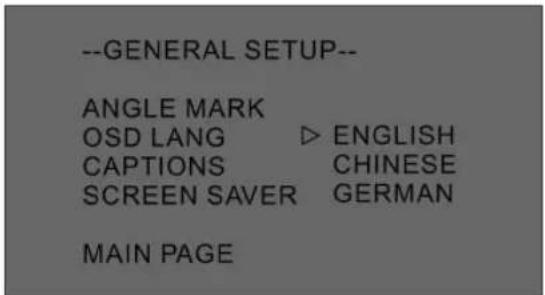
You can select the TV display language (ON SCREEN DISPLAY, OSD).
CAPTION (Title)

In this menu you can switch the caption function on or off.
Note: This function depends on the medium that has been inserted.
SCREEN SAVER

If the device is switched on but no disc is inserted, or if playback is interrupted for a certain time, the device automatically switches on the „Screensaver“ function. This time the screen will become black, only the DVD patten move on the screen. This function is protect the TV screen long time display will be hurt.
SPEAKER SETUP
DOWNMIX

LT/RT: When the playback disc with the PROLOGIC DOLBY stereo, select this item, through this unit 's decode system, you can enjoy effect in your room similar the movie theater with two front speaker.
STEREO: When sources is two channel, the audio output is the common stereo signal. When sources is 5.1 channel, only output the left and right 2 channel signal.
AUDIO SETUP (Dolby Setup)
SPDIF OUTPUT

OFF: The default output display is set to "analogue" format. This setting should be selected if you play back the CD in your DVD player via the right-hand and left-hand SPDIF OUTPUT socket. If you select this function, there is no display from the coaxial port.
SPDIF/PCM: This option should be selected if the DVD is connected to a two-channel digital mode or stereo amplifi er. If a Dolby Digital or MPEG CD is played back, the output of the coaxial port is in PCM two-channel format. These programmes have an uncompressed digital stereo soundtrack for improved sound quality. During playback a discreet stereo sound can be heard from the front left-hand and right-hand loudspeaker.
Note: If a built-in amplifier is used, the audio output must be set to analogue, as otherwise the rear and central loudspeaker will not receive any output signals.
SPDIF/RAW: Select this option if the DVD player is connected to an amplifier via the optical DIGITAL OUT. The amplifier that is to be connected must have Dolby Digital decoding.
DUAL MONO
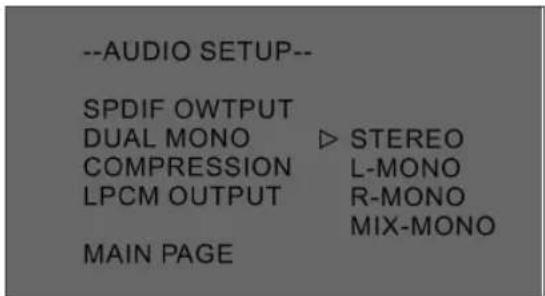
STEREO, for separate playback of both channels (as "stereo").
L MONO or R MONO, if the left-hand or right-hand sound channel is to be played back through both front loudspeakers (e.g. in the case of separate spoken language).
MIX MONO, for mixed playback of both channels.
COMPRESSION

Dynamic Range Compression
Dynamic Range Compression reduces volume change by letting you adjust the difference between soft and loud sounds.
- Press up/down button to set Dynamic Range Compression to 2/8 through FULL or to turn it OFF, then press ENTER.
- To hear the full range of range of sounds as recorded, choose OFF or a lower ratio such as 2/8. To minimize the difference in volume between loud segments and quiet scenes, choose a higher ratio such as 6/8 or FULL.
LPCM OUTPUT
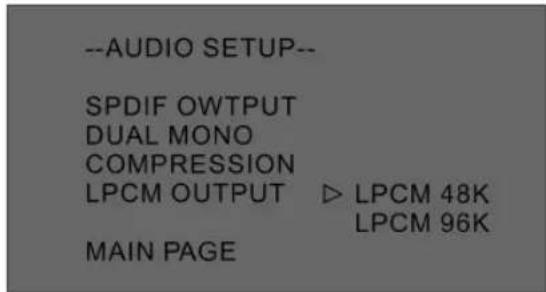
LPCM 48K:
In the linear PCM setting „48K“ means that the maximum „Digital Output Sampling Rate“ is 48 KHz. If the encoded sampling rate of the title track is 96 KHz the output is forcibly converted to 48 KHz.
LPCM 96K:
If „96K“ has been selected the maximum output sampling rate is 96K and no enforced conversion takes place.
PREFERENCES
The PREFERENCE menu can only be opened in stop mode.
TV DISPLAY

NORMAL/PS: Pan scan. Select when the unit is connected to a conventional TV. Video material formatted in the Pan Scan style is played back with the left and right edges are cut off.
NORMAL/LB: Letter Box. Select when the unit is connected to a normal TV. Wide-screen images are shown on the screen with a black band at the top and bottom.
WIDE: Select when the unit is connected to a wide-screen TV.
TV TYPE
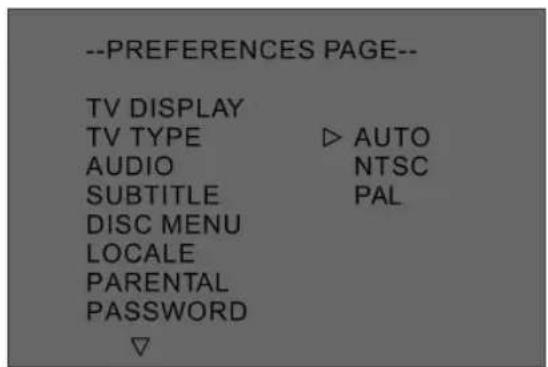
Please adjust the Video Out in this way, that he meets the system of the TV, the model will be connected to.
- If you are using a PAL television set, select the PAL output signal;
- If you are using an NTSC television, select the NTSC output signal;
- Or select AUTO and your device will automatically detect the type of television set.
AUDIO

The audio is decide by disc, only the disc support the language format, the audio set up just can work. For example, the disc have English and German two FORMATS, you can select the English or German is decide the disc.
In this menu you can select the standard language with which your disc is to start. However, this is only possible if the language that has been set is available on the disc.
SUBTITLE

Subtitle is the words of the disc play audio, as same the audio set up, must the disc support, the subtitle just can work.
DISC MENU

In this menu you can set the desired standard language for the disc menu. However, this can only be displayed if the inserted disc also supports this language.
LOCALE
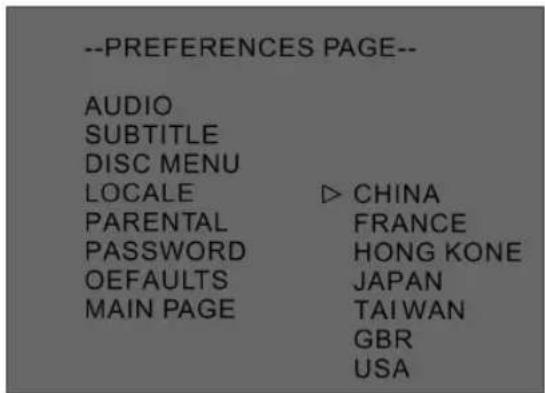
Select the appropriate region in this menu.
PARENTAL

In this menu you can set the parental controls. The lower the setting, the higher the level of security.
Example: With the PG13 setting all fi lms that are approved for children under 13 can be played back.
Note: Not every commercially available disc supports the parental control function.
PASSWORD

The new password is set using the CHANGE function. First confirm CHANGE and then the PASSWORD menu appears. Enter the original password („xxxx“), then go to „new“, enter the new password a first time and then a second time in order to confirm it. You can leave this menu with the ENTER button.
To clear 4-digit password: If you forget your password, the super password is "3308".
DEFAULTS (Factory settings)

ENGLISH
If you select RESET all functions are returned to the original factory settings of the device.
Radio Operation
- Press the FUNCTION button to access the tuner mode.
- Then select FM or AM with the BAND button.
- In the FM band you can select mono or stereo with the FM MODE button.
- Use the TUNING+ or - button to set the desired frequency.
- The volume can be set with the VOL+ or - button.
- In order to switch off radio operation again, press the FUNCTION button or the POWER/STANDBY button.
Storing Radio Stations
- Set a frequency using the TUNING buttons.
- Now press the MEMORY button. The display shows "00".
- You can now use the number buttons to select the station number where you would like to store the station.
- Press the MEMORY button again to store the station.
- In order to call up a stored station, you only need to enter the corresponding station number with the number buttons during radio operation.
MP3 Playback
This device has an inbuilt MP3 decoder. This can be used to play back MP3 tracks (fi les) that have been recorded on CD-R or CD-RW.
Starting Playback
It is recommended that you turn on your television set if you would like to play back an MP3 disc.
- Press the OPEN/CLOSE button to load the disc. The folders and the fi les appear in the menu in the root directory.
- Select the desired music folder with the up/down arrow buttons and confirm with ENTER.
- To select a song fi le (in stop mode) use the up/down buttons and then press the ENTER button to start playback of the song fi le. During playback you can jump to the next or previous track with the TUNING buttons. In order to select a track directly you can also use the number buttons.
This device has been tested according to all relevant current CE guidelines, such as electromagnetic compatibility and low voltage directives, and has been constructed in accordance with the latest safety regulations.
Subject to technical changes without prior notice!
Guarantee
The device supplied by our Company is covered by a 24 month guarantee starting on the date of purchase (receipt).
During the life of the guarantee any fault of the device or its accessories *) ascribable to material or manufacturing defects will be eliminated free of charge by repairing or, at our discretion, by replacing it. The guarantee services do not entail an extension of the life of the guarantee nor do they give rise to any right to a new guarantee!
Proof of the guarantee is provided by the proof of purchase. Without proof of purchase no free replacement or repair will be carried out.
For repairs or replacement during the life of the guarantee return the device in its original packing together with the proof of purchase to your dealer.
*) Damage to accessories does not mean automatic free replacement of the whole machine. In such cases please contact our hotline. Broken glass or breakage of plastic parts are always subject to a charge.
Defects to consumables or parts subject to wearing (e.g. motor pistons, kneading blades, drive shafts, spare remote control, spare toothbrushes, saw blades, etc.) as well as cleaning, maintenance or the replacement of said parts are not covered by the guarantee and hence are to be paid!
The guarantee lapses in case of unauthorized tampering.
After the expiry of the guarantee
After the expiry of the guarantee repairs can be carried by the competent dealer or repair service against the payment of the ensuing costs.
Preferenties....41-43
Radiomodus.... 43
MP3-weergave.... 43
Garantie.... 44
Na de garantieperiode 44
NEDERLANDS
natural_image
Simple diagram with a circle containing a central arrow and two arrows, no text or symbols present.24 ▶ / II PLAY/PAUSE-toets
25 N/P-toets
26 L/R-toets
27 MENU-toets
28 ▼ pijltoets
29 ▶ pijltoets
30 ENTER-toets
31 ZOOM-toets
32 VOL --toets
33 A-B-toets
34 VOL +-toets
35 REPEAT-toets
natural_image
Diagram of two batteries with one shown in a simple line drawing (no text or symbols)PREFERENCES (Preferenties)
DEFAULTS (Fabrieksinstelling)

NEDERLANDS
natural_image
Line drawing of a hand holding a circular object with a pointed tip (no text or symbols)
natural_image
Pure technical line drawing of a mechanical component with no text or symbolsBandeja portadiscos X Disco compact
natural_image
Simple diagram with a circle containing a central arrow and two arrows pointing outward, above a circle with a top circle (no text or symbols)natural_image
Diagram of two battery types: one with a small battery and the other with a larger battery and two labeled terminals (① and ②), no text or symbols present.natural_image
Diagram of two battery types: one with a small battery and the other with a larger battery (no text or symbols)Collegamenti
natural_image
Pure technical line drawing of a mechanical component with no text or symbolsSZUFLADKA CD X PŁYTA CD
natural_image
Simple diagram with a circle, arrow inside, and an upward arrow inside a circle (no text or symbols)17 Przycisk OPEN/CLOSE
Tyt

natural_image
Diagram of two batteries with one shown in a simple line drawing (no text or symbols)- CD-Fach
- General safety instructions
- Precautions
- Protection of the Mains Lead
- Positioning
- When the device is not being used:
- Do not insert your fingers or other objects into the device
- Keep away from water, fire and magnets
- Ventilation
- Condensation
- What to do if there is television interference while you are watching a programme.
- Table of contents
- How to Handle and Care for your CDs Handling Precautions
- CD COMPARTMENT X CD
- If the Surface is Dirty
- Incorrect CD Storage
- Maintenance
- For your Information:
- Operating Controls
- Remote Control
- Battery Mode
- Notes:
- Range of Operation of the Remote Control
- Connections
- Before connecting the DVD player
- Operation
- Preparation
- Functions
- PLAY/ PAUSE
- STOP
- FUNCTION
- TUNING+ / TUNING-
- CHANNEL+ / CHANNEL-
- Number Buttons (0-9 and +10)
- MUTE
- VOL+ /VOL-
- DISPLAY
- ZOOM
- SLOW
- REPEAT
- DVD
- CD
- A-B
- RETURN (only for VCDs)
- ANGLE
- AUDIO
- SUBTITLE
- PROGRAM
- TITLE ( only for DVDs)
- MENU
- L/R
- N/P
- STEP
- Arrow Buttons ◀ / ▶ / ▲ / ▼
- PBC
- GOTO
- SHUFFLE
- SETUP
- GENERAL SETUP
- ANGLE MARK
- OSD LANGUAGE
- CAPTION (Title)
- SCREEN SAVER
- SPEAKER SETUP
- DOWNMIX
- AUDIO SETUP (Dolby Setup)
- SPDIF OUTPUT
- LPCM 48K:
- LPCM 96K:
- PREFERENCES
- TV TYPE
- DISC MENU
- LOCALE
- PARENTAL
- PASSWORD
- DEFAULTS (Factory settings)
- Radio Operation
- Storing Radio Stations
- MP3 Playback
- Starting Playback
- Guarantee
- After the expiry of the guarantee
- NEDERLANDS
- PREFERENCES (Preferenties)
- Collegamenti
Brand : AEG
Model : DVD 4404 HC
Category : Home Theater