TeraStation 3200D - NAS BUFFALO - Free user manual and instructions
Find the device manual for free TeraStation 3200D BUFFALO in PDF.

| Product Type | Network Attached Storage (NAS) |
| Model | TeraStation 3200D |
| Brand | Buffalo |
| Number of Bays | 2 |
| Processor | Intel Atom D2550 (dual-core, 1.86 GHz) |
| Memory | 2 GB DDR3 (expandable to 4 GB) |
| Drive Support | 2 x 3.5" SATA HDD (up to 8 TB total) |
| RAID Modes | RAID 0, RAID 1, JBOD, Independent |
| Network Interface | 2 x Gigabit Ethernet (RJ-45) |
| USB Ports | 2 x USB 2.0, 1 x USB 3.0 |
| Dimensions (W x H x D) | 170 x 215 x 170 mm (6.7 x 8.5 x 6.7 in) |
| Weight | 4.5 kg (9.9 lbs) without drives |
| Power Supply | 100-240 V AC, 50/60 Hz, 60 W external |
| Power Consumption | 30 W typical operation, 1 W standby |
| Main Functions | File sharing, backup, media streaming, FTP, iSCSI, RAID management |
| Supported File Systems | EXT3, EXT4, XFS, FAT32, NTFS (external) |
| Access Protocols | SMB/CIFS, AFP, NFS, FTP, SFTP, WebDAV |
| Security | User/group management, ACL, encrypted volumes, antivirus support |
| Cooling | 1 x 80 mm fan, temperature-controlled |
| Maintenance | Web-based management interface, firmware update via web |
| Repairability | User-replaceable drives, memory, and fan; spare parts available from Buffalo |
| General Information | Installation guide, quick setup wizard, 3-year limited warranty |
Frequently Asked Questions - TeraStation 3200D BUFFALO
User questions about TeraStation 3200D BUFFALO
0 question about this device. Answer the ones you know or ask your own.
Ask a new question about this device
Download the instructions for your NAS in PDF format for free! Find your manual TeraStation 3200D - BUFFALO and take your electronic device back in hand. On this page are published all the documents necessary for the use of your device. TeraStation 3200D by BUFFALO.
USER MANUAL TeraStation 3200D BUFFALO
natural_image
Line drawing of three server rack units (no text or symbols)Americas: www.buffaloamericas.com
Europe: www.buffalo-technology.com
Asia Pacific: www.buffalo-asia.com
35013005-11
2015.09
Contents
Chapter 1 Getting Started ....8
Diagrams....8
Turning the TeraStation On and Off.... 10
Changing the Administrator Password 12
Creating a Recovery Drive 14
Chapter 2 Configuration ...... 16
Opening Settings 16
Opening Easy Admin 18
Chapter 3 Access Restrictions....20
Adding a Shared Folder 20
Recycle Bin....23
Read-Only Shares....23
Hidden Shares 23
Adding Users 23
Importing User Information....25
Adding Groups 25
Configuring Access Restrictions 27
Local Users and Groups 27
Active Directory 28
NT Domain....31
User Authentication with an External SMB Server....33
Chapter 4 Managing Storage.... 37
RAID Arrays.... 37
Working with RAID Arrays....38
Using JBOD 38
Changing RAID Mode 39
Configuring a Hot Spare....40
RMM (RAID Mode Manager)......41
RAID Scanning....44
Adding an External Hard Drive 45
Connecting an External Drive 45
Compatibility 45
Dismounting Drives 45
Checking Drives 46
Formatting Drives 47
Encrypting Drives....50
Media Cartridges....50
Erase Data on the TeraStation Completely....51
Disk Quotas 52
Quotas for Users....52
Quotas for Groups ....53
Size Limits....54
Using the TeraStation as an iSCSI Device 57
Introduction 57
Creating a iSCSI Volume 57
Connecting or Disconnecting Volumes....59
Configuring Access Restrictions 65
Expanding Volume Sizes 73
Deleting Volumes....74
Hard Drive Replacement 75
Hard Drive Replacement Examples....76
Chapter 5 Backup 82
Back Up from the TeraStation 82
Preparing a Backup Destination....82
Configuring a Backup Job 84
Replication....88
Failover 91
Ethernet Cable Connection Methods....91
Usage Restrictions 93
Configuration....93
Additional Settings....94
When the Main TeraStation Fails 95
Backing Up Your Mac with Time Machine 95
Copying from a USB Device....99
Chapter 6 Remote Access....101
WebAccess 101
WebAccess Remote 103
FTP 105
Amazon S3 106
Chapter 7 BitTorrent......109
Chapter 8 Multimedia .... 112
DLNA 112
Playing Files 113
Connected DLNA-compatible Devices 113
Streaming to DLNA-compatible Devices 114
Disabling Playback from Specific Devices 115
iTunes Server 116
Chapter 9 Surveillance Server .... 119
Getting Started 119
Installing Client Tools ....120
Connecting Devices to the Network....120
Enabling Surveillance Cameras 120
Enabling the Free License ....122
Registering Recording Policies 124
Checking Recording....129
Viewing Saved Video 130
Advanced Usage....130
Export Recorded Data as a MOV Video File ....130
Viewing Video Real-time 133
Moving Recorded Video Data to Another TeraStation....134
Backing Up Recorded Video to Another TeraStation ....135
Automatically Delete Old Data when Space is Low....136
Changing Where Recorded Video Is Saved 138
Email Notification 138
Client Tools 139
Camera Policies....139
Live Viewer 139
Data Service Policies....140
Vault Admin....141
Surveillance Video Manager 142
Network Activity 143
Mini Vault Stats 144
Activating Additional Licenses 144
When the TeraStation is Connected to the Internet....144
TeraStation Not Connected to the Internet 146
Troubleshooting....150
Chapter 10 Advanced Features .... 152
Antivirus Software 152
Licenses 152
Activating Virus Scanning 153
Configuring Security Settings 153
Connecting through a Proxy Server 155
Updating....155
Excluding a Specific Folder from Antivirus Scanning ....156
Virus Scanning 157
Checking the Log 158
Online Help....159
Email Notification 159
Sleep Mode 161
Wake-on-LAN 162
UPS (Uninterruptible Power Supply)....163
Port Trunking.... 164
Configuring Port Trunking 165
Connecting a Printer 166
TeraSearch 167
Offline Files....168
DFS 170
Accessing from an NFS Client....172
Encrypting Data Transmission 175
Encrypting Settings Data 175
Encrypting FTP Transfer Data 175
SSL Keys 175
Web Server....176
MySQL Server 177
SNMP 179
Saving and Applying Settings....179
Saving Settings 180
Applying Settings 181
Transferring Another TeraStation's Settings 182
Restoring Factory Defaults....183
Initializing from Settings 183
Initializing with a Recovery Drive....184
Logs 184
Updating the Firmware....185
Name, Date, Time, and Language 186
Beep Alerts 189
LCD and LEDs....189
Jumbo Frames 190
Changing the IP Address 192
Chapter 11 Utilities....194
NAS Navigator2 for Windows....194
Mount as Network Drive....196
Changing the IP Address....197
NAS Navigator2 for Mac 198
Mount as Network Drive....200
Changing the IP Address....201
iSCSI Connection Tool 201
Menu 203
NovaBACKUP 203
Installing from CD....203
Installing from Website 203
Chapter 12 Appendix ...... 204
LCD Display 204
Modes 204
Errors....204
Status....205
Default Settings 207
Specifications 208
Chapter 13 Regulatory Compliance Information....210
For Customers in the United States 210
For Customers in Europe 210
For Customers in Korea....212
For Customers in Taiwan....213
For Customers in China....213
Chapter 1 Getting Started
This manual provides instructions for the latest firmware (as of April 2015). For more detailed information on the latest firmware, refer to the Buffalo website.
Diagrams
TS3400D

text_image
1 2 3 4 5 6 INFO STICKER LANF LANF 7 8 BUFFALO 9 10 11 12 13 14 15 16 17 18 19 20 21 25- or 24 25TS3400R
text_image
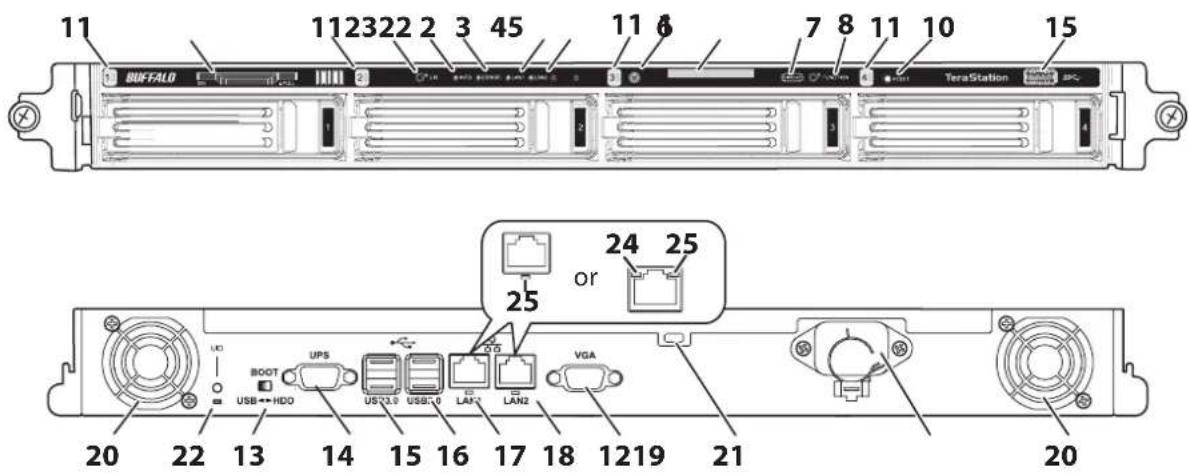
11 112322 2 3 45 11 6 7 8 11 10 15 BUFFALO TeraStation 2 3 4 24 25 25 or 20 22 13 14 15 16 17 18 1219 21 BOOT UPS US3.0 USB.0 LAN2 VGA USB↔HDD VGA 20TS3200D
text_image
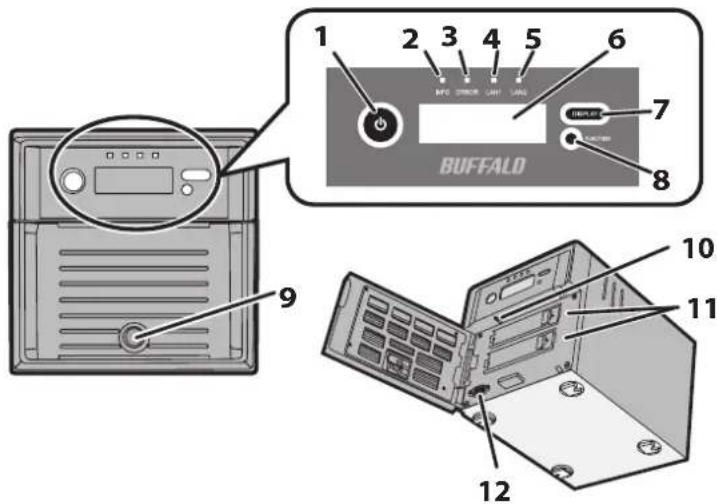
1 2 3 4 5 6 BIFC STICKER LIGHT VAS 7 8 BUFFALD 9 10 11 12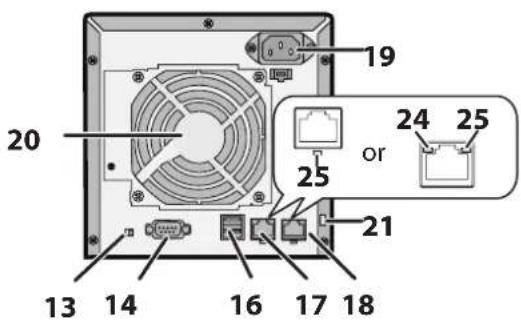
text_image
19 20 24 25 or 25 21 13 14 16 17 181 Power Button
To power on, connect the power cable and wait for 10 seconds, then hold down the power button for 1 second. To power off, hold down the power button for 3 seconds (until it beeps).
2 Info LED
If there is a status message, the amber info LED will light up. Check the LCD panel to see the status message.
3 Error LED
If there is an error, the red error LED will light up. Check the LCD panel to see the error message.
4 LAN1 LED
When LAN port 1 is connected, this LED glows green. It blinks when the connection is active.
5 LAN2 LED
When LAN port 2 is connected, this LED glows green. It blinks when the connection is active.
6 LCD Panel
This display shows the status of many TeraStation settings. It also displays errors and messages when available.
7 Display Button
Switches between the different display modes. Also, if the TeraStation is beeping, press this button to stop it.
8 Function Button
Use this button for Direct Copy, dismounting USB devices, rebuilding RAID arrays, and configuring failover.
9 Drive Lock
Open the front panel with the key to replace hard drives or access the reset button.
10 Init Button
Hold down this button to initialize the TeraStation's admin username and password, IP address, SSL, and service port restriction settings to their factory default values. The behavior of this button can be modified in Settings.
11 Status LEDs
Normally, these LEDs blink green when hard drives are accessed. If a drive fails, its LED will turn red or amber.
12 Factory Use Only
13 Boot Mode Switch
Leave the switch in the HDD position during normal operation. To recover settings, insert the recovery USB drive into a USB 2.0 port, move the boot switch to the USB position, and press the power button.
14 UPS Port
Connect to a UPS.
15 USB 3.0 Port
Compatible Buffalo USB 3.0 hard drives can be connected. USB hubs are not supported.
16 USB 2.0 Port
Compatible Buffalo USB hard drives, USB flash drives, digital cameras, and USB UPS connections can be connected. USB hubs are not supported.
17 LAN Port 1
Use an Ethernet cable to connect this port to your network.
18 LAN Port 2
This second Ethernet port may be used for network redundancy or backup. You may connect a second TeraStation directly to this port for backup.
19 Power Connector
Use the included power cable to connect to an UPS, surge protector, or outlet.
20 Fan
Do not block the fan.
21 Anti-Theft Security Slot
Use this slot to secure your TeraStation with a cable lock (not included).
22 UID Button
Press the UID button on the front or the back of the unit to cycle the blue LED on and off.
23 Serial Number
This sticker shows the TeraStation's serial number.
24 Not in use.
25 Link and Act LEDs
These LEDs show network activity. They blink orange when the TeraStation is accessed over the network.
Turning the TeraStation On and Off
Press the power button on the TeraStation to turn it on.
To power off, hold down the power button for 3 seconds (until it beeps). Don't unplug the TeraStation without turning it off first. You can also shut it down and restart it remotely from Settings.
Shutting Down or Restart from Settings
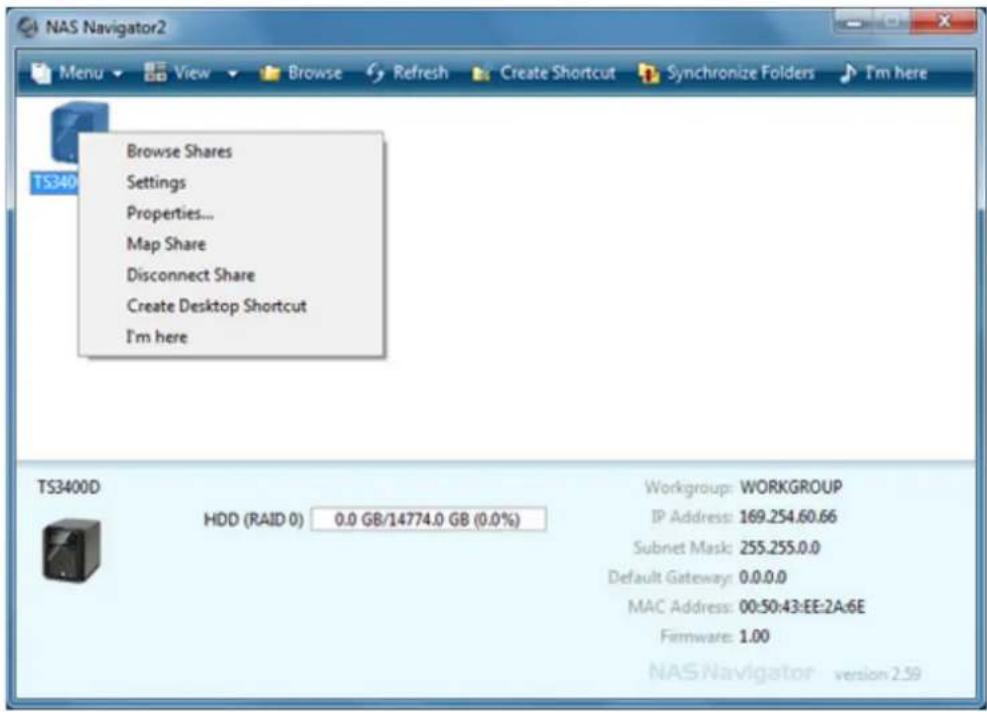
1 Double-click the icon to start NAS Navigator2.

2 Right-click your TeraStation's icon and select Settings. For Mac OS, select the TeraStation's icon while holding down the control key, then select Settings.

text_image
NAS Navigator2 Menu View Browse Refresh Create Shortcut Synchronize Folders I'm here Browse Shares Settings Properties... Map Share Disconnect Share Create Desktop Shortcut I'm here TS3400D HDD (RAID 0) 0.0 GB/14774.0 GB (0.0%) Workgroup: WORKGROUP IP Address: 169.254.60.66 Subnet Mask: 255.255.0.0 Default Gateway: 0.0.0.0 MAC Address: 00:50:43:EE:2A:6E Firmware: 1.00 NAS Navigator version 2.593 Enter the username and password, then click OK.

text_image
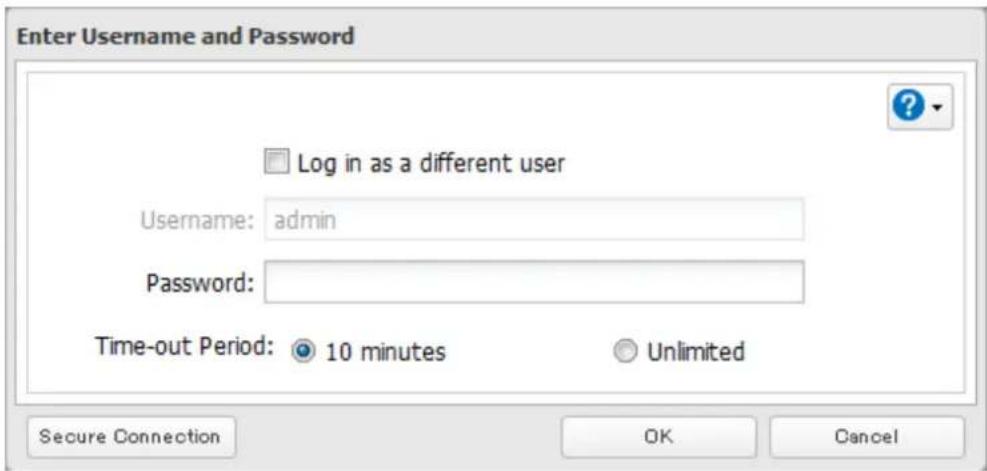
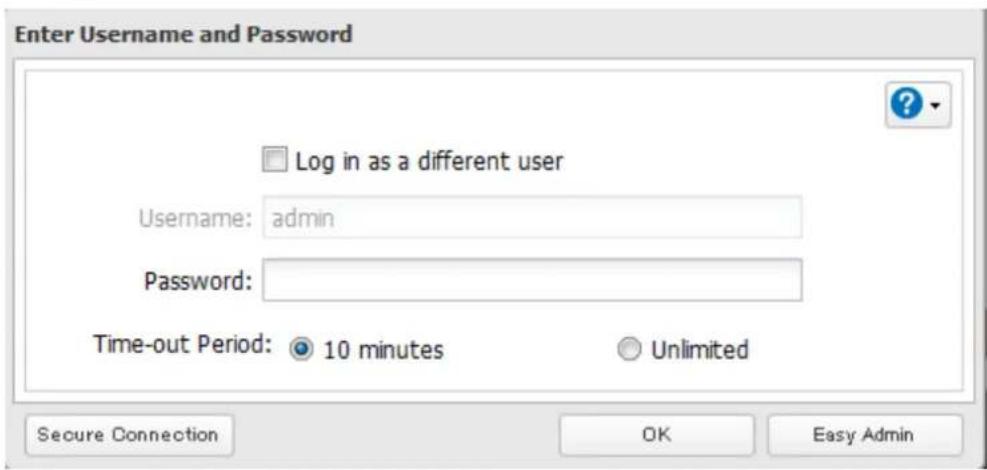
Enter Username and Password Log in as a different user Username: admin Password: Time-out Period: 10 minutes Unlimited Secure Connection OK Easy AdminNote: The default username and password are "admin" and "password".
4 Settings will open.
text_image
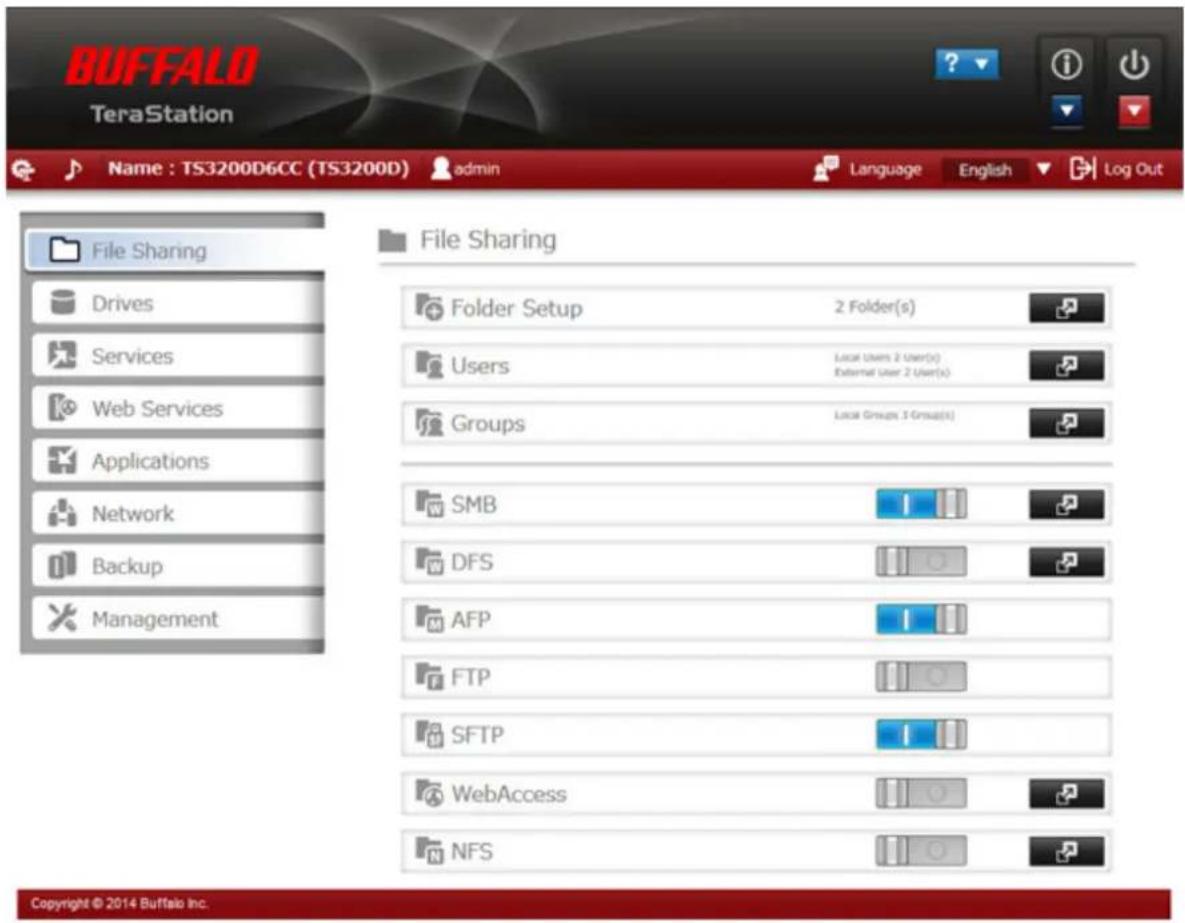
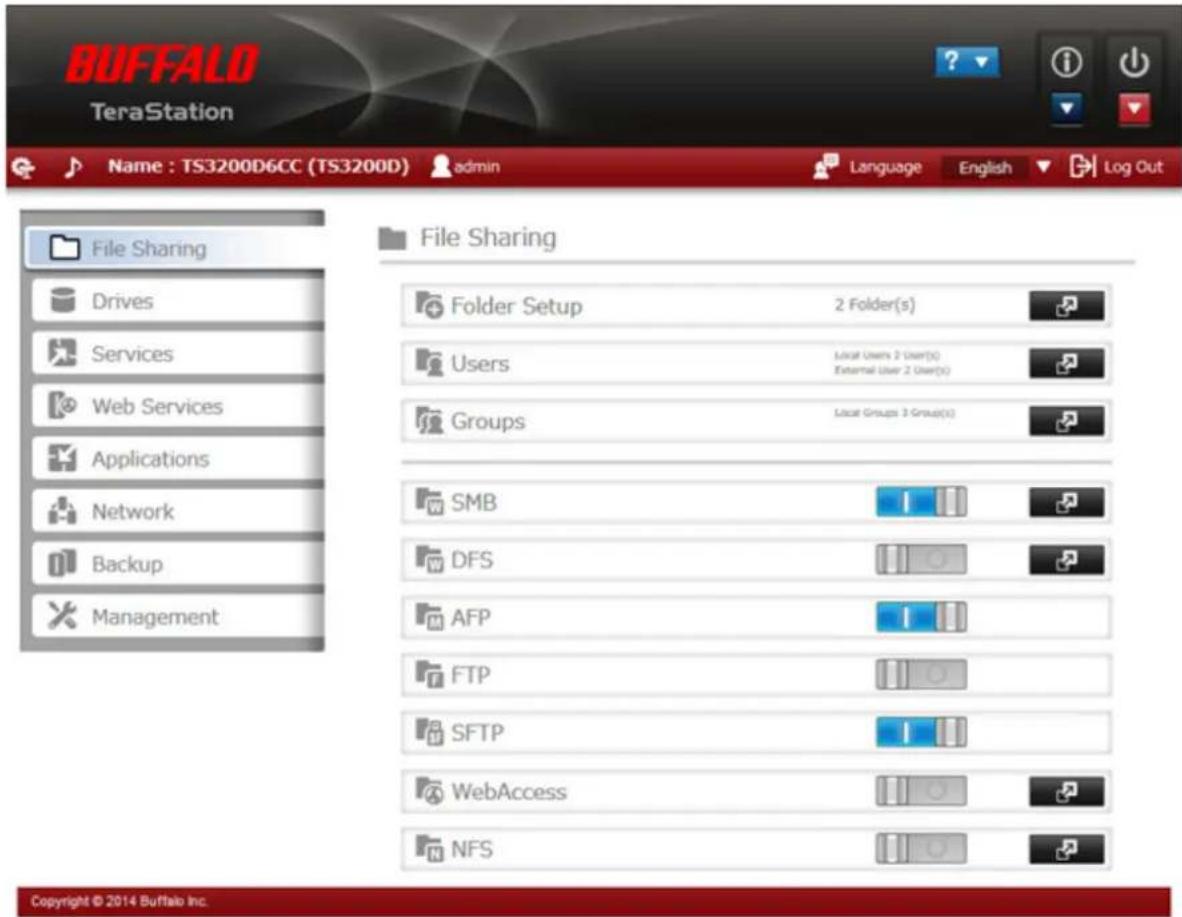
BUFFALO TeraStation Name : TS3200D6CC (TS3200D) admin Language English Log Out File Sharing Drives Services Web Services Applications Network Backup Management File Sharing Folder Setup 2 Folder(s) Users Local Users 2 User(s) External User 2 User(s) Groups Local Group 3 Group(s) SMB DFS AFP FTP SFTP WebAccess NFS Copyright © 2014 Buffalo Inc.5 Click at the top-right of Settings and choose either Restart or Shut Down.

text_image
Language Engl i i i Restart Shut DownWhen all the LEDs on the front of the TeraStation turn off, the shutdown process is complete.
Changing the Administrator Password
After initial setup, follow this procedure to change your password.
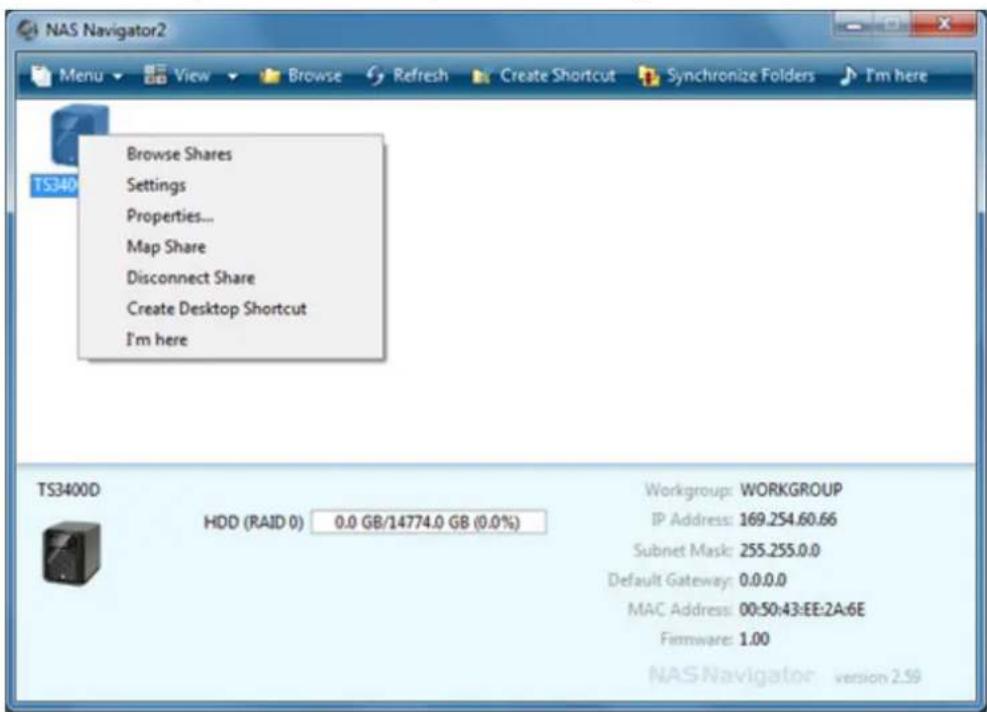
1 Double-click the icon to start NAS Navigator2.

2 Right-click on your TeraStation's icon and select Settings. On the Mac, select the TeraStation's icon while holding down the control key, then select Settings.
text_image
NAS Navigator2 Menu View Browse Refresh Create Shortcut Synchronize Folders I'm here Browse Shares Settings Properties... Map Share Disconnect Share Create Desktop Shortcut I'm here TS340D HDD (RAID 0) 0.0 GB/14774.0 GB (0.0%) Workgroup: WORKGROUP IP Address: 169.254.60.66 Subnet Mask: 255.255.0.0 Default Gateway: 0.0.0.0 MAC Address: 00:50:43:EE:2A:6E Firmware: 1.00 NAS Navigator version 2.593 Click Easy Admin.

text_image
Enter Username and Password Log in as a different user Username: admin Password: Time-out Period: 10 minutes Unlimited Secure Connection OK Easy Admin4 Click Change Password.
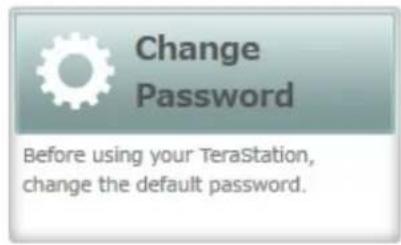
text_image
Change Password Before using your TeraStation, change the default password.5 If this screen is displayed, enter the current password and click OK. The default password is "password".
text_image
Enter Username and Password Log in as a different user Username: admin Password: Time-out Period: 10 minutes Unlimited Secure Connection OK Cancel6 Enter the new password (twice) and click Next.

Easy Admin > Change Administrator Password
Change the administrator password.
For security, please choose a new administrator password below.

Show entered password
Password:

Enter the password again to confirm.
Confirm Password:

The password may include up to 20 alphanumeric characters, hyphens (-), underscores (_), periods (.), and symbols !, #, &, @, \$, *, ^, %.
Skip
Next
7 Click OK. You have changed the admin password.
Creating a Recovery Drive
Follow the procedure below to create a recovery drive, which allows you to initialize all of the TeraStation's settings or just restore the admin password to its factory default value.
Notes:
- Normally, creating and using a recovery drive will not affect data on the TeraStation. However, always back up your data regularly!
- This USB drive can be used to recover the system if your TeraStation doesn't boot at all. In this case, if the data partition is damaged, then all your data will be deleted by the recovery process.
1 Insert a 1 GB or larger USB flash drive into a USB port on the TeraStation.
Note: All data on the USB flash drive will be erased!
2 In Settings, navigate to Management - Configuration Management - USB Drive Options.
3 Select Create a USB drive for initializing settings.

text_image
USB Drive Options Select from the following options: Save current configuration to a USB drive Transfer settings from a USB drive Create a USB drive for initializing settings Target USB drive: USB Disk 1 Execute4 Select the USB memory device from "Target USB drive", then click Execute.
5 The "Confirm Operation" screen will open. Enter the confirmation number, then click OK. The TeraStation will create the recovery drive. This will take about a minute.
6 When the "finished" dialog opens, the USB recovery drive is ready to use. Dismount the USB drive before unplugging it. See "Dismounting Drives" in chapter 4 for the instructions on dismounting drives.
Chapter 2 Configuration
Configure and manage your TeraStation using the Settings interface, accessible from a browser window. Open the interface using the procedure below or type the TeraStation's IP address in the URL field of your browser. Within Settings, the Easy Admin page gives you quick access to commonly used settings.
Note: Internet Explorer 9, Firefox 18, Google Chrome 24, Safari 5, and later are supported. If you have difficulty viewing Settings, check the following:
- If there are a large number of registered users, groups, or shared folders, use Firefox instead of Internet Explorer.
• If you have a proxy server enabled in the browser settings, disable the proxy server. - With Internet Explorer, set security to Local intranet. On Windows Server 2008 or later version Windows OS, higher-level security is configured by default. Set the security to a lower level temporarily.
Opening Settings

1 Double-click the icon to start NAS Navigator2.
2 Right-click on your TeraStation's icon in NAS Navigator and select Settings. For Mac OS, click your TeraStation's icon while holding down the control key, then select Settings.
text_image
NAS Navigator2 Menu View Browse Refresh Create Shortcut Synchronize Folders I'm here Browse Shares Settings Properties... Map Share Disconnect Share Create Desktop Shortcut I'm here TS340 T5340D HDD (RAID 0) 0.0 GB/14774.0 GB (0.0%) Workgroup: WORKGROUP IP Address: 169.254.60.66 Subnet Mask: 255.255.0.0 Default Gateway: 0.0.0.0 MAC Address: 00:50:43:EE:2A:6E Firmware: 1.00 NAS Navigator version 2.593 Enter the username and password and click OK.

text_image
Enter Username and Password Log in as a different user Username: admin Password: Time-out Period: 10 minutes Unlimited Secure Connection OK Easy AdminNotes:
- If the time-out period is set to "10 minutes", you will be logged out of Settings after 10 minutes of inactivity.
- Click Secure Connection to log in with an encrypted connection.
4 Settings will open.
text_image
BUFFALO TeraStation Name : TS3200D6CC (TS3200D) admin Language English Log Out File Sharing Drives Services Web Services Applications Network Backup Management File Sharing Folder Setup 2 Folder(s) Users Local Users 2 User(s) External User 2 User(s) Groups Local Groups 3 Group(s) SMB DFS AFP FTP SFTP WebAccess NFS Copyright © 2014 Buffalo Inc.Notes:
- Username/Password Combinations:
| Username Password Settings Available | |
| admin password All | |
| guest blank System information (read-only) | |
| Your username Your password | If a user is assigned as an administrator, all settings are available. If assigned under another group, only system information (read-only) is available. |

- Click 📋 to play a tone from the TeraStation for easy location. For TS3400R models, you can stop the beeping by pressing the function or display button.
- You can also use Bonjour to log in to Settings from OS X 10.4 or later. In Safari, click View - Show Bookmarks Bar. From Bookmarks, click Bonjour - TeraStation name.
Opening Easy Admin
The Easy Admin page makes it easy to change common settings. Follow the steps below to open Easy Admin.

1 Double-click the icon to start NAS Navigator2.
2 Right-click on your TeraStation's icon and choose Settings. For Mac OS, click the TeraStation icon while holding down the control key, then select Settings.

text_image
NAS Navigator2 Menu View Browse Refresh Create Shortcut Synchronize Folders I'm here Browse Shares Settings Properties... Map Share Disconnect Share Create Desktop Shortcut I'm here TS3400D HDD (RAID 0) 0.0 GB/14774.0 GB (0.0%) Workgroup: WORKGROUP IP Address: 169.254.60.66 Subnet Mask: 255.255.0.0 Default Gateway: 0.0.0.0 MAC Address: 00:50:43:EE:2A:6E Firmware: 1.00 NAS Navigator version 2.593 Click Easy Admin.
text_image
Enter Username and Password Log in as a different user Username: admin Password: Time-out Period: 10 minutes Unlimited Secure Connection OK Easy Admin4 The Easy Admin screen will open.
text_image
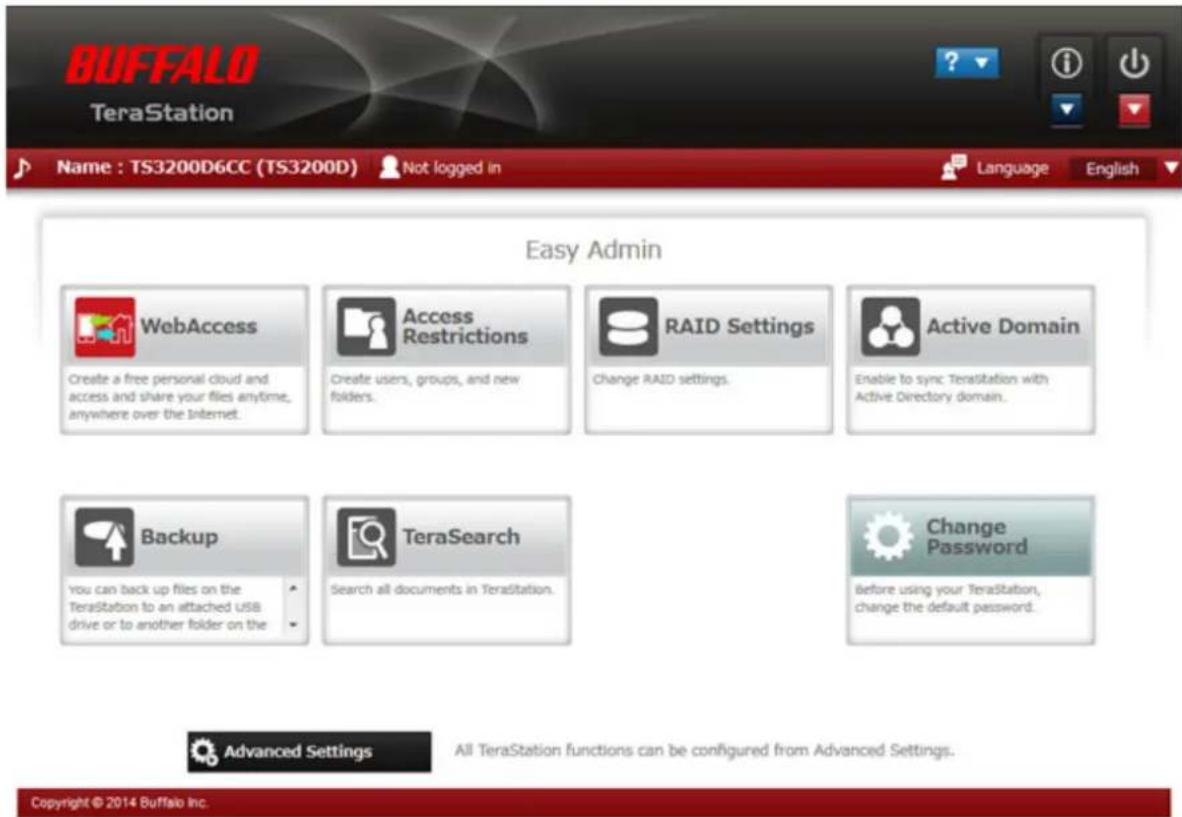
BUFFALO TeraStation Name : TS3200D6CC (TS3200D) Not logged in Language English Easy Admin WebAccess Create a free personal cloud and access and share your files anytime, anywhere over the Internet. Access Restrictions Create users, groups, and new folders. RAID Settings Change RAID settings. Active Domain Enable to sync Terasitation with Active Directory domain. Backup you can back up files on the Terasitation to an attached USB drive or to another folder on the TeraSearch Search all documents in Terasitation. Change Password Before using your Terasitation, change the default password. Advanced Settings All TeraStation functions can be configured from Advanced Settings. Copyright © 2014 Buffalo Inc.Notes:
• If you click any buttons, you will need to enter a username and password.
• In Advanced Settings, click the icon at the top left to open Easy Admin.
Chapter 3 Access Restrictions
You may restrict access to specific shared folders, including external USB drives.
Notes:
- Access restrictions can be set separately for each shared folder, but not for folders within the shared folders.
- Configure access restrictions through Settings. Configuring access restrictions through Windows is not supported and may cause unexpected behavior.
- You can also configure users, groups, and shared folders from Easy Admin by clicking Access Restrictions.
- Shared folders with limited access can still be used as backup destinations.
Adding a Shared Folder
1 In Settings, click File Sharing.

text_image
File Sharing2 Click to the right of "Folder Setup".

text_image
Folder Setup 4 Folder(s)3 Click Create Folder.

Configure the desired settings, then click OK.
text_image
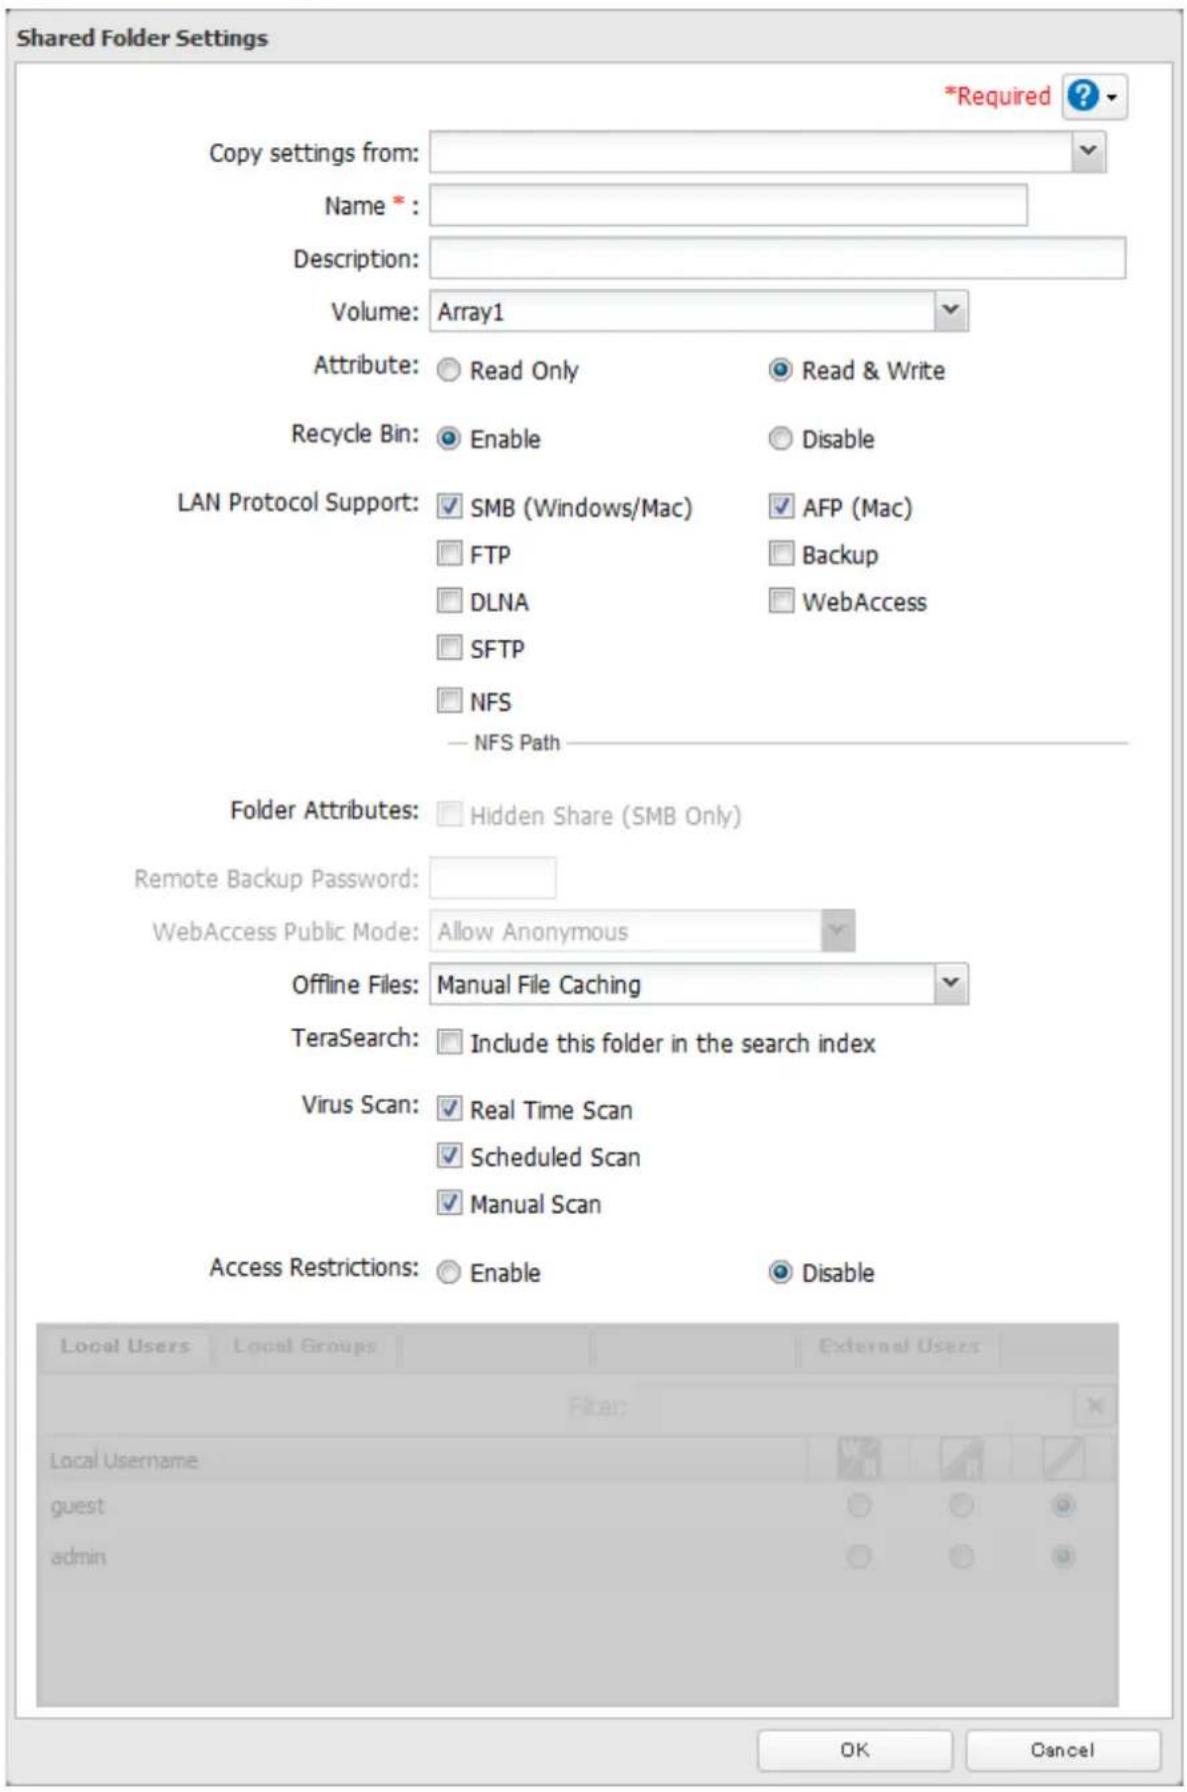
Shared Folder Settings *Required ? Copy settings from: Name *: Description: Volume: Array1 Attribute: ○ Read Only ○ Read & Write Recycle Bin: ○ Enable ○ Disable LAN Protocol Support: ✓ SMB (Windows/Mac) ✓ AFP (Mac) □ FTP □ Backup □ DLNA □ WebAccess □ SFTP □ NFS — NFS Path—— Folder Attributes: □ Hidden Share (SMB Only) Remote Backup Password: WebAccess Public Mode: Allow Anonymous Offline Files: Manual File Caching TeraSearch: □ Include this folder in the search index Virus Scan: ✓ Real Time Scan ✓ Scheduled Scan ✓ Manual Scan Access Restrictions: ○ Enable ○ Disable Local Users Local Groups External Users Local Username guest admin OK CancelNotes:
- Names may contain up to 27 alphanumeric characters, hyphens (-), and underscores (_). Do not use a symbol as the first character in a name.
- The description may contain up to 75 alphanumeric characters, hyphens (-), underscores (_), and spaces. Do not use a symbol or space as the first character.
• You may create up to 400 shared folders.
- The names of shared folders should not use characters from more than one language. For example, mixing Japanese and Korean characters in names is not supported.
- If multi-byte characters are used in shared folder names, configure the client language to match the characters in Management - Name/Time/Language.
- The following characters are handled differently by Mac OS and Windows. Avoid using these characters when sharing data between Mac OS and Windows: —\~ || - ¢ £ →
- Windows does not support some characters that Mac OS and the TeraStation allow. If you create a filename on a Mac with any of the following characters, it will not display correctly on a Windows computer. With OS X 10.2 or later, you may have to connect to the TeraStation via AFP in order to display or copy any of the following characters:
$$ ? [ ] / \backslash = + < >;:: ^ {\prime \prime}, | * $$
- Do not use any of the following words as the name of a shared folder. These words are reserved for internal use by the TeraStation: info, spool, lost+found, global, printers, homes, lp, authtest, ram, msdfs_root, mt-daapd, usbdisk# (where # is a number, for example: usbdisk1)
- Don't use the following unsupported characters in shared folder names, workgroup names, or filenames:
• File and folder names may contain up to 255 single-byte characters.
- Configure hidden and read-only file attributes in Settings. Configuring them from within Windows is not supported and may cause unexpected behavior.
- Folder and workgroup names whose names contain non-Roman characters may not be displayed correctly.
- If shared folders are accessed from a Mac, information files for the Mac may be generated automatically. Do not delete these files. If they are deleted using Windows, this may prevent further access from a Mac.
- If an SMB connection is used with OS X 10.3.9, the names of mounted volumes may appear as unreadable characters in Finder and other applications. This is not a problem with the filename or data.
- With OS X 10.5 to 10.5.6, Spotlight searches are not supported over AFP connections. Use SMB connections or upgrade to OS X 10.5.7 or later.
• The TeraStation belongs to the default zone in AppleShare: the zone cannot be specified.
- When files are copied to the TeraStation or to a USB drive connected to the TeraStation, file information such as date created, date modified, and other date information may be updated or changed.
- During a file transfer, if settings are changed, the file transfer operation may be aborted.
- File copying to the TeraStation is protected by a journaling file system. If the Ethernet cable is disconnected or a power outage occurs while copying data, the following may occur:
- Preset data such as the TeraStation name, users, and groups may be erased.
- An incomplete file may be copied and the file can no longer be deleted. If this happens, restart the
TeraStation, delete the file, and perform the copy operation again.
Recycle Bin
To protect your data from accidental deletion, you may configure your TeraStation to use a recycle bin instead of deleting files immediately. The recycle bin will only work with SMB connections. To empty the recycle bin, click File Sharing - Folder Setup - Empty Recycle Bin in Settings.
Read-Only Shares
By default, new shares are set with read & write access, but you may change the attribute to Read Only in Attribute. Read-only shares and HFS+ formatted USB hard drives will have "Read-only" added to the shared folder description.
Hidden Shares
If hidden shares is enabled, shared SMB folders will not be displayed in My Network, and only certain users are allowed to access them. To hide a shared SMB folder, follow the instructions below.
1 In Settings, navigate to File Sharing - Folder Setup and choose a shared folder or a USB drive to configure hidden shares.
2 Check "Hidden Share (SMB Only)" and click OK.
Note: If protocols other than "SMB" or "Backup" under "LAN Protocol Support" are enabled, the hidden shares option will be grayed out and cannot be selected.
To open a hidden folder, click Start - Search programs and files and enter "\TeraStation name\Shared folder name\" for the name. For example, if the TeraStation name is "TSXXX001" and the shared folder name is "share", enter "001\" to open it.
Adding Users
Note: The TeraStation can register a maximum 300 of users, which includes the default users "admin" and "guest".
1 In Settings, click File Sharing.

text_image
File Sharing2 Click to the right of "Users".

text_image
Users Local Users 3 User(s)3 Click Create User.
4 Enter the desired settings, then click OK.

text_image
User Settings Username: * User ID: Enter a number from 1000 to 1999. Email: Password: * Confirm Password: * Description: Quota: Enable Quota Alert 1 GB Capacity: Quota Capacity: 1 GB Disable * Required ? Filter: Group admin hdusers Select All Unselect All Primary Group: hdusers OK CancelNotes:
- Usernames may contain up to 128 characters, including hyphens (-), underscores (_), periods (.), !, #, &, @, \$, *, ^, and %. Do not use a symbol as the first character.
- The user ID should be a number from 1000 to 1999. Each user ID should be unique. If this field is left blank, a user ID is assigned automatically.
- Do not duplicate user IDs, group IDs, usernames, or group names. Each should be distinct and unique.
- The description may contain up to 75 alphanumeric characters, hyphens (-), underscores ( ), and spaces. Do not use a symbol or space as the first character.
- Passwords may contain up to 20 alphanumeric characters and the following characters: - _ @ ! # \$ % & ' () * + , / ; < > = ? " [ ] ^ { } | \~. Do not use a symbol other than an underscore ( ) as the first character.
- Use the same username and password for both Windows and the TeraStation or you may not be able to access shared folders.
- Do not use any of the following words as a username or group name: root, bin, daemon, sys, adm, tty, disk, lp, sync, shutdown, halt, operator, nobody, mail, news, uucp, ftp, kmem, utmp, shadow, users, nogroup, all, none, hdusers, admin, guest, man, www, sshd, administrator, ftpuser, apache, mysql, splx
Importing User Information
You can import users in File Sharing - Users by clicking Import CSV File. Existing users will be overwritten.
Format for user data: Username (required), password (required), and user description (optional).
Examples:
username1, password1, comment1
username2, password2, comment2
username3, password3, comment3
Guidelines:
- Use commas (,) as separators. Do not put spaces before or after commas.
• If a line has an incorrect format, the user on that line will not be registered.
• If a username exists, the new user information will overwrite the old information. - Do not use commas (,) in the username, password, or user description.
Note: Imported users are added to the "hdusers" group automatically.
Adding Groups
1 In Settings, click File Sharing.

text_image
File Sharing2 Click to the right of "Groups".

Local Groups 5 Group(s)

3 Click Add Group.

Enter settings, then click OK.

text_image
Group Settings *Required ? Group Name: * Filter: Username admin local01 local02 Group ID: (*Enter a number from 1000 to 1999.) Group Privileges: General Users Select a recipient for group notifications: User (with email address configured) Disabled Email address Description: Quota: Enable Quota Alert Capacity: 1 GB Quota Capacity: 1 GB Disable Select All Unselect All OK CancelNotes:
- Group names may contain up to 20 alphanumeric characters, hyphens (-), underscores (_), and periods (.). Do not use a symbol other than an underscore (_) as the first character.
- Group descriptions may contain up to 75 alphanumeric characters, hyphens (-), underscores (_), and spaces. Do not use a symbol or space as the first character.
- If the group ID field is left blank, a group ID is automatically assigned. Use numbers between 1000 and 1999 to set a group ID manually. Don't use duplicate group IDs.
• You may register up to 300 groups with the TeraStation. - If you are logged in as a member of the general users group, you can only change your own password. If you're logged in as an administrator, you can change any settings, including other users' passwords. If you are logged in as a member of the power users group, you can create and edit shared folders, users, and groups.
- Do not use any of the following words as a username or group name: root, bin, daemon, sys, adm, tty, disk, lp, sync, shutdown, halt, operator, nobody, mail, news, uucp, ftp, kmem, utmp, shadow, users, nogroup, all, none, hdusers, admin, guest, man, www, sshd, administrator, ftpuser, apache, mysql, splx
Configuring Access Restrictions
Local Users and Groups
1 In Settings, click File Sharing.
text_image
File Sharing2 Click to the right of "Folder Setup".

text_image
Folder Setup 4 Folder(s)3 Click the shared folder that you want to set access restrictions for.
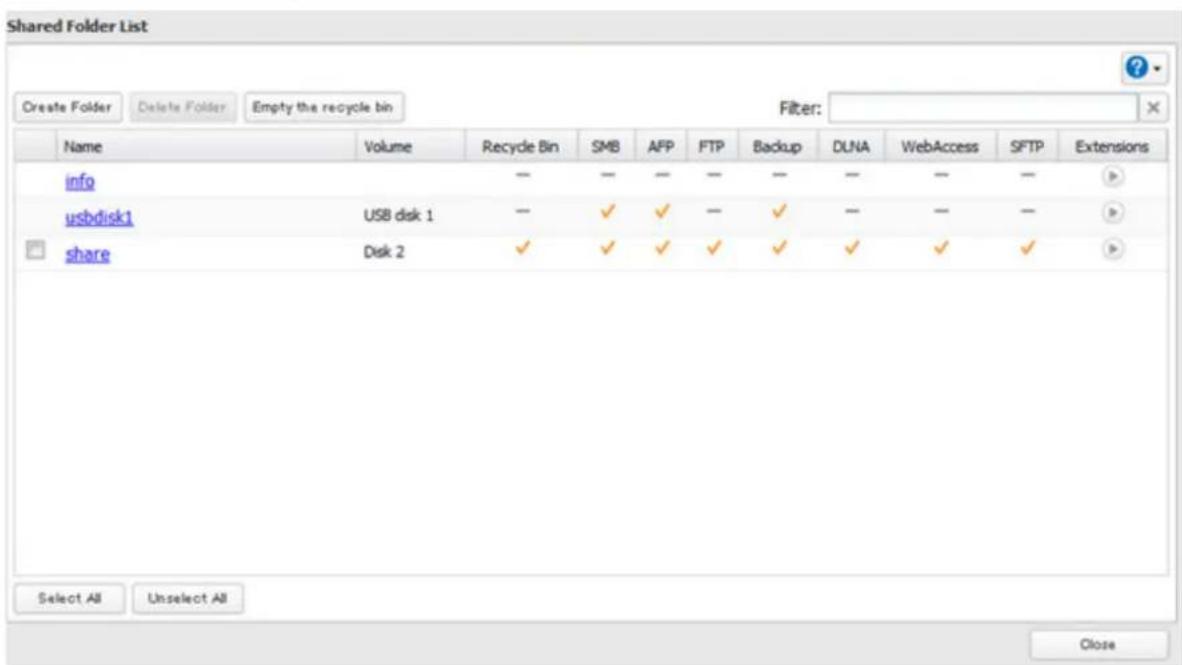
text_image
Shared Folder List Create Folder Delete Folder Empty the recycle bin Filter: Name Volume Recycle Bin SMB AFP FTP Backup DUNA WebAccess SFTP Extensions info — — — — — — — — — usbdisk1 USB disk 1 — ✓ ✓ — ✓ — — — share Disk 2 ✓ ✓ ✓ ✓ ✓ ✓ ✓ ✓ Select All Unselect All Close4 Click Edit.
5 Enable "Access Restrictions".

text_image
Access Restrictions: ● Enable ○ Disable6 Select the level of access for the user or group you added.

text_image
W/R: Read and write access allowed : Read access allowed : Access prohibited Local Users Local Groups Domain Users Domain Groups External Users Filter: Local Username W/R R / guest ○ ○ ● admin ○ ○ ○ general_user ○ ● ○ OK Cancel7 Click OK.
Notes:
- The example above shows access restriction by user. To restrict access by group, click the Local Groups tab and select group permissions.
- If both read-only and read & write permissions are given to a user, the user will have read-only access. The most restrictive access always applies.
- For an access-restricted shared folder, if you change the access restrictions of all users and groups from read & write or read only to access prohibited from the user or group list page in Settings, that shared folder can only be accessed by admin users and groups.
Active Directory
The TeraStation can join an Active Directory domain. Up to 1000 domain users and 1000 groups may be downloaded from Active Directory.
Notes:
- The TeraStation supports a domain environment with a maximum of 1000 users and 1000 groups. 10,000 users and 10,000 groups can be downloaded from the domain controller but are not supported.
- If usernames or group names from Active Directory include multi-byte characters, you will not be able to configure access restrictions for them.
1 In Settings, click Network.

2 Click to the right of "Workgroup/Domain".

text_image
Workgroup/Domain Workgroup3 Click Edit.
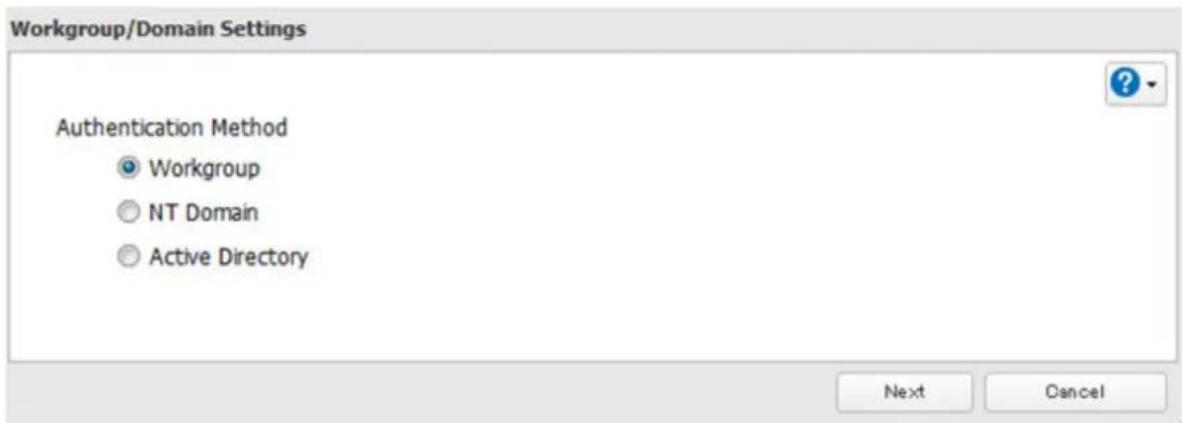
4 Select "Active Directory", then click Next.

text_image
Workgroup/Domain Settings Authentication Method ○ Workgroup ○ NT Domain ● Active Directory Next Cancel5 Click Yes.
6 Enter the desired settings, then click OK.

text_image
Active Directory Domain Settings NetBIOS Name: WORKGROUP DNS Name: Active Directory Domain Controller Name: (Authentication Server) Administrator Name: Administrator Password: WINS Server IP Address: OK Cancel7 Click to the right of "Folder Setup".

text_image
Folder Setup 4 Folder(s)8 Click a shared folder that you want to set access restrictions for.
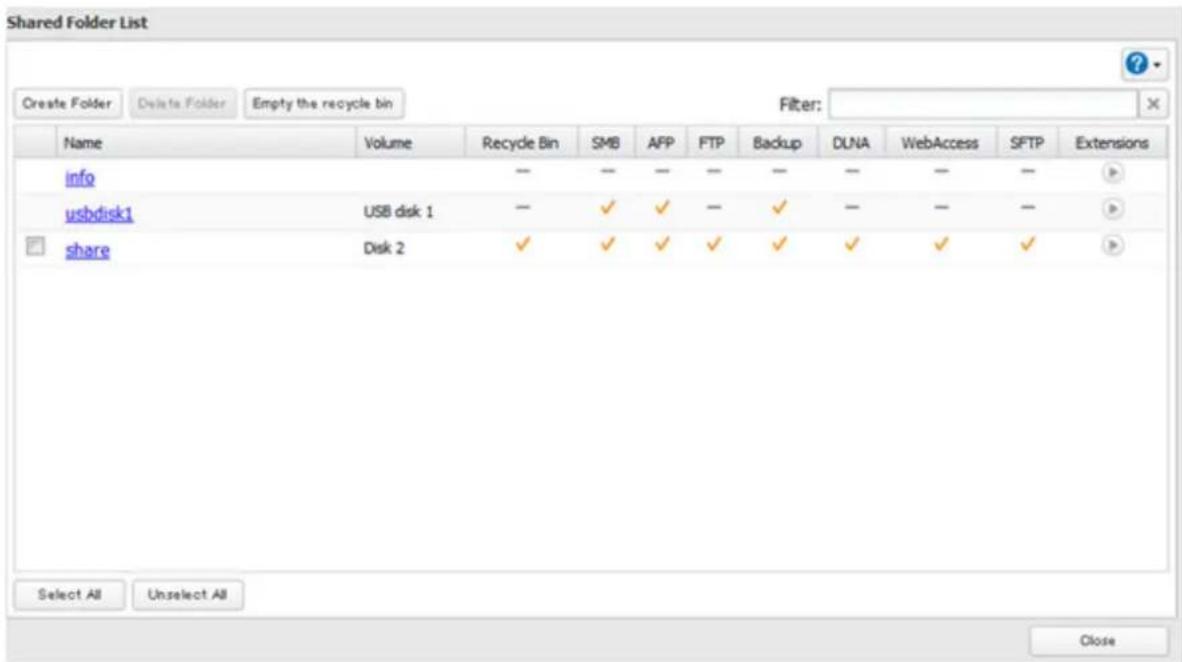
text_image
Shared Folder List Create Folder Delete Folder Empty the recycle bin Filter: Name Volume Recycle Bin SMB AFP FTP Backup DLNA WebAccess SFTP Extensions info — — — — — — — — — usbdisk1 USB disk 1 — ✓ ✓ — ✓ — — — share Disk 2 ✓ ✓ ✓ ✓ ✓ ✓ ✓ ✓ Select All Unselect All Close9 Click Edit.
10 Enable "Access Restrictions".
Access Restrictions:

Enable

Disable
11 Select the level of access for the user or group.

: Read and write access allowed

ad access allowed

: Access prohibited
12 Click OK.
Notes:
- To have the TeraStation join an Active Directory domain, configure it to use a DNS server that can resolve names for the Active Directory domain.
• After building an Active Directory domain, the administrator password for joining the domain must be changed at least once, or joining the Active Directory domain will fail.
• The DNS name and NetBIOS name of Active Directory domains should be identical. - If both read-only and read & write permissions are given, the user will have read-only access. The most restrictive access setting will apply.
- If there are more than 5 minutes difference between the TeraStation's clock and the domain controller's clock, joining the domain or authenticating domain users and groups may fail. For best results, use an NTP server to set the time for all network devices.
- To use the TeraStation as a member server in an Active Directory domain, the TeraStation should be logged in to the domain and accessed from a computer that is not a member of the domain with a valid domain account.
- If the TeraStation is a member server of an Active Directory domain, you cannot connect as a guest user via AFP.
- If your TeraStation is a member server in an Active Directory domain and you change the authentication method to "Workgroup", the account on the domain controller will not be deleted automatically.
-
If FTP is enabled, local and domain group access restrictions from the AD network do not work. Use user access restrictions instead.
-
Don't disable the SMB protocol while Active Directory is used for access restrictions. If you do, you will need to enable SMB again and reconfigure AD from scratch.
- For an access-restricted shared folder, if you change the access restrictions of all users and groups from read & write or read only to access prohibited from the user or group list page in Settings, that shared folder can only be accessed by admin users and groups.
NT Domain
In an NT domain environment, the TeraStation uses account information from the NT domain server to set access restrictions for files and folders on the TeraStation. There's no need to perform individual account management for the TeraStation. If multiple TeraStations are installed on the network, the account information is centrally managed in the NT domain, greatly reducing the operations required for installation and management.
Note: A maximum of 1000 domain users and 1000 groups can be downloaded from an NT domain server. 10,000 users and 10,000 groups can be downloaded from the domain controller but are not supported.
1 Create an account on the domain controller for the TeraStation.
2 In Settings, click Network.

3 Click to the right of "Workgroup/Domain".

text_image
Workgroup/Domain Workgroup4 Click Edit.
5 Select "NT Domain", then click Next.
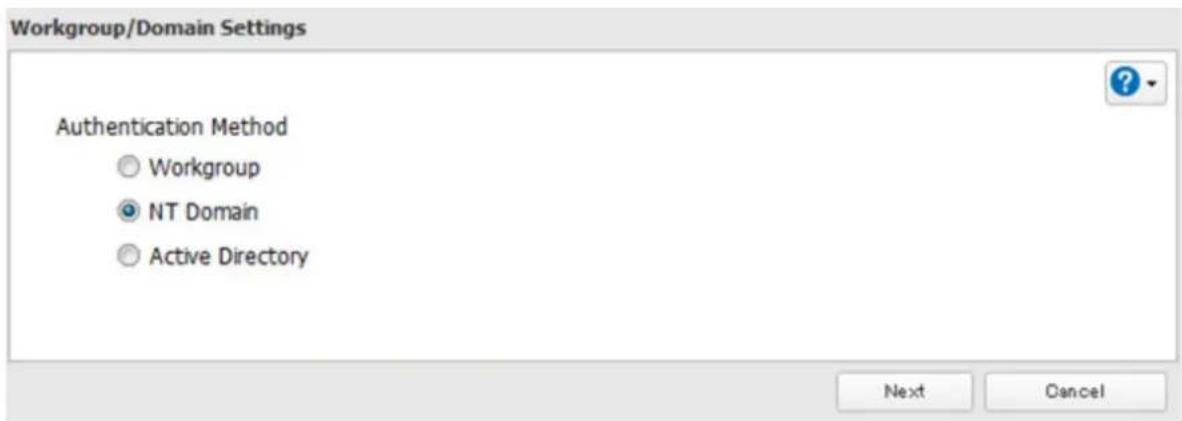
text_image
Workgroup/Domain Settings Authentication Method ○ Workgroup ● NT Domain ○ Active Directory Next CancelNote: To use Active Directory from Windows 2000 or Windows Server 2003, select "Active Directory" instead of "NT Domain".
6 Click Yes.
7 Enter settings and click OK.

text_image
NT Domain Settings NT Domain Name: WORKGROUP (NetBIOS Name) NT Domain Controller Name: (Computer Name) Administrator Name: Administrator Password: WINS Server IP Address: OK Cancel8 Click to the right of "Folder Setup".

text_image
Folder Setup 4 Folder(s)9 Click a shared folder for which you want to set access restrictions.

text_image
Shared Folder List Create Folder Delete Folder Empty the recycle bin Filter: Name Volume Recycle Bin SMB AFP FTP Backup DLNA WebAccess SFTP Extensions info — — — — — — — — — usbdisk1 USB disk 1 — ✓ ✓ — ✓ — — — share Disk 2 ✓ ✓ ✓ ✓ ✓ ✓ ✓ ✓ ✓ Select All Unselect All Close10 Click Edit.
11 Enable "Access Restrictions".

text_image
Access Restrictions: Enable Disable12 Select the level of access for "Domain Users" or "Domain Groups" you added.

text_image
W/R: Read and write access allowed : Read access allowed : Access prohibited13 Click OK.
Notes:
- If you change the TeraStation's name, you will no longer be able to use domain users and groups or access restrictions. To repair this, rejoin the domain.
- If both read-only and read & write permissions are given to a user, the user will have read-only access.
• If a domain username is more than 20 bytes long, the TeraStation truncates it to 20 bytes. - To use the TeraStation as a member server in an NT domain, the TeraStation should be logged in to the domain and accessed from a computer that is not a member of the domain with a valid domain account.
- If the TeraStation is a member server of an NT domain, you cannot connect as a guest user via AFP.
- When you change the user or group settings on the domain controller, these changes may not take effect immediately on the TeraStation until it is rebooted.
- If your TeraStation is a member server in an NT domain and you change the authentication method to "Workgroup", the account on the domain controller will not be deleted automatically.
- If FTP is enabled, local and domain group access restrictions from the NT domain network do not work. Use user access restrictions instead.
- Don't disable the SMB protocol while an NT domain server is used for access restrictions. If you do, you will need to enable SMB again and reconfigure the NT domain settings from scratch.
- For an access-restricted shared folder, if you change the access restrictions of all users and groups from read & write or read only to access prohibited from the user or group list page in Settings, that shared folder can only be accessed by admin users and groups.
User Authentication with an External SMB Server
TeraStations on your network can be linked to an external authentication server for centralized management of user accounts and passwords. The authentication server should be another TeraStation or a LinkStation. Other external SMB authentication servers are not supported.
Notes:
- Disable SMB2 before using external authentication.
- Access restrictions for local users and groups will still apply to shared folders if an external SMB server is used for authentication.
- The procedure below contains methods to automatically register external users. You can also manually add external users by converting them from local users. Refer to the "Converting Local Users into External Users" section below for more details on converting local users.
1 In Settings, click Network.

text_image
Network2 Click to the right of "Workgroup/Domain".

text_image
Workgroup/Domain Workgroup3 Click Edit.
4 Select "Workgroup" and click Next.
text_image
Workgroup/Domain Settings Authentication Method ● Workgroup ○ NT Domain ○ Active Directory Next Cancel5 If a prompt appears, click Yes.
6 Enter a workgroup name. Select "Authenticate local and external SMB server users" and enter the SMB server's IP address. You can also specify a server from another subnet.

text_image
Workgroup Settings Workgroup Name: WORKGROUP WINS Server IP Address: Authentication Settings: ● Authenticate local TeraStation users only ● Authenticate local and external SMB server users Authentication server name or IP address ✓ Automatically register users who access TeraStation folders ✓ Restrict user registration to a single folder Name: OK Cancel7 If "Automatically register users who access TeraStation folders" is checked, users that access any of the TeraStation's folders will be automatically registered as external users. This process only applies with folders that have access restrictions disabled. After new external users are added, disable this option to limit the number of authenticated user accounts.
8 If "Restrict user registration to a single folder" is checked, the TeraStation will automatically create a read-only shared folder. Enter the shared folder name. Users that access this specific folder will be automatically registered as external users. If this setting is de-selected at a later time, the TeraStation will automatically remove the folder.
Note: Connect to the authentication folder via SMB, not FTP or AFP. Automatic user registration may not work with OS X 10.8 (or later) the first time. If this occurs, try rebooting the TeraStation then access the authentication shared folder again.
9 Click OK to save any changes. When saving changes to the external authentication server settings, you may not to convert all current local users to external users. If a local user is converted to an external user, their user information (including passwords) will be removed from the NAS. External users cannot be reverted to local users.
10
Click to the right of "Folder Setup".

text_image
Folder Setup 4 Folder(s)11
Click a shared folder to set access restrictions on.

text_image
Shared Folder List Create Folder Delete Folder Empty the recycle bin Filter: Name Volume Recycle Bin SMB AFP FTP Backup DUNA WebAccess SFTP Extensions info — — — — — — — — usbdisk1 USB disk 1 — ✓ ✓ — ✓ — — — share Disk 2 ✓ ✓ ✓ ✓ ✓ ✓ ✓ ✓ Select All Unselect All Close12
Click Edit.
13
Enable "Access Restrictions".
Access Restrictions:

Enable

Disable
14
Click on the External Users tab and select the level of access for each external user.

Read and write access allowed

ad access allowed

: Access prohibited
15
Click OK.
Notes:
- Users that are automatically registered belong to the "hdusers" group. They can be added to other groups from within group settings. Added users will be listed in "Users" - "External Users". To delete a user that was registered automatically, select that user and click Delete External User.
- If both read-only and read & write permissions are given to a user, the user will have read-only access.
• OS X 10.4 or earlier and Windows Server 2012 are not supported with external authentication. - To access access-limited shared folders from OS X 10.7, use AFP instead of SMB; under "LAN Protocol Support", check "AFP (Mac)" on the destination folders to use AFP and click OK.
- If access restrictions are set for users and groups from the authentication server, guest and anonymous connections will not be possible with AFP connections.
- FTP connections do not support authentication with an external SMB server.
- If using a Windows PC for external authentication, the default Windows SMB security settings may need to be changed. An easy way to do this is to run the File Sharing Security Level Change Tool, available from this product's download page on the Buffalo website. This utility will let you easily change or restore your Windows security settings to work with external authentication.
- If you change all users' and groups' access attributes for the access-restricted shared folder, from read & write or read only to access prohibited in the user or group list page of Settings, that shared folder can only be accessed by admin users and groups.
Converting Local Users into External Users
If using an external SMB server for authentication, you may convert any local users into external users. This way, the TeraStation will have a user list that matches the users in the external SMB server, and access restrictions for this TeraStation's shared folders may be assigned to the converted "external" users.
Follow the steps below to convert a local user into an external user. If a local user is converted, their user information (including passwords) will be removed from the TeraStation. External users cannot be reverted to local users.
Note: External authentication should be enabled before local users can be converted. For more information on external authentication, refer to the "User Authentication with an External SMB Server" section.
1 In Settings, click File Sharing.
2 Click to the right of "Users".
3 In the user list screen, check any users to be converted to an external user, then click Convert to External User.
4 Enter the confirmation number and click OK.
Converted users are displayed under the "External Users" tab. You can then configure access restrictions for external users.
Chapter 4 Managing Storage
RAID Arrays
TeraStations support many types of RAID. The type of RAID arrays available for use depends on how many drives are installed in your TeraStation.
| TeraStation Default RAID Mode | |
| TS3400D | RAID 5 |
| TS3400R | |
| TS3200D RAID 1 |
Notes:
- If you change the RAID mode, all data on the array is deleted. This is true for every procedure in this chapter. Always back up any important data before performing actions that affect your RAID array.
- Hard drive capacity is shown in Settings in actual gigabytes. The Properties window in Windows may show GiB instead, which will be a smaller number.
- After the RAID mode is changed (except when creating a RAID 0 array or JBOD), the TeraStation performs a RAID check that will take about 10 hours per TB. File transfers are slower during this period. While the I17 message is displayed on the LCD panel, do not turn off the TeraStation. If you do, the RAID check starts over.
- If the TeraStation is restarted or shut down while changing the RAID mode, the message displayed on the LCD panel will change from I46 or I47 to I18.
RAID 6\*
RAID 6 arrays are available for TeraStations with 4 or more hard drives. RAID 6 combines 4 or more drives into a single array. The usable space is equal to the sum of the capacity of all drives minus the capacity of two drives. For example, if 4 drives are combined into a RAID 6 array, the usable space is the sum of the capacity of 2 drives. If 2 drives in the array are damaged, you can recover data by replacing them. If 3 or more drives are damaged, your data is lost.
RAID 5\*
RAID 5 arrays are available for TeraStations with 3 or more hard drives. RAID 5 combines 3 or more drives into a single array. The usable space is equal to the sum of the capacity of the hard drives minus the capacity of one drive. For example, if 4 drives are combined into a RAID 5 array, the usable space is the sum of 3 drives. If one drive in the array is damaged, you can recover data by replacing the damaged drive. If two or more drives are damaged at the same time, your data is lost.
RAID 10\*
RAID 10 arrays are available for TeraStations with 4 or more hard drives. In this mode, mirrored pairs of drives in RAID 1 arrays are combined into a RAID 0 array. The usable space is equal to the capacity of the smallest drive multiplied by the number of hard drives divided by 2.
RAID 1
Combines 2 or more drives into a mirrored array. The available space in the array is the capacity of a single drive. Identical data is written to each drive. If a drive is damaged, data can be recovered by replacing the damaged drive. As long as one drive in the array remains undamaged, all data in the array can be recovered.
RAID 0
Combines 2 or more hard drives into a single array. The usable disk space is the total space of all drives used. This simple RAID mode offers faster performance than RAID modes that include parity. If a single drive in the array fails, then all data in the array is lost.
JBOD
This mode uses the hard drives inside the TeraStation as individual drives. The disk space you can use is the total capacity of all drives in the TeraStation. If any drive is damaged, then the data on that drive is lost.
*Available for TS3400D and TS3400R.
Working with RAID Arrays
To change RAID settings, navigate to Drives - RAID in Settings.
Using JBOD
With JBOD, each hard drive in the TeraStation is addressed separately. To put drives from an array into JBOD, follow the steps below.
1 In Settings, click Drives.

2 Click technology of "RAID".

text_image
RAID3 Click the array to delete.
text_image
RAID Array List Name RAID Mode Status Unit Capacity Amount Used % Used File System Time Remaining Progress Array1 RAID1 Normal 2762.5 GB 0 GB 0.00 % XFS Array2 No RAID array is configured. Options Close4 Click Delete RAID Array.
Once JBOD is configured, create shared folders on each drive to use them.
Changing RAID Mode
To change the RAID mode, first put the drives in JBOD.
1 In Settings, click Drives.

2 Click to the right of "RAID".

text_image
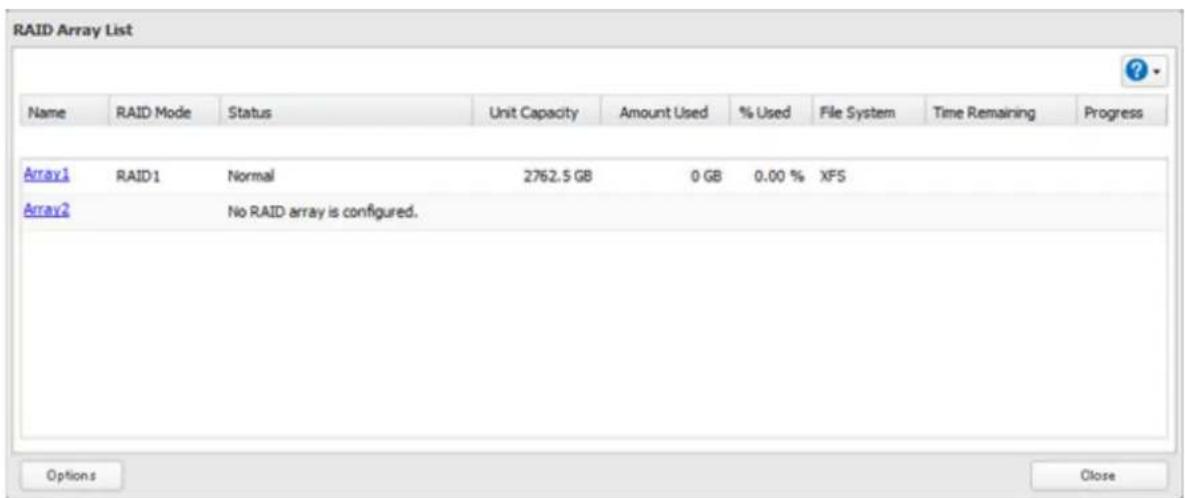
RAID3 Click the array to delete.

text_image
RAID Array List Name RAID Mode Status Unit Capacity Amount Used % Used File System Time Remaining Progress Array1 RAID1 Normal 2762.5 GB 0 GB 0.00 % XFS Array2 No RAID array is configured. Options CloseNote: If the "RAID Mode" field is blank, the array is already in JBOD. Proceed to step 7.
4 Click Delete RAID Array.
5 The "Confirm Operation" screen will open. Enter the confirmation number, then click OK.
6 Click OK.
7 Choose a RAID array.
8
Select a RAID mode and the drives to be used, then click Create RAID Array.
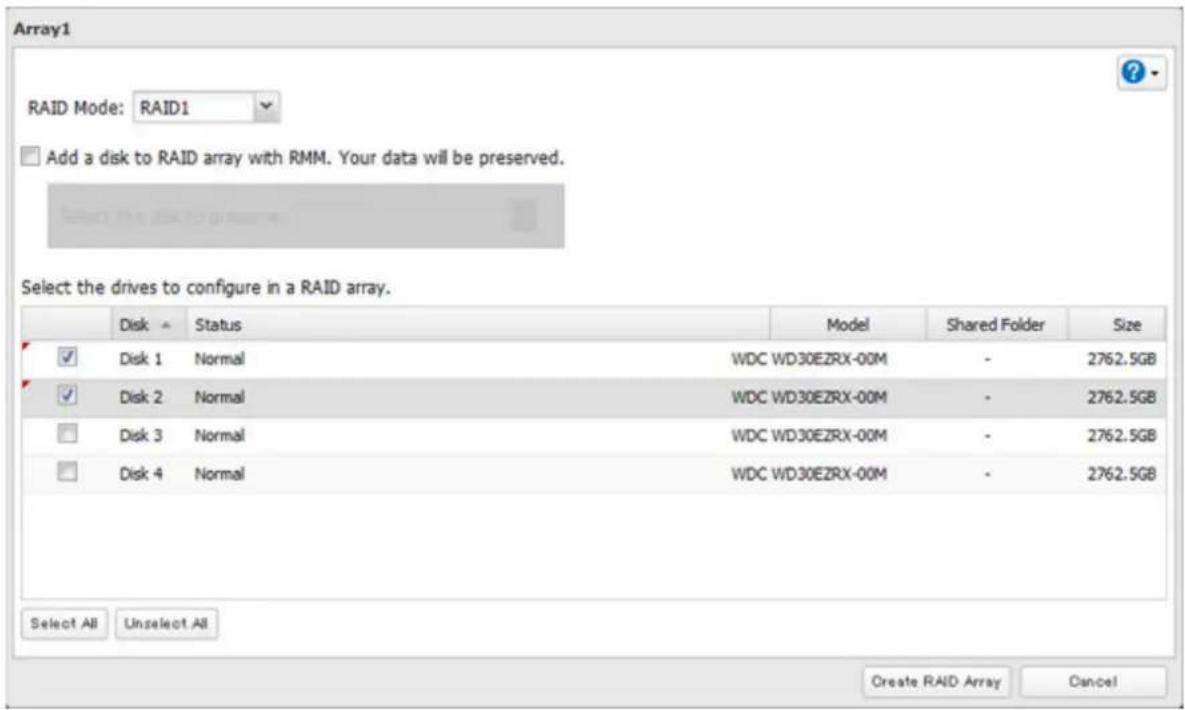
text_image
Array1 RAID Mode: RAID1 Add a disk to RAID array with RMM. Your data will be preserved. Select the drives to configure in a RAID array. Disk Status-model Shared Folder Size ✓ Disk 1 Normal WDC WD30EZRX-00M - 2762.5GB ✓ Disk 2 Normal WDC WD30EZRX-00M - 2762.5GB □ Disk 3 Normal WDC WD30EZRX-00M - 2762.5GB □ Disk 4 Normal WDC WD30EZRX-00M - 2762.5GB Select All Unselect All Create RAID Array Cancel9 Step through the wizard to create the array.
Notes:
• You can also configure RAID settings from Easy Admin.
• After changing the RAID mode, create a shared folder.
Configuring a Hot Spare
If you have a hot spare configured and an array fails, the TeraStation immediately switches over to the hot spare. To use a hot spare, you need an extra drive that's not part of any array and a RAID 1, RAID 10, RAID 5, or RAID 6 array.
Notes:
- All data on the hot spare drive is deleted when it is configured as a hot spare and again when it changes from a spare to a drive in the array.
- A hot spare cannot be configured for TeraStation models with only two hard drives. Use RAID 1 instead.
1 In Settings, click Drives.

2 Click to the right of "RAID".

text_image
RAID3 Choose a RAID array.
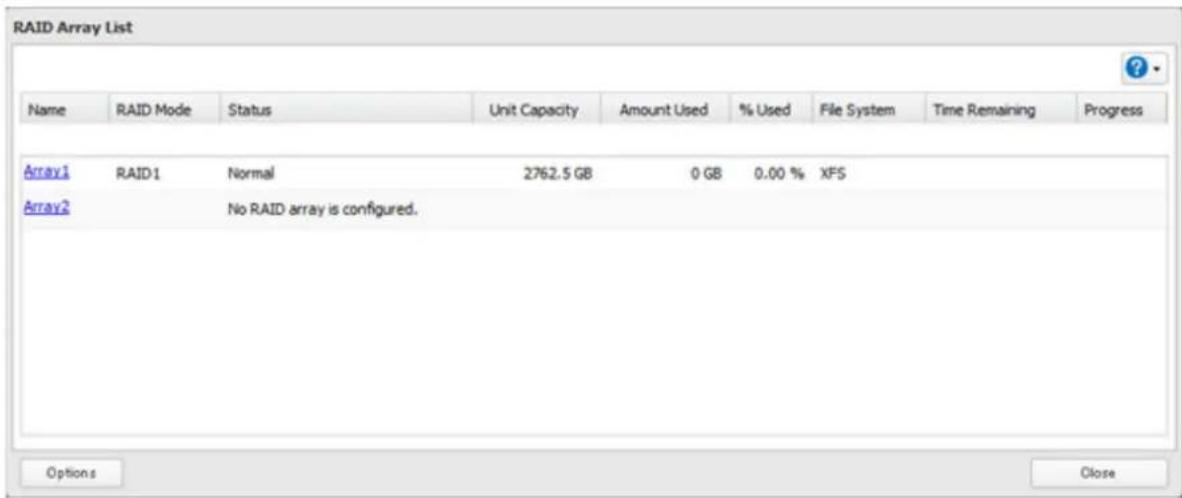
text_image
RAID Array List Name RAID Mode Status Unit Capacity Amount Used % Used File System Time Remaining Progress Array1 RAID1 Normal 2762.5 GB 0 GB 0.00 % XFS Array2 No RAID array is configured. Options Close4 Click Set as a hot spare.
5 Step through the wizard.
6 When the "Confirm Operation" screen opens, enter the confirmation number and click OK.
Notes:
• To turn the hot spare back into a normal disk, choose Set as a normal disk.
- If a drive fails in the RAID array before it is rebooted, the hot spare will not automatically replace the failed drive. In this case, follow the steps below to repair the array.
(1) In Settings, navigate to Drives - Drives.
(2) Click the drive that was configured as a hot spare, then click Dismount Disk.
(3) Click Rediscover Disk.
(4) Navigate to Drives - RAID.
(5) Choose the RAID array to repair.
(6) Click the drive that was previously configured as a hot spare, then click "Recover RAID Array". This will rebuild the RAID array.
RMM (RAID Mode Manager)
With RMM, you can create or expand a RAID array without erasing the data on the drives. To use RMM, insert all internal drives of the same size into the slots.
Changing from JBOD to RAID 1
Hard drives that aren't in a RAID array show "Normal". You must have at least two drives available in JBOD (not in a RAID array) to build the RAID 1 array with RMM.
1 In Settings, click Drives.

2 Click to the right of "RAID".

text_image
RAID3 Choose a RAID array.
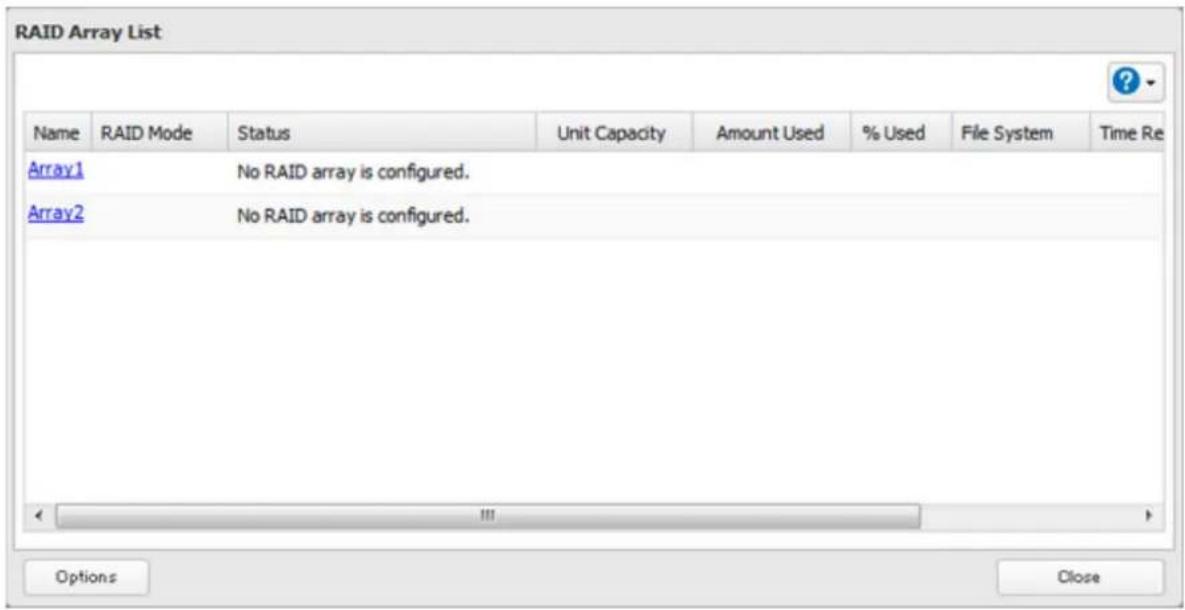
text_image
RAID Array List Name RAID Mode Status Unit Capacity Amount Used % Used File System Time Re Array1 No RAID array is configured. Array2 No RAID array is configured. Options Close4 Set the RAID mode to "RAID 1".
5 Check "Add a disk to RAID array with RMM. Your data will be preserved."
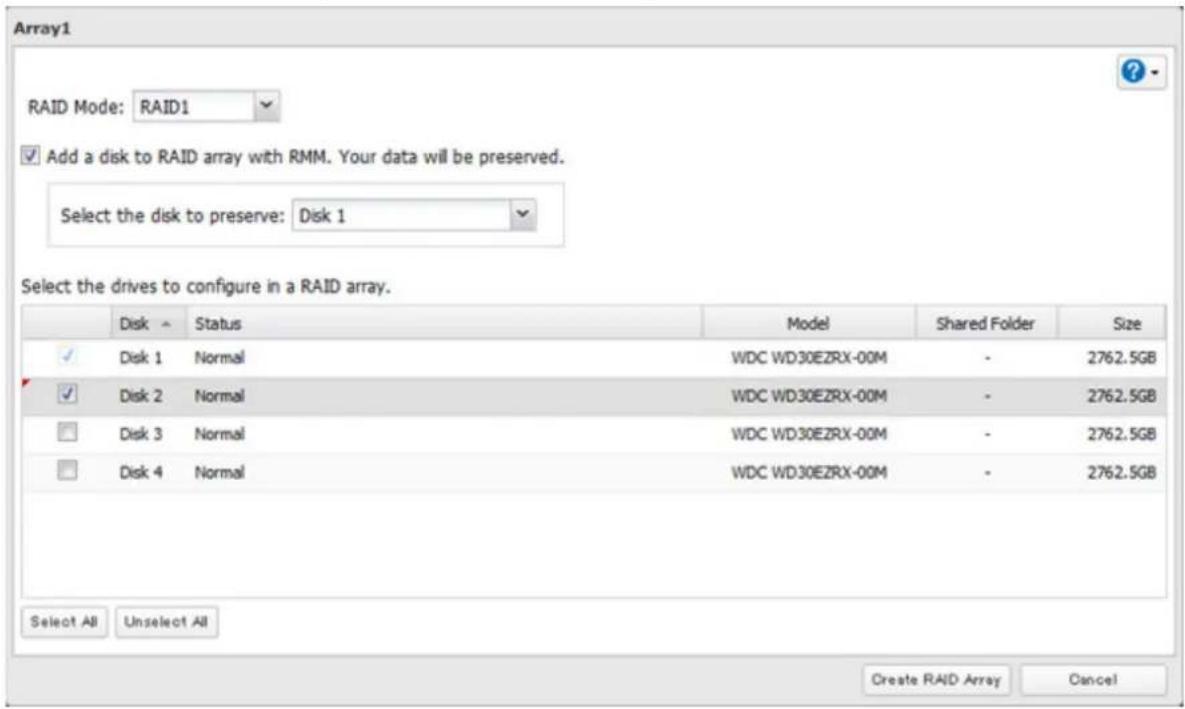
text_image
Array1 RAID Mode: RAID1 Add a disk to RAID array with RMM. Your data will be preserved. Select the disk to preserve: Disk 1 Select the drives to configure in a RAID array. Disk Status-model Shared Folder Size Disk 1 Normal WDC WD30EZRX-00M - 2762.5GB Disk 2 Normal WDC WD30EZRX-00M - 2762.5GB Disk 3 Normal WDC WD30EZRX-00M - 2762.5GB Disk 4 Normal WDC WD30EZRX-00M - 2762.5GB Select All Unselect All Create RAID Array Cancel6 Select the drive whose data will be saved from the drop-down menu.
7 Select the drive to add to the RAID array.
8 Click Create RAID Array.
9 The "Confirm Operation" screen will open. Enter the confirmation number, then click OK.
Adding a Drive to an Existing RAID Array
You can add a drive to a RAID 1, RAID 5, or RAID 6 array. Drives that can be added to the RAID array show "Normal". Note: RMM can be used to expand an array by one drive per operation. To expand by two or more drives, RMM must be performed multiple times.
1 Click Drives.

2 Click to the right of "RAID".

text_image
RAID3 Choose a RAID array.

text_image
RAID Array List Name RAID Mode Status Unit Capacity Amount Used % Used File System Time Remaining Progress Array1 RAID1 Normal 2762.5 GB 0 GB 0.00 % XFS Array2 No RAID array is configured. Options Close4 Select the drive to add to the RAID array.
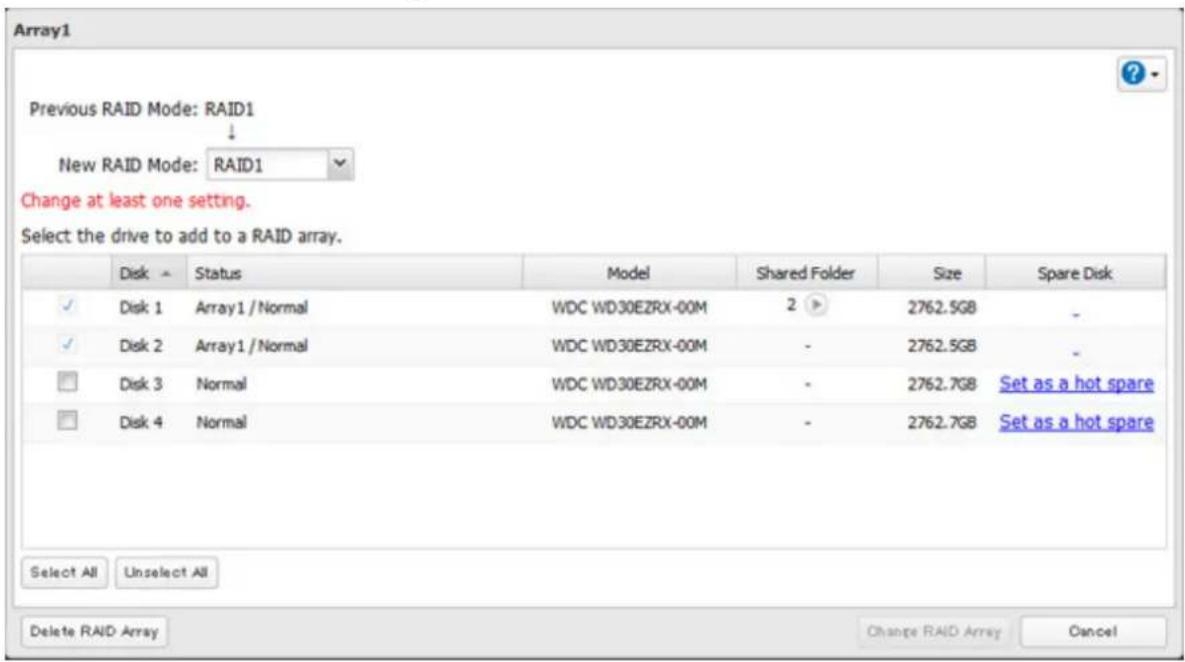
text_image
Array1 Previous RAID Mode: RAID1 ↓ New RAID Mode: RAID1 Change at least one setting. Select the drive to add to a RAID array. Disk Status Model Shared Folder Size Spare Disk ✓ Disk 1 Array1 / Normal WDC WD30EZRX-00M 2 2762.5GB - ✓ Disk 2 Array1 / Normal WDC WD30EZRX-00M - 2762.5GB - □ Disk 3 Normal WDC WD30EZRX-00M - 2762.7GB Set as a hot spare □ Disk 4 Normal WDC WD30EZRX-00M - 2762.7GB Set as a hot spare Select All Unselect All Delete RAID Array Change RAID Array Cancel5 Click Create RAID Array.
6 The "Confirm Operation" screen will open. Enter the confirmation number, then click OK.
Changing the RAID Mode While Adding a Drive
Select the drive you want to add to the RAID array and choose the mode for the array. Enter the "Confirm Operation" number and click OK.
RAID Scanning
RAID maintenance scans your RAID array for bad sectors and if it finds any it automatically repairs them. RAID 1, RAID 10, RAID 5, and RAID 6 arrays are supported. For best results, run RAID maintenance regularly.
1 In Settings, click Drives.

2 Move the RAID scanning switch to the position to enable RAID scanning.

text_image
RAID Scanning3 Click to the right of "RAID Scanning".

text_image
RAID Scanning4 Click Edit.
5 Select when to run the scan and click OK.
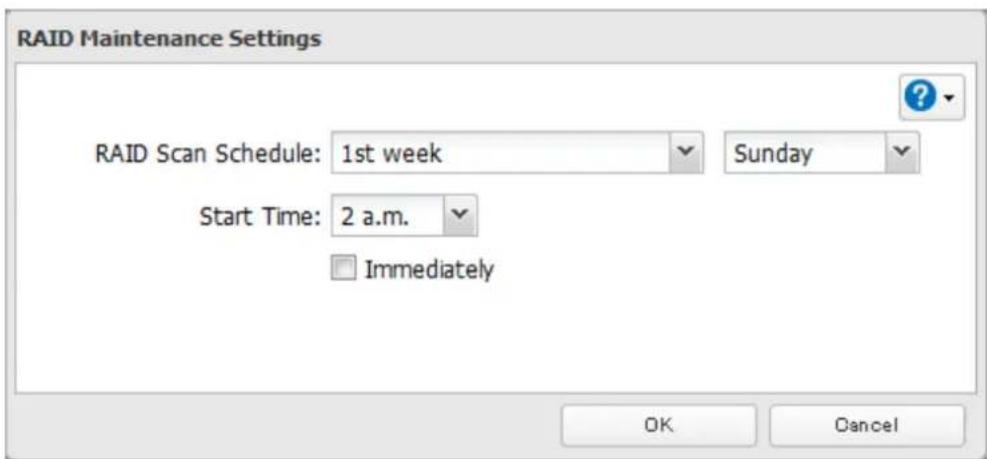
text_image
RAID Maintenance Settings RAID Scan Schedule: 1st week Sunday Start Time: 2 a.m. Immediately OK CancelNotes:
- Check "Immediately" to run RAID maintenance immediately.
• To stop a RAID scan, click Cancel RAID Scan.
Adding an External Hard Drive
Connecting an External Drive
Your TeraStation includes USB ports (the number of ports depends on your model), and you can connect external drives to these ports. Once connected they appear as shared folders on the TeraStation. Formatted drives are detected automatically. Unformatted drives should be formatted in Settings.
After a USB drive is recognized, Windows adds "usbdisk X" under the TeraStation in "Network", where "X" is the USB port where the hard drive is connected.
Compatibility
The following USB devices are supported by the TeraStation:
• USB storage devices
• Card readers (except for card readers that can recognize two or more memory cards)
Buffalo external USB drives are recommended. However, the following USB drives are not supported:
• DUB and DIU series drives
Supported file systems for external drives are below:
- FAT32
- EXT3
• XFS
- NTFS
• HFS+ (read-only)
Connect only one device to each USB port of the TeraStation. Some external drives with automatic power-on don't turn on automatically when connected to the TeraStation. Use their manual power switch to turn them on. Be sure to connect only one bus-powered drive at a time. If there is insufficient bus power for your USB drive, connect its AC adapter. Note that only the first partition of a connected USB hard drive is mounted. Additional partitions are not recognized. Do not connect bus-powered devices (except for USB flash drives and card readers) to the 2-drive TeraStation models.
Notes:
- Backup data from Mac OS may include characters that cannot be written to FAT16 or FAT32 drives such as ".DS_Store". For best results, reformat the drive before using it as a backup target.
- The TeraStation is compatible with most USB 2.0 external hard drives. Compatible USB 3.0 external drives include HD-LBU3 series, HD-LXU3 series, HD-PCTU3 series, HD-PNTU3 series, HD-PZU3 series (as of May 2013).
Dismounting Drives
If the TeraStation is powered on, dismount drives (internal and external) before unplugging them. You may dismount external drives with the function button, or any drive from Settings. If the TeraStation is off, then all drives are already dismounted and may be unplugged safely.
Dismounting with the Function Button
Hold down the function button for 8 seconds. The function button will flash as all external drives are dismounted, which will take about 30 seconds. When the dismount is finished, the function LED will stop flashing and glow steadily. You may now unplug any USB drives safely.
Note: After 60 seconds, the function LED will go out and any drives that have not yet been unplugged will be remounted.
Dismounting from Settings
1 In Settings, click Drives.

2 Click Drives to dismount an internal drive or USB Drives to dismount an external drive.

text_image
Drives USB Drives3 Select the drive to dismount and click Dismount Disk. It will take about 30 seconds for the drive to be dismounted.

text_image
USB Drives Check Disk Format Disk Dismount Disk Refresh Disk Name Status Model Name Unit Capacity Amount Used % Used File System Manufacturer USB disk 1 Normal USB Reader 1.8 GB 0 GB 1.86 % EXT3 Close4 When the following message is displayed, it is safe to unplug the drive.
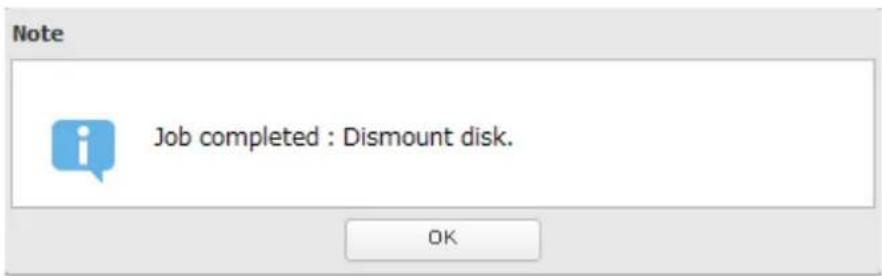
text_image
Note Job completed : Dismount disk. OKNote: To remount the drive, unplug it and then plug it back in.
Checking Drives
A disk check tests the data on a drive in the TeraStation or connected via USB for integrity. Errors are fixed automatically. With large drives, a disk check may run for many hours. Shared folders cannot be accessed during a disk check. Do not turn off the TeraStation until the disk check is finished. Use the procedure below to run a disk check.
1 In Settings, click Drives.

Drives
2 Select Drives to check an internal drive or USB Drives to check an external drive.

Drives


USB Drives

3 Select the drive to test, then click Check Disk.
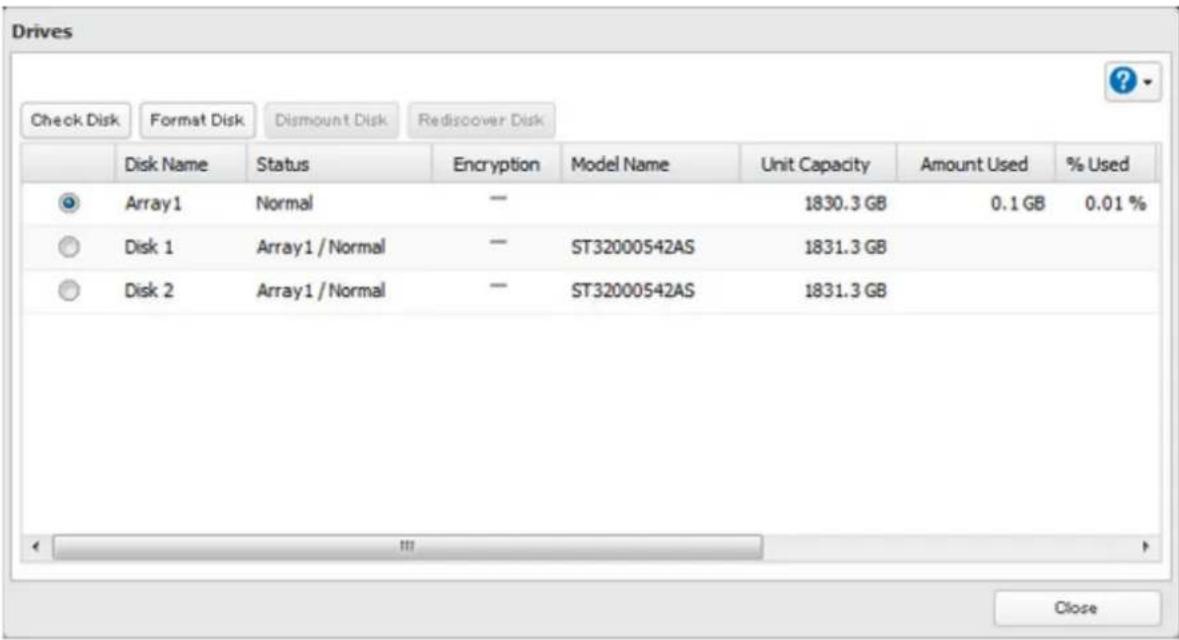
text_image
Drives Check Disk Format Disk Dismount Disk Ridiscover Disk Disk Name Status Encryption Model Name Unit Capacity Amount Used % Used Array1 Normal — 1830.3 GB 0.1 GB 0.01 % Disk 1 Array1 / Normal — ST32000542AS 1831.3 GB Disk 2 Array1 / Normal — ST32000542AS 1831.3 GB Close4 Click Check. You have the option of deleting information files from Mac OS during the check if desired.

text_image
Check Disk Check Target: Disk 2 Delete Mac OS specific files Warning: Before running the disk check, check that the disk is not set as a backup device. Do not run the disk check if the disk is set as a backup device. Check CancelFormatting Drives
Notes:
- Under some circumstances, data deleted when a drive is formatted can be recovered. To ensure that data is "gone forever", a format might not be sufficient. See the "Erase Data on the TeraStation Completely" section below.
- After a drive is formatted, the "% Used" and "Amount Used" in Settings will not be 0. This is because some drive space is used for the system area.
1 In Settings, click Drives.

2 Select Drives to format an internal drive or USB Drives to format an external drive.

text_image
Drives USB Drives3 Select the drive to format, then click Format Disk.

text_image
Drives Check Disk Format Disk Dismount Disk Ridiscover Disk Disk Name Status Encryption Model Name Unit Capacity Amount Used % Used Array1 Normal — 1830.3 GB 0.1 GB 0.01 % Disk 1 Array1 / Normal — ST32000542AS 1831.3 GB Disk 2 Array1 / Normal — ST32000542AS 1831.3 GB Close4 Select a format type, then click Format.
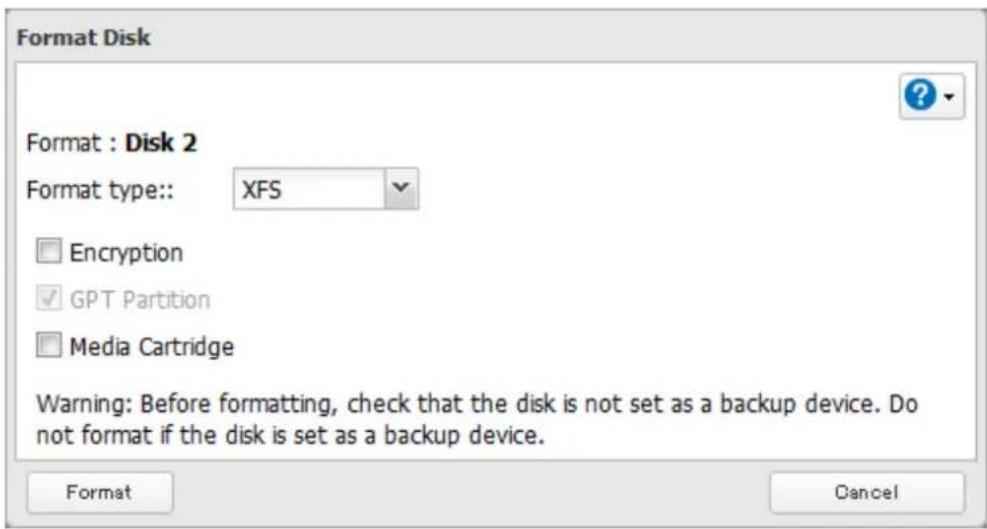
text_image
Format Disk Format : Disk 2 Format type:: XFS Encryption GPT Partition Media Cartridge Warning: Before formatting, check that the disk is not set as a backup device. Do not format if the disk is set as a backup device. Format Cancel5 The "Confirm Operation" screen will open. Enter the confirmation number, then click OK.
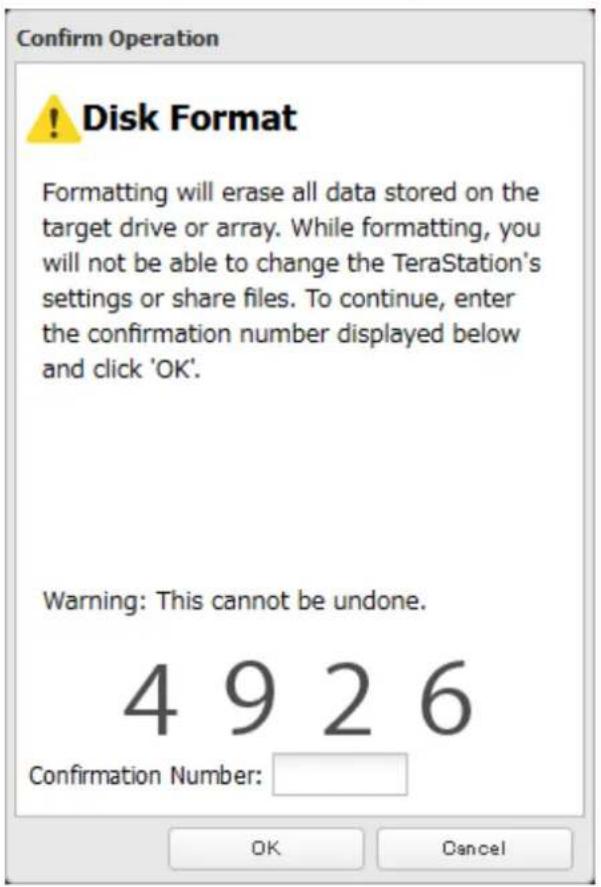
text_image
Confirm Operation ! Disk Format Formatting will erase all data stored on the target drive or array. While formatting, you will not be able to change the TeraStation's settings or share files. To continue, enter the confirmation number displayed below and click 'OK'. Warning: This cannot be undone. 4 9 2 6 Confirmation Number: OK Cancel6 Depending on the size of your drive, the format may take several minutes or several hours to complete. "Formatting" will be displayed on the LCD display until the format is complete.
Notes:
- Do not turn off or disconnect power to the TeraStation while formatting a hard drive.
- For drives of 2.2 TB or larger, make sure that the "GPT Partition" checkbox is selected. For many drives, this option will be enabled automatically during format.
Encrypting Drives
Internal drives (and arrays) can be encrypted with 128-bit AES during formatting. Encrypted drives and arrays are then readable only from that specific TeraStation. To unencrypt a drive or array, uncheck "Encryption" and format it again.
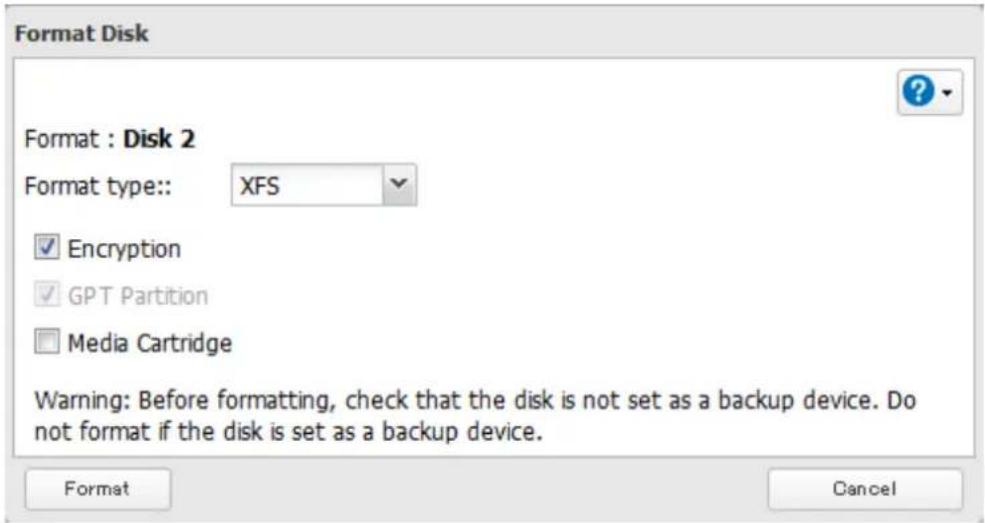
text_image
Format Disk Format : Disk 2 Format type:: XFS ✓ Encryption ✓ GPT Partition □ Media Cartridge Warning: Before formatting, check that the disk is not set as a backup device. Do not format if the disk is set as a backup device. Format CancelMedia Cartridges
If configured as a media cartridge, an internal drive can be used as a removable storage device in the same way as an external drive. Media cartridges can be unplugged and connected to a different TeraStation with all data intact. To configure a drive as a media cartridge, check "Media Cartridge" during formatting. To return it to its original state, uncheck "Media Cartridge" and reformat the drive.

text_image
Format Disk Format : Disk 2 Format type:: XFS Encryption GPT Partition Media Cartridge Warning: Before formatting, check that the disk is not set as a backup device. Do not format if the disk is set as a backup device. Format CancelMedia cartridges do not support:
- RAID arrays
• LVM volumes - Access restrictions
• Direct connection to a Windows computer
Erase Data on the TeraStation Completely
Under some circumstances, data from formatted drives can be recovered. The disk erasure process in this section does a much more thorough job of erasing data. This procedure is recommended for removing all data from a drive in a way that makes it nearly impossible to recover with current tools. All data on the drives is completely erased.
The TeraStation will then be in the following state:
• All drives in JBOD
• An empty shared folder on each drive
• All settings returned to their default values
- All logs deleted
If you remove a drive and then erase all data on the TeraStation, the LCD will show the E22 error message and the number of the removed drive. You can still use the TeraStation.
1 In Settings, click Management.

2 Click to weight of "Restore/Erase".

text_image
Restore/Erase3 Click Erase TeraStation.

text_image
Erase This will erase all data and settings and return the TeraStation to its factory defaults. Erased data cannot be restored. Several hours will be required for this process. Erase TeraStation4 The "Confirm Operation" screen will open. Enter the confirmation number, then click OK.

text_image
Confirm Operation ! Format Disk This action will erase all data on the disk and restore configuration settings to factory defaults. Warning: This cannot be undone. 5 7 2 6 Confirmation Number: OK Cancel5 All data on the TeraStation will be permanently erased.
Disk Quotas
You can set a disk quota to limit drive space for each user or group. You can also set an alert space. If the drive space exceeds the set alert space, an email notification is sent. To configure email notifications for disk quota, refer to the "Email Notification" section in chapter 10.
Notes:
- When using quotas, disable the recycle bin or empty the trash folder often. The limited space includes the space used for trash.
- Quotas apply per drive or per array. If a quota is set to 1 GB, each array or drive can use a maximum of 1 GB.
- Quotas cannot be set for external hard drives connected to the TeraStation and hard drives that are configured as media cartridges.
- If both user and group quotas are configured for a user, the most restrictive quota will always apply.
• Make sure that SMB2 is disabled before using quotas on the TeraStation.
Quotas for Users
Follow this procedure to limit the shared folder disk space available for a user.
1 In Settings, click File Sharing.

text_image
File Sharing2
Click
of "Users".

text_image
Users Local Users 3 User(s)3 Select the user whose space will be limited.
4 Enable quotas, choose the maximum space the user will be allowed to use, and click OK.

text_image
Quota: Enable Quota Alert 10 GB Capacity: Quota Capacity: 100 GB Disable nousers OK CancelNote: If you change the primary group, restart the TeraStation to apply the quota settings.
5 Click OK.
Quotas for Groups
Follow the procedure below to limit the space for shared folders that each group can use.
1 In Settings, click File Sharing.

text_image
File Sharing2 Click to the right of "Groups".

text_image
Groups Local Groups 5 Group(s)3 Select the group whose space will be limited.
4 Enable quotas, choose the maximum space the group is allowed, and click OK.

text_image
Quota: Enable Quota Alert Capacity: 10 GB Quota Capacity: 100 GB Disable OK Cancel5 Click Close.
6 Click the number of "Users".

text_image
Users Local Users 3 User(s)7 Select the user who will inherit the group quota settings.
8 Change the user's primary group to the group with the quota, then click OK.
9 Click OK.
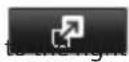
Size Limits
If LVM is enabled, volumes can be created with maximum size limits.
1 In Settings, click Drives.

2 Click to the right of "LVM".

text_image
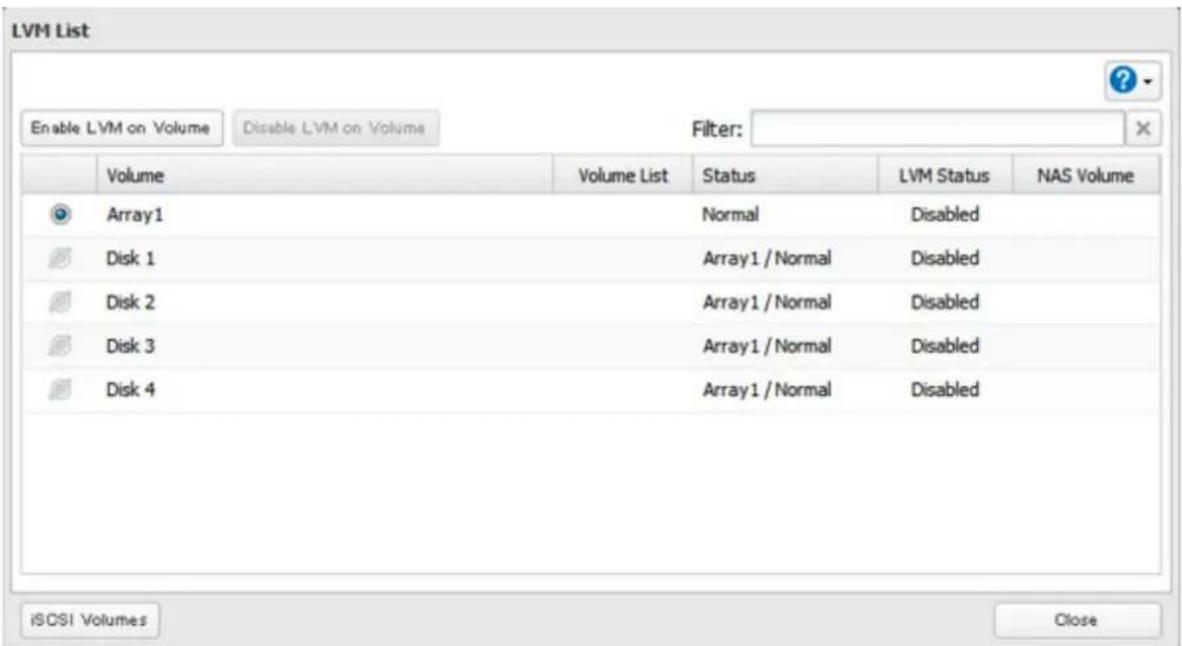
LVM3 Select the drive or array where the volume will be located and click Enable LVM on Volume.
text_image
LVM List Enable LVM on Volume Disable LVM on Volume Filter: Volume Volume List Status LVM Status NAS Volume Array1 Normal Disabled Disk 1 Array1 / Normal Disabled Disk 2 Array1 / Normal Disabled Disk 3 Array1 / Normal Disabled Disk 4 Array1 / Normal Disabled iSCSI Volumes Close4 The "Confirm Operation" screen will open. Enter the confirmation number, then click OK.
5 Click OK.
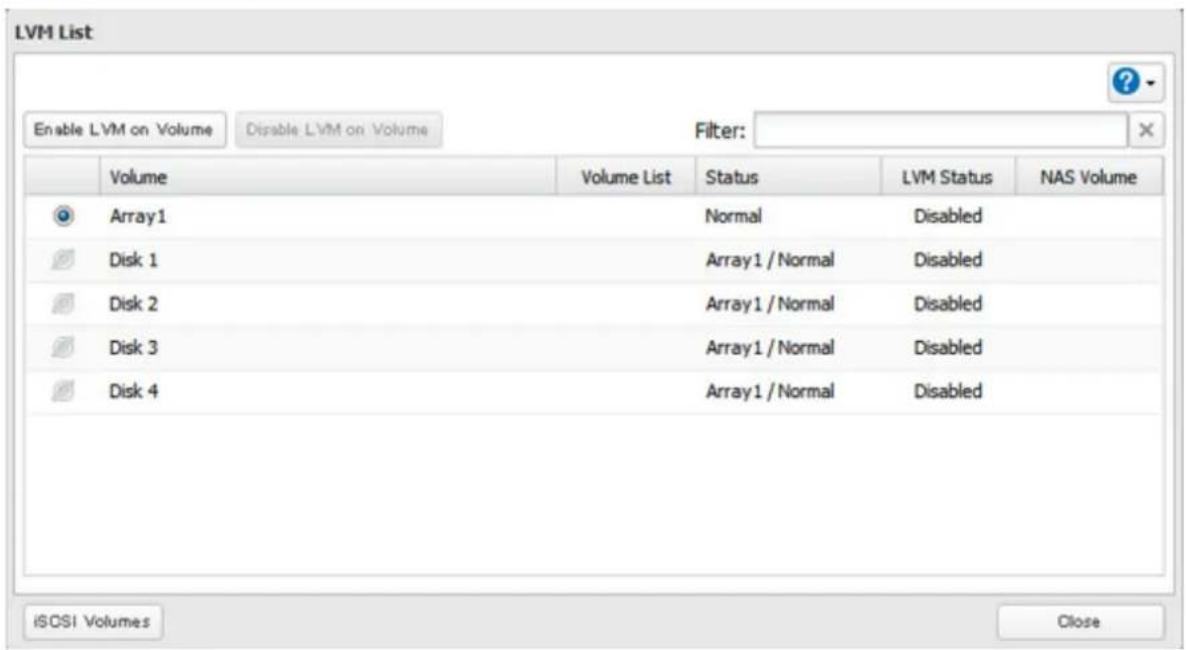
6 Click Edit under "NAS Volume".
text_image
LVM List Enable LVM on Volume Disable LVM on Volume Filter: Volume Volume List Status LVM Status NAS Volume Array1 Show LVM Enabled / Normal Enabled Edit Disk 1 Array1 / Normal Disabled Disk 2 Array1 / Normal Disabled Disk 3 Array1 / Normal Disabled Disk 4 Array1 / Normal Disabled iSOSI Volumes Close7 Click Create Volume.

text_image
NAS Volume List: Disk 2 Create Volume Delete Volume Filter: Volume Name Size Close8 Configure the desired settings, then click OK.
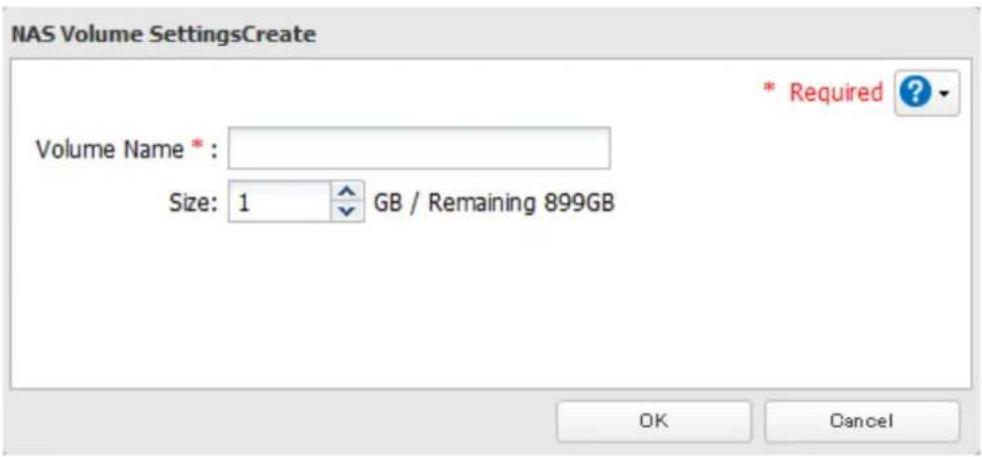
text_image
NAS Volume SettingsCreate Volume Name * : Size: 1 GB / Remaining 899GB * Required ? OK Cancel9 Click OK.
10 Click Close.
11 Click Close.
12 Navigate to File Sharing - Folder Setup.

text_image
Folder Setup 4 Folder(s)13 Click Create Folder.
14 Configure the settings.
15 Select the volume that you created and click OK.
Using the TeraStation as an iSCSI Device
Introduction
iSCSI is a protocol for carrying SCSI commands over IP networks. Unlike traditional SAN protocols such as Fibre Channel, which requires special-purpose cabling, iSCSI can be run over long distances using existing network infrastructure. Normal Windows formatting such as NTFS is supported.
Differences Between NAS and iSCSI
With iSCSI, the TeraStation is connected to a single computer, such as a server. Other computers on the network access files on the TeraStation through the computer it's connected to. The TeraStation can be used as a local drive from Windows Server. Features of Windows Server such as Active Directory can be used normally.
As a NAS, the TeraStation is a server, and computers (including other servers) on the network can access shared folders on it directly. A separate server is not required, and features such as backup are built-in.
Network Configuration
Use gigabit or faster network equipment with iSCSI. For best results, a dedicated network for iSCSI is recommended, separate from the regular network. Use fixed IP addresses for storage devices such as the TeraStation.
Installing a Connection Tool
Windows XP, Windows Server 2003
Before using any iSCSI equipment, download and install the iSCSI connection software "Microsoft iSCSI Software Initiator" from the Microsoft website.
You can also use Buffalo iSCSI Connection Tool to connect an iSCSI hard drive.
Windows Vista or later, Windows Server 2008 or later
The Microsoft iSCSI Software Initiator is already installed on your computer. You don't need to download and install it.
You can also use Buffalo iSCSI Connection Tool to connect an iSCSI hard drive.
Creating a iSCSI Volume
To use the TeraStation as an iSCSI hard drive, create a volume first. Configure the TeraStation as described below.
Notes:
- If the LVM settings are changed, all data on the volume will be erased. Before changing any settings, back up any important data.
- The TeraStation can have up 255 volumes, but we recommend using only a maximum of 32. Exceeding this volume amount may cause irreparable damage to the unit.
1 In Settings, click Drives.

Note: Steps 2–6 below describe the procedure to enable LVM for specifying a volume size or changing it later. LVM does not need to be enabled for a drive to be used as an iSCSI hard drive, as you can still create an iSCSI volume from the entire drive or array. However, enabling LVM is recommended for drives that will be used for iSCSI.
To use whole drive or array as an iSCSI hard drive, skip to step 7.
2 Click to the right of "LVM".

text_image
LVM3 Select the drive or array where the volume will be created and click Enable LVM on Volume.
text_image
LVM List Enable LVM on Volume Disable LVM on Volume Filter: Volume Volume List Status LVM Status NAS Volume Array1 Normal Disabled Disk 1 Array1 / Normal Disabled Disk 2 Array1 / Normal Disabled Disk 3 Array1 / Normal Disabled Disk 4 Array1 / Normal Disabled iSCSI Volumes Close4 The "Confirm Operation" screen will open. Enter the confirmation number, then click OK.
5 Click OK.
6 Click Close.

text_image
LVM List Enable LVM on Volume Disable LVM on Volume Filter: Volume Volume List Status LVM Status NAS Volume Array1 Show LVM Enabled / Normal Enabled Edit Disk 1 Array1 / Normal Disabled Disk 2 Array1 / Normal Disabled Disk 3 Array1 / Normal Disabled Disk 4 Array1 / Normal Disabled iCSI Volumes CloseNote: If you click Show under "Volume List", the volumes will be listed on the screen and you can see if these volumes are being used as iSCSI or NAS.
7
Move the iSCSI switch to the
position to enable iSCSI.

iSCSI


8
Click

of "iSCSI".
9
Click Create Volume.
10
Enter a volume name, volume description, volume, and size (if you enabled LVM), then click OK.
The volume size that you specify here can be changed later. To change the volume size, refer to the "Expanding Volume Sizes" section below.
11
The "Confirm Operation" screen will open. Enter the confirmation number, then click OK.
12
Click OK, then Close.
Creating an iSCSI volume is finished.
Note: If you click Disable Connection for the selected volume in Drives - iSCSI in Settings, the selected iSCSI volume can no longer be accessed. If you click Enable Connection, the volume will become accessible from the iSCSI initiator software.
Connecting or Disconnecting Volumes
There are two methods to connect or disconnect volumes. One uses the pre-installed Microsoft iSCSI Initiator on Windows; the other uses Buffalo iSCSI Connection Tool.
Note: By default, the IP address of the TeraStation is automatically assigned from a DHCP server. However, in this case, if you turn off and restart the TeraStation, the IP address may be changed and the volumes on the TeraStation may not be accessible. To avoid changing the IP address unexpectedly, using a fixed IP address for the TeraStation is recommended.
Using Microsoft iSCSI Initiator
Connecting Volumes
To connect a volume using Microsoft iSCSI Initiator from a Windows computer, follow the procedure below.
Note: Do not shut down the TeraStation while connecting to an iSCSI volume. It may cause unexpected data erasure. Make sure all connections are disconnected before shutdown.
1
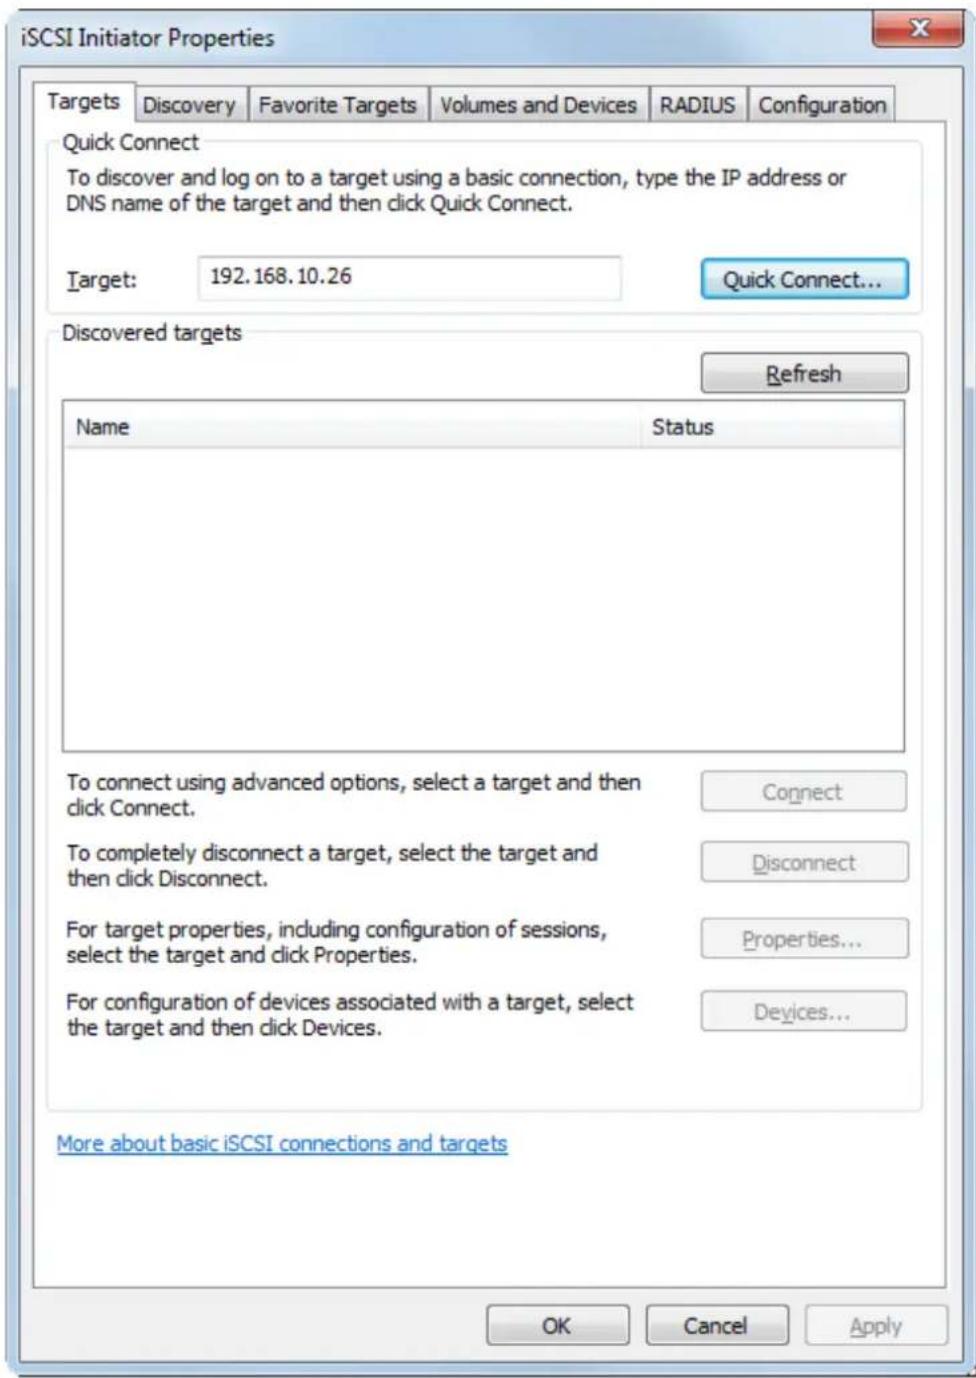
In Windows, navigate to Control Panel - Administrative Tools - iSCSI Initiator.
2 Enter the IP address of the TeraStation into the "Target" field and click Quick Connect.
text_image
iSCSI Initiator Properties Targets Discovery Favorite Targets Volumes and Devices RADIUS Configuration Quick Connect To discover and log on to a target using a basic connection, type the IP address or DNS name of the target and then click Quick Connect. Target: 192.168.10.26 Quick Connect... Discovered targets Refresh Name Status To connect using advanced options, select a target and then click Connect. To completely disconnect a target, select the target and then click Disconnect. For target properties, including configuration of sessions, select the target and click Properties. For configuration of devices associated with a target, select the target and then click Devices. Connect Disconnect Properties... Devices... More about basic iSCSI connections and targets OK Cancel Apply3 Confirm if the connection is established and click Done.
Connecting a volume is finished.
If using the connected volume for the first time, the volume should be formatted to be used as a local drive. Follow the procedure below for formatting.
1 In Windows, navigate to Control Panel - Administrative Tools - Computer Management.
2 Click Disk Management. When the "Initialize Disk" screen is displayed, click OK without changing any settings.
3 Right-click the disk volume that shows the status "Unallocated" and click New Simple Volume from the displayed menu. Follow the screen to finish formatting.
Formatting a volume is finished. When the formatting process is completed, the drive will be visible as an icon in Computer or My Computer and can be used as a normal drive on the computer.
Disconnecting a Volume
1 In Windows, navigate to Control Panel - Administrative Tools - iSCSI Initiator.
The status of the connecting volume will be displayed as "Connected" under "Discovered targets".
2 Select a volume to disconnect and click Disconnect.
3 Click Yes.
4 When the volume status is displayed as "Inactive", the disconnection was carried out properly.
Disconnecting a volume is finished.
Using Buffalo iSCSI Connection Tool
Connecting a Volume
To connect a volume using Buffalo iSCSI Connection Tool from a Windows computer, follow the procedure below.
1 Click Start - Programs - Buffalo - iSCSI Connection Tool - iSCSI Connection Tool. iSCSI Connection Tool will open.
2
Select the TeraStation name from the drop-down menu of "Target" and click Register iSCSI Device.

text_image
Buffalo iSCSI Connection Tool File Configuration Help Target TeraStation Register iSCSI Device Model TS3200D Series Series TS3200D IP Address 192.168.10.26 Subnet Mask 255.255.255.0 Firmware 1.20 MAC Address AA:BB:CG:DD:EE:FF iSCSI Service Enabled Volume Refresh Exit3
Click OK.
4 Select a volume to connect from the drop-down menu of "Volume" and click Connect.

text_image
Buffalo iSCSI Connection Tool File Configuration Help Target TeraStation Unregister iSCSI Device Model TS3200D Series Series TS3200D IP Address 192.168.10.26 Subnet Mask 255.255.255.0 Firmware 1.20 MAC Address AA:BB:CC:DD:EE:FF iSCSI Service Enabled Volume sample Status : Disconnected User Authentication : Disabled Connect on Start Up Connect Refresh Exit5 Click OK.
Connecting a volume is finished.
If using the connected volume for the first time, the volume should be formatted to be used as a local drive. Follow the procedure below for formatting.
1 In Windows, navigate to Control Panel - Administrative Tools - Computer Management.
2 Click Disk Management.
When the "Initialize Disk" screen is displayed, click OK without changing any settings.
3 Right-click the disk volume that shows the status "Unallocated" and click New Simple Volume from the displayed menu. Follow the screen to finish formatting.
Formatting a volume is finished. When the formatting process is completed, the drive will be visible as an icon in Computer or My Computer and can be used as a normal drive on the computer.
Disconnecting a Volume
1 Click Start - Programs - Buffalo - iSCSI Connection Tool - iSCSI Connection Tool. iSCSI Connection Tool will open.
2 Select a volume to disconnect from the drop-down menu of "Volume" and click Disconnect.

text_image
Buffalo iSCSI Connection Tool File Configuration Help Target TeraStation Unregister iSCSI Device Model TS3200D Series Series TS3200D IP Address 192.168.10.26 Subnet Mask 255.255.255.0 Firmware 1.20 MAC Address AA:BB:CG:DD:EE:FF iSCSI Service Enabled Volume sample Status : Connected User Authentication : Disabled Connect on Start Up Disconnect Refresh Exit3 Click Yes.
4 Click OK.
5
Select the TeraStation name from the drop-down menu of "Target" and click Unregister iSCSI Device.

text_image
Buffalo iSCSI Connection Tool File Configuration Help Target TeraStation Unregister iSCSI Device Model TS3200D Series Series TS3200D IP Address 192.168.10.26 Subnet Mask 255.255.255.0 Firmware 1.20 MAC Address AA:BB:CC:DD:EE:FF iSCSI Service Enabled Volume sample Status : Disconnected User Authentication : Disabled Connect on Start Up Connect Refresh Exit6 Click OK.
Disconnecting a volume is finished.
Using with Multiple Computers
If the TeraStation is divided into multiple volumes (or drives), it can be used with multiple computers. However, multiple computers cannot be accessed from one volume (or one drive) at the same time.
Checking Whether iSCSI Volume is Connected
To check whether an iSCSI volume is connected, navigate to Drives - iSCSI. Current volumes will be listed. If "Connected" is displayed under "Connection", the volume is currently connected from the client.
Configuring Access Restrictions
A username and password can be configured for the entire iSCSI volume or each existing volume. Access restrictions can be configured so that entering a username and password is required for each connection.
The TeraStation can perform mutual authentication (two-way authentication). Dual passwords ensure that only authorized client computers can access the volume on the TeraStation.
Follow the procedure below to enable access restrictions.
Configuring Access Restrictions for the Entire TeraStation
1 In Settings, click Drives.

2 Click to the right of "iSCSI".

text_image
iSCSI iSCSI3 Click the Security tab.
4 Click Edit under "Access Control (Target Discovery)".
5 Enable access restrictions, enter the username and password, and click OK.
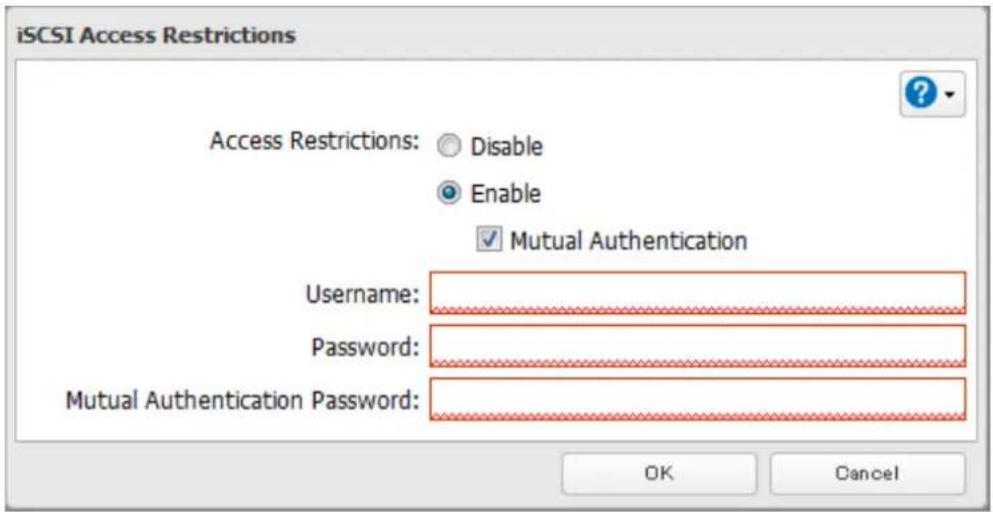
text_image
iSCSI Access Restrictions Access Restrictions: Disable Enable Mutual Authentication Username: Password: Mutual Authentication Password: OK CancelNote: To enable mutual authentication in addition to username and password authentication, check "Mutual Authentication" and enter the mutual authentication password.
To search or connect the volume which has mutual authentication enabled from Microsoft iSCSI Initiator, mutual CHAP secret settings should be configured.
6 Click Close.
Configuring access restrictions for the entire TeraStation is finished.
Connecting Volumes on the Access-Restricted TeraStation
Using Microsoft iSCSI Initiator
If access restrictions are configured for the entire iSCSI volume, that volume will not be detected by Microsoft iSCSI Initiator. To connect that volume, the configured username and password should be authenticated.
1 Open the Microsoft iSCSI Initiator.
2 Register the mutual authentication password to your computer first. If you didn't enable mutual authentication, skip this step.
Click CHAP in the "Configuration" tab. In the "Initiator CHAP secret" field, enter the configured mutual authentication password and click OK.
3 In the "Discovery" tab, click Discover Portal.
4 Enter the TeraStation's IP address in the "IP address or DNS name" field.
5 Click Advanced.
6 Check "Enable CHAP log on" and enter the configured username to the "Name" field and password into the "Target secret" field.
If the mutual authentication is enabled, check "Perform mutual authentication".
7 Click OK twice.
8 In the "Targets" tab, select the volume from "Discovered targets" and click Connect - OK.
9 If the status of the selected volume is displayed as "Connected" under "Discovered targets", the connection is established properly.
Accessing the volume on the access-restricted TeraStation is finished.
Using iSCSI Connection Tool
1 Open iSCSI Connection Tool.
2 Select the TeraStation name from the drop-down menu of "Target" and click Register iSCSI Device.
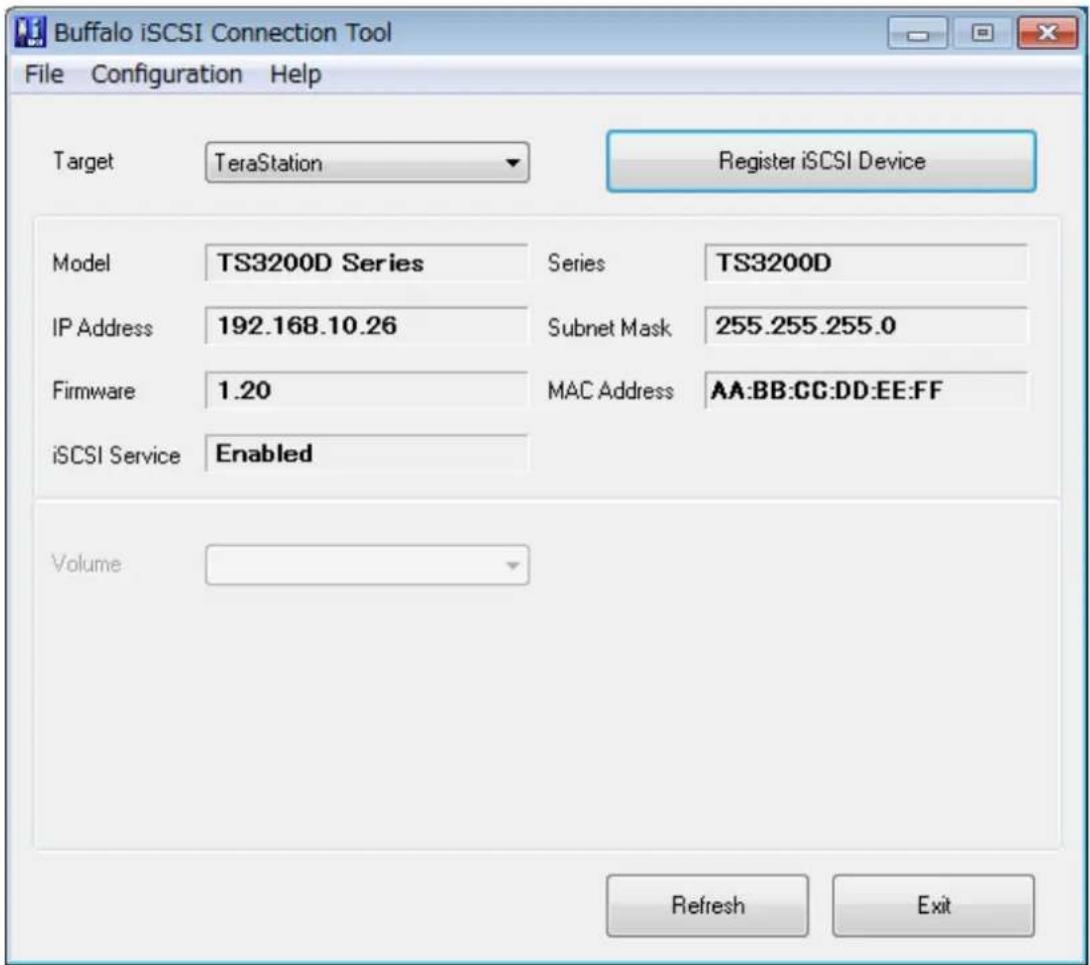
text_image
Buffalo iSCSI Connection Tool File Configuration Help Target TeraStation Register iSCSI Device Model TS3200D Series Series TS3200D IP Address 192.168.10.26 Subnet Mask 255.255.255.0 Firmware 1.20 MAC Address AA:BB:CC:DD:EE:FF iSCSI Service Enabled Volume Refresh Exit3 The screen to enter the username and password will be displayed. Enter the configured username and password from step 5 of the "Configuring Access Restrictions for the Entire TeraStation" section above and click OK.
If mutual authentication is enabled, check "Mutual Authentication", then click OK.

text_image
User Authentication Enter username and password. Username Password ✓ Mutual Authentication OK Cancel4 If "Mutual Authentication" is checked, the following screen will be displayed. Enter the mutual authentication password and click OK.
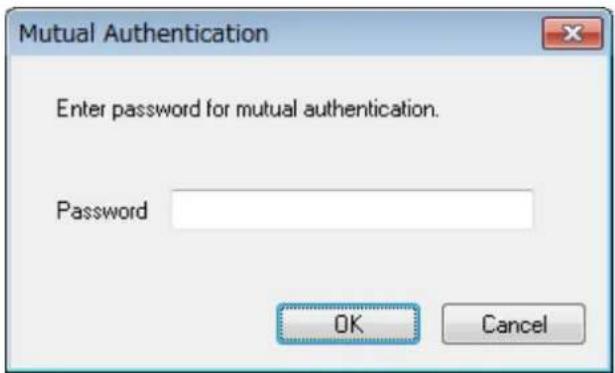
text_image
Mutual Authentication Enter password for mutual authentication. Password OK Cancel5 When authentication is successful, click OK.
6 Select a volume to connect from the drop-down menu of "Volume" and click Connect.
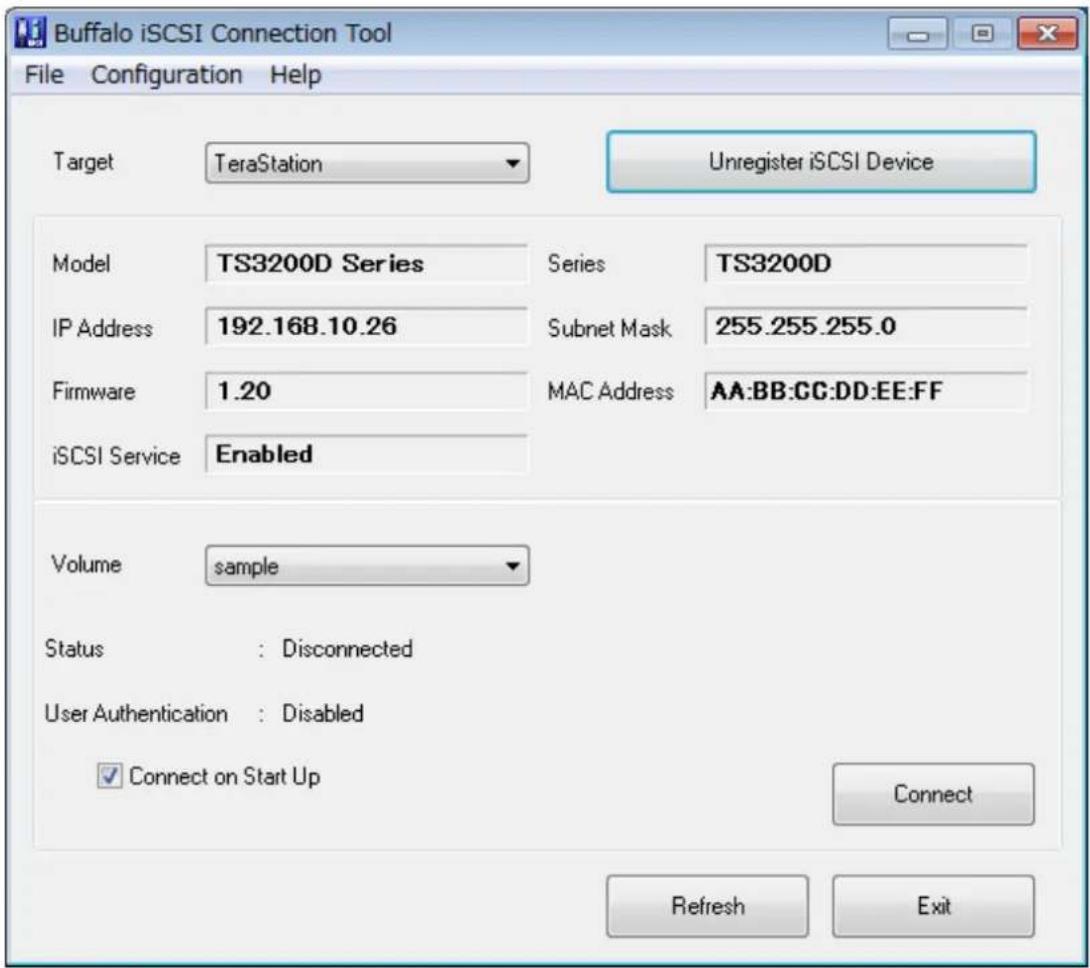
text_image
Buffalo iSCSI Connection Tool File Configuration Help Target TeraStation Unregister iSCSI Device Model TS3200D Series Series TS3200D IP Address 192.168.10.26 Subnet Mask 255.255.255.0 Firmware 1.20 MAC Address AA:BB:CC:DD:EE:FF iSCSI Service Enabled Volume sample Status : Disconnected User Authentication : Disabled Connect on Start Up Connect Refresh Exit7 Click OK.
Accessing the volume on the access-restricted TeraStation is finished.
Configuring Access Restrictions for Individual Volumes
If access restrictions are configured for a volume, that volume cannot be accessed unless the username and password are authenticated.
1 In Settings, click Drives.

2 Click to the right of "iSCSI".

text_image
iSCSI iSCSI3 Click the volume to configure access restrictions.
4 Enable access restrictions, enter a username and password, and click OK.
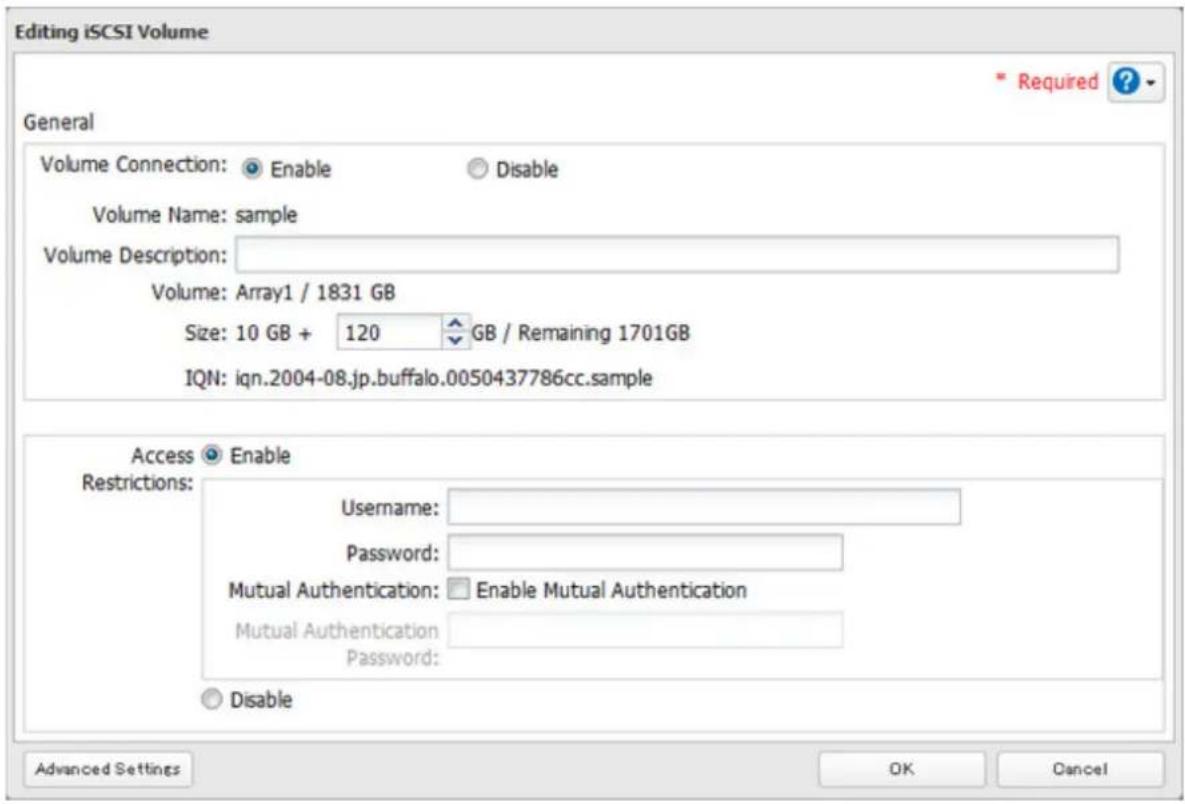
text_image
Editing iSCSI Volume General Volume Connection: Enable Disable Volume Name: sample Volume Description: Volume: Array1 / 1831 GB Size: 10 GB + 120 GB / Remaining 1701GB IQN: iqn.2004-08.jp.buffalo.0050437786cc.sample Access Enable Restrictions: Username: Password: Mutual Authentication: Enable Mutual Authentication Mutual Authentication Password: Disable Advanced Settings OK CancelNote: To enable mutual authentication, check "Enable Mutual Authentication" in the screen above and enter the mutual authentication password.
5 The "Confirm Operation" screen will open. Enter the confirmation number, then click OK.
6 Click OK, then Close.
Configuring access restrictions for each iSCSI volume is finished.
Connecting to Individual Volumes that are Access-Restricted
Using Microsoft iSCSI Initiator
1 Open the Microsoft iSCSI Initiator.
2 Register the mutual authentication password to your computer first. If you didn't enable the mutual authentication, skip this step.
Click CHAP in the "Configuration" tab. In the "Initiator CHAP secret" field, enter the configured mutual authentication password and click OK.
3 In the "Discovery" tab, click Discover Portal.
4 Enter the TeraStation's IP address in the "IP address or DNS name" field.
5 Click Advanced.
6 Check "Enable CHAP log on" and enter the configured username to the "Name" field and password into the "Target secret" field.
If the mutual authentication is enabled, check "Perform mutual authentication".
7 Click OK twice.
8 In the "Targets" tab, select the volume from "Discovered targets" and click Connect.
9 Click Advanced.
10 Check "Enable CHAP log on" and enter the configured username into the "Name" field and password into the "Target secret" field.
If mutual authentication is enabled, check "Perform mutual authentication".
11 Click OK twice.
12 If the status of the selected volume is displayed as "Connected" under "Discovered targets", the connection is established properly.
Accessing the access-restricted volume is finished.
Using Buffalo iSCSI Connection Tool
1 Open the Buffalo iSCSI Connection Tool.
2 Select the TeraStation name from the drop-down menu of "Target" and click Register iSCSI Device.
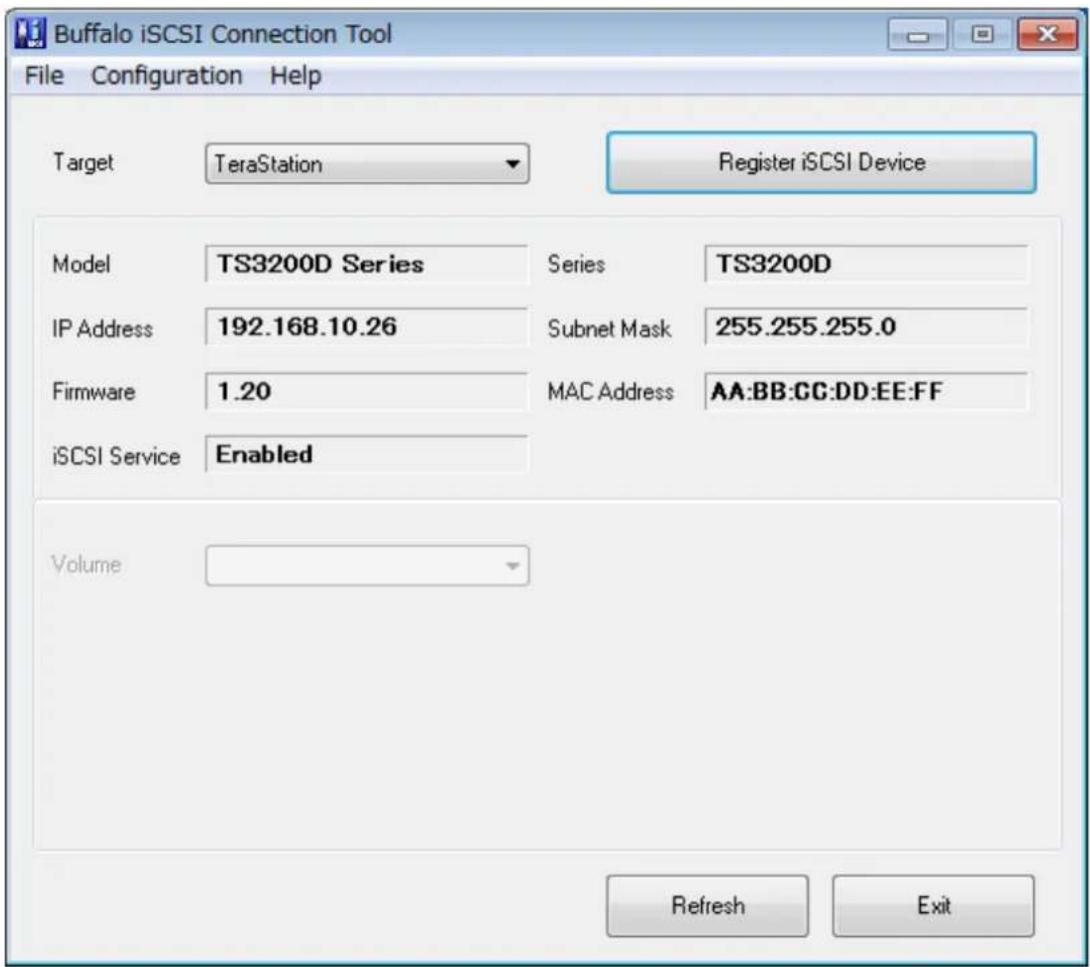
text_image
Buffalo iSCSI Connection Tool File Configuration Help Target TeraStation Register iSCSI Device Model TS3200D Series Series TS3200D IP Address 192.168.10.26 Subnet Mask 255.255.255.0 Firmware 1.20 MAC Address AA:BB:CC:DD:EE:FF iSCSI Service Enabled Volume Refresh Exit3
Select a volume to connect from the drop-down menu of "Volume" and click Connect.

text_image
Buffalo iSCSI Connection Tool File Configuration Help Target TeraStation Unregister iSCSI Device Model TS3200D Series Series TS3200D IP Address 192.168.10.26 Subnet Mask 255.255.255.0 Firmware 1.20 MAC Address AA:BB:CG:DD:EE:FF iSCSI Service Enabled Volume sample Status : Disconnected User Authentication : Enabled Connect on Start Up Connect Refresh Exit4
The screen to enter the username and password will be displayed. Enter the configured username and password from step 4 of the "Configuring Access Restrictions for Individual Volumes" section above and click OK.
If mutual authentication is enabled, check "Mutual Authentication", then click OK.
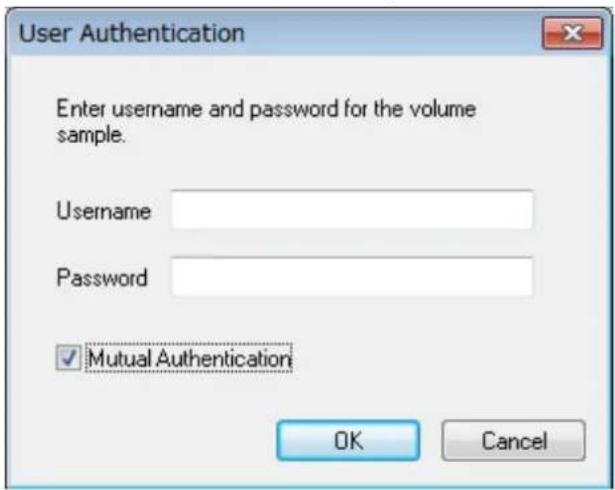
text_image
User Authentication Enter username and password for the volume sample. Username Password ✓ Mutual Authentication OK Cancel5 If "Mutual Authentication" is checked, the following screen will be displayed. Enter the mutual authentication password and click OK.

text_image
Mutual Authentication Enter password for mutual authentication. Password OK Cancel6 When authentication is successful, click OK.
Accessing the access-restricted volume is finished.
Expanding Volume Sizes
The volume size of the existing volumes can expand after they are created.
Notes:
- Expanding volume size may erase all data in the volume depending on the formatting type. Back up the data before expanding the volume size is recommended.
• To expand the volume size, the volume should be created in the LVM-enabled drive or array.
1 In Settings, click Drives.

2 Click to the right of "iSCSI".

text_image
iSCSI iSCSI3 Select the volume to expand.
4 Enter the desired volume size to add and click OK.
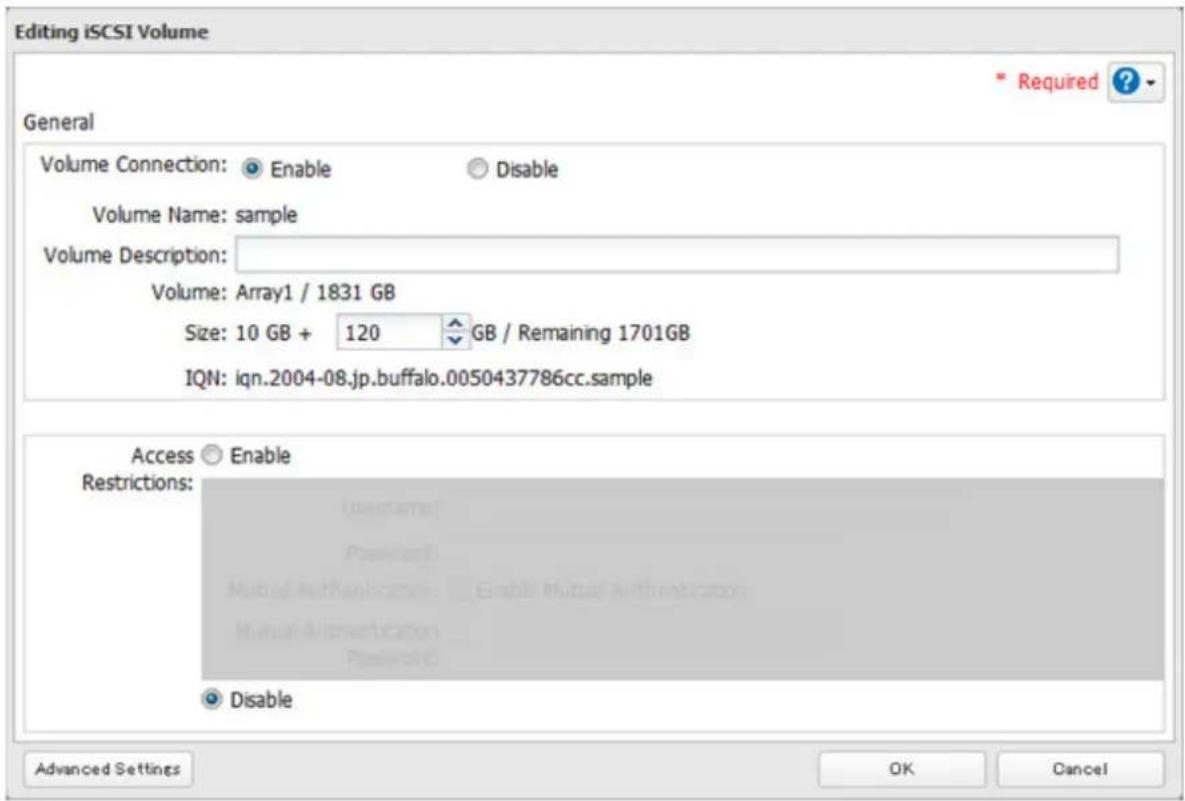
text_image
Editing iSCSI Volume General Volume Connection: Enable Disable Volume Name: sample Volume Description: Volume: Array1 / 1831 GB Size: 10 GB + 120 GB / Remaining 1701GB IQN: iqn.2004-08.jp.buffalo.0050437786cc.sample Access Enable Restrictions: Disable Advanced Settings OK Cancel5 The "Confirm Operation" screen will open. Enter the confirmation number, then click OK.
6 Click OK, then Close.
Expanding the volume size is finished.
Deleting Volumes
To delete an existing volume, follow the procedure below.
Note: Deleting a volume will erase all data on the volume. Back up the data before deleting the volume.
1 In Settings, click Drives.

2 Click to the right of "iSCSI".

text_image
iSCSI iSCSI3
Select the volume to delete and click Delete Volume.

text_image
iSCSI Settings General Security Create Volume Delete Volume Enable Connection Disable Connection Refresh Volume List Connection Volume Name Volume IQN Access Restrictions Standing By sample Array1 ign.2004-08.jp.buffalo.0050437786cc.sample - Select All Unselect All Show Connection History Close4 Confirm that the volume is correctly selected on the screen and click OK.
5 The "Confirm Operation" screen will open. Enter the confirmation number, then click OK.
6 Click OK.
7 Click Close.
Deleting the volume is finished.
Hard Drive Replacement
Hard drives in the TeraStation show a blue status LED during normal operation. If a drive fails, its error LED will glow red.
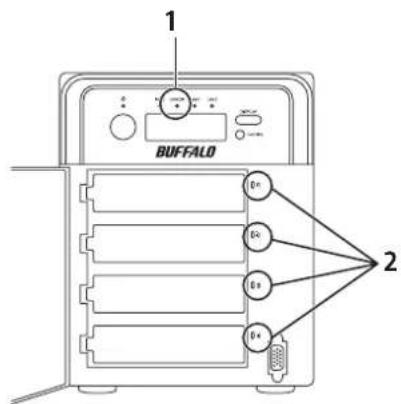
text_image
1 BUFFALO 2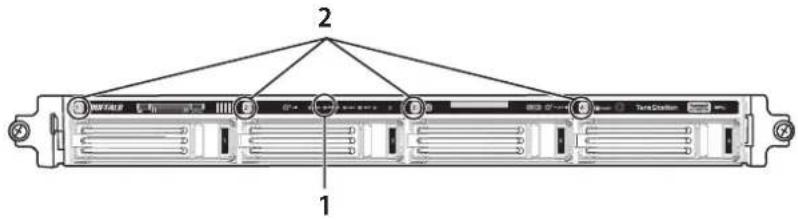
text_image
Diagram of a rack-mounted server rack with labeled components and connection points1 Error LED
Glows red if a drive has failed.
2 Status LEDs
The failed drive's status LED will be glowing a steady red. A drive with a red status LED is ready to hot-swap.
Notes:
- Do not unplug a drive whose status LED is green instead of red. Dismount it first or shut down the TeraStation before swapping a working drive. If you remove the drive without properly dismounting it, data may be lost or the TeraStation may malfunction.
- Use a Buffalo OP-HDS series drive of the same size or larger (the same size if using RMM) as the replacement drive. If a larger drive is used, the extra space will not be usable in a RAID array.
- To avoid damaging the TeraStation with static electricity, ground yourself by touching something made of metal before handling any sensitive electronic parts.
- After a drive is replaced, it will take about 30 minutes before normal file reading and writing are restored. Settings may not be accessible during this period.
- Do not change the order of the hard drives in the TeraStation. For example, pulling out drive 1 and replacing it with drive 2 may cause data to be corrupted or lost.
• If the LCD display does not change after a new drive is installed, click Rediscover Disk in Settings.
Hard Drive Replacement Examples
Drive Replacement (using JBOD or a redundant RAID mode such as RAID 1, 5, or 6 with auto-shutdown disabled)
This section describes replacing a drive with the TeraStation on.
1 Open the front cover with the included key.
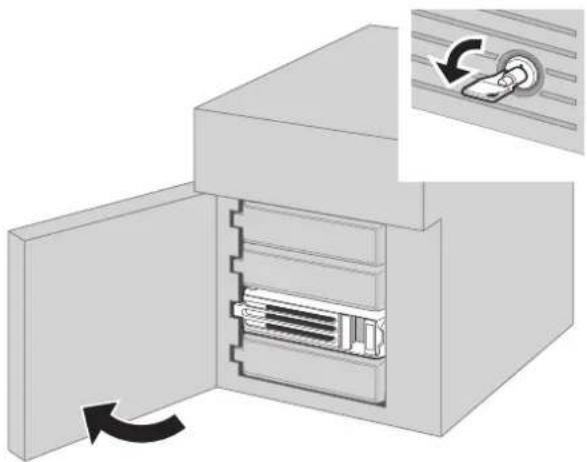
natural_image
Diagram of a mechanical device with an open door and internal components, showing a close-up of a circular component (no text or symbols present)2 The failed drive's status LED will be glowing red. Push its unlock button and swing the lock mechanism out.
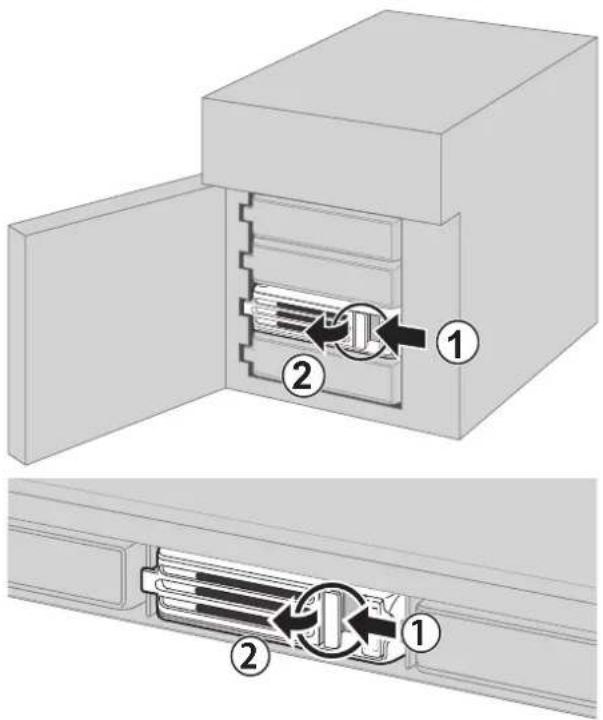
text_image
Technical diagram showing two views of a mechanical component with numbered parts and directional arrows indicating assembly or movement.Hard drives without red status LEDs lit are still on. Do not unplug or remove them.
3 Pull out the drive cartridge and remove it from the TeraStation.
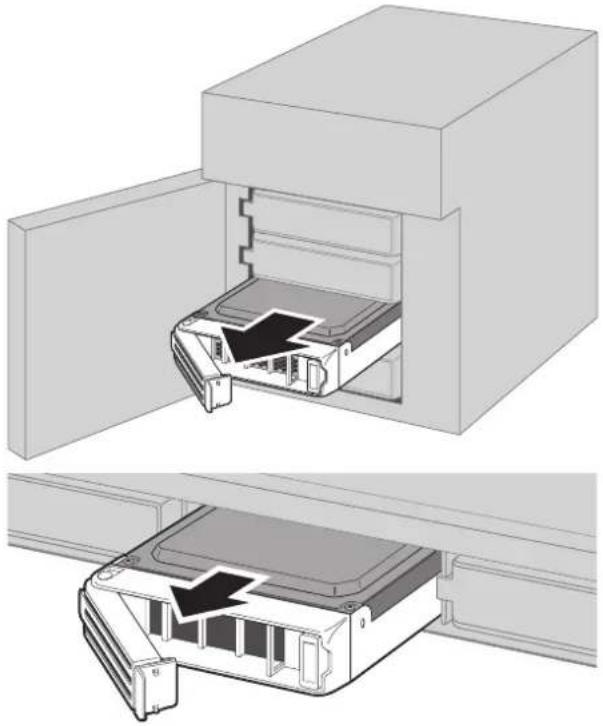
natural_image
Technical illustration of a device internal structure showing two views: top view with open door opening, bottom view with closed panel showing internal components (no text or symbols)4 Insert the new drive into the empty slot. Slide the drive in with the locking mechanism open.
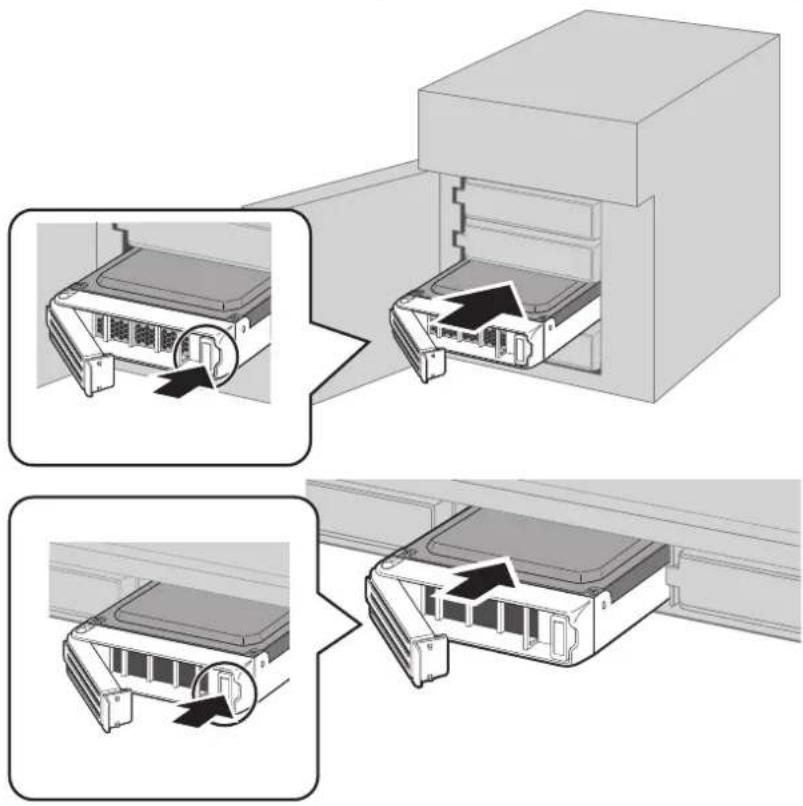
text_image
Diagram illustrating the process of inserting a device into a rack, with three views showing internal components and directional arrows.5 Swing the lock back down until it clicks into place.

natural_image
Diagram showing two views of a device's internal structure with arrows indicating flow or movement (no text or symbols present)6 Close the front cover.
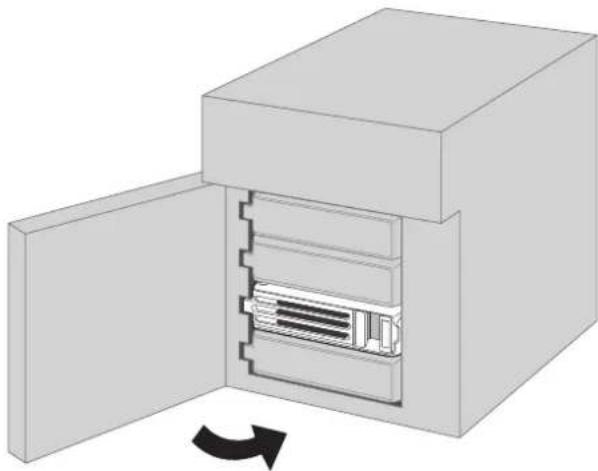
natural_image
3D diagram of a device with an open door and internal storage unit, showing internal structure and rotation arrow (no text or symbols)7 When the replacement hard drive is recognized, the status LED will flash red and the I31 message will be displayed on the LCD panel.
8 Hold down the function button on the front of the TeraStation for 3 seconds until it beeps.
For RAID 1, 5, or 6:
The TeraStation will start rebuilding the RAID array automatically. After a few minutes, the I18 message will be displayed until the array is rebuilt.
For JBOD:
The drive will be formatted as an individual drive. Create a shared folder on the drive before use.
Drive Replacement (using a redundant RAID mode such as RAID 1, 5, or 6 with auto-shutdown enabled)
This section describes the process of replacing a drive while the TeraStation is off.
1 Open the front cover with the key.
2 Push the unlock button of the failed hard drive and swing the lock mechanism out.
3 Pull out the drive cartridge and remove it from the TeraStation.
4 Insert the new hard drive into the empty slot. Slide the drive in with the locking mechanism open. Swing the lock back down until it clicks into place.
5 Close the front cover.
6 Press the power button on the TeraStation.
7 When the replacement hard drive is recognized, the status LED will flash red and the I31 information message will be displayed on the LCD panel.
8 Hold down the function button on the front of the TeraStation for 3 seconds until it beeps. The TeraStation will start rebuilding the RAID array automatically. It will take about 5 minutes before the l18 message is displayed.
Drive Replacement (RAID 0)
Drives in a RAID 0 array do not automatically turn off in the event of a malfunction. Before replacing the failed drive, either dismount the drive from Settings, or shut down the TeraStation.
This section describes the process of replacing a drive with the TeraStation on.
Note: If a hard drive malfunctions in RAID 0, all data on the RAID array will be lost. All of the settings for the shared folders (such as access restrictions) are erased after replacing a drive from a RAID 0 array.
1 Open the front cover with the included key.
2 In Settings, navigate to Drives - Drives.
3 Select the hard drive with the flashing status LED and click Dismount Disk.
4 Enter the number that appears on the screen, then click OK.
5 The status LED will stop flashing and glow steadily.
6 Unlock the failed drive by pushing the unlock button and swinging the lock mechanism out.
Note: Hard drives without red status LEDs lit are still on. Do not unplug or remove them.
7 Pull out the hard drive cartridge and remove it from the TeraStation.
8 Insert the new hard drive (sold separately) into the empty slot. Slide the drive in with the locking mechanism open. Swing the lock back down until it clicks into place.
9 Close the front cover.
10 When the replacement drive is recognized, the status LED will flash red and the I32 information message will be displayed on the LCD panel.
Select the RAID array from Drives - RAID in Settings and click Delete RAID Array. In Drives - Drives, click Format Disk to format the new drive. In Drives - RAID, choose the type of RAID array desired. Enter the confirmation number and click OK. Create a shared folder before use.
Drive Replacement (using a redundant RAID mode such as RAID 1, 5, or 6 with a hot spare configured)
If your TeraStation's drives are in a redundant RAID mode, and you have a hot spare enabled, a malfunctioning drive in the array is replaced by the spare disk and the RAID array is rebuilt automatically. The status LED will continue to glow red for the failed drive even after the RAID array is rebuilt with the hot spare. This section describes the replacement process for a hard drive while the TeraStation is still on.
1 Open the front cover with the included key.
2 The failed drive's status LED will be glowing red. Push its unlock button and swing the lock mechanism out.
3 Pull out the drive cartridge and remove it from the TeraStation.
4 Insert the new drive into the empty slot. Slide the drive in with the locking mechanism open. Swing the lock back down until it clicks into place.
5 Close the front cover.
6 When the replacement drive is recognized, the status LED will flash red and the I31 information message will be displayed on the LCD panel.
7 Hold down the function button on the front of the TeraStation for 3 seconds until it beeps. The replacement hard drive is automatically registered as a hot spare.
To use the replacement disk as a normal drive rather than a hot spare, navigate to Drives - RAID and click the RAID array, select the new drive, and click Set as a normal disk.
Replacing a Media Cartridge
Drives configured as media cartridges may be removed and moved to a different TeraStation for use. Before unplugging the drive, dismount it in Settings or shut down the TeraStation.
Chapter 5 Backup
Back Up from the TeraStation
You can back up TeraStation folders to:
• A different folder on the TeraStation
• Another LinkStation on the network
• Another TeraStation on the network
You can also configure backup jobs from Easy Admin.
Preparing a Backup Destination
First, configure a folder as a backup destination.
1 In Settings, click File Sharing.

text_image
File Sharing2 Click to the right of "Folder Setup".

text_image
Folder Setup 4 Folder(s)3 Choose the folder to set as a backup destination.
4 Click Edit.
5 Under "LAN Protocol Support", check "Backup" and click OK.
Note: To configure a password, enter it in the "Remote Backup Password" field. Leave this field blank if you don't want a password. If the target device is configured with a backup password, you can easily find the backup target folder during configuration of the backup job by searching for the password.
Backing up to a LinkStation or TeraStation on another network when connected by a VPN
You can back up to a LinkStation or TeraStation on another network as long as the two networks are connected by a VPN. Follow this procedure to enter the IP address or hostname of the target LinkStation or TeraStation.
1 In Settings, click Backup.

text_image
Backup2 Click to the right of "Backup".

text_image
Backup Inactive3 Click List of LinkStations and TeraStations.
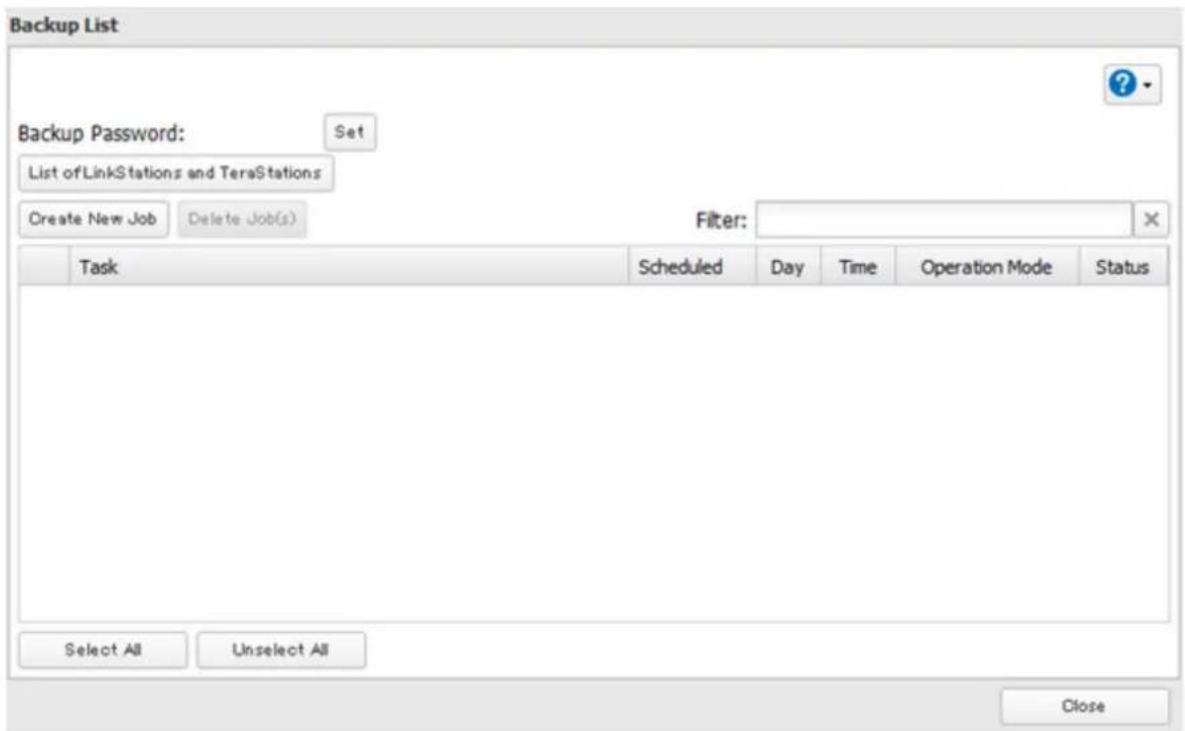
text_image
Backup List Backup Password: Set List of LinkStations and TeraStations Create New Job Delete Job(s) Filter: Task Scheduled Day Time Operation Mode Status Select All Unselect All Close4 Click Add under "Off-subnet Devices", enter the IP address of the target LinkStation or TeraStation, and click Close.
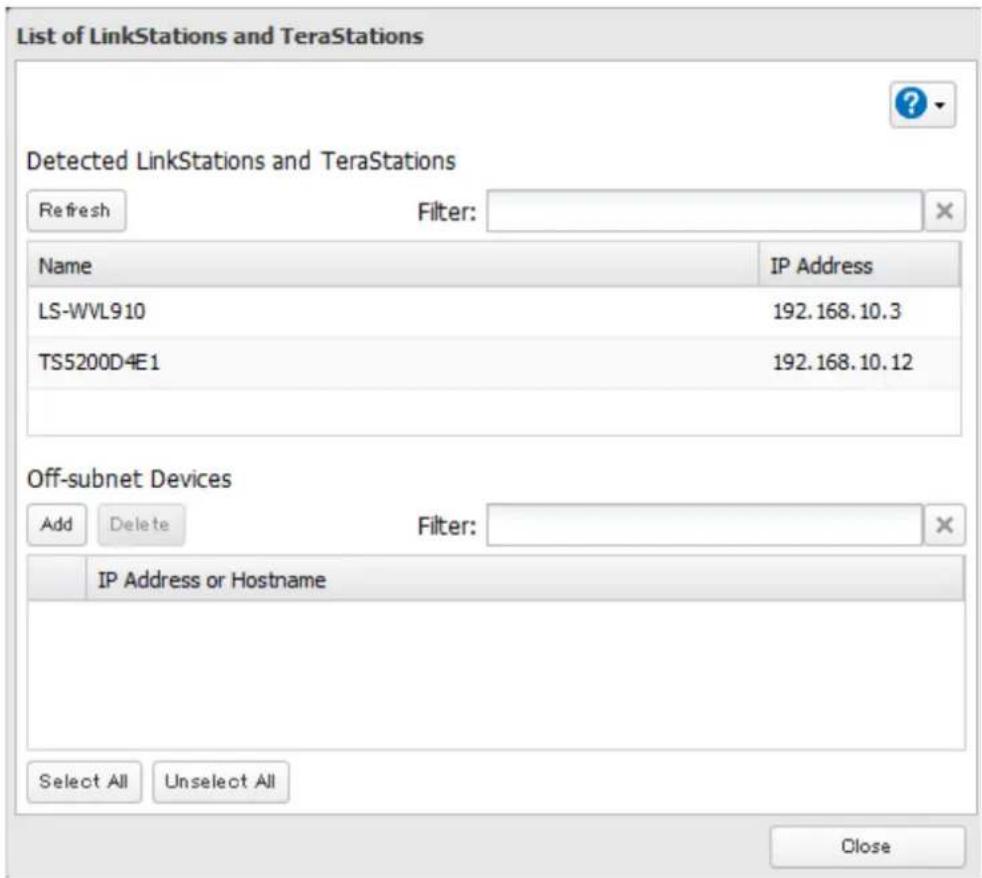
text_image
List of LinkStations and TeraStations Detected LinkStations and TeraStations Refresh Filter: Name IP Address LS-WVL910 192.168.10.3 TS5200D4E1 192.168.10.12 Off-subnet Devices Add Delete Filter: IP Address or Hostname Select All Unselect All CloseIf your setup meets the requirements below, you don't have to configure these settings:
• The source and target TeraStations are on the same network.
• No backup password is set for the target TeraStation.
• No TeraStation from outside the subnet, or connected by a VPN, is used.
Notes:
- To back up data between LinkStations or TeraStations on a network using jumbo frames, make sure that both devices are configured to use identical (or similar) Ethernet frame sizes. If Ethernet frame sizes are significantly different, the backup job may not be properly performed. In such a case, select the default frame size (1500 bytes).
• You can also specify hostname by a fully qualified domain name (FQDN).
Configuring a Backup Job
1 In Settings, click Backup.

text_image
Backup2 Click to the right of "Backup".

text_image
Backup Inactive3 Click Create New Job.
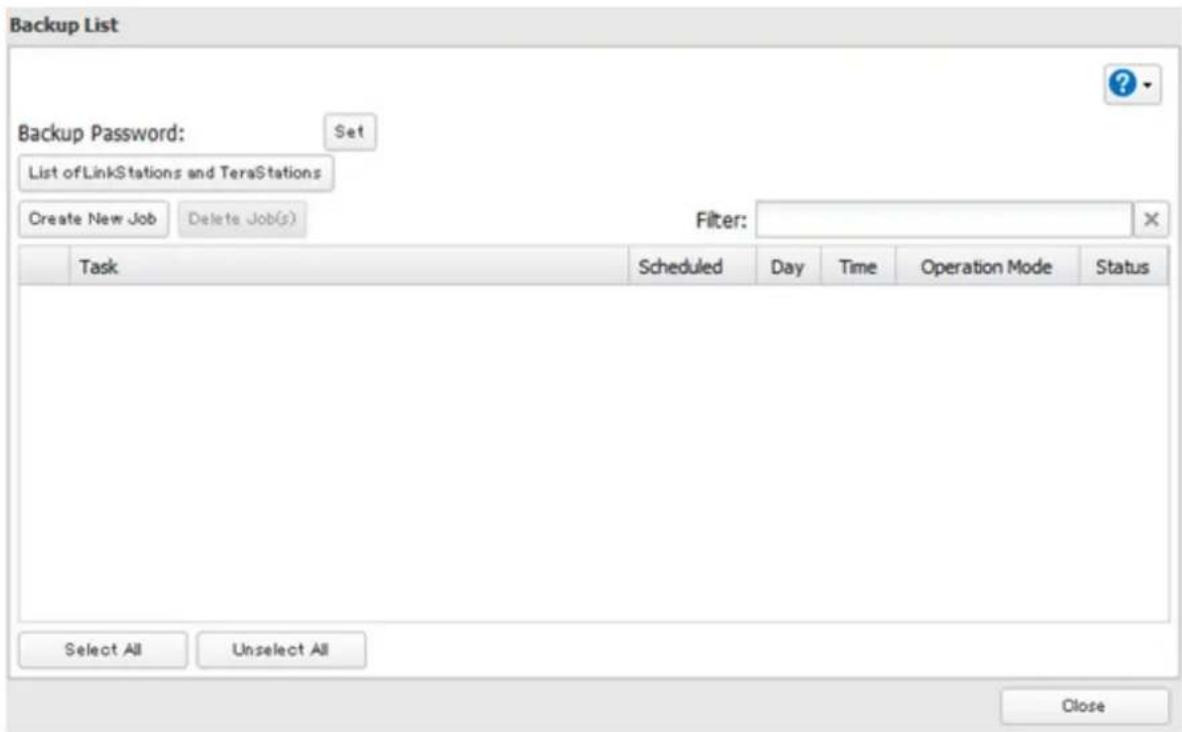
text_image
Backup List Backup Password: Set List of LinkStations and TeraStations Create New Job Delete Job(s) Filter: Task Scheduled Day Time Operation Mode Status Select All Unselect All CloseNote: Up to 8 backup jobs can be configured.
4 Select backup settings such as date and time to run.
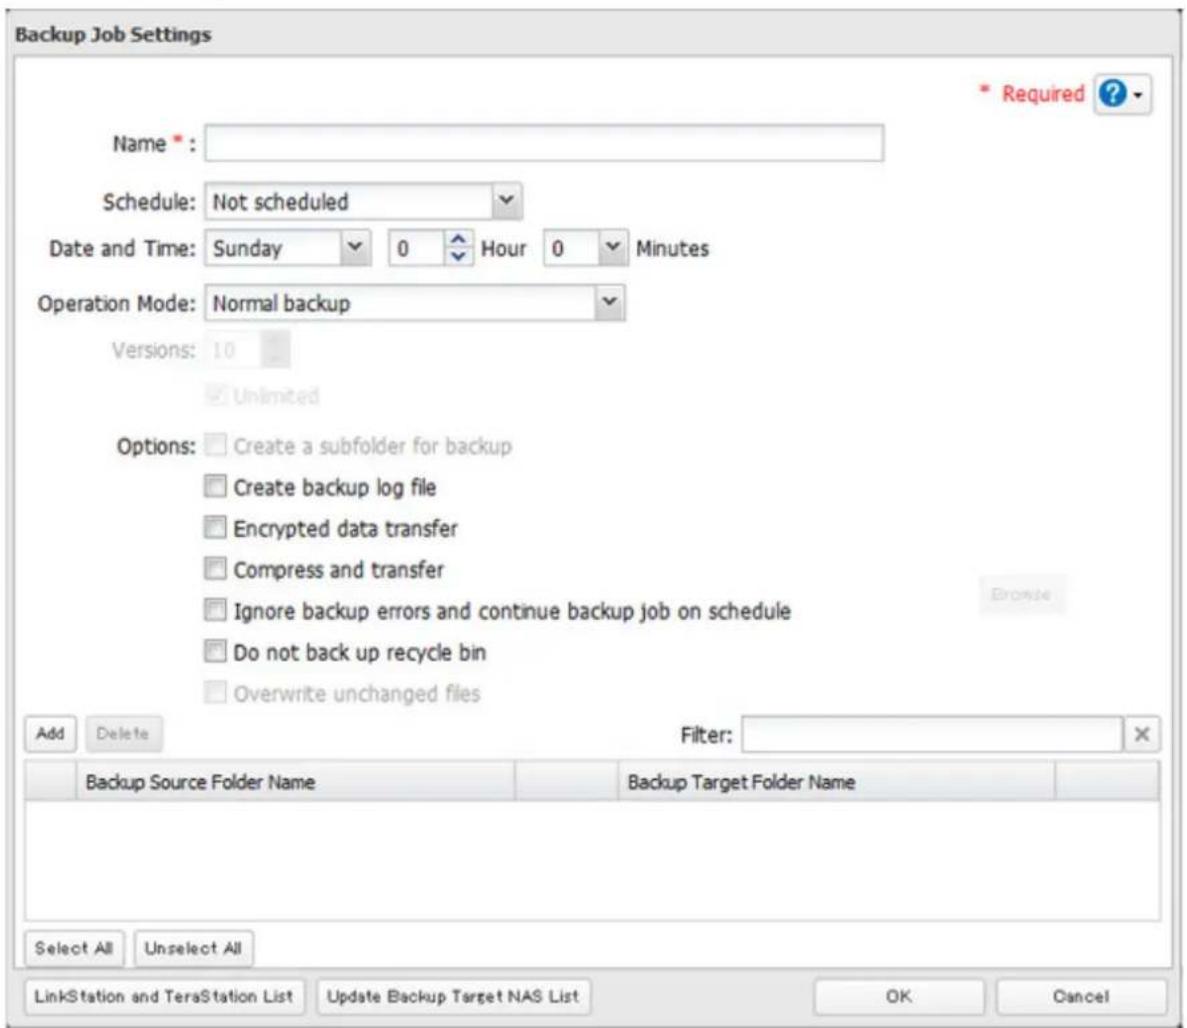
text_image
Backup Job Settings Name * Schedule: Not scheduled Date and Time: Sunday 0 Hour 0 Minutes Operation Mode: Normal backup Versions: 10 Unlimited Options: Create a subfolder for backup Create backup log file Encrypted data transfer Compress and transfer Ignore backup errors and continue backup job on schedule Do not back up recycle bin Overwrite unchanged files Add Delete Filter: Filter: Backup Source Folder Name Backup Target Folder Name Select All Unselect All LinkStation and TeraStation List Update Backup Target NAS List OK Cancel Required ?The following types of backup jobs may be selected:
| Type Files included | |
| Normal backup All files in the source will be backed up to the destination. | |
| Overwrite (incremental) | The first time the backup job runs like a normal backup. In subsequent backups, files added to the source as well as files deleted from the source are kept in the backup folder. |
| Overwrite (differential) | The first backup job runs like a normal backup. As each additional backup job runs, files are added to and deleted from the backup folder. The backup destination folder is always the same size as the backup source folder. |
| Management backup | Each time a backup is executed, management information is stored, and only files that have changed are copied or deleted. Data is retrieved from the previous backup file for files that were not changed. This is useful for making backups with limited space or for referencing status at a particular point in time (for use for data snapshot applications). The destination folder for a management backup should be a local folder on this TeraStation or on a USB drive attached to it. The target folder will be set to read-only. Do not use folders from drives formatted with FAT. |
5 Click Add.
6 Click Browse under "Backup Source Folder Name".
7 Select the shared folder that will be the backup source, then click OK.
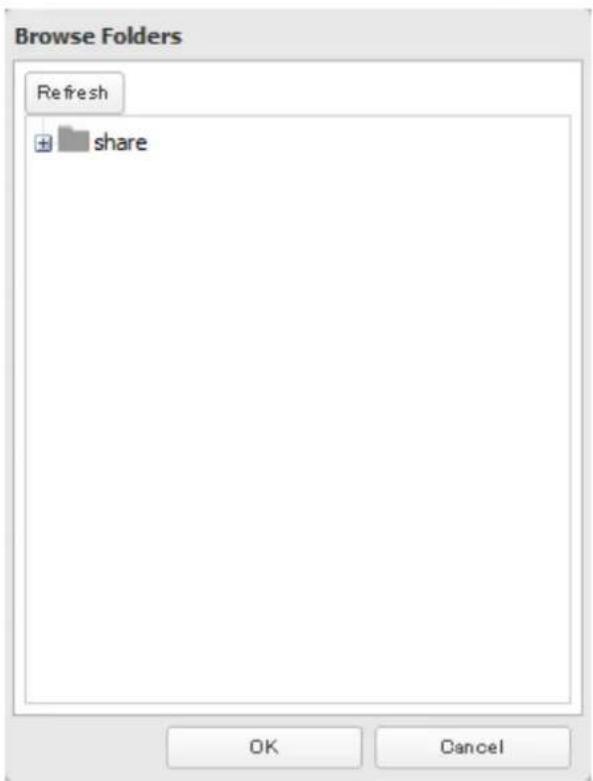
text_image
Browse Folders Refresh + share OK Cancel8 Click Browse under "Backup Target Folder Name".
9 Select the backup target and click OK.

text_image
Browse Folders Refresh usbdisk1 usbdisk3 mediacartridge4 OK CancelNote: If you will use the same folder for both Amazon S3 remote replication and as a backup target folder, create a new subfolder under "\wbfs\amazons3". Under "LAN Protocol Support", check "Backup" and click OK. Without these settings, that shared folder will not be listed in the backup target folder list.
10 Click OK. Tasks added to "Backup List" are displayed.
11 Click Close.
Replication
Replication copies all data from a share to a share on a different TeraStation. This is an easy way to configure a reliable system to provide data protection in the event your main TeraStation fails. To configure replication, connect an Ethernet cable to the LAN port of each TeraStation and follow the steps below.
Note: Replication source data is copied to the replication target folder with a differential overwrite. Any data that is not in the replication source will be overwritten.
1 In Settings, click Backup.

text_image
Backup2 Click to wrong of "Replication".

text_image
Replication3 Click Edit.
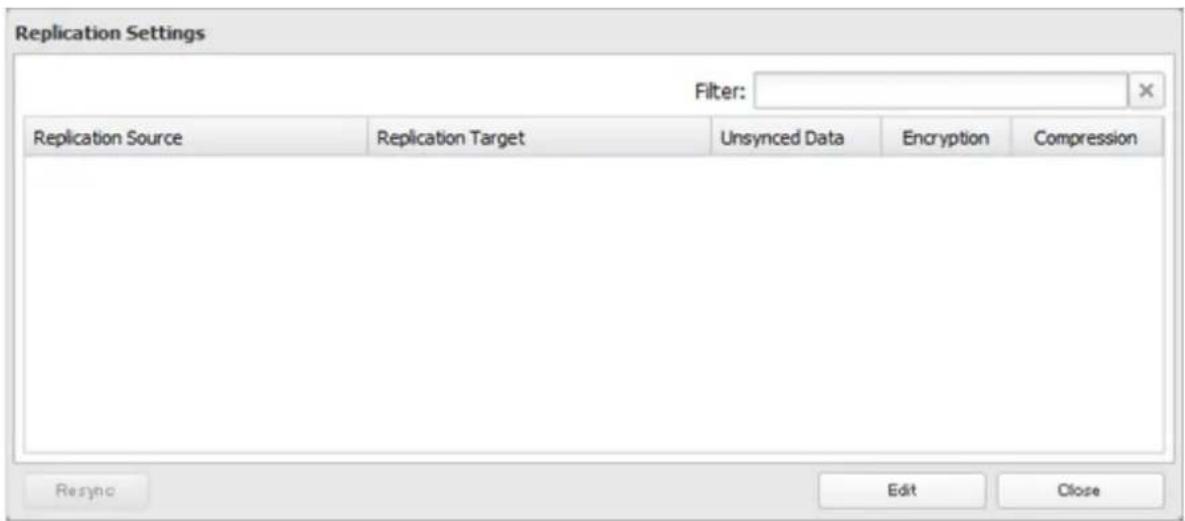
text_image
Replication Settings Filter: Replication Source Replication Target Unsynced Data Encryption Compression Resync Edit Close4 Click Add.

text_image
Replication Settings Add Delete Filter: Replication Source Replication Target Encryption Compression Select All Unselect All OK Cancel5 Click Browse under "Replication Source".
6 Select the shared folder that will be the replication source, then click OK.
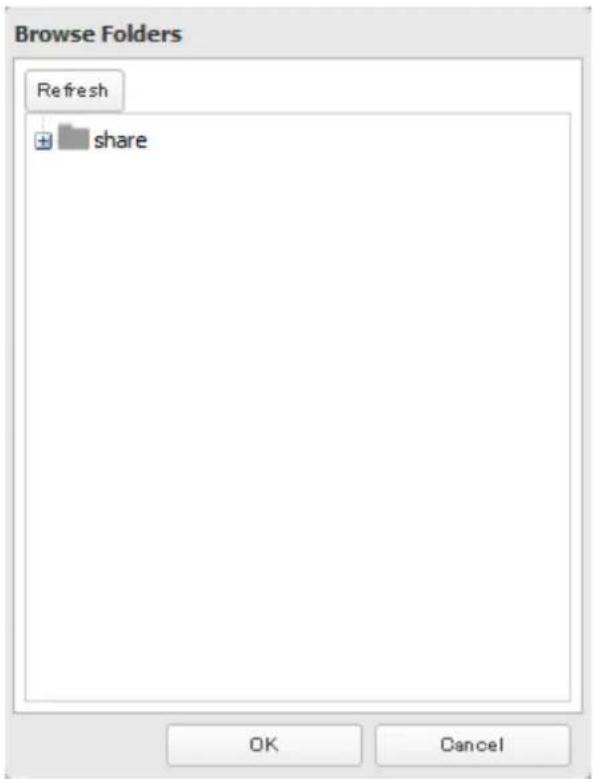
text_image
Browse Folders Refresh + share OK Cancel7 Click Browse under "Replication Target".
8
Select the shared folder that will be the replication target, then click OK.

text_image
Browse Folders Refresh TS3200D6CC@share TS3200D6CC@rep_src TS3200D6CC@rep_dst OK Cancel9
Click OK.
10
Click Yes.
Notes:
- During setup, you may choose to encrypt and/or compress replication data. Encrypted data will transferred securely on the network. Compressed data will ease network loading and is recommended for slow or heavily loaded network connections. Either will increase the CPU load on the source TeraStation. Encrypted and compressed data will be unencrypted and decompressed on the target TeraStation.
• A maximum of 64 shared folders can be configured for replication. - Shared folders with a backup password set cannot be selected as replication targets.
- Replication can also be used to copy all data from a share to a share on an attached external drive. Format the drive with ext3 or XFS before using it for replication. Drives with FAT32 partitions are not supported with replication.
- You can select subfolders as the replication source. Folders whose names contain more than 80 alphanumeric characters cannot be selected.
- Don't use the same TeraStation for both failover and replication, or replication and Time Machine.
- Don't configure replication from one source folder to multiple target folders.
- If a network problem causes a replication error, unsynced data may be shown as "0" even though replication is incomplete. Click Resync to recover from the replication error. All files from the source folder will be copied to the target folder.
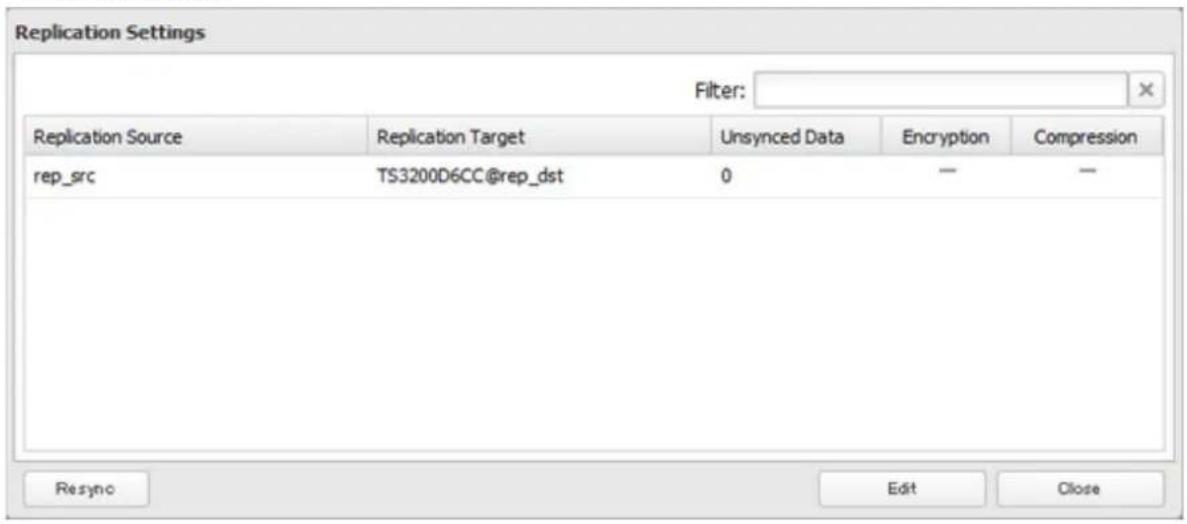
text_image
Replication Settings Filter: Replication Source Replication Target Unsynced Data Encryption Compression rep_src TS3200D6CC@rep_dst 0 — — Resync Edit CloseFailover
With failover, two TeraStations are connected to the network for redundancy. If a problem occurs in the main TeraStation so that it can no longer be accessed, operation is automatically switched to the backup TeraStation.

flowchart
graph TD
    A["Main"] --> B["Data on both TeraStations stays up-to-date."]
    B --> C["Switches automatically if failure occurs."]
    C --> D["Laptop 1"]
    C --> E["Laptop 2"]
    C --> F["Laptop 3"]
    C --> G["Laptop 4"]
    C --> H["Laptop 5"]
    C --> I["Laptop 6"]
    C --> J["Laptop 7"]
    C --> K["Laptop 8"]
    C --> L["Backup"]
Note: Use identical model and capacity TeraStations for the main TeraStation and backup TeraStation. If the capacity of the main TeraStation is larger than that of the backup TeraStation, an I33 replication error will occur.
Ethernet Cable Connection Methods
Two different configurations for failover are available.
Connecting to the network at LAN port 1 and setting failover at LAN port 1
With the first setup, if the main TeraStation fails, the backup TeraStation will replace it completely, using the same name and IP address. The backup TeraStation is updated over normal network traffic.

flowchart
graph TD
    A["Network"] --> B["LAN port 1"]
    A --> C["LAN port 1"]
    B --> D["Main"]
    C --> E["Backup"]
Connecting to the network at LAN port 1 and setting failover at LAN port 2
With the second setup, the backup TeraStation and main TeraStation are connected by a second Ethernet cable connecting their LAN 2 ports. Updating is done over this dedicated network path, so updates are quicker and don't interfere with normal network traffic. With this setup, if the main TeraStation fails, the backup TeraStation will replace it by name, but will keep its original IP address.
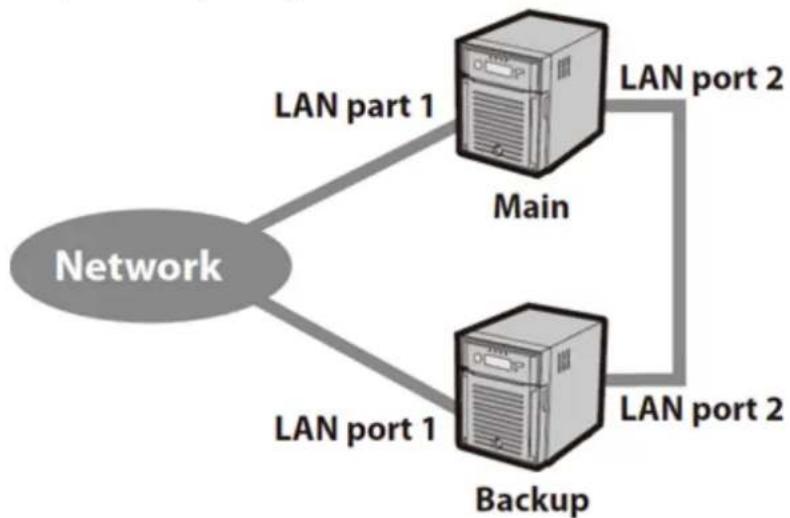
flowchart
graph TD
    A["Network"] -->|LAN part 1| B["Main"]
    A -->|LAN port 1| C["Backup"]
    B -->|LAN port 2| D["Network"]
    C -->|LAN port 2| D
Check if the main TeraStation is alive using LAN port 1 and back up data via LAN port 2
- Select LAN port 1 for the backup target and LAN port 2 for the backup LAN port.
• This is more efficient than the setup below and doesn't interfere with normal network traffic.
Check if the main TeraStation is alive and back up the data via LAN port 2
- Select LAN port 2 for the backup target and for the backup LAN port.
• This is fault-tolerant if network disconnections occur.
The main and backup TeraStations should be the same model and capacity. Use fixed IP addresses for both TeraStations. Because the IP address of the TeraStation designated as the backup cannot be changed, set its IP address before configuring failover.
Function Restrictions
Failover is not available when any of the following functions are enabled:
Replication, sleep mode, encrypted disk volume, MySQL server, media cartridge, LVM volume, iSCSI volume, port trunking, cloud storage, surveillance server, hot spare, access restrictions by Active Directory or NT domain
Non-Transferable Settings
The settings below are not copied from the main TeraStation to the backup TeraStation. Make a note of the original settings so that they can be configured manually if the backup TeraStation replaces the main TeraStation.
Web server (including PHP), MySQL server, Direct Copy, WebAccess, print server, UPS synchronization, antivirus, email notification**
*Only if the antivirus is activated on the TeraStation.
**Email notification settings will revert to the default settings after failover. Notification emails will be sent at midnight by default. Reconfigure email notification after the backup TeraStation replaces the main TeraStation.
Note: After failover, re-register your buffalonas.com account for WebAccess on the new main TeraStation if LAN port 1 is assigned a new static IP address or using DHCP. If the new main TeraStation inherits the original static IP address for LAN port 1, WebAccess settings will be transferred and you will not need to reconfigure it.
Using with UPS
Once failover is configured, you cannot set up a UPS for the backup TeraStation. Configure your UPS before configuring failover. UPS recovery can be configured for both the main TeraStation and the backup TeraStation.
However, the UPS settings of the main TeraStation will not be copied to the backup TeraStation.
If the backup TeraStation is configured to sync with the UPS connected to the main TeraStation, and the main TeraStation shuts down, the backup TeraStation will no longer be able to detect if there was a power outage. In this case, move the UPS communication cable from the main TeraStation to the backup TeraStation and reconfigure the UPS link settings.
Configuration
1 In Settings, click Backup.

text_image
Backup2 Click to the right of "Failover".

text_image
Failover Standalone3 Click Edit Failover Status.
4 Select a TeraStation to be the target backup device.

text_image
Failover Settings Status: Standalone Registered Backup Device: Admin Password of the Failover Target: Use TeraStations of the same model and storage capacity for the main and backup units. Set the same Ethernet frame size for both units. Continue Close5 Enter the administrator password of the target backup device, then click Start Failover.
6 If the administrator password is correct, the backup TeraStation will beep. To accept the settings from the main TeraStation, hold down the function button on the front of the backup TeraStation until it stops beeping.
7 The I51 message will display on the LCD and NAS Navigator2 for both TeraStations. Wait until initialization finishes. Failover is configured after it finishes and the I51 message disappears.
Notes:
- If replication is configured for more than one folder, initialize the TeraStation before configuring failover.
• The main TeraStation cannot be used as the backup location for Time Machine. - If email notification is enabled and failover occurs, navigate to Management - Email Notification - Edit in the main TeraStation's settings and click OK.
- Ethernet frame size settings for main and failover TeraStations should be 1500 bytes. To change the Ethernet frame size, navigate to Network - IP Address, click the LAN port and Edit, and change the Ethernet frame size to "1500" bytes.
- Files whose filenames contain more than 80 alphanumeric characters will not be backed up.
- If the I33 error message appears on the LCD display, navigate to Backup - Replication and click Resync.
- Don't use the same TeraStation for both failover and replication, or failover and Time Machine.
Additional Settings
Maintenance Mode
If failover is configured, change to maintenance mode temporarily before operating the following settings: Initializing settings, changing the RAID settings, formatting drives, iSCSI volume, restarting or turning off the TeraStation, updating the TeraStation's firmware
Enable/Disable Maintenance Mode
Maintenance mode can be enabled and disabled at Backup - Failover in the main TeraStation's settings. Click Maintenance mode to enable maintenance mode, or click Cancel maintenance mode to disable maintenance mode.
Service IP Address
The "service IP address" will be the new address of the backup TeraStation when it takes over operation from the main TeraStation. If no service IP address is set, or a fixed IP address is set, an attempt is made to inherit the IP address from the main TeraStation.
Backup TeraStation Promotion Situations
• The backup TeraStation cannot detect the main TeraStation within a specified time
If the backup TeraStation has not received the packet from the main TeraStation for a specified time, the backup TeraStation considers the main TeraStation to have failed. By default, it will try 5 times and wait 60 seconds. If this is triggered by accident, reconfigure failover from the main TeraStation.
• The following error occurs
If any of the following errors occur, the main TeraStation will automatically shut down and the backup TeraStation will take over from the main TeraStation:
E12 (cooling failure), E14 (cannot mount RAID array), E16 (drive not found), E22 (cannot mount drive), E30 (drive failure)
Displayed Messages
If network problems occur, the following messages may appear on the LCD display and in NAS Navigator2 even if neither TeraStation has failed. If this happens, log in to both the main and backup TeraStation's Settings, reset the failover settings, and configure it again.
• The I49 message may appear for the backup TeraStation if the main TeraStation fails.
• The E27 message may appear for the main TeraStation if it cannot detect the backup TeraStation on the network.
Switching to the Backup Unit Manually
If "Switch to backup unit manually" is selected in Settings, the backup TeraStation will not replace the main TeraStation automatically. If the main TeraStation fails, there are two ways to have the backup unit replace the main unit manually on the network:
• In Settings, click on the "Set as Main Unit" button.
- Or, press and hold down the function button on the backup TeraStation.
Backing Up Your Mac with Time Machine
Time Machine is a backup program included with OS X 10.5 or later. Configure your TeraStation as shown to use Time Machine.
1 In Settings, click File Sharing.
text_image
File Sharing2 Move the AFP switch to the position to enable AFP.

text_image
M AFP3 Click to the right of "Folder Setup".

text_image
Folder Setup 4 Folder(s)4 Choose a shared folder as your backup destination for Time Machine.
5 Click Edit.
6 Under "LAN Protocol Support", check "AFP (Mac)" and click OK.
7 Click OK.
8 Click Close.
9 Click Backup.

text_image
Backup10 Click to the right of "Time Machine".

text_image
Time Machine11 Click Edit.
12 Click Browse.
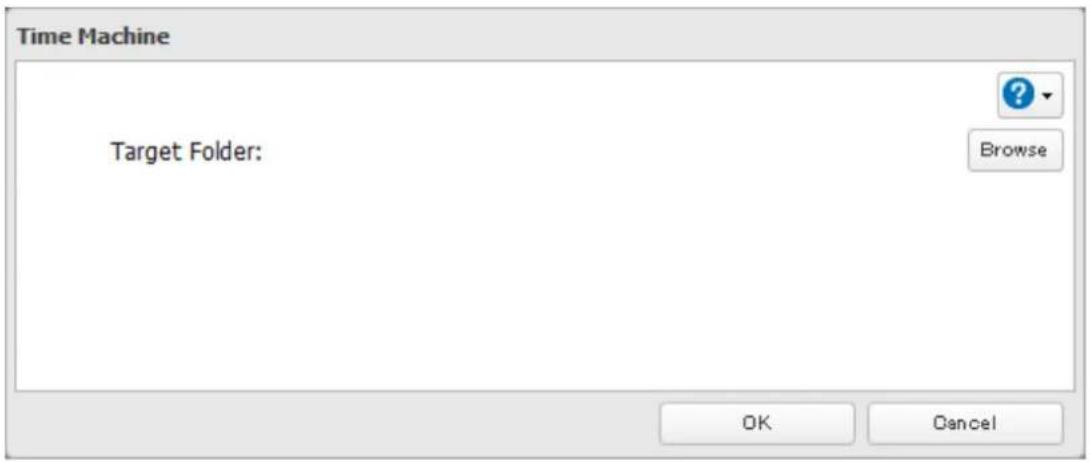
text_image
Time Machine Target Folder: Browse OK Cancel13 Select the shared folder that you set in the previous step, then click OK.

text_image
Browse Folders Refresh + share OK Cancel14 Click OK.
15 Click OK.
16 Move the Time Machine switch to the position to enable Time Machine.

text_image
Time Machine17 On the Mac, open System Preferences.
18 Click Time Machine.
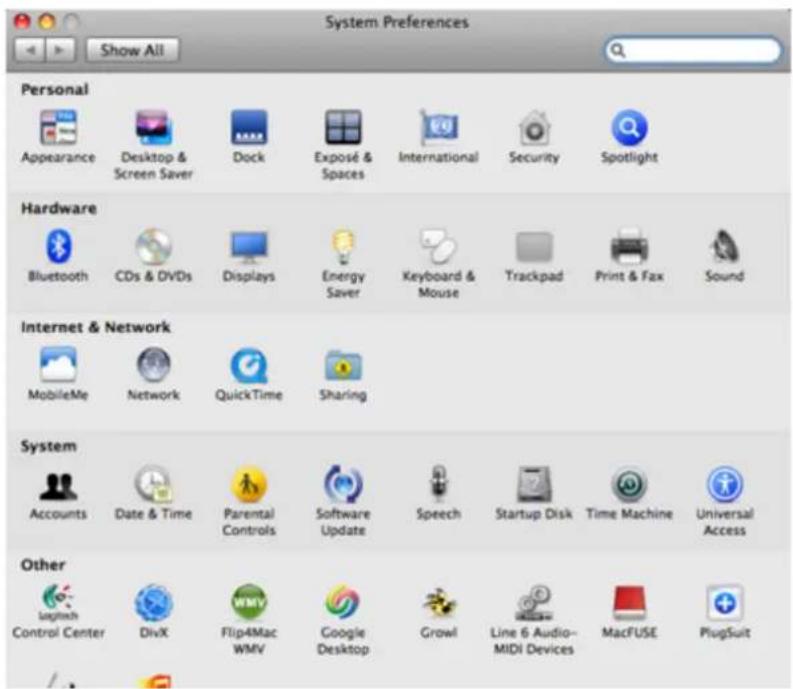
text_image
System Preferences Show All Personal Appearance Desktop & Screen Saver Dock Exposé & Spaces International Security Spotlight Hardware Bluetooth CDs & DVDs Displays Energy Saver Keyboard & Mouse Trackpad Print & Fax Sound Internet & Network MobileMe Network QuickTime Sharing System Accounts Date & Time Parental Controls Software Update Speech Startup Disk Time Machine Universal Access Other Logitech DivX Flip4Mac WMV Google Desktop Growl Line 6 Audio- MIDI Devices MacFUSE PlugSuit Control Center19 Click Select Backup Disk.
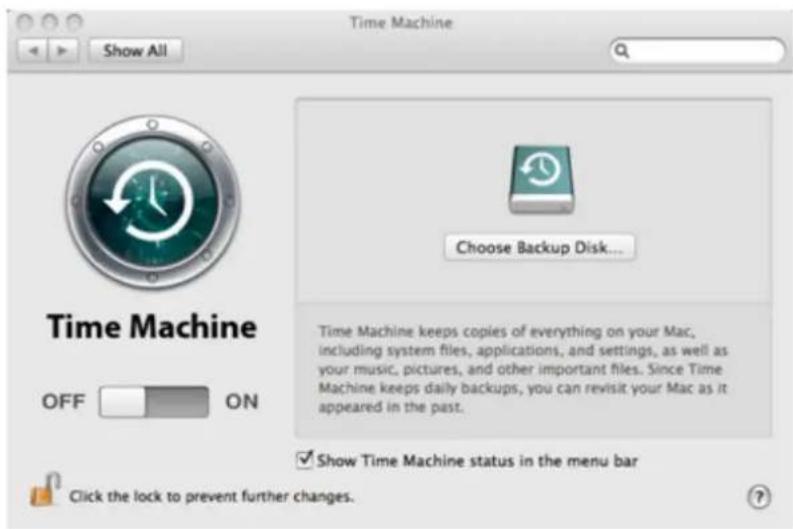
text_image
Time Machine Show All Choose Backup Disk... Time Machine keeps copies of everything on your Mac, including system files, applications, and settings, as well as your music, pictures, and other important files. Since Time Machine keeps daily backups, you can revisit your Mac as it appeared in the past. ✓ Show Time Machine status in the menu bar Click the lock to prevent further changes.20 Select the TeraStation, then click Use Disk.

text_image
timemacn (LS-XHLDBB-TimeMachine) Documents (JohnsPro-TimeMachine) share (LS-CHLAB1-TimeMachine) backtoMac (JOHNSCHL-TimeMachine) backups (BRIAN-QUAD-TimeMachine) temp (TS-XL5BEsupport-TimeMachine)21 Enter a username and password with the rights to access the shared folder of the TeraStation, then click Connect.
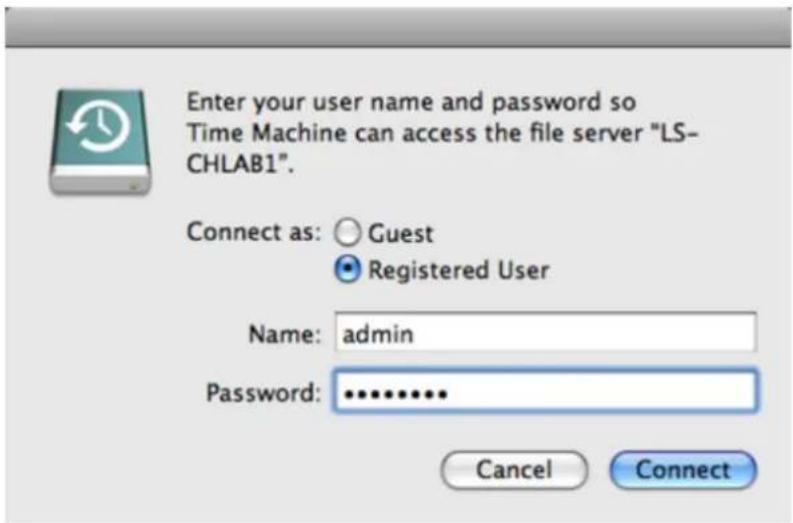
text_image
Enter your user name and password so Time Machine can access the file server "LS- CHLAB1". Connect as: Guest Registered User Name: admin Password: ******** Cancel ConnectNote: If access restrictions are not configured on the target share, log in with the administrator account. The default username and password for the administrator account are "admin" and "password". If access restrictions are configured, log in with an account with write privileges.
22 Time Machine will count down from 120 seconds, and the backup will begin.

text_image
Time Machine Show All Name: share-2 Available: -- Oldest Backup: -- Latest Backup: -- Options... Next Backup: 115 seconds... Time Machine keeps • Hourly backups for the past 24 hours • Daily backups for the past month • Weekly backups until your backup disk is full Show Time Machine status in the menu bar Click the lock to prevent further changes.Copying from a USB Device
Use Direct Copy to copy from a USB device directly to the TeraStation.
Note: To use Direct Copy, connect only one USB device at a time.
These devices are supported:
• USB mass storage devices
• Card readers (except for card readers that can recognize two or more memory cards)
• Digital cameras and other PTP devices
• UPS devices that are specifically indicated as compatible
- USB printers
These devices are not supported:
- USB hubs
- Mice
- Keyboards
1 In Settings, click Backup.

2 Move the Direct Copy switch to the position to enable Direct Copy.

text_image
Direct Copy3 Connect the USB device. When it mounts (about 10 seconds), the function button will light up.
Note: Devices that don't trigger the function button to light up are not supported.
4 You now have 60 seconds to hold down the function button for 3 seconds. If you do, the function button will flash as all the files on the USB device are copied to the Direct Copy folder of the TeraStation.
Notes:
• While the function button is flashing, hold it down for 3 seconds to cancel Direct Copy.
For digital cameras that are not in the USB mass storage class, all files from the digital camera are copied.
- To change the Direct Copy target folder, navigate to Backup - Direct Copy - Edit, select a new folder, and click OK.

text_image
Direct Copy Target: share Edit Close5 When the copy operation is finished, the access LED of the USB device will stop flashing. Hold down the function button for 8 seconds. The function button will flash as all external drives are dismounted, which will take about 30 seconds. When the dismount is finished, the function button will stop flashing and glow steadily. You now have 60 seconds to unplug any USB drives safely.
Chapter 6 Remote Access
WebAccess
WebAccess is a software program for accessing the files in the shared folder of your TeraStation from your computer or mobile devices through the Internet. Be careful when configuring WebAccess. Certain settings can make the files in the shared folder available to anyone on the Internet, without any access restrictions.
Notes:
• You can also configure WebAccess from Easy Admin.
- WebAccess supports downloading up to 60,000 files. Attempting to download more than 60,000 files may result in unexpected behavior.
1 In Settings, click File Sharing.

text_image
File Sharing2 Click to the right of "WebAccess".

text_image
WebAccess3 Click Edit.
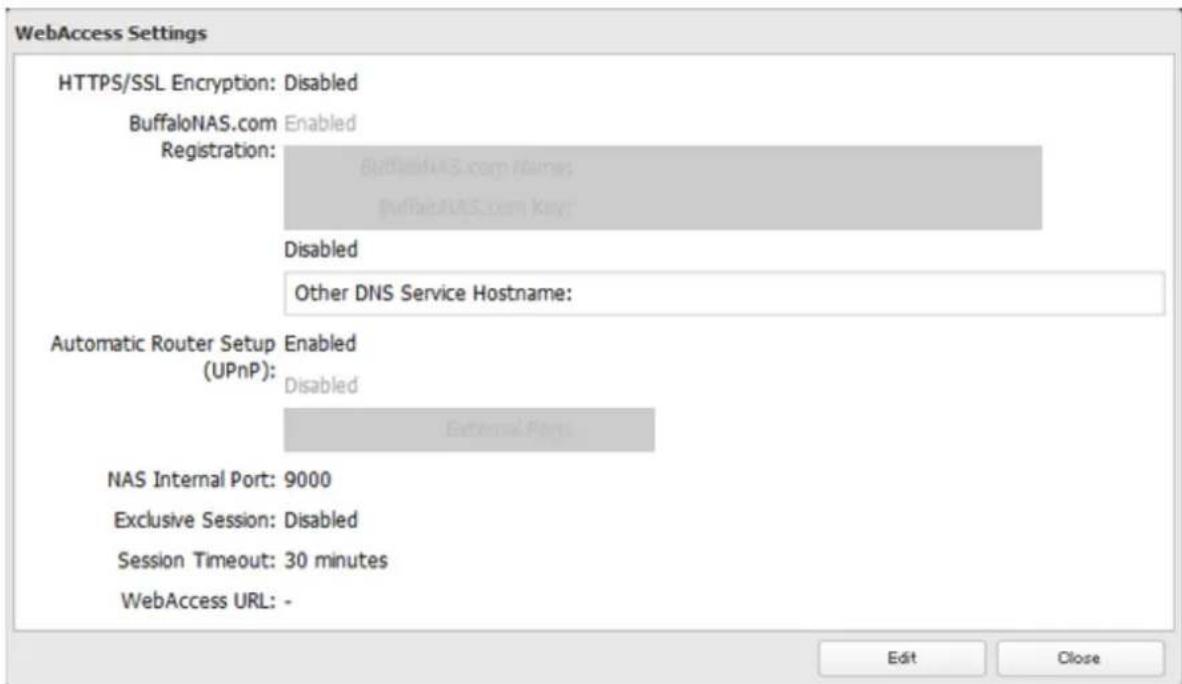
text_image
WebAccess Settings HTTPS/SSL Encryption: Disabled BuffaloNAS.com Enabled Registration: BuffaloNAS.com Name: BuffaloNAS.com Key: Disabled Other DNS Service Hostname: Automatic Router Setup Enabled (UPnP): Disabled External Port: NAS Internal Port: 9000 Exclusive Session: Disabled Session Timeout: 30 minutes WebAccess URL: - Edit Close4 Configure the desired settings, then click OK.
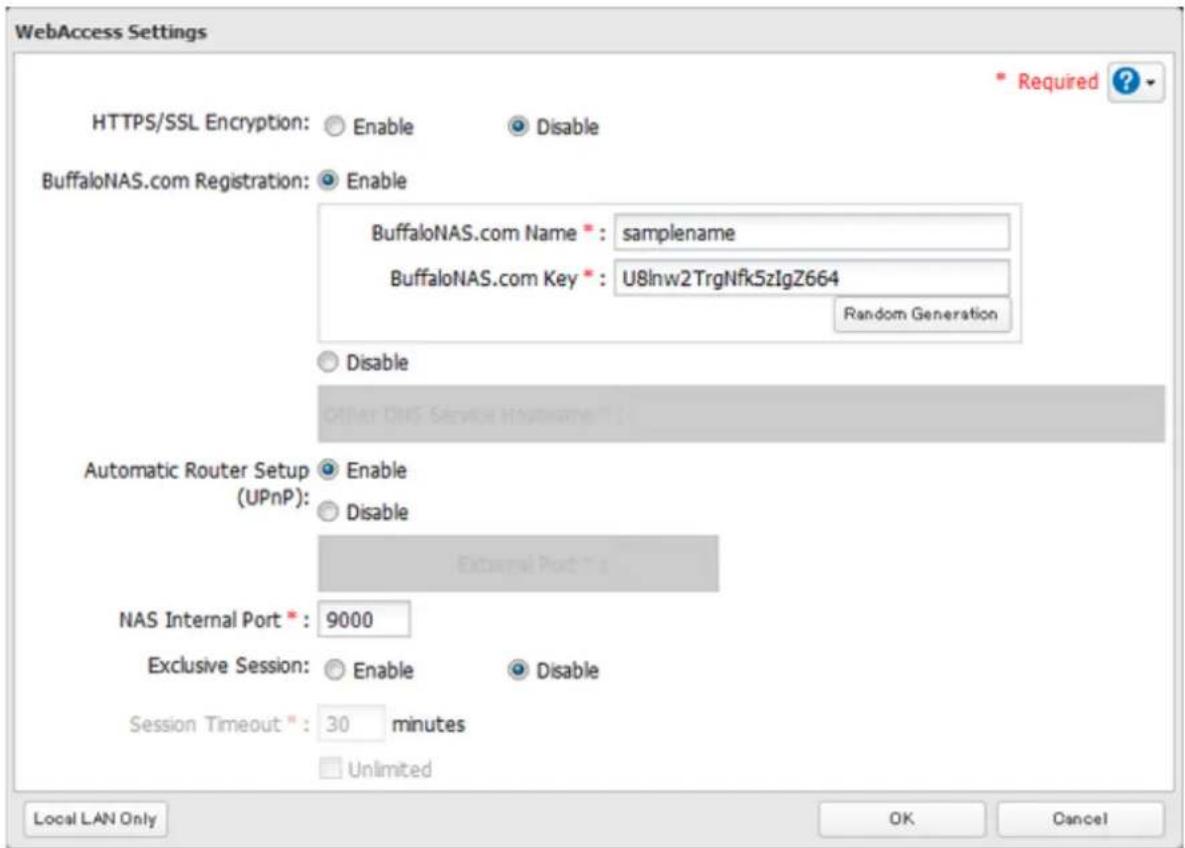
text_image
WebAccess Settings HTTPS/SSL Encryption: Enable Disable BuffaloNAS.com Registration: Enable BuffaloNAS.com Name * : samplename BuffaloNAS.com Key * : U8lnw2TrgNfk5zIgZ664 Random Generation Disable Automatic Router Setup Enable (UPnP): Disable External Port * a NAS Internal Port * : 9000 Exclusive Session: Enable Disable Session Timeout * : 30 minutes Unlimited Local LAN Only OK Cancel Required ?- You may use the default BuffaloNAS.com registration, or disable to use a different DNS server.
- Choose a "BuffaloNAS.com Name" and "BuffaloNAS.com Key" for your WebAccess account. Names and keys may use 3 to 20 alphanumeric characters, underscores (_), and hyphens (-).
- If "Exclusive Session" is enabled, users cannot log multiple computers into WebAccess. Only the last login will be active.
- Enter a time in minutes (1 to 120, or "Unlimited") before inactive users are logged out of WebAccess.
5 Click OK.
6 Move the WebAccess switch to the position to enable WebAccess.

text_image
WebAccess7 Click to the right of "Folder Setup".

text_image
Folder Setup 4 Folder(s)8 Select a shared folder to publish.
Notes:
• For best results, create a new dedicated share for WebAccess.
- When accessing shared folders through WebAccess from a remote location, a username and password may be required for certain operations. For best results, create a user account with permissions on the WebAccess share before using WebAccess.
9 Click Edit.
10 Under "LAN Protocol Support", check "WebAccess" and click OK.
Notes:
• The following levels of security are available:
"Allow Anonymous" - Anyone can access (view) shared folders.
"Allow All Groups and Users" - All groups and users registered on the LinkStation or TeraStation can use WebAccess.
"Use Inherited Folder Permissions" - Users and groups have the same access permissions with WebAccess that they do locally. If access restrictions are not set for the shared folder, then this option will not be shown.
- When a user or group can access a folder through WebAccess depends on a combination of WebAccess settings and the shared folder's settings.
| Folder Setup | WebAccess Public Mode | Allow Anonymous | Allow All Groups and Users | Use Inherited Folder Permissions | |||
| Folder Attribute | Read & Write | Read Only | Read & Write | Read Only | Read & Write | Read Only | |
| WebAccess Account | Not logged in R R - - - - | ||||||
| User with read & write access R/W | R R/W R | R/W R | |||||
| User with read-only access R/W R | R/W R R | ||||||
| Group with read & write access R/W | R W R/W | R R/W R | |||||
| Group with read-only access R/W | R R/W R | R | |||||
| Other users R/W R R/W R - - | |||||||
R: Read only, R/W: Read and write, -: No access
There are many ways to access WebAccess folders depending on your device.
- From a computer, supported browsers include Internet Explorer 8, Firefox 3.6, and Safari 4. Instructions: http://buffalonas.com/manual/en/
- To access from an iOS device, install the "WebAccess i" application from the App Store. Instructions: http://buffalonas.com/manual/i/en/
- To access from an Android device, install the "WebAccess A" application from Google Play. Instructions: http://buffalonas.com/manual/a/en/
- To access from a Windows Phone, install "WebAccess" from the Windows Phone Store. Instructions: http://buffalonas.com/manual/wp/en/
WebAccess Remote
WebAccess Remote lets you open a shared folder on a remote TeraStation or LinkStation from Explorer, My Computer, or other file manager.
To use WebAccess Remote, the following conditions must be satisfied.
• You have TeraStations or LinkStations in two different locations, such as at home and at a remote location.
- WebAccess should be enabled on the source TeraStation.
1 In Settings, click Web Services.

2 Click to the right of "WebAccess Remote".

text_image
WebAccess WebAccess Remote3 Click Edit.
4 From Target Folder, select the shared folder that will be connected.
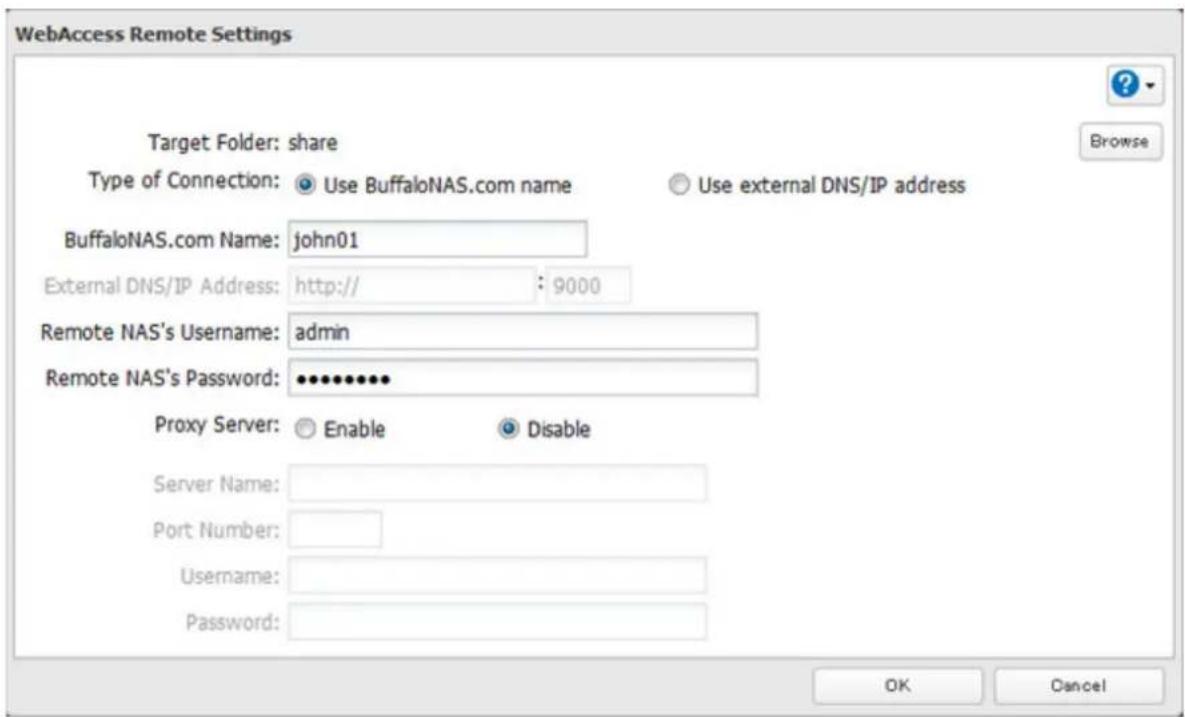
text_image
WebAccess Remote Settings Target Folder: share Type of Connection: Use BuffaloNAS.com name Use external DNS/IP address BuffaloNAS.com Name: john01 External DNS/IP Address: http:// : 9000 Remote NAS's Username: admin Remote NAS's Password: •••••••••• Proxy Server: Enable Disable Server Name: Port Number: Username: Password: OK CancelNotes:
- The selected folder is used internally by "WebAccess Remote". Files are not added to this folder and the amount of used space does not increase.
- If using both Amazon S3 and WebAccess Remote, configure the same shared folder for both. Don't use different folders for these services.
5 You may choose to enter a BuffaloNAS.com name or an external DNS/IP address. If using a BuffaloNAS.com name, it should be the same BuffaloNAS.com name assigned to the source TeraStation. If using an external DNS/IP address, enter either the IP address of your DNS server, or the global IP address of the remote TeraStation's WebAccess.
6 Enter the remote TeraStation's WebAccess username and password.
7 Click OK.
8 Move the WebAccess Remote switch to the position to enable WebAccess Remote.
position to enable WebAccess Remote.

WebAccess Remote


9 You can directly access the shared folder in the remote TeraStation by entering the path displayed in "Target Folder" into the address box in Explorer, My Computer, or other file manager.
Notes:
- If no files and folders are displayed in the target folder, disable WebAccess Remote and Amazon S3, reboot the TeraStation, and turn on both services again.
- If you change the NAS internal port number from the default value (9000) on the target TeraStation, enter the new port number after the external DNS/IP address with a colon. Example: http://buffaloamericas.com:9002
FTP
By default, the TeraStation's shares are only accessible by users connected to the same network or router as the TeraStation. The optional FTP server allows users outside the local network to access the TeraStation.
Note: FTP is intended for users who already have FTP client software and have experience with it.
1 In Settings, move the FTP switch to the position to enable FTP.


2 Click to the right of "Folder Setup".
4 Folder(s)

3 Choose a folder to enable remote FTP access on.
4 Click Edit.
5 Select read-only or read & write for the shared folder's attribute; under "LAN Protocol Support", check "FTP" and click OK.
Accessing the TeraStation with an FTP Client
• To access the TeraStation via FTP, configure your FTP client software with the following settings:
Hostname: IP address of the TeraStation
Username: The TeraStation's username
Password: The TeraStation's password
Port: 21
- Shared folders connected by FTP are available from the "/mnt" directory. The default locations are:
For RAID 0, RAID 5, or RAID 1:
/mnt/array1/share
/mnt/usbdisk1
/mnt/usbdisk2
For RAID 1 (two arrays):
/mnt/array1/share
/mnt/array2/share2
/mnt/usbdisk1
/mnt/usbdisk2
For JBOD:
/mnt/disk1/share
/mnt/disk2/share2
/mnt/disk3/share3
/mnt/disk4/share4
/mnt/usbdisk1
/mnt/usbdisk2
Accessing the TeraStation with an Anonymous User ^1
• To allow anonymous access to your FTP share, disable access restrictions.
• To access the TeraStation via anonymous FTP, configure your FTP client software with the following settings:
Hostname: IP address of the TeraStation
Username: anonymous
Password: any character string
Port: 21
*If the TeraStation joins a domain, anonymous users cannot access it.
Notes:
- If a file was created or copied by AFP, you may not be able to delete it using an FTP connection. If this occurs, use an SMB or AFP connection instead to delete the file.
- For FTP connections, make sure that the total filename including directory path is 250 single-byte characters or less.
Amazon S3
Amazon S3 (Amazon Simple Storage Service) is a fee-based online storage service provided by Amazon. Follow the steps below to configure your TeraStation for use with Amazon S3:
1 Create an account at the Amazon S3 website: http://aws.amazon.com/s3
2 In Settings, click Web Services.

3 Move the Amazon S3 switch to the position to enable Amazon S3.

text_image
Amazon S34 Click OK.
text_image
Note The settings must be changed to enable this service. OK5 Click Browse.
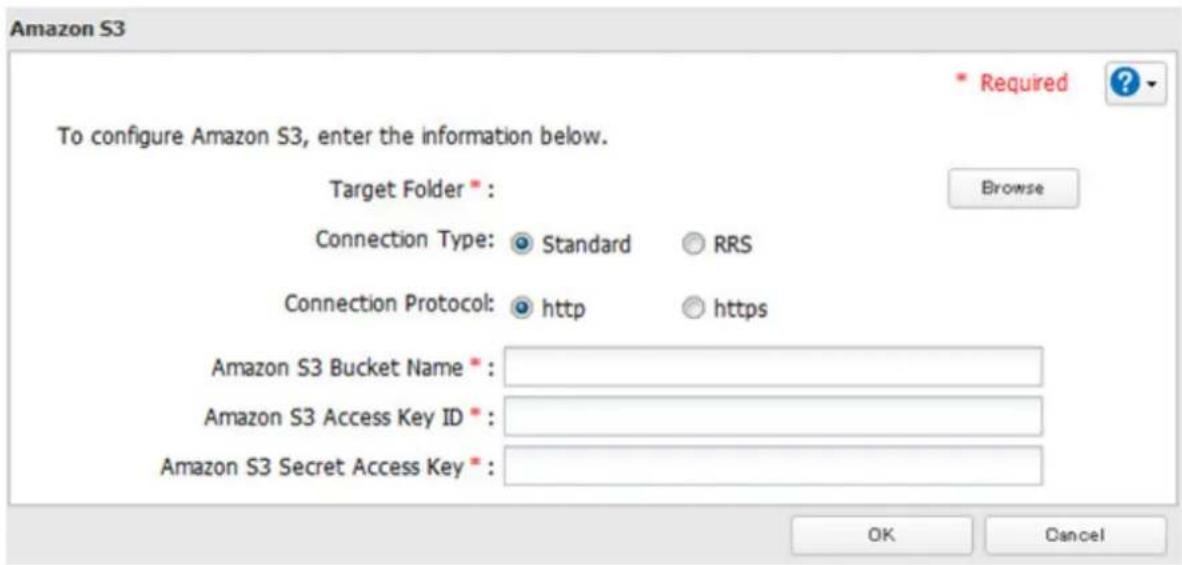
text_image
Amazon S3 To configure Amazon S3, enter the information below. Target Folder * Connection Type: Standard RRS Connection Protocol: http https Amazon S3 Bucket Name * Amazon S3 Access Key ID * Amazon S3 Secret Access Key * OK Cancel6 Select the shared folder for remote replication, then click OK.
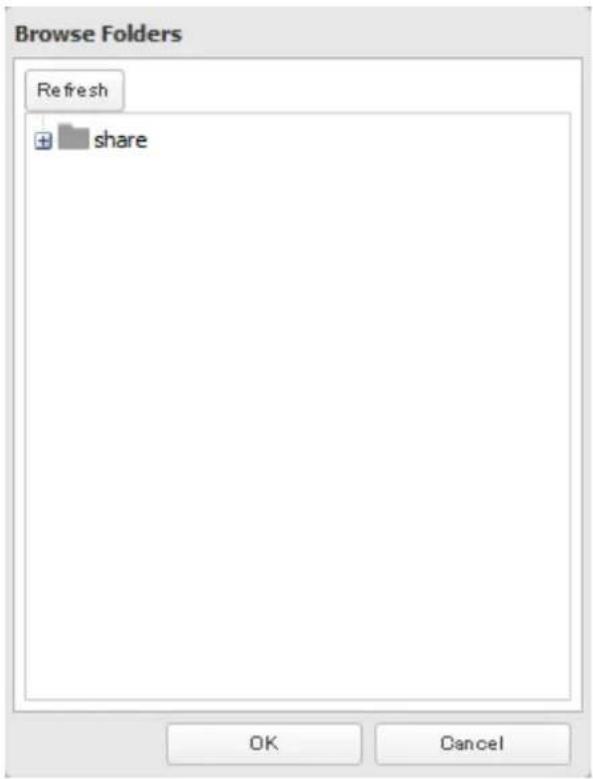
text_image
Browse Folders Refresh + share OK CancelNotes:
- This folder is used by Amazon S3. Files are not added to the selected folder and the amount of used space does not increase.
- If using both Amazon S3 and WebAccess Remote, configure the same shared folder for both. Don't use different folders for these two services.
7 Enter the bucket name, access key ID, and secret access key of the Amazon S3 bucket, then click OK.
8 Amazon S3 is now enabled.
Notes:
- Enter the path from the "Target Folder" field in a browser window to access the files saved to Amazon S3.
- If no files and folders are displayed in the target folder, disable WebAccess Remote and Amazon S3, reboot the TeraStation, and turn on both services again.
• To use after the network was temporarily disconnected, click Remount. - If a file is added to the Amazon S3 bucket from a folder other than the TeraStation's Amazon S3 remote replication folder, it may take up to an hour for the file to appear in the TeraStation's Amazon S3 remote replication folder. However, when a file is added to the TeraStation's Amazon S3 remote replication folder, it immediately appears in the bucket.
Chapter 7 BitTorrent
BitTorrent is a protocol for distributing large amounts of data efficiently. The information in this chapter is for users who are familiar with BitTorrent.
Note: Use compatibility mode to use the download manager with Windows 8.1 and Windows 8.
1 In Settings, click Applications.

text_image
Applications2 Click to the right of "BitTorrent".

text_image
BitTorrent3 Click Edit.
4 Click Browse.

text_image
BitTorrent Settings Download Folder: Port * : 9090 * Required ? Browse Initialize Settings OK Cancel5 Select the shared folder where the downloaded file will be saved, then click OK.
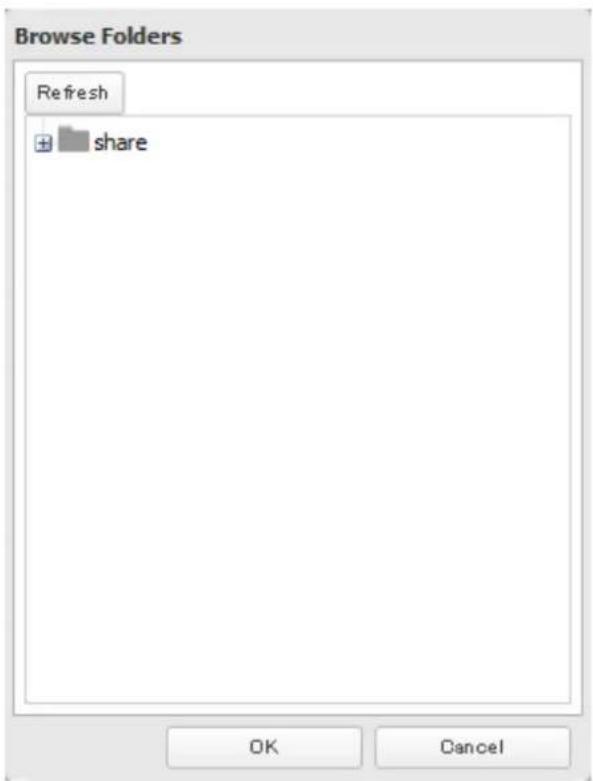
text_image
Browse Folders Refresh + share OK Cancel6 Click OK.

text_image
BitTorrent Settings Download Folder: share Port * : 9090 * Required ? Browse Initialize Settings OK Cancel7 Move the BitTorrent switch to the position to enable BitTorrent.

text_image
BitTorrent8 Click to the right of "BitTorrent".
9 Click Open Download Manager. The default username is "admin" and the default password is blank (no password).
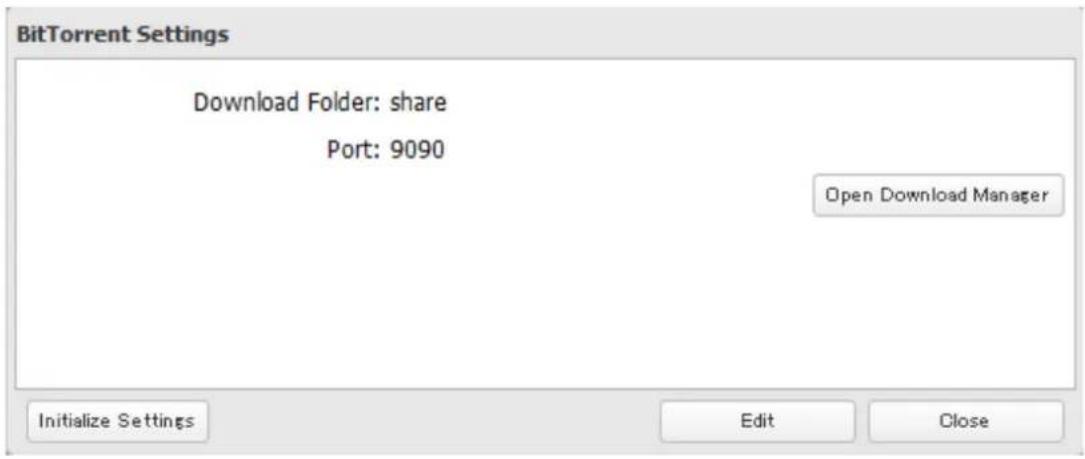
text_image
BitTorrent Settings Download Folder: share Port: 9090 Open Download Manager Initialize Settings Edit Close10 The download manager will open.
Chapter 8 Multimedia
DLNA
DLNA is a set of guidelines for sharing digital media. The TeraStation includes a DLNA server compliant with the DLNA guidelines. The movies, photos, and music saved on this product can be played back on DLNA-compliant TVs, stereo equipment, game consoles, and other devices within the network.
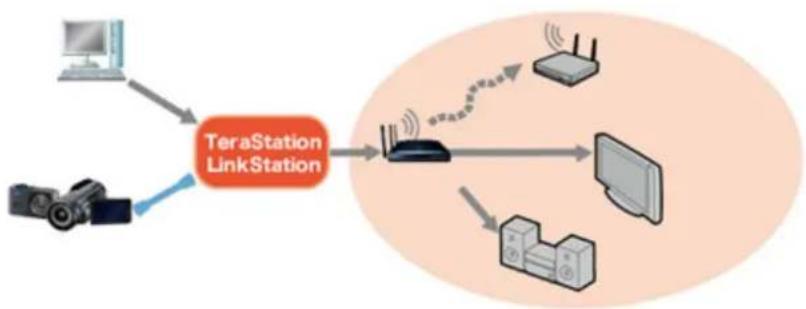
flowchart
graph TD
    A["Computer"] --> B["TeraStation LinkStation"]
    C["Camera"] --> B
    B --> D["Router"]
    D --> E["Desktop"]
    D --> F["Server"]
    D --> G["Mobile Device"]
    D --> H["Wireless Tower"]
1 In Settings, click File Sharing.

text_image
File Sharing2 Click to the right of "Folder Setup".

text_image
Folder Setup 4 Folder(s)3 Select the folder that you want to share with media players and other DLNA-compatible devices.
4 Click Edit.
5 Under "LAN Protocol Support", check "DLNA" and click OK.
6 Click Services.

text_image
Services7 Move the DLNA switch to the position to enable DLNA.

text_image
DLNA Server8
Click
of "DLNA Server".
9
Click Edit.

text_image
DLNA Server Settings DLNA Client Access Permissions Automatic Update: Search for Updates Restart Refresh Database Edit Close10 Select an interval for DLNA server database updates and click OK.

text_image
DLNA Server Settings DLNA Client Access Permissions Automatic Update: ● Search for Updates ○ Specify Update Interval Minutes Initialization of the database: ● Keep Current List ○ Initialize OK Cancel11 Click OK.
Playing Files
To play back content from a DLNA-compatible device:
1 Connect the DLNA-compatible device to the same network as the TeraStation and turn it on.
2 Select the TeraStation in the software of the DLNA-compatible device.
3 Select the content to be played back.
Note: For more information on playing files, see the DLNA-compatible devices' manuals.
Connected DLNA-compatible Devices
Follow the procedure below to view the DLNA-compatible devices connected to your TeraStation.
1 In Settings, click Services.

text_image
Services2 Click to the right of "DLNA Server".

text_image
DLNA Server3 Click DLNA Client Access Permissions.

text_image
DLNA Server Settings DLNA Client Access Permissions Automatic Update: Search for Updates Restart Refresh Database Edit Close4 A list of the MAC addresses, IP addresses, and device names of the DLNA-compatible devices connected to the same network as the TeraStation is displayed. If your device is not listed, click Refresh Database.

text_image
Enable DLNA Clients Refresh Database MAC Address IP Address Device Name Allow 68:A3:C4:0C:E3:2C 192.168.10.16 Windows 7 OK CancelStreaming to DLNA-compatible Devices
When new movies, photos, and music files are added to the TeraStation's DLNA folder, the database must be updated before the new file can be streamed. By default, the database is updated at startup and again every 60 minutes. You can change this interval or update the database manually.
1 In Settings, click Services.

Services
2 Click to the right of "DLNA Server", then click Edit.

DLNA Server


3 You may change the update interval, or select Refresh Database to update the database immediately.
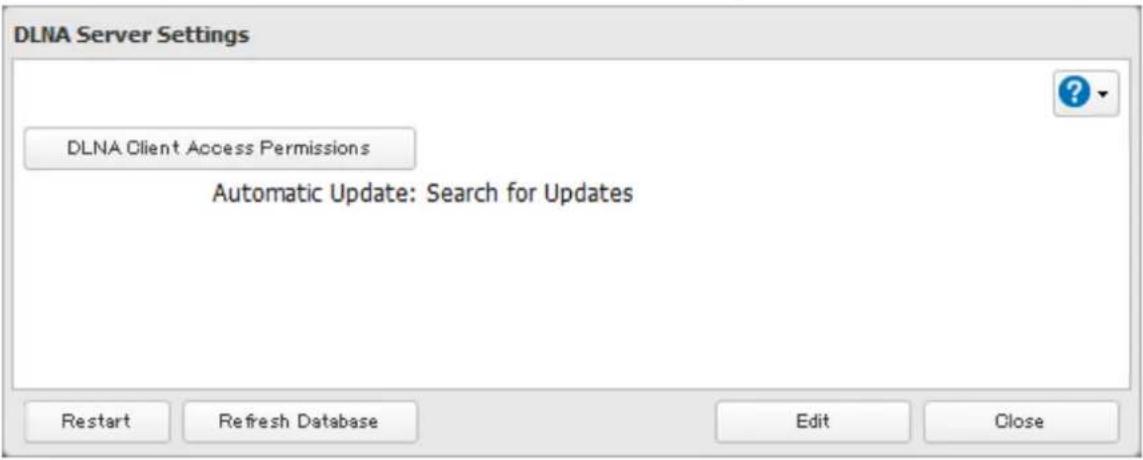
text_image
DLNA Server Settings DLNA Client Access Permissions Automatic Update: Search for Updates Restart Refresh Database Edit CloseDisabling Playback from Specific Devices
You may block specific DLNA devices from playing back media content.
1 In Settings, click Services.

Services
2 Click to the right of "DLNA Server".

DLNA Server


3 Click DLNA Client Access Permissions.
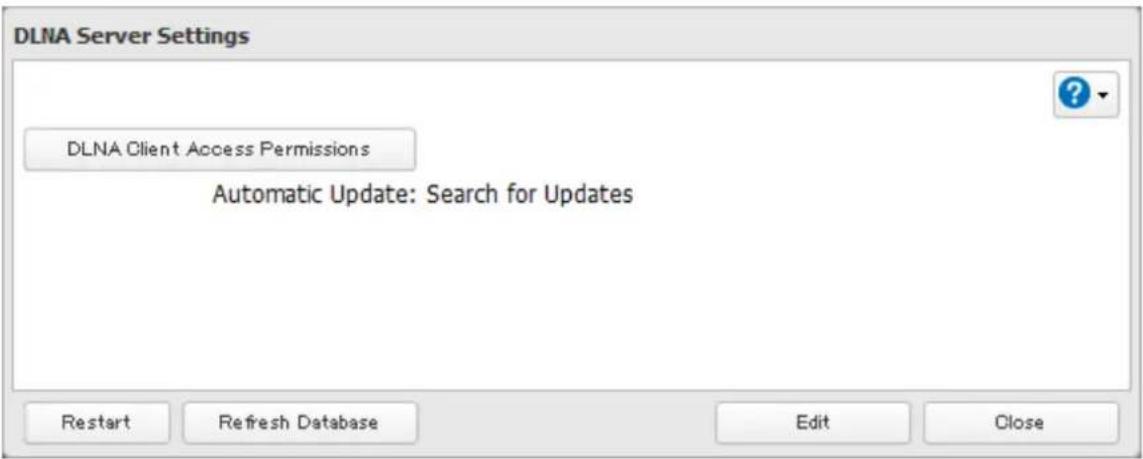
text_image
DLNA Server Settings DLNA Client Access Permissions Automatic Update: Search for Updates Restart Refresh Database Edit Close4 Uncheck the devices you do not want to allow to play media and click OK.

text_image
Enable DLNA Clients Refresh Database MAC Address IP Address Device Name Allow 68:A3:C4:0C:E3:2C 192.168.10.16 Windows 7 OK CancelSupported File Types
The TeraStation supports DLNA streaming of files with the extensions below.
| Types File Extensions | |
| Video files | .avi, .divx, .asf, .mpg, .mpe, .m1v, .vob, .mts, .m2ts, .m2t, .mpeg, .mpeg2, .vdr, .spts, .tp, .ts, .3gp, .mov, .m4v, .wmv, .dvr-ms, .xvid, .mp4, .m4v |
| Picture files .jpg, .jpeg, .gif, .png, .tif, .tiff, .yuv, .bmp | |
| Music files | .mp3, .mpa, .wma, .aac, .apl, .ac3, .lpcm, .pcm, .wav, .m3u, .m4a, .mp4, .3gp, .m4b, .aif, .aiff, .flac, .ogg, .mp2, .mp1, .mp4 |
iTunes Server
If iTunes server is enabled, computers on your network with iTunes can play music files stored on the TeraStation and transfer them to iPod, iPhone, and iPad devices. iTunes server supports playback from up to five computers.
Configuration
1 In Settings, click Services.

text_image
Services2 Click to the right of "iTunes Server".

text_image
iTunes Server3 Click Edit.

text_image
iTunes Server Settings Public Folder: Not configured yet. Restart Edit Close4 Click Browse.

text_image
iTunes Server Settings Public Folder * : * Required ? Browse OK Cancel5 Select the shared folder that you want to make available to iTunes, then click OK.
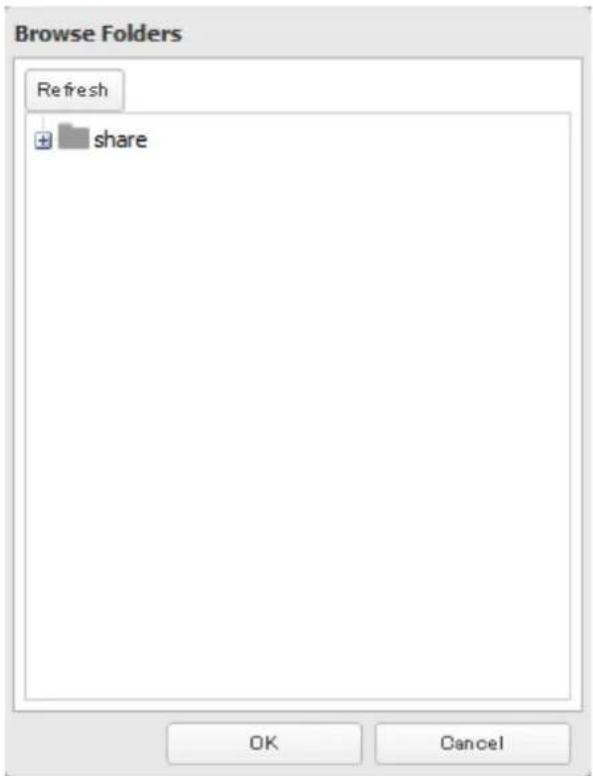
text_image
Browse Folders Refresh + share OK Cancel6 Click OK, then OK again.
7 Move the iTunes server switch to the


iTunes Server

Chapter 9 Surveillance Server
The TeraStation supports streaming video from RTSP (Real Time Streaming Protocol) network cameras.
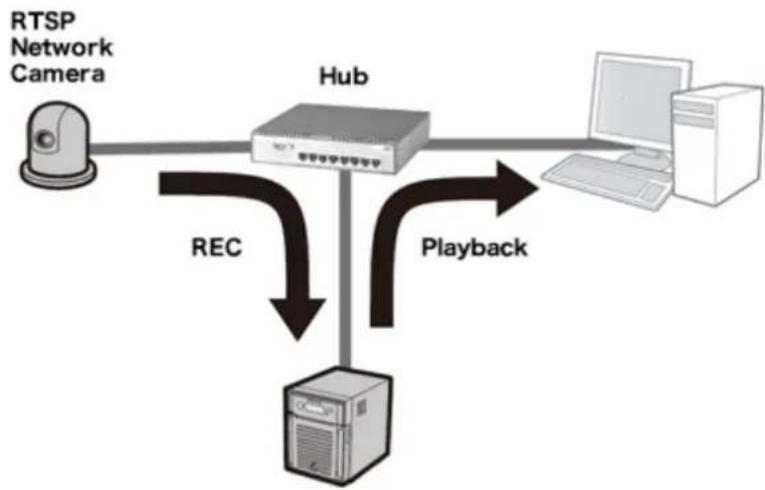
flowchart
graph TD
    A["RTSP Network Camera"] --> B["Hub"]
    B --> C["Host"]
    B --> D["Computer"]
    B --> E["Playback"]
    B --> F["REC"]
    F --> B
Getting Started
The following items are required:
• TeraStation with surveillance camera support
• Supported network camera
- Ethernet cable
- Ethernet hub
- Computer
Supported operating systems: Windows 8.1 (64-bit or 32-bit), Windows 8 (64-bit or 32-bit), Windows 7 (64-bit or 32-bit), Windows Vista (64-bit or 32-bit), Windows XP SP3, Windows Server 2008 SP2 (64-bit or 32-bit), Windows Server 2003 SP2, OS X 10.5.8 or later
CPU: Intel dual-core 2.20 GHz or faster
Hard drive: 10 GB or more of available space
RAM: 2 GB or more
*Log in to Windows 8 or Windows 8.1 with a local admin account, not a Microsoft account. If you log in with a Microsoft account, you will not be able to access the surveillance server on the TeraStation.
Live Viewer Requirements:
Supported operating systems: Windows 8.1 (64-bit or 32-bit), Windows 8 (64-bit or 32-bit), Windows 7 (64-bit or 32-bit), Windows Vista (64-bit or 32-bit), Windows XP SP3
CPU: Quad-core 2.33 GHz or faster
Hard drive: 10 GB or more of available space
RAM: 2 GB or more
Note: Surveillance cameras cannot be used if failover is configured. Also, failover cannot be used if surveillance camera functionality is enabled. They're just not compatible.
Installing Client Tools
Download "Buffalo Surveillance Camera Client Tools Setup" from the Buffalo website and install the following client tools using the install wizard on your computer.
Camera Policies - Registers that a network camera is connected and ready to record.
Live Viewer - Lets you view video as it is being recorded. With some network cameras, pan, tilt, zoom, focus, and other remote operations may be unavailable.
Data Service Policies - Used to move, back up, and delete recorded video data.
Vault Admin - Used to perform license registration, self-diagnosis, check the remaining disk space, and other operations.
Surveillance Video Manager - Used to view recorded video data, perform searches, export, and other operations.
Network Activity - Displays the operating status of the TeraStation.
Notes:
• Install after logging into your computer using an account with administrator rights.
- Install another media player to play recorded videos if the version of "Buffalo Surveillance Camera Client Tools Setup" is 5.7.3.2 or later.
- Install VideoLAN VLC media player 1.11–1.13, or Apple QuickTime 7 or later if the version of "Buffalo Surveillance Camera Client Tools Setup" is older than 5.6.19.3. VLC media player 2.0.x may not work with some network cameras. Using VLC media player is recommended if your network camera records in MPEG-4 format.
- If VLC media player is installed, use the default installation location (C:\Program Files (x86)\VideoLAN\VLC in Windows 7 64-bit or the Application folder in Mac OS).
- If surveillance cameras or client tools installed under C:\Program Files (x86)\BUFFALO\SurveillanceServer\Bin are blocked due to the OS firewall, refer to the OS help for instructions about how to disable the firewall.
- Install client tools on one or more computers connected to the same network as the network camera(s) and the TeraStation. Surveillance camera settings are shared for all computers on the network.
Connecting Devices to the Network
Connect the following devices to the network.
• A TeraStation that supports surveillance cameras
• A compatible network camera
• A computer with the above client tools installed
Notes:
- Connect all devices on the same network subnet.
- Set the TeraStation's and network camera's time settings to the correct time. To select a different NTP server on the TeraStation, refer to "Name, Date, Time, and Language" section in chapter 10. In certain cases, the DNS server address must be set in order to access the NTP server.
- Use the dedicated utility provided with the network camera or other program to confirm that the network camera is operating properly.
Enabling Surveillance Cameras
Enable surveillance cameras in Settings.
Note: First, complete the initial settings for the TeraStation and the network camera. For details on the procedure, see the manual supplied with the device.
1 In Settings, click Applications.

text_image
Applications2
Click to the right of "Surveillance Cameras".


of "Surveillance Cameras".

3 Click Edit.
4 From "LAN Port", select the LAN port connected to the same network as the network camera and computer where the client tools are installed.

text_image
Surveillance Camera Settings Folder for Saving Video: LAN Port: LAN Port 1 Browse OK Cancel5 Click Browse.
6 Choose a folder for recorded video, then click OK. A folder that contains multi-byte characters in its name cannot be used.

text_image
Browse Folders Refresh + share OK CancelNote: Use a folder with at least 100 GB of available space.
7 Click OK.
8 Click OK.
9 Move the surveillance camera switch to the
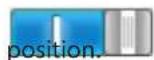

Surveillance Cameras


Notes:
- If the target shared folder specified as the storage location for recorded video is deleted, the surveillance camera is automatically disabled.
- Do not directly edit recorded video data in the shared storage folder. If a file is directly edited, the surveillance camera may no longer operate properly.
- Do not duplicate or back up the recorded videos with the backup or replication functions in the TeraStation's Settings. A separate backup license must be purchased to back up this data to another TeraStation.
• The client tools can only be used with the LAN connected to the selected LAN port.
Use with Two or More Network Cameras
In the default settings, only one network camera can be used. To use two or more network cameras, additional licenses (sold separately) must be purchased and registered. For more details to add licenses and registration, see "Activating Additional Licenses" section.
Enabling the Free License
Your TeraStation comes with a license for one surveillance camera. Follow the procedure below to enable the included license.
1 Connect the TeraStation to the Internet.
2 Click Start - BUFFALO - BUFFALO Surveillance Server - Vault Admin. For Windows 8.1 and Windows 8, click Vault Admin in the Start menu.
3 Select the TeraStation where you want to add the license, right-click it, and click Properties.
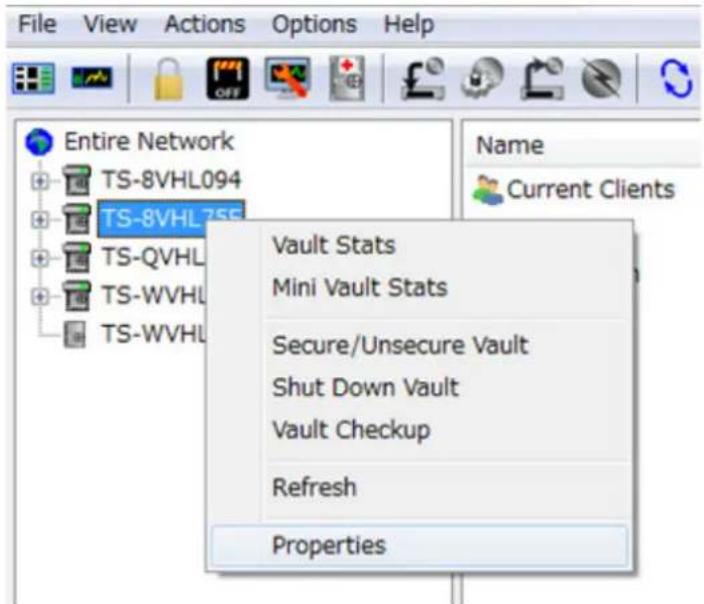
text_image
File View Actions Options Help Entire Network TS-8VHL094 TS-8VHL755 TS-QVHL TS-WVHL TS-WVHL Vault Stats Mini Vault Stats Secure/Unsecure Vault Shut Down Vault Vault Checkup Refresh Properties Name Current ClientsNote: If your computer joins a Public network, the TeraStations may not be detected. In such case, let the computer joins a Home or Work network.
4
Open the License tab, then click Activate Free License.
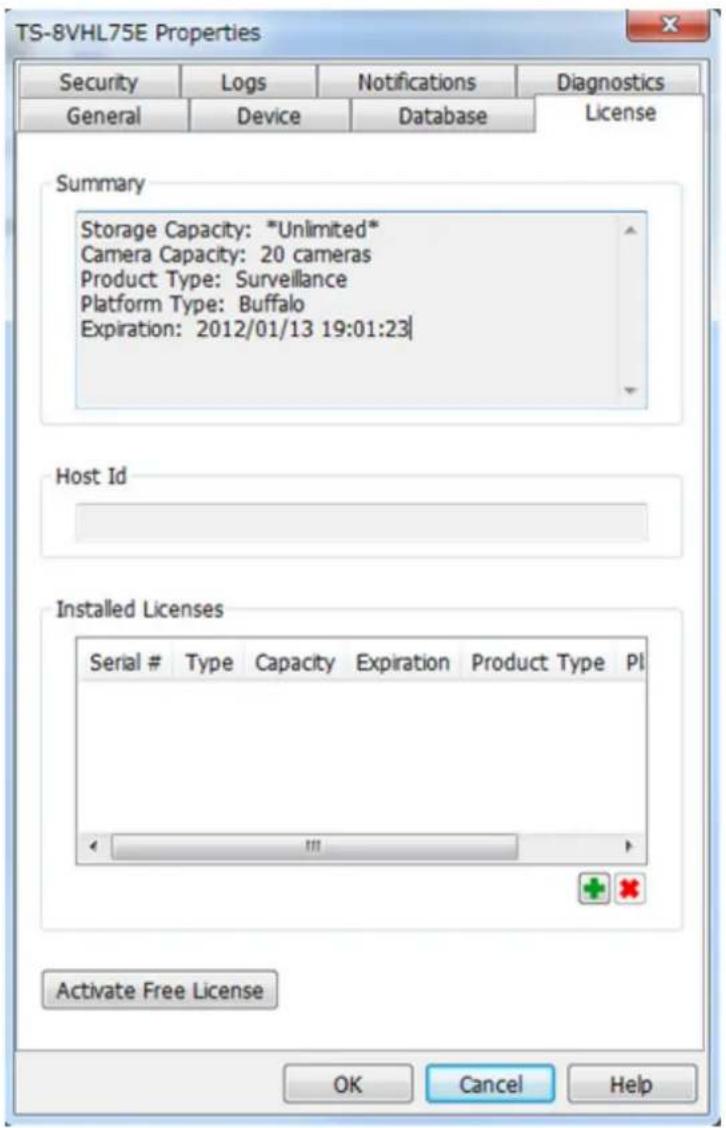
text_image
TS-8VHL75E Properties Security Logs Notifications Diagnostics General Device Database License Summary Storage Capacity: *Unlimited* Camera Capacity: 20 cameras Product Type: Surveillance Platform Type: Buffalo Expiration: 2012/01/13 19:01:23| Host Id Installed Licenses Serial # Type Capacity Expiration Product Type PI Activate Free License OK Cancel HelpTo deactivate the license, click .
5 Make sure that "SurveillanceCamera" and "HardDisk" were added to "Installed Licenses".
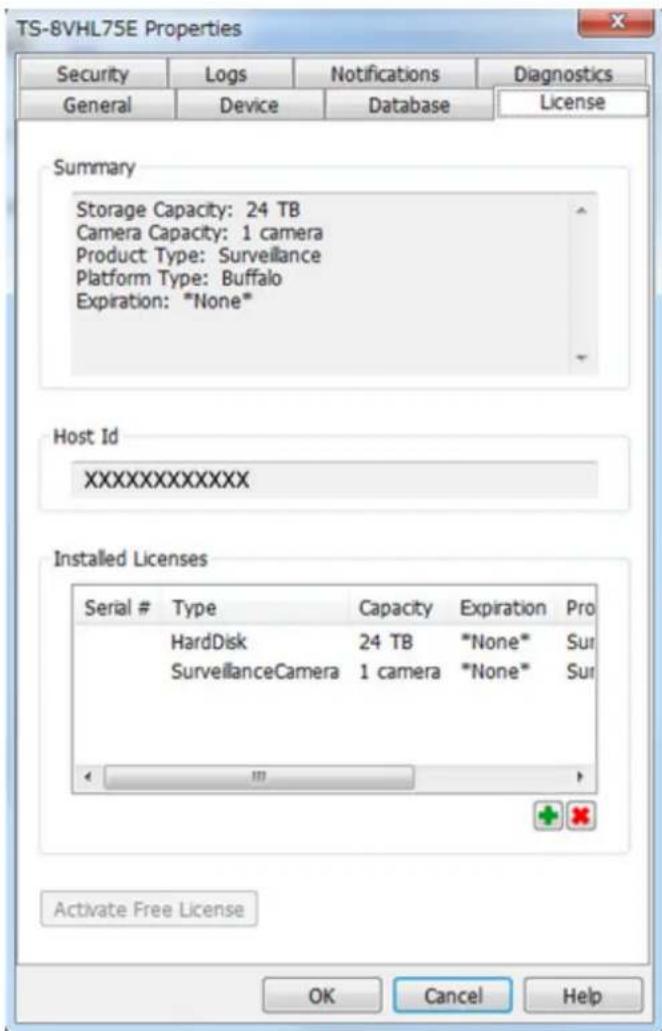
text_image
TS-8VHL75E Properties Security Logs Notifications Diagnostics General Device Database License Summary Storage Capacity: 24 TB Camera Capacity: 1 camera Product Type: Surveillance Platform Type: Buffalo Expiration: "None" Host Id XXXXXXXXXXXX Installed Licenses Serial # Type Capacity Expiration Pro HardDisk 24 TB "None* Sur SurveillanceCamera 1 camera "None* Sur Activate Free License OK Cancel HelpThe free license is now enabled.
Registering Recording Policies
Register the network camera that is used.
1 Click Start - BUFFALO - BUFFALO Surveillance Server - Camera Policies. For Windows 8.1 and Windows 8, click Camera Policies in the Start menu.
2 Click the icon.
3 Click Next.

Welcome to the Add Camera Wizard
This wizard helps you add and schedule a new camera.
You may need to run this wizard with administrative rights.
To continue, click Next.
About
Help
< Back
Next >
Cancel
4 Click Find Cameras.

Camera Information
Find cameras on my network to populate the information below.
Find Cameras
Select the manufacturer and model.
- Select Manufacturer -

- Select Model -

What is the IP Address?

What credentials are needed to access this camera?
User Name:

Password:

Test Camera
Camera Not Listed
Help
< Back
Next >
Cancel
5
Select the detected network camera, then click OK.
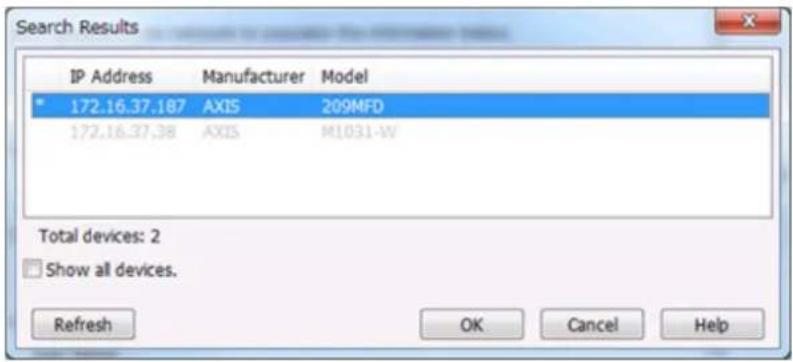
text_image
Search Results IP Address Manufacturer Model 172.16.37.187 AXIS 209MFD 172.16.37.38 AXIS M1031-W Total devices: 2 □ Show all devices. Refresh OK Cancel HelpNote: Network cameras that are already in use are indicated by an asterisk (*) and are grayed out.
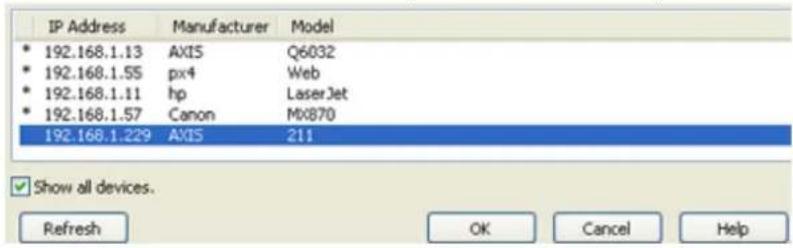
text_image
IP Address Manufacturer-model * 192.168.1.13 AXIS Q6032 * 192.168.1.55 pX4 Web * 192.168.1.11 hp LaserJet * 192.168.1.57 Canon Mx870 192.168.1.229 AXIS 211 Show all devices. Refresh OK Cancel Help6 Enter the username and password if they are configured, then click Next.
Note: Clicking Test Camera runs an operational check on the network camera.
7 Enter the description, then click Next.

natural_image
Yellow square icon with a red pencil and eraser on a light blue background (no text or symbols)Description
What is the name of this camera? (For example, 'Front Lobby')
Enter a brief description of this camera.

text_image
Help < Back Next > Cancel8 Select the recording schedule, then click Next.

Recording Schedule
When do you want to record video?
Always
○ At selected times
Help
< Back
Next >
Cancel
9 Select the TeraStation where the video will be recorded, then click Next.

Recording Computer
What computer will be used for recording video?
- Select Computer -

Help
< Back
Next >
Cancel
10 Check the registration information; if it is correct, click Next.

Ready to Add
Review the summary below before clicking Next to add the camera.
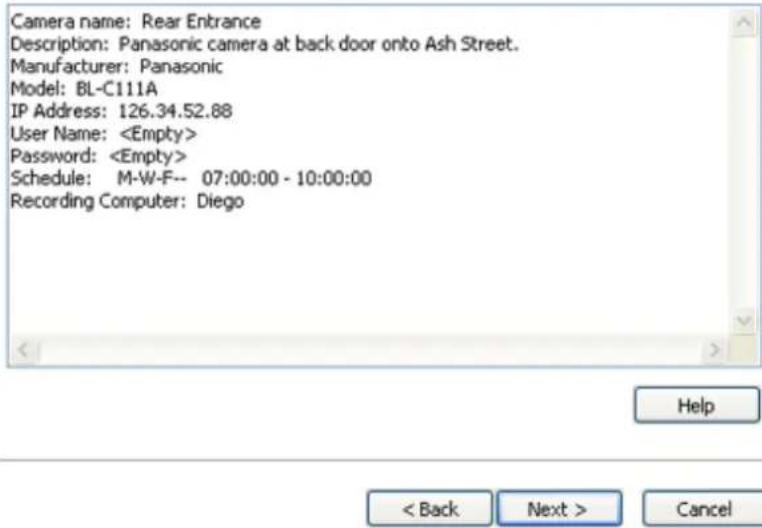
text_image
Camera name: Rear Entrance Description: Panasonic camera at back door onto Ash Street. Manufacturer: Panasonic Model: BL-C111A IP Address: 126.34.52.88 User Name:11 Click Next.
An additional network camera can be registered by selecting "Yes" when asked "Do you want to add an additional camera?"

List of Cameras Added
Rear Entrance at 126.34.52.88 scheduled on M-W-F-- 07:00:00 - 10:00:00
Remove selected Camera
Do you want to add an additional camera?
○ Yes
No
Help
< Back
Next >
Cancel
12 Click Finish.

text_image
Camera Information Name: | Description: Manufacturer: Generic Model: Generic Find Cameras Video Capture URL: rtsp:// Test... User Name: Password: OK Cancel Help13 Click Save.
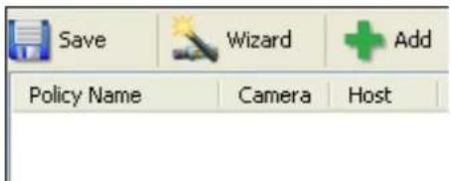
text_image
Save Wizard Add Policy Name Camera HostRecording will begin. You've now registered the recording policy of the network camera.
Checking Recording
To check that recording is working correctly, follow the procedure below. Wait at least 15 minutes after registering the recording policy before checking the recording.
1 Click Start - BUFFALO - BUFFALO Surveillance Server - Surveillance Video Manager.
For Windows 8.1 and Windows 8, click Surveillance Video Manager in the Start menu.
2 Click Search.
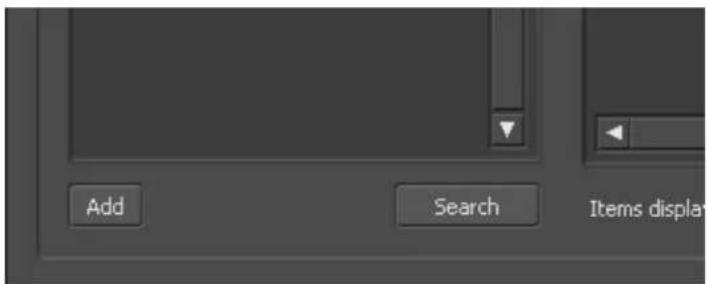
text_image
Add Search Items display3 Recorded video clips are shown in the center of the screen. Click a video clip to start playback.
text_image
Search Engine Search Results Expert Group Search Engine Search Results Expert Group Search Engine Search Results Expert Group Search Engine Search Results Expert Group Search Engine Search Results Expert Group Search Engine Search Results Expert Group Search Engine Search Results Expert Group Search Engine Search Results Expert Group Search Engine Search Results Expert Group Search Engine Search Results Expert Group Search Engine Search Results Expert Group Search Engine Search Results Expert Group Research Engine Research Engine Research Engine Research Engine Research Engine Research Engine Research Engine Research Engine Research Engine Research Engine Research Engine Research Engine Research Engine Research Engine Research Engine Research Engine Research Engine Research Engine Research Engine Research Engine Research Engine Research Engine Research Engine Research Engine Research Engine Research Engine Research Engine Research Engine Research Engine Research Engine Research Engine Research Engine Research Engine Research EngineThis completes checking recording.
Viewing Saved Video
Follow the procedure below to view recorded data saved in the TeraStation.
1 Click Start - BUFFALO - BUFFALO Surveillance Server - Surveillance Video Manager. For Windows 8.1 and Windows 8, click Surveillance Video Manager in the Start menu.
2 Click Search.

text_image
Add Search Items display3 Video clips are shown in the search results at the center of the screen. Click the clip to start playback.
text_image
Search Elements Search Results Target BASILIC, APTCOS, 2013. To be the most in the context of this Target Source: BASILIC, APTCOS, 2013. To be the most in the context of thisAdvanced Usage
Export Recorded Data as a MOV Video File
To export recorded data saved to the TeraStation as a MOV format video file:
1 Click Start - BUFFALO - BUFFALO Surveillance Server - Surveillance Video Manager. For Windows 8.1 and Windows 8, click Surveillance Video Manager in the Start menu.
2
Select the search criteria on the left side of the search screen, then click Search.
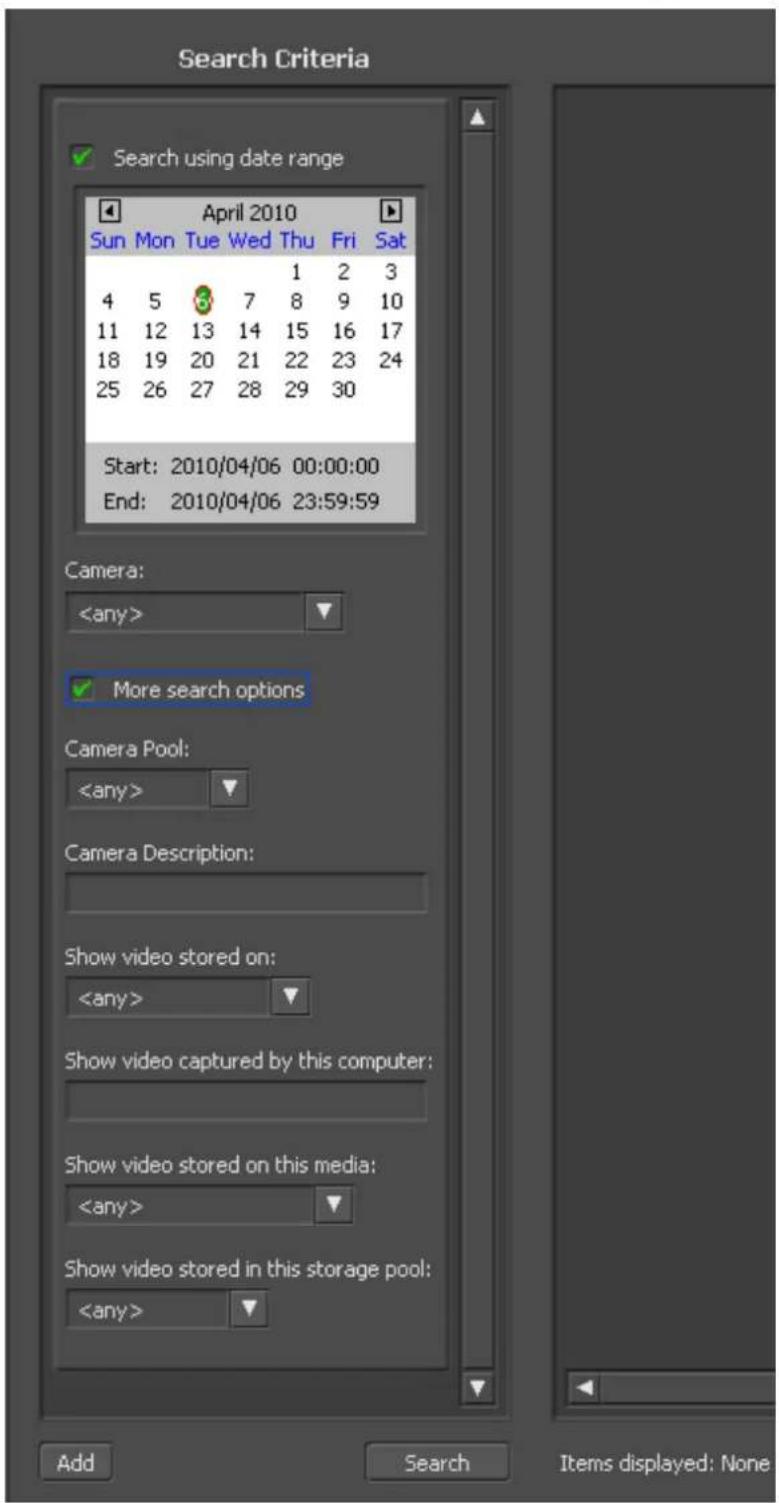
text_image
Search Criteria ✓ Search using date range April 2010 Sun Mon Tue Wed Thu Fri Sat 4 5 6 7 8 9 10 11 12 13 14 15 16 17 18 19 20 21 22 23 24 25 26 27 28 29 30 Start: 2010/04/06 00:00:00 End: 2010/04/06 23:59:59 Camera:3 The search results are displayed. Click a thumbnail to start the media viewer.
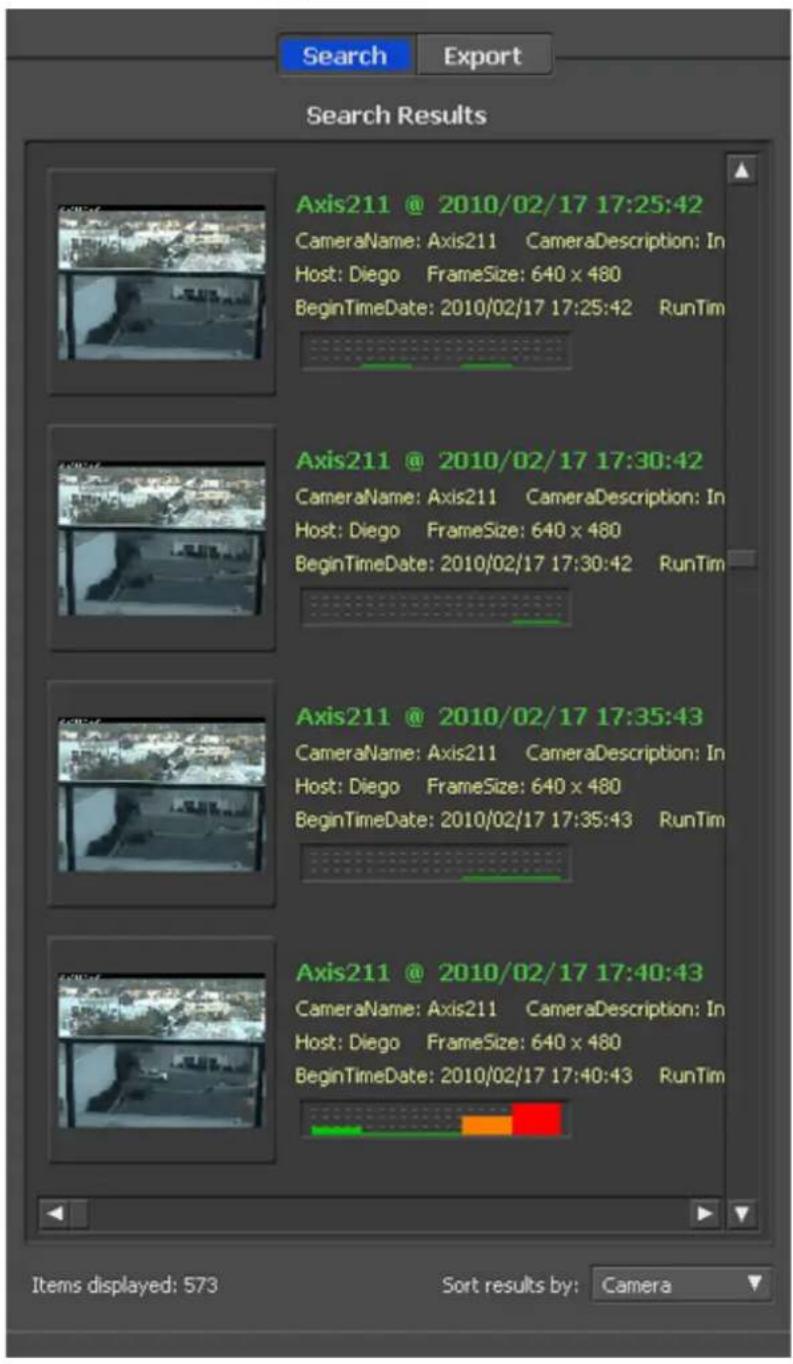
text_image
Search Export Search Results Axis211 @ 2010/02/17 17:25:42 CameraName: Axis211 CameraDescription: In Host: Diego FrameSize: 640 x 480 BeginTimeDate: 2010/02/17 17:25:42 RunTim Axis211 @ 2010/02/17 17:30:42 CameraName: Axis211 CameraDescription: In Host: Diego FrameSize: 640 x 480 BeginTimeDate: 2010/02/17 17:30:42 RunTim Axis211 @ 2010/02/17 17:35:43 CameraName: Axis211 CameraDescription: In Host: Diego FrameSize: 640 x 480 BeginTimeDate: 2010/02/17 17:35:43 RunTim Axis211 @ 2010/02/17 17:40:43 CameraName: Axis211 CameraDescription: In Host: Diego FrameSize: 640 x 480 BeginTimeDate: 2010/02/17 17:40:43 RunTim Items displayed: 573 Sort results by: Camera4 Select the section to export and click Export. This will register the video to the export queue.

text_image
2010/02/17 - 17:43:43 17:32:30 v 00:00:00 23:40:49 1.8x Export Close Help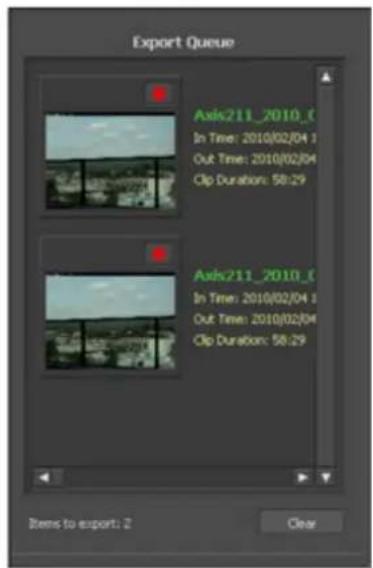
text_image
Export Queue Axis211_2010_0 In Time: 2010/02/04 1 Out Time: 2010/02/04 Clip Duration: 58:29 Axis211_2010_0 In Time: 2010/02/04 2 Out Time: 2010/02/04 Clip Duration: 58:29 Items to export: 2 Clear5 Open the Export screen, register the export information from "Export Job Configuration", and click "Start Export". The video is exported in MOV format.
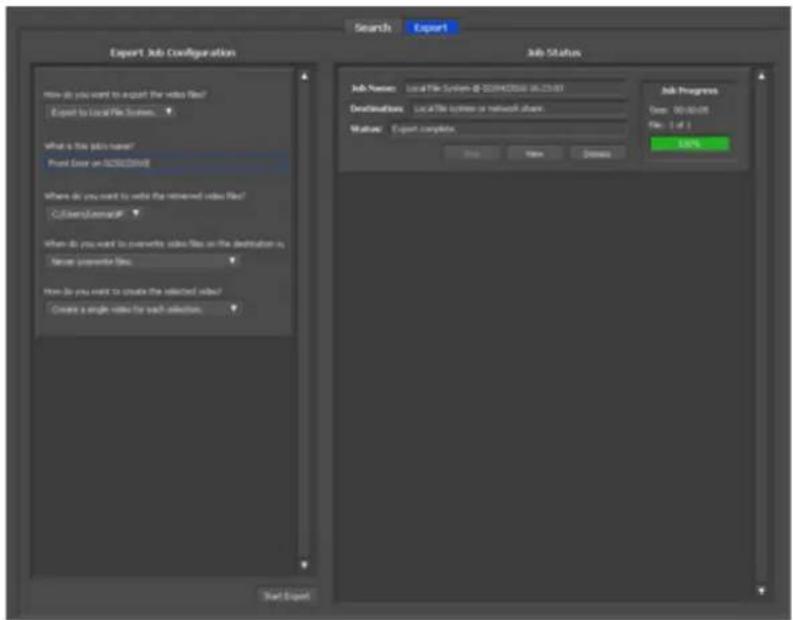
text_image
Export Job Configuration How do you want to expand the video files? Export to Local File System. What is this file name? Print Over on 02/06/2014 Where do you want to write the remote video files? CoClientUserMap# Where do you want to overwrite video files on the destination in Name: parentfile How do you want to create the selected video? Create a single video for each selection. Start Export Search Export Job Status Job Names: Local File System @ 003443000 06:25:00 Destinations: Local File system or network shares Status: Export complete Stop New Remove Job Progress Over: 00:00:00 File: 1 of 1 Add Start ExportThis completes exporting video in the MOV format.
Viewing Video Real-time
Follow this procedure to view the video as it is being recorded by the network camera.
Note: Live Viewer data cannot be viewed.
1 Click Start - BUFFALO - BUFFALO Surveillance Server - Live Viewer. For Windows 8.1 and Windows 8, click Live Viewer in the Start menu.
2 Registered network cameras are listed in the "Cameras" folder on the right side of the screen. To view a video that is currently being recorded, double-click the camera whose video you want to view or drag to a frame of the camera viewer on the left side of the screen.
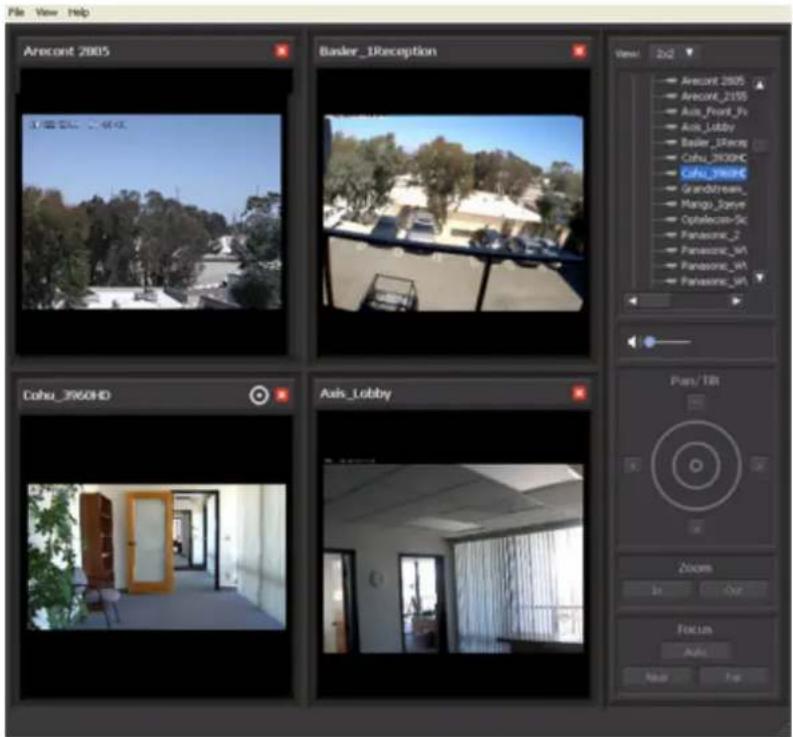
text_image
File View Help Arecont 2005 Basler_1Reception Cohu_3960HD Axis_Lobby Zoom Focus Auto View 2x2 Arecont 2005 Arecont_2115 Axis_Food_3s Axis_Lobby Basler_1Rece Cohu_3960HC Cohu_1rece Grandstream_ Mango_2erve Optelacore-Sc Panasonic_2 Panasonic_M1 Panasonic_M1 Panasonic_M1 Purs/Tilt Auto OutThis completes viewing current video.
Moving Recorded Video Data to Another TeraStation
Follow the procedure below to move (migrate) the recorded video data to another TeraStation.
Note: A separate surveillance server license pack must be purchased to do this.
1 Click Start - BUFFALO - BUFFALO Surveillance Server - Data Service Policies.
For Windows 8.1 and Windows 8, click Data Service Policies in the Start menu.
2 Click and when the Create a Policy screen is opened, enter "MigrateTest" into the "Policy Name" field, select "Migrate", and click OK.
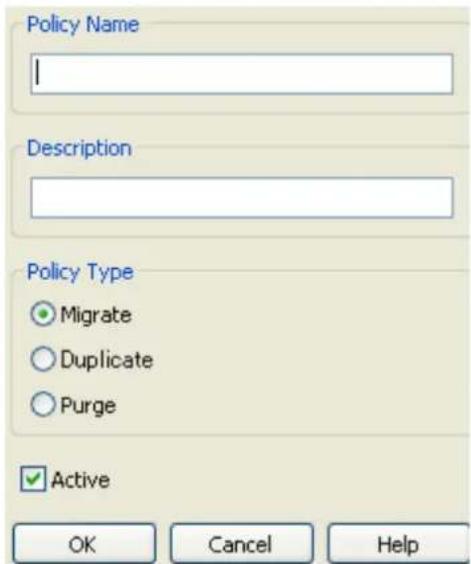
text_image
Policy Name Description Policy Type Migrate Duplicate Purge ✓ Active OK Cancel Help3 Click the Source tab. Under "Vault", select the TeraStation where the recorded video data is saved. Select "Any" to migrate recorded data on all network-connected TeraStations.
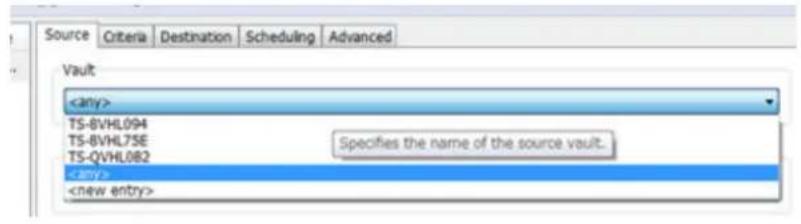
text_image
Source Criteria Destination Scheduling Advanced Vault4 Click the Destination tab to select which TeraStation you want to move the data from "Vault" off of.

text_image
Source Criteria Destination Scheduling Advanced Vault TS-BVHL75E Marks Froma Specifies the name of the destination vault.5 Set the migration date and time on the Scheduling tab. To execute migration every hour, select "Repeatedly at a defined interval" and "Every 1 hour".
6 Click and register the policy.
This completes the settings for moving recorded video to another TeraStation.
Backing Up Recorded Video to Another TeraStation
Follow this procedure to back up recorded video data to another TeraStation.
Note: A separate surveillance camera license pack must be purchased to do this.
1 Click Start - BUFFALO - BUFFALO Surveillance Server - Data Service Policies. For Windows 8.1 and Windows 8, click Data Service Policies in the Start menu.
2 Click and when the Create a Policy screen opens, enter "DuplicateTest" into the "Policy Name" field, select "Duplicate", and click OK.

text_image
Policy Name Description Policy Type Migrate Duplicate Purge Active OK Cancel Help3 Click the Source tab and select the TeraStation where the recorded video data is saved under "Vault".
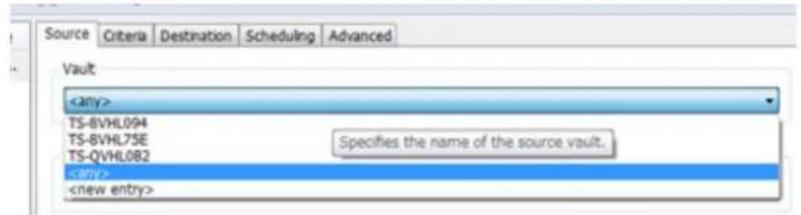
text_image
Source Criteria Destination Scheduling Advanced VaultNote: If "any" is selected, recorded data for all TeraStations connected to the network will be backed up. Click the Destination tab, then select the TeraStation where you want to move the data from "Vault".

text_image
Source Criteria Destination Scheduling Advanced Vault TS-BVHL7SE Specifies the name of the destination vault. Marki Name4 Set the job execution date and time from the Scheduling tab. In this example, to execute the backup job every hour, select "Repeatedly at a defined interval" and "Every 1 hour".
5 Click and register the policy.
This completes the settings for backing up video to another TeraStation.
Automatically Delete Old Data when Space is Low
Follow the procedure below to delete (purge) recorded video starting from the oldest when available space for recording video becomes low.
Note: By default, old video data will be deleted automatically when 80% of available space is used. Old data will be removed at the same rate as new video is added, so there will always be enough video to fill about 80% of the total available space. To disable this setting, remove the "Remove Old Video" policy from "Data Service Policies".
1 Click Start - BUFFALO - BUFFALO Surveillance Server - Data Service Policies. For Windows 8.1 and Windows 8, click Data Service Policies in the Start menu.
2 Click and when the Create a Policy screen is opened, enter "PurgeTest" into the "Policy Name" field, select "Purge", and click OK.

text_image
Policy Name Description Policy Type Migrate Duplicate Purge Active OK Cancel Help3 Click the Source tab and select the TeraStation on which recorded video is saved under "Vault".

text_image
Source Criteria Destination Scheduling Advanced Vault4 Open the Criteria tab; under "Miscellaneous Options", set "Watermark: High" and "Watermark: Low" options. This determines the used space threshold.
For example, if you set Watermark: High to "80" and Watermark: Low to "40", old data will be deleted when the amount of used space exceeds 80% until it drops to 40%.
5 Set the job execution date and time from the Scheduling tab. In this example, we'll configure a job to execute at 2:00 AM on weekdays.
- Select "On selected days each week".

text_image
When should the job run? On selected days each week.• Select every day between Monday and Friday.

text_image
Days Sunday Monday Tuesday Wednesday Thursday Friday Saturday Select All Deselect All OK Cancel• Select "2:00" and "AM", then click OK.
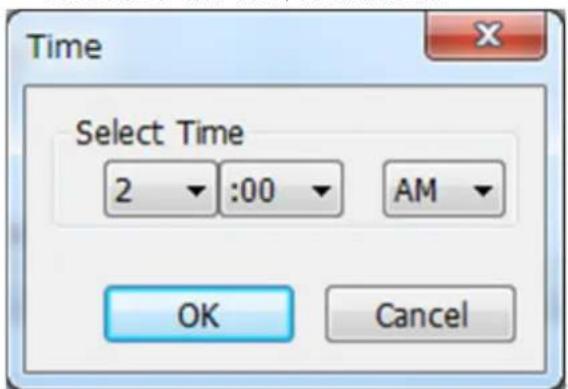
text_image
Time Select Time 2 :00 AM OK Cancel6 Click and register the policy.
This completes the registration of the policy. The job is executed at 2:00 AM Monday to Friday.
Changing Where Recorded Video Is Saved
Follow this procedure to change the TeraStation to which video is saved.
1 Click Start - BUFFALO - BUFFALO Surveillance Server - Camera Policies. For Windows 8.1 and Windows 8, click Camera Policies in the Start menu.
2 Click the icon on the tool bar and open the "Camera Configurations" screen.
3 Double-click the camera for which video will be saved. This opens "Modify Camera".

text_image
Screenshot of a camera configuration interface showing sensor data for various camera models and their status.4 Change the TeraStation you want to use as the "Recording Computer" and click OK.

text_image
Modify Camera Camera Information Name: AXIS M1011-W Description: Manufacturer: AXIS Model: M1011-W Find Cameras Video Capture URL: rtsp:// 172.16.37.129 /axis-media/media.amp Test... User Name: root Password: password Recording Computer:5 Click and register the policy.
This completes changing the TeraStation where recorded video is saved.
Email Notification
You may configure the TeraStation to send you an email notification when the available space for recording is low, or if recording fails due to a camera malfunction, network disconnection, or other cause.
Client Tools
Camera Policies
Camera Policies is utility software that registers the network cameras and starts video recording.

text_image
Save Wizard Add Delete Refresh Cameras Policy Name Camera Host Description ACTi Lobby ACTi L... walle Axis_Front... Axis-F... LG1 test Axis_Rear... Axis-R... drake Basler Basler TS1-B... COHU_Fro... COHU LG2 Cohu_3930HD D_LINK D-LINK TS1-B... Grandstrea... Grand... walle Granstrea... Grand... drake IQEye711... IQEye... drake Milestone IQEye_711... Mango... drake Robotix_L... Robotix... (e069... Milestone once_in_a... Robotix... (e069... Optelecom Optele... Hatha... Sigura_BC62 Camera Information ACTi Lobby - 2 (Active) Name: ACTiLobby - 2 Description: Target Camera Server Address: 192.168.2.39 User Name: user Password: password Camera: ACTiLobby - 2 Video Type: InpegClick to start a wizard to register network cameras and schedule recording.
Click to open the camera configuration screen where network cameras are registered.
| Camera Name | Manufacturer | Model | Video Capture URL |
| ACT-Lobby | ACTi | TCM-4301 | rtsp://192.168.5.240:7070/ |
| AVS_Receptions | rtsp://192.168.5.238/mpeg4 | ||
| Axis-Front Parking | AXIS | 210 | rtsp://192.168.5.226/mpeg4/media |
| Axis-Rear Deck | AXIS | 211 | rtsp://192.168.1.229/mpeg4/media |
| Axis_Lobby | AXIS | 210 | rtsp://192.168.5.237/mpeg4/media |
| Basler | Basler | BIP-1000c | rtsp://192.168.5.224/mpeg4 |
| Basler in Lab 2 | Basler | BIP-1300c-dn | rtsp://192.168.7.103/mpeg4 |
| Basler_1Reception | Basler | BIP-1300c | rtsp://192.168.5.100/h264 |
| D-LINK | D-Link | rtsp://192.168.5.228/play1.sdp | |
| Grandstream | rtsp://192.168.5.235/ | ||
| Grandstream_2 | rtsp://192.168.5.236/ | ||
| IQEye_732N | IQinVision | rtsp://192.168.5.244/now.mp4 | |
| Mango_IQEye711.227 | Generic | Generic | rtsp://192.168.5.241/mpeg4?cam= |
| Mango_Iqay711.234 | Generic | Generic | rtsp://192.168.5.241/mpeg4?cam= |
Click to start a new registration screen for an additional network camera. You can also register the camera and define the recording video policy.
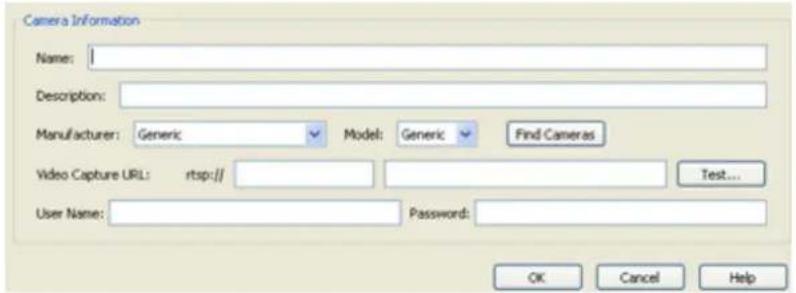
text_image
Camera Information Name: Description: Manufacturer: Generic Model: Generic Find Cameras Video Capture URL: rtsp:// Test... User Name: Password: OK Cancel HelpLive Viewer
Live Viewer allows you to view video currently being recorded by a network camera.
Note: To view the current video, the network camera must be registered in Camera Policies.

text_image
File View Help Arecont 2005 Basler_13Reception Arecont 2005 Arecont_2155 Axis_Front_Fs Axis_Lobby Basler_13Rece Cohu_3960HD Cohu_3960HD Grandstream_ Mango_Hange Capsiacore-Sx Panasonic_2 Panasonic_MH Panasonic_MH Panasonic_MH Lohu_3960HD Axis_Lobby Purs/Tilt Zoomers Out Focus Auto Save For- The layout of the camera view (numbers of rows and columns) and registered network cameras are displayed in the panel on the right side of the screen.
- The camera view (live video) is displayed on the left side panel. In the default setting, a 2x2 camera view is displayed. A layout view with up to 4x4 cameras can be displayed.
- Double-clicking the network camera name or dragging to the camera view frame enables viewing of the current video that is being recorded by the network camera.
The layout can be saved in View - Save Layout As.
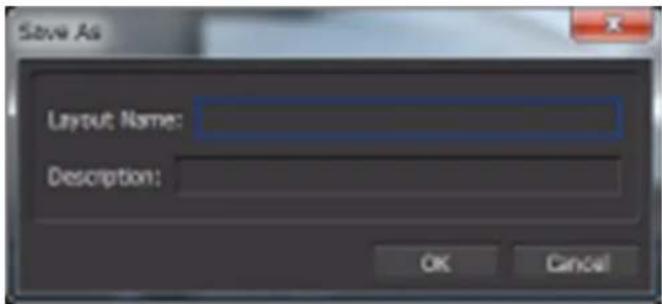
text_image
Save As Layout Name: Description: OK CancelData Service Policies
Data Service Policies is utility software for creating data service policies. The policy types that can be created are shown below.
Note: To use migration and duplication, a separate backup license must be purchased.
| Policy Type Action | |
| Migration Moves recorded video data to another TeraStation | |
| Duplication Copies recorded video data to another TeraStation and synchronizes the data. | |
Policy Type Action
Purge Deletes the recorded video data.

text_image
File Edit View Help Save Add Delete Refresh Policy Name Type Descriptive Demo_DailyBackups2WorkingPool Migrate Demo_Inactive2LongTerm Migrate Demo_PersonalFilesClean Purge Demo_Virtualizations2LongTerm Migrate Demo_WorkingPool2Compliance Migrate Demo_WorkingPool2LongTerm Replicate Demo_WorkingPoolClean Purge Main.Entrance_Purge Purge Rear Entrance Purge Office_OffsiteReplicate Replicate Office_Purge_HW85_LW85 Purge Source Criteria Destination Scheduling Advanced Vault Office_HJ Media NameThe right side of the screen includes tools for creating and updating data service policies. The left side of the screen shows an overview of all data service policies.
Notes:
• If is displayed for a policy in the left-side frame, the policy is disabled.
- Surveillance server functionality must be enabled beforehand for the TeraStation where migration or duplication files will be saved.
Vault Admin
Vault Admin is utility software for managing surveillance camera resources.
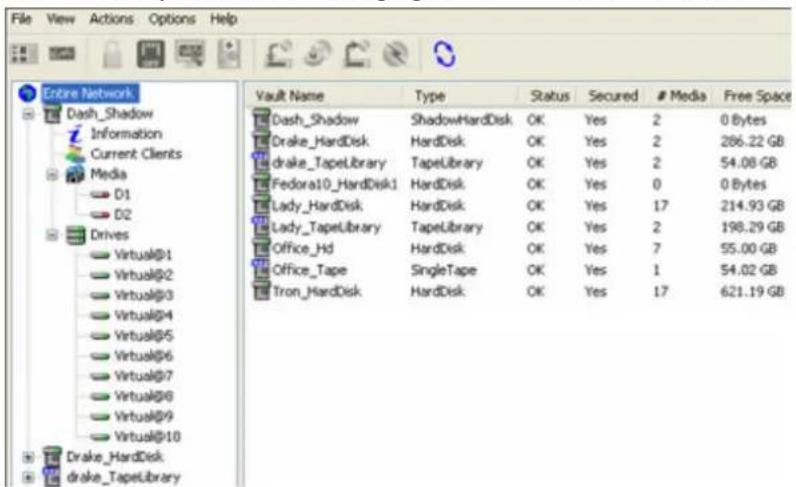
text_image
File View Actions Options Help Entire Network Dash_Shadow Information Current Clients Media D1 D2 Drives Virtual@1 Virtual@2 Virtual@3 Virtual@4 Virtual@5 Virtual@6 Virtual@7 Virtual@8 Virtual@9 Virtual@10 Drake_HardDisk drake_TapeLibrary Vault Name Type Status Secured # Media Free Space Dash_Shadow ShadowHardDisk OK Yes 2 0 Bytes Drake_HardDisk HardDisk OK Yes 2 286.22 GB drake_TapeLibrary TapeLibrary OK Yes 2 54.08 GB Fedora10_HardDisk1 HardDisk OK Yes 0 0 Bytes Lady_HardDisk HardDisk OK Yes 17 214.93 GB Lady_TapeLibrary TapeLibrary OK Yes 2 198.29 GB Office_Hd HardDisk OK Yes 7 55.00 GB Office_Tape SingleTape OK Yes 1 54.02 GB Tron_HardDisk HardDisk OK Yes 17 621.19 GBOperations are performed from the tool bar located in the top section of the screen.

text_image
Row of software toolbar icons including spreadsheet, lock, OFF, medical cross, finance, refresh, and refresh symbolThe icons and their functions are shown below.
| Icon Description | |
 | Starts "Mini Vault Stats" for enabling the display of basic monitoring information. |
 | Sets the security status. |
 | Shuts down or restarts a portion (Vault) of the surveillance cameras. |
 | Changes the properties. |
 | Performs a diagnosis of the surveillance camera. |
 | Loads a media device. |
 | Prepares a media device. |
 | Unloads a media device. |
 | Erases a media device. |
 | Refreshes the current screen. |
Surveillance Video Manager
Surveillance Video Manager is utility software for performing searches and exporting recorded video data.
Search Window
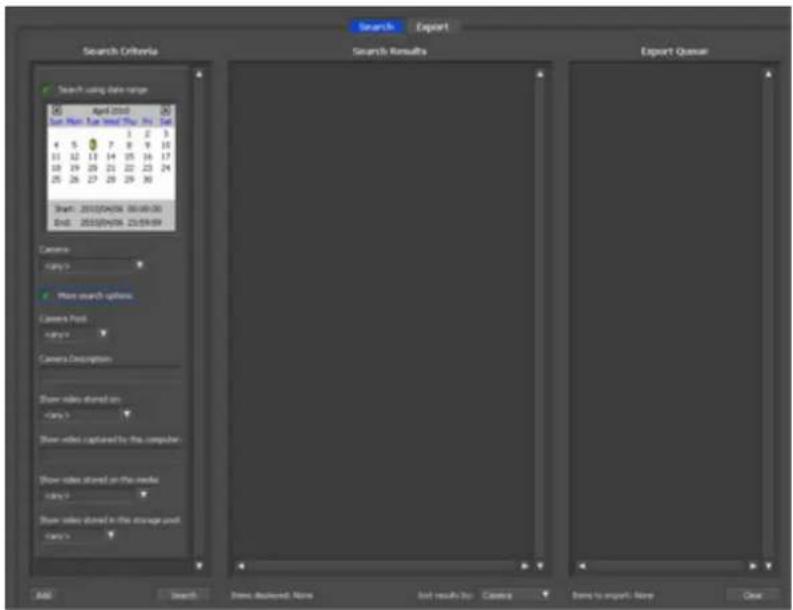
text_image
Search Export Search Criteria Search Results Export Wizard Search using data range April 2013 Sun Main Ray Head Thu 24 Set 1 2 3 4 5 6 7 8 9 10 11 12 13 14 15 16 17 18 19 20 21 22 23 24 25 26 27 28 29 30 Start: 2013/04/06 00:00:00 End: 2013/04/06 23:00:00 Camera: range> Most search options Camera Port: range> Camera Description Show video stored on axis> Show video captured by the computer Show video stored on the media axis> Show video stored in the storage unit axis> AAG Search Show Selected Name Add results by: Clarity Show to export Name ClearExport Window
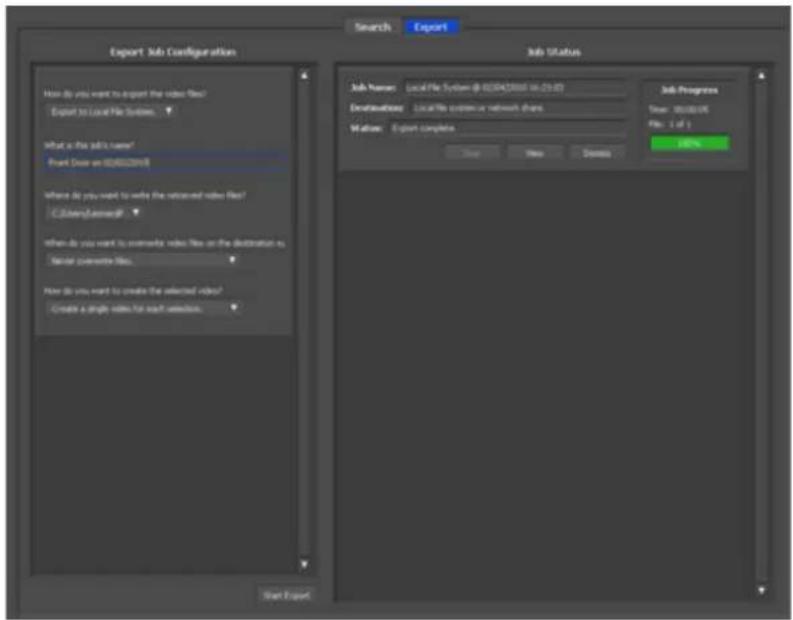
text_image
Export Job Configuration How do you want to export the video files? Export to Local File System What is the job's name? Front Over an 000000000 Where did you want to write the retrieved video files? C:\Users\system3\* When do you want to rewrite video files on the destination to: Select parameters files. How do you want to create the selected video? Create a single video for each selection. Start Export Search Export Job Status Job Names: Local File System @ 000000000 in 21/07 Destination: Local file system or network share Methods: Export complete Save New Remove Job Progress Show: 0000000 File: 1 of 1 HelpNetwork Activity
Network Activity is utility software that displays the TeraStations on which surveillance cameras are operating on the network in real time and in graphical form.

scatter
| Device | Activity | | ------------------- | ------------ | | office_Hd | Yes | | storm_HardDisk | Yes | | Johnny_HardDisk | Yes | | QA_Hulk_HardDisk | Yes | | lady_HardDisk | Yes | | Tron_HardDisk | Yes | | Homer_HardDisk | Yes | | Burns_HardDisk | Yes | | Arnold_HardDisk | Yes | | Lady_TapeLibrary | Yes | | felix | Yes |All clients and TeraStations located on the network are indicated by and labels. These can be moved by dragging and dropping them. Clients are displayed only when a job is being executed and activities are indicated by a line linking the client and TeraStation.
Mini Vault Stats
Double-clicking the icon for a TeraStation on "Network Activity" starts "Mini Vault Stats". "Mini Vault Stats" shows the network traffic in graphical form.
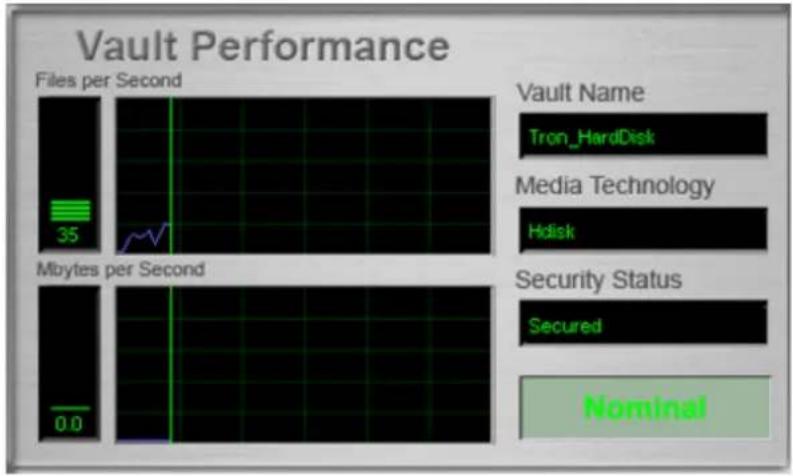
text_image
Vault Performance Files per Second 35 Mbytes per Second 0.0 Vault Name Tron_HardDisk Media Technology Hdisk Security Status Secured NominalActivating Additional Licenses
Purchasing an additional license (sold separately) enables you to connect and use two or more cameras and use the migration and duplication functions. Use this procedure to activate an additional license.
When the TeraStation is Connected to the Internet
1 Click Start - BUFFALO - BUFFALO Surveillance Server - Vault Admin.
For Windows 8.1 and Windows 8, click Vault Admin in the Start menu.
2 Select the TeraStation to which you want to add the license, right-click it, and click Properties.

text_image
File View Actions Options Help Entire Network TS-8VHL094 TS-8VHL755 TS-QVHL TS-WVHL TS-WVHL Vault Stats Mini Vault Stats Secure/Unsecure Vault Shut Down Vault Vault Checkup Refresh Properties Name Current Clients3 Open the License tab, then click +.

text_image
TS-8VHL75E Properties Security Logs Notifications Diagnostics General Device Database License Summary Storage Capacity: 24 TB Camera Capacity: 1 camera Product Type: Surveillance Platform Type: Buffalo Expiration: "None" Host Id XXXXXXXXXXXXX Installed Licenses Serial # Type Capacity Expiration Pro HardDisk 24 TB "None* Sur SurveillanceCamera 1 camera "None* Sur << "" > Activate Free License OK Cancel HelpIf your default free license activation is not installed, see the "Enabling the Free License" section to install it.
4 Enter the product key for the license pack (sold separately), then click OK.

text_image
Add License Activate product key Product Key For Activation OK Cancel Help5 Confirm that the new license was added to "Installed License".
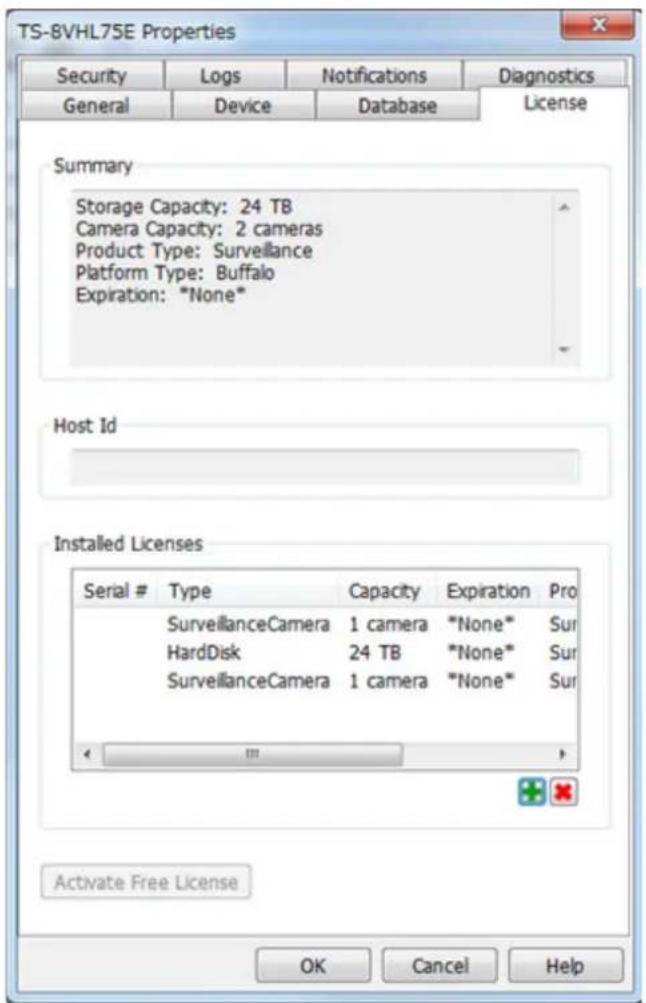
text_image
TS-8VHL75E Properties Security Logs Notifications Diagnostics General Device Database License Summary Storage Capacity: 24 TB Camera Capacity: 2 cameras Product Type: Surveillance Platform Type: Buffalo Expiration: "None" Host Id Installed Licenses Serial # Type Capacity Expiration Pro SurveillanceCamera 1 camera "None" Sur HardDisk 24 TB "None" Sur SurveillanceCamera 1 camera "None" Sur Activate Free License OK Cancel HelpYou have now activated the additional license.
TeraStation Not Connected to the Internet
1 If the TeraStation is being used in an environment where Internet access is not available, a separate computer with access to the Internet is required to activate the additional license.
2 Click Start - BUFFALO - BUFFALO Surveillance Server - Vault Admin. For Windows 8.1 and Windows 8, click Vault Admin in the Start menu.
3 Select the TeraStation where you want to add the license, right-click it, and click Properties.

text_image
File View Actions Options Help Entire Network TS-8VHL094 TS-8VHL755 TS-QVHL TS-WVHL TS-WVHL Vault Stats Mini Vault Stats Secure/Unsecure Vault Shut Down Vault Vault Checkup Refresh Properties Name Current Clients4 Open the License tab, then make a note of the "Host Id".

text_image
TS-8VHL75E Properties Security Logs Notifications Diagnostics General Device Database License Summary Storage Capacity: 24 TB Camera Capacity: 1 camera Product Type: Surveillance Platform Type: Buffalo Expiration: "None" Host Id XXXXXXXXXXXX Installed Licenses Serial # Type Capacity Expiration Pro HardDisk 24 TB "None" Sur SurveillanceCamera 1 camera "None" Sur Activate Free License OK Cancel Help5 Open the website in web browser: http://buffalo.jp/support_s/camera_licence/.
6 From the license pack (sold separately), enter the product key and host ID code and click "Activate Software License".
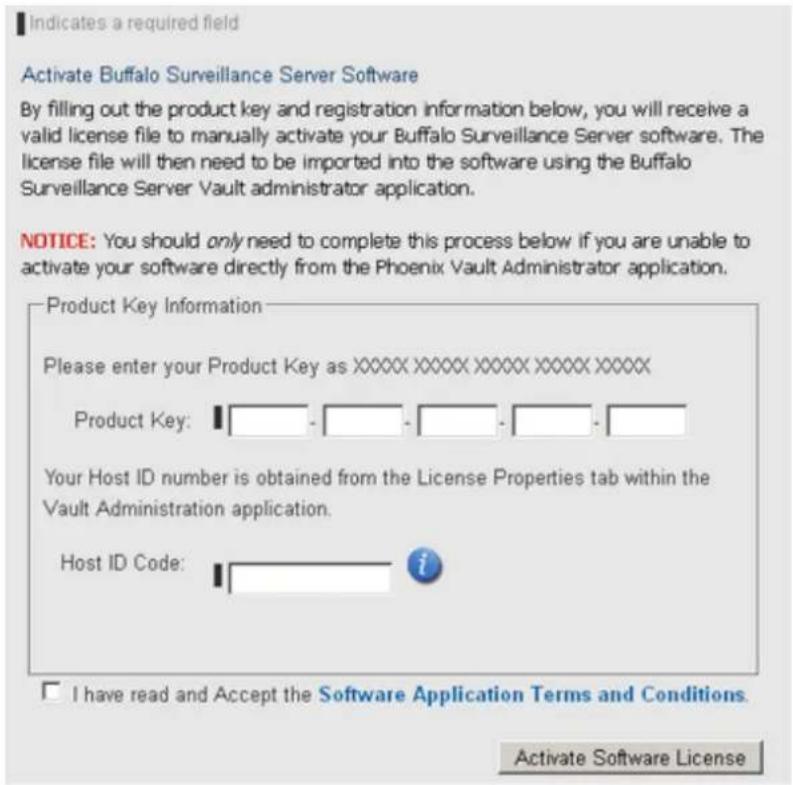
text_image
Indicates a required field Activate Buffalo Surveillance Server Software By filling out the product key and registration information below, you will receive a valid license file to manually activate your Buffalo Surveillance Server software. The license file will then need to be imported into the software using the Buffalo Surveillance Server Vault administrator application. NOTICE: You should only need to complete this process below if you are unable to activate your software directly from the Phoenix Vault Administrator application. Product Key Information Please enter your Product Key as XXXXX XXXXX XXXXX XXXXX XXXXX Product Key: Your Host ID number is obtained from the License Properties tab within the Vault Administration application. Host ID Code: I have read and Accept the Software Application Terms and Conditions. Activate Software License7 Downloading of the license file (*.lic) begins. Save the license file to a USB memory drive or other storage device.
8 Copy the license file to a computer connected to the same network as the TeraStation.
9 In the computer connected to the same network as the TeraStation, click Start - BUFFALO - BUFFALO Surveillance Server - Vault Admin.
For Windows 8.1 and Windows 8, click Vault Admin in the Start menu.
10 Select the TeraStation to which you want to add the license, right-click, and click Properties.

text_image
File View Actions Options Help Entire Network TS-8VHL094 TS-8VHL759 TS-QVHL TS-WVHL TS-WVHL Vault Stats Mini Vault Stats Secure/Unsecure Vault Shut Down Vault Vault Checkup Refresh Properties Name Current Clients11 Open the License tab, then click +.
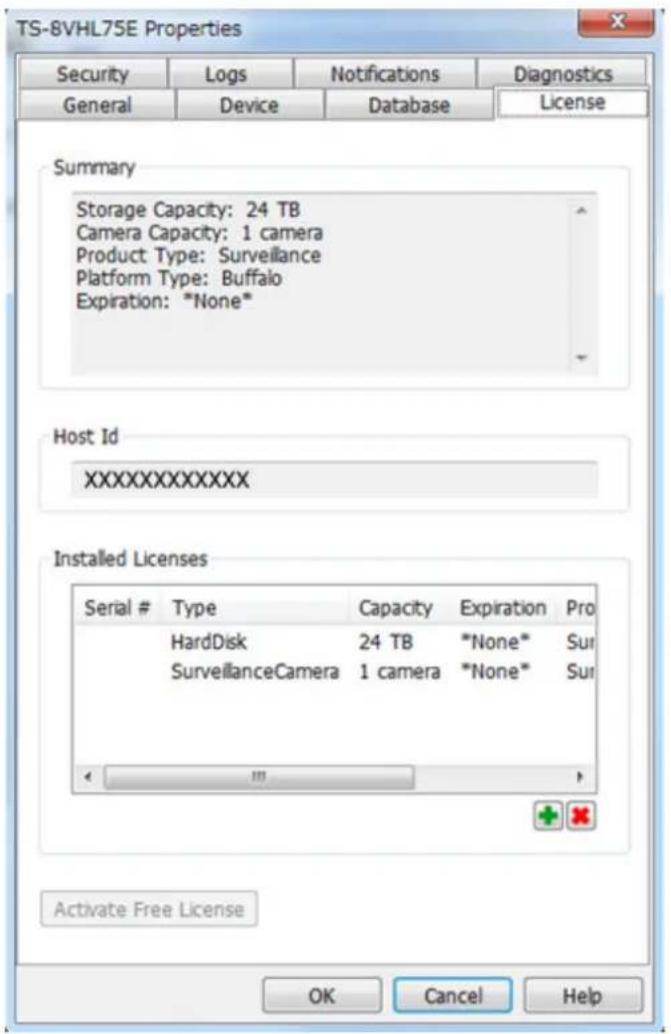
text_image
TS-8VHL75E Properties Security Logs Notifications Diagnostics General Device Database License Summary Storage Capacity: 24 TB Camera Capacity: 1 camera Product Type: Surveillance Platform Type: Buffalo Expiration: "None" Host Id XXXXXXXXXXXXX Installed Licenses Serial # Type Capacity Expiration Pro HardDisk 24 TB "None" Sur SurveillanceCamera 1 camera "None" Sur Activate Free License OK Cancel Help12 Select "Import license file", then click Browse.

text_image
Add License Import license file Select License File Browse... OK Cancel Help13 Select the license file that was saved before, then click OK.
14 Check that the license pack was added to "Installed Licenses".
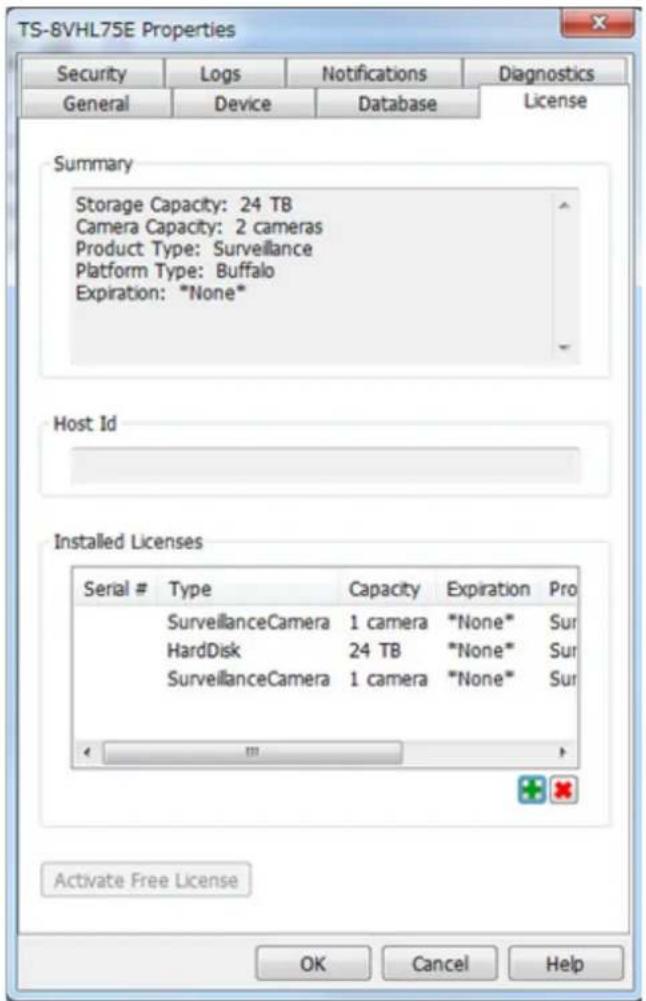
text_image
TS-8VHL75E Properties Security Logs Notifications Diagnostics General Device Database License Summary Storage Capacity: 24 TB Camera Capacity: 2 cameras Product Type: Surveillance Platform Type: Buffalo Expiration: "None" Host Id Installed Licenses Serial # Type Capacity Expiration Pro SurveillanceCamera 1 camera "None" Sur HardDisk 24 TB "None" Sur SurveillanceCamera 1 camera "None" Sur Activate Free License OK Cancel HelpThis completes authentication of an additional license.
Troubleshooting
| Issue Possible Cause Possible Solution | ||
| Video recording does not start. | Surveillance Camera setting not enabled. | Enable surveillance camera in Settings. |
| A LAN cable between the TeraStation and network camera is disconnected, or the power is turned off. | Check that the LAN cables are inserted correctly. | |
| The video recording policy is not registered. | Register the video recording policy from Camera Policies. | |
| The device is not connected to a network on the same LAN, or the device is not connected to the LAN port that was set in Settings. | Connect the device to the network of the LAN port that was set in Settings. | |
| The disk is full. | Free available space on the disk by moving or deleting files. | |
| The time for the TeraStation and network camera is not correct. | Set the time in Settings. | |
| There are not enough camera licenses for the network cameras. | Purchase and register an additional license. | |
| I cannot enable the surveillance camera. | Failover is running. Disable failover. | |
| Surveillance cameras no longer record video. | The target shared folder for the recorded video was deleted. | Enable surveillance camera functionality in Settings. |
| I cannot view the network camera using Live Viewer. | The network camera is not registered in some camera policies. | Register the network camera from camera policies. |
| There is an error in the network camera settings. | Verify the settings in the camera policies. | |
| There is no recorded data, or the recorded data cannot be found. | A camera was added in camera policies while Surveillance Video Manager was running. | If this is the case, this video may not be accessible. Restart Surveillance Video Manager to enable searching for recorded video from the new camera. |
Notes:
• QuickTime is a trademark of Apple Inc., registered in the U.S. and other countries.
• VLC media player is a trademark of Video LAN org.
• See the Buffalo website for supported cameras.
- Refer to the "Buffalo Surveillance Server Administrator's Guide" available from the Buffalo website for information about client tools.
- The TeraStation supports up to five network cameras but includes only a single camera license. To use more than one camera, additional licenses must be purchased and registered.
Chapter 10 Advanced Features
Antivirus Software
Trend Micro NAS Security™ can protect your network and data from software viruses, malware, and spyware. To use Trend Micro NAS software, purchase an OP-TSVC license pack (sold separately). If your TeraStation includes activated antivirus software, no license registration is necessary.
Notes:
- To use the antivirus software effectively, the TeraStation should be connected to the Internet. The connection can be routed through a proxy server if the appropriate settings are configured in Administration - Proxy Settings from the left-side menu of the Trend Micro NAS Security settings page.
• Trend Micro is a registered trademark of Trend Micro Incorporated.
Licenses
If the antivirus software on your TeraStation is not activated or has expired, please purchase an OP-TSVC license pack (sold separately). If your TeraStation includes activated antivirus software, no license registration is necessary. The total period for antivirus software updates may be extended up to 5 years.
This example shows an initial 1-year period for updates extended by an additional year.

flowchart
graph LR
    A["1/1/2012"] --> B["Antivirus software updates activated"]
    B --> C["Extension (9/1/2012)"]
    C --> D["License period before extension"]
    D --> E["License period after extension"]
    E --> F["1/1/2014"]
    F --> G["Up to 5 years (Cannot be extended beyond 5 years)"]
    G --> H["1/1/2019"]
Note: It's not possible to register a serial number that would extend the total license period beyond 5 years, such as a second 3-year license after 3 years.
1 From the left-side menu, click Administration - Product License.
text_image
TREND M I C R O | Trend Micro NAS Summary ► Scan Options Scheduled Update ► Logs ▼ Administration Proxy Settings Product License Debug Settings Summary System Information (2) Product version: Scan Results for Virus Summary Virus uncleanable Virus quarantined2 Enter the serial number from the "Trend Micro NAS Security™ License Pack Guide", included in your package. Click Activate.
Product License

Please enter the new serial number to activate your product.
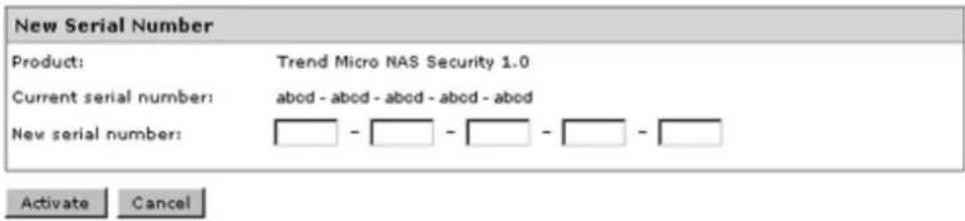
text_image
New Serial Number Product: Trend Micro NAS Security 1.0 Current serial number: abod - abod - abod - abod New serial number: Activate CancelThe new license is now registered.
To check the status of the current license, open the Trend Micro NAS Security settings page and navigate to Administration - Product License on the left-side menu.
Activating Virus Scanning
Follow the procedure below to activate virus scanning.
1 In Settings, click Applications.

text_image
Applications2 Move the antivirus switch to the


text_image
DFSA quarantine folder named "TMNAS" is automatically created on the TeraStation. If a virus is detected, viruses are moved to this folder.
Configuring Security Settings
To configure Trend Micro NAS Security, follow this procedure.
1 In Settings, click Applications.

2 Click to the right of "Antivirus".

text_image
DFS3 Click Options.
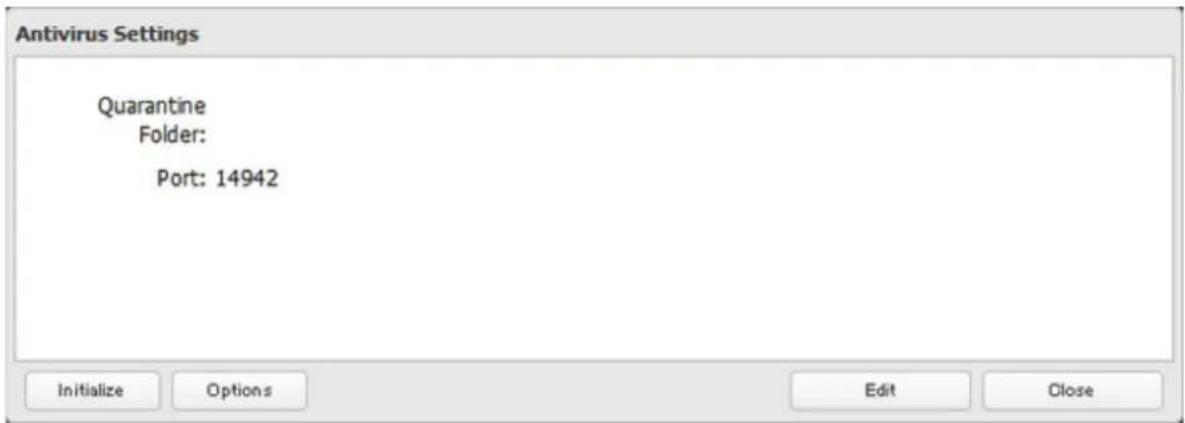
text_image
Antivirus Settings Quarantine Folder: Port: 14942 Initialize Options Edit Close4 Enter your username and password, then click Log On.

TREND MICRO
Trend Micro NAS Security™

text_image
LOGON Please type your user name and the password to access the web console. User name: Password: Log OnYou can log on with the TeraStation's admin account. The default username and password are "admin" and "password".
5 Trend Micro NAS Security settings will open.
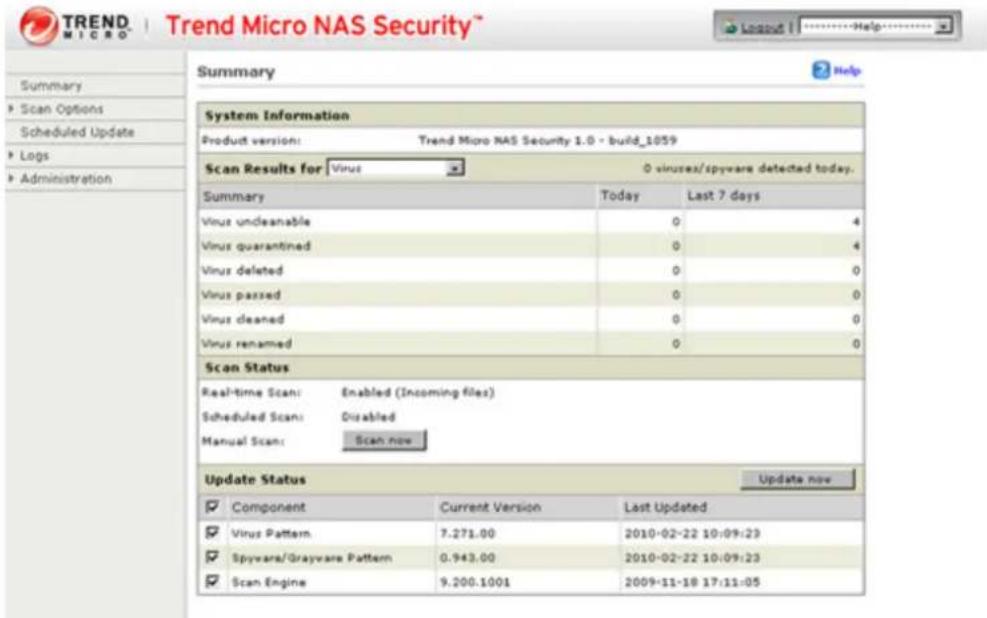
text_image
TREND MICRO | Trend Micro NAS Security™ Summary System Information Product version: Trend Micro NAS Security 1.0 - build_1059 Scan Results for Virus 0 viruses/spware detected today. Summary Today Last 7 days Virus undecanable 0 4 Virus quarantined 0 4 Virus deleted 0 0 Virus passed 0 0 Virus cleaned 0 0 Virus renamed 0 0 Scan Status Real-time Scan: Enabled (Incoming files) Scheduled Scan: Disabled Manual Scan: Scan now Update Status Update now ✓ Component Current Version Last Updated ✓ Virus Pattern 7.271.00 2010-02-22 10:09:23 ✓ Spyware/Grayware Pattern 0.943.00 2010-02-22 10:09:23 ✓ Scan Engine 9.200.1001 2009-11-18 17:11:05Note: The Trend Micro NAS Security settings page is compatible with IE 6.0 SP2 or later (Windows) and Firefox 1.5 or later (Windows or Mac).
Connecting through a Proxy Server
If you must pass through a proxy server to connect to the Internet in your network environment, follow this procedure to set the IP address of the proxy server and other settings.
1 From the left-side menu, click Administration - Proxy Settings.

text_image
TREND MICRO™ | Trend Micro NAS Summary ► Scan Options Scheduled Update ► Logs ► Administration Proxy Settings Product License Debug Settings System Information (20) Product version: Scan Results for Virus Summary Virus uncleanable Virus quarantined2 Check "Use a proxy server to access the Internet (License update)". Enter the IP address and port of the proxy server, then click Save.
Proxy Settings
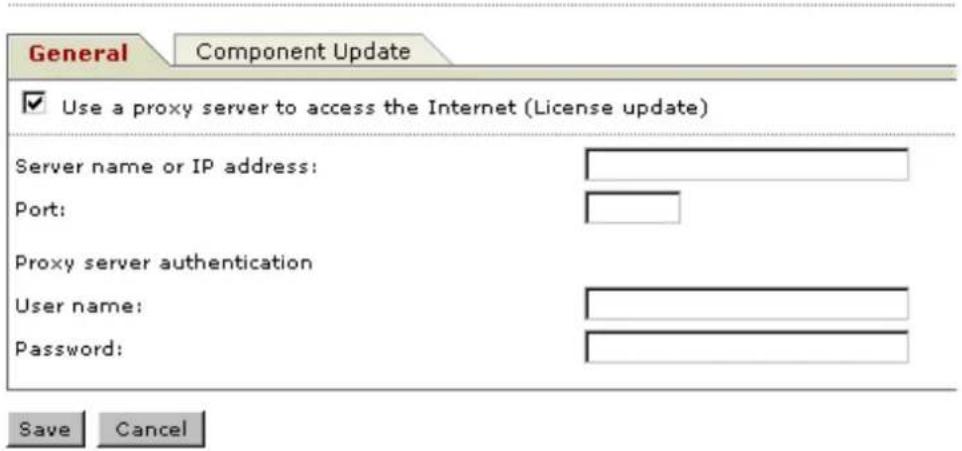
text_image
General Component Update ✓ Use a proxy server to access the Internet (License update) Server name or IP address: Port: Proxy server authentication User name: Password: Save CancelThe antivirus software is now configured to use a proxy server.
Updating
For best results, configure your antivirus software to update automatically as described below.
1 From the left-side menu, choose Scheduled Updates.

text_image
TREND MICRO™ | Trend Micro NAS Summary ► Scan Options Scheduled Update ► Logs ► Administration System Information (2) Product version: Scan Results for Virus Summary2 Check "Enable Scheduled Update".
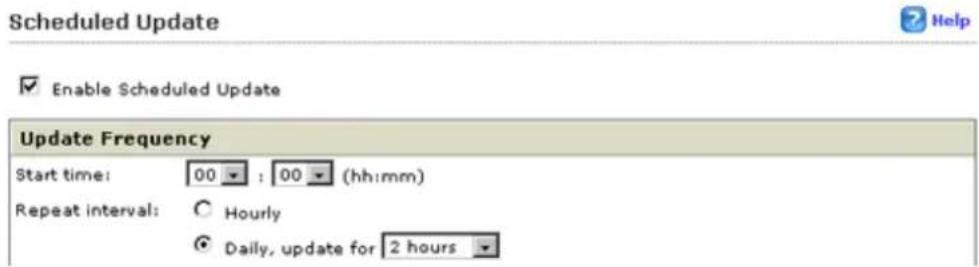
text_image
Scheduled Update Enable Scheduled Update Update Frequency Start time: 00 : 00 (hh:mm) Repeat interval: ○ Hourly ● Daily, update for 2 hours3 Select a time for updates to begin, an interval for updates, and an amount of time for updates to continue. Select the components to update. Click Save.
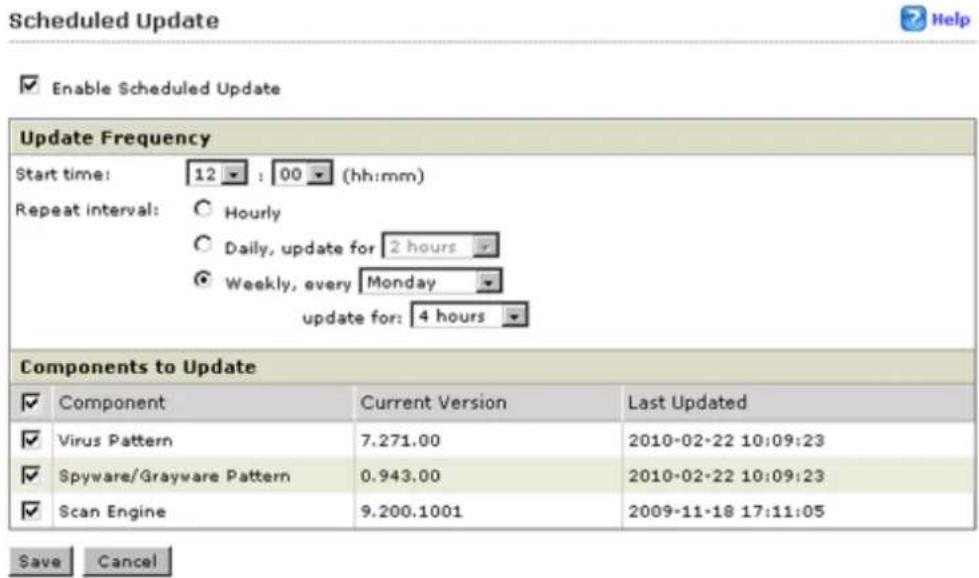
text_image
Scheduled Update Enable Scheduled Update Update Frequency Start time: 12 : 00 (hh:mm) Repeat interval: ○ Hourly ○ Daily, update for 2 hours ● Weekly, every Monday update for: 4 hours Components to Update ✓ Component Current Version Last Updated ✓ Virus Pattern 7.271.00 2010-02-22 10:09:23 ✓ Spyware/Grayware Pattern 0.943.00 2010-02-22 10:09:23 ✓ Scan Engine 9.200.1001 2009-11-18 17:11:05 Save CancelThe antivirus software is now configured to update automatically at the scheduled time. Updates will not be downloaded if the TeraStation is turned off, in standby mode, or disconnected from the Internet.
Excluding a Specific Folder from Antivirus Scanning
By default, all folders on the TeraStation (including attached USB drives) will be scanned. Follow the procedure below to block specific shared folders from being scanned.
1 In Settings, navigate to File Sharing - Folder Setup.

text_image
Folder Setup 4 Folder(s)2 Click the shared folder that you want to remove from the scan, then click Edit.
3 Uncheck items to exclude from the scan, then click OK.
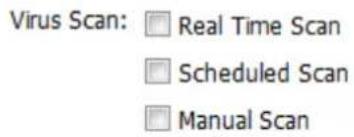
text_image
Virus Scan: □ Real Time Scan □ Scheduled Scan □ Manual ScanVirus Scanning
Three types of virus scans are available:
Real-time Scan
The virus scan runs in the background, scanning every file that you read or write. This is the default type of scanning. Your TeraStation may run slower if real-time scanning is enabled.
Scheduled Scan
A scheduled scan is executed at specific regular intervals, such as every Tuesday at 3 am.
Manual Scan
A manual scan runs once when initiated. Initiate a manual scan as described below.
1 From the left-side menu, choose Scan Options - Manual Scan.
text_image
TREND MICRO | Trend Micro Summary ▼ Scan Options Real-time Scan Scheduled Scan Manual Scan Summary System Inform Product version: Scan Results fo2 Click Scan now.
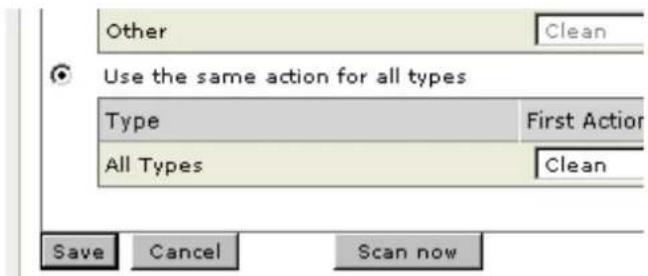
text_image
Other Clean Use the same action for all types Type First Action All Types Clean Save Cancel Scan nowThis starts the virus scan.
If the scan finds a virus, the user can be notified in two ways:
- The I34 virus alert message is normally shown on the LCD panel. Once the virus is removed from the quarantine folder, the message is no longer displayed. If the antivirus software is configured to delete viruses from the quarantine folder automatically, then the I34 virus alert message will not be displayed.
- If email notification is enabled in Settings, then the antivirus software notifies the user by email if a virus is found. Enabling email notifications is recommended.
Depending on how many files are on your TeraStation, a virus scan may take several hours. Estimated scanning times are shown below.
• 10,000 files: \~ 30 minutes
• 100,000 files: \~ 5 hours
• 1,000,000 files: \~ 50 hours
Checking the Log
Follow the procedure below to check the virus scan log.
1 From the left-side menu, choose "Logs".
text_image
TREND MICRO™ | Trend Micro NAS Summary System Information (2 Product version: Scan Results for Virus Administration Summary2 Click the log item that you want to check.
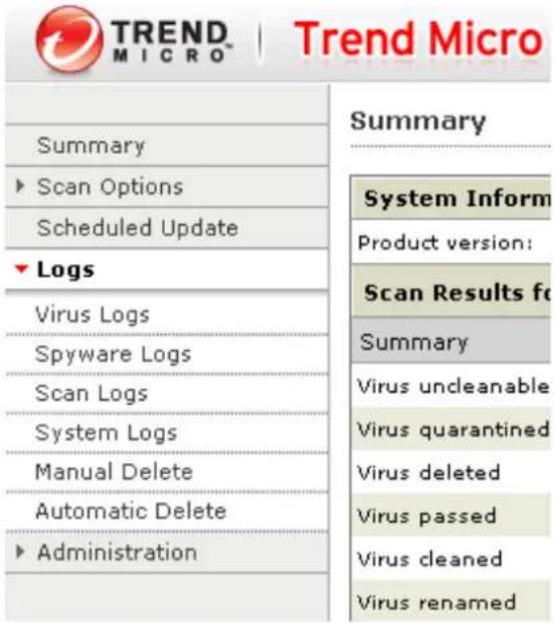
text_image
TREND MICRO™ | Trend Micro Summary System Inform ► Scan Options Scheduled Update ► Logs Virus Logs Spyware Logs Scan Logs System Logs Manual Delete Automatic Delete ► Administration Product version: Scan Results fo Summary Virus undecanable Virus quarantined Virus deleted Virus passed Virus cleaned Virus renamed3 Click Display Log.
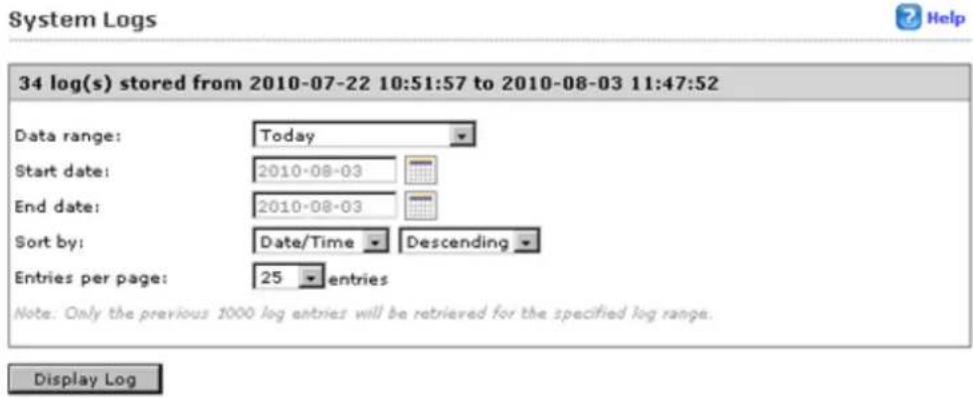
text_image
System Logs 34 log(s) stored from 2010-07-22 10:51:57 to 2010-08-03 11:47:52 Data range: Today Start date: 2010-08-03 End date: 2010-08-03 Sort by: Date/Time Descending Entries per page: 25 entries Note. Only the previous 1000 log entries will be retrieved for the specified log range. Display LogThis completes the procedure for checking the log.
Online Help
For more information on the antivirus software, refer to the online help. Follow the procedure below to access the online help.
1 From the right-top menu, choose Help - Contents and Index.
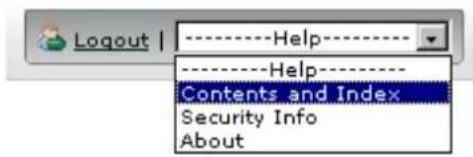
text_image
Logout | ----Help---- ----Help---- Contents and Index Security Info About2 Online help will open.
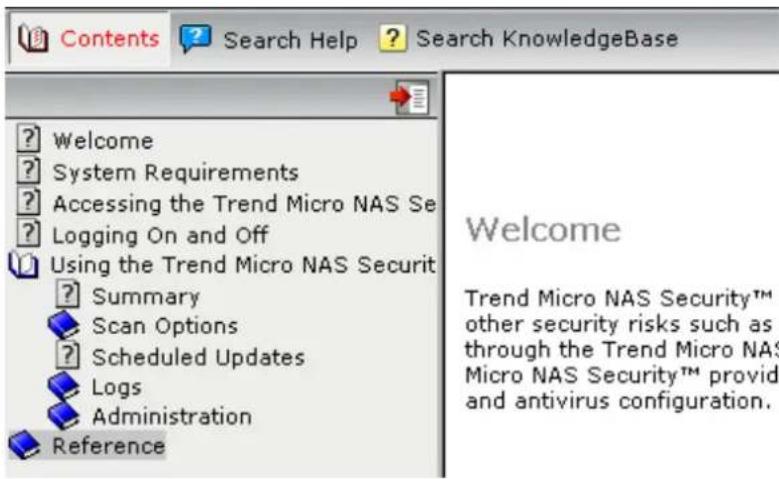
text_image
Contents Search Help Search KnowledgeBase ? Welcome ? System Requirements ? Accessing the Trend Micro NAS Se ? Logging On and Off Using the Trend Micro NAS Securit ? Summary Scan Options Scheduled Updates Logs Administration Reference Welcome Trend Micro NAS Security™ other security risks such as through the Trend Micro NAS Micro NAS Security™ provide and antivirus configuration.Online help is now ready to use.
Email Notification
Your TeraStation can send you email reports daily, or when settings are changed or an error occurs. Notification emails may be triggered by any of the following events:
- Scheduled hard drive status notification (includes quota exceeded notification)
- Backup jobs
- RAID error
- Fan error
• Hard drive read error
• Hard drive replacement
• RAID configuration change
• System bootup/shutdown
1 In Settings, click Management.

Management
2 Move the email notification switch to the position to enable email notification.

Email Notification


3 Click to the right of "Email Notification".
4 Click Edit.
5 Enter your mail server settings and choose which events will trigger notifications. Click OK to send a test email.
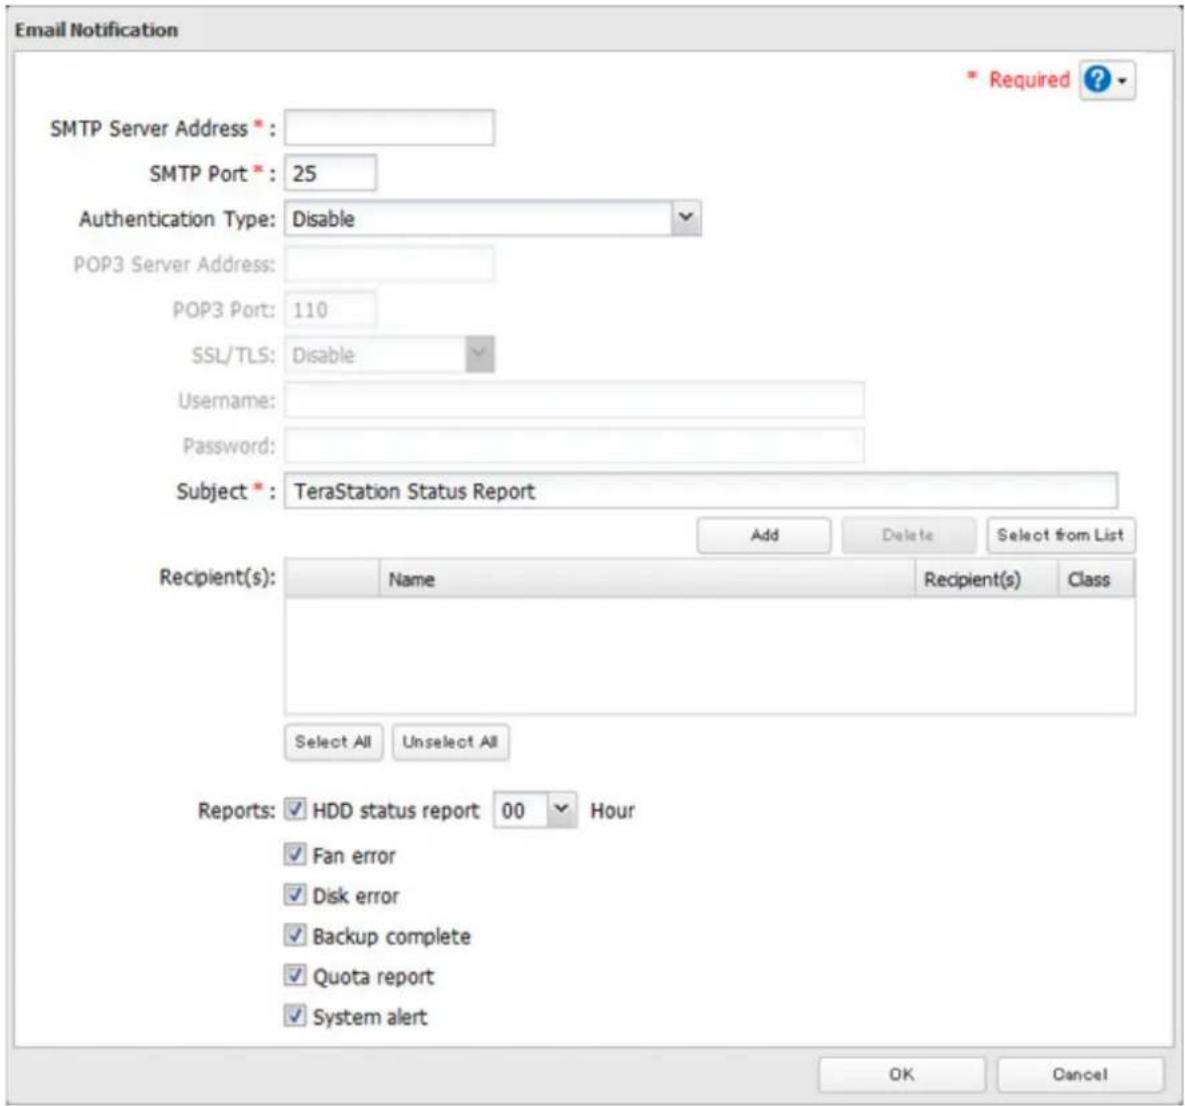
text_image
Email Notification Required ? SMTP Server Address * SMTP Port *: 25 Authentication Type: Disable POP3 Server Address: POP3 Port: 110 SSL/TLS: Disable Username: Password: Subject *: TeraStation Status Report Add Delete Select from List Recipient(s): Name Recipient(s) Class Select All Unselect All Reports: HDD status report 00 Hour Fan error Disk error Backup complete Quota report System alert OK CancelSleep Mode
To save energy, you can specify times to put the TeraStation into sleep (standby) mode, during which the hard drive and LEDs are turned off.
1 In Settings, click Management.

2 Click to the right of "Sleep Timer".

text_image
Sleep Timer3 Click Edit.
4 Specify the timer interval, wake-up time, and time to go into sleep mode, then click OK.

text_image
Sleep Timer Settings Timer 1 Schedule: Weekly Monday Tuesday Wednesday Thursday Friday Saturday Sunday Wake Up at: 07 Hour 00 Minutes Begin Sleep at: 22 Hour 00 Minutes Timer 2 Schedule: Disable Monday Tuesday Wednesday Thursday Friday Saturday Sunday Wake Up at: 00 Hour 00 Minutes Begin Sleep at: 00 Hour 00 Minutes Timer 3 Schedule: Disable Monday Tuesday Wednesday Thursday Friday Saturday Sunday Wake Up at: 00 Hour 00 Minutes Begin Sleep at: 00 Hour 00 Minutes OK CancelNotes:
• Up to three timers can be set.
• The time to enter sleep mode can be set from 0:00 am to 3:45 of the next day.
The time to wake from sleep mode can be set from 0:00 to 23:45.
If the time to enter sleep mode is after 24:00, the wake-up time setting may be from 4:00 to 23:45.
• The time to enter sleep mode should not be set at the same time as or before the start time.
- If a backup job is scheduled during a disk check, disk format, backup job or within 5 minutes of the current time, the TeraStation will not change to standby mode when the configured time is reached.
- If scheduled times in the timer overlap, operation is performed using the widest time interval.
• Examples of multiple timer settings are shown below.
Example 1:
If running at a current time of 10:00 Wednesday
Timer 1: Daily 12:00–24:00
Timer 2: Not used
Timer 3: Not used
No operation is performed at 12:00 and the unit goes into sleep mode at 24:00.
Example 2:
If running at a current time of 10:00 Wednesday
Timer 1: Daily 9:00–18:00
Timer 2: Wednesday 10:00–20:00
Timer 3: Not used
On days other than Wednesday, normal operation begins at 9:00 and the unit goes into sleep mode at 18:00.
On Wednesday, the unit goes into sleep mode at 20:00.
Example 3:
If running at the current time of 10:00 Wednesday
Timer 1: Daily 9:00–18:00
Timer 2: Wednesday 10:00–1 am of the next day
Timer 3: Not used
On days other than Wednesday, normal operation begins at 9:00 and the unit goes into sleep mode at 18:00.
On Wednesday, normal operation begins at 10:00 and the unit goes into sleep mode at 1:00 am of the next day.
Example 4:
When running at a current time of 10:00 Wednesday
Timer 1: Daily 9:00–18:00
Timer 2: Wednesday 7:30–22:00
Timer 3: Not used
On days other than Wednesday, normal operation begins at 9:00 and the unit goes into sleep mode at 18:00.
On Wednesday, normal operation begins at 7:30 and the unit goes into sleep mode at 22:00.
• To wake the TeraStation from sleep mode manually, press the power button.
Wake-on-LAN
The TeraStation supports Wake-on-LAN, which allows it to be turned on remotely.
1 In Settings, click Network.

2 Click to a right of "IP Address".

text_image
IP Address LAN Port 1 192.168.10.26 LAN Port 2 169.254.200.573 Click Change.
4 Enable "Wake-on-LAN", then click OK.
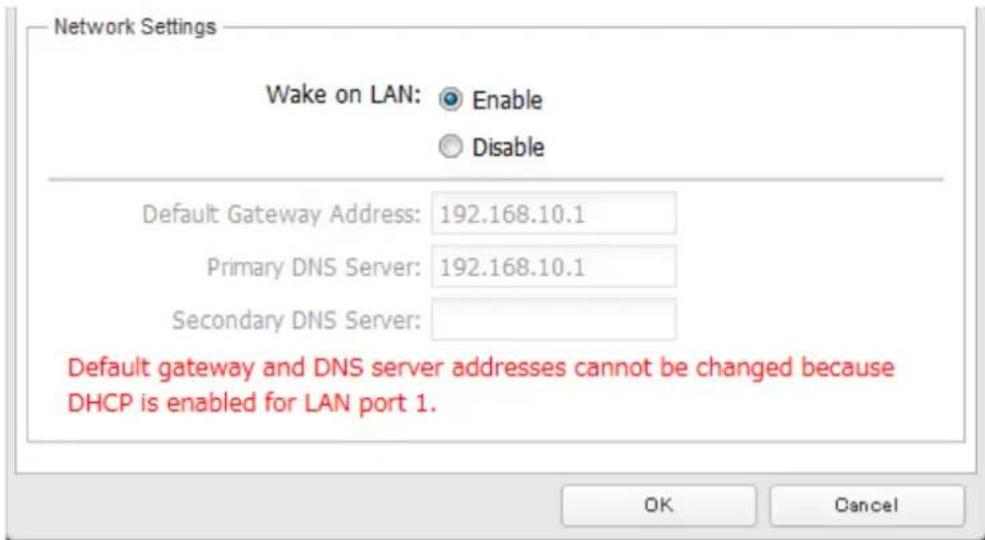
text_image
Network Settings Wake on LAN: Enable Disable Default Gateway Address: 192.168.10.1 Primary DNS Server: 192.168.10.1 Secondary DNS Server: Default gateway and DNS server addresses cannot be changed because DHCP is enabled for LAN port 1. OK CancelWake-on-LAN is now enabled. As long as it is connected to power and the network, you can turn on the TeraStation remotely.
Notes:
• After a power outage, wait 5 minutes after power is restored to send the Wake-on-LAN packet to the TeraStation.
• After receiving the Wake-on-LAN packet, the TeraStation may take approximately five minutes to be ready to use.
- To use Wake-on-LAN, you'll need Wake-on-LAN software that sends magic packets. The TeraStation does not include Wake-on-LAN software.
- The TeraStation does not support using Wake-on-LAN and port trunking at the same time. You may use either feature, but not both at the same time.
- On the local network, Wake-on-LAN packets may be sent to port 2304 on either of the TeraStation's LAN ports. If the TeraStation is connected to a Buffalo wireless router configured for remote access, then it may be turned on from outside the local network (from the WAN side). To use this feature, connect the router to only LAN port 1 on the TeraStation.
UPS (Uninterruptible Power Supply)
If a UPS (sold separately) is attached, the TeraStation can be automatically shut down for protecting data in the event of a power outage.
1 Plug the power cable of the UPS to a wall socket.
2 Connect the AC cable of the TeraStation to the UPS.
3 Connect the UPS and TeraStation using a USB cable or serial cable.
4 Turn on the UPS, then the TeraStation.
5 In Settings, click Management.

6
Click
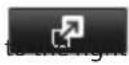
of "UPS Sync".

UPS Sync
Do not synchronize with UPS

7 Click Edit.
8 Configure the desired settings, then OK.
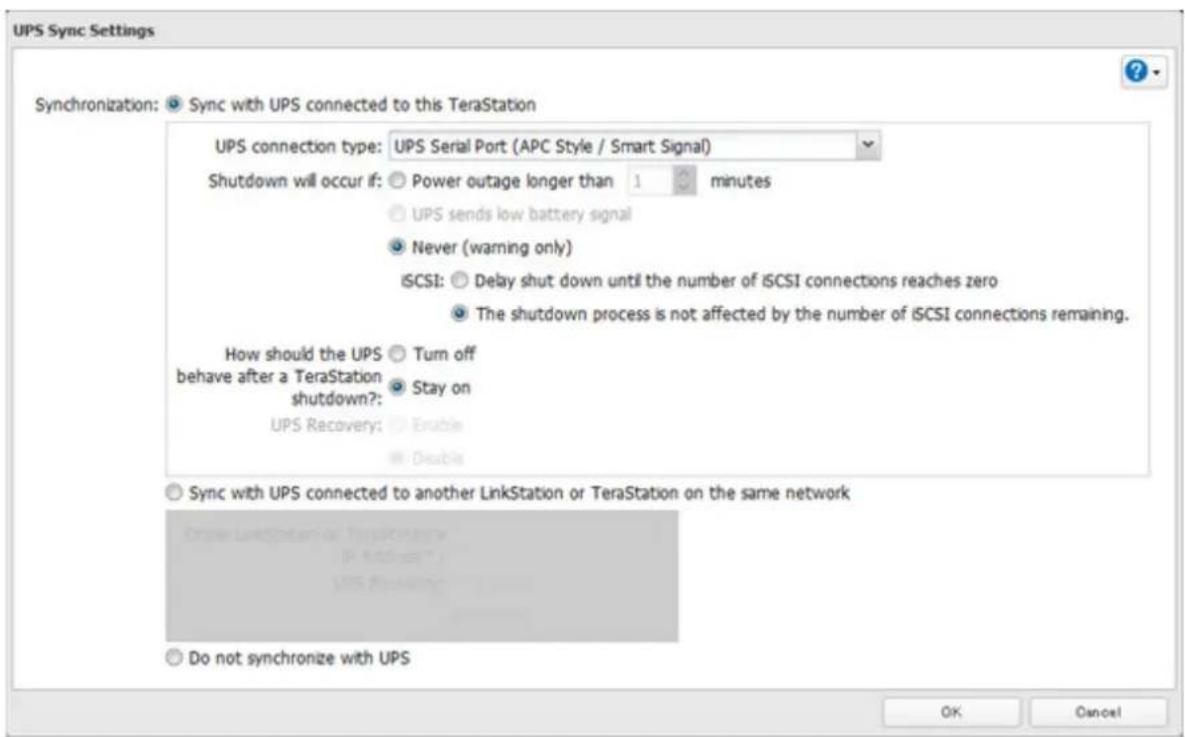
text_image
UPS Sync Settings Synchronization: Sync with UPS connected to this TeraStation UPS connection type: UPS Serial Port (APC Style / Smart Signal) Shutdown will occur if: Power outage longer than 1 minutes UPS sends low battery signal Never (warning only) iSCSI: Delay shut down until the number of iSCSI connections reaches zero The shutdown process is not affected by the number of iSCSI connections remaining. How should the UPS Turn off behave after a TeraStation shutdown? Stay on UPS Recovery: Enable Disable Sync with UPS connected to another LinkStation or TeraStation on the same network Do not synchronize with UPS OK CancelNotes:
- If the TeraStation is connected directly to a UPS, select "Sync with UPS connected to this TeraStation". If a different TeraStation is connected to the UPS, select "Sync with UPS connected to another LinkStation or TeraStation on the same network". After making this selection, enter the IP address of the TeraStation that will be the sync source in "Other LinkStation or TeraStation's IP Address".
- When the TeraStation is rebooted after an automatic shutdown (such as from a power outage or power supply problem), verify that the power supply has been restored. If the TeraStation is turned on while it is still running on the UPS and without the power supply restored, automatic shutdown is not performed, even after the specified time has elapsed.
- If the power supply from the UPS to the TeraStation is stopped and restarted when UPS recovery is enabled, the TeraStation is automatically restarted.
Port Trunking
Two Ethernet cables can be used to establish two separate communication routes providing LAN port redundancy and improving communication reliability. The use of two Ethernet cables enables access to the TeraStation even if one of the cables is disconnected.
The port trunking modes that can be set in the TeraStation are shown below.
| Trunking Mode Characteristics | |
| Round-robin | Network packets are transmitted in sequential order from the first available NIC slave through the last. |
| Active-backup | Only one NIC slave in the bond is active. A different slave becomes active if and only if the active slave fails. |
| XOR* | Transmits network packets based on [(source MAC address XOR'd with destination MAC address) modulo NIC slave count]. This selects the same NIC slave for each destination MAC address. |
| Broadcast Transmits network packets on all slave network interfaces. | |
| Dynamic link aggregation** | Creates aggregation groups that share the network speed and duplex settings. Utilizes all slave network interfaces in the active aggregator group according to the 802.3ad specification. |
| TLB | The outgoing network packet traffic is distributed according to the current load (relative to the speed) on each network interface slave. |
| ALB Includes both balance-tlb and rlb by ARP | negotiation. |
*A separate intelligent switch that supports EtherChannel or other port trunking is required. Configure two LAN ports on the switch for port trunking first.
**A separate intelligent switch that supports IEEE 802.3ad is required. Configure LACP in the switch first.
Configuring Port Trunking
If the TeraStation is being used as an iSCSI hard drive, disable iSCSI before changing network settings such as port
trunking. Navigate to Drives - iSCSI in Settings and move the iSCSI switch to the position temporarily.
1 Use an Ethernet cable to connect the hub LAN port and TeraStation LAN port 1.
Notes:
- Do not connect the second Ethernet cable to the TeraStation yet.
- If using an intelligent switch, configure the LAN ports on the switch first, before connecting to the TeraStation.
2 In Settings, click Network.

Network
3 Click to the right of "Port Trunking".

Port Trunking

4 Choose a port trunking link.
5 Select the LAN port that will be used, select the port trunking mode, and click Accept.
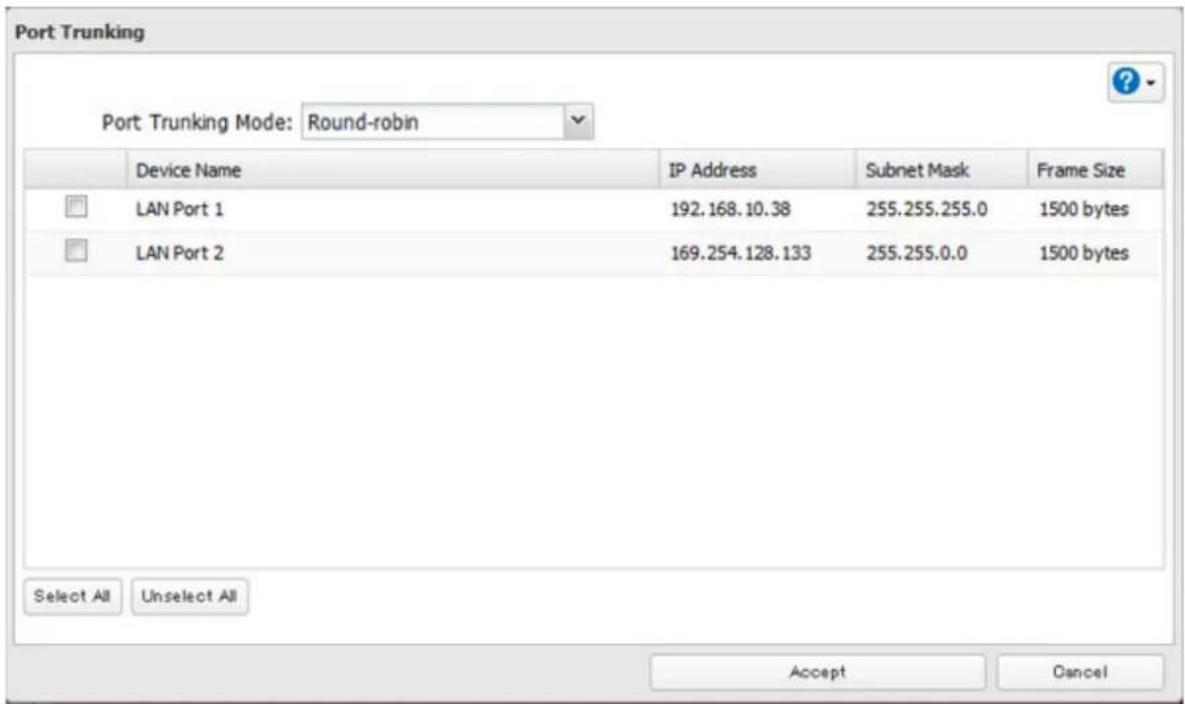
text_image
Port Trunking Port Trunking Mode: Round-robin Device Name IP Address Subnet Mask Frame Size LAN Port 1 192.168.10.38 255.255.255.0 1500 bytes LAN Port 2 169.254.128.133 255.255.0.0 1500 bytes Select All Unselect All Accept Cancel6 Connect the hub's LAN port and TeraStation's LAN port using the second LAN cable. If you are using an intelligent switch, connect to the LAN port that was previously configured for port trunking.
7 Reboot the TeraStation before use.
Connecting a Printer
You can connect a printer to the USB port on the TeraStation.
Notes:
• Only one USB printer can be connected to the TeraStation.
- Bidirectional communication is not supported i.e., remaining ink quantities and other printer status information is not displayed.
- If a multifunctional printer is connected, only the printer function can be used. Other functions such as scanning will not be available.
• The print server does not support Mac OS.
- Don't disable the SMB protocol while the print server is enabled. If you do, you will need to enable SMB again and reconfigure the print server from scratch.
1 In Settings, click Services.

text_image
Services2 Move the print server switch to the position to enable the print server.

text_image
Print Server3 Refer to the manual supplied with the printer and install the printer drivers.
4 Launch NAS Navigator2. Double-click your TeraStation's icon.
5 Double-click the icon of the connected printer (shared name is displayed).
6 Click OK.
7 Select your printer, then click OK.
8 Register the printer.
TeraSearch
TeraSearch lets you search for character strings contained in text files and HTML files stored on the TeraStation. For other file types (e.g. Word or Excel files), TeraSearch will only locate the entered strings in the filename. Follow the steps below to enable TeraSearch.
1 In Settings, click File Sharing.

text_image
File Sharing2 Click to view the right of "Folder Setup".

text_image
Folder Setup 4 Folder(s)3 Click the shared folder to be indexed.
4 Click Edit.
5 Check "Include this folder in the search index", then click OK.
6 Click OK.
7 Click Close.
8 Click Applications.

text_image
Applications9 Move the TeraSearch switch to the position to enable TeraSearch.

text_image
DFS10 Click to the right of "TeraSearch".
11 Click Refresh Index
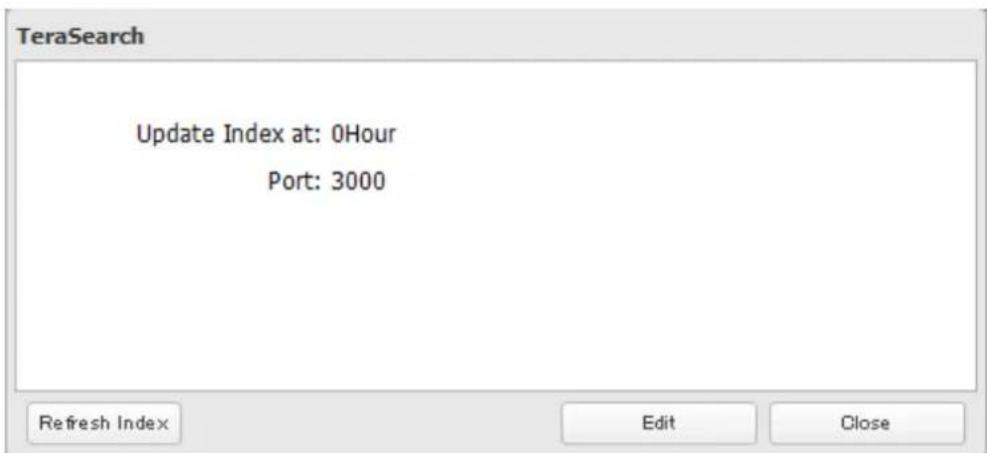
text_image
TeraSearch Update Index at: 0Hour Port: 3000 Refresh Index Edit Close12 Click Edit.
13 Enter the port number that you want to use and the time that the index will be updated, then click OK.

text_image
TeraSearch Settings Update Index at: 00 Hour Port*: 3000 * Required ? OK Cancel14 Open the following URL in your browser.
http://(IP address of your TeraStation):3000/
Note: You can identify your IP address from NAS Navigator2.
15 Enter your TeraStation's username and password, then click Login.
16 Enter a keyword in the "Search Text" field. Check "Advanced Search" to enable searches by specifying the filename, owner, date updated, and file size.
17 Click Search. The search results are displayed. Click the filename in the results to open the file.
Offline Files
The "offline files" feature that is included with many versions of Windows can be used with files on the TeraStation. You will be able to work on files stored on the TeraStation even when your PC is disconnected from the network. When you next connect to the network, the updated files are written and synchronized. Follow the procedure below to configure offline files.
1 In Settings, click File Sharing.

text_image
File Sharing2 Click to the right of "Folder Setup".

text_image
Folder Setup 4 Folder(s)3 Click the shared folder for offline files.
4 Click Edit.
5 Choose "Manual File Caching", "Automatic File Caching", or "Automatic Program and File Caching", then click OK.
Note:
- "Manual File Caching" - User selects files that are cached.
- "Automatic File Caching" - Opened files can be cached locally for offline use. Previous versions of files that are not synchronized are automatically replaced by the latest versions.
- "Automatic Program and File Caching" - Opened files can be cached locally for usage offline. Previous versions of files and applications executed from the network that are not synchronized are automatically replaced by the latest version of the files and applications.
6 Click OK.
7 Click Close.
8 In Windows, navigate to Folder options. (The user who doesn't use Windows XP or earlier should skip to step 9).
9 Check "Enable Offline Files", then click OK.
Note: Offline files cannot be enabled if "Use Fast User Switching" is enabled. To change the setting, open "User Accounts" in Control Panel and select "Change the way users log on or off".
10 Right-click the icon of the shared folder on the TeraStation for which you have set the offline feature, then click Always available offline. If the offline file wizard opens, follow the instructions on the screen.
11 When the offline settings and sync settings are completed, the files and folders set appear as shown:
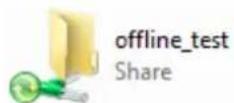
Offline files can be accessed by the original Universal Naming Convention (UNC) where the data was saved.
Note: If you cannot access offline files, try the following procedure:
(1) Reconnect the computer to the network.
(2) Navigate to Start - All Programs - Accessories - Sync Center and click Sync All to synchronize all offline files.
(3) Disconnect the computer from the network and verify that you can access offline files.
DFS
DFS (Distributed File System) is a set of client and server services that allows Windows users to organize many distributed SMB file shares into a distributed file system. Follow the steps below to enable DFS on the TeraStation.
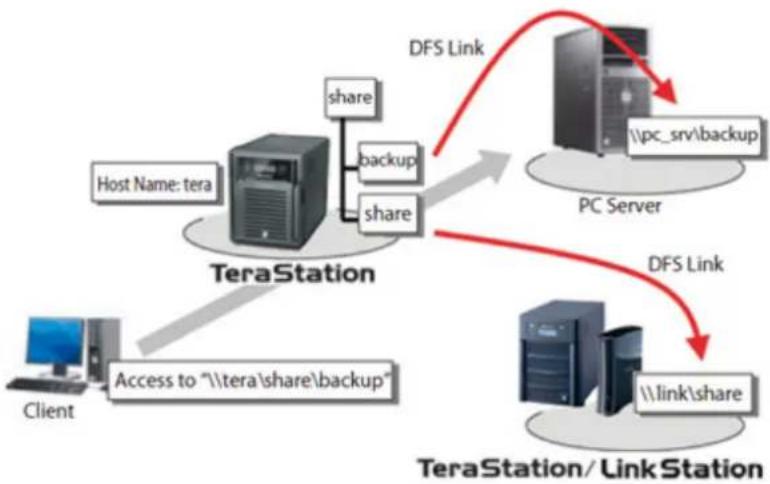
flowchart
graph TD
    A["Client"] -->|Access to "\tera\share\backup"| B["TeraStation"]
    B -->|share| C["Host Name: tera"]
    B -->|share| D["PC Server"]
    D -->|DFS Link| E["PC Server"]
    E -->|DFS Link| F["TeraStation/Link Station"]
    F -->|DFS Link| G["PC Server"]
    G -->|DFS Link| H["PC Server"]
    H -->|DFS Link| I["PC Server"]
    I -->|DFS Link| J["PC Server"]
    J -->|DFS Link| K["PC Server"]
    K -->|DFS Link| L["PC Server"]
    L -->|DFS Link| M["PC Server"]
    M -->|DFS Link| N["PC Server"]
1 In Settings, click File Sharing.
text_image
File Sharing2 Click to the right of "DFS".

text_image
DFS3 Click Edit.
4 Enable or disable "Set DFS Link to DFS Root".
If enabled, a DFS link target shared folder is created under the DFS root. If disabled, up to 8 DFS link target shared folders can be created under the DFS root.
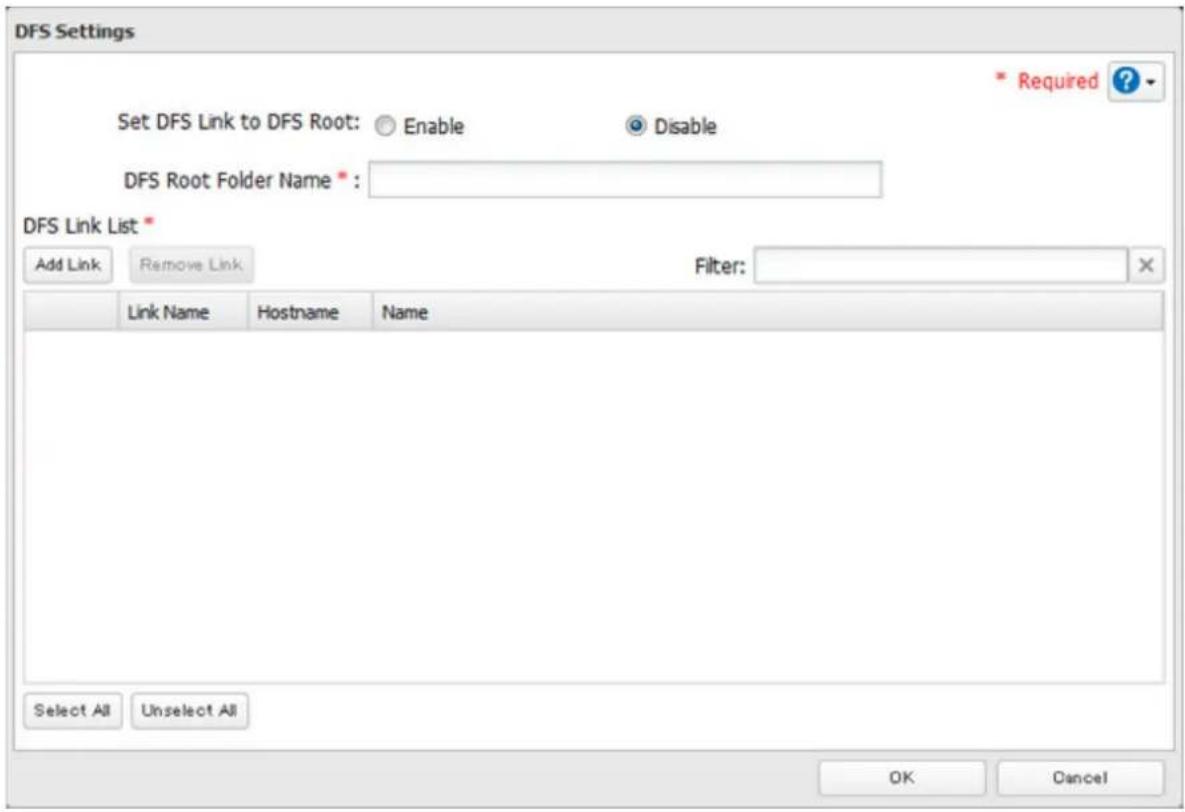
text_image
DFS Settings Set DFS Link to DFS Root: Enable Disable DFS Root Folder Name * DFS Link List * Add Link Remove Link Filter: Link Name Hostname Name Select All Unselect All OK Cancel Required ?5 Enter DFS Root Folder Name.
6 Click Add Link.
7 Enter the link name, hostname, and shared folder name, then click OK.
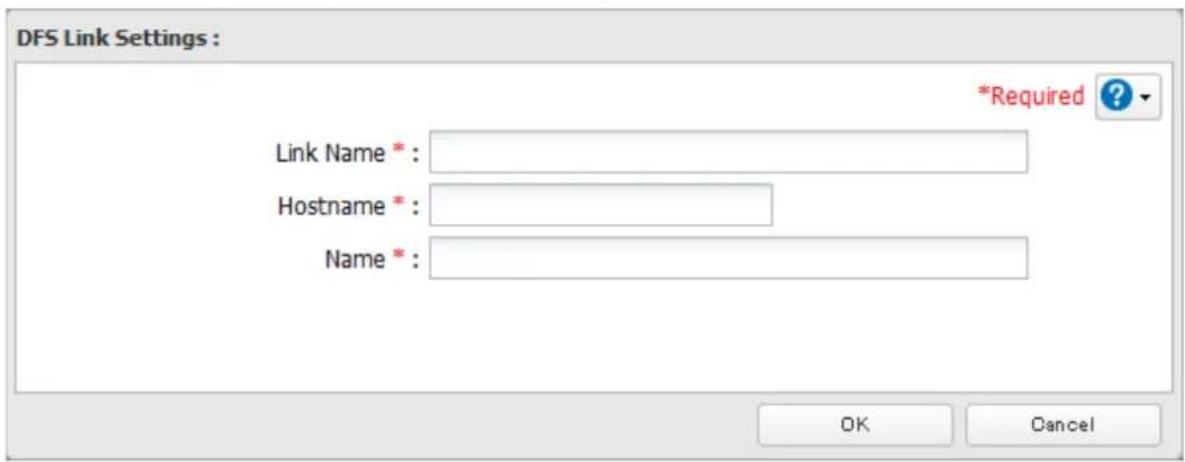
text_image
DFS Link Settings : Link Name *: Hostname * Name *: *Required ? OK Cancel8 Click OK.
9 Move the DFS switch to the position to enable DFS.

text_image
DFSNotes:
- Don't disable the SMB protocol while DFS is enabled. If you do, you will need to enable SMB again and reconfigure DFS from scratch.
- TeraStations, LinkStations, and SMB-compatible Windows computers can be specified as DFS link targets (Mac OS and Linux are not supported).
Accessing from an NFS Client
Note: (US purchasers only) Buffalo's customer support will help configure the NFS settings on your TeraStation, and will support VMware and Windows clients but will not provide support for configuring your Linux or other UNIX clients. There are many types of UNIX and the procedures for configuring NFS with them will vary considerably. For help configuring your NetWare, Linux, or other UNIX clients for NFS support please consult each client's own documentation and support.
1 In Settings, click File Sharing.

text_image
File Sharing2 Click to the right of "Folder Setup".

text_image
Folder Setup 4 Folder(s)3 Choose the shared folder that will be accessible to the NFS client.
4 Click Edit.
5 Under "LAN Protocol Support", check "NFS" and click OK.
Note the NFS path. It will be used later for accessing data from an NFS client.
6 Click Close.
7 Move the NFS switch to the position to enable NFS.

text_image
DFS8 Click to the right of "NFS".
9 Click Client Settings.
10 Click Add Client.
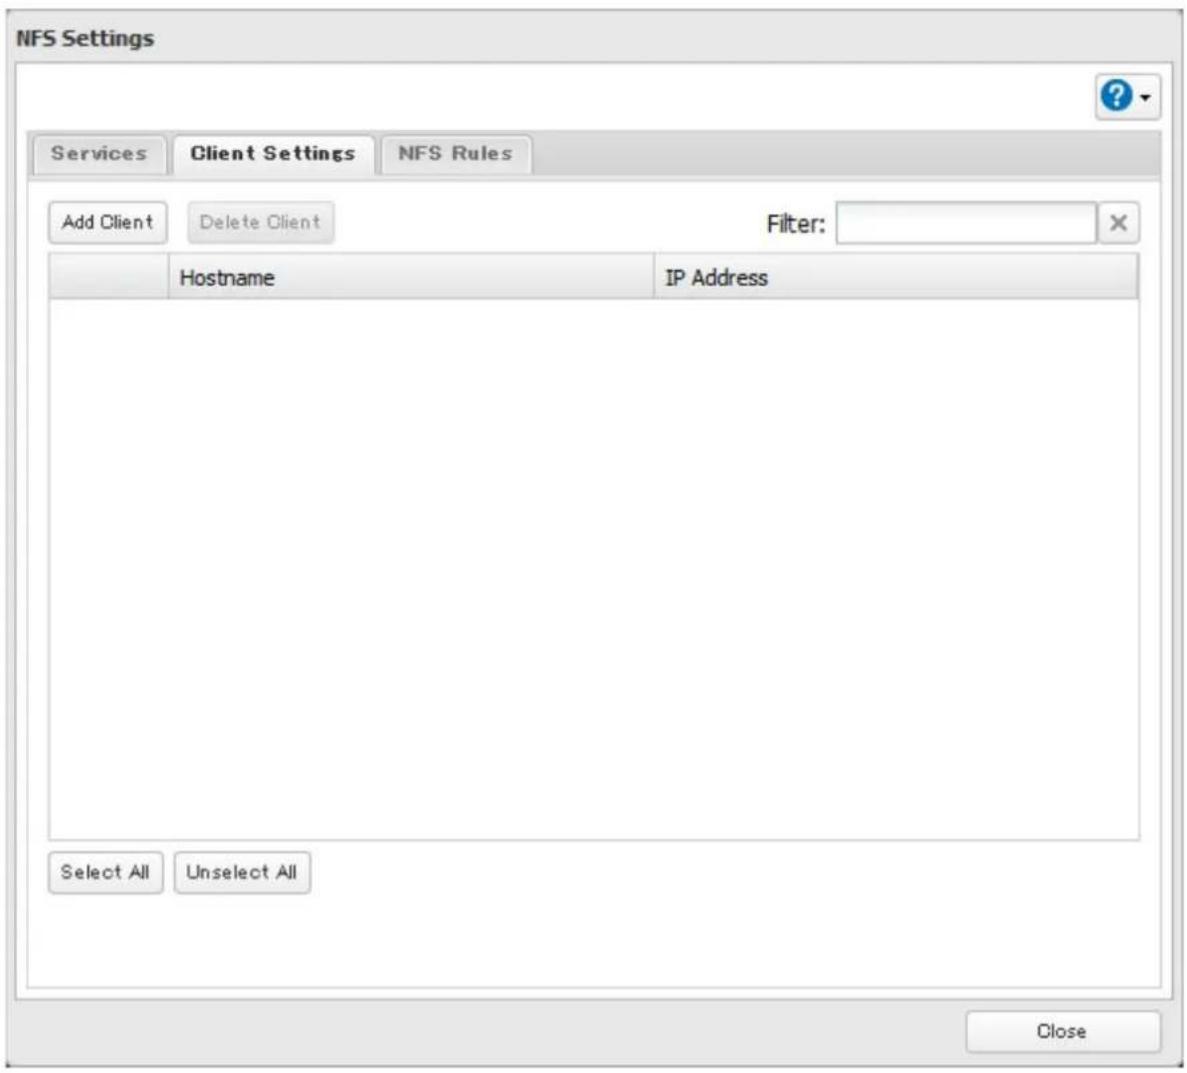
text_image
NFS Settings Services Client Settings NFS Rules Add Client Delete Client Filter: Hostname IP Address Select All Unselect All Close11 Enter the IP address and hostname of the NFS client, then click OK.
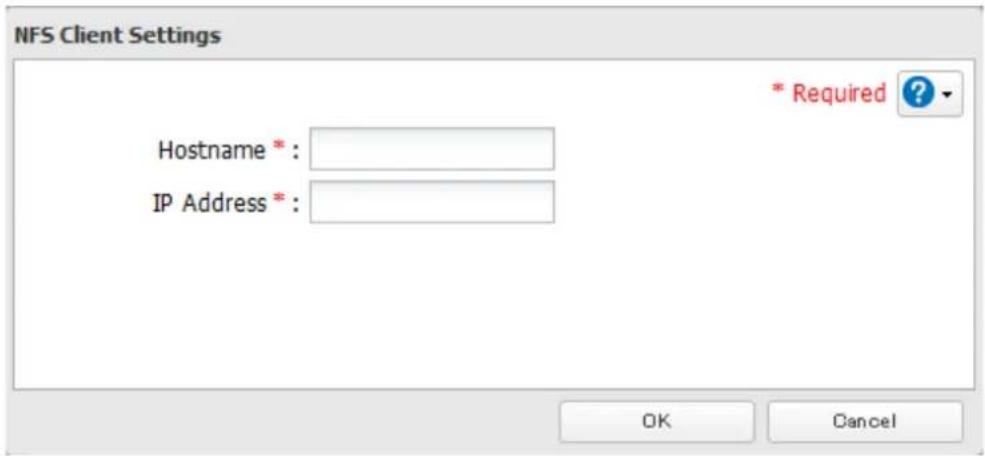
text_image
NFS Client Settings * Required ? Hostname * : IP Address * : OK CancelNote: To delete a client, check the hostname and click Delete Client.
12 Click Close.
13 Enter the mount command to access the shared folder from the NFS client.
The mount command depends on your operating system. The examples below assume that IP address of your TeraStation is 192.168.11.10, "/mnt/array1/share" is the desired NFS path, and "/mnt/nas" or drive letter "z" is the mount point.
For Linux:
mount -t nfs 192.168.11.10:/mnt/array1/share /mnt/nas
For Windows Service for Unix 3.5:
mount 192.168.11.10:/mnt/array1/share z:
For Solaris 10:
mount -F nfs 192.168.11.10:/mnt/array1/share /mnt/nas
Notes:

text_image
NFS Settings Services Client Settings NFS Rules Public Network Address: 192.168.11.10 Public Subnet Mask: 255.255.255.0 Operation Mode: User Mode Edit Close- To restrict NFS access to a specific network or client, navigate to File Sharing - NFS - Services and click Edit. Enter the address of the network. For example, if your local network subnet has a router at 192.168.1.1 and clients with IP addresses in the range from 192.168.1.2 through 192.168.1.48 with subnet mask 255.255.255.0, then the "Public Network Address" would be 192.168.1.0 and the "Public Subnet Mask" would be 255.255.255.0. This would mean that only clients on this local network would be able to access the NFS share. If the default settings are used (0.0.0.0 for both the public network address and the public subnet mask), then access to the NFS share will not be restricted.
- To use NFS folders with VMware ESX/ESXi or Citrix, navigate to Services - Edit and change the operation mode from "User Mode" to "Kernel Mode".
- Async is the default for NFS rules. Sync is available only when the device is in kernel mode.
- To restrict access to a NFS share for specific clients, navigate to File Sharing - NFS - NFS Rules and click Add Rule. Choose the folder to restrict access to, and enter the clients that will have restricted access in the "Hosts" field. Clients may be entered by hostname, IP address, or IP address range. Wildcards are supported. Separate
multiple entries with commas. You may assign read-only or read & write access to the listed clients. Rules override settings made from the Services tab.

text_image
NFS Rule Folder *: Hosts *: Privilege : ○ Read & Write Synchronization : Async *Required ? Browse OK CancelEncrypting Data Transmission
Encrypting Settings Data
All communication with Settings can use SSL encryption if you access settings through https://.
Encrypting FTP Transfer Data
You can encrypt passwords and files using SSL/TLS for secure FTP communication. First, open a shared folder's settings and click Edit; under "LAN Protocol Support", check "FTP" and click OK. Enable SSL security in the setup screen for your FTP client. The procedure depends on the FTP client software.
SSL Keys
SSL keys are used during setup screen operations and FTP communication. SSL (Secure Socket Layer) is a type of encryption system called public key encryption. Generally, SSL is managed by the two files below.
server.crt (SSL Certificates)
The TeraStation sends the file to a computer, and the computer uses it to perform encryption. The TeraStation receives the encrypted data and uses server.key (the private key) to decrypt the data.
In SSL, this key contains the server certificate, and depending on your computer environment, a check may be performed to determine the trustworthiness of the certificate. The server certificate included in the TeraStation in the default settings was created by Buffalo, and in some cases the message "There is a problem with this website's security certificate" may be displayed in your browser or other software. Disregard this message and continue.
server.key (SSL Key)
This file is used as a pair with server.crt (server certificate). This is required for decrypting the data that was encrypted by the server certificate, and this is normally not revealed.
Updating SSL Key
To update a server certificate and a private key for SSL, follow this procedure.
1 Navigate to Management - SSL.
2 Register "server.key" for "Secret Key" and "server.crt" for "Server Certificate (.crt)", then click Import.
Notes:
- Place the SSL key files (server.key, server.crt) directly below the C root drive. The SSL key may not be able to be updated if it is placed in folders or paths that contain multi-byte characters.
• Use the provided password for the SSL key.
• If Settings cannot be displayed after updating, initialize the TeraStation settings. - Updating the firmware initializes an SSL key.
Web Server
The TeraStation can be used as a web server. In addition to HTML files, images, and JavaScript, the TeraStation also allows installation of Perl script and PHP script files.
1 In Settings, click Services.

2 Move the web server switch to the position to enable the web server.

text_image
DFS3 Click the number of "Web Server".
4 Click Edit.
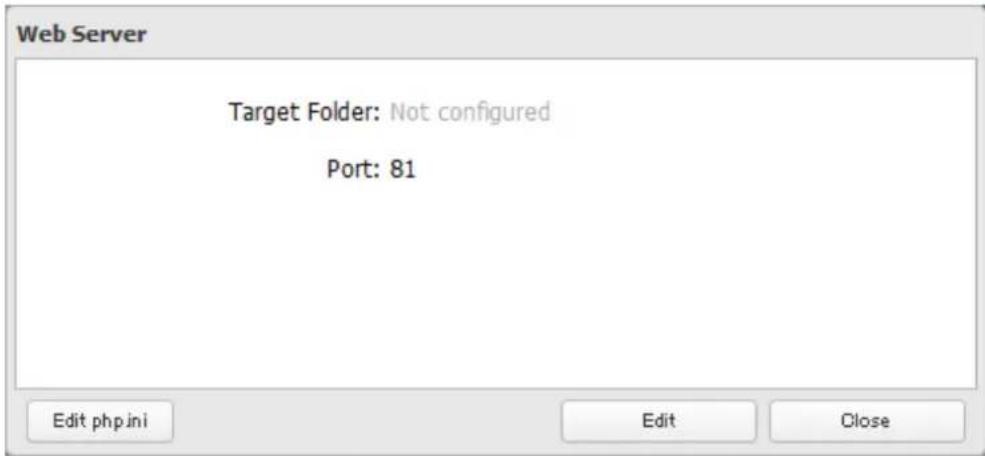
text_image
Web Server Target Folder: Not configured Port: 81 Edit php ini Edit CloseNote: The settings of the PHP language interpreter can be changed from "Edit php.ini".
5 Click Browse.
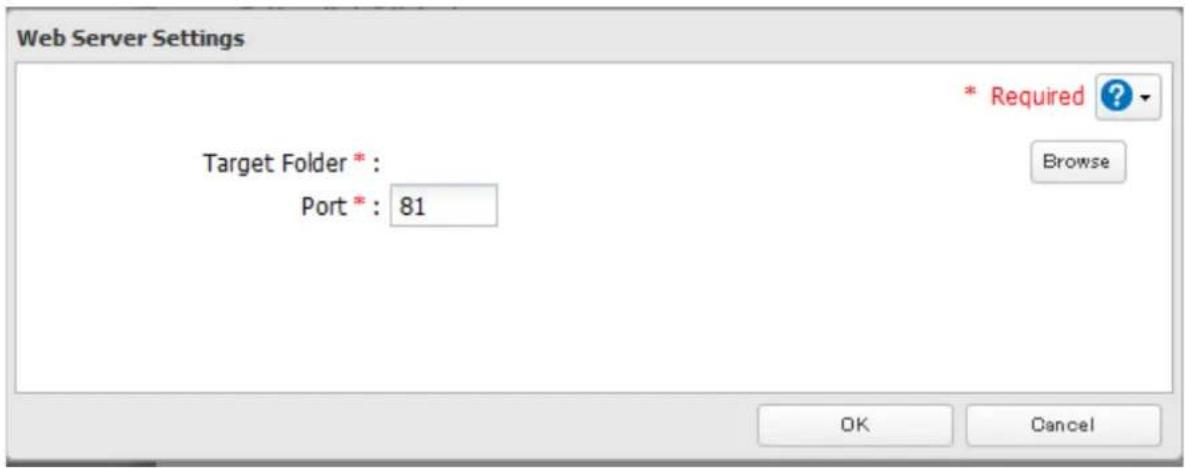
text_image
Web Server Settings Target Folder * : Port * : 81 * Required ? Browse OK Cancel6 Choose a shared folder for the web server, then click OK.
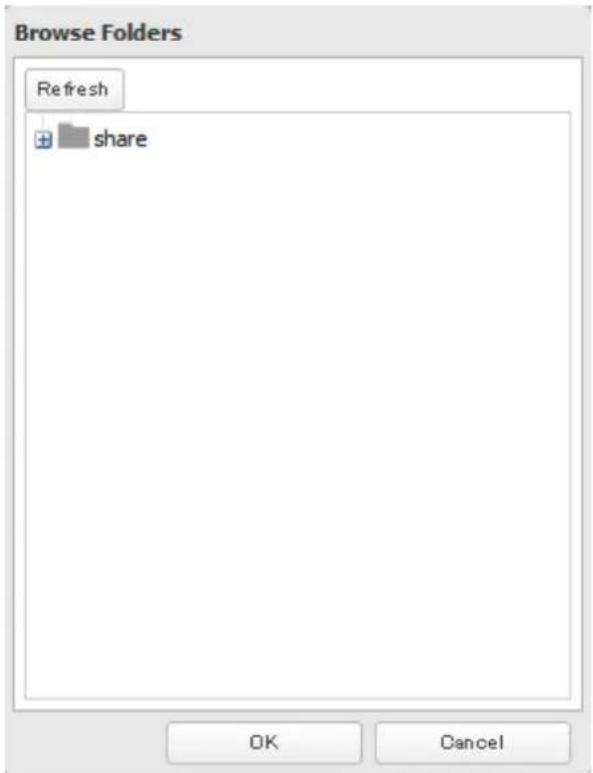
text_image
Browse Folders Refresh + share OK Cancel7 Choose an external port, then click OK.
MySQL Server
The TeraStation can be used as a MySQL server. A MySQL database may be installed and linked with the web server.
1 In Settings, click Services

2 Move the MySQL server switch to the position to enable the MySQL server.


3 Click to the right of "MySQL Server".
4 Click Edit.
5 Click Browse.
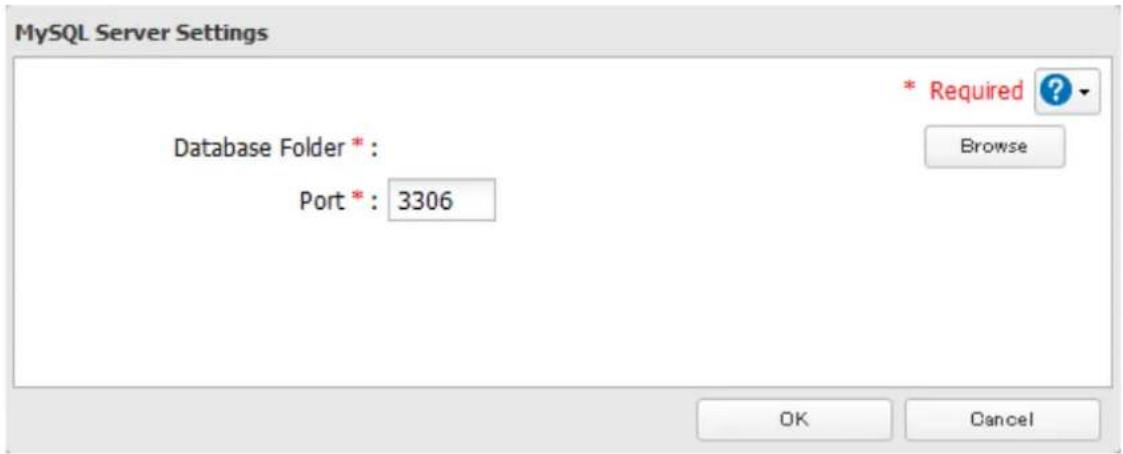
text_image
MySQL Server Settings Database Folder * : Port * : 3306 * Required ? Browse OK Cancel6 Choose a shared folder for the MySQL server, then click OK.

text_image
Browse Folders Refresh + share OK Cancel7 Choose an external port, then click OK.
SNMP
If SNMP is enabled, you can browse your TeraStation from SNMP-compatible network management software. The specific MIB (management information base) file for Buffalo is available from the Buffalo website.
1 In Settings, click Network.

2 Move the SNMP switch to the position to enable SNMP.

text_image
SNMP SNMP3 Click to the right of "SNMP".
4 Click Edit.
5 Configure the desired settings, then click OK.
Saving and Applying Settings
The TeraStation's settings can be saved to a USB memory device and restored to another TeraStation of the same series. Use this function to back up and copy settings to a new TeraStation.

flowchart
graph LR
    A["Server"] -->|save| B["USB Drive"]
    B -->|restore| C["Setting & Firmware"]
    B -->|restore| D["Setting & Firmware"]
    B -->|restore| E["Setting & Firmware"]
Make a note of the hard drive configuration (number of hard drives, RAID, LVM, etc.) of the TeraStation where the settings were saved. Make sure that any TeraStation that you apply these settings to has exactly the same hard drive configuration before you apply the settings. If the drive configuration is different, you may get unexpected results.
The following settings are not saved or restored:
| Category Settings | |
| File Sharing Shared folder information of USB drive and media cartridge | |
| Drives | All settings in "Drives" |
| All settings in "RAID" - "Options" - "RAID Array Settings" | |
| All settings in "LVM" | |
| All settings in "iSCSI" | |
| USB drive and media cartridge information | |
| Network | All settings in "IP Address" |
| All settings in "Port Trunking" | |
| Backup All settings in "Failover" | |
| Management | All settings in "Name" |
| All settings in "UPS Sync" | |
| All settings in "SSL" | |
| Display language in Settings | |
Saving Settings
1 Insert a USB memory device into a USB port on the TeraStation.
Notes:
- Use a USB 2.0 port. If your TeraStation has both USB 3.0 and USB 2.0 ports, make sure that you use one of the USB 2.0 ports.
• The USB memory device should have a capacity of at least 1 GB.
• Any data stored on the USB memory device will be deleted.
2 In Settings, click Management.

3 Click the "Configuration Management" of "Configuration Management".

text_image
Configuration Management4 From "Target USB drive", select the USB memory device that is connected to the USB 2.0 port of the TeraStation.

text_image
USB Drive Options Select from the following options: Save current configuration to a USB drive Transfer settings from a USB drive Create a USB drive for initializing settings Target USB drive: USB Disk 1 Execute5 Select "Save current configuration to a USB drive", then click Execute.
6 The "Confirm Operation" screen will open. Enter the confirmation number, then click OK.
7 When the following message is displayed, saving settings is finished. Click OK.
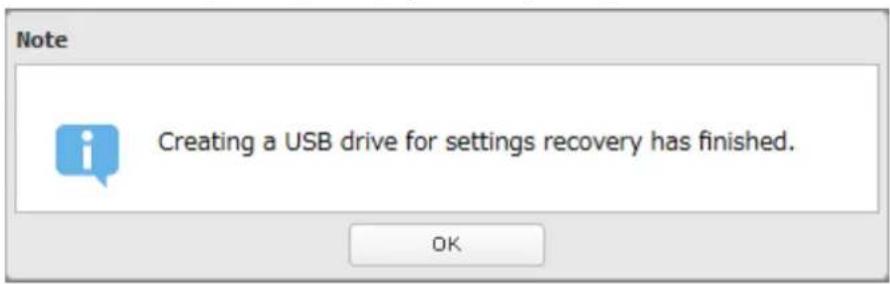
text_image
Note Creating a USB drive for settings recovery has finished. OKTroubleshooting:
If the settings are not saved to the USB memory device successfully, you may receive the error message "The specified operation cannot be executed.". Verify:
• The device is connected to a USB 2.0 port, not a USB 3.0 port.
• The device has a capacity of 1 GB or larger.
• The device is not write-protected.
Applying Settings
The saved settings can be applied to a different TeraStation (of the same series).
1 Connect the USB memory device with the saved settings to a USB 2.0 port of the TeraStation (not a USB 3.0 port).
2 In Settings, click Management.

Management
3 Click to the right of "Configuration Management".

Configuration Management

4 From "Target USB drive", select the USB memory device that is connected to the USB 2.0 port of the TeraStation.
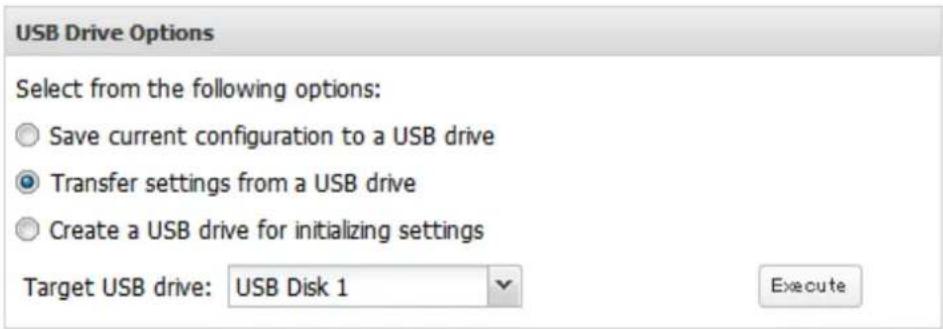
text_image
USB Drive Options Select from the following options: Save current configuration to a USB drive Transfer settings from a USB drive Create a USB drive for initializing settings Target USB drive: USB Disk 1 Execute5 Select "Transfer settings from a USB drive", then click Execute.
6 The "Confirm Operation" screen will open. Enter the confirmation number, then click OK.
7 When the following message is displayed, applying settings is finished. Click OK.

text_image
Note Settings restored. OKTransferring Another TeraStation's Settings
You can transfer saved settings from another series TeraStation to a TS3000 series TeraStation using the "NS-SHFT" software. The following settings can be transferred:
- Shared folders
- Access restrictions*
- Users
- Groups
*NT domain access restrictions cannot be transferred.
Note: This feature is currently supports the TS-HTGL/R5 series TeraStations and TS-X series TeraStations (as of June 2015). The latest compatibility information will be on the Buffalo website.
Follow the procedure below to transfer settings from another series TeraStation.
1 Create the config file (.nas_config) using NS-SHFT. The "NS-SHFT" software can be downloaded from the Buffalo website.
For instructions on creating the config file, refer to the NS-SHFT user guide.
2 Before transferring access restrictions with Active Directory domain users or external users, make sure the migration target TeraStations are joined to the same domain controller. To have the unit join the domain network, read and follow the instructions on either the "Active Directory" section or "User Authentication with an External SMB Server" section in chapter 3.
If you didn't configure access restrictions with Active Directory domain users and external users, skip to step 3.
3 In Settings, click Management.

Management
4 Click to the right of "Configuration Management".

Configuration Management

5 Click Browse and select the config file (.nas_config) that was created with another TeraStation. If the config file was created with a password, enter it in the "Password" field.
Configuration Migration
Migrate TeraStation's users, groups, shared folders, and access restriction settings. Select the config file (.nas_config) saved using the NS-SHFT tool. Note: If the migration source TeraStation is configured with Active Directory, NT domain, or external authentication, this TeraStation should also have the same configuration, or else migration will not work.
Configuration migration is available for config files created with the following products:
- TS-HTGL series firmware version 1.30 or later
- TS-XL series firmware version 1.58 or later
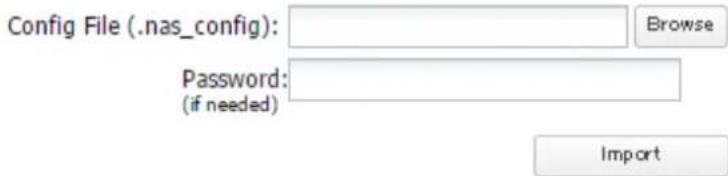
text_image
Config File (.nas_config): Password: (if needed) Browse Import6 Click Import.
7 The "Confirm Operation" screen will open. Enter the confirmation number, then click OK.
8 When the following message is displayed, transferring settings is finished. Click OK.

text_image
Note Migration finished. OKNotes:
- If the migration target TeraStation contains shared folders, users, and groups that share the same name as the transferred settings, the existing settings will be overwritten.
- If the migration target TeraStations have already added some shared folders, users, and groups, the transferred settings may exceed the maximum number of allowed shared folders, users, or groups. After migration finishes, open Settings and verify that all settings were properly transferred.
Restoring Factory Defaults
There are several ways to initialize the TeraStation and restore its factory default settings. One simple way to do this is to hold down the init button (refer to the TeraStation diagram in chapter 1) on the front panel for three seconds. Normally this will reset the admin username and password, network configuration, SSL, and security port settings to their factory default values. However, this button can be disabled in Settings. If the init button is disabled, refer to the methods below on how to initialize the TeraStation.
Initializing from Settings
To initialize the TeraStation to its factory defaults from Settings, follow this procedure.
1 In Settings, click Management.

2 Click to the right of "Restore/Erase".

text_image
Restore/Erase3 Click Initialize TeraStation.
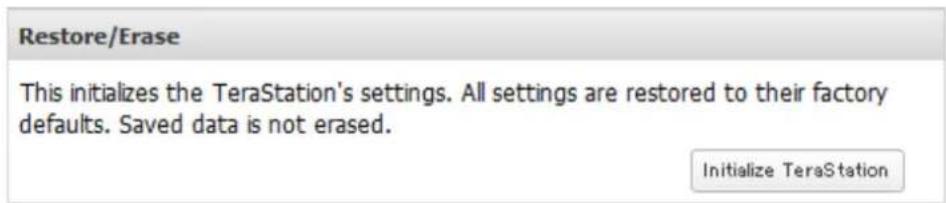
text_image
Restore/Erase This initializes the TeraStation's settings. All settings are restored to their factory defaults. Saved data is not erased. Initialize TeraStation4 The "Confirm Operation" screen will open. Enter the confirmation number, then click OK.
5 The TeraStation will be restored to its factory default settings.
Initializing with a Recovery Drive
To initialize the settings on your TeraStation with a recovery drive, follow the procedure below. If using a recovery drive to initialize the TeraStation, you do not have to be logged in to Settings. For instructions on how to create a recovery drive, refer to the "Creating a Recovery Drive" in chapter 1.
1 Insert the recovery drive into a USB 2.0 port (not a USB 3.0 port) on the TeraStation.
2 Set the boot mode switch to "USB".
3 Press the power button to turn on the TeraStation.
4 When the I41 message appears on the LCD panel, press the function button.
5 It will take several minutes for initializing the settings. The TeraStation will shut down when it's finished.
6 After shutdown, the I39 message is displayed.
7 Set the boot mode switch to "HDD" position.
8 Press the power button to start the TeraStation.
Logs
Follow the procedure to check the TeraStation's logs.
1 In Settings, click Management.

2 Click to the right of "Logs".

text_image
Logs3 Click Edit.
4 Select a log to view.

text_image
Logs Transfer Logs: —Disabled Store Files Locally: —Disabled Log View: System logs SMB logs FTP logs Edit CloseThe file operation log stores file operations performed on the internal hard drives. File operations on USB drives are not logged.
Note: All logs are encoded in UTF-8 format. To show them correctly, change the software encoding to "UTF-8".
To transfer logs
1 Click Edit.
2 Enable "Syslog Transfer".
3 Enter the IP address of the syslog server where you want to transfer the logs to.
4 Select the type of log that you want to transfer from "Logs to Transfer".
5 Click OK.
Note: FTP logs cannot be written to a syslog server.
To create a link to the logs in the shared folder
1 Click Edit.
2 Enable "Share Link to Logs".
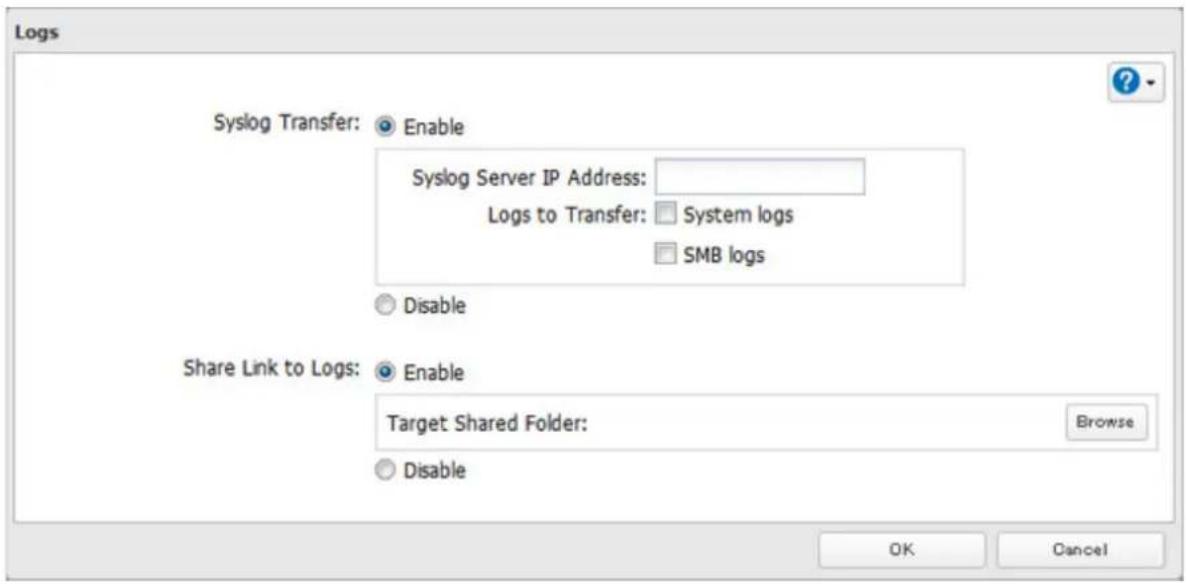
text_image
Logs Syslog Transfer: Enable Syslog Server IP Address: Logs to Transfer: System logs SMB logs Disable Share Link to Logs: Enable Target Shared Folder: Browse Disable OK Cancel3 Select the shared folder where the link will be created in "Target Shared Folder".
4 Click OK.
Under the selected shared folder, a folder named "system_log" will now contain the logs.
Updating the Firmware
If a new firmware is available, a message is displayed when the TeraStation boots. You can update the firmware by following ways:
To update from Settings:
1 In Settings, click Management.

2 Click to the right of "Update".
This TeraStation is using the latest firmware.

3 Click Install Update.
You can also download the latest firmware from the Buffalo website.
Name, Date, Time, and Language
Configure the TeraStation's hostname, date, time, and language as shown below.
Note: If the TeraStation is being used as an iSCSI hard drive, to change the settings, navigate to Drives - iSCSI in
Settings and set the icon to
1 In Settings, click Management.

2 Click the English of "Name/Time/Language".

3 Click Edit.
4
Click the Name tab, then configure the TeraStation's name and description.
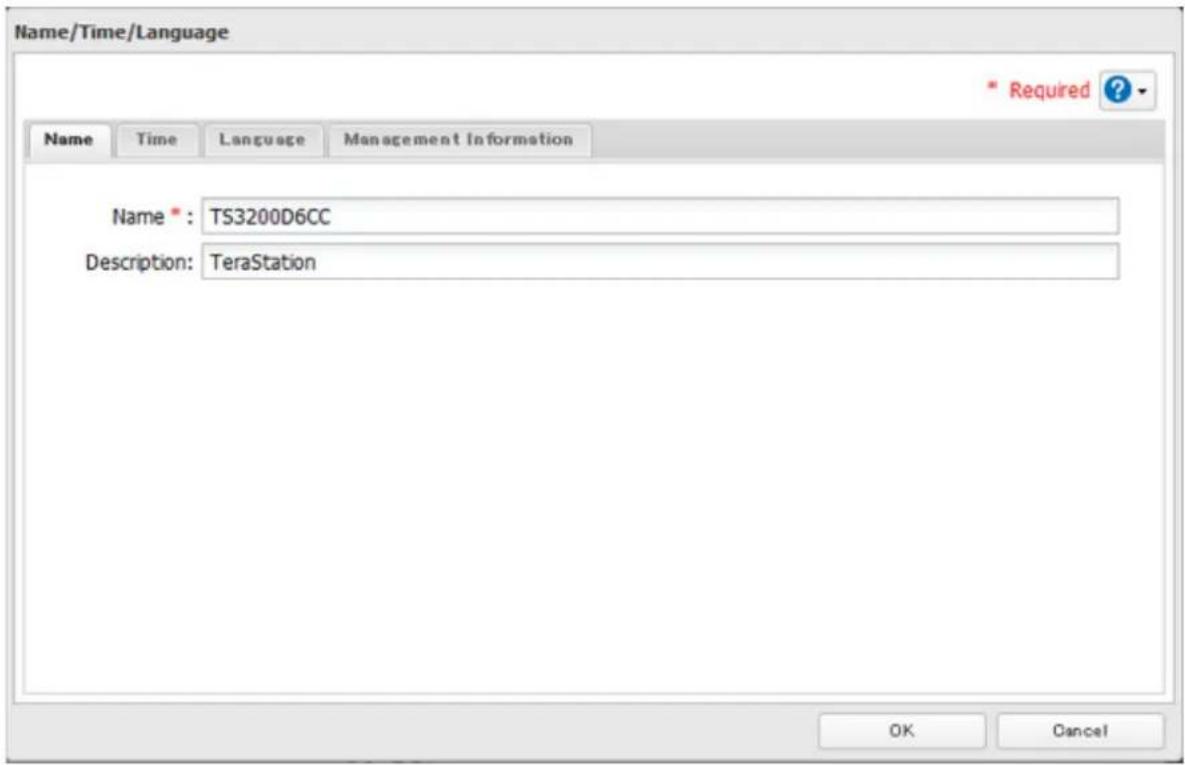
text_image
Name/Time/Language * Required ? Name Time Language Management Information Name*: TS3200D6CC Description: TeraStation OK Cancel5
Click the Time tab.
Click Use Local Date/Time to use your computer's time settings for the TeraStation.
By default, the TeraStation adjusts its clock automatically by using a default NTP server. This NTP server belongs to Internet Multi Feed Inc. For more information, visit http://www.jst.mfeed.ad.jp.
To use a different NTP server, select Name/Time/Language from Management. Click Time, then Edit. Uncheck "Use Default NTP Server" and enter a new NTP IP address. Click OK.
If an NTP server is specified by name instead of IP address, make sure that a DNS server is configured for the TeraStation.
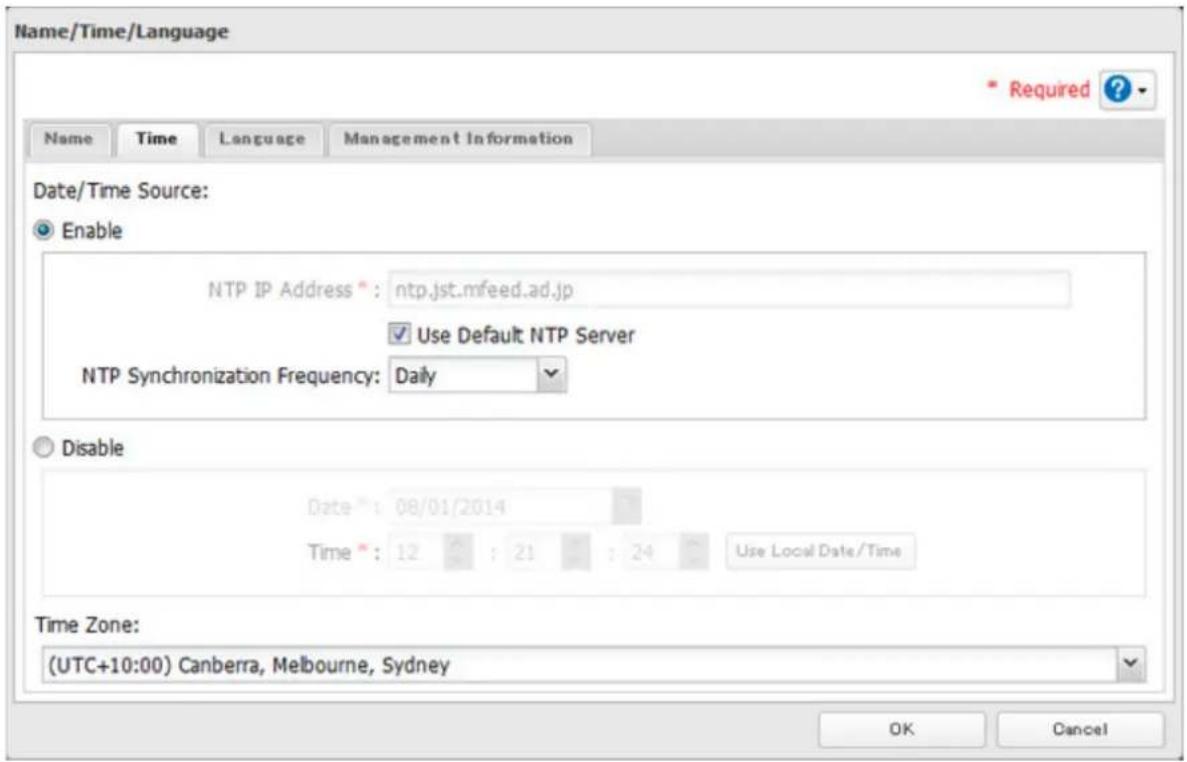
text_image
Name/Time/Language * Required ? Name Time Language Management Information Date/Time Source: Enable NTP IP Address * : ntp.jst.mfeed.ad.jp ✓ Use Default NTP Server NTP Synchronization Frequency: Daily Disable Date * : 08/01/2014 Time * : 12 : 21 : 24 Use Local Date/Time Time Zone: (UTC+10:00) Canberra, Melbourne, Sydney OK CancelNote: The internal clocks of the TeraStation and other devices on your network may run at slightly different speeds. Over a long period of time your network devices may show somewhat different times, which can cause network problems. If clocks on your network vary by more than 5 minutes it may cause unexpected behavior. For best results, keep all clocks on the network set to the same time by adjusting them regularly, or use an NTP server to correct them all automatically.
6 Click the Language tab. Select the language to be used and click OK.
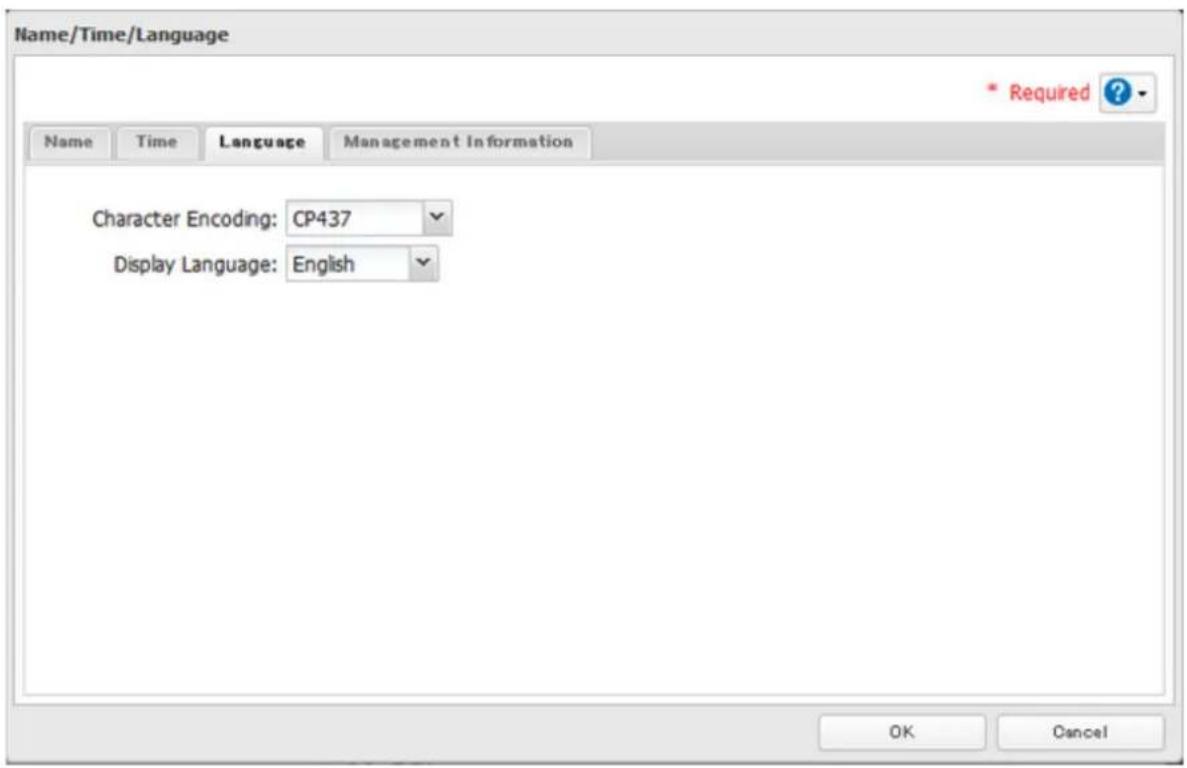
text_image
Name/Time/Language * Required ? Name Time Language Management Information Character Encoding: CP437 Display Language: English OK CancelNote: This tab changes the language used by the TeraStation for email notifications, DLNA, and other functions. To change the language displayed in Settings, go to Advanced Settings or Easy Admin and click Language in the menu bar. Choose your desired language from the drop-down menu.
Beep Alerts
You can set the TeraStation to beep when certain errors occur.
1 In Settings, click Management.

2 Click to the right of "Notifications".

text_image
Notifications3 Click Edit.
4 Select the conditions to beep the alert, then click OK.
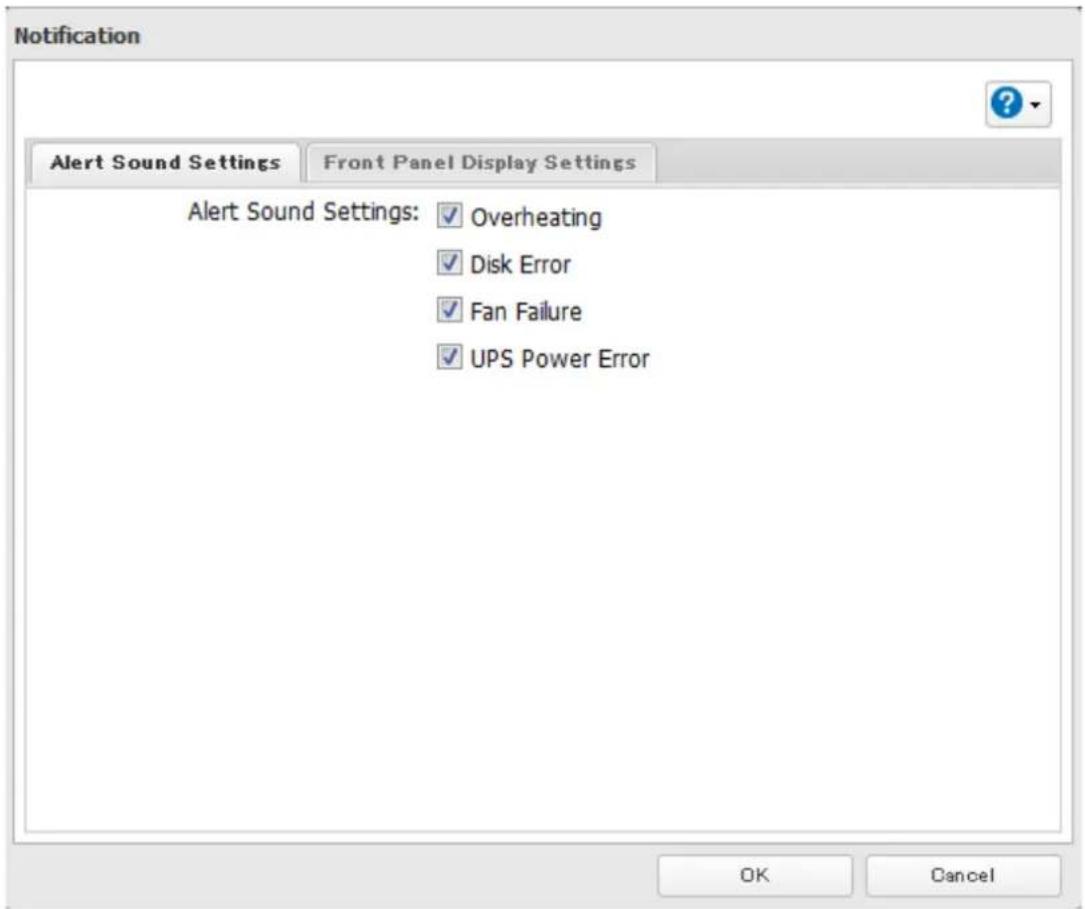
text_image
Notification Alert Sound Settings Front Panel Display Settings Alert Sound Settings: ✓ Overheating ✓ Disk Error ✓ Fan Failure ✓ UPS Power Error OK CancelLCD and LEDs
You may configure the LEDs and LCD on the front of the TeraStation.
1 In Settings, click Management.

Management
2 Click to the right of "Notifications".

Notifications

3 Click Edit.
4 Click Front Panel Display Settings.
5 Configure your settings, then click OK.

text_image
Notification Alert Sound Settings Front Panel Display Settings Front Panel Display Display: ✓ Host IP ✓ Time Flip Display: ○ Yes ○ No LCD Brightness: Dim Bright LED Display Settings LED Brightness (Normal): Dim Bright LED Synchronization: ○ Enable ○ Disable LED Brightness (Sleep Dim Bright) Mode): Begin Sleep: Make Up: OK CancelJumbo Frames
If your other network devices support it, you may be able to increase network performance with jumbo frames.
1 In Settings, click Network.

Network
2
Click
of "IP Address".

IP Address
LAN Port 1 192.168.10.26
LAN Port 2 169.254.200.57

3 Click the LAN port where the jumbo frames will be used.
4 Select the desired Ethernet frame size and click OK.
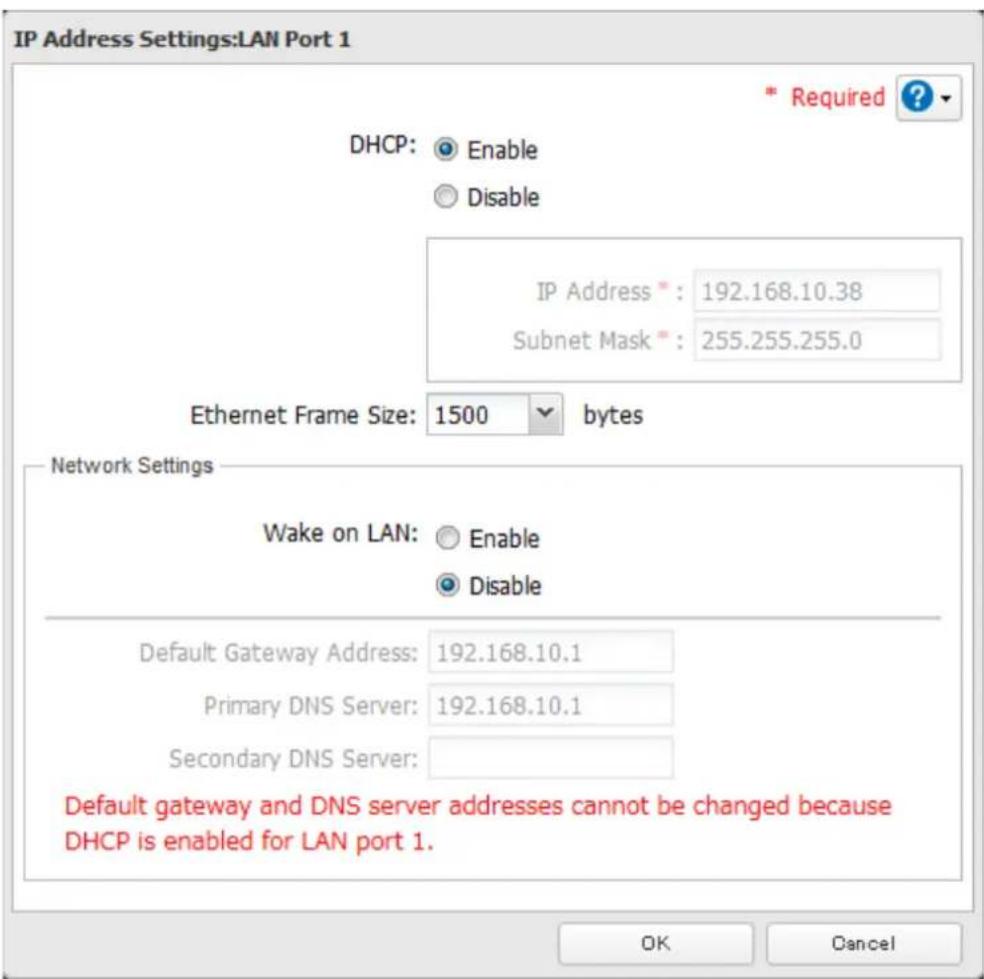
text_image
IP Address Settings:LAN Port 1 * Required ? DHCP: Enable Disable IP Address*: 192.168.10.38 Subnet Mask*: 255.255.255.0 Ethernet Frame Size: 1500 bytes Network Settings Wake on LAN: Enable Disable Default Gateway Address: 192.168.10.1 Primary DNS Server: 192.168.10.1 Secondary DNS Server: Default gateway and DNS server addresses cannot be changed because DHCP is enabled for LAN port 1. OK Cancel| Connection Transmission | ||||
 Jumbo Frame Jumbo Frame Compatible Hub Jumbo Frame Compatible PC Jumbo Frame Jumbo Frame Compatible Hub Jumbo Frame Compatible PC | O | Transfer data in jumbo frames. | ||
 Jumbo Frame Jumbo Frame Compatible Hub Jumbo Frame Incompatible PC Jumbo Frame Jumbo Frame Compatible Hub Jumbo Frame Incompatible PC | Δ | Transfer data not using jumbo frames. | ||
 Jumbo Frame Jumbo Frame Incompatible Hub Jumbo Frame Incompatible PC Jumbo Frame Jumbo Frame Incompatible Hub Jumbo Frame Incompatible PC | Δ | Transfer data not using jumbo frames. | ||
 Jumbo Frame Jumbo Frame Incompatible Hub Jumbo Frame Compatible PC Jumbo Frame Jumbo Frame Incompatible Hub Jumbo Frame Compatible PC | X | Any data cannot be transferred. | ||
Note: Make sure the TeraStation's Ethernet frame size is smaller than the hub or router's. Larger frame sizes may not transfer the data to the TeraStation correctly.
Changing the IP Address
Normally, the TeraStation's IP address is set automatically from a DHCP server on your network. If you prefer, you can set it manually. An easy way to do this is to change it from NAS Navigator2 running on a computer connected to the same router (subnet) as the TeraStation. The procedure to change the IP address in Settings is below.
Note: If the TeraStation is being used as an iSCSI hard drive, to change the settings, navigate to Drives - iSCSI in
Settings and move the iSCSI switch to the temporarily before changing network settings.
1 In Settings, click Network.

2 Click to the right of "IP Address".

text_image
IP Address LAN Port 1 192.168.10.26 LAN Port 2 169.254.200.573 Click the LAN port where the IP address will be changed.
4 Disable "DHCP" and enter the desired network address settings, then click OK.

text_image
IP Address Settings:LAN Port 1 * Required ? DHCP: Enable Disable IP Address*: 192.168.10.38 Subnet Mask*: 255.255.255.0 Ethernet Frame Size: 1500 bytes Network Settings Wake on LAN: Enable Disable Default Gateway Address: 192.168.10.1 Primary DNS Server: 192.168.10.1 Secondary DNS Server: OK CancelNotes:
- Do not set the same address for LAN port 1 and LAN port 2. This may cause unstable network communication.
- Use LAN port 1 to access different network subnets from the TeraStation. Access to a different network subnet is not possible from LAN port 2 since it doesn't have a default gateway.
- The following IP addresses are reserved and should not be used. If you configure one of them by accident, initialize all settings with the init button on the TeraStation.
Local loopback address: 127.0.0.1, 255.255.255.0
Network address: 0.0.0.0, 255.255.255.0
Broadcast address: 255.255.255.255, 255.255.255.0
The IP address range from 224.0.0.0 to 255.255.255.255
Chapter 11 Utilities
NAS Navigator2 for Windows
NAS Navigator2 is a utility program that makes it easy to display Settings, change the TeraStation's IP address, or check its hard drive. If you installed the TeraStation with the TeraNavigator CD, NAS Navigator2 was installed automatically.

Double-click the icon to start NAS Navigator2.

text_image
NAS Navigator2 Menu View Browse Refresh Create Shortcut Synchronize Folders I'm here TS3400DA6E TS3400D HDD (RAID 0) 0.0 GB/14774.0 GB (0.0%) Workgroup: WORKGROUP IP Address: 169.254.60.66 Subnet Mask: 255.255.0.0 Default Gateway: 0.0.0.0 MAC Address: 00:50:43:EE-2A:6E Firmware: 1.00 NAS Navigator version 2.59Click your TeraStation's icon to open a share on the TeraStation and display:
• Total capacity
• Capacity in use
- IP address
- Workgroup
- Subnet mask
- Default gateway
- MAC address
- Firmware version
| Name Description | ||
| Menu | Map Share* | Assigns the TeraStation's shared folder as a network drive. |
| Disconnect Share* | Unmaps the network drive. | |
| Map All Remote Shares to Drive Letters | Assigns all the TeraStation's shared folders as network drives. | |
| Create Desktop Shortcut* | Creates a shortcut to the TeraStation's shared folder (share). | |
| Launch NAS Navigator2 on Startup | Launches NAS Navigator2 in the system tray when Windows boots. | |
| Display Errors | If an error occurs, an error message will pop up from the NAS Navigator2 icon in the system tray. | |
| Properties* | Opens the selected TeraStation's properties page. | |
| Close Closes NAS Navigator2. | ||
| View | View | Icons: Displays icon.Details: Displays hostname, product name, workgroup, IP address, subnet mask, and default gateway. |
| Sort by | Selects the sort order from following to display when multiple TeraStations are found:Hostname, product name, workgroup, IP address, subnet mask, default gateway | |
| Browse* | Opens the TeraStation's shared folder. | |
| Refresh Searches for NAS devices on the network again | ||
| I'm here* | Causes your TeraStation to beep. For TS3400R models, you can stop the beeping by pressing the function or display button. | |
| Right-click your device's icon to show these options. | Browse Shares Opens the TeraStation's shared folder. | |
| Settings Opens Settings for the selected TeraStation. | ||
| Properties Opens the TeraStation's properties page. | ||
| Map Share Assigns the TeraStation's shared folder as a network drive. | ||
| Disconnect Share Unmaps the network drive. | ||
| Create Shortcut | Creates a shortcut icon to the shared folder "share" on the desktop. | |
| I'm here | Causes your TeraStation to beep. For TS3400R models, you can stop the beeping by pressing the function or display button. | |
*Click on the TeraStation's icon to display these options.
When NAS Navigator2 is minimized, right-click on the NAS Navigator2 icon in the system tray for the following options.
| Refresh | |
| Browse Shares | |
| Create Shortcut | |
| Synchronize Folder | |
| Exit |
| Name Description | ||
| TeraStation Name | Browse Shares Opens the TeraStation's shared folder. | |
| Settings Opens Settings for the selected TeraStation. | ||
| Properties Opens the TeraStation's properties page. | ||
| Map Share Assigns the TeraStation's shared folder as a network drive. | ||
| Disconnect Share Unmaps the network drive. | ||
| Create Shortcut Creates a shortcut icon to the shared folder "share" on the desktop. | ||
| I'm here | Causes your TeraStation to beep. For TS3400R models, you can stop the beeping by pressing the function or display button. | |
| Refresh Refreshes list of NAS devices. | ||
| Browse Shares Displays NAS Navigator2 window. | ||
| Exit Exits NAS Navigator2. | ||
The following tasks may be performed from the TeraStation's properties page.

text_image
TS3400DA6E Properties TS3400D Configuration | IP Address | Settings is where you configure your NAS. Settings OK Cancel Apply| Name Description | |
| Configuration Click Settings to open the configuration interface. | |
| IP Address | Check Use DHCP to assign an IP address from the DHCP server automatically. If there is no DHCP server in the network, you cannot use this function.Check Renew IP address to obtain an IP address from the DHCP server.You can manually enter an IP address, subnet mask, and default gateway. |
Mount as Network Drive
You can easily map a shared folder as a network drive using NAS Navigator2.
1 Double-click the

icon on to start NAS Navigator2.
2 Right-click on the TeraStation's icon, then click Map Share.

text_image
NAS Navigator2 Menu View Browse Refresh Create Shortcut Synchronize Folders I'm here Browse Shares Settings Properties... Map Share Disconnect Share Create Desktop Shortcut I'm here TS340D HDD (RAID 0) 0.0 GB/14774.0 GB (0.0%) Workgroup: WORKGROUP IP Address: 169.254.60.66 Subnet Mask: 255.255.0.0 Default Gateway: 0.0.0.0 MAC Address: 00:50:43:EE:2A:6E Firmware: 1.00 NAS Navigator version 2.593 An icon for the mapped share will appear in Computer or My Computer. You can use this network drive just like any other hard drive.

Changing the IP Address
1 Double-click the icon to start NAS Navigator2.
2 Right-click on your TeraStation's icon and choose Properties - IP Address.
3 Uncheck "Use DHCP" and enter the desired settings, then click OK. If the username and password prompt appears, enter the admin username and password.
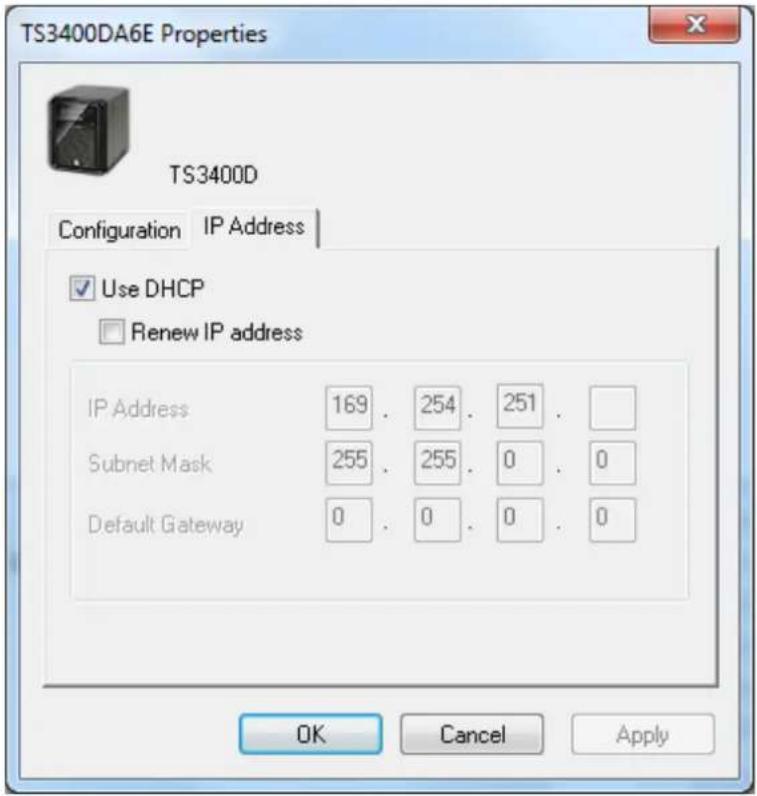
text_image
TS3400DA6E Properties TS3400D Configuration IP Address ✓ Use DHCP □ Renew IP address IP Address 169 . 254 . 251 . Subnet Mask 255 . 255 . 0 . 0 Default Gateway 0 . 0 . 0 . 0 OK Cancel ApplyNote: The following IP addresses are reserved and should not be used. If you configure one of them by accident, initialize all settings with the init button on the TeraStation.
Local loopback address: 127.0.0.1, 255.255.255.0
Network address: 0.0.0.0, 255.255.255.0
Broadcast address: 255.255.255.255, 255.255.255.0
The IP address range from 224.0.0.0 to 255.255.255.255
NAS Navigator2 for Mac
NAS Navigator2 is a utility program that makes it easy to display Settings, change the TeraStation's IP address, or check its hard drive.
If you installed the TeraStation with the TeraNavigator CD, NAS Navigator2 was installed automatically. To launch it,

click the icon in the Dock.
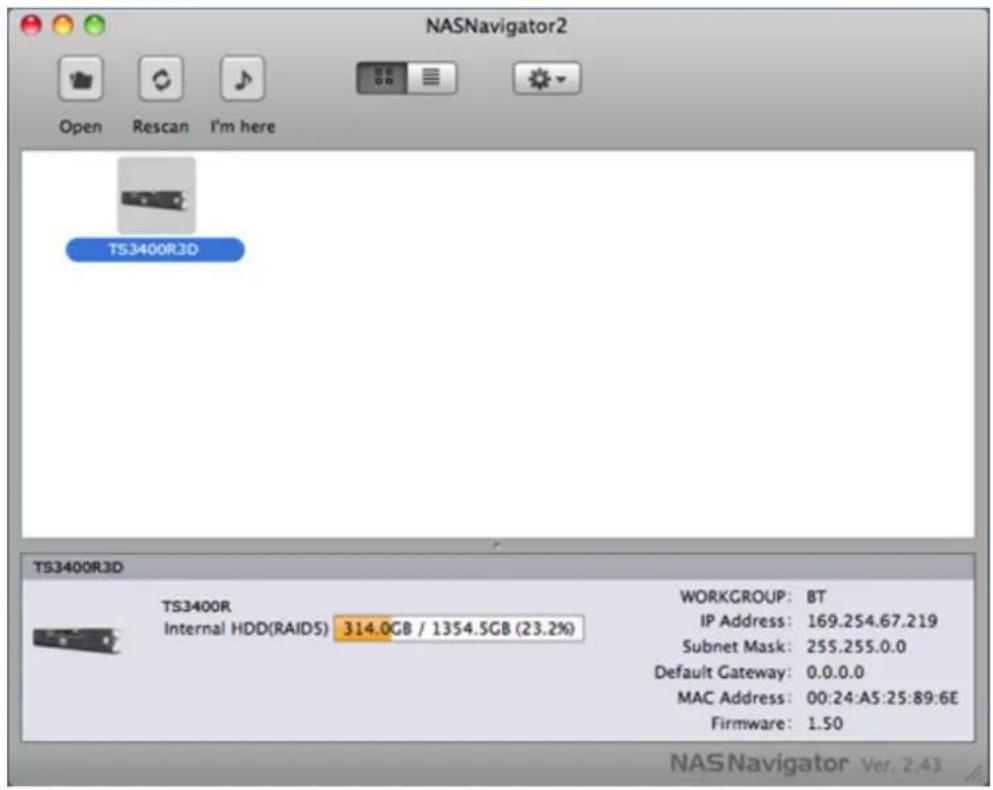
text_image
NASNavigator2 Open Rescan I'm here TS3400R3D TS3400R3D Internal HDD(RAIDS) 314.0GB / 1354.5GB (23.2%) WORKGROUP: BT IP Address: 169.254.67.219 Subnet Mask: 255.255.0.0 Default Gateway: 0.0.0.0 MAC Address: 00:24:A5:25:89:6E Firmware: 1.50 NAS Navigator Ver, 2.43Click on a TeraStation's icon to display:
• Total capacity
• Used capacity
- Workgroup
- IP address
- Subnet mask
- Default gateway
- MAC address
- Firmware version
Double-click it to open a share on the TeraStation.
| Name Description | ||
| Open Opens the default shared folder for a selected TeraStation. | ||
| Refresh Searches for NAS devices on the network again. | ||
| I'm here | Causes your TeraStation to beep. For TS3400R models, you can stop the beeping by pressing the function or display button. | |
| Settings Opens Settings for the selected TeraStation. | ||
| Configure | Opens a window that lets you configure NAS's IP address or open Settings. | |
| Label Color Selects the color of the name displayed below the icon. | ||
| View Options Lets you choose icon size, position, and view mode. | ||
| Auto Power Mode | Auto power mode can turn supported TeraStations and LinkStations on the network on and off automatically. | |
| To display these options, hold down the control key and select your TeraStation's icon. | Open Folder Opens the TeraStation's shared folder. | |
| Settings Opens Settings for the selected TeraStation. | ||
| Configure | Opens a window that lets you change the NAS's IP address or open Settings. | |
| I'm here | Causes your TeraStation to beep. For TS3400R models, you can stop the beeping by pressing the function or display button. | |
| Label Color | Selects the color of the name displayed below the icon. The menu below is displayed when you click the TeraStation icon while holding down the control key. | |
Mount as Network Drive
You can map a shared folder as a network drive using NAS Navigator2 on Mac OS.
1 Click the icon in the Dock to start NAS Navigator2.
2 Double-click the TeraStation icon or click the TeraStation icon while holding down the control key, then select Open Folder. Enter a username and password with the rights to access the shared folder.
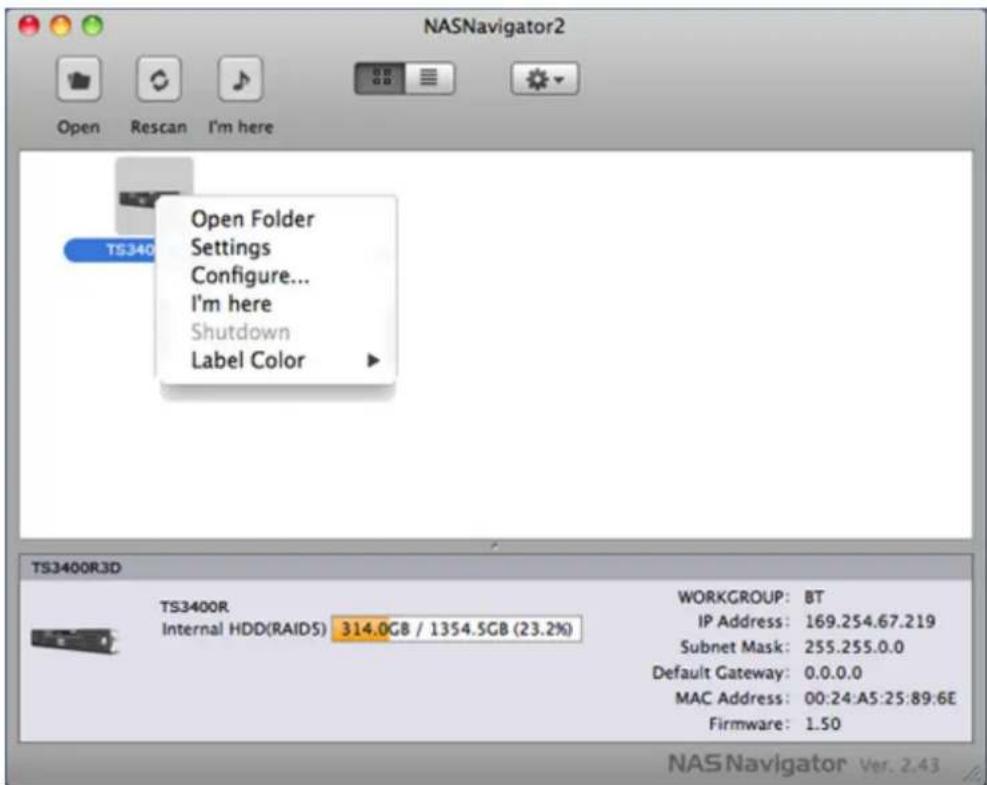
text_image
NASNavigator2 Open Rescan I'm here Open Folder Settings Configure... I'm here Shutdown Label Color TS3400R3D TS3400R Internal HDD(RAIDS) 314.0GB / 1354.5GB (23.2%) WORKGROUP: BT IP Address: 169.254.67.219 Subnet Mask: 255.255.0.0 Default Gateway: 0.0.0.0 MAC Address: 00:24:A5:25:89:6E Firmware: 1.50 NAS Navigator Ver. 2.433 Select the shared folder that you want to mount, then click OK.
4 The shared folder is now mounted as a network drive.
Changing the IP Address

1 Click the icon in the Dock to start NAS Navigator2.
2 Click the TeraStation icon while holding down the control key, then choose Configure - IP Address.
3 Uncheck "Use DHCP"; enter the desired settings and the administrator password, then click Apply.

text_image
NASNavigator2 TS5200D4E1 TS5200D Series Configuration IP Address Use DHCP Renew IP address IP Address: 192 168 10 Subnet Mask: 255 255 255 0 Default Gateway: 192 168 10 1 Administrator Password Cancel ApplyNote: The following IP addresses are reserved and should not be used. If you configure one of them by accident, initialize all settings with the init button on the TeraStation.
Local loopback address: 127.0.0.1, 255.255.255.0
Network address: 0.0.0.0, 255.255.255.0
Broadcast address: 255.255.255.255, 255.255.255.0
The IP address range from 224.0.0.0 to 255.255.255.255
iSCSI Connection Tool
The iSCSI Connection Tool is a Windows utility that lets you use the TeraStation as an iSCSI drive.
To launch it, click Start - All Programs - BUFFALO - iSCSI Connection Tool - iSCSI Connection Tool.
For Windows 8.1 and Windows 8, click iSCSI Connection Tool.

text_image
Buffalo iSCSI Connection Tool File Configuration Help Target TeraStation Register iSCSI Device Model TS3200D Series Series TS3200D IP Address 192.168.10.26 Subnet Mask 255.255.255.0 Firmware 1.20 MAC Address AA:BB:CC:DD:EE:FF iSCSI Service Enabled Volume Refresh Exit| Name Description | |
| Target | If a TeraStation is selected, clicking Register iSCSI Device will register all the volumes in the TeraStation to the computer for enabling connection to individual volumes.If a volume is already registered, click Unregister iSCSI Device to unregister all volumes, disconnecting them from the TeraStation. |
| Model Displays TeraStation's model name. | |
| Series Displays TeraStation's series name. | |
| IP Address Displays TeraStation's IP address. | |
| Subnet Mask Displays TeraStation's subnet mask. | |
| Firmware Displays TeraStation's firmware version. | |
| MAC Address TeraStation's MAC address. | |
| iSCSI Service Shows whether the iSCSI service of the TeraStation is running or stopped. | |
| Volume | Select individual volumes from a registered TeraStation.Select a volume and click Connect, then the selected volume will be recognized as a local drive in My Computer on your computer. If a volume is connected, click Unregister to disconnect it. |
| Current status | Displays current status of the selected volume.- Disconnected: Volume is disconnected.- Connected: Volume is connected.- Connected to another PC: Volume is connected to another computer.Displays the other computer's IP address. |
| User authorization | - Disabled: No authentication.- Enabled: User authentication is needed to connect to a volume. |
| Connect on Start Up | If selected, the computer will connect to the volume automatically at boot. |
| Refresh Searches for network devices | on the LAN. |
| Exit Exits iSCSI Connection Tool. | |
Menu
| Name Description | ||
| File | Refresh Searches for network devices on the LAN. | |
| Exit Closes the iSCSI Connection Tool. | ||
| Setup | Configuration Opens Settings for the selected TeraStation. | |
| Change IP address You can change the IP address of the selected TeraStation. | ||
| Unregister iSCSI device | If you disconnect the TeraStation without unregistering it or changing its IP address, the registration information stays in your computer and searches will take longer. For better performance, unregister disconnected TeraStations with this command. | |
| Set mutual CHAP secret | Sets the CHAP password on the computer side. | |
| Persistent Volume | If checked, your computer will reconnect to the TeraStation whenever it's restarted. | |
| Connect volumes Connects multiple volume at a time. | ||
| Disconnect volumes Displays the screen to disconnect multiple volume at a time. | ||
| Disk management Formats drives. | ||
| Help About Displays version information. | ||
NovaBACKUP
NovaBACKUP is a Windows utility that lets you back up the data on your computer or TeraStations.
Installing from CD
The installation methods are different depending on which version of TeraNavigator CD you have. If your TeraNavigator CD is version 1.11 or earlier, install NovaBACKUP from the included TeraNavigator CD.
1 Insert the TeraNavigator CD to your computer.
2 Launch TSnavi.exe from the TeraNavigator CD.
3 Click Options - Additional Software Installation.
4 Select "NovaBACKUP" and click Install. Follow the procedure to finish installing NovaBACKUP.
Installing from Website
If your TeraNavigator CD is version 1.20 or later, install the software from http://buffalo.jp/support_s/guide2/manual/ts/3000/en/manual.html. Select the region and model to go to the d.buffalo site of your specific product model.
To download the installer, you will need the serial number of your TeraStation. The serial number is printed on the label on the back of the unit.
Chapter 12 Appendix
LCD Display
The LCD display can be cycled through different modes by pressing the display button on the front of the TeraStation. Also, the items displayed can be configured at Management - Notifications - Front Panel Display Settings in Settings.
Modes
| LCD Message Description Corrective Action | |||
| LINK SPEED Note: When an Ethernet cable is connected to LAN Port 2, "LINK SPEED 2" is displayed. | LINK SPEED No LINK | Not connected to network. | Connect an Ethernet cable to the LAN port. |
| LINK SPEED 10 Mbps HALF | Connected at 10 Mbps half duplex. - | ||
| LINK SPEED 10 Mbps FULL | Connected at 10 Mbps full duplex. - | ||
| LINK SPEED 100 Mbps HALF | Connected at 100 Mbps half duplex. - | ||
| LINK SPEED 100 Mbps FULL | Connected at 100 Mbps full duplex. - | ||
| LINK SPEED 1000 Mbps | Connected at 1000 Mbps full duplex. - | ||
| Hostname / IP Address | TSxxxx xxx 192.168.11.150 | Displays the hostname and IP address. At the end of the IP address, F (fixed IP address) or D (IP address automatically acquired from a DHCP server) is displayed.Note: When an Ethernet cable is connected to LAN port 2, "NETWORK2" is displayed in the hostname section. | - |
| Calendar / Clock | DATE TIME 2012/1/1 11:11 | Displays the date and time set in the TeraStation. - | |
Errors
| LCD Message Description Corrective Action | ||
| BOOT FAIL Hard drive not found. | Contact Buffalo technical support for assistance. | |
| SYSTEM Error E04 Can't Load Krnl! | The firmware is corrupted. | Contact Buffalo technical support for assistance. |
| E10 UPS Running Off Battery | The TeraStation is running on the UPS battery due to a power outage. The system will now be shut down safely. | Check that power is being supplied to the UPS, and if there are no problems, turn on the TeraStation. |
| I10 System Is Overheating | A rise in the system temperature may have exceeded the allowable safety value. | Move the TeraStation to a cool location. Do not place objects in the area around the TeraStation. |
| E11 Fan Failure An error occurred in the fan speed. | Check that no foreign objects or dust are clogging the fan. If any foreign objects or dust are found, use a pair of tweezers, air duster, or other tool to remove them. If the error is displayed again, contact Buffalo technical support for assistance. | |
| E12 Cooling Failure | A rise in the system temperature may have exceeded the allowable safety value. | Do not place objects in the area around the TeraStation. Also, move the TeraStation to a cool location. |
| E14 Can't Mount Array x | RAID array x cannot be mounted. Run the RAID | array disk check in Settings. |
| E16 Drive x Not Found | Unable to find drive x. | Hard drive x may be disconnected or may have failed. After shutting down, reinstall the hard drive. |
| E22 Can't Mount Drive x | Mounting of hard drive x failed. | Format the hard drive. After formatting, if the error still appears after rebooting, replace the hard drive. If the error is displayed again, contact Buffalo technical support for assistance. |
| E27 Lost Failover Target | Unable to find the backup TeraStation. | In the main TeraStation's settings, navigate to Backup - Failover to reconfigure the backup TeraStation for failover. |
| E30 Replace Drive x | An error occurred, so hard drive x was removed from the RAID array. | Replace hard drive x. |
Status
After you change settings or format a hard drive, the current status is displayed on the LCD.
| LCD Message Description | Correction Corrective Action | |
| I11 Bad Sectors on Drive x | The bad sectors in hard drive x may have reached a dangerous level. | Replace hard drive x. |
| I12 Degraded Mode Operating in degraded mode. - | ||
| I13 Formatting Array x... | Formatting RAID array x. - | |
| I14 Checking Array x... | Checking RAID array x. - | |
| I15 Scanning Array x Data... | Examining the error status of RAID array x. | - |
| I16 Creating Array x... | Creating RAID array x. - | |
| I17 Resyncing Array x... | Resynchronizing RAID array x. - | |
| I18 Rebuilding Array x... | Rebuilding RAID array x. - | |
| I19 Filling Array x with 0s | Writing 0s to RAID array x and erasing all data. | - |
| I20 Formatting Drive x... | Formatting hard drive x. - | |
| I21 Checking Drive x... | Checking hard drive x. - | |
| I22 Filling Drive x with 0s | Erasing the data on hard drive x. | - |
| LCD Message Description | tion Corrective Action | |
| I25 Updating Firmware... | Updating the TeraStation firmware. Note: Do not turn off the power during the updating process. | - |
| I26 Initializing Settings... | Initializing all settings. - | |
| I27 Checking USB Drive x... | Checking USB hard drive x. - | |
| I28 Formatting USB Drive x... | Formatting USB hard drive x. - | |
| I31 Push Func to Use New Drive x | Displayed when pressing the function button to rebuild the RAID after replacing hard drive x. | Press the function button to rebuild the RAID array. |
| I32 New Drive x Detected | Displayed after replacing hard drive x when the RAID needs to be rebuilt in Settings or formatting is necessary. | In Settings, either rebuild the RAID array or format the hard drive. |
| I33 Replication Failure | An error occurred in replication, or synchronization between the main TeraStation and the backup TeraStation failed during failover configuration. | In Settings, navigate to Backup - Replication and click Resync to execute resynchronization. If the error is displayed again, contact Buffalo technical support for assistance. |
| I34 Virus Quarantined | A virus scan found a virus. | Once the virus is removed from the quarantine folder, the message is no longer displayed. If the antivirus software is configured to delete viruses from the quarantine folder automatically, then the message will not be displayed. |
| I35 Bay 1 Has Media Cartridge | A hard drive set as a media cartridge has been installed in the drive 1 slot. | Connect to the slot that was set as a media cartridge. |
| I36 Drive x Decryption Error | Media cartridge cannot be decrypted. The media cartridge may have been encrypted by a TeraStation other than this product. | Connect the drive to the TeraStation that performs encryption to decrypt the drive. |
| I37 Recovering System... | System recovery in progress. - | |
| I38 Recovery Finished | System recovery is complete. - | |
| I39 Change Boot Switch Back | System recovery from the USB recovery device is complete. | Change the boot mode switch on the rear to "HDD". |
| I40 All Data Will Be Deleted | Beginning recovery. All data on the drive in disk 1 will be deleted. | - |
| I41 Push Func to Start Recovery | Press the function button on the front to start the recovery process. | - |
| I42 Preparing Recovery | Preparing to start the recovery process. | - |
| I43 Unsupported Hardware | The TeraStation was started from the USB recovery device, but the system cannot be recovered from this USB recovery device. | - |
| I44 Drive 1 Not Found | Recovery from the USB recovery device was initiated, but disk 1 was not detected. | Make sure that disk 1 is present and fully inserted in its slot. |
| I45 Recovery Failed Re | Recovery failed. - | |
| LCD Message Description | Correction Action | |
| I46 Migrating RAID Array x... | Data migration or conversion (RAID migration) is in progress. | Do not turn off the TeraStation power. |
| I47 Don't Power Off System! | ||
| I48 Push Func to Start Failover | This TeraStation is ready to become the failover backup for the main TeraStation. | Hold down the function button on the front of the target TeraStation until it stops beeping to accept failover backup status. |
| I49 Lost Failover Main | The main TeraStation in the failover configuration cannot be found. | Make sure that the main TeraStation is on, working, and connected to the network. |
| I50 Failover in Maintenance Mode | Failover maintenance is in progress. Do not turn off the TeraStation power. | |
| I51 Initializing Failover... | Initializing the failover configuration. Do not turn off the TeraStation power. | |
| I52 New Firmware Available | A new firmware version has been released. | Update the firmware. |
| I54 Backup Job xx Failed | A backup job has failed. | Make sure that the backup job is configured correctly. Make sure that the NAS is on and not in standby mode. If the backup job still fails, check the status of NAS, network, and backup source and destinations. |
| I55 Recovery Not Authorized | Authentication failed while recovering TeraStation settings. | Settings can only be restored for the TeraStation whose settings were originally saved. To restore settings, insert the USB memory device, move the Boot Mode switch on the rear of the TeraStation to the USB position, and restart the TeraStation. Or, settings can be restored from Settings with the TeraStation powered on. |
| I56 Need License for Camera | There are not enough surveillance camera server licenses. | Purchase and register an additional license. |
| I57 No Free Space to Record | There is not enough space to save additional surveillance video. | Delete or move some of the stored video. |
| I58 Recording Failure | Video not recorded. | Check your settings. Also, use the utilities provided with your camera to check that the camera is operating correctly. |
Default Settings
| Administrator's Name admin | |
| Password password | |
| Shared Folders | "share" (for both Windows and Mac computers). The recycle bin is enabled on "share" by default. |
| DHCP Client | Normally, the TeraStation will get its IP address automatically from a DHCP server on the network.If no DHCP server is available, then an IP address will be assigned as follows:IP Address: 169.254.xxx.xxx (xxx is assigned randomly when booting the TeraStation.)Subnet Mask: 255.255.0.0 |
| Registered Group | "hdusers", "admin", and "guest" are default groups and cannot be edited or deleted. |
| Microsoft Network Group Setting WORKGROUP | |
| Ethernet Frame Size 1500 bytes (not including 14 bytes of the header and 4 bytes of FCS) | |
| AFP Enabled | |
| FTP Disabled | |
| NTP Enabled | |
| Print Server Enabled | |
| WebAccess Disabled | |
| Time Machine Disabled | |
| TeraSearch Disabled | |
| RAID Mode | TS3400D, TS3400R: RAID 5TS3200D: RAID 1 |
Specifications
Check the Buffalo website for information about the latest products and specifications.
| LAN Port | Interface | IEEE 802.3ab (1000BASE-T)IEEE 802.3u (100BASE-TX)IEEE 802.3 (10BASE-T) |
| Transfer Speed | 1000 Mbps Full duplex (auto-negotiation)100 Mbps Full duplex/Half duplex (auto-negotiation)10 Mbps Full duplex/Half duplex (auto-negotiation) | |
| Number of Ports 2 ports (supports auto-MDIX) | ||
| Connector Type RJ-45 8-pin | ||
| Protocol TCP/IP | ||
| Access Method CSMA/CD | ||
| File Sharing SMB/CIFS, AFP, FTP/SFTP, NFS, HTTP/HTTPS | ||
| Management | HTTP/HTTPS | |
| Jumbo Frame | 1500, 4084, 7404, and 9216 byte modes are supported.(not including 14 bytes of header and 4 bytes of FCS) | |
| USB Port | TS3400D: 2 USB 3.0 ports and 2 USB 2.0 ports (type A)TS3400R: 2 USB 3.0 ports and 3 USB 2.0 ports (type A)TS3200D: 2 USB 2.0 ports (type A)Note: Supported USB devices include Buffalo USB hard drives, USB UPS devices, and printers. | |
| UPS Port | UPS port (D-sub 9 pin (male)) x 1Note: Compatible UPS are manufactured by Omron or APC. | |
| Internal Hard Drive | If a hard drive in the TeraStation malfunctions, replace it with a Buffalo OP-HDS series drive of the same capacity, available from the Buffalo website. | |
| Power Supply | AC 100–240 V, 50/60 Hz | |
| Dimensions (D x W x H) | TS3400D: 230 x 170 x 215 mm; 9.1 x 6.7 x 8.5 inTS3400R: 430 x 45 x 430 mm; 16.9 x 1.7 x 16.9 inTS3200D: 230 x 170 x 170 mm; 9.1 x 6.7 x 6.7 in | |
| Weight | TS3400D: Approx. 8.0 kg; 17.7 lbTS3400R: Approx. 9.0 kg; 19.8 lbTS3200D: Approx. 4.5 kg; 9.9 lb | |
| Power Consumption (Max.) | TS3400D: 86 WTS3400R: 140 WTS3200D (for EU region model): 89 WTS3200D (for other region model): 47 WNote: To identify if your unit is EU region model or others, refer to the label on the unit that the series name is printed. If it says "1.5 A" for the PSU ampacity, your unit is EU region model. | |
| Operating Environment | Temperature: 5–35°C; 41–95°FHumidity: 20–80% (no condensation) | |
| Compatibility | Windows and Mac computers with Ethernet interface.Note: The TeraStation requires an Ethernet connection with your computer for operation. It cannot be connected via USB. | |
| Supported OS | Windows 8.1*, Windows 8*, Windows 7*, Windows Vista*, Windows XP, Windows XP Media Center Edition (2004 or 2005), Windows Server 2012, Windows Server 2008 R2, Windows Server 2008, Windows Server 2003 R2, Windows Server 2003, Windows RT 8.1, Windows RTOS X 10.10, 10.9, 10.8, 10.7, 10.6, 10.5, 10.4*32-bit and 64-bit | |
Chapter 13 Regulatory Compliance Information
For Customers in the United States
FCC Statement
This equipment has been tested and found to comply with the limits for a Class A digital device, pursuant to part 15 of the FCC Rules. These limits are designed to provide reasonable protection against harmful interference when the equipment is operated in a commercial environment. This equipment generates, uses, and can radiate radio frequency energy and, if not installed and used in accordance with the instruction manual, may cause harmful interference to radio communications. Operation of this equipment in a residential area is likely to cause harmful interference in which case the user will be required to correct the interference at his own expense.
This device complies with Part 15 of the FCC Rules. Operation is subject to the following two conditions: (1) This device may not cause harmful interference, and (2) this device must accept any interference received, including interference that may cause undesired operation.
Only use the cables and accessories that are included in the package. Don't use other accessories or cables unless specifically instructed to in the documentation.
For Customers in Europe
EU Declaration of Conformity

Dansk
This is a Class A product. In a domestic environment, this product may cause radio interference, in which case the user may be required to take adequate measures.
Only use the cables and accessories that are included in the package. Don't use other accessories or cables unless specifically instructed to in the documentation.
Do not use USB cables that are 3 meters or longer to connect USB devices to this TeraStation series.
Español
For Customers in Korea
KC
For Customers in Taiwan
BSMI
警告使用者:
For Customers in China
CCC
警告