LinkStation Pro Duo Diskless - NAS BUFFALO - Free user manual and instructions
Find the device manual for free LinkStation Pro Duo Diskless BUFFALO in PDF.

User questions about LinkStation Pro Duo Diskless BUFFALO
0 question about this device. Answer the ones you know or ask your own.
Ask a new question about this device
Download the instructions for your NAS in PDF format for free! Find your manual LinkStation Pro Duo Diskless - BUFFALO and take your electronic device back in hand. On this page are published all the documents necessary for the use of your device. LinkStation Pro Duo Diskless by BUFFALO.
USER MANUAL LinkStation Pro Duo Diskless BUFFALO
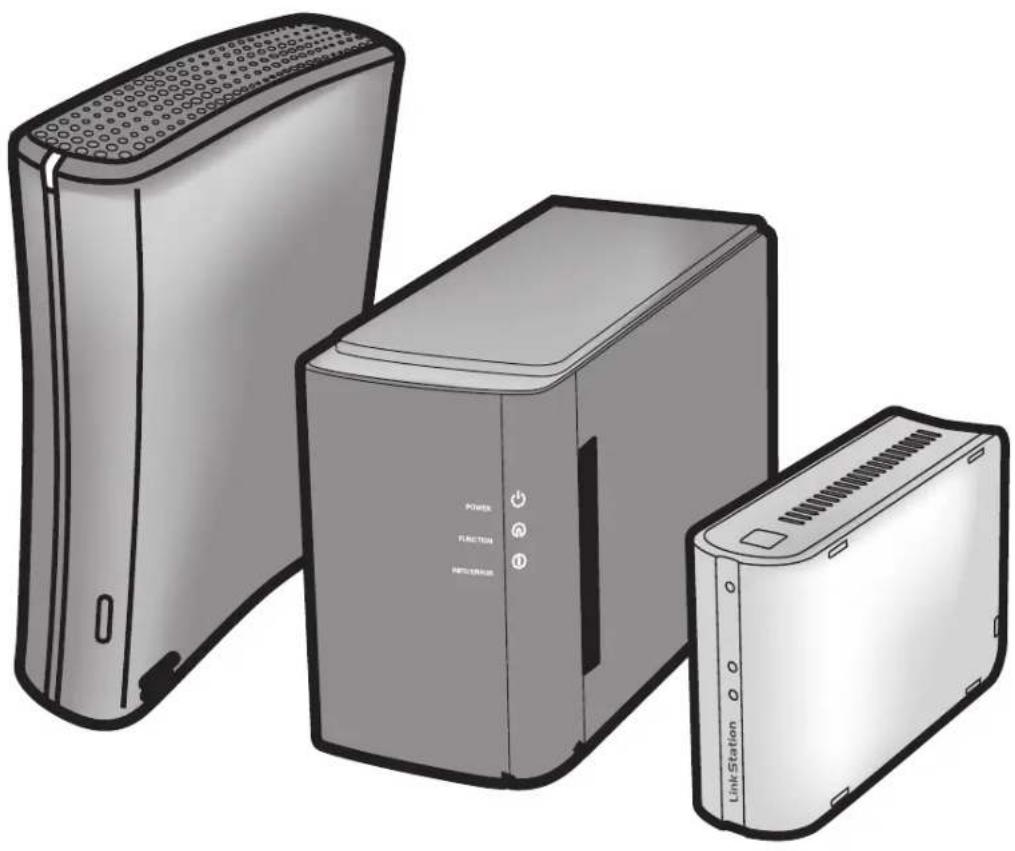
LinkStation User Manual
natural_image
Illustration of three different electronic devices: a power unit, a function unit, and a Link Station, shown in grayscale without any text or symbols on the devices themselves.www.buffalotech.com
35011114 ver.04
Contents
Chapter 1
Setup...... 4
LinkNavigator Setup (LS-VL, LS-XHL, LS-CHL) ....4
LinkNavigator Setup (LS-WVL, LS-WXL) ......6
LinkNavigator Setup (LS-WSXL) 8
Diagrams and Layout (LS-VL, LS-XHL, LS-CHL) 11
Diagrams and Layout (LS-WVL, LS-WXL) 13
Diagrams and Layout (LS-WSXL) 15
Chapter 2
Using your LinkStation 17
Opening the Shared Folder ....17
Opening the shared folder from another PC 18
Adding another LinkStations....19
Power Modes 20
Web Admin interface 21
Adding shared folders 24
Access Restrictions....26
Disk Quotas....36
FTP Server....41
Direct Copy 44
Users/Groups 46
Adding Users 46
Adding Groups 48
Admin Password 49
Network....50
Jumbo Frame....50
Web server....52
MySQL server 53
System-Settings....54
Name, Date and Time ....54
System-Storage 56
Check Disk....56
Format a Drive....58
Adding Storage 60
Remove Disk....64
System Backup 65
Time Machine....65
System-Backup 70
RAID Arrays 78
RAID Scanning 84
System - Maintenance 85
E-mail Notification....85
System Power Management 87
UPS Settings 87
Sleep Timer....88
Restoring Factory Defaults 90
Format the LinkStation 92
Extensions 93
WebAccess 93
Print Server....94
BitTorrent Client 101
Media Server....103
Using iTunes with the Media Server 112
Chapter 3
NAS Navigator2 113
Chapter 4
Web Admin interface 118
Home....118
Shared Folders 119
Users/Groups 122
Network....125
System 132
Extensions 146
Appendix.... 151
Specifications 151
Default Settings 152
Mapping Additional Shares 153
Windows 153
Mac OS X 154
Software....155
Info folder 158
Status LED (LS-VL, LS-XHL, LS-CHL) 159
Status LED (LS-WVL, LS-WXL) 162
Status LED (LS-WSXL) 166
Compliance Information 169
Troubleshooting 170
Data Backup 172
GPL Information 172
Chapter 1
Setup
LinkNavigator Setup (LS-VL, LS-XHL, LS-CHL)
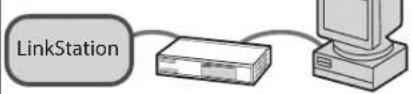
1 Connect the LinkStation with an Ethernet cable and the included AC adapter. Plug the power cord into a surge protector or power outlet. Connect the Ethernet cable to a router, hub, or switch on your network. The Ethernet cable will "click" and lock in place when inserted properly.

flowchart
graph TD
    A["Laptop"] --> B["Network (Router or Hub)"]
    B --> C["LinkStation"]
    C --> D["Output Port"]
2 Move the Power Mode Switch on the back of the LinkStation to the ON position.
Note: Do not set the Power Mode Switch to AUTO at this time. After the initial installation is complete, then the Auto Power Mode may be used.
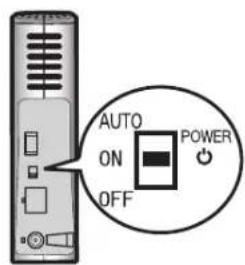
text_image
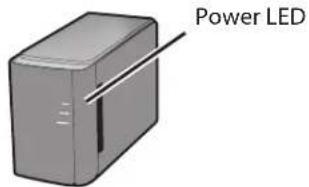
AUTO ON OFF POWER3 Wait until the power LED stops blinking and glows a steady blue.

text_image
Power LED4 Insert the Utility CD in your computer's CD drive. LinkNavigator will launch. Click [Begin Installation]. The wizard will guide you through installation.
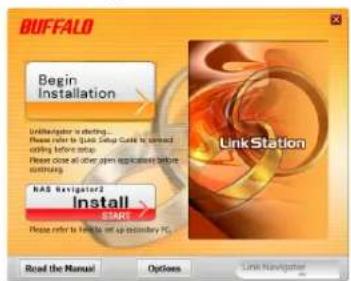
text_image
BUFFALO Begin Installation LinkNavigator is starting... Please refer to Blue Supply Guide to correct editing before setup. Next close all now join applicable before cooling. RAS Navigator2 Install 3.5M Please refer to help to off ordinary PC. Read the Manual Options Link NavigatorIf LinkNavigator does not launch automatically, open the Utility CD and double-click [LSNavi.exe].
This example shows a LS-VL LinkStation. Your screen may be slightly different.
Notes: If you are using Windows 7 or Vista, the autoplay screen may appear. Click [Run LSNavi.exe].
If "Do you want to allow the following program to make changes to this computer?" is displayed in Windows 7, please click [Yes].
If "A program needs your permission to continue" is displayed in Windows Vista, please click [Continue].
For OS X, double-click on the LinkNavigator icon in the utility CD.
If you have problems installing, temporarily disable your anti-virus software and software firewall. After setup is complete, re-enable the software.
If your computer does not have a CD drive, you may download the LinkNavigator software from www.buffalotech.com.
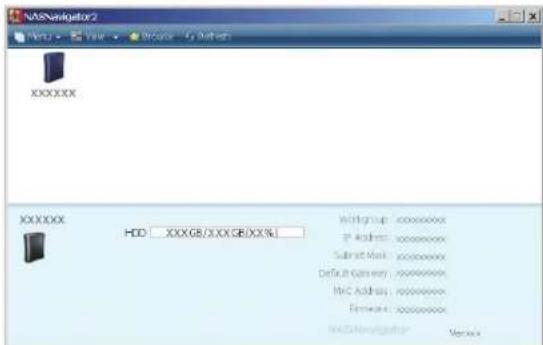
5 Click [Finish] or [Complete]. NAS Navigator2 starts automatically.
6
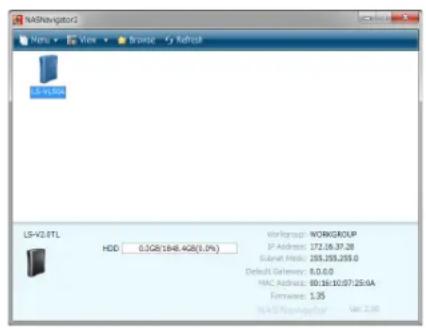
text_image
LS-V2.8TL HDD 0.3GB/164.4GB(1.0%) Workload: WORKGROUP IP Address: 172.05.37.28 Subnet Host: 255.255.255.0 Default Gateway: 8.0.6.0 MAC Address: 80.16.10.07.25.0A Firmware: 1.35 NASDAQ导航员: Get 2.00In NAS Navigator2, double-click your LinkStation's icon.
7 The LinkStation's shared folder opens. You can now use the LinkStation's shared folder to save files just like any other hard drive.
Note: With Mac OS, the LinkStation is mounted as a drive icon on the desktop, or it is displayed in the sidebar of the Finder.
Setup is now complete.
LinkNavigator Setup (LS-WVL, LS-WXL)
1 Connect the LinkStation with an Ethernet cable and the included AC adapter. Plug the power cord into a surge protector or power outlet. Connect the Ethernet cable to a router, hub, or switch on your network. The Ethernet cable will "click" and lock in place when inserted properly.

flowchart
graph TD
    A["Laptop"] --> B["Network (Router or Hub)"]
    B --> C["LinkStation"]
    C --> D["USB Port"]
    C --> E["USB Cable"]
    C --> F["USB Cable"]
2 Move the Power Mode Switch on the back of the LinkStation to the ON position.
Note: Do not set the Power Mode Switch to AUTO at this time. After the initial installation is complete, then the Auto Power Mode may be used.

text_image
AUTO ON OFF3 Wait until the power LED stops blinking and glows a steady blue.
text_image
Power LED4 Insert the Utility CD in your computer's CD drive. LinkNavigator will launch. Click [Begin Installation]. The wizard will guide you through installation.

text_image
BUFFALO Begin Installation LinkNavigator is starting... Please refer to Quick Setup Guide to connect railing before setup. Please close all other upon applications before continuing. NAS Navigator2 Install B/AM1 Please refer to have to set up secondary PC... Read the Manual Options Link NavigatorIf LinkNavigator does not launch automatically, open the Utility CD and double-click [LSNavi.exe].
This example shows a LS-WVL LinkStation. Your screen may be slightly different.
Notes: If you are using Windows 7 or Vista, the autoplay screen may appear. Click [Run LSnavi.exe].
If "Do you want to allow the following program to make changes to this computer?" is displayed in Windows 7, please click [Yes].
If "A program needs your permission to continue" is displayed in Windows Vista, please click [Continue].
For OS X, double-click on the LinkNavigator icon in the utility CD.
If you have problems installing, temporarily disable your anti-virus software and software firewall. After setup is complete, re-enable the software.
If your computer does not have a CD drive, you may download the LinkNavigator software from www.buffalotech.com.
5 Click [Finish] or [Complete]. NAS Navigator2 starts automatically.

text_image
M50Navigator 2 View Browse Refresh LS-WV2.0Tc/RLI HDD (RAID): 0.1GB/16X4.3GB(5.0%) Workgroup: WORKGROUP IP Address: 292.168.11.33 Submit Media: 255.255.255.0 Default Gateway: 292.168.11.1 MAC Address: 89.08.6D/FE.31.AC Flawware: 1.35 M50Navigator 2 Ver 2.20In NAS Navigator2, double-click your LinkStation's icon.
7 The LinkStation's shared folder opens. You can now use the LinkStation's shared folder to save files just like any other hard drive.
Note: With Mac OS, the LinkStation is mounted as a drive icon on the desktop, or it is displayed in the sidebar of the Finder.
Setup is now complete.
LinkNavigator Setup (LS-WSXL)
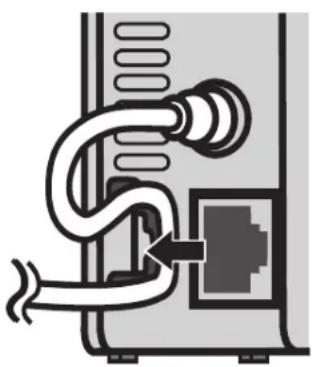
1 Connect the LinkStation with the AC adaptor and an Ethernet cable. Plug the power cord into a surge protector or power outlet. Connect the Ethernet cable to a router, hub, or switch on your network. The Ethernet cable will "click" and lock in place when inserted properly.
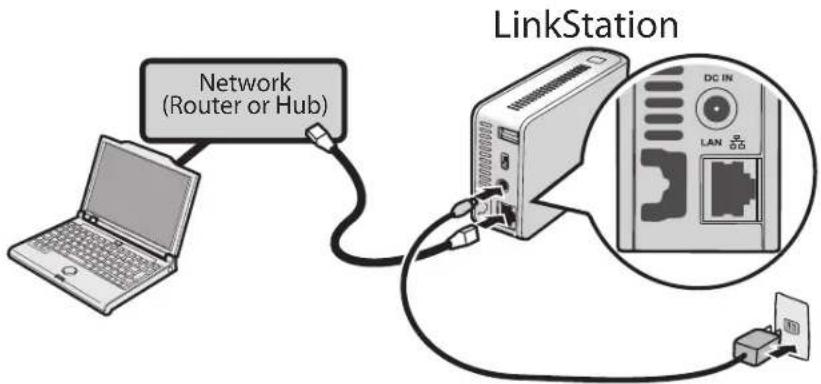
text_image
Network (Router or Hub) LinkStation DC IN LAN 0.052 Move the Power Mode Switch on the back of the LinkStation to ON.
Note: Do not set the Power Mode Switch to AUTO at this time. After the initial installation is complete, then the Auto Power Mode may be used.
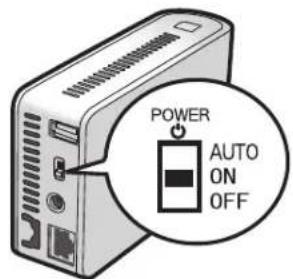
text_image
POWER AUTO ON OFF3 Wait until the power LED stops blinking and glows a steady blue.
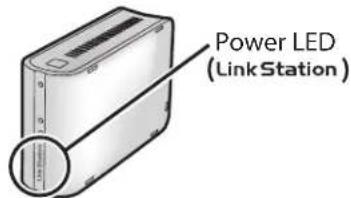
text_image
Power LED (Link Station)4 Insert the Utility CD in your computer's CD drive. LinkNavigator will launch.
Click [Begin Installation]. The wizard will guide you through installation.
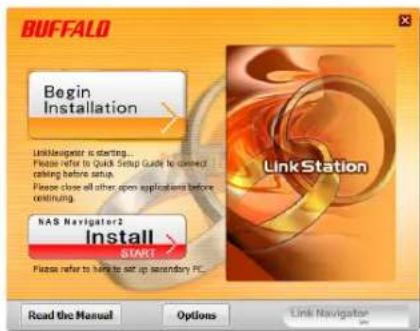
text_image
BUFFALO Begin Installation LinkNavigator is starting... Please refer to Quick Setup Guide to correct calling before setup. Please close all other open applications before continuing. NAS Navigator2 Install START Please refer to have to set up supplementary PC... Read the Manual Options Link NavigatorNotes: If LinkNavigator does not launch automatically, open the Utility CD and double-click [LSNavi.exe].
If you are using Windows 7 or Vista, the autoplay screen may appear. Click [Run LSNavi.exe].
If "Do you want to allow the following program to make changes to this computer?" is displayed in Windows 7, please click [Yes].
If "A program needs your permission to continue" is displayed in Windows Vista, please click [Continue].
For Mac OS, double-click on the LinkNavigator icon in the utility CD.
If you have problems installing, temporarily disable your anti-virus software and software firewall. After setup is complete, re-enable the software.
If your computer does not have a CD drive, you may download the LinkNavigator software from www.buffalotech.com.
5 Click [Finish] or [Complete]. NAS Navigator2 starts automatically.
6
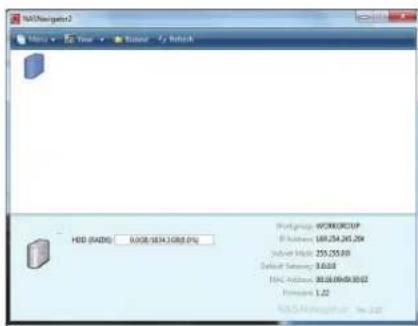
text_image
HDD (HDD): 0/08/1634.2008.0% Portgug: WORKGROUP P Address: 169,254,267,259 Subset Index: 255,255.00 Default Security: 3.0.03 HAC Address: 30.08.09/09.30.02 Performance: 1.22 HDD:\MyDsgn\MydDouble-click your LinkStation's icon in the NAS Navigator2 window.
7 The LinkStation's shared folder opens. You can now use the LinkStation's shared folder to save files just like another hard drive.
Note: With OS X, the LinkStation is mounted as a drive on the desktop or displayed in the sidebar of the Finder.
Setup is now complete.
Diagrams and Layout (LS-VL, LS-XHL, LS-CHL)
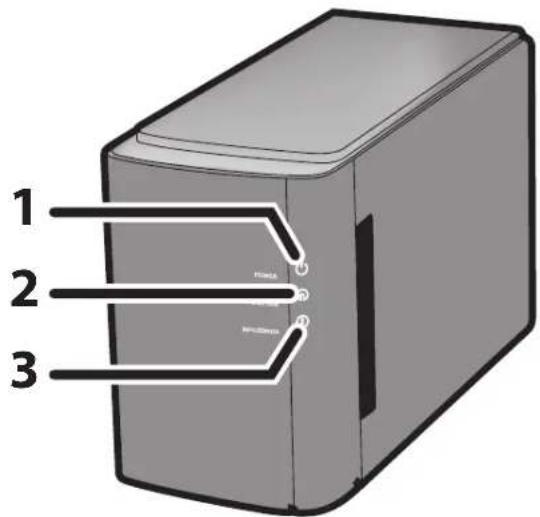
Front

text_image
1 2 01 Power LED
Blue light is ON: Power ON
Blue light is OFF: Power OFF
Amber light is flashing: The amber light flashes if there is a message. Flashing pattern varies depending on the message. For more information, refer to "Status LED" on page 161.
Red light is flashing: Red light flashes when an error occurs. Flashing pattern varies depending on the message. For more information, refer to "Status LED" on page 159.
2 Function Button
The Function button initiates direct copy, dismounts USB devices, and is used to initialize the LinkStation
Back
text_image
3 4 5 6 7 8
text_image
AUTO ON OFF POWER 5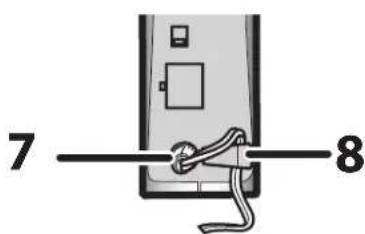
text_image
7 83 Fan
Do not block the fan when installing the unit.
4 USB 2.0 Connector
You may attach a USB device such as a digital camera, printer, memory card reader, or hard drive. USB hubs, mice, keyboards, and all-in-one printers are not supported. USB card readers that support multiple memory cards may not function properly.
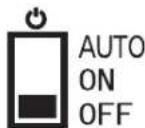
5 Power Mode Switch
AUTO: Automatically powers the LinkStation on and off with your computer.
ON: Turns the LinkStation on.
OFF: Turns the LinkStation off.
6 LAN Port Connect an Ethernet cable here. The Link/Act LED by the LAN port turns green when the unit is connected to the network and flashes when there is network activity.
7 Power Connector Connect the AC adapter here. When it's connected properly, the LED to the right will glow green.
8 Hook Use as a strain relief for the AC adapter cable.
Diagrams and Layout (LS-WVL, LS-WXL)
Front
text_image
1 2 3Back

text_image
4 5 6 7 8 9 10 11 12Note: – Please do not lift the LinkStation by its front cover. It might come off.
1 Power LED
Blue LED: Power on.
LED is off: Power off.
Blinks blue: During startup and shutdown.
2 Function LED
The Function LED glows blue when direct copy is finished, during initialization, and during USB dismounting (about 60 seconds). During direct copy it blinks blue.
3 Info/Error LED
The Info/Error LED blinks orange when there's a message and red when there's an error.
4 Function Button
The Function button initiates direct copy, dismounts USB devices, and is used to initialize the LinkStation.
5 USB 2.0 connector
You may attach a USB device such as a digital camera, printer, memory card reader, or hard drive. USB hubs, mice, keyboards, and all-in-one printers are not supported. USB card readers that support multiple memory cards may not function properly.
6 Power Mode Switch
AUTO: The LinkStation turns on and off automatically with your PC (s).
ON: The LinkStation boots and is operational.
OFF: The LinkStation shuts down.
7 LAN Port
Connect to your LAN with an Ethernet cable.
8 Link/Act LED
Glows green for connection.
Blinks green for access.
9 Power connector
The AC adaptor connects here.
10 Fan
Do not block the fan when installing the unit.
11 Security lock for anti-theft
Many security cables are compatible with this lock.
12 Hook
Secure the Power cable so that it does not come off by mistake. Slide the cable down to secure.
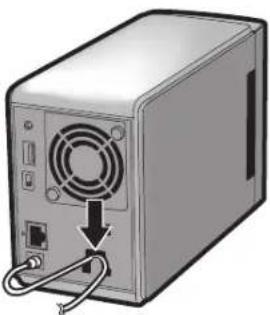
natural_image
Illustration of a computer tower with a power outlet and cable, no text or symbols presentDiagrams and Layout (LS-WSXL)
Front

text_image
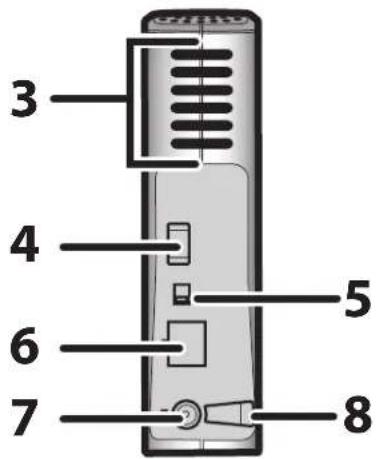
1 2 3 4 5 6Back
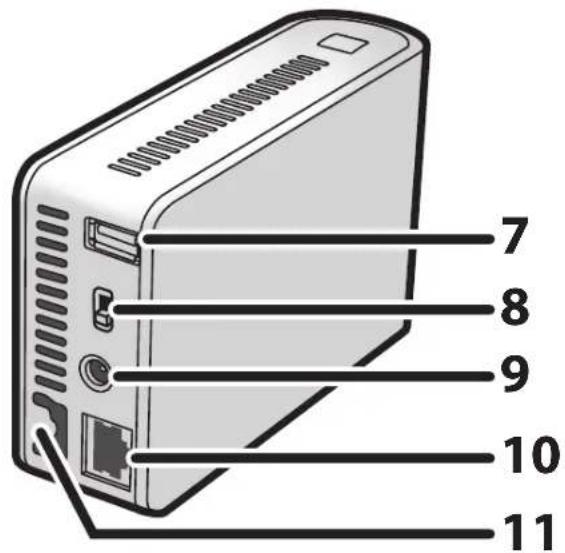
text_image
7 8 9 10 111 Function Button
The Function Button initiates direct copy, dismounts USB devices, and is used to initialize the LinkStation.
2 Function LED
The Function LED glows blue when direct copy is finished, during initialization, and during USB dismounting (about 60 seconds). During direct copy the Function LED blinks blue.
3 Link/Act LED
Glows green for connection. Blinks green for access.
4 Info/Error LED
The Info/Error LED blinks orange when there's a message and red when there's an error.
5 Power LED (LinkStation)
Blue LED: Power on.
LED is off: Power off.
Blinks blue: During startup / shutdown.
6 Security lock for anti-theft
Many security cables are compatible with this lock.
7 USB 2.0 connector
You may attach a USB device such as a digital camera, printer, memory card reader, or hard drive. USB hubs, mice, keyboards, and all-in-one printers are not supported. USB card readers that support multiple memory cards may not function properly.
8 Power Mode Switch
AUTO: The LinkStation turns on and off automatically with your PC(s).
ON: The LinkStation boots and is operational.
OFF: The LinkStation shuts down and turns off.

AUTO
ON
OFF
9 Power connector
The AC adaptor connects here.
10 LAN Port
Connect to your LAN with an Ethernet cable.
11 Hook
Secure the Power cable so that it does not come off by mistake. Slide the cable down to secure.
natural_image
Diagram of a computer setup with a coiled cable and ventilation duct (no text or symbols)Chapter 2 Using your LinkStation
Opening the Shared Folder
1 Launch NAS Navigator2.
Notes: In Windows, click [Start] - [(All) Programs] - [BUFFALO] - [BUFFALO NAS Navigator2] - [BUFFALO NAS Navigator2].
In Mac OS, double click on the [NAS Navigator2] icon in the Dock.
2
text_image
XXXXXXX HDD: XXXGB/XXXGB/XX%Double click on the LinkStation's icon.
3 The LinkStation's shared folder opens.
Note: In OS X, the share is mounted as a drive icon on the desktop, or displayed in the sidebar of the Finder.
You can now use the LinkStation's shared folder to save files just like another hard drive.
Opening the shared folder from another PC
After the LinkStation is installed on one computer, you don't have to go through the full installation to add a second computer. Just install NAS Navigator2 on each additional computer to access the LinkStation.
1 Insert the Utility CD in your computer's CD drive. LinkNavigator will launch.
Notes: If LinkNavigator does not open, open the Utility CD and double-click [LSnavi.exe].
If you are using Windows 7 or Vista, the autoplay screen may appear. Click [Run LSnavi.exe']
If "Do you want to allow the following program to make changes to this computer?" is displayed in Windows 7, please click [Yes].
If "A program needs your permission to continue" is displayed in Windows Vista, please click [Continue].
For Mac OS, double-click on the LinkNavigator icon in the utility CD.
2

text_image
BUFFALO Begin Installation LinkNavigator is starting... Please refer to Quick Setup Guide to connect coiling before setup. Please close all other open applications before continuing. NAS Navigator2 Install START Please refer to help to set up secondary PC. Read the Manual Options Link NavigatorClick [Options] - [Additional Software Installation]. For Mac OS, click [Install NAS Navigator].
3 Follow the instruction on the screen to install NAS Navigator2.
4 After NAS Navigator2 is installed, click ✗it the top right top of the installer window to close it.
5 Launch NAS Navigator2:
In Windows, click [Start] - [(All) Programs] - [BUFFALO] - [BUFFALO NAS Navigator2] - [BUFFALO NAS Navigator2].
In OS X, double-click on the [NAS Navigator2] icon in the Dock.
6

text_image
NLSNavigator 2 File Edit View Browse Help Refresh XXXXXX XXXXXX HDD XXXGS/XXXGBXX(%) Network: xxxxxxxxx IP Address: xxxxxxxxx Submit Mask: xxxxxxxxx Default Server: xxxxxxxxx NBC Address: xxxxxxxxx Forward: xxxxxxxxx NLSNavigator VersionDouble-click on the LinkStation icon.
7 The LinkStation's shared folder opens.
Note: On Mac OS, LinkStation is mounted as a drive icon on the desktop, or displayed in the sidebar on the Finder.
Setup is complete. You can now use the LinkStation's shared folder to save files just like another hard drive.
Adding another LinkStations
To add one or more additional LinkStations to your network, rerun the installation program for each one.
Power Modes
The LinkStation can automatically turn on and off with your computers. To use this feature, install NAS Navigator2 on each computer and then set the Power Mode Switch to the AUTO position.
LS-VL, XHL, CHL LS-WVL, WXL LS-WSXL
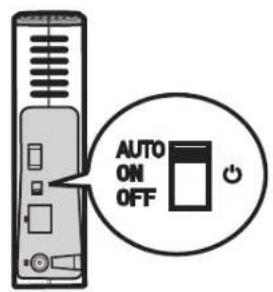
text_image
AUTO ON OFF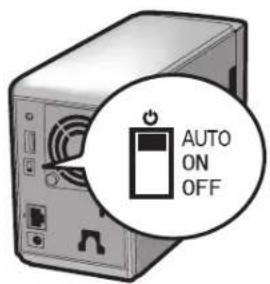
text_image
AUTO ON OFF
text_image
AUTO ON OFFAUTO: When the switch is in the AUTO position, the LinkStation automatically turns off when all computers on the network with NAS Navigator2 turn off. If any computer on the network is powered on, the LinkStation automatically powers on as well.
ON: The LinkStation stays on, even when all computers are off.
OFF: Turns the LinkStation off.
Notes: Never disconnect power from the LinkStation while the switch is in the ON position.
The Auto Power Mode may not work in some network environments. If this occurs, move the switch to the ON position to use the LinkStation.
After all computers are powered down, it may take several minutes for the LinkStation to shut down.
During initial setup, leave the Power Mode Switch in the ON position. Do not move it to the AUTO position until the unit is set up and NAS Navigator2 is installed on all computers that will access the LinkStation.
If a power outage disconnects power from the LinkStation while it's in Auto Power Mode, will not power on automatically when power is restored. Move the Power Mode Switch to the ON position to power on the LinkStation. Once the unit has booted, you can move the Power Mode Switch back to the AUTO position.
Immediately after the Power Mode Switch is switched to the AUTO position, it will not shut down for at least 5 minutes even if all PCs on the network are turned off.
The LinkStation models with multiple hard drives do not shut down during RAID initialization or rebuild.
Web Admin interface
To open the LinkStation's web-based administration interface, follow the steps below.
1 Launch NAS Navigator2.
In Windows, click [Start] - [(All) Programs] - [BUFFALO] - [BUFFALO NAS Navigator2] - [BUFFALO NAS Navigator2].
In OS X, double click on [NAS Navigator2] icon in the Dock.
2

text_image
Browse Shares Open Web Admin Properties... Map remote default share to drive letter Disconnect mapped drive letter Create desktop shortcut for Tera/LinkStationIn Windows, right-click on the LinkStation's icon. In OS X, click the icon while holding down the control key. Select [Open Web Admin] in the displayed menu.
If 2 or more LinkStations and TeraStations are connected on the network, multiple icons will be displayed. Right-click on the unit that you want to display.
When a LinkStation's icon is selected, information about its settings appears in the bottom right of the window.
3

text_image
LinkStation Network Attached Storage BUFFALO User name: Password: LoginEnter your username and password, and click [Login]. The default username and password are:
Username: admin Password: password
After you log in, refer to page 49 to change the password for security purposes.
4
text_image
BUFFALO Data Information BASF DATA NAME DATA NAME DATA NAME DATA NAME DATA NAME DATA NAME DATA NAME DATA NAME DATA NAME DATA NAME DATA NAME DATA NAME DATA NAME DATA NAME DATA NAME DATA NAME DATA NAME DATA NAME DATA NAME DATA NAME DATA NAME DATA NAME DATA NAME DATA NAME DATA NAME DATA NAME DATA NAME DATA NAME DATA NAME DATA NAME DATA NAME DATA NAME DATA NAME DATA NAMEThe Web Admin interface opens. The LinkStation's name, IP address, workgroup and hard disk information are displayed on the left side of the window.
Note: The Web Admin interface is compatible with Internet Explorer 6.0 Service Pack 2 or later, Firefox 1.5 or later, and Safari 3 or later.
The Web Admin interface contains the following sections.
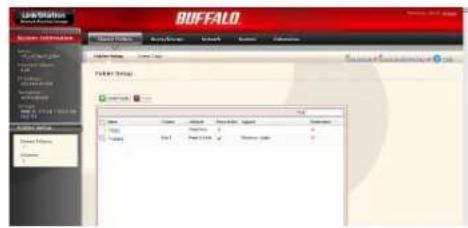
text_image
Link Station Network Attached Storage System Information Shared Folders Users/Groups Network Systems Extensions Folder Setup Direct Caps Folder Setup Delete Folder Name Volume Attribute Recycle Bin: Support Directories Info Read Only # # shares Data 1 Read & Write Windows, Apple Status: within local Back 1: 0.6 GB / 25.6 GB (0.0 %) Folder Setup Shared Folders: 3 Volumes: 3 Pref Back Manual Status: Redistribution FAO: Data- [Shared Folders]
Add/delete shared folders, set access restrictions, and configure direct copy.
- [Users/Groups]
Register and delete users and groups.
• [Network]
Register and delete networks and workgroups.
- [System]
Configure name, time, disk check format, backup, mail notification settings, timers, UPS synchronization settings, initialization, and format drives.
• [Extensions]
Configure WebAccess, Media Server, Print Server, BitTorrent, and Time Machine.
To open the Web Admin interface from a different computer, open a browser and type the LinkStation's IP address into the URL field.
With a Mac, you can open the Web Admin interface from Bonjour as described below.
1 Launch Safari.
2 Select [View] - [View Bookmark Bar] from Safari's menu.
3
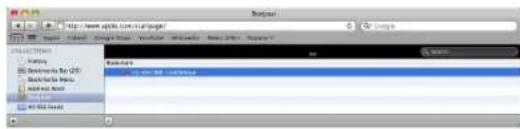
text_image
Balance History Balance for USD Balance for USD Add BackSelect [Bonjour] from the left-side menu, then click on your LinkStation in the bookmark list.
4

text_image
Link Station Network Attached Storage BUFFALO Read Manual Help Username: Password: Login1 Enter your username and password.
2 Click [Login].
Note: To log in as a guest, enter "guest" as the username and leave the password blank.
5
text_image
LinkStation BUFFALO System Information Share Folders Share Figs Network System Extensions Folder Setup Direct Copy Folder Setup Create Tools Total Name Value Address Resource Map Sequence Parameters Basic Basic Data Data Files Windows, Open Options HelpThe Web Admin interface opens.
The LinkStation's name, IP address and drive information are displayed on the left.
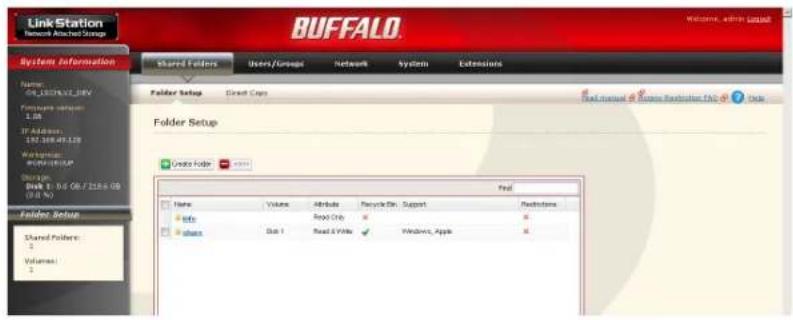
Adding shared folders
By default, the LinkStation includes one shared folder "share". You may add additional folders as follows.
1

text_image
Link Station BUFFALO System Information Shared Patterns Items/Groups Network Systems Categories Folder Setup Direct Data Folder Setup Data Sets Name Volume Module Security Bin Layout Preferences Help Read Comp + - Windows, Apps + - Share Edit Read Edit ✓ Window, Apps ✓1 In the Web Admin interface, click [Shared Folders] - [Folder Setup].
2 Click [Create Folder].
2
text_image
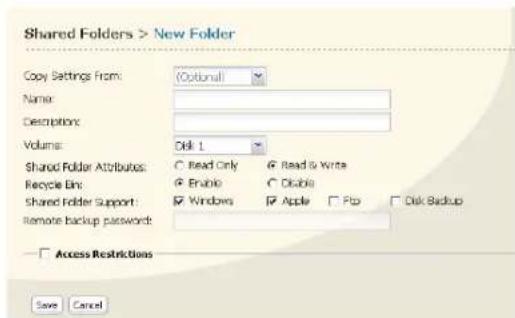
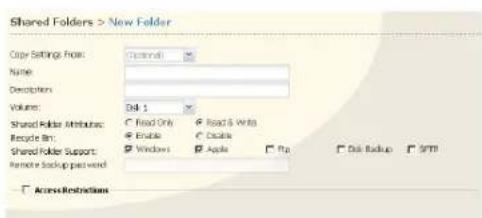
Shared Folders > New Folder Copy Settings From: (Optional) Name: Description: Volume: Disk 1 Shared Folder Attributes: C Read Only ✓ Read & Write Recycle Bin: ✓ Enable ✓ Disable Shared Folder Support: ✓ Windows ✓ Apple ✓ Fbp ✓ Disk Backup Remote backup password: Access Restrictions Save Cancel1 Enter desired characteristics for the new share.
Note: If you would like to copy the settings of an existing folder, select a source folder from the [Copy Settings From] dropdown.
2 Click [Save].
You have created a new share.
To protect your data from accidental deletion, you may enable a [Recycle Bin] for the share (not available for Apple and FTP connections). Deleted data in a shared folder will be temporarily moved to the [Recycle Bin] folder. To recover deleted data, open the [Recycle Bin] folder and move files.
Read-Only shares cannot be modified or deleted. To make a Read-Only share, select [Read Only] in the [Shared Folder] screen and click [Save].
Notes:
- By default, [shared Folder Attributes] is configured as [Read & Write].
- A shared folder set to [Read Only] cannot be written by any users or groups, even if they have read and write permissions. Read-Only folders are read-only for all users.
- Read Only shares are described as [Read Only] in the shared folder description.
Notes:
- When using multi-byte character(such as Japanese), make folder or file names with 80 bytes(UTF-8) or less. You may not be able to copy a folder or a file whose name length is more than 80 bytes.
- You cannot set hidden or read-only attributes to subfolders or files on the LinkStation.
- If non-Roman alphabetical folder names or workgroup names do not display properly, rename the folder or workgroup with Roman alphabetical characters.
- Please do not use any of the following words as the name of a shared folder. These words are reserved for internal use by the LinkStation:
info, spool, usbdisk1, usbdisk2, usbdisk3, usbdisk4, lost+found, global, printers, homes, lp, auth, test, ram, disk1, disk2, disk3, disk4, array1, array2, msdfs_root, mt-daapd
- The following characters are handled differently by Mac OS X and Windows. Avoid using these characters when sharing data between Mac OS X and Windows:
--£
- The following characters are not displayed correctly by Windows, or by a Mac connected to the LinkStation via SMB. Avoid their use in file names that will be used with the LinkStation.
?[] / ¥ = + < >; : ", | *
- Never turn off the LinkStation or unplug its Ethernet cable while data is being written. Doing so may result in an incomplete file that cannot be opened or deleted. If this happens, restart the LinkStation, delete the file, then retry copying the file.
- Your OS may update the date and timestamp stored on the LinkStation's hard drive, or on a USB drive connected to the LinkStation. This might result in inaccurate information for date-created or date-accessed data on the LinkStation.
- In the Web Admin interface, or from a Mac OS X 10.6 or later, drive size is displayed in gigabytes, where 1 gigabyte = 1,000,000,000 bytes. This is also how drive capacity is expressed on your LinkStation's packaging. However, if you check the drive size from an older Mac, or from a Windows computer, it may display the size of the drive in gibibytes, where 1 gibibyte = 1,073,741,824 bytes. Since a gibibyte is larger than a gigabyte, the displayed drive capacity will be a smaller number than the actual drive size.
Access Restrictions
There are several ways to restrict access to users of a LinkStation.
Access restrictions for Users and/or Groups on the LinkStation
The next page describes how to configure access restrictions for local users and/or groups.
Access Restrictions on NT Domain
Follow the procedure on page 29 to configure.
Access Restrictions on Active Directory
Follow the procedure on page 31 to configure.
Notes:• This chapter describes the procedure to use Active Directory with Windows 2000 Server, Server 2003, and Server 2008.
- Depending on the security settings, the LinkStation may not be able to join, or may be able to join but may not be authenticated by a domain. In such a case, it is recommended to restrict access by delegating authority.
Access restrictions by using the Delegate Authority server feature
Follow the procedure on page 33 to configure.
Notes:• Permissions are assigned to shared folders. Child folders in a shared folder inherit their permissions from the parent folder. If a file or folder is moved into a new shared folder with different permissions from the folder it was originally in, it will now have the access restrictions from the new shared folder.
- When accessing the LinkStation from Windows via SMB, changing permissions from the folder's security tab in the properties screen of a folder is not supported. Access restrictions for shared folders on the LinkStation can only be configured from within the Web Admin interface.
Restricting access for Users and Groups on the LinkStation
You can set access restrictions for shared folders by username or group names for users that are registered on the LinkStation.
1 Create new user accounts and passwords in Windows, or record existing Windows usernames and passwords. Each account on the LinkStation will have the same username and password as the user's Windows account.
2 Register users and groups on the LinkStation.
1 Add users as described on page 46.
2 Add groups as described on page 48.
3 Configure access restrictions for groups and/or users.

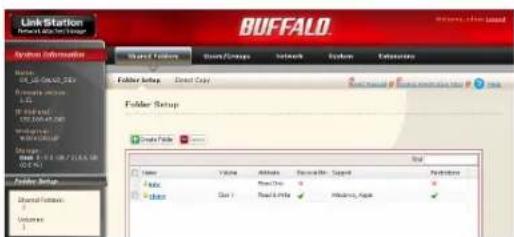
text_image
1 Link Station Buffalo System Information Source: Dr. 2007-01-2015 Hardware Manager File Edit View Help File Setup Folder Setup Folder Setup Create Folder Name: Vasee Address: Redknd Chn. Stock#: Copy: Edit: Read History Edit: New York Browse... Browse... Browse... Browse... Browse... Browse... Browse... Browse... Browse... Browse... Browse... Browse... Browse... Browse... Browse... Browse... Browse... Browse... Browse... Browse... Browse... Browse... Browse... Browse... Browse... Browse... Browse... Browse... Browse... Browse... Browse... Browse... Browse... Browse... Browse... Browse... Browse... Browse... Browse... Browse... Browse... Browse... Browse... Browse... Browse... Browse... Browse... Browse... Browse... Browse... Browse...In the Web Admin interface, navigate to [Shared Folders] - [Folder Setup].

text_image
2 Folder Setup Create Folder File Name Volume Attribute Recycle Run Support Restrictions data Panel Only X # Stack Dot 1 Fold & Write ✓ Windows, Apple ✓Click a shared folder you want to set access restrictions for.
Using your LinkStation
3
Check [Access Restrictions] to enable.
4
Click [Add].
Note: The procedure described here shows how to set access restrictions for users. To set access restrictions for a group of users, click [Local Groups] - [Add].
5
1 Check the users (or groups) that you want to permit to access the share.
2 Click [Add].
6
Select the level of access for the user or group you added.
7 Click [Save].
You have assigned access restrictions.
- If you log on from a Microsoft Network Domain, you can set the [Access Restrictions] with the users and/or groups which are registered on the domain.
- If both [Read only] and [Read & Write] permissions are given to a user, that user will have read-only access.
LinkStation User Manual 28
Access Restrictions on NT Domain
The LinkStation can download users, groups, and passwords from an NT Domain server. This procedure is recommended for system administrators only.
Note: The LS-CHL LinkStation doesn't support NT Domain in the US and the EU.
1 Create an account on the Domain Controller for the LinkStation.
Note: If there is an option to "Accept accounts for computers with Windows 2000 or earlier", then select it.
2

text_image
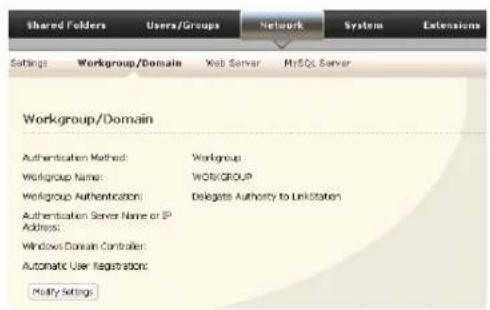
Shared Folders Users/Groups Network System Extensions Settings Workgroup/Domain Web Server MySQL Server Workgroup/Domain Authentication Method: Workgroup Workgroup Name: WORKGROUP Workgroup Authentication: Delegate Authority to Link Station Authentication Server Name or SP Address: Windows Domain Controller: Automatic User Registrations: Modify SettingsClick [Network] - [Workgroup/Domain] - [Modify Settings] in the Web Admin interface.
3

text_image
Workgroup/Domain Authentication Method C Workgroup © NT Domain C Active Directory NT Domain Name: WORKGROUP NT Domain Controller Name: Administrator Name: Administrator Password: WINS Server IP Address: Save Cancel1 Select [NT Domain].
2 Enter [NT Domain Name].
3 Enter [NT Domain Controller Name].
4 Enter [Administrator Name].
5 Enter [Administrator Password].
6 Enter [WINS Server IP Address].(Optional)
7 Click [Save].
4 Follow the instructions in the previous section to add access restrictions to the domain.
Notes: You can enter up to 23 bytes(UTF-8) for [NT Domain Name]. Alphanumeric characters, multi-byte characters, -(hyphen), _ (underscore), and . (dot) may be used. Do not use a symbol as the first character.
- You can enter up to 63 bytes(UTF-8) for [NT Domain Controller Name]. Do not use multi-byte characters. Alphanumeric characters, -(hyphen), and _ (underscore) may be used. Do not use a symbol as the first character.
Notes: If you change the LinkStation's name, you will no longer be able to use domain users and groups or access restrictions. Rejoin the domain.
- If a domain user name contains more than 20 bytes, the LinkStation truncates it to 20 bytes.
- The LinkStation only downloads the first 1000 users or the first 1000 groups from a domain controller.
- If you operate LinkStation as a member server of NT Domain or Active Directory domain, you cannot connect as a guest user via AFP.
- When you change the user or group settings on the domain controller, these changes may not take effects immediately on LinkStation. If you need to reflect changes on the domain controller immediately, reboot LinkStation.
- If your LinkStation is a member server in NT Domain or Active Directory domain and you change the [Authentication Method] to [Workgroup] in [Network] - [Workgroup/Domain] - [Modify Settings] on the Web Admin interface, the computer account on the domain controller will not be deleted automatically.
- If it has joined a domain network, you cannot connect to the LinkStation via FTP.
Access Restrictions on Active Directory
The LinkStation can download users, groups, and passwords from an Active Directory domain server. This procedure is recommended for system administrators only.
Note: The LS-CHL LinkStation doesn't support Active Directory in the US and the EU.
1 Create an account on the Domain Controller for the LinkStation.
Note: If there is an option to "Accept accounts for computers with Windows 2000 or earlier", then select it.
2
text_image
Shared Folders Users/Groups Network System Extensions Settings Workgroup/Domain Web Server MySQL Server Workgroup/Domain Authentication Method: Workgroup Workgroup Name: WORKGROUP Workgroup Authentication: Delegate Authority to Linkstation Authentication Server Name or IP Address: Windows Domain Controller: Automatic User Registration: Modify SettingsClick [Network] - [Workgroup/Domain] - [Modify Settings] in the Web Admin interface.
3
text_image
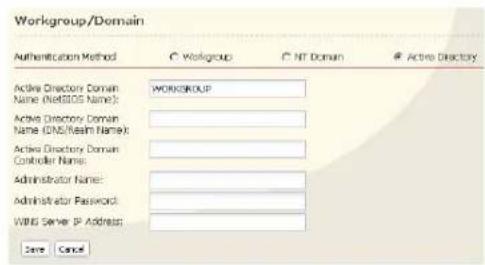
Workgroup/Domain Authentication Method © Workgroup C° NT Domain # Active Directory Active Directory Domain Name (NetBIOS Name): Active Directory Domain Name (DNS/Read Name): Active Directory Domain Controller Name: Administrator Name: Administrator Password: WIBS Server IP Address: Save Cancel1 Select [Active Directory].
2 Enter [Active Directory Domain Name (NetBIOS Name)].
3 Enter [Active Directory Domain Name (DNS/Realm Name)].
4 Enter [Active Directory Domain Controller Name].
5 Enter [Administrator Name].
6 Enter [Administrator Password].
7 Enter [WINS Server IP Address]. (Optional).
8 Click [Save].
4 Follow the instructions on page 27 to 28 to add Access Restrictions to Domain Users/Domain Groups.
You have completed the settings for this feature. .
Notes:• When you have the LinkStation joined to an Active Directory domain, you must specify the DNS Server which can resolve names for Active Directory domain.
- After building an Active Directory domain, the administrator's password which is needed to join the Active Directory domain must be changed at least once, or joining the Active Directory domain will fail.
- Active Directory domain's DNS name and NetBIOS name must be identical.
- If there are more than 5 minutes differences between the LinkStation's clock and the domain controller's clock, joining the domain or authenticating domain user or group may fail.
Access restrictions by using the Delegate Authority server feature
You may administer all user accounts and passwords centrally from a delegate server as described below. This procedure is intended for network administrators only.
Notes:• You can set access restrictions on shared folders. You cannot set different restrictions on folders in a shared folder. Child folders in a shared folder inherit their permissions from the parent folder.
- When accessing the LinkStation from Windows via SMB, changing permissions from the folder's security tab in the properties screen of a folder is not supported. Access restrictions for shared folders on the LinkStation can only be configured from within the Web Admin interface.
There are restrictions when administrating through a delegate authority server:
- To access the LinkStation, you must be logged into Windows with the account registered to the authentication server.
- If you use the Delegate Authority option, you cannot connect as a guest user via AFP.
- If you use the Delegate Authority option, you cannot connect anonymously via FTP.
Notes:
Windows 7/Vista and Windows Server 2003/Server 2008 users need to change the security settings to use the Delegate Authority to External SMB server feature to restrict access.
[Start] - [BUFFALO] - [File Security Tool] - [File Security Tool], and then select [Change Security level] to change the security settings (Select "Recover default security level" change it back to the previous setting).
You may download the latest version of the File Sharing Security Level Change Tool from www.buffalotech.com.
1
text_image
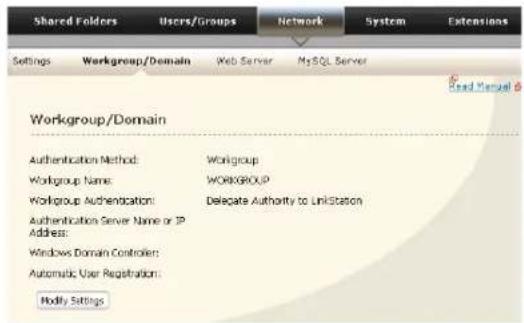
Shared Folders Users/Groups Network System Extensions Settings Workgroup/Domain Web Server MySQL Server Read Manual Workgroup/Domain Authentication Method: Workgroup Workgroup Name: WORKGROUP Workgroup Authentication: Delegate Authority to LinkStation Authentication Server Name or IP Address: Windows Domain Controller: Automatic User Registration: Modify Settings1 In the Web Admin interface, navigate to [Network] - [Workgroup/Domain].
2 Click [Modify Settings].
2

text_image
Workgroup/Domain Authentication Method Workgroup NT Domain Workgroup Name: WORKGROUP WINS Server IP Address: For Workgroup Authentication Delegate Authority to LinkStation Delegate Authority to External SMB Server Save Cancel1 Click [Workgroup] (even if you are in a domain environment).
2 Enter the [Workgroup Name]. To use a Windows Domain Controller as an external SMB authentication server, enter its name for the [Workgroup Name].
3 Select [Delegate Authority to External SMB Server].
3
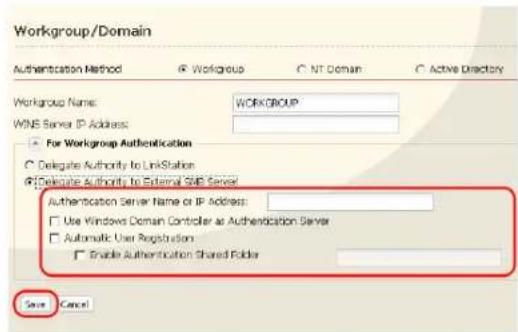
text_image
Workgroup/Domain Authentication Method Workgroup NT Domain Active Directory Workgroup Name: WORKGROUP WINS Server IP Address: For Workgroup Authentication Delegate Authority to LinkStation Delegate Authority to External SNE Server Authentication Server Name or IP Address: Use Windows Domain Controller as Authentication Server Automatic User Registration Enable Authentication Shared Folder Save Cancel1 Enter the [Authentication Server Name or IP Address].
Note: When connecting with AFP or FTP, an IP address is recommended.
2 Check [Use Windows Domain Controller as Authentication Server], [Automatic User Registration] and [Enable Authentication Shared Folder].
3 Enter the shared folder name for authentication.
4 Click [Save].
4 The shared folder for authentication should be created on the LinkStation
A user that has been registered to the specified authentication server will be automatically registered as a user on the LinkStation when they open the shared folder for authentication (you can also register users directly).
Configuration of the Authentication Server is complete.
Notes:
- A user who is automatically registered will belong to the "hdusers" group. They added to other groups from within Group settings.
- You can restrict access to shared folders by username or group.
- The names of registered users are listed in [Users/Groups] - [External Users]. To delete an automatically registered user, select that user and click [Delete].
- When connecting through AFP or FTP, always use an IP address. Using a server name may cause problems with authentication.
- To specify a server from another subnet, enter its IP address.
- AFP and FTP connections do not support delegating authority to an external SMB server.
Disk Quotas
Notes:
- When using quotas, disable the recycle bin or empty the trash folder. The limited space includes the space used for trash.
- Quotas apply per drive or per array. If a Quota is set to 1 GB, each array or drive can use maximum of 1 GB.
- Quotas can't be set for external USB hard drives connected to the LinkStation, only internal drives.
- The LS-CHL LinkStation doesn't support disk quotas in the US and the EU.
Disk space quotas for users
To limit the space of shared folders that each user can use, follow the procedure below.
1

text_image
Shared Folders Users/Groups Network System Extensions Local Users Local Groups Local User Create on Enter User Details Users admin Use ID 52 Document Left to account for abstracting. Buses ID admin Help Use1 In the Web Admin interface, navigate to [Users/Groups] - [Local Users].
2 Click [Create User].
2

text_image
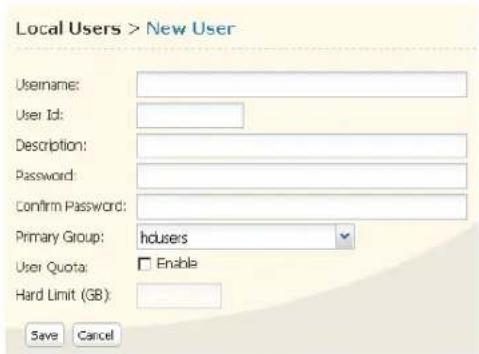
Local Users > New User Username: User Id: Description: Password: Confirm Password: Primary Group: hdusers User Quota: ☐ Enable Hard Limit (GB): Save Cancel1 Enter [Username], [User Id], [Password], and [Description].
Note: User IDs may be between 1000 and 1999. Do not duplicate user IDs.
2 Check [Enable] for [User Quota].
3 Enter the maximum space this user is allowed for the [Hard Limit (GB)].
4 Click [Save].
Notes:
- Username and password must be the same one that the user logs into Windows with. If these values are different, shared folders with access restrictions cannot be accessed.
- Deleting or adding users repeatedly may cause quotas to not work properly.
3 Select [Shared Folders] - [Folder Setup] and click [Create Folder].
4
text_image
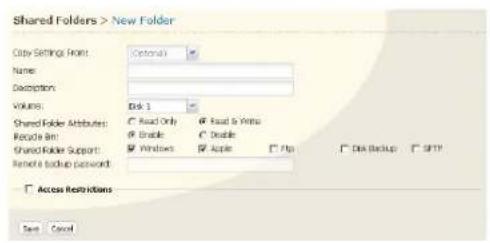
Shared Folders > New Folder City Settings Front: Name: Description: Volume: Shared Folder Attributes: Recycle Bin: Shared Folder Support: Remove Backup Password: Access Restrictions Save Cancel1 Configure the desired settings.
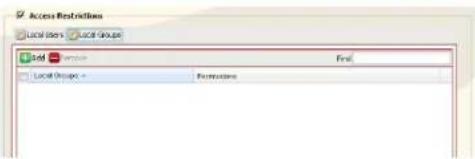
2 Click [Access Restrictions].
5

text_image
Access Restrictions Local Users Local Groups ASM Find Local Users PersistentClick [Add].
6
text_image
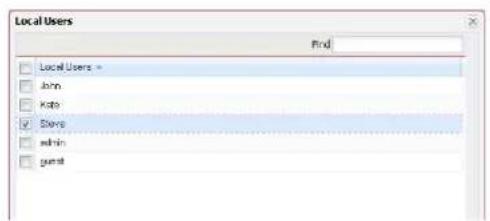
Local Users Find Local Users = John Kate Store admin guest1 Check the user you created in step 2.
2 Click [Add].
7

text_image
Access Restrictions Local Users Local Groups A&T Restriction Field Local Users None Restriction Fixed Only Fixed Only Fixed Only WhiteSelect level of access privileges for the user you added from [Read Only] or [Read & Write].
8 Click [Save].
You've configured a disk quota for users.
Disk space quotas for groups
To limit the space of shared folders that each group can use, follow the procedure below.
1
text_image
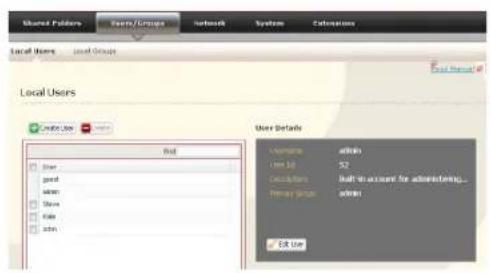
Shared Polders Users/Groups Network System Extensions Local Users Local Groups Local User Create User End User Details Username: within User ID: 52 Classification: built-in account for administering... Primary User: when Edit User1 In the Web Admin interface, select [Users/Groups] - [Local Users].
2 Click [Create User].
2
text_image
Local Users > New User Username: User Id: Description: Password: Confirm Password: Primary Group: hdusers User Quota: Enable Hard Limit (GB): Save Cancel1 Enter [Username], [User Id], [Password] and [Description].
Note:
User IDs may be between 1000 and 1999. Do not duplicate user IDs.
2 Click [Save].
Repeat steps 1 and 2 for each user in the group.
Notes:
- Usernames and passwords should be the same ones that the users log in to Windows with.
- If two different quotas apply, such a user quota and a group quota, the smaller quota is applied.
3

text_image
Shared Folders Users/Groups Network System Extensions Local Users Local Groups Local Groups Create Group Group Details Group Name: admin Group ID: 52 Description: Default Administrator Group Talk Group1 Select [Users/Groups] - [Local Groups].
2 Click [Create Group].
4
text_image
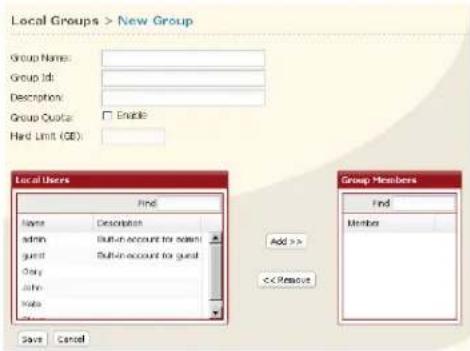
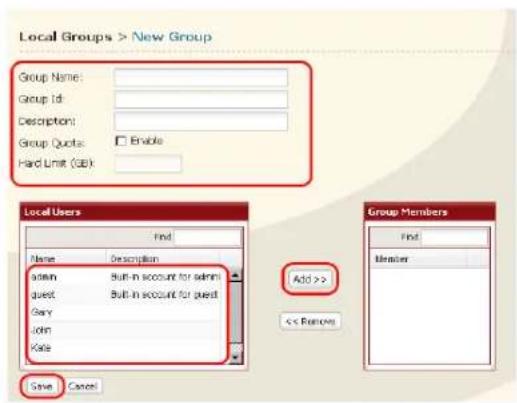
Local Groups > New Group Group Name: Group Id: Description: Group Quotes: Enable Hard Limit (GD): Local Users Find Name Description admin Built-in account for admin guest Built-in account for guest Gary admin Note Save Cancel Add >> << Passive Group Members Find Member1 Enter [Group Name], [Group Id] and [Description]. Note:
The group ID may be any number from 1000 and 1999. Do not duplicate Group IDs.
2 Click [Enable] for [Group Quota].
3 Enter the total space that the group can use in the Hard Limit (GB) field.
4 Select users from step 2 in [Local Users], and click [Add] for each.
5 Click [Save].
Note: • Deleting and adding groups repeatedly may cause quotas to not work properly.
5

text_image
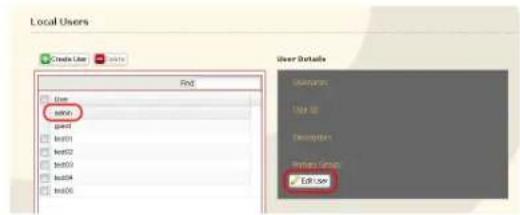
Shared Folders Users/Group Network System Extensions Local Users Local Groups Local Users Construction Name Name Details User Name: City Name of: 1007 Description: Category Name: Address: City List1 Click [Users/Groups] - [Local Users].
2 Select a user from step 2, and click [Edit User].
6

text_image
Local Users > Gary Username: Gary User Id: 1003 Description: Password: ************ Confirm Password: ************ Primary Group: GroupA User Quota: EnableSelect the group created in step 4 for [Primary Group] and click [Save].
7 Click [Shared Folders] - [Folder Setup].
8 Click [Create Folder].
9
text_image
Shared Folders > New Folder Copy Settings From: Name: Description: Volume: Dill 1 Shared Folder Attributes: ● Read Only ● Read & Write ● Enable ● Display ● Windows ● Apple ● Pop □ Disk Backup □ SFTP Recycle Bin: Shared Folder Support: Remote backup password □ Across Restrictions1 Configure the desired settings.
2 Click [Access Restrictions].
10
text_image
Access Restrictions Local Groups Local Groups Add Formulation Final Local Groups Formations1 Click [Local Groups].
2 Click [Add].
11
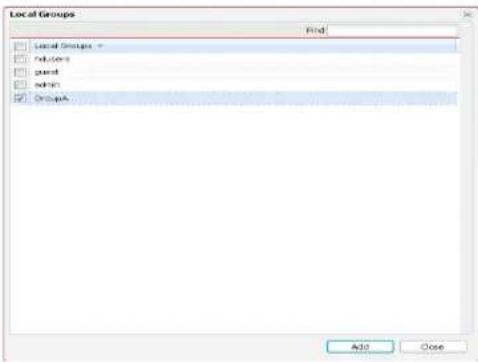
text_image
Local Groups Find Local Groups * Followers goons admin GroupA Add Close1 Check the group you created step 4.
2 Click [Add].
12

text_image
Access Restrictions Local Users Local Groups ADD Policies Field Local Groups - GroupA Formulations Read Only Read Only Read OnlySelect level of access privileges for group you added from [Read Only] or [Read & Write].
13 Click [Save].
You have configured a group quota.
FTP Server
By default, the LinkStation's shares are only accessible by users connected to the same network or router as the LinkStation. The optional FTP server allows users to access the LinkStation from outside of the local network. You may enable it as follows.
1

text_image
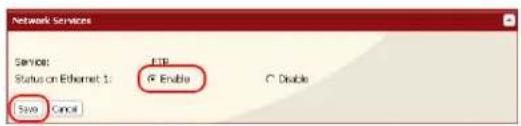
LinkStation Network Management Studio BUFFALO System Information Shared Folder's Users/Groups Network System Extensions Name: SIL-16-CN00_SIP Performance Version: 3.2 IP Address SRL: 318.49.24 Win Group WCP: 251.85.8 Email: 5.0.0.08 / 213.6.06 (0.0.0.0) Settings IP Address Settings Efficient Phone Size Network Services Service Channel 1 MIP MIP InternetIn the Web Admin interface, navigate to [Network] - [Settings] - [Network Services] and click [FTP].
2
text_image
Network Services Service: Status on Ethernet 1: Save Cancel EIR Enable Disable1 Select [Enable].
2 Click [Save].
3
Click [Shared Folders] - [Folder Setup].
4

text_image
Folder Setup Create Folder Name Volume Attribute Recycle Del Support Restrictions File Read Only OK Share Data 8.74 Bits ✓ Windows L, Apple ✓Click the folder to enable remote FTP access on.
5
text_image
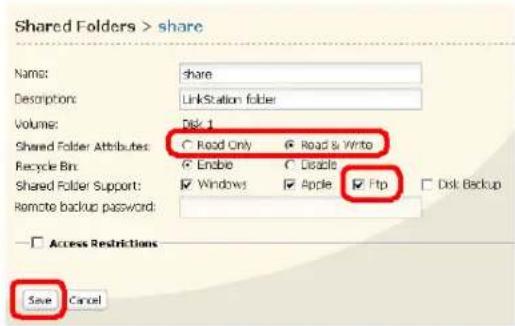
Shared Folders > share Name: share Descriptions: LinkStation folder Volume: Disk 1 Shared Folder Attributes: ○ Read Only ● Road & Write Recycle Bin: ○ Enable ○ Disable Shared Folder Support: ✓ Windows ✓ Apple ✓ Ftp Remote backup password: □ Access Restrictions Save Cancel1 Select whether the shared folder is [Read Only] or [Read & Write].
2 Check [Ftp].
3 Click [Save].
The folder is now configured for FTP access. Do not forget to give read (or write) permissions for the FTP share to any users that will be accessing the share remotely. Folder permissions can only be changed from the Web Admin interface. Changing them remotely with FTP client software is not supported.
To access to the LinkStation with an FTP client
Configure your FTP client software with the following settings:
- Host Name IP address of the LinkStation.
- Username Username registered on the LinkStation
- Password Password registered to the LinkStation
- Port 21
Example ftp://192.168.11.150/
- You cannot write by FTP if the shared folder is set to read-only on the LinkStation.
- Access restrictions are applied based on the settings in the LinkStation. The restrictions are not displayed for users without permissions for the share.
- To access your FTP share from outside of your network, you may need to configure your router and firewall. Consult your router documentation for more information.
-
Shared folders appear as follows when connected by FTP:
-
disk1 share
- usbdisk1
-
info
-
The internal hard drive of the LinkStation is displayed as disk1, and a USB hard drive (optional) will be displayed as usbdisk1.
- "usbdisk1" is not displayed when the USB hard drive is not connected, or if access is restricted.
Accessing the LinkStation with an Anonymous user:
To allow anonymous access to your FTP share, disable access restrictions on the FTP share.
Configure your FTP client as follows:
- Host Name IP address of the LinkStation
- Username anonymous
- Password any set of characters
- Port 21
Example ftp://192.168.11.150/
- To make your FTP share available from outside your network, you will need to configure your router and firewall. Consult your router's documentation for information on how to allow FTP traffic.
- If the LinkStation joins a domain, anonymous users cannot access it.
- Folders created or copied via an AFP connection may not be deleted from the AFP connection. This is because an automatically generated ".AppleDouble" folder begins with a dot. To delete these files, use an SMB connection.
- Do not exceed 250 characters for a file/folder name including directory path when you are creating it by using an FTP connection. Otherwise, you cannot view or delete it in Explorer or other applications.
Direct Copy
DirectCopy automatically copies movie, music, and images directly to the LinkStation from a USB device.
You can connect many types of USB devices to the LinkStation, including USB hard drives, USB flash drives, single-card card readers, digital cameras, and USB printers. USB hubs, mice, keyboards, and card readers that support 2 or more cards are not supported.
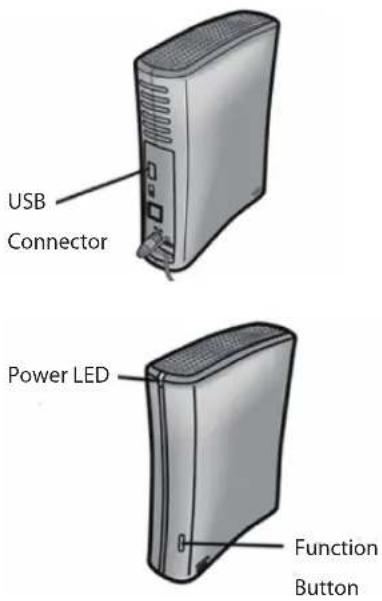
1 Connect to a USB device (USB flash/digital camera/hard disk/card reader) to the LinkStation.
text_image
USB Connector Power LED Function ButtonAfter the USB device is recognized, the function button is lit in blue for 60 seconds. After the function button is lit in blue, you can access the USB device.
If an unsupported USB memory device is connected to the LinkStation, then the function button will not light up in blue, and the device will not be mounted.
2 While the function button is blue, press it to automatically copy data from the USB device to a shared folder on the LinkStation. The function button will flash blue during the copy. Push the function button again to abort the copy.

text_image
Target: share Save CancelFiles are copied to the folder:
yyyy: year copied
mm: month copied
dd: date copied
You may change the destination shared folder for DirectCopy in [Shared Folders] - [Direct Copy] - [Modify Settings] in the Web Admin interface. Subsequent DirectCopy folders are created at:
yyyy: year copied
mm: month copied
dd: date copied
n: 1st time n=0, 2nd time n=1, 3rd time=2 and so on.
For USB Mass Storage class USB devices, files with following extensions will be copied.
avi, divx, asf, mpg, mpe, m1v, vob, mts, m2ts, m2t, mpeg, mpeg2, vdr, spts, tp, ts, 3gp, mov, m4v, wmv, dvr-ms, xvid, mp4, jpg, jpeg, gif, png, tif, tiff, yuv, bmp, mp3, mpa, wma, aac, apl, ac3, lpcm, pcm, wav, m3u, m4a, m4b, aif, aiff, flac, ogg, mp2, mp1
For digital cameras that do not follow the USB Mass Storage Class standard, all files on the device will be copied.
3 When the access LED of the USB device goes off, the copy is finished. Dismount the USB device before unplugging it.
To dismount the USB device if the LinkStation is on, hold in the function button for 3 seconds. The blue LED will go out, and the USB device is dismounted. You may now unplug it safely.
If you turn off the LinkStation, the USB device is already dismounted, and you can remove it safely.
Users/Groups
Adding Users
Add users as shown below.
1

text_image
LinkStation Buffalo System automation Shared Editors User/Design Network Services Extensions Server 1.00 GB / 1.00 GB Database name: 1.00 GB IP address: 1.00 GB Address: 1.00 GB Local Server Local Server Local Server Local Server User Details Name: user: user1: user2: user3: user4: user5: user6: user7: user8: user9: user10: user11: user12: user13: user14: user15: user16: user17: user18: user19: user20: user21: user22: user23: user24: user25: user26: user27: user28: user29: user30: user31: user32: user33: user34: user35: user36: user37: user38: user39: user40: user41: user42: user43: user44: user45: user46: user47: user48: user49: user50: user51: user52: user53: user54: user55: user56: user57: user58: user59: user60: user61: user62: user63: user64: user65: user66: user67: user68: user69: user70: user71: user72: user73: user74: user75: user76: user77: user78: user79: user80: user81: user82: user83: user84: user85: user86: user87: user88: user89: user90: user91: user92: user93: user94: user95: user96: user97: user98: user99: user100:1 In the Web Admin interface, navigate to [Users/Groups] - [Local Users].
2 Click [Create User].
2

text_image
Local Users > New User Username: Kevin User Id: Description: Password: ••••••• Confirm Password: ••••••• Primary Group: hdusers User Quota: ☐ Enable Hard Limit (GB): Save Cancel1 Configure the desired settings for the new user.
2 Click [Save].
You have added a user.
Use the same username and password that the user logs into Windows with. If the username and passwords are different, the user may not be able to access restricted shares.
Notes:
- When using access restrictions, you can register up to 300 users on the LinkStation.
- Please do not use any of the following words as a username or a group name:
root, bin, daemon, sys, adm, tty, disk, lp, sync, shutdown, halt, operator, nobody, mail, news, uucp, ftp, kmem, utmp, shadow, users, nogroup, all, none, hdusers, admin, guest, man, www, sshd, administrator, ftpuser, apache, mysql
- If you are using Mac OS 9 or earlier, do not use more than 9 alphanumeric characters for the user password, or the user will not be able to access shared folders on the LinkStation.
Adding Groups
Add groups as shown below:
1

text_image
Link Station BUFFALO System Information Shared Patterns Open Groups Networks System Information Local Groups Local Groups Local Groups Send Data Send Settings Send Details Send User Send User Send User Send User Send User Send User Send User Send User Send User Send User Send User Send User Send User Send User Send User Send User Send User Send User Send User Send User Send User Send User Send User Send User Send User Send User Send User Send User Send User Send User Send User Send User Send User Send User1 In the Web Admin interface, navigate to [Users/Groups] - [Local Groups].
2 Click [Create Group].
2
text_image
Local Groups > New Group Group Name: Group Id: Description: Group Quotes: Enable Hard Limit (SB): Local Users Find Name Description admin Built-in account for admin guest Built-in account for guest Gary John Kate Add >> << Remove Group Members Find Member Save Cancel1 Enter [Groupe Name] and [Description].
2 Select users to include in the group.
3 Click [Add], then [Save].
You have added a group.
Please do not use any of the following words as a group name:
root, bin, daemon, sys, adm, tty, disk, lp, sync, shutdown, halt, operator, nobody, mail, news, uucp, ftp, kmem, utmp, shadow, users, nogroup, all, none, hdusers, admin, guest, man, www, sshd, administrator, ftpuser, apache, mysql
Admin Password
You may change the admin password as follows.
1

text_image
LinkStation BUFFALD System Information Share/Database Store/Group Network System Customs Local Bins Local Groups Local Users Create User Add User Details Name: 123 Address: 107 Contact: 108 Key Address: 108.000 User Groups Users: Design: Test:In the Web Admin interface, navigate to [Users/Groups] - [Local Users].
2
text_image
Local Users Create User End User edit grip1 edit1 edit2 edit3 edit4 edit5 Edit User User Details Description Use ID Description Preview User Edit UserSelect [admin] and click [Edit User].
3

text_image
Local Users > admin Username: admin User Id: 52 Description: Built-in account for administering the system Password: ********** Confirm Password: ********** Primary Group: admin Save Cancel1 Enter a [Username] and [Password].
2 Click [Save].
You have now changed the admin password.
Note: You cannot set access restrictions or use WebAccess with the admin account. Use the admin account only to log in to the Web Admin interface.
Network
Jumbo Frame
If your other network devices support it, you may be able to increase network performance with Jumbo Frame.
1
text_image
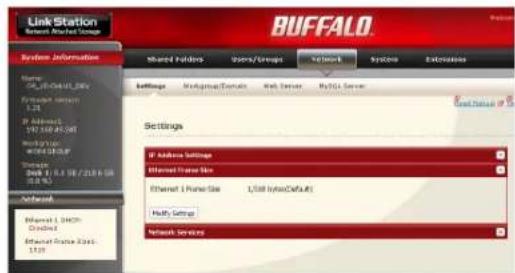
Link Station Network Market Data BUFFALO System Information Name: SP_01-0445.20v System Services List IP Address: 192 368 45-06f Network WORKS Service Database Disk 1 8.1 18 / 23.6 18 (8.8 %) Network Internet 1.000 Compiled Internet Service Class: 1319 Shared Portfolio Users/Groups Network Systems Extremation Settings Configuration/Services Web Server Web1 Server Settings IP Address Settings Ethernet Frame Size Ethernet 1 Prime Size: 1,500 bytes/Default Fully Setup Network Services1 In the Web Admin interface, navigate to [Network] - [Settings] - [Ethernet Frame Size].
2 Click [Modify Settings].
2

text_image
Ethernet Frame Size Ethernet: 1 Frame Size 1.518 (kbpsDefault) Save Cancel1 Select [Ethernet Frame Size].
2 Click [Save].
Notes: • To use the LinkStation with Jumbo Frame, your router/switch/hub must support Jumbo Frame.
- To use Jumbo Frame (4102/7422/9694 bytes), your computer's NICs and all switches, hubs, and routers on the transmission route need to support Jumbo Frame. If any device on the route does not support Jumbo Frame, use standard transmission (1518 bytes) instead.
- If you are using Jumbo Frame and back up data from a LinkStation/TeraStation to another LinkStation/TeraStation, set the Ethernet frame sizes of the LinkStations/TeraStations to the same settings (or the closest available). If the Ethernet frame sizes are significantly different, the backup job may fail. If you have problems with backup jobs, select the default frame size (1518 bytes).
| Connection Transmission | ||||
 Jumbo Frame(4102/7422/9694) Jumbo Frame supported Jumbo Frame supported Jumbo Frame(4102/7422/9694) Jumbo Frame supported Jumbo Frame supported |  | TransmitJumbo Frame(4102/7422/9694) | ||
 Jumbo Frame(4102/7422/9694) Jumbo Frame Supported Jumbo Frame not supported Jumbo Frame(4102/7422/9694) Jumbo Frame Supported Jumbo Frame not supported |  | Transmitnormally(15 18 ) | ||
| KKYC]Jumbo Frame(4102/7422/9694) Jumbo Frame not supported Jumbo Frame not supported |  | Transmitnormally(15 18 ) | ||
 Jumbo Frame(4102/7422/9694) Jumbo Frame not supported Jumbo Frame supported Jumbo Frame(4102/7422/9694) Jumbo Frame not supported Jumbo Frame supported |  | No transmission | ||
Web server
The LinkStation can be used as a Web server.
HTML, CGI scripts, images, and JavaScript are supported.
Notes: • The LinkStation's Web server is for advanced users only. Do not enable it unless you know what you're doing.
• The LS-CHL LinkStation does not support Web server.
1 Navigate to [Network] – [Web Server] – [Web Server Settings] in the Web Admin interface and click [Modify Settings].
2 Select [Enable] for [Web Server], choose an external port setting (81 is the default) for [Port No.] and a Web server public folder for [Target Folder], and click [Save].
3

text_image
Web Server Settings Web Server: 01 Enable Double Port No.: 63 Target Folder: Save Cancel <|vision_start|> Apache settings File Import php.ini Import Manual Edit php.ini Save Restore Default SettingsEdit the php.ini file to change the PHP language interpreter settings. Instructions are in the file.
The Web server is now configured.
MySQL server
The LinkStation can be used as a MySQL server.
A MySQL database may be installed and linked with the web server.
Notes: • The LinkStation's MySQL server is for advanced users only.
- Do not enable it unless you know what you're doing.
• The LS-CHL LinkStation does not support MySQL server.
1 Navigate to [Network] – [MySQL Server] in the Web Admin interface and click [Modify Settings].
2 Select [Enable] for [MySQL Server], choose a [Port No.] and [Data Folder], and click [Save].

text_image
MySQL Server Settings MySql Server: 4 Double 5 Double Port No.: 3000 Data Folder: share Save CancelThe MySQL server is now configured.
System-Settings
Name, Date and Time
Configure the LinkStation's host name, date, or time as follows:
1
text_image
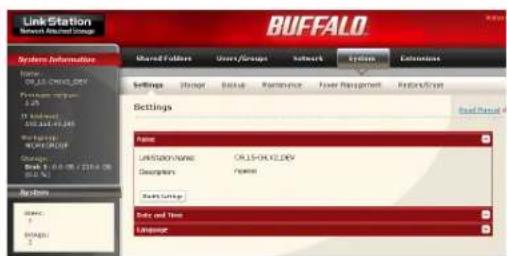
Link Station System Information BUFFALO Shared Factors User Groups Network System Settings Name Link Station Name: ORUS-ORUS-DRX Description: Name Data Group Date and Time Settings1 In the Web Admin interface, navigate to [System] - [Settings] - [Name].
2 Click [Modify Settings].
2

text_image
Name: LinkStation Name: XXXXXXXX Description: XXXXXXXX Save CancelEnter the [LinkStation Name] and [Description], then click [Save].
3
text_image
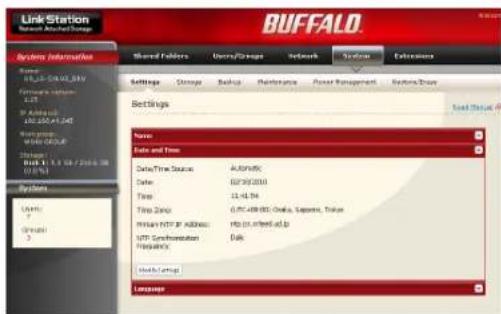
LinkStation Bench Information Name: BLK-5-0402.SH External network: BLK IP Address: 196 000 01.045 Network: WTR GROUP Storage: 8/03/11.16/2016.08 Systems Length: 7 Groups: 3 Shared Folders Users/Groups Network System Extensions Settings Storage Backup Maintenance Power Management Systems Group Settings Total Status: Name: Date and Time: Date/Time Status: Automatic Date: 02/29/2009 Time: 11:44:54 Time Date: 6:30:48:00; Open, Save, Print Internal HTTP Address: http://a.1698/sd.b MTP Consultation: Black Proposition: Email Settings Language1 In the Web Admin interface, navigate to [System] - [Settings] - [Date and Time].
2 Click [Modify Settings].
4
text_image
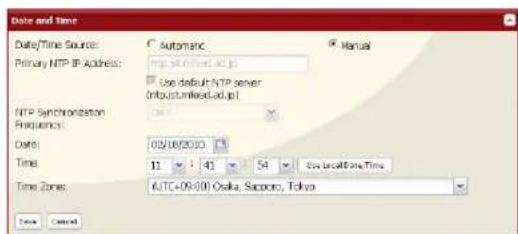
Date and Time Date/Time Source: Automatic Manual Primary NTP IP Address: http://mnlnrd.ad.jp Use default NTP server http://mnlnrd.ad.jp/ NTP Synchronization Frequency: Date: 02/08/2010 Time 11 : 41 : 54 Use LocalTime.Time Time Zones: UTC+09:00 Osaka, Sapporo, Tokyo Time Cancel1 Enter the [Date] and [Time].
2 Click [Save].
Click [Use Local Date/Time] to use your computer's time settings for the LinkStation.
By default, the LinkStation adjust its clock automatically by using an NTP server.
NTP
NTP may not be usable in some networks.
The default NTP Server (ntp.jst.mfeed.ad.jp) belongs to Internet Multi Feed Inc. For more information, please visit www.jst.mfeed.ad.jp.
Use NTP at your own risk. Buffalo Technology is not responsible for any loss or damage caused by using of this service, stopping the service, or missing service.
You've completed hostname and time settings for the LinkStation.
Note: The LinkStation's internal clock may run at a slightly different speed from other clocks on you network, and over a long period of time your network devices may show different times. If clocks on your network vary by more than 5 minutes it may cause unexpected behavior. For best results, keep all clocks on the network set to the same time by adjusting them regularly, or use an NTP server to correct them all automatically.
System-Storage
Check Disk
A disk check tests the data on a drive in the LinkStation or connected via USB. Errors are fixed automatically. A disk check may run for more than ten hours. Shared folders cannot be accessed during the disk check. Do not turn off power to the LinkStation during the disk check.
If the Power Mode Switch is set to AUTO, then the LinkStation will turn off when the disk check is finished.
Run a disk check as follows:
1
text_image
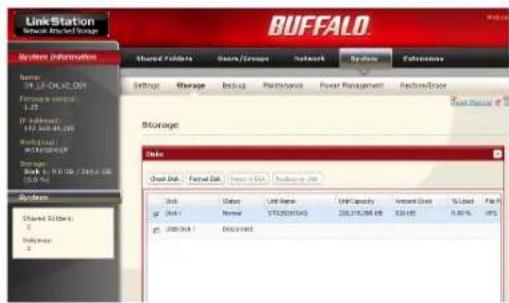
Line Station Security Information Name: 01.18-04V2.031 Email: wstc 1.25 If addressed: 192.648.031 Stock(s): Wt@wstc.com/ Storage: Bank 1: 01.08 / 07.01.08 S/N Data Shared Portfolio Share/Group Network Systems Settings Settings Manage Backup Pathways Power Management Electro/Store Storage Delete Check Data Format Data Update Data Database Data Disk Status Unit Name Unit Capacity Internet Grid %Listed FailUnit 1
Normal (0120)0154G 203,316,088 KB $3.00 8.80%Unit 2
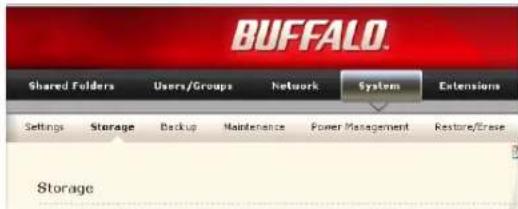
DiscountIn the Web Admin interface, navigate to [System] - [Storage].
2

text_image
Disk Check Disk Format Disk Remove Disk Recoverize Disk Disk Status Unit Name Unit Capacity Amount Used % Used File Disk 1 XXXXXX ST20837045 229,216388KB 628 KB 0.00 % USB Disk 1 XXXXXX1 Select the hard drive to test.
2 Click [Check Disk].
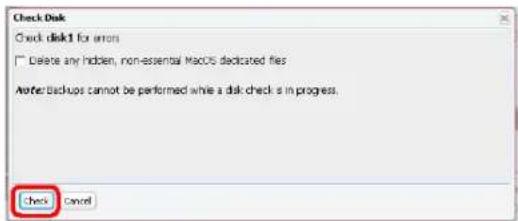
3
text_image
Check Disk Check disk1 for errors Delete any hidden, non-essential MacOS dedicated files After: Backups cannot be performed while a disk checks in progress. Check CancelClick [Check].
The Status LED on the front of the LinkStation will flash during the disk check.
Note: If a power outage disconnects the LinkStation in the middle of a disk check, then you may not be able to access shares on the LinkStation from Mac OS. This is because the database created by Mac OS is damaged. To resolve, navigate to [System] - [Storage] - [Check Disk] and check [Delete any hidden, non-essential Mac OS dedicated files]. Rerun the disk check when done.
Note: If you access a shared folder from a Macintosh computer, information files for Macintosh may be automatically generated. Do not delete these files from a Windows computer. Otherwise, you may no longer be able to access folders from the Macintosh. If you cannot access them, check [Delete any hidden, non-essential Mac OS dedicated files] in [System] - [Storage] - [Check Disk].
Format a Drive
- A format deletes all data from a hard drive. Be careful! Back up any important data on a drive before formatting it. It will take several minutes to format a hard drive.
- Shared folders cannot be accessed during formatting.
- Do not turn off the power switch or disconnect power while formatting a hard drive.
- If the Power Mode Switch is set to AUTO, then the LinkStation will turn off when the format is finished.
• To erase all data on a disk, choose [Disk Management] - [Erase Disk].
1
text_image
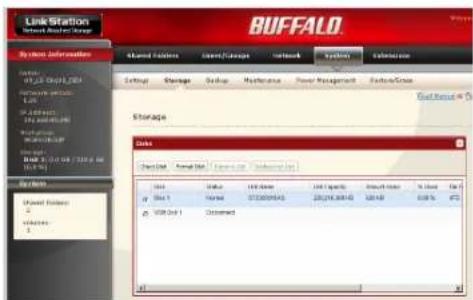
BUFFALO Shared Folders Users/Groups Network System Extensions Settings Storage Backup Maintenance Power Management Resture/Reuse StorageIn the Web Admin interface, navigate to [System] - [Storage].
2
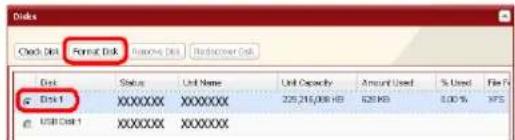
text_image
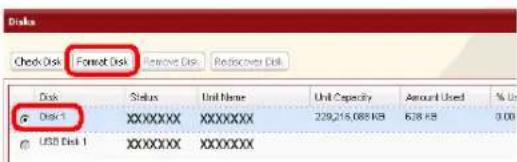
Disk Check Disk Format Disk Remove Disk Reiscover Disk Disk Status Unit Name Unit Capacity Amount Used % Use Disk 1 XXXXXXX XXXXXXX 239,215,088 KB 6.38 KB 0.00 USB Disk 1 XXXXXXX XXXXXXX1 Select the drive to format.
2 Click [Format Disk].
3

text_image
Format Disk Format disk 1: File System: XPS □ GPT Partition Note: Backups cannot be performed while a disk format is in progress. Also, in case of a disk failure, encrypted data cannot be recovered. Format CancelClick [Format].
4
The [Confirm Operation] screen will be displayed. Type the displayed number into the [Confirmation Number] field within 60 seconds, then click [Apply].
5
Follow the instructions displayed on the screen.
Note: The time needed to format a hard drive varies based on the hard drive's size and format types (a few seconds to several minutes).
The Info LED on the front of the LinkStation will flash during formatting. The LinkStation's shared folders cannot be accessed until the disk format is complete.
If the hard drive is connected to the USB connector, partitions will be recreated.
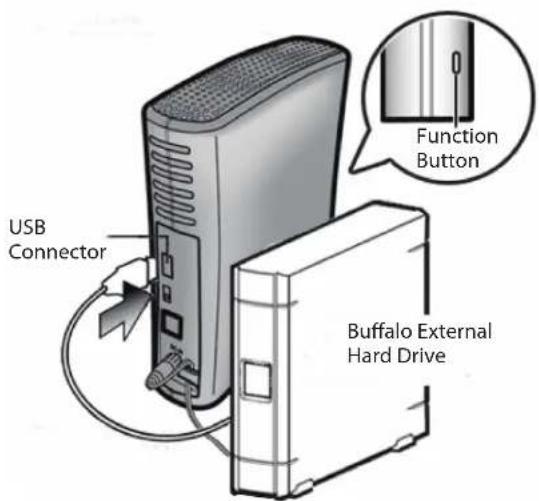
Adding Storage
The LinkStation has a USB connector on the back. You can connect a Buffalo external hard drive to the USB Port. It will appear as an additional shared folder on the LinkStation.
Connect the hard drive as shown below. If the hard disk is not formatted, format it from the Web Admin interface.
Refer to page 64 when removing the hard drive from the LinkStation.
text_image
USB Connector Function Button Buffalo External Hard Drive- Only one hard drive can be connected to the LinkStation at a time. Bus powered drives are not supported. Always use the drive's AC adapter.
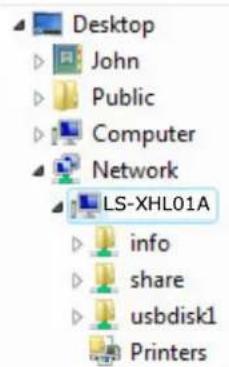
text_image
Desktop John Public Computer Network LS-XHL01A info share usbdisk1 PrintersIf the drive is connected properly, [usbdisk1] will be added to the shares under the LinkStation in Network.
Note: If the USB drive is formatted with FAT 32 (or FAT 16), files created by Mac OS X automatically (such as .DS_Store) cannot be backed up to this drive.
To format a USB hard drive
For best results with the LinkStation, reformat the external USB drive from the Web Admin interface. Formatting will delete all data on the drive. Back up any important data before formatting.
1
text_image
Link Station Stock Exchange Manager Buffalo System Information Stored Resources Stored/Storage Network Systems Settings Settings Storage Storage Stock Volume 100 shares 100 shares Total shares Total shares Share 1 Share 2 Share 3 Share 4 Share 5 Share 6 Share 7 Share 8 Share 9 Share 10 Share 11 Share 12 Share 13 Share 14 Share 15 Share 16 Share 17 Share 18 Share 19 Share 20 Share 21 Share 22 Share 23 Share 24 Share 25 Share 26 Share 27 Share 28 Share 29 Share 30 Share 31 Share 32 Share 33 Share 34 Share 35 Share 36 Share 37 Share 38 Share 39 Share 40 Share 41 Share 42 Share 43 Share 44 Share 45 Share 46 Share 47 Share 48 Share 49 Share 50 Share 51 Share 52 Share 53 Share 54 Share 55 Share 56 Share 57 Share 58 Share 59 Share 60 Share 61 Share 62 Share 63 Share 64 Share 65 Share 66 Share 67 Share 68 Share 69 Share 70 Share 71 Share 72 Share 73 Share 74 Share 75 Share 76 Share 77 Share 78 Share 79 Share 80 Share 81 Share 82 Share 83 Share 84 Share 85 Share 86 Share 87 Share 88 Share 89 Share 90 Share 91 Share 92 Share 93 Share 94 Share 95 Share 96 Share 97 Share 98 Share 99 Share 100In the Web Admin interface, navigate to [System] - [Storage].
2
text_image
Disk Check Disk Format Disk Remove Disk Hardcover Disk Disk 1 XXXXXXX XXXXXXX XXXXXXX XXXXXXX XXXXXXX XXXXXXX XXXXXXX XXXXXXX XXXXXXX XXXXXXX XXXXXXX XXXXXXX XXXXXXX XXXXXXX XXXXXXX XXXXXXX XXXXXXX XXXXXXX XXXXXXX XXXXXXX XXXXXXX XXXXXXX XXXXXXX XXXXXXX XXXXXXX XXXXXXX XXXXXXX XXXXXXX XXXXXXX XXXXXXX XXXXXXX XXXXXXX XXXXXXX XXXXXXX XXXXXXX XXXXXXX XXXXXXX XXXXXXX XXXXXXX XXXXXXX XXXXXXX XXXXXXX XXXXXXX XXXXXXX XXXXXXX XXXXXXX XXXXXXX XXXXXXX XXXXXXX XXXXXXX XXXXXX XXXXXXX XXXXXXX XXXXXXX XXXXXXX XXXXXXX XXXXXXX XXXXXXX XXXXXXX XXXXXXX XXXXXXX XXXXXXX XXXXXXX XXXXXXX XXXXXXX XXXXXXX XXXXXXX XXXXXXX XXXXXXX XXXXXXX XXXXXXX XXXXXXX XXXXXXX XXXXXXX XXXXXXX XXXXXXX XXXXXXX XXXXXXX XXXXXXX XXXXXXX XXXXXXX XXXXXXX XXXXXXX XXXXXXX XXXXXXX XXXXXXX XXXXXXX XXXXXXX XXXXXXX XXXXXXX XXXXXXX XXXXXXX XXXXXXX XXXXXXX XXXXXXX XXXXXXX XXXXXXX XXXXXXX XXXXXXX XXXXXXX XXXXX XXXXXXXXXXXXX XXXXXXXXXXXXX XXXXXXXXXXXXX XXXXXXXXXXXXX XXXXXXXXXXXXX XXXXXXXXXXXXX XXXXXXXXXXXXX XXXXXXXXXXXXX XXXXXXXXXXXXX XXXXXXXXXXXXX XXXXXXXXXXXXX XXXXXXXXXXXXX XXXXXXXXXXXXX XXXXXXXXXXXXX XXXXXXXXXXXXX XXXXXXXXXXXXX XXXXXXXXXXXXX XXXXXXXXXXXXX XXXXXXXXXXXXX XXXXXXXXXXXXX XXXXXXXXXXXXX XXXXXXXXXXXXX XXXXXXXXXXXXX XXXXXXXXXXXXX XXXXXXXXXXXXX XXXXXXXXXXXXX XXXXXXXXXXXXX XXXXXXXXXXXXX XXXXXXXXXXXXX XXXXXXXXXXXXX XXXXXXXXXXXXX XXXXXXXXXXXXX XXXXXXXXXXXXX XXXXXXXXXXXX1 Select the USB hard drive.
2 Click [Format Disk].
3
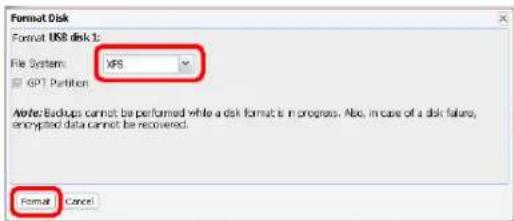
text_image
Format Disk Format USB disk 1: File System: XPS GP&T Partition Able: Backups cannot be performed while a disk format is in progress. Able, in case of a disk failure, encrypted data cannot be recovered. Format Cancel1 Select a format type (see next page).
2 Click [Format].
4
The [Confirm Operation] screen will be displayed.
Enter the number shown in the [Confirmation Number] field within 60 seconds, and click [Apply].
5
Follow the instructions on the screen.
When the format is complete, create a shared folder on the drive.
Note:
| Format type Advantages Disadvantages | ||
| FAT 32Drives formatted with FAT 32 can be disconnected from the LinkStation and connected to a Windows or Mac computer directly. They work well with many devices, but do not support large filesizes. | ·Read/Write support with LinkStation, PCs, and Macs.·You can connect the hard drive to a Windows PC or a Mac at any time and use it normally. | ·Cannot copy or back up files larger than 4 GB.·Cannot use some characters from Mac OS X such as [:].·It takes extra time to access from the Web Admin interface or NAS Navigator2. |
| EXT3This is recommended if you may have to reconnect to and use other LinkStation/TeraStation. | ·Supports both Reading and Writing.·Supports Journaling File System.·Also available when connecting to other LinkStation. | ·May take a while to format (a few minutes to several minutes).·Less space is available than XFS after format.·the more files in a folder, the slower the access.*You cannot read data by directly connecting a PC. |
| XFSThis format is recommended when you only use the drive with a LinkStation or TeraStation. | ·Supports both Reading and Writing.·Supports Journaling File System.·More space is available with XFS after format.·Access speed will not degrade even though more files in 1 folder. | Not supported by legacy LinkStations such as HD-LAN, HD-HLAN, HD-HGLAN Series. You cannot read data by directly connecting to a PC. |
| NTFSNTFS works well with Windows PCs. Read-Only from the LinkStation. | Can be used with Windows XP, Windows 2000, Vista, Windows Server2003, and Windows Server2008. | ·Read-only from the LinkStation or a Mac.·Not suitable for backup from the LinkStation. |
| HFS+HFS+ works well with Macs. Read-Only from the LinkStation. | Can be used to connect to Mac OS X 10.3.9 or later. | ·Read-only from the LinkStation.·Not suitable for use with Windows PCs. |
To set access restrictions on an additional hard drive
You can set access restrictions for shares on an external USB hard drive. In the Web Admin interface, navigate to [Shared Folders] - [Folder Setup].
Note: Even if a shared folder is not visible, you can still format the drive, run a disk check, or back up to the external USB hard drive.
About the USB connector on the LinkStation
- You can connect many types of USB devices to the LinkStation, including USB hard drives, USB flash drives, single-card card readers, digital cameras, and USB printers. USB hubs, mice, keyboards, and card readers that support 2 or more cards are not supported.
- One hard drive or other device may be connected to the LinkStation at a time. USB hubs are not supported. Only Buffalo hard drives are supported.
- Hard drives with their Power Mode Switch set to AUTO may not be recognized by the LinkStation. Set the Power Mode Switch to MANUAL for use with the LinkStation.
- Bus-powered hard drives are not supported. Always use the AC adapter for a hard disk.
- Only the primary partition of USB hard drives can be recognized. Secondary or other partitions will not be recognized.
- If the external USB drive is formatted as FAT32 or FAT 16, you may not be able to copy or back up files or folders from Mac OS X to it. These files may include characters that are not supported by FAT 32 or FAT 16.
- When you back up to a FAT 32 USB hard drive with Overwrite Backup (Differential) enabled, the system may overwrite data even though there are no difference in data. If the second of the date when the file created is an odd number, an overwrite backup is performed every time regardless of differences in the data.
Remove Disk
To remove the hard drive:
If the LinkStation is powered on, dismount the USB hard drive before unplugging it. Hold in the function button for 3 seconds. The blue LED will go out, and the drive is dismounted. You may now unplug it safely.
If the LinkStation is off, then the USB device is already dismounted, and you can remove it safely.
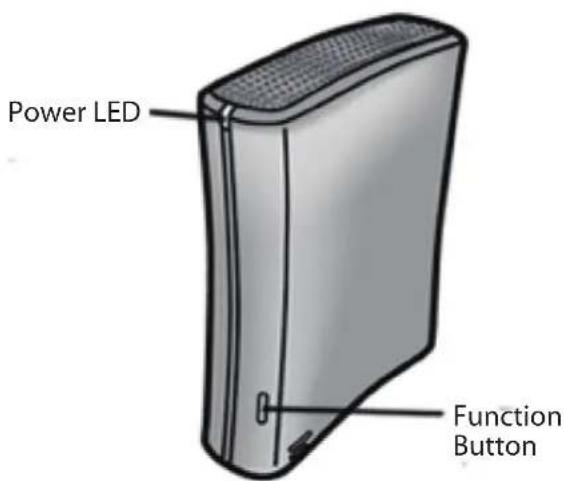
text_image
Power LED Function ButtonSystem Backup
Time Machine
Time Machine is a backup program included with Mac OS X 10.5 and later version. It can back up to your LinkStation if you configure the LinkStation as follows:
1
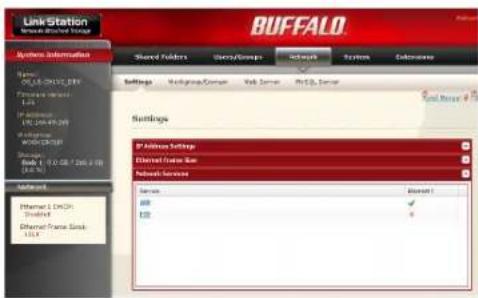
text_image
Link Station Network Information BUFFALO Shared Folders Item/Groups Internet System Database Name: C:\Users\CH\CH\CH\CH\CH\CH\CH\CH\CH\CH\CH\CH\CH\CH\CH\CH\CH\CH\CH\CH\CH\CH\CH\CH\CH\CH\CH\CH\CH\CH\CH\CH\CH\CH\CH\CH\CH\CH\CH\CH\CH\CH\CH\CH\CH\CH\CH\CH\CH\CH\Cherry Settings Membership/Cancel Web Server PCB2 Server Serial Server 100% Settings IP Address Settings Channel Frame Size Network Services Services Blank 1 OK ✓ USB 41 In the Web Admin interface, navigate to [Network] - [Settings] - [Network Services].
2 Click [AFP].
2
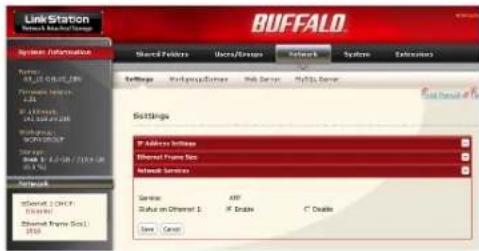
text_image
Link Station Network Information BUFFALO System Information Server: 68.000.000.000 Network Server: 1234 IP Address: 95.000.000.000 Network Service: 1234 Storage: 1.0 GB/7.0 GB/1.0 GB Network Internet: 1234 Internet Frame Size: 1234 Network Services Service: 68 Status on Channel 1: IP Address C Double Save: CancelSelect [Enable] and click [Save].
3
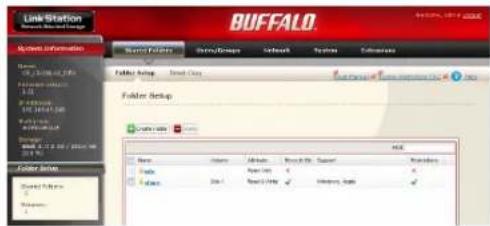
text_image
Link Station BUFFALO Share Information Name: 01-2008-06-20 File Size: 1.51 Format Setup: Direct Type Folder Setup Folder Setup Name: 01-2008-06-20 File Size: 1.51 Format Setup: Direct Type Folder Setup Name: 01-2008-06-20 File Size: 1.51 Format Setup: Direct Type Folder Setup Name: 01-2008-06-20 File Size: 1.51 Format Setup: Direct Type Folder Setup Name: 01-2008-06-20 File Size: 1.511 Click [Shared Folders].
2 Select a shared folder to use as the backup destination for Time Machine, or create a new share and then select it.
4

text_image
Shared Folders > share Name: share Description: BuffatioNas folder Volume: Disk 1 Shared Folder Attributes: Open Only Open Read & Write Recycle Birc: Enable Open Disable Shared Folder Support: Windows Apple Flip Disk Backup Remote backup password: Access Restrictions Save Cancel1 Select [Apple].
2 Click [Save].
5

text_image
LinkStation System Information Name: 10.1.04-01.04 System Information 1.2 Up address: 15.10.04-01.04 Parameters: WIND GROUP Show: Book 8 (No. 26/104) on (3.2.5) Extensions Shared Portfolio Volume: 1 Buffalo Shared Portfolio Name: Time Machine User Machine Time Machine Updated Target Model Share Help Service... Net Information Target Net Name: Target MFC Address: Units1 Click [Extensions] - [Time Machine].
2 Click [Modify Settings].
6
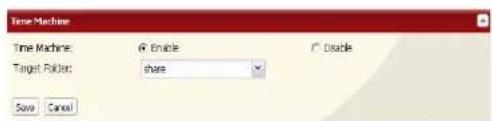
text_image
Time Machine Time Machine: Edit Target Folder: share Save Cancel1 Select [Enable].
2 Select the shared folder that you chose in step 3.
3 Click [Save].
7

text_image
Mac Information Target host name: Target MAC address: Credits1 Enter the [Target host name].
2 Enter the [Target MAC address].
3 Click [Create].
- You can find the Mac's host name under [Computer Name] in [System Preferences] - [Sharing].
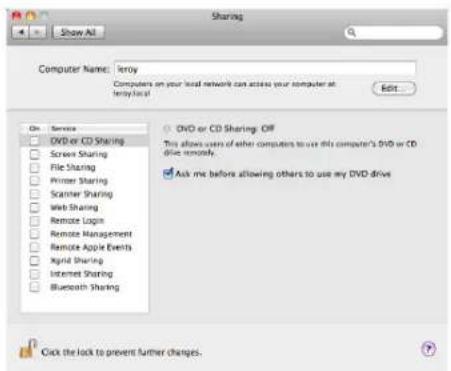
text_image
Sharing Show All Computer Name: Teroy Computers on your local network can access your computer at TeroyLocal Edit... On: Service DVD or CD Sharing Screen Sharing File Sharing Printer Sharing Scanner Sharing Web Sharing Remote Login Remote Management Remote Apple Events Xpial Sharing Internet Sharing Bluetooth Sharing DVD or CD Sharing OFF This allows users of other computers to use this computer's DVD or CD drive remotely. Ask me before allowing others to use my DVD drive Click the lock to prevent further changes.e.g.) If it is displayed as "bbbbbbbbbbb.local", enter "bbbbbbbbbbb" for the host name. If it is displayed as "cccccccccc.eee-ee.local", enter "cccccccccc" for the host name. If it is displayed as "ddddddddddd.fff-ff.jp", enter "dddddddddddd" for the host name.
•To verify the MAC address of the Mac:
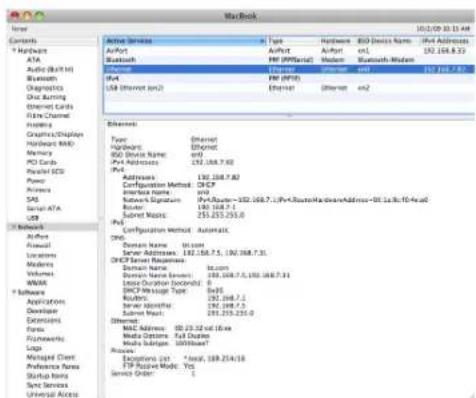
text_image
MacBook Server Contents * Hardware ATA Audio (Built-in) Bluetooth Diagnostics One Bursing Internet Cards Flow Channel Housing Graphics/Displiers Hardware MDU Memory PCI Cards Radio/SDS Power Access SPG Serial ATA USB Networks Admin Finescale Locations Modems Volume Watts Software Applications Developer Extensions Focus Fitzeworth Logo Managed Client Preferences Name Startup Name Servi Service Universal Access Active Service AirPort Bluetooth Type: Ethernet Highway: Ethernet 650 Drive Name: en/ IPv4 Addresses: 192.168.7.62 IPv3: Adapters: 192.168.7.62 Configuration Method: DHCP Internal Name: and Nuclear Significance: Port Routes=192.168.7.1;IPv4:RealHardwareAddress=62.168.7.1;IPv3:RealHardwareAddress=62.168.7.1;IPv3:RealHardwareAddress=62.168.7.1;IPv3:RealHardwareAddress=62.168.7.1;IPv3:RealHardwareAddress=62.168.7.1;IPv3:RealHardwareAddress=62.168.7.1;IPv3:RealHardwareAddress=62.100.0000000000000000000000000000000000000000000000000000000000000000000000000000000000000000000000000000 Ethernet Type: Ethernet Highway: Ethernet 650 Drive Name: en/ IPv4 Addresses: 192.168.7.62 IPv3: Adapters: 192.168.7.62 Configuration Method: DHCP Internal Name: and Nuclear Significance: Port Routes=192.168.7.1;IPv4:RealHardwareAddress=62.168,FD-Actd Router: 192.168.7.1; Subnet Music: 253.253.253.253. IPv3: Adapters: 192.168.7.62; Automatic DNS: Domestic Name: 5x.com TCP Address: 192.168.7.1, 192.168.7.31, DHCP Server Resources: Domestic Name: 5x.com DNS: 192.168.7.1, 192.168.7.31, 192.168.7.31, 192.168.7.31, 192.168.7.31, 192.168.7.31, 192.168.7.31, 192.168.7.31, 192.168.7, 192.168.7, 192.168.7, 192.168.7, 192.168.7, 192.168, 192.168, 192.168, 192.168, 192.168, 192.168, 192.168, 192, 192, 192, 192, 192, 192, 192, 192, 192, 192, 192, 192, 192, 192, 192, 192, 192, 192, 192, 192, 191 Open [About This Mac] from the Apple menu and click [More Info].
2 When the System Profiler is open, click [Network] on the menu at the left of the screen.
3 Select the MAC address for the device whose BSD Device Name is [en0] under [Active Services]. Normally this will be listed below under "Ethernet MAC Address". Copy and paste it to [Target MAC address].
The folder
8 Select [System Preferences] from the Apple menu of Mac OS X 10.5.
9 System Preferences Show All Click [Time Machine].
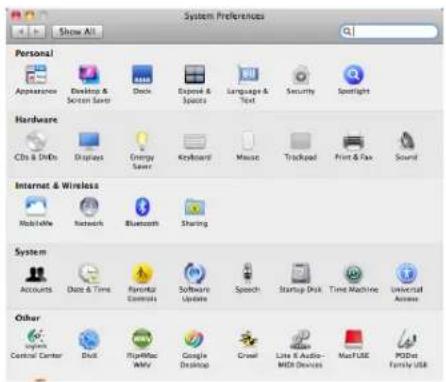
text_image
System Preferences Show All Personal Appearance Desktop & Screen Save Clock Expose & Spaces Language & Text Security Spotlight Hardware CDS & DDo Displays Energy Save Keyboard Music Trackpad Print & Fax Sound Internet & Wireless Mobile Network Bluetooth Sharing System Accounts Date & Time Parental Controls Software Updates Speech Startup Disk Time Machine Universal Access Other Central Center Disk Symbolize My Google Desktop Crowd Lite Audio-MEM Devices MasterFUSE PODist Family USB10 Time Machine Show All Click [Choose Backup Disk].
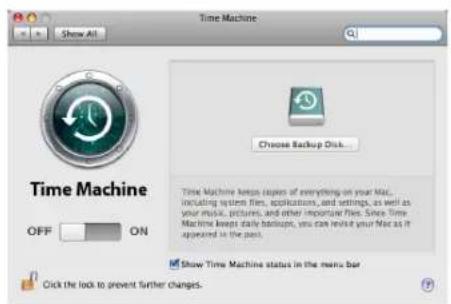
text_image
Time Machine Show All Choose Backup Disk... Time Machine keeps copies of everything on your Mac, including system files, applications, and settings, as well as your music, pictures, and other important files. Since Time Machine keeps daily backups, you can revise your Mac as it appeared in the past. Show Time Machine status in the menu bar Click the look to prevent further changes.11 backups on "BIAN-QUAD-TimeMachine" Documents Select the folder on the LinkStation and click [Use for Backup].

text_image
backups on "BRIAN-QUAD-TimeMachine" Documents on "JohnPro-TimeMachine" BackupMac on "TSODev-TimeMachine" timemachine on "15-30E.DBB-TimeMachine" temp on "Tx-30 USB-support-TimeMachine" Set Up Time Capsule Cancel Stop Backing Up12
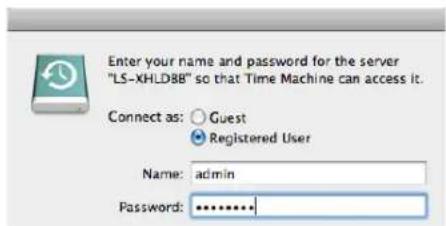
text_image
Enter your name and password for the server "LS-XHLD8B" so that Time Machine can access it. Connect as: Guest Registered User Name: admin Password: ********Enter [Name] and [Password] to access the shared folder on the LinkStation, and click [Connect].
If you do not use access restrictions for the shared folder of the LinkStation you set as a backup destination, enter "admin" in the username box and your password for "admin" in the password. If you use access restrictions, enter a username and password that has read and write access rights to the share.
13
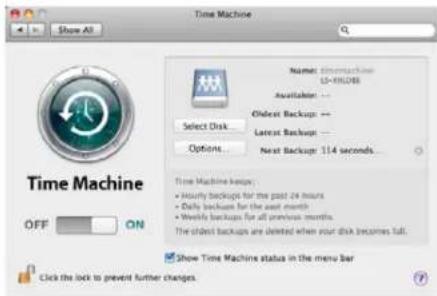
text_image
Time Machine Show All Name: timemachine 15-80048 Available... Oldest Backup: -- Latest Backup: -- Options... Next Backup: 114 seconds... Time Machine keeps: • Hourly backups for the past 24 hours • Daily backups for the next month • Weekly backups for all previous months The oldest backups are deleted when your disk becomes full. Show Time Machine status in the menu bar Click the lock to prevent further changes.Make sure that the switch for Time Machine is "on". The number of seconds displayed in [Next Backup] will count down and a backup job will start when it hits zero. The backup job will run in the background, so you can use and shut down the Mac as usual. To recover data or set items you want to exclude from backup, refer to Mac OS Help.
You've configured your LinkStation to work with Time Machine.
System-Backup
1 Back up data on the LinkStation
You can back up shared folders on the LinkStation from the Web Admin interface.
- Other LinkStation

flowchart
graph LR
    A["Server 1"] --> B["Server 2"]
    style A fill:#000,stroke:#fff,color:#fff
    style B fill:#000,stroke:#fff,color:#fff
LinkStation Other Link/TeraStation
The following sections will discuss how to:
- [Setting up the backup destination folder on LinkStation]
• [Finding the backup destination folder from LinkStation]
• [Set up a backup job on LinkStation]
• USB hard drive connected to the LinkStation
natural_image
Two black-and-white images of a desktop computer with an arrow indicating data transfer (no text or symbols)LinkStation USB Hard Drive
The following sections will discuss how to:
- [Set up a backup job on LinkStation]
2 Setting up the backup destination folder on LinkStation # 1
You may configure a destination folder on a LinkStation for backup jobs from a TeraStation or another LinkStation.
1
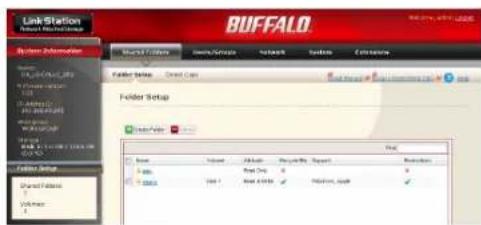
In the Web Admin interface, click on [Shared Folders].
2
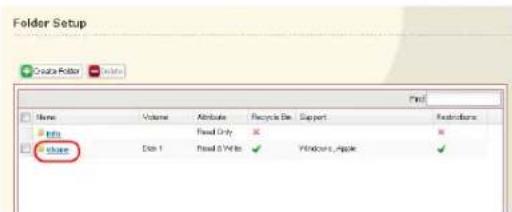
text_image
Folder Setup Create Folder File Name Volume Attribute Recycle Bin Support Restrictions File File Only File 1 Read & Write Windows, AppleClick the shared folder you want to set as a backup destination.
3

text_image
Shared Folders > share Name: share Description: Buffelines folder Volume: Disk 1 Shared Folder Attributes: ○ Read Only ○ Read & Write Recycle Bin: ○ Enable ○ Disable Shared Folder Support: ✓ Windows ✓ Apple ✓ Ftp ✓ Disk Backup Remote backup password: Access Restrictions Save Cancel1 Check [Disk Backup].
Note: If you enter a backup password, users of other LinkStations (and TeraStations) will have to enter the password before using this LinkStation as a backup destination.
2 Click [Save].
3 Finding the backup destination folder from LinkStation # 2
If the password is set for the backup destination folder, you must enter the password to configure the folder as the destination for a backup job.
1
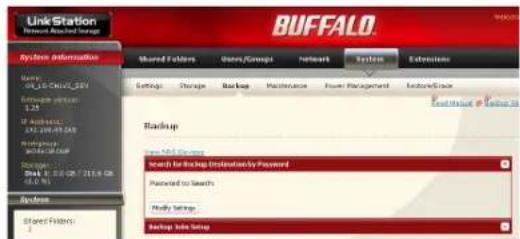
text_image
Link Station Network Attached Image System Information Shared Folders Users/Groups Network System Extensions Settings Storage Backup Maintenance Power Management Maintenance/Group Backup New NLS Settings Search for Backup Options by Password Password to Search Ready Settings Backup Info SetupIn the Web Admin interface, navigate to [System] - [Backup].
2
Click [Modify Settings] in [Search for Backup Destination by Password].
3

text_image
Search for Backup Destination by Password Password to Search: Save CancelEnter the [Password to Search] for the folder that is the backup destination.
The search will find backup-enabled folders on the network that have the same password that you are searching for, or that have no password set.
4 Configuring LinkStation # 2 to use LinkStation # 1 as a backup destination
1

text_image
Link Station Network Attach Storage System Information Name: 01.12-CRCH_379 Software Version: 1.0Account
1.0.0.4.2-5 Background WORKGROUP Storage: 3.0.1.0.05 / 218.6.06 (0.0 %) System Shared Portfolio: 1 Buffalo Backup Backup Settings Search for Backup Destination by Password Password to Search Fully Storage Backup Info SetupIn the Web Admin interface, navigate to [System] - [Backup].
2
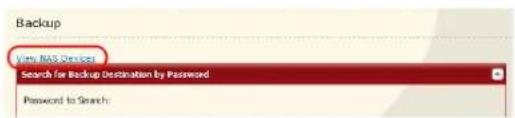
text_image
Backup Very NAS Devices Search for Backup Destination By Password Password to Search:Click [View NAS Devices].
3

text_image
NAS Devices Local LinkStations Refresh Name IP Address XXXXXXXXX 192.168.49.120 XXXXXXXXX 192.168.49.104 XXXXXXXXX 192.168.49.139 Off Subnet LinkStations New IP Address Add Delete IP Address Close1 Check the [IP Address] of the LinkStation you want to specify as a backup destination from [Local LinkStations].
2 Enter IP address of the LinkStation you want to specify as a backup to [Off Subnet LinkStations] and click [Add].
Notes:
If LinkStation # 2 (backing up) and LinkStation # 1 (with the destination folder) are on different networks, you must create a VPN connection between the two networks before the LinkStations will be able to see or back up to each other.
If you are using Jumbo Frame and back up data from one LinkStation or TeraStation to another LinkStation or TeraStation, set the Ethernet frame sizes of the LinkStations/TeraStations to the same settings (or the closest available). If the Ethernet frame sizes are significantly different, the backup job may fail. If you have problems with backup jobs, select the default frame size (1518 bytes).
5 Set up a backup job on LinkStation # 2
1
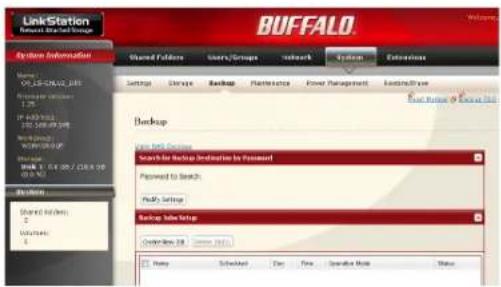
text_image
LinkStation Buffalo System Information Shared Followers Users/Groups network System Extensions Settings Storage Backup Maintenance Power Management Existing/Active Backup User Back Setup Search for Backup Instances to Payment Password to Search: Reply Settings Backup Info Setup Copyright 200 - 10000000000000000000000000000000000000000000000000000000000000000000000000000000000000000000000000000 Help Scheduled Day New Operative Mode StatusIn the Web Admin interface, navigate to [System] - [Backup] - [Backup Jobs Setup].
2

text_image
Backup Jobs Setup Create New Job Name Scheduled Day Time Operation Mode StatusClick [Create New Job].
3
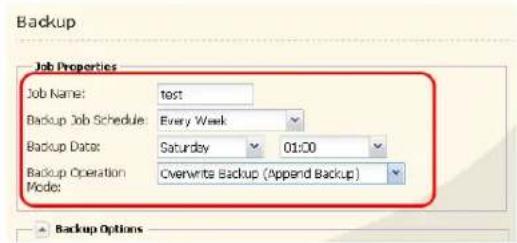
text_image
Backup Job Properties Job Name: test Backup Job Schedule: Every Week Backup Date: Saturday 01:00 Backup Operation: Overwrite Backup (Append Backup) Mode: Backup OptionsSelect backup options.
Backup operation modes
Three backup operation modes are available.
Normal Backup
All files in the source folder are backed up to the destination folder.
Overwrite Backup (Append Backup)
The first time the backup runs, it backs up all files in the source folder just like a normal backup. If later, file A is added to the backup source and file B is deleted, the next backup will add file A, but file B will not be deleted from the backup destination. This will use more space on the backup destination because of the files that are not deleted.
Overwrite Backup (Differential Backup)
The first time the backup runs, it backs up all files in the source folder just like a normal backup. If later, file A is added to the backup source and file B is removed, the next backup will add file A and delete file B. This uses the same space on the backup destination as a normal backup.
The following types of folders may be used as either backup sources or backup destinations:
- Shared folders on your LinkStation, including attached USB drives, but not including the info folder
- Shared folders on a different TeraStation or LinkStation on the local network, but not USB drives attached to it
- Shared folders of a TeraStation or LinkStation on a different network that has been selected manually by IP address, but not USB drives attached to it
Notes:
Before using a folder for backup, navigate to [Shared Folders] in the Web Admin interface and check [Disk Backup] for [Shared Folder Support].
Subfolders of shared folders are not supported for backup.
To make a TeraStation or LinkStation that is on a different network available for use as a backup target, navigate to [System] - [Backup] - [View NAS Devices] in the source LinkStation's Web Admin interface and add it by IP address.
4
Backup
Click [Add] in the [Backup Folders].

text_image
Job Properties Job Name: test Backup Job Schedula: Every Week Backup Date: Saturday 01:00 Backup Operation Mode: Overwrite Backup (Append Backup)Backup Options

text_image
Backup Folders Add Remove Backup Sources Backup Targets5

text_image
Source & Destination Folders Backup Sources Backup Targets Add CloseSelect the [Backup Source] and [Backup Targets] folders, then click [Add].
6
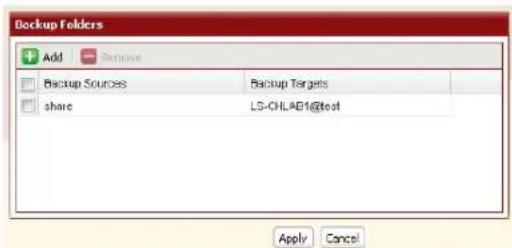
text_image
Backup Folders Add Remove Backup Sources Backup Targets share LG-CHLAB1@test Apply CancelClick [Apply].
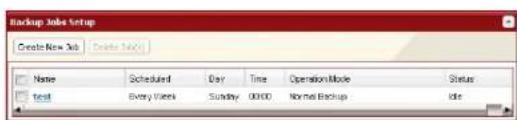
text_image
Backup Jobs setup Create New Jobs Create New Job Name Scheduled Day Time Operation Mode Status Text Every Users Sunday 00:00 Normal Backup IdleThe task added is displayed to the backup list.
You've now configured a backup job.
Notes:
- You can register up to the second level of subfolders. However, folders with more than 80 bytes(UTF-8) in their names cannot be selected.
- The backup destination device must be configured as a backup destination in advance in order to select it.
- For best results, USB hard drives connected to the LinkStation for backup should be formatted with XFS or EXT3. If a hard disk connected to LinkStation is formatted in FAT 32 or FAT 16, the following restrictions apply:
You cannot back up more than 2 GB of data per file in FAT 16 and more than 4 GB of data per file in FAT 32.
Files created by Mac OS X cannot be backed up, since they contains character not allowed by FAT 32 or FAT 16.
- You must change the backup settings for backup if you format the hard drive after setting up backup. If there is no shared folder at the destination, an error message will be displayed.
RAID Arrays
Several RAID modes are available for LinkStation models with multiple hard drives. LinkStations with only one hard drive do not support RAID modes.
Notes: All data is lost when the RAID mode is changed. Back up any important data before changing RAID modes.
In this document, "Recovery" means putting the LinkStation back to the state it was in before the malfunction happened. It does not mean reading data from broken hard drives.
When the RAID mode is changed, all data on the drives is lost. Before changing RAID modes, please back up any important data from the array.
- RAID 1 mode
Uses 2 hard drives in a mirrored array. One drive's worth of space is usable. Identical data is written to both drives. If one drive is damaged, data can be recovered by replacing the damaged drive.
Note: Hard drives in the LS-WSXL LinkStation are not user-replaceable. If you experience a drive failure with this model, contact Buffalo tech support for assistance.
- RAID 0 mode (LS-WVL, LS-WXL, and LS-WSXL Default Setting)
Multiple hard drives are combined into a single array. The total capacity of all drives is usable. This is the fastest of the LinkStation's RAID modes. If any drive is damaged, all data on the array is lost.
- Normal Mode
Each drive is accessible as a separate, individual drive. The total capacity of each drive is usable. If any drive is damaged, all data on that drive is lost.
• Using in RAID 1 mode
1 Change system to normal mode (page 83).
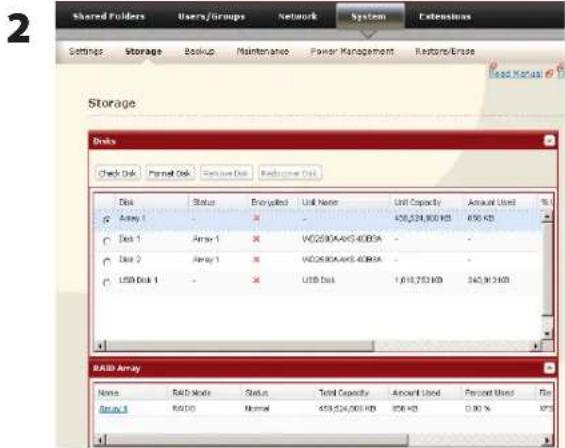
text_image
2 Stored Folders Users/Groups Network System Extensions Settings Storage Backup Maintenance Power Management Restore/Erase Storage Drials Check Disk Format Disk Custom Disk Recompute Disk Disk Status Encrypted Unit Name Unit Capacity Amount Used % Array 1 - - - 458,524,900 KB 650 KB Disk 1 Array 1 - - VAC2630A-AKS 4000A - - Disk 2 Array 1 - - VAC2630A-AKS 4000A - - USB Disk 1 - - USB Data 1,018,753 KB 240,913 KB RAID Array None RAID Mode Status Total Capacity Amount Used Percent Used Ten Array 3 RAID0 Normal 458,524,900 KB 858 KB 0.90 % 875Click [System] - [Storage] - [RAID Array] in the Web Admin interface.

text_image
RAID Array Name RAID Mode Status Total Capacity Amount Used Person Used Fld Array 1 RAD10 Normal 400,524,000 KB 956 KB 0.00 % XFTSClick the array you want to set.
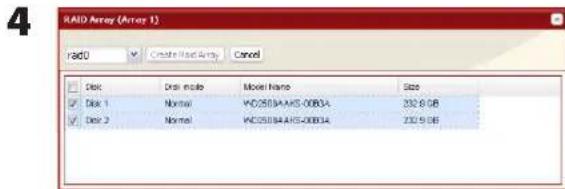
text_image
RAID Array (Array 1) rad0 Create Read Array Cancel Disk Disk mode Model Name Size Disk 1 Normal KDC250BAHIS-00B3A 232.8 GB Disk 2 Normal KDC250BAHIS-00B3A 232.9 GBSelect all available hard drives.
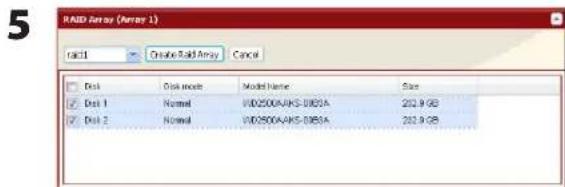
text_image
RAID Array (Array 1) rac11 Create Rapid Array Cancel Disk Disk mode Model Name Size Disk 1 Normal WID2500A/AKS-0363A 222.9 GB Disk 2 Normal WID2500A/AKS-0363A 222.9 GB1 Select [raid 1].
2 Click [Create Raid Array].
6 The [Confirm Operation] screen will appear. Enter the number shown in the [Confirmation Number] field within 60 seconds, and click [Apply].
7 Follow the instructions displayed on the screen.
You have set up a RAID 1 array. Turn to page 24 to create a shared folder.
Note: If power is turned off during a RAID rebuild, the RAID rebuild will continue when power is restored.
[Confirm Operation] screen
When you perform any of the following tasks, a [Confirm Operation] screen is displayed. To continue, enter the displayed number within 60 seconds and click [Apply].
- Change RAID array (Create/Delete) - Format Array or Disk
- Delete Folder
- Remove Disk
- Restore Factory Defaults
- Rebuild RAID array
- Format LinkStation
EDP (Easy Data Protection)
With EDP (Easy Data Protection), you can create a RAID 1 array while preserving the data on one of the hard drives. To use EDP, make sure that the following conditions are met:
- Your hard drives must display [Normal (EDP available)] as shown in Step 1 below.
- Both hard drives must be the same size.
Caution: If your hard drives show [Normal] instead of [Normal (EDP available)], then you cannot use EDP. If you create a RAID 1 array, all data on both drives will be lost. Back up any important data before changing your RAID array.
1
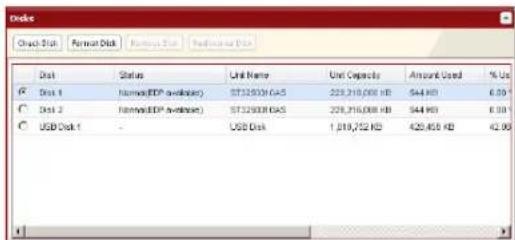
text_image
Disk Chuck Disk Perman Disk Remote Disk Perman Disk Disk Status Unit Name Unit Capacity Amount Used % Use Disk 1 Internal EDP available ST32908 GAS 228,216,000 KB 544 KB 6.09 Disk 2 Internal EDP available ST32908 GAS 228,216,000 KB 544 KB 6.09 USB Disk 1 - USB Disk 1,019,752 KB 420,456 KB 42.08In the Web Admin interface, navigate to [System]-[Storage] - [Disks]. In the [Status] column, [Normal (EDP available)] should be displayed beside both drives.
2
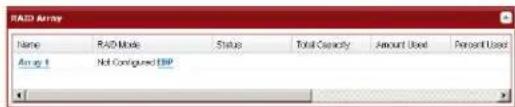
text_image
RAID Array Name RAID Mode Status Total Capacity Amount Used Persent Used Array 1 Not Configured IRIPUnder [RAID Array], click [EDP].
3

text_image
RAID Array (Array 1) Center Disk 1 465.0 GB Domain existing data in Disk1 and format Disk7 mirroring data as RAID array. Disk 2 465.0 GB Domain existing data in Disk7 and format Disk1 mirroring data as RAID array.The data on one disk will be preserved; the other will be erased to create the RAID 1 array. Choose which disk will have its data preserved and which will be formatted.
4 The [Confirm Operation] screen will open. Within 60 seconds, enter the displayed number in the [Confirmation Number] field. Click [Apply].
5 While the array is being built, file transfer speeds will be slower than usual. It will take about 6 hours per terabyte to build the array. The Info/Error LED will blink amber while the array is being built. Do not turn off the LinkStation until the array is finished.
When the build finishes, the Info/Error LED will stop blinking. Your RAID 1 array is now complete and ready to use.
- Changing to RAID 0 mode
1 Change system to normal mode (page 83).
2

text_image
Shared Folders Users/Groups Network System Extensions Settings Storage Backup Maintenance Power Management Restore/Ensize Read Status Storage Bits Check Disk Format Disk Remove Disk Radiocover Disk Disk Status Engrated Unit Name Unit Capacity Amount Used % Array 1 - X - 458,524,800 KB 650 KB Disk 1 Array 1 X WD2090A495.4083K - - Disk 2 Array 1 X WD2090A495.4083K - - USD Disk 1 - X USD Disk 1,618,752 KB 340,912 KB RAD Array Name: RAD Mode Status: Total Capacity Amount Used Percent Used File Array 1 RAD0 Normal 458,524,800 KB 856 KB 0.00 % 85%Click [System] - [Storage] - [RAID Array] in the Web Admin interface.
3
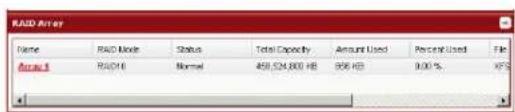
text_image
RAID Array Name RAID Mode Status Total Capacity Amount Used Percent Used Fil Array 5 RAD016 Normal 459,524,800 HB 956 HB 0.00 % VFSClick the array you want to set.
4

text_image
RAID Array (Array 1) rad0 Create Rad Array Cancel Disk Disk node Model Name Size Disk 1 Normal WDS50EAAKS-00B3A 232.9 GB Disk 2 Normal WDS50EAAKS-00B3A 232.9 GBSelect all available hard drives.
5
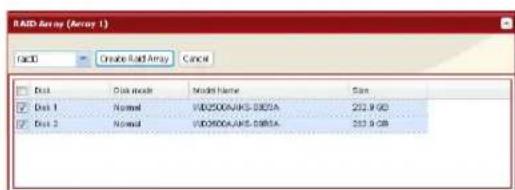
text_image
RAID Array (Array 1) Fac3 Create RAID Array Cancel Disk Disk mode Model Name Size Disk 1 Normal WBD2500AUKS-0005A 222.9 GB Disk 2 Normal WBD2500AUKS-0005A 222.9 GB1 Select [Raid 0].
2 Click [Create Raid Array].
6 The [Confirm Operation] screen will appear. Enter the number shown in the [Confirmation Number] field within 60 seconds, and click [Apply].
7 Follow the instructions displayed on the screen.
You have set up a RAID 0 array. Turn to page 24 to create a shared folder.
- Changing to Normal mode
1
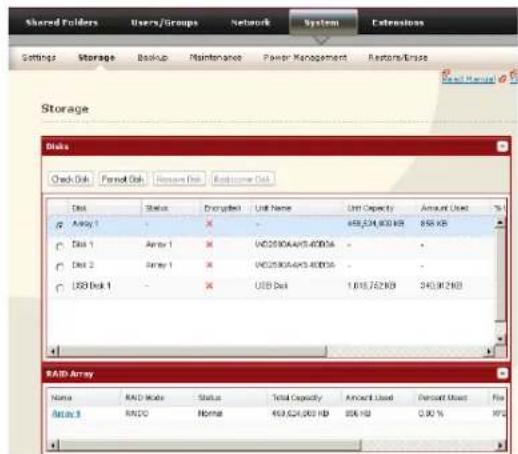
text_image
Shared Folders Users/Groups Network System Extensions Settings Storage Backup Maintenance Power Management Restore/Restore Storage Disk Check Disk Forward Disk Remove Disk Exchange Disk Disk Status Disagreen Unit Name Unit Capacity Amount Used %Array 1
- - - 458,534,000 KB 858 KB Disk 1 Array 1 - - VDC2610A/495.400156 - - Disk 2 Array 1 - - VDC2610A/495.400156 - - USB Disk 1 - - USB Disk 1,018,752 KB 245,912 KB RAM Array Name RAM Mode Status Total Capacity Amount Used Percent Used File Array 3 RAMO Normal 459,624,000 KB 806 KB 0.90 % RAMClick [System] - [Storage] - [RAID Array] in the Web Admin interface.
2
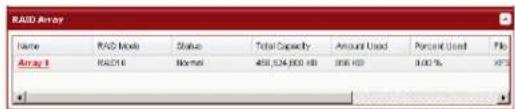
text_image
RAID Array Name RAID Mode Status Total Capacity Amount Used Personal Used File Array 1 RAID Normal 450,324,800 KB 356 KB 0.00 % 97%Click the array you want to set.
3 Click [Delete RAID Array].
4 When [Are you sure you want to change RAID mode?] is displayed, click [Apply].
5 The [Confirm Operation] screen will appear. Enter the number shown in the [Confirmation Number] field within 60 seconds, and click [Apply].
6 Follow the instructions displayed on the screen.
You have configured Normal mode. Turn to page 24 to create a shared folder.
RAID Scanning
LinkStations that are in RAID 1 mode support RAID scanning. A RAID scan tests the RAID array for read performance. If defective sectors are found, they are repaired automatically. If your multiple-drive LinkStation is in RAID 1 mode, you should run RAID scans regularly. Configure regular RAID scans as follows:
1

text_image
Shared Folders Users/Groups Network System Extensions Settings Storage Backup Maintenance Power Management Restore/Close Storage Read Manual Units RAID Array RAID Scanning RAID Scanning: Disabled RAID Scanning Schedule: Every 1st day/month RAID Scanning Start Time: 2 Hour Modify Settings: Next SAG ScanningNavigate to [System] - [Storage] - [RAID Scanning] in the Web Admin interface. Under [RAID Scanning], click [Modify Settings].
2
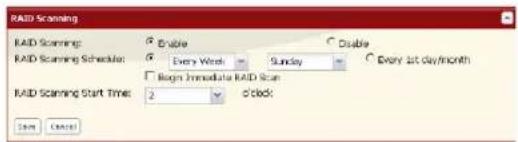
text_image
RAID Scanning RAID Scanning: Enable Double RAID Scanning Schedule: Every Week Sunday Every 1st day/month Begin Immediate RAID Scan RAID Scanning Start Time: 2 o'clock OK CancelChoose [Enable], enter your desired schedule, and click [Save].
Notes: Check [Shutdown] to automatically shut down the LinkStation whenever a RAID error occurs. Check [Begin Immediate RAID Scan] to initiate an immediate RAID scan.
To stop a RAID scan, click [Abort RAID Scanning].
Single-drive LinkStations do not support RAID arrays or RAID scanning.
RAID Scanning is now configured.
System - Maintenance
E-mail Notification
Your LinkStation can send you daily email reports. It can also send you an email when settings are changed or an error occurs.
The following things will be sent via E-mail:
• The condition of the hard drive
- Notification of completed backup jobs
- Notification of fan errors
- Notification of hard drive errors
1
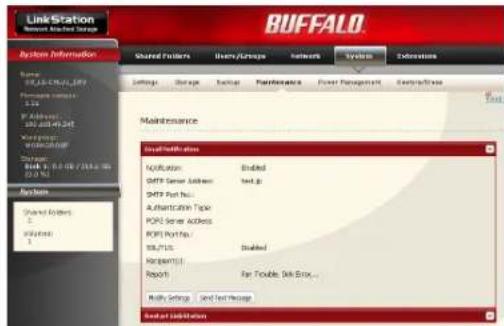
text_image
LinkStation System: BlackNet Storage BUFFALO System Information Name: RUSTA CHAPOL.COM Formulation version: 1.00 IP Address: 2.00 KDD Page: 3.00 Maintenance Status: BlackNet Storage Maintenance Status Information OK/OK SMT Server Address SMT Port Bus... Authentication Topic PORT Server Address PORT Port Bus... SQL Plus Report(s) Report Key Tools Help... Multi Settings Send Text Package System AdministrationIn the Web Admin interface, navigate to [System] - [Maintenance].
2
Click [Modify Settings] in [E-mail Notification].
3

text_image
Email Notification Notification: SMTP Server Address: SMTP Port No.: Authentication Type: POP before SMTP POP Server Address: POP3 Port No.: 110 SSL/TLS: Username: Password: Subject: Request(s): Unicast Station Status Report New Email Address Add Complete Recipient(s) Report: HDD Status Report 0 of Scott Fan Trouble Edit Engr. Backup Complete Save Cancel1 Click [Enable] in Notification.
2 Type the [SMTP Server Address] and [SMTP port No.].
Note: If using [POP before SMTP], enter [POP3 Server address] and [POP3 port No.].
3 Select [Authentication Type] from [Disabled]/[POP before SMTP]/[LOGIN(SMTP-AUTH)]/[CRAM-MD5 (SMTP-AUTH)/CRAM-MD5)].
4 Enter a username.
5 Enter a password that will be used to verify.
6 To use a secured connection, select [SSL]/[TLS].
7 Enter the [Subject] for notification e-mail. Click [Reset to Default] to reset the subject line to [LinkStation Status Report].
8 Enter a receiver's e-mail address. E-mail can be sent to up to 5 addresses.
9 Select conditions for emails to be sent.
• [HDD Status Report] Sends status of hard drive periodically.
• [Fan Failure] Sends a message when a fan error occurs.
- [Disk Error] Sends a message when a hard drive fails.
- [Backup Complete] Sends a message when the backup is complete.
10 If you have selected [HDD Status Report] for sending condition, select time to send.
11 Click [Save].
4
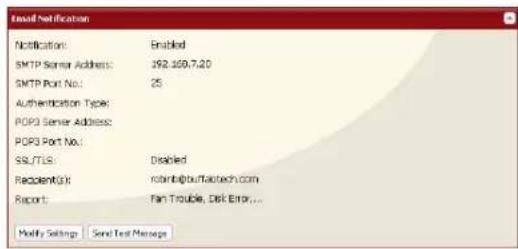
text_image
Email Notification Notification: Enabled SMTP Server Address: 192.269.7.20 SMTP Port No.: 25 Authentication Type: PDR3 Server Address: PDR3 Port No.: SSL/TLS: Disabled Recipient(s): rodb@tourfastech.com Report: Fan Trouble, Disk Error... Modify Settings Send Test ManageClick [Send Test Message] to send a test message.
System Power Management
UPS Settings
A UPS (uninterruptable power supply) can automatically shut down your LinkStation in case of a power outage. To use the LinkStation with a UPS, configure the following settings:
1 Plug the Power cable of UPS to a wall socket.
2 Connect the AC adapter of the LinkStation to the UPS.
3 Connect the UPS and the LinkStation with a USB cable.
4 Turn on the UPS, then the LinkStation.
5 In the Web Admin interface, navigate to [System] - [Power Management] - [UPS Settings] and click [Modify Settings].
In the Web Admin interface, navigate to [System] - [Power Management] - [UPS Settings] and click [Modify Settings].

text_image
Shared Followers Energy/Groups Network System Settings Storage Backup Maintenance Power Management Features/Trace Power Management UPS Settings UPS Status Synchronized Setting/Normal Synchronization with UPS: synchrony with UPS connected to the LinkStation UPS Connection Type: UPS Serial Port (APC Style J Smart Signal) Shutdown Condition when Power Failure: Shutdown LinkSolution after 5 Minutes of Power Failure UPS Behavior after LinkStation shutdown: Supply Settings SharpPower6 UPS Settings Synchronization with UPS: P synchronize with UPS connected to the LinkStation C synchronize with UPS connected to other LinkStation on the network C do not synchronize with UPS
synchronized source LinkStation IP Address:
UPS Connection Type: UPS Serial Port (UPC Style / Smart Signal)
LinkStation behavior When Power Future: P shutdown undulation after C Rules of Power Future O Shutdown LinkStation when UPS Reports Battery Low Status.
UPS Behavior After LinkStation has shutdown: P Start O Turn Off
Begin Cancel
1 If your LinkStation is connected directly to the UPS, select [synchronize with UPS connected to this LinkStation]. To have the UPS shut down multiple LinkStations on the same network, select [synchronize with UPS connected to other LinkStation on the network] and enter the IP address of the LinkStation that is connected directly to the UPS in the field below.
2 Click [Save].
The LinkStation is now configured to work with the UPS.
Note: If the LinkStation shuts down automatically due to a power outage, make sure that the power issue is resolved before turning it back on. If the LinkStation is turned back on while it's still running on the UPS battery, the UPS will not shut it down again, even if the battery runs low.
Sleep Timer
To save energy, you can specify times to put the LinkStation into sleep mode, where the hard disk and LED lights are turned off. The sleep timer only works when the LinkStation's Power Mode Switch is ON. This feature cannot be used when it is set to AUTO.
1

text_image
Shared Folders Users/Groups Network System Extensions Settings Storage Backup Maintenance Power Management Alosum/Bio Power Management UPS Settings SleepTimer Time 1 Time Interval Data: Wake up at: Begin Sleep at: Time 2 Time Interval Data:1 In the Web Admin interface, navigate to [System] - [Power Management] - [Sleep Timer]
2 Click [Modify Settings].
2
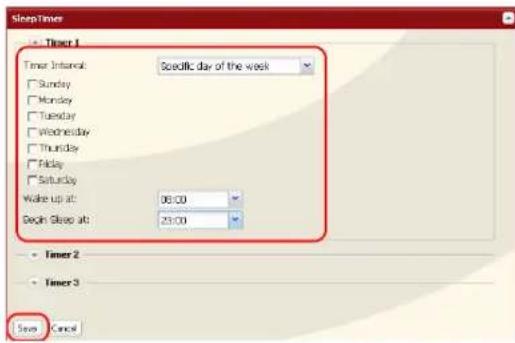
text_image
SleepTime Timer 1 Timer Interval: Scaditic day of the week Sunday Monday Tuesday Wednesday Thursday Friday Saturday Wake up at: 08:00 Deck Sleep at: 23:00 Timer 2 Timer 3 Stop Cancel1 Specify a [Timer Interval], [Wake up at] and [Begin Sleep at].
2 Click [Save] at the bottom of the screen.
* You can set up to 3 timers.
* You can set ending time from 0:00 to 27:45.
You can set beginning time from 0:00 to 23:45.
(If the ending time is 24:00 or later, the beginning time can be set from 4:00 to 23:45.)
If 24:00 is equivalent to 0:00 of the next day, and 27:00 is equivalent to 3:00 of the next day.
* You can not set the ending time before or the same time as a beginning time.
- During processing disk check, disk format, and backup jobs or when a backup job is scheduled before and after 5 minutes of the current time, the LinkStation will not be proceeded to Standby mode even though the end time has reached.
- If time of the timers are duplicated, the longest interval time is used to operate.
Examples of multiple timers:
(e.g.1) It is at 10:00 Wednesday with the LinkStation powered on:
Timer 1 Everyday 12:00 - 24:00
Timer 2 not used
Timer 3 not used
-> Nothing happens at 12:00 and goes into sleep mode at 24:00
(e.g.2) It is at 10:00 Wednesday with the LinkStation powered on:
Timer 1 Everyday 9:00 - 18:00
Timer 2 Day specified Wednesday 10:00 - 20:00
Timer 3 not used
-> Except on Wednesdays, the LS powers on at 9:00 and goes into sleep mode at 18:00.
On Wednesdays, it goes into sleep mode at 20:00.
(e.g.3) It is at 10:00 Wednesday with the LinkStation powered on:
Timer 1 Everyday 9:00 - 18:00
Timer 2 Day specified Wednesday 10:00 - 25:00
Timer 3 not used
-> Except on Wednesdays, the LS powers on at 9:00 and goes into sleep mode at 18:00.
-> On Wednesdays, it goes into sleep mode at 1:00 of the next day.
(e.g.4) It is at 10:00 Wednesday with the LinkStation powered on:
Timer 1 Everyday 9:00 - 18:00
Timer 2 Day specified Wednesday 07:30 - 22:00
Timer 3 not used
-> Except on Wednesdays, the LS goes into sleep mode at 18:00.
-> LS turns on Wednesday at 7:30, and goes into sleep mode at 22:00.
In standby mode, pressing the LinkStation's function button or moving the Power Mode Switch to AUTO will turn the LinkStation on.
Sleep timer settings are now complete.
Restoring Factory Defaults
To initialize the LinkStation to its factory defaults, follow the procedure below.
1 Move the power switch to the OFF position to shut down the LinkStation.
2 Move the power switch to the ON position while holding down the function button. The function button will flash blue for 1 minute.

text_image
AUTO ON OFF POWER Function Button3 While the function button is flashing blue, press it again. The status LED will flash blue. It will start flashing amber when initialization begins (2 - 3 minutes).
Notes: This method of initializing the LinkStation restores its IP address settings, Ethernet frame size settings, and administrator (admin) password to their factory defaults. If you chose not to initialize the administrator's password from the Web Admin interface, only the IP address and Ethernet frame size settings are initialized. You can initialize other items from the Web Admin interface.
If you do not want to initialize the admin password when you initialize the LinkStation, select [Keep current admin password] in the [System] - [Restore/Erase] - [Restore Factory Defaults] screen, and click [Save].
If you choose to not initialize the admin password from the function button, you can no longer configure the LinkStation if you forget the password! Write your password down and put it in a safe place.
Initialization from the Web Admin interface
You can initialize the following settings from the Web Admin interface: LinkStation name, Description, NTP settings, Workgroup settings, Shared service settings, access restrictions of the shared folder, User settings, Groups, mail notification settings, UPS synchronization settings, Backup Settings, Admin Username and password, Print server settings, WebAccess, Language settings, SleepTimer, Media server settings, BitTorrent settings, Time Machine configuration, Web Server, MySQL Server, and Network Services.
1
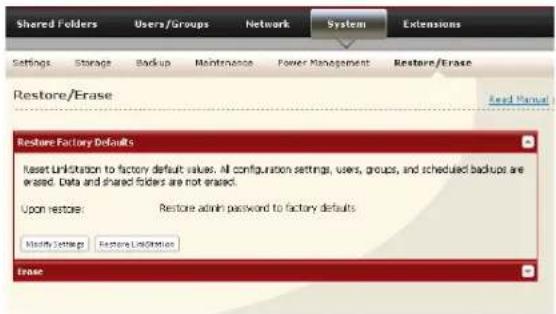
text_image
Shared Folders Users/Groups Network System Extensions Settings Storage Backup Maintenance Power Management Restore/Erase Restore/Erase Read Manual Restore Factory Defaults Reset Linkstation to factory default values. All configuration settings, users, groups, and scheduled backups are erased. Data and shared folders are not erased. Upon restore: Restore admin password to factory defaults Modify Settings Restore Linkstation EraseIn the Web Admin interface, navigate to [System] - [Restore/Erase].
2

text_image
Restore Factory Defaults Reset LinkStation to factory default values. All configuration settings, users, groups, and scheduled backups are erased. Data and shared folders are not erased. Upon restore: Restore admin password to factory defaults Modify Settings Restore ListStartlesClick [Restore LinkStation].
3
The [Confirm Operation] screen will appear. Enter the number shown in the [Confirmation Number] field within 60 seconds, and click [Apply].
4
Follow the instructions displayed on the screen.
Your LinkStation has been initialized.
Format the LinkStation
1
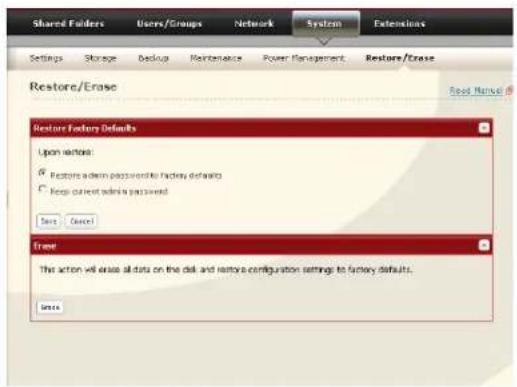
text_image
Shared Folders Users/Groups Network System Extensions Settings Storage Backup Maintenance Power Management Restore/Enase Restore/Enase Restore Factory Defaults Upon version: ✓ Restore admin passwords to factory defaults ✓ Keep current admin password Save Cancel Frame This action will erase all data on the disk and restore configuration settings to factory defaults. SaveIn the Web Admin interface, navigate to [System] - [Restore/Erase].
2

text_image
Lease This action will erase all data on the disk and restore configuration settings to factory defaults. BaseClick [Erase].
3
The [Confirm Operation] screen will be displayed.
Enter the number from the [Confirmation Number] field within 60 seconds, and click [Apply].
4
Follow the instructions displayed on the screen.
Warning: Formatting the LinkStation will erase all data on the drive! Back up any important data before formatting.
After a format, your LinkStation will reboot. Settings will be returned to their factory defaults. LinkStations with multiple hard drives will be set to "normal" mode, where individual drives are addressed separately. Drives will be blank, with no shares on them. You will need to create at least one shared folder before you can use the LinkStation.
Extensions
WebAccess
What is WebAccess?
WebAccess lets you access files on your LinkStation through the Internet. Access restrictions can be set for folders that are shared, and automatic router settings by UPnP and redirect functionality from the buffalonas.com server (similar to Dynamic DNS) make configuration easy.
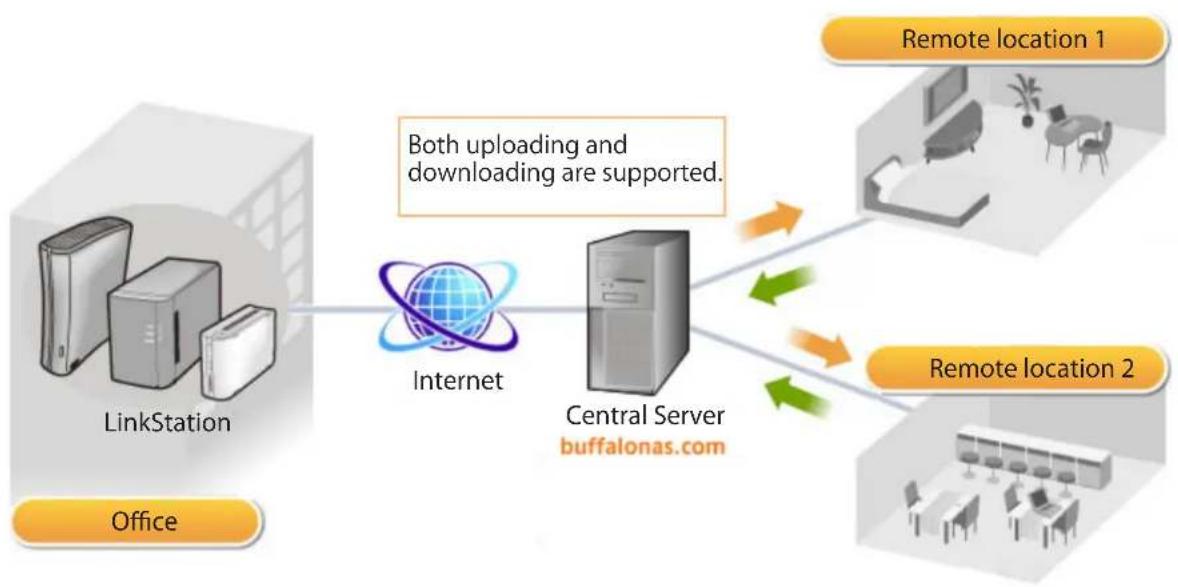
flowchart
graph TD
    A["LinkStation"] -->|Both uploading and downloading are supported.| B["Internet"]
    B --> C["Central Server buffalonas.com"]
    D["Office"] --> A
    E["Remote location 1"] --> C
    F["Remote location 2"] --> C
Note: Care should be taken with configuration of WebAccess. Certain settings can make the files in the shared folder available to anyone on the Internet without any access restrictions.
For more information on WebAccess, visit http://buffalonas.com/manual/en/
Print Server
LinkStation is equipped with a USB connector on the back. You can connect a USB printer to the LinkStation as shown below.

text_image
USB Connector USB Printer (not included) USB cable (not included)Notes:
- Only one printer can be connected to the LinkStation.
- The LinkStation does not support 2-way communication. For example, it cannot tell you the amount of ink left.
- Multi-function printers are not supported.
- Printers which only support 2-way communication or WPS (Windows Printing System) are not supported.
• Mac OS X cannot print to a printer connected to the LinkStation.
Setting up a printer on Windows 7/Vista
1
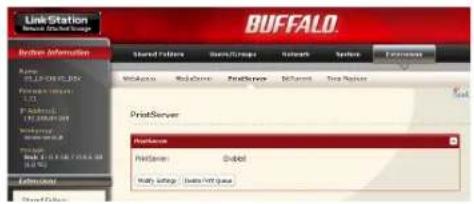
text_image
Line Station Buffalo Service Information Shared Paths Groups/Groups Networks Systems Externalities Windows Red Cross RealServer BGP Control Free Repos PrintServer Production PrintServer Global Mally Settings Data Port QueueIn the Web Admin interface, navigate to [Extensions] - [PrintServer] and click [Modify Settings].
2

text_image
PrintServer PrintServer: © Enable © Disable Save CancelSelect [Enable] and click [Save].
3
Refer to your printer's manual installation instructions. You may need to install the printer driver from a software disk.
4
Click [Start] - [Network].
5
Double-click on the LinkStation's server name.
6
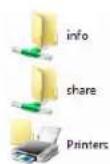
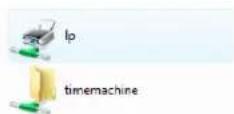
Double-click on the LinkStation's printer icon ("LP").
7
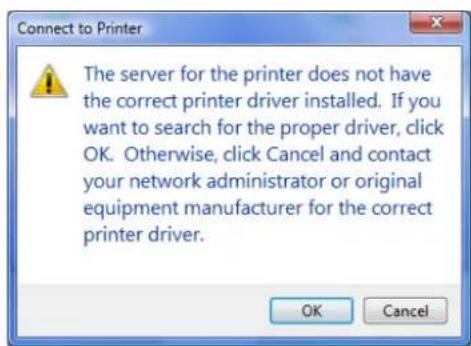
text_image
Connect to Printer The server for the printer does not have the correct printer driver installed. If you want to search for the proper driver, click OK. Otherwise, click Cancel and contact your network administrator or original equipment manufacturer for the correct printer driver. OK CancelClick [OK].
8

text_image
Add Printer Wizard Select the manufacturer and model of your printer. If your printer came with an installation disk, click Have Disk. If your printer is not listed, consult your printer documentation for a compatible printer. Manufacturer Apollo Brother Canon Citizen Dell Printers Apollo F-1200 Apollo F2100/F2300U Apollo F2200 This driver is digitally signed. Tell me why driver signing is important Have Disk... OK Cancel1 Select your printer. Choose the manufacturer on the left and the model on the right. If your printer is not listed, click [Have Disk] and follow the printer manufacturer's directions for installation.
2 Click [OK].
You have added a printer.
Setting up a printer on Windows XP
1
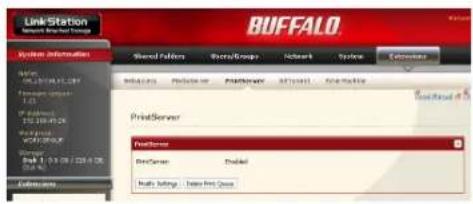
text_image
LinkStation Buffalo System Information Shared Servers Shared Groups Network Service Commerce PrintServer PrintServer PrintServer PrintServer PrintServer PrintServer PrintServer PrintServer PrintServer PrintServer PrintServer PrintServer PrintServer PrintServer PrintServer PrintServer PrintServer PrintServer PrintServer PrintServer PrintServer PrintServer PrintServer PrintServer PrintServer PrintServer PrintServer PrintServer PrintServer PrintServer PrintServer PrintServer PrintServer PrintServerIn the Web Admin interface, navigate to [Extensions] - [PrintServer] and click [Modify Settings].
2

text_image
PrintServer PrintServer Open Enable Cancel Save Cancel1 Choose [Enable] and click [Save].
3
Refer to your printer's manual installation instructions. You may need to install the printer driver from a software disk.
4
Click [Start] - [Control Panel].
5
Click [Network and Internet Connections] icon.
6
Double-click on [View workgroup computers] - (Name of the LinkStation Server name) in this order.
7
Double-click on the LinkStation's printer icon ("Ip").
lp
8
If "The printer driver to your computer will be automatically installed. Would you like to continue?" is displayed, click [Yes].
9
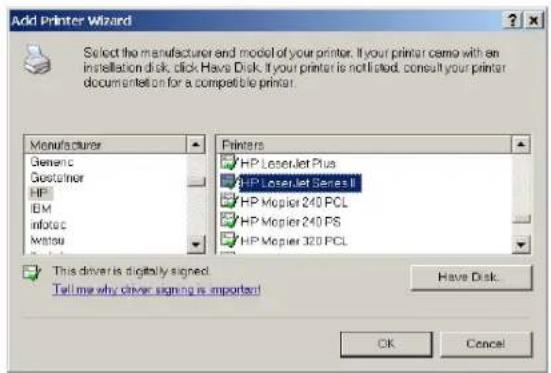
text_image
Add Printer Wizard Select the manufacturer and model of your printer. If your printer came with an installation disk, click Have Disk. If your printer is not listed, consult your printer document set on for a compatible printer. Manufacturer Generic Gestheimer HP IBM InfoTec Wattou Printers HP LaserJet Plus HP LaserJet Series II HP Mopier 240 PCL HP Mopier 240 PS HP Mopier 320 PCL This driver is digitally signed. Tell me why driver signing is important! Have Disk. OK Cancel1 Select your printer. Choose the manufacturer on the left and the model on the right. If your printer is not listed, click [Have Disk] and follow the printer manufacturer's directions for installation.
2 Click [OK].
You have added a printer.
Setting up a printer on Windows 2000
1
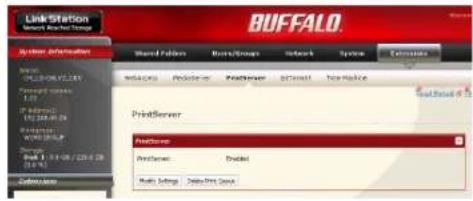
text_image
LinkStation BUFFALO Action Information Word Patterns BurstGroups Network System Extensions Microsoft PrintServer PrintServer PrintServer PrintServer PrintServer PrintServer PrintServer PrintServer PrintServer PrintServer PrintServer PrintServer PrintServer PrintServer PrintServer PrintServer PrintServer PrintServer PrintServer PrintServer PrintServer PrintServer PrintServer PrintServer PrintServer PrintServer PrintServer PrintServer PrintServer PrintServer PrintServer PrintServer PrintServer PrintServerIn the Web Admin interface, navigate to [Extensions] - [PrintServer] and click [Modify Settings].
2

text_image
PrintServer PrintServer: ④ Enable C Disable Save Cancel1 Click [Enable].
2 Click [Save].
3
Refer to your printer's manual to install the printer driver.
4
Double-click [My Network Places (*)] - [Entire Network] - (the LinkStation Server Name). * On Windows NT 4.0 this is [Network].
5
Double-click on the LinkStation's printer icon ("Ip").
6

text_image
Connect to Printer The server for the printer does not have the correct printer driver installed. If you want to search for the proper driver, click OK. Otherwise, click Cancel and contact your network administrator or egriral equipment manufacturer for the correct printer driver. OK CancelClick [OK].
7

text_image
Connect to Printer You are about to connect to a printer on document is, which will automatically install a print driver on your machine. Printer drivers may contain viruses or scripts that can be harmful to your computer. It is important to be certain that the computer sharing this printer is trustworthy. Would you like to continue? Yes NoClick [Yes].
8
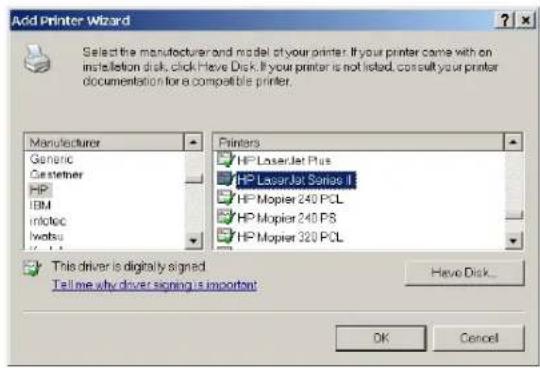
text_image
Add Printer Wizard Select the manufacturer and model of your printer. If your printer come with an installation disk, click Have Disk. If your printer is not listed, consult your printer documentation for a compatible printer. Manufacturer Generic Customer HP IBM Inloc Iwatsu Printers HP LaserJet Plus HP LaserJet Series II HP Mopier 240 PCL HP Mopier 240 PS HP Mopier 320 PCL This driver is digitally signed. Tell me why driver signing is important Have Disk... OK Cancel1 Select your printer. Choose the manufacturer on the left and the model on the right. If your printer is not listed, click [Have Disk] and follow the printer manufacturer's directions for installation.
2 Click [OK].
You have added a printer.
BitTorrent Client
BitTorrent is a protocol for sharing files. You can download files quickly since files are distributed on the network and network traffic is not concentrated, even with a large file. It does not keep anonymity, and it is easily known who publishes what files.
Warning: Do not download copyrighted files without permission from the owner.
See http://www.bittorrent.com/ for more information about BitTorrent.
Flow chart of downloading with BitTorrent:
1 Use a search engine to find the torrent for a file that you want. Download the torrent.
Notes:
- Torrents are information files with a ".torrent" extension.
- Torrents can be downloaded from BitTorrent Inc.'s website or many other websites. Follow the terms of use and copyright rules for each website.
2 Send torrent information to a server called "tracker" and receive information about a terminal which has a file.
3 Start downloading based on the information received from the "tracker" server.
4 Download pieces of data from multiple terminals and make one file.
Use the following steps to download shared files to the LinkStation with BitTorrent.
Enabling BitTorrent and selecting folders
1
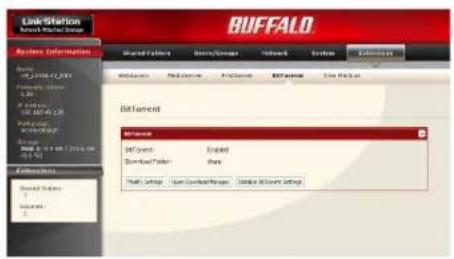
text_image
Link Station BUFFALO System Information Shared Connection Binary Connection Network System Extensions Networks Redeemers Internet BIF Partners File Package BitTorrent Biftevent Enabled Download/Transfer Share Health Settings Open Download/Transfer Options BitTorrent Settings1 In the Web Admin interface, navigate to [Extensions] - [BitTorrent].
2 Click [Modify Settings].
2
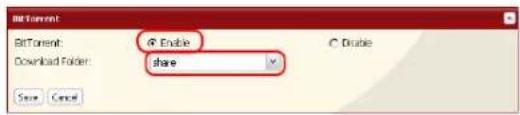
text_image
BitTorrent BitTorrent: @ Enable Download Folder: share Save Cancel1 Click [Enable].
2 Select a folder for downloads on the LinkStation from [Download Folder].
3 Click [Save].
3

text_image
BCTorrent BCTorrent: Enabled Download Folder: share Modify Settings: Open Download Manager Initiate BCTorrent SettingsClick [Open Download Manager]. Note: If you click [Initialize BitTorrent Settings], you can initialize BitTorrent settings.
Enter the username and password for Download Manager.
The default username and password are:
Username: admin
Password: (blank; no password)
The Download Manager will open.
The Download Manager is similar to "μTorrent". For more information on how to use it, do an Internet search for "μTorrent".
Media Server
The LinkStation is equipped with a DLNA Media Server. Videos, pictures and music saved on the LinkStation can be displayed or played on TV, audio devices, game devices and other DLNA compatible network devices.
DLNA (Digital Living Network Alliance) defines Home Network Device Interoperability Guidelines, which are product design guidelines in the industry's standard technology in order to achieve the interconnecting environment for digital devices (computers, home appliance, mobile devices and so on).
To use DLNA on the LinkStation, begin by enabling it.
1

text_image
Shared Folders Users/Groups Network System Extensions WebAccess MediaServer PrintServer BitCorrect Time Machine MediaServer Media Server Settings Media Server: Disabled Media Server Folder: share Show folders on User driver: Disabled Automatic Update: Disabled Religh interval (Minutes): - STOP-IP: Disabled Modify Settings: Podcast Media Server Update STOP-IP Automated Digital Media Clients this is available STOP-IP.In the Web Admin interface, navigate to [Extensions] - [MediaServer] and click [Modify Settings].
2
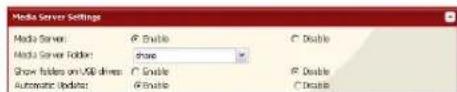
text_image
Media Server Settings Media Server: Open Enable Media Server Folder: Share Show folders on USB drives: Enable Automatic Updates: Enable Disable Disable DisableIf it is set to [Disable], click [Enable].
3
Click [Save] at the bottom of the Web Admin interface.
DLNA is now enabled on the LinkStation.
Connecting to the LinkStation and playing the files
This example shows how to use DLNA compatible media players to play files on the LinkStation. Screenshots are from a Buffalo LinkTheater LT-H90 media player.
1 Connect DLNA compatible devices to the network and turn them on. Note: Refer to the devices' manuals for how to connect them.
2 Select the DLNA server of the LinkStation from the screen to select DLNA compatible devices
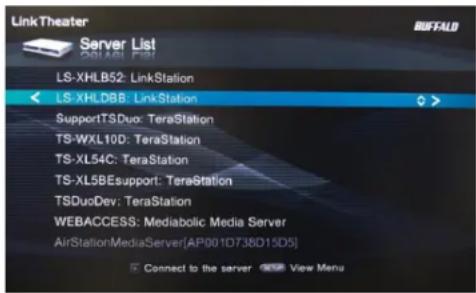
text_image
Link Theater Server List CS1431 F-591 LS-XHLB52: LinkStation < LS-XHLDBB: LinkStation SupportTSDuo: TeraStation TS-WXL10D: TeraStation TS-XL54C: TeraStation TS-XL58Esupport: TeraStation TSDuoDev: TeraStation WEBACCESS: Mediabolic Media Server AirStationMediaServer(AP001D738D15D5) Connect to the server View MenuSelect your LinkStation from the list of available devices. By default, its name will be its model number followed by the last 3 digits of its MAC address. For example, a LS-XHL LinkStation Pro whose MAC address ends in DBB will have the name LS-XHLDBB.
3 Select the contents you want to play.
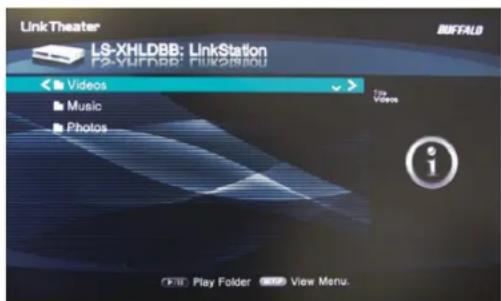
text_image
LinkTheater LS-XHLDBB: LinkStation F2-YHDFBP: FUKOSIMOU Videos Music Photos Top Views i Play Folder View Menu.Select from [Videos], [Music], or [Photos].
4 Select the file that you want to play, then play it.
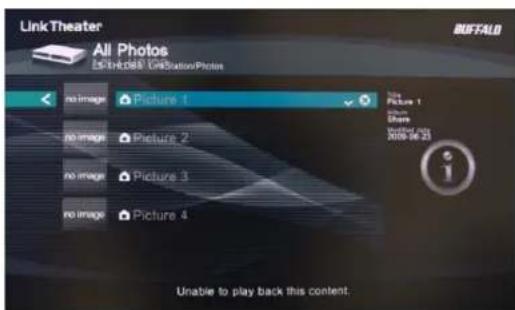
text_image
Link Theater All Photos Link Theater GBStationPhoto no image Picture 1 no image Picture 2 no image Picture 3 no image Picture 4 Unable to play back this content.Media Server Settings
By default, the LinkStation is set to allow all videos, pictures, and music in the shared folder "share" to be played. You may configure it to only play videos, pictures, and music from a specific folder.
1
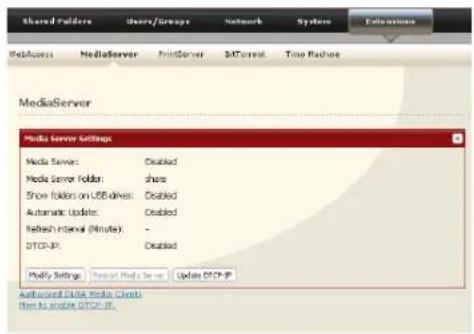
text_image
Shared Folders Users/Groups Network System Extensions WebAccess MediaServer PrintServer BATCurrent Time Machines MediaServer Media Server Settings Media Server: Disabled Media Server Folder: share Show folders on USB drives: Disabled Automatic Update: Enabled Refresh interval (Minute): - DTCP-PR: Disabled Modify Settings: Contact Media Server Update DTCP-PR Authenticated Data Media Clients then to choose DTCP-PR.In the Web Admin interface, navigate to [Extensions] - [MediaServer] and click [Modify Settings].
2

text_image
Media Server Settings Media Server: Enable Media Server Folder: share Show folders on USB drives: Enable Automatic Update: Enable C Double R Double C DoubleShared folders and subfolders can be pulled down from [Media Server Folder]. Select a folder to share.
3
Click [Save] at the bottom of the page.
4
Now, only files saved in the folder you selected in step 2 can be selected or played from DLNA compatible devices.
To view DLNA compatible devices connected to the LinkStation:
1

text_image
Shared folders doors/groups Network System Extensions WebAccess MediaServer PrintServer B4Percent Time Machine MediaServer Media Server Settings Media Server: Enabled Media Server Folder: share Show folders on USB drives: Enabled Automatic Update: Enabled Refresh internal (Minute) : - DTG-UP: Enabled Modify Settings: Typical Media Server Update DTG-UP Appurchased DTA Media Clients Don to enable DTG-UP.In the Web Admin interface, navigate to [Extensions] - [MediaServer].
2
Click [Authorized DLNA Media Clients].
3
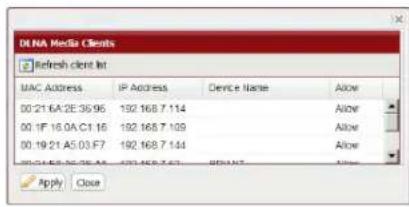
text_image
DLNA Media Clients Refresh client bit MAC ADDRESS IP Address Device Name Allow 00:21 6A:2E:36.96 192.168.7.114 Allow 00:1F 16:0A:01.16 192.168.7.109 Allow 00:19:21 A5:03:F7 192.168.7.144 Allow 00:24:5B:26:34 192.168.7.13 Allow Apply CloseA list of DLNA compatible devices on the network will appear, showing [MAC Address], [IP Address] and [Device Name].
If a DLNA device does not broadcast its name or IP address, it will be displayed as [cannot be acquired].
After connecting a new DLNA device to the network, or changing its settings, click [Refresh client list].
DLNA Media List
The LinkStation will maintain a database of videos, pictures, and music saved in its media folder and distribute a list of available media to DLNA media players on the network. This list is distributed after each reboot and once every 60 minutes by default. Configure the database as described below.
1

text_image
Shared Servers Images/Groups Network System Extensions WebAccess MediaServer PrintServer S4Control Time Machine MediaServer Media Server Settings Media Server: Enabled Media Server Folder: share Show folders on USB drives: Enabled Automatic Updates: Enabled Refresh Interval (Minute): DTCP-IP: Enabled Modify Settings: Correct Media Server Update DTCP-IP Advanced Dbls Media Clients then to enable DTCP-IP.In the Web Admin interface, navigate to [Extensions] - [MediaServer] and click on [Modify Settings].
2

text_image
Media Server Settings Media Server: 46 Enable Media Server Folder: Share Show folders on USB drives: 46 Enable Automatic Update: 46 Enable Refresh Interval (Minute): 100 ○ Double ○ Disable ○ Disable ○ DisableTo distribute the list of available media, click [Enable] in [Automatic Update], then click [Refresh now].
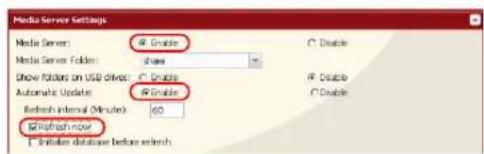
text_image
Media Server Settings Media Server: @ Enable Media Server Folders: Share Show folders on USB drive: @ Enable Automatic Updates: @ Enable Refresh internal (Minute): 60 Refresh now: Initiate database before refreshOptionally, you may choose a different refresh interval. To distribute the media list at a different interval, enter the desired interval in minutes in the [Refresh interval] field.
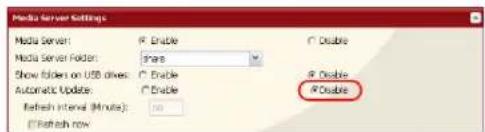
text_image
Media Server Settings Media Server: Enable Media Server Folder: Share Show folders on USB drives: Enable Automatic Update: Enable 4 Double 4 Refresh Interval (Minutes): 50 4 Refresh rowTo completely disable distribution of the media list, click [Disable] for [Automatic Update].
3
Click [Save] to save your settings.
If other DLNA media devices do not recognize the LinkStation:
If the Media Server on the LinkStation is disabled, other DLNA devices won't be able to see it. You may enable the Media Server on the LinkStation as follows.
1
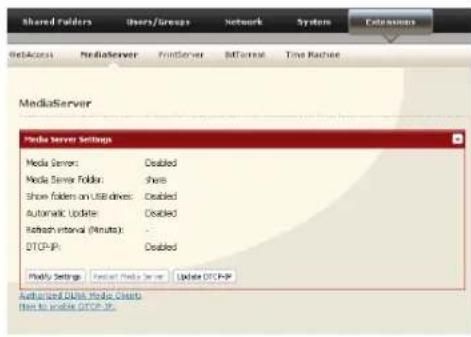
text_image
Shared Folders Users/Groups Network System Extensions NetAccess MediaServer PrintServer Format Time Cache MediaServer Media Server Settings Media Server: Disabled Media Server Folder: share Show folders on User drives: Disabled Automatic Update: Disabled Refresh interval (Minutes): - DTCP-PR: Disabled Modify Settings Contact Media Server Update DTCP-PR Authorized Data Media Clients This to enable DTCP-PR.In the Web Admin interface, navigate to [Extensions] - [MediaServer] and click [Modify Settings].
2

text_image
Media Server Settings Media Server: ① Enable Media Server Folder: share Show folders on USB drives: ② Enable Automatic Update: PEnable C Enable ③ Disable ④ DisableClick [Enable].
3
Click [Save].
To disable playback from a specific DLNA media player
By default, the LinkStation will allow playback from any compatible media player on the same network. To prohibit playback for a specific DLNA media player, follow the directions below.
1
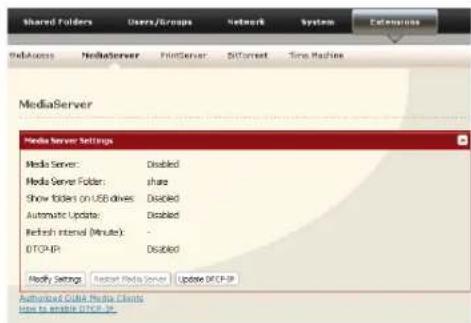
text_image
Shared Folders Users/Groups Network System Extensions WebAccess MediaServer PrintServer SoftCorrect Time Machine MediaServer Media Server Settings Media Server: Disabled Media Server Folder: share Show folders on USB drives: Disabled Automatic Update: Disabled Refresh Interval (Minute): - DTCF-IR Disabled Modify Settings Reset Media Server Update DTCF-IR Authorized GUAA Media Clients uses to enable DTCF-IR.In the Web Admin interface, navigate to [Extensions] - [MediaServer] and click [Modify Settings].
2
Click [Authorized DLNA Media Clients].
3

text_image
DLNA Media Clients Refresh client list MAC Address IP Address Device Name Allow 00 21.6A.2E.36.96 192.168.7.114 Allow 00 1F.16.6A.C1.16 192.168.7.109 Allow 00 19.21.A5.03.F7 192.168.7.144 Allow 00 21.5B.2E.36.96 192.168.7.67 Allow Apply Close DenySelect [Deny] for DLNA media player(s) that you want to block from accessing media on the LinkStation. Media players that are allowed to access media on the LinkStation should be set to [Allow].
4
Click [Save].
Troubleshooting:
Problem: The DLNA media player can't see media files on the LinkStation
If your DLNA media players can't access the media files on the LinkStation, then the list of available media files should be updated. Try the following:
1

text_image
Shared Folders Users/Groups Network System Extensions WebAccess MediaServer PrintServer SoftCorrect Time Machine MediaServer Media Server Settings Media Server: Disabled Media Server Folder: share Show folder on USB drives: Disabled Automatic Update: Disabled Refresh Interval (Minute): DTCP-IP: Disabled Modify Settings Copy Media Server Update DTCP-IP Authorized DNA Media Clients How to enable DTCP-IP.In the Web Admin interface, navigate to [Extensions] - [MediaServer] and click [Modify Settings].
2
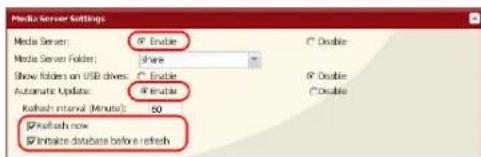
text_image
Media Server Settings Media Server: ○ Enable Media Server Folder: Share Show folders on USB drives: ○ Enable Automatic Update: ○ Enable Refresh interval (Minutes): 50 ○ Reflush now ○ Initiate database before a refreshSelect [Enable] for [Media Server] and [Automatic Update]. Check [Refresh now] and [Initialize database before refresh].
3
Click [Save].
If you cannot play certain files:
The LinkStation's DLNA media server supports the following types of files. Only files of these types will be available to DLNA media players on the network.
| Types File Extensions | |
| Video files | .avi, .divx, .asf, .mpg, .mpe, .m1v, .vcb, .mts, .m2ts, .m2t, .mpeg, .mpeg2, .vdr, .spts, .tp, .ts, .3gp, .mov, .m4v, .wmv, .dvr-ms, .xvid, .mp4, .m4v |
| Picture files | .jpg, .jpeg, .gif, .png, .tif, .tiff, .yuv, .bmp |
| Music files | .mp3, .mpa, .wma, .aac, .apl, .ac3, .lpcm, .pcm, .wav, .m3u, .m4a, .mp4, .3gp, .m4b, .aif, .aiff, .flac, .ogg, .mp2, .mp1, .mp4 |
Your media player may not support all of these filetypes. Files that your media player does not support may not be visible from the media player. Check your media players documentation for a list of the types of files that it can play.
Using iTunes with the Media Server
Computers on the network running iTunes can access MP3, M4A, and M4P music files from the LinkStation's media server. Enable the LinkStation's media server as described below.
1
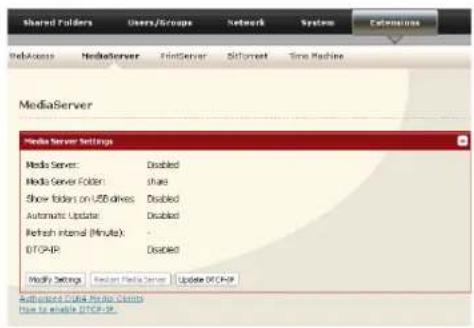
text_image
Shared Folders Users/groups Network System Extensions WebAccess MediaServer PrintServer Siforncet Time Machine MediaServer Media Server Settings Media Server: Disabled Media Server Folder: share Show folders on USB drives Disabled Automatic Update: Disabled Refresh Internal (Minute): DTGAR Disabled Modify Settings Reset Media Server Update DTGAR Copyright © Data Privacy Check How to enable DTGAR.In the Web Admin interface, navigate to [Extensions] - [MediaServer] and click [Modify Settings].
2

text_image
Media Server Settings Media Server: Enable Media Server Folder: share Show tables on USB drives: Enable Automatic Updates: Enable Refresh Interval (Minute): 50 □ Refresh row □ Indicate database before refresh Save Cancel1 Select [Enable].
2 Click [Save].
Note: If you add, change, or delete music files on the LinkStation, iTunes may halt playback until the database is updated and the media list distributed. After making changes to the media files, refresh the media list as described on the previous page and restart iTunes.
With the media server enabled, the LinkStation will appear in iTunes on computers on the network, and music files on the LinkStation can be played normally.
Chapter 3 NAS Navigator2
NAS Navigator2 is a utility program that makes it simple to display the Web Admin interface, change its IP address or check its hard drive.
Windows Vista/XP/2000 and Windows Server2003/Server2008
If you set up the LinkStation with the LinkNavigator CD, NAS Navigator2 is installed and configured to run automatically in the system tray at startup.

You can launch NAS Navigator2 in either of the following ways:
- Click the NAS Navigator icon on your Desktop.
- Click [Start] - [(All) Programs] - [BUFFALO] - [BUFFALO NAS Navigator2]-[BUFFALO NAS Navigator2].
Screen:
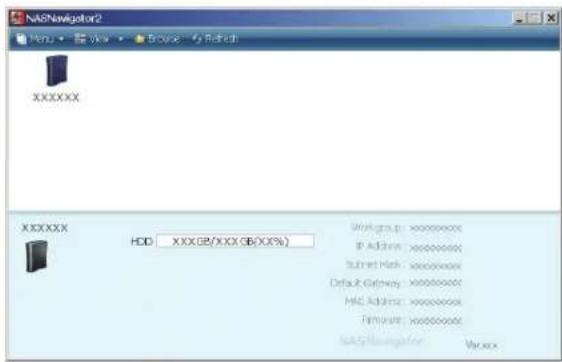
text_image
NAGNavigator2 Menu View Browse My Refresh XXXXXX XXXXXX HDD: XXX@/XXX GB(XX%) Workgroup: xxxxxxxxx IP Address: xxxxxxxxx Subnet Hash: xxxxxxxxx Default Gateway: xxxxxxxxx MAC Address: xxxxxxxxx Firmware: xxxxxxxxx NAG Navigator Var.xxClicking a LinkStation's icon will display its total capacity, capacity being used, [IP Address], [Workgroup], [Subnet Mask], [Default Gateway], [MAC Address], and [Firmware] version.
| Name Descriptions | ||
| Menu | Map remote default share to drive letter (*) | Assigns the LinkStation's shared folder as a network drive. |
| Disconnect mapped drive letter (*) | Removes the network drive mapping. | |
| Map all remote shares to drive letters | Assigns all the LinkStation's shared folders as network drives. | |
| Create desktop shortcut for Tera/LinkStation (*) | Creates a shortcut to the LinkStation's shared folder (share) | |
| Launch NAS Navigator2 on startup | Launches NAS Navigator2 in the task tray when Windows boots. | |
| Display the error information If an | error occurs, an error message will pop up from the NAS Navigator2 icon in the task tray. | |
| Properties (*) Opens the selected | LinkStation's Properties window. | |
| Close Closes NAS Navigator2. | ||
| View | View [Icon]: Displays icon for ease. | [Details]: Displays Name, Product Name, Workgroup, IP Address, Subnet Mask, and Default Gateway. |
| Sort by Selects the sort order from | following to display when multiple LinkStations are found: Host name, Product Name, Workgroup, IP Address, Subnet Mask, Default Gateway | |
| Browse(*) Opens the LinkStation's shared folder. | ||
| Refresh Searches for NAS devices on the | network again. | |
* not displayed unless the LinkStation's icon is clicked.
When NAS Navigator2 is minimized to the task tray, you have the following options from its icon.
| Browse Shares | LS-XHL01A |
| Open Web Admin | TS-XL54C |
| Properties | TS-XL54C |
| Map remote default share to drive letter | Refresh |
| Disconnect mapped drive letter | Browse Shares |
| Create short cut | Exit |
| Menu Item Descriptions | ||
| LinkStation Name | Browse Shares Opens the LinkStation's Share folder. | |
| Open Web Admin | Opens the Web Admin interface in a web browser. | |
| Properties Opens | the LinkStation's properties page. | |
| Map remote default share to drive letter | Assigns the LinkStation's default share as a network drive. | |
| Disconnect mapped drive letter | Unmaps the network drive. | |
| Create short cut | Creates a shortcut to a LinkStation's shared folder (share). | |
| Refresh Refreshes list of NAS devices. | ||
| Browse Shares Displays NAS Navigator2 window. | ||
| Exit Exits NAS Navigator2. | ||
You can perform the following tasks from a LinkStation's properties window.

text_image
LS-XHL01A Properties LS-XHL01A Web Admin | IP Settings | Open Web setting by browser Open Web setting OK Cancel Apply| Menu Item Descriptions | |
| Web Admin Opens | a Web Admin interface. |
| IP Settings If [Obtain an IP address automatically via DHCP] is checked, the LinkStation will attempt to get its IP address automatically from a DHCP server.Alternately, you can manually enter the [IP Address], [Subnet Mask], and [Default Gateway address] for the LinkStation. | |
Mac OS X 10.3.9 or later
If you installed the LinkStation with the LinkNavigator CD, NAS Navigator2 was installed automatically. To launch it, click the NAS Navigator2 icon in the Dock.

NasNavigator2
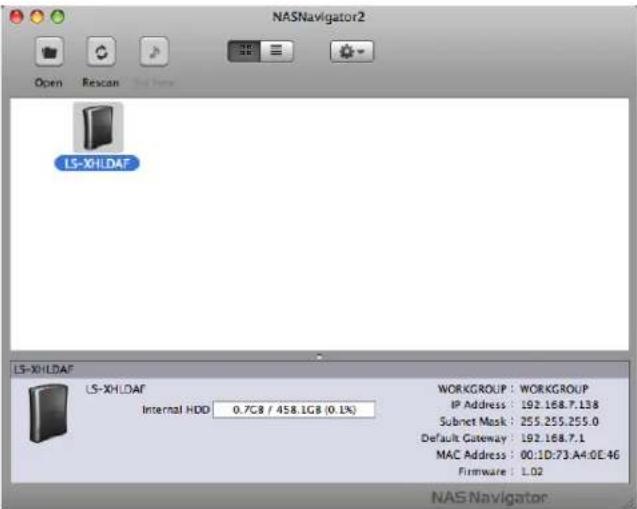
text_image
NASNavigator2 Open Rescan Real Name LS-XHLDAF LS-XHLDAF Internal HDD 0.7GB / 458.1GB (0.1%) WORKGROUP : WORKGROUP IP Address : 192.168.7.138 Subnet Mask : 255.255.255.0 Default Gateway : 192.168.7.1 MAC Address : 00:1D:73.A4:0E-46 Firmware : L02 NAS NavigatorClick on a LinkStation's icon to display its total capacity, used capacity, [WORKGROUP], [IP Address], [Subnet Mask], [Default Gateway], [MAC Address], and [Firmware] version. Double-click to open a share on the LinkStation.
| Name Descriptions | ||
| Open Opens the default shared folder for a selected LinkStation. | ||
| Rescan Refreshes list of NAS devices. | ||
| Tool Menu Open Web Op | ens the selected Web Admin interface. | |
| Configure Displays the screen to open the Web Admin interface or change an IP Address. | ||
| Color Label Selects the color of the name displayed below the icon. | ||
| Show View Options Sets the orders of icon sizes, label positions, and icons. | ||
Chapter 4
Web Admin interface
Home
The following options can be configured from the Home screen.
| Name Descriptions | |
| Name Displays the name of the LinkStation. | |
| Firmware version Displays the firmware version of the LinkStation. | |
| IP Address Displays the IP address of the LinkStation. | |
| Workgroup Displays the LinkStation's workgroup. | |
| Storage Displays the total capacity of the LinkStation's hard drive, as well as the amount used. | |
| Shared Folders Displays shared folders and disks on the LinkStation. If the [Users/Groups] tab is selected, Users and Groups are displayed. If the [Network] tab is selected, it shows if DHCP is Enabled or Disabled and displays the Ethernet Frame Size. | |
| Logout | Log out of the Web Admin interface. |
Shared Folders
The following options can be set from the [Shared Folders] screen.
| Name Descriptions | |||
| Folder Setup | Folder Setup Click [Create Folder] to open the Adding a New Shared Folder screen.Click a shared folder name to open the shared folder's settings screen.Select the shared folder and click [Delete] to delete the shared folder.Enter a letter in the [Find] field to display folders that begin with that letter.Click a folder name from the list to select the folder.The following tasks open the [Confirm Operation] screen.• Delete Folder• Restore Factory Defaults• FormatEnter the number from the [Confirmation Number] field within 60 seconds, and click [Apply]. | ||
| Folder Setup >New FolderClick [Create Folder] to view this option. | Copy Settings From | Select the shared folder you want to copy settings from. | |
| Name Enter a name for the share folder.You can enter up to 27 bytes(UTF-8). Alphanumeric characters, multi-byte characters, hyphens, and underscores may be used.Do not use a symbol as the first character of the name. | |||
| Description Enter a description for the shared folder.You can enter up to 75 bytes(UTF-8). Alphanumeric characters, multi-byte characters, hyphens, underscores, and spaces may be used.Do not use a symbol as the first character of the description. | |||
| Name Description | |||
| Folder Setup > New Folder Click [Create Folder] to view this option. | Volume Select | the volume for the shared folder. | |
| Shared Folder Attributes | The shared folder may be read-only or writable. | ||
| Recycle Bin If | enabled, deleted files are moved to a trashbox folder rather than actually deleted.You can enable recycle bin functionality for each shared folder on the LinkStation as well as usbdisk1.To use Recycle Bin with usbdisk1, format it with EXT3, XFS, or FAT 32. NTFS and HFS+ are not supported because files cannot be deleted with these formats.Recycle Bin is not supported while connecting via AFP or FTP. | ||
| Shared Folder Support | Select which operating systems and features the share will support. | ||
| Shared Folder Support | Description | ||
| Windows (SMB) | Check to enable SMB support for connection to Windows and Mac OS X. | ||
| Apple (AFP) Check to enable AFP support for connection to Mac OS. Also, navigate to [Network]-[Network Settings]-[Network Services] and make sure that AFP is enabled there as well. | |||
| FTP Check to enable remote FTP access to the share.Also, navigate to [Network]-[Network Settings]-[Network Services] and enable FTP there as well. | |||
| Disk Backup Check to allow other LinkStations to use this share as a backup target. | |||
| SFTP Select when connecting by SFTP. | |||
| Remote backup password | If another LinkStation will be backing up to this share, consider configuring a password for remote backup. This will make it easy to configure the other LinkStation to back up to the correct share and prevent other users from mistakenly backing up to it.Passwords many contain up to 8 bytes(UTF-8). Alphanumeric character, hyphen, and underscore may be used. | ||
| Access RestrictionsClick [Access Restrictions] from the [Create Shared Folders] screen to view this option. | Access Restrictions | If using access restrictions, click [Add ] to add users or groups that will be allowed to access the share.You may delete users and groups from the access list with the [Remove] button.With AFP and FTP connections, access restrictions can be set per user. | |
| Direct CopyClick [Modify Settings] to change settings. | Target Choose | the destination folder for Direct Copy. | |
Users/Groups
The following options can be set from the [Users/Groups] screen.
| Name | Descriptions | |
| Local Users | Local Users Displays [Username], [User Id], [Description], and [Primary Group].To create a new user, click [Create User].To edit the user, select the user name and click [Edit User]. To delete the user, select the user and click [Delete].If [Delegate Authority to External SMB Server] is selected from [Network] - [Workgroup/Domain] for the [For Workgroup Authentication], a user who are registered at the LinkStation can be converted to an authorized user of the external SMB server by clicking [The selected user(s) will be converted to external users].Enter a letter in the [Find] field to list users that begin with that letter.The users [admin] and [guest] are built-in to the LinkStation. They cannot be deleted.If the LinkStation is a domain member, [Domain Users] will also be available. | |
| Local Users > New UserTo display, click [Create a user]. | Username User names may contain up to 20 bytes(UTF-8). Alphanumeric characters, hyphens, underscores, and spaces may be used.Do not use multi-byte characters. Do not use a symbol as the first character of the Username. | |
| UserId If a user | ID is left blank, a user ID will be automatically assigned. When using the Quota feature, use numbers between 1000 and 1999 to set a group ID manually. Make sure that a user ID does not duplicate to other users. | |
| Description Descriptions may contain up to 75 bytes(UTF-8). Alphanumeric characters, multi-byte characters, hyphens, underscores, and spaces may be used.Do not use a space as the first character in a description.New users automatically belong to the [hdusers] group. You can change the group the user belongs to in Group Settings. | ||
| Local Users > New UserTo display, click [Create a user]. | Password Enter | the user's password. This should be the same password that the user uses to log in to his computer.Passwords may contain up to 20 bytes(UTF-8). Alphanumeric character, hyphen, and underscore may be used. Do not use a hyphen as the first character of a password.If the user is using Mac OS, passwords must be limited to 9 or fewer characters. Otherwise, the user will not be able to access shared folders on the LinkStation. |
| Confirm Password | Enter the password again for confirmation. | |
| Primary Group | When the user belongs to the multiple groups, select which group is the main for that user. If the space usage is limited by the Quota feature for the group, the limitation of the usage of the group selected is applied. | |
| User Quota To | use a quota to restrict the space which is available for a user, click [Enable]. | |
| Hard Limit(GB) | Set space to be available to use (in GB).* Quotas only restrict the available hard drive space. This feature does not provide quotas per user; it should be managed by individual users. To verify the owner, open the new window and click [Owner] tab by selecting [Security] tab on Properties screen for each file or folder and click [Advanced Settings]. (The steps to check the owner may vary according to your OS. The example above is for Windows XP). | |
| Domain Users | Domain Users T | The list of Domain Users is displayed when it joins [NT Domain] or [Active Directory]. |
| Domain Groups | Domain Groups | The list of Domain Groups is displayed when it joins [NT Domain] or [Active Directory]. |
| External Users | External Users N | Navigate to [Network] - [Workgroup/Domain] - [For Workgroup Authentication] and select [Delegate Authority to External SMB Server] and [Automatic User Registration]. Users will be registered automatically and listed.To delete automatically registered users, select each user and click [Delete External Users]. |
| Local Groups | Local Groups Displays [Group Name], [Group Id], and [Description].To create a new group, click [Create Group].To edit a group, select it and click [Edit Group].To delete a group, select it and click [Delete].Note: Enter a letter in the [Find] field and groups beginning with that letter are displayed. Click on a group name in the list to select the group. | |
| Local Groups > New GroupTo display, click [Create Group] on the Group Screen. | Group Name Group names may contain up to 20 bytes(UTF-8). Alphanumeric characters, hyphens, underscores, and periods may be used. Do not use multi-byte characters. Do not use a symbol as the first character of a group name. | |
| Group Id If Group ID is left blank, a group ID will be automatically assigned. When using the Quota feature, use numbers between 1000 and 1999 to set a group ID manually. Make sure that the group ID does not duplicate to other groups. | ||
| Description Group descriptions may contain up to 75 bytes(UTF-8). Alphanumeric characters, multi-byte characters, hyphens, underscores, and spaces may be used.Do not use a space as the first character in a description. | ||
| Group Quota To use a quota to restrict the space which is available for a group, click [Enable]. | ||
| Hard Limit(GB) | Set space to be available for use (in GB).* Quota feature only restricts the available hard drive space. This feature does not show the space that each group is currently using; It should be managed by individual group. To verify the owner, open the new window and click [Owner] tab by selecting [Security] tab on [Properties] screen for each file or folder and click [Advance Settings] button. (The steps to check the owner may very depending on OS. The example above shows for Windows XP). | |
| Local Users/Group Members | Local Users To add a user to the group, select the user and click [Add].Note: Domain Users from the Domain Controller cannot be added to groups here. | |
| Group Members | Displays users who are registered to a group. To unregister a user, select the user and click [Remove]. | |
Network
The following options can be set from the [Network] screen.
| Name | Descriptions | |
| IP Address SettingsClick [Modify Settings] to change settings. | DHCP If enabled, the | LinkStation will attempt to get its IP address from a DHCP server on the network. |
| Primary IP Address Set IP address. | ||
| Subnet Mask Set Subnet Mask. | ||
| Default Gateway Address | Specify by IP address if Default Gateway Address exists. | |
| Primary DNS Server | Specify an IP address of the DNS server which has priority. | |
| Secondary DNS Server | Specify an IP address of an alternative DNS server. | |
| Ethernet Frame SizeClick [Modify Settings] to change settings. | Ethernet Frame Size | Ethernet frame size is the maximum size of data that can be sent at a time. If all devices on your network support Jumbo Frame, you may be able to improve transmission efficiency by choosing a larger frame size than the default.[1518 bytes (Default)] It is set to 1518 bytes at default.[4102 bytes (Jumbo Frame)] Transfer at 4102 bytes.[7422 bytes (Jumbo Frame)] Transfer at 7422 bytes.[9694 bytes (Jumbo Frame)] Transfer at 9694 bytes. |
| Network Services | Network Services En | able or disable AFP and FTP.[AFP] must be enabled here for Mac OS computers to connect via AFP. Also, enable AFP in the shared folder settings to use AFP.[FTP] must be enabled here for remote users to access the LinkStation via FTP. Also, enable FTP in the shared folder settings to use FTP. |
| Workgroup/DomainClick [Modify Settings]to change settings. | Authentication Method | Select the method to join the network ([Workgroup], [NT Domain], or [Active Directory]). [Workgroup] is the default. Networking knowledge is required to configure other methods. Consult your network administrator for details. |
| Workgroup Name Enter the [Workgroup Name] to have the LinkStation join a Microsoft network group.Workgroup names may contain up to 23 bytes(UTF-8). Alphanumeric characters, multi-byte characters, hyphens, underscores, and periods may be used.Do not use a symbol as the first character of the workgroup name. | ||
| WINS Server IP Address | Enter the IP address of a WINS Server to use WINS Server. | |
| NT Domain Name Enter [NT Domain Name] to use [NT Domain] as the method to join the network.* You can enter up to 23 bytes(UTF-8).* Alphanumeric characters, multi-byte characters, -(hyphen), _ (underscore), and .(dot) may be used.* Do not use a symbol as the first character. | ||
| NT Domain Controller Name | Enter [NT Domain Controller Name] to use [NT Domain] as a method to join the network. Register the computer account which has the same name as the LinkStation to the Domain Controller.* You can enter up to 63 bytes(UTF-8). Do not use multi-byte characters.* Alphanumeric characters, -(hyphen), and _ (underscore) may be used.* Do not use a symbol as the first character. | |
| Active Directory Domain Name (NetBIOS Name) | Enter [Active Directory Domain Name (NetBIOS Name)] to use [Active Directory] as a method to join the network.* You can enter up to 23 bytes(UTF-8).* Alphanumeric characters, multi-byte characters, -(hyphen), _ ( underscore), and .(dot) may be used.* Do not use a symbol as the first character. | |
| Workgroup/DomainClick [Modify Settings] to change settings. | Active Directory Domain Name (DNS/Realm Name) | Enter [Active Directory Domain Name (DNS/Realm Name)] when selecting [Active Directory] as a method to join the network.* You can enter up to 255 bytes(UTF-8). Do not use multi-byte characters.* Alphanumeric characters, -(hyphen), _underscore), and .(dot) may be used. |
| Active Directory Domain Controller Name | Enter [Active Directory Domain Controller Name] to use [Active Directory].* You can enter up to 63 bytes(UTF-8). Do not use multi-byte characters.* Alphanumeric characters, -(hyphen), and _underscore) may be used.* Do not use a symbol as the first character. | |
| Administrator Name | Enter the Administrator account username for [Administrator Name].* This must be entered if [NT Domain] or [Active Directory] is selected for [Authentication Method].* You can enter up to 256 bytes(UTF-8). Do not use multi-byte characters.* Alphanumeric characters, -(hyphen), _underscore), and .(dot) may be used.* Do not use a symbol as the first character. | |
| Administrator Password | Enter [Administrator Password].* This must be entered if [NT Domain] or [Active Directory] is selected for [Authentication Method].* You can enter up to 256 bytes(UTF-8). Do not use multi-byte characters.* Alphanumeric characters, -(hyphen), and _underscore) may be used.* Do not use a symbol as the first character. | |
| Workgroup/DomainClick [Modify Settings] to change settings. | For Workgroup Authentication | Select the user authentication method here.[Delegate Authority to LinkStation] (usually recommended) Only registered users may access the LinkStation. Usernames and passwords should be exactly the same as those used for Windows login.[Delegate Authority to External SMB Server] Users are authenticated by an external Authentication server. Microsoft network knowledge required for setup. Consult your System Administrator for details.[Use Windows Domain Controller as Authentication Server] Select this option when you want to authenticate against Domain Controller, but the LinkStation does not join the domain.Note: The Windows Domain Controller has been assigned to be an external authentication SMB Server. The workgroup name on the LinlStation must be identical to the Windows Domain Name.[Automatic User Registration] Select to automatically register users allowed by the Authentication Server to the LinkStation's authenticated user list .[Enable Authentication Shared Folder] Use the folder as an authentication test folder which can be accessed by users registered to Authentication Server. |
| Authentication Server Name or IP Address | When [Delegate Authority to External SMB Server] is selected for the [For Workgroup Authentication], specify the external server which is used for the user authentication by the server name or IP address of the serverNote: ·When connecting using AFP or FTP/FTPS, always use an IP address. Authentication may fail if a server name is used.·Enter the IP address rather than the server name anytime that the server is not on the same subnet. | |
| Workgroup/DomainClick [Modify Settings] to change settings. | Enable Authentication Shared Folder | When [Delegate Authority to External SMB Server], [Automatic User Registration], and [Enable Authentication Shared Folder] are selected for the [For Workgroup Authentication], specify the shared folder name for the authentication test. It can be registered as the users of the LinkStation automatically who open the shared folder for the authentication test.Note: • You cannot create more than 2 shared folders for the Authentication test.A user who is automatically registered will belong to the [hdusers] group.You cannot use shared folder names which already exist as a shared folder name for the authentication test.You can enter up to 27 bytes(UTF-8).Alphanumeric characters, multi-byte characters, -(hyphen), and _ (underscore) may be used.Do not use a number or symbol as the first character.AFP and FTP/FTPS connection do not allow delegating authority to external SMB server to obtain user information. |
| Web Server SettingsClick [Modify Settings] to change settings. | Web Server Enable to use the Web Server. | |
| Port No. Enter a port | number here, or leave blank to use the default port (port 81). | |
| Web Server SettingsClick [Modify Settings] to change settings. | Target Folder Select | a target folder for the Web Server to access.-(Target folder)/htdocs/This folder holds the content.Use this folder as the installation location for HTML files and PHP scripts.Example: If the target folder is set as a shared folder with the name “web”, HTML files, PHP files, and other content are installed under \(LinkStation name)\web\htdocs over the SMB.-(Target folder)/cgi-bin/This folder holds Perl scripts.Use this folder as the installation location for Perl scripts.Only Perl scripts with .pl or .cgi extensions should be placed in this folder.To run a CGI script, copy it to the “cgi-bin” folder.CGI files in the Perl language with .cgi or .pl extensions are supported in the cgi-bin folder. PHP files with .php extensions are supported in the htdocs folder.(Target folder)/log/Logs from the Web Server are sorted in this folder. If phpinfo (PHP interpreter setting information) is displayed, then the Web Seerver is working properly.To access the Web Server, navigate to http://LinkStation IP address: port number.Example: http://192.168.11.150:81 |
| Web Server | php.ini Settings To | change PHP language interpreter settings, edit the php.ini file. Don’t do this unless you know what you’re doing!To restore php.ini to its original state, click [Restore Default Settings].[File Import] allows you to import a php.ini file from your computer.[Manual Edit] allows you to manually edit the php.ini file displayed in the text box. |
| MySQL Server SettingsClick [Modify Settings] to change settings. | MySQL Server Enable | to use MySQL server. |
| Port No. Enter the number of a port for MySQL server. | ||
| Data Folder This selects the shared folder where the MySQL database is saved. | ||
| Open phpMyAdmin | This opens phpMyAdmin where MySQL database management can be performed. The Web Server must be enabled to use phpMyAdmin.By default, the phpMyAdmin username and password are:Username: adminPassword: password*The phpMyAdmin username and password can be changed in phpMyAdmin.*Although they have the same default values, the usernames and passwords for phpMyAdmin and LinkStation administration are completely independent.*Buffalo Technology does not provide technical support for phpMyAdmin. | |
System
The following options can be set from the [System] tab.
| Name | Descriptions | |
| Settings | ||
| NameClick [Modify Settings] to change settings. | LinkStation Name | Enter a name to identify the LinkStation on the network. Names may contain up to 15 bytes(UTF-8). Alphanumeric characters, hyphens, and underscores may be used. Do not use multi-byte characters. Do not use a symbol as the first character of the name. |
| Description Descriptions may contain up to 75 bytes(UTF-8). Alphanumeric characters, multi-byte characters, hyphens, underscores and spaces may be used.Descriptions are only displayed in Windows. They will not be displayed on a Macintosh. | ||
| Date and TimeClick [Modify Settings] to change settings. | Date/Time Source | Select [Automatic] to use an NTP to correct system time automatically. Select [Manual] to set time manually. |
| Primary NTP IP Address | Enter the DNS name or the IP address of an NTP server. You may user ntp.jst.mfeed.ad.jp or 192.168.11.123, for example.To specify ntp.jst.mfeed.ad.jp as the NTP server, select [Use default NTP server (ntp.jst.mfeed.ad.jp)]. | |
| NTP Synchronization Frequency | You may have NPT correct your system time [Daily], [Weekly], or [Every 3 hours]. | |
| Time Zone Specify Time Zone. | ||
| Date Displays year, month and date. Enter numbers to change these values. | ||
| Time Displays time. Enter numbers to change the value manually. Click [Use Local Date/Time] to obtain time and time zone from the internal clock of your computer.Note: If system clocks on your network get more than 5 minutes off from each other, it may cause problems with your network. For best results, use an NTP server to automatically set the system time for all of your network devices, including the LinkStation. | ||
| LanguageClick [Modify Settings] to change settings. | Display Language | Select the language to be displayed. |
| Windows Client Language | Select the language to be used in the Windows client. | |
| Name | Descriptions | ||
| Storage | |||
| Disks | Check Disk You may run a disk check on hard drives in or attached to the LinkStation via USB. Depending on the size of the disk, a disk check may take many hours to complete.Notes: • You cannot run a disk check at the same time as a backup job.• During the disk check, the file sharing service stops.If the unit is disconnected abnormally from Mac OS, the database created by Mac OS may be destroyed and you can no longer connect to the unit. If this happens, select [Delete any hidden] and run a disk check. All of the files listed below will be deleted, including sub directories.• AppleDB• AppleDesktop• AppleDouble• TheVolumeSettingsFolder• Network Trash Folder• Please make sure the LinkStation is not selected as a backup destination of other LinkStation before you run the disk check. If the LinkStation is selected as the backup destination, do not run the disk check. | ||
| Disks | Format Disk You may format disks in or connected to the LinkStation. All data on the disk will be deleted if the drive is formatted. Back up any important data before formatting a disk.You cannot format a drive if you've scheduled a backup job. Also, do not format the drive if it's configured as the backup target of another LinkStation.The following tasks open a [Confirm Operation] screen.• Delete Folder• LinkStation's Restore Factory Defaults• Erase Disk of the LinkStationEnter the number shown in the [Confirmation Number] field within 60 seconds, and click [Apply].The LinkStation can format or recognize the following format types: | ||
| Disks | Format Disk | ||
| Format type Descriptions | |||
| XFS(USB Hard Drive/LinkStation Internal Hard Drive) | This format is recommended for the internal drive in the TeraStation or LinkStation.Supports both Reading/Writing.Supports Journaling File System.More space is available than XFS after formatted.Access speed will not degrade even with many files in a single folder.XFS is not supported by legacy LinkStations such as HD-LAN, HD-HLAN, or HD-HGLAN series.You cannot read data on an XFS drive by directly connecting to your PC. | ||
| FAT32(USB hard drive only) | FAT32 is recommended if you're going to connect the drive to Windows and Mac computers as will as the LinkStation. It works with most computers and devices.Supports both Reading/WritingCannot copy or backup data with more than 4 GB per fileCannot use some characters which are used in Mac OS X such as [.]. | ||
| NTFS(USB hard drive only) | Cannot format from the Web Admin interface. This is Read Only for the LinkStation. It can be used read/write with Windows 7/Vista/XP/2000, or Windows Server2003/Server2008.Read Only (not writable for backup either). | ||
| HFS+(USB hard drive only) | Cannot format from the Web Admin interface. Read-Only.Can be used to connect to Mac OS X 10.3.9 or later.Read Only (not writable for backup either). | ||
| GPT partitions (64 bit) are recommended for connected USB hard drives of 2.2 TB or larger. Other types of partitions will not address the full size of larger drives. GPT partitions are supported by Windows 7, Windows Vista, Windows Server 2003 SP1 or later, Windows Server 2008, Mac OS X 10.4 or later, and Buffalo TeraStations and LinkStations (e.g.TS-XL, TS-XEL, TS-WXL, LS-XHL, and LS-CHL series)Please note that other operating systems (including Windows XP) may not detect GPT partitions correctly. To read hard drives larger than 2.2 TB from Windows XP, either use a proprietary GPT solution, or use multiple partitions smaller than 2.2 TB. | |||
| Remove Disk Select the USB hard drive and click [Remove Disk] to safely remove the USB hard drive. | |||
| Rediscover Disk Not used for this product | |||
| RAID Array *1*1: LinkStation models with multiple hard drives only | Configure RAID arrays from this menu. RAID 0 and RAID 1 modes are available. If RAID is disabled, the drives in the LinkStation will be available as separate drives.[Disk Structure]:To configure a RAID array, check the target drives, select a RAID mode, and click [Create Raid Array]. To delete the RAID array, select [Delete RAID Array].Warning: All data is lost when the RAID array is modified. Back up any important data before changing RAID settings.[RAID Array Error Detection Response]:If shutdown is enabled, the LinkStation will automatically shut down when a RAID 1 error is detected. RAID 0 arrays and drives in normal mode are not affected by this setting.The default setting is [Shutdown].[RAID Array check speed]:Select the RAID scanning speed from the following:[High]: ~ 10 hours per TB[Normal]: ~ 20 hours per TB[Low]: ~ 100 hours per TB | ||
| RAID Scanning *1*1: LinkStation models with multiple hard drives only | A RAID scan tests your RAID array for errors. If errors are found, they are fixed automatically if possible. If you are using a RAID array, regular RAID scans are recommended.Recoverable errors found during standard file operations will be automatically repaired regardless of whether RAID Scanning is enabled or not. | ||
| Status Examples | |||
| Recoverable errors Read errors in data or system area of a RAID 1 array | |||
| Unrecoverable errors Write errors, RAID management area errors, partition errors, drive detection failure | |||
| Name Descriptions | |||
| Storage | |||
| If many recoverable errors (bad cluster) are found in one of the hard drives which builds RAID, that drive will be removed and the system will automatically move to degrade mode.Since the data is not protected in the degrade mode, it is strongly recommended to replace the erroneous hard drive immediately.When running RAID Scanning in the first time, it is strongly recommended to backup data on the LinkStation in advance.[RAID Scanning]:Set whether using RAID Scanning or not.[RAID Scanning Schedule]:Select the schedule to perform RAID Scanning.[Every Week], select from [Sunday] to [Saturday][1st], from [Sunday] to [Saturday][2nd], from [Sunday] to [Saturday][3rd], from [Sunday] to [Saturday][4th], from [Sunday] to [Saturday][1st, 3rd], from [Sunday] to [Saturday][2nd, 4th], from [Sunday] to [Saturday][Every 1st day / month]Select [Begin Immediate RAID Scan]] and click [Save] to immediately run the maintenance.[RAID Scanning Start Time]:Select time to start RAID from 0 to 23 o'clock.*Click [Abort RAID Scanning] to stop the operation. | |||
| Backup | |||
| View NAS Devices | Local LinkStations | Displays LinkStations and TeraStations on the network with shares enabled for backup.Click [Refresh] to update the list. | |
| Off Subnet LinkStations | You can add an off-subnet LinkStation or TeraStation to the list. Enter the IP address of the LinkStation/TeraStation and click [Add].Note: Only devices with active backup shares can be registered. | ||
| Name Descriptions | |||||
| Backup | |||||
| Search for Backup Destination by Password Click [Modify Settings] to change settings. | Password to Search | Enter a password to search for LinkStations and TeraStations with that password for backup. | |||
| Example of ConfigurationConfiguration on the LinkStation (Backup Destination) | |||||
| Name share1 share2 share_free | |||||
| Remote backup password 111 222 None | |||||
| Example of ConfigurationConfiguration on the LinkStation (Backup Source) | |||||
| The shared folder as a backup destination displayed when "222" is set on "Search for Backup Destination by Password" on the LinkStation as a backup source. | View Not | Displayed | View | ||
| The shared folder as a backup destination displayed when "222" is set on "Search for Backup Destination by Password" on the LinkStation as a backup source. | Not Displayed | View View | |||
| A shared folder as a backup destination displayed when the password is not set | Not Displayed | Not Displayed | View | ||
| Name Descriptions | ||
| Backup | ||
| Search for Backup Destination by PasswordClick [Modify Settings] to change settings. | Password to Search | Steps for Setup1 In the Web Admin interface of the backup destination, set [Remote backup password] for each shared folder.2 When setting up the backup for the LinkStation which is the backup source, set the same password of [Search for Backup Destination by Password] as for [Remote backup password] which is set for the shared folder you want to display as the backup destination.3 Set up the backup at the LinkStation which is the backup source.Select the shared folders of the backup destination from the following.*Shared folders in the LinkStation which is the backup source.The USB hard drive connected to the LinkStation which is the backup source.A shared folder for which [Remote backup password] is not set in the Link/TeraStation which is the backup destination.A shared folder whose [Remote backup password] in the LinkStation/TeraStation which is the backup source matches with [Search for Backup Destination by Password].* [Backup] must be enabled as a published destination when setting up the shared folder. |
| Backup Jobs Setup | Backup Jobs Setup | Click [Create New Job] to set up to 8 backup timers.Back up data saved on the LinkStation to the USB external hard drive or another Link/TeraStation at the specified time.Notes:If you choose the USB hard drive in order to utilize this backup feature, the USB drive must be formatted in FAT32, XFS or EXT3 The format type for a USB hard drive can be displayed on the Web Admin interface, [System] - [Storage].If a USB drive is formatted in FAT32, the maximum file size that can be backed up is 4 GB.Never unplug the Ethernet cable connected to the LinkStation or USB hard drive during backup.Do not restore, run Check Disk, Backup Job setup and Folder Setup, User/Group, Add, Edit, or Delete User during backup. Otherwise, the backup may fail.If an error occurs during a regularly scheduled backup (Every day/Every Week), the backup job will not be performed after that. You will need to configure the backup job again. However, this does not apply when [Ignore Errors and Proceed with Backup] option is selected. |
| Name | Descriptions | ||||
| Backup | |||||
| Backup Jobs SetupClick [Create New Job] to display this option in the [Backup ]screen. | Job Name Enter the | name you want for a backup task. | |||
| Backup Job Schedule | Select the schedule to run from [Not Scheduled], [Immediate], [Every Day], [Every Week][1st], [2nd], [3rd], [4th], [1st, 3rd], [2nd, 4th] or [Every 1st day/month]. | ||||
| Backup Date Select | the day or time to run the backup job. | ||||
| Backup Operation Mode | Select the Backup Operation Mode from the following choice.·[Normal Backup]·[Overwrite Backup (Append Backup)]·[Overwrite Backup (Differential Backup)]Caution:If you select [Overwrite Backup (Differential Backup)], any files which do not exist in the source will be deleted without further warning or notice.All operation modes other than normal backup will overwrite all data at the backup destination.·Do not perform any file operations (such as rename or delete a file) in the Backup Sources during the Backup. If you do so, the backup job may halt with errors. In such a case, rerun the backup job. | ||||
| Backup Jobs SetupClick[Create New Job] to display this option in the [Backup ] screen. | Backup Operation Mode | The following table shows behavior during each operation mode. Behaviors will vary if [Create Target Folder for Backup] is selected or not in Backup Option.Note: This example uses "/target" as the backup target.If data is backed up to the USB hard drive, the "target" below, will be displayed as "usbdisk*". and * will be 1 - 2 (number).If data is backed up to the LinkStation, the "target" below, the shared folder name of the backup source will be displayed.The Backup Log File is displayed under the following names in Backup Sources.backuplog (backup task number)_(backup starting time).txtExample: If the date the backup is started on March 27, 2004, 19:55,"backuplog1_200403271955.txt" is created. | |||
| Normal(Copy all files without overwriting previously backed up data every time) | |||||
| Target Folder for Backup | Backup Sources | Backup Targets / Result Re- | marks | ||
| Create (Forced) /share / | target/(Date)*1/share | ||||
| /share/folder /target/(Date)*1/folder | |||||
| Overwrite Backup (Append Backup)(Only copy and overwrite the files with changes based on the file size and time stamp*2) | |||||
| Target Folder for Backup | Backup Sources | Backup Targets / Result Re- | marks | ||
| Create /share /target/_backups/share | |||||
| /share/folder /target/_backups/share/folder | |||||
| Do not create /share /target | |||||
| /share/folder /target/folder | |||||
| *1 The format of the folder is yyyymmddhhmm by using the backup starting time.For example, if the starting time is March 27, 2004, 19:55, the folder name is displayed as "200403271955"*2 [Time Stamp] here is not the time information that can be verified Windows Macintosh, but the time information managed by LinkStation.*3 If there is the difference in the shared folders that is above the backup folder, files will not be deleted. | |||||
| Backup Jobs SetupClick [Create New Job] to display this option in the [Backup ] screen. | Backup Options | [Create Target Folder for Backup]:The options you have selected on the Backup Operation Mode will make a big differences on behavior. Refer to the table described in the Operation Mode.[Create Backup Log File]:Create the backup log file.[Use Encrypted Transfer Method]:Select whether having data to be transferred encrypted or not when backup data.* The throughput is degraded if the encryption is enabled.* Do not select this option when the backup destination is a USB hard drive.[Use Compressed Transfer Method]:Select whether having data to be transferred compressed or not when backup data.* If running a backup job via the network, the compressed transfer may improve the transfer speed when the network bandwidth is narrow (this does not mean that data is archived into 1 file and backed up).* Do not select this option when the backup destination is a USB hard drive.[Ignore backup failure and continue backup job on schedule]:The next backup will be performed even though the last backup is halt in error.[Exclude trash boxes from backup target]:Exclude the data in the trash boxes to backup.[Complete Backup]:Overwrite the files which have not changed. | |||
| Backup FoldersClick a task number to display this option in the [Backup] Screen. | Backup Folders | Select the backup source and the shared folder on the backup destination folders, and click [Add].You can select following folder as a shared folder on the backup destination.• Shared folders on the Link/TeraStation displayed in [View NAS Devices]• usbdisk1 and usbdisk2 connected to the backup source of the LinkStation* Do not specify the backup source folder which include Japanese katakana in the folder name. The backup job will halt if any of these characters are included. | |||
| Name Descriptions | |||||
| Maintenance | |||||
| Email NotificationClick [Modify Settings] to change settings.Click [Send Test Message] to send a test e-mail to the e-mail address which has been set. | Notification Select w | whether using E-mail notification feature or not. Following message is sent by using E-mail Notification.Note: Mail Server displays the list of [POP before SMTP] (the method to give the permission to use SMTP server by authenticating at specified POP server before sending e-mail). If this is set, this feature cannot be used. | |||
| SMTP Server Address | Enter [SMTP Server Address] (Mail Server Address). | ||||
| SMTP Port No. Enter | [SMTP Port No.]. | ||||
| Authentication Type | Select [Authentication Type] from [POP before SMTP], [LOGIN(SMTP-AUTH)], and [CRAM-MD5(SMTP-AUTH/CRAM-MD5)]. | ||||
| POP3 Server Address | Enter the [POP3 Server Address] (E-mail server address). | ||||
| POP3 Port No. Enter | [POP Port No.]. | ||||
| SSL/TLS When [LOGIN(SMTP-AUTH)] and [CRAM-MD5(SMTP-AUTH/CRAM-MD5)] are selected for [Authentication Type], specify either using [SSL] or [TLS]. | |||||
| Username Enter a user name that will be used for authentication. | |||||
| Password Enter the p | password used to access with above user name. | ||||
| Subject Specify the s | subject of the e-mail to be sent. Use only one-byte characters, not two-byte characters. | ||||
| Recipient(s) Enter the | e-mail address of the receiver, and click [Add]. You can register up to 5 e-mail addresses as receivers. | ||||
| Report Select the contents to send in the e-mail notification.• [HDD Status Report]Send the status other hard drive of the LinkStation on the specified time on [HDD Status Sending Time].• [Fan Failure]Sent if a problem on the fan of the LinkStation.• [Disk Error]Sent when an error occurs on the drive.• [Backup Complete]When the backup job is completedSent if the backup of the LinkStation is completed. | |||||
| Maintenance | |||||
| Restart LinkStation | Restart the LinkStation | Click [Restart] to reboot the LinkStation. | |||
| Power Management | |||||
| UPS SettingsClick [Modify Settings] to change settings. | Synchronization with UPS | [synchronize with UPS connected to this LinkStation]:Select to synchronize the LinkStation with a UPS that is directly connected.[synchronize with UPS connected to other LinkStation on the network]:Select to synchronize the LinkStation with a UPS that is connected to a different LinkStation on the same network.[do not synchronize with UPS]:Select if synchronizing to a UPS is not desired. | |||
| synchronized source LinkStation IP Address | If [synchronize with UPS connected to other LinkStation on the network] is selected, enter the IP address of the LinkStation that is directly connected to the UPS. | ||||
| UPS Connection Type | Select a connection method with UPS.Note: [USB Port (APC Style)] or [USB Port (OMRON Style)] can be only set when UPS manufactured by APC for USB connection is connected. | ||||
| LinkStation behavior When Power failure | Allows you to set the time until shutdown when the power failure continues. Or, it can shut down when it detects "Battery Low" from UPS.Note: "Low Battery" shutdown is only supported with UPSs that are connected to the LinkStation via USB. | ||||
| UPS Behavior After LinkStation has shut down | Specify whether or not to shut down the UPS after shutting down the LinkStation. | ||||
| SleepTimerClick [Modify Settings] to change settings. | Timer Interval Select | Sleep Timer interval from [Disable], [Everyday], or [Specific day of the week]. If selecting [Specific day of the week], specify the day by clicking the check box of the day. Timer can be set from 1 - 3. | |||
| Wake up at Specify a | wake-up time for the LinkStation to recover from sleep mode and resume its normal state. Times from 0:00 to 23:45 are allowed. | ||||
| Begin Sleep at Specify a | time for the LinkStation to move from its normal functionality to a standby state ("sleep mode"). Times from 0:00 to 27:45 are allowed.Note: The wake-up time must be later than the beginning time. | ||||
| Name Descriptions | |||||
| Restore/Erase | |||||
| Restore Factory Defaults | Upon restore | Click [Modify Settings] and select whether or not Initialization will reset the admin password.Note: If [Keep current admin password] has been selected, you cannot reconfigure the LinkStation without the password. Please write down the password and keep it in a safe place!. | |||
| Restore LinkStation | The following settings are initialized by [Restore LinkStation].LinkStation Name, Description, NTP Settings, Workgroup Settings, Shared Service Settings, Access Restrictions for Shared Folders, User Settings, User Group Settings, E-mail Notification, UPS Settings, Backup Jobs Setup, Admin username and password, Print server settings, WebAccess, Language settings, SleepTimer, HDD Spindown, Media server settings, BitTorrent settings, Time Machine configuration, Web Server, and MySQL Server.Note: The following tasks require a [Confirm Operation] screen.• Delete Folder• Restore LinkStation• Format LinkStation• Erase DiskEnter the number shown in the [Confirmation Number] field within 60 seconds, and click [Apply]. | ||||
| Erase | Erase Clicking | [Erase] will erase data completely on the hard drive of the LinkStation.Note: • All data will be erased. There is no “undo” for this!• While erasing, the settings for the LinkStation cannot be changed. | |||
Extensions
The following options can be set from the [Extensions] tab.
| Name Descriptions | ||
| WebAccess | ||
| WebAccess | WebAccess Settings | Enable the WebAccess service first, then click a shared folder name to display the [Edit] screen.Folder information of the LinkStation to be published by WebAccess Settings will be displayed on [Name] and [Description]In [WebAccess Settings], the following Access Restrictions can be selected.[Disable]:Does not publish shared folders.[Allow Anonymous]:Anyone can access (view) shared folders.[Allow All Groups / Users]:Allow to access (or view) only groups or uses registered to the LinkStation.[Use Inherited Folder Permissions]:Use same permissions as set on the Shared Folder Screen. If access restrictions are not set in the Shared Folder Screen, this option is not displayed. |
| WebAccess ServiceClick [Easy WebAccess Settings] to change settings.WebAccess ServiceClick [Advanced WebAccess Settings] to change settings. | WebAccess ServiceWebAccess Service | [WebAccess Service]:Configure if using WebAccess or not.[BuffaloNAS.com Name]:Enter a name for your account with WebAccess.Write this name down in a safe place. You will need it to use WebAccess.If your LinkStation is left disconnected from the Internet for 60 days or more, your BuffaloNAS name and account may be deleted from the BuffaloNAS.com server.[WebAccess Service]:Configure if using WebAccess or not.[HTTPS/SSL Encryption]:Configure if encrypting your data transfers with SSL.[Use BuffaloNAS.com]:Configure if using “BuffaloNAS.com” server.[BuffaloNAS.com Name]:Enter a name for your account with WebAccess.• Write this name down in a safe place. You will need it to use WebAccess.• If your LinkStation is left disconnected from the Internet for 60 days or more, your BuffaloNAS name and account may be deleted from the BuffaloNAS.com server.[BuffaloNAS.com Key]:Choose a password (optional) to enter a name for your accout with WebAccess.[DNS Hostname]:Use of BuffaloNAS.com is recommended for most users, but you may specify a different DNS service by entering its hostname.[Auto-Configure Firewall (UPnP)]:If your router supports UPnP, selecting [Enable] for [Auto-Configure Firewall (UPnP)] is recommended. UPnP must be enabled in the router for this to work.[External Port]:To configure the firewall manually without using UPnP, enter a port number.In the router’s settings, forward this external port number to an internal port on your LinkStation on your local network.[NAS Internal Port]:Enter internal port number for your LinkStation on your network.[Exclusive session]:If [Exclusive session] is enabled, a user account cannot be used to log multiple computers in to WebAccess simultaneously. Only the last login will be active.[Session expiration time (minute)]:Enter a time in minutes (1 - 120) before inactive users are logged out of WebAccess, or select [Unlimited].• If [Exclusive session] is enabled, [Unlimited] may not be selected. |
| MediaServer | ||
| Media Server Settings | Media Server Settings | [Restart Media Server]:Click to restart the media server.[Authorized DLNA Media Clients]:This displays the MAC Address, IP Address, and Device Name of connected DLNA clients. Click [Allow] to let a selected client to access DLNA media, then click [Apply]. Click [Refresh client list] refresh the list of available clients connected to the network.[Media Server]:To turn on the media server, click [Modify Settings] and select [Enable].[Media Server Folder]:Click [Modify Settings] and select a media server folder. If [Show folders on USB drives] is enabled, media on connected USB drives will also be available to DLNA clients.[Automatic Update]:If [Automatic Update] is enabled, the DLNA database is automatically refreshed. To immediately refresh the database, select [Refresh now] and then click [Save]. To both initialize and refresh the database, select [Initialize database before refresh] and then click [Save].Note: The [Initialize database before refresh] option is not available for LS-XHL LinkStations with firmware version 1.20 or later.[Refresh interval (Minute)]:After clicking [Modify Settings], the automatic refresh interval can be specified in minutes here. |
| Media Server Settings | ||
| Click [Modify Settings] to change settings. | ||
| The LS-WXL LinkStation supports DTCP-IP. Copyright-protected content can be used in players that support DTCP-IP. Incompatible players don’t display any DTCP-IP-related media. [Update DTCP-IP]: This downloads the latest version of the DTCP-IP encryption key. When the download is complete, the media server will restart automatically. [DTCP-IP]: This displays whether DTCP-IP is enabled or disabled as well as the current DTCP-IP version number. DTCP-IP is enabled by default for LinkStation firmware 1.20 and later. [Disk space for DTCP-IP contents.]: For LinkStation with multiple hard drives, you may choose which disk or array is used to store DTCP-IP media files. [How to enable DTCP-IP.]: When DTCP-IP is disabled, click [How to enable DTCP-IP function] and follow the directions. | ||
| Name Descriptions | ||
| PrintServer | ||
| PrintServer | PrintServer | Select whether or not to use the PrintServer (Windows only).Click [Delete Print Queue] to delete printer jobs. Note: Some printers may not work with the PrintServer. |
| Click [Modify Settings] to change settings. | ||
| Name Descriptions | ||
| BitTorrent | ||
| BitTorrentClick [Modify Settings] to change settings. | BitTorrent | [Enable] or [Disable]: Select [Enable] to use Bit Torrent.[Download Folder]: If using BitTorrent, select a download destination folder and click [Save]. To display the download screen, click [Open Download Manager]. |
| Time Machine | ||
| Time MachineClick [Modify Settings] to change settings. | Time Machine Select [Enable] when using to specify the LinkStation as a backup destination for Time Machine on Mac OS X 10.5 or later. Select a shared folder as a backup destination in [Target Folder]. | |
| Mac Information | Mac Information | Enter [Target host name] and [Target MAC address] of the Macintosh that will be using Time Machine with the LinkStation. |
Appendix
Specifications
Check Buffalo's catalogs or web site (www.buffalotech.com) for information about the latest products or compatible models.
| Interface (LAN port) | Interface: Complied with IEEE802.3ab (1000BASE-T)Complied with IEEE802.3u (100BASE-TX)Complied with IEEE802.3 (10BASE-T)Transfer Speed:1000Mbps Full duplex (AutoNegotiation)100Mbps Full duplex/Half duplex (auto-negotiation),10Mbps Full duplex/Half duplex (auto-negotiation),Number of ports:1 port (support AUTO-MDIX)Connector type: RJ-45 8-pinAccess method: CSMA/CDProtocol: TCP/IPNetwork File Systems: SMB/CIFS, AFP, FTP, HTTP/HTTPSJumbo Frame: 1,518/4,102/7,422/9,694 Bytes (Including 14 bytes of the header and 4 bytes of FCS) | |
| Interface (USB Connector) | Interface: USB Standard Revision 2.0Data transfer speed: Maximum 480 Mbps (Theoretical value)Connector: USB connector (Series A) X 1Supporting USB devices: USB hard disk manufactured by Buffalo, USB UPS, USB printer and etc. Please ensure the supported USB UPS on Buffalo's website (www.buffalotech.com). | |
| Power/ Consumption power | AC100V 50/60Hz /LS-VL, XHL, CHL: Approximately 24 W (Maximum) Approximately 17 W (Average)LS-WVL, WXL: Approximately 48 W (Maximum) Approximately 26 W (Average)LS-WSXL: Approximately 15 W (Maximum) Approximately 9 W (Average) | |
| External size / Weight | LS-VL, XHL, CHL: W45 X H175 X D156 mm (excluding protruding parts) / about 1.1 kgLS-WVL, WXL: W86 X H127 X D204 mm (excluding protruding parts) / about 2.3 kgLS-WSXL: W40 X H82 X D135 mm (excluding protruding parts) / about 0.5 kg | |
| Operating Environment | Temperature 5 - 35 °C / Humidity 20 - 80 % (no condensation) | |
| Compatible Models | Compatible computer | IBM/PC Compatible (OADG spec), NEC PC98-NX Series, Apple Mac SeriesNOTE: Equipped with LAN interface.The LinkStation cannot be connected with computers via USB; It is only connected via LAN. |
| Compatible OS | Windows 7/Vista/XP/2000, Windows Server2003/Server2008, Mac OS X 10.3.9 or later | |
Default Settings
The following settings are factory defaults for the LinkStation.
| Administrator's Name admin | |
| Password password | |
| Shared folders By default, the folder "share" may be accessed from both Windows and Macintosh computers. The recycle bin is [Enabled] on 'share' by default. | |
| DHCP Client Normally, the LinkStation will get its IP address automatically from a DHCP server on the network. If no DHCP server is available, then an IP address will be assigned as follows:IP Address: 169.254.xxx.xxx where xxx are random numbers between 1 and 254.Subnet Mask: 255.255.0.0 | |
| Registered Group The LinkStation has 3 default groups: hdusers, admin and guest. You cannot edit or delete these groups. | |
| Microsoft Network Group Setting | WORKGROUPNote: If you installed the LinkStation from the LinkNavigator installation CD, then the LinkStation's workgroup is set to the same workgroup as the computer you used for setup. |
| EthernetFrame Size | 1518 bytes |
| AFP Disabled | |
| FTP Disabled | |
| NTP Automatic | |
| PrintServer Enabled | |
| WebAccess Disabled | |
| Media Server (DLNA/iTunes) | Enabled |
| BitTorrent | Disabled |
Note: The installation program on the LinkNavigator CD can only configure a LinkStation once. To automatically install a LinkStation a second time, use the Init button to initialize the LinkStation's configuration first.
Mapping Additional Shares
When you installed the LinkStation, a share was mapped as a network drive on the computer that was used for installation. You can map additional shares, or map shares to different computers.
Windows
With Windows 7/Vista/XP/2000 or Windows Server2003/Server2008, use NAS Navigator2 to map a driveletter to a shared folder on the LinkStation.
1 Click on the [Buffalo NAS Navigator2] icon on your Desktop. NAS Navigator2 will launch.

text_image
2 Right click on the LinkStation's icon and choose [Map remote default share to drive letter]. LS-CH640L-12 HDD 0.308/581.838(0.1%) Any group: WORKGROUP. IP Address: 192.168.7.54 Submit Mask: 285.255.255.0 Default Gateway: 192.168.7.1 MAC Address: 00088.FD4.EA.BI Password: 1.21 MAC Webpage: 192.168.7.1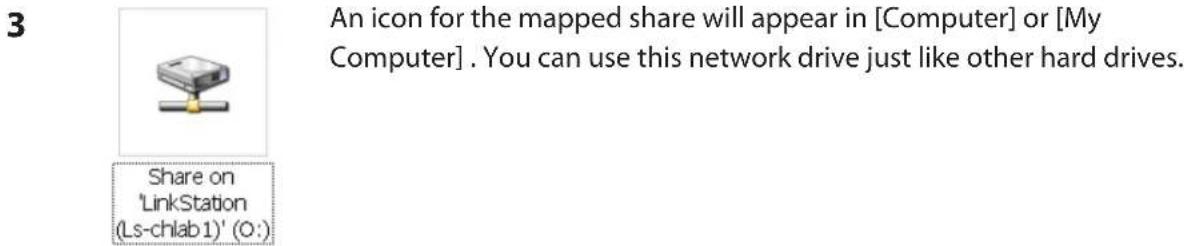
text_image
3 An icon for the mapped share will appear in [Computer] or [My Computer]. You can use this network drive just like other hard drives. Share on 'LinkStation (Ls-chlab1)' (O:)You've now mapped a driveletter to the network share. If the LinkStation is disconnected or off when your computer is booted, the message "The network path could not be found. The connection was not established" will be displayed.
Mac OS X
With Mac OS X 10.3 or later, use NAS Navigator2 to mount a share from the LinkStation as a drive on the Mac.
1

NasNavigator2
Click on the [NAS Navigator2] icon in the Dock. NAS Navigator2 will launch.
2

text_image
Open Rescan Open Folder Open Web Configure... I'm here Color Label Show View Options LS-CI LS-CH8A81 LS-CH840L-V2 Internal HDD 0.3CB / 581.8CB (0.1%) WORKGROUP WORKGROUP IP Address 192.168.7.54 Subset Mask 255.255.255.0 Default Gateway 192.168.7.1 MAC Address 00.08.BF.D4.EA.B1 Firmware : 1.21 NAS NavigatorHold the control key, click on your LinkStation's icon, then choose [Open Folder].
3

text_image
Select the volumes you want to mount on "LS- CHLAB1": info share test Cancel OKSelect the folder that you want to mount and click [OK].
4
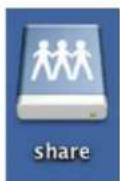
A drive icon will appear on the desktop. The shared folder is now mounted as a network drive. To dismount the share, drag and drop the share icon to the Trash.
Software
You can install following software applications and the manual by using utilities CD which comes with the LinkStation.
Select and install software from the selection screen which is displayed during Setup (Or click [Option] and follow the instruction on the screen to install software).
NAS Navigator2

text_image
NASDAQNavigator2 View View Browse Refresh XXXXXX XOOXXX HDD XXX GB XXX GB (XX%) Background: www.nasdaq IP Address: www.nasdaq Submit Date: www.nasdaq Default Gateway: www.nasdaq MAC Address: www.nasdaq Printed: www.nasdaq NASDAQNavigator MicrosoftYou need NAS Navigator2 in order to display the Web Admin interface of the LinkStation or search for the LinkStation from the network.
It is always installed when you setup by clicking [Begin Installation] on LinkNavigator.
Note: – When using Power Management with PC feature, you need to install NAS Navigator2 on all computers connected within the same network as LinkStation.
File Sharing Security Level Change Tool
To use the LinkStation with Windows Vista, Windows Server2003, Windows Server2008, or Windows 7, you must change some security settings in Windows. The File Security Tool will make these changes for you automatically.
During initial setup, the message "Change security level. Will you continue?" will be displayed. Click [Yes], follow the instructions on the screen, and restart your PC.
You may download the latest version of the File Sharing Security Level Change Tool from www.buffalotech.com.
1 Click [Start] - [BUFFALO] - [File Security Tool] - [File Security Tool].
The File Security Tool will launch. If "A program needs your permission to continue" is displayed, click [Continue].
2
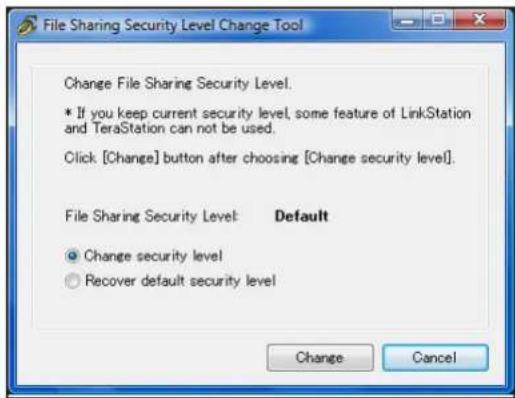
text_image
File Sharing Security Level Change Tool Change File Sharing Security Level. * If you keep current security level, some feature of LinkStation and TeraStation can not be used. Click [Change] button after choosing [Change security level]. File Sharing Security Level: Default Change security level Recover default security level Change Cancel1 When the [Change File Sharing Security Level] window opens, select [Change security level].
2 Click [Change].
3 The message, "Change security level. Will you continue?" is displayed. Click [Yes].
4 The message, "Will you restart your computer?" is displayed. Click [Yes].
Your PC should reboot.
You have changed the security level.
You can reset the security settings to their Windows defaults with the following procedure.
1 Click [Start] - [BUFFALO] - [File Security Tool] - [File Security Tool]. If "A program needs your permission to continue" is displayed, click [Continue].
2 When the [Change File Sharing Security Level] window opens, select [Recover default security level].
3 Click [Change].
The setting is now changed back.
TurboCopy
TurboCopy speeds up file copy operations in Windows.
TurboPC
TurboPC optimizes transfer speeds for hard drives by caching data in your computer's RAM. It works best when TurboCopy is also installed.
Note: Your LinkStation does not benefit from TurboPC.
Info folder
In the folder called "info" on the internal hard disk of the LinkStation, Install programs such as the NAS Navigator2 is included.
[info]-[English] Folder
- [NASNavi2] Folder... Installs NAS Navigator2 by double-clicking Inst.exe.
Status LED (LS-VL, LS-XHL, LS-CHL)
During normal operation, the power LED will glow blue.
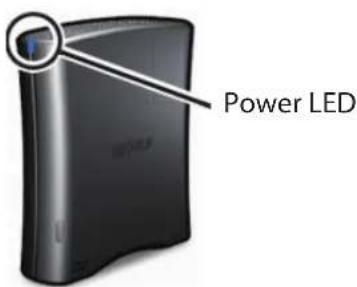
text_image
Power LEDFlashing Red
The Power LED flashes red if the LinkStation experiences an error. The way it flashes indicates the type of error.
Note: If there is an error, open NAS Navigator2. It may have an error message displayed.
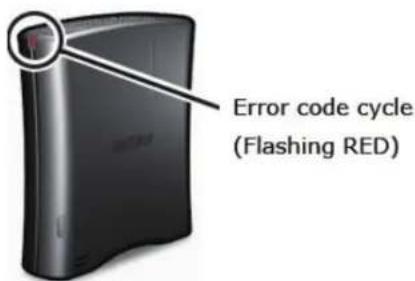
text_image
Error code cycle (Flashing RED)| Place of error code Status | |
| 10s place of error code The LED illuminates | for 1.0 seconds every 0.3 seconds.The number of flashes is the tens place of the error code. |
| 1s place of error code The LED illuminates | for 0.5 seconds every 0.3 seconds.The number of flashes is the ones place of the error code. |
| Error code Descriptions | |
| E01 Problem in DRAM DATA LINE | Contact Buffalo tech support for assistance. |
| E02 Problem in DRAM ADDRESS | LINE. Contact Buffalo tech support for assistance. |
| E03 Problem in RTC CHIP. Contact | Buffalo tech support for assistance. |
| E04 Kernel extraction failed. Contact | Buffalo tech support for assistance. |
| E06 The firmware is corrupted. Contact | Buffalo tech support for assistance. Wait 5 minutes for “E04”, then shut down the unit. Or, turn the power switch off. |
| E07 No hard drives detected. If the hard drives are connected normally, contact Buffalo technical support for assistance. | |
| E10 Operating from UPS battery. The LinkStation will be shut down normally. After the LinkStation shuts down, ensure that power is supplied to the UPS. If there is no problem, briefly press the LinkStation's function button to reset. Do not hold down the function button too long or you may get unexpected results. | |
| E11 Fan Error. The fan is spinning too slowly or has stopped. Move the unit to a cool place with good airflow and no objects blocking the fan. If the LED remains lit, replace the fan with part OP-FAN/LS, sold separately. | |
| E15 Hard drive IO error. Contact | Buffalo tech support for assistance. |
| E16 The hard disk is not connected or is malfunctioning. Contact Buffalo tech support for assistance. | |
| E17 Internal controller error. Contact | Buffalo tech support for assistance. |
| E20 The circuit board may be damaged. Disconnect and then reconnect power. Reboot the LinkStation. If the error persists, contact Buffalo technical support for assistance. | |
| E21 Internal controller error. Contact | Buffalo tech support for assistance. |
| E22 Drive mount error. Contact | Buffalo technical support for assistance. |
| E23 The hard drive may be damaged. Contact Buffalo technical support for assistance. | |
Power LED flashing amber
The Power LED flashes amber with information codes. The way it flashes indicates the message.
Note: If the Power LED is flashing amber, you can open NAS Navigator2. It will tell you the status of the LinkStation.
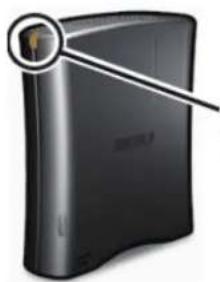
natural_image
Exterior view of a black hard drive with a circular icon highlighting the top-left corner (no text or symbols)Information Code Cycle (Flashing amber)
| Place Status | |
| 10s place The LED illuminates for 1.0 seconds | conds every 0.3 seconds.The number of flashes is the tens place of the information code. |
| 1s place The LED illuminates for 0.5 seconds | conds every 0.3 seconds.The number of flashes is the ones place of the information code. |
| Information codes Descriptions | |
| I01 Checking the system area. | |
| I19 Erasing disk (fills disk with zeros). | |
| I20 Formatting the hard drive. | |
| I21 Checking the hard drive. | |
| I23 Initializing the system settings. | |
| I25 Updating the firmware. | |
| I26 Initializing the settings in the Web Admin interface. | |
| I27 Checking a USB hard disk. | |
| I28 Formatting a USB hard disk. |
Status LED (LS-WVL, LS-WXL)
There are 5 LEDs on the LinkStation: "Power", "Function", "Info/Error", "Link/Act", and "AC adaptor".

text_image
Power LED Function LED Info/Error LED Link/Act LED AC adaptor LEDPower LED
| Status Descriptions | |
| Solid Blue The LinkStation is powered on. | |
| Blinking Blue The LinkStation is starting up or shutting down. | |
| LED is off The LinkStation is off. |
Function LED
| Status Descriptions | |
| Solid Blue DirectCopy is ready (lights for 1 minute).USB device is dismounted (lights for 5 seconds).Initialization is in progress. | |
| Blinking Blue DirectCopy is in use. | Note:The function LED (blue) and the info/error LED (orange) blink together if an error occurs during DirectCopy. Please do the following if this happens:.1.Shut down the LinkStation.2.Detach the USB device from the LinkStation.3.Reattach the USB device to the LinkStation.4.Power on the LinkStation. |
Info/Error LED
The Info/Error LED blinks orange when it has a message. The message is coded by the pattern of blinking.
Note: The messages are also available (uncoded) in NAS Navigator2.
| Place Status | |
| 10s place The LED illuminates for 1 second every 0.3 seconds.The number of flashes is the tens place of the information code. | |
| 1s place The LED illuminates for 0.5 seconds every 0.3 seconds.The number of flashes is the ones place of the information code. | |
| Information code Descriptions | |
| I01 Checking the system area. | |
| I11 Many defective sectors have been found. | |
| I12 The RAID array is being degraded mode. | |
| I13 The RAID array is being formatted. | |
| I14 The RAID array is being checked. | |
| I15 The error status of the RAID array is being investigated.Data transfers will be slower than usual until this is complete. | |
| I16 The RAID array is being created. | |
| I17 The RAID array is being resynchronized.Data transfers will be slower than usual until this is complete. | |
| I18 The RAID array is being reconfigured.Data transfers will be slower than usual until this is complete. | |
| I19 The RAID array is being erased. | |
| I20 Formatting the hard drive. | |
| I21 Checking the hard drive. | |
| I23 Initializing the system settings | |
| I25 Updating the firmware | |
| I27 Checking a USB drive | |
| I28 Formatting a USB hard drive | |
The Info/Error LED blinks red to indicate an error.
The error may be identified by the pattern of blinking.
Note: The error may also be viewed from NAS Navigator2.
| Place Status | |
| 10s place The LED illuminates for 1 second every 0.3 seconds.The number of flashes is the tens place of the error code. | |
| 1s place The LED illuminates for 0.5 seconds every 0.3 seconds.The number of flashes is the ones place of the error code. | |
| Error code Descriptions | |
| E00 MPU is abnormal; no power. Contact Buffalo tech support for assistance. | |
| E01 DRAM data line is abnormal. Contact Buffalo tech support for assistance. | |
| E02 DRAM address line is abnormal. Contact Buffalo tech support for assistance. | |
| E03 RTC chip is abnormal. Contact Buffalo tech support for assistance. | |
| E04 Kernel extraction failed. Contact Buffalo tech support for assistance. | |
| E14 The RAID array cannot be mounted. Turn off power, then turn power on again.If the same error is displayed, re-configure RAID. And if the same error is displayed again, contact Buffalo tech support for assistance. | |
| E15 Hard drive I/O error. Contact Buffalo tech support for assistance. | |
| E16 The hard drive is not connected, or data transfer has failed. Check your hard drive status. If the error still remains, replace your hard drive. | |
| E17 Controller error. Contact Buffalo tech support for assistance. | |
| E21 Controller error. Contact Buffalo tech support for assistance. | |
| E23 The hard drive has crashed. Replace your hard drive. |
Link/Act LED
| Status Descriptions | |
| Solid green Linking. | |
| Blinking green Accessing. |
AC adaptor LED
| Status Descriptions | |
| Green Power is connected. | |
| Off Power is not connected. |
Status LED (LS-WSXL)
There are 4 LEDs on the LinkStation: "Function", "Info/Error", "Link/Act", and "Power".
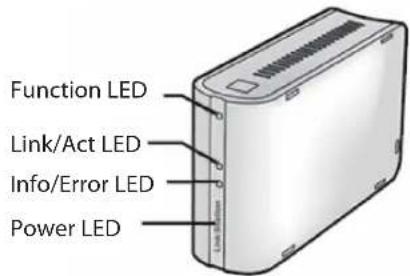
text_image
Function LED Link/Act LED Info/Error LED Power LEDFunction LED
| Status Descriptions | |
| Solid Blue DirectCopy is ready (lights for 1 minute).USB device is dismounted (lights for 5 seconds).Lights during initialization. | |
| Blinking Blue DirectCopy is in use. | Note:The function LED (blue) and the info/error LED (orange) blink together if an error occurs during DirectCopy. Please do the following if this happens:.1.Shut down the LinkStation .2.Detach the USB device from the LinkStation.3.Reattach the USB device to the LinkStation.4.Power on the LinkStation. |
Link/Act LED
| Status Descriptions | |
| Solid green Linking. | |
| Blinking green Accessing. |
Info/Error LED
The Info/Error LED blinks orange when it has a message.
The message is coded by the pattern of blinking.
Note: The messages are also available (uncoded) in NAS Navigator2.
| Place Status | |
| 10s place The LED illuminates for 1 second every 0.3 seconds.The number of flashes is the tens place of the information code. | |
| 1s place The LED illuminates for 0.5 seconds every 0.3 seconds.The number of flashes is the ones place of the information code. | |
| Information code Descriptions | |
| I01 Checking the system area. | |
| I11 Many defective sectors have been found. | |
| I12 The RAID array is being degraded mode. | |
| I13 The RAID array is being formatted. | |
| I14 The RAID array is being checked. | |
| I15 The error status of the RAID array is being investigated.Data transfers will be slower than usual until this is complete. | |
| I16 The RAID array is being created. | |
| I17 The RAID array is being resynchronized.Data transfers will be slower than usual until this is complete. | |
| I18 The RAID array is being reconfigured.Data transfers will be slower than usual until this is complete. | |
| I19 The RAID array is being erased. | |
| I20 Formatting the hard drive. | |
| I21 Checking the hard drive. | |
| I23 Initializing the system settings | |
| I25 Updating the firmware | |
| I27 Checking a USB drive | |
| I28 Formatting a USB hard drive | |
The Info/Error LED blinks red to indicate an error.
The error may be identified by the pattern of blinking.
Note: The error may also be viewed from NAS Navigator2.
| Place Status | |
| 10s place The LED illuminates for 1 second every 0.3 seconds.The number of flashes is the tens place of the error code. | |
| 1s place The LED illuminates for 0.5 seconds every 0.3 seconds.The number of flashes is the ones place of the error code. | |
| Error code Descriptions | |
| E00 MPU is abnormal; no power. Contact Buffalo tech support for assistance. | |
| E01 DRAM data line is abnormal. Contact Buffalo tech support for assistance. | |
| E02 DRAM address line is abnormal. Contact Buffalo tech support for assistance. | |
| E03 RTC chip is abnormal. Contact Buffalo tech support for assistance. | |
| E04 Kernel extraction failed. Contact Buffalo tech support for assistance. | |
| E14 The RAID array cannot be mounted. Turn off power, then turn power on again.If the same error is displayed, re-configure RAID. And if the same error is displayed again, contact Buffalo tech support for assistance. | |
| E15 Hard drive I/O error. Contact Buffalo tech support for assistance. | |
| E16 The hard drive is not connected, or data transfer has failed. Check your hard drive status. If the error still remains, contact Buffalo tech support for assistance. | |
| E17 Controller error. Contact Buffalo tech support for assistance. | |
| E21 Controller error. Contact Buffalo tech support for assistance. | |
| E23 The hard drive has crashed. Contact Buffalo tech support for assistance. |
Power LED
| Status Descriptions | |
| Solid Blue The LinkStation is powered on. | |
| Blinking blue The LinkStation is starting up or shutting down. | |
| Off The LinkStation is off. |
Compliance Information
FCC Information
This equipment has been tested and found to comply with the limits for a Class B digital device, pursuant to Part 15 of the FCC Rules. These limits are designed to provide reasonable protection against harmful interference in a residential installation. This equipment generates, uses and can radiate radio frequency energy and, if not installed and used in accordance with the instructions, may cause harmful interference to radio communications. However, there is no guarantee that interference will not occur in a particular installation. If this equipment does cause harmful interference to radio or television reception, which can be determined by turning the equipment off and on, the user is encouraged to try to correct the interference by one or more of the following measures:
-- Reorient or relocate the receiving antenna.
-- Increase the separation between the equipment and receiver.
-- Connect the equipment into an outlet on a circuit different from that to which the receiver is connected.
-- Consult the dealer or an experienced radio/TV technician for help.
CE Mark Warning
This is a Class B product. In a domestic environment, this product may cause radio interference, in which case the user may be required to take adequate measures.
Environmental Information
- The equipment that you have purchased required the extraction and use of natural resources for its production.
- The equipment may contain hazardous substances that could impact health and the environment.
- In order to avoid the dissemination of those substances in our environment and to diminish the load on natural resources, we encourage you to use the appropriate take-back systems.
- The take-back systems will reuse or recycle most of the materials of your end of life equipment appropriately.
- The crossed-out wheeled bin symbol invites you to use those systems.
- If you need more information on the collection, reuse and recycling systems, please contact your local or regional waste administration.

The following section lists typical occurrences and causes when you cannot setup the LinkStation by using LinkNavigator or cannot use LinkStation even after finishing setup,
Occurrence: The message "Cannot find LinkStation", "No available LinkStation was found", or "Setup cannot be completed" is displayed.
Cause 1. An Ethernet cable is not connected.
Reconnect the AC Adapter and the Ethernet cable, and turn on the LinkStation again.
Cause 2. The firewall is enabled, or software running in the background is installed.
Disable the firewall or uninstall software which enables the firewall, and try to search for the LinkStation again.
Cause 3. Both wireless and Ethernet Adapter are enabled.
Disable any adapters other than the Ethernet Adapter to connect to the LinkStation.
Cause 4. The defective Ethernet cable or the connection is not stable.
Change a port on the hub to connect or replace the Ethernet cable.
Cause 5. Your Ethernet Board, card, or adapter is malfunctioning.
Replace a Ethernet Board, card, or adapter.
Cause 6. The Ethernet Board you are using or the transfer mode of the hub is not set.
Change the Ethernet Board, or change the transfer mode to [10M half-duplex] or [100M half-duplex].
Some Ethernet Boards and hubs may not be connected to the network properly if the transfer mode is set to [Auto Negotiation].
Cause 7. There is a network bridge.
If any network bridge which is not used, delete them.
Cause 8. You are searching from a different network.
You cannot search for the LinkStation over network segments. Connect the LinkStation to the same segment as the computer you use for search.
Cause 9. TCP/IP does not work properly.
Install the LAN adapter's driver again.
Cause 10. You are running Setup second time or more (it has been already run before).
After initializing the LinkStation, follow steps described in "LinkNavigator Setup" on Page 4 to run Setup.
Note: – When using Power Management with PC feature, you need to install NAS Navigator2 on all computers connected within the same network as the LinkStation.
If a shared folder does not open on NAS Navigator2
The LinkStation may not be physically connected or may not be recognized properly. Reconnect the Ethernet cable and restart your computer and the LinkStation.
A shared folder does not open suddenly
If you use a shared folder on the LinkStation as a network drive, you may not be able to access to the LinkStation when the IP address or the workgroup has changed.
In such a case, follow the instructions in "Opening the Shared Folder" on Page 17 and open the shared folder on the LinkStation by using NAS Navigator2.
Note: – On Mac OS, LinkStation is mounted as a drive icon on the desktop, or displayed in the sidebar on Finder.
- If the problem still persists after you tried the procedures described above on Mac OS, select [System]-[Storage]-[Disks]-[Check Disk]-[Delete any hidden, non-essential MacOS dedicated files] on the Web Admin interface, and run Disk Check.
If a shared folder does not open even though NAS Navigator 2 recognizes the LinkStation
If power outage occurred or the AC adapter is unplugged while the LinkStation is ON, the LinkStation's firmware may be corrupted and shared folders may not open (You can search for folders on NAS Navigator2 but they do not open).
Note: – In such a case, the LinkStation name displayed on NAS Navigator2 or the Web Admin interface on the LinkStation is displayed as LS-XHL-EM abc(abc stands for last 3 digits of the MAC address of the LinkStation) or LS-CHL-EM abc, LS-WXL-EM abc, LS-WSXL-EM abc. In such a case, download the latest firmware from BUFFALO's website (www.buffalotech.com) and update it.
Data Backup
While using the LinkStation, you may lose your important data due to sudden accidents, hard disk failure, or accidental misoperation. It is important to back up your data to recover data or minimize losses in such a case.
Use Mass Storage class hard disk manufactured by BUFFALO (such as TeraStation/LinkStation and a USB external hard disk) as Backup Targets.
GPL Information
The source code for Buffalo products that use GPL code is available at http://opensource.buffalo.jp/.