2.5” SATA 500GB HDD - External hard drive Digittrade - Free user manual and instructions
Find the device manual for free 2.5” SATA 500GB HDD Digittrade in PDF.

| Product Type | External Hard Drive |
| Brand | Digittrade |
| Model | 2.5" SATA 500GB HDD |
| Interface | USB 3.0 |
| Storage Capacity | 500 GB |
| Form Factor | 2.5-inch |
| Dimensions (W x H x D) | 7.0 x 1.0 x 10.0 cm |
| Weight | 140 g |
| Power Supply | USB bus-powered |
| File System | exFAT (pre-formatted) |
| Compatible Operating Systems | Windows, macOS, Linux (with driver) |
| Data Transfer Rate | Up to 5 Gbps (USB 3.0) |
| Shock Resistance | Internal shock sensor |
| Operating Temperature | 5°C to 35°C |
| Storage Temperature | -20°C to 60°C |
| Package Contents | Hard drive, USB cable, user manual |
| Maintenance | Avoid physical shocks, keep away from moisture and magnetic fields |
| Safety Precautions | Regularly backup data, safely eject before disconnecting |
| Spare Parts and Repairability | Not user-replaceable; contact support if defective |
| General Information | Portable external hard drive for data storage and backup |
Frequently Asked Questions - 2.5” SATA 500GB HDD Digittrade
User questions about 2.5” SATA 500GB HDD Digittrade
0 question about this device. Answer the ones you know or ask your own.
Ask a new question about this device
Download the instructions for your External hard drive in PDF format for free! Find your manual 2.5” SATA 500GB HDD - Digittrade and take your electronic device back in hand. On this page are published all the documents necessary for the use of your device. 2.5” SATA 500GB HDD by Digittrade.
USER MANUAL 2.5” SATA 500GB HDD Digittrade
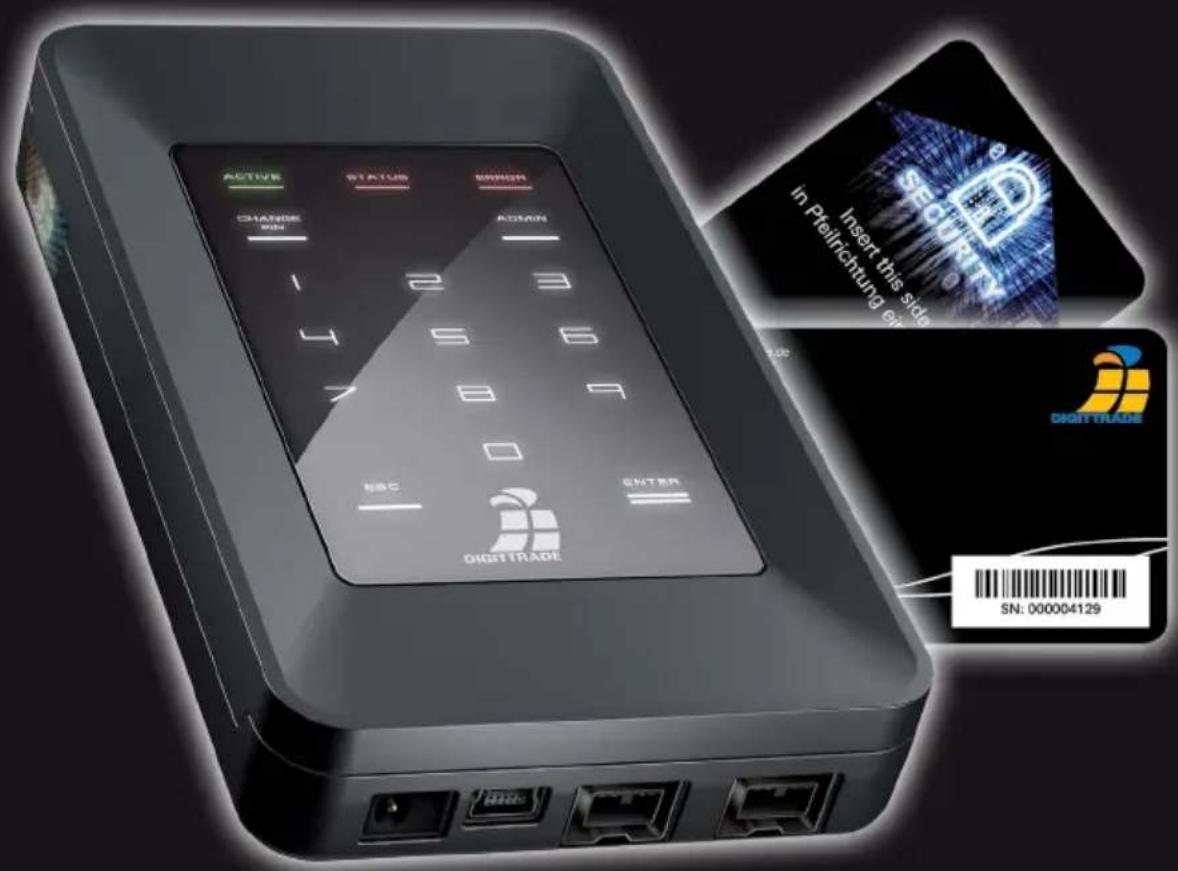
High Security HS128 / HS256
external encrypted HDD/SSD
natural_image
Black rectangular electronic device with a visible logo on its side (no readable text or symbols)
natural_image
Black rectangular electronic device with a visible logo or label on its side (no readable text or symbols beyond the logo)natural_image
Close-up of a USB cable being inserted into a device labeled A and B (no text or symbols on the cable itself)natural_image
Close-up of a black cable with connector and a digital display device connected to a keyboard (no visible text or symbols)
natural_image
Black electronic device with a digital display showing binary code and card (no readable text or symbols)| NTFS FAT | 32 HFS+ | EXT3 | ||
| Windows 98 X L, S | X X | |||
| Windows NT, 2000, ME, XP, Vista, 7 | L, S | L, S | X X | |
| Mac OS X | L | L, S | L, S | X |
| Linux | L | L, S | X L, S |
Transferrate: USB 1.1 max 12 MBit/s
USB 2.0 max 480 MBit/s
FireWire 400 max 400 MBit/s
FireWire 800 max 800 MBit/s
Smartcard: Smartcard Atmel CryptoMemory AT88SC014C
natural_image
Symbol of a trash bin crossed with two diagonal lines, no text or labels present1.3 The smart card 43
1.4 Extra features 44
1.5 Overview of the most important features 44
1.6 DIGITTRADE HS128 / HS256 benefits 45
1.7 The HS128 / HS256 security seals 45
- Connectivity 46
2.1 Connecting to a USB 1.1 Port 47
2.2 Connecting to a USB 2.0 Port 47
2.3 Connecting to a FireWire Port 48
- Getting started with the HS128/HS256 49
3.1 Inserting the smart card 49
3.2 Entering the smart card PIN 50
3.3 Changing the smart card PIN 51
- Device PIN features 52
4.1 Changing the device PIN 52
4.2 Activating/deactivating of the lock-out mode 53 (Device PIN needed)
-
Initialising / partitioning and formatting with Windows 54
-
Initialising / partitioning and formatting with Mac OS X 60
-
Initialising / partitioning and formatting with Linux 62
-
The correct file system 65
-
Possible usage of the DIGITTRADE HS128 / HS256 67
-
Technical specifications 69
-
Troubleshooting 70
-
Data security and disclaimer 72
-
Smart card storage 72
-
Product contents 73
-
WEEE Statement 73
-
Functions diagram 74
1. About the DIGITTRADE HIGH SECURITY HDD
The external DIGITTRADE HIGH SECURITY HS128 / HS256 (external encrypted HDD/SSD) is one of the safest solutions to save mobile data based on its security features.
In regards to the confidentiality of the data the DIGITTRADE HS128 / HS256 is secure from unauthorized access even if it were to be stolen, lost or misplaced and also from digital and physical attacks.
The DIGITTRADE HS128 / HS256 ensures the safety of the data through the following safety mechanisms:
- Encryption
- User authentication
1.1 Encryption
- 256 bit AES full disk hardware encryption in CBC mode
The encryption module inside the secure casing does a complete encryption of the hard drive/SSD. Every saved byte and every written sector on the hard drive/SSD are encrypted according to AES (Advanced Encryption Standard) in 128 bit / 256 bit CBC mode.
The DIGITTRADE HS128 / HS256 also encrypts temporary files and areas that are often missed by encryption software

flowchart
graph TD
    A["AES Key"] --> B["plain text 1011010101010100 9F75B162580DAC90F"]
    A --> C["cipher text"]
1.2 User authentication
- 2 factor authentication using smart card and PIN
The user authentication is based on the principal „having and knowing“
To get an access to the data the user must have the smart card and must know the correct 8 digit PIN.
If the 8 digit PIN is entered incorrect 8 times the smart card is disabled and useless. The cryptographic key is also irreversibly deleted.
1.3 The smart card
Two Smartcard (Smartcard Atmel CryptoMemory AT88SC014C) are used. The card can securely save cryptographic keys.
There are two different types of smart cards optionally available.
For higher security requirements, the smartcard Oberthur Cosmo 64 v5.4, certified by FIPS 140-2 level 3.
On the other hand, for especially high security requirements, two java based smart cards, NXP P5CD081 J3A081 JCOP v2.4.1 R3 (BSI-DSZ-CC-0675-2011) are available. These smartcards are certified by the BSI (Federal Institute of Information Technology) with EAL5.
In case of any manipulation the smart card will be irrevocably destroyed and disabled.
1.4 Extra features
The 2.5 inch built-in data storage device makes the HS128 / HS256 small and handy. The optional usage of SSD storage devices makes it shock proof. The data transfer and power solution are solved by USB or FireWire. The hardware encryption method makes it possible to use the storage device on any OS and occurs transparently. Accessing the data occurs without the loss of read/write speed.
1.5 Overview of the most important features
- 128 bit / 256 bit AES full disk hardware encryption in CBC mode
- 2-factor authentication by smart card and 8-digit PIN
- External and encrypted storage of the cryptographic key
- Hardware based encryption module
- Data encryption of all saved bytes and written sectors
- Independent of the used OS (support for all operating systems, multimedia devices and machines with USB storage device support)
- Bootable
- Compatible with USB 1.1, USB 2.0 and FireWire
- Without the loss of read/write speed
- Handy 2.5 inch format
1.6 DIGITTRADE HS128 / HS256 benefits
- Private and company data are safe from unauthorised access
- Easy and safe handling using Hardware encryption: connect, log in, use it
- All data is immediately saved with encryption, no performance loss
- Integrating in existing Smartcard-Infrastructures within Companies.
1.7 The HS128 / HS256 security seals
The components vital to the security are sealed with epoxy resin.
There are also security seals placed on the opening points as seen below. Please check to see if the security seals have been damaged or removed when you receive your product and before every use. Contact the seller if you find the seals have been manipulated.
There are more security seals inside of the HS128 / HS256.

natural_image
Exterior view of a black rectangular electronic device with a visible logo on the side (no readable text or symbols beyond the label)
natural_image
Black rectangular electronic device with a small visible label showing 'LIGHT TRAFS' (no readable text or symbols on the device body)2. Connectivity
The DIGITTRADE HS128 / HS256 can either be connected to a computer using USB or FireWire.
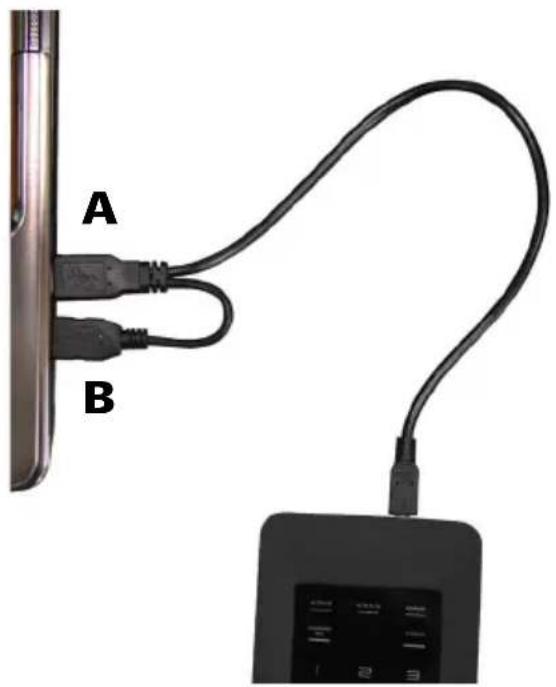
2.1 Connecting to a USB 1.1 Port
Connect the HS128 / HS256 with the supplied USB-Y-cable to your computer, laptop or any other compatible device, which supports USB storage devices.
Paying attention that you connect the A- and B-plug to the PC or lap-top first (Picture 1) and then the mini USB plug to the HS128 / HS256.
This is important, because when using a USB 1.1 port the needed starting current is sometimes not available.
natural_image
Close-up of a cable being inserted into a device labeled A and B, showing its connector and cable (no text or symbols on the cable itself)
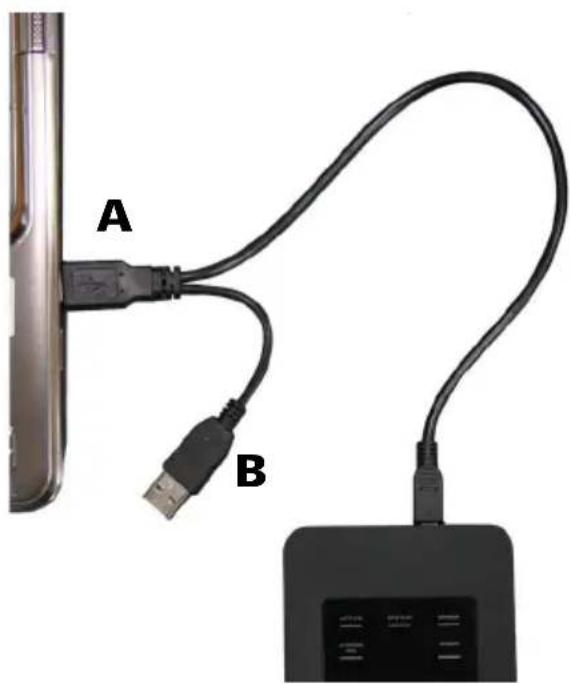
2.2 Connecting to a USB 2.0 Port
Connect the HS128 / HS256 with the supplied USB-Y-Cable to your computer, laptop or any other compatible device, which supports USB storage devices.
Paying attention that you use the A plug (Picture 2) to connect.
The USB cable does not only transfer the data but also provides your HS128 / HS256 with power. Make sure the HS128 / HS256 is directly connected to the USB port of your computer or laptop.
natural_image
Close-up of a USB cable being inserted into a device, labeled A and B (no text or symbols on the cable itself)Note: do not use your DIGITTRADE HS128 / HS256 with a USB hub or extension cable and ensure it has enough power.
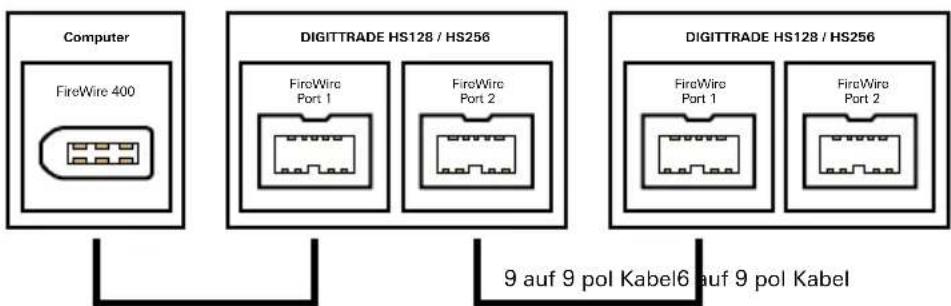
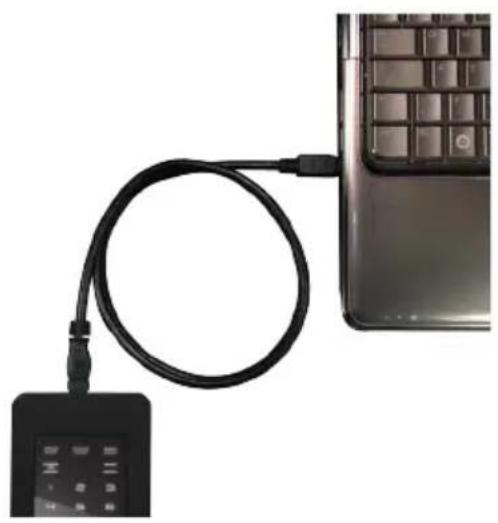
2.3 Connection to FireWire
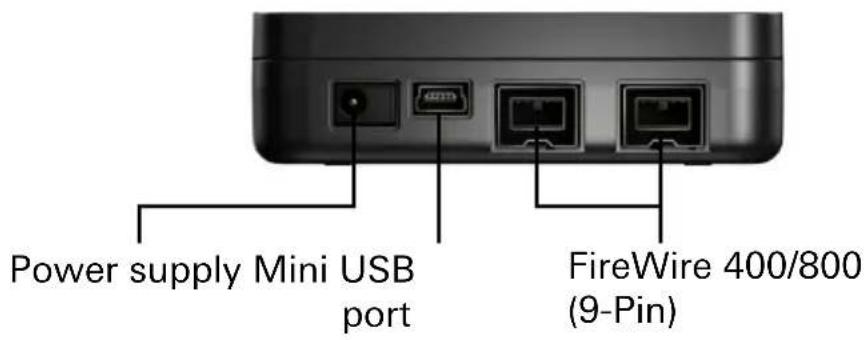
To use the FireWire port on your DIGIT-TRADE HS128 / HS256 you will need a 9 pin FireWire cable for the port on your computer.
There are two FireWire ports on the DIGITTRADE HS128 / HS256. This makes a series connection possible with the HS128 / HS256. For this plug your FireWire cable as seen in the image below.
natural_image
Close-up of a black USB cable with a small electronic device attached, next to a computer keyboard (no visible text or symbols)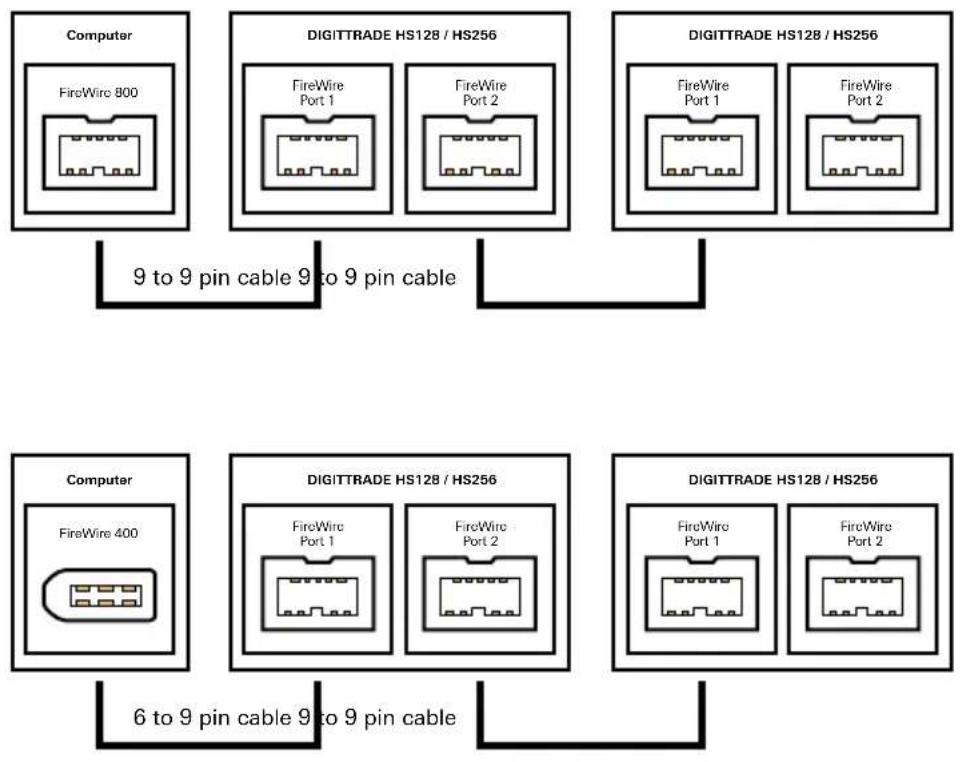
flowchart
graph TD
    A["Computer\nFireWire 800"] --> B["9 to 9 pin cable 9 to 9 pin cable"]
    C["DIGITTRADE HS128 / HS256"] --> D["FireWire Port 1"]
    C --> E["FireWire Port 2"]
    F["DIGITTRADE HS128 / HS256"] --> G["FireWire Port 1"]
    F --> H["FireWire Port 2"]
    I["Computer\nFireWire 400"] --> J["6 to 9 pin cable 9 to 9 pin cable"]
    K["DIGITTRADE HS128 / HS256"] --> L["FireWire Port 1"]
    K --> M["FireWire Port 2"]
    N["DIGITTRADE HS128 / HS256"] --> O["FireWire Port 1"]
    N --> P["FireWire Port 2"]
Note: FireWire ports in a Computer can be 9-, 6- or 4-pin. Please use the correct cable for your computer. When using a 4 to 9 pin cable you will need to use an external power source (Page 55).
3. Getting started with the HS128 / HS256
The necessary power supply for the HS128 / HS256 is provided by USB or FireWire. An extra power supply is usually not needed. If the cable you are using does not provide enough power an optional DIGITTRADE power supply can be purchased.
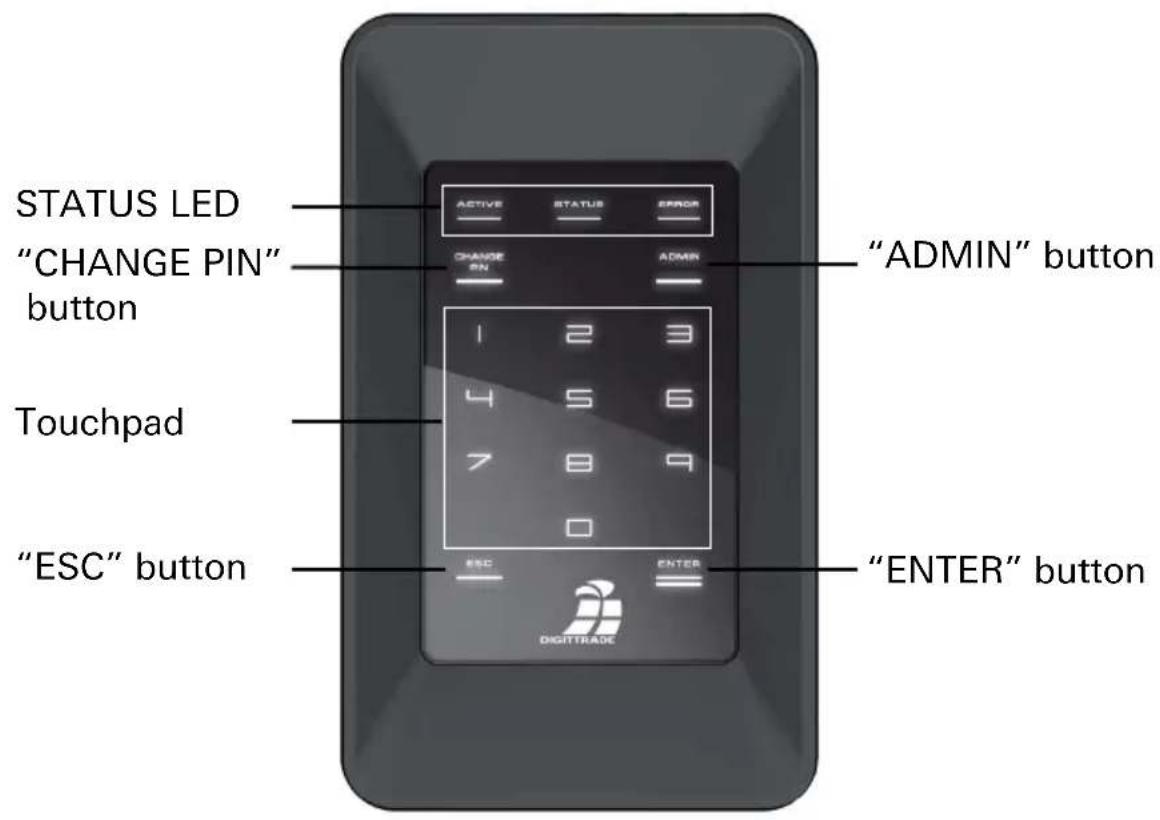
After correctly connecting the HS128 / HS256 to the computer the Status-LED will shortly light up „ACTIVE“, „STATUS“ and „ERROR“ in turn.
After which your DIGITTRADE HS128 / HS256 is operational yet it still has to be unlocked. Have your smart card and smart card PIN ready.
Note: For security reasons only use original accessories with your DIGITTRADE HS128 / HS256.
3.1 Inserting the smart card
After the DIGITTRADE HS128 / HS256 is operational it has to be unlocked for use.
To accomplish this insert your smart card (paying attention to the direction of the arrow) in the Harddrive.
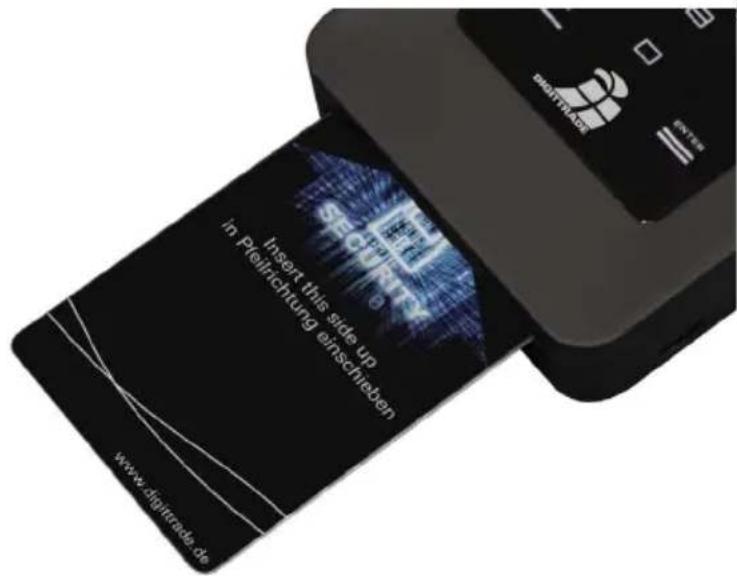
If a valid smart card is inserted the „STATUS“-LED will flash once. Followed by the number pad lighting up and ready for the input of your PIN.
If an invalid smart card is inserted the „ERROR“-LED illuminates.
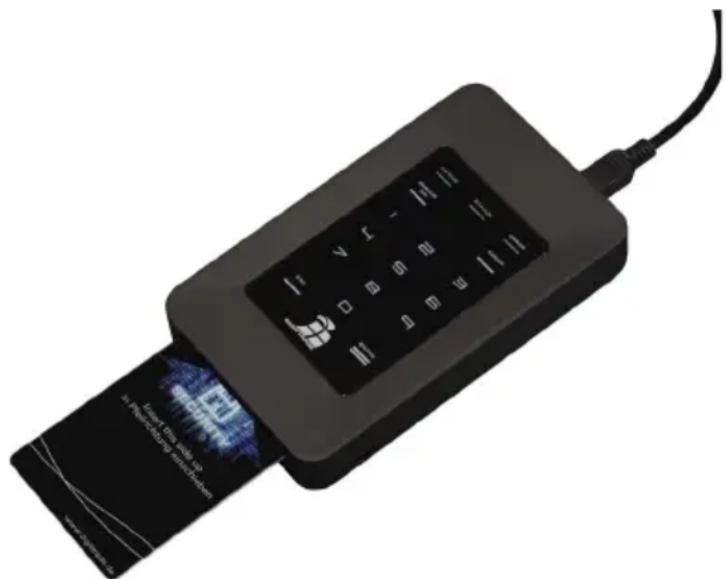
3.2 Entering the smart card PIN
After starting up and identifying a valid smart card the display on the DIGITTRADE HS128 / HS256 illuminates and is ready for you to enter the PIN.
Now the 8-digit PIN can be entered.
The factory set PIN is:
1-2-3-4-5-6-7-8
Enter the PIN using the touch pad
Then confirm with „ENTER“.
natural_image
Black electronic device with a digital display showing internal function keys (no readable text or symbols)Note: to guarantee the safety of your data it is very important to change the factory set PIN (Page 57). Change the smart card pin periodically. It is recommended to use different PINs for different cards.
After successful smart card PIN input, the cryptographic key is transferred to the encryption module. The DIGITTRADE HS128 / HS256 is recognised as a removable media device and the LEDs on the touch pad go out.
You can now access the storage device. The Smart card must stay in the DIGITTRADE HS128 / HS256 whilst in operation. If the smart card is removed from the slot then the storage device will be blocked (Lock-Out Mode).
If wanted this function can be deactivated, so that the smart card can be removed after starting up and unlocking the HS128 / HS256 it is then furthermore accessible. More information in chapter 4.2.
If a wrong PIN has been entered the „ERROR“-LED illuminates. Press the „ESC“ Button to re-enter your PIN.
Note: The smart card is automatically disabled and useless as soon as the 8-digit PIN has been incorrectly entered 8 times. The cryptographic key in the smart card is irreversibly deleted in the process.
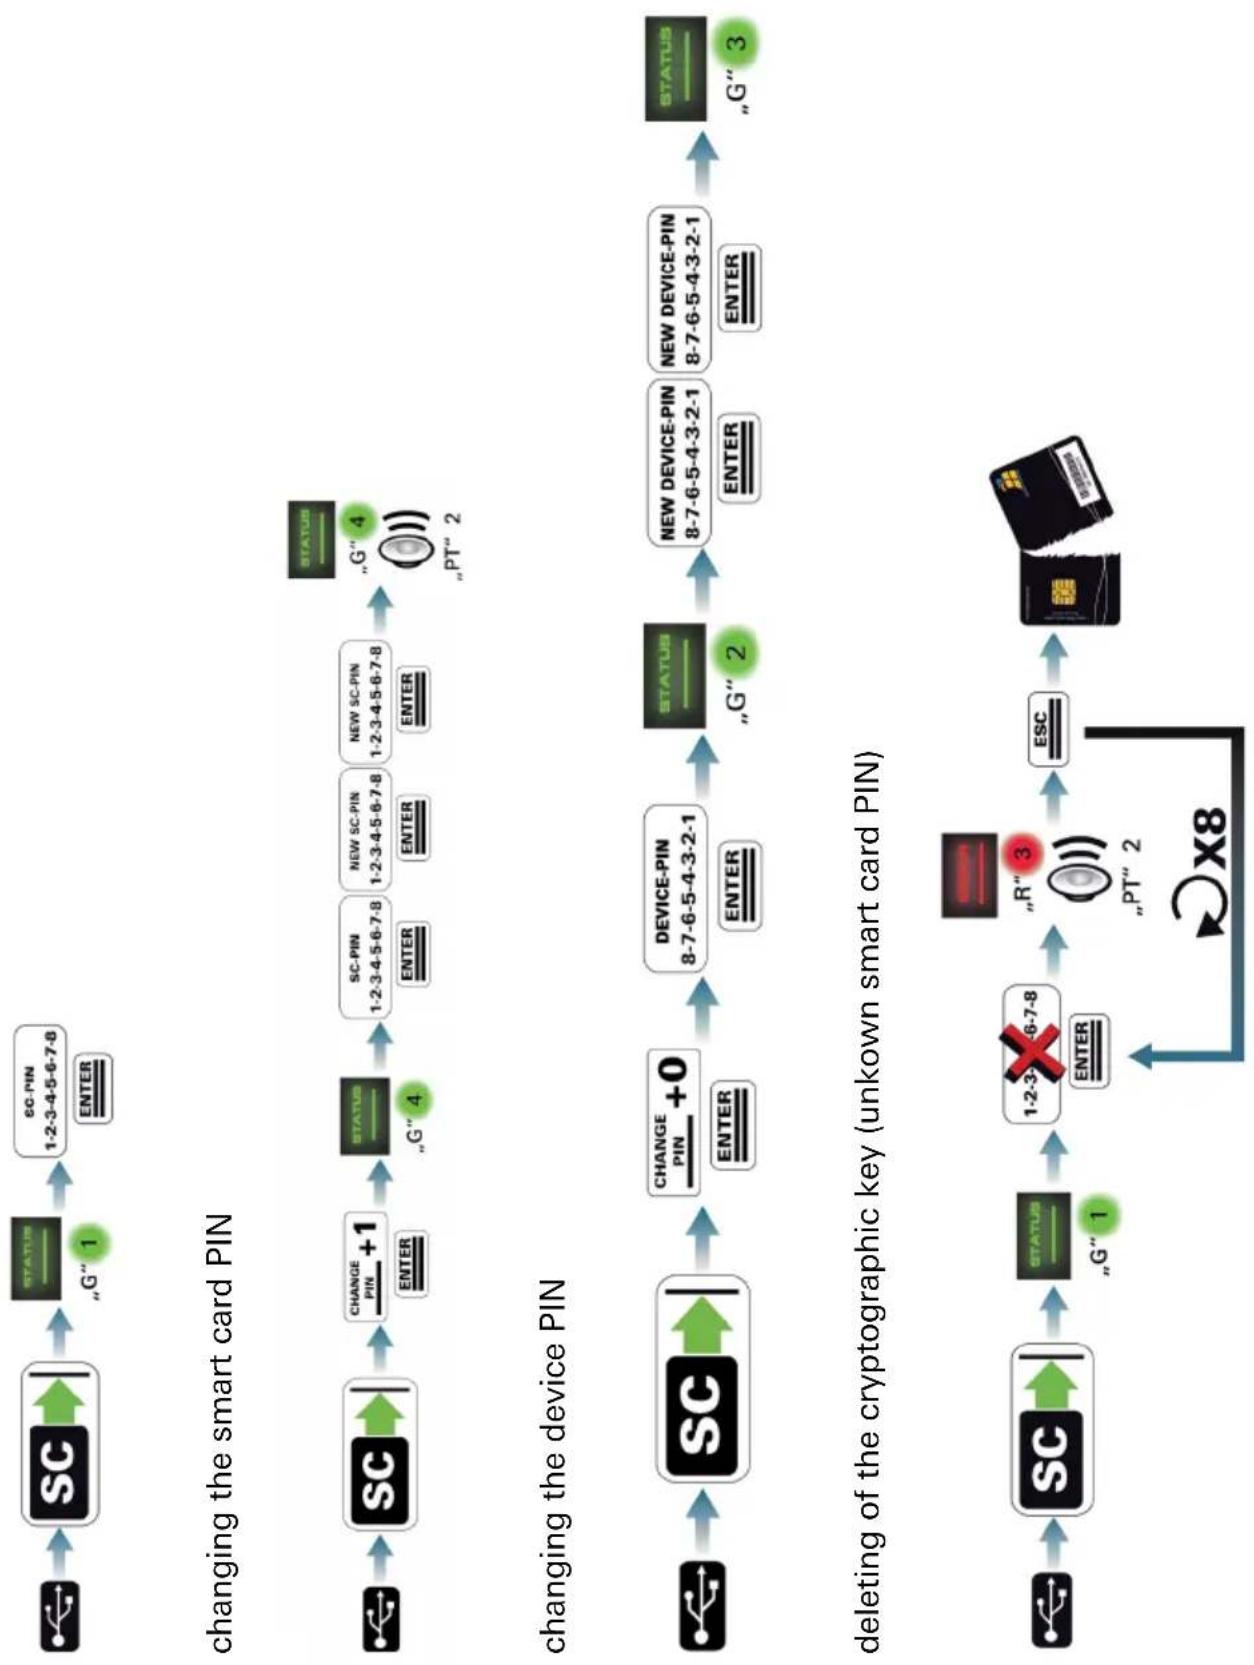
3.3 Changing the smart card PIN
Follow these steps to change your smart card PIN:
1) Insert the Smart Card into DIGITTRADE HIGH SECURITY HDD (see page 37).
2) Press the "CHANGE PIN" button and afterwards the "1" button.
3) Confirm the entry with "ENTER". The "STATUS" LED will flash four times.
4) Enter the current 8-digit PIN and press "ENTER" to confirm the entry.
5) Enter the new 8-digit PIN and press "ENTER" again for confirmation.
6) Enter the new confirmed 8-digit PIN again and press "ENTER".
After a successful PIN change, the Status -LED will flash four times and you will hear two beeps. The DIGITTRADE HIGH SECURITY HDD will be identified by the system as a removable medium and the lighting of the touchpad disappears.
The access is enabled and the Smart Card can be removed.
If the PIN change was not successful, the "ERROR" LED will flash. Press the "ESC" button and start again with the first step of the PIN change.
Note: The DIGITTRADE HIGH SECURITY HDD only accepts 8-digit PINs.
4. Device PIN Features
With the device PIN you can perform the following things:
- Change the device PIN
- Activate/deactivate the Lock-Out Mode
The factory set device PIN is: „8-7-6-5-4-3-2-1”. For security reasons it is very important to change the device PIN to prevent data loss by actions from an unauthorised person.
4.1 Changing the device PIN
To change the device PIN, follow these steps:
1) Insert the smart card into the card slot.
2) Press the „CHANGE-PIN“ button on the keypad And then „0“.
3) Confirm your entry with „ENTER“.
4) Input the current 8-digit PIN and confirm with „ENTER“. the „STATUS“-LED flashes twice.
5) Input the new 8-digit PIN and confirm with „ENTER“.
6) Input the new 8-digit PIN again and confirm with „ENTER“.
7) After the PIN has been successfully changed the „STATUS“-LED flashes three times and you will hear two beeps.
8) The smart card can now be removed.
If changing the PIN was unsuccessful, the „ERROR“-LED illuminates. Press the „ESC” button and begin at step 1. of changing the device PIN.
Note: The DIGITTRADE HS128 / HS256 only accepts 8-digit PIN. The PIN should be chosen at random. Do not use any Trivial-PIN like ascending or descending number patterns or personal oriented PIN.
4.2 Activating/deactivating of the lock-out mode (Device PIN needed)
In the activated Lock-Out Mode access to the data is instantly stopped if the smart card is removed.
The HS128 / HS256 is factory set with lock out mode active. The „STATUS“- LED illuminates red during the authentication process.
The user can deactivate this feature in particular situations. This must be done when only one smart card has access to many different storage devices that are supposed to be unlocked at the same time but have the same cryptographic key. When the lock-out mode is deactivated the „STATUS“-LED illuminates green during the authentication process.
Follow these steps to activate/deactivate the Lock-out mode:
1) Insert the smart card into the DIGITTRADE HS128 / HS256. Paying attention that the „STATUS“-LED flashes once.
Note: if the „ERROR“-LED illuminates after inserting the smart card, please initialise the smart card as described in chapter 5.4.
2) Press the „ADMIN“-button and then the „1“.
3) Press „ENTER“. The „STATUS“-LED flashes three times.
4) Input your 8-digit device pin and press „ENTER”.
If the PIN was entered correctly the „STATUS“-LED flashes three times and you will hear two beep sounds.
5) The Lock-out mode is now activated/deactivated. The „STATUS“-LED illuminates red when the feature is activated and green when it is deactivated.
6) disconnect the USB connection to the DIGITTRADE HS128 / HS256 and reconnect to leave this feature.
Note: The Lock-Out mode is factory set to active. Do not remove the smart card from the DIGITTRADE HS128 / HS256 in this mode, as it can lead to data loss.
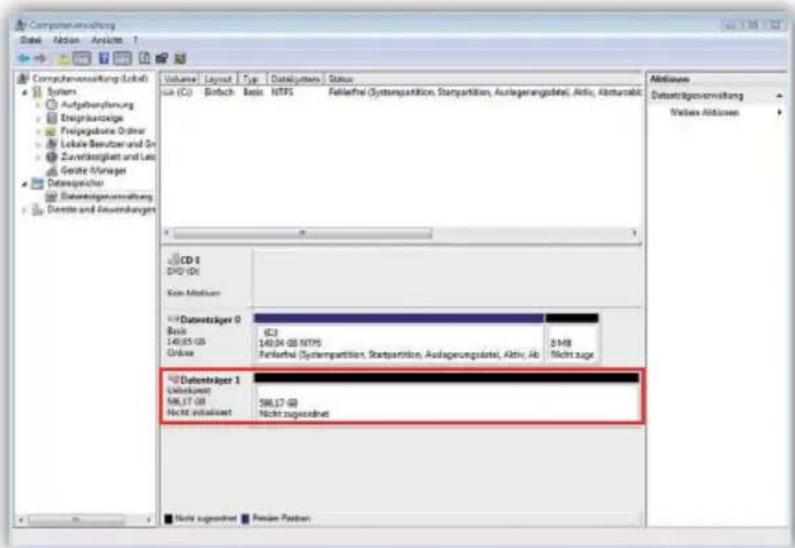
5. Initialising / partitioning and formatting with Windows
To initialize the HS128 / HS256 with Windows follow these Steps:
- Enter disk management. To do this right-click on my computer and then click on manage. In Windows Vista or 7 click start, then right-click on my computer, choose manage and then click on Disk management from the list.
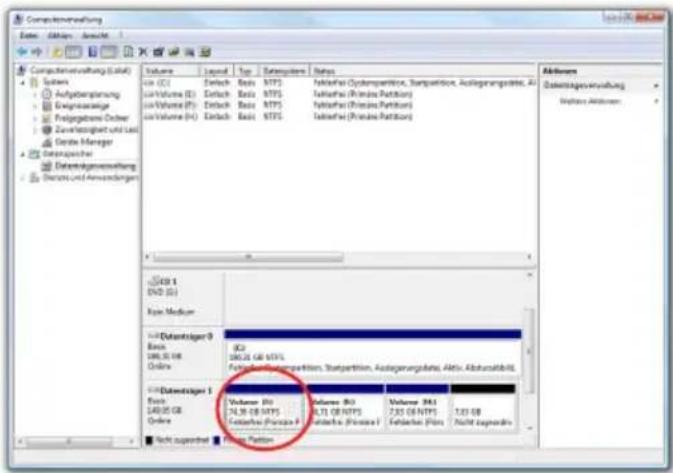
Here you will find an overview of the different drives:
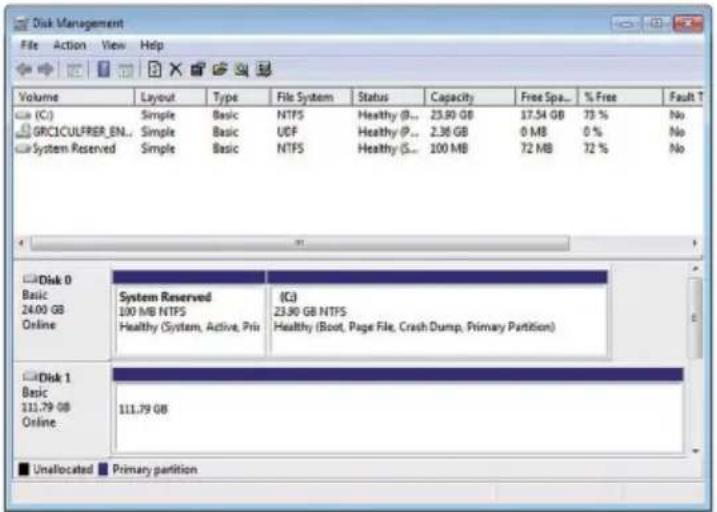
- After successfully initialising the HS128 / HS256 it will be in the bottom area of the disk management software:
- If the disk management is open the first time since the HS128 / HS256 was started following window will pop-up:
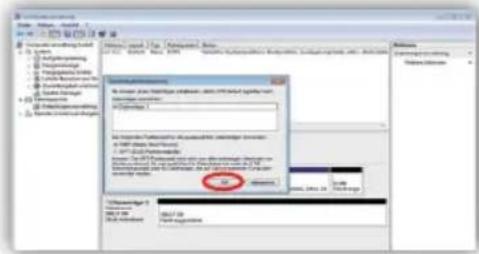
- Here you can initialize the drive by clicking „OK“
Note: In case the initialisation window does not automatically pop up, or it was ended by clicking „Cancel“, you can initialise the disk by right clicking on it in the list.
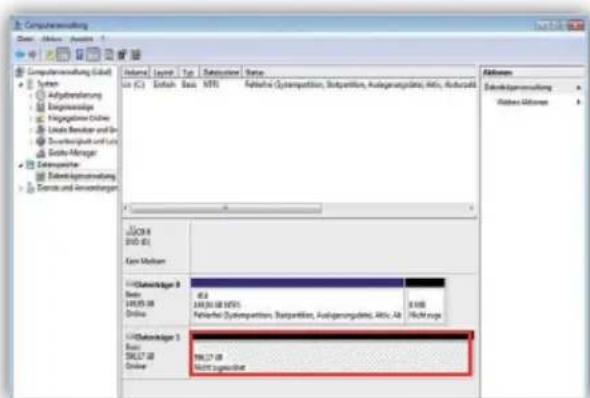
- The status should then change from „not initialised“ to „online“
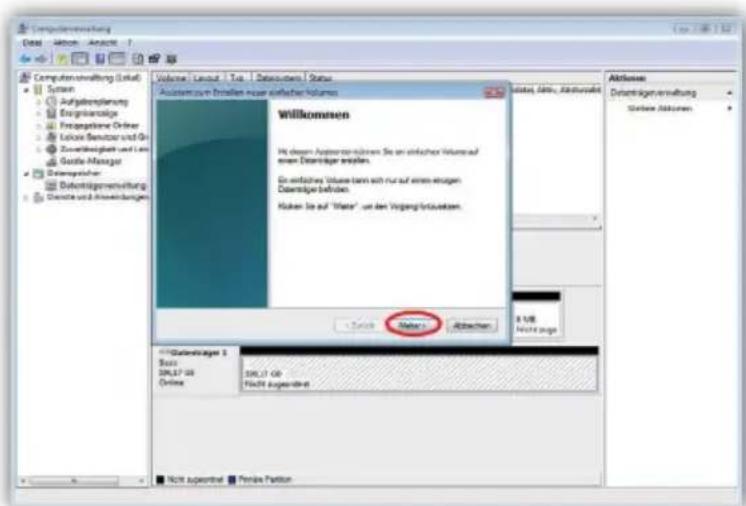
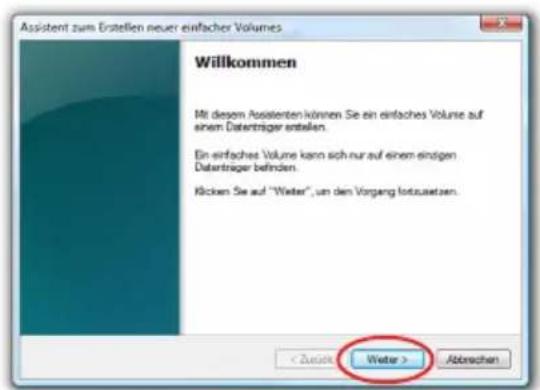
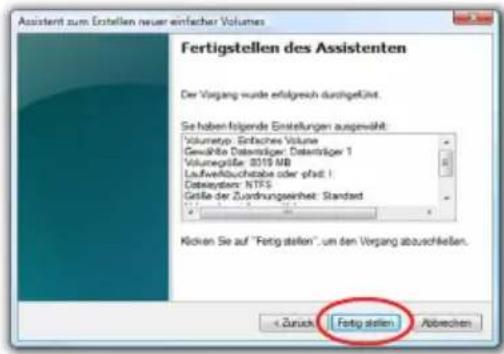
- Right click on the „unallocated“ area and in the menu choose „New simple volume“. In the started assistant you can change all needed settings and format the drive.
- Click on „next“ to start the process
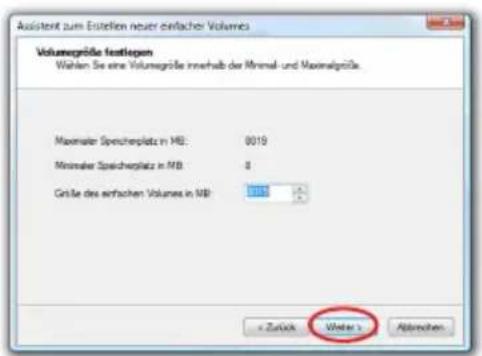
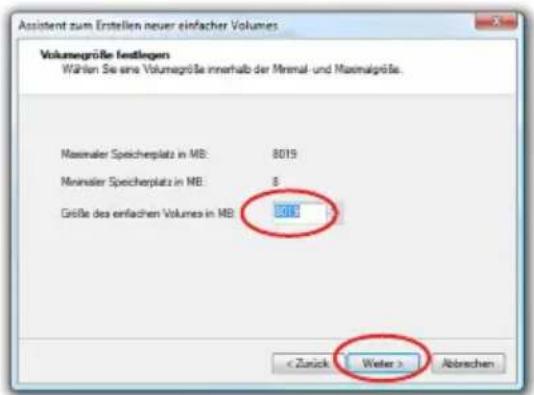
- Type the desired size of the partition in MB and click „next“:
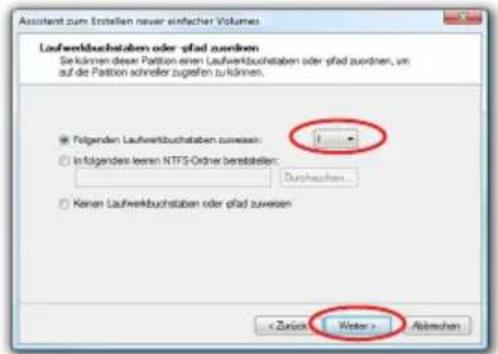
- You may assign a letter to the partition then click on „next“:
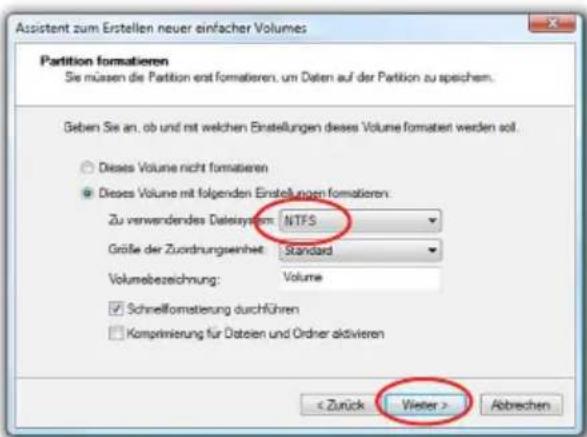
- Now choose the file system and the type of format you would like to use and click „next“:
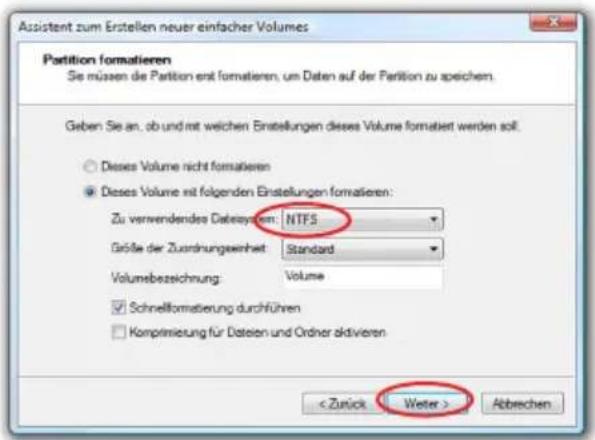
The duration of the format can vary depending on the size of the hard drive.
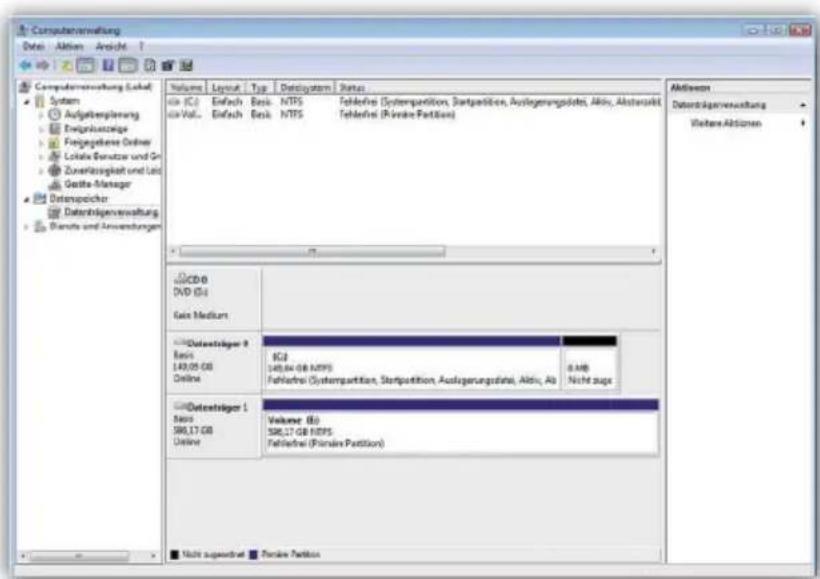
When formatting is complete the HS128 / HS256 will be shown as „healthy“ and can now be used:
It is also possible to partition the DIGITTRADE HS128 / HS256 in more than one partition using the disk management.
To partition the HS128 / HS256 follow these steps:
- Scroll to the HS128 / HS256 with your mouse right-click on it to open the context menu
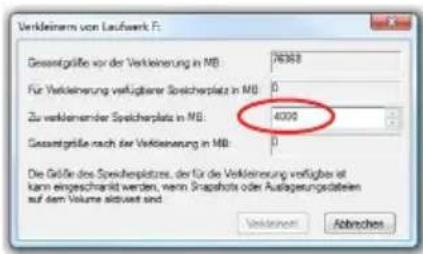
- Choose „shrink volume“.
- Type the desired size (in MB) the partition should be shrunk to
- It will then show unallocated space in the management window
- Scroll to the unallocated space, right-click and then choose „new simple volume” from the menu.
- The partition manager opens:
- Type the desired size of the partition in MB and click „next“:
- Now choose the file system and the type of format you would like to use and click „next“:
Note: The newly partitioned area is being formatted. After successfully partitioning, the new partition is automatically recognised by the system.
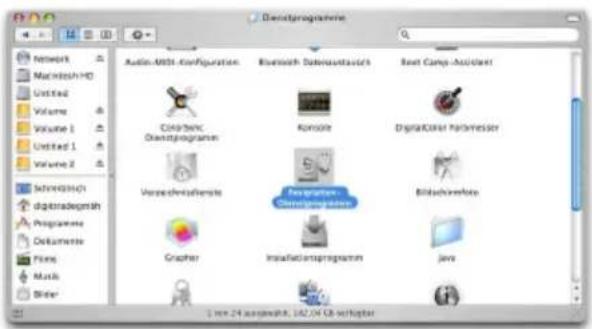
6. Initialising / partitioning and formatting with Mac OS X
To manage external disks using a MAC you can use the „disk utility“. To open it go to „Programs“ and then „Utilities“.
- Choose the „Disk Utility“. The disk management for initialising, partitioning and formatting opens.
- From the drive list on the left choose the HS128 / HS256. Under menu item „delete “ you can initialise and partition the HS128 / HS256.
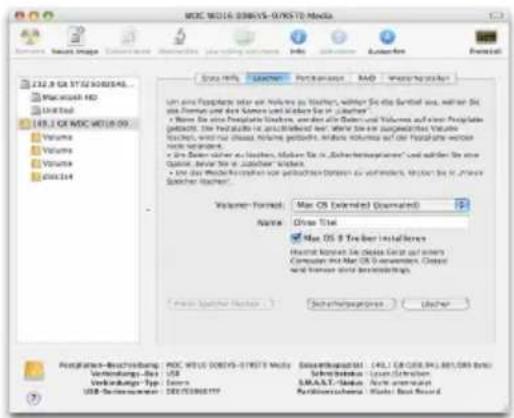
As well as giving the drive a name you can choose the file system to be used. For MAC OS X you should use „Mac OS Extended (Journaled)“ and for the classic MAC OS 9 the HFS Format (Mac OS Extended).
- Confirm the initialisation / format by clicking the „delete“ button.
To partition the HS128 / HS256 the „Disk utility“ is also used. To do this simply click on the HS128 / HS256 and choose „partitioning“ you may also choose the size of the partiotions.
- In the middle you can see how the disk is currently partitioned. Click on the pulldown menu „current“ right under „volume scheme“.
- You may now choose the number of partitions you would like.
- After you have applied all of the partitions, you can decide the name and size of every partition under „Volume Information“.
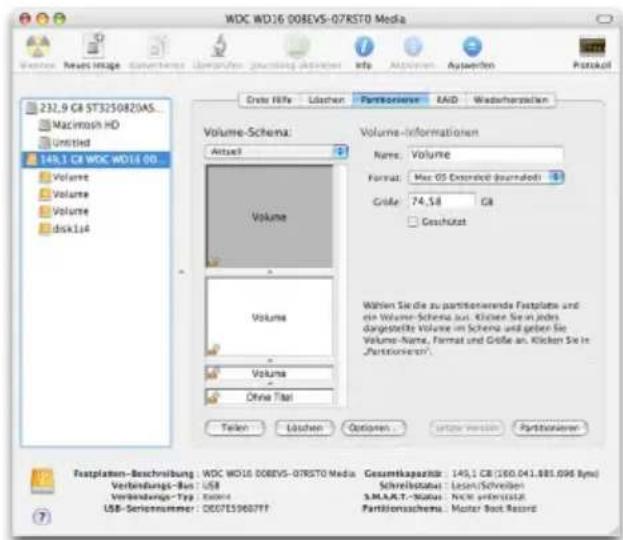
- You can now apply the settings by clicking „apply“
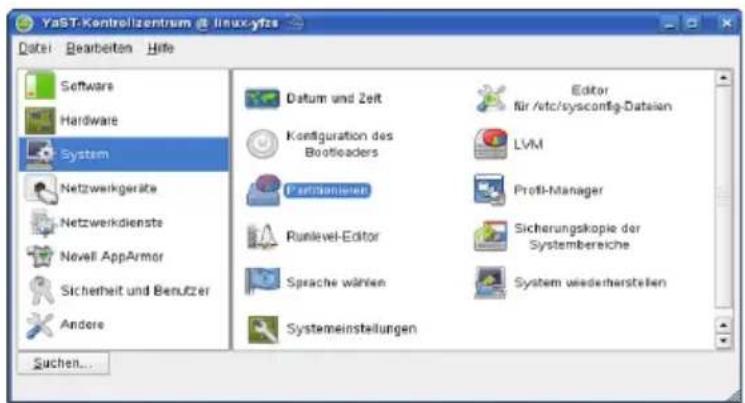
7. Initialising / partitioning und formatting with Linux
It is possible to partition the DIGITTRADE HS128 / HS256 in more than one partition using Linux. To do this the correct file system has to be initialised first. The process described here is based on YaST from Suse Linux. The process is similar on other Linux distributions.
To begin open YaST, if prompted you may have to type your root password into the password window, then press "Enter."
- according to the security you will ask about if you are already familiar to partitioning, confirm it by pressing "yes"
- The list of your data storage devices will open.
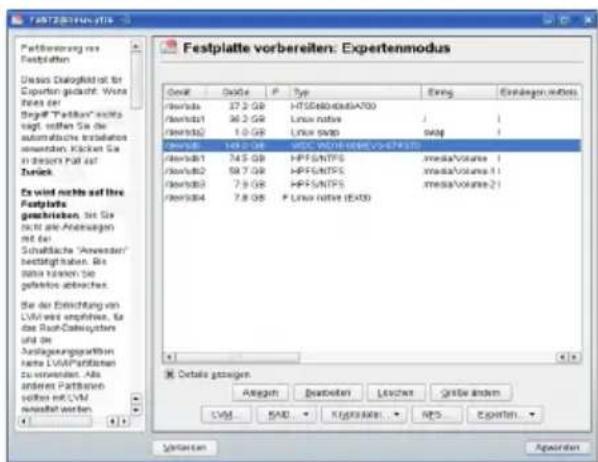
- Here you can choose the desired storage device and partition it or change/delete previous partitions.
- To delete the standard already existing NTFS partition select it and then click on „delete“.
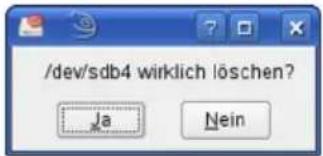
- You will be asked by the system if you are sure you want to delete the partition. Make sure you selected the right partition and continue by clicking „Yes“.
Note: After deleting the partition all data on the partition is irreversibly deleted.
- To generate a new partition on the unallocated space of the storage device click on „create”.
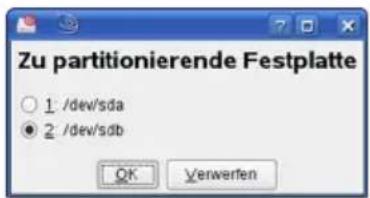
- Choose on which storage device you would like to create a partition.
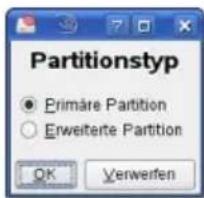
- During the next step you will be asked which type of partition should be used. In most cases it is recommended to choose „primary partition“.
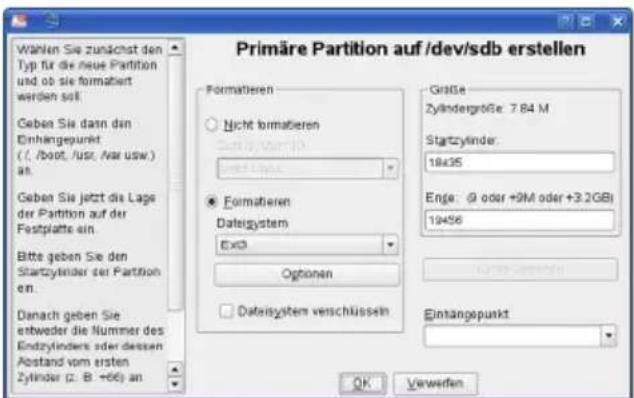
- In this window the settings are chosen. You can choose a file system, the size and even if needed the mount point in your system.
- When finished confirm your entries with „OK“.
- Formatting is similar, to do this choose the partition you would like to format and click on „Edit“.
- Lastly tick „format“ and choose a file system. Confirm with „OK“.
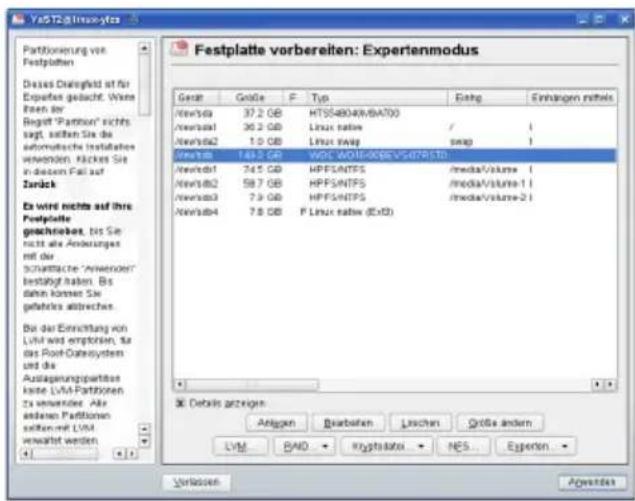
- In a new window all changes will be displayed. Make sure all settings are correct and confirm them by clicking „Finish”.
Note: If you are unsure about the file system and the size of the partition, it is recommended to use the already entered standard settings.
8. The Correct File System
- The table below shows the compatibility between operating systems and file systems.
| NTFS F | AT32 H | FS+ EXT | 3 | |
| Win 98 X R, W X X | ||||
| Win NT, 2000, ME, XP, Vista | R, W R | W X X | ||
| Mac OS X | R R, W | R, W X | ||
| Linux | R R, W | X R, W |
R - read
W - write
X - no compatibility
You may be able to write data to file systems that are usually not compatible by using an external program.
The DIGITTRADE HS128 / HS256 is at the time of delivery already formatted for you in the NTFS file system. In the chart above you can see the compatibility of the NTFS file system with your operating system. If NTFS does not work with your operating system, you will have to re-format the hard drive (Chapter 6).
For Windows users we recommend NTFS. The most powerful file system for MAC OS X is HFS+ and for Linux you should use EXT3. The DIGIT-TRADE HS128 / HS256 can be formatted to any other file system, this does not affect the encryption of the data.
If you would like to use the hard drive with different operating systems, we suggest using the FAT32 file system, as it is supported by nearly all operating systems (Read/Write) However, there are restrictions to the file/partition size. Furthermore there are slight performance differences.
9. Possible usage of the DIGITTRADE HS128/HS256
1) Secure and cost-efficient data transport
The HS128 / HS256 can be used to transport confidential data. For this both the dispatcher and recipient of the data have a smart card with an identical cryptographic key. The dispatcher only sends the HS128 / HS256. As the cryptographic key does not physically exist (it is on the smart cards), it cannot be read out during transport. Additionally the HS128 / HS256 with confidential data can be sent cost-efficiently and insured by a postal service or courier.
The dispatcher and recipient must check that the HS128 / HS256 has not been tampered with during transport. Pay special attention to the DIGITTRADE security seals. You can also take other security measures like a sealed packaging. This is also effective for all other transport possibilities of the HS128 / HS256.
For additional security, the use of multiple smart cards with different cryptographic keys, (deposited at the dispatcher and recipient) which can be used to decrypt or encrypt the data in a chosen sequence.
Both of the branch offices have one or more smart cards with their own cryptographic key:

flowchart
graph TD
    A["branch office 1"] --> B["TRANSPORT"]
    C["branch office 2"] --> B
    B --> D["Output"]
2) Data storage device & Authentication separation
Access to the data can be regulated so that it is only possible by i.e. combining three people. Person X has the HS128 / HS256, Person Y has the smart card and person Z knows the smart card PIN. The three people only meet for the data transfer at the recipient and separate again afterwards. Persons X,Y and Z cannot gain access to the data on their own.
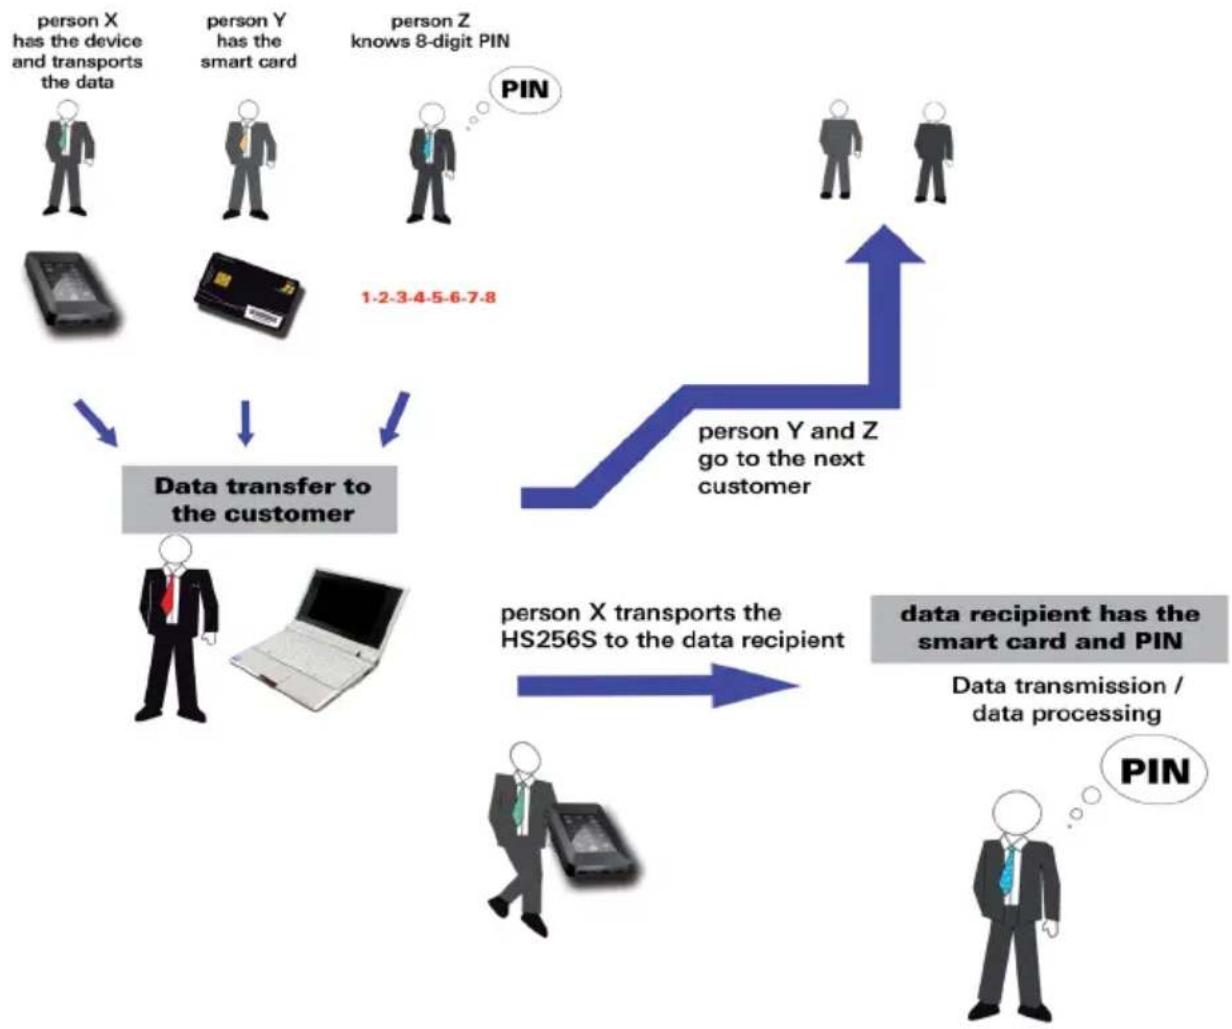
flowchart
graph TD
    A["person X has the device and transports the data"] --> D["Data transfer to the customer"]
    B["person Y has the smart card"] --> D
    C["person Z knows 8-digit PIN"] --> E["1.2-3.4-5-6-7.8"]
    D --> F["person X transports the HS256S to the data recipient"]
    E --> G["person Y and Z go to the next customer"]
    F --> H["data recipient has the smart card and PIN"]
    G --> H
    H --> I["Data transmission / data processing"]
    I --> J["pin"]
3) Deleting the cryptographic key
The cryptographic key can be deleted by incorrectly entering the 8-digit PIN 8 times.
7) Bootability
Operating systems, programs and data can be saved to the HS128 / HS256. This usage is compatible with stationary as well as mobile computers. By disconnecting the HS128 / HS256 from the pc, the data, programs and operating systems are saved and encrypted exclusively on the HS128 / HS256 and are inaccessible by unauthorized persons.
8) Usage with all operating systems
The HS128 / HS256 hardware encryption is standalone, which means it can be used on any device that supports data storage devices.
9) Integrating in existing software solutions
All existing software solutions can still be used to additionally expand the security properties and methods of use.
10. Technical Specifications
Interface: S-ATA 150
Data Transfer Rate: USB 1.1 max 12 Mbps
USB 2.0 max 480 Mbps
FireWire 400 max 400 Mbps
FireWire 800 max 800 Mbps
Smart Card: Smartcard Atmel CryptoMemory AT88SC014C
Supported Encryption: 128-Bit AES-ECB / 256-Bit AES-CBC
Computers and HDD manufacturers convert differently from Byte to KByte, MByte and GByte. HDD manufacturers calculate in the metric system (1 KByte = 10 ^3 Byte = 1000 Byte) and computers use due to their construction the dual system (1 KByte = 2 ^10 Byte = 1024 Byte). The outcomes of this are the following differences in the representation of the memory capacity.
| HDD Manufacturer Available Space | |
| 120 GB 111.76 GB | |
| 160 GB 149.01 GB | |
| 250 GB 232.83 GB | |
| 320 GB 298.02 GB | |
| 500 GB 465.66 GB | |
| 1000 GB 931.32 GB |
11. Troubleshooting
If any problems occur with your DIGITTRADE HIGH SECURITY HDD please read the following checklist to find a solution.
If further technical support is required, please feel free to contact our support team.
| Problem Symptom Solution | ||
| The numberpad is inactive | keypad light is turned off | Ensure that the USB connector is firmly connected to your computer's USB port. If you are using Firewire, ensure that the Firewire connector is firmly connected to the computer's Firewire port. |
| "ERROR" LED lights up | Ensure that a valid card is inserted, and that the card orientation is correct by inserting the card with the contacts facing down. | |
| Authentication fails | "ERROR" LED lights up | Incorrect PIN was entered. Press the "ESC" button to restart PIN entry (max. 8 trials). |
| The drive cannot be identified | no icon for the device is shown on the computer | Ensure that the HS128/256 is not connected to a bus-powered USB hub or a USB extension cable. Please use the delivered USB-Y-cable. |
| missing partition or file system cannot be detected | Please refer to Chapter 6 "Partitioning / Formatting", p. 41 et seqq. | |
| The drive cannot be identified | the wrong USB-cable is used | Please use the delivered USB-Y-cable and connect the A- and B-plug to your computer. |
| The drive is performing very slowly | connection using USB Please ensure your HS128 / HS256 is connected to a USB 2.0 bus interface. | |
| the wrong USB-cable is used | Please use the delivered USB-Y-cable and connect the A- and B-plug to your computer. | |
| wrong connection to the computer | Ensure the USB and FireWire cable is connected to your computer. | |
| the HS128/256 is plugged in an USB hub | Connect the HS128 / HS256 directly to your computer. | |
| other USB devices are connected to the same port | Disconnect any other USB devices and see if performance improves. | |
12. Data security and disclaimer
We recommend to frequently backup your data saved on the DIGITTRADE HIGH SECURITY HDD on another storage device. This will protect you against a total data loss. The DIGITTRADE GmbH is not liable for data loss and/or resulting costs and damages.
13. Smart card storage
The DIGITTRADE HS128 / HS256 is delivered with 2 smart cards.
If a smartcard is lost or broken, we recommend using the HS128 / HS256 with two new smart cards with a new cryptographic key. You can obtain new smart cards at DIGITTRADE. These can be sent to you already written with a cryptographic key
If the smartcards are lost or broken, there is no way of accessing the data. To continue using the hard drive you need at least two new DIGITTRADE certified smart cards. Please contact the support at DIGITTRADE GmbH for new smart cards and other questions.
14. Product contents
- DIGITTRADE HIGH SECURITY HDD HS128 / HS256 (sealed)
- 2 smart cards
- USB-Y-Cable
- Manual
- Hard case
15. WEEE Statement
According to the EC directive, waste electrical and electronic equipment (WEEE) must not be disposed as municipal wastes.
To avoid the spread of the contained fabric components in your environment and to save natural resources we would like to ask you to hand this product after its economic life time only to a collecting point for WEEE in your area.
Thanks to these measures, materials of your product can be reused environmentally friendly.

natural_image
Symbol of a trash bin crossed with no text or labels16. Functions diagram
authentication on the HS128 / HS256
flowchart
graph TD
    A["Switch"] --> B["SC"]
    B --> C["STATUS 1: "G" 1"]
    C --> D["SC-PIN 1-2-3-4-5-6-7-8 ENTER"]
    D --> E["Changing the smart card PIN"]
    F["Switch"] --> G["SC"]
    G --> H["CHANGE PIN +1 ENTER"]
    H --> I["STATUS 4: "G" 4"]
    I --> J["SC-PIN 1-2-3-4-5-6-7-8 ENTER"]
    J --> K["NEW SC-PIN 1-2-3-4-5-6-7-8 ENTER"]
    K --> L["STATUS 4: "G" 4 PT" 2"]
    M["Switch"] --> N["SC"]
    N --> O["CHANGE PIN +0 ENTER"]
    O --> P["DEVICE-PIN 8-7-6-5-4-3-2-1 ENTER"]
    P --> Q["STATUS 2: "G" 2"]
    Q --> R["NEW DEVICE-PIN 8-7-6-5-4-3-2-1 ENTER"]
    R --> S["STATUS 3: "G" 3"]
    T["Switch"] --> U["SC"]
    U --> V["STATUS 1: "G" 1"]
    V --> W["1-2-3-4-5-6-7-8 ENTER"]
    W --> X["STATUS 3: "R" 3 PT" 2"]
    X --> Y["ESC"]
    Y --> Z["Electronic Device"]
    style A fill:#f9f,stroke:#333
    style F fill:#f9f,stroke:#333
    style M fill:#f9f,stroke:#333
    style T fill:#f9f,stroke:#333
activating/deactivating the lock out mode

flowchart
graph TD
    A["Function activated"] --> B["STATUS"]
    B --> C["G"]
    C --> D["Function deactivated"]
    D --> E["SWITCHER"]
    E --> F["R"]
    F --> G["DEVICE-PIN 8-7-6-5-4-3-2-1"]
    G --> H["ENTER"]
    H --> I[""G" 3"]
    I --> J["STATUS +1 ADMIN"]
    J --> K[""G" 1"]
    K --> L["SC"]
    L --> M["PT" 2"]
    M --> N[""Status"]
    N --> O["G"]
    O --> P["R"]
function schema

Connect the HS128 / HS256 to the PC
disconnect the HS128 / HS256 from the PC
Connector
Insert the smart card into the slot
The smart card is locked and unusable
Enter the smart card PIN by using the touchpad
Enter the new smart card PIN on the touchpad
Enter the device PIN on the touchpad
Enter the new device PIN on the touchpad
Misentry of the smart card PIN
Press "CHANGE PIN" then "0"
Press "CHANGE PIN" then "1"
Press "ADMIN" then "0"
(similiar for 1,2,3)
Press "ENTER"
Press "ESC"
Do this step 8 times in a row
The "STATUS" LED flashes/ illuminates green
The "STATUS" LED flashes green X-times
(X = number of flashes)
The "STATUS" LED flashes multiple times
The "STATUS" illuminates green
The "STATUS" LED flashes/ illuminates red
The "ERROR" LED flashes/ illuminates red
The "STATUS" or "ERROR" LED flashes red X-times
(X = number of flashes)
The "STATUS" or "ERROR" LED illuminates red
You will hear beep tones X-times
(X= number of beeptones)