PY-GPS7007 - Browser Peiying - Free user manual and instructions
Find the device manual for free PY-GPS7007 Peiying in PDF.

User questions about PY-GPS7007 Peiying
0 question about this device. Answer the ones you know or ask your own.
Ask a new question about this device
Download the instructions for your Browser in PDF format for free! Find your manual PY-GPS7007 - Peiying and take your electronic device back in hand. On this page are published all the documents necessary for the use of your device. PY-GPS7007 by Peiying.
USER MANUAL PY-GPS7007 Peiying
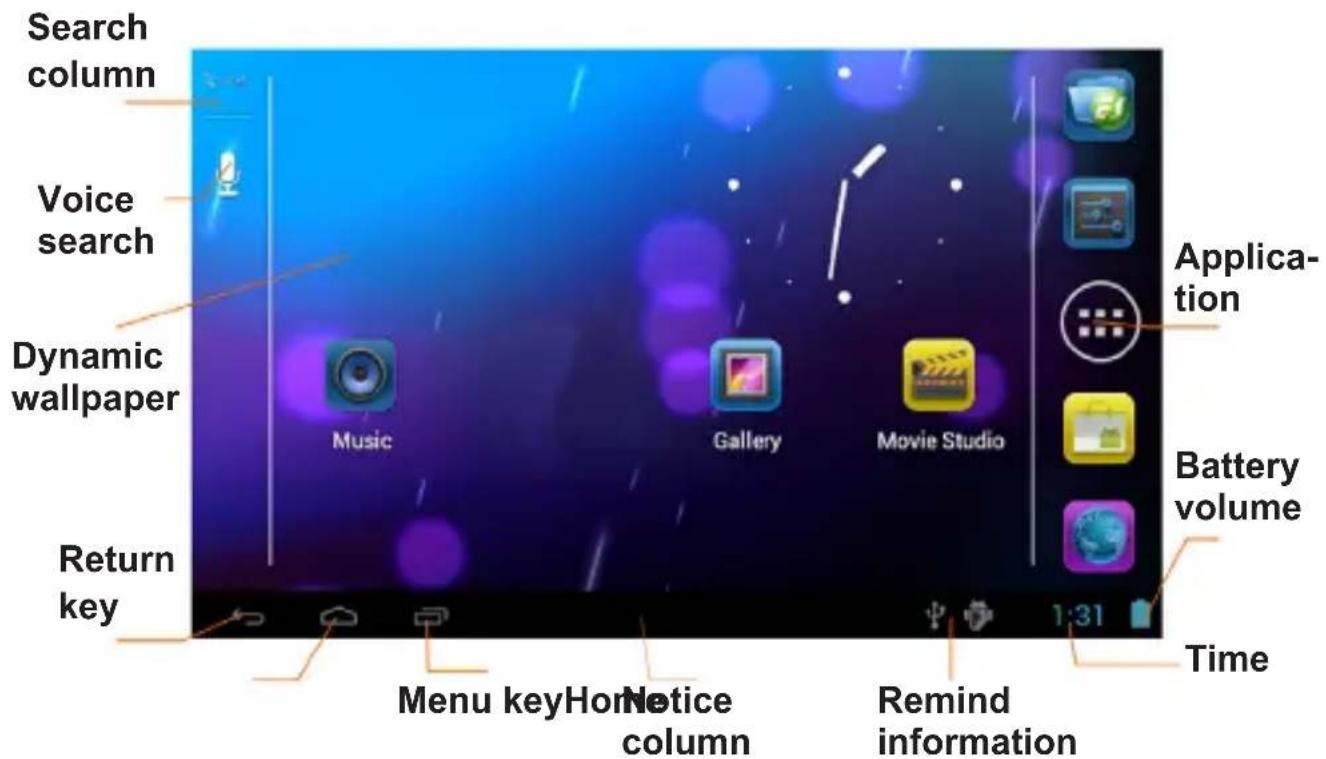
When the notice message appeared on your notice panel, please click the column frame and slide on the screen with your finger to open notice list. Click the options you need to check for checking the detailed information. Then you can click information box and slide upward to close the information window. The following is the iconic illustration of the status bar:
DE
Abb. 3-2
Abb. 3-4
DE
Abb. 3-6
3.8 Speicherkarte
Abb. 5-3
Wiedergabe-Fenster
Abb. 6-1
Abb. 7-1
8 GPS Navigation
8.1 Installation
1.1 Acknowledgement 33
1.2 Maintenance 33
1.3 Safety instruction 34
1.4 Acronym / terminology 35
2 MID brief instruction 36
2.1 MID accessories introduction 36
2.2 MID use & preparation 36
2.3 MID status & notice 36
3 Quick starts 38
3.1 Button function 38
3.2 Power On/Off 38
3.3 Screen turn On/Off 39
3.4 Usage of touch panel 40
3.5 Home page 41
3.6 Visit application 43
3.7 USB connection 44
3.8 Storage card 45
3.9 Input word 46
4 Multi-Media 47
4.1 File format support 47
4.2 Music 48
4.3 Video 48
4.4 HDMI 49
4.5 Photo gallery 49
5 The use of Mobile TV 50
6 FM transmitter 52
7 Connection establishment 52
7.1 External 3G 52
7.2 Wi-Fi connection 53
8 GPS navigation 54
8.1 Install 54
8.2 Update 54
8.3 Uninstall 54
9 Trouble shooting 55
10 Product spec 57
EN
1 Introduction
1.1 Acknowledgement
Thanks for your purchase of our product. The product is MID (Mobile Internet Device), it is a high end product, with a touch screen which resolution of 800x480 pixel. It is designed with 1 GHz high speed processor. The operating system is Android 4.0.
The manual systemically introduces the functions, use techniques and announcements, please read this manual carefully before your operation.
1.2 Maintenance
- Please keep the device, battery or charger away from water, steam, do not use the wet hands to operate the device or adapter, so as not to cause the device breakdown or people be electronic shocked because of device short-circuit, corrosion.
- Please do not make the device, battery and charger be strongly impacted or vibrated, so as not to cause the device, battery and charger breakdown.
- Please do not put the equipment, battery and charger in too high or low temperature area, otherwise it may cause the device, battery and charger breakdown.
- Please do not bump, throw or acupuncture the MID and avoid falling, extrusion, bending the MID
- Please do not disassemble the device and accessories, otherwise the device and accessories will no longer within the warranty scope of our company
1.3 Safety instruction
Please read and let your children know the information of this section before you use the MID. Other more detailed information, please refer to the safety instructions and remarks
- Please do not use the MID when you are driving to avoid interfering with safe driving.
- Please comply with the relevant provisions or regulations in medical place. Please turn off your MID when you are nearby medical equipment area.
- Please turn off the MID or open plane mode when you are boarding to avoid radio signals interfering the aircraft control signal.
- Please turn off the MID in the vicinity of using high-precision electronic equipment, otherwise, it may lead to the breakdown of the electronic equipment.
- Please do not disassemble the MID and accessories by yourself, only the authorization institution can repair the MID.
- Please keep the MID far away from magnetic equipment, the radiation of MID will erase the stored messages of magnetic equipment.
- Please do not use the MID at the place of high temperature, inflammable gas existed area (such as gas station).
- Please put the MID and accessories out of the touch scope of children, do not let them to use the MID in unsupervised condition.
- When you use the MID, please comply with relevant laws and regulations, and respect for others' privacy and legal rights when you are using the MID.
- Please strictly comply with the relevant specification of this manual when you are using the USB cable, otherwise it might damage your MID or personal computer
- Please do not use the MID under wet environment (such as bathroom) and avoid the MID be soaked or irrigated by liquid.
1.4 Acronym / terminology
| Abbreviations/terminologies | Full name Introductions | |
| MID Mobile Internet Device | Internet mobile terminal | |
| WIFI Wireless Fidelity Wireless LAN based on the standard of IEEE 802.1 | ||
| TF Trans Flash Aka Micro SD, ultra-small memory card | ||
| HDMI High Definition Multimedia Interface | ||
EN
2 MID brief instruction
2.1 MID accessories introduction
Packing list
Your MID packing box contains the following items:
- MID device
- Power adapter
- Holder
- USB cable
- User's manual
- Warranty card
2.2 MID use & preparation
Battery charging
Please charge the battery before you first time use the MID.
2.3 MID status & notice
Notice icon
When the notice message appeared on your notice panel, please click the column frame and slide on the screen with your finger to open notice list. Click the options you need to check for checking the detailed information. Then you can click information box and slide upward to close the information window. The following is the iconic illustration of the status bar:
EN
 | New e-mail Airplane |  | |
 | USB is connected US |  | ustment is connected |
 | Previous Downloadir |  | |
 | Display the appli- cation you use re- cently |  | Home key |
 | Battery volume mark |  | WIFI service has been connected, available to internet |
 | No SD card Alarm or |  | |
 | General notice Mute |  |
Notification panel
When you received an e-mail, setted the alarm, schedule, and inserted SD card, the notice icon will pop-up, you can open the notification panel to check the detailed information.
Open notification panel
When new notice icon appears in the notification bar, please press the notification bar, then slide your fingers downward to open the notification panel.
3 Quick starts
3.1 Button function
Button function introduction:
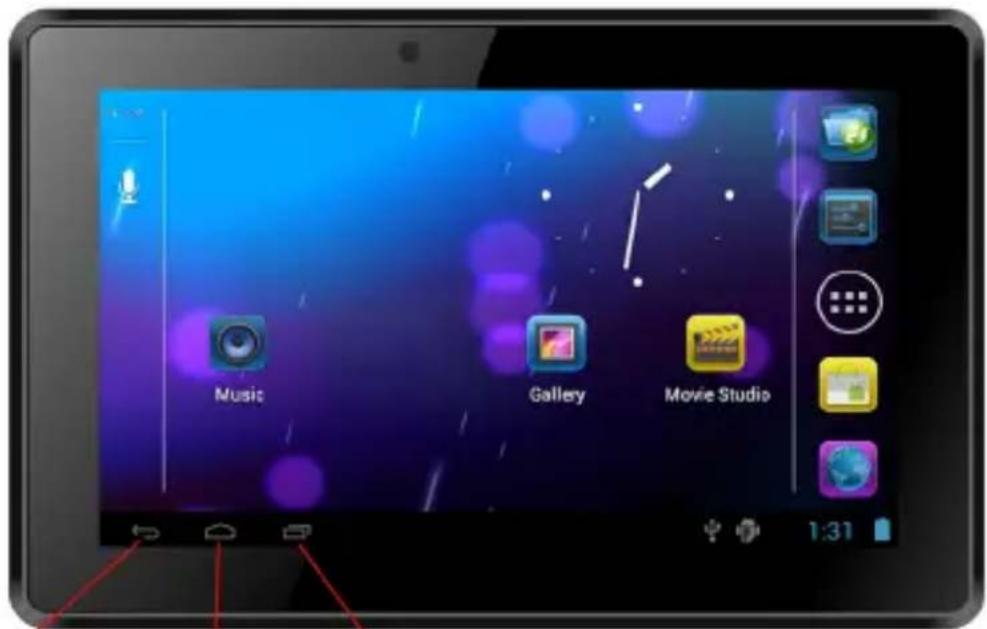
Return key
Home key
Display the application you use recently
Picture 3-1
3.2 Power On/Off
Power on
EN
Long press the power button for 2 seconds, you will see the start-up screen. You can operate the device after entering into the main page under the system open state.
Power Off
- Long press the Power button, the power off options will pops-up.
- Device options list out silent mode and power off mode.
- Click the Power Off icon to turn off the device.
3.3 Screen turn On/Off
The screen will turn off automatically when it is in idle status.
- After the screen is in idle state for a while, the screen will turn off automatically for saving the battery power
- Under the screen turn on state, press power button, the screen will turn off immediately.
Turn on the screen under off state
You can press power button to turn on the screen under screen off state, it will enter into lock state, refer to picture 3-2. Press the Lock icon and slide upward with your finger to unlock.
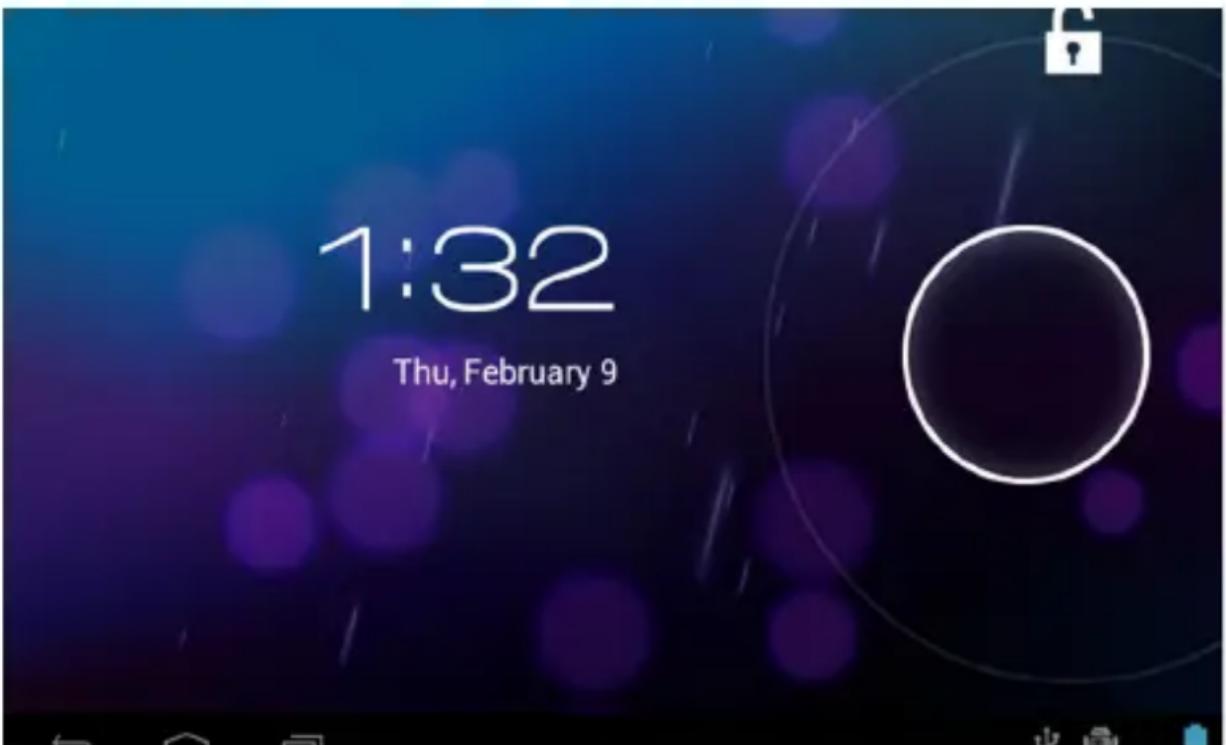
Picture 3-2
3.4 Usage of touch panel
The operation mode of MID
There are several ways to view the main screen, menu and application programs of your MID.
Click
If you would like to use the screen keyboard input or choose the item on the home page of the application, you just need to use your finger to click on the screen.
Hold
If you want to open the available option of some project (such as the text box or link of web page), or open the shortcut of main page, or move the main program menu, you just need to hold this item.
Slide
Slide means using your finger to vertical or level drag fastly on the image.
Drag
Before drag, you must use a finger to hold and put some pressure on the item, don't release your finger until you reach the destination.
Rotate
For most of the image, you just need to make the MID rotate laterally, then the screen will rotate from horizontal to straight direction automatically. Such as when you are inputting the word or watching movies, etc.
EN
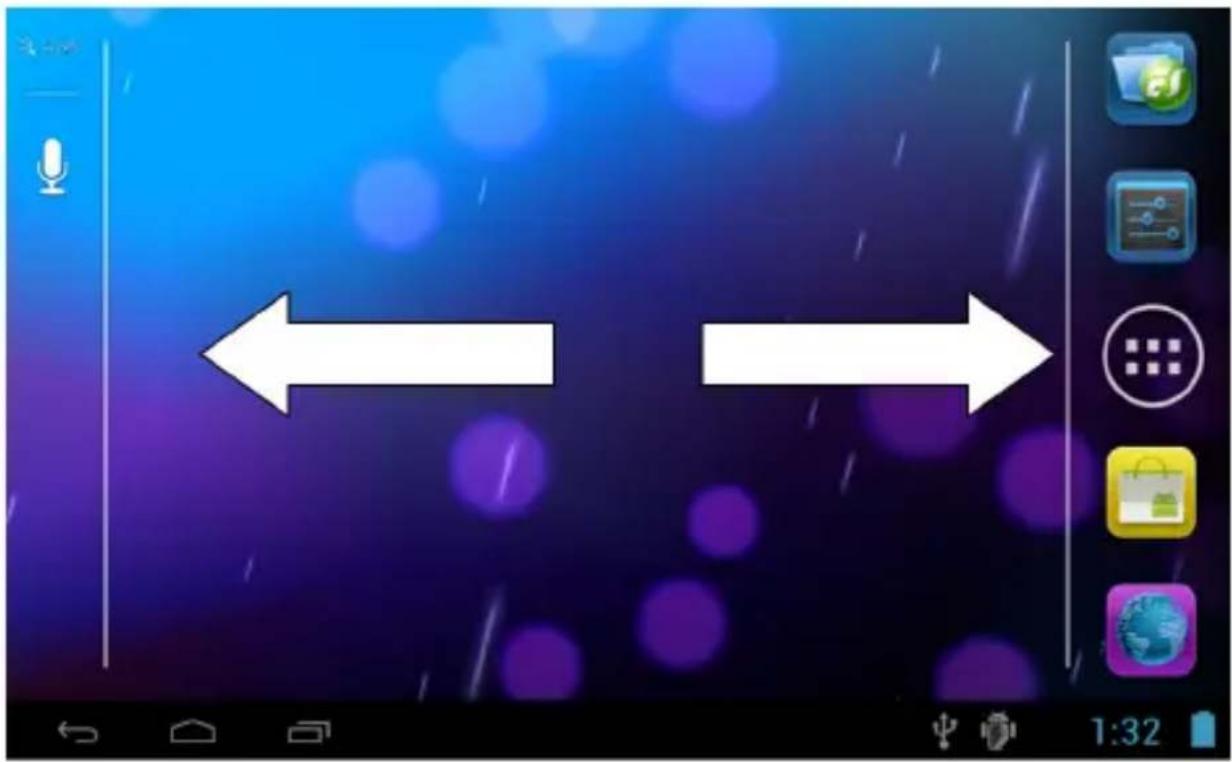
3.5 Home page
The screen of main menu will show all applications of this device as picture 3-3. You can use the application, shortcut and customize your wallpaper of home page interface, etc.
Picture 3-3
EN
Extensible home page Interface
Home page interface can be extended to the outside screen to provide much more space, which allow you to put new shortcut, small tools etc. Press the blank space of home page interface then use finger slide vertically around quickly, it will extend outside to the right or left of the screen. Home page interface have two or more extension images as picture 3-4.
Picture 3-4
EN
3.6 Visit application
How to visit the application of MID:

- Please click on the icon.
- Select the application that you want to visit.
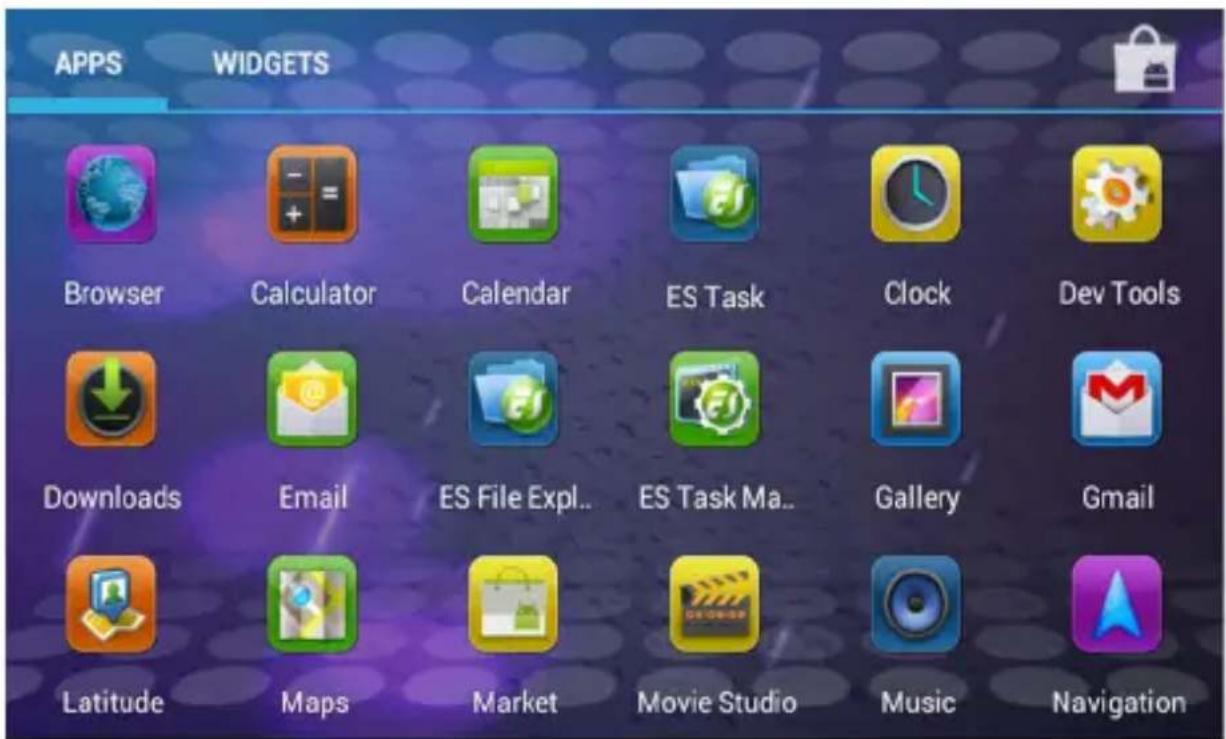
Picture 3-5
3.7 USB connection
Storage settings of MID
Before you transfer files, you must set the storage mode of your MID first:
- Use USB cable to connect the MID with computer. The notice tips will appear in the notice bar.
- Open notification panel, how to open the panel please check the MID status & notice in chapter 2-3.
- In notification panel, click on USB connected (External), then click Load icon, as picture.
- Now USB has connected successfully.
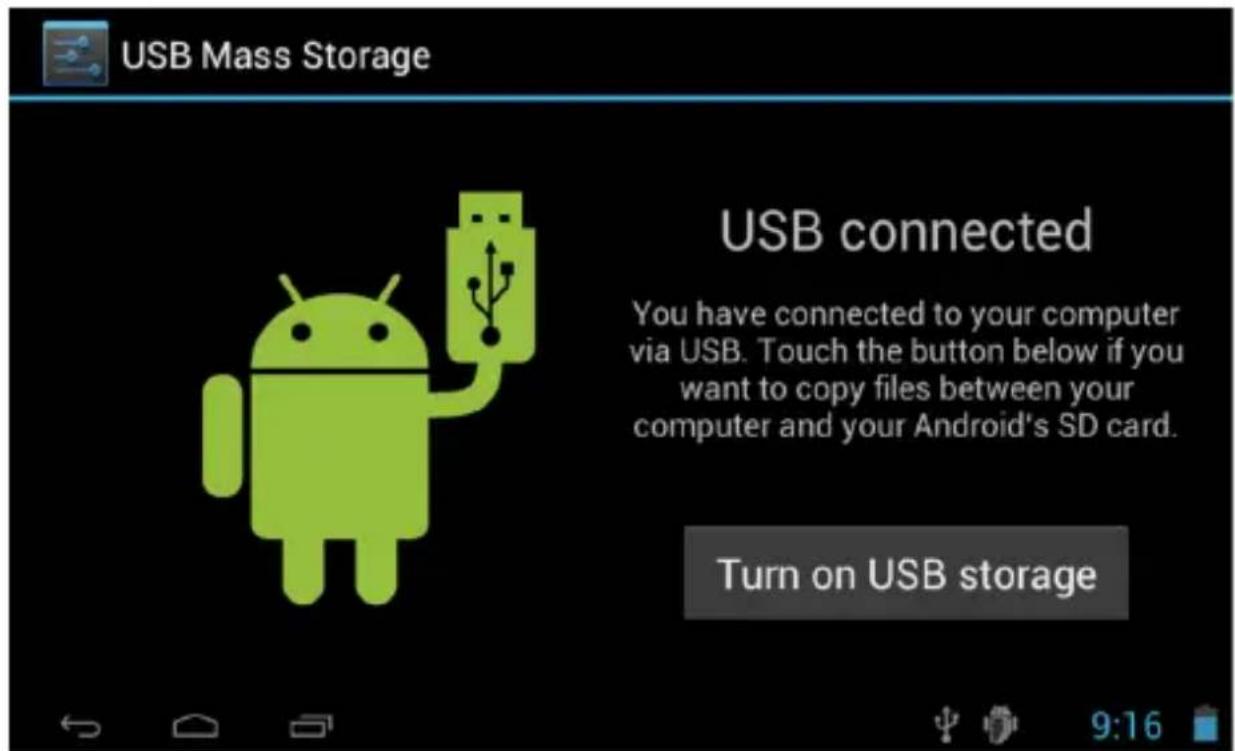
Picture 3-6
EN
3.8 Storage card
Copy files into the storage card
- Use USB cable to connect the MID with computer.
- After press the Storage Settings of MID icon, connected with computer successfully.
- Open My Computer file folder in your computer, view the content of Removable Disk.
- Find out the file that you want to copy, and then copy it to the "Removable disk".
- After finished copy, click the Safely Remove Hardware icon in the task bar of your computer to uninstall it.
Notes: If you enabled the USB Storage Device when your MID is connected with your USB cable, you would not be able to visit storage card of MID, if you need to visit the storage card of MID, please disconnect the USB cable with the MID.
3.9 Input word
Use screen buttonboard
When you start the programme or choose the text edit box for inputting word or number, the screen buttonboard will pop-up.
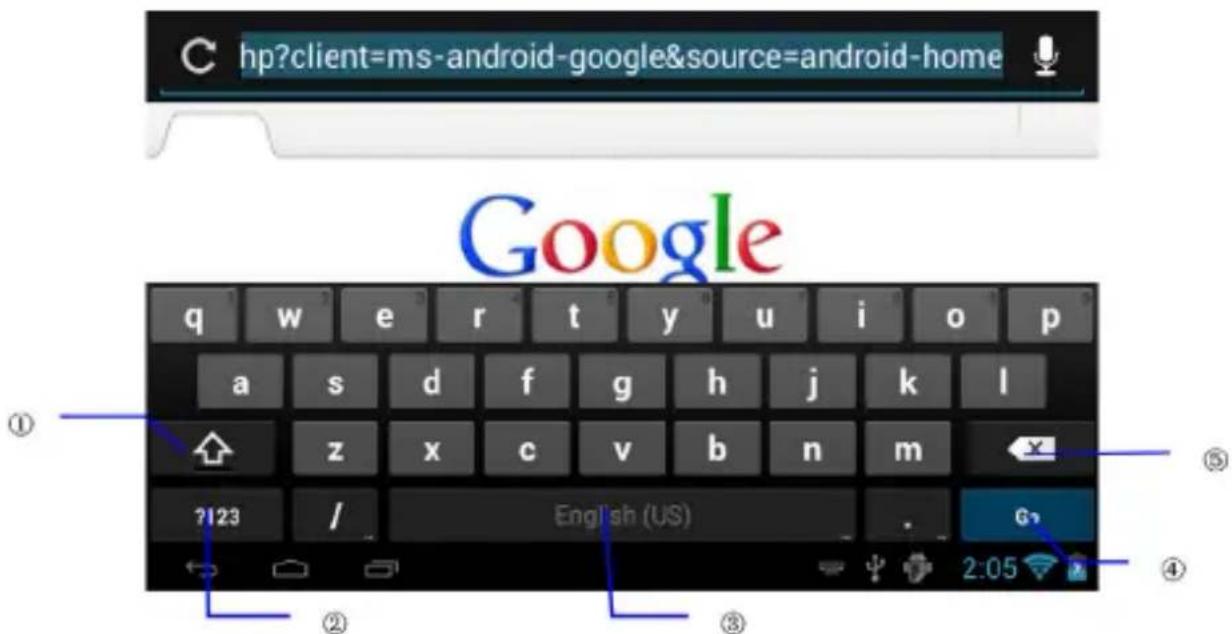
Picture 3-7
| 1 Shift Caps input method | |
| 2 Shift word input method with symbol and number input method | |
| 3 Tap to insert a space | |
| 4 Click to enter | |
| 5 Delete the left character of the cursor. Click and hold to delete all the characters on the left side of the cursor |
EN
4 Multi-Media
4.1 File format support
Your MID can play the following format:
Music file format
• MP3
- AAC
• OGG
• WMA
- WAV
• APE
- FLAC
• AMR
Video file format
• AVI
• MPG
• VOB
• MKV
• FLV
• TS/TP
• H264
- MPRC-4
• RMVB
• DIVX
- MPEG-2
Picture file format
Your music will be classified in four kinds: Artist, Album, Music, Play List. If you choose one classify, choose the one you would like to play. For example, if you choose Artist category, you will see the artist name list from A to Z. If you choose one artist, the list will show the album and the song list of the artist.
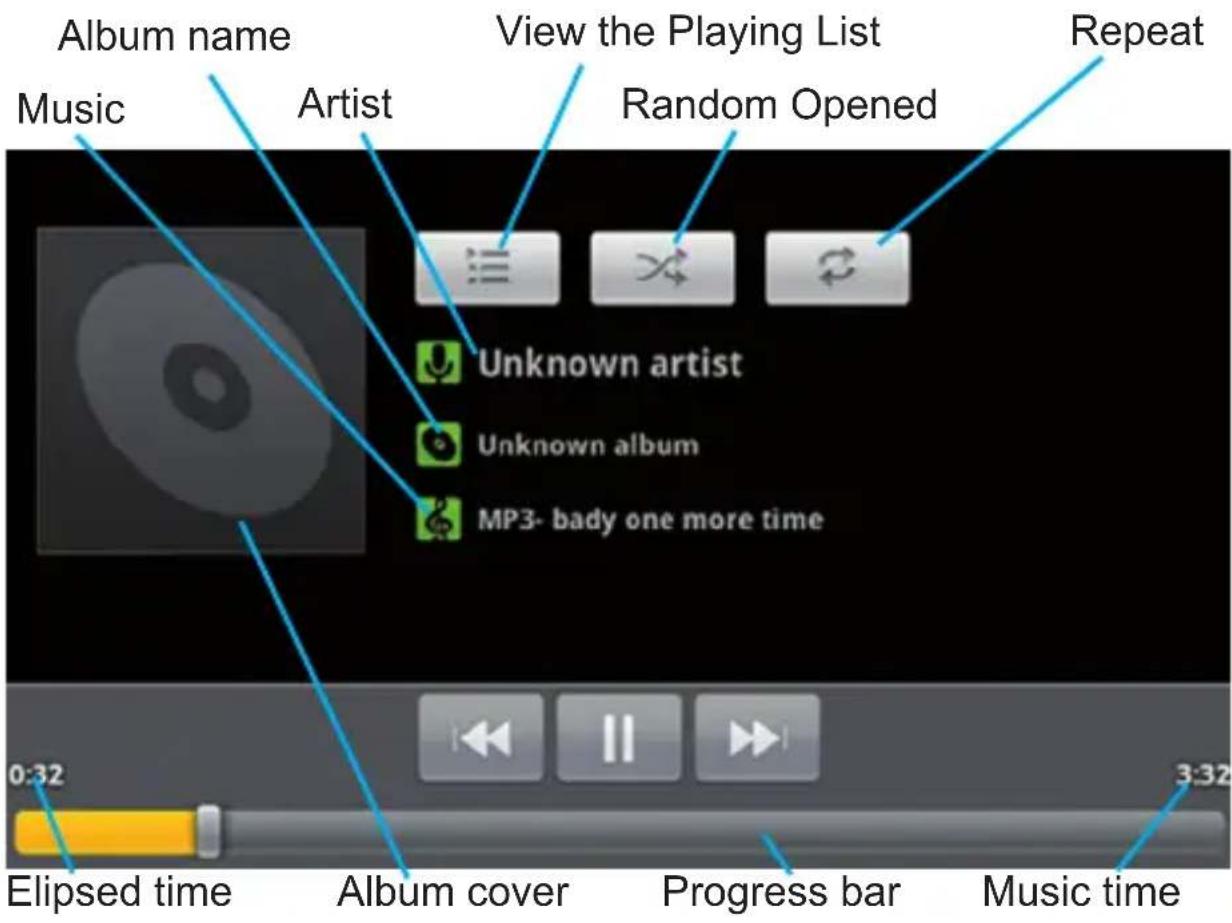
Picture 4-1
4.3 Video
EN
Visit Video Gallery
- Click gallery application.
- MID refresh all video files.
- Click the file you want play.
- Enter into play picture to play.
4.4 HDMI
When use HDMI connector, set the HDMI export method, MID connect HDMI TV, display the high definition video in full screen, and can support 1080P resolution of picture quality.
Remark: HDMI connector needs a standard HDMI connector to connect.
Click setting application in main screen.
- Click display, select output setting.
- Select HDMI in output type.
- Connect HDMI connector, high definition digital TV should be adjusted as HDMI output.
4.5 Photo gallery
Photo gallery application can be search into SD card memory card and video file, and photo gallery will device the photos and video photo, you can use the photo gallery application to view and edit photo, and set the desktop and view photo.
View photos
- Click photo gallery application in main interface.
- Enter into photo gallery, click the file you want to view and.
- Click the photo you want to view, system will view the photo in full screen.
- When you view photos, you can zoom in and out, touch the screen with two finders, and pull the fingers and separate the fingers to decrease and increase the photo or double touch screen.
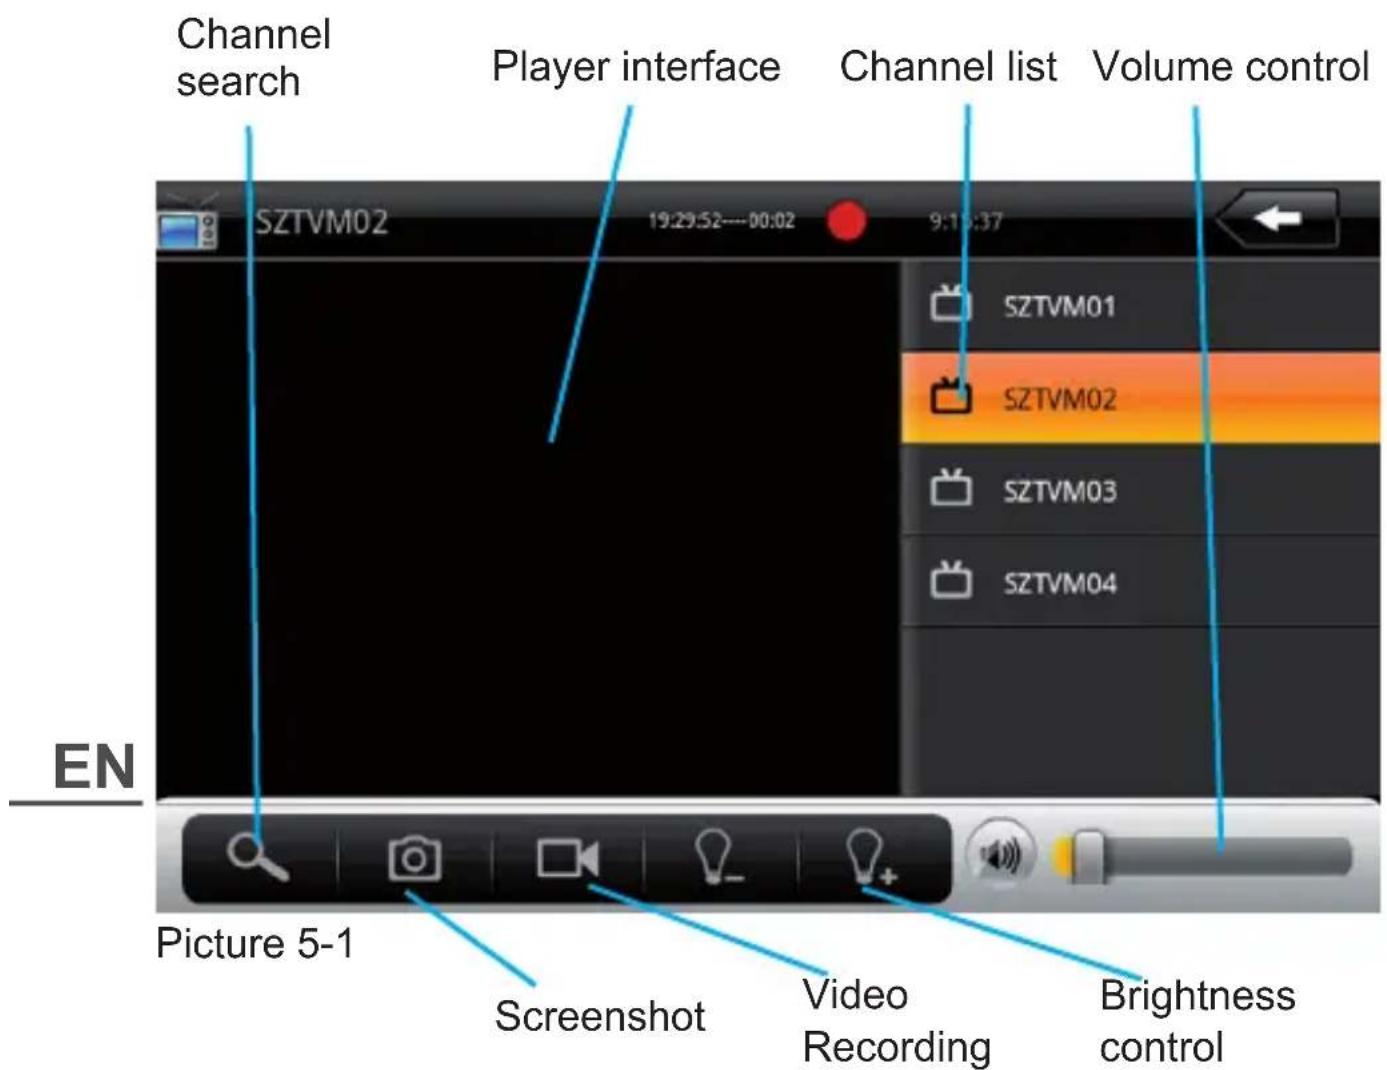
5 The use of Mobile TV
Mobile TV Main Interface:
- Click DVB-T Programme icon.
- Press Search icon to search the channel.
- Choose the channel you would like to watch from the channel list.
- Click the player interface to enter into full screen play status.
- The photos of screenshot will store in /SDCARD/Images.
- Video recorded file will store in /SDCARD/Videos.
Notes: Please don't pull out the SD card when you are recording the TV.
On the full screen playing interface, press the Menu button, the bottom of the screen will pop-up the following option bar:
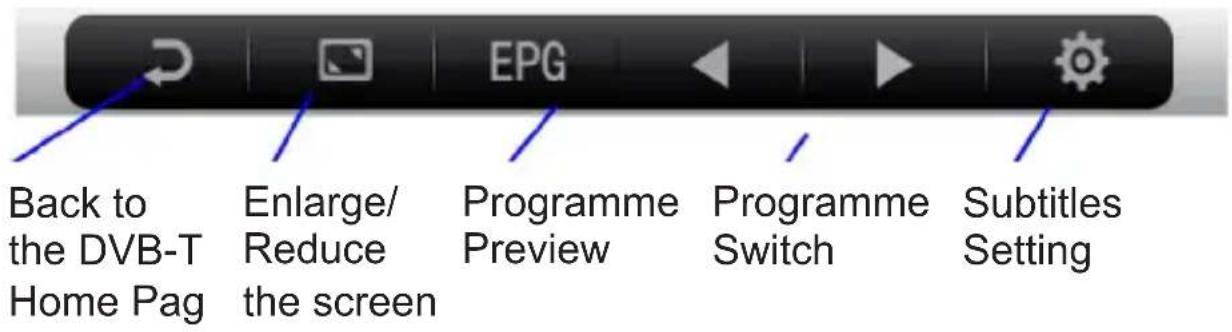
Picture 5-2
Click the EPG icon, enter into the EPG interface, see picture 5-3
![EPG 3:10 - 3:35 Costa Del Dosh 3:35 - 4:0 Undercover Lovers 4:0 - 4:59 Teleshopping 4:59 - 5:1 Ftn 5:1 - 11:0 Ftn Costa Del Dosh Lads and Ladettes: Documentary series following British ex-pats on the Costa del Sol. This episode looks at some of the bad behaviour of some young Brits on the Costa. [S] Picture 5-3 Player Interface Programme synopsis Programme preview](/content/2026/05/1029442/images/f8bcdd89f6257bd3edc99a4f4b6d4a888efc363fac4c5eab2f43488a644da11b.jpg)
EN
6 FM transmitter
- Click setting icon in main interface.
- Click more.
- Click FM transmitter configuration.
- Click FM transmitter, start FM.
- After starting FM, click FMS Trans Setting to set the frequency, and keep it same with radio receiving frequency, then connect.
- Click Save, as Picture 6-1.
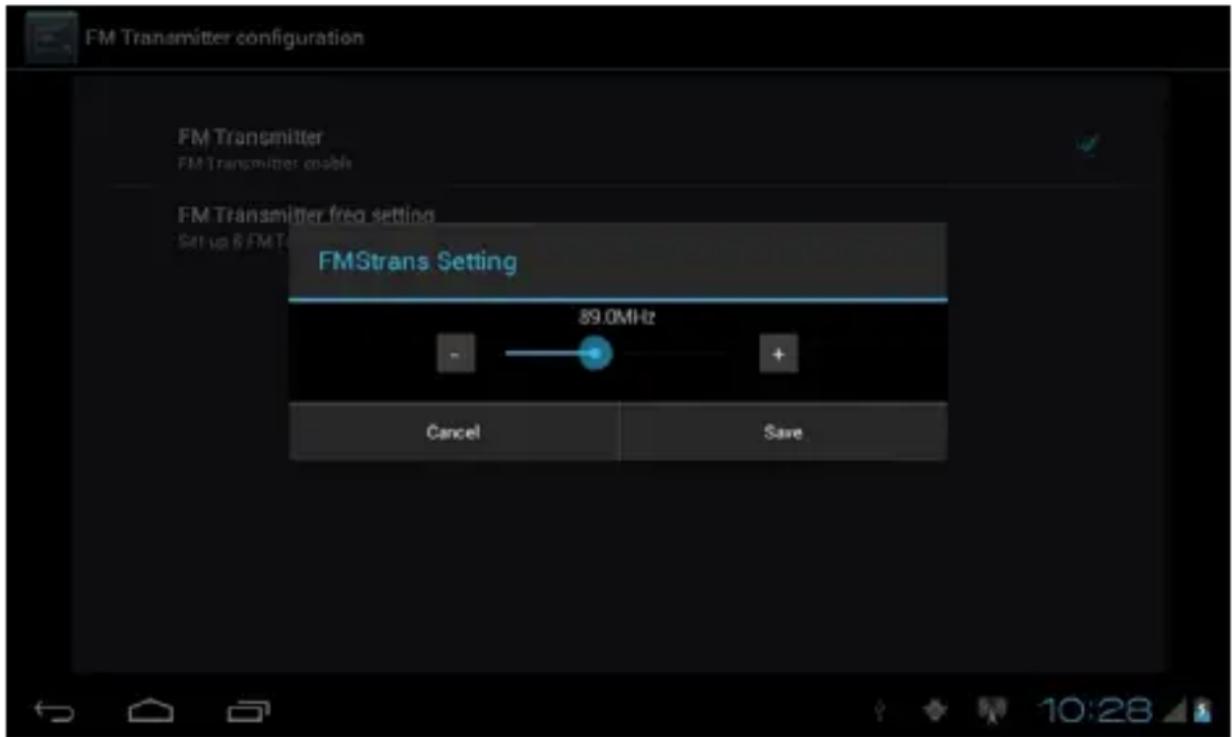
Picture 6-1
Note: When FM function is opened, there is no voice output from MID. It is a must condition to connect the charger as antenna when building FM connection.
7 Connection establishment
EN 7.1 External 3G
Your MID can support external 3G,
- Enter into main interface.
- MID connect 3G dongle.
- Wait the 3G icon. shows in remind column.
7.2 Wi-Fi connection
Your MID can link to Wi-Fi network, see link instruction:
- Click the Menu button to pop-up setting menu list on the home page.
- Click Setting icon.
- Click Wireless and Network icon.
- Click Wi-Fi icon to start Wi-Fi network.
- Click Wi-Fi Setting icon, the MID will scan the available Wi-Fi wireless network automatically, see picture 7-1.
- Choose the Wi-Fi network you would like to link, if the network is encrypted, it will pop-up a window requires you to input the password, please input the correct password. (Notes: some of the router requires to use the static IP, see picture 7-1, press Menu button to choose Senior icon to set static IP and other senior options.
- Click Connection icon to link.

Picture 7-1
8 GPS navigation
8.1 Install
- To obtain the navigation map from map operators
- Select the install program package of APK in the file browser to install.
8.2 Update
To obtain the updated navigation map from map operators to update.
8.3 Uninstall
- Click on the Setting bitmap on the main interface.
- Click on the Application icon.
- Click on Application Management icon, you can finish the uninstallation by click on the file what you want to uninstall.
Notes : 1. All the map be provided by the operators must be the APK file package.
- Please comply with the traffic regulations and safety warning from the map operator strictly when driving.
EN
9 Trouble shooting
1. MID Slow Start For the First Time
After the system upgrade, MID will need 2-3 mins to power on for the first time because of upgrading the pre-installed application, and the speed will become much faster after first time start.
2. MID feels hot
You will feel the device hot when you are operating several applications at the same time, making the screen the brightness, or the device being charged, it's all normal.
3. MID can not connect Wi-Fi
- Make sure the wireless router which provide the internet service work normally.
- Make sure to leave a certain distance of 50 to 100 miles between MID and wireless Router, and they should not be separated by any wall or other obstacles
- Make sure to input the right user name and password.
4. Website can not be opened
- Please keep the distance within remain distance effectively between routing and MID
- Please restart WIFI to try again
5. System abnormal, MID can not run normally
It may make the system can not run normally when you are installing some third party application, you can press the reset button (beside the power interface) to reset the system.
6. Can not set up E-mail or register application
- Make sure your Network work normally and can connect to the internet.
- Make sure to set the E-mail correctly.
7. TF card can not read data
- Please make sure to insert the TF card in place
- Please wait for the reminding tone, if it not appears, Please re-insert the TF card
8. MID no voice output
- Please check whether the main volume is in silence mode
- Please check the if FM is on, if yes, please turn off the FM function.
9. MID No image output
- Please make sure the files play normally and the TV signal entirely
- Please check the output mode of HDMI in “voice and display”, if you have connected with the HDMI device and output mode is “1280*720 60HZ”, please select “HDMI”, if it’s MID output the video, please select “None”.
10. MID have no response for a long time sometimes
- Please press reset key (beside the power interface) to reset the system.
11. The MID can not be turned on even when the charger connected after the power was fully run out.
- This is a normal phenomenon. Please turn on your device after charged for more than 10 minutes in order to protect your MID to work in a much more steady condition.
EN
10 Product spec
| CPU Frequency 1 GHZ | |
| DDR-RAM 1 GB | |
| NAND FLASH 4 GB | |
| Operating System Google Android 4.0 | |
| Network Access WiFi Wireless Network | |
| GPS Built-in | |
| DVB-T Built-in | |
| FM transmitter Built-in | |
| USB Interface Mini USB | |
| HDMI Interface 1920x1080P HD Video Output | |
| Standard Battery Polymer lithium battery, 2400mAh/3.7V | |
| Power Adapter Input Voltage AC 100V-240V,Output Voltage DC 5V,Current 2A | |
| SD Card Maximum support 32G | |
| LCD 7 inch TFT LCD with capacitive touch panel, resolution 800x480 |
EN
| Applications | Video play Support | AVI, MKF, FLVVideo Format, Support720P 1080P play |
| Audio play Built-in video player which support MP3, MIDI, WAV etc. | ||
| Games Support third party software | ||
| Photo viewer Support | JPEG, BMP, PNG,GIF etc. | |
| Office software Support | port office (word, excel read and edit ), support PDF view | |
Specifications are subject to change without notice.
The Lechpol company declares that product PY-GPS7007 is consistent with the essential requirements and other relevant provisions of directive 1999/5/EC. The proper declaration for download from www.lechpol.eu
English

Correct Disposal of This Product (Waste Electrical & Electronic Equipment)
(Applicable in the European Union and other European countries with separate collection systems)
This marking shown on the product or its literature, indicates that it should not be disposed with other household wastes at the end of its working life. To prevent possible harm to the environment or human health from uncontrolled waste disposal, please separate this from other types of wastes and recycle it responsibly to promote the sustainable reuse of material resources.
Household users should contact either the retailer where they purchased this product, or their local government office, for details of where and how they can take this item for environmentally safe recycling. Business users should contact their supplier and check the terms and conditions of the purchase contract. This product should not be mixed with other commercial wastes for disposal
Made in China for LECHPOL Zbigniew Leszek, Miętne, 1 Garwolińska Street 08-400 Garwolin.
Spis treści
1 Wprowadzenie 61
Rys. 3-2
PL
3.4 Ekran dotykowy
Tryb pracy
Rys. 3-4
PL
3.6 Aplikacje
Rys. 3-6
PL
PL
6 Transmiter FM
Rys. 6-1
Rys. 7-1
PL
8 Nawigacja GPS
8.1 Instalacja
6 Transmitator FM 108
7 Conexiuni 108
7.1 Dispozitiv 3G Extern 108
7.2 Conectare la o retea Wi-Fi 109
8 Navigare GPS 110
8.1 Instalare 110
8.2 Update 110
8.3 Dezinstalare 110
9 Depanare 111
10 Product spec 113
1 Introducere
1.1 Multumiri
Fig. 3-2

Fig. 3-4
Fig. 3-6
3.8 Card de memorie
6 Transmitator FM
Fig. 6-1
Fig. 7-1
8 Navigare GPS
8.1 Instalare
- Trebuie sa obtineti o harta de la operatorii de harti GPS.
- Selectati optiunea de instalare a hartii si instalati-o.