EM720CCC - Microwave Coline - Free user manual and instructions
Find the device manual for free EM720CCC Coline in PDF.


| Type of product | Countertop microwave oven |
| Brand | Coline |
| Model | EM720CCC |
| Capacity | 0.7 cu ft (20 liters) |
| Power output | 700 watts |
| Power levels | 5 levels |
| Display type | LED digital display |
| Control type | Dial and push buttons |
| Timer | Up to 35 minutes |
| Turntable | Glass turntable, removable |
| Defrost function | Yes, by weight or time |
| Dimensions (W x D x H) | 17.7 x 13.8 x 10.7 inches (45 x 35 x 27 cm) |
| Weight | 22.7 lbs (10.3 kg) |
| Power supply | 120 V ~ 60 Hz, 1050 W |
| Cavity interior light | Yes |
| Child safety lock | Yes |
| Door opening | Push-button release |
| Cleaning | Wipe with damp cloth, mild detergent |
| Accessories included | Glass turntable, rotating ring, user manual |
| Repairability index | 8.5 / 10 (based on user rating) |
Frequently Asked Questions - EM720CCC Coline
User questions about EM720CCC Coline
0 question about this device. Answer the ones you know or ask your own.
Ask a new question about this device
Download the instructions for your Microwave in PDF format for free! Find your manual EM720CCC - Coline and take your electronic device back in hand. On this page are published all the documents necessary for the use of your device. EM720CCC by Coline.
USER MANUAL EM720CCC Coline
natural_image
Line drawing of a microwave oven with digital display and control buttons (no text or symbols on main body)Art. No.: Model. No:
18-4399
EM720CCC-UK
34-2332, -1
EM720CCC, -BLACK
English 3
Svenska 12
Norsk 21
Suomi 30
Deutsch 39
Microwave oven
Art.no 18-4399 Model EM720CCC-UK 34-2332, -1 EM720CCC, -BLACK
Please read the entire instruction manual before use and save it for future reference. We reserve the right for any errors in text or images and for making any necessary technical changes to this document. If you should have any questions concerning technical problems please contact our Customer Services.
- Please read the Safety section of this manual before using the microwave.
- Ensure that the turntable roller and the glass turntable are fitted as instructed in the Preparations and installation section below. Select a suitable location for the microwave as described in the Preparations and installation section below.
- Connect the mains lead to a 230 V power point.
- There are two quick methods to warm a portion of food on full power for 1 minute: Press number key [1] once.
Or:
Press [ START/+30SEC ] twice (each press increases the time by 30 seconds). The number keys [ 1 ]–[ 6 ] (EXPRESS COOK) will start the microwave operating on full power immediately for 1, 2, 3, 4, 5 or 6 minutes.
The microwave can be stopped at any time by pressing [ STOP/CLEAR ].
Safety
- Warning: Never use the microwave oven if it is in any way damaged or malfunctioning.
- Warning: The microwave oven must only be repaired by qualified service personnel.
- Warning: Never open the casing. Certain components within the casing carry dangerous currents and if touched may give you an electric shock.
- Warning: Never heat drinks or other food items in closed containers since it might cause them to explode. Only use microwave-safe containers.
- Warning: The microwave will become hot during use. Be careful not to touch any hot parts inside the oven.
- The microwave should not be taken apart or modified.
- This microwave oven may be used by children of 8 years and above and by persons with reduced physical, sensory or mental capability or lack of experience and knowledge provided they have been given supervision or instruction concerning use of the product in a safe way and understand the hazards involved.
- Cleaning and maintenance may be carried out by children aged 8 or over, but only under adult supervision. Never let children play with the microwave oven.
- Ensure that the microwave oven and its mains lead are kept out of reach of children under the age of 8.
-
Never leave the microwave oven unattended whilst heating food in plastic or paper containers.
-
If smoke is detected, turn off or unplug the microwave oven immediately. Keep the microwave oven door shut to smother any flames.
- The contents of feeding bottles or similar baby food containers should always be well stirred or shaken before serving.
• Always check the temperature of food before serving to avoid burns. - Eggs in the shell or hard-boiled eggs should not be heated in the microwave oven since they may explode even after heating has ended.
- Both the interior and exterior surfaces of the microwave oven may become hot during use.
- Remove any twist-ties containing metal from packaging before placing them in the microwave oven.
- Clean the microwave regularly. Make sure to wipe up any food spills.
- Place the microwave oven on a dry and level surface.
- Do not let the mains lead hang over the edge of the table or counter.
- Do not place the microwave where it could fall into water or any other type of liquid.
- Check that your power supply is 230 V and that the microwave oven is connected to an earthed socket.
• Always unplug the microwave oven from the power point before cleaning it. - Do not subject the microwave oven or its mains lead to knocks or blows.
- The microwave oven must not be operated by means of an external timer or any form of remote control.
- Make sure that the lead does not come in contact with hot surfaces such as cooker hobs.
- Do not use the microwave oven if the mains lead or plug is damaged in any way.
- The microwave should only be used and kept indoors.
- Bear in mind that the food containers inside the microwave oven can become very hot. It is advisable to use an oven mitt or similar when removing hot food, in order to avoid burns.
- The microwave oven should only be used as described in the instruction manual.
- Never turn the microwave oven on when it is empty, doing so could produce sparks and damage the oven.
- This microwave oven is intended for normal domestic use or under similar conditions in staff kitchens or hotel rooms.
- Do not use a steam cleaner to clean the microwave oven.
- If a thermometer is used, make sure that it is approved for microwave oven use (only microwave ovens designed for use with thermometers).
- Any kitchen cabinet doors designed to conceal the microwave oven must be open when the oven is operated.
Product description

- Turntable roller
- Turntable drive coupling
- Magnetron shield screen
- Safety interlock system (stops the oven as soon as the door is opened)
- Turntable
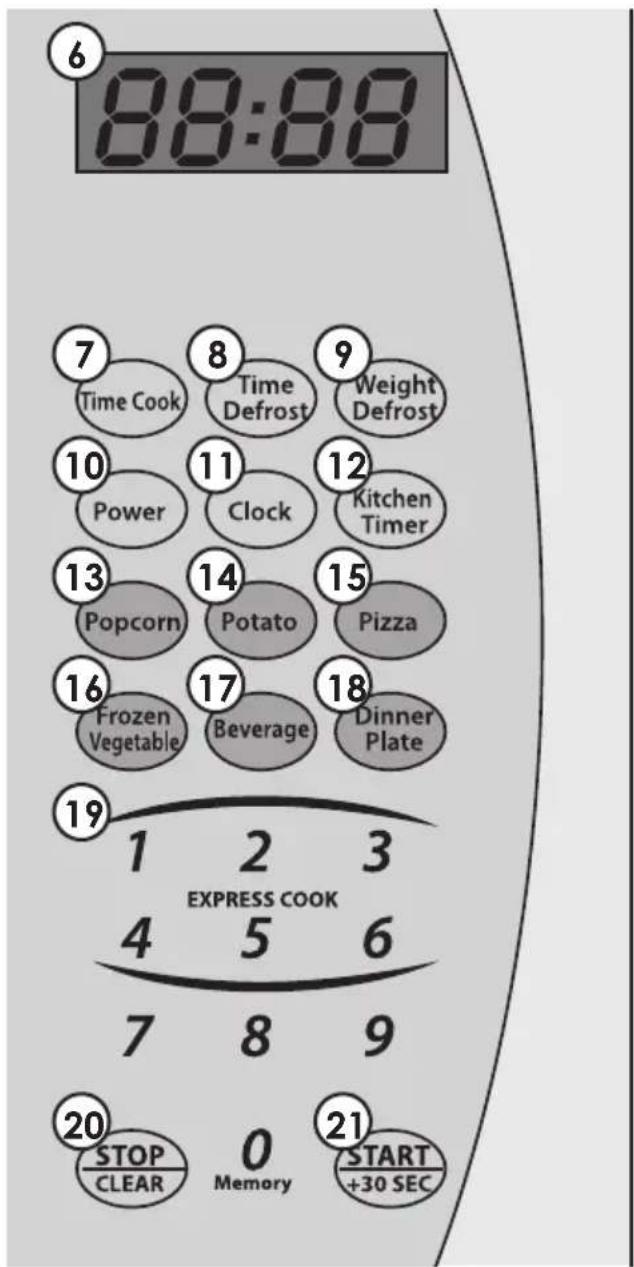
Buttons and functions
- Digital display
- [Time Cook]
- [Time Defrost]
- [Weight Defrost]
- [Power]
- [Clock]
- [Kitchen Timer]
- [Popcorn]
- [Potato]
- [Pizza]
- [Frozen Vegetable]
- [Beverage]
- [Dinner Plate]
- [0]-[9] Number keys
- [STOP/CLEAR]
- [START/+30SEC]
Preparations and installation
Remove all packing material.
Note: Do not remove the light brown Mica cover (3). It protects the magnetron which generates the microwaves.
- Place the roller and the turntable inside the oven. The three lugs on the bottom of the turntable should slot into the recesses in the drive coupling.
- Both the turntable and the roller must be in place every time the microwave oven is used.
- All food and containers should be placed on the turntable when defrosting, heating or cooking.
Location

- Place the microwave oven on a dry and level surface.
• Make sure that the air vents are not blocked. - The minimum installation height is 85 cm above floor level.
- The back of the microwave oven should be placed against a wall. A clearance of 30 cm should be left above the microwave oven and 20 cm on the sides.
- Do not remove the feet since they are required to ensure adequate ventilation underneath the oven.
- Place the oven as far away from TVs and radios as possible. Microwave ovens can cause poor television reception and radio interference if located too close.
Setting the clock
- Connect the mains lead to a 230 V electrical socket.
- Press [Clock]. 00:00 will appear on the display. The first nought will flash.
- Enter the desired time using the number keys. Note: The clock is on a 12-hour format; only times within the range 01:00-12:59 can be set.
- Press [Clock] to confirm the set time.
Operation
Note: Only use microwave safe food containers. Never use metal containers, ovenware or dinnerware with gold or silver trim. Even containers of wood or with wooden parts are unsuitable since the wood will dry out in the microwave and may even crack.
The oven has the following power levels:
| Level 10 9 8 7 6 5 4 3 2 1 0 | |||||||||||
| Power % | 100 | 90 | 80 | 70 | 60 | 50 | 40 | 30 | 20 | 10 | 0 |
| Display | PL10 | PL9 | PL8 | PL7 | PL6 | PL5 | PL4 | PL3 | PL2 | PL1 | PL0 |
Functions
Timed cooking/heating
- Press [Time Cook], the display will flash.
- Enter the desired time using the number keys (max 99 minutes and 99 seconds).
- Press [Power], PL10 will appear on the display (max power, default factory setting). If you like you can change the power level using the number keys.
- Press [ START/+30SEC ] to start the oven.
Example: Cooking on 50 % power for 15 minutes.
- Press [Time Cook], the display will flash.
- Enter [1]-[5]-[0]-[0] using the number keys.
- Press [ Power ] followed by the number key [ 5 ] to select 50% power.
- Press [ START/+30SEC ] to start the oven.
Timed defrosting
- Press [Time Defrost], dEF 2 will appear on the display.
- Enter the desired time using the number keys (duration 00:01–99:99 minutes).
- Power level 3 is the default factory setting. To change the power level: Press [Power], PL3 will appear on the display. Select the desired power level using the number keys.
- Press [START/+30SEC] to start the oven. The remaining duration of the defrosting cycle will appear on the display.
Popcorn
- Press [Popcorn] the required number of times to select 50 or 100 grams, depending on the size of the bag.
- Press [ START/+30SEC ] to start the oven.
Potatoes
- Press [Potato] repeatedly until the equivalent number of potatoes is displayed: 1, 2 or 3, based on one potato weighing 230 grams.
- Press [ START/+30SEC ] to start the oven.
Frozen vegetables
- Press [ Frozen Vegetables ] repeatedly until the desired weight is displayed: 150, 350 or 500 grams.
- Press [ START/+30SEC ] to start the oven.
Drinks
- Press [ Beverage ] repeatedly until the desired number of cups is displayed: 1, 2 or 3 based on one cup being 120 ml (not a standard 240 ml cup).
- Press [ START/+30SEC ] to start the oven.
Defrosting by weight
- Press [Weight Defrost], dEF 1 will appear on the display.
- Enter the desired weight using the number keys (100–2000 grams).
- Press [ START/+30SEC ] to start the oven. The remaining duration of the defrosting cycle will appear on the display.
Kitchen timer (the oven does not start)
- Press [Kitchen Timer], the display will flash.
- Enter the desired time using the number keys (max 99 minutes and 99 seconds).
- Press [ START/+30SEC ] to start the timer.
- When the set time has elapsed the buzzer will sound 5 times and the display will revert to showing the current time.
- When the kitchen timer function is being used, none of the oven's other functions can be used.
- The kitchen timer function can be quit at any time by pressing [ STOP/CLEAR ].
Pizza
- Press [Pizza] repeatedly until the desired weight is displayed: 100, 200 or 400 grams.
- Press [ START/+30SEC ] to start the oven.
Dinner plate
- Press [Dinner Plate] repeatedly until the desired weight is displayed: 250, 350 or 500 grams.
- Press [ START/+30SEC ] to start the oven.
Memory function
The oven can be programmed with 3 memorized power level and time setting cycles.
Example: To programme 3 minutes and 20 seconds cooking at 80% power in memory slot 2.
- Press [0/Memory] until number 2 is displayed.
- Press [Time Cook] once and then [3]-[2]-[0].
- Press [Power] once. PL10 will appear on the display. Press the number [8] so that PL8 is displayed, signifying 80% power.
- Press [ START/+30SEC ] once to save into the memory. The oven will beep once and the number 2 will appear on the display.
- Press [ START/+30SEC ] once to start the oven cooking at the set power level for the set length of time. If [ START/+30SEC ] is not pressed within one minute, the display will revert to showing the current time.
In order to use the programme on memory slot 2 at a later date:
- Press [0/Memory] until number 2 is displayed.
- Press [ START/+30SEC ] to start the oven.
The times and power levels programmed onto the memory slots can be changed by going through the procedure laid out above again.
Multi-stage cooking
Example: If you want to cook at 80% power for 50 minutes followed directly by cooking at 60% power for 10 minutes.
- Press [Time Cook] once and then [5]-[0]-[0]-[0] to set the cooking time.
- Press [Power] once and then [8] for 80 % power.
- Press [Time Cook] once and then [1]-[0]-[0]-[0] to set the cooking time.
- Press [Power] once and then [6] for 60 % power.
- Press [ START/+30SEC ] to start the oven.
Enquiry function
- If you would like to know what time it is whilst the oven is on; press [Clock] once to display the time for 3 seconds.
- If you would like to check the power level whilst the oven is on; press [Power] once to display the current level.
Child safety lock
- Hold in [ STOP/CLEAR ] for 3 seconds to lock the control panel. The oven will beep and will appear on the display.
- Hold in [ STOP/CLEAR ] for another 3 seconds to unlock the control panel.
Care and maintenance
Always unplug the mains lead from the electrical socket before cleaning the oven. Clean the exterior of the oven using a lightly moistened cloth. Only use mild cleaning agents, never solvents or corrosive chemicals.
Troubleshooting guide
| The oven does not start. The display does not come on. | Check that the mains lead is properly plugged into an electrical socket.Check that the electrical socket you are using is live by testing with another product such as a lamp. |
| The food does not get hot. | The oven door is not closed properly. |
| TV/Radio reception affected. | A degree of interference is normal. Try increasing the distance between the oven and your TV/radio. |
| Dim oven light. • When cooking on low power, the oven light may become dim. This is completely normal. | |
Disposal
This product should be disposed of in accordance with local regulations.
If you are unsure how to proceed, contact your local authority.
Specifications
Power supply 230 V, 50 Hz
Input power 1050 W
Output power 700 W
Capacity 201
Turntable 255 mm
Exterior dimensions 440 × 330 × 258 mm
Weight 10.2 kg
Mikrovågsugn
Art.nr 18-4399 Modell EM720CCC-UK
34-2332, -1 EM720CCC, -BLACK
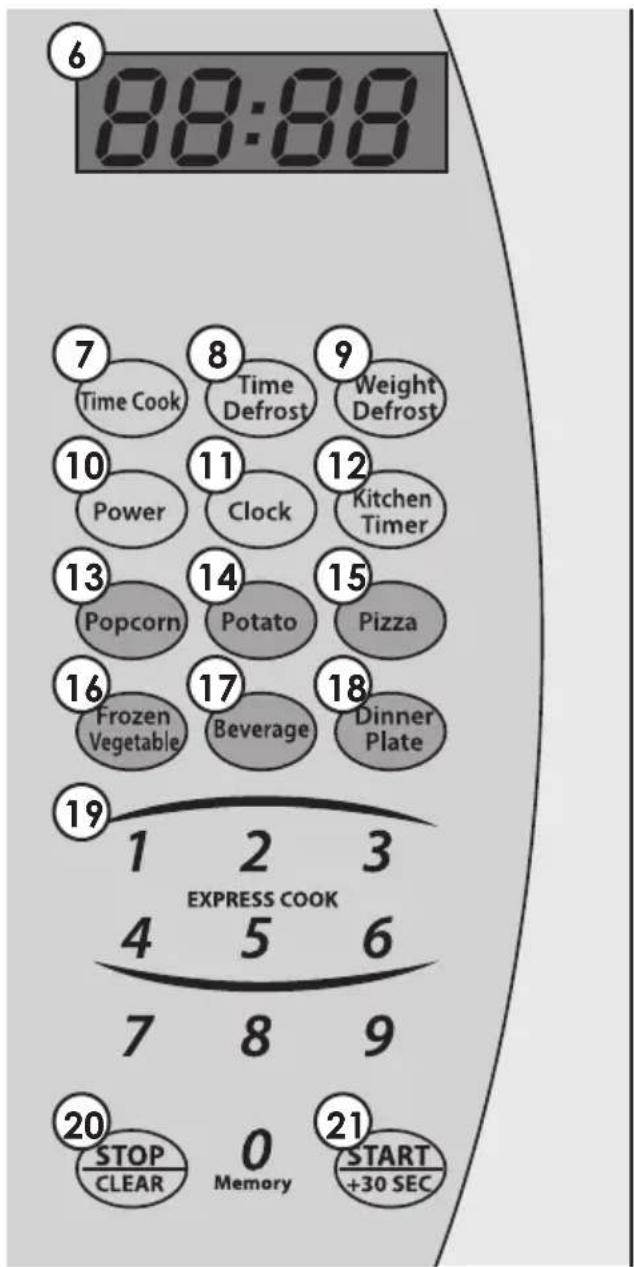
- Display
- [Time Cook]
- [Time Defrost]
- [Weight Defrost]
- [Power]
- [Clock]
- [Kitchen Timer]
- [Popcorn]
- [Potato]
- [Pizza]
- [Frozen Vegetable]
- [Beverage]
- [Dinner Plate]
- [0]-[9] Siffertangenter
- [STOP/CLEAR]
- [START/+30SEC]

- Display
- [Time Cook]
- [Time Defrost]
- [Weight Defrost]
- [Power]
- [Clock]
- [Kitchen Timer]
- [Popcorn]
- [Potato]
- [Pizza]
- [Frozen Vegetable]
- [Beverage]
- [Dinner Plate]
- [0–9] Talltaster
- [STOP/CLEAR]
- [START/+30SEC]

- Display
- [Time Cook]
- [Time Defrost]
- [Weight Defrost]
- [Power]
- [Clock]
- [Kitchen Timer]
- [Popcorn]
- [Potato]
- [Pizza]
- [Frozen Vegetable]
- [Beverage]
- [Dinner Plate]
- [0]-[9] Zahlentasten
- [STOP/CLEAR]
- [START/+30SEC]
10 - 13 Market Place
Kingston Upon Thames
Surrey
KT1 1JZ
DEUTSCHLAND
Kundenservice
- Microwave oven
- Or:
- Safety
- Product description
- Buttons and functions
- Preparations and installation
- Location
- Setting the clock
- Operation
- Functions
- Timed cooking/heating
- Timed defrosting
- Popcorn
- Potatoes
- Frozen vegetables
- Drinks
- Defrosting by weight
- Kitchen timer (the oven does not start)
- Pizza
- Dinner plate
- Memory function
- Multi-stage cooking
- Enquiry function
- Child safety lock
- Care and maintenance
- Troubleshooting guide
- Disposal
- Specifications
- Mikrovågsugn
- DEUTSCHLAND
Brand : Coline
Model : EM720CCC
Category : Microwave