L-3126 - Washing machine EDESA - Free user manual and instructions
Find the device manual for free L-3126 EDESA in PDF.

| Product Type | Washing Machine |
| Brand | Edesa |
| Model | L-3126 |
| Capacity | 7 kg |
| Spin Speed | 1200 rpm |
| Energy Class | A++ |
| Dimensions (H x W x D) | 85 cm x 60 cm x 55 cm |
| Weight | 70 kg |
| Voltage | 220-240 V |
| Frequency | 50 Hz |
| Water Pressure | 0.5-8 bar |
| Number of Programs | 15 |
| Key Programs | Cotton, Synthetic, Delicate, Quick Wash, Eco, Wool, Hand Wash, Spin, Drain, Rinse |
| Features | Delay Start, Child Lock, Load Sensor, Foam Control, Unbalance Control, Overheat Protection, Overflow Protection |
| Display | Digital LED |
| Drum Material | Stainless Steel |
| Noise Level (Wash) | 59 dB |
| Noise Level (Spin) | 77 dB |
| Water Consumption | 45 L per cycle |
| Annual Energy Consumption | 200 kWh |
Frequently Asked Questions - L-3126 EDESA
User questions about L-3126 EDESA
0 question about this device. Answer the ones you know or ask your own.
Ask a new question about this device
Download the instructions for your Washing machine in PDF format for free! Find your manual L-3126 - EDESA and take your electronic device back in hand. On this page are published all the documents necessary for the use of your device. L-3126 by EDESA.
USER MANUAL L-3126 EDESA
INSTALLATION AND ASSEMBLY 80 - 85
HOW TO USE THE MACHINE. PRACTICAL TIPS 86 - 96
MAINTAINING AND CLEANING THE MACHINE 97 - 99
SAFETY AND TROUBLESHOOTING 100 - 102
ENVIRONMENTAL ADVICE 103
CONDICIONES DE GARANTÍA
(VALEDERO ÚNICAMENTE EN ESPAÑA)
natural_image
Hand opening a white washing machine with a handle, mounted on top (no visible text or symbols)
natural_image
Front view of a white washing machine with a hand adjusting its front panel (no visible text or symbols)DESBLOQUEO
natural_image
Top-down view of a white appliance with a curved internal component and three black circular annotations pointing to specific areas (no text or symbols present)
natural_image
Close-up of a hand holding a tool with a curved wire, no visible text or symbols
natural_image
Close-up of a hand holding a small mechanical tool, no visible text or symbolsIMPORTANTE
natural_image
Person washing a large refrigerator with a hand adjusting the lid (no visible text or symbols)
natural_image
Close-up of a white plastic pipe fitting with a black circular inset showing its side view (no text or symbols)
natural_image
Close-up of a mechanical valve component with threaded shaft and flange, enclosed in a circular frame (no text or symbols visible)
text_image
max. 70 cm min. 50 cmIMPORTANTE
natural_image
Close-up of a hand holding a small cylindrical object, possibly a knob or knob, against a white background (no text or symbols visible)natural_image
Close-up of a hand cleaning a wall with a small object, labeled 'a' in the corner (no text or symbols on the main subject)
natural_image
Black and white photo of a flat rectangular object with a black tab, placed on a surface (no visible text or symbols)natural_image
Close-up of hands holding a pen or tool, no visible text or symbolsnatural_image
Close-up of hands holding a small object, possibly a tool or device, with no visible text or symbols.
natural_image
Close-up of a hand using a tool to cut or spread material on a white surface, no visible text or symbols
natural_image
Close-up of a hand holding a flexible heating element with a metallic handle (no visible text or symbols)
natural_image
Close-up of hands holding a black cable or wire against a plain background (no text or symbols visible)natural_image
Close-up of hands installing or adjusting a wall-mounted electrical socket (no visible text or symbols)
natural_image
Close-up of a metallic sheet or panel with a hand holding it, no visible text or symbols
natural_image
Close-up of a hand using a pipette to apply plastic or paper (no visible text or symbols)
natural_image
Close-up of a hand holding a flat, dark object with a small circular icon labeled 'f' in the corner (no readable text or symbols)
natural_image
Close-up of a hand holding a small black square object against a plain white background (no text or symbols visible)natural_image
Close-up of hands holding a small object near a wall, possibly part of a device or panel (no visible text or symbols)
natural_image
Close-up of a hand using a tool to draw or install a grid-like structure (no visible text or symbols)
natural_image
Close-up of a hand inserting a USB into a device (no visible text or symbols)
natural_image
Hand holding a small white rectangular object on a wall, no visible text or symbols
natural_image
Close-up of a white car front panel with a small circular button and a black icon (no visible text or symbols)natural_image
Close-up of a white rectangular object with a small protrusion and a circular badge labeled 'a' (no text or symbols on the object itself)natural_image
Close-up of a hand holding a tool with wires and components, no visible text or symbols
natural_image
Close-up of hands holding a metallic object with visible surface texture and a small circular label (no text or symbols)7 LIMPIEZA PREVIA
natural_image
Close-up of a hand pressing down on a control panel with buttons and dials (no visible text or symbols)natural_image
Close-up of a hand pressing down on a white appliance control panel with buttons and a dial (no readable text or symbols)natural_image
Black-and-white photo of a dark fabric garment with a close-up inset showing hand holding small items (no text or symbols visible)text_image
Black-and-white photo of two printed documents with visible text, placed on a dark fabric background.IMPORTAL

natural_image
Exterior view of a washing machine with two circular insets showing a woven basket containing laundry items (no text or symbols visible)IMPORTANTE
natural_image
Close-up of a white electronic device cabinet with visible internal compartments and a 'cdesea' label (no readable text beyond branding)IMPORTANTE
natural_image
Close-up of a white electronic device casing with internal compartments and a label reading 'Sedesa' (no readable text beyond label)
natural_image
Close-up of a white plastic drawer with internal compartments and a control panel (no visible text or symbols)
text_image
NOTA ECOLÓGICAnatural_image
Close-up of a finger pressing a button on a white appliance panel (no visible text or symbols)
text_image
visualizador POT
text_image
NOTA ECOLÓGICANOTA ECOLÓGICA
natural_image
Close-up of a circular dial with numbered markings (no readable text or symbols beyond numbers)natural_image
Pure electrical circuit lines without any symbolsTecla: flot/antiarrugas
text_image
Close-up of a hand pressing down on a control panel with icons and a numeric display showing '8' and '400'.Desaccionar bloqueo
text_image
NOTA ECOLÓGICAnatural_image
Front view of a white washing machine with an open door opening the side (no visible text or symbols)IMPORTANTE
natural_image
Close-up of a white appliance with a fan and control panel, partially obscured by a hand holding a bag (no visible text or symbols)natural_image
Close-up of a mechanical component with no visible text or symbols2
LIMPIEZA DEL FILTRO ACCESIBLE
natural_image
Person installing or adjusting a wall-mounted panel (no visible text or symbols)
natural_image
Close-up of a hand adjusting a small mechanical component (no visible text or symbols)
natural_image
Close-up of a hand holding a pen tip over a white surface (no visible text or symbols)
natural_image
Close-up of a white electronic device with a circular lens and cable (no visible text or symbols)
natural_image
Close-up of a hand pressing down on a mechanical component (no visible text or symbols)
natural_image
Close-up of a hand inserting a black circular component into a metallic housing (no text or symbols visible)
natural_image
Diagram of a circular device with bidirectional arrows indicating rotation or cycle (no text or symbols)natural_image
White front-loading washing machine with hand cleaning the top panel (no visible text or symbols)text_image
NOTA ECOLÓGICAnatural_image
Black-and-white photo of a hand opening a white washing machine with a handle, no visible text or symbols.
natural_image
Front view of a white washing machine with a hand adjusting its side panel (no visible text or symbols)DESBLOQUEIO
natural_image
Top-down view of a white appliance with a curved pipe and circular annotations (no readable text or symbols)
natural_image
Close-up of a hand holding a tool with a cable, no visible text or symbols
natural_image
Close-up of a hand holding a small mechanical tool, no visible text or symbolsIMPORTANTE
natural_image
Person using a washing machine to clean or adjust the interior wall (no visible text or symbols)
natural_image
Close-up of a white plastic pipe fitting with a black circular inset showing its side profile (no text or symbols)
natural_image
Close-up of a mechanical component with threaded end and base, enclosed in a circular frame (no visible text or symbols)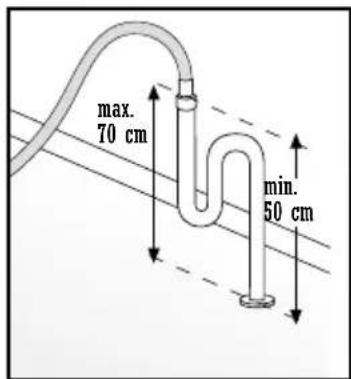
text_image
max. 70 cm min. 50 cmIMPORTANTE
natural_image
Close-up of a hand holding a small cylindrical object, possibly a mechanical component or tool, with no visible text or symbols.4 CONEXÃO ELÉCTRICA
text_image
IPX4 N CEIMPORTANTE
natural_image
Person cleaning a wall-mounted appliance (no visible text or symbols)
natural_image
Close-up of a white rectangular electronic component with black top tabs, placed on a surface (no visible text or symbols)natural_image
Close-up of hands holding a small object with a ruler, possibly part of a device or tool (no visible text or symbols)natural_image
Close-up of a hand holding a small object near a surface, possibly a tool or device (no visible text or symbols)
natural_image
Close-up of a hand using scissors to lift a white material from a metal bracket (no text or symbols visible)
natural_image
Close-up of a hand holding a metal tool with a white panel, no visible text or symbols
natural_image
Close-up of hands holding a black cable or wire against a plain background (no text or symbols visible)natural_image
Close-up of hands installing or adjusting a wall-mounted electrical socket (no visible text or symbols)
natural_image
Close-up of a metallic sheet or panel with a hand holding it, no visible text or symbols
natural_image
Close-up of a hand using a pipette to apply plastic or paper (no visible text or symbols)
natural_image
Close-up of a hand holding a flat, dark object with a small circular icon labeled 'f' in the corner (no readable text or symbols)
natural_image
Close-up of a hand holding a small black square object against a white background (no text or symbols visible)natural_image
Close-up of hands holding a small object near a wall, no visible text or symbols
natural_image
Close-up of a hand using a tool to cut or mark a grid pattern on a surface (no text or symbols visible)
natural_image
Close-up of a hand inserting a USB into a device (no visible text or symbols)
natural_image
Hand holding a small white rectangular object on a wall, possibly a device or component (no visible text or symbols)
natural_image
Close-up of a white car front panel with a small circular button and a black icon (no visible text or symbols)natural_image
Close-up of a white rectangular object with a metallic rod inserted, possibly a sink or vent (no visible text or symbols)natural_image
Close-up of a hand holding a tool with wires, partially visible in a container (no text or symbols)
natural_image
Close-up of hands holding a metallic object with visible surface texture and a small circular label (no text or symbols)7 LIMPEZA PRÉVIA
natural_image
Close-up of a hand pressing down on a control panel with buttons and dials (no visible text or symbols)natural_image
Black-and-white photo of a dark fabric garment with a close-up inset showing hand holding small items (no text or symbols visible)text_image
Black-and-white photo of two white printed documents with visible text, placed on dark fabric backgroundIMPORTA

Lave separadamente as roupas brancas e as roupas de cor.

natural_image
Exterior view of a washing machine with two circular insets showing a woven basket containing laundry items (no text or symbols visible)IMPORTANTE
natural_image
Close-up of a refrigerator shelf with visible door, drawer, and front panel (no readable text or symbols)IMPORTANTE
natural_image
Close-up of a white electronic device casing with internal compartments and a paper clip (no visible text or symbols)
natural_image
Close-up of a white plastic container with multiple compartments and a small label on the side (no readable text or symbols)
natural_image
Close-up of a dark, textured leaf or fabric fragment (no visible text or symbols)NOTA ECOLÓGICA
text_image
edesa L-4126 6th
natural_image
Close-up of a finger pressing a button on a white appliance panel (no visible text or symbols)
text_image
visor POT
text_image
NOTA ECOLÓGICANOTA ECOLÓGICA
natural_image
Close-up of a circular dial with numbered markings (no readable text or symbols)natural_image
Pure electrical circuit lines without any symbolsTecla: Flot/anti-vincos
text_image
Close-up of a hand interacting with electronic control buttons including icons and a numeric display showing '8' and '400'.natural_image
Close-up of a finger pressing a button with control buttons (no visible text or symbols)text_image
NOTA ECOLÓGICAnatural_image
Front view of a white washing machine with an open door opening the side (no visible text or symbols)IMPORTANTE
natural_image
Close-up of a washing machine with a hand holding a fan (no visible text or symbols)
natural_image
Close-up of a mechanical component with no visible text or symbolsnatural_image
Person installing or adjusting a wall panel, no visible text or symbols
natural_image
Close-up of a hand holding a small mechanical component, possibly a valve or clamp, with no visible text or symbols.
natural_image
Close-up of a hand holding a pen tip over a white surface (no visible text or symbols)
natural_image
Close-up of a white electronic device with a circular lens and cable (no visible text or symbols)
natural_image
Close-up of a hand pressing down on a mechanical component (no visible text or symbols)
natural_image
Close-up of a hand inserting a black circular component into a metallic housing (no text or symbols visible)
natural_image
Close-up of a circular mechanical component with bidirectional arrows indicating rotation or cycle (no text or symbols)natural_image
White front-loading washing machine with hand cleaning the top panel (no visible text or symbols)SEGURANÇA E SOLUÇÃO DE PROBLEMAS
text_image
NOTA ECOLÓGICAnatural_image
Hand opening a large white washing machine with a hand adjusting the lid (no visible text or symbols)
natural_image
Front view of a white washing machine with a hand adjusting its front panel (no visible text or symbols)natural_image
Top-down view of a white washing machine casing with visible tubing and three black circular annotations (no text or symbols)
natural_image
Close-up of a hand holding a tool over a medical device (no visible text or symbols)
natural_image
Close-up of a hand holding a mechanical tool, no visible text or symbolsWICHTIG
natural_image
Close-up of a white plastic pipe fitting with a black circular inset showing its side profile (no text or symbols)
natural_image
Close-up of a mechanical component with threaded shaft and flange, enclosed in a circular frame (no visible text or symbols)
text_image
max. 70 cm min. 50 cmWICHTIG
natural_image
Close-up of a hand holding a small cylindrical object, possibly a mechanical component or tool, with no visible text or symbols.4
text_image
IPX4 N CE 90% 10% 12% 15% 18% 20% 22% 25% 28% 30% 32% 35% 38% 40% 42% 45% 48% 50% 52% 55% 58% 60% 62% 65% 68% 70% 72% 75% 78% 80% 82% 85% 88% 90% 92% 95% 98% 100%natural_image
Close-up of a hand using a tool to clean or install a wall-mounted device (no visible text or symbols)
natural_image
Close-up of hands holding a small object with a pen, possibly part of a device or tool (no visible text or symbols)
natural_image
Exterior view of a white rectangular electronic device with black top and control panel (no visible text or symbols)natural_image
Close-up of hands holding a small object, possibly a tool or device, with no visible text or symbols.
natural_image
Close-up of a hand using scissors to cut a white strip on a flat surface, no text or symbols visible
natural_image
Close-up of a hand holding a metal tool with a grid-like structure, no visible text or symbols
natural_image
Close-up of a hand holding a black cable or wire, with no visible text or symbolsnatural_image
Close-up of hands installing or adjusting a wall-mounted electrical outlet (no visible text or symbols)
natural_image
Close-up of a hand holding a metallic sheet or panel, with no visible text or symbols.
natural_image
Close-up of a hand using a pipette to add material into a stack of cylindrical objects (no visible text or symbols)
natural_image
Close-up of a dark, flat electronic device with a small circular button labeled 'f' (no visible text or symbols on the device itself)
natural_image
Close-up of a hand holding a small black square object against a plain white background (no text or symbols visible)natural_image
Close-up of hands holding a small object with a ruler, possibly part of a device or tool (no visible text or symbols)
natural_image
Close-up of a hand using a tool to draw or mark a grid pattern on a surface (no text or symbols visible)
natural_image
Close-up of a hand inserting a small electronic component into a device (no visible text or symbols)
natural_image
Hand holding a small electronic device on a cabinet (no visible text or symbols)
natural_image
Close-up of a white car front panel with a small black square and circular button, no visible text or symbols.6
natural_image
Close-up of a white rectangular object with a metallic rod inserted, possibly a sink or vent (no visible text or symbols)natural_image
Close-up of a hand holding a tool with wires, partially visible in a container (no text or symbols)
natural_image
Close-up of hands holding a metallic object with visible surface texture and a small circular label (no text or symbols)7
VORREINIGUNG
natural_image
Close-up of a hand pressing down on a control panel with buttons and dials (no visible text or symbols)natural_image
Close-up of a hand pressing down on a white industrial control panel with buttons and a dial (no readable text or symbols)natural_image
Black-and-white photo of a dark fabric garment with a hand holding a small object, showing internal components (no text or symbols visible)text_image
Black-and-white photo of two white printed documents with visible text, placed on dark fabric backgroundWICHTIG

natural_image
Exterior view of a washing machine with two circular insets showing a woven basket containing laundry items (no text or symbols visible)WICHTIG
natural_image
Close-up of a refrigerator shelf with visible door, shelves, and air conditioner (no text or symbols)WICHTIG
natural_image
Close-up of a white electronic device casing with internal compartments, shown in two views: one showing internal structure and another showing close-up of its internal components (no visible text or symbols)
natural_image
Close-up of two leaf veins with visible vein patterns (no text or symbols)text_image
FAG-OR Air Air Control Panel Air Air Control Panel AIR Air Control Panel AIR Air Control Panel AIR Air Control Panel AIR Air Control Panel AIR Air Control Panel AIR Air Control Panel AIR Air Control Panel AIR Air Control Panel AIR Air Control Panel AIR Air Control Panel AIR Air Control Panel AIR Air Control Panel AIR Air Control Panel AIR Air Control Panel AIR Air Control Panel AIR Air Control Panel AIR Air Control Panel AIR Air Control Panel AIR Air Control Panel AIR Air Control Panel A10000000000000000000000000000000000000000000000000000000000000000000000000000000000000000000000000000
natural_image
Close-up of a finger pressing a button on a white appliance panel (no visible text or symbols)
text_image
display P07
natural_image
Close-up of two leaf fragments with visible veins and texture, no text or symbols presentnatural_image
Close-up of a circular dial with measurement markings (no readable text or symbols)natural_image
Pure electrical circuit lines without any symbolsnatural_image
Close-up of a hand pressing down on a control panel with icons and a digital display (no readable text or symbols)natural_image
Close-up of a finger pressing a button on a surface, with no visible text or symbolsFunktionsleuchte

text_image
edesa D-100% 6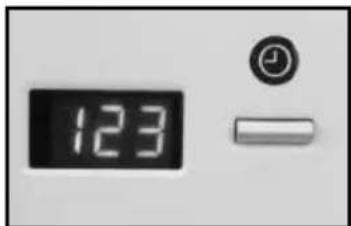
text_image
123natural_image
Close-up of two leaf veins with visible vein patterns, no text or symbols presentnatural_image
Front view of a white washing machine with open door opening, showing internal compartments and control panel (no visible text or symbols)WICHTIG
natural_image
Close-up of a washing machine with a hand inserting a fan into the air (no visible text or symbols)
natural_image
Close-up of a mechanical component with metallic parts and a curved handle (no visible text or symbols)natural_image
Person installing or adjusting a wall panel, no visible text or symbols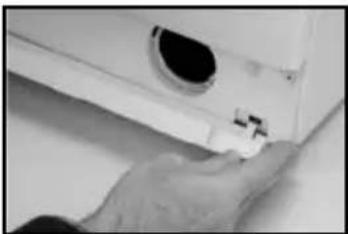
natural_image
Close-up of a hand holding a small mechanical component, possibly a valve or clamp, with no visible text or symbols.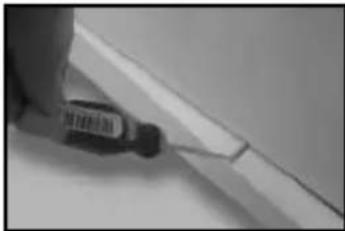
natural_image
Close-up of a hand holding a pen tip over a white surface (no visible text or symbols)
natural_image
Close-up of a white electronic device with a circular lens and cable (no visible text or symbols)
natural_image
Close-up of a hand pressing down on a mechanical component (no visible text or symbols)
natural_image
Close-up of a hand inserting a black circular component into a metallic housing (no text or symbols visible)
natural_image
Close-up of a circular mechanical component with bidirectional arrows indicating rotation or cycle (no text or symbols)natural_image
White front-loading washing machine with hand cleaning the top panel (no visible text or symbols)natural_image
Close-up of black-and-white close-up of a leaf with visible vein patterns (no text or symbols)CONDITIONS OF GUARANTEE
FAGOR ELECTROMESTICOS, S. COOP., Guarantee this new product for one year from the date of purchase.
During that time FAGOR'S engineers will replace or repair any defective parts free of charge. This guarantee covers the product for domestic use only and the appliance must have been supplied, installed and use in accordance with FAGOR'S instructions. Consequential losses and accidental damage to the product are not covered by the guarantee.
TO QUALIFY FOR BENEFITS UNDER THE GUARANTEE, YOU MUST BE ABLE TO PROVIDE PROOF OF DATE OF PURCHASE TO FAGOR'S ENGINEERS AND MUST SHOW THIS DOCUMENT ON ANY SERVICE VISIT.
This guarantee is in addition to your statutory and other legal rights which will not be excluded or in any way diminished.
- Valid for United Kingdom only TO BE RETAINED RETAINED BY CUSTOMER (THE GUARANTEE CERTIFICATE AND CONDITIONS OF GUARANTEE DOCUMENTS).
- IN IRELAND, THE FAGOR DISTRIBUTOR WILL GUARANTEE THE PRODUCT.
- In other Countries, FAGOR products will be guaranteed by the FAGOR distributors according to their conditions.
FAGOR UK
Lancastrian Office Center
Ground Floor, Duck Worth House
Talbot Road
Old Trafford
M32 OEU MANCHESTER
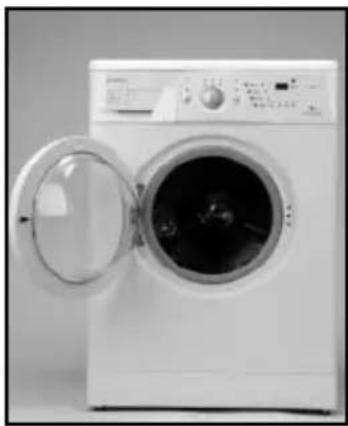
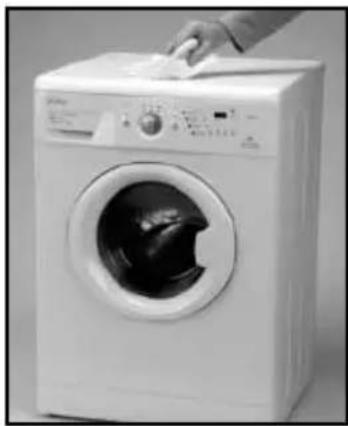
1 UNPACKING AND UNLOCKING THE WASHING MACHINE
UNPACKING

natural_image
Hand opening a white washing machine with lid, mounted on a stand (no visible text or symbols)
natural_image
Front view of a white washing machine with a hand adjusting its front panel (no visible text or symbols)UNLOCKING
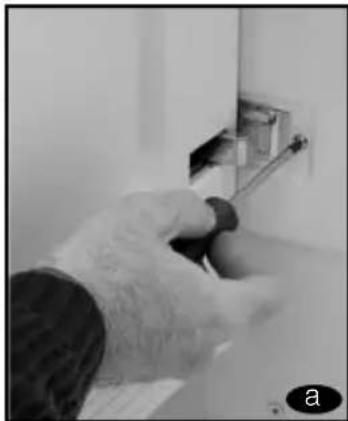
a Loosen the screws that hold the plastic boards at the back of the machine.
b Loosen and remove the blocking screws.
c Cover the holes with the previously removed plastic boards.

natural_image
Top-down view of a white plastic container with a curved internal structure and three black circular annotations (no text or symbols)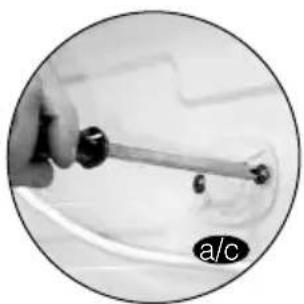
natural_image
Close-up of a hand holding a tool with a curved wire, no visible text or symbols
natural_image
Close-up of a hand holding a small mechanical tool, no visible text or symbolsIMPORTANT
Keep the blocking screws safely for future use IÓN A LA WATER MAINS
2
CONNECTION TO THE WATER MAINSLEVELATION
You will find the water-input pipe inside the drum:
a Connect the bent end of the pipe at the screw entrance of the electrically operated valve situated at the back of the machine.
b Connect the other end of the tube to the water supply. Tighten the connection nut well.
We recommend you have a fixed drainage exit at a distance of between 50 and 70 cm from the floor.
Ensure that the drainage pipe is not too tight and that there are no folds or bottlenecks.

natural_image
Person using a washing machine to clean or adjust the interior wall (no visible text or symbols)
natural_image
Close-up of a white plastic pipe fitting with a black circular inset showing its side profile (no text or symbols)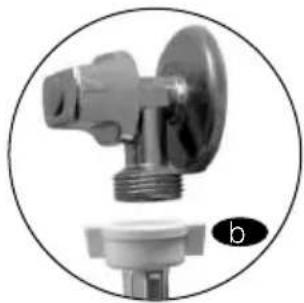
natural_image
Close-up of a mechanical valve component with threaded end and base (no visible text or symbols)
text_image
max. 70 cm min. 50 cmIMPORTANT
It is important that the elbow of the pipe is properly fixed at the exit so that it doesn't fall, with the consequent risk of flooding.
If your washing machine has an input for hot water, connect the tube with the red threading to the hot water tap and to the electrically operated valve with the red filter.
3
LEVELLING
Level the washing machine by using the adjustable feet. This will reduce the noise level and ensure that the machine will not move when in operation.

natural_image
Close-up of a hand holding a small circular object, possibly a lens or button, against a white background (no text or symbols visible)4
ELECTRICAL CONNECTION
Consult the characteristics panel situated on the porthole door of the washing machine before making the electrical connections. Ensure that the voltage available at the base of the socket is the same as the voltage indicated on the panel.
Do not remove the characteristics panel. It contains important information.

text_image
IPX4 N CEIMPORTANT
It is very important to earth the washing machine properly.
The electrical fittings, socket, plug, fuses or automatic switch and meter must be scaled for the maximum power indicated on the characteristics panel.
If the power cord is damaged, it must be replaced by one with the same reference number, only available from an authorised service centre.
5
PANELLING
It is easy
to change the coating of the washing machine panels
to match your kitchen furniture. These coating panels may not be thicker than 5 mm.
a Loosen the
screws of the hinges and dismantle the door of the washing machine.
b Remove the lower protection frame, loosening the screws.
Extract the panel that was supplied with the washing machine.

natural_image
Close-up of a hand using a tool to clean or install a wall-mounted device (no visible text or symbols)
natural_image
Close-up of a white rectangular electronic component with black top and metallic base, no visible text or symbolsC of the new panel is 3 mm. thick or more, you will not need to leave the original panel. If it is less than 3 mm. thick, place it over the panel originally supplied with the washing machine.

natural_image
Close-up of hands holding a small object with a ruler, possibly part of a device or tool (no visible text or symbols)In order to assemble the door with the new decorative panel, repeat the steps given in points a, b, c.
It is also possible to adjust the height of the decorative
door in order to align it with the rest of the kitchen furniture and fittings.
a Loosen the screws of the hinges and dismantle the door of the washing machine.
b Remove the lower protection frame, loosening the screws and extract the panel that was supplied with the washing machine.
c The lower part of the door and the lower protection frame are divided into 7x10 mm. Sections. depending on your needs, divide and adapt the decorative panel to the new dimensions.
d Replace the decorative panel and the lower protection frame and assemble the door again.
natural_image
Close-up of hands installing or adjusting a wall-mounted fixture (no visible text or symbols)
natural_image
Close-up of hands holding a small object, possibly a tool or device, with no visible text or symbols.
natural_image
Close-up of a hand using a tool to cut a white strip on a flat surface, with no visible text or symbols.
natural_image
Close-up of a hand holding a metal tool with a white panel, no visible text or symbols
natural_image
Close-up of hands holding a black cable or wire against a plain background (no text or symbols visible)Fagor washing machines also allow you to change the direction in which the door opens.
a. Loosen the screws of the hinges and dismantle the door of the washing machine.
b Remove the lower protection frame, loosening the screws. .
c Extract the panel that was supplied with the washing machine and the internal panel, loosening the screws that hold it together.
d Extract the hinges and insert them on the other side of the door.
e Loosen the protective cover on the door and place it on the opposite side where the hinges were.
f replace the plate again, the door panel and the lower protection frame. Then hang the door again.
g Extract the fastener situated at the front of the washing machine unit, by loosening the corresponding screw. Now place the fastener in the spot where the upper hinge used to be
h Remove the protective buffer and place it in the spot where the lower hinge used to be.
natural_image
Close-up of hands installing or adjusting a wall-mounted electrical outlet (no visible text or symbols)
natural_image
Close-up of a metallic sheet or panel with a hand holding it, no visible text or symbols
natural_image
Close-up of a hand using a pipette to add material into stacked cylindrical containers (no visible text or symbols)
natural_image
Close-up of a dark, flat electronic device with a small circular button labeled 'f' (no visible text or symbols on the device itself)
natural_image
Close-up of a hand holding a small black object against a plain white background (no text or symbols visible)I hang the door by lightly pushing and inserting the hinges in their new location. Adjust the screws.

natural_image
Close-up of hands holding a small object with a ruler, possibly part of a device or tool (no visible text or symbols)
natural_image
Close-up of a hand using a tool to draw or mark a grid pattern on a mechanical component (no visible text or symbols)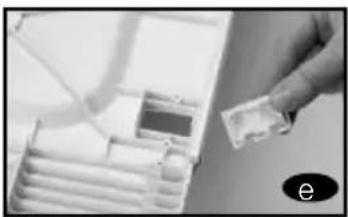
natural_image
Close-up of a hand inserting a USB into a device (no visible text or symbols)
natural_image
Hand holding a small electronic device on a cabinet (no visible text or symbols)
natural_image
Close-up of a white car front panel with a small black square and circular button labeled 'i' (no readable text or symbols)6 INSTALLATION OF THE WASHING MACHINE UNDER THE KITCHEN WORKTOP
It is possible to place the washing machine under the kitchen worktop.
If you need to change the worktop of the washing machine, please ask the Technical Support Service, for the guard plate and follow these steps:
a Dismantle the work-top of your washing machine by loosening the side screws and lightly knocking the worktop backward in order to extract it.

natural_image
Close-up of a white rectangular object with a metallic rod inserted, possibly a sink or vent (no visible text or symbols)b Remove the fasteners that hold the worktop in place by loosening the screws.
Place and screw in the guard plate on the washing machine in order that you may introduce it in the intended spot.

natural_image
Close-up of a hand using a tool to adjust or install electronic components (no visible text or symbols)
natural_image
Close-up of hands holding a metallic object with visible surface texture and a small mark, no text or symbols present.7 PRIOR CLEANING
Now that you have satisfactorily installed your washing machine, we recommend that you run programme 5 at 60°C, without inserting any laundry or detergent. This is in order to check the installation, the connections and the drainage system, as well as to fully clean the inside before running a wash programme in the washing machine.
natural_image
Close-up of a hand pressing down on a control panel with buttons and dials (no visible text or symbols)Select programme 5 at 60^

text_image
StopPress the On/ Off button
HOW TO USE THE MACHINE. PRACTICAL TIPS
1 PREPARING THE LAUNDRY BEFORE A WASH
Before putting the laundry in the drum, ensure that all the pockets are empty. Small objects can obstruct the motor pump for water discharge.

natural_image
Black-and-white photo of a dark fabric garment with a close-up inset showing hand holding small items (no text or symbols visible)Sort your laundry according to material or make-
up. We recommend you use delicate programmes for delicate garments. Woollens may be washed in a special wool programme.

text_image
Black-and-white photo of two white printed documents with visible text, placed on dark fabric backgroundIMPORTA

Please ensure that your woollen garments are machine washable before running the wool programme.
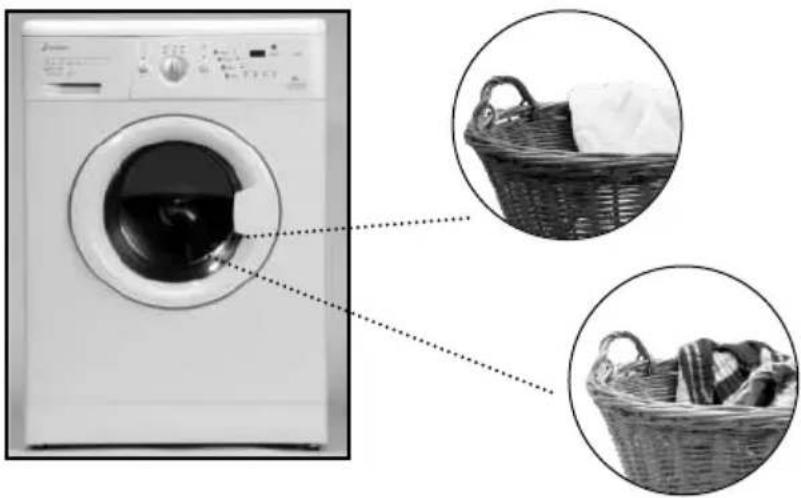
Sort your laundry according to how soiled it is.
a lightly soiled garments should preferably be washed in a short, cold programme.
b Normally soiled garments should be washed in a pro-gramme without pre-wash..
C Heavily soiled garments may be washed in a long programme with pre-wash.
Sort your laundry accor- ding to the
colours. Wash whites and coloureds separately.
natural_image
Exterior view of a washing machine with two circular insets showing a woven basket containing laundry items (no text or symbols visible)IMPORTANT
We remind you to load the washing machine at its maximum capacity. This will save water and energy.
IWe recommend that you wash garments of different sizes in the same wash programme, if possible, in order to reinforce the washing effects. This also favours the distribution of the laundry inside the drum at the spinning stage, which will mean the machine will work more silently.
2 USE OF DETERGENT AND ADDITIVES
Before you start the wash programme, introduce the detergent or additive in the detergent drawer. The detergent drawer of your washing machine has three compartments.

text_image
Pre-wash Compartment. Wash Compartment. Liquid Additive Compartment (softeners,...) Ever exceed the MAX reference rawer.IMPORTANT
The liquid level should never exceed the MAX reference mark on the side of the drawer.
You may also use liquid detergents with this washing machine, using the optional drawer that may be acquired through the Technical Support Network.
The optional drawer should be placed in the wash compartment.
Remember that the dose of detergent to be used always depends on
● The amount of laundry to be washed.
● How soiled the laundry is.
● The hardness of the water (You can request information on the water hardness from the competent local entities).

natural_image
Close-up of a white electronic device casing with internal compartments, shown in two views: one showing internal structure and another showing close-up of its internal components (no visible text or symbols)
text_image
ECOLOGICAL NOTERemember that there are concentrated detergents that are more careful with nature and the environment.
Using more detergent than is needed does not improve the wash results and as well as being a waste of money, it has a negative effect on the preservation of the environment.
Therefore, please follow the instructions supplied by the manufacturer of the detergent.
3
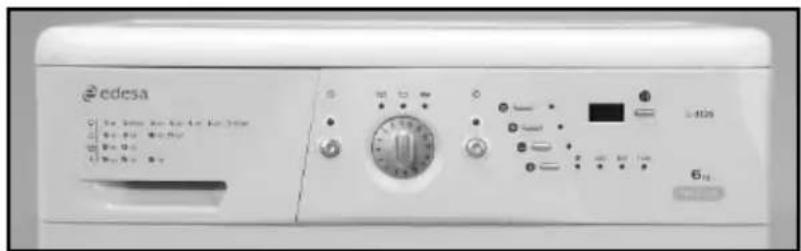
SELECTING THE WASH PROGRAMME
There are four types of programme:
a Normal pro-
grammes
b Delicate pro-
grammes
c Wool programmes
d Auxiliary pro-
grammes
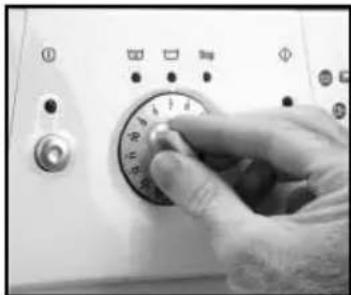
To select a wash programme, proceed as follow:
-
Switch the washing machine ON by pressing the master switch (the pilot light above the master switch will come on).
-
Select the wash programme by turning the Programme Selector Dial.
When this is done the spin speed light for this programme will come on.
If your washing machine has a display, it will light up for a few seconds when the programme is selected, showing P + programme number (P01, P02, etc.). It will then show the approximate duration in minutes.
The time shown on the display will vary according to the stage the programme is at.
text_image
edesaa L-4126 6
natural_image
Close-up of a finger pressing a button on a washing machine (no visible text or symbols)
text_image
display P07
text_image
ECOLOGICAL NOTEWe recommend you choose a wash programme without pre-wash whenever possible. This will save you money and help protect the environment.
| PROGRAMME | RECOMEMENDED TEMPERATURE | TYPE DE MATERIAL | BUTTONS OF POSSIBLE OPTIONS | MAX. LAUNDRY LOAD (KG) | WASH PRODUCT COMPART-MENT | PROGRAMME DESCRIPTION | TOTAL CONSUMPTION KWh/litres | APPROXIMATE DURATION (min.) | ||||||||
| Extra Rinse | Reduced time | Easy iron | Spin selection | No spin | No creases | For 5 kg Washing machines* | For 5.5 kg Washing machines* | For 5 kg Washing machines* | For 5.5 kg Washing machines* | |||||||
| 1 | Normal Cold | Cold | Cotton/linen Normal wash, rinse, delicate cottons very lightly soiled desired and long final spin | 5/5.5* | additives automatically absorbed if | 0.15/46 | 0.15/49 | 90 | 90 | |||||||
| 2 | Fast 30°C |  | Cotton/linen SHORT wash, rinse, Whites/coloureds suciedad muy ligera | YES | NO | YES | 1.5 | additives automatically absorbed if desired and long final spin | 0.20/25 | 0.20/30 | 30 | 30 | ||||
| 3 | Normal 30°C |  | Cotton/linen delicate cottons lightly soiled | YES | 5/5.5* | Normal wash, rinse, additives automatically absorbed if desired and long final spin | 0.35/46 | 0.40/49 | 120 | 120 | ||||||
| 4 | Normal 40°C |  | Cotton/linen solid coloureds lightly soiled | YES | 5/5.5* | 0.60/46 | 0.65/49 | 125 | 125 | |||||||
| 5 | Normal 60°C |  | Cotton/linen solid coloureds normally soiled | YES | 5/5.5* | 0.95/46 | 1.05/49 140 | 140 | ||||||||
| 6 | Normal 90°C |  | Cotton/linen whites heavily soiled | YES | 5/5.5* | 1.60/46 | 1.70/49 | 125 | 125 | |||||||
| 7 | Pre-wash 60°C |  | Cotton/linen whites/solid coloureds heavily soiled | YES | 5/5.5* | Pre-wash, Normal wash, rinse, additives automatically absorbed if desired and long final spin | 1.40/55 | 1.45/60 | 135 | 135 | ||||||
| 8 | Delicate cold Cold cotton delicate cottons | Synthetic/mix YES 3 0.15/50 0.15/55 70 very lightly soiled | ☐ | Delicate wash, rinse, absorbed if desired and soft final spin | ||||||||||||
| 9 | Delicate 30°C | ☐ | Synthetic/mix cotton delicate cottons lightly soiled additives automatically | 3 | 0.35/50 | 0.35/55 | 75 | 75 | ||||||||
| 10 | Delicate 40°C cotton delicate cottons | Synthetic/mix normally soiledl | 0.55/50 0.60/55 80 80 | |||||||||||||
| 11 | Delicate 60°C | ☐ | Synthetic/mix cotton whites/solid coloured normally soiled | YES 3 0.95/50 1.00/55 90 90 | ||||||||||||
| 12 | Wool cold | WOOL cold | Wool/mix wool whites/coloureds very lightly soiled | YES | NO | YES | 1 | Wool wash, rinse, additives automatically absorbed if desired and soft final spin | 0.05/60 0.05/60 30 30 | |||||||
| 13 | Wool 35°C | WOOL 35 | Wool/mix wool whites/coloureds lightly soiled | YES | NO | YES | 1 | 0.45/60 0.50/60 40 40 | ||||||||
| 14 | Rinse | — | Cotton/mix cotton Synthetic/delicate Wool/wool mix | YES | NO | YES | 5/5.5* | ☐ | Rinse, additives automatically absorbed if desired and long final spin | 0.05/25 | 0.05/30 | 25 | 25 | |||
| 15 | Spin | — | Cotton/mix cotton Synthetic/delicate Wool/wool mix | NO | YES | NO | 5/5.5* | — | Drum emptied and long final spin | 0.05/0 | 0.05/0 | 10 | 10 | |||
| 16 | Empty/end | — | Cotton/mix cotton Synthetic/delicate Wool/wool mix | NO | 5/5.5* | — | Drum emptied and end of programme. Takes programme to final position | 0.00/0 | 0.00/0 | 2 | 2 | |||||
| * Check if the machine maximum load capacity is 5 or 5.5 on the guarantee certificate that appears on the front page of this manualNOTE: The kWh and litre consumption, as well as the programme duration given are for the maximum load case. They may vary depending on the type and amount of laundry, mains water pressure, etc. | ||||||||||||||||
4
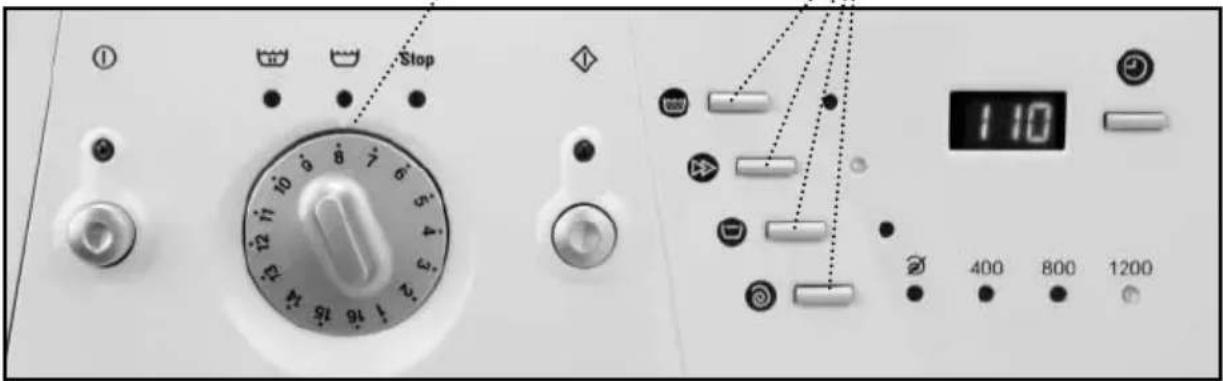
SELECTING ADDITIONAL FUNCTIONS
The wash options should always be selected after the wash programme has been chosen. If the programme is changed during the selection, the options previously selected will be cancelled out.

natural_image
Close-up of a circular dial with numbered markings (no readable text or symbols beyond numbers)After switching on the washing machine by pressing the master switch, select the desired options. When these are selected the corresponding light will go on next to each selection switch.
text_image
Stop 1:10 400 800 1200The following options are available:
Button: Extra rinse
This increases the final rinse given to the clothes. It is suitable for large loads and for washing clothes for people with sensitive skin. It increases water consumption!
Button: wash time reduction
When this option is selected the programme time is reduced by up to a third (see programme table). If your washing machine has a display, the new time will appear when it is pressed.

text_image
Extra rinse Wash time reduction Anti-creaseButton: anti crease
This stops the cycle after the last rinse and the clothes remain wet. When the function is deactivated the washing machine continues the programme, draining and spinning. You can use it for example when you are not at home and you want to delay the spin dry until you arrive, to prevent the clothes becoming creased after spinning and being left in the drum.
Button: Spin speed select
The programme selected goes together with a certain spin speed. This can be seen on the row of pilot lights at the bottom.
If necessary, the spin speed can be changed or the spin-dry can be skipped completely.
To do this, press the spin speed select button one or more times until the desired option lights up.
Option: spin suppression
With this option the programme will run leaving out the final spin dry. It is used to prevent creating when washing special fabrics.

text_image
110 Spin speed selection 400 800 1200 Spin suppression Spin revolutionsButton: delay selector
This option is only available if your washing machine has a display. It can be selected after choosing the wash programme. To select the hours of delay time, press or hold down the button until the desired number of hours of delay time appear on the display.
Cancelling the delay
To cancel the delay, either press the delay button repeatedly or hold it down. When it reaches 24 hours delay, if it is pressed one more time it will cancel the delay and the approximate programme duration will appear on the display.

text_image
Delay selector 123IMPORTANT
If the programme is changed or the master switch is switched off while the additional functions mentioned up to here are being selected, all the functions chosen up to this point will be cancelled.
Selecting the safety lock
Safety lock function
The safety lock ensures that the programme and wash options selected will not be affected if any of the buttons are accidentally pressed (by children, for example).
Activating the safety lock
The safety lock is activated by pressing the Extra Rinse and Wash Time Reduction buttons at the same time and holding them down for at least 3 seconds. The On button light will then start to flash, showing that the safety lock is on, and the washing machine will start up. The safety lock should be activated after selecting the wash programme and all its options plus the desired time delay.

text_image
Close-up of a hand pressing down on a control panel with icons and a numeric display showing '8' and '400'.Deactivating the safety lock
The safety lock is cancelled out when the wash programme ends and when the STOP light comes on.
If you wish to deactivate the safety lock before the programme has finished, press the Extra Rinse and Wash Time
Reduction buttons and hold them down for at least 3 seconds. The light will then go off and remain in pause status.
Turning off the master switch will not cancel the safety lock. When the washing machine is started up again the programme will continue to run from where it has left off.
5 COMMISSIONING
In order to switch on the washing machine, press the on/off button. The display situated over the button will light up and the washing machine will start the selected programme with the options.
If your washing machine has a display, you will be able to see how many minutes are left until the end of the wash.
Switching on the delay
This consists of pressing the on/off button after selecting the programme, the wash options and the delay time.
When pressed, the display will flash in cycles of 2 seconds ON and 2 seconds OFF during the whole of the

text_image
Operating Pilot Light edesa 6-1200 6
text_image
123period selected as the delay, whereas the time shall be discounted by the hour, until the last hour, when it will show the minutes left until the programme begins.
IMPORTANT
If you need to add or remove a garment, select pause and ensure that the water level is not over the door and that the inside temperature is not high. If you press the ON button, the wash will recommence at the same stage of the cycle where it stopped.
6 STAGES IN WASH PROGRAMME
The active phases at each point of the programme shall appear as the programme progresses.
Any option button may be selected as long as the phase in the programme in which it takes effect has not ended and as long as the programme allows this option.
Pressing the delay but-
ton during the wash has no effect on the washing
IMPORTANT
If you use the selector to change programmes while the machine is working, it will enter the PAUSE mode. The on/off light will go off and the programme will be annulled.
machine. If you press the On/ Off button during the wash, the washing machine will enter the PAUSE mode and this button's light will turn off.

text_image
Stop 3 2 1 167
POWER CUTS
If there is a power cut, when the electricity comes back the washing machine will continue to run from where it
left off (it has a memory of several hours). The same happens if the master switch is switched on and off.
8
TIPS
● To reduce spin-drying noise: level the washing machine using its adjustable legs.
- Whenever possible, wash different-sized clothes together in the same wash programme, as this helps the distribution of the clothes in the drum when spinning.
- Some models (those with a high spin speed) have a spin safety system which prevents spin-drying from taking place if the clothes are out of balance in the drum. This prevents excessive vibration or thumping. If the clothes should come out too wet, redistribute them uniformly in the drum and spin-dry again.

text_image
ECOLOGICAL NOTETo protect the environment, your washing machine is provided with a system which enables it to adapt to the different conditions of use (load and fabric types). This means that during the wash process the amount of water you can see through the door will appear rather low, but this is nothing to worry about, as the degree of wash and rinse efficiency will be optimum.
WASHING MACHINE
MAINTAINING AND CLEANING THE MACHINE
After each wash, leave the porthole door open for a while to let the air circulate freely inside the machine.
Depending on the hardness of the water, we recommend running a complete wash cycle using a decalcifying product. This will prolong the life of your washing machine.
natural_image
Exterior view of a white washing machine with open door (no visible text or symbols)IMPORTANT
Before any cleaning or maintenance operations, we recommend you disconnect the washing machine from the electricity mains.
1
CLEANING THE DETERGENT DRAWER
You should clean the detergent drawer whenever you notice residues of any product inside it.
a Fully extract the detergent drawer by pulling out the flap.
b Clean the compartments in the drawer. Use warm water and a brush.
c Also, clean the sip-hons in the additive drawer.

natural_image
Close-up of a washing machine with a hand inserting a fan into the air gap (no visible text or symbols)
natural_image
Close-up of a mechanical component with no visible text or symbolsReplace the drawer in the washing machine.
2
CLEANING THE ACCESSIBLE FILTER
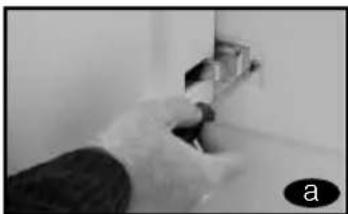
Clean the accessible filter whenever the drainage pump is blocked by foreign bodies.
a. Loosen the base by gently pulling on the sides and turning downwards. Then undo the fasteners. If there is no side access, introduce a small screwdriver in the three slots on the upper part of the base, in order to lever it and loosen the hooks.
b Use a plate or other container under the filter to collect the water that will be released when it is loosened.
C Turn the filter a quarter- or half-way sideways towards the left. Water will start to come out.
d When you are finished taking the water out of the washing machine, turn the filter around several times until you can take it out fully.
e Remove any objects or fluff that may be in the filter.
f Replace the filter and the base in their places.

natural_image
Person holding a white cylindrical object against a plain wall (no text or symbols visible)
natural_image
Close-up of a hand holding a pen tip, writing on paper (no visible text or symbols)
natural_image
Close-up of a hand holding a small electronic device with a black circular component (no visible text or symbols)
natural_image
Close-up of a white electronic device with a circular lens and cable (no visible text or symbols)
natural_image
Close-up of a hand pressing down on a mechanical component (no visible text or symbols)
natural_image
Close-up of a hand inserting a black circular component into a metallic housing (no text or symbols visible)
natural_image
Diagram of a circular device with bidirectional arrows indicating rotation or cycle (no text or symbols)IMPORTANT
In order to avoid burns, this operation should not be carried out when the wash water temperature is over 30^ C.
3
CLEANING THE OUTSIDE OF THE MACHINE
In order to clean the outside of the washing machine, use warm soapy water or a soft, non-abrasive cleaning agent that does not contain solvents.
Then dry it well with a soft cloth.
natural_image
White front-loading washing machine with hand cleaning the top panel (no visible text or symbols)SAFETY AND TROUBLESHOOTING
If you detect a problem when using your washing machine, you may be able to solve it after consulting the following troubleshooting tips.
If you cannot find the solution, disconnect the machine and contact the TECHNICAL SUPPORT SERVICE
IMPORTANT
Please do not open the machine under any circumstances. There is no fuse or similar component inside that may be replaced by the user.
- Why doesn't the washing machine start working?
Perhaps
– There is no voltage in the electricity mains.
- The fuses of the electrical fittings are blown.
- The washing machine is not connected to the electricity mains.
- You didn't press the on/off button(this button's light should be on)
– The programme selector dial is not out.
- The door of the washing machine isn't closed properly. When this is detected, the displays that show "pre-wash" or "end" flash and F04 appears on the display of the washing machine. Then you should check if the door is open and close it properly.
- Why does the washing machine vibrate or make too much noise?
Perhaps:
- The internal fastening screws were not removed.
- The washing machine is not level.
- Why doesn't the washing machine fill with water?
- When this fault is detected, the Wash and Rinse displays will flash in turn. If your washing machine has a display, it will show F01.
- This water input fault could be due to an interruption in the water supply, water input tap or because the water input filter on the washing machine is blocked.
- Therefore, you should take the following steps: wait until the water supply starts again, open the water input tap or loosen the water input pipe and clean its filter.
- Why doesn't the washing machine drain or spin?
- When this fault is detected, the Rinse and End displays will flash in turn. If your washing machine has a display, it will show F02.
- Possible reasons for this fault may be: obstruction in the drain motor pump in the washing machine, obstruction in the drainage piping of the building or incorrect electrical connection of the motor pump.
- Action: if the reason for the fault is an obstruction in the motor-pump, follow the steps in section 2. Maintaining and cleaning the machine.
- Why doesn't the washing machine spin the clothes?
- When this fault is detected, the Pre-wash and Wash displays will flash in turn. If your washing machine has a display, it will show F03.
- This fault occurs because the laundry is not evenly distributed in the drum, which can cause too much vibration.
– Solution: return to the spin stage.
- Is it better to put the detergent in the drawer or directly in the drum?
The use of “detergent tablets” that go directly into the drum is increasingly common. These tablets wash well and do not damage the laundry. However, other powder and liquid detergents contain aggressive components that may damage clothes if applied directly to the garments. In this case, we recommend you use the drawer
- Why can't I see water in the drum?
This could be because the washing machine has a system that allows it to adapt to the laundry load and the type of material, adjusting the water level and the energy used with a view to preserving the environment. This means that during the wash process, although the amount of water you can see through the porthole door may seem low, there is no need to worry. The wash and rinse will be highly efficient.
• Why is water coming out of the drawer?
Perhaps the drawer or dispenser needs cleaning. This simple operation is described in Maintaining and cleaning the machine;
1- Cleaning the detergent drawer; page 21.
- Why can't I open the porthole door immediately after the wash ends?
Modern washing machines are equipped with safety systems to protect users. One of these is that it is not possible to open the washing machine until the drum has come to a complete halt. That is why it takes about 2 minutes before you can open the porthole door.
- Other faults
- The washing machine is able to detect other faults. When this happens, all the displays for the various wash stages will flash or different errors will appear on the display, F05, F06.....,F10.
– These faults may be due to very diverse causes.
– Solution: call the OFFICIAL TECHNICAL SUPPORT SERVICE
WASHING MACHINE
ENVIRONMENTAL ADVICE
text_image
ECOLOGICAL NOTEWith the aim of preserving the environment, deposit your used machine at an official centre for collecting or recovering recyclable materials.
Before throwing out your used machine, cut the plug cable so that it may no longer be used.