YT-GC380 - Lawn mower Cotech - Free user manual and instructions
Find the device manual for free YT-GC380 Cotech in PDF.


| Product Type | Hand push reel lawn mower |
| Brand | Cotech |
| Model | YT-GC380 |
| Cutting Width | 380 mm |
| Cutting Height | 15–40 mm (adjustable) |
| Weight | 7.5 kg |
| Sound Pressure Level (LpA) | 83 dB(A) |
| Sound Power Level (LwA) | 96 dB(A) |
| Vibration Level | 5.0 m/s² |
| Power Source | Manual (no motor) |
| Cutting Adjustment | Height adjustment knobs on rear roller |
| Blade Clearance Adjustment | Yes, via knobs and nuts on each side |
| Blade Type | Reel (self-sharpening with proper adjustment) |
| Handle | Folding handle with two sections |
| Recommended Use | Domestic, well-kept lawns |
| Assembly Required | Yes (handle attachment) |
| Maintenance | Clean with brush; oil blades; no water |
| Storage | Dry place, blades oiled before storage |
| Safety Features | Guard required; keep hands/feet away |
| Construction Material | Steel and plastic |
| Colour | Red/black (typical Cotech) |
Frequently Asked Questions - YT-GC380 Cotech
User questions about YT-GC380 Cotech
0 question about this device. Answer the ones you know or ask your own.
Ask a new question about this device
Download the instructions for your Lawn mower in PDF format for free! Find your manual YT-GC380 - Cotech and take your electronic device back in hand. On this page are published all the documents necessary for the use of your device. YT-GC380 by Cotech.
USER MANUAL YT-GC380 Cotech
Read the entire instruction manual carefully and make sure that you fully understand it before you use the equipment. Keep the manual for future reference.
Viktig information:
natural_image
Line drawing of a CD TECH lawn mower (no text or symbols on the device body)ART.NO
31-4744
MODEL
YT-GC380
Ver. 20130913
Original instructions
Bruksanvisning i original
Please read the entire instruction manual before using the product and save it for future reference. We reserve the right for any errors in text or images and any necessary changes made to technical data. If you have any questions regarding technical problems please contact Customer Services.
Safety
- Keep onlookers, especially children and pets at a safe distance from the lawnmower whilst mowing.
• Walk behind the lawnmower, do not run with it.
• Only mow your lawn in daylight. - Do not mow your lawn when it is wet, it is easy to slip over.
• Always mow across slopes, not up and down them.
• Do not use the lawnmower on steep slopes. - Do not use the lawnmower if the guard is damaged or missing.
• Never use the lawnmower when you are tired, under the influence of alcohol or medicine. - Inspect the lawn before beginning to mow to make sure that there are no foreign objects which could damage the lawnmower or be flung out from the blades and cause damage.
• The lawnmower must not be modified or used for any other purpose than that for which it has been designed. - Be careful that your hands or feet do not get crushed between the blade cylinder and the frame when adjusting or cleaning the lawnmower.
- Keep hands and feet away from rotating parts at all times.
• Always wear long trousers and sturdy footwear when mowing grass.
• Never let children play with the lawnmower.
Product description
Hand push lawnmower designed for domestic use.

natural_image
Diagram of a COTech lawn mower with labeled parts (no text or symbols on the device itself)
- Upper handle
- Handle upright
- Lower handle
- Blade cylinder
- Handle fastening lug
- Cutting bar adjustment knobs
- Cutting height adjustment knobs
- Cutting bar
Assembly

natural_image
Illustration of mechanical components including a star-shaped bolt, sleeve, and threaded screw (no text or symbols)- Join the upper handle and the handle uprights together using the bolts and the provided spanner.

natural_image
Mechanical assembly diagram showing a curved pipe with four circular components and four bolts (no text or symbols)- Bolt the flattened ends of the handle uprights onto the sides of the lower handle.

natural_image
Abstract 3D rendering of a mechanical component with no visible text or symbols- Attach the assembled handle onto the lawnmower. Squeeze the ends of the handle in a little and pass the holes over the lugs on the mower head. Insert a split pin into the hole in the lug and open the ends out to lock the handle on.
Operation
Setting the cutting height
Note: Wear protective gloves.
- Undo the knobs (7) on each side of the rear roller and adjust the height.
- Make sure that the height is the same on both sides.
- Tighten the adjustment knobs again.

natural_image
Mechanical component diagram showing a gear and lever mechanism (no text or symbols)Adjusting the blade cylinder to the cutting bar
Note: Wear protective gloves.
Note: The cutting bar should be as close to the blade cylinder as possible. The blades should come into contact with the cutting bar but there must be enough clearance for the cylinder to be turned by hand.
-
Undo the nut A (one on each side) and adjust the clearance using the knobs (6).
-
To increase the clearance, turn the knobs anticlockwise. To reduce the clearance, turn the knobs clockwise.
-
Adjust the blade cylinder so that the entire length of the blade touches the cutting bar. It can take a bit of adjusting to get the blade clearance right.
-
The blades are set correctly if they cut a piece of paper placed between the cylinder and cutting bar just as well as a pair of scissors. Test this by turning the cylinder by hand. Note: Wear protective gloves. Bear in mind that the blades are sharp.
-
When the adjustments have been made, retighten nut A.

natural_image
Mechanical assembly diagram showing a gear mechanism with two circular components and a central shaft (no text or labels)How to mow
A hand lawnmower works best on a well-kept lawn.
For best results:
- Do not walk too slowly; the cylinder needs to rotate quite quickly for a clean cut.
- Do not let your grass grow too tall. Mow your lawn with a motor-powered mower first if the grass is too tall or if it has too many weeds.
- Mow in straight lines and slightly overlap the row that has just been cut.
Care and maintenance
- Inspect the lawnmower regularly to make sure that all bolts and nuts are tight and that there is no visible damage.
- Clean the exterior of the lawnmower with a soft brush or cloth. Do not use water or solvents.
- Lay the lawnmower on its side to clean the area around the blades. The blades are sharp, wear gloves. Remove any grass and twigs with a piece of wood or plastic so as not to blunt the blades.
• Store the lawnmower in a dry place.
• Oil the blades lightly before storing the lawnmower.
• The blades on the cylinder are self-sharpening provided the cutting bar is set properly.
Troubleshooting guide
| The lawnmower is difficult to push. | Make sure that no compacted grass or obstacle is preventing the cylinder from turning.The blades are too close together. Adjust the blade clearance.Refer to Operation. |
| Unsatisfactory cutting results. • The blades are too far apart. Adjust the blade clearance.Refer to Operation.Make sure that the blades are sharp and undamaged. | |
Disposal
Follow local ordinances when disposing of this product.
If you are unsure how to proceed, contact your local authority.
Specifications
Cutting width 380 mm
Cutting height 15–40 mm
Sound level (at 5 km/h walking speed) LpA 83 dB(A)
LwA 96 dB(A)
Vibration level (at 5 km/h walking speed) 5.0 m/s ^4
Weight 7.5 kg
Handgräsklippare
ART.NR 31-4744 MODELL YT-GC380
natural_image
Diagram of a COTech lawn mower with labeled parts (no text or symbols on the device itself)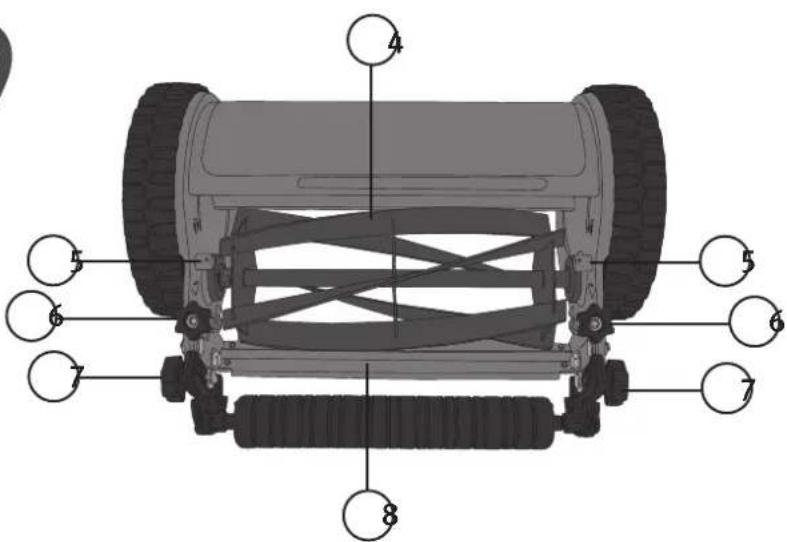
natural_image
Collection of mechanical components including a knob, washer, screw, and nut (no text or symbols visible)natural_image
Mechanical assembly diagram showing a curved pipe with bolts and multiple nut components (no text or symbols)natural_image
Abstract grayscale illustration of a mechanical component with a hook and base, no text or symbols presentnatural_image
Mechanical assembly diagram showing a gear mechanism with no visible text or symbols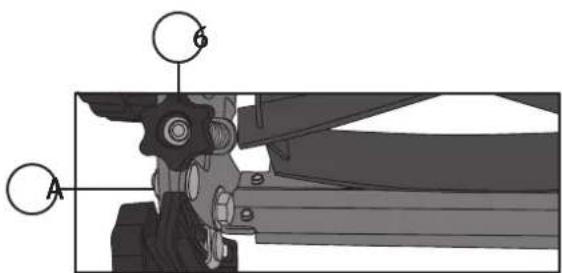
natural_image
Mechanical assembly diagram showing a gear and shaft assembly with no visible text or symbolsGräsklippning
natural_image
Diagram of a COTech lawn mower with labeled parts (no text or symbols on the device itself)
natural_image
Mechanical components including a star-shaped bolt, spring, and bolts (no text or symbols)natural_image
Mechanical assembly diagram showing a curved pipe with four bolted components and two separate gear-like parts (no text or symbols)natural_image
Close-up of a mechanical component with a looped end and triangular base (no visible text or symbols)natural_image
Mechanical component diagram showing gear and adjustment mechanism (no text or symbols)
natural_image
Mechanical assembly diagram showing a gear mechanism with labeled components (no text or symbols present)Gressklipping
natural_image
Diagram of a COTechi lawn mower with labeled parts (no text or symbols on the device itself)
natural_image
Collection of mechanical components including a star-shaped bolt, black bracket, and threaded screw (no text or symbols)natural_image
Mechanical assembly diagram showing a curved pipe with multiple bolted components and mounting holes (no text or labels)natural_image
Abstract 3D rendering of a mechanical component with no visible text or symbolsnatural_image
Mechanical assembly diagram showing gear and adjustment mechanism (no text or symbols)natural_image
Mechanical assembly diagram showing a gear and shaft assembly with no visible text or symbolsRuohonleikkaus
ART.NR. 31-4744 MODELL YT-GC380
natural_image
Collection of mechanical components including a black handle, screw, washer, and nut (no text or symbols visible)natural_image
Mechanical assembly diagram showing a curved pipe with bolts and multiple nut components (no text or symbols)natural_image
Abstract grayscale illustration of a mechanical component or tool interacting with a surface (no text or symbols)natural_image
Mechanical component diagram showing gear and housing assembly (no text or symbols)natural_image
Mechanical assembly diagram showing gear and shaft components with no visible text or symbolsRasenmähen
POSTAL 10 – 13 Market Place
Kingston Upon Thames
Surrey
KT1 1|Z
DEUTSCHLAND


Brand : Cotech
Model : YT-GC380
Category : Lawn mower