SafeTANK GR5630-WSB3+ - Server Raidon - Free user manual and instructions
Find the device manual for free SafeTANK GR5630-WSB3+ Raidon in PDF.

| Product Type | 6-bay RAID Storage Server |
| Brand | Raidon |
| Model | SafeTANK GR5630-WSB3+ |
| Form Factor | Tower |
| Drive Bays | 6 x 3.5-inch SATA III (compatible with 2.5-inch) |
| RAID Levels | 0, 1, 5, 6, 10, JBOD |
| Host Interface | USB 3.0 (Type-B), eSATA, Gigabit Ethernet |
| Maximum Capacity | Up to 120 TB (with 20 TB drives) |
| Cooling | 1 x 120mm fan with temperature control |
| Power Supply | Internal 250W, 100-240V AC, 50/60Hz |
| Dimensions (W x H x D) | 30 x 25 x 18 cm (approx.) |
| Weight | 8 kg (without drives) |
| Operating Temperature | 5°C to 35°C |
| Supported OS | Windows, macOS, Linux |
| LED Indicators | Power, HDD activity, status, LAN |
| Maintenance | Clean with a dry, lint-free cloth; avoid liquids |
| Safety Features | Overvoltage protection, surge protection, lockable drive trays |
| Spare Parts & Repairability | Contact Raidon support for replacement parts; modular design for easy service |
| General Information | Supports hardware RAID acceleration; includes management software |
Frequently Asked Questions - SafeTANK GR5630-WSB3+ Raidon
User questions about SafeTANK GR5630-WSB3+ Raidon
0 question about this device. Answer the ones you know or ask your own.
Ask a new question about this device
Download the instructions for your Server in PDF format for free! Find your manual SafeTANK GR5630-WSB3+ - Raidon and take your electronic device back in hand. On this page are published all the documents necessary for the use of your device. SafeTANK GR5630-WSB3+ by Raidon.
USER MANUAL SafeTANK GR5630-WSB3+ Raidon
Thank you for purchasing RAIDON products.
This manual will introduce the GR5630-WSB3+. Before using your GR5630-WSB3+, please read this manual thoroughly. Although all information contained in this user manual has been carefully verified before publishing, however, the actual product specification will be based on the time of delivery from RAIDON. Any updates to the product specifications or relevant information may be found on www.RAIDON.com.tw. Products are subject to change without prior notifications. If you have any questions regarding the products of RAIDON, or you would like to know the latest product information, user manual update, or firmware update, please contact your local supplier or visit www.RAIDON.com.tw for further information.
Copyright © RAIDON TECHNOLOGY, INC. All rights reserved.
Table of Contents
Chapter 1. Package Contents and Product Views
Chapter 2. Environmental Requirements
Chapter 3. Hardware Requirements and Precautions
Chapter 4. Hardware Installation
Chapter 5. Description of Front Panel Operation and LCD Information
Chapter 6. Replacement of Malfunctioning Drive and Data Rebuild Instructions
Chapter 7. System Temperature Overheat and Fan Failure Management
Chapter 8. Visual Status Indicator Definitions
Chapter 9. Frequently Asked Questions
Chapter 1 Package Contents and Product Views
Front view Rear view

A Hard drive status Indicator
B Removable drive tray
c Button for Tray Clamp
D LCM display
E UP button
F DOWN button
G ENTER button
H ESC button
Power indicator
J Alarm indicator
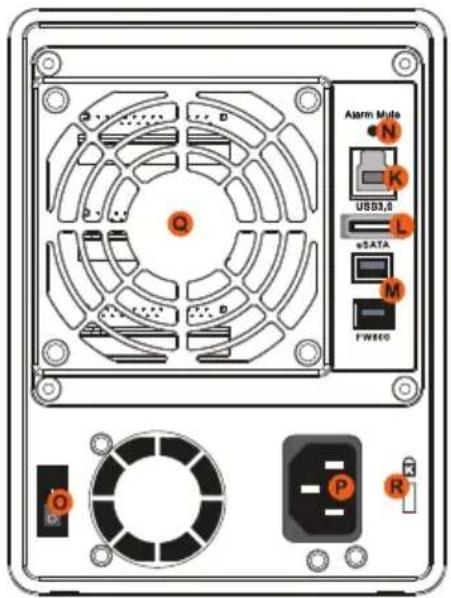
K USB3.0 interface connection
L e-SATA interface connection
M FireWire 800 (1394b) interface connection
N Mute button
Power Switch
connection
P Power socket
Q Cooling fan
R Anti-theft cord slot
Storage Mode Definition
Independent mode ( JBOD ) : Four discrete storage capacities.
Speed mode ( Raid 0 ) : One big independent data storage with without data protection.
Safe mode ( Raid 1 ) : One independent data storage with data protection.
The secondary FireWire 800 (1394b) connection on the GR5630-WSB3+ is provided to connect and extend to another FireWire 800 (1394b) device.
Open the package and you should find the following :
| GR5630-WSB3+ | |
| Item | Qty. |
| GR5630-WSB3+(with removable drive tray enclosed) | 1 |
| Firewire 800 (1394b) Cable | 1 |
| e-SATA Cable | 1 |
| USB 3.0 Cable | 1 |
| AC Power Cable | 1 |
| Accessories Kit | 1 |
| CD(GUI) | 1 |
| Quick Installation Guide | 1 |
Please make sure that the contents listed above are not damaged or missing. If you should find damages or missing contents, please contact your supplier immediately.
Chapter 2 Operating Information
Operating Temperature: 0 \~40 °C (32 \~ 104 °F)
Storage Temperature : -10 \~ 70 °C (14 \~ 158 °F)
Line Voltage : 100 \~ 240V AC
Chapter 3 Hardware Requirements and Precautions
- Only one interface connection may be used at once per computer system.
- RAID volume formation utilizes the capacity of whichever hard drive has the smallest and then multiply that capacity by three for RAID 5, four for RAID 0, to form a large volume, therefore, it is recommended to only install hard drives of the same brand and specification for all drive position prior to use. Moreover, when you need to replace with a new hard drive, please be sure to purchase one with the same specification, capacity and brand. If these conditions can't be met, select one that's at least 20 GB greater in capacity.
- The actual storage capacity of GR5630-WSB3+ recognized by the system may differ from the total capacity stated on the hard drives once the drives have been formatted.
- When connected to the computer system, it's prohibited to remove, insert or swap the hard drive while data transfer is being performed.
- It's prohibited to change the positioning of the drives once the initial installation has been completed as the changes made to the drive positions may destroy the RAID formation.
- If you discover that hard drive failure is taking place, go to Section 6 "Replacement of Malfunctioning Drive and Data Rebuild Instructions" and follow the steps accordingly.
- Whenever turning off or unplugging the GR5630-WSB3+ from your computer system becomes necessary, always remember to safely remove it from your operating system first.
- In RAID 5 mode, the system allows one single hard drive failure. If multiple drive failures occur at once, it's likely that all data stored in the system have been destroyed or lost. In RAID 0 mode, if one hard drive failure occurs, then all data may be destroyed or lost. If this happens, we recommend you to consult with a professional hard drive data recovery specialist to see if your data may be recoverable.
- It is highly recommended for users to back up important data contained within the GR5630-WSB3+ unit on a regular basis or whenever the user feels necessary to a remote or a separate storage device. RAIDON will not be responsible for any lost of data caused during the use of the unit or the recovery of the data lost.
Chapter 4 Hardware Installation
Step 1 Open the package and take out the product making sure that all the enclosed contents are not damaged or missing. Should you find damages or missing contents, please contact your supplier immediately.
Step 2 Place the system on a stable surface. Ensure that it is well ventilated without blockage to the vent and kept away from areas near water and damage prone areas.
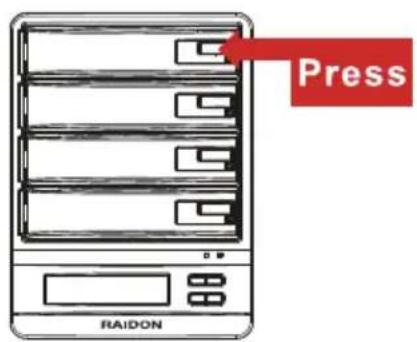
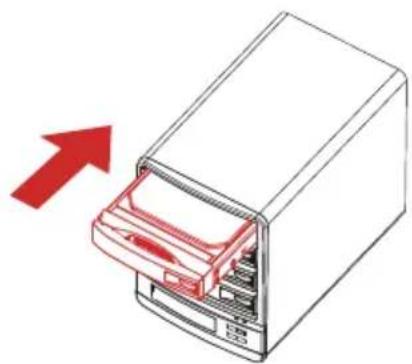
Step 3 Press down the button for tray clamp to eject the removable drive tray latch and extract the removable drive tray.

natural_image
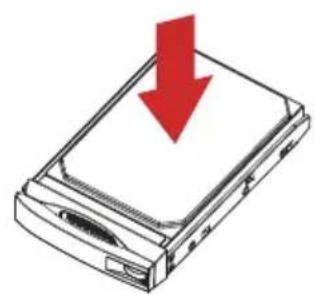
Illustration of a desktop computer tower with a red arrow indicating compression or disassembly (no text or symbols present)Step 4 Mount your hard drives onto the removable drive tray and secure it with the screws included in the accessory kit to avoid any damage to the hard drive due to accidental movements.
natural_image
Illustration of a hard drive with a red downward arrow indicating compression (no text or symbols)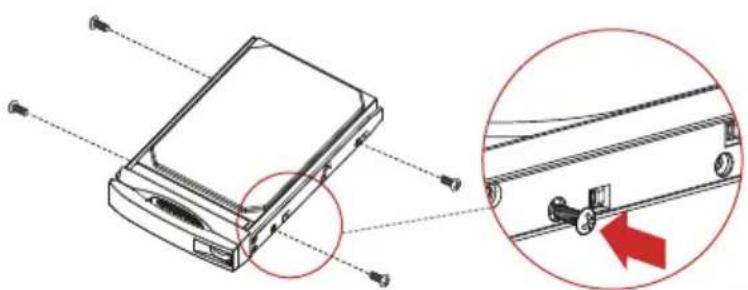
natural_image
Technical diagram of a smartphone with an inset close-up showing the internal components (no text or symbols present)Step 5 When the hard drive installation has been completed, insert the hard drive tray into the system horizontally and secure the latch into place.
natural_image
Illustration of a computer tower with a red arrow pointing to the front panel (no text or symbols present)Step 6 Connect the AC power cable to the GR5630-WSB3+, and then plug the AC power to the wall socket. Boot-up the unit.
Step 7 Set the storage mode using the LCD and buttons on the front (please refer to section 5 for front panel and LCD information).
Step 8 Connect the cable to the PC and the GR5630-WSB3+ port.
Step 9 After boot-up, your operating system will automatically detect the storage capacity of your hard drives. Please follow the operating system instructions to configure and format your drives. The formatted drives can be configured for the RAID setup.
Chapter 5 Description of Front Panel Operation and LCD Information
| Level 0 | Level 1 Level 2 Level 3 Level 4 | |||
| External 4BAY HARDWARE RAID | Quick Setup | Create One RAID | RAID 0/ RAID 5 Select Disk | |
| Delete All RAID | ||||
| Disk Manager | Identify Disk | Disk 1 | Check Disk LED | |
| Disk 2 | Check Disk LED | |||
| Disk 3 | Check Disk LED | |||
| Disk 4 | Check Disk LED | |||
| Show Disk Info | < Disk Info > | |||
| RAID Manager | Identify RAID | Select RAID | ||
| Create RAID | RAID 0 / RAID 5 | Select Disk | ||
| Delete RAID | Select RAID | |||
| RAID Info | ||||
| Change RAID Pwd | < Password > for RAID Setup | |||
| Rebuilding Priority | Highest/High/Medium/Low/Lowest | |||
| Standby Timer | < 99999min > | |||
| System Manager | System Info | Firmware Version | ||
| Changhe Password | < Password > for System Info | |||
| Logout From Menu | < Y or N > | |||
| Alarm Control | Mute the Buzzer | |||
| Hardware Monitor | Voltage Monitor < 3.3V / 5V / 12V > | |||
| Temp. Monitor | < Temp. > | |||
| Fan Monitor | < Fan Speed / Fan Level > | |||
Chapter 6 Replacement of Malfunctioning Drive and Data Rebuild Instructions
When a front hard drive indicator has lit up red and the audio alarm sounds, this could mean the indicated hard drive may be malfunctioning. If this occurs, you may press the mute button at the rear of the system to shut off the audio alarm and power off the system immediately if in the allowed operational state, and then re-power on the system to double check and see if in fact the indicated hard drive has malfunctioned. If the problem persists, please turn off the system and follow the directions below :
Step 1 Remove the drive tray containing the malfunctioned hard drive and disassemble the hard drive from drive tray.
Step 2 Mount the new hard drive onto the tray and insert it back to the empty drive position of the GR5630, then push the latch into place making sure it is secured and locked.
Step 3 In RAID 5 mode, when you turn the system on, the hard drive status indicator of the replacement drive will interchangeably blink red and purple to inform that the data is being rebuilt to the replacement drive. During data rebuild, you may operate the GR5630-WSB3+ as normal. When the indicator stops, the data rebuild process has been completed.
Chapter 7 System Temperature Overheat and Fan Failure Management
If the alarm indicator has lit up red and the audio alarm sounds, this could mean that either a system fan has stopped operating entirely or the system temperature has exceeded over the default temperature of 60^ C. When this occurs, you may press the mute button at the rear of the system to shut off the audio alarm and power off the system immediately if in the allowed operational state to let the system cool. Check and see if the overall operation environment is well ventilated and make sure there are no blockages to the enclosed fan and then re-power on the system to continue use. If the problem persists, please turn off the system and contact your supplier or the RAIDON tech support for further assistance.
Chapter 8 Visual Status Indicator Definitions
| States | Front LED | buzzer | ||
| Power LED Alarm LED | HDD LED | |||
| Power on | Blue | ---- | Blue flash => Blue | 1 long when booting finished |
| No disk | Blue | ---- | ---- | |
| Disk Fail | Blue | ---- | Red | ---- |
| RAID Fail | Blue | ---- | Red | 4 short |
| Disk Idle | Blue Blue | ---- | ---- | |
| Format | Blue | ---- | Blue flash | ---- |
| Access | Blue | ---- | Blue flash | ---- |
| Fan Fail | Blue | Red | Blue | 4 short |
| Over Temp. | Blue | Red | Blue | 4 short |
| Rebuilding | Blue | ---- | Source: Blue flashTarget: Blue and Purple light on alternatively | ---- |
Chapter 9 Frequently Asked Questions
Q1. Which drive format should I choose to format the hard drives in the GR5630-WSB3+?
A : It depends on the computer system you most often use. See the below suggestions:
- Use NTFS format for Windows 2000/XP/Vista/Windows 7 system
- Use HFS+ (Mac OS Extended) format for a Mac OS X system
3.Choose FAT32 format if you'll use the GR5630 in both Windows and Mac environments (the maximum size of one single file may not exceed 4 GB).
Q2. Why can't my GR5630-WSB3+ reach the transfer performance speed of 200 MB/s via e-SATA interface as stated on your website?
A : 1. Please first check if your PCI-E SATA host adapter would only support PCI-E (1X). This type of host adapters cannot reach the transfer performance speed beyond 135MB/s.
- The GR5630-WSB3+ will need to be set to the RAID 0 mode also.