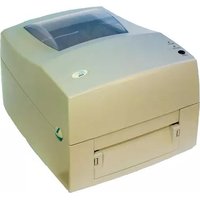
EC-FT-420 - Printer EC Line - Free user manual and instructions
Find the device manual for free EC-FT-420 EC Line in PDF.


| Product Type | Barcode Printer |
| Model | EC-FT-420 |
| Print Technology | Thermal Transfer / Direct Thermal |
| Resolution | 203 dpi (8 dots/mm) |
| Print Speed | 50.8 to 101.6 mm/s (2 to 4 inches/sec) |
| Maximum Print Width | 104 mm (4.10 inches) |
| Maximum Print Length | 1727 mm (68 inches) |
| Media Width Range | 25 mm to 110 mm |
| Media Roll Maximum Diameter | 105 mm |
| Media Core Diameter | 26 mm (1 inch) with adapters for 1.5" and 3" |
| Ribbon Type | Outward roll, wax/resin hybrid |
| Ribbon Length | 300 meters |
| Ribbon Width Range | 30 mm to 110 mm |
| Connectivity | Parallel port (IEEE 1284) |
| Control Panel | 2 LEDs (Ready, Status) and one FEED button |
| Sensor | Label gap and black mark detection |
| Supported Barcodes | Code 39, Code 93, Code 128, UPC-A/E, EAN-8/13, PDF417, DataMatrix, QR Code |
| Power Supply | AV 18V 4000mA (adapter included) |
| Dimensions (L x W x H) | 286 x 233 x 176 mm |
| Weight | 2.43 kg |
| Operating Temperature | 5°C to 40°C |
| Storage Temperature | -20°C to 50°C |
| Operating Humidity | 30% to 85% non-condensing |
| Included Accessories | Power cord, parallel cable, label axis, ribbon axis (2), empty ribbon roll, sample labels, CD, warranty card |
Frequently Asked Questions - EC-FT-420 EC Line
User questions about EC-FT-420 EC Line
0 question about this device. Answer the ones you know or ask your own.
Ask a new question about this device
Download the instructions for your Printer in PDF format for free! Find your manual EC-FT-420 - EC Line and take your electronic device back in hand. On this page are published all the documents necessary for the use of your device. EC-FT-420 by EC Line.
USER MANUAL EC-FT-420 EC Line
natural_image
Exterior view of a beige electronic device with a transparent lid and mounting holes (no visible text or symbols)1 General
1.1 Printer Accessories
1.2 General Specifications
1.3 Communicate Interface
1.4 Printer Parts
2 PRINTER INSTALLATIONS
2.1 Ribbon Installation
2.2 Label Installation
2.3 Label Roll Core
2.4 Installation Instruction
2.5 PC Connection
3 Control Panel
3.1 FEED Key
3.2 Notice
4 Maintenance and Adjustment
4.1 Thermal Print Head Cleaning
4.2 Troubleshooting
1. General
1.1. Printer Accessories
After unpacking, please check the accessories that come with the package and store appropriately.
| 1 | Barcode Printer |
| 2 | Power Cord |
| 3 | Printer Cable (Parallel) |
| 4 | Label Axis |
| 5 | Ribbon Axis X 2 Pieces |
| 6 | Empty Ribbon Roll |
| 7 | Label |
| 8 | Ribbon Axis |
| 9 | CD |
| 10 | Warranty Card |
1.2. General Specifications
| Model | FT-420 |
| Resolution | 203dpi/ (8 dot/mm) |
| Print Model | Thermal Transfer / Direct Thermal |
| CPU | 32bit |
| Sensor | Type :Label gap and black mark sensingDetection: Label length auto sensing or program command setting |
| Print Speed | 50.8mm(2.0inch)/Sec—101.6mm(4.0inch)/Sec |
| Print Length | 1727 mm(68inch) |
| Print Width | 25 mm(1inch) ~ 104 mm(4.10inch) |
| Media | Paper Roll External Diameter: Maximum Diameter 105mmPaper Roll Axis: 26mmPaper Width:25mm—110mmPaper Thickness:0.06mm—0.3mmMedia Type: Label gap, Back Mark, Continuous |
| Ribbon | Types : Outward Roll (wax hybrid resin)Length : 300 MExternal Diameter: 64mm(Max)Core Inner Diameter: 25.4 mm (1Inch.)Width : 30 mm to 110 mm (1.18 Inch. To 4.33 Inch.) |
| Image | Monochrome PCX,BMP(support after the software control: ICO WMF,JPG,EMF Picture, can control the picture amplification, reduced, rotation, mirror image and highlight |
| Bar Code | Code 39, Code 93, Code 128 (subset A,B,C), UPC A / E (add on 2 & 5), I 2 of 5I, EAN 8 / 13 (add on 2 & 5), Codebar , China Postal Code, PDF417 & Datamatrix code,(QR code available) |
| Interface | Parallel port |
| Control Panel | LED*2: Ready, StatusFunction Key*1:Feed |
| Power | AV 18V 4000mA |
| Environment | Operating Temperature: 40°F to 104°F (5°C to 40°C)Storage Temperature: -40°F to 122°F (-20°C to 50°C)Operating Humidity: 30-85%, non-condensing. Free air.Storage Humidity: 10-90%, non-condensing. Free air. |
| Physical Dimension | Length: 286mm / Height: 176mmWidth: 233 mm / Weight: 2.43 Kg |
1.3. Communication Interface
| Parallel Interface | ||
| Interface cable | : | Parallel cable compatible to IBM PC |
| Pin out | : | See below |
| PIN NO. | FUNCTION | TRANSMITTER |
| 1 | /Strobe | host / printer |
| 2-9 | Data 0-7 | host |
| 10 | /Acknowledge | printer |
| 11 | Busy | printer |
| 12 | /Paper empty | printer |
| 13 | /Select | printer |
| 14 | /Auto-Line Feed | host / printer |
| 15 | N/C | |
| 16 | Signal Gnd | |
| 17 | Chasis Gnd | |
| 18 | +5V ,max 500mA | |
| 19-30 | Signal Gnd | host |
| 31 | /Initialize | host / printer |
| 32 | /Error | printer |
| 33 | Signal Ground | |
| 34-35 | N/C | |
| 36 | /Select-In | host / printer |
1.4. Printer Parts


| 1 | Upper cover opens a button | 11 | LED Light(Ready) |
| 2 | Top Cover | 12 | LED Light (Status) |
| 3 | Ribbon Rewind Wheel | 13 | Ribbon Supply Shaft |
| 4 | Locking Tenon (left/right) | 14 | Label Guide |
| 5 | Ribbon Rewind Shaft + Empty Ribbon Roll | 15 | Platen Roller |
| 6 | Front Cover Piece | 16 | Power Switch |
| 7 | Mount the Gaika slot | 17 | Power Socket |
| 8 | Label Supply | 18 | Parallel Port |
| 9 | Label Roll Core | 19 | Fan-Fold Label Insert |
| 10 | FEED Key |
2. Printer Installation
This printer model has the following print modes:
| Thermal Transfer (TT) : | When printing, ribbon must be installed to transfer the print contents onto the media. |
| Direct Thermal (DT) : | When printing, no ribbon is necessary; it only requires direct thermal media. |
2.1. Ribbon Installation
| 1. Place the printer on a horizontal surface, and open the top cover by pressing the Cover Open Buttons on both sides. |  |
| 2. Loosen and then lift the upper print mechanism by pressing the locking buttons.. | 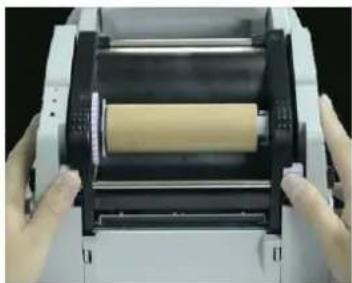 |
| 3. Place a new ribbon roll onto the ribbon supply shaft。 |  |
| 4. Feed the ribbon from the Ribbon Supply Shaft under the Print Head. | 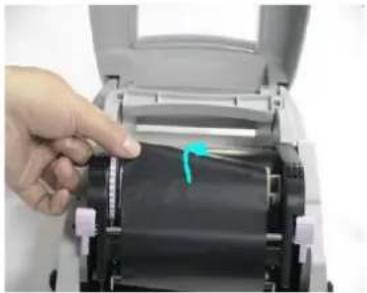 |
| 5. Warp the ribbon around the Ribbon Shaft and stick the ribbon onto the Empty Ribbon Roll Core。 |  |
| 6. Firmly close the upper print mechanisms. |  |
2.2. Label Installation
| 1. Open the top cover by pressing the Cover. Open Buttons on both sides。 |  |
| 2. Place the label roll onto the Label Roll Core. |  | |
| 3. Loosen and lift the upper print mechanism ☐ by pressing the locking buttons. |  | |
| 4. Feed the label through the two Label Guides to the Tear-off Bar. Align the label guides to the label edge. | 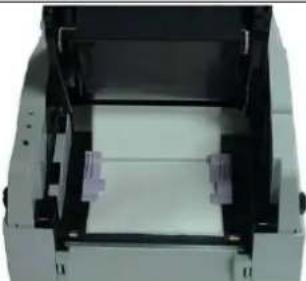 | |
| 5. Firmly close the upper print mechanisms. |  |
2.3.Label Roll Core Installation Instruction
(A) 1" roll core installation
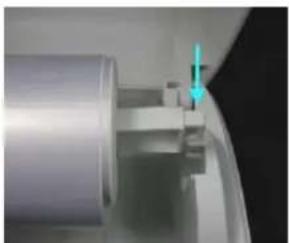
natural_image
Close-up of a mechanical component with a green arrow pointing to a small component (no visible text or symbols)
natural_image
Close-up of a white cylindrical object with a small protrusion, possibly part of a printer or scanner (no visible text or symbols)(B) 1.5" roll core installation

natural_image
Close-up of a mechanical component with a blue arrow pointing to a specific part (no visible text or symbols)
natural_image
Close-up of a mechanical component with cylindrical and rectangular parts (no visible text or symbols)(C) 3" roll core installation

natural_image
Close-up of a mechanical component with a blue arrow pointing to a small feature (no visible text or symbols)
natural_image
Close-up of a white plastic container with internal compartments and side handles (no text or symbols visible)2.4. PC Connection
- Please make sure the printer is powered off.
- Take the power cable, plug the cable switch to the power socket, and then connect the other end of the cable to the printer power socket.
- Connect the cable to the USB/parallel port on the printer and on the PC.
- Power on the PC and the printer and the printer's LED light will on.
3. Control Panel
3.1. FEED Key
After pressing the FEED key, printer will send the media (according to media type) to the specified stop position. When printing with continuous media, pressing the FEED key will feed media out to a certain length. When printing labels, pressing the FEED key will feed one label at a time; if the label is not sent out in a correct position, please proceed with the Auto Sensing
Self-Test
The Self-Test function in a printer will help user to figure out whether the printer is operating normally. In the Self-Test Mode, the printer will print out a test sample as below figure. The printer will back to standby mode after printing out the test sample. Below are the Self-Test procedures:
- Power off the printer, press and hold the FEED key.
- Power on the printer (while still holding the FEED key); release the FEED key after printer beeping 3 times.
- After about 1 second, printer would automatically print out the following. This indicates the printer is operating normally.
3.2. Notice
When prints on the way, the printer does not have the paper, after loads the paper, should put the power off, and termination the print on host, print again!
Self test: Press and hold the FEED Key then power on the printer. The printer automatic printing self-checking content, then automatically to detect the paper, it is means the printer does not have the breakdown.
When prints on the way the RED LED is ON, please do the self test.
Operator Controls
Power Switch Controls printer power
READY-normal operation
Off-the power should be tuned off before connect or disconnect the communication cables and power cables
Feed Button
Advance the label media to fist printing position
Press to take the printer out of a "pause" condition
Keep pressing while turning on the power to print out a configuration profile
Ready Indicator
Show the printer status
Green: printer is ready to operate
Blinking: printer is paused
Power indicator
Shows the power and error status
Off-printer power off
Green: printer power off
Blinking: error occurs
Performing Calibration
- Keep pressing the feed button while turning on the power until the printing motor becomes activated.
- The calibration has been performed while the printer automatically feed label stock for certain length
NOTE:
This step is very important and must always be carried out whenever media is changed Fail to do so will result in miss-detection of the label sensor.
Printing Configuration Report
- Keep pressing the feed button while turning on the power until the printing motor becomes activated.
- After feeding 12-inch blank media the printing motor will suspend for one second then it will print out the configuration profile This profile states the firmware version ROM check sum, RS232, thermal transfer/direct thermal settings hardware configuration and font types.
- At PPLB emulation the printer will enter character dump mode .TO exit from dump made just re-start the printer again.
Returning to Factory Default Settings
- Turn on the printer and wait for 5 or more seconds.
- Press the feed button for about 10 seconds then the ready indicator and the power indicator will go off in order.
- While two indicators become lit again release the feed button
- At this moment the printer will feed the label stock 12 inches in length and come back to the factory default settings.
NOTE:
All settings are stored in non-volatile E2PROM and cannot be destroyed even turn off the printer.
Notes :
If you are just updating your driver, make sure to delete the previous version first.
4. Maintenance and Adjustment
4-1. Maintenance and Adjustment
Thermal Print Head Cleaning Unclear printouts may be caused by dusty print head, ribbon stain or label liner glue. Therefore when printing, it's necessary to keep the top cover closed. Also, check and prevent paper/label from being stained or dusty to ensure print quality and to prolong the print head life. Print head cleaning instructions are as follows:
- Power-off the printer.
- Open the top cover.
- Take out the ribbon.
- Hold down the button hook to the card opened up so that print head lifted upward
- If on the print head (see blue arrow) there's label pieces or other stain, please use a soft cloth with industrial use alcohol to wipe away the stain.
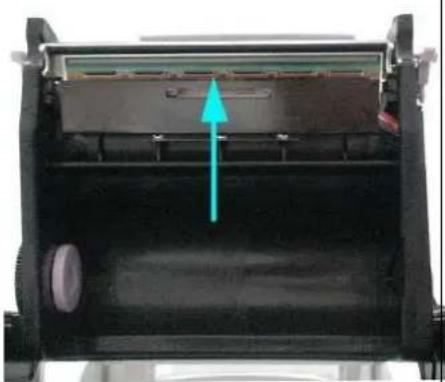
natural_image
Interior view of a mechanical device with a blue arrow pointing to a component (no visible text or symbols)Note1: Weekly cleaning on the print head is recommended. Note2: When cleaning the print head with soft cloth, make sure there is no any metal or hard particle attached on it. Note3: You can also clean the print head with the cleaning card that comes with the printer.
4-2. Troubleshooting
| Problem | Recommended Solution |
| Power on the printer, but the LED does not light up | Check the power connector |
| LED light turns red(power/status) after printing stops | Check for software setting or program command errors Check if label is all out。Check if label is jammed/tangled up。Check if mechanism is not closed (Thermal Print Head not positioned correctly)。Check if sensor is blocked by paper/label。 |
| Printing started, but nothing was printed on the label | Check if label is placed upside down or if label is not suitable for the application。Select the correct printer driver。Select the correct label and print type。 |
| When printing, label is jammed/tangled up | Clean the label jam, and if label is stuck on Thermal Print Head, please remove it by using soft cloth with alcohol。 |
| When printing, only part of the contents were printed | Check if label or ribbon is stuck on the Thermal Print Head。Check if application software has errors。Check if start position setting has errors。Check if ribbon has wrinkles。Check if ribbon supply shaft is creating friction with the platen roller. If the platen roller needs to be replaced please contact your reseller for more information。Check if power supply is correct |
| When printing, part of the label wasn't printed completely | Check if Thermal Print Head is stained or dustedUse internal command “~T” to check Thermal Print Head can print completelyCheck the media quality。 |
| Printout not in desired position | Check if sensor is covered by paper or dustCheck if liner is suitable for use, please contact reseller for more informationCheck if label roll edge is aligned with Label Width Guide |
| When printing, page skipping occurs | Check if error occurs on label height setting。Check is sensor is covered by dust。 |
| Unclear printout | Check print darkness settingCheck if Thermal Print Head is covered with glue or stain。 |
【Notice】If above operation can't solve the troubles, Please contact you local dealer for further technical.
- General
- PRINTER INSTALLATIONS
- Control Panel
- Maintenance and Adjustment
- General
- Printer Accessories
- General Specifications
- Communication Interface
- Printer Parts
- Printer Installation
- Ribbon Installation
- Label Installation
- 2.3.Label Roll Core Installation Instruction
- PC Connection
- Control Panel
- FEED Key
- Self-Test
- Notice
- Operator Controls
- Feed Button
- Ready Indicator
- Power indicator
- Performing Calibration
- NOTE:
- Printing Configuration Report
- Returning to Factory Default Settings
- Notes :
- Maintenance and Adjustment
- 4-1. Maintenance and Adjustment
Brand : EC Line
Model : EC-FT-420
Category : Printer