
EFM-01 - Hi-Fi Power Acoustik - Free user manual and instructions
Find the device manual for free EFM-01 Power Acoustik in PDF.


| Product Type | Car Stereo Amplifier |
| Model | EFM-01 |
| Brand | Power Acoustik |
| Dimensions (W x H x D) | 10.2 x 2.0 x 6.0 inches |
| Net Weight | 3.1 lbs |
| Power Supply Voltage | DC 12V (negative ground) |
| Rated RMS Power Output (4 ohms) | 50W x 2 channels |
| Peak Power Output | 150W x 2 channels |
| Frequency Response | 20Hz - 20kHz ±1dB |
| Input Sensitivity | 200mV - 6V |
| Signal-to-Noise Ratio | >90dB |
| THD (Total Harmonic Distortion) | <0.05% |
| Speaker Impedance | 4-8 ohms |
| Fuse Rating | 15A (AGU type) |
| Cooling Method | Convection cooling |
| Protection Circuits | Overload, short circuit, thermal |
| Input Type | RCA line inputs (2 pairs) |
| Audio Outputs | Spring-loaded speaker terminals |
| Controls | Gain, bass boost, low-pass crossover |
| Mounting | Horizontal or vertical |
| Operating Environment | Indoor, dry, well-ventilated |
| Maintenance | Clean exterior with dry cloth; ensure unobstructed airflow |
| Safety Precautions | Disconnect battery before installation; avoid shorts |
| Spare Parts & Repairability | Contact Power Acoustik service center |
| Certification | CE, RoHS |
Frequently Asked Questions - EFM-01 Power Acoustik
User questions about EFM-01 Power Acoustik
0 question about this device. Answer the ones you know or ask your own.
Ask a new question about this device
Download the instructions for your Hi-Fi in PDF format for free! Find your manual EFM-01 - Power Acoustik and take your electronic device back in hand. On this page are published all the documents necessary for the use of your device. EFM-01 by Power Acoustik.
USER MANUAL EFM-01 Power Acoustik
Digital FM Stereo Modulator
Multi-Channel PLL Synthesizer
MODEL : EFM-01 OWNER'S MANUAL
FEATURE
● High reliability PLL synthesized tuning system
● Provide 8 carrier frequencies
● High isolation from nonessential frequencies
- Compact and light, Can be placed behind the radio inside the dashboard.
SPECIFICATIONS
| POWER SUPPLY | DC 12V | =50mA |
| CARRIER FREQUENCY | 88.5MHz-89.9MHz | 8 step by 0.2MHz |
| TUNING SYSTEM | PLL synthesize | |
| INPUT IMPEDANCE | =10KΩ | AUDIO INPUT L&R |
| INPUT TERMINAL | RCA JACK | L&R |
| FUSE | 250V 1A | Tube type, 6 × 30mm |
| FROM ANT CABLE | RCA jack | Coaxial |
| TO TUNER CABLE | RCA plug | Coaxial |
■ Design and specifications are subject to change without notice.
WARNING TO REDUCE THE RISK OF FIRE OR ELECTRIC SHOCK. DO NOT EXPOSE THIS PRODUCT TO RAIN OR MOISTURE. CAUTION TO PREVENT ELECTRICS SHOCK MATCH POLRAITY OF POWER SOURCE, USE DC12V OF CAR BATTERY ONLY.
IMPORTANT SAFETY INSTRUCTIONS
This unit is fully transistorized and does not contain any parts that can be repaired by the user.
DO NOT REMOVE THE CABINET COVER, OR YOU MAY BE EXPOSED TO DANGEROUS VOLTAGE. REFER SERVICING TO QUALIFIED SERVICE PERSONNEL ONLY.
- Read owner's manual
After unpacking this unit read the owner's manual carefully, and follow all the operating and other instructions.
- Power sources
This product should be operated only from the type of power source indicated on the marking label. If you are not sure of the type of power supply in your circumference, consult your product dealer.
3. Heat
The product should be situated away from heat sources such as radiators, heat register or other products (including amplifiers) that produce heat.
4. Water and Moisture
Do not use this product near water-for example, near a bath tub, wash bowl, kitchen sink, or laundry tub in a wet basement or near a swimming pool and the lake.
5. Object and Liquid entry
Never push objects of any kind into this product through openings as they may touch dangerous voltage points or short-out parts that could result in a fire or electric shock. Never spill liquid of any kind on the product.
6. Burden
Do not place a heavy object on or step on the product. The object may fall, causing serious personal injury and serious damage to the product.
7. Connecting
When you connect the product to other equipment, turn off the power and unplug all of the equipment from the outlet. Failure to do so may cause an electric shock and serious personal injury. Read the owner's manual of the other equipment carefully and follow the instructions when marking any connections.
CONNECTING TO CAR FM RADIO SYSTEM

flowchart
graph LR
    A["Input"] --> B["①"]
    B --> C["②"]
    C --> D["③"]
    D --> E["④"]
    E --> F["⑤"]
    G["FM Stereo Modulator Multi-Channel PLL Synthesizer"] --> H["⑥"]
    H --> I["⑦"]
    style A fill:#f9f,stroke:#333
    style B fill:#f9f,stroke:#333
    style C fill:#f9f,stroke:#333
    style D fill:#f9f,stroke:#333
    style E fill:#f9f,stroke:#333
    style F fill:#f9f,stroke:#333
    style G fill:#f9f,stroke:#333
- Connect GROUND terminal(①). then connect the terminal of fuse cable(②) to DC 12V which to be supplied when you turn on your instruments. Cut and delete terminal(@) if you do not use it. It may cause eletric short if you leave as it is, so you may be exposed to any risk or accidents.
- Connect AUDIO INPUT jack(③) from audio output jack of audio sources. VCR, CD player, DVD, MD, etc., This unit is prepared for stereo sound. white color jack is for LEFT sound and red color jack is for RIGHT sound.
- Connect FROM ANTENNA input jack(④) from an outside FM antenna.
- Connect TO TUNER antenna plug(⑤)to antenna input jack of FM tuner on your car.
- Set this unit(⑥)behind the FM radio inside the dashboard.
HOW TO SET FM FREQUENCY
You can set the FM carrier frequency which can be use in your car FM tuner by setting DIP switch that it is located on bottom side. How to set FM carrier frequencies are as follows.

88.5 MHz

88.7 MHz

88.9 MHz
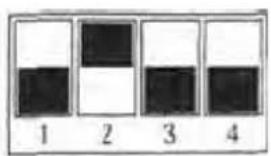
89.1 MHz
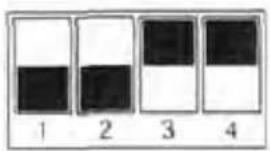
89.3 MHz

89.5 MHz

89.7 MHz

89.9 MHz
※ Pin 1 is not available.
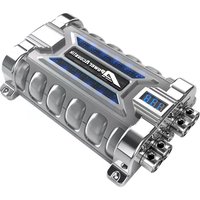


Brand : Power Acoustik
Model : EFM-01
Category : Hi-Fi