
ZN-8092 - Iron Concept - Free user manual and instructions
Find the device manual for free ZN-8092 Concept in PDF.


| Product Type | Steam Iron |
| Brand | Concept |
| Model | ZN-8092 |
| Dimensions (approx.) | 30 x 15 x 20 cm |
| Weight | 1.5 kg |
| Power Supply | 220-240 V ~ 50/60 Hz |
| Power Consumption | 2000-2400 W |
| Soleplate Type | Ceramic |
| Water Tank Capacity | 300 ml |
| Steam Output | Up to 40 g/min |
| Spray Function | Yes |
| Self-Cleaning Function | Yes |
| Anti-Calc System | Yes |
| Auto Shut-Off | Yes (when left unattended) |
| Temperature Control | Adjustable thermostat |
| Care and Cleaning | Wipe soleplate with damp cloth; empty water tank after use; use self-clean function regularly. |
| Safety Features | Auto shut-off, thermal fuse, heat-resistant handle |
| Spare Parts Availability | Soleplate, water tank, spray nozzle, power cord |
| Repairability | Repairable by qualified technician; spare parts available. |
| Warranty | 2 years |
Frequently Asked Questions - ZN-8092 Concept
User questions about ZN-8092 Concept
0 question about this device. Answer the ones you know or ask your own.
Ask a new question about this device
Download the instructions for your Iron in PDF format for free! Find your manual ZN-8092 - Concept and take your electronic device back in hand. On this page are published all the documents necessary for the use of your device. ZN-8092 by Concept.
USER MANUAL ZN-8092 Concept
natural_image
Black and white photo of a ferries iron with circular patterns on the side (no visible text or symbols)ZN8091, ZN8092
CZ LV EN DESK PL
PODĚKOVÁNÍ
natural_image
White beaker with a pointed tip, labeled 'A' pointing to its side (no other text or symbols visible)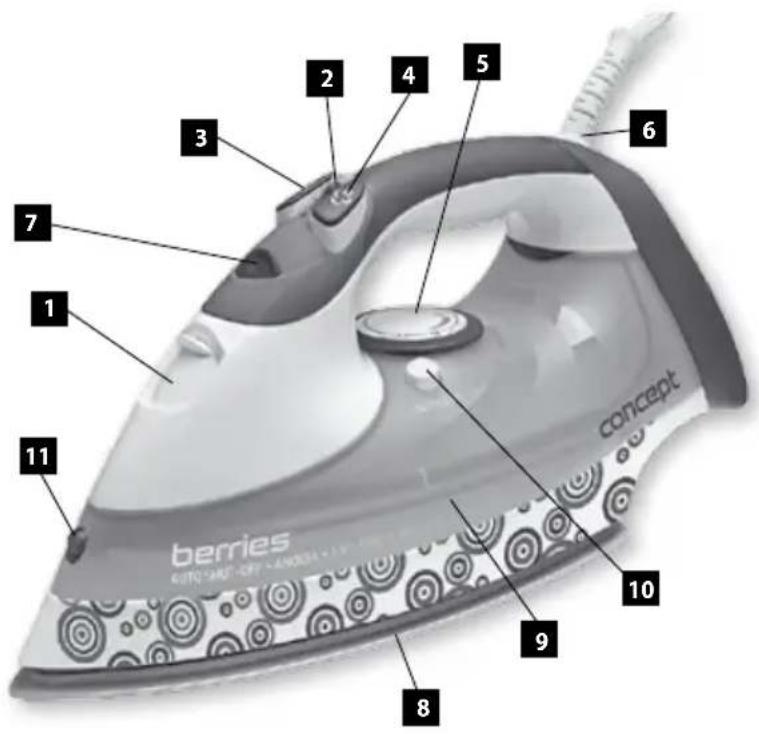
NÁVOD K OBSLUZE
natural_image
Close-up of a hand holding a small object with icons, no visible text or symbolsnatural_image
Close-up of a mechanical component with a circular dial and arrow indicator (no readable text or symbols)Obr. 3
natural_image
White plastic beaker with a black arrow pointing to its side, labeled 'A' (no text or symbols on the beaker itself)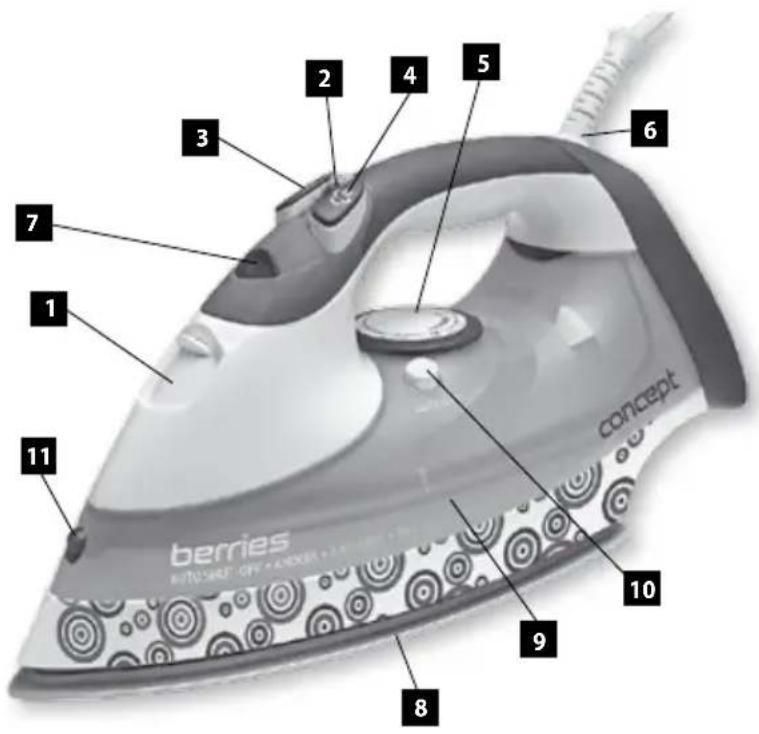
NÁVOD NA OBSLUHU
natural_image
Close-up of a hand holding a small object with icons, no visible text or symbolsObr. 2
natural_image
Close-up of a circular mechanical component with an arrow pointing to it, no visible text or symbols.Obr. 3
SKLADOVÁNÍ
natural_image
White plastic beaker with a black arrow pointing to its side, labeled 'A' (no text or symbols on the beaker itself)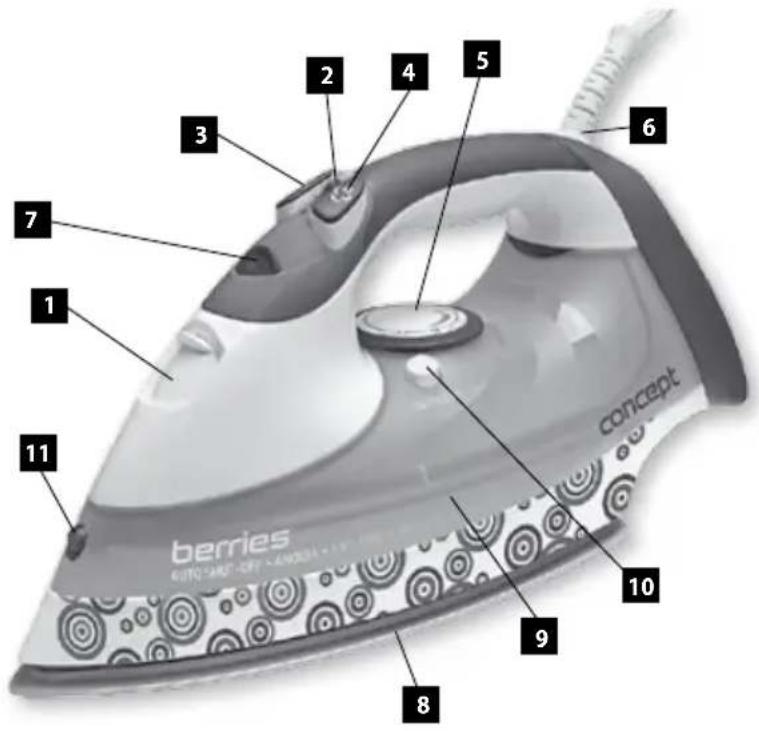
INSTRUKCJA OBSŁUGI
natural_image
Close-up of a white iron iron with a black arrow pointing to a small hole on its side (no text or symbols visible)Ryc. 1
natural_image
Close-up of a hand holding a small object with icons, no visible text or symbolsRyc. 2
Piederumi
A Üdens tvertne
A
EKSPLUATĀCIJAS NORĀDĪJUMI
natural_image
Close-up of a bathroom sink with hand icons and a downward arrow indicating a location (no text or symbols)Att gludināšanas
Thank you for purchasing a Concept product. We hope you will be satisfied with our product throughout its service life.
Please study the entire Operating Manual carefully before you start using the product. Keep the manual in a safe place for future reference. Make sure other people using the product are familiar with these instructions.
| Technical parameters | |
| Voltage 220–240 V | /50Hz |
| Power input 2000 | -2400 W |
IMPORTANT SAFETY PRECAUTIONS:
• Use the unit only as described in this operating manual.
- Remove all the packaging and marketing materials from the unit before the first use.
• Make sure the mains voltage corresponds to the values on the rating plate. Use grounded wall outlets only.
- The unit reaches high temperatures during operation and remains hot for some time after being turned off. Do not touch the hot surfaces. Use the handles and buttons. There is a risk of being burned.
- Do not leave the unit unattended while it is turned on or even only plugged into the wall outlet.
• Unplug the unit from the wall outlet when not in use.
- When disconnecting the unit from the wall outlet, never pull the power cord. Grasp the plug and disconnect it by pulling.
- Do not allow children or unskilled people to handle the unit. Use the unit out of the reach of these individuals.
- Person with limited movement capacities, reduced sensory perception, insufficient mental capacity or those who are unaware of the proper handling shall use the product only under the supervision of a responsible, aware person.
• Take extra care when using the unit near children.
- Don't let anyone use the unit as a toy.
• Use only accessories recommended by the manufacturer.
- Never use an appliance with a damaged power cord or plug. Contact an authorized service center immediately to have defective components repaired or replaced.
- Keep the vacuum cleaner away from heat sources such as radiators, ovens, and so on. Do not expose the product to direct sunlight or moisture.
• Do not touch the unit with wet or damp hands.
• The unit is suitable for domestic use only. It is not designed for commercial operation.
- Do not immerse the power cord, plug, or appliance into water or any other liquid.
- Check the appliance and power cord for damage regularly. Do not switch on a damaged unit.
• Turn the unit off, unplug the power cord from the wall outlet, and let the unit cool before cleaning and after use.
• Unplug the unit from the power source before filling the water tank.
• The filling hole cannot be open during operation.
- When connecting and unplugging the unit, set the temperature regulator to the minimum.
• The unit must be used and stored on a stable surface.
• Make sure the ground on which the stand is placed is stable, when putting the unit on the stand.
- Do not use the unit if it has been dropped, if there is any visible damage, or if it does not seal.
• Do not repair the appliance yourself. Contact an authorized service center.
• Prevent any contact of the power cord with hot surfaces.
• High temperature during operation can cause burns.
• Make sure the power cord does not overhang the working area, and that children cannot reach it.
- Store the unit in a vertical standing position. Let the unit cool down before storing it. Do not touch the hot surfaces.
Failure to follow the manufacturer's instructions may lead to refusal of warranty repair.
- This appliance is not intended for use by persons (including children) with reduced physical, sensory or mental capabilities, or lack of experience and knowledge, unless they have been given supervision or instruction concerning use of the appliance by a person responsible for their safety.
- Children should be supervised to ensure that they do not play with the appliance.
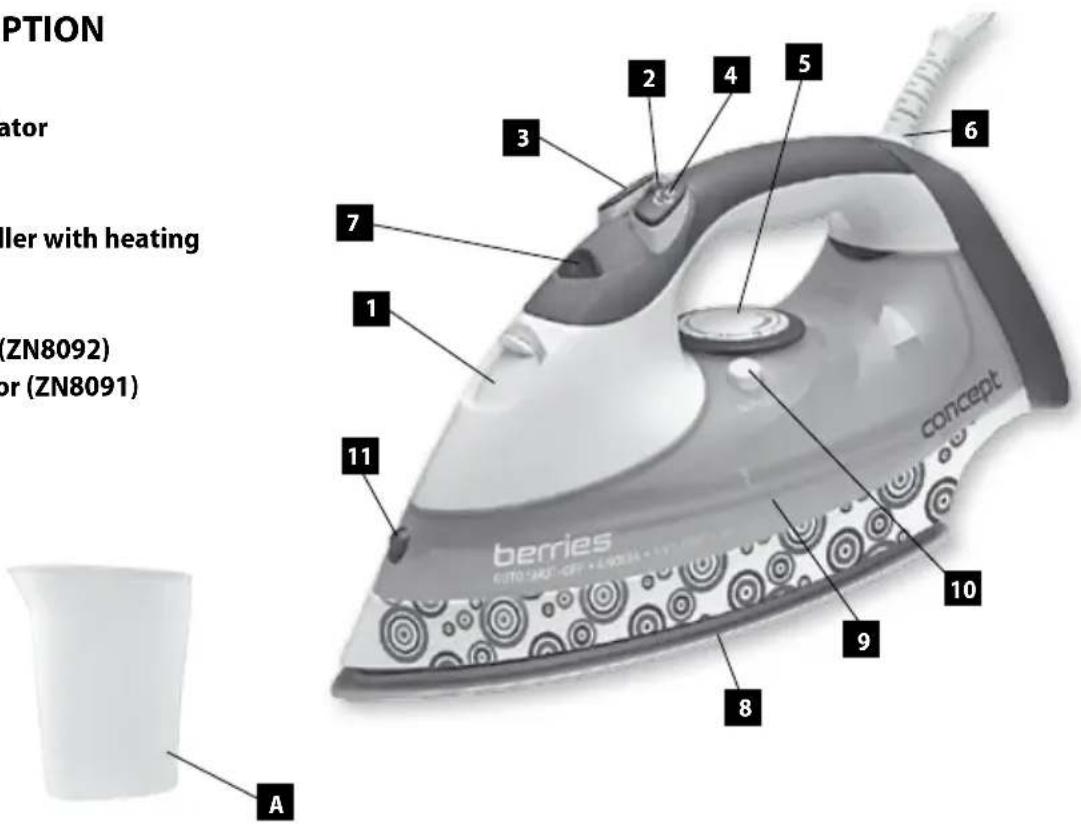
PRODUCT DESCRIPTION
- Filling hole cover
- Steam volume regulator
- Spray button
- Steam button
- Temperature controller with heating indicator
- Supply cable joint
- Operation indicator (ZN8092) Automatic OFF indicator (ZN8091)
- Ironing surface
- Water tank
- Self-clean button
- Spray nozzle
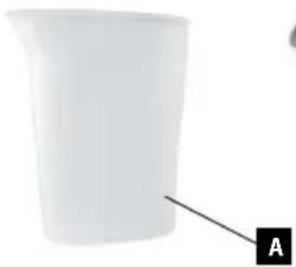
Accessories A Water tank
OPERATING INSTRUCTIONS
Do not leave the unit unattended if it is connected to the power source.
Remove all the stickers and packaging from the ironing surface before the first use. Before the first ironing, try the unit on a piece of old fabric to make sure the ironing surface and water tank are perfectly clean.
The unit may emit a slight odor during the first use. This smell will vanish after a short time.
FILLING WITH WATER
- Unplug the unit from the power source.
- Set the steam volume regulator to minimum (OFF)
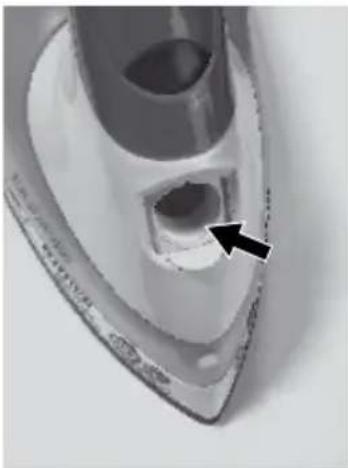
- Open the filling hole cover (Fig. 1) and fill the tank with water. Use only distilled or boiled water. Don't fill the tank with a liquid other than water. Do not put any additions in the water. There is a risk of damage to the unit. The capacity of the tank is approximately 350 ml . Do not exceed the maximum marked water level.
- Close the filling hole cover.
natural_image
Close-up of a steam iron with a black arrow pointing to a hole (no text or symbols visible)Fig. 1
SPRAYING
Push the spray button; water is released through the spray nozzle. You will need a sufficient volume of water in the tank to activate this function.
Steam ironing
-
For steam ironing set the steam volume regulator to the minimum, and the temperature controller according to the material „...“ „...“ or „MAX“
-
After the heating indicator goes off, set the steam volume regulator to the required position, the steam will start to release, and you may begin ironing.
Steam shock
Turn the temperature controller to the position „...“ or „MAX“, and push the steam button – the ironing surface will emit steam. Wait for a couple of seconds before the next push.
You may use this function for ironing in a vertical position to smoothen folds on hanging clothes or curtains. Hold the unit several centimeters from the fabric to prevent damage to soft materials.
Never iron any clothing on the body!
Ironing
- If you want to use the spray or steam function, fill the tank with water (see Filling with Water).
- Set the temperature controller to the minimum.
- Insert the plug into the mains outlet.
- Set the temperature controller to the value that corresponds to the material to be ironed (according to the international textile codes). The heating indicator will be illuminated.
Note: Iron fabrics that require a lower temperature first, then those at higher temperatures. Most fabrics are marked according to international codes – see the table below.
| Note:The symbol on the tag means: “This fabric must not be ironed!” | |||
| Tag with ironing info Fabric type Temperature setting Steam setting | |||
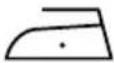 | Synthetic Polypropylene Polyurethane Polyamide Polyester Viscose | MIN. | DRYS T E A M(MAX steam) |
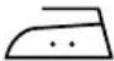 | Silk Wool | ||
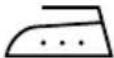 | Cotton | MAX. | |
| Linen | |||
- Wait until the heating indicator stops shining. Only then has the ironing surface reached the right temperature. The ironing surface will be heated during ironing. The heating indicator will turn on and off.
- After use, set the temperature controller to the minimum, unplug the unit from the power source, and let it cool down. Then pour the remaining water out of the tank.
Anti-dripping function (ANTI-DRIP)
This unit is equipped with a function that prevents water from dripping, i.e. it will automatically stop steaming if the temperature is too low and water could be dripping from the ironing surface.
Limescale sedimentation preventive function (ANTI-CALC)
This function is based on the filtration of materials from the water used. It softens the used water, which reduces the sedimentation of limescale in the steam chamber.
Self-clean function
This function allows cleaning minor sediment from the steam chamber. Use it once every two weeks.
- Fill the tank with water (see Filling with Water).
- Insert the plug into the mains outlet.
- Set the temperature control to the maximum.
- Wait until the heating indicator light stops shining.
- Hold the unit horizontally over a sink or wide water vessel.
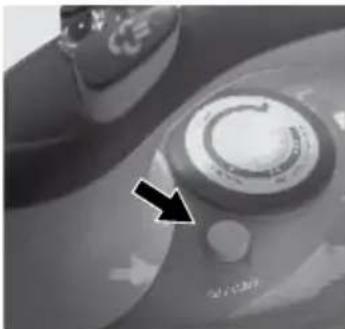
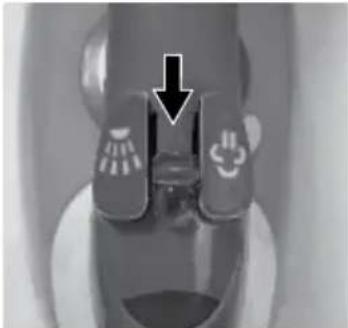
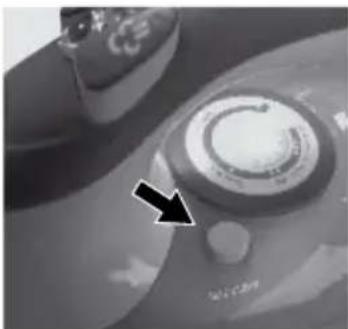
- Turn and hold the steam volume regulator in position OFF. Push and hold the Self-clean button with your other hand (Figs. 2 and 3). Water will pour out of the steam holes in the ironing surface, which will rinse minor sediment from the steam chamber.
natural_image
Close-up of a bathroom toilet sink with hand icons and a downward arrow indicating pressure point (no text or symbols)Fig. 2
Automatic SHUT OFF function – for the ZN8091 only
This safety feature allows automatic shutoff if the unit is left on a horizontal ironing surface for 30 seconds without moving, or for 10 minutes in the vertical position without moving.
In these cases the unit will shut off automatically, a short beep will be heard, and the automatic shutoff indicator will start blinking. The unit will turn on automatically when moved.
Note: This function is just a safety measure. For normal shutoff, set the temperature controller to minimum, and unplug the unit from the power source.
natural_image
Close-up of a circular mechanical component with an arrow pointing to it, no visible text or symbols.Fig. 3
STORAGE
Pour the remaining water out of the tank. Keep the cooled unit in a vertical and stable position in a safe and dry place, out of the reach of children
CLEANING AND MAINTENANCE
Unplug the unit from the power source.
Remnants of fabric fibers may be stuck to the ironing surface. Remove them with a soft cloth soaked in water and vinegar. Then wipe the surface using a dry cloth.
Do not use any abrasives or steel wool to clean the ironing surface. Keep the ironing surface smooth; prevent it from coming into contact with hard metal objects. Make sure the ironing surface is not scratched or damaged.
Clean the body with a wet cloth. Do not use aggressive substances for cleaning, such as solvents or abrasives!
Do not pour vinegar or other limescale removers in the water tank. To clean the steam holes, use a wet cloth, and remove lumps and dust from the internal parts of the holes.
Do not immerse the power cord, plug, or appliance into water or any other liquid.
REPAIR & MAINTENANCE
Any extensive maintenance or repair that requires access to the inner parts of the product must be performed by an expert service centre.
ENVIRONMENTAL PROTECTION
• Packaging materials and obsolete appliances should be recycled.
• The transport box may be disposed of as sorted waste.
• Polyethylene bags shall be handed over for recycling.
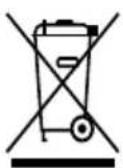
Appliance recycling at the end of its service life:
A symbol on the product or its packaging indicates that this product should not go into household waste. It must be taken to the collection point of an electric and electronic equipment recycling facility. By making sure this product is disposed of properly, you will help prevent the negative effects on the environment and human health that would otherwise result from inappropriate disposal of this product. You can learn more about recycling this product from your local authorities, a household waste disposal service or in the shop where you bought this product.
DANKE FÜR IHR VERTRAUEN
Zubehör
A Wasserbehälter
natural_image
White beaker with a labeled arrow pointing to its side (no text or symbols on the cup itself)BEDIENUNGSANLEITUNG
natural_image
Close-up of a mechanical component with two circular features and a downward arrow indicating a cut or change (no text or symbols visible)Abb. 2

- PODĚKOVÁNÍ
- NÁVOD K OBSLUZE
- NÁVOD NA OBSLUHU
- SKLADOVÁNÍ
- INSTRUKCJA OBSŁUGI
- Piederumi
- EKSPLUATĀCIJAS NORĀDĪJUMI
- IMPORTANT SAFETY PRECAUTIONS:
- PRODUCT DESCRIPTION
- OPERATING INSTRUCTIONS
- FILLING WITH WATER
- SPRAYING
- Steam ironing
- Steam shock
- Never iron any clothing on the body!
- Ironing
- Anti-dripping function (ANTI-DRIP)
- Limescale sedimentation preventive function (ANTI-CALC)
- Self-clean function
- Automatic SHUT OFF function – for the ZN8091 only
- STORAGE
- CLEANING AND MAINTENANCE
- REPAIR & MAINTENANCE
- ENVIRONMENTAL PROTECTION
- Appliance recycling at the end of its service life:
- DANKE FÜR IHR VERTRAUEN
- Zubehör
- BEDIENUNGSANLEITUNG
Brand : Concept
Model : ZN-8092
Category : Iron