
KD-DV5507EE - Car radio JVC - Free user manual and instructions
Find the device manual for free KD-DV5507EE JVC in PDF.


| Product Type | Car Stereo with DVD/CD/MP3/WMA Playback |
| Brand | JVC |
| Model | KD-DV5507EE |
| Dimensions (W x H x D) | 178 x 100 x 160 mm (Standard Double DIN) |
| Weight | Approx. 1.6 kg |
| Power Supply | 12V DC (Negative Ground) |
| Maximum Power Output | 50 W x 4 (at 4 ohms) |
| Playback Media | DVD-Video, DVD-R/RW, CD, CD-R/RW, MP3, WMA, JPEG (CD/DVD) |
| Tuner Bands | FM/AM with RDS |
| Audio Inputs | Front AUX (3.5 mm), USB (front panel) |
| Bluetooth | Built-in (Hands-Free Calling and Audio Streaming) |
| Display | Mono LCD with White Illumination |
| Maintenance and Cleaning | Use a soft, dry cloth to clean the faceplate; avoid solvents. Clean lens with a disc lens cleaner. |
| Safety | Detachable faceplate for theft prevention; internal voltage stabilizer protects against surges. |
| Spare Parts and Repairability | Contact JVC authorized service center. Replacement parts include faceplate, remote control, and wiring harness. |
| General Information | Compatible with steering wheel remote control (adapter may be required). Firmware upgradable via USB. |
Frequently Asked Questions - KD-DV5507EE JVC
User questions about KD-DV5507EE JVC
0 question about this device. Answer the ones you know or ask your own.
Ask a new question about this device
Download the instructions for your Car radio in PDF format for free! Find your manual KD-DV5507EE - JVC and take your electronic device back in hand. On this page are published all the documents necessary for the use of your device. KD-DV5507EE by JVC.
USER MANUAL KD-DV5507EE JVC
Having trouble with operation?
Please reset your unit.
Refer to the page on how to reset your unit.
© 2009 Victor Company of Japan, Limited
0309DTSMDTJEIN
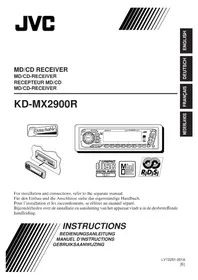
Instructions
JVC

DVD/CD
DVD/CD Receiver
To cancel the display demonstration, see page 10.
For installation and connections, refer to the separate manual.
Instructions
Thank you for purchasing a JVC product.
Please read all instructions carefully before operation to ensure your complete understanding and to obtain the best possible performance from the unit.
Important for Laser Products
- CLASS 1 LASER PRODUCT
- CAUTION: Do not open the top cover. There are no user serviceable parts inside the unit; leave all servicing to qualified service personnel.
- CAUTION: Visible and/or invisible class 1M laser radiation when open. Do not view directly with optical instruments.
- REPRODUCTION OF LABEL: CAUTION LABEL, PLACED OUTSIDE THE UNIT.
| CAUTIONVISIBLE AND/ORINVISIBLE CLASS 1MLASER RADIATIONWHEN OPEN, DO NOTVIEW DIRECTLY WITHOPTICAL INSTRUMENTS.EC:80825-1:2001(ENG) | ATTENTIONRAYONNEMENT LASERVISIBLE ET/OUINVISIBLE DE CLASSE1M UNE POIS OUVERT.NE PAS REGARDIERDIRECTMENT AVCEDES INSTRUMENTSOPTIQUES. (RA) | AVISORADIACIÓN LÄSERDE CLASE 1MVISIBLE Y/O INVISIBLECUANDO ESTABERTO, NO MIRARDIRECTAMENTECON INSTRUMENTALÓPTICO. (ESP) | VARNINGSYNUG OCH/ELIERSYNLIGLASER STRÄLNING.KLASS 1M, NÄR DENNADEL, ÄR ÖPPNAD.BETRAKTA EJSTRALEN MED OPTISKAINSTRUMENT. (SWE) | 注意ここを除くと可視及び/または不可視のクラス 1MLレーザ・放射が出ます。光学装置で推進見ないでください。(JPY) | CAUTIONVISIBLE AND/ORINVISIBLE CLASS 3LASER RADIATIONWHEN OPEN.DO NOT STAREINTO BEAM.FDA 21 CPR(ENG) |
[European Union only]
This mark is used to indicate...

Turn the control dial to make a selection, then press to confirm the selection.
Indication language:
In this manual, English indications are used for purposes of explanation. You can select the indication language on the monitor on the "LANGUAGE" setting (see page 44).
For safety...
- Do not raise the volume level too much, as this will block outside sounds, making driving dangerous.
- Stop the car before performing any complicated operations.
Temperature inside the car...
If you have parked the car for a long time in hot or cold weather, wait until the temperature in the car becomes normal before operating the unit.
Caution on volume setting:
Digital devices (CD/USB) produce very little noise compared with other sources. Lower the volume before playing these digital sources to avoid damaging the speakers by sudden increase of the output level.
Detaching the control panel

Attaching the control panel

How to reset your unit

- Your preset adjustments will also be erased (except the registered Bluetooth device, see page 26).
How to forcibly eject a disc

- You can forcibly eject the loaded disc even if the disc is locked. To lock/unlock the disc, see page 14.
- Be careful not to drop the disc when it ejects. • If this does not work, reset your unit.
WARNINGS:
(To prevent accidents and damage)
- DO NOT install any unit or wire any cable in a location where;
- it may obstruct the steering wheel and gearshift lever operations.
- it may obstruct the operation of safety devices such as air bags.
- it may obstruct visibility.
- DO NOT operate the unit while driving.
- If you need to operate the unit while driving, be sure to look around carefully.
- The driver must not watch the monitor while driving.
If the parking brake is not engaged, "DRIVER MUST NOT WATCH THE MONITOR WHILE DRIVING." appears on the monitor, and no playback picture will be shown.
- This warning appears only when the parking brake lead is connected to the parking brake system built into the car (refer to the Installation/Connection Manual).
Playable disc types
| Disc type Recording format, file type, etc Playable | ||
| DVD DVD-Video (Region Code: 5) * | 1    | √OK |
| DVD-Audio/DVD-ROM | ✕NO | |
| DVD Recordable/Rewritable(DVD-R/-RW *2, +R/+RW *3)· DVD Video: UDF bridge· DVD-VR· DivX/MPEG-1/MPEG-2/MP3/WMA/WAV: ISO 9660 level 1,level 2, Romeo, Joliet | DVD-Video | √OK |
| DVD-VR | ||
| DivX/MPEG1/MPEG2 | ||
| MP3/WMA/WAV | ||
| AAC/JPEG/MPEG4/DVD+VR/DVD-RAM | ✕NO | |
| Dual Disc DVD side | √OK | |
| Non-DVD side | ✕NO | |
| CD/VCD Audio CD/CD Text (CD-DA) | √OK | |
| VCD (Video CD) | ||
| DTS-CD/SVCD (Super Video CD)/CD-ROM/CD-I (CD-I Ready) | ✕NO | |
| CD Recordable/Rewritable(CD-R/-RW)· ISO 9660 level 1, level 2, Romeo,Joliet | CD-DA | √OK |
| VCD (Video CD) | ||
| DivX/MPEG1/MPEG2 | ||
| MP3/WMA/WAV | ||
| AAC/JPEG/MPEG4 | ✕NO | |
*1 If you insert a DVD Video disc of an incorrect Region Code, "REGION CODE ERROR" appears on the monitor.
*2 DVD-R recorded in multi-border format is also playable (except for dual-layer discs). DVD-RW dual-layer discs are not playable.
*3 It is possible to play back finalized +R/+RW (Video format only) discs. +RW double-layer discs are not playable.
Caution for DualDisc playback
The Non-DVD side of a "DualDisc" does not comply with the "Compact Disc Digital Audio" standard. Therefore, the use of the Non-DVD side of a DualDisc on this product may not be recommended.
CONTENTS
Detaching the control panel 3
Attaching the control panel 3
How to reset your unit 3
How to forcibly eject a disc 3
INTRODUCTION
Playable disc types 4
OPERATIONS
Basic operations 6
• Using the control panel 6 • Using the remote controller (RM-RK255) ..... 8
Preparation....10
Listening to the radio 11
Disc operations 14
• Operations using the control panel ..... 16 - Operations using the remote controller (RM-RK255).... 18
USB operations 24
EXTERNAL DEVICES
Using the Bluetooth® devices 25
• Using the Bluetooth cellular phone ..... 28 • Using the Bluetooth audio player 29
Listening to the CD changer 30
Listening to the iPod/iPhone 31
- When connected with the USB cable ...... 31
- When connected with the interface adapter....35
Listening to the other external components....36
SETTINGS
Selecting a preset sound mode 37 Menu operations 39 Color settings 43 Disc setup menu 44 Bluetooth settings 46
REFERENCES
More about this unit 47 Maintenance....54 Troubleshooting....55 Specifications....60
Basic operations
Using the control panel
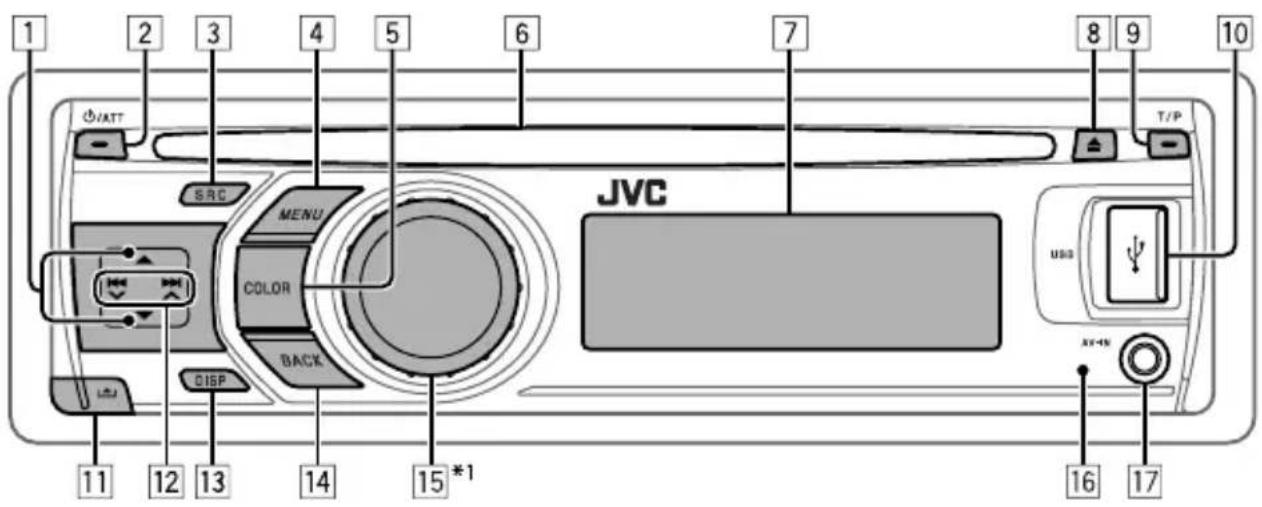
1 • FM/AM/FM-LO: Select preset station.
• DISC: Select title/program/playlist/folder.
- CD-CH: Select folder.
- IPOD: Enter the main menu/Pause playback *2/ Confirm selection.
- BT-PHONE/BT-AUDIO: Enter/go back to previous Bluetooth menu.
2 · Turn on the power.
- Attenuate the sound (if the power is on).
- Turn off the power [Hold].
3 • Select the source.
FM → DISC³ → USB³ / USB (iPod)*3,*4
→ CD-CH³ / IPOD³ (or EXT INPUT)
→ BT-PHONE³ → BT-AUDIO³ →
LINE IN → AV IN⁵ → AM⁵ → FM-LO
→ (back to the beginning)
- BT-PHONE: Enter "DIAL" menu if a Bluetooth phone is connected [Hold].
4 • Enter list operations.
- Enter Menu setting [Hold].
- USB (iPod): Enter the main menu.
5 Select the display and button illumination color.
6 Loading slot
7 Display window
8 Eject disc.
9 • Activate/deactivate TA Standby Reception.
- Enter PTY Searching mode [Hold].
10 USB (Universal Serial Bus) input terminal
11 Detach the panel.
12 • FM/AM/FM-LO: Search for station.
• DISC/USB/USB (iPod): Select chapter/track.
• CD-CH/IPOD: Select track.
- BT-PHONE/BT-AUDIO: Select setting item/registered device.
13 • Change the display information (if the power is turned on).
- Check the current clock time (if the power is turned off). *6
14 • Return to the previous menu.
- USB (iPod): Switch the setting between
and
- HAVING TROUBLE WITH OPERATION
- PLEASE RESET YOUR UNIT
- DVD/CD RECEIVER
- INSTRUCTIONS
- THANK YOU FOR PURCHASING A JVC PRODUCT
- IMPORTANT FOR LASER PRODUCTS
- THIS MARK IS USED TO INDICATE
- INDICATION LANGUAGE
- FOR SAFETY
- TEMPERATURE INSIDE THE CAR
- CAUTION ON VOLUME SETTING
- DETACHING THE CONTROL PANEL
- ATTACHING THE CONTROL PANEL
- HOW TO RESET YOUR UNIT
- HOW TO FORCIBLY EJECT A DISC
- WARNINGS
- (TO PREVENT ACCIDENTS AND DAMAGE)
- CAUTION FOR DUALDISC PLAYBACK
- CONTENTS
- INTRODUCTION
- OPERATIONS
- EXTERNAL DEVICES
- SETTINGS
- REFERENCES
- BASIC OPERATIONS
- USING THE CONTROL PANEL
Brand : JVC
Model : KD-DV5507EE
Category : Car radio