7000 - Shaver PHILIPS - Free user manual and instructions
Find the device manual for free 7000 PHILIPS in PDF.
User questions about 7000 PHILIPS
0 question about this device. Answer the ones you know or ask your own.
Ask a new question about this device
Download the instructions for your Shaver in PDF format for free! Find your manual 7000 - PHILIPS and take your electronic device back in hand. On this page are published all the documents necessary for the use of your device. 7000 by PHILIPS.
USER MANUAL 7000 PHILIPS
Always here to help you
Register your product and get support at
www.philips.com/welcome

text_image
Question? Contact PhilipsRQ1100 series

natural_image
Red Philips SensoTouch device with black handle and white buttons, no visible text or symbols on bodyUser manual
ENGLISH 4
DANSK 27
SUOMI 50
FRANÇAIS 72
NEDERLANDS 95
DEUTSCH 118
ΕΛΛΗΝΙΚΑ 141
ITALIANO 166
NORSK 189
ESPAÑOL 212
PORTUGUÊS 235
SVENSKA 258
TÜRKÇE 280
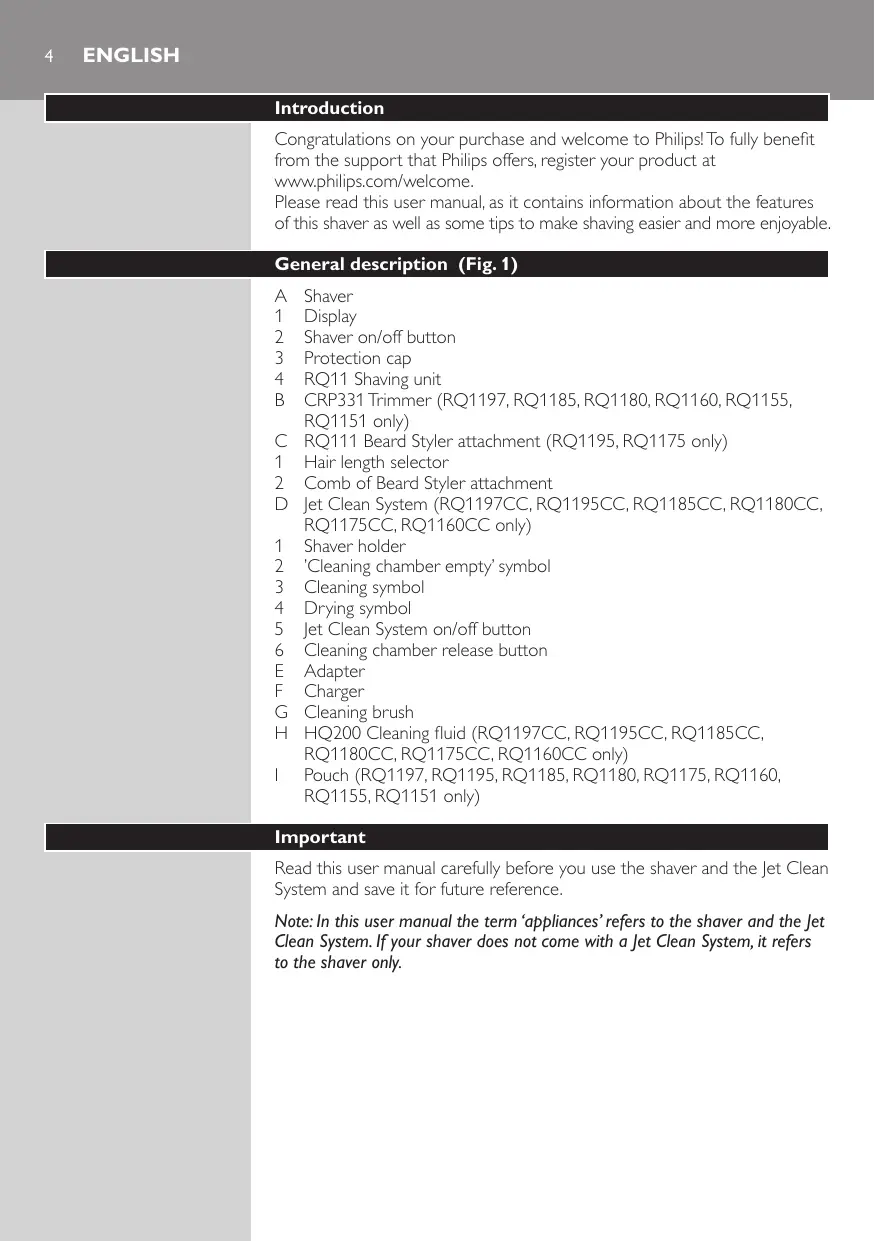
Introduction
Congratulations on your purchase and welcome to Philips! To fully benefit from the support that Philips offers, register your product at www.philips.com/welcome.
Please read this user manual, as it contains information about the features of this shaver as well as some tips to make shaving easier and more enjoyable.
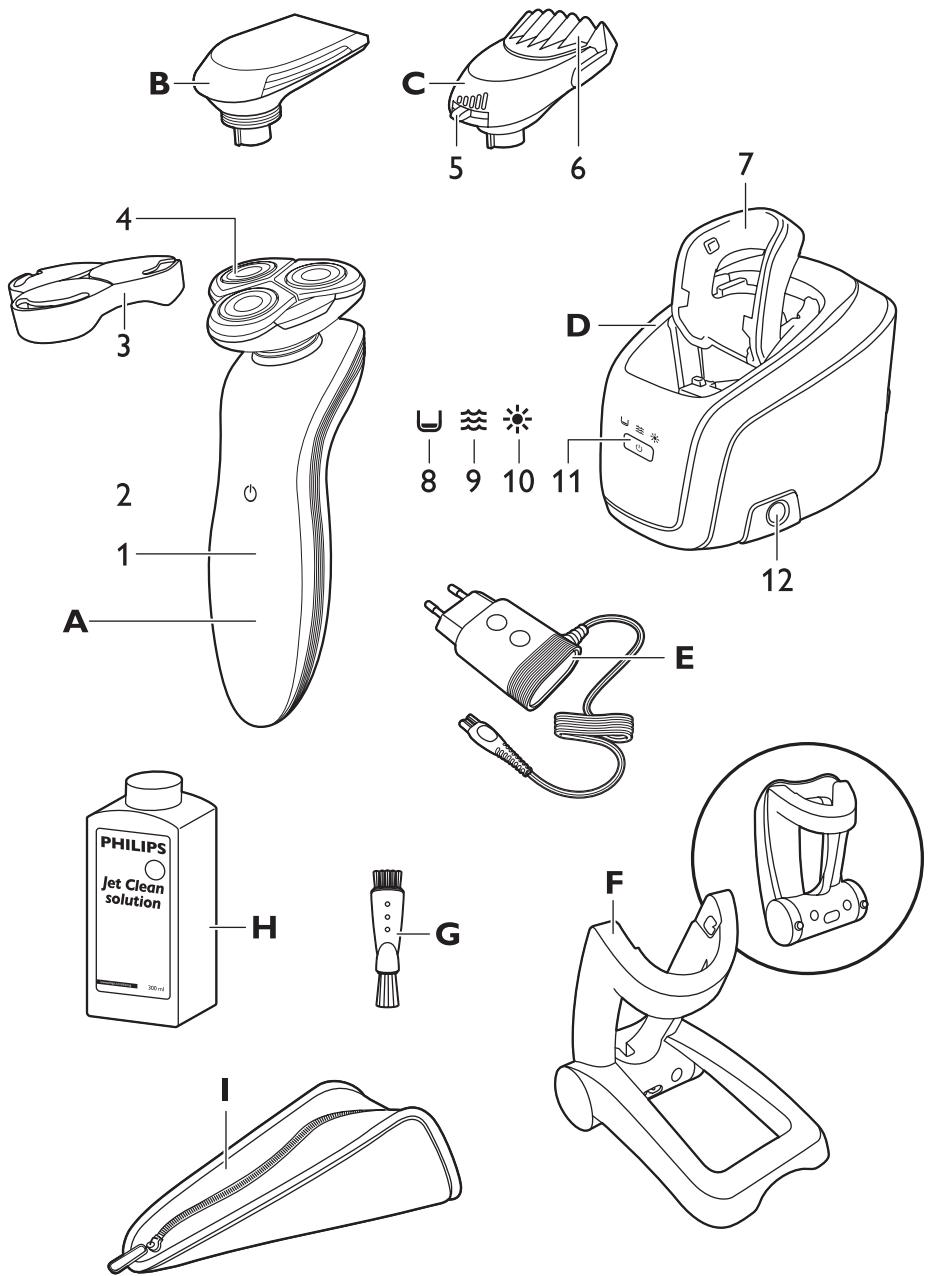
General description (Fig. 1)
A Shaver
1 Display
2 Shaver on/off button
3 Protection cap
4 RQ11 Shaving unit
B CRP331 Trimmer (RQ1197, RQ1185, RQ1180, RQ1160, RQ1155, RQ1151 only)
C RQ111 Beard Styler attachment (RQ1195, RQ1175 only)
1 Hair length selector
2 Comb of Beard Styler attachment
D Jet Clean System (RQ1197CC, RQ1195CC, RQ1185CC, RQ1180CC, RQ1175CC, RQ1160CC only)
1 Shaver holder
2 'Cleaning chamber empty' symbol
3 Cleaning symbol
4 Drying symbol
5 Jet Clean System on/off button
6 Cleaning chamber release button
E Adapter
F Charger
G Cleaning brush
H HQ200 Cleaning fluid (RQ1197CC, RQ1195CC, RQ1185CC, RQ1180CC, RQ1175CC, RQ1160CC only)
I Pouch (RQ1197, RQ1195, RQ1185, RQ1180, RQ1175, RQ1160, RQ1155, RQ1151 only)
Important
Read this user manual carefully before you use the shaver and the Jet Clean System and save it for future reference.
Note: In this user manual the term ‘appliances’ refers to the shaver and the Jet Clean System. If your shaver does not come with a Jet Clean System, it refers to the shaver only.
General
natural_image
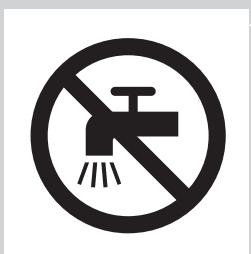
Prohibition sign showing a faucet without a shower, enclosed in a circle (no text or symbols)Danger
- Make sure the adapter does not get wet.
Warning
- The adapter contains a transformer. Do not cut off the adapter to replace it with another plug, as this causes a hazardous situation.
- These appliances are not intended for use by persons (including children) with reduced physical, sensory or mental capabilities, or lack of experience and knowledge, unless they have been given supervision or instruction concerning use of these appliances by a person responsible for their safety.
- Children should be supervised to ensure that they do not play with the shaver and the Jet Clean System.
- Be careful with hot water when you clean the appliances. Always check if the water is not too hot, to prevent your hands from getting burnt.
Caution
- Never immerse the Jet Clean System and the charger in water nor rinse them under the tap.
- The appliances and accessories are not dishwasher-proof.
- Always place and use the appliances on a surface that is fluid-resistant.
- Use, charge and store the shaver at a temperature between 5^ C and 35^ C.
- Only use the accessories supplied with this shaver or that have been specifically developed for this shaver.
- If the adapter or any of the other accessories is damaged, always have it replaced with one of the original type in order to avoid a hazard.
- The adapter transforms 100-240 volts to a safe low voltage of less than 24 volts.
- Do not use the appliances and accessories if they are damaged.
- Water may leak from the socket at the bottom of the shaver when you rinse it. This is normal and not dangerous because all electronics are enclosed in a sealed power unit inside the shaver.
Jet Clean system (RQ1197CC, RQ1195CC, RQ1185CC, RQ1180CC, RQ1175CC only)
Caution
- Only use the Jet Clean System with the original HQ200 cleaning fluid.
- Always place and use the Jet Clean System on a stable, level and horizontal fluid-resistant surface to prevent leakage.
- Never immerse the Jet Clean System in water.
- Empty the cleaning chamber and clean it thoroughly by rinsing it with hot tap water every 15 days.
- The Jet Clean System thoroughly cleans but does not disinfect your shaver; therefore do not share the shaver with others.
- The cleaning chamber of the Jet Clean System is not dishwasher-proof.
- When the Jet Clean System is ready for use, do not move it to prevent leakage of cleaning fluid.
Beard Styler attachment (RQ1195, RQ1175 only)
Caution
- Only use the Beard Styler attachment to trim facial hair (beard, moustache and sideburns). Do not use it to trim body parts below the neckline.
- Only use the Beard Styler attachment in combination with the following shaver types: RQ12xx, RQ11xx, RQ10xx.
- The Beard Styler attachment is not dishwasher-proof.
Compliance with standards
- This shaver complies with the internationally approved safety regulations and can be safely used in the bath or shower and cleaned under the tap.
- These Philips appliances comply comply with all standards regarding electromagnetic fields (EMF). If handled properly and according to the instructions in this user manual, the appliances are safe to use based on scientific evidence available today.
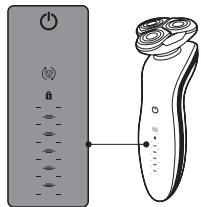
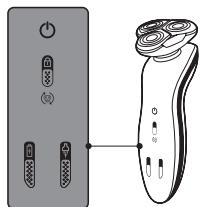
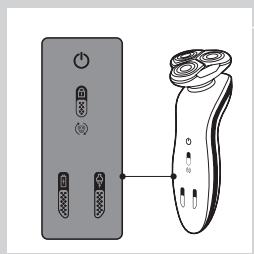
The display
text_image
Diagram showing a power switch and its 3D model with labeled components and connection pointNote: If there is a protective foil on the display, remove it before you use the shaver for the first time.
The various shaver types have different displays, which are shown in the figures below.
text_image
Diagram showing a remote control panel connected to a pair of electric shakers, with icons for function keys and buttons.- RQ1185, RQ1167, RQ1160
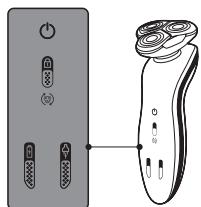
text_image
Diagram showing a pair of electronic devices connected to a handheld device, with labeled ports and control buttons.- RQ1155, RQ1151, RQ1150, RQ1145, RQ1141, RQ1131
Charging

text_image
Diagram showing battery charging mechanism with lock, power lines, and battery symbol
text_image
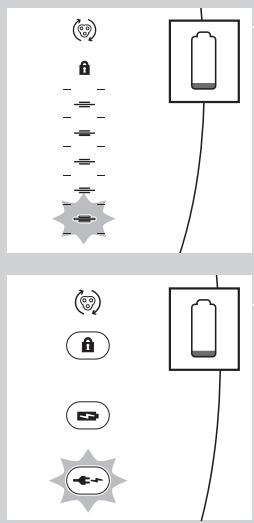
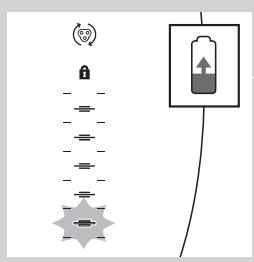
Diagram showing battery charging symbols and charging mechanism with icons for power, battery, and charging elements- Charging takes approx. 1 hour.
- When the shaver is charging, first the bottom charging light flashes, then the second charging light, and so on until the shaver is fully charged.
- Quick charge: When the shaver contains enough energy for one shave, the bottom charging light alternately flashes orange and white.
RQ1185, RQ1167, RQ1160, RQ1155, RQ1151, RQ1150, RQ1145, RQ1141, RQ1131
Note: The displays of the various shaver types look different, but work in the same way.
- When the shaver is charging, first the plug symbol and the battery symbol flash alternately. After some time, the plug symbol goes out and the battery symbol continues to flash until the shaver is fully charged.
- Quick charge: When the shaver contains enough energy for one shave, the alternate flashing of the plug symbol and battery symbol stops and only the battery symbol flashes.
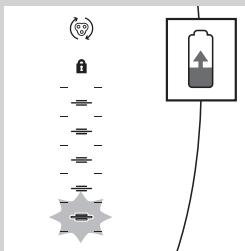
Battery fully charged
text_image
Diagram showing a battery connected to a series of cylindrical components with a lock icon and a separate rectangular device.
text_image
Diagram showing battery and control icons with labels like Wi-Fi, lock, battery, and power plug- When the battery is fully charged, all charging lights light up continuously. After approx. 30 minutes, the display automatically switches off again.
RQ1185, RQ1167, RQ1160, RQ1155, RQ1151, RQ11510, RQ1145, RQ1141, RQ1131
Note: The displays of the various shaver types look different, but work in the same way.
- When the battery is fully charged, the battery symbol lights up continuously. After approx. 30 minutes, the display automatically switches off again.
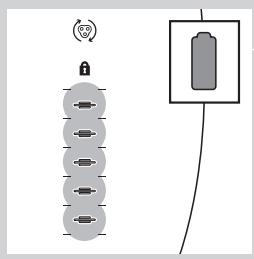
Battery low
text_image
Diagram showing battery and sensor icons with labels for signal, lock, battery, and connection symbols- When the battery is almost empty (when there are only 5 or fewer shaving minutes left), the bottom charging light flashes orange.
- When you switch off the shaver, the bottom charging light continues to flash for a few seconds.
RQ1185, RQ1167, RQ1160, RQ1155, RQ1151, RQ11510, RQ1145, RQ1141, RQ1131
Note: The displays of the various shaver types look different, but work in the same way.
- When the battery is almost empty (when there are only 5 or fewer shaving minutes left), the plug symbol flashes.
- When you switch off the shaver, the plug symbol continues to flash for a few seconds.
text_image
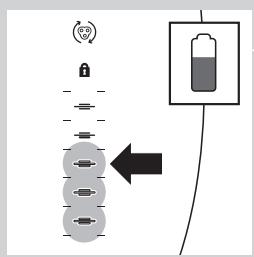
Diagram showing battery charging process with lock, power plug, and battery stack connectionRemaining battery capacity
- The remaining battery capacity is indicated by the number of charging lights that are on.
Travel lock
text_image
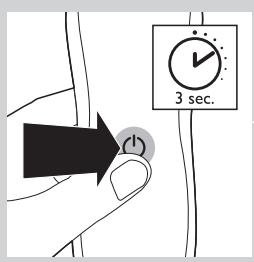
3 sec.You can lock the shaver when you are going to travel. The travel lock prevents the shaver from being switched on by accident.
Activating the travel lock
1 Press the on/off button for 3 seconds to enter the travel lock mode.
flowchart
graph TD
    A["Lock Icon"] --> B["Switch"]
    C["Lock Icon"] --> D["Switch"]
    E["Switch"] --> F["Switch"]
    G["Switch"] --> H["Switch"]
    I["Switch"] --> J["Switch"]
    K["Switch"] --> L["Switch"]
    M["Switch"] --> N["Switch"]
    O["Switch"] --> P["Switch"]
    Q["Switch"] --> R["Switch"]
    S["Switch"] --> T["Switch"]
    U["Switch"] --> V["Switch"]
    W["Switch"] --> X["Switch"]
    Y["Switch"] --> Z["Switch"]
    AA["Switch"] --> AB["Switch"]
    AC["Switch"] --> AD["Switch"]
    AE["Switch"] --> AF["Switch"]
    AG["Switch"] --> AH["Switch"]
    AI["Switch"] --> AJ["Switch"]
    AK["Switch"] --> AL["Switch"]
    AM["Switch"] --> AN["Switch"]
    AO["Switch"] --> AP["Switch"]
    AQ["Switch"] --> AR["Switch"]
    AS["Switch"] --> AT["Switch"]
    AU["Switch"] --> AV["Switch"]
    AW["Switch"] --> AX["Switch"]
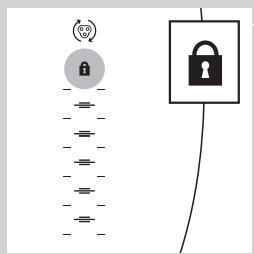
The lock symbol lights up on the display.
Note: The displays of the various shaver types look different, but show the same symbol.
Deactivating the travel lock
1 Press the on/off button for 3 seconds.
The motor starts running to indicate that the travel lock has been deactivated.
The shaver is now ready for use again.
Note: When you place the shaver in the plugged-in charger or Jet Clean System, the travel lock is automatically deactivated.
Replace shaving head holder
text_image
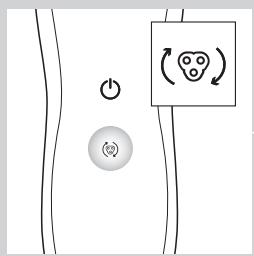
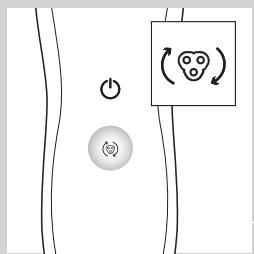
Diagram showing a power button and a circular symbol with a smiley face inside, likely representing a health or safety concept.Note: The displays of the various shaver types look different, but show the same symbol.
For maximum shaving performance, we advise you to replace the shaving head holder every two years.
- To remind you to replace the shaving head holder, the appliance is equipped with a replacement reminder which is activated automatically after approx. two years. The replacement reminder is repeated at 9 successive shaves or until you reset the shaver.
Charging
Charging takes approx. 1 hour.
RQ1155: A fully charged shaver has a shaving time of up to 50 minutes.
RQ1151, RQ1150, RQ1145: A fully charged shaver has a shaving time of up to 45 minutes.
RQ1141, RQ1131: A fully charged shaver has a shaving time of up to 40 minutes.
Charge the shaver before you use it for the first time and when the display indicates that the battery is almost empty (see section 'Battery low' in chapter 'The display').
Quick charge
After the shaver has charged for 5 minutes, it contains enough energy for one shave.
Charging in the charger
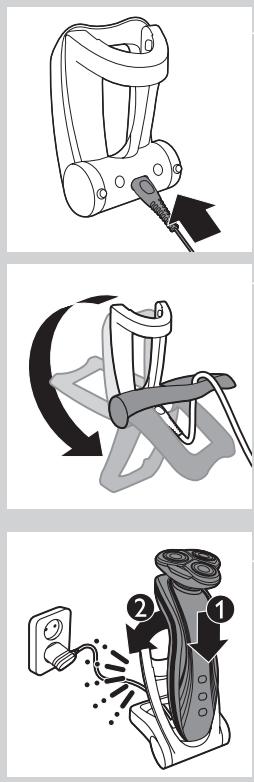
1 Insert the small plug into the charger.
2 Unfold the charger ('click').
3 Put the adapter in the wall socket.
4 Put the shaver in the charger (1) and press it backwards until it locks into place (2).
The display shows that the shaver is charging (see section ‘Charging’ in chapter ‘The display’).
Charging in the Jet Clean System (RQ1197CC, RQ1195CC, RQ1185CC, RQ11801CC, RQ1175CC only)
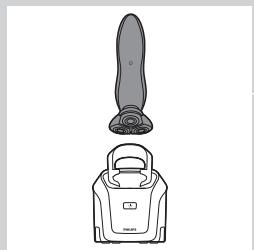
natural_image
Line drawing of a vacuum cleaner with a handle and top component (no text or symbols)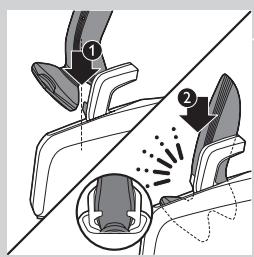
text_image
Diagram illustrating foot contact technique with labeled parts and motion indicators1 Put the small plug in the Jet Clean System.
2 Put the adapter in the wall socket.
3 Hold the shaver upside down above the holder with the back of the shaver pointing towards the holder.
Note: RQ1197, RQ1195, RQ1180, RQ1175: when you turn the shaver upside down, the battery indication on the display is also turned upside down so you can still see to what level the battery is charged.
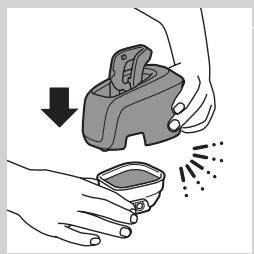
4 Place the shaver body in the holder behind the two clips (1) and press it down until it locks into place (2).
Note: The shaver cannot be placed in the Jet Clean System when the protection cap is on the shaving unit or when the trimmer is placed on the shaver.
The display shows that the shaver is charging (see chapter 'The display').
Using the shaver
Shaving
Skin adaptation period
Your first shaves may not bring you the result you expect and your skin may even become slightly irritated. This is normal. Your skin and beard need time to adapt to any new shaving system.
We advise you to shave regularly (at least 3 times a week) for a period of 3 weeks to allow your skin to adapt to the new shaver. During this period, use your new electric shaver exclusively and do not use other shaving methods. If you use different shaving methods, it is more difficult for your skin to adapt to the new shaving system.
natural_image
Illustration of a person's face with arrows indicating motion or movement, no text or symbols present1 Press the on/off button once to switch on the shaver.
RQ1197, RQ1195, RQ1185, RQ1180, RQ1175: The display lights up for a few seconds.
2 Move the shaving heads over your skin in circular movements.
- Do not make straight movements.
3 Press the on/off button once to switch off the shaver.
RQ1197, RQ1195, RQ1185, RQ1180, RQ1175: The display lights up for a few seconds and then shows the remaining battery capacity.
Wet shaving
You can also use this shaver on a wet face with shaving foam or shaving gel. To shave with shaving foam or shaving gel, follow the steps below:
1 Apply some water to your skin.
2 Apply shaving foam or shaving gel to your skin.
3 Rinse the shaving unit under the tap to ensure that the shaving unit glides smoothly over your skin.
4 Press the on/off button once to switch on the shaver.
5 Move the shaving heads over your skin in circular movements.
Note: Rinse the shaver under the tap regularly to ensure that it continues to glide smoothly over your skin.
6 Dry your face and thoroughly clean the shaver after use (see chapter 'Cleaning and maintenance').
Note: Make sure you rinse all foam or shaving gel off the shaver.
Using the trimmer (RQ1197, RQ1185, RQ1180, RQ1160, RQ1155, RQ1151 only)
natural_image
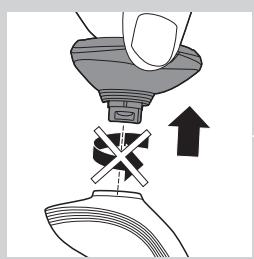
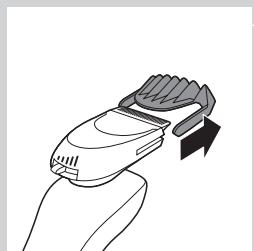
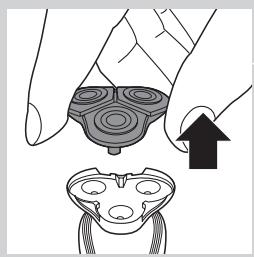
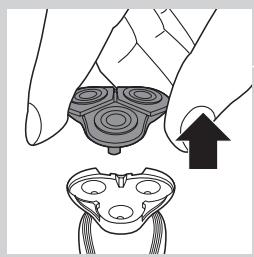
Diagram showing a hand pressing down a component with an arrow indicating upward motion (no text or symbols present)You can use the trimmer to groom your sideburns and moustache.
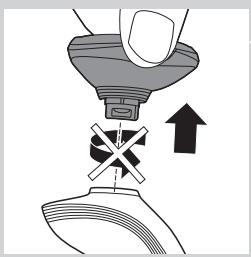
1 Pull the shaving unit straight off the shaver.
Note: Do not twist the shaving unit while you pull it off the shaver.
text_image
Diagram illustrating a spray gun mechanism with labeled parts and magnified detail view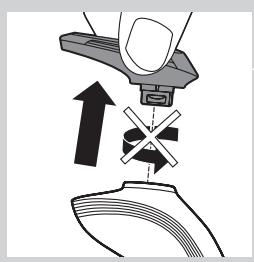
natural_image
Diagram showing a hand pressing down on a mechanical component with an arrow indicating upward motion (no text or symbols present)
text_image
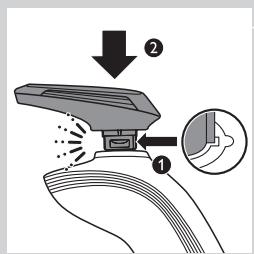
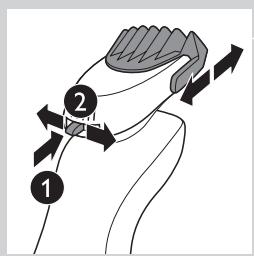
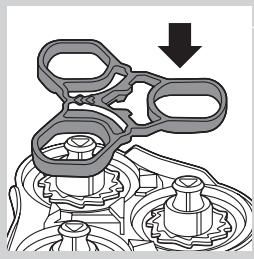
Diagram illustrating spray application process with labeled steps 1 and 2, showing spray bottle and spray nozzle setup2 Insert the lug of the trimmer into the slot in the top of the shaver (1). Then press down the trimmer (2) to attach it to the shaver ('click').
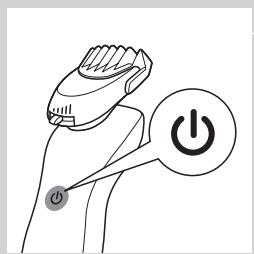
3 Press the on/off button once to switch on the trimmer.
RQ1180: The display lights up for a few seconds.
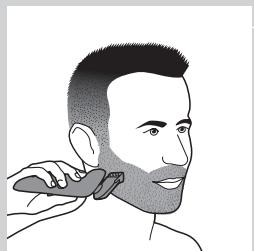
4 You can now start trimming.
5 Press the on/off button once to switch off the trimmer.
RQ1180: The display lights up for a few seconds to show the remaining battery capacity.
6 Pull the trimmer straight off the shaver.
Note: Do not twist the trimming unit while you pull it off the shaver.
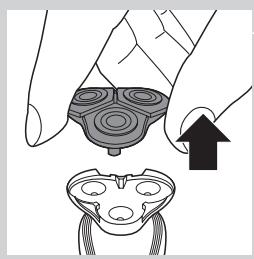
7 Insert the lug of the shaving unit into the slot in the top of the shaver (1). Then press down the shaving unit (2) to attach it to the shaver ('click').
Using the Beard Styler attachment (RQ1195, RQ1175 only)
natural_image
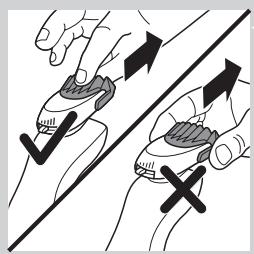
Diagram showing a hand pressing down a device with a cross symbol and an upward arrow (no text or labels)
natural_image
Illustration of a hand holding a small electronic device with a magnified inset showing internal components (no text or symbols)Note: Only use the Beard Styler attachment to trim facial hair (beard, moustache and sideburns). Do not use it to trim body parts below the neckline.
1 Make sure the shaver is switched off.
2 Pull the shaving unit straight off the shaver.
Note: Do not twist the shaving unit while you pull it off the shaver.
3 Insert the lug of the Beard Styler attachment into the slot in the top of the shaver (1). Then press down the Beard Styler attachment (2) to attach it to the shaver ('click').
Using the Beard Styler attachment with comb
You can use the Beard Styler attachment with the comb attached to style your beard at one fixed setting, but also at different length settings. The hair length settings on the Beard Styler attachment correspond to the remaining hair length after cutting and range from 1 to 5mm.

natural_image
Illustration of a hand holding a medical device with a black arrow indicating force or direction (no text or symbols)1 Slide the comb straight into the guiding grooves on both sides of the Beard Styler attachment ('click').
text_image
Diagram showing a mechanical or anatomical process with numbered arrows indicating direction of movement or force, labeled 1 and 2.2 Press the length selector (1) and then push it to the left or right (2) to select the desired hair length setting.
natural_image
Line drawing of a hand holding a power shaver with a circular button labeled 'Power' (no text or symbols beyond the icon)3 Press the on/off button on the shaver to switch it on.
natural_image
Illustration of a person applying a hair to their face, no text or symbols present4 You can now start styling your beard.
Using the Beard Styler attachment without comb
You can use the Beard Styler attachment without the comb to trim and contour your beard, moustache or sideburns.
natural_image
Line drawing of a hand holding a handheld device with a brush and arrow indicating motion (no text or symbols)1 Pull the comb off the Beard Styler attachment.
natural_image
Illustration of two hands holding a tool with directional arrows indicating movement or force (no text or symbols)Note: Grab the comb in the centre to pull it off the Beard Styler attachment. Do not pull at the sides of the comb.
2 Press the on/off button to switch on the shaver.
natural_image
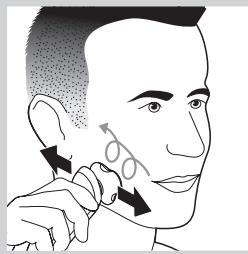
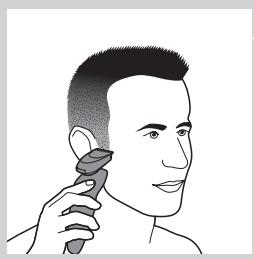
Illustration of a person applying a hairdryer to their ear (no text or symbols present)3 You can now start to trim and contour your beard, moustache, sideburns or neckline.
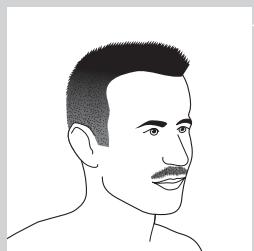
Beard styles
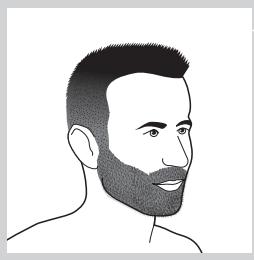
Below you find some examples of beard styles you can create.

natural_image
Line drawing of a male head and shoulders (no text or symbols)- A stubble look

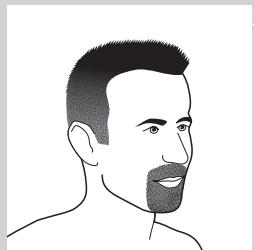
natural_image
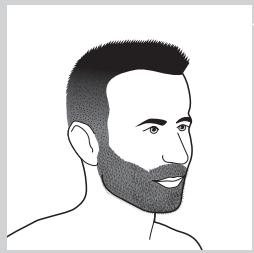
Line drawing of a man's head and shoulders with short hair and beard (no text or symbols)- A full beard
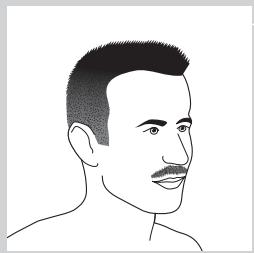
natural_image
Line drawing of a male's head and shoulders (no text or symbols)- A moustache

natural_image
Line drawing of a man's head and shoulders (no text or symbols)- A goatee
Cleaning and maintenance
Never use scouring pads, abrasive cleaning agents or aggressive liquids such as petrol or acetone to clean the shaver, its accessories and the Jet Clean System (RQ1197CC, RQ1195CC, RQ1185CC, RQ1180CC, RQ1175CC only).
- The best and most hygienic way to clean the shaver is in the Jet Clean System (RQ1197CC, RQ1195CC, RQ1185CC, RQ1180CC, RQ1175CC only). You can also rinse the shaver under the tap or clean it with the brush supplied.
- Clean the shaver after every shave for optimal shaving performance.
- You can clean the outside of the shaver with a damp cloth.
- Regular cleaning guarantees better shaving performance.
Cleaning the shaving unit

text_image
°C °FBe careful with hot water. Always check if the water is not too hot, to prevent your hands from getting burnt.
1 Switch off the shaver. Remove it from the charger or remove it from the Jet Clean System (RQ1197CC, RQ1195CC, RQ1185CC, RQ1180CC, RQ1175CC only).
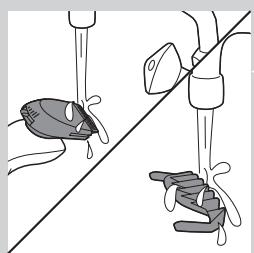
2 Rinse the shaving unit under a hot tap for some time.
Note: You can also clean the shaving unit with the cleaning brush supplied.
3 Pull the shaving head holder off the bottom part of the shaving unit and rinse it under a hot tap for 30 seconds.
Note: You can also clean the shaving head holder with the cleaning brush supplied.
4 Carefully shake off excess water and let the shaving head holder dry.
Never dry the shaving unit with a towel or tissue, as this may damage the shaving heads.
natural_image
Illustration of a hand holding a device with an arrow pointing to a separate view of a device (no text or symbols present)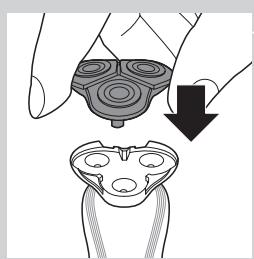
natural_image
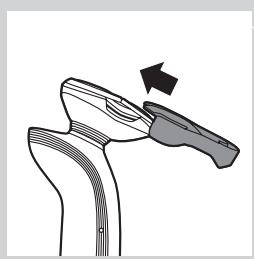
Illustration of a hand holding a mechanical component with a downward arrow indicating motion (no text or symbols)5 Reattach the shaving head holder to the bottom part of the shaving unit ('click').
Cleaning the shaving unit in the Jet Clean System (RQ1197CC, RQ1195CC, RQ1185CC, RQ1180CC, RQ1175CC only)
The Jet Clean System has an automatic cleaning program. When you press the on/off button, the Jet Clean System starts cleaning in this automatic cleaning program.
Preparing the Jet Clean System for use
Fill the cleaning chamber before first use.
text_image
Diagram illustrating a mechanical device with labeled parts and directional arrows indicating motion or assembly.1 Put the small plug in the Jet Clean System.
2 Put the adapter in the wall socket.
The holder automatically moves to the highest position.
text_image
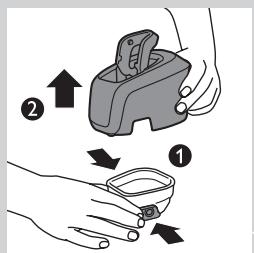
Diagram showing a container being poured into a container with a label indicating 'Water' and directional arrows, likely illustrating a chemical or physical process.3 Simultaneously press the release buttons on both sides of the cleaning chamber (1). Then lift the Jet Clean System off the cleaning chamber (2).
The cleaning chamber remains behind.
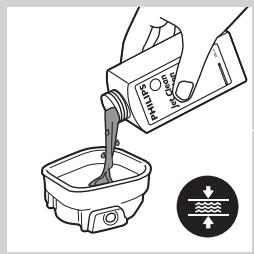
4 Unscrew the cap from the bottle with HQ200 cleaning fluid.
5 Fill the cleaning chamber with HQ200 cleaning fluid to a level between the two lines.

natural_image
Illustration of hands using a handheld tool to remove or spray particles (no text or symbols)6 Place the Jet Clean System back onto the cleaning chamber.
Make sure the release buttons click back into place.
Using the Jet Clean System
Note: If you use the shaver with shaving foam or shaving gel, we advise you to rinse it under the hot tap before you clean it in the Jet Clean System. This guarantees an optimal lifetime for the cleaning fluid.

natural_image
Line drawing of a vacuum cleaner with a handle and top component (no text or symbols)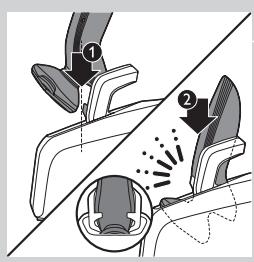
text_image
Diagram illustrating foot contact technique with labeled parts and motion indicators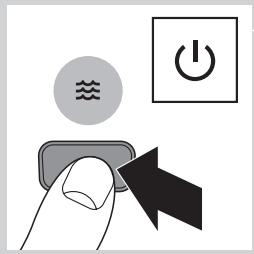
text_image
Diagram showing a hand pressing a button with icons for water, power, and switch symbols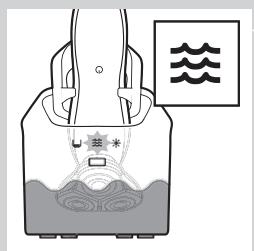
text_image
Diagram of a scientific apparatus with labeled components and wave symbols, likely illustrating an experimental setup or measurement.
text_image
Diagram showing a container with liquid and a sun symbol, likely illustrating a chemical or biological process.1 Hold the shaver upside down above the holder with the back of the shaver pointing towards the holder.
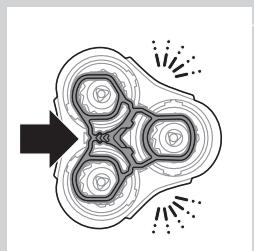
2 Place the shaver body in the holder behind the two clips (1) and press it down until it locks into place (2).
The display shows that the shaver is charging (see chapter 'The display').
3 Press the on/off button on the Jet Clean System to start the cleaning program.
The shaver display stops showing the charging indication.
The cleaning light starts to flash and the shaver is automatically lowered into the cleaning fluid.
The cleaning light flashes throughout the cleaning program, which takes a few minutes.
During the first phase of the cleaning program, the shaver automatically switches on and off several times and moves up and down.
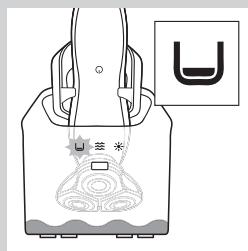
During the second phase of the cleaning program, the shaver is placed in the drying position, indicated by the flashing drying symbol. This phase takes approx. 2 hours. The shaver stays in this position until the end of the program.
After the cleaning program, the charging indication appears on the shaver display (see chapter 'The display').
Note: If you press the on/off button of the Jet Clean System during the cleaning program, the program aborts. In this case, the cleaning or drying light stops flashing and the holder moves to the highest position.
natural_image
Diagram of a device with a U-shaped symbol and a sensor icon, no readable text or labels present
text_image
Diagram illustrating a medical procedure with labeled steps ① and ② showing hand positioning and movement of a device.
natural_image
Line drawing of a hand holding a small object with a looped cable or wire, no text or symbols present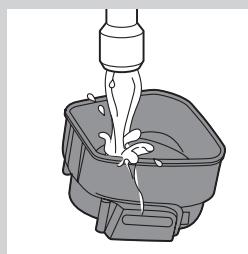
natural_image
Illustration of a hand pouring liquid into a container with a handle (no text or symbols)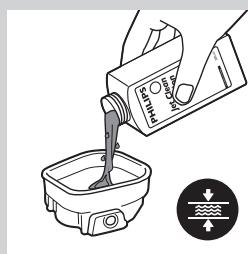
text_image
Diagram showing a hand pouring liquid into a container with a water level indicator belowNote: If you remove the adapter from the wall socket during the cleaning program, the program aborts. The holder remains in its current position. When you put the adapter back into the wall socket, the holder moves to the highest position.
- When the cleaning fluid drops below the minimum level, the 'cleaning chamber empty' symbol starts to flash and the holder returns to its starting position.
- If you use the Jet Clean System to clean your shaver every day, you need to refill the cleaning chamber approx. every 15 days.
Cleaning the Jet Clean System
Clean the cleaning chamber every 15 days.
You can wipe the outside of the Jet Clean System with a damp cloth.
1 Simultaneously press the release buttons on both sides of the Jet Clean System (1). Then lift the Jet Clean System off the cleaning chamber (2).
The cleaning chamber remains behind.
2 Pour any remaining cleaning fluid out of the cleaning chamber.
You can simply pour the cleaning fluid down the sink.
3 Rinse the cleaning chamber under the tap.
The cleaning chamber is not dishwasher-proof.
4 Fill the cleaning chamber with HQ200 cleaning fluid to a level between the two lines.
natural_image
Illustration of hands using a handheld device to remove or clean material, with no text or symbols present.5 Place the Jet Clean System back onto the cleaning chamber. Make sure the release buttons click back into place.
Extra-thorough cleaning method
natural_image
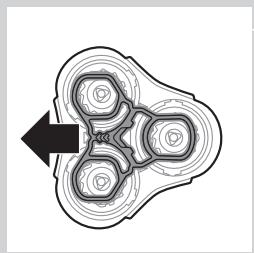
Illustration of a hand holding a circular object with an arrow pointing to a separate abstract shape (no text or symbols)Make sure the appliance is switched off.
1 Pull the shaving head holder off the bottom part of the shaving unit.
natural_image
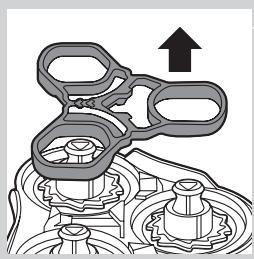
Pure mechanical component diagram without any text, numbers, or symbols2 Slide the green retaining frame in the direction of the arrows indicated on the retaining frame.
natural_image
Mechanical assembly diagram showing a gear-like component with an upward arrow indicating motion (no text or symbols present)3 Lift the retaining frame out of the shaving head holder.
natural_image
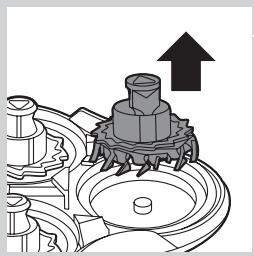
Mechanical assembly diagram showing a gear and shaft assembly with an upward arrow (no text or symbols)4 Remove the cutter from the shaving guard.
Note: Do not clean more than one cutter and shaving guard at a time, since they are all matching sets. If you accidentally put a cutter in the wrong shaving guard, it may take several weeks before optimal shaving performance is restored.

natural_image
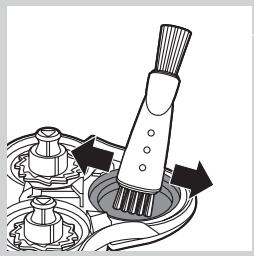
Diagram showing mechanical components with arrows indicating motion (no text or symbols)5 Clean the cutter with the cleaning brush supplied.
natural_image
Mechanical assembly diagram showing a brush and rotating components (no text or symbols)6 Clean the inside of the shaving guard.

natural_image
Mechanical assembly diagram showing a gear and shaft assembly with a downward arrow indicating motion (no text or symbols present)7 After cleaning, place the cutter back into the shaving guard with the cutter legs pointing downwards.
natural_image
Mechanical assembly diagram showing gear and housing components with a downward arrow (no text or labels)8 Place the retaining frame back onto the shaving head holder.
natural_image
Abstract diagram with concentric circles and radiating lines, no text or symbols present9 Slide the guard back into place ('click').

natural_image
Illustration of a hand holding a mechanical component with a downward arrow indicating motion (no text or symbols)10 Reattach the shaving head holder to the bottom part of the shaving unit.
Cleaning the trimmer (RQ1197, RQ1185, RQ1180, RQ1160, RQ1155, RQ1151 only)

text_image
Diagram illustrating a temperature measurement process with thermometer and thermometer readings, showing hand holding sample.Clean the trimmer every time you have used it.
1 Switch on the appliance with the trimmer attached.
2 Rinse the trimmer under a hot tap for some time.
3 After cleaning, switch off the appliance.
Tip: For optimal trimmer performance, lubricate the trimmer teeth with a drop of sewing machine oil every six months.
Cleaning the Beard Styler attachment (RQ1195, RQ1175 only)
natural_image
Illustration of two hands using a tool to lift a fish and drop water onto a surface (no text or symbols)Clean the Beard Styler attachment every time you have used it.
1 Pull the comb off the Beard Styler attachment.
2 Rinse the Beard Styler attachment and the comb separately under a hot tap for some time.
Note: You can also clean the Beard Styler attachment and the comb with the cleaning brush supplied.
3 Lubricate the trimmer teeth with a drop of sewing machine oil every six months.
Storage
natural_image
Line drawing of a mechanical component with an arrow indicating motion (no text or symbols)1 Slide the protection cap onto the shaving unit to prevent damage to the shaving heads.
2 RQ1197, RQ1195, RQ1185, RQ1180, RQ1175, RQ1160, RQ1155, RQ1151 only: Store the shaver in the pouch supplied.
Replacement
text_image
Diagram showing electrical connections with power and circular symbols, including a smiley face iconFor maximum shaving performance, we advise you to replace the shaving head holder every two years.
Only replace the shaving head holder with an original RQ11 Philips Shaving Head Holder.
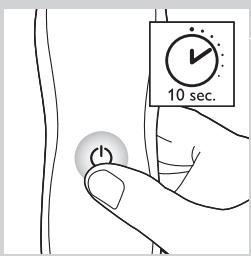
Replacement reminder
To remind you to replace the shaving head holder, the appliance is equipped with a replacement reminder which is activated automatically after approx. two years. The replacement reminder is repeated at 9 successive shaves or until you reset the shaver.
natural_image
Illustration of a hand holding a device with an arrow pointing to a separate device (no text or symbols present)1 The shaving unit symbol flashes when you switch off the shaver.
Note: The displays of the various shaver types look different, but show the same symbol.
2 Pull the shaving head holder off the bottom part of the shaving unit.

text_image
RQ113 Attach the new shaving head holder to the bottom part of the shaving unit ('click').
text_image
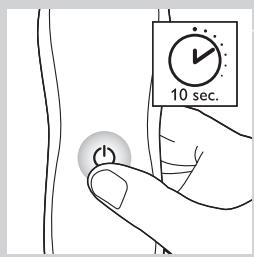
10 sec.4 To reset the shaver, press and hold the on/off button for approx. 10 seconds.
Note: If you do not reset the shaver at the first replacement reminder, it continues to show the shaving unit symbol at 8 more shaves or until you reset the shaver.
Ordering accessories
To purchase accessories for this appliance, please visit our online shop at www.shop.philips.com/service. If the online shop is not available in your country, go to your Philips dealer or a Philips service centre. If you have any difficulties obtaining accessories for your appliance, please contact the Philips Consumer Care Centre in your country. You find its contact details in the worldwide guarantee leaflet.
The following parts are available
- HQ8505 adapter
- RQ11 Philips Shaving Head Holder
- HQ110 Philips Shaving Head Cleaning Spray
- HQ200 Philips Cleaning Fluid
- RQ111 Beard Styler attachment

text_image
2yrsShaving head holder
- We advise you to replace the shaving head holder every two years. Always replace the shaving head holder with an original RQ11 Philips Shaving Head Holder.
Cleaning
- RQ1197CC, RQ1195CC, RQ1185CC, RQ1180CC, RQ1175CC only: use Jet Clean Solution (HQ200) for regular cleaning of the shaving heads.
Environment
natural_image
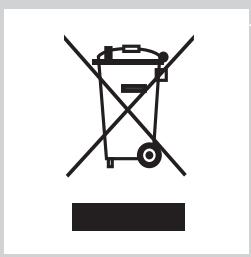
Symbol of a trash bin crossed with no visible text or labels- Do not throw away the shaver and the Jet Clean System (RQ1197CC, RQ1195CC, RQ1185CC, RQ1180CC, RQ1175CC only) with the normal household waste at the end of their life, but hand them in at an official collection point for recycling. By doing this, you help to preserve the environment.

natural_image
Symbol of a trash bin crossed out by two crossed lines (no text or labels)- The built-in rechargeable shaver battery contains substances that may pollute the environment. Always remove the battery before you discard or hand in the shaver at an official collection point. Dispose of the battery at an official collection point for batteries. If you have trouble removing the battery, you can also take the appliance to a Philips service centre. The staff of this centre will remove the battery for you and will dispose of it in an environmentally safe way.
Removing the rechargeable shaver battery
| Only remove the rechargeable battery when you discard the shaver.Make sure the battery is completely empty when you remove it.Be careful, the battery strips are sharp.1 Remove the back panel of the shaver with a screwdriver.2 Remove the rechargeable battery. |
Guarantee and support
| If you need information or support, please visit www.philips.com/support or read the separate worldwide guarantee leaflet. Guarantee restrictions | |
| The shaving heads (cutters and shaving guards) are not covered by the terms of the international guarantee because they are subject to wear. |
Troubleshooting
| This chapter summarises the most common problems you could encounter with the appliance. If you are unable to solve the problem with the information below, visitwww.philips.com/supportfor a list of frequently asked questions or contact the Consumer Care Centre in your country. |
| Problem | Possible cause | Solution |
| The shaver does not shave as well as it used to. | The shaving heads are damaged or worn. | Replace the shaving head holder (see chapter ‘Replacement’). |
| Long hairs obstruct the shaving heads. | Clean the shaving heads by following the steps of the extra-thorough cleaning method (see chapter ‘Cleaning and maintenance’). | |
| RQ1197CC, RQ1195CC, RQ1185CC, RQ1180CC, RQ1175CC only:The Jet Clean System has not cleaned the shaver properly, because the cleaning fluid in the cleaning chamber is soiled or the cleaning fluid level is too low. | Clean the shaver thoroughly before you continue shaving. If necessary, clean and refill the cleaning chamber (see chapter ‘Cleaning and maintenance’). | |
| The shaver does not work when I press the on/off button. | The rechargeable battery is empty. | Recharge the battery (see chapter ‘Charging’). |
| The travel lock is activated. | Press the on/off button for 3 seconds to deactivate the travel lock. | |
| The shaving head holder is soiled or damaged to such an extent that the motor cannot run. | Clean the shaving head holder or replace it (see chapters ‘Cleaning and maintenance’ and ‘Replacement’). | |
| The temperature of the shaver is too high. In this case, the shaver does not work. | Let the shaver cool down. As soon as the temperature of the shaver has dropped sufficiently, you can switch on the shaver again. | |
| RQ1197CC, RQ1195CC, RQ1185CC, RQ1180CC, RQ1175CC only: The shaver is not entirely clean after I clean it in the Jet Clean System. | The cleaning fluid in the cleaning chamber is soiled. | Empty and rinse the cleaning chamber and refill it with new cleaning fluid. |
| The cleaning fluid level is too low. If the fluid volume in the cleaning chamber drops below the minimum level during the cleaning program, the program aborts. The cleaning light and the ‘cleaning chamber empty’ symbol flash at intervals and the holder returns to its starting position. | Refill the cleaning chamber with cleaning fluid to a level between the two lines (see chapter ‘Cleaning and maintenance’). | |
| You have used another cleaning fluid than the original Philips cleaning fluid. | Only use HQ200 Philips Cleaning Fluid. | |
| RQ1197CC, RQ1195CC, RQ1185CC, RQ1180CC, RQ1175CC only: The Jet Clean System does not work when I press the on/off button. | The Jet Clean System is not connected to the mains. | Put the small plug in the Jet Clean System and put the adapter in the wall socket. |
| There is no electrical connection between the Jet Clean System and the shaver. | Press the shaver tightly into the holder to lock it into place. | |
| The shaver is not fully charged after I charge it in the charger/Jet Clean System (RQ1197CC, RQ1195CC, RQ1185CC, RQ1180CC, RQ1175CC only). | You have not placed the shaver in the charger/Jet Clean System properly. | Make sure you press the shaver until it locks into place. |
Introduktion
natural_image
Prohibition sign showing a faucet with no text or symbols (no readable text)Generelt
Fare
text_image
Diagram showing a power switch and its 3D model with labeled components and connection pointtext_image
Diagram showing a remote control panel connected to a pair of electric shakers, with icons for function keys and buttons.- RQ1185, RQ1167, RQ1160

text_image
Diagram showing a pair of electronic devices connected to a handheld device, with labeled ports and control buttons.- RQ1155, RQ1151, RQ1150, RQ1145, RQ1141, RQ1131

text_image
Diagram showing battery charging mechanism with lock, power lines, and battery symbol
text_image
Diagram showing battery charging symbols and a battery icon with upward arrow, indicating charging direction or status.Opladning
text_image
Diagram showing a battery connected to a series of five identical components with a lock icon and a separate battery symbol.
text_image
Diagram showing battery and control icons with labels like Wi-Fi, lock, battery, and power plugtext_image
Diagram showing battery and sensor icons with labels for signal, lock, reset, and connection symbolstext_image
Diagram showing battery charging process with lock, power plug, and battery stack connectiontext_image
Diagram showing security icons including a lock and Wi-Fi symbol, alongside a padlock icon connected by lines.text_image
Diagram showing a power button and a circular icon with a smiley face inside, likely representing a health or social context.natural_image
Line drawing of a mechanical device with a tool inserted, no text or symbols presentnatural_image
Diagram of a mechanical clamp or bracket with rotational motion arrows (no text or symbols)text_image
Diagram showing how to switch a power shaver with labeled parts and electrical connectionsnatural_image
Line drawing of a vacuum cleaner with a handle and top component (no text or symbols)text_image
Diagram illustrating a mechanical or safety procedure with labeled parts and motion indicators4 Placer selve shaveren i holderen bag de to klemmer (1), og tryk den ned, indtil den låses på plads (2).
natural_image
Illustration of a person's face with arrows indicating motion or movement, no text or symbols presentnatural_image
Diagram showing a hand pressing down a component with an arrow indicating upward motion (no text or symbols present)text_image
Diagram illustrating spray application process with labeled steps 1 and 2, showing spray nozzle and spray bottle setupnatural_image
Diagram showing a hand pressing down on a mechanical component with an arrow indicating force or movement (no text or symbols present)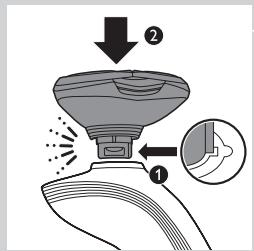
text_image
Diagram illustrating a spray gun with labeled parts and directional arrows, showing spray motion and component placement.natural_image
Diagram showing a mechanical assembly with a tool and a cross symbol, no text or labels presentnatural_image
Illustration of a hand holding a device with a magnified inset showing a mechanical component (no text or symbols)natural_image
Illustration of a hand using a hairdryer with a black arrow indicating compression (no text or symbols)text_image
Diagram showing a person's head with labeled parts and directional arrows indicating movement or force.natural_image
Line drawing of a hand holding a power switch with a circular button labeled 'Power' (no text or symbols beyond the icon)natural_image
Illustration of a person applying a hair product to their face (no text or symbols)natural_image
Line drawing of a hand holding a handheld device with a brush and arrow indicating motion (no text or symbols)natural_image
Illustration of two hands performing a finger manipulation technique with directional arrows (no text or symbols)natural_image
Illustration of a person applying a hair product to their ear (no text or symbols)natural_image
Line drawing of a male head and shoulders with short hair and beard (no text or symbols)- Et "skægstubbe-look"
natural_image
Line drawing of a man's head and beard (no text or symbols)- Et fuldskæg
natural_image
Line drawing of a male's head and shoulders (no text or symbols)- Et overskæg
natural_image
Line drawing of a man's head and shoulders (no text or symbols)- Et gedeskæg
natural_image
Illustration of a hand holding a device with an arrow pointing to a separate view of a device (no text or symbols present)
natural_image
Illustration of a hand holding a device with a black arrow pointing to a device component (no text or symbols present)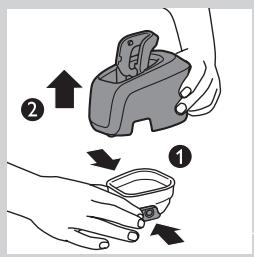
text_image
Diagram illustrating two-step steps of a device handling, labeled with arrows and numbered indicators.natural_image
Illustration of hands using a handheld device to clean or spray liquid, with no text or symbols present.
natural_image
Line drawing of a vacuum cleaner with a handle and top component (no text or symbols)
text_image
Diagram illustrating foot contact technique with labeled parts and motion indicators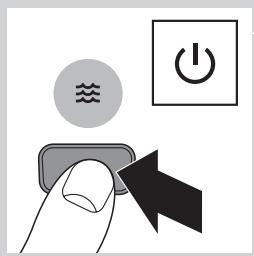
text_image
Diagram showing a hand pressing a button with icons for water, power, and switch symbolsnatural_image
Diagram of a container with internal flow and a wavy pattern, no text or symbols present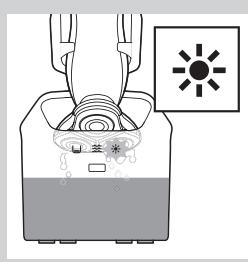
natural_image
Diagram of a device with a sun icon and internal components, no text or symbols present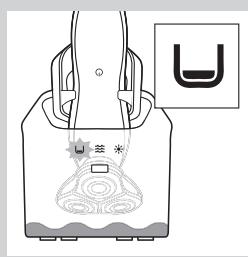
natural_image
Line drawing of a hand holding a device with abstract patterns and a small symbol labeled 'U' (no text or symbols on the diagram itself)
text_image
Diagram illustrating a hand holding a device with two steps: adding an upward arrow and moving a small container, labeled ① and ②.
natural_image
Illustration of a hand holding a small object with a looped arm, no text or symbols presentnatural_image
Illustration of a water tap into a container with liquid, no text or symbols present3 Skyl rensekammeret under vandhanen.
text_image
PO Box Water Levelnatural_image
Illustration of hands using a handheld device to remove or spray particles (no text or symbols)natural_image
Illustration of a hand pressing down on a device component with an arrow indicating motion (no text or symbols)natural_image
Abstract diagram with concentric circles and a black arrow pointing left (no text or symbols)natural_image
Mechanical assembly diagram showing gears and housing components with an upward arrow (no text or labels)natural_image
Mechanical gear assembly diagram showing a rotating shaft and housing with an upward arrow (no text or symbols)natural_image
Diagram showing mechanical components with arrows indicating motion or force direction (no text or symbols)natural_image
Mechanical assembly diagram showing a brush applying material to a mechanical component (no text or symbols)natural_image
Mechanical assembly diagram showing a gear and shaft assembly with a downward arrow indicating motion (no text or symbols present)natural_image
Mechanical assembly diagram showing a valve mechanism with a downward arrow indicating motion (no text or symbols present)natural_image
Abstract diagram with concentric circles and radiating lines, no text or symbols presentnatural_image
Illustration of a hand holding a device with a magnified view showing internal components (no text or symbols)text_image
Diagram showing a hand holding a tool with a thermometer above a tip, illustrating temperature measurement.natural_image
Illustration of two hands using a tool to lift water from a surface, showing liquid droplets (no text or symbols)natural_image
Line drawing of a mechanical component with an arrow indicating motion (no text or symbols)text_image
Diagram showing electrical connections with power and circular symbols, including a heart icon and a smiley face icon.
natural_image
Illustration of a hand holding a device with an arrow pointing to a separate device (no text or symbols present)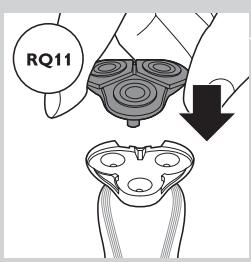
text_image
RQ11
text_image
10 sec.natural_image
Symbol of a trash bin crossed out by two crossed lines (no text or numbers present)
natural_image
Symbol of a trash bin crossed out by two diagonal lines (no text or numbers present)natural_image
Prohibition sign showing a faucet with no text or symbols (no readable text)Vaara
text_image
Diagram showing a power button and a brush with labeled buttons, illustrating the mechanism of switching or positioning.text_image
Diagram showing a remote control panel connected to a brush with a scroll, illustrating the use of a brush.- RQ1185, RQ1167, RQ1160

text_image
Diagram showing a pair of electronic devices connected to a handheld device, with labeled ports and directional arrows.- RQ1155, RQ1151, RQ1150, RQ1145, RQ1141, RQ1131
Lataaminen

text_image
Diagram showing battery charging mechanism with lock, power lines, and battery symbol
text_image
Diagram showing battery charging symbols and a battery icon with upward arrow, indicating charging direction or status.natural_image
Diagram showing a battery connected to a vertical stack of circular components with a lock icon (no text or symbols)
text_image
Diagram showing battery and control icons with labels like Wi-Fi, lock, battery, and power plugtext_image
Diagram showing battery symbol, lock, and connection points with a battery icon above ittext_image
Diagram showing battery and connection icons including lock, battery, switch, and power symboltext_image
Diagram showing battery charging process with lock, power plug, and battery stack connectiontext_image
Diagram showing security icons including a lock and Wi-Fi symbol, alongside a padlock icon connected by lines.text_image
Diagram showing a power button and a circular icon with a smiley face inside, likely representing a health or social context.natural_image
Line drawing of a mechanical device with a tool inserted, no text or symbols presentnatural_image
Diagram of a mechanical clamp or clamping device with rotational arrow indicating motion (no text or symbols)
text_image
Diagram showing a hairdryer with labeled parts and electrical connectionsnatural_image
Line drawing of a vacuum cleaner with a handle and top component (no text or symbols)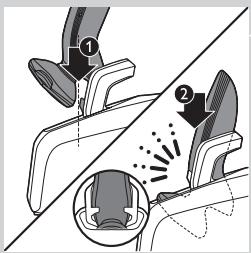
text_image
Diagram illustrating foot contact technique with labeled parts and motion indicatorsnatural_image
Illustration of a person's face with arrows indicating movement or pressure points (no text or symbols)natural_image
Diagram showing a hand pressing down a mechanical component with an arrow indicating upward motion (no text or symbols present)text_image
Diagram illustrating a spray gun mechanism with labeled parts and directional arrowsnatural_image
Diagram showing a hand holding a tool above a device with an arrow indicating motion (no text or symbols present)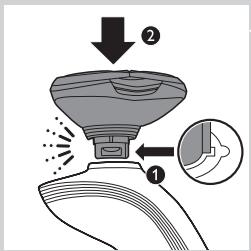
text_image
Diagram illustrating spray application on a device with labeled parts and magnified viewnatural_image
Diagram showing a mechanical assembly with a downward arrow and cross symbol (no text or labels)text_image
Diagram showing a hand holding a device with a magnified inset highlighting a component, including a circular component and a downward arrow indicating action or change.natural_image
Illustration of a hand holding a handheld device with a lightning bolt symbol (no text or labels)text_image
Diagram showing a person's head with labeled parts and directional arrows indicating movement or force.natural_image
Line drawing of a hand holding a power shaver with a circular button labeled 'Power' (no text or symbols beyond the icon)natural_image
Illustration of a person applying a hair product to their face (no text or symbols)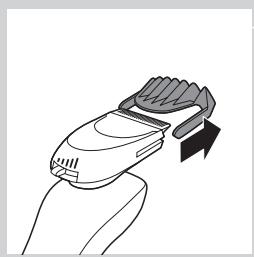
natural_image
Line drawing of a hand holding a handheld device with a stylized brush (no text or symbols)
natural_image
Illustration of two hands holding a tool with directional arrows indicating movement or force (no text or symbols present)
natural_image
Illustration of a person applying a hair product to their ear (no text or symbols)
natural_image
Line drawing of a male head with short hair and beard (no text or symbols)natural_image
Line drawing of a man's head and shoulders with short hair and beard (no text or symbols)- Kokoparta

natural_image
Line drawing of a male face with short hair and mustache (no text or symbols)- Viikset

natural_image
Line drawing of a man's head and shoulders (no text or symbols)- Pukinparta
Puhdistus ja hoito
text_image
Diagram illustrating a hand holding a device with two arrows indicating movement or change, labeled ① and ②.natural_image
Illustration of hands using a handheld device to clean or spray liquid, with no text or symbols present.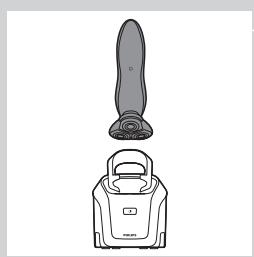
natural_image
Line drawing of a vacuum cleaner with a handle and top component (no text or symbols)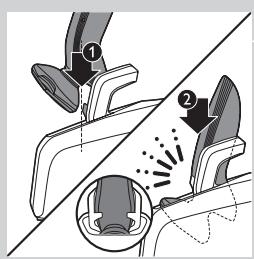
natural_image
Diagram showing two mechanical components with numbered parts, one partially cut and one partially inserted (no text or symbols)
text_image
Diagram showing a hand pressing a button with icons for water, power, and switch symbolsnatural_image
Diagram of a person inside a container with a wavy line above, showing abstract patterns and no readable text or symbols.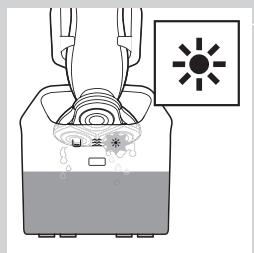
natural_image
Diagram of a device emitting heat from a fan with a sun symbol (no text or labels)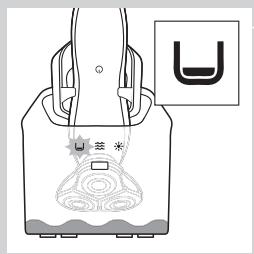
natural_image
Diagram of a hand holding a device with a U-shaped symbol and a star, no text or labels present
text_image
Diagram showing two hands holding a device with arrows indicating motion or change, labeled with numbers ① and ②.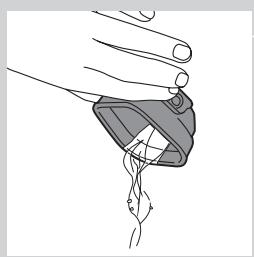
natural_image
Illustration of a hand holding a small object with a curved line inside, no text or symbols presentnatural_image
Illustration of a water spray bottle dispensing liquid into a square basin (no text or symbols)text_image
PO Box Water Levelnatural_image
Illustration of hands using a handheld device to remove or spray particles (no text or symbols)natural_image
Illustration of a hand holding a device with an arrow pointing to a separate device (no text or symbols present)natural_image
Abstract diagram with concentric circles and a black arrow pointing left (no text or symbols)natural_image
Mechanical assembly diagram showing gear and housing components with an upward arrow (no text or labels)natural_image
Mechanical gear assembly diagram showing a rotating shaft and housing with an upward arrow (no text or symbols)natural_image
Diagram showing a hand holding a gear with arrows indicating motion or force (no text or symbols)natural_image
Mechanical assembly diagram showing a brush applying force to a mechanical component (no text or symbols)natural_image
Mechanical assembly diagram showing a gear and shaft assembly with a downward arrow indicating motion (no text or symbols present)natural_image
Mechanical assembly diagram showing a valve mechanism with a downward arrow indicating motion (no text or symbols present)natural_image
Abstract diagram with concentric circles and radiating lines, no text or symbols presentnatural_image
Illustration of a hand holding a device with a downward arrow indicating action (no text or symbols present)text_image
Diagram illustrating a temperature measurement process with labeled temperature readings (°C and °F) and a hand holding a sample.natural_image
Illustration of two hands using a tool to lift water from a surface, showing liquid droplets (no text or symbols)natural_image
Line drawing of a mechanical component with an arrow indicating motion (no text or symbols)text_image
Diagram showing electrical connections with power and circular symbols, including a warning icon with smiley face.natural_image
Illustration of a hand holding a device with an arrow pointing to a separate device (no text or symbols present)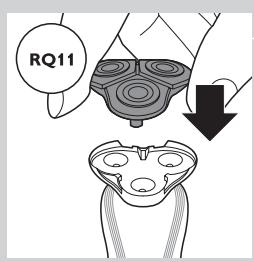
text_image
RQ11natural_image
Symbol of a trash bin crossed with no visible text or labelsnatural_image
Symbol of a trash bin crossed out by a diagonal line, representing no waste or elimination (no text present)natural_image
Prohibition sign showing a faucet with no text or symbols (no readable text)Danger
text_image
Diagram showing a power switch and its 3D model with labeled components and connection pointtext_image
Diagram showing a remote control panel connected to a pair of electric shakers, with icons for function keys and buttons.- RQ1185/RQ1167/RQ1160

text_image
Diagram showing a pair of remote control switches connected to a handheld electric shaver, illustrating the connection mechanism.- RQ1155/RQ1151/RQ1150/RQ1145/RQ1141/RQ1131
Charge

text_image
Diagram showing a battery connected to a lock and a star-shaped device, with an icon indicating 'Control' and a plus sign.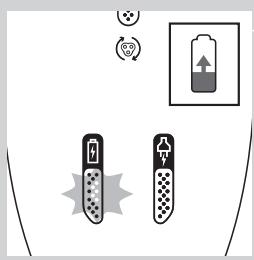
text_image
Diagram showing battery charging symbols and charging mechanism with icons for power, battery, and charging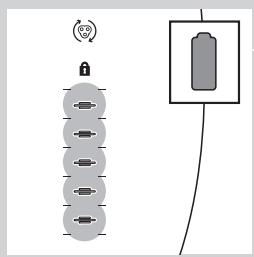
natural_image
Diagram showing a battery connected to a vertical stack of circular components with a lock icon (no text or symbols)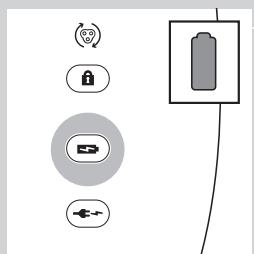
text_image
Diagram showing battery and connection icons including lock, battery, switch, and power source symbolstext_image
Diagram showing battery symbol, lock, and connection to a star-shaped device with a battery icon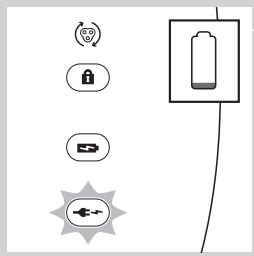
text_image
Diagram showing battery and connection icons including lock, battery, switch, and power plug symbolsRQ1197/RQ1195/RQ1180/RQ1175
text_image
Diagram showing battery connection with lock, battery symbol, and power supply connectionsRQ1197/RQ1195/RQ1180/RQ1175
text_image
Diagram showing a power button and a circular icon with a smiley face inside, likely representing a health or safety symbol.natural_image
Line drawing of a mechanical device with a tool inserted, no text or symbols presentnatural_image
Illustration of a hand gripping a chair with a curved arrow indicating rotation (no text or symbols)text_image
Diagram showing a hairbrush with labeled parts and electric shock experiment setupnatural_image
Line drawing of a vacuum cleaner with a handle and top component (no text or symbols)text_image
Diagram illustrating foot contact technique with labeled parts and motion indicatorsnatural_image
Illustration of a person's face with arrows indicating motion or movement, no text or symbols presentnatural_image
Diagram showing a hand pressing down a valve with a cross symbol, indicating mechanical or fluid flow (no text or labels)text_image
Diagram illustrating spray application process with labeled steps 1 and 2, showing spray bottle and spray nozzle setupnatural_image
Illustration of a hand using a tool to press or install a component, with an upward arrow indicating motion (no text or symbols present)text_image
Diagram illustrating a spray gun with labeled parts and an inset showing the tip of the spray gun.natural_image
Diagram showing a hand pressing down a device with a cross symbol and an upward arrow, no text or labels present.natural_image
Illustration of a hand holding a small electronic device with a magnified inset showing internal components (no text or symbols)natural_image
Illustration of a hand using a hairdryer with a black arrow indicating compression (no text or symbols)text_image
Diagram showing a person's head with numbered arrows indicating movement or force, labeled 1 and 2.natural_image
Line drawing of a hand holding a power switch with a circular button labeled 'Power' (no text or symbols beyond the icon)natural_image
Line drawing of a person applying a hair to their neck, no text or symbols present
natural_image
Line drawing of a hand holding a handheld device with a curved handle and arrow indicator (no text or symbols)
natural_image
Illustration of two hands holding a tool with arrows indicating motion or force direction (no text or symbols)
natural_image
Illustration of a person applying a hair product to their ear (no text or symbols)
natural_image
Line drawing of a male head and neck with short hair and beard (no text or symbols)natural_image
Line drawing of a man's head and shoulders with short hair and beard (no text or symbols)natural_image
Line drawing of a man's head and shoulders (no text or symbols)- Une moustache

natural_image
Line drawing of a man's head and shoulders (no text or symbols)- Un bouc
text_image
Diagram illustrating a hand holding a device with directional arrows indicating movement or change, labeled with numbers ① and ②.natural_image
Illustration of hands using a handheld device to remove or spray particles (no text or symbols)natural_image
Line drawing of a vacuum cleaner with a handle and top component (no text or symbols)text_image
Diagram illustrating foot contact technique with labeled parts and motion indicators
natural_image
Illustration of a hand holding a medical device with a catheter inserted (no text or symbols)natural_image
Illustration of a faucet pouring liquid into a square basin (no text or symbols)text_image
Diagram showing a hand pouring liquid into a container with a label indicating 'CO2OH' and directional arrows, likely illustrating a chemical or physical process.natural_image
Illustration of hands using a handheld device to remove or spray particles (no text or symbols)natural_image
Illustration of a hand holding a mechanical component with an arrow indicating upward motion (no text or symbols)natural_image
Mechanical gear assembly diagram showing a rotating shaft and housing with a downward arrow indicating motion (no text or symbols)natural_image
Mechanical assembly diagram showing a gear-like component with a downward arrow indicating motion (no text or symbols present)natural_image
Abstract diagram with concentric circles and radiating lines, no text or symbols presentnatural_image
Illustration of a hand holding a device with a downward arrow indicating process (no text or symbols)text_image
Diagram illustrating a temperature measurement process with thermometer and magnified view of the stepnatural_image
Illustration of two hands using a tool to lift a small object, with no text or symbols present.natural_image
Diagram of a mechanical component with an arrow indicating motion (no text or symbols)text_image
Diagram showing electrical connections with power source, switch, and circular symbol indicating rotation or signalnatural_image
Illustration of a hand holding a device with an arrow pointing to a device component (no text or symbols present)natural_image
Symbol of a trash bin crossed with no visible text or labelsnatural_image
Symbol of a trash bin crossed out by two crossed lines (no text or labels)natural_image
Prohibition sign showing a faucet with no text or symbols (no readable text)Algemeen
Gevaar
text_image
Diagram showing a power switch and its shaker with labeled buttons and componentstext_image
Diagram showing a remote control panel connected to a pair of electric shakers, with labeled buttons and connection points.- RQ1185, RQ1167, RQ1160
text_image
Diagram showing a pair of electronic devices connected to a power shaver, with labeled ports and connection points.- RQ1155, RQ1151, RQ1150, RQ1145, RQ1141, RQ1131
Opladen
text_image
Diagram showing battery charging mechanism with lock, power, and connection symbolstext_image
Diagram showing battery charging symbols and charging mechanism with icons for power, battery, and charging elementsRQ1185, RQ1167, RQ1160, RQ1155, RQ1151, RQ1150, RQ1145, RQ1141, RQ1131
text_image
Diagram showing a battery connected to a series of circular components with a lock icon and a separate rectangular device.text_image
Diagram showing battery and connection icons with labels like lock, battery, switch, and power sourcetext_image
Diagram showing battery symbol, lock, and connection points with a battery icon above ittext_image
Diagram showing battery and connection icons including lock, battery, switch, and power source symbolsRQ1185, RQ1167, RQ1160, RQ1155, RQ1151, RQ11510, RQ1145, RQ1141, RQ1131
text_image
Diagram showing battery charging process with lock, power input, and load connectiontext_image
Diagram showing electrical connections with power and circular symbols, including a warning icon with smiley face.natural_image
Line drawing of a mechanical device with a tool inserted, no text or symbols presentnatural_image
Illustration of a chair with a curved arrow indicating rotational motion (no text or symbols)text_image
Diagram illustrating a hairpin with labeled parts and electrical connections, showing how to drive or attach.natural_image
Line drawing of a vacuum cleaner with a handle and spout (no text or symbols)text_image
Diagram illustrating foot contact technique with labeled parts and motion indicatorsnatural_image
Illustration of a person's face with arrows indicating motion or movement, no text or symbols presentnatural_image
Diagram showing a mechanical assembly with a handle, cross symbol, and upward arrow (no text or labels)text_image
Diagram illustrating spray application process with labeled steps 1 and 2, showing spray nozzle and spray bottle setup
natural_image
Diagram showing a hand pressing down on a mechanical component with an arrow indicating upward motion (no text or symbols present)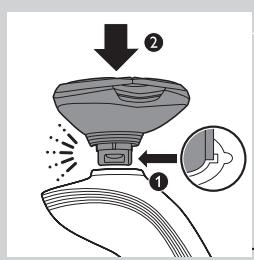
text_image
Diagram illustrating spray application process with labeled steps 1 and 2, showing spray bottle and spray nozzle setup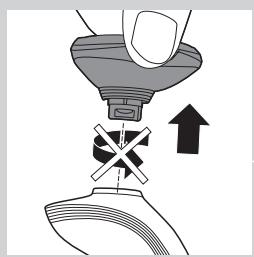
natural_image
Diagram showing a hand pressing down a funnel with a cross symbol, indicating mechanical or fluid flow (no text or labels)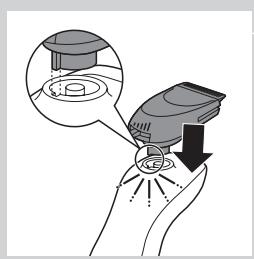
natural_image
Illustration of a hand holding a device with a magnified inset showing internal components (no text or symbols)natural_image
Illustration of a hand using a hairdryer to clean or brush with a downward arrow (no text or symbols)text_image
Diagram showing a person's head with labeled parts and directional arrows indicating movement or force.natural_image
Line drawing of a hand holding a power shaver with a button labeled 'Power' (no text or symbols beyond the icon)natural_image
Illustration of a person applying a hair to their face, no text or symbols present4 U kunt nu beginnen uw baard te stylen.
natural_image
Line drawing of a hand holding a handheld device with a stylized brush (no text or symbols)natural_image
Illustration of two hands holding a tool with directional arrows indicating movement or force (no text or symbols)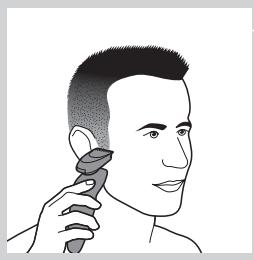
natural_image
Illustration of a person using a hairdryer (no text or symbols present)
natural_image
Line drawing of a male head with short hair and beard (no text or symbols)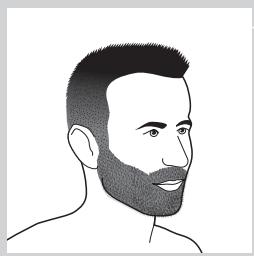
natural_image
Line drawing of a man's head and beard (no text or symbols)
natural_image
Line drawing of a male's head and shoulders (no text or symbols)natural_image
Line drawing of a man's head and shoulders (no text or symbols)- Een sik
natural_image
Illustration of a hand holding a device with an arrow pointing to a separate device (no text or symbols present)natural_image
Illustration of a hand holding a device with a downward arrow indicating compression or disassembly (no text or symbols present)text_image
Diagram illustrating a hand holding a device with two arrows indicating movement, labeled ① and ②.text_image
PO Box Water Levelnatural_image
Illustration of hands using a handheld device to remove or clean material, with no text or symbols present.natural_image
Line drawing of a vacuum cleaner with a handle and top component (no text or symbols)
text_image
Diagram illustrating foot contact technique with labeled parts and motion indicators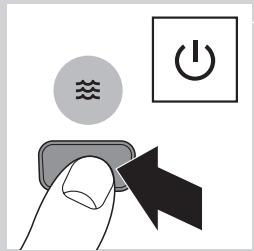
text_image
Diagram showing a hand pressing a button with icons for water, power, and switch symbols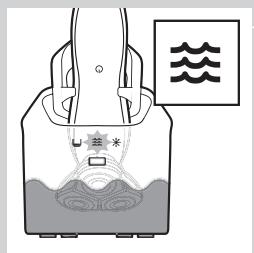
text_image
Diagram showing a container with liquid and a labeled component marked with asterisk, alongside a wavy line symbol.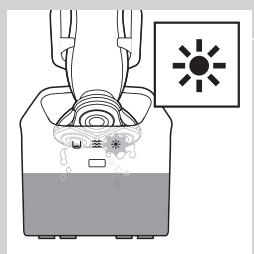
text_image
Diagram showing a device with a sun symbol and Chinese text labels, indicating a warning or safety hazard.natural_image
Line drawing of a hand holding a bag with a decorative pattern and a small U-shaped symbol (no text or symbols present)
text_image
Diagram showing two-step instructions for using a device to interact with a small container, labeled with arrows and numbered steps.
natural_image
Line drawing of a hand holding a small object with a curved line inside, no text or symbols present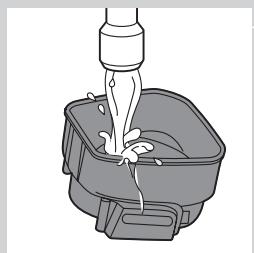
natural_image
Illustration of a bucket being lifted by a piping bag (no text or symbols)
text_image
Diagram showing a hand pouring liquid into a container with a magnified inset illustrating water flow direction.natural_image
Illustration of hands using a handheld device to interact with a small bowl, showing motion and vibration (no text or symbols)natural_image
Illustration of a hand holding a circular object with an arrow pointing to a separate abstract shape (no text or symbols)natural_image
Pure mechanical component diagram without any text, numbers, or symbolsnatural_image
Mechanical assembly diagram showing gears and housing components with an upward arrow (no text or labels)natural_image
Mechanical gear assembly diagram showing a rotating shaft and housing with an upward arrow (no text or symbols)natural_image
Illustration of a hand holding a textured object with arrows indicating direction (no text or symbols)natural_image
Mechanical assembly diagram showing a brush and rotating components (no text or symbols)natural_image
Mechanical gear assembly diagram showing a rotating shaft and housing with a downward arrow indicating motion (no text or symbols)natural_image
Mechanical assembly diagram showing a valve mechanism with a downward arrow indicating motion (no text or symbols present)natural_image
Abstract diagram with concentric circles and radiating lines, no text or symbols presentnatural_image
Illustration of a hand holding a device with a downward arrow indicating motion or change (no text or symbols present)text_image
Diagram illustrating a temperature measurement process with thermometer and magnified view of the stepnatural_image
Illustration of two hands using a tool to lift a fish and drop it, with no text or symbols present.natural_image
Line drawing of a mechanical device with a lever and handle, showing motion direction (no text or symbols)text_image
Diagram showing electrical connections with power and switch symbols, including a circular icon labeled '电' (electricity) and a circular icon with a smiley face.natural_image
Illustration of a hand holding a device with an arrow pointing to a separate view of a device (no text or symbols present)natural_image
Symbol of a waste bin with crossed lines indicating no waste, and a blank rectangular block below (no text or labels)natural_image
Symbol of a trash bin crossed out by two diagonal lines (no text or numbers present)natural_image
Prohibition sign showing a faucet with no text or symbols (no readable text)Gefahr
text_image
Diagram showing a power button connected to a brush, with labeled buttons and a pointer indicating the right-hand rule.text_image
Diagram showing a remote control panel connected to a brushbrush with labeled buttons and pointer- RQ1185, RQ1167, RQ1160
natural_image
Diagram showing a remote control panel connected to a handheld electric shaver (no text or symbols present)- RQ1155, RQ1151, RQ1150, RQ1145, RQ1141, RQ1131
Laden
text_image
Diagram showing a battery connected to a vertical line with lock symbols and a lightning bolt icon, likely representing a system or signal flow.text_image
Diagram showing battery charging symbols and charging mechanism with icons for power, battery, and charging elementsnatural_image
Pure electrical circuit lines without any symbolstext_image
Diagram showing battery and connection icons including lock, battery, USB, and power plug symbolsnatural_image
Pure electrical circuit lines without any symbolstext_image
Diagram showing battery and sensor icons with labels for status, lock, battery, and connection symbolstext_image
Diagram showing battery charging process with lock, battery symbol, and power connectionstext_image
Diagram showing a power button and a circular icon with a smiley face inside, likely representing a medical or health concept.natural_image
Line drawing of a mechanical device with a tool inserted, no text or symbols present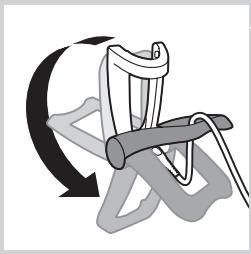
natural_image
Illustration of a chair with crutches and a pulley, showing rotational motion (no text or symbols)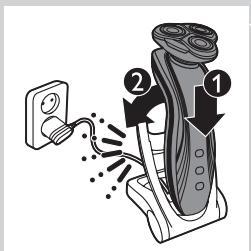
text_image
Diagram showing hairpin mounting process with labeled parts 1 and 2natural_image
Line drawing of a vacuum cleaner with a handle and top component (no text or symbols)text_image
Diagram illustrating foot contact technique with labeled parts and motion indicatorsnatural_image
Illustration of a person's face with hand near ear, showing motion arrows indicating movement (no text or symbols)natural_image
Diagram showing a hand pressing down a device with an arrow indicating upward motion (no text or symbols present)text_image
Diagram illustrating a spray gun mechanism with labeled parts and directional arrowsnatural_image
Diagram showing a hand pressing down on a mechanical component with an arrow indicating force or movement (no text or symbols present)text_image
Diagram illustrating a spray gun with labeled parts and an inset showing the tip structurenatural_image
Diagram showing a hand pressing a component with an arrow indicating upward motion (no text or symbols present)natural_image
Illustration of a hand holding a small electronic device with a magnified inset showing internal components (no text or symbols)natural_image
Illustration of a hand holding a hairdryer with a black arrow indicating compression (no text or symbols)text_image
Diagram showing a person's head with labeled parts and directional arrows indicating movement or force.natural_image
Line drawing of a person using a power shaver with a 'Power' button (no text or symbols beyond the icon)natural_image
Illustration of a person applying a hair to their face, no text or symbols presentnatural_image
Line drawing of a hand holding a handheld device with a curved handle and arrow indicating motion (no text or symbols)natural_image
Illustration of two hands holding a device with directional arrows indicating movement (no text or symbols)natural_image
Illustration of a person applying a hairdryer to their ear (no text or symbols present)natural_image
Line drawing of a male head with short hair and beard (no text or symbols)- Ein Dreitagebart
natural_image
Line drawing of a man's head and shoulders with short hair and beard (no text or symbols)- Ein Vollbart

natural_image
Line drawing of a male's head and shoulders (no text or symbols)- Ein Schnurrbart

natural_image
Line drawing of a man's head and shoulders with short hair and beard (no text or symbols)- Ein Spitzbart
natural_image
Illustration of a hand holding a circular object with an arrow pointing to a separate abstract shape (no text or symbols)natural_image
Illustration of a hand holding a circular object with a downward arrow indicating motion or change (no text or symbols)text_image
Illustration showing two-step instructions for using a device to interact with a bowl, labeled with arrows and numbered steps.text_image
Diagram showing a container being poured into a container with a label indicating 'Water' and directional arrows.
natural_image
Illustration of hands using a manual tool to remove or clean a small container (no text or symbols)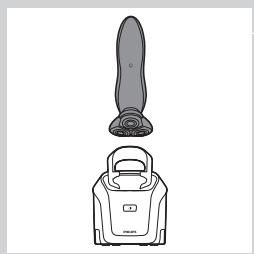
natural_image
Line drawing of a vacuum cleaner with a handle and top component (no text or symbols)text_image
Diagram illustrating foot contact technique with labeled parts and motion indicators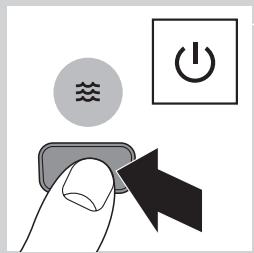
text_image
Diagram showing a hand pressing a button with icons for water, power, and switch symbols
natural_image
Diagram of a container with internal flow and a label showing '水' (water) and symbols, no readable text or labels present.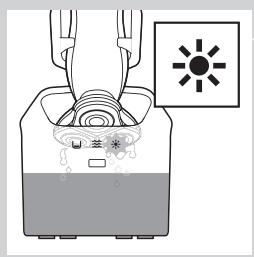
text_image
Diagram showing a device emitting heat from a fan, with a sun icon and Chinese text labels.
natural_image
Line drawing of a hand holding a bag with a U-shaped symbol and decorative elements (no text or symbols present)text_image
Diagram illustrating two-step steps of a device handling, labeled with arrows and numbered indicators.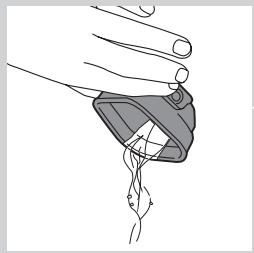
natural_image
Illustration of a hand holding a device with a curved handle and internal structure (no text or symbols)
natural_image
Illustration of a bucket being poured into a container with liquid (no text or symbols)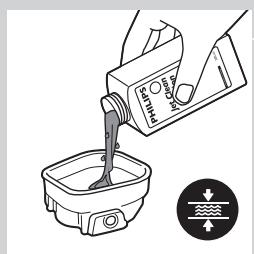
text_image
CO2OH CO2OH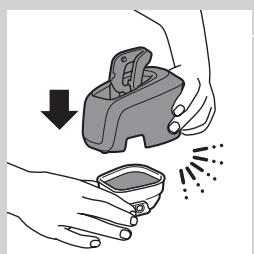
natural_image
Illustration of hands using a handheld device to remove or clean material, with no text or symbols present.natural_image
Illustration of a hand holding a device with an arrow pointing to a separate device (no text or symbols present)natural_image
Abstract diagram with concentric circles and a black arrow pointing left (no text or symbols)natural_image
Mechanical assembly diagram showing gears and shafts with an upward arrow (no text or symbols)natural_image
Mechanical gear assembly diagram showing a rotating shaft and housing with an upward arrow (no text or symbols)natural_image
Illustration of a hand holding a textured object with arrows indicating direction, no text or symbols presentnatural_image
Mechanical assembly diagram showing a brush and rotating components (no text or symbols)natural_image
Mechanical assembly diagram showing a gear and shaft assembly with a downward arrow indicating motion (no text or symbols present)natural_image
Mechanical assembly diagram showing a gear-like component with a downward arrow indicating motion (no text or symbols present)natural_image
Abstract diagram with concentric circles and radiating lines, no text or symbols presentnatural_image
Illustration of a hand holding a device with a downward arrow indicating process (no text or symbols)text_image
Diagram illustrating a hand holding a tool with a thermometer and temperature scale, showing thermal treatment process.Den Trimmer reinigen (nur RQ1197, RQ1185, RQ1180, RQ1160, RQ1155, RQ1151)
natural_image
Illustration of two hands using a tool to lift a fish and drop water onto a surface (no text or symbols)natural_image
Diagram of a medical or surgical tool with an arrow indicating direction (no text or symbols present)text_image
Diagram showing a power button and a circular icon with a smiley face inside, likely representing a health or safety symbol.natural_image
Illustration of a hand holding a device with a magnified view of its internal components (no text or symbols)natural_image
Symbol of a waste bin with crossed lines indicating no waste, and a solid black rectangle below (no text or labels)natural_image
Symbol of a trash bin crossed out by two diagonal lines (no text or numbers present)natural_image
Prohibition sign showing a faucet with no text or symbols (no readable text)Γενικά
Κίνδυνος
text_image
Diagram showing a remote control panel connected to a mushroom-shaped device with labeled ports and ports.text_image
Diagram showing a remote control with directional buttons and a stylized hairbrush illustration.- RQ1185, RQ1167, RQ1160
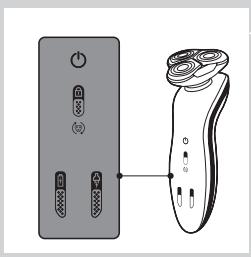
text_image
Diagram showing a remote control panel connected to a handheld electric shaver, illustrating the connection mechanism.- RQ1155, RQ1151, RQ1150, RQ1145, RQ1141, RQ1131
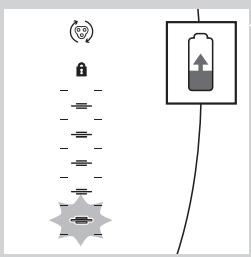
text_image
Diagram showing battery symbol, lock, and connection to a star-shaped device with directional arrows and a battery iconΦόρτιση
text_image
Diagram showing battery charging symbols and charging mechanism with icons for power, current, and chargeRQ1185, RQ1167, RQ1160, RQ1155, RQ1151, RQ1150, RQ1145, RQ1141, RQ1131
natural_image
Diagram showing a vertical stack of circular components with a battery symbol above, connected to a wire (no text or labels)text_image
Diagram showing battery and connection icons including lock, battery, switch, and power symboltext_image
Diagram showing battery symbol, lock, and connection to a star-shaped device with sensor iconstext_image
Diagram showing battery and sensor icons with labels for status, lock, battery, and connection symbolsRQ1185, RQ1167, RQ1160, RQ1155, RQ1151, RQ11510, RQ1145, RQ1141, RQ1131
text_image
Diagram showing battery charging process with lock, battery, and power connectionstext_image
Diagram showing a power button and a circular icon with a smiley face inside, likely representing a health or safety symbol.natural_image
Line drawing of a mechanical device with a tool inserted, no text or symbols presentnatural_image
Diagram of a chair with a curved arrow indicating rotational motion (no text or symbols)text_image
Diagram showing a hairdryer with labeled parts and electrical connectionsnatural_image
Line drawing of a vacuum cleaner with a handle and top component (no text or symbols)text_image
Diagram illustrating foot contact technique with labeled parts and motion indicatorsnatural_image
Illustration of a person applying facial massage to the ear with directional arrows indicating motion (no text or symbols)natural_image
Diagram showing a hand pressing down on a mechanical component with an upward arrow indicating motion (no text or symbols present)text_image
Diagram illustrating spray application process with labeled steps 1 and 2, showing spray bottle and nozzle components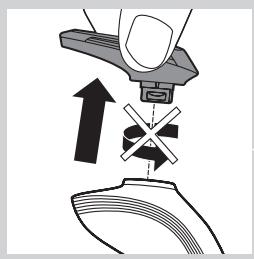
natural_image
Diagram showing a hand pressing down on a mechanical component with an upward arrow indicating motion (no text or symbols present)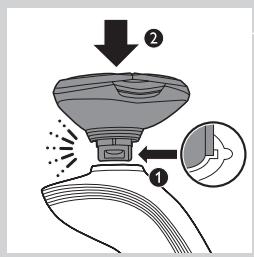
text_image
Diagram illustrating a spray gun with labeled parts and an inset showing the tip of the gun's tip.natural_image
Diagram showing a mechanical assembly with a downward force arrow and cross symbol (no text or labels)
natural_image
Illustration of a hand holding a device with a magnified inset showing a mechanical component (no text or symbols)natural_image
Illustration of a hand holding a small electric shaver with a black arrow indicating motion (no text or symbols)text_image
Diagram showing a hand holding a jaw with numbered arrows indicating motion or movement, labeled 1 and 2.natural_image
Line drawing of a hand holding a power shaver with a circular button labeled 'Power' (no text or symbols beyond basic icons)natural_image
Illustration of a person's face with a comb, showing facial features and hair (no text or symbols)natural_image
Line drawing of a hand holding a handheld device with a brush and arrow indicating motion (no text or symbols)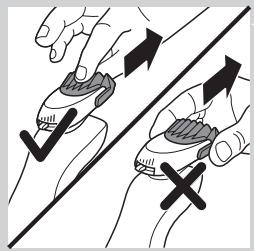
natural_image
Illustration of two hands holding a stylus with arrows indicating motion, one pointing upward and the other falling (no text or symbols)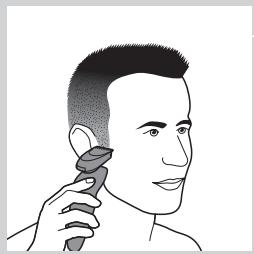
natural_image
Illustration of a person applying a hair product to their ear (no text or symbols)
natural_image
Line drawing of a male head with short hair and beard (no text or symbols)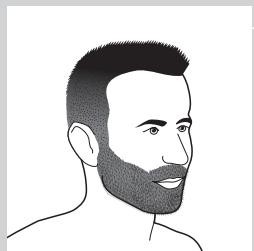
natural_image
Line drawing of a man's head and shoulders with short hair and beard (no text or symbols)natural_image
Line drawing of a man's head and shoulders (no text or symbols)- Μουστάκι

natural_image
Line drawing of a man's head and shoulders (no text or symbols)- Μουσάκι
natural_image
Illustration of a hand holding a circular object with an arrow pointing to a separate abstract shape (no text or symbols)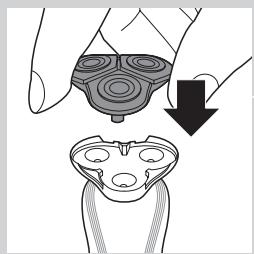
natural_image
Illustration of a hand holding a device with a magnified view showing internal components (no text or symbols)text_image
Diagram showing two hands holding a device with arrows indicating motion or change, labeled with numbers ① and ②.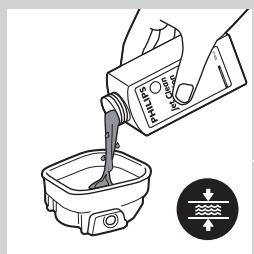
text_image
Diagram showing a hand pouring liquid into a container with a label indicating 'Recycle' and directional arrows.natural_image
Illustration of hands using a handheld device to remove or clean material, with no text or symbols present.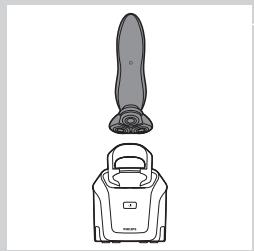
natural_image
Line drawing of a vacuum cleaner with a handle and base (no text or symbols)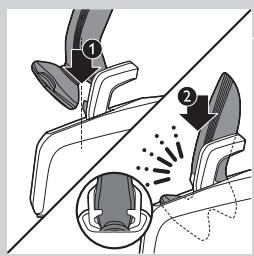
text_image
Diagram illustrating foot massage technique with labeled parts and motion arrows
text_image
Diagram showing a hand pressing a button with icons for water, power, and switch symbols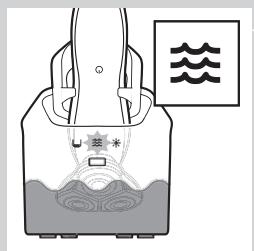
text_image
Diagram showing a device with a star symbol inside, connected to a container with water and wave symbols above it.text_image
Diagram showing a person in a container with a sun icon and Chinese text labels, likely illustrating a scientific or safety concept.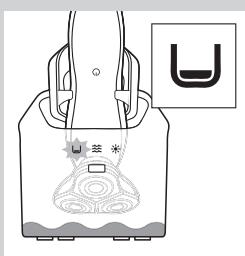
natural_image
Line drawing of a hand holding a bag with abstract patterns and a small symbol labeled 'U' (no text or symbols present)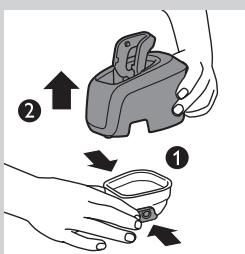
text_image
Diagram illustrating a hand holding a device with two steps: adding an upward arrow and removing it into a small bowl.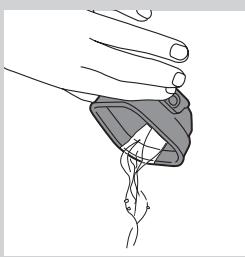
natural_image
Illustration of a hand holding a small object with a curved line and arrow, no text or symbols presentnatural_image
Illustration of a water spray bottle dispensing liquid into a square basin (no text or symbols)text_image
PO Box Water Levelnatural_image
Illustration of hands using a handheld device to remove or spray particles (no text or symbols)natural_image
Illustration of a hand pressing down on a device component with an arrow indicating motion (no text or symbols)natural_image
Abstract diagram with concentric circles and a black arrow pointing left (no text or symbols)natural_image
Mechanical assembly diagram showing gear and housing components with an upward arrow (no text or labels)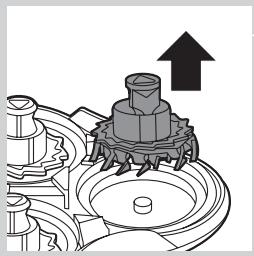
natural_image
Mechanical gear assembly diagram showing a rotating shaft and housing with an upward arrow (no text or symbols)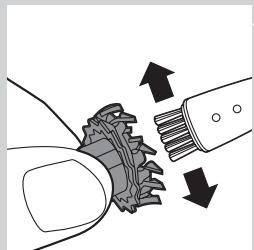
natural_image
Diagram showing mechanical gear meshing with arrows indicating direction (no text or symbols)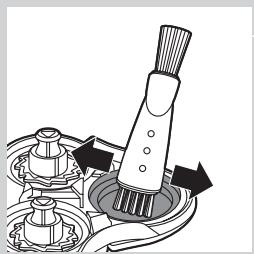
natural_image
Mechanical assembly diagram showing a brush applying material to a mechanical component (no text or symbols)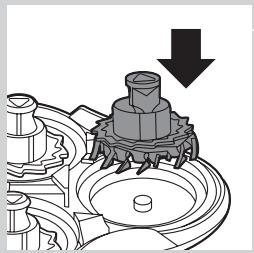
natural_image
Mechanical assembly diagram showing a gear and shaft assembly with a downward arrow indicating motion (no text or symbols present)natural_image
Mechanical assembly diagram showing a valve mechanism with a downward arrow indicating motion (no text or symbols present)natural_image
Abstract diagram with concentric circles and radiating lines, no text or symbols presentnatural_image
Illustration of a hand holding a device with a downward arrow indicating motion (no text or symbols)text_image
Diagram illustrating a temperature measurement process with thermometer and magnified view of the stepnatural_image
Illustration of a hand using a tool to lift a water droplet onto a surface, with another hand holding a spray bottle (no text or symbols present)natural_image
Illustration of a robotic arm with a handle and arrow indicating motion (no text or symbols)text_image
Diagram showing electrical connections with a power switch and a circular symbol, likely illustrating a system or signal flow.natural_image
Illustration of a hand holding a circular object with an arrow pointing to a separate abstract shape (no text or symbols)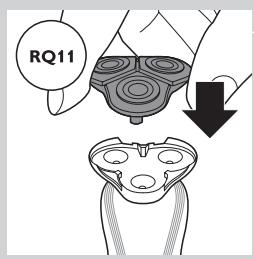
text_image
RQ11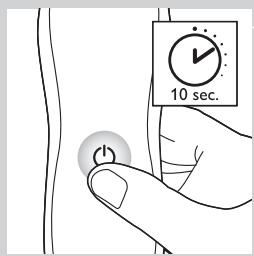
text_image
10 sec.natural_image
Symbol of a trash bin crossed out by two crossed lines (no text or numbers present)
natural_image
Symbol of a trash bin crossed out by a diagonal line, representing no waste or elimination (no text or numbers present)natural_image
Prohibition sign showing a faucet with no text or symbols (no readable text)Pericolo
text_image
Diagram showing a power button and a brush with labeled buttons and a pointer indicating the right-hand rule.text_image
Diagram showing a remote control panel connected to a pair of electric shakers, with icons for function keys and buttons.- RQ1185, RQ1167, RQ1160
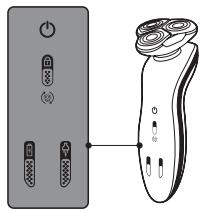
text_image
Diagram showing two electronic devices with labeled buttons and a separate brush tip, illustrating the connection or positioning of each device.- RQ1155, RQ1151, RQ1150, RQ1145, RQ1141, RQ1131
text_image
Diagram showing battery symbol, lock, and connection to a star-shaped device with power rating and upward arrowtext_image
Diagram showing battery charging symbols and charging mechanism with icons for power, battery, and charging elementsnatural_image
Diagram showing a battery connected to a series of circular components with a lock icon (no text or symbols)text_image
Diagram showing battery and connection icons including lock, battery, USB, and power plug symbolsnatural_image
Pure electrical circuit lines without any symbolstext_image
Diagram showing battery and connection icons with labels like Wi-Fi, lock, battery, and power plug symbolstext_image
Diagram showing battery charging process with lock, battery symbol, and power connectionstext_image
Diagram showing a power button and a circular icon with a smiley face inside, likely representing a health or safety symbol.natural_image
Line drawing of a mechanical device with a tool inserted, no text or symbols presentnatural_image
Diagram of a chair with a curved arrow indicating rotational motion (no text or symbols)text_image
Diagram illustrating how to discharge a hairless brush with labeled parts and electric shock hazardnatural_image
Line drawing of a vacuum cleaner with a handle and top component (no text or symbols)text_image
Diagram illustrating foot contact technique with labeled parts and motion indicatorsnatural_image
Illustration of a person's face with arrows indicating motion or movement, no text or symbols presentnatural_image
Diagram showing a hand pressing down a valve with a cross symbol, indicating pressure or force application (no text or labels present)text_image
Diagram showing spray application process with labeled steps 1 and 2, including a magnified inset of the spray nozzle.natural_image
Illustration of a hand using a tool to press or install a component, with an upward arrow indicating motion (no text or symbols present)text_image
Diagram illustrating a spray gun with labeled parts and an inset showing the tip of the gun's tip.natural_image
Diagram showing a hand pressing down a device with a cross symbol and an upward arrow, no text or labels present.natural_image
Illustration of a hand holding a small electronic device with a magnified inset showing internal components (no text or symbols)natural_image
Illustration of a hand using a hairdryer with a black arrow indicating compression (no text or symbols)text_image
Diagram showing a person's head with numbered arrows indicating movement or force, labeled 1 and 2.natural_image
Line drawing of a hand holding a power switch with a circular button labeled 'Power' (no text or symbols beyond the icon)natural_image
Line drawing of a person applying a hair to their face, no text or symbols present
natural_image
Line drawing of a hand holding a handheld device with a curved handle and arrow indicator (no text or symbols)
natural_image
Illustration of two hands holding a tool with arrows indicating motion or force direction (no text or symbols)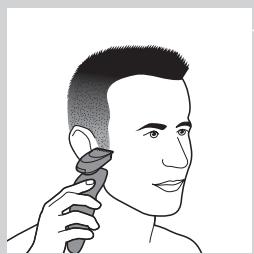
natural_image
Illustration of a person applying a hair product to their ear (no text or symbols)
natural_image
Line drawing of a male head and neck with short hair and beard (no text or symbols)natural_image
Line drawing of a man's head and shoulders with short hair and beard (no text or symbols)- Barba lunga
natural_image
Line drawing of a man's head and shoulders (no text or symbols)- Baffi

natural_image
Line drawing of a man's head and shoulders (no text or symbols)- Pizzetto
text_image
Diagram illustrating a hand holding a device with two arrows indicating movement, labeled ① and ②.natural_image
Illustration of hands using a manual tool to clean or spray particles (no text or symbols)natural_image
Line drawing of a vacuum cleaner with a handle and top component (no text or symbols)text_image
Diagram illustrating foot contact technique with labeled parts and motion indicators
natural_image
Line drawing of a hand holding a small object with a curved line inside, no text or symbols presentnatural_image
Illustration of a bucket being poured into a basin (no text or symbols)text_image
Diagram showing a hand pouring liquid into a container with a label indicating 'O2O2' and directional arrows, likely illustrating a chemical or physical process.natural_image
Illustration of hands using a handheld device to remove or clean a small container (no text or symbols)natural_image
Illustration of a hand holding a circular object with an arrow pointing to a separate abstract shape (no text or symbols)natural_image
Abstract diagram of a symmetrical mechanical or fluidic component with concentric rings and a central arrow (no text or symbols)natural_image
Mechanical assembly diagram showing a gear-like component with an upward arrow indicating motion (no text or symbols present)natural_image
Mechanical gear assembly diagram showing a rotating shaft and housing with an upward arrow (no text or symbols)natural_image
Illustration of a hand holding a gear with arrows indicating motion or force (no text or symbols)natural_image
Mechanical assembly diagram showing a brush tool interacting with a mechanical component (no text or symbols visible)natural_image
Mechanical assembly diagram showing a gear and shaft assembly with a downward arrow (no text or symbols)natural_image
Mechanical assembly diagram showing gear and housing components with a downward arrow indicating motion (no text or symbols)natural_image
Abstract symmetrical diagram with four concentric circles and radiating lines, no text or symbols presentnatural_image
Illustration of a hand holding a device with a magnified view showing internal components (no text or symbols)text_image
Diagram illustrating a droplet being placed on a tube with temperature and temperature labels, showing a hand holding a sample.natural_image
Illustration of two hands performing a water spray procedure on a surface, with no text or symbols present.natural_image
Line drawing of a hairdryer with an arrow indicating the tip (no text or symbols present)text_image
Diagram showing a power button and a circular symbol with a heart icon, likely representing a medical or health monitoring system.natural_image
Illustration of a hand holding a device with an arrow pointing to a separate device (no text or symbols present)natural_image
Symbol of a trash bin crossed out by two crossed lines (no text or numbers present)

natural_image
Symbol of a trash bin crossed out by a diagonal line, representing no waste or elimination (no text present)natural_image
Prohibition sign showing a faucet with no text or symbols (no readable text)Generelt
Fare
text_image
Diagram showing a power switch and its shaker with labeled components and connection pointstext_image
Diagram showing a remote control panel connected to a pair of electric shakers, with icons for function keys and buttons.- RQ1185, RQ1167, RQ1160
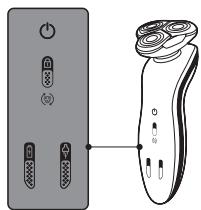
text_image
Diagram showing a pair of electronic devices connected to a handheld device, with labeled ports and control buttons.- RQ1155, RQ1151, RQ1150, RQ1145, RQ1141, RQ1131
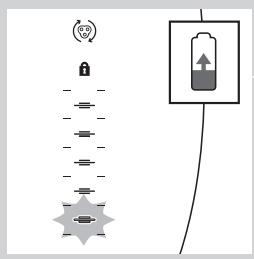
text_image
Diagram showing a battery connected to a vertical stack of icons, with an upward arrow indicating charging direction.
text_image
Diagram showing battery charging symbols and charging mechanism with icons for power, battery, and charging elementsLading
- Ladingen tar ca. én time.
natural_image
Pure electrical circuit lines without any symbols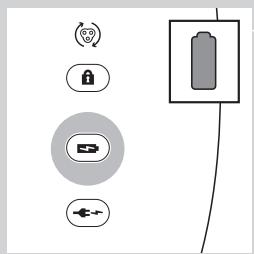
text_image
Diagram showing battery and control icons with labels like Wi-Fi, lock, battery, and power plugtext_image
Diagram showing battery and sensor icons with labels for signal, lock, battery, and connection symbolstext_image
Diagram showing battery charging process with lock, power plug, and battery stack connectiontext_image
Diagram showing security icons including a lock and Wi-Fi symbol, alongside a padlock icon connected by lines.text_image
Diagram showing a power button and a circular icon with a smiley face inside, likely representing a health or safety symbol.Ladingen tar ca. én time.
natural_image
Line drawing of a mechanical device with a tool inserted, no text or symbols present1 Sett den lille kontakten i laderen.
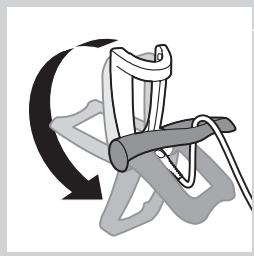
natural_image
Illustration of a hand gripping a chair with a curved arrow indicating rotation (no text or symbols)text_image
Diagram showing a hairbrush with labeled parts and electric shock experiment setup4 Sett barbermaskinen i laderen (1), og trykk den bakover til den låses på plass (2).
- Displayet viser at barbermaskinen lades (se under Lading i avsnittet Displayet).
Lading i Jet Clean-systemet (kun RQ1197CC, RQ1195CC, RQ1185CC, RQ11801CC, RQ1175CC)

natural_image
Line drawing of a vacuum cleaner with a handle and top component (no text or symbols)1 Koble den lille kontakten til Jet Clean-systemet.
2 Sett adapteren i stikkontakten.
3 Hold barbermaskinen opp-ned over holderen med baksiden av barbermaskinen mot holderen.
text_image
Diagram illustrating foot contact technique with labeled parts and motion indicatorsnatural_image
Illustration of a person's face with hand near ear, showing motion arrows indicating movement (no text or symbols)natural_image
Diagram showing a hand pressing down a component with an arrow indicating upward motion (no text or symbols present)text_image
Diagram illustrating spray gun mechanism with labeled parts and directional arrowsnatural_image
Diagram showing a hand pressing down on a mechanical component with an upward arrow indicating motion (no text or symbols present)text_image
Diagram illustrating a spray gun with labeled parts and an inset showing the tip of the gun's tip.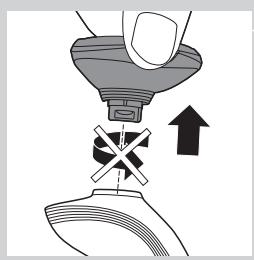
natural_image
Diagram showing a hand pressing down a device with a cross symbol and an upward arrow, no text or labels present.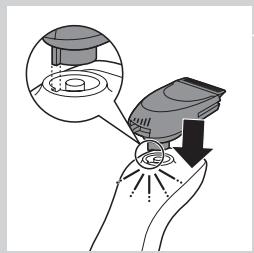
natural_image
Illustration of a hand holding a small electronic device with a magnified inset showing internal components (no text or symbols)
natural_image
Illustration of a hand using a hairbrush to clean or wear a surface, with no text or symbols present.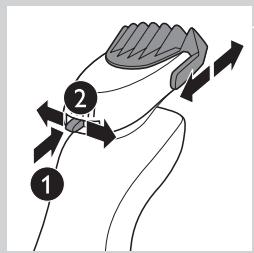
text_image
Diagram showing a hand holding a small object with labeled parts and directional arrows indicating motion or movement.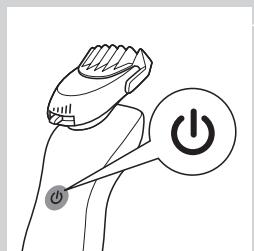
natural_image
Line drawing of a hand holding a power shaver with a button labeled 'Power' (no text or symbols beyond the icon)Bruke skjeggstylertilbehøret (kun RQ1195, RQ1175)
natural_image
Line drawing of a person applying a hair to their face, no text or symbols presentnatural_image
Line drawing of a hand holding a handheld device with a curved handle and arrow indicator (no text or symbols)natural_image
Illustration of two hands holding a tool with directional arrows indicating movement or force (no text or symbols)natural_image
Illustration of a person applying a hairdryer to their ear (no text or symbols present)natural_image
Line drawing of a male head and shoulders (no text or symbols)- Tredagersskjegg

natural_image
Line drawing of a man's head and shoulders with short hair and beard (no text or symbols)- Helskjegg

natural_image
Line drawing of a man's head and shoulders (no text or symbols)- Bart

natural_image
Line drawing of a man's head and shoulders (no text or symbols)- Fippskjegg
natural_image
Illustration of a hand holding a device with an arrow pointing to a separate device (no text or symbols present)
natural_image
Illustration of a hand holding a device with a downward arrow indicating motion or change (no text or symbols present)
text_image
Diagram showing two-step instructions for using a device to interact with a small container, labeled with arrows and numbered parts.2 Skyll barberingsenheten under varmt vann.
natural_image
Illustration of hands using a tool to remove or clean a small container with liquid, no text or symbols present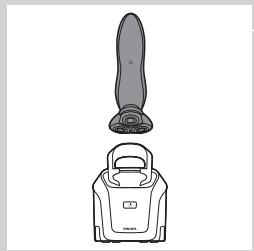
natural_image
Line drawing of a vacuum cleaner with a handle and blade (no text or symbols)
text_image
Diagram illustrating foot contact technique with labeled parts and motion arrows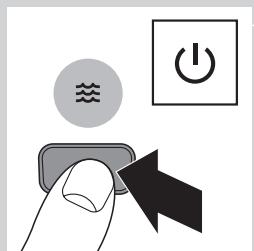
text_image
Diagram showing a hand pressing a button with icons for water, power, and switch symbolsnatural_image
Diagram of a container with internal flow and wavy lines above, no text or symbols present
text_image
Diagram showing a device with labeled components and a sun symbol indicating light or illumination.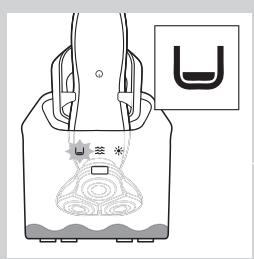
natural_image
Diagram of a device with a U-shaped symbol and a sun icon, no readable text or labels present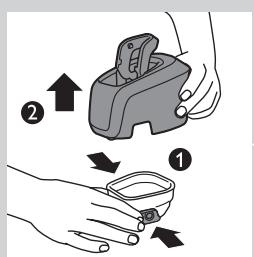
text_image
Diagram illustrating a hand holding a device with two labeled steps (① and ②) showing directional arrows indicating movement.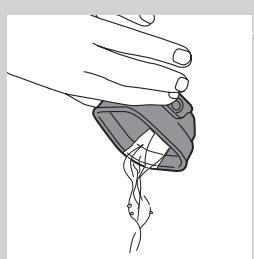
natural_image
Illustration of a hand holding a medical device with a catheter inserted (no text or symbols)natural_image
Illustration of a faucet pouring liquid into a container with water splashing (no text or symbols)text_image
Diagram showing a container being poured into a container with a label indicating 'Recycle' and flow direction.natural_image
Illustration of hands using a manual tool to clean or spray a small container (no text or symbols present)natural_image
Illustration of a hand holding a circular object with an arrow pointing to a separate abstract shape (no text or symbols)natural_image
Abstract diagram with concentric circles and a black arrow pointing left (no text or symbols)2 Skyv den grønne holderammen i pilens retning, som står på holderammen.
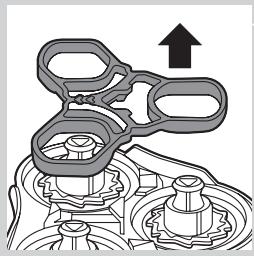
natural_image
Mechanical assembly diagram showing a gear-like component with an upward arrow indicating motion (no text or symbols present)natural_image
Mechanical assembly diagram showing a gear mechanism with an upward arrow (no text or symbols)4 Fjern kniven fra barberlamelltoppen.
natural_image
Diagram showing mechanical components with arrows indicating motion or force (no text or symbols)natural_image
Mechanical assembly diagram showing a brush applying material to a mechanical component (no text or symbols)natural_image
Mechanical gear assembly diagram showing a bolted component with a downward arrow indicating motion (no text or symbols present)natural_image
Mechanical assembly diagram showing gear and housing components with a downward arrow indicating motion (no text or symbols)natural_image
Abstract diagram with concentric circles and radiating lines, no text or symbols presentnatural_image
Illustration of a hand holding a device with a downward arrow indicating process (no text or symbols)text_image
Diagram illustrating a temperature measurement process with thermometer and humidity gauge, showing hand holding sample.natural_image
Illustration of two hands performing a water spray procedure on a surface, with no text or symbols present.natural_image
Line drawing of a mechanical device with a lever and handle, no text or symbols presenttext_image
Diagram showing a power button and a circular icon with a smiley face inside, likely representing a health or safety symbol.natural_image
Illustration of a hand holding a device with an arrow pointing to a separate view of a device (no text or symbols present)
text_image
RQ11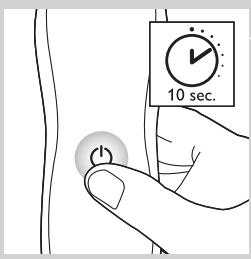
text_image
10 sec.natural_image
Symbol of a trash bin crossed out by two crossed lines (no text or numbers present)
natural_image
Symbol of a trash bin crossed out by a diagonal line, representing no waste or elimination (no text present)natural_image
Prohibition sign showing a faucet with no text or symbols (no readable text)Peligro
text_image
Diagram showing a pair of electronic devices with power and button labels, connected by a pointer to a shaver with a circular indicator.text_image
Diagram showing a remote control panel connected to a brush with a scroll wheel, illustrating the right-hand rule for remote control.- RQ1185, RQ1167, RQ1160

natural_image
Diagram showing a pair of electronic devices connected to a handheld device (no text or symbols present)- RQ1155, RQ1151, RQ1150, RQ1145, RQ1141, RQ1131
Carga
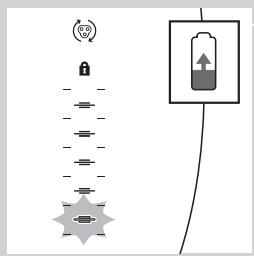
text_image
Diagram showing a battery connected to a lock and a star-shaped connector, with an icon indicating 'Control' and a plus sign.text_image
Diagram showing battery charging symbols and charging station icons with Chinese labelstext_image
Diagram showing a lock mechanism and a battery symbol with directional arrows, likely illustrating a system or control logic.text_image
Diagram showing battery and connection icons with labels like Wi-Fi, lock, battery, and plug symbolsnatural_image
Pure electrical circuit lines without any symbolstext_image
Diagram showing battery and connection icons with labels like Wi-Fi, lock, battery, and power plug symbolstext_image
Diagram showing battery charging process with lock, battery symbol, and power connectionstext_image
Diagram showing electrical connections with power and circular symbols, likely representing a system or signal flow.natural_image
Line drawing of a mechanical device with a tool inserted, no text or symbols presentnatural_image
Illustration of a chair with a curved arrow indicating rotational motion (no text or symbols)text_image
Diagram illustrating how to discharge an electric shaver with labeled parts and current flow arrowsnatural_image
Line drawing of a vacuum cleaner with a handle and top component (no text or symbols)text_image
Diagram illustrating foot contact technique with labeled parts and motion indicatorsnatural_image
Illustration of a person's face with hand near ear, showing motion arrows indicating movement (no text or symbols)natural_image
Diagram showing a hand pressing down a device with a cross symbol and an upward arrow (no text or labels)text_image
Diagram illustrating a spray gun mechanism with labeled parts and directional arrowsnatural_image
Diagram showing a hand pressing down on a mechanical component with an arrow indicating upward motion (no text or symbols present)text_image
Diagram illustrating a spray gun with labeled parts and an inset showing the spray gun's internal structure.natural_image
Diagram showing a hand pressing down a mechanical component with an arrow indicating upward motion (no text or symbols present)natural_image
Illustration of a hand holding a small electronic device with a magnified inset showing internal components (no text or symbols)natural_image
Illustration of a hand holding a handheld hairdryer with a black arrow indicating compression (no text or symbols)text_image
Diagram showing a hand holding a small object with labeled parts and directional arrows indicating movement or force.natural_image
Line drawing of a hand holding a power shaver with a circular button labeled 'Power' (no text or symbols beyond the icon)natural_image
Line drawing of a person applying a hair to their neck, no text or symbols present
natural_image
Line drawing of a hand holding a handheld device with a curved handle and arrow indicator (no text or symbols)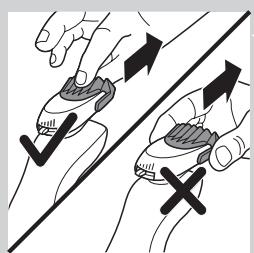
natural_image
Illustration of two hands performing a manual press or grip operation with directional arrows (no text or symbols)
natural_image
Illustration of a person using a hairdryer (no text or symbols present)
natural_image
Line drawing of a male head and neck with short hair and beard (no text or symbols)natural_image
Line drawing of a man's head and shoulders with short hair and beard (no text or symbols)- Barba completa

natural_image
Line drawing of a man's head and shoulders (no text or symbols)- Bigote

natural_image
Line drawing of a man's head and shoulders (no text or symbols)- Perilla
text_image
Diagram illustrating a hand holding a device with two arrows indicating movement, labeled ① and ②.text_image
Diagram showing a hand pouring liquid into a container with a label indicating 'CO2OH' and a water level indicator.natural_image
Illustration of hands using a manual tool to clean or spray a small container (no text or symbols)natural_image
Line drawing of a vacuum cleaner with a handle and top component (no text or symbols)text_image
Diagram illustrating foot contact technique with labeled parts and motion indicators
natural_image
Line drawing of a hand holding a device with a curved line inside, no text or symbols presentnatural_image
Illustration of a bucket being poured into a basin (no text or symbols)text_image
Diagram showing a container being poured into a container with a label indicating 'BONIONA' and water flow direction.natural_image
Illustration of hands using a handheld device to remove or clean a small container (no text or symbols)natural_image
Illustration of a hand pressing down on a circular object with an arrow indicating motion (no text or symbols)natural_image
Abstract diagram of a symmetrical mechanical or fluidic component with concentric rings and a central arrow (no text or symbols)natural_image
Mechanical assembly diagram showing a gear-like component with an upward arrow indicating motion (no text or symbols present)natural_image
Mechanical gear assembly diagram with upward arrow indicating motion (no text or symbols)4 Extraiga la cuchilla del protector.
natural_image
Illustration of a hand holding a textured object with arrows indicating direction (no text or symbols)natural_image
Mechanical assembly diagram showing a brush tool interacting with a mechanical component (no text or symbols visible)natural_image
Mechanical assembly diagram showing a gear and shaft assembly with a downward arrow indicating motion (no text or symbols)natural_image
Mechanical assembly diagram showing gear and housing components with a downward arrow indicating motion (no text or labels)natural_image
Abstract symmetrical pattern with concentric circles and radiating lines, no text or symbols presentnatural_image
Illustration of a hand holding a device with a downward arrow indicating process (no text or symbols)text_image
Diagram illustrating a droplet being placed on a fiber with temperature and temperature labels, showing hand positioning and magnified view.natural_image
Illustration of a hand holding a tool with liquid, showing two different actions (no text or symbols present)natural_image
Diagram of a mechanical tool or tool with an arrow indicating direction (no text or symbols present)text_image
Diagram showing electrical connections with power and circular symbols, including a stylized eye iconnatural_image
Illustration of a hand holding a circular object with an arrow pointing to a separate abstract shape (no text or symbols)
text_image
RQ11
text_image
10 sec.natural_image
Symbol of a trash bin crossed out by two crossed lines (no text or numbers present)

natural_image
Symbol of a trash bin crossed out by a diagonal line, representing no waste or elimination (no text present)natural_image
Prohibition sign showing a faucet with no text or symbols (no readable text)Geral
Perigo
text_image
Diagram showing a power switch and its shaker with labeled components and connection pointstext_image
Diagram showing a remote control panel connected to a brush with a stylus, illustrating the use of a brush.- RQ1185,RQ1167,RQ1160

natural_image
Diagram showing a remote control panel connected to a handheld electric shaver (no text or symbols present)- RQ1155,RQ1151,RQ1150,RQ1145,RQ1141,RQ1131
Carregamento
text_image
Diagram showing a battery connected to a lock and a star-shaped device, with an icon indicating 'Control' and a plus sign.RQ1185, RQ1167, RQ1160, RQ1155, RQ1151, RQ1150, RQ1145, RQ1141, RQ1131

text_image
Diagram showing battery charging symbols and charging mechanism with battery symbol and charging indicatorsnatural_image
Diagram showing a battery connected to a vertical stack of circular components with a lock icon (no text or symbols)RQ1197,RQ1195,RQ1180,RQ1175
text_image
Diagram showing battery and connection icons with a battery symbol and signal symbolsnatural_image
Pure electrical circuit lines without any symbolsRQ1197,RQ1195,RQ1180,RQ1175
text_image
Diagram showing battery and connection icons with labels like Wi-Fi, lock, battery, and power plug symbolstext_image
Diagram showing battery charging process with lock, battery symbol, and power connectionsRQ1197,RQ1195,RQ1180,RQ1175
text_image
Diagram showing a power button and a circular icon with a smiley face, likely representing a health or safety symbol.natural_image
Line drawing of a mechanical device with a tool inserted, no text or symbols present1 Introduza a ficha pequena no carregador.
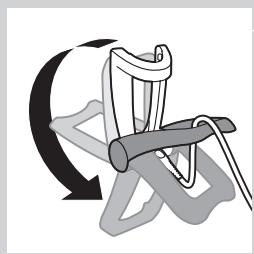
natural_image
Diagram of a chair with a curved arrow indicating rotational motion (no text or symbols)text_image
Diagram illustrating how to discharge a hairless brush with labeled parts and electric shock hazardnatural_image
Line drawing of a vacuum cleaner with a handle and top component (no text or symbols)1 Introduza a ficha pequena no sistema Jet Clean.
2 Ligue o adaptador à tomada eléctrica.
text_image
Diagram illustrating a mechanical assembly or disassembly process with labeled parts ① and ②, showing tool positioning and motion indicators.natural_image
Illustration of a person's face with arrows indicating motion or movement, no text or symbols presentnatural_image
Diagram showing a hand pressing down a device with a cross symbol and an upward arrow (no text or labels)text_image
Diagram illustrating a spray gun mechanism with labeled parts and directional arrowsnatural_image
Diagram showing a hand pressing down on a mechanical component with an arrow indicating upward motion (no text or symbols present)text_image
Diagram illustrating a spray gun with labeled parts and an inset showing the tip of the gun's tip.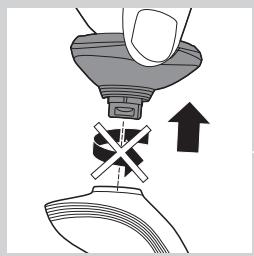
natural_image
Diagram showing a hand pressing down a mechanical component with an arrow indicating upward motion (no text or symbols present)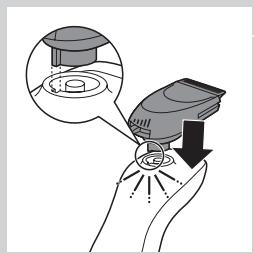
natural_image
Illustration of a hand holding a small electronic device with a magnified inset showing internal components (no text or symbols)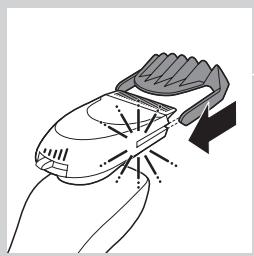
natural_image
Illustration of a hand holding a handheld hairdryer with a black arrow indicating compression (no text or symbols)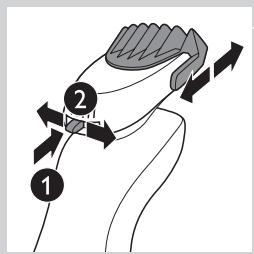
text_image
Diagram showing a hand holding a small object with labeled parts and directional arrows indicating motion or movement.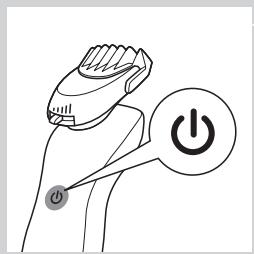
natural_image
Line drawing of a hand holding a power shaver with a circular button labeled 'Power' (no text or symbols beyond the icon)natural_image
Line drawing of a person applying a hair to their face, no text or symbols presentnatural_image
Line drawing of a hand holding a small electric shaver with a black arrow indicating motion (no text or symbols)natural_image
Illustration of two hands holding a tool with directional arrows indicating movement or force (no text or symbols)natural_image
Line drawing of a person applying a hairdryer to their ear (no text or symbols)natural_image
Line drawing of a male head and shoulders (no text or symbols)natural_image
Line drawing of a man's head and shoulders with short hair and beard (no text or symbols)natural_image
Line drawing of a man's head and shoulders (no text or symbols)- Um bigode

natural_image
Line drawing of a man's head and shoulders (no text or symbols)- Uma barbicha
natural_image
Illustration of a hand holding a device with an arrow pointing to a separate device (no text or symbols present)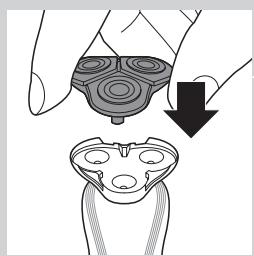
natural_image
Illustration of a hand holding a device with a downward arrow indicating motion or change (no text or symbols present)
text_image
Diagram showing two-step instructions for using a device to interact with a small object, labeled with arrows and numbered steps.text_image
Diagram showing a hand pouring liquid into a container with an inset diagram illustrating water flow and directional arrows.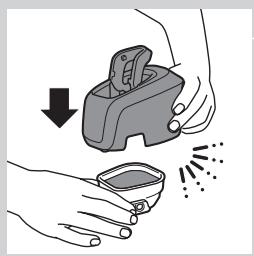
natural_image
Illustration of hands using a handheld device to remove or clean material, with no text or symbols present.
natural_image
Line drawing of a vacuum cleaner with a handle and top component (no text or symbols)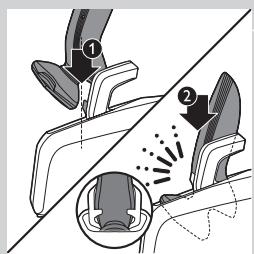
text_image
Diagram illustrating foot contact technique with labeled parts and motion indicators
text_image
Diagram showing a hand pressing a button with icons for water, power, and switch symbolsnatural_image
Diagram of a mechanical device with internal components and wave symbols (no readable text or labels)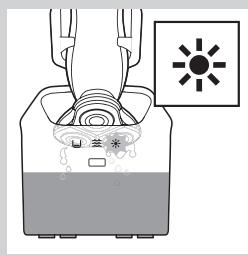
text_image
Diagram showing a device with labeled components and a sun symbol indicating light or heat.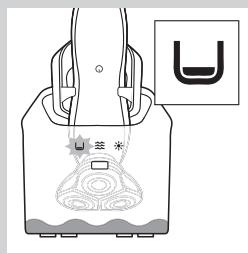
natural_image
Diagram of a device with a U-shaped symbol and a star-like symbol inside, no readable text or labels present.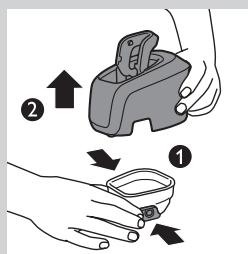
text_image
Diagram illustrating a mechanical device with labeled parts and directional arrows indicating motion or assembly.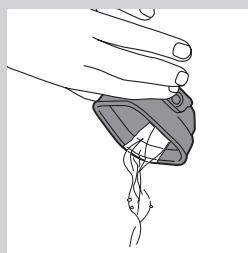
natural_image
Illustration of a hand holding a small object with a curved line inside, no text or symbols presentnatural_image
Illustration of a faucet pouring liquid into a container with water splashing (no text or symbols)
text_image
Diagram showing a container being poured into a container with a label indicating 'Recycle' and a water level indicator.
natural_image
Illustration of hands using a manual tool to clean or spray a small container (no text or symbols present)natural_image
Illustration of a hand pressing down on a mechanical component with an arrow indicating motion (no text or symbols)
natural_image
Abstract diagram with concentric circles and a black arrow pointing left (no text or symbols)natural_image
Mechanical assembly diagram showing a gear-like component with an upward arrow indicating motion (no text or symbols present)natural_image
Mechanical assembly diagram showing a gear mechanism with an upward arrow (no text or symbols)natural_image
Diagram showing mechanical gear meshing with arrows indicating direction (no text or symbols)natural_image
Mechanical assembly diagram showing a brush tool interacting with a base component (no text or symbols visible)natural_image
Mechanical gear assembly diagram showing a rotating shaft and housing with a downward arrow indicating motion (no text or symbols)natural_image
Mechanical assembly diagram showing gear and housing components with a downward arrow indicating motion (no text or symbols)natural_image
Abstract diagram with concentric circles and radiating lines, no text or symbols presentnatural_image
Illustration of a hand holding a device with a downward arrow indicating process (no text or symbols)text_image
Diagram illustrating a temperature measurement process with thermometer and humidity gauge, showing hand holding sample.natural_image
Illustration of two hands using a tool to lift a fish and drop water onto a surface (no text or symbols)Limpe o acessório do estilizador de barba cada vez que o utilizar.
natural_image
Line drawing of a robotic arm with a handle and arrow indicating motion (no text or symbols)text_image
Diagram showing electrical connections with power and circular symbols, including a refresh icon and directional arrowsnatural_image
Illustration of a hand holding a device with an arrow pointing to a device component (no text or symbols present)
text_image
RQ11
text_image
10 sec.Encomendar acessórios
natural_image
Symbol of a trash bin crossed out by two crossed lines (no text or numbers present)
natural_image
Symbol of a trash bin crossed out by a diagonal line, representing no waste or elimination (no text present)natural_image
Prohibition sign showing a faucet with no text or symbols (no readable text)Fara
text_image
Diagram showing a power switch and its shaker with labeled components and connection pointstext_image
Diagram showing a remote control panel connected to a pair of electric shakers, with icons for function keys and buttons.- RQ1185, RQ1167, RQ1160

text_image
Diagram showing a pair of remote control switches connected to a handheld device, illustrating the connection or status change.- RQ1155, RQ1151, RQ1150, RQ1145, RQ1141, RQ1131
Laddning
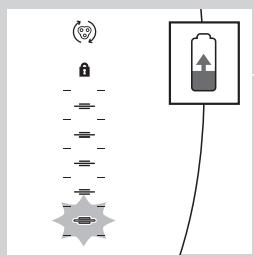
text_image
Diagram showing battery symbol, lock, and connection points with directional arrows
text_image
Diagram showing battery charging symbols and charging mechanism with icons for power, battery, and charging signalnatural_image
Pure electrical circuit lines without any symbols
text_image
Diagram showing battery and control icons with labels like Wi-Fi, lock, battery, and power plugtext_image
Diagram showing battery and sensor icons with labels for signal, lock, battery, and connection symbolsLåg batterinivå
text_image
Diagram showing battery charging process with lock, power plug, and battery stack connectiontext_image
Diagram showing security icons including a lock and Wi-Fi symbol, alongside a padlock icon connected by lines.text_image
Diagram showing a power button and a circular icon with a smiley face inside, likely representing a health or social context.natural_image
Line drawing of a mechanical device with a tool inserted, no text or symbols presentnatural_image
Diagram of a mechanical clamp or clamping device with rotational arrow indicating motion (no text or symbols)
text_image
Diagram showing a hairdryer with labeled parts and electrical connectionsnatural_image
Line drawing of a vacuum cleaner with a handle and top component (no text or symbols)
text_image
Diagram illustrating foot contact technique with labeled parts and motion indicatorsnatural_image
Illustration of a person's face with arrows indicating motion or movement, no text or symbols presentnatural_image
Diagram showing a hand pressing down a mechanical component with an arrow indicating upward motion (no text or symbols present)text_image
Diagram illustrating a spray gun mechanism with labeled parts and directional arrowsnatural_image
Diagram showing a hand holding a tool above a mechanical component with an arrow indicating upward motion (no text or symbols present)text_image
Diagram illustrating spray application on a device with labeled steps 1 and 2, showing spray effect and magnified detail.natural_image
Diagram showing a hand pressing down a funnel with a cross symbol, indicating mechanical or fluid movement (no text or labels)natural_image
Illustration of a hand holding a handheld device with a magnified inset showing internal components (no text or symbols)natural_image
Illustration of a hand using a hairbrush to clean or wear a surface, with no text or symbols present.text_image
Diagram showing two labeled arrows pointing to a stylized object, with numbered annotations 1 and 2 indicating directional movement.natural_image
Line drawing of a hand holding a power switch with a circular button labeled 'Power' (no text or symbols beyond the icon)natural_image
Illustration of a person applying a hair to their face, no text or symbols presentnatural_image
Line drawing of a hand holding a handheld device with a brush and arrow indicating motion (no text or symbols)natural_image
Illustration of two hands holding a stylus with directional arrows indicating movement or force (no text or symbols)natural_image
Illustration of a person applying a hair product to their ear (no text or symbols)natural_image
Line drawing of a male head and shoulders (no text or symbols)- Skäggstubb

natural_image
Line drawing of a man's head and beard (no text or symbols)- Helskägg
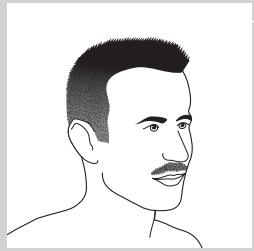
natural_image
Line drawing of a man's head and shoulders (no text or symbols)- Mustasch
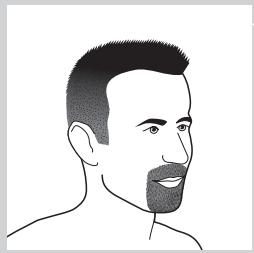
natural_image
Line drawing of a man's head and shoulders (no text or symbols)- Bockskägg
natural_image
Illustration of a hand holding a device with an arrow pointing to a separate view of a device (no text or symbols present)
natural_image
Illustration of a hand holding a device with a downward arrow indicating motion (no text or symbols)text_image
Diagram showing two-step instructions for using a device to interact with a small container, labeled with arrows and numbered steps.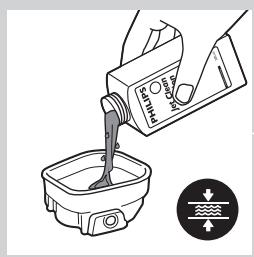
text_image
Diagram showing a hand pouring liquid into a container with a label indicating 'CO2OH' and directional arrows, likely illustrating a chemical or physical process.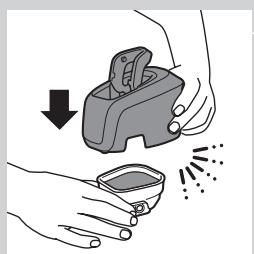
natural_image
Illustration of hands using a handheld device to remove or spray particles (no text or symbols)natural_image
Line drawing of a vacuum cleaner with a handle and top component (no text or symbols)
text_image
Diagram illustrating foot massage technique with labeled parts and motion arrows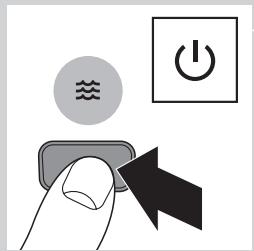
text_image
Diagram showing a hand pressing a button with icons for water, power, and switch symbols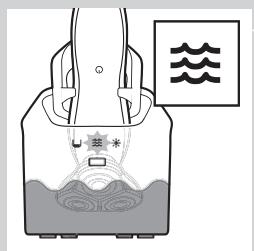
text_image
Diagram illustrating a scientific apparatus with labeled components and wave symbols, likely representing an experimental setup or measurement system.
text_image
Diagram showing a container with liquid and a sun symbol, likely illustrating a chemical or biological process.natural_image
Simple line drawing of a hand holding a bag with a decorative pattern and a small U-shaped symbol (no text or symbols present)
text_image
Diagram illustrating two-step steps of a device handling, labeled with arrows and numbered positions (① and ②)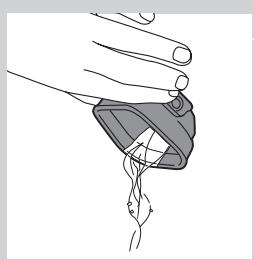
natural_image
Illustration of a hand holding a medical device with a catheter inserted (no text or symbols)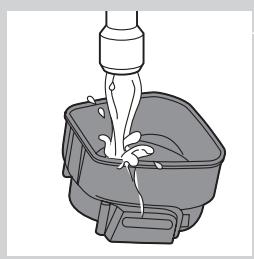
natural_image
Illustration of a faucet pouring liquid into a square basin (no text or symbols)text_image
Diagram showing a hand pouring liquid into a container with a label indicating 'CO2' and directional arrows, likely illustrating a chemical or physical process.natural_image
Illustration of hands using a handheld device to remove or clean material, with no text or symbols present.natural_image
Illustration of a hand holding a device with a magnified view of its internal components (no text or symbols)natural_image
Abstract diagram with concentric circles and a black arrow pointing left (no text or symbols)natural_image
Mechanical assembly diagram showing a gear-like component with an upward arrow indicating motion (no text or symbols present)natural_image
Mechanical gear assembly diagram showing a shaft and gear mechanism with an upward arrow (no text or labels)natural_image
Illustration of a hand turning a gear with arrows indicating motion (no text or symbols)natural_image
Mechanical assembly diagram showing a brush applying material to a gear (no text or symbols)natural_image
Mechanical gear assembly diagram showing a rotating shaft and housing with a downward arrow indicating motion (no text or symbols)natural_image
Mechanical assembly diagram showing a gear mechanism with a downward arrow indicating motion (no text or symbols present)natural_image
Abstract diagram with concentric circles and radiating lines, no text or symbols presentnatural_image
Illustration of a hand holding a device with a magnified view showing internal components (no text or symbols)text_image
Diagram illustrating a temperature measurement process with thermometer and droplet tip, showing thermal imaging setupnatural_image
Illustration of a hand holding a tool above a pair of water droplets, with no text or symbols present.natural_image
Diagram of a mechanical component with an arrow indicating motion (no text or symbols)text_image
Diagram showing electrical connections with a power switch and a circular symbol labeled with iconsnatural_image
Illustration of a hand holding a device with an arrow pointing to a separate device (no text or symbols present)natural_image
Symbol of a trash bin crossed with no visible text or labelsnatural_image
Symbol of a trash bin crossed out by two crossed lines (no text or labels)natural_image
Prohibition sign showing a faucet with no text or symbols (no readable text)Tehlike
text_image
Diagram showing a power button and a brush with labeled buttons, illustrating a physical or electrical concept.text_image
Diagram showing a remote control panel connected to a pair of electric shakers, with icons for function keys and buttons.- RQ1185, RQ1167 ve RQ1160

text_image
Diagram showing a pair of remote control switches connected to a handheld device, illustrating the connection or status change.- RQ1155, RQ1151, RQ1150, RQ1145, RQ1141 ve RQ1131
Şarj etme

text_image
Diagram showing battery charging mechanism with lock, power lines, and battery symbol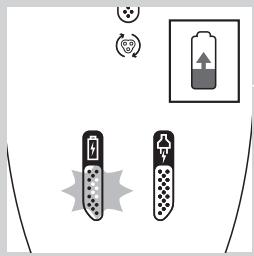
text_image
Diagram showing battery charging symbols and a battery icon with upward arrow, indicating charging direction or status.text_image
Diagram showing a battery connected to a series of five identical components with a lock icon and a separate box, likely illustrating a basic circuit or sensor setup.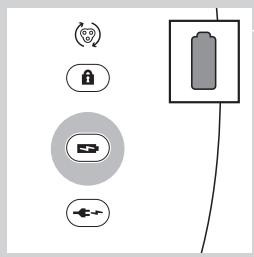
text_image
Diagram showing battery and control icons with labels like Wi-Fi, lock, battery, and power plugtext_image
Diagram showing battery and sensor icons with labels for signal, lock, battery, and connection symbolsDüşük pil
text_image
Diagram showing battery connection with lock, battery symbol, and power connectionstext_image
Diagram showing electrical connections with a power switch and a circular symbol, alongside a directional indicator with a smiley face.natural_image
Line drawing of a mechanical device with a tool inserted, no text or symbols presentnatural_image
Diagram of a mechanical clamp or clamping device with rotational arrow indicating motion (no text or symbols)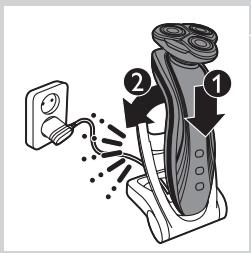
text_image
Diagram showing a hairdryer with labeled parts and electrical connectionsnatural_image
Line drawing of a vacuum cleaner with a handle and top component (no text or symbols)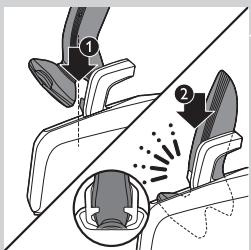
text_image
Diagram illustrating foot contact technique with labeled parts and motion indicatorsnatural_image
Illustration of a person's face with arrows indicating motion or movement, no text or symbols presentnatural_image
Diagram showing a hand pressing a component with an arrow indicating upward motion (no text or symbols present)text_image
Diagram showing spray gun mechanism with labeled parts and magnified detail viewnatural_image
Diagram showing a hand pressing down on a mechanical component with an upward arrow and cross symbol (no text or labels)text_image
Diagram illustrating a spray gun with labeled parts and an inset showing the tip of the gun's tip.natural_image
Illustration of a hand holding a funnel with a cross symbol, next to a device with an upward arrow (no text or symbols present)natural_image
Illustration of a hand holding a small electronic device with a magnified inset showing internal components (no text or symbols)natural_image
Illustration of a hand using a hairbrush to clean or wear, with no text or symbols present.text_image
Diagram showing a hand holding a jaw with numbered arrows indicating motion or movement, labeled 1 and 2.natural_image
Illustration of a hand holding a power shaver with a circular button labeled 'Power' (no text or symbols beyond the icon)natural_image
Line drawing of a person applying a hair to their face, no text or symbols present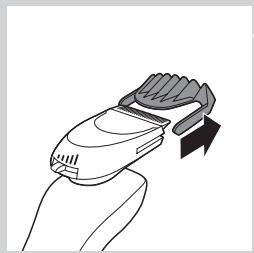
natural_image
Line drawing of a hand holding a handheld device with a brush and arrow indicating motion (no text or symbols)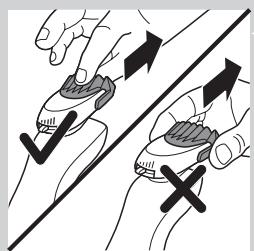
natural_image
Illustration of two hands holding a tool with directional arrows indicating movement or force (no text or symbols)
natural_image
Illustration of a person applying a hairdryer to their ear (no text or symbols present)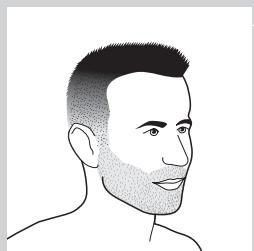
natural_image
Line drawing of a male head and shoulders (no text or symbols)natural_image
Line drawing of a man's head and shoulders with short hair and beard (no text or symbols)- Uzun sakal

natural_image
Line drawing of a man's head and shoulders (no text or symbols)- Bıyıklı

natural_image
Line drawing of a man's head and shoulders (no text or symbols)- Keçi sakal
Temizlik ve bakım
text_image
Diagram illustrating two-step steps of a device handling, labeled with arrows and numbered indicators.text_image
Diagram showing a container being poured into a tank with a label indicating 'POT' and directional arrows, likely illustrating a process or flow.natural_image
Illustration of hands using a handheld device to remove or clean a small container (no text or symbols)natural_image
Line drawing of a vacuum cleaner with a handle and top component (no text or symbols)text_image
Diagram illustrating foot contact technique with labeled parts and motion indicatorsnatural_image
Line drawing of a hand holding a device with a curved line inside, no text or symbols presentnatural_image
Illustration of a faucet pouring liquid into a square basin (no text or symbols)text_image
Diagram showing a container being poured into a container with a label indicating 'CO2O2' and directional arrows.natural_image
Illustration of hands using a handheld device to remove or clean a small container (no text or symbols)natural_image
Illustration of a hand holding a circular object with an arrow pointing to a separate abstract shape (no text or symbols)natural_image
Abstract diagram of a symmetrical mechanical or fluidic component with concentric rings and a central arrow (no text or symbols)natural_image
Mechanical assembly diagram showing a gear-like component with an upward arrow indicating motion (no text or symbols present)natural_image
Mechanical gear assembly diagram with upward arrow indicating motion (no text or symbols)natural_image
Illustration of a hand holding a textured object with arrows indicating direction (no text or symbols)natural_image
Mechanical assembly diagram showing a brush tool interacting with a mechanical component (no text or symbols visible)natural_image
Mechanical assembly diagram showing a gear and shaft assembly with a downward arrow indicating motion (no text or symbols)natural_image
Mechanical assembly diagram showing gear and housing components with a downward arrow indicating motion (no text or symbols)natural_image
Abstract symmetrical pattern with concentric circles and radiating lines, no text or symbols presentnatural_image
Illustration of a hand holding a device with a downward arrow indicating process (no text or symbols)text_image
Diagram illustrating a droplet being placed on a tube with temperature and Fahrenheit scale indicatorsnatural_image
Illustration of two hands using a tool to lift a fish and drop water, with no text or symbols present.natural_image
Line drawing of a medical or surgical tool with an arrow indicating direction (no text or symbols)text_image
Diagram showing electrical connections with power and switch symbols, including a circular icon labeled '心' (heart) and a circular icon with a heart symbol.natural_image
Illustration of a hand pressing down on a mechanical component with an arrow indicating motion (no text or symbols)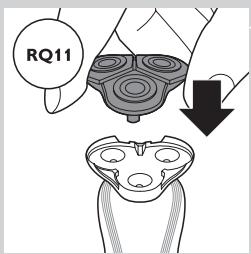
text_image
RQ11