
SATIN PERFECT HP6581 - Epilator PHILIPS - Free user manual and instructions
Find the device manual for free SATIN PERFECT HP6581 PHILIPS in PDF.



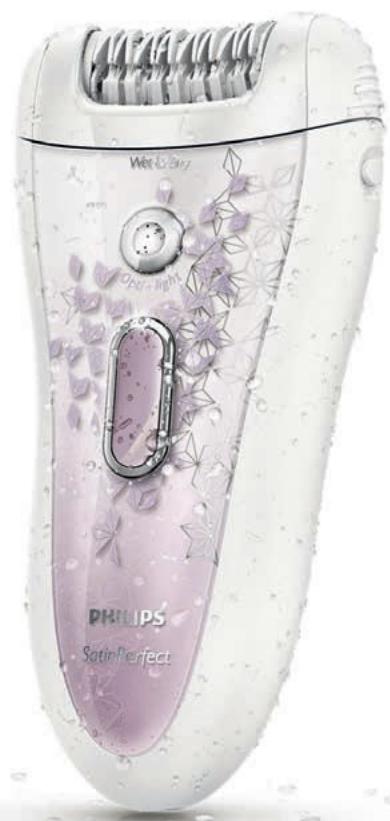
| Product type | Epilator |
| Brand | PHILIPS |
| Model | SATIN PERFECT HP6581 |
| Power supply | Rechargeable via mains adapter 100-240 V, safety transformer < 24 V |
| Charging time | Approximately 1 hour |
| Cordless autonomy | Up to 40 minutes |
| Operating speeds | 2 speeds (speed I for sensitive areas, speed II for effective epilation) |
| Main functions | Epilation, shaving, trimming (3 mm comb), precision epilation (mini epilator), eyebrow epilation (illuminated tweezers) |
| Included accessories | Epilation head, shaving head, comb, sensitive area reducer, active massaging hair lifter, Skin Stretcher system, precision mini epilator, illuminated tweezers, storage pouch, cleaning brush |
| Usage | Cordless only; can be used on dry or wet skin (waterproof, can be used in bath or shower) |
| Cleaning | Epilation head and accessories washable under running water; adapter to clean with dry cloth |
| Safety | Overheating and overcharge protection; transport lock |
| Battery type | Built-in rechargeable battery (epilator); AA 1.5V batteries (mini epilator); L736H button batteries (tweezers) |
| Warranty | International warranty (epilation head excluded as subject to wear) |
| Recycling | Removable rechargeable battery at end of life; follow selective collection guidelines |
| Maximum noise level | 77 dB(A) |
Frequently Asked Questions - SATIN PERFECT HP6581 PHILIPS
User questions about SATIN PERFECT HP6581 PHILIPS
0 question about this device. Answer the ones you know or ask your own.
Ask a new question about this device
Download the instructions for your Epilator in PDF format for free! Find your manual SATIN PERFECT HP6581 - PHILIPS and take your electronic device back in hand. On this page are published all the documents necessary for the use of your device. SATIN PERFECT HP6581 by PHILIPS.
USER MANUAL SATIN PERFECT HP6581 PHILIPS
Always here to help you
Register your product and get support at
www.philips.com/welcome

HP6583
HP6581
ENGLISH 4
DANSK 21
DEUTsCH 38
EAAHNIKA 56
ESPANOL 75
SUOMI 93
FRANÇAIS 110
ITALIANO 128
NEDERLANDS 146
NORSK 164
PORTUGUES 182
PORTUGUES DO BRASIL 200
SVENSKA 218
TURKCE 235
267
283
Introduction
Congratulations on your purchase and welcome to Philips! To fully benefit from the support that Philips offers, register your product at www.philips.com/ welcome.
Important
Read this important information carefully before you use the appliance and its accessories and save it for future reference. The accessories supplied may vary for different products.
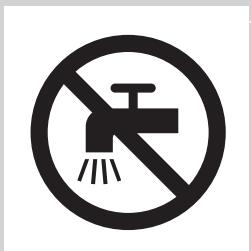
Danger
- Keep the adapter dry.
- If you charge the epilator in the bathroom, do not use an extension cord.
Warning
- The adapter contains a transformer. Do not cut off the adapter to replace it with another plug, as this causes a hazardous situation.
- This appliance can be used by children aged from 8 years and above and persons with reduced physical, sensory or mental capabilities or lack of experience and knowledge if they have been given supervision or instruction concerning use of the appliance in a safe way and understand the hazards involved. Children shall not play with the appliance. Cleaning and user maintenance shall not be made by children without supervision.
- Always unplug the appliance before you clean it under the tap.
- Do not insert metal-containing material into the socket on the epilator to avoid short circuiting.
- Always check the appliance before you use it. Do not use the appliance if it is damaged, as this may cause injury. Always replace a damaged part with one of the original type.
Caution
- Never use water hotter than 40irc C to rinse the appliance. It is strongly recommended to rinse the appliance with cold water to prevent bacterial growth.
-
Only use this appliance for its intended purpose as shown in the user manual.
-
Never use compressed air, scouring pads, abrasive cleaning agents or aggressive liquids such as petrol or acetone to clean the appliance.
- Make sure the socket is live when you charge the appliance. The electricity supply to sockets in bathrooms may be cut off when the light is turned off.
- For hygienic reasons, the appliance should only be used by one person.
- To prevent damage and injuries, keep operating appliances (with or without attachment) away from scalp hair; face, eyebrows, eyelashes, clothes, threads, cords, brushes, etc.
- Do not use the appliance on irritated skin or skin with varicose veins, rashes, spots, moles (with hairs) or wounds without consulting your doctor first. People with a reduced immune response or people who suffer from diabetes mellitus, haemophilia or immunodeficiency should also consult their doctor first.
- Your skin may become a little red and irritated the first few times you use an epilator. This phenomenon is absolutely normal and quickly disappears. As you epilate more often, your skin gets used to epilation, skin irritation decreases and regrowth becomes thinner and softer. If the irritation has not disappeared within three days, we advise you to consult a doctor.
- Do not use any exfoliation brush immediately after epilation, as this may intensify possible skin irritation caused by the epilator.
- Do not use bath or shower oils when you epilate under wet conditions, as this may cause serious skin irritation.
- Charge, use and store the epilator at a temperature between 10irc C and 30irc C .
- If your epilator is equipped with a light for optimal epilation, do not look directly into the light to avoid being dazzled by it.
- Do not use the epilating head of the epilator without one of the epilation caps.
- Fully charge the epilator every 3 to 4 months, even if you do not use the epilator for a longer time.

- If your epilator comes with tweezers, always replace the batteries of the tweezers with batteries of the original type.
Electromagnetic fields (EMF)
This Philips appliance complies with all applicable standards and regulations regarding exposure electromagnetic fields.
General
- This epilator is waterproof. It is suitable for use in the bath or shower and for cleaning under the tap. For safety reasons, the epilator can therefore only be used without cord.
- The appliance is suitable for mains voltages ranging from 100 to 240 volts.
- The adapter transforms 100-240 volts to a safe low voltage of less than 24 volts.
Maximum noise level: Lc = 77dB(A)
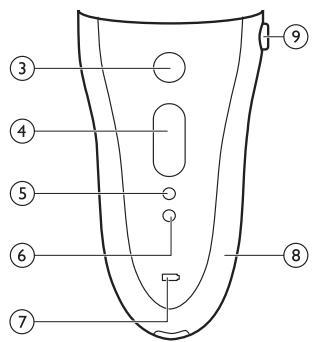
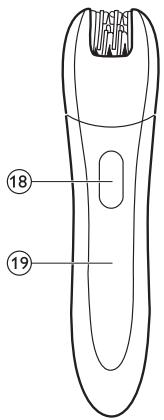
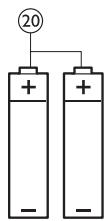
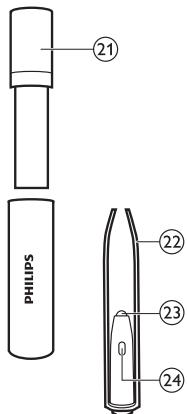
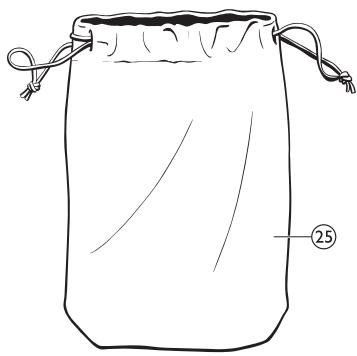
General description (Fig. 3)
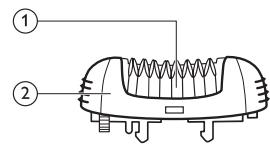
1 Epilating discs
2 Epilating head
3 Opti-Light
4 On/off button
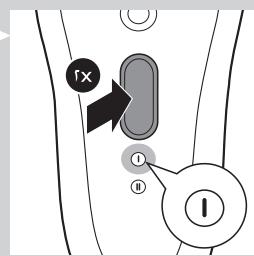
- Press once for speed II
- Press twice for speed I
5 Light for speed I
6 Light for speed II
7 Charging light
8 Epilator
9 Release button
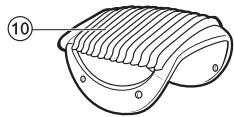
10 Trimming comb
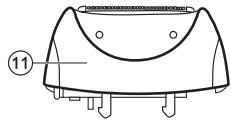
11 Shaving head
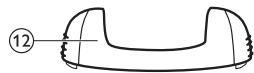
12 Basic epilation cap
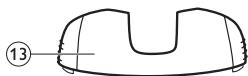
13 Sensitive area cap
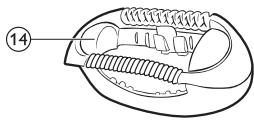
14 Active hair-lift and massage cap
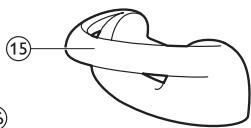
15 Skin stretcher
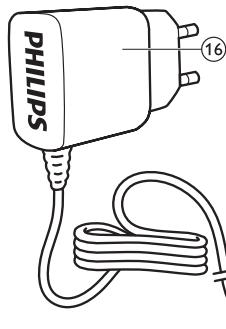
16 Adapter
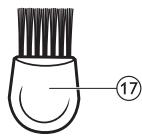
17 Cleaning brush
18 On/off slide
19 Precision epilator
20 Disposable non-rechargeable batteries
21 Storage case of Smart Tweezers
22 Smart Tweezers
23 Light of Smart Tweezers
24 On/off slide for light
25 Pouch
Preparing for use
Charging
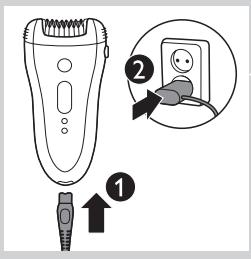
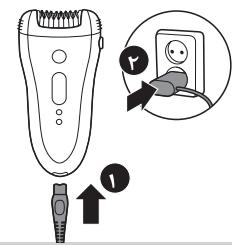
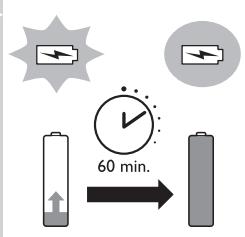
- Charging the epilator takes approx. 1 hour. When the epilator is fully charged, it has a cordless operating time of up to 40 minutes.
1 Connect the small plug to the appliance (1) and the mains plug to the wall socket (2).
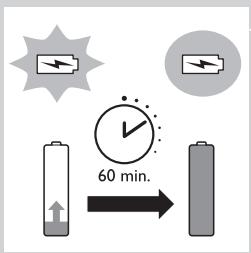
The charging light pulsates white to indicate that the appliance is charging. When the batteries are fully charged, the charging light lights up white continuously for 20 minutes and then goes out.
Batteries low or empty
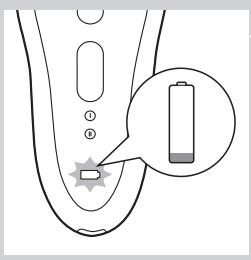
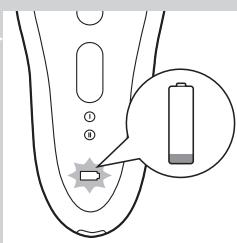
- When the batteries are almost empty, the charging light starts to flash red. When this happens, the batteries still contain enough energy for a few minutes of operation.
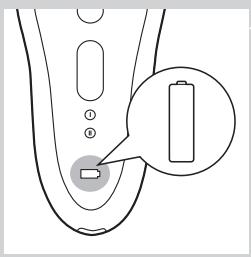
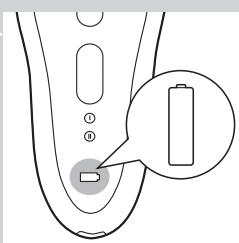
- When the batteries are completely empty, the appliance stops operating and the charging light lights up red continuously. To charge the epilator, see 'Charging' above.
Using the epilator
Clean the epilating head and charge the appliance fully before you use the appliance for the first time.
Note: You cannot use the appliance while it is connected to the mains.
Epilating tips
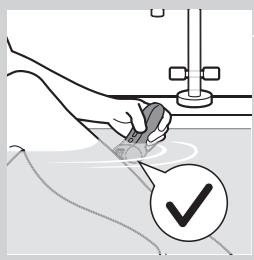
- Wet: If you are new to epilation, we advise you to start epilating on wet skin, as water relaxes the skin and makes epilation less painful and gentler. The appliance is waterproof and can be safely used in the shower or bathtub.
- Wet: If you want, you can use your common shower gel or foam.
- Dry: If you epilate dry, epilation is easier just after taking a bath or shower.
- Dry: Make sure your skin is clean and free from grease. Do not apply any cream to your skin before you start to epilate.
- General: We advise you to epilate in the evening, as skin irritation usually disappears overnight.
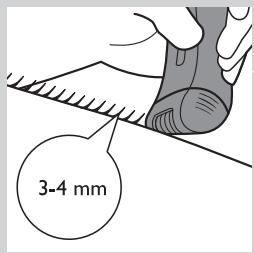
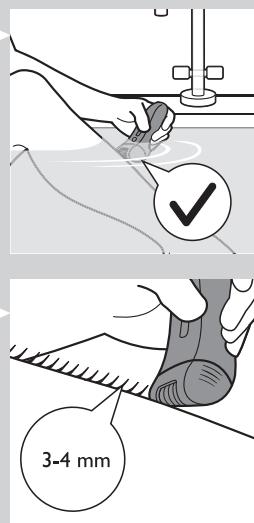
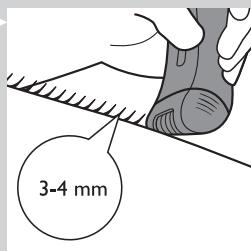
- General: Epilation is easier and more comfortable when the hairs have a length of 3 - 4mm . If the hairs are longer, we recommend that you shave first and epilate the shorter regrowing hairs after 1 or 2 weeks. Alternatively, you can trim the hairs to 3 - 4mm .
- General: Use the skin stretcher to keep the skin tight on your arms or upper legs. The skin stretcher helps to reduce the pain while epilating.
Epilating the legs with the epilator
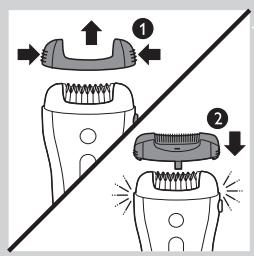
- If you already have some experience with epilation, you can simply use the epilating head with the basic epilation cap.
- If your hairs lie flat on your skin, we advise you to use the active hair-lift and massage cap. This cap not only lifts up the hairs but its active massaging roller also minimises the pulling sensation of epilation.
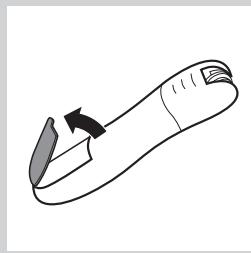
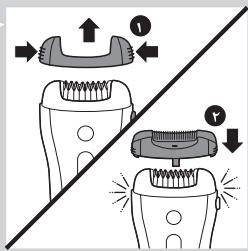
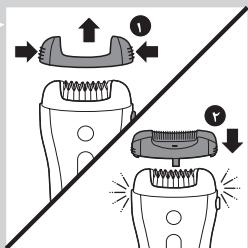
Note: Remove the basic epilation cap by pressing its both sides (1) before you attach another cap (2) or the skin stretcher.
1 Put any cap on the epilating head.
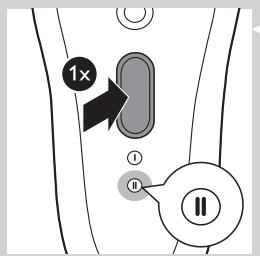
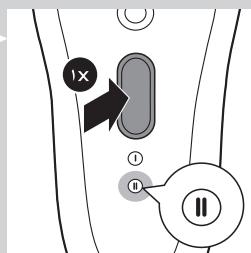
Press the on/off button once to switch on the appliance.
The appliance starts to operate at speed II, which is the most efficient speed for epilating.
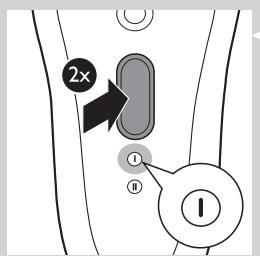
Note: If you want to use speed I, press the on/off button a second time.
Note: Speed I is suitable for areas with little hair growth and for hard-to-reach areas, such as knees and ankles.
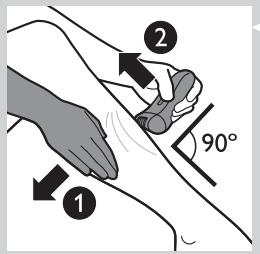
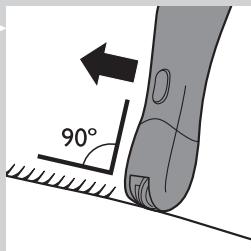
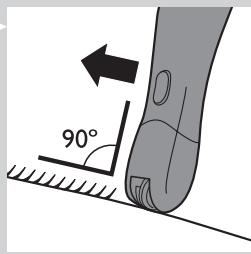
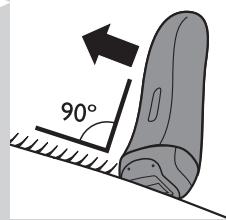
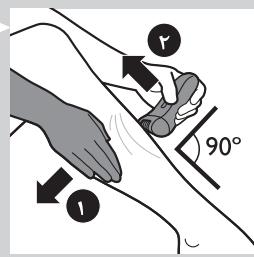
3 If you are not using the skin stretcher, stretch the skin with your free hand to make the hairs stand upright (1). Place the epilating head at an angle of 90irc onto the skin with the on/off button pointing in the direction in which you are going to move the appliance (2).
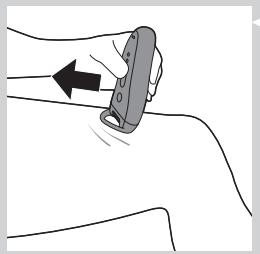
Note: If you are using the skin stretcher you do not need to stretch your skin anymore. The skin stretcher also ensures that you keep the appliance on your skin at the right angle. Make sure that the skin stretcher is in contact with your skin as shown in the figure.
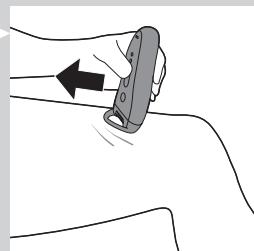
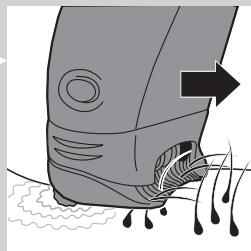
4 Slowly move the appliance over the skin against the direction of the hair growth while pressing it lightly.
Tip: To relax the skin, we advise you to apply a moisturising cream immediately or a few hours after epilation. For the underarms, use a mild deodorant without alcohol.
Shaving the underarms and bikini line
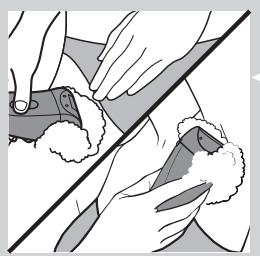
Use the shaving head to shave sensitive areas, such as the underarms and the bikini line.
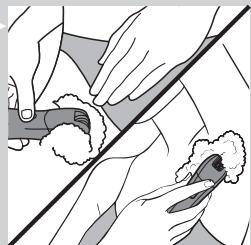
Note: To get the best shaving results, use the shaving head on a dry skin. If you want to use the shaving head in the bath or shower, we advise you to use your common shower gel for a more gentle shave.
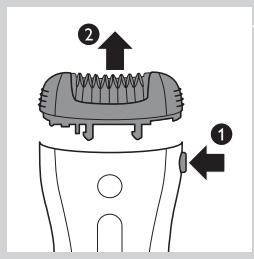
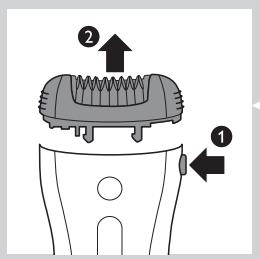
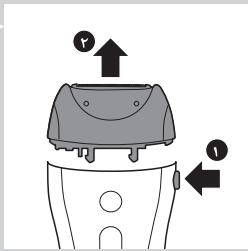
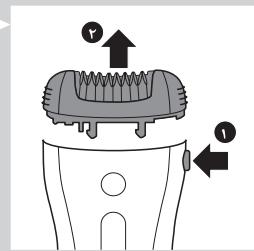
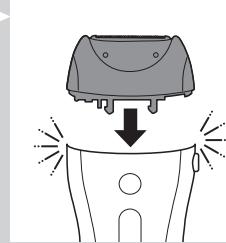
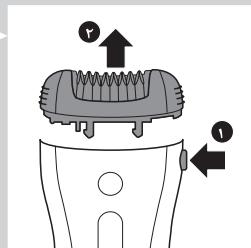
1 Press the release button (1) and remove the epilating head from the epilator (2).
Note: You can remove the shaving head in the same way.
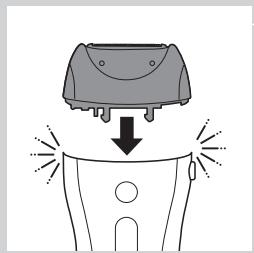
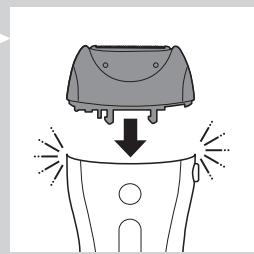
2 Put the shaving head on the appliance and press it until it snaps home.
3 Switch on the appliance.
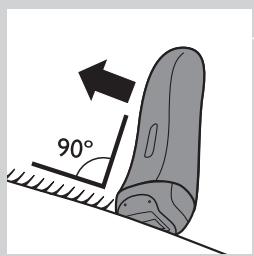
4 Place the shaving head at an angle of 90irc onto your skin with the on/off button pointing in the direction in which you are going to move the appliance.
5 Slowly move the appliance against the direction of hair growth.
Note: Make sure that the shaving head is always fully in contact with the skin.
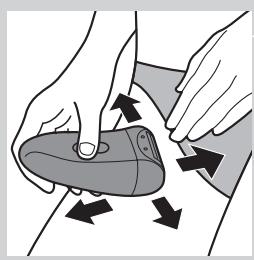
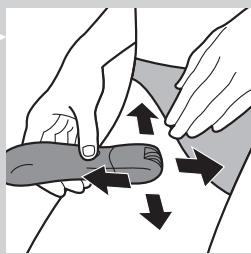
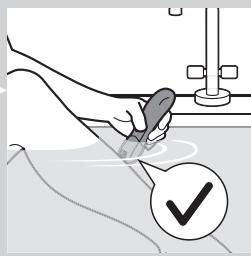
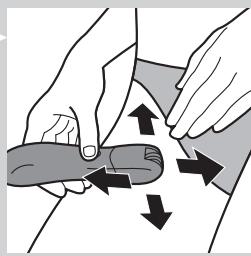
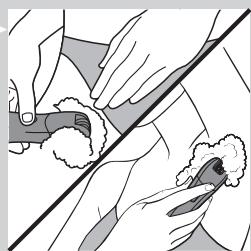
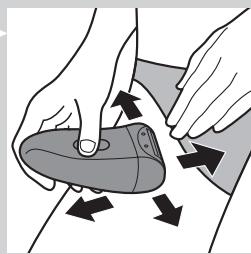
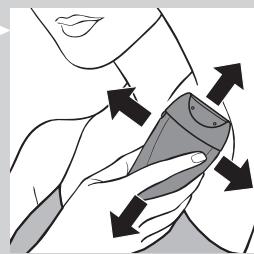
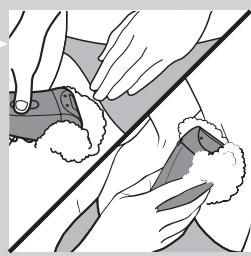
6 Shave your bikini line as shown in the figure. Stretch the skin with your free hand and move the appliance in different directions.
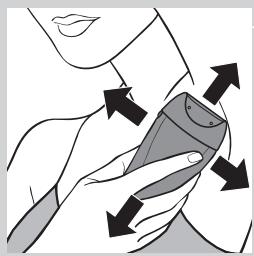
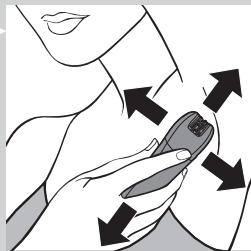
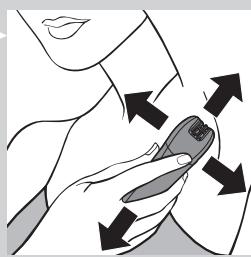
7 Shave your underarms as shown in the figure. Move the appliance in different directions and raise your arm to stretch the skin.
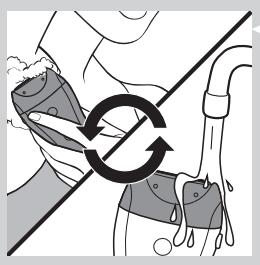
Note: When you use shaving foam or gel, clean the shaving head during and after each use with water to ensure optimum performance.
8 When you have finished shaving, switch off the appliance and clean the shaving head according to the instructions in chapter 'Cleaning and maintenance'.
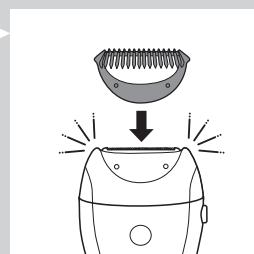
9 Put the trimming comb on the shaving head when you store the appliance.
Trimming with the comb
Use the shaving head with the comb attached to trim your hairs in the bikini line to a length of 3mm . You can also use the comb to pretrim long hairs (longer than 10mm ) on the underarms or legs.
1 Press the release button (1) and remove the epilating head from the epilator (2).
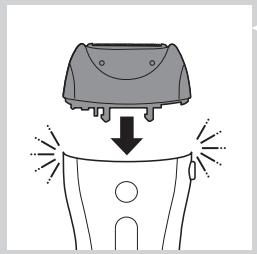
2 Put the shaving head on the appliance and press it until it snaps home.
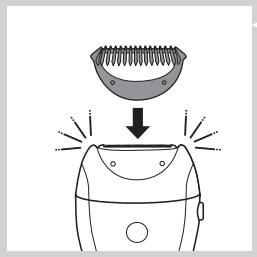
3 Put the comb on the shaving head.
4 Follow steps 3 to 8 in section 'Shaving the underarms and bikini line'.
Overheat protection
This function helps to prevent overheating of the appliance.
Note: To avoid overheating of the appliance, do not press it too hard onto your skin. The appliance works best when you move it over your skin without excessive pressure.
If the overheat protection is activated, the appliance switches off automatically and the charging light and the speed lights flash red for 30 seconds.
You can deactivate the overheat protection by letting the appliance cool down and then switch it on again.
Note: If the charging light flashes red again, the appliance has not yet cooled down completely.
Overload protection
If you press the epilating head onto your skin too hard or when the epilating discs of the epilating head get blocked (e.g. by clothes), the appliance switches off automatically and the speed lights flash red for 5 seconds.
1 Turn the epilating discs with your thumb until you can remove whatever blocks the epilating discs.
Using the precision epilator
Inserting/changing the batteries
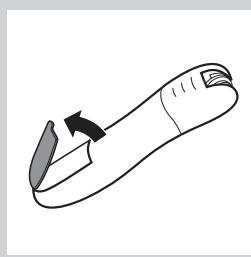
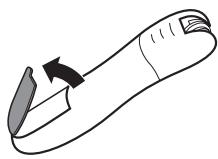
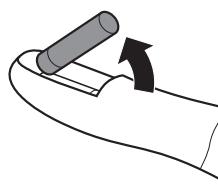
1 Remove the lid of the battery compartment by pressing the snap hooks.
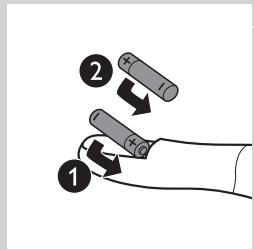
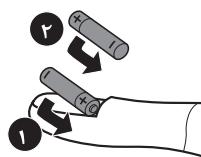
2 Insert 2 AA 1.5V alkaline batteries into the battery compartment.
Note: Make sure the + and - poles of the batteries point in the direction indicated at the bottom of the battery compartment.
Note: New batteries have an operating time of up to 40 minutes.
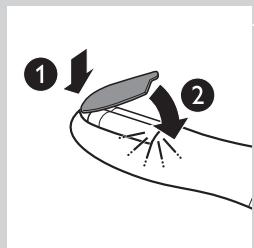
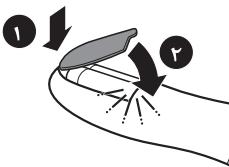
3 To close the battery compartment, first insert the bottom part of the lid into the rim of the compartment (1) and then press the top part of the lid home until it locks with a snap (2).
Removing the batteries
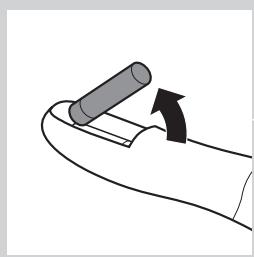
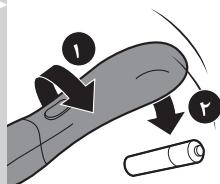
1 If you want to remove the batteries, open the lid of the battery compartment, see step 1 in section 'Inserting/changing the batteries' above.
2 Take out the first battery.
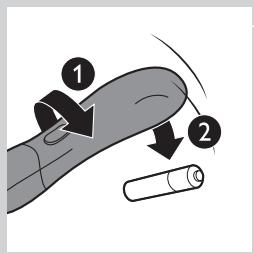
3 Turn the appliance around, so that the open part of the battery compartment is facing the floor. Hold your hand under the opening and shake the appliance until the second battery falls out.
Note: When you put down the appliance, place it in such a way that the on/off slide is facing the floor to prevent the appliance from rolling away.
Epilating with the precision epilator

Do not use this appliance to epilate eyebrows or eyelashes.
Do not use this appliance to remove hairs that grow out of moles.
- Use the precision epilator to epilate the underarms, the bikini line and hard-to-reach areas, wet or dry.
1 Thoroughly clean the area to be epilated. Remove any residues of deodorant, cream etc.
Switch on the appliance.
3 Place the epilating head at an angle of 90irc onto the skin with the on/off slide pointing in the direction in which you are going to move the appliance.
4 Slowly move the appliance over the skin, against the direction of the hair growth.
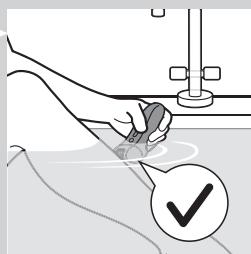
Epilate your bikini line as shown in the figure. Stretch the skin with your free hand and move the appliance in different directions to catch all hairs.
6 Epilate your underarms as shown in the figure. Raise your arms to stretch the skin and move the appliance in different directions to catch all hairs.
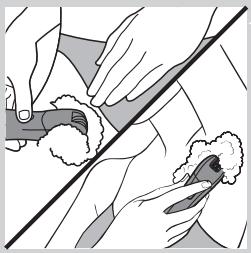
Tip: If you want to use the precision epilator in the bath or shower, we advise you to use a small amount of your common shower gel for better gliding.
Using the Smart Tweezers
Your epilator comes with Smart Tweezers with integrated light for easy removal of facial hair, such as eyebrow hairs. The Smart Tweezers are protected by a case with integrated mirror which allows you to depilate wherever and whenever you want. The Smart Tweezers are supplied ready for use with 3 button batteries in the battery compartment.
Using the Smart Tweezers
Do not use the Smart Tweezers to remove hairs that grow out of moles.
Do not point the light of the Smart Tweezers directly at your or somebody else's eyes.
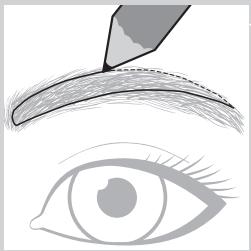
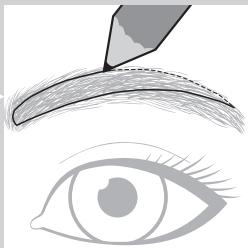
1 Use an eye pencil to mark the desired shape of your eyebrows.
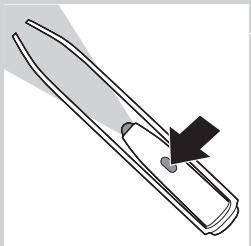
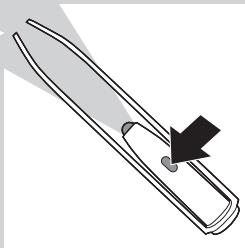
2 Switch on the light by sliding the on/off button.
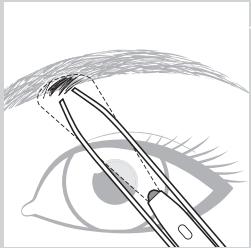
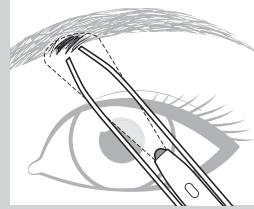
3 Remove any hairs outside the marked shape. Always pull out the hair in the direction of hair growth.
Replacing the batteries
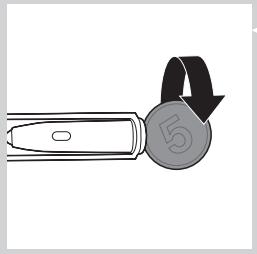
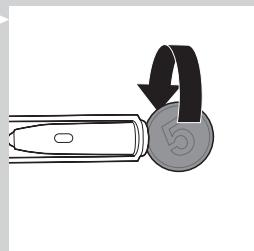
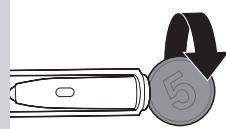
1 Open the battery and light compartment by turning the bottom anticlockwise with a coin.
2 Remove the old button batteries.
Keep the button batteries out of the reach of children and pets.
Button batteries present a potential choking hazard.
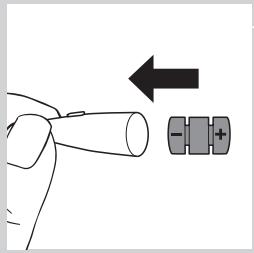
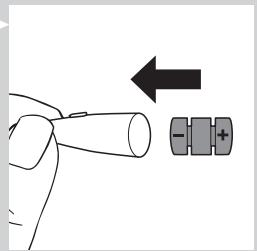
3 Insert the new button batteries with the negative side pointing forward into the battery and light compartment.
Note:The Smart Tweezers work on three alkaline button batteries, type L736H or AG3 (dia. 7.8 × 3.4 mm ).
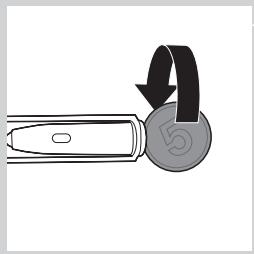
4 Screw the bottom back onto the battery and light compartment by turning it clockwise with a coin.
Cleaning and maintenance
Never use scouring pads, abrasive cleaning agents or aggressive liquids such as petrol or acetone to clean the appliance.
Always keep the adapter dry. Never rinse it under the tap or immerse it in water. If necessary, clean the adapter with the cleaning brush or a dry cloth.
Cleaning the epilator and attachments
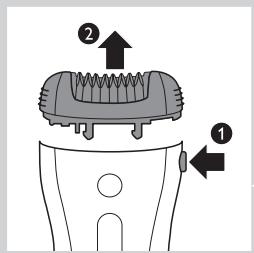
Clean the epilating head after each wet use to ensure optimum performance.
Always switch off the appliance before you clean it.
1 Switch off the appliance.
2 Remove the cap from the epilating head.
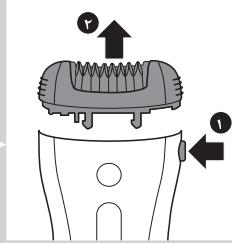
3 Press the release button (1) and remove the epilating head from the appliance (2).
Note: Never try to detach the epilating discs from the epilating head.
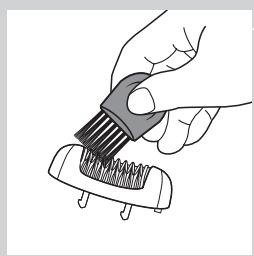
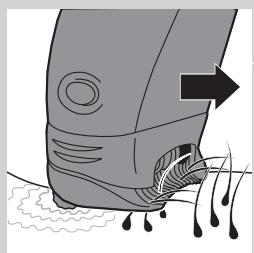
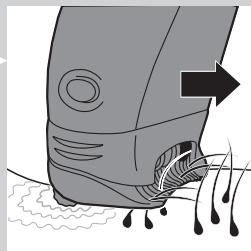
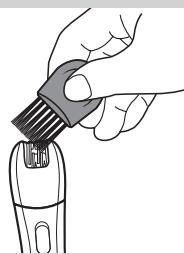
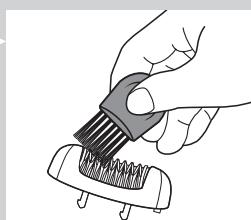
4 Remove loose hairs with the cleaning brush.
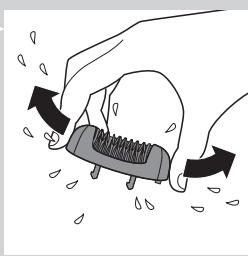
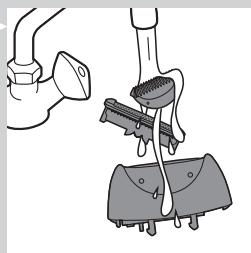
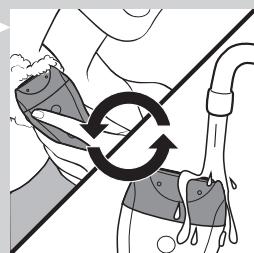
5 Rinse all parts (epilator, epilating head, caps and skin stretcher) under a lukewarm tap while turning them.
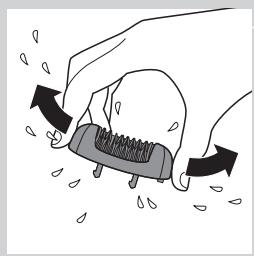
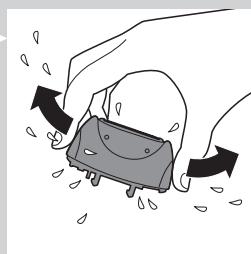
6 Shake excess water off the parts and let them dry.
Note: For hygienic reasons, make sure all parts are dry before you reassemble the appliance.
7 To reattach the epilating head, place it on the appliance and press it onto the appliance until it snaps home.
Cleaning the shaving head and the comb
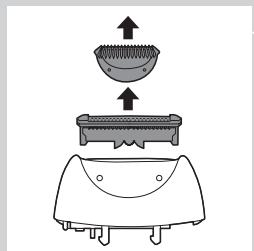
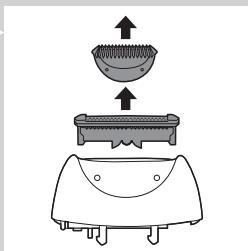
1 Remove the comb, if attached, by pulling it off the shaving head.
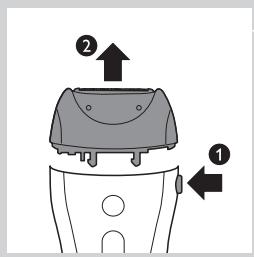
Press the release button (1) and remove the shaving head from the appliance (2).
3 Remove the shaving unit from the shaving head.
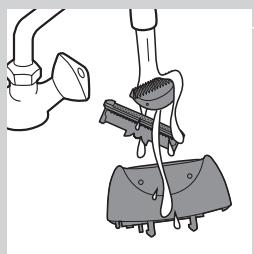
4 Rinse the shaving unit, the shaving head and the comb under a lukewarm tap while turning them.
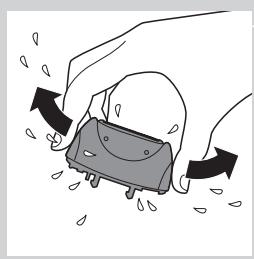
5 Shake the shaving unit, the shaving head and the comb firmly and let them dry.
Note: Do not exert any pressure on the shaving unit to avoid damage.
6 Reattach the shaving unit to the shaving head.
Note: Make sure all parts are dry before you place them back on the appliance.
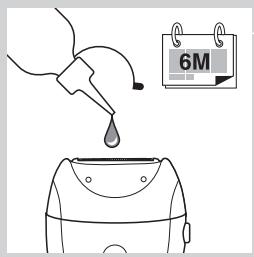
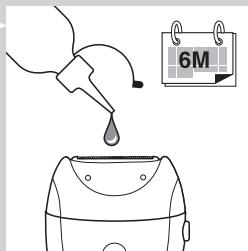
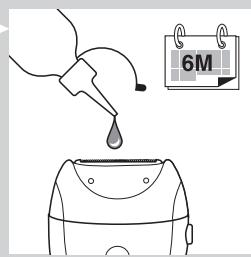
Tip: Rub a drop of sewing machine oil onto the shaving unit twice a year to extend the lifetime of the cutting element.
Cleaning the precision epilator
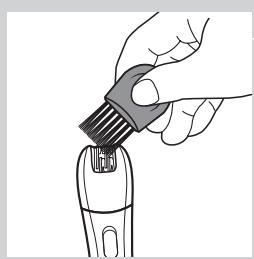
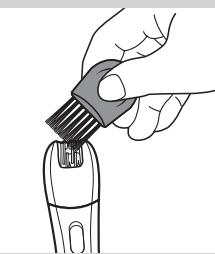
1 Clean the precision epilator regularly by removing loose hairs with the cleaning brush.
Do not switch on the appliance while brushing.
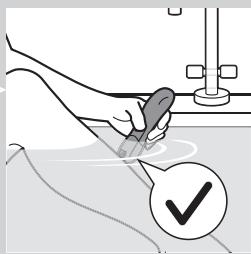
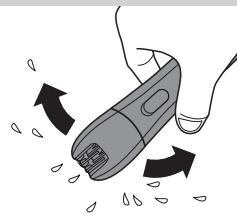
2 Rinse the precision epilator under the tap.
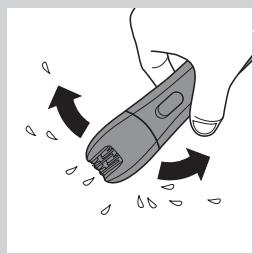
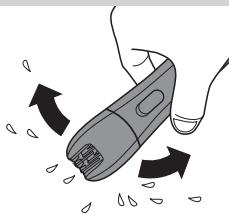
3 Shake excess water off the precision epilator and let it dry.
Note: To make cleaning easier, the epilating head can also be detached by pulling it off the appliance.
Storage
- Store the appliances and the accessories in the pouch.
- Put the comb on the shaving head to prevent damage.
Note: Make sure that all parts are dry when you store them.
Travel lock
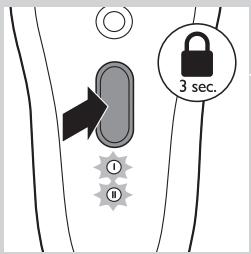
The epilator has an integrated travel lock which prevents the appliance from accidentally being switched on during travel.
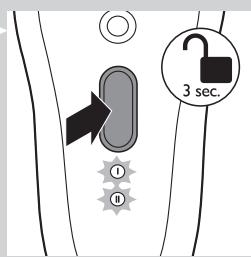
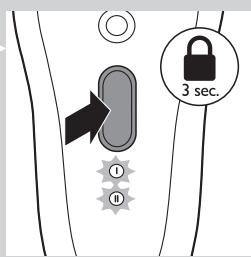
1 To activate the travel lock, press and hold the on/off button for 3 seconds until the speed lights flash white 2 times.
The epilator starts running and stops immediately when the travel lock activates.

2 To deactivate the travel lock, press and hold the on/off button for 3 seconds until the speed lights flash white 2 times.
Note:You can also insert the appliance plug into the inlet socket and the adapter into a wall socket to deactivate the travel lock.
Ordering accessories
To buy accessories or spare parts, visit www.shop.philips.com/service or go to your Philips dealer. You can also contact the Philips Consumer Care Centre in your country (see the worldwide guarantee leaflet for contact details).
Epilating head
If you use the epilating head two or more times a week, we advise you to replace the epilating head after two years or when it is damaged.
Recycling
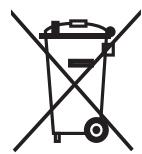
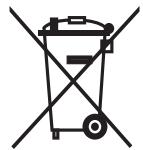
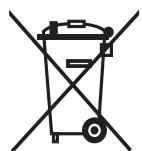
- This symbol on a product means that the product is covered by European Directive 2012/19/EU.
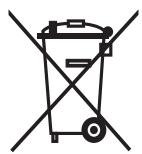
- This symbol means that the product contains a built-in rechargeable battery covered by European Directive 2006/66/EC which cannot be disposed of with normal household waste. We strongly advise you to take your product to an official collection point or a Philips service centre to have a professional remove the rechargeable battery.
- Inform yourself about the local separate collection system for electrical and electronic products and rechargeable batteries. Follow local rules and never dispose of the product and rechargeable batteries with normal household waste. Correct disposal of old products and rechargeable batteries helps prevent negative consequences for the environment and human health.
Removing the rechargeable battery
Note: We strongly advise you to have a professional remove the rechargeable battery.
Only remove the rechargeable battery when you discard the appliance.
Make sure the battery is completely empty when you remove it.
1 Check if there are any screws in the back or front of the appliance. If so, remove them.
2 Remove the back and/or front panel of the appliance with a screwdriver. If necessary, also remove additional screws and/or parts until you see the printed circuit board with the rechargeable battery.
3 If necessary, cut the wires to separate the printed circuit board and the rechargeable battery from the appliance.
Removing the disposable battery
To remove the disposable batteries, see the appropriate section in the user manual.
Guarantee and support
If you need information or support, please visit www.philips.com/support or read the separate worldwide guarantee leaflet.
Guarantee restrictions
Cutting units are not covered by the terms of the international guarantee because they are subject to wear.
Troubleshooting
This chapter summarises the most common problems you could encounter with the appliances. If you are unable to solve the problem with the information below, contact the Consumer Care Centre in your country.
| Problem | Possible cause | Solution |
| The epilator does not work. | The socket used to charge the epilator does not work. | Make sure the socket you use to charge the epilator is live. The charging light goes on to indicate that the epilator is charging. If you connect the epilator to a socket in a bathroom cabinet, you may need to switch on the light in the bathroom to make sure the socket is live. |
| The rechargeable batteries are empty. | When the charging light lights up red continuously, the batteries are empty and you need to charge the epilator for approx. 1 hour. Note:You have to charge the epilator fully before first use. | |
| The travel lock is active. | To deactivate the travel lock, press and hold the on/off button for 3 seconds until the speed lights flash white 2 times. You can also connect the epilator to the mains with the adapter to deactivate the travel lock. | |
| During use, the epilator becomes hot and suddenly stops operating. Then the speed lights and the charging light flash red for 30 seconds. | The overheat protection has been activated. | The epilator is equipped with integrated overhead protection, which prevents the epilator from becoming too hot. If the overheat protection is activated, the appliance switches off automatically. Then the speed lights and the charging light flash red for 30 seconds. To reset the overheat protection, let the epilator cool down and then switch it on again. To avoid overheating of the epilator, do not press the epilator too hard onto your skin. |
| During use, the epilator suddenly stops operating. Then the speed lights flash red for 5 seconds. | The overload protection has been activated. | If you press the epilating head too hard onto your skin or when the rotating discs of the epilating head get blocked (for instance because a piece of clothing has got stuck between the epilating discs), the epilator switches off automatically. Then the speed lights flash red for 5 seconds. Turn the epilating discs with your thumb until you can remove whatever is blocking the epilating discs. Then switch on the epilator again. |
| My skin is irritated after shaving or trimming. | You move the shaver (with or without trimming comb) in the wrong direction or you press too hard. | Slight skin irritation like red skin may occur. This is normal. To avoid irritated skin, make sure the shaving head (with or without trimming comb) is always in full contact with the skin and that you gently move the appliance against the direction of hair growth. |
| Do not apply too much pressure during shaving and trimming, as this may cause skin irritation. | ||
| Check if the shaving head or the trimming comb is broken. Always replace damaged or broken parts with original Philips parts. | ||
| The precision epilator does not work. | The disposable batteries are empty or have been inserted incorrectly. | Replace the batteries or insert them correctly (see chapter 'Using the precision epilator'). |
| The precision epilator is operating, but its performance is poor. | After 40 minutes, the disposable batteries are almost empty and no longer have enough power to guarantee good performance. | Insert new batteries (see chapter 'Using the precision epilator'). Only use disposable non-rechargeable AA 1.5V alkaline batteries. |
Introduction
1 Pinsettilvyt
2 Epilogue
3 Opti-light-valo
4 Virtapainike
Commanded accessoires
Colocar/substituir as pilhas
www.philips.com/support
a#da 1
ilwslg
Jg w o Jg w o g y w y jlll all ool cui aia iia u w w w
#
auiuuiuuiuuiuuiuuiuuiuuiuuiuuiuuiuuiuuiuuiuuiuuiuuiuuiuuiuuiuuiuuiuuiuuiuuiuuiuuiuuiuuiuuiuuiuuiuuiuuiuuiuuiuuiuuiuuiuuiuuiuuiuuiuuiuuiuuiuuiuuiuuiuuiuui uuuuuuuuuuuuuuuuuuuuuuuuuuuuuuuuuuuuuuuuuuuuuuuuuuuuuuuuuuuuuuuuuuuuuuuuuuuuuuuuuuuuuuuuuuuuuuuuuuuuuuuuuuuuuuuuuuuuuuuuuuuuuuuuuuuuuuuuuuuuuuuuuuu uu
jgl julu jlau
www.shop.philips.com/ www.shop.philips.com/
gssssssssssssssssssssssssssssssssssssssssssssssssssssssssssssssssssssssssssssssssssssssssssssssssssssssssssss
#
oluiu ydlwusl bdo joo n l uurj gao sgs d cosle 2012/19/EU
doluiu uusuy ciu d cwl uysj y slu d lsl u w u 2006/66/EC
gugao sla dlj uio I jnl gai g u y u ygl ucl 2006/66/EC
clssylo ly sgl gau gauu Jx y u ygl d lsl uu y u aoggi .cui ul. Philips
guy cygao u oy bgyo ay d oilu y gay p uiuw u y p jx cslbl
guy dyu uy du yu y gl u y u yu y u yu y u yu y u yu y u yu y u yu y u yu y u yu y u yu y u yu y u yu y u yu y u yu y u yu y u yu y u yu y u yu y u yu y u yu y u yu y u yu y u
jLdJgJyJyJyJy
- | x,y| = 1,| x,y| = 2,| y,x| = 3,| x,y| = 4 .
J 1
J 1 J 1 J 1 J 1 J 1 J 1 J 1 J 1 J 1 J 1 J 1 J 1 J 1 J 1 J 1 J 1 J 1 J 1 J 1 J 1 J 1 J 1 J 1 J 1 J 1 J 1 J 1 J 1 J 1 J 1 J 1 J 1 J 1 J 1 J
joc jcb 1111 200000000000000000000000000000000000000000000000
g
aui dai jai aai yduai aai gao ujy jai ly biio jbi ygdi
L
1
1 1
S1
aJ 1 aJ J j j j g g d i
suiy Suuui uui yusip pliaa iis 5 aaii gao:aa
jla
a 15 aaii i daiy jia yjg yjg yjg yjg yjg
J 1
4yjyj yjgyj/
1
A 1AA 1,0
1aii 5ii 1aii 1aii 1aii -g + 1aii 5giu uiao :
aaii 100000000000000000000000000000000000000
w g aJl j (1) abao aJy Jy sIaai y bJy ay bao y Sly .(r) uo oJ Lg y SjLg Lg yu Jy
45 150
1
1
jI jI jI jI jI jI jI jI jI jI jI jI jI jI jI jI jI jI jI jI jI jI jI jI jI jI jI jI jI jI jI jI jI jI jI jI jI jI jI jI jI jI jI jI jI jI jI jI jI jI jI J I J I J I J I J I J I J I J I J I J I J I J I J I J I J I J I J I J I J I J I J I J I J I J I J I J I J I J I J I J I J I J I J I J I J I J I J I J I J I J I J I J I J I J I J I J I J I J I J I J I J J I J J J J J J J J J J J J J J J J J J J J J J J J J J J J J J J J J J J J J J J JJJJJJJJJJJJJJJJJJJJJJJJJJJJJJJJJJJJJJJJJJJJJJJJJ
jglaljolaiwlglaow
J 1 J 1 J 1 J 1 J 1 J 1 J 1 J 1 J 1 J 1 J 1 J 1 J 1 J 1 J 1 J 1 J 1 J 1 J 1 J 1 J 1 J 1 J 1 J 1 J 1 J 1 J 1 J 1 J 1 J 1 J 1 J 1 J 1 J 1 J
1
J 1

daiwaiydydiuus
jL
JwJwJwSbolgjvsldolssolla. solsll oJgcbcluogds
Jd Jai a j j j j j j j j j j j j j j j
Jwlo wswy L Jg 500 aii 14
wos 15
16
17
wgsols/ wgsgws 18
19
20
21
iuaigoo sluigo 22
iuaigai gaiyog 23
24
25
douao
jI Jolalaiawl llyi jnPhilips a g yu wu wu wu wu wu wu wu wu wu wu wu wu wu wu wu wu wu wu wu wu wu wu wu wu wu wu wu wu wu wu wu wu wu wu wu wu wu wu wu wu wu wu wu wu wu wu wu wu wu wu
#
a aas jy ly lgl g wlgcoa y dl iulj alaiwjl pao cclbl jnl 1uaglcoia ciao slycwlln daae aalj qjgl .s
jbs
. 1d Suiu Jgulj - .auii oiai w y bui pww j uis w plao Jy gialu j
Jua
Jg 10000000000000000000000000000000000000000000000000000000000000000000000000000000000000000000
blusl
jll jae aaiy aay jll
aJlal aIall ayIbll egjy pgs yjz all Jezy auiy caii lii: dbslo ayIbll 100 sUf, bao aoalsill ic jqll no xuall aLx alall ayIbll qjil
15 1g .jgl jgl jgl jgl jgl jgl jgl jgl jgl jgl jgl jgl jgl jgl jgl jgl jgl jgl jgl jgl jgl jgl jgl jgl jgl jgl jgl jgl jgl jgl jgl jgl jgl jgl jgl jgl jgl jgl jgl jgl jgl jgl jgl jgl jgl jgl jgl jgl jgl jgl jgl
aagall iieg aalgloluo dao pluxuily jgll aolxl gl/g aalsll aall gclj 1 agboll aill agl sgt aaloloo glgglg aaloluo daaas .aull auley alall aylblg
aii iie 1000000000000000000000000000000000000000000000000000
aallll al1j4 aabii
lll j 1
auii iuij pluiu
ally all dlaauiie jiaai
aagjgljll jgllll
jssll 0o lssssg jcbse baj jessll aillj wjj d sSosuill Juswld: abso
#
a aai 1
a1 = 23,a2 = - 43,b1 = 58,b2 = - 34
J
aJyJyJyJyJyJyJyJyJyJyJyJy
jglg r aol jaiuill gla/ jaiyjj jyjayuoy, jaiy jaiy
a a a a a a a a a a a a a a a a a
. 1
1 1 1 1 1 1 1 1 1 1 1 1 1 1 1 1 1 1 1 1 1 1 1 1 1 1 1 1 1 1 1 1 1 1 1 1 1 1 1 1 1 1
bailg aolll wj jai
aalwJoo aW JbLoo aJy pJ 15j bll Eyy
.(j)j#d#
aaaal j no aal al aagjul
algoa jalialljssll alao cai balsll aalg gaaallaa
Lg aag g aalg aaal al gaaal gl ggllll
alil 1000x jia aoll oag g hao x : abdo
aalw j aall aag yj aolg
b1 = 2,b2 = - 4
aIbll aJy JlLl lll 1000000000000000000000000000000000000000000000000000000000000000000000000000000000
aclll alac alzal go daly cogallg ayarll aay jy g y glawl cjll S 8 .aiiae alac pluxuW
aJallgabittll
Jia aag jilg w g abtill Jgogwll abii dIyixx y .jall cabi g ngiwgl alaiial
abj.qlall g ayos x g yowll ci liqalbaas x. lail ygal all gla j bols .djgall sic aoa aebg lcbi adw pluxiu ypal
aLolglgeall alj jzabii
Jl 1111111111111111111111111111111111
jgljzwg
jlll jllj 10000000000000000000
(1)jgl jyj yj (1)jyj j
ailll llll! 1000000000000000000000000000000000000000
aill alpa pluowly gill cai tll aalssll
(aJll aIg aIg gseal allj wgrgall jla)cJgXg
algo jolalljollldoo
aallbdolll plsi
jao gao gao jao gao jao jao ge jao jao laigao jao dl jao aao o ao ge bao aiogao jao jao jao jao jao jao jao jao jao jao jao jao jao jao jao jao jao jao jao jao jao jao jao jao jao jao jao jao jao jao jao jao jao jao jao jao jao jao jao jao jao jao jao jao jao jao jao jao jao jao
aill bolll plu
ololll gai jll clyiill allj! bdloll ooi
aJyIyIyIyIyIyIyIyIyIyIyIyIyIyIyIyIyIyIyIyIyIy
gol goll jull jout gol pl
Jzill 1 Jzill j dzy 8dall
g lagjss s s. cai jll sll g bji jgs gall jll y
jai jai
Jyj
plaaa aalw alw wse gwlll clll ygall lll
duo
aalllulbll qjil
aIjIbll aii i .aiJx 101g Jlab jglio g liu ay bally
g ( x) = - 1x + 12x + 13x
aallallllglgloiswyslll
golgljglal jai! jajll iio gssx 101111111111111111111111111
.1
jglauu
J /12 11 11 11 11 11 11 11 11 11 11 11
8
aill lll lll lll gaa . Jlall gao go los gull bs no jell 0
Jg jlll lgljll g jll . Jlll g o go lo s 1000000000000000000000000000000000000000000
Jiaaiyuiu 1i i jiu yjgl plssl jg jzll liu Jaiuiu uji l jia jzll jzjj g jzll jzjj
dallallll jla pluul
a
cull llb: le bally aylll alal e 1
a|b2ll a> c> 1,0AA
gagall daxl gclalbll (-) aillwgl (+) aggall lbbxg o goo sfo
ai a ai 分母最小值为 k .
aagjε. g Jaaas cgg aayssll aybll jgs: abdo
aIbllgss aIblln no Iabll cJgll Jggs aIbll aIgla
.(1)ababcbglofoafoe bolloo golll oclbdo
Jg
aagbsll aalbll abg cgg
aal
1
du 1000000000000000000000000000000000
a. a. all a. b. all b. a. 100 all 100
gljlll jieill lgljlll jieil g jg jg jg jg jg jg jg jg
a1 = 20,2 = 2025,b1 = 2025,b2 = 2025
(1)jJgJnOgJlJgJgJgJgJgJgJgJgJgJgJgJgJgJgJgJgJgJgJgJgJgJgJgJgJgJgJgJgJgJgJgJgJgJgJgJgJgJgJgJgJg
Lgso jao w g Lgale bdojglal 1e aolll
aalw jle wieill bao
"gall bgs gbsgll aas"pwll gagwglwll A Jr Gogbglwl 8
ailll digssll no ydaall
jaiill aill iigswll gio aiaagall iaia
Jsu jupu Jao. auijui iguiu wui ciui diyau de aga jiu yia 2:do lo
.8a aue baaall 0g dya daaie laai
aill aol c gai yllalj jell jn lne waa aull jgswll no aalw alals buiu
dui r. dai jao 21 gully dc wll cai oao
a 100000000000000000000000000000000000000000000
alai jyssll yol o! syyj axosx glll yssll aod jaoi: abdo
jill Joll no Joll
jai jai aie iic gai aywagayd jayi jy jy bao yai jgull aywai aol oogig laljglll (sio wssll j)jw
algo
1
δ = 1.2
1450 6jaiw jiaLg jzoljzll Jd aJy
jai jiaiu y
Jusill /jusill jssy j 9- ygj yll jss
jaiil gao jia jia jia jia jia jia jia jia jia jia jia jia jia jia jia jia jia jia jia jia jia jia jia jia jia jia jia jia jia jia jia jia jia jia jia jia jia jia jia jia jia jia
.3aill 20 aal lwl pll wol llo g sfo : abdo
y 1
.
yjg aliss cai jgl s. Jlll g no go loa y a
aall aal 1jll
cll clly aessll wj gabi jgolil gl Jllll plaxiwgl jglo Jlaeoiw ie: abdo
clj jai jia jial jaoi j5 22g
aiaill bdd aekll jai jabigjai jai jai jao aokll no eai xie
"ddalglddill"dlllg
jll jssic aalw jle yieill bao 9
biolliigill
jaiy1 jiaiill jie jiaol i acjll gaiu plsiul uui ci5 li:abdo
Jgogll gill glblialg jai jw clj glbliall wio1 aepull sgiwo : abdo 1. JdIggl a5y Ito 4.
J 1 J 1 J 1 J 1 J 1 J 1 J 1 J 1 J 1 J 1 J 1 J 1 J 1 J 1 J 1 J 1 J 1 J 1 J 1 J 1 J 1 J 1 J 1 J 1 J 1 J 1 J 1 J 1 J 1 J 1 J 1 J 1 J 1 J 1 J

a 121 121 121 121 121 121 121 121 121 121 121 121 121 121 121 121 121 121 121 121 121 121 121 121 121 12
8 1
aill bgs aal
1 1 1 1 1 1 1 1 1 1 1 1 1 1 1 1 1 1 1 1 1 1 1 1 1 1 1 1 1 1 1 1 1 1 1 1 1 1 1 1 1 1 1 1 1 1 1 1 1 1 1
.1
aaiyblw waiy aaiy daiy wiy eji ySao:abdo
Jc jlll jw wcl a Jgjx jlll alljy noogai ci 1: ab, gj
jll lio. labi slgall cajrill allj Iaeg aillll gl cui y, ab, ay
.1olplaxxl oag ggl wall caiolul qag clall lao
.1jI iJd aalll agjll gl jlll plaxxl ng poxlil dluy
aLac cai .oag ailll allj g jalln ooiu xiu ci 1: dol, ay
.ayu u g plas jf de algaw ydl tll allj
prrll o egj gai X. cugll no aullsg adabi diy u no gdt dol, ay
jeell allj f ciiill liq dylu p
.1u oiae aullg jx x, clull g jeell allj bclaui :ple
13 lof, po E-r Jbblcuiu llouic alg w jell allj dlaoc epi
g f ggeiill aolill caytll allj g jwlll gl bclauii Jgblll ci5
po E-r ll Jauel iiip jy g. nrgwli
oo sglld cjjll g jnlly aayll w le abolsall alll u al yoswi : ple
jeell allj c1l x no ll g slll w all sclw .
jlll j1j pluillnolll no jlll
aillj! aJy JI abLbB yJyll llj! 1eall yJy JdCtLi j. wJy Jyll all! eJy Jyall j. Jyall j. Jyall j. Jyall j. Jyall j. Jyall j. Jyall j. Jyall j. Jyall j. Jyall j. Jyall j. Jyall j. Jyall j. Jyall j. Jyall j. Jyall j. Jyall j. Jyall j. Jyall j. Jyall j. Jyall j
jI eIbI 1 (1) niiJlJI Jc biaill yuWai jaiil allj Icbic jal ablo .JJI aJgl (r) .Jauill allj! wJ Jc elbaill q
jI jI JJI aJg aJoo Jauitll sla/JuauiuJJ Jc JbJ 10 Jauil alljx aJleJzJzJ acsw g. (r) aJtll acsw Jc JzJ Lae
.(r) biliI Ii jyjyjll jll jilg (1) jjlyjyyjll lall jll jy
a a a a a a a a a a a a a a a a a a a a a a a a a a a
aJg aagaa Jbll
eeg 1y jia aai ylll lal n 10n 10n 10n 10n 10n 10n 10n
Lolai aicjia jllbll lioic jaiwuyasXy jll yu wll qagjllg 00 g y uill djjj xu wul okl "xu"
aill allj! jles plaii
. 10000000000000000000000000000000000000000000000000000000
jaiabci uogy jaiy jayu oal jaiy aui 10000000000000000000000000000000000000000000000000000000000000000000000000000000000000000
(EMF)
aill lai ylll lal gall gall ge aq Philips joo jol li qll bbl .

pIlog wll ci g plal o plssw plo gag. glall pglao liq aill jg 1uwl clljg, bao aylll je wll allj jgs Jae, gog gnnll cci aaiill
aoswulglaw
gge ggl 1 1 1 1 1 1 1 1 1 1 1 1 1 1 1 1 1 1 1 1 1 1 1 1 1 1 1 1 1 1 1 1 1
cog RE 100 jai xiaog
()uW=LC:efogss

(rJ5) pall aagll
1
j 2
ω ÷ os = 12
a/1j 4
ii aJyul sgiu uL gauu duiug joo beol
IacwglgauoJcJgauuJyoo beol
1 aull sioo dol 5
11 a p uill s g iuio qal 6
7
8
j 9
uill bio 10
aaa 11
jlll 12
awusll jbiol llb 13
Joljoll joll gogjdlll 14
JlJ 15
16
17
Juaill gla/Jeauill giaoll 18
gdlj19
aill aJx alal yag gll Jaaai 20
aill bssll 21
aill baxlall 22
aaiXbaxllg23
gll glal / jieui jia 24
25
plitsslljzgill
#
doudao
aouai gill pall no aolal alaiwll !Philips pll o jog cial li el .j .l l . . . . . . . . . . . . . . . . . . . . . . . . . . . . . . . . . . . . . . . . . . . . . . . . . . . . . . . . . . . . . . . . . . . . . . . . . . . . . . . . . . . . . . . . . . . . . . . . . . 1. www.philips.com/welcomc 1e e e e e e e e e e e e e e e e e e e e e e e e e e e e e e e e e e e e e e e e e e e e e e e
plao
gll biaxl g 1xalnlogjol pluwl j aie aagall clogall adcjo .all .al l xlyjogial claxlall alixi . Jaiwll
jlllall jkbal 1. jiau ellw youxui w la, plaoi w jaiil allj jn xuy uogai ci li
ybs
Δ > 0
:
1
1
#
m = 311
m - 1 ≠ 0 ;
:
12x - 1 > 0 ②
120 irc
:
J
21
.
8
.
9
1
m : x = 1 或 3x + 4y + 1 = 0
:
| x - 2x| = 516| x - 3| .
m = 311 ;
1
X -
23
m - 1 ≠ 0 ;
1
m = 311 ;
3x = - 2 + 22
1
duii
1
√
1
1.
:
1
:
V
m : x = 1 或 3x + 4y + 1 = 0
11
ωdot S
e
:
0
m - 1 ≠ 0 ;
1
[Tab]
m - 1 ≠ 0 ;
:
:
1
( x - 1) ( x + 3) = 0
m - 1 ≠ 0 ;
。
9
1
1
1
18 : 2( x - 1) + 35 = 35
C
上
.
1
1
**
9
1
1
图 1
.
1
J
m - 1 ≠ 0 ;
.
31
1
√
m - 1 ≠ 0 ;
.1
1
m = 311 ;
1
X -
2
。
U
“
1
1
m - 1 ≠ 0 ;
1
图 1
a12 + a22
AD = AC = 1
。


- Always here to help you
- Introduction
- Important
- Danger
- Warning
- Caution
- Electromagnetic fields (EMF)
- General
- General description (Fig. 3)
- Preparing for use
- Charging
- Batteries low or empty
- Using the epilator
- Epilating tips
- Epilating the legs with the epilator
- Shaving the underarms and bikini line
- Trimming with the comb
- Overheat protection
- Overload protection
- Using the precision epilator
- Inserting/changing the batteries
- Removing the batteries
- Epilating with the precision epilator
- Using the Smart Tweezers
- Replacing the batteries
- Cleaning and maintenance
- Cleaning the epilator and attachments
- Cleaning the shaving head and the comb
- Cleaning the precision epilator
- Storage
- Travel lock
- Ordering accessories
- Epilating head
- Recycling
- Removing the rechargeable battery
- Removing the disposable battery
- Guarantee and support
- Guarantee restrictions
- Troubleshooting
- Commanded accessoires
- Colocar/substituir as pilhas
- #
- jgl julu jlau
- jLdJgJyJyJyJy
- g
- S1
- jla
- J 1
- 4yjyj yjgyj/
- 150
- jglaljolaiwlglaow
- daiwaiydydiuus
- jL
- douao
- jbs
- Jua
- blusl
- jll jae aaiy aay jll
- aallll al1j4 aabii
- J
- bailg aolll wj jai
- aJallgabittll
- aLolglgeall alj jzabii
- aallbdolll plsi
- aill bolll plu
- Jyj
- aallallllglgloiswyslll
- dallallll jla pluul
- a
- Jg
- ailll digssll no ydaall
- jill Joll no Joll
- aill bgs aal
- jlll j1j pluillnolll no jlll
- (EMF)
- (rJ5) pall aagll
- plitsslljzgill
- doudao
- plao
- ybs
Brand : PHILIPS
Model : SATIN PERFECT HP6581
Category : Epilator