
Inventa 300 - Sewing machine TERMOZETA - Free user manual and instructions
Find the device manual for free Inventa 300 TERMOZETA in PDF.


| Product Type | Sewing machine |
| Brand | Termozeta |
| Model | Inventa 300 |
| Power Supply | 220-240 V, 50 Hz |
| Power Consumption | 85 W |
| Dimensions (approx.) | 40 x 20 x 30 cm |
| Weight (approx.) | 6 kg |
| Stitch Patterns | Straight, zigzag, stretch, decorative satin, blind hem, overcast, buttonhole, and more |
| Buttonhole Type | Automatic 4-step buttonhole, corded buttonhole |
| Needle Type | Home sewing needles (size 9-16 depending on fabric) |
| Stitch Length | Adjustable, up to 4 mm |
| Stitch Width | Adjustable, up to 5 mm |
| Free Arm | Yes, removable extension table |
| Sewing Light | Yes, 15 W bulb |
| Accessories | Extension table (accessory storage), bobbins, needles, screwdriver, seam ripper, buttonhole foot, etc. |
| Safety Features | Power switch, polarized plug, thermal protection |
| Maintenance | Oiling, cleaning feed dogs, hook race disassembly, belt tension adjustment |
| Country of Manufacture | P.R.C. |
Frequently Asked Questions - Inventa 300 TERMOZETA
User questions about Inventa 300 TERMOZETA
0 question about this device. Answer the ones you know or ask your own.
Ask a new question about this device
Download the instructions for your Sewing machine in PDF format for free! Find your manual Inventa 300 - TERMOZETA and take your electronic device back in hand. On this page are published all the documents necessary for the use of your device. Inventa 300 by TERMOZETA.
USER MANUAL Inventa 300 TERMOZETA

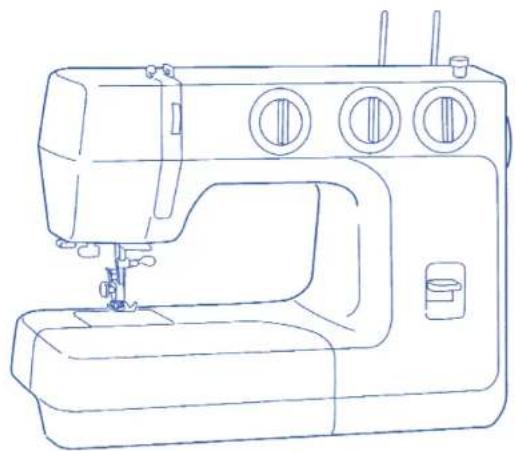
Inventa 300
natural_image
Line drawing of a sewing machine with three buttons and a handle (no text or symbols)LIBRETTO ISTRUZIONI
▶ INSTRUCTION MANUAL
▶ LIBRO DE INSTRUCCIONES
TERMOZETA®
ITALIANO
ITALIANO
▶ PARAGRAFO 2. PREPARAZIONE AL CUCITO
natural_image
Simple line drawing of a vehicle with motion arrows indicating speed (no text or symbols)natural_image
Technical line drawing of a mechanical device with two separate views showing internal components (no text or symbols)natural_image
Line drawing of a sewing machine with hands operating it (no text or symbols)natural_image
Technical line drawing of a mechanical device with two views: top shows a vertical arm and horizontal base, bottom shows a curved mechanism (no text or symbols)natural_image
Diagram showing a mechanical device with directional arrows indicating motion or force (no text or symbols present)natural_image
Line drawing of a sewing machine needle and foot (no text or symbols)natural_image
Technical line drawing of a mechanical device with two views: top shows a vertical component, bottom shows a screwdriver with a handle (no text or symbols)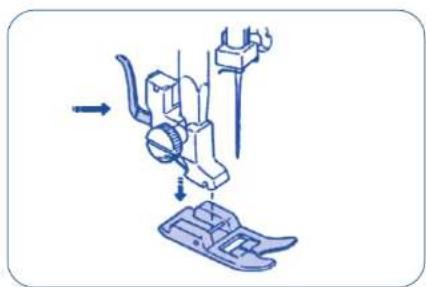
natural_image
Diagram of a sewing machine needle insertion into a base, showing mechanical components and tool path (no text or labels)natural_image
Line drawing of a hand using a tool to press or install a component on a base, with no visible text or symbols.① Filo superiore
② Foro
① Groviglio
natural_image
Line drawing of a sewing machine needle stitching a base, with no text or symbols presentnatural_image
Line drawing of a sewing machine needle stitching fabric, no text or symbols presentnatural_image
Diagram of a mechanical or electrical component with two circular components and a central rotating element (no text or symbols)natural_image
Technical line drawing of a mechanical assembly with a spool and tool, showing no text or symbols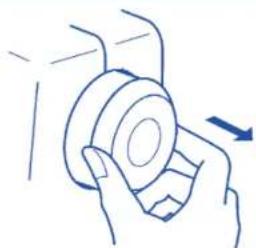
natural_image
Hand holding a circular object with an arrow indicating direction (no text or symbols)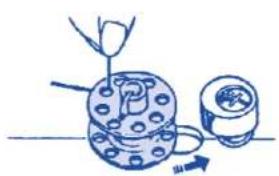
natural_image
Simple line drawing of a mechanical assembly with a tool and component (no text or symbols)natural_image
Illustration of hands holding a mechanical component with a circular housing and bolt holes (no text or symbols)natural_image
Illustration of a hand holding a device with a downward arrow indicating motion (no text or symbols)natural_image
Illustration of a hand holding a small object with a pointed tip, no text or symbols present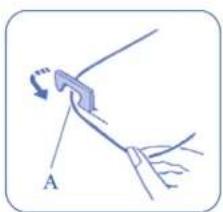
natural_image
Diagram of a person using a pole-mounted lever system with a curved arrow indicating rotation (no text or symbols present)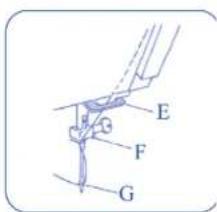
natural_image
Line drawing of a sewing machine with hands operating it, showing mechanical components and a magnified inset (no text or symbols)natural_image
Line drawing of a person climbing stairs with a ladder and directional arrow (no text or symbols)natural_image
Illustration of a medical device with a blue coil and cable, no text or symbols present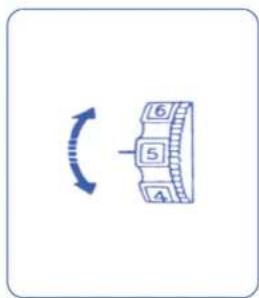
natural_image
Diagram showing a mechanical component with a 3D view and a scale ruler (no text or symbols present)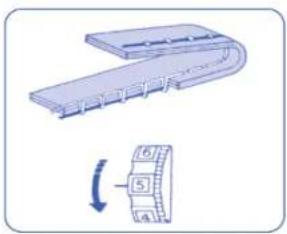
natural_image
Diagram of a mechanical component with a curved housing and a separate circular component with numbered parts (no text or symbols)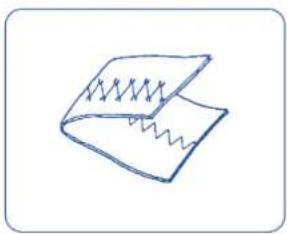
natural_image
Simple line drawing of a closed book with a spring-like design on the cover (no text or symbols)natural_image
Simple line drawing of a hand pressing down on a rectangular object with a small blue arrow (no text or symbols)natural_image
Illustration of a sewing machine stitching a blue fabric sheet (no text or symbols)natural_image
Illustration of a sewing machine needle stitching fabric (no text or symbols)natural_image
Diagram of a mechanical device with an inset showing a component (no text or symbols present)natural_image
Diagram of a mechanical assembly with a lever and guide mechanism (no text or labels)natural_image
Diagram of a sewing machine with a magnified inset showing the blade and base structure (no text or symbols)natural_image
Illustration of a sewing machine needle stitching fabric (no text or symbols)▶ Cucitura a zigzag
natural_image
Illustration of a person using a sewing machine on a fabric (no text or symbols visible)Sopraggitto
natural_image
Illustration of a sewing machine on a slatted base (no text or symbols)Punto a sopraggitto
natural_image
Illustration of a sewing machine needle stitching fabric (no text or symbols)natural_image
Line drawing of a sewing machine needle stitching fabric (no text or symbols)natural_image
Technical line drawing of a mechanical device with no visible text or symbols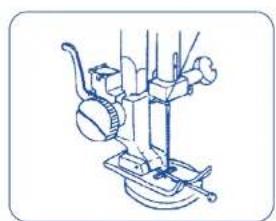
natural_image
Line drawing of a mechanical device with no visible text or symbols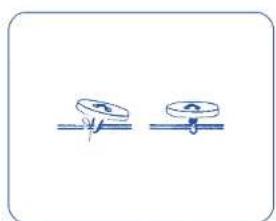
natural_image
Simple line drawing of two identical mechanical components with a fulcrum, no text or symbols presentCucitura bottoni
natural_image
Technical line drawing of a mechanical assembly with no visible text or symbols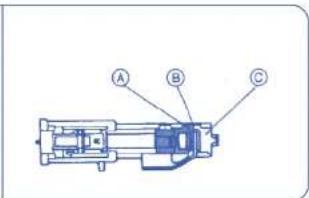
A Cursore
natural_image
Technical illustration of a sewing machine on a fabric mat (no text or symbols visible)natural_image
Illustration of a mechanical tool with spring and handle, no text or symbols presentnatural_image
Line drawing of a mechanical device with an arrow indicating motion (no text or symbols)natural_image
Illustration of a hand using scissors to cut a screwdriver (no text or symbols present)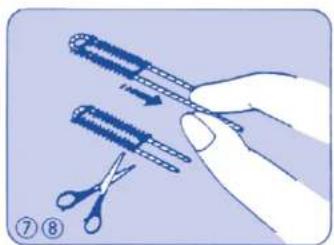
natural_image
Illustration of a hand using scissors to cut a screwdriver (no text or symbols present)ITALIANO
natural_image
Illustration of a sewing machine needle stitching fabric (no text or symbols)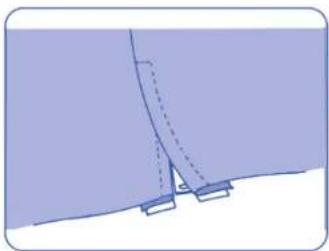
natural_image
Pure diagram of a mechanical or structural component without any text, numbers, or symbolsnatural_image
Technical line drawing of a sewing machine needle and foot (no text or symbols)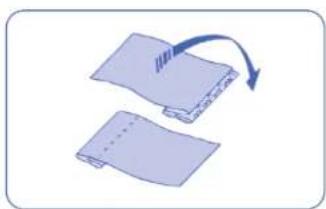
natural_image
Diagram showing two layered materials with a blue arrow indicating rotation or deformation (no text or symbols)natural_image
Illustration of a person climbing a slope with tools and wires (no text or symbols)natural_image
Illustration of a person using a sewing machine to lift water, with no text or symbols present.natural_image
Illustration of hands fastening a fabric piece with ruffled edges and a woven pattern (no text or symbols)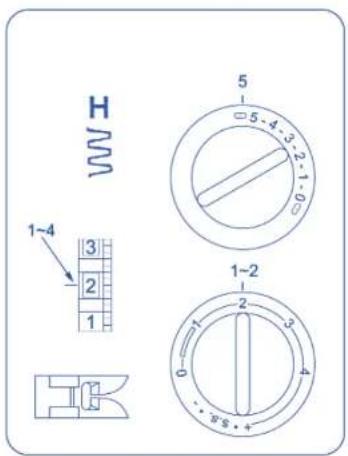
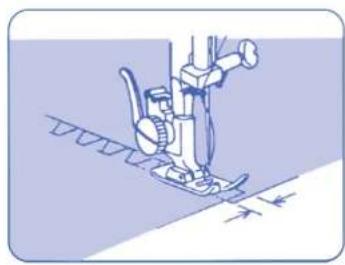
natural_image
Illustration of a sewing machine needle stitching fabric (no text or symbols)natural_image
Simple line drawing of a mechanical device with no text or symbolsnatural_image
Technical line drawing of a mechanical component with no visible text or symbolsnatural_image
Technical line drawing of a mechanical assembly with no visible text or symbolsnatural_image
Line drawing of a sewing machine needle stitching fabric (no text or symbols)natural_image
Technical line drawing of mechanical components and parts (no text or symbols)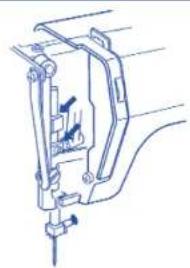
natural_image
Technical line drawing of a mechanical assembly with no visible text or symbols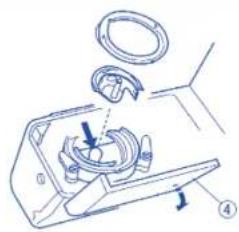
natural_image
Mechanical assembly diagram showing a disassembly or assembly process with labeled parts (no text or symbols present)▶ SAFETY REQUIREMENT

- This booklet is an integral part of the appliance and must be carefully read before use, since it provides important information on the installation, safety, use and maintenance of the appliance. Keep in a safe place.
- After removing the packaging make sure the appliance is undamaged and that no parts ng. If in doubt, do not use and contact an authorised Termozela service centre.
- Do not leave parts of packaging (plastic bags, foam polystyrene, nails, etc) within reach of children or unqualified persons since they are potential sources of danger.
- If the appliance comes with an earth plug, the electrical safety is ensured only when this plug is correctly connected to an effective earthing system in compliance with the existing electrical safety standards. Termozeta shall not be held responsible for any damages caused by the lack of a correct earthing system.
- Before connecting the plug to the power outlet check that the operating voltage of the appliance corresponds to the voltage of your mains supply. If in doubt, contact a qualified technician.
- Do not use adaptors, multiple plugs and extension leads. If necessary, only use devices that conform to the current safety standards making sure they are compatible with the power of the appliance. If in doubt, contact a qualified technician.
- Any installation not conforming to the above instructions may compromise your safety and cancel the guarantee.
• The machine is exclusively for domestic use for sewing fabrics. - For safety reasons:
- do not use the appliance with bare feet and with wet hands or feet
- do not use the appliance outside the home
- do not leave the appliance exposed to atmospheric agents (sun, rain...)
- do not allow the machine to be used by children or by anyone with reduced physical or mental abilities or without experience unless they are supervised and instructed on its use.
- never pull on the power cord or on the appliance itself to disconnect the plug from the power outlet
- do not leave the appliance unattended when it is plugged into the main power supply
- never immerse the appliance in water or other liquids.
- The power cord of the appliance must not be replaced by the user. If necessary, contact an authorised TERMOZETA service centre or qualified technician.
- Switch off and do not tamper with the appliance should it breakdown and/or not function properly. Contact an authorised TERMOZETA service centre for any repairs and ask for original spare parts.
- Make the appliance unserviceable at the end of its running life by unplugging it from the power outlet and cutting the power cord. Abide by the existing standards in your country for instructions on its disposal.
- Termozeta cannot be held responsible for any damages to people animals or things caused by incorrect installation or due to improper, incorrect or negligent use.
- Do not put fingers near the moving parts. Pay particular attention to the area around the
sewing machine needle.
• Always use the correct needle plate otherwise the needle could break. - Do not use bent needles.
- Do not push or pull the fabric during sewing. The needle could bend and break.
- Switch off the sewing machine ("0") whenever any adjustments have to be made in the needle area, e.g. change needle, thread a bobbin or change the foot etc.

INDEX
▶ SECTION 1. ESSENTIAL PARTS
Names of parts pag. 27
▶ SECTION 2. GETTING READY TO SEW
Connecting the machine to the power supply pag. 28
Thread and needle chart
Setting spool pins
Removing or inserting the bobbin base
Winding the bobbing
Threading bobbin case
Threading the machine
Drawing up bobbin thread
Balancing needle thread tension
Pattern selector dial
Stitch length dial
Reverse stitch button
Seam guide line
Dropping the feed dogs
▶ SECTION 3. BASIC SEWING
Straight stitch sewing
To change the sewing directions
Zigzag stitching
▶ SECTION 4. UTILITY STITCHINGS
Overcasting pag. 37
Overedge stitch
Tricot stitch
Triple strength stitch
Sewing buttons
Automatic Buttonhole
Corded Buttonholes
Zipper Application
Blind stitch hemming
▶ SECTION 5. DECORATIVE STITCHING
Shell tuck
Stretch stitch patterns
Decorative satin stitch patterns
Smocking
Box stitching
▶ SECTION 6. CARE OF YOUR MACHINE
Dismantling and assembling hook race
Cleaning the feed dogs
Drive belt tension
Oiling the Machine
Trouble Shooting
pag. 29
pag. 30
pag. 31
pag. 31
pag. 32
pag. 32
pag. 33
pag. 33
pag. 34
pag. 35
pag. 35
pag. 36
pag. 36
paq. 36
[Non-Text]
080 36
pag 37
page 37
1.2.3
[Non-Text]
The Ground Truth image displays a single, solid horizontal line, which is a stylistic or background element (like a rule line on paper). According to Rule 2, such lines must be ignored by the OCR result. The provided OCR content is "____", which consists of underscores. Underscores are not equivalent to a solid line and are not permitted under the “Stylistic/Background Lines (Ignore)” rule. Outputting underscores for a stylistic line is incorrect because it misinterprets the line as a placeholder fill-in-the-blank area. Since the OCR output incorrectly rendered a stylistic line as underscores (which should be ignored), this violates the rule. Therefore, the OCR result is inconsistent with the Ground Truth.
07
pag. 57
pag. 50 pag. 20
pag. 56
pag. 59
pag. 40
pag. 41
pag. 42
pag. 42
[Non-Text]
This image contains no text. The visible element is a stylistic or background line, which must be ignored according to the rules.
pag. 43
pag. 44
pag. 44
pag. 45
pag. 45
[Non-Text]
1 + u1 - 1 = ( 1 + u) u1 < 1 = u
pag. 46
pag. 46
089 46
pag. 47
n24 4B
page 10
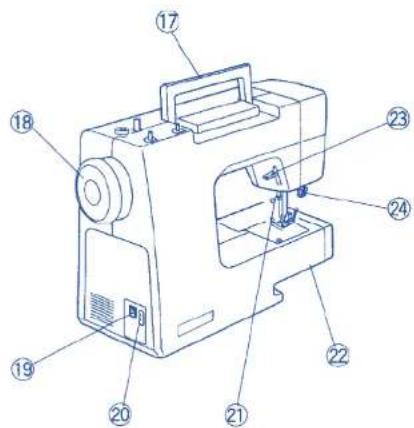
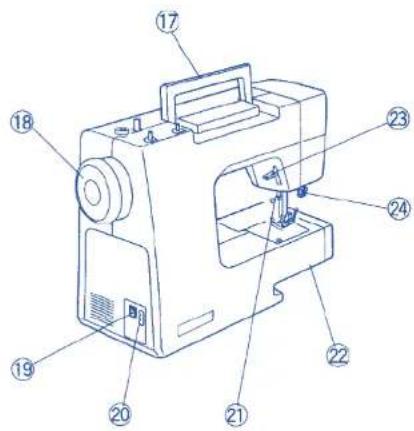
▶ SECTION 1. ESSENTIAL PARTS
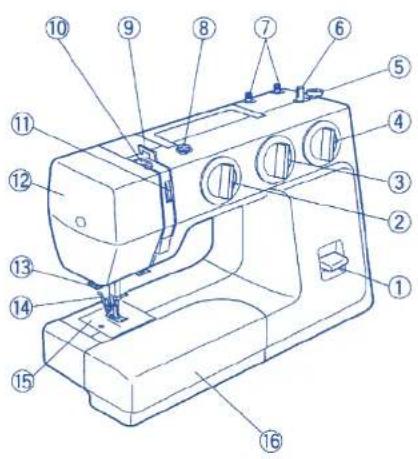
Names of parts
① Reverse stitch button
② Pattern selector dial
③ Stitch length dial
④ Stitch width dial
⑤ Bobbin winder stopper
⑥ Bobbin winder spindle
⑦ Spool pins
⑧ Bobbin winder thread guide
⑨ Thread guide
⑩ Thread take-up lever
⑪ Thread tension dial
⑫ Face plate
⑬ Thread cutter
⑭ Presser foot holder
⑮ Needle plate
⑯ Extension table
⑰ Carrying handle
18 Handwheel
19 Power switch
20 Machine socket
21 Needle clamp screw
22 Free arm
②3 Presser foot lifter
24 Buttonhole lever
▶ ENGLISH
▶ SECTION 2. GETTING READY TO SEW
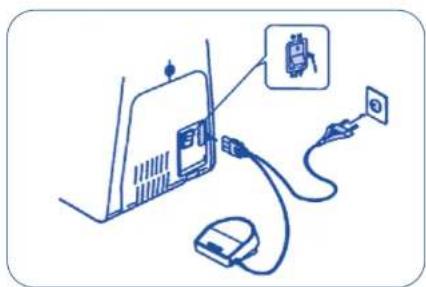
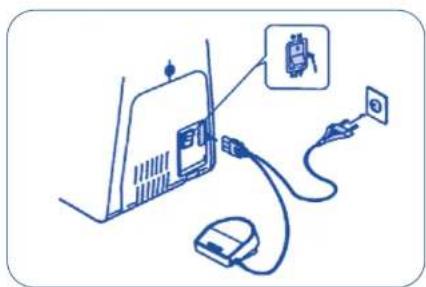
- Connecting the machine to the power supply
Before connecting the power, make sure the voltage and frequency of your electrical power conform to the machine. Make sure the power switch is in the OFF position.
Fit the nonreversible plug into the cord socket and plug the machine in to the power supply.
Then turn the power switch on.
▶ Extension table (accessory storage box)
The extension table provides added sewing surface and can be easily removed for free arm sewing.
natural_image
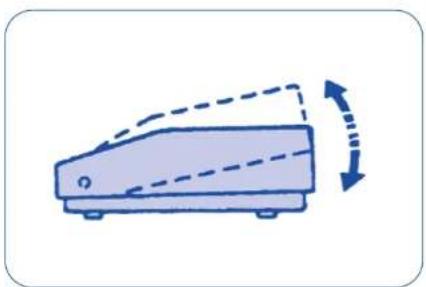
Simple line drawing of a vehicle with motion arrows indicating speed (no text or symbols)Foot control
Sewing speed can be varied by the foot control. The harder you press on the control, the faster the machine runs.
natural_image
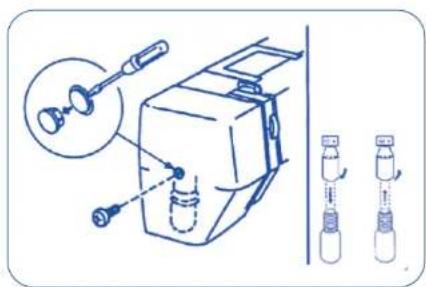
Technical line drawing of a mechanical device with two separate views showing internal components (no text or symbols)▶ Sewing light
The sewing light is located behind the face plate.
To change the bulb, take the face plate off the sewing machine by removing the set screw.
Unplug the power supply before changing the bulb.
• To remove push and twist to the left.
• To remove push and twist to the right
WARNING: use bulbs with a maximum power of 15W only.
natural_image
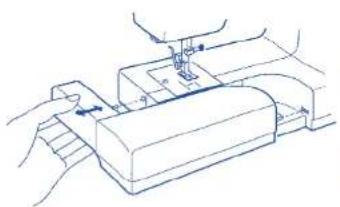
Line drawing of a sewing machine with hands operating it (no text or symbols)▶ For free arm sewing
Pull the end of the extension table away from the machine, as illustrated.
For attaching the table
Push the extension table until its lugs fit into the machine.
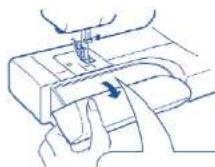
- Accessory storage box
Sewing accessories are conveniently stored under the extension table.
ENGLISH
natural_image
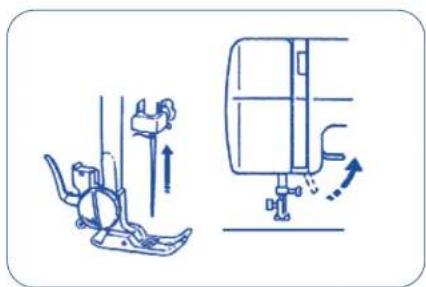
Diagram showing two mechanical components with directional arrows indicating motion (no text or symbols)To snap on and snap off the presser foot
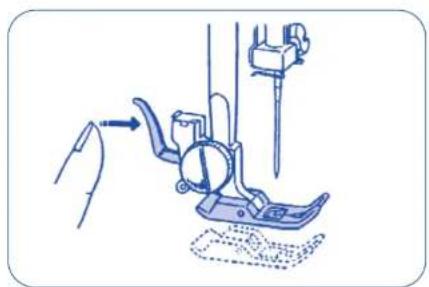
To snap off
Turn the balance wheel toward you to raise the needle to its highest position.
Raise the presser foot.
natural_image
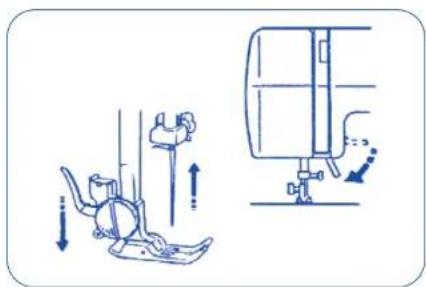
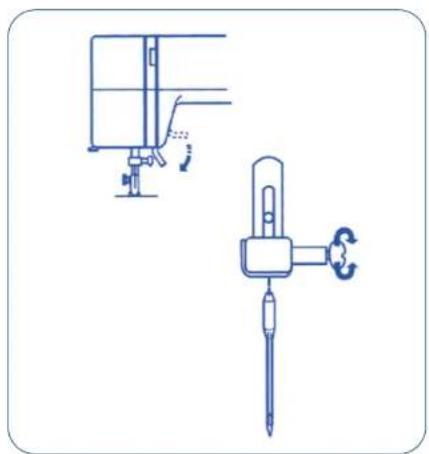
Diagram showing a mechanical device with directional arrows indicating motion or force (no text or symbols present)▶ Changing needle
Raise the needle by turning the balance wheel toward you and lower the presser foot.
natural_image
Line drawing of a sewing machine needle and foot (no text or symbols)Press the lever on the back of the foot holder.
The presser foot will drop off.
natural_image
Technical line drawing of a mechanical device with two views: top shows a vertical component, bottom shows a screwdriver with a handle (no text or symbols)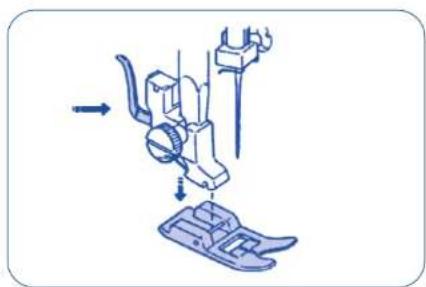
natural_image
Diagram of a sewing machine needle insertion into a base, showing mechanical components and tool path (no text or labels)To snap on
Place the presser foot so the pin on the foot lies just under the groove of the foot holder.
Lower the foot holder to lock the foot in place.
Loosen the needle clamp screw by turning it counter-clockwise. Remove the needle from the clamp.
Insert the new needle into the needle clamp with the flat side away from you.
When inserting the needle into the clamp, push it up as far as it will go and tighten
the clamp screw firmly with the screwdriver.
Check you needles frequently for barbed or blunted points. Snags and runs in knits, fine silks and silk-like fabrics are permanent and are almost always caused by a damaged needle.
▶ ENGLISH
THREAD AND NEEDLE CHART
| Fabrics Threads Needle Size | |||
| Light weight Crepe de Chine, Voile, Fine silk 9 or 11 | |||
| Lawn, Organdy, Georgette, Fine cotton | |||
| Tricot | Fine | synthetic | |
| Fine cotton covered polyester | |||
| Medium weight | Linens, Cotton, Piqué, Serge, Double Knits, Percale 50 to 80 Cotton | 50 Silk | 11 or 14 |
| 50 to 60 | |||
| Synthetic | |||
| Cotton covered polyester | |||
| Heavy weight | Denim, Tweed, Gabardine, Coating, Drapery and upholstery fabricie | 50 Silk | 14 or 16 |
| 40 to 50 Cotton | |||
| 40 to 50 | |||
| Synthetic | |||
| Cotton covered polyester | |||
- In general, fine threads and needles are used for sewing thin fabrics, and thicker threads and needles are used for sewing heavy fabrics. Always test thread and needle size on a small piece of fabric which will be used for actual sewing.
- Use the same thread for needle and bobbin.
- When sewing very line fabrics, sew over a piece of paper to prevent yarn distortion.
ENGLISH
natural_image
Line drawing of a hand using a tool to press or install a mechanical component (no text or symbols present)Setting spool pins
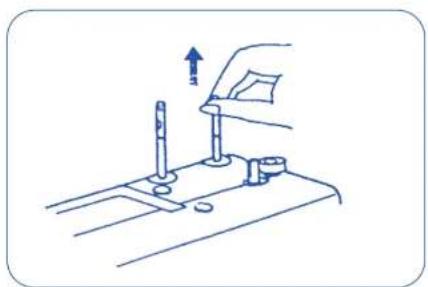
The spool pins are used for holding the spool of thread in order to feed thread to the machine. To use, pull up the spool pin. Push down for storage.
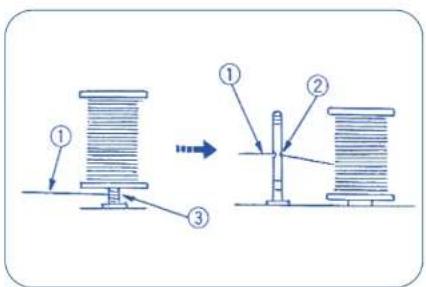
① Upper thread
② Hole
① Tangle
NOTE: In case of using the thread which has tendency to tangle around the spool pin, thread through the hole of spool pin as shown. The hole should face to the thread spool.
natural_image
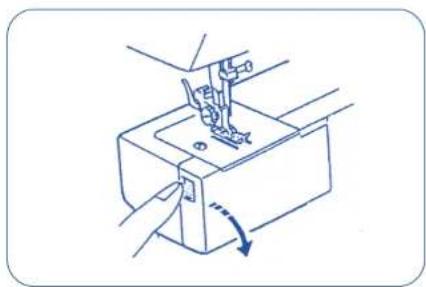
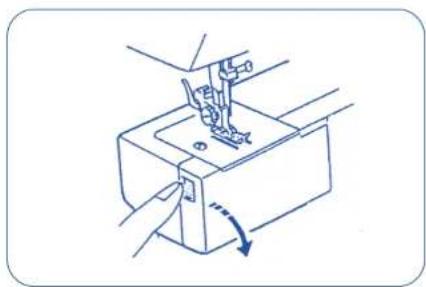
Line drawing of a sewing machine needle stitching a base, with no text or symbols present- Removing or inserting the bobbin case Open the hook cover.
natural_image
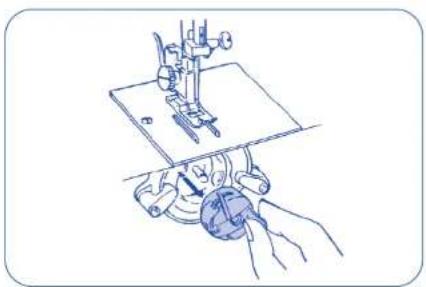
Line drawing of a sewing machine needle stitching fabric, no text or symbols presentRaise the needle by turning the balance wheel toward you. Take out the bobbin case by holding the latch.
natural_image
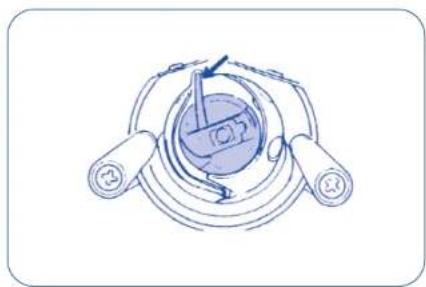
Diagram of a mechanical or electrical component with two circular components and a central rotating element (no text or symbols)When inserting the bobbin case, place the horn into the recess of the hook race.
▶ ENGLISH
natural_image
Technical line drawing of a mechanical assembly with a spool and tool, showing no text or symbols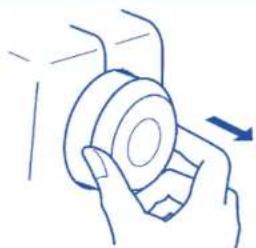
natural_image
Hand holding a circular object with an arrow indicating direction (no text or symbols)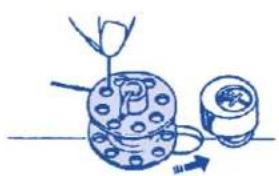
natural_image
Simple line drawing of a mechanical assembly with a tool and component (no text or symbols)Winding the bobbin
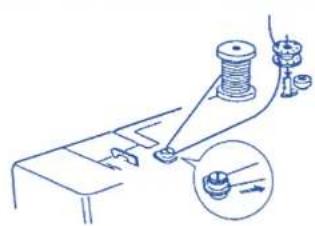
Draw the thread from spool. Guide the thread around the bobbin winder thread guide. Insert the thread through one of the holes in the bobbin from the inside to the outside.
Put the bobbin on the bobbin winder spindle, and push it to the right.
While holding the balance wheel with your left hand, tum the clutch knob counter-clockwise with your right hand. With the free end of the thread held in your hand ,depress the foot control. Stop the machine when it has made a few turns, and cut the thread close to the hole in the bobbin. Depress the foot control again. When the bobbin is fully wound, it will stop automatically.
Return the bobbin winder to its original position by moving the spindle to the left, and cut the thread. Turn the clutch knob clockwise..
natural_image
Illustration of hands holding a mechanical component with a circular housing and bolt holes (no text or symbols)▶ Threading bobbin case
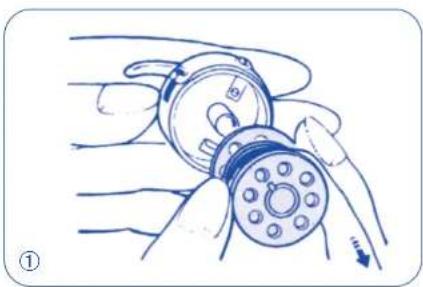
① Place the bobbin into the bobbin case. Make sure the thread unwinds in the direction of arrow.
natural_image
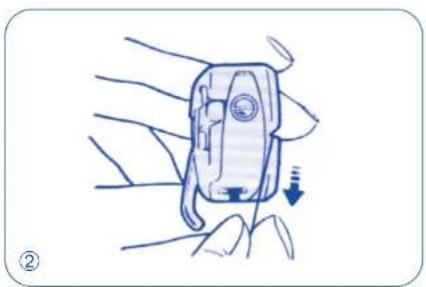
Illustration of a hand holding a medical device with a downward arrow indicating motion (no text or symbols)② Pull the thread into the bobbin case slot.
natural_image
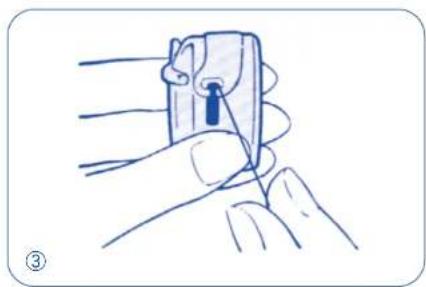
Illustration of a hand holding a small object with a pointed tip, no text or symbols present③ Draw the thread under the tension spring and into the delivery eye.
- Leave about 10 cm of free thread.
ENGLISH
natural_image
Diagram of a person using a pole-mounted lever system with a curved arrow indicating rotation (no text or symbols present)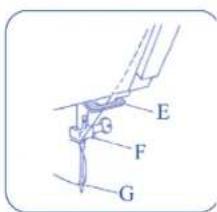
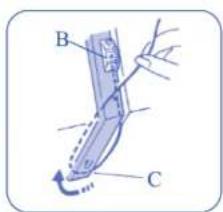
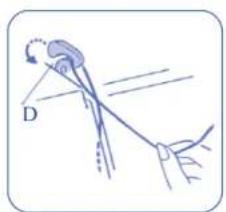
▶ Threading the machine
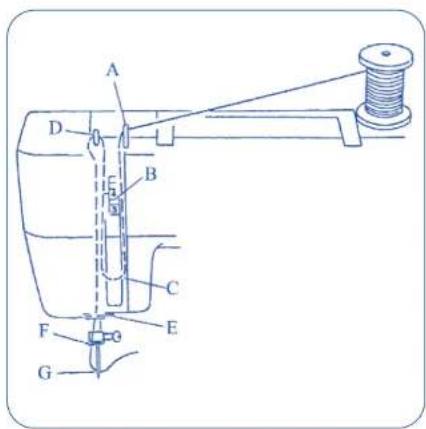
Raise take-up lever to its highest position by turning balance wheel toward you. Raise presser foot.
Place spool on spool pin as shown, with thread coming from the back of the spool.
A. Draw thread into thread guide using both hands.
B. While holding thread near spool.
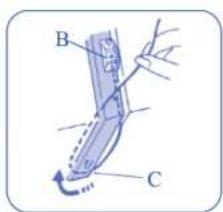
C. Draw thread down into the tension area and then around the check spring holder.
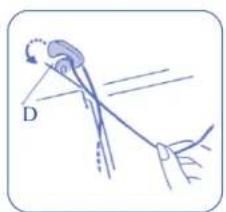
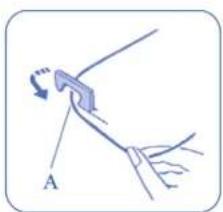
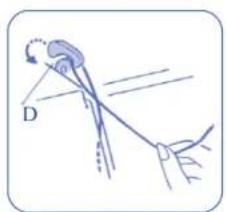
D. Firmly draw thread up and through take-up lever from right to left.
E. Slip thread into the lower thread guide.
F.Draw thread down and slip it into needle bar thread guide.
G. Thread needle eye from front to back.
NOTE: You may want to cut the end of thread with sharp scissors for easier needle threading.
natural_image
Line drawing of a sewing machine with hands operating it, showing mechanical components and a magnified inset (no text or symbols)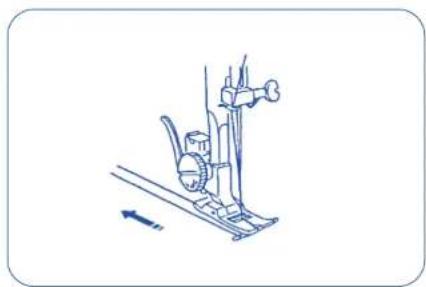
natural_image
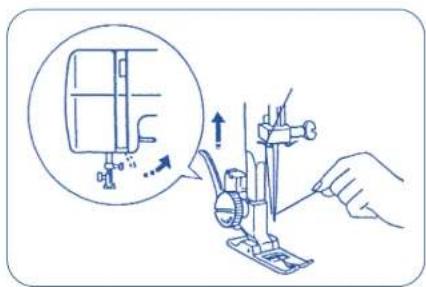
Line drawing of a person climbing stairs with a ladder and valve (no text or symbols)▶ Drawing up bobbin thread
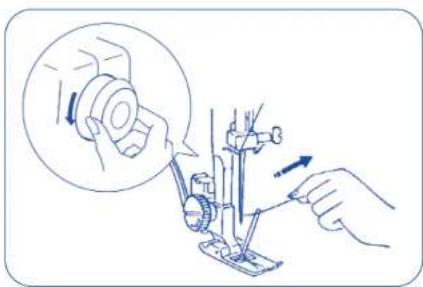
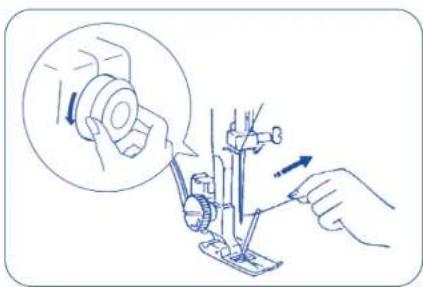
1. Raise the presser foot and hold the needle thread lightly with your left hand..
-
Turn the balance wheel slowly towards you with your right hand until the needle goes down and continue turning the balance wheel until the take-up lever is at its highest position. Lightly draw up the needle thread forming a loop of the bobbin thread.
-
Pull 15 cm of both threads back and under the presser foot.
▶ ENGLISH
natural_image
Illustration of a medical device with a blue coil and cable, no text or symbols present- Balancing needle thread tension
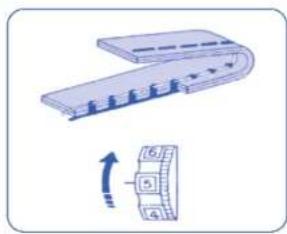
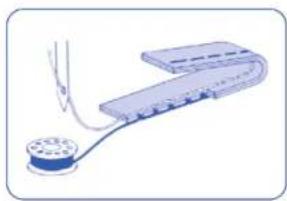
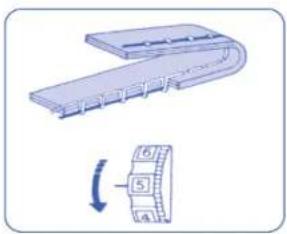
The needle thread and the bobbin thread should interlock in the center of two layers of fabric in straight seams.
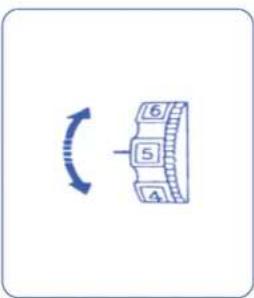
Set the desired number of the thread tension dial at setting mark.
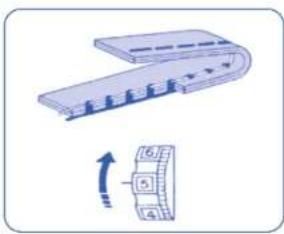
Loosen the needle thread tension by moving the dial to a lower number.
natural_image
Diagram of a mechanical component with a curved housing and a separate circular component with numbered parts (no text or symbols)Tighten the needle thread tension by moving the dial to a higher number.
natural_image
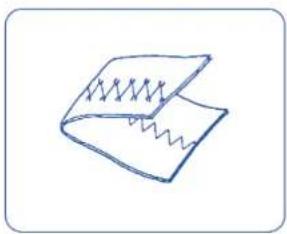
Simple line drawing of a closed book with a spring-like design on the cover (no text or symbols)Thread tension for zigzag sewing To obtain better zigzag stitches, the upper tension should be slightly weaker than in the case of straight sewing. The upper thread should appear slightly on the reverse side of the fabric.
ENGLISH
▶ Pattern selector dial
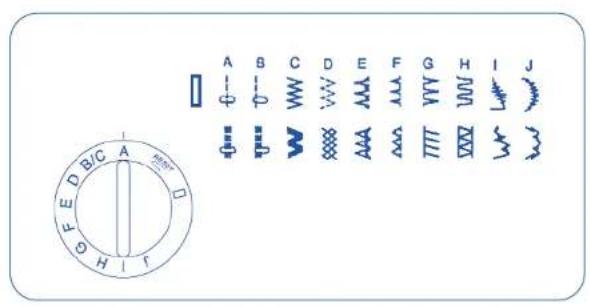
Raise the needle above the fabrics and select the desired pattern at the setting mark by turning the pattern selector dial.
▶ Selecting stretch stitch patterns
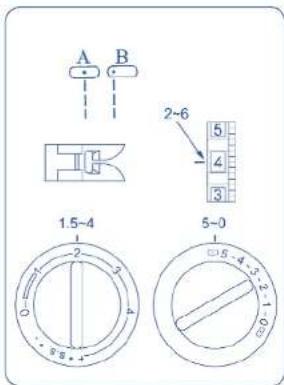
When sewing stretch stitch, set the stitch length dial at S.S. . When forward and reverse feeds become unbalanced depending upon the type of fabric, correct the balance as follows:
When patterns are compressed, correct it by turning the dial toward + .
When patterns are drawn out, correct it by turning the dial toward - .
▶ Stitch length dial
The higher the number, the longer the stitch length. You can select the suitable stitch length for most fabrics.
▶ ENGLISH
natural_image
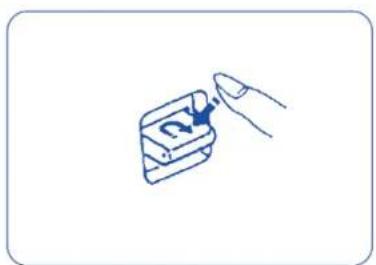
Simple line drawing of a hand pressing down on a rectangular object with a small blue arrow (no text or symbols)▶ Reverse stitch button
As long as you keep the reverse stitch button depressed, the machine sews backwards.
natural_image
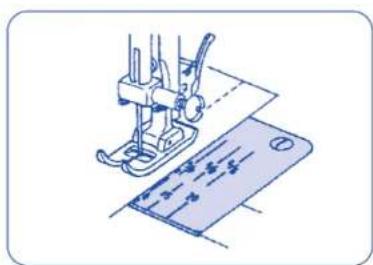
Illustration of a sewing machine stitching a blue fabric sheet (no text or symbols)Seam guide line
The numbers on the needle plate indicate the distance
between the center needle position and the line.
The numbers in the front indicate in Millimeters.
The numbers in the back indicate in inches.
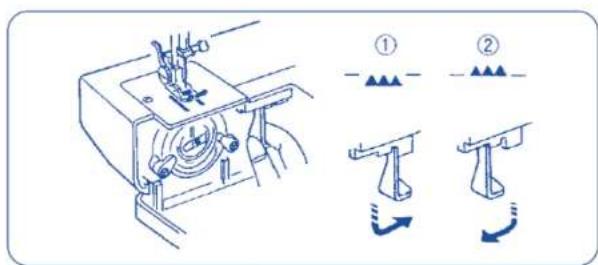
▶ Dropping the feed dogs
-
For dropping the feed dogs, press down the lever and move it to the direction of arrow as illustrated.
-
To raise the feed dogs, press down the lever and move it to the direction of arrow as illustrated.
Feed dogs must always be up for normal sewing.
▶ SECTION 3. BASIC SEWING
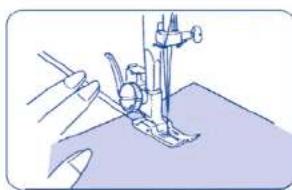
natural_image
Illustration of a sewing machine needle stitching fabric (no text or symbols)▶ Straight stitch sewing
Raise the presser foot and position the fabric next to a stitching guide line on the needle plate.
Lower the needle into the fabric. Lower the presser foot and smooth the threads toward the back. Depress the foot control.
Gently guide the fabric along the guide line letting the fabric feed by itself.
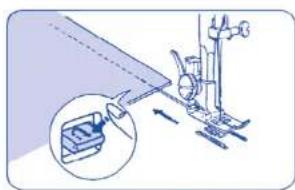
natural_image
Diagram of a mechanical device with an inset showing a component (no text or symbols present)For fastening the ends of seams, press the reverse stitch button and sew several reverse stitches.
Raise the presser foot and remove the fabric, drawing the threads to the back.
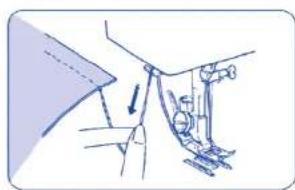
natural_image
Diagram of a mechanical assembly with a lever and guide mechanism (no text or labels)The threads are cut the proper length for starting the next seam.
ENGLISH
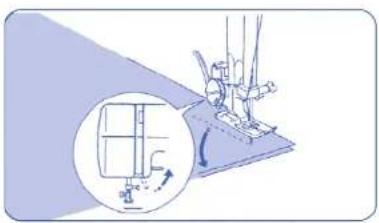
natural_image
Diagram of a sewing machine with a magnified inset showing the blade structure (no text or symbols)To change the sewing directions
Stop the machine and turn the balance wheel
toward you to bring the needle down into the fabric.
Raise the presser foot.
Pivot the fabric around the needle to change
sewing direction as desired. Lower the presser
foot and continue sewing.
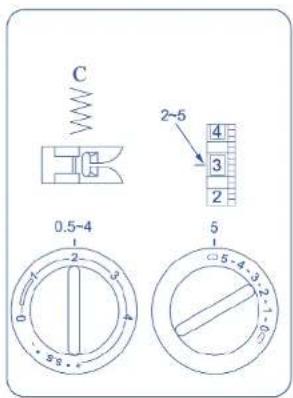
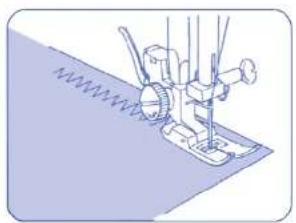
natural_image
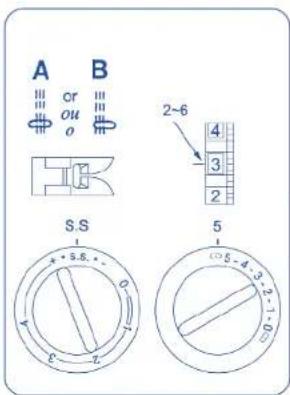
Illustration of a sewing machine needle stitching fabric (no text or symbols)Zigzag stitching
Machine setting
Simple zigzag stitching is widely used for
overcasting, sewing on buttons etc.
▶ SECTION 4. UTILITY STITCHING
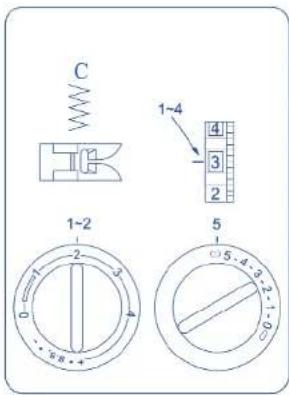
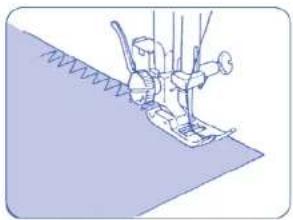
natural_image
Illustration of a person using a sewing machine on a fabric (no text or symbols visible)Overcasting
Machine setting
This type of stitch is used on the seam
allowance to prevent fabrics from fraying at raw edges.
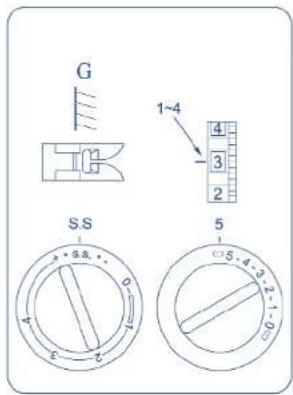
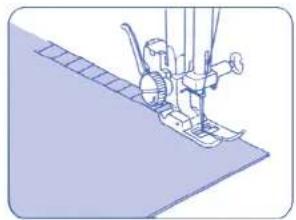
natural_image
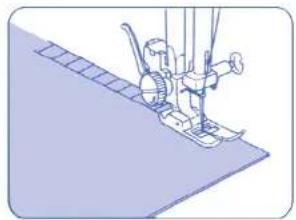
Illustration of a sewing machine on a slatted base (no text or symbols)▶ Overedge stitch
Machine setting
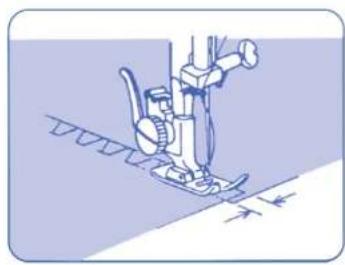
Overedge stitch will be done most successfully
when the right side stitches of zigzag fall slightly off the edge of the fabrics.
▶ ENGLISH
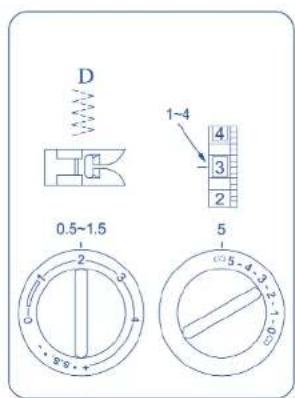
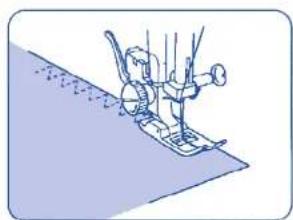
natural_image
Illustration of a person using a sewing machine on a surface (no text or symbols)Tricot stitch
Machine setting
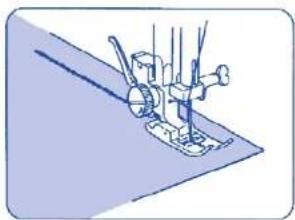
Place the fabric under the presser foot so
that the edge will be slightly inside the
right hand side of the presser foot.
Guide the work so the right hand stitches
fall at the edge of the ladric.
natural_image
Illustration of a sewing machine needle stitching fabric (no text or symbols)▶ Triple strength stitch
Machine setting
The stitch is sewn with two stitches forward
and one stitch backward forming a seam
that does not rip easily.
Garments should be basted for fitting
before seaming.
ENGLISH
natural_image
Line drawing of a laboratory apparatus with a central rotating component and a base mount (no text or symbols)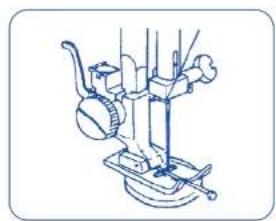
natural_image
Technical line drawing of a mechanical device with no visible text or symbols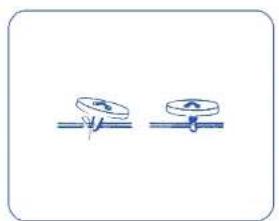
natural_image
Two identical blue line-drawn diagrams of a pin or screw with a central knob, no text or symbols present.▶ Sewing buttons
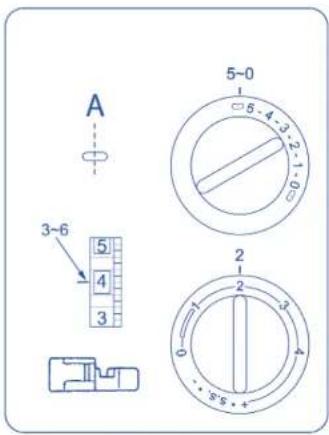
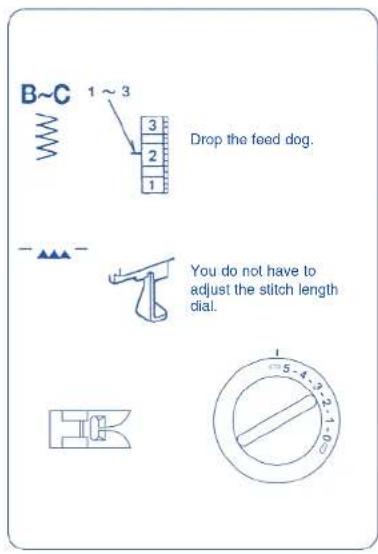
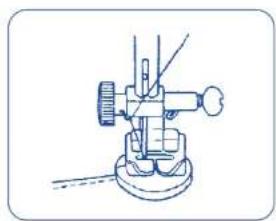
A pin can be placed on top of the foot to form a shank. Set the pattern selector at B. Align the both holes of the button with the slot of the foot and place the left hole of the button just below the needle point. Lower the foot and turn the pattern selector until the needle point comes just above the right hole of the button. Sew about five stitches and raise needle. Set the pattern selector at B again and sew a few stitches to lock thread.
To strengthen the shank, cut the threads leaving a 20 cm tail. Bring the needle thread down through the hole in the button and wind it around the shank. Draw the thread to the wrong side and knot.
Refer to page 46 to raise or drop the feed dog. After you finish sewing, set the drop feed lever to the original position.
▶ ENGLISH
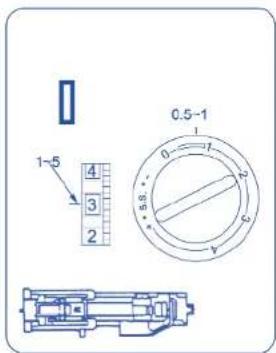
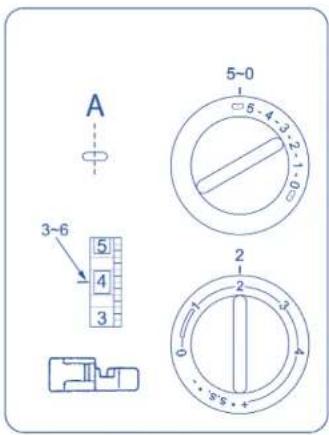
▶ Automatic Buttonhole Machine setting
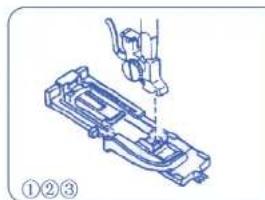
- The size of buttonhole is automatically set by placing the button in the automatic buttonhole foot (R).
- The button holder of the foot takes a button size up to 2.5 cm in diameter.
• Make a test buttonhole on a sample duplicating the fabric, interfacing and seams of the actual garment. - Place the button on the fabric sample and mark the top and bottom to determine the position of buttonhole. Use the interfacing on the stretch fabrics
natural_image
Technical line drawing of a mechanical assembly with no visible text or symbols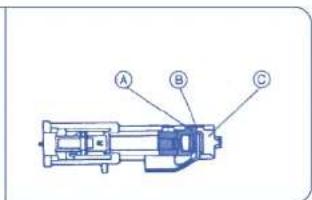
① Tum the balance wheel toward you to raise the needle to its highest position. Raise the presser foot lifter.
Select the pattern [ ] by turning the pattern selector deal. If the BH pattern is already selected, reset the dial once
according to the procedure in ⑥.
③ Attach the automatic buttonhole foot (R).
NOTA: There should be no gap between the slider and spring holder of the foot as shown above.
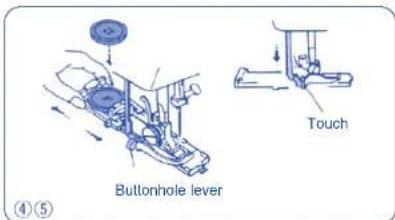
④ Pull the button holder to the back, and place the button in it. Push back the button holder toward you as far as it will go.
⑤ Pull the buttonhole lever downward as far as it will go.
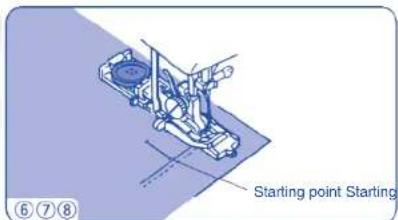
Insert fabric under the foot. Turn the balance wheel slowly towards you with your right hand until the needle goes down and continue turning balance wheel until the take-up lever is at its highest position.
⑦ Remove the fabric to the left to draw both threads to the left.
Insert the garment under the foot, and lower the needle at the starting point. Then lower the automatic buttonhole foot.
natural_image
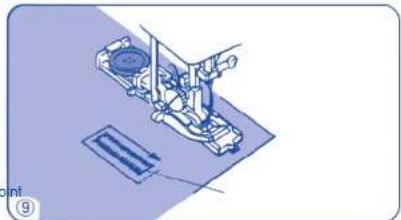
Technical illustration of a sewing machine with a cutting tool and base plate (no text or symbols)⑤ Sew slowly and stop the machine at the starting point when a buttonhole is completed.
The front bartack and left row first, then the back bartack and right row.
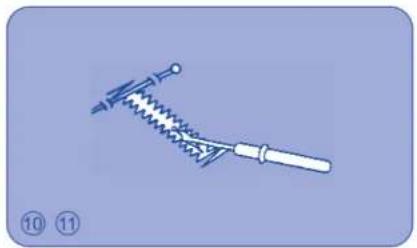
natural_image
Illustration of a mechanical spring or tool with a handle and spring, no text or symbols presentCut the both needle and bobbin threads leaving about 10 cm thread ends. Draw the needle thread to wrong side of fabric by pulling the bobbin thread. Then, knot the threads. Inserire un perno all'interno della travetta.
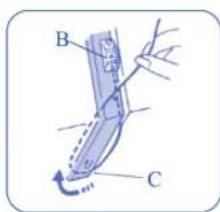
① Insert a pin inside the bartack. Then cut the opening with a seam ripper. Take care not to cut the stitches.
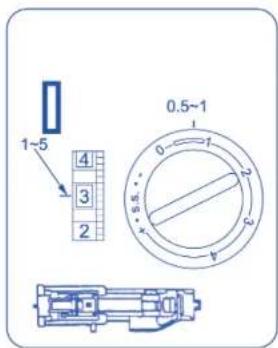
▶ Corded buttonholes
- Set the stitch width in accordance with the thickness of the cord used.
- To cut the opening and to reset for sewing the next buttonhole, refer to the instructions on page 40.
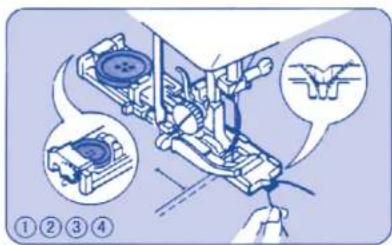
① With the buttonhole foot raised, hook the filler cord on the cord spur at the back of the buttonhole foot.
② Bring the ends toward you under the buttonhole foot until they clear the front end.
③ Hook the filler cord into the forks on the front of the R foot to hold them tight.
④ Lower the needle into the garment where the buttonhole will start and lower the foot.
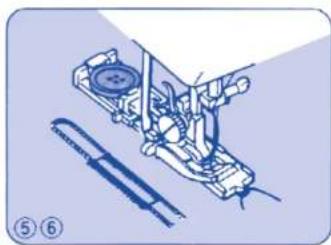
⑥ Depress the foot control gently and sew the buttonhole. Each side of the buttonhole and the bartacks will be sewn over the cord.
Remove the fabric from the machine and cut the sewing threads.
⑥ Pull the left end of the filler cord to tighten it.
Thread the end through a daming needle, draw to the bottom side of the fabric and cut.
natural_image
Technical illustration of a mechanical assembly with two components (no text or symbols)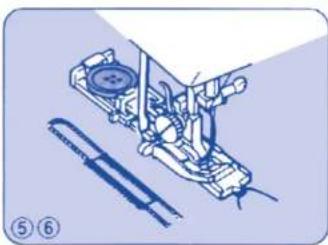
natural_image
Technical line drawing of a mechanical assembly with no visible text or symbols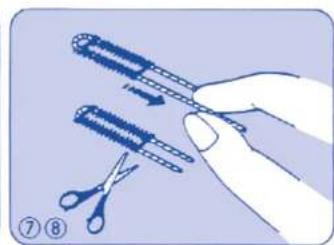
natural_image
Illustration of a hand using scissors to cut a blue tool, no text or symbols present▶ ENGLISH
natural_image
Illustration of a sewing machine needle stitching fabric (no text or symbols)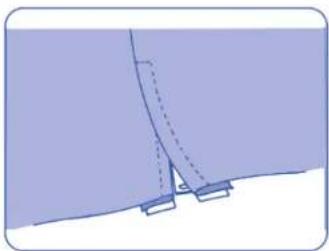
natural_image
Pure diagram of a mechanical or structural component without any text, numbers, or symbolsZipper application
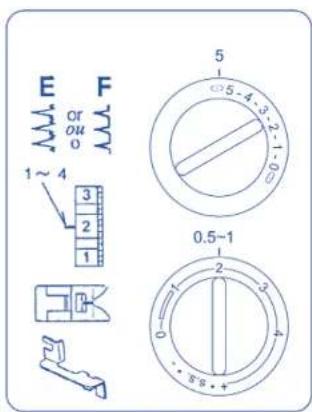
Machine setting
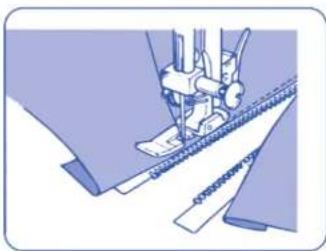
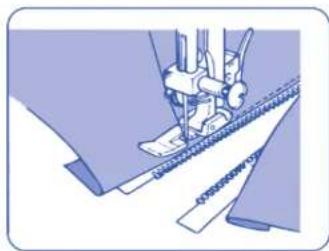
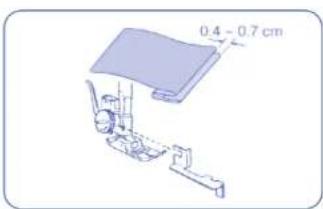
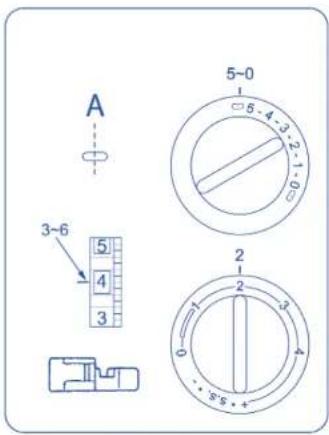
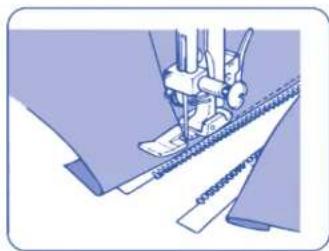
Pin or baste zipper tape to fabric and place it under the foot.
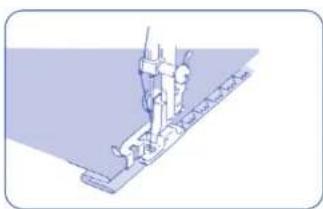
Smooth the threads toward the back and lower the fool. To sew left side of the zipper, guide the edge of
the zipper along the zipper teeth and stitch through garment and zipper tape.
Turn the fabric and sew the other side of the zipper in the same way as you did on the left side of the zipper.
natural_image
Technical line drawing of a sewing machine needle and foot (no text or symbols)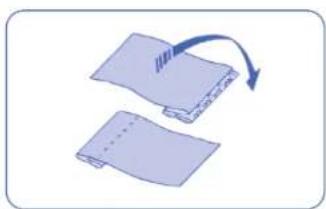
natural_image
Diagram showing two layered materials with a blue arrow indicating rotation or deformation (no text or symbols)Blind stitch hemming
Machine setting
Fold up the fabric as illustrated.
Lower the presser foot, then loosen the foot holder screw to place the hem guide between the screw and the shank of foot holder. Tighten the screw making sure the wall of hem guide is placed in the middle of the toes of the presser foot.
Raise the presser foot and place the fabric under the foot so that the soft fold rests against the wall of hem guide. Lower the foot, then stitch slowly for better control so that the zigzag stitches fall on the hem allowance and pierce the soft fold. While sewing, make sure the soft fold runs along the wall of hem guide.
Spread the fabric flat with the right side facing up.
ENGLISH
▶ SECTION 5. DECORATIVE STITCHING
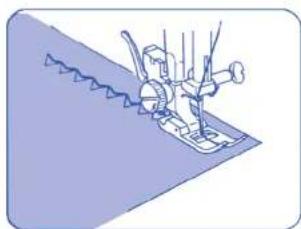
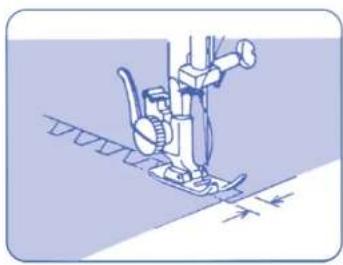
▶ Shell tuck
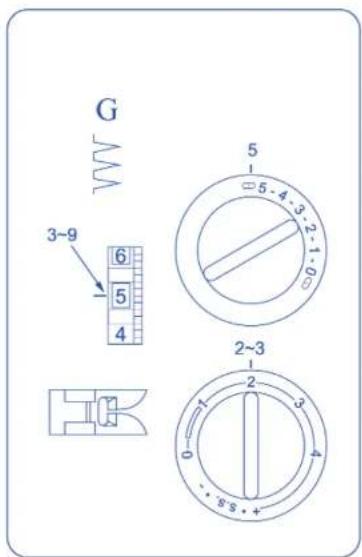
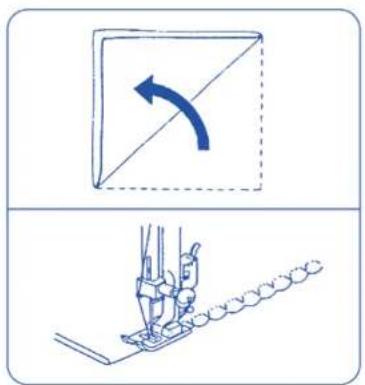
Machine setting
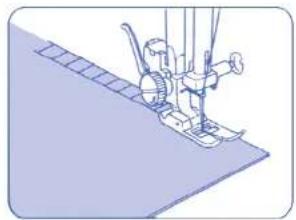
Place the folded edge along the slot of foot. The needle should fall off the edge of the fabric on the right forming a tuck.
▶ ENGLISH
natural_image
Illustration of a person climbing a slope with tools and wires (no text or symbols)▶ Stretch atitch patterns
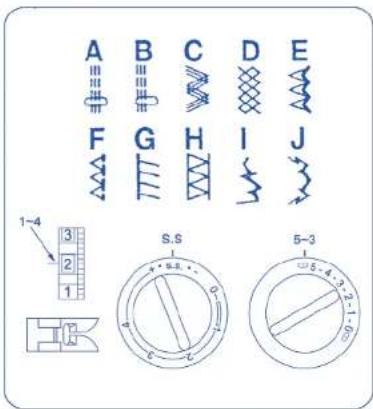
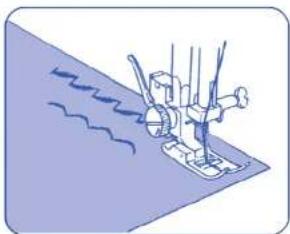
Machine setting
When forward and reverse feeds become unbalanced depending upon the type of fabric, correct the balance by turning the stitch length dial as follows:
when patterns are compressed, correct it by turning the dial toward + .
When patterns are drawn out, correct it by turning the dial toward - .
natural_image
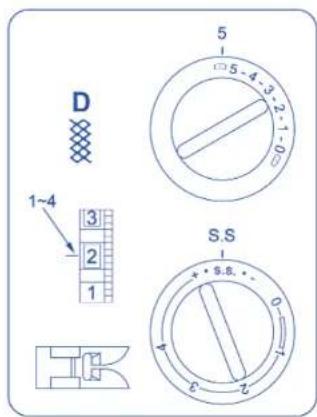
Illustration of a person using a sewing machine to lift water, with no text or symbols present.▶ Decorative satin stitch patterns
Machine setting
Sew a row of stitches and adjust the thread tension so the upper thread
should appear on the reverse side of the fabric.
Test the stitch on the actual fabric for the best results.
ENGLISH
Wrong side of fabric
natural_image
Illustration of hands fastening a fabric piece with visible stitching and texture (no text or symbols)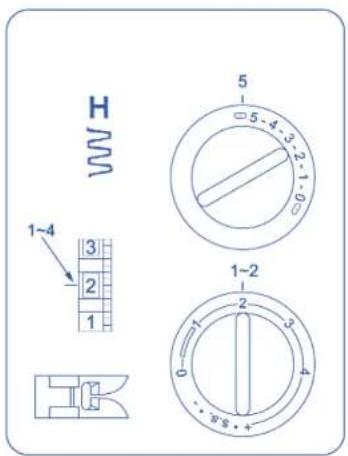
Box stitching
Machine setting
Use this stitch to join heavy weight interlining.
Overlap two raw edges together and use this stitch to join them.
natural_image
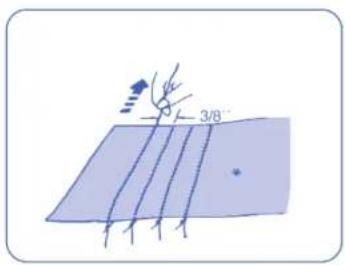
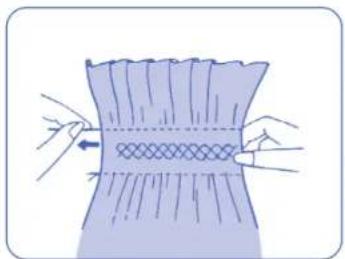
Illustration of a sewing machine needle stitching fabric (no text or symbols)▶ Smocking
Machine setting
With the stitch length at 4 , sew straight stitching lines 3/8 apart across the area to be smocked.
Knot the threads along one edge. Pull the bobbin threads and distribute the gathers evenly. Secure the
threads at the other end. Sew the decorative stitch between the gathering stitches.
Pull out the gathering stitches.
NOTE: Loosen the top thread tension to make gathering easier.
▶ ENGLISH
▶ SECTION 6. CARE OF YOUR MACHINE
natural_image
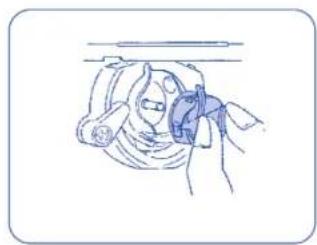
Simple line drawing of a mechanical device with no text or symbolsWARNING: Switch off and unplug the machine before carrying out any maintenance or adjustment.
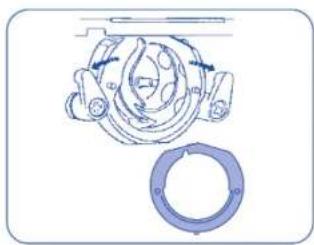
Dismantling and assembling hook race To dismantle hook race: Raise the needle to its highest position and open the hook cover. Open the hinged latch of bobbin case and take it out of the machine.
natural_image
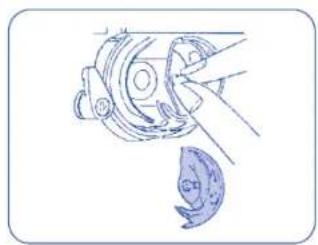
Technical line drawing of a mechanical assembly with no visible text or symbolsOpen the hook race ring holders and remove the hook race ring.
natural_image
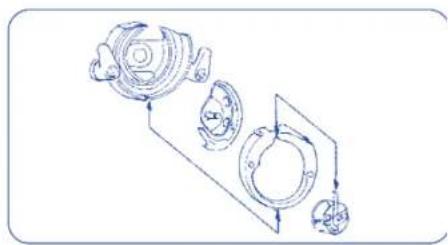
Technical line drawing of a mechanical component with hands operating it (no text or symbols)Remove the hook Clean the hook race with a brush and a soft dry cloth.
flowchart
graph TD
    A["Top Left Component"] --> B["Top Right Component"]
    B --> C["Bottom Left Component"]
    C --> D["Bottom Right Component"]
    D --> E["Bottom Right Component"]
    style A fill:#f9f,stroke:#333
    style B fill:#f9f,stroke:#333
    style C fill:#f9f,stroke:#333
    style D fill:#f9f,stroke:#333
To assemble hook race Hold the hook by the center pin and fit it carefully back into the hook race, forming a perfect circle with the shuttle driver. Attach the hook race ring making sure bottom pin fits into the notch. Lock the hook race ring by turning the holders back into position. Insert the bobbin case.
natural_image
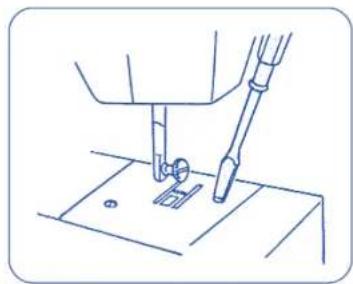
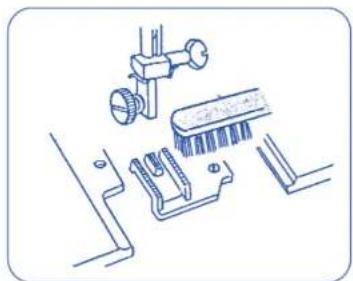
Line drawing of a sewing machine needle and base (no text or symbols)- Cleaning the feed dogs Remove the needle and the presser foot. Remove the needle plate set screws and remove the needle plate.
natural_image
Technical line drawing of mechanical components and wiring (no text or symbols)With a brush, clean out dust and lint clogging on the feed dog teeth. Reset the needle plate.
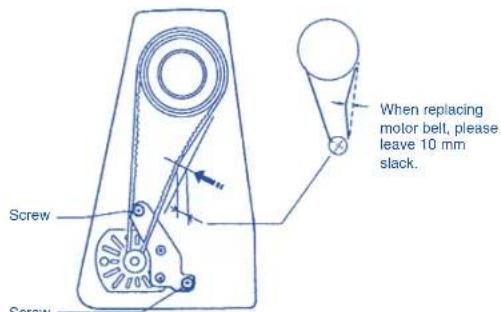
- Drive belt tension To adjust the belt tension, take off the belt cover and loosen the fixing screws about one turn with a screwdriver. This will allow the motor to move downward or upward. Then firmly tighten the screw, making sure the belt has the correct tension.
CAUTION: Do not tighten the belt too tightly.
ENGLISH
natural_image
Technical line drawing of a mechanical assembly with no visible text or symbols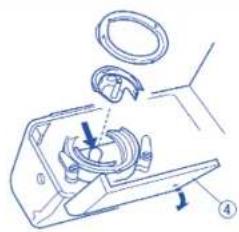
natural_image
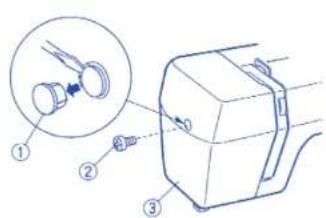
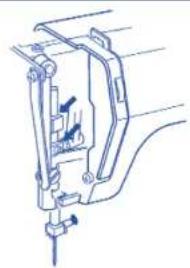
Mechanical assembly diagram showing a disassembly or assembly process with labeled parts (no text or symbols present)▶ Oiling the machine
① Cap
② Screw
③ Face plate
④ Hook cover
Apply a few drops of fine quality sewing machine oil to the points indicated by the arrows in the figures.
For a machine in constant use, oil two or three times a year.
In case the machine does not work smoothly due to standing idle for some time, apply a few drops of kerosene at the oiling points, and run the machine rapidly for a minute.
Before oiling, wipe off the oiling points.
▶ ENGLISH
▶ Trouble shooting
| Condition Cause Reference | ||
| The machine does not run smoothly and is noisy 2. The feed dog is packed with lint See page 46 | 1. Threads have been caught in hoot mechanism | See page 46 |
| The needle thread breaks 1. The needle thread is not threaded properly See page 332. The needle thread tension is too tight See page 343. The needle is bent or blunt See page 294. The needle is incorrectly inserted See page 295. The fabric is not being drawn to the back when sewing is finished6. The thread is either too heavy or too fine for the needle | See page 36See page 30 | |
| The bobbin thread breaks | 1. The bobbin thread is not threaded properly in the bobbin case2. Lint has collected in the bobbin case3. The bobbin is damaged and doesn't turn smoothly | See page 33Clean the bobbin caseExchange bobbin |
| The needle breaks | 1. The needle is Incorrectly Inserted2. The needle is bent or blunt See page 293. The needle clamp screw is loose4. The tension of the needle thread is too tight5. The fabric is not drawn to the back when sewing is finished6. The needle is too fine for the fabric being sewn7. The Pattern selector dial had been turned while the needle was in the material | See page 29See page 29See page 33See page 36See page 30See page 35 |
| Skipped stitches | 1. The needle is incorrectly inserted2. The needle is bent or blunt See page 293. The needle and/or threads are not suitable for the work being sewn4. A BLUE TIPPED needle is not being used for sewing stretch, very fine fabrics and synthetics5. The needle thread is not threaded properly See page 33 | See page 29See page 30See page 30 |
| Seam puckering | 1. The needle thread tension is too light2. The machine is not threaded correctly3. The needle is too heavy for the cloth being sewn4. The stitches are too coarse for the fabric being sewnWhen sewing extremely light weight materials, place a sheet of paper underneath the fabric | See page 34See page 33See page 30Make the stitches denser |
ENGLISH
| Condition Cause Reference | ||
| Stitches form loops below the work 1. The needle thread tension is too loose See page 462. The needle is either too heavy or too fine for the thread | See page 46 | |
| The cloth is not feeding smoothly 1. The feed dog is packed with lint See page 462. The stitches are too fine Eseguire dei punti | più grossi | |
| The machine does not work 1. The machine is not plugged in See page 282. A thread is caught in the hook race See page 463. Clutch knob is disengaged for the bobbin winding See page 32 | ||
| The buttonhole stitches are not balanced | 1. The stitch length is not suitable for the fabric being sewn2. The work is being pulled or held back | See page 34Do not force the fabric for guiding |
INVENTA 300
Type 803003
220-240 V - 50 Hz - 85 W
Made in P.R.C

Termozeta S.p.A. reserves the right to introduce technical and/or aesthetic changes to its products intended to improve performances. Termozeta is an international trademark. Copyright © 1995. All rights reserved.
Termozeta S.p.A. - Via Magenta, 41/43 - 20010 Bareggio (MI) Italy
▶ ESPAÑOL
▶ PRESCRIPCIONES DE SEGURIDAD

▶ ESPAÑOL
natural_image
Simple line drawing of a vehicle with motion arrows indicating speed (no text or symbols)Pedal de mando
natural_image
Technical line drawing of a mechanical device with two separate views showing internal components (no text or symbols)Luz para coser
natural_image
Line drawing of a sewing machine needle stitching a wooden block (no text or symbols)▶ Costura de brazo libre
natural_image
Diagram showing two mechanical components with directional arrows indicating motion (no text or symbols)natural_image
Line drawing of a sewing machine needle and foot (no text or symbols)natural_image
Mechanical assembly diagram showing a sewing machine needle inserted into a base (no text or symbols)natural_image
Technical line drawing of a sewing machine with base, legs, and side mount (no text or symbols)natural_image
Technical line drawing of a mechanical device with two views: top shows a vertical component, bottom shows a screwdriver with a handle (no text or symbols)natural_image
Line drawing of a hand using a tool to press or install a mechanical component (no text or symbols present)① Hilo superior
② Agujero
③ Enredo
natural_image
Line drawing of a sewing machine needle stitching a base, with no text or symbols presentnatural_image
Line drawing of a sewing machine needle stitching fabric, no text or symbols presentnatural_image
Diagram of a mechanical or electrical component with two circular components and a central rotating element (no text or symbols)natural_image
Technical line drawing of a mechanical assembly with a spool and tool, showing no text or symbols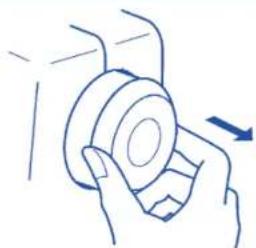
natural_image
Hand holding a circular object with an arrow indicating direction (no text or symbols)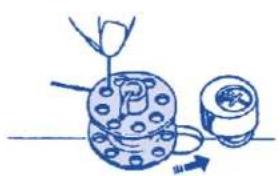
natural_image
Simple line drawing of a mechanical assembly with a tool and component (no text or symbols)natural_image
Illustration of hands holding a mechanical component with a circular housing and bolt holes (no text or symbols)natural_image
Illustration of a hand holding a medical device with a downward arrow indicating motion (no text or symbols)natural_image
Illustration of hands using a tool to adjust or install a component (no text or symbols visible)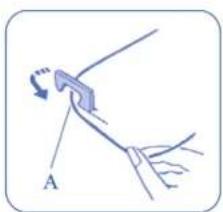
natural_image
Diagram of a person using a pole-mounted lever system with a curved arrow indicating rotation (no text or symbols)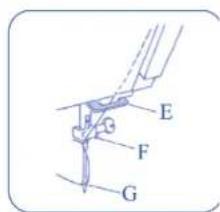
natural_image
Line drawing of a sewing machine with hands operating it, showing mechanical components and a magnified inset (no text or symbols)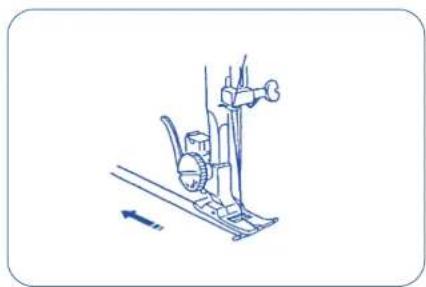
natural_image
Line drawing of a person climbing stairs with a ladder and valve (no text or symbols)natural_image
Illustration of a medical device with a spool and tubing, no text or symbols present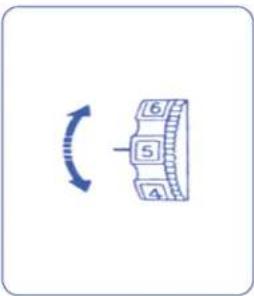
natural_image
Simple diagram showing a circular arrow labeled '6' pointing to a segmented rectangular block labeled '5', with no text or symbols beyond the numbers.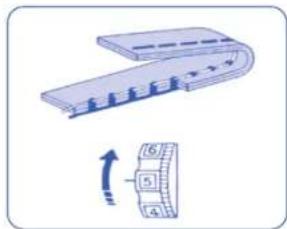
natural_image
Diagram showing a U-shaped structure with numbered parts and an arrow indicating direction (no text or symbols)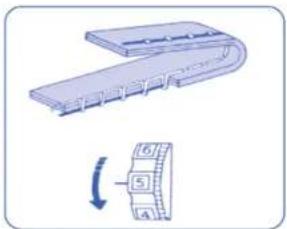
natural_image
Technical illustration of a mechanical component with a U-shaped section and a side view showing a numbered component (no text or symbols)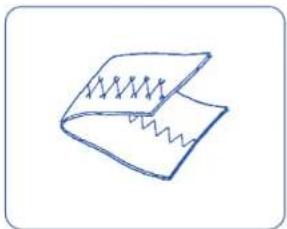
natural_image
Simple line drawing of a closed book with a spring-like design on the cover (no text or symbols)natural_image
Simple line drawing of a hand pressing down on a rectangular object with a question mark (no text or symbols)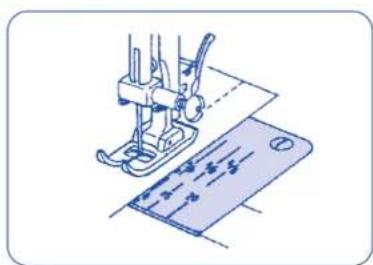
natural_image
Illustration of a sewing machine stitching a blue fabric sheet (no text or symbols)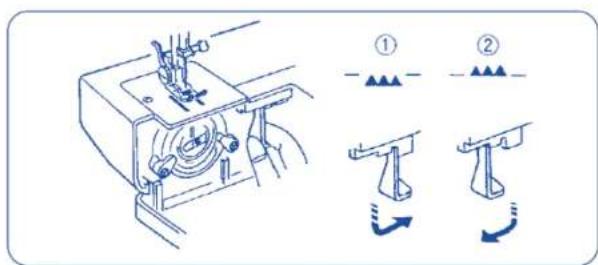
natural_image
Illustration of a sewing machine needle stitching fabric (no text or symbols)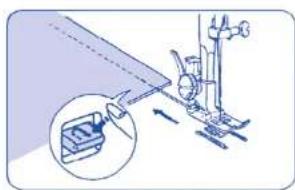
natural_image
Diagram of a mechanical device with a magnified inset showing a component (no text or symbols present)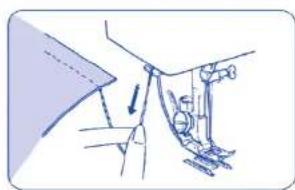
natural_image
Diagram of a mechanical device with a lever and foot, showing motion lines (no text or symbols)natural_image
Diagram of a sewing machine with a magnified inset showing the blade structure (no text or symbols)natural_image
Illustration of a sewing machine needle stitching fabric (no text or symbols)▶ Costura en zigzag
natural_image
Illustration of a person using a sewing machine on a fabric (no text or symbols visible)Por encima
natural_image
Illustration of a sewing machine on a slatted base (no text or symbols)Punto por encima
natural_image
Illustration of a sewing machine needle stitching fabric (no text or symbols)natural_image
Line drawing of a sewing machine needle stitching fabric (no text or symbols)natural_image
Simple line drawing of a laboratory apparatus with no visible text or symbols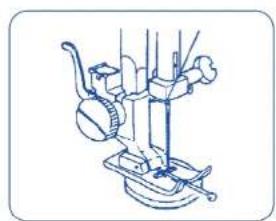
natural_image
Line drawing of a laboratory apparatus with a stand and tubing (no text or symbols)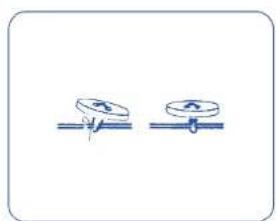
natural_image
Simple line drawing of two identical circular objects on a horizontal line, no text or symbols present▶ Costura botones
natural_image
Technical line drawing of a mechanical assembly with no visible text or symbols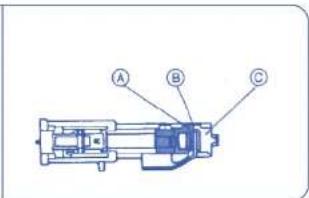
natural_image
Technical illustration of a sewing machine with a base plate and mechanical components (no text or symbols)natural_image
Illustration of a mechanical tool or spring with a handle and base, no text or symbols presentnatural_image
Line drawing of a mechanical assembly with an arrow indicating direction (no text or symbols)natural_image
Technical illustration of a mechanical assembly with no visible text or symbols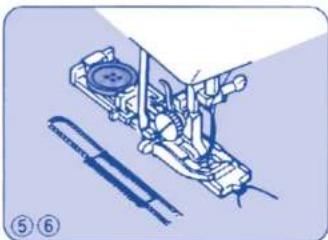
natural_image
Technical illustration of a mechanical assembly with two components (no text or symbols)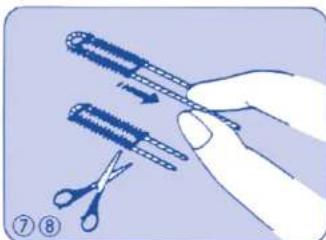
natural_image
Illustration of a hand holding scissors and a pair of scissors, with no text or symbols present.▶ ESPAÑOL
natural_image
Illustration of a sewing machine needle stitching fabric (no text or symbols)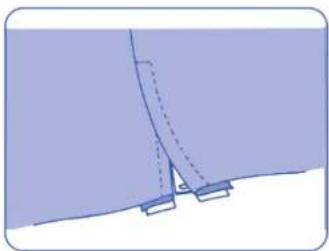
natural_image
Pure diagram of a mechanical or structural component without any text, numbers, or symbolsnatural_image
Technical line drawing of a sewing machine needle and foot (no text or symbols)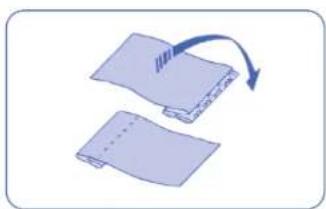
natural_image
Diagram showing two layered materials with a blue arrow indicating rotation or deformation (no text or symbols)natural_image
Illustration of a person climbing a slope with tools and wires (no text or symbols)natural_image
Illustration of a person using a sewing machine to lift water, with no text or symbols present.natural_image
Illustration of hands fastening a fabric piece with ruffled edges and a woven pattern (no text or symbols)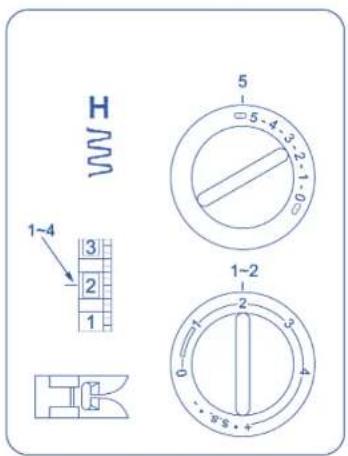
natural_image
Illustration of a sewing machine needle stitching fabric (no text or symbols)natural_image
Line drawing of a mechanical device with a handle and lever (no text or symbols)natural_image
Technical line drawing of a mechanical component with no visible text or symbolsnatural_image
Technical line drawing of a mechanical component with no visible text or symbolsnatural_image
Technical line drawing of a mechanical assembly with no visible text or symbolsnatural_image
Line drawing of a sewing machine needle stitching fabric (no text or symbols)natural_image
Technical line drawing of mechanical components and connectors (no text or symbols)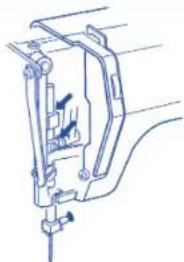
natural_image
Technical line drawing of a mechanical component with no visible text or symbols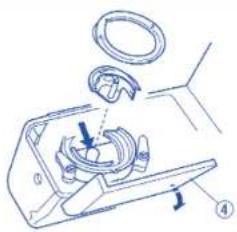
natural_image
Mechanical assembly diagram showing a gear and lever mechanism (no text or labels)In accordance with European Directives 2002/95/CE, 2002/96/CE and 2003/108/CE on the restriction of
• The barred symbol of the rubbish bin shown on the equipment indicates that, at the end of its useful life, the product must be collected separately from other waste.
• Therefore, any products that have reached the end of their useful life must be given to waste disposal centres specialising in separate collection of waste electrical and electronic equipment, or given back to the retailer at the time of purchasing new similar equipment, on a one for one basis.
• The adequate separate collection for the subsequent start-up of the equipment sent to be recycled, treated and disposal of in an environmentally compatible way contributes to preventing possible negative effects on the environment and health and optimises the recycling and reuse of components making up the apparatus.
- Abusive disposal of the product by the user involves application of the administrative sanctions according to the laws in force.
SPIAN
- Inventa 300
- Cucitura bottoni
- ▶ SAFETY REQUIREMENT
- INDEX
- ▶ SECTION 1. ESSENTIAL PARTS
- ▶ SECTION 2. GETTING READY TO SEW
- ▶ SECTION 3. BASIC SEWING
- ▶ SECTION 4. UTILITY STITCHINGS
- ▶ SECTION 5. DECORATIVE STITCHING
- ▶ SECTION 6. CARE OF YOUR MACHINE
- Names of parts
- Winding the bobbin
- ▶ Threading bobbin case
- ▶ Threading the machine
- ▶ SECTION 4. UTILITY STITCHING
- ▶ Sewing buttons
- ▶ Automatic Buttonhole Machine setting
- ▶ Corded buttonholes
- ▶ Oiling the machine
- ▶ ENGLISH
- ▶ PRESCRIPCIONES DE SEGURIDAD
- ▶ Costura botones
Brand : TERMOZETA
Model : Inventa 300
Category : Sewing machine