
THOMG1 60 - Oven Thermex - Free user manual and instructions
Find the device manual for free THOMG1 60 Thermex in PDF.


| Product Type | Built-in Electric Oven |
| Brand | Thermex |
| Model | THOMG1 60 |
| Width | 60 cm |
| Height | 59.5 cm |
| Depth | 56 cm |
| Energy Source | Electric |
| Power Consumption | ~3.2 kW |
| Oven Capacity | 65 Liters |
| Number of Functions | 8 |
| Functions | Convection, Grill, Top Heat, Bottom Heat, Defrost, Light, Pizza, Turbo |
| Cleaning Type | Catalytic (back wall) |
| Control Type | Mechanical knobs + Timer |
| Display | Analog clock |
| Door Type | Drop-down, cool touch glass |
| Safety Features | Child lock, automatic shut-off, cool door |
| Energy Class | A |
| Net Weight | 34 kg |
| Gross Weight | 37 kg |
Frequently Asked Questions - THOMG1 60 Thermex
User questions about THOMG1 60 Thermex
0 question about this device. Answer the ones you know or ask your own.
Ask a new question about this device
Download the instructions for your Oven in PDF format for free! Find your manual THOMG1 60 - Thermex and take your electronic device back in hand. On this page are published all the documents necessary for the use of your device. THOMG1 60 by Thermex.
USER MANUAL THOMG1 60 Thermex
natural_image
Three black-and-white icons: a person reading, a book with gears and a box, and a rectangular block with dimension arrows (no text or symbols)THERMEX SCANDINAVIA A/S

www.thermex.dk
THERMEX SCANDINAVIA AS

www.thermex.no
THERMEX SCANDINAVIA AB

www.thermex.se
THERMEX SCANDINAVIA S.L.U.

www.thermex.es
THERMEX SCANDINAVIA A/S

www.thermex.fi


3 THERMEX THOMG160 M 905213000229042024
INDHOLD
| Dansk | 4 |
| Norsk | 17 |
| Svenska | 28 |
| Suomi | 39 |
| Español | 50 |
| English | 61 |
4 THERMEX THOMG160 M 905213000229042024
INDHOLD
natural_image
Line drawing of a microwave oven with an open door and internal components, showing a close-up inset of the lid (no text or symbols)
Ellektrisk installation
Dette apparat skal tilsluttes jordforbindelse!
- Låge låsesystem
- Vindue
- Ventilationsrist
- Rulleskinne til glasplade
- Glasplade
- Betjeningspanel/Display
- Grill rist
BETJENING
Betjeningspanel
natural_image
Line drawing of a microwave oven connected to a transparent enclosure with internal wiring (no text or symbols)natural_image
Line drawing of a microwave oven with an open door and internal components, showing a close-up inset of the lid (no text or symbols)
INNAN MONTERING/IDRIFTTAGNING
natural_image
Line drawing of a microwave oven with an open door and internal components, showing a close-up inset of the lid (no text or symbols)
natural_image
Line drawing of a microwave oven connected to a transparent enclosure with internal wiring (no text or symbols)natural_image
Line drawing of a microwave oven with an open door and internal control panel, showing a close-up inset of the lid (no text or symbols)
Sähköasennus
natural_image
Line drawing of a microwave oven with an open door and internal components, showing a close-up inset of the lid (no text or symbols)General safety and warning 62
Installation
63
Technical Specifications 65
Overview and Accessories 65
Operation
66
Before first use 68
Using the Oven 69
Cleaning and Maintenance 70
Service and troubleshooting 71
GENERAL SAFETY AND WARNING
- This device is intended for residential use only. If it is used for other purposes, the right of complaint expires.
- All installation must be carried out by a qualified technician in accordance with the instructions from Thermex Scandinavia A/S (Thermex) and applicable legislation.
- Thermex disclaims all liability for damages resulting from incorrect installation, assembly, use or incorrect settings.
- Please keep the user and assembly instructions and pass them on to a possible subsequent owner in case of resale.
BEFORE INSTALLATION/COMMISSIONING
- Please read the user and assembly instructions carefully before putting the unit into use. It contains important instructions for installation, safety, use and maintenance.
- Check the unit for transport damage, errors and defects immediately upon receipt.
- Transport damage is reported immediately on receipt to the transport company and Thermex.
- Faults and defects must be reported to Thermex within 8 days of receipt, and at the latest before installation/commissioning.
• Children must not use the device or stay near the device unless they are under constant supervision. - A damaged device can mean a safety hazard. Check the unit for visible damage. Never use a damaged device.
- Connection data (voltage and frequency), which appear on the device's nameplate, must absolutely be in accordance with the existing conditions at the installation site. Compare the connection data before connecting. If in doubt, ask a trained professional.
- The door and/or handle must not be used to lift or move the unit.
INSTALLATION
- Installation, maintenance or repair may only be carried out by qualified specialist personnel. Consult Thermex if you are in doubt about the necessary skills in connection with the installation of the unit.
- The unit must not be installed behind a door/gate, as this may cause overheating.
- Do not allow accessories or electrical cables to come into contact with hot parts of the unit.
- If the supply cord is damaged, it must be replaced by the manufacturer, a service partner or similarly qualified personnel.
- The device must be placed in such a way that the power supply is available at all times.
- The installation must take place in accordance with the applicable building regulations.
- The device is intended for operation at 230 Volt ±10%\~50 Hz, according to EN 50160.
- For the unit to function properly, there must be a sufficient supply of cooling air. Make sure that the supply of cooling air is unhindered (e.g. by heat protection strips). In addition, the cooling air must not be heated too much by other heat sources.
- Connect the device according to the instructions.
- Different materials require different rawlplugs and screws. Use rawl-plugs and screws that match the material in which the unit is to be mounted.
- Failure to follow the instructions for installing screws and brackets may result in electric shock
USE OF THE DEVICE
- If alcohol is used to prepare food, be aware that alcohol evaporates at high temperatures. The steam from here can be ignited on the hot heaters.
- Do not allow paper or cloth to come into contact with heating elements.
- Never place tinfoil or oven protection foil on the bottom of the unit.
- Plastic products that are not heat resistant may melt at high temperatures and may damage the device and create a fire hazard. Only use ovenproof dishes, crockery, etc. Observe the instructions from the manufacturer.
- Use only original accessories. If other parts are fitted, the right to complain, the guarantee and/or the product liability are void.
- You should choose a cooking temperature and function that suits the food you are preparing. You should also ensure that the food is placed in an appropriately sized dish and that you use the drip tray where appropriate.
- Excess and loose spills must be removed before cleaning and all accessories must be removed.
• Always keep the device and the environment around it clean. Follow the instructions for cleaning and maintaining the device. - Steam cleaners must not be used.
- Do not use harsh abrasive cleaners or metal scrapers to clean the lid's glass, as this may scratch the surface, resulting in the glass shattering.
- If the food develops smoke during cooking, keep the door closed to smother any flames. Stop the process by turning off the device and unplugging it. The door must only be opened when the smoke has disappeared.
- Due to high temperatures, fire may occur in objects near the lit device. Never use the device for space heating.
- Oil and grease can cause a fire hazard if overheated. Keep an eye on the unit when oil or grease is used. Never extinguish oil and grease fires with water. Turn off the unit and carefully smother the flames by leaving the door closed.
- Never store or use corrosive chemicals, vapors, flammable substances or non-food products in or near the unit. It is specially designed for use when heating or cooking food. Using corrosive chemicals for heating or cleaning will damage the unit and may result in personal injury.
- During use, the device becomes warm. Be careful to avoid touching the heating elements inside the unit.
INSTALLATION
Never use the oven door as a handle to push the oven into place during assembly. Avoid applying too much pressure on the oven door, especially when it is open. We recommend installing the oven with the assistance of another person.
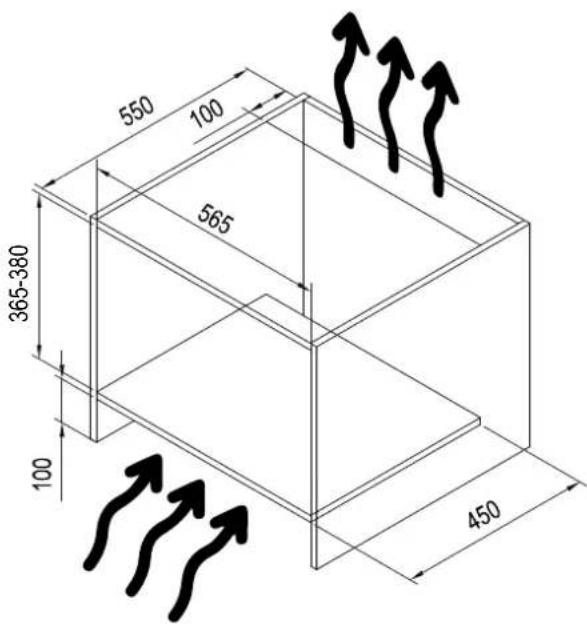
The appliance must be installed as a built-in unit in a cabinet. Adequate clearance must be maintained around adjacent sides, appliances, and kitchen walls. Ensure that the hole where the unit is installed complies with the dimensions specified in the illustration (in mm).
Surfaces, laminates, and adhesives in close contact with the oven must be heat-resistant, up to a minimum of 100^ C.
Kitchen cabinets must be leveled and secured. A distance of 5 mm is required between the appliance and surrounding unit fronts.
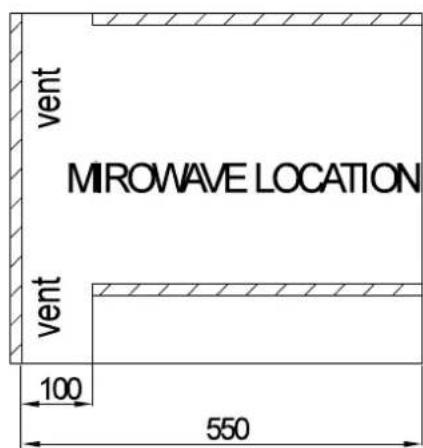
It is important to ensure sufficient cooling for the unit. Cutouts for cooling and airflow must be present as per the illustration. IMPORTANT: Outdoor access must be available at both the top and bottom of the cabinet, as shown in the illustration.
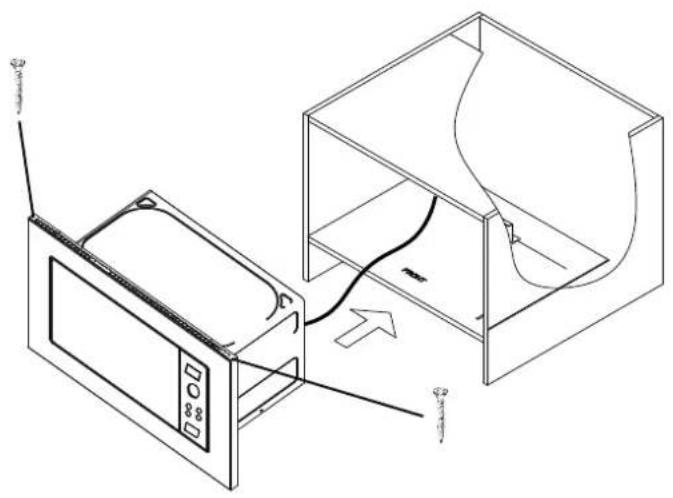
Install the oven in the cabinet. Ensure that wires, etc., are correctly positioned and do not get caught during installation. Secure the oven in place with screws, as shown in the illustration.
natural_image
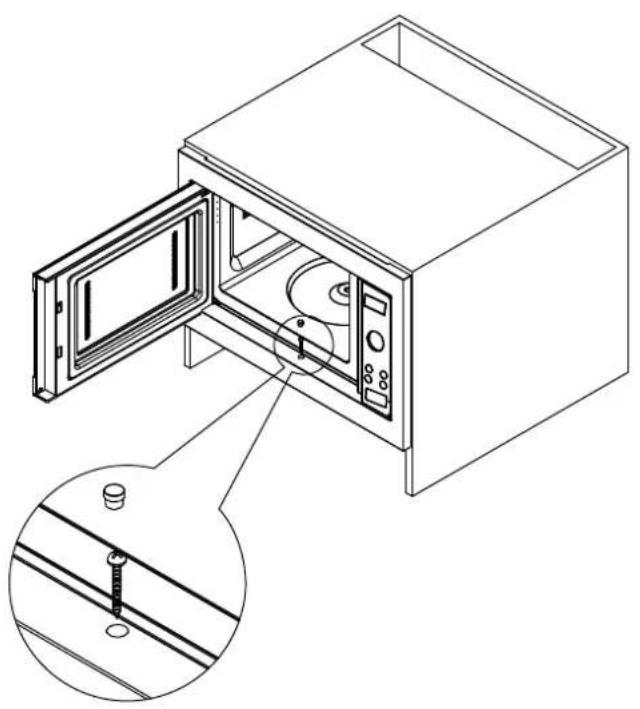
Line drawing of a microwave oven connected to a transparent enclosure with internal wiring (no text or symbols)Open the door and secure the unit with the screw, as shown in the illustration.
natural_image
Line drawing of a microwave oven with an open door and internal control panel, showing a close-up inset (no text or symbols)
Electrical installation:
This appliance must be connected to an earth connection!
Thermex® cannot be held responsible for damages caused by using the appliance without a grounded electrical connection. Likewise, there is a risk of electric shock, short circuit, or fire caused by incorrect installation! The appliance must only be connected to the mains by an authorized professional, and the appliance's warranty is only valid after correct installation.

There is a risk of electric shock, short circuit, or fire caused by damage to the cord! The cord must not be pinched, bent, or come into contact with hot parts of the appliance. If the cord is damaged, it must be replaced by an authorized electrician.

The mains voltage must correspond to the data indicated on the appliance's nameplate.

Risk of electric shock!
Before starting the electrical installation, switch off/disconnect the relay.
TECHNICAL SPECIFICATIONS
| Voltage/Frequency: 230V ~ 50Hz, 1400W | |||
| Grill | Heater: | 1200 | W |
| Microwave: | 900 | W | |
| External Dimensions (height/width/depth): 390/595/382 mm | |||
| Internal Dimensions (height/width/depth): 213/348/334 mm | |||
| Oven | Type: | Combi | grill/microwave |
OVERVIEW AND ACCESSORIES
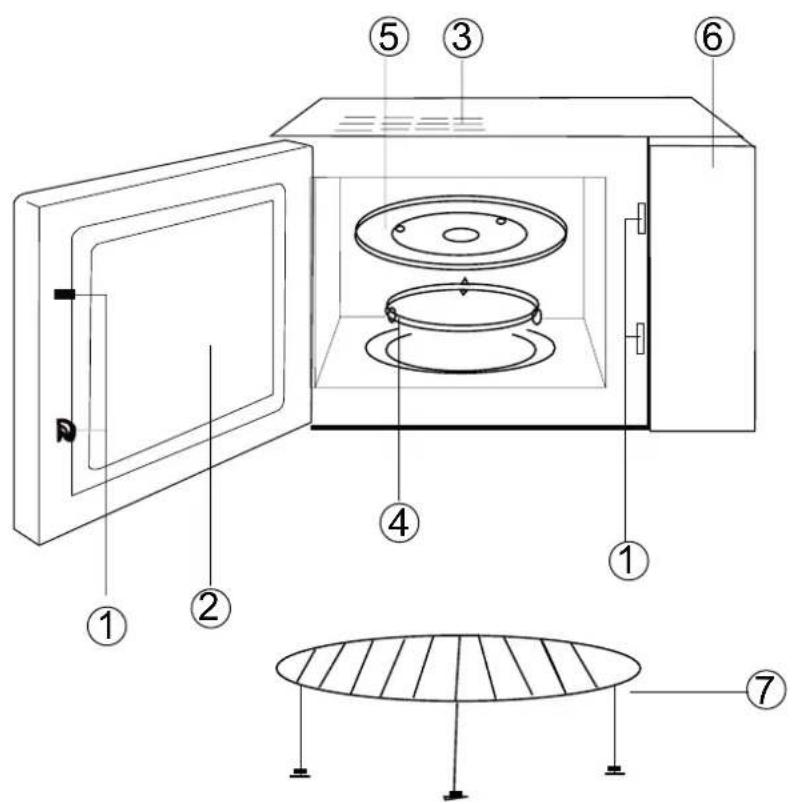
- Door locking system
- Window
- Ventilation grille
- Roller guide for glass plate
- Glass plate
- Control panel/Display
- Grill rack
OPERATION
Control Panel
Carefully read the user manual to understand all functions and operating procedures.
Examine and set the correct cooking time and temperature for the specific food to ensure proper cooking.
Avoid using metal utensils or packaging in the oven, as they can cause sparks and damage the oven.
For optimal results, clean the oven regularly to remove grease splatters and food residues that may affect the taste and quality of your dishes.
Always use oven mitts when handling hot dishes or removing them from the oven to avoid burns.
Allow the oven to cool after use before cleaning or maintenance to avoid the risk of burns or damage.
Always monitor the food during cooking and flip it if necessary to ensure even heating.
Cook the food on a suitable plate or dish suitable for microwave use, and cover it with a microwave-safe lid or film to retain moisture.
Adjust the cooking time and temperature as needed based on the amount of food and your personal preferences for degree of doneness.
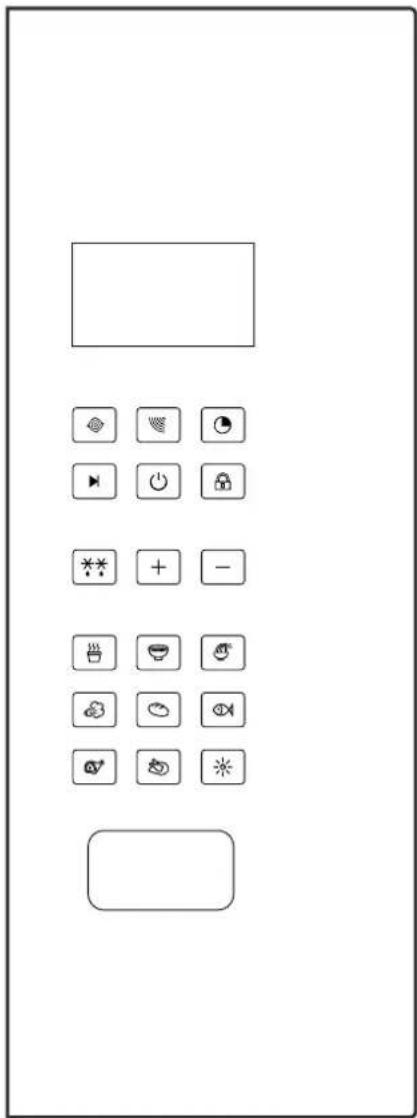
| Activate the unit and the display. | |||||||||
| Start cooking after selecting the desired program.If pressed without selecting a program, P100 microwave cooking starts for 30 seconds. Press again to increase the time by 30 seconds. | |||||||||
| Microwave function: Place the food in the middle of the oven on the rotating glass plate. Press repeatedly to select the desired power (P10, P30, P70, or P100, from low to high power). Then select the desired cooking time using the "+" and "-" buttons. Press START to begin cooking. | |||||||||
| Grill function: Place the food in the middle of the oven on the included grill rack (remove the glass plate, etc., from the oven when using the grill function). Press GRILL and then select program G-1 (high power) or G-2 (low power). Select the desired cooking time using the "+" and "-" buttons. Then press START to begin cooking. When the cooking is halfway done, the program pauses and the unit beeps twice. Flip the food upside down and press START to continue the program. If not done, the unit will resume the program automatically after 1 minute.Combi function: If you want a combined cooking between microwave and grill, select program C-1 (high power) or C-2 (low power) by pressing GRILL three or four times respectively. Then select the desired cooking time using the "+" and "-" buttons. Press START to begin cooking. | |||||||||
| The timer function works as a delayed start. Press the icon and set the desired reservation time using the "+" and "-" buttons. Then set the desired cooking program. | |||||||||
| The child lock can be activated by pressing the icon for 1.5 seconds when the display is active. | |||||||||
| Defrost function: Press the icon, then select the weight from 100g to 2000g using the "+" and "-" buttons. Then press START to start defrosting. | |||||||||
| Function buttons "+" and "-" , for adjusting time, cooking time, or grams. | |||||||||
| Auto function (A-1 to A-8) based on type of food and weight.First select the type of food, and then select the weight using the "+" and "-" buttons. The options for cooking different foods are shown in the chart. | |||||||||
| Program | A-1 | A-2 | A-3 | A-4 | A-5 | A-6 | A-7 | A-8 | |
| Setting Food | MIK | Soup | Noodles | Vegetables | Bread | Fish | Meat | Chicken | |
| 1 | 250g | 500g | ≈125g | 100g | 100g | 100g | 200g | 200g | |
| 2 | 500g | 800g | ≈250g | 200g | 200g | 200g | 300g | 400g | |
| 3 | 300g | 300g | 300g | 400g | 600g | ||||
| 4 | 400g | 400g | 500g | 800g | |||||
| 5 | 500g | 500g | 600g | 1000g | |||||
| 6 | 600g | 600g | 700g | 1200g | |||||
| 7 | 700g | 800g | 1400g | ||||||
| 8 | 800g | 900g | 1600g | ||||||
| 9 | 900g | 1000g | 1800g | ||||||
| 10 | 1000g | 2000g | |||||||
| Cleaning function: Press the icon, and the timer is set to 15:00 minutes. Press START to start the 15-minute cleaning pro-gram, which cleans and disinfects the unit. Afterwards, wipe it with a damp cloth and possibly a little detergent. | |||||||||
BEFORE FIRST USE
After unpacking the product, it should be left at room temperature for 2 hours before use. During this time, there will be a temperature equilibrium between the product and the surroundings, which is important for the proper functioning of the product's electronics.
To avoid the risk of suffocation due to packaging materials, keep the packaging out of reach of children. Packaging materials such as foils should be removed to prevent accidental wrapping by children.
When unpacking the product, all packaging materials should be removed, including the protective film around the cabinet. However, it is important not to remove the cover in front of the microwave vent opening in the oven, as well as the foil on the inside of the door.
Before use, the product should be checked for any damage to avoid health risks due to a defective product. Microwave leakage may occur if the microwave oven is damaged, which can pose a risk to the user. Do not use the microwave oven if the door is dented, the door hinges are loose, or there are visible holes or scratches on the cabinet, door, or walls of the oven cavity.
Finally, it is recommended to clean the oven cavity and accessories with a sponge and warm water before use.
USING THE OVEN
Cooking in a Thermex Combination Oven with Microwave and Grill Function:
1. Preparation:
Before starting cooking, it is important to ensure that the oven is clean and ready for use. Clean the interior surface to remove any food residues or grease splatters that may affect the taste or quality of your dishes. If the oven has a preheating function, consider preheating it for a few minutes before starting cooking to ensure even and efficient heating.
2. Selection of Container:
When selecting a container for cooking in the microwave or grill, it is important to choose microwave-safe materials that can withstand heat and do not react with the food. Only use plates, bowls, or trays that are labeled as suitable for use in the microwave or grill. Choose an appropriate size and type of container depending on the dish you are preparing and adjust the cooking time and temperature accordingly.
3. Cooking with Microwave:
Cooking with the microwave is ideal for heating food, thawing, or cooking dishes that require a short cooking time. Place the food in a microwave-safe container and cover it with a microwave-safe lid or film to retain moisture. Set the desired power and cooking time on the oven, and press the start button to start cooking. Note that the microwave power and cooking time may vary depending on the type and quantity of food being cooked.
4. Cooking with Grill:
The grill function is perfect for cooking dishes with a crispy and golden surface, such as grilled meat, fish, or vegetables. To use the grill function, place the food on a grill rack or in a grill tray, and set the oven to the grill function. Adjust the desired temperature and cooking time according to the recipe instructions or your preferences. Note that the grill's power may vary depending on the type and thickness of the food being cooked, so it may be necessary to adjust the cooking time and temperature as needed.
5. Combined Cooking:
One of the advantages of a Combination Oven is the ability to combine the microwave and grill functions to achieve faster and more efficient cooking of food. With combined cooking, you can take advantage of both the microwave's rapid heating and the grill's ability to create a crispy surface. Set the oven to the desired combination of microwave and grill and then adjust the cooking time and temperature as needed.
6. Monitoring and Control:
During cooking, it is important to regularly monitor the food to ensure that it is cooked properly and to avoid overcooking or overheating. Flip the food if necessary to ensure even heating and cooking on both sides. Always use heat-resistant gloves or cloths when handling hot dishes or removing them from the oven to avoid burns.
7. Finishing and Serving:
When the cooking time is up and the food is ready, open the oven door carefully and use heat-resistant gloves or cloths to remove the food from the oven. Let the food rest for a few minutes before serving to allow the flavors to develop and the temperature to decrease to a comfortable level. Enjoy your delicious dishes, cooked with ease and convenience in your Thermex Combination Oven with microwave and grill function.
By following this guide, you can easily cook a wide variety of dishes in your Thermex Combination Oven and achieve fantastic results every time. Always remember to follow the manufacturer's instructions and safety precautions for optimal and safe oven use.
CLEANING AND MAINTENANCE
Cleaning and maintenance of a Thermex Combination Oven:
1. Cooling:
Allow the microwave oven to cool completely before starting the cleaning process to avoid the risk of burns.
2. Wiping the Interior Surfaces:
Dampen a soft cloth or sponge with warm soapy water and gently wipe the interior surfaces of the microwave oven to remove any food residues, grease splatters, or stains. Avoid using harsh cleaning agents or scouring pads as these can damage the surfaces.
3. Cleaning the Turntable:
Remove the turntable and wash it in warm soapy water or in the dishwasher if possible. Thoroughly dry it before placing it back into the microwave oven.
4. Cleaning the Grill Rack:
If your microwave oven has a grill function, remove the grill rack and clean it separately. Gently scrape off any food residues or grease splatters with a soft brush or cloth and wash it in warm soapy water. Rinse and dry thoroughly before placing it back in the oven.
5. Wiping the Door and Seal:
Gently wipe the interior and exterior surfaces of the door with a soft cloth or sponge and warm soapy water to remove dirt or grease splatters. Also, check the seal for any dirt or food residues and clean it as needed.
6. Odor Removal:
If there is a bad odor in the microwave oven, you can place a bowl of water and lemon juice or vinegar in the oven and heat it for a few minutes. The steam will help eliminate the odor and freshen up the oven.
7. External Cleaning:
Gently wipe the external surface of the microwave oven with a soft cloth or sponge and warm soapy water to remove dust or dirt. Avoid using harsh cleaning agents as they can damage the finish.
8. Regular Maintenance:
To maintain a clean and fresh-smelling microwave oven, it is recommended to perform cleaning regularly, such as once a week or after each use, depending on the frequency of use and type of cooking.
By following this guide to cleaning and maintenance, you can keep your microwave oven with grill function in optimal condition and ensure that it operates efficiently and safely every time you use it.
SERVICE AND TROUBLESHOOTING
Before you report your Thermex product for service, it is important that you have thoroughly read the installation and/or user manual. This ensures that Thermex can provide you with the best possible assistance.
The service department at Thermex can be contacted for:
- Technical support for assembly and installation of your product.
- Clarification of functionalities in your product.
• Service request under the right of complaint on your product
Always try to disconnect the power supply to the product for approx. 5 minutes. Then reconnect the power to see if the problem is resolved. If the error is not resolved, disconnect the power supply to the product for one hour. If the product still does not work properly and the points in the troubleshooting guide have been reviewed, contact the service department.
NOTE: In the event of inquiries within the right of complaint, you will be asked for documentation of your purchase in the form of a purchase receipt. Therefore, always save your purchase receipt.
Before contacting us regarding service requests within the right of complaint, it is important to have all the necessary information ready:
• Information and documentation for purchases - purchase receipt
- Error description
- Model
Service requests under the right of complaint can be made by filling in the service form at www.thermex.dk/service, where the service conditions can also be read.
Inquiries regarding technical support or clarification of functionalities can be made by sending an inquiry to service@thermex.dk or on tel. +45 9892 6233.
Troubleshooting
In rare cases, the oven may have abnormal breakdowns during cooking. You can check the error list before calling the service department, as the problem may be easily fixed.
Normal operation:
When the oven is put into use for the first time, you may experience a smell and smoke for a few hours. Until the oven at 250 degrees, and it burns through for approx. 1 hour. Then wait a while until the oven is cold, open the door and clean the oven.
If the heated food emits a lot of moisture, the heat discharge hole may blow out steam during cooking. This is normal and does not damage either the oven or the food.
The fan will start running 15 minutes after the oven has started heating. When the oven is switched off, the fan will continue to run for 35 minutes to cool down the oven.
MILJ∅HENSYN
EMBALLAGE
SKROTNING AF PRODUKTET
The packaging must be disposed of in accordance with local regulations on waste management.
SCRAPPING OF THE PRODUCT
The symbol on the product or accompanying documentation indicates that this product may not be disposed of as household waste but must be delivered to the nearest collection center for the recycling of electrical and electronic equipment.
MILIEUOVERWEGINGEN
VERPAKKING
THERMEX sCandinaVia as
Tel. +47 22 21 90 20
www.thermex.no
service@thermex.no
THERMEX sCandinaVia aB
Tel. 031 340 82 00
www.thermex.se
info@thermex.se
THERMEX sCandInaVla s.I.U.
Noi del Sucre 42 ■ 08840 Viladecans ■ España
Tel. +34 936 373 003
www.thermex.es
info@thermex.es
THERMEX sCandInaVla a/s
Puhelin +358 942 454 000
www.thermex.fi
info@thermex.fi
- THERMEX THOMG160 M 905213000229042024
- THERMEX THOMG160 M 905213000229042024
- INDHOLD
- Ellektrisk installation
- BETJENING
- Betjeningspanel
- INNAN MONTERING/IDRIFTTAGNING
- Sähköasennus
- GENERAL SAFETY AND WARNING
- BEFORE INSTALLATION/COMMISSIONING
- INSTALLATION
- USE OF THE DEVICE
- OVERVIEW AND ACCESSORIES
- OPERATION
- Control Panel
- BEFORE FIRST USE
- USING THE OVEN
- Preparation:
- Selection of Container:
- Cooking with Microwave:
- Cooking with Grill:
- Combined Cooking:
- Monitoring and Control:
- Finishing and Serving:
- CLEANING AND MAINTENANCE
- Cooling:
- Wiping the Interior Surfaces:
- Cleaning the Turntable:
- Cleaning the Grill Rack:
- Wiping the Door and Seal:
- Odor Removal:
- External Cleaning:
- Regular Maintenance:
- SERVICE AND TROUBLESHOOTING
- Troubleshooting
- Normal operation:
- MILJ∅HENSYN
- EMBALLAGE
- SKROTNING AF PRODUKTET
- MILIEUOVERWEGINGEN
- VERPAKKING
- THERMEX sCandinaVia as
- THERMEX sCandinaVia aB
- THERMEX sCandInaVla s.I.U.
- THERMEX sCandInaVla a/s
Brand : Thermex
Model : THOMG1 60
Category : Oven