
THOMGS1 - Oven Thermex - Free user manual and instructions
Find the device manual for free THOMGS1 Thermex in PDF.


| Product Type | Multifunction Steam Oven (Combination Microwave, Grill, Convection, Steam) |
| Brand / Model | Thermex THOMGS1 |
| Oven Capacity | 35 Liters |
| External Dimensions (H x W x D) | 455 x 595 x 587 mm |
| Internal Dimensions (H x W x D) | 210 x 426 x 380 mm |
| Voltage / Frequency | 230 V ~ 50 Hz |
| Microwave Power | 1000 W |
| Grill Power | 1000 W |
| Convection Power | 1400 W |
| Steam Power | 1750 W |
| Control Panel | Touch controls with ON/OFF, LOCK, LIGHT, MICROWAVE, MICRO STEAM, GRILL/OVEN, DELAYED START, KEEP WARM, STERILIZATION, DEFROST, CLEAN |
| Functions | Microwave, Steam, Grill, Convection, Keep Warm, Sterilization, Defrost, Clean |
| Accessories Included | Shelf, Grill Rack, Steam Tray, Grill Tray, Glass Tray, Water Tank, Water Pipette, Plastic Cup |
| Installation | Built‑in; requires proper ventilation (5 mm gap from fronts); must be earthed; installation by qualified technician |
| Safety Features | Child safety lock (touch lock), automatic shut‑off, cooling fan runs after use, overheat protection |
| Cleaning & Maintenance | Clean with soft cloth and warm soapy water; descale steam system regularly; use included cleaning agent for CLEAN function; avoid abrasives |
| Repairability / Spare Parts | Contact Thermex service for parts; bulb replacement, gasket replacement possible; service form at www.thermex.dk/service |
| Energy Supply | 230 V ±10%, 50 Hz, must be connected to earth |
| Usage | Residential use only; do not use for heating oils or open flames; avoid foil on oven bottom |
Frequently Asked Questions - THOMGS1 Thermex
User questions about THOMGS1 Thermex
0 question about this device. Answer the ones you know or ask your own.
Ask a new question about this device
Download the instructions for your Oven in PDF format for free! Find your manual THOMGS1 - Thermex and take your electronic device back in hand. On this page are published all the documents necessary for the use of your device. THOMGS1 by Thermex.
USER MANUAL THOMGS1 Thermex
natural_image
Three black-and-white icons: a person reading, a book with gears and a box, and a rectangular block with dimension arrows (no text or symbols)THERMEX SCANDINAVIA A/S

www.thermex.dk
THERMEX SCANDINAVIA AS

www.thermex.no
THERMEX SCANDINAVIA AB

www.thermex.se
THERMEX SCANDINAVIA S.L.U.

www.thermex.es
THERMEX SCANDINAVIA A/S

www.thermex.fi

3 THERMEX THOMGS160 M 905212000224042024
INDHOLD
| Dansk | 4 |
| Norsk | 16 |
| Svenska | 28 |
| Suomi | 40 |
| Español | 52 |
| Engelsk | 64 |
4 THERMEX THOMGS160 M 905212000224042024
INDHOLD
natural_image
Diagram of a microwave oven with four circular components and directional arrows indicating assembly or labeling (no text or symbols present)
Ellektrisk installation
Dette apparat skal tilsluttes jordforbindelse!
Oventype Multifunction damp oven
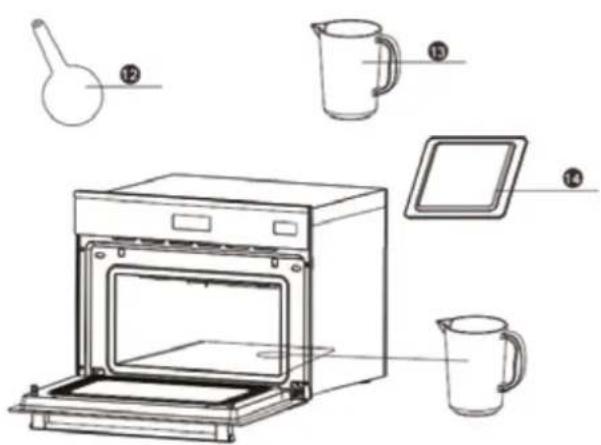
OVERSIGT OG TILBEH∅R
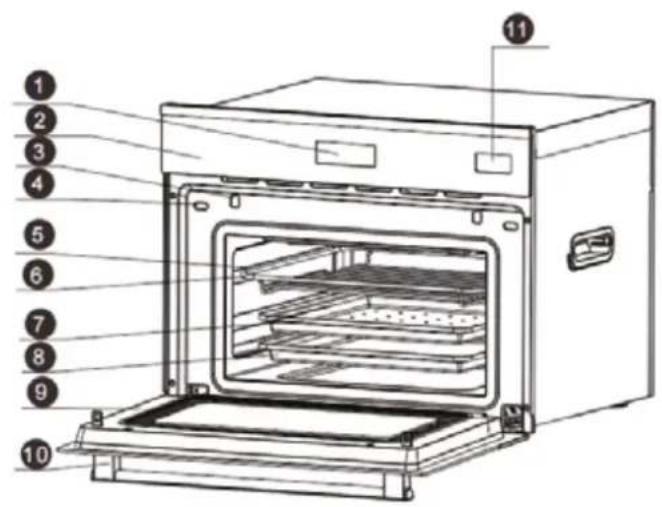
- Display
- Kontrolpanel
- Kontakt
- Dørkrog
- Hylde
- Grillrist
- Dampbakke
- Grillbakke
- Dør
- Håndtag
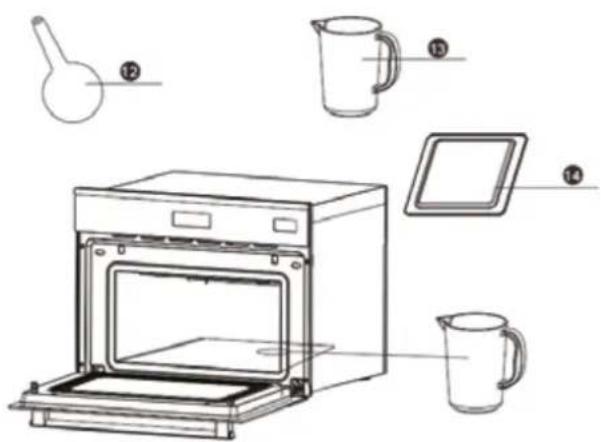
- Vandtank
- Vandpipette (til spild)
- Plastikkop
- Glasbakke
BETJENING
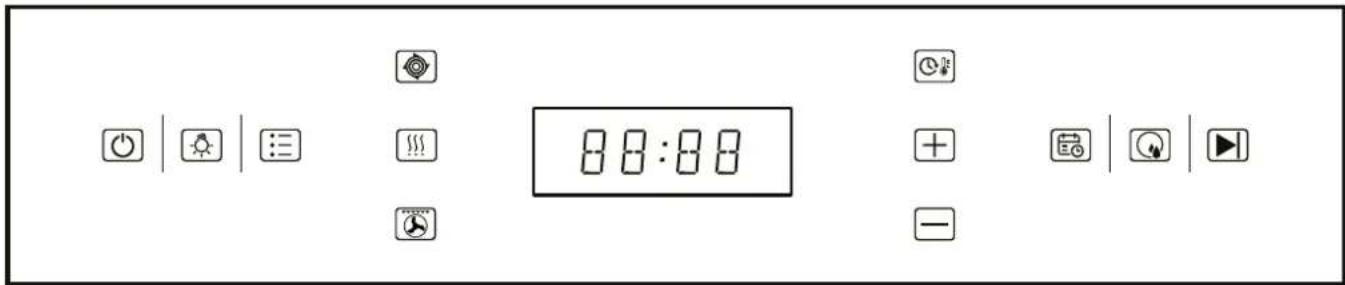
Betjeningspanel
flowchart
graph TD
    A["CLEAN"] --> B["KEEP WARM"]
    B --> C["STERILIZE"]
    C --> D["DE FROST"]
    D --> E["CLEAN"]
    E --> F["10g / 500ml"]
    F --> G["Ostern with lid"]
    G --> H["Clutter"]
    H --> I["Hand press"]
    I --> J["Water 30 min"]
    J --> K["Drain with drop"]
    K --> L["500ml"]
    L --> M["Ostern with lid"]
    M --> N["Clutter"]
    N --> O["Hand press"]
    O --> P["Water 3 min"]
    P --> Q["Drain with drop"]
    Q --> R["500ml"]
    R --> S["Ostern with lid"]
    S --> T["Clutter"]
    T --> U["Hand press"]
    U --> V["Water 3 min"]
ANVENDELSE OG F∅R F∅RSTE BRUG
natural_image
Diagram of a microwave oven with four circular components and directional arrows indicating assembly or labeling (no text or symbols present)
- Display
- Kontrollpanel
- Bryter
- Dørkrok
- Hylle
- Grillrist
- Dampbrett
- Grillbrett
- Dør
- Håndtak
- Vanntank
- Vanndråpepipette (for søl)
- Plastikkopp
- Glassbrett
BETJENING
Betjeningspanel
INNEHÄLLSFÖRTECKNING
INNAN MONTERING/IDRIFTTAGNING
natural_image
Diagram of a microwave oven with four circular components and directional arrows indicating flow or placement (no text or labels)
Elektrisk installation
BETJENING
Betjeningspanel
natural_image
Diagram of a microwave oven with four circular components and directional arrows indicating assembly or labeling (no text or symbols present)
Sähköasennus
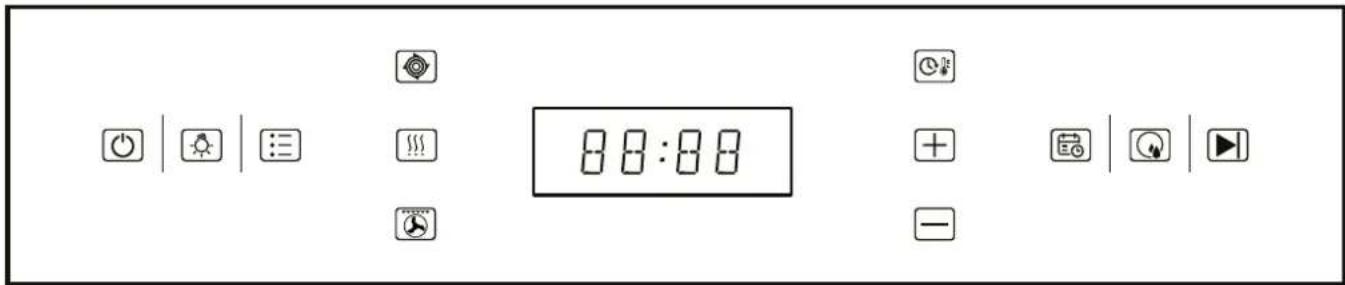
KÄYTTÖ
Käyttöpaneeli
flowchart
graph TD
    A["CLEAN"] --> B["KEEP WARM STERILIZE DE-FROST CLEAN"]
    B --> C["10 g 500 ml"]
    C --> D["Recoating oven"]
    D --> E["Recoating oven"]
    E --> F["Recoating oven"]
    F --> G["Recoating oven"]
    G --> H["Recoating oven"]
    H --> I["Recoating oven"]

    J["Wait 30 min"] --> K["Recoating tank with water drop"]
    K --> L["Recoating tank with water drop"]
    L --> M["Recoating tank with water drop"]
    M --> N["Recoating tank with water drop"]
    N --> O["Recoating tank with water drop"]

    P["Wait 3 min"] --> Q["Recoating tank with water drop"]
    Q --> R["Recoating tank with water drop"]
    R --> S["Recoating tank with water drop"]
    S --> T["Recoating tank with water drop"]
    T --> U["Recoating tank with water drop"]
General safety and warning 65
Installation
66
Technical specifications 68
Overview and accessories 68
Control panel 69
Usage and First Use 72
Cleaning and Maintenance 73
Service and troubleshooting 74
GENERAL SAFETY AND WARNING
- This device is intended for residential use only. If it is used for other purposes, the right of complaint expires.
- All installation must be carried out by a qualified technician in accordance with the instructions from Thermex Scandinavia A/S (Thermex) and applicable legislation.
- Thermex disclaims all liability for damages resulting from incorrect installation, assembly, use or incorrect settings.
- Please keep the user and assembly instructions and pass them on to a possible subsequent owner in case of resale.
BEFORE INSTALLATION/COMMISSIONING
- Please read the user and assembly instructions carefully before putting the unit into use. It contains important instructions for installation, safety, use and maintenance.
- Check the unit for transport damage, errors and defects immediately upon receipt.
- Transport damage is reported immediately on receipt to the transport company and Thermex.
- Faults and defects must be reported to Thermex within 8 days of receipt, and at the latest before installation/commissioning.
• Children must not use the device or stay near the device unless they are under constant supervision. - A damaged device can mean a safety hazard. Check the unit for visible damage. Never use a damaged device.
- Connection data (voltage and frequency), which appear on the device's nameplate, must absolutely be in accordance with the existing conditions at the installation site. Compare the connection data before connecting. If in doubt, ask a trained professional.
- The door and/or handle must not be used to lift or move the unit.
INSTALLATION
• Installation, maintenance or repair may only be carried out by qualified specialist personnel. Consult Thermex if you are in doubt about the necessary skills in connection with the installation of the unit.
- The unit must not be installed behind a door/gate, as this may cause overheating.
- Do not allow accessories or electrical cables to come into contact with hot parts of the unit.
- If the supply cord is damaged, it must be replaced by the manufacturer, a service partner or similarly qualified personnel.
- The device must be placed in such a way that the power supply is available at all times.
- The installation must take place in accordance with the applicable building regulations.
- The device is intended for operation at 230 Volt ±10%\~50 Hz, according to EN 50160.
- For the unit to function properly, there must be a sufficient supply of cooling air. Make sure that the supply of cooling air is unhindered (e.g. by heat protection strips). In addition, the cooling air must not be heated too much by other heat sources.
- Connect the device according to the instructions.
- Different materials require different rawlplugs and screws. Use rawl-plugs and screws that match the material in which the unit is to be mounted.
- Failure to follow the instructions for installing screws and brackets may result in electric shock
USE OF THE DEVICE
- If alcohol is used to prepare food, be aware that alcohol evaporates at high temperatures. The steam from here can be ignited on the hot heaters.
- Do not allow paper or cloth to come into contact with heating elements.
- Never place tinfoil or oven protection foil on the bottom of the unit.
- Plastic products that are not heat resistant may melt at high temperatures and may damage the device and create a fire hazard. Only use ovenproof dishes, crockery, etc. Observe the instructions from the manufacturer.
- Use only original accessories. If other parts are fitted, the right to complain, the guarantee and/or the product liability are void.
- You should choose a cooking temperature and function that suits the food you are preparing. You should also ensure that the food is placed in an appropriately sized dish and that you use the drip tray where appropriate.
- Excess and loose spills must be removed before cleaning and all accessories must be removed.
• Always keep the device and the environment around it clean. Follow the instructions for cleaning and maintaining the device. - Steam cleaners must not be used.
- Do not use harsh abrasive cleaners or metal scrapers to clean the lid's glass, as this may scratch the surface, resulting in the glass shattering.
- If the food develops smoke during cooking, keep the door closed to smother any flames. Stop the process by turning off the device and unplugging it. The door must only be opened when the smoke has disappeared.
- Due to high temperatures, fire may occur in objects near the lit device. Never use the device for space heating.
- Oil and grease can cause a fire hazard if overheated. Keep an eye on the unit when oil or grease is used. Never extinguish oil and grease fires with water. Turn off the unit and carefully smother the flames by leaving the door closed.
- Never store or use corrosive chemicals, vapors, flammable substances or non-food products in or near the unit. It is specially designed for use when heating or cooking food. Using corrosive chemicals for heating or cleaning will damage the unit and may result in personal injury.
- During use, the device becomes warm. Be careful to avoid touching the heating elements inside the unit.
INSTALLATION
Never use the oven door as a handle to push the oven into place during installation. Avoid applying too much pressure on the oven door, especially when it is open. We recommend installing the oven with the assistance of another person.
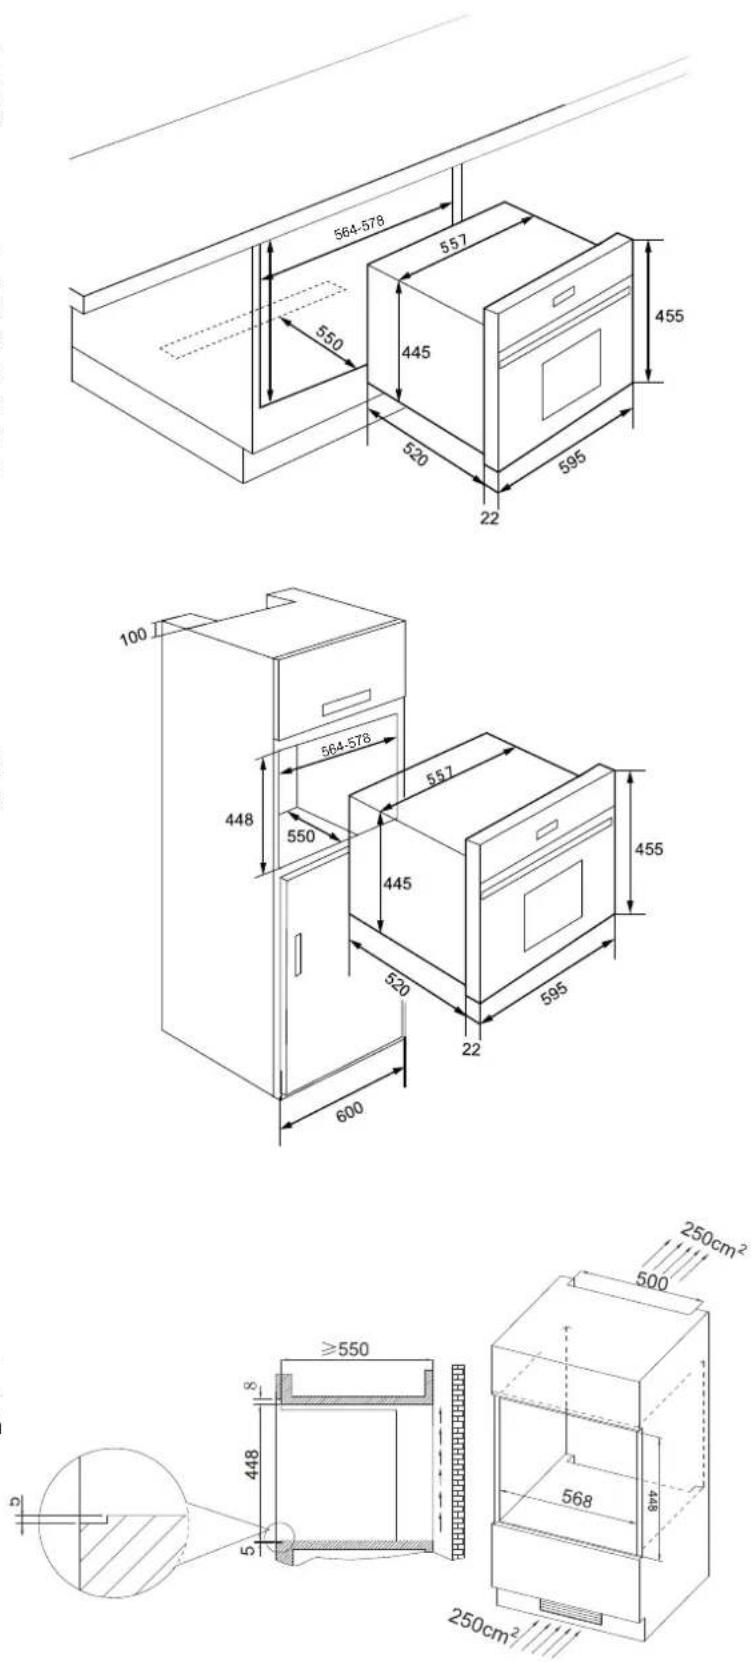
The appliance must be installed as a built-in unit in a cabinet. A safety distance must be maintained from surrounding walls, appliances, and kitchen surfaces. Ensure that the hole where the unit is installed complies with the dimensions specified in the illustration (values in mm). Surfaces, laminates, and adhesives in close contact with the oven must be heat-resistant, up to a minimum of 100°C. Kitchen cabinets must be level and securely fixed. A distance of 5 mm is required between the appliance and surrounding unit fronts
If there is a drawer beneath the oven, a shelf must be installed between the oven and the drawer to prevent overheating and, in extreme cases, fire.
It is important to ensure adequate ventilation for the unit. Cutouts for cooling and airflow must be present as per the illustration. IMPORTANT: Access to fresh air must be present at both the top and bottom of the cabinet, as shown in the illustration.
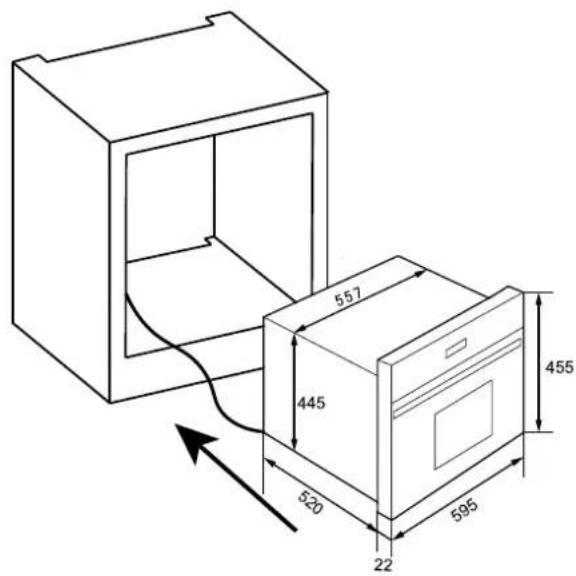
Install the oven in the cabinet. Ensure that wires, etc. are correctly positioned and do not get pinched during installation.
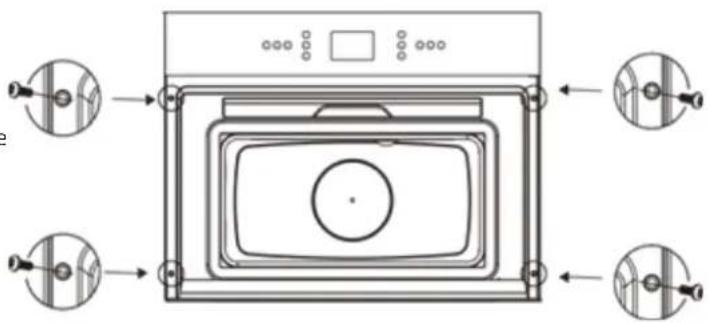
Open the door and secure the unit with screws, as shown in the illustration.
natural_image
Diagram of a microwave oven with four circular components and directional arrows indicating assembly or labeling (no text or symbols present)
Electrical Installation
This appliance must be connected to an earth connection!
Thermex® cannot be held responsible for damages caused by the use of the appliance without a grounded electrical connection. Likewise, there is a risk of electric shock, short circuit, or fire caused by improper installation!

The appliance must only be connected to the mains by an authorized professional, and the appliance's warranty is only valid after correct installation.

There is a risk of electric shock, short circuit, or fire caused by damage to the cord! The cord must not be pinched, bent, or come into contact with hot parts of the appliance. If the cord is damaged, it must be replaced by an authorized electrician. The mains must correspond to the data indicated on the appliance's nameplate. Risk of electric shock! Before starting the electrical installation, the relay must be turned off/disconnected.

TECHNICAL SPECIFICATIONS
| Voltage/frequency | 230V | ~ | 50Hz |
| Grill heater | 1000 | W | |
| Microwave | 1000 | W | |
| Convection | 1400 | W | |
| Steam | 1750W | ||
Oven capacity (L) 35 L
External dimensions (height/width/depth) 455/595/587 mm
Internal dimensions (height/width/depth) 210/426/380 mm
Oven type
Multifunction steam oven
OVERVIEW AND ACCESSORIES
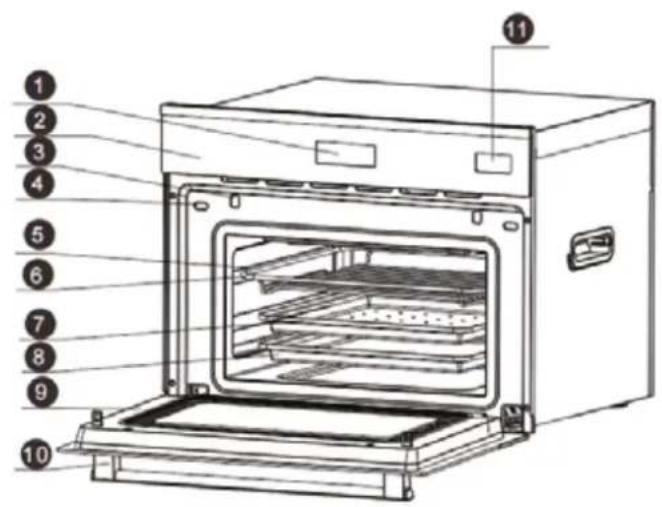
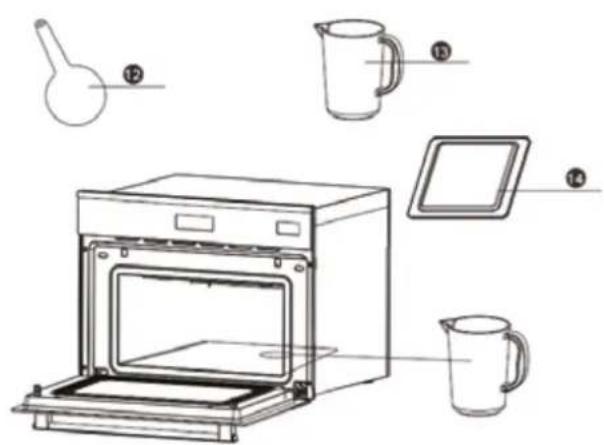
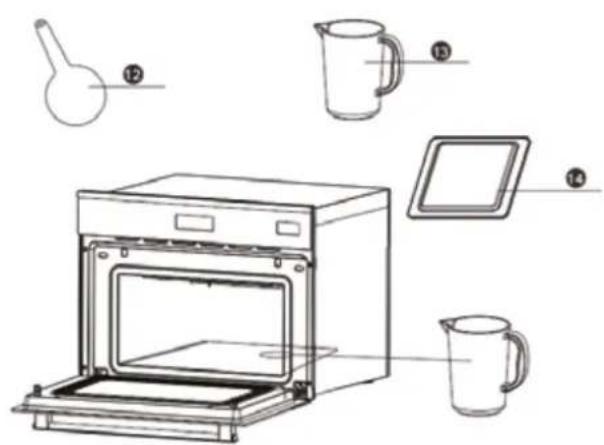
- Display
- Control panel
- Switch
- Door hook
- Shelf
- Grill rack
- Steam tray
- Grill tray
- Door
- Handle
- Water tank
- Water pipette( for spillage)
- Plastic cup
- Glass tray
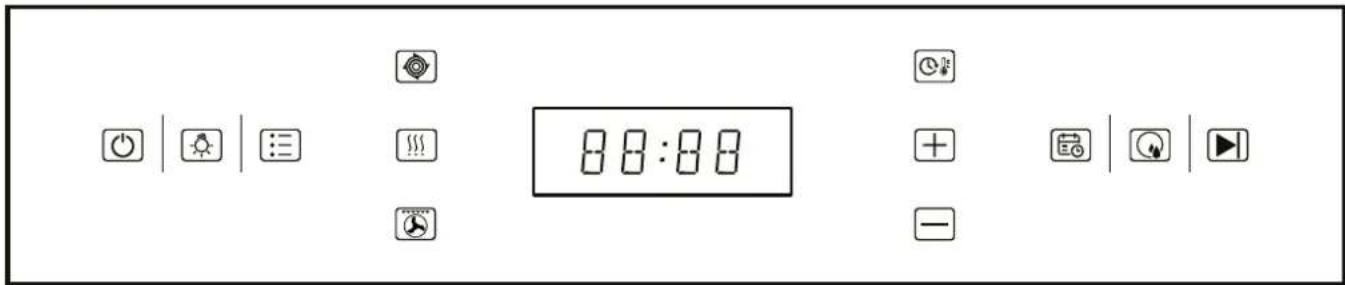
CONTROL PANEL
Control panel
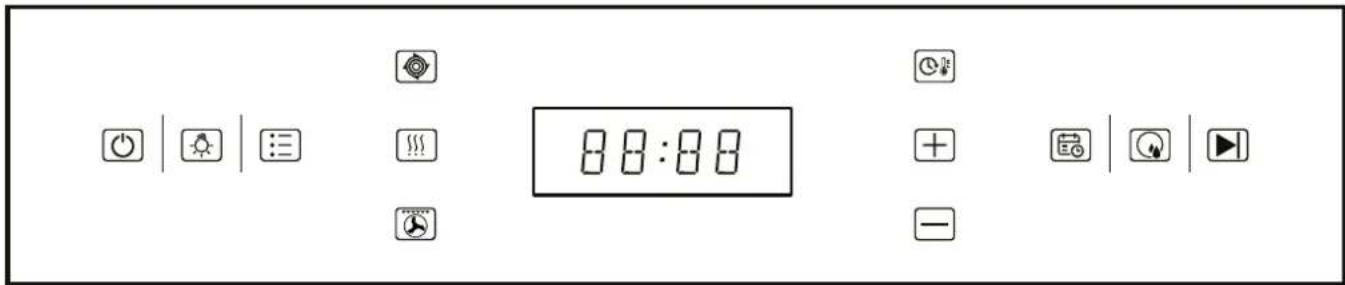
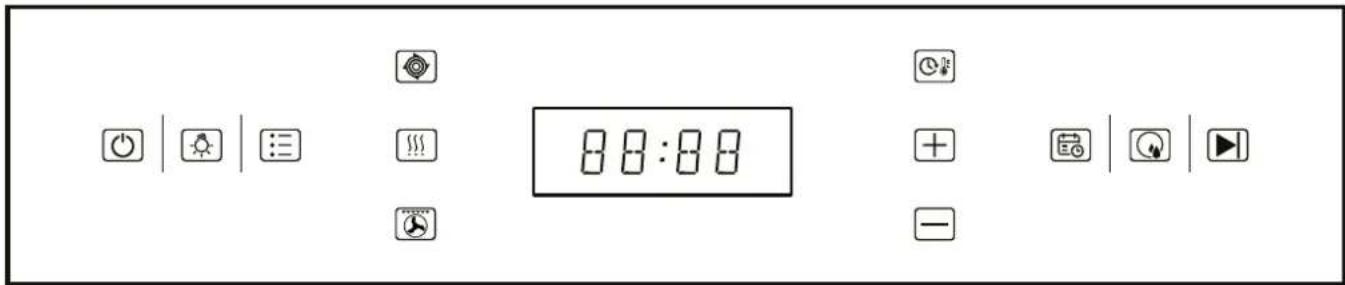
| ON/OFF Press ON/OFF to activate the display. | 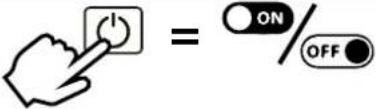 | |
| LOCK/ UNLOCK | Press ON/OFF for 2 seconds to open/lock the touch panel for operation. | 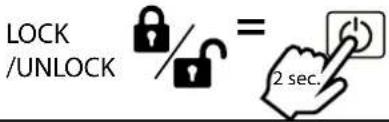 |
| LIGHT Press LIGHT to turn on/off the light. | 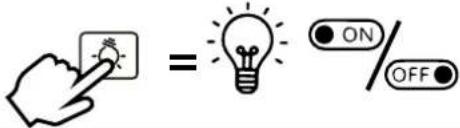 | |
| MICROW-AVE | a) Press ON/OFF to activate the display.b) Select MICROWAVE, then set the desired program by pressing MICROW-AVE repeatedly.c) Then press TIMER/ TEMPERATURE and set the desired time using the "+" & "-" buttons.d) Press START. | MICRO  |
| STEAM | a) Press ON/OFF to activate the display.b) Fill the water reservoir with clean water, as shown in the illustration. NOTE: Max 1L.c) Select STEAM.d) Press TIMER/TEMPERA-TURE and set the desired temperature using the "+" & "-" buttons.e) Press TIMER/TEMPERATURE again and set the desired time using the "+" & "-" buttons.f) Press START (*Optional: set delayed start).g) It is recommended to empty the water reservoir after use. See section on emptying the water reservoir. | 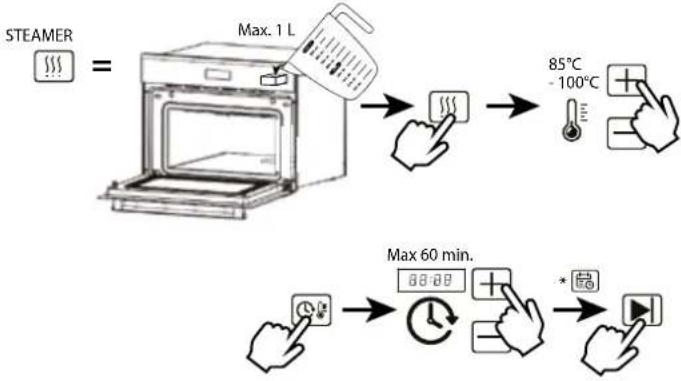 |
| GRILL/OVEN | a) Press ON/OFF to activate the display.b) Select GRILL/OVEN, then set the desired program by pressing GRILL/OVEN repeatedly.c) Set the desired temperature using the "+" & "-" buttons.d) Then press TIMER/TEMPERATURE and set the desired time using the "+" & "-" buttons.e) Press START (*Optional: set delayed start). |  |
| DELAYED START | *a) Press DELAYED START.b) Set the desired time using the "+" & "-" buttons.c) Press START. | 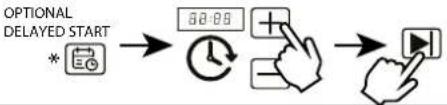 |
| KEEP WARM | a) Press ON/OFF to activate the display.b) Select PROGRAMS, then choose the KEEP WARM function.c) Set the desired temperature using the "+" & "-" buttons.d) Then press TIMER/TEMPERATURE and set the desired time using the "+" & "-" buttons.d) Press START. | KEEPV  |
| STERILI-ZATION | a) Press ON/OFF to activate the display.b) Select PROGRAMS, then choose the STERILIZATION function.d) Press START. | 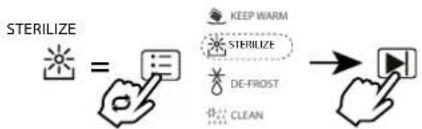 |
| DEFROSTA) | Press ON/OFF to activate the display.b) Select PROGRAMS, then choose the DEFROST function.c) Set the desired amount of grams to defrost using the "+" & "-" buttons.d) Press START. | 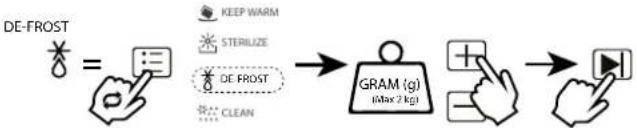 |
| EMP-TYING WATER TANK | NOTE: Ensure that the oven is cooled down before emptying the water tank.a) Place the container Press ON/OFF to activate the display.b) Select PROGRAMS, then choose the DEFROST function.c) Set the desired amount of grams to defrost using the "+" & "-" buttons.d) Press START. | EMPTY WATER TANK = 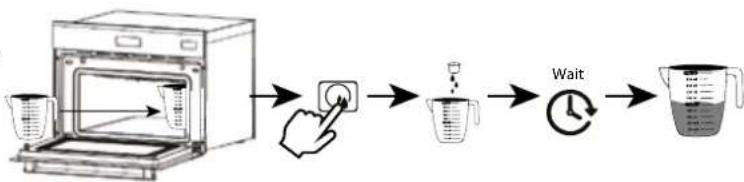 |
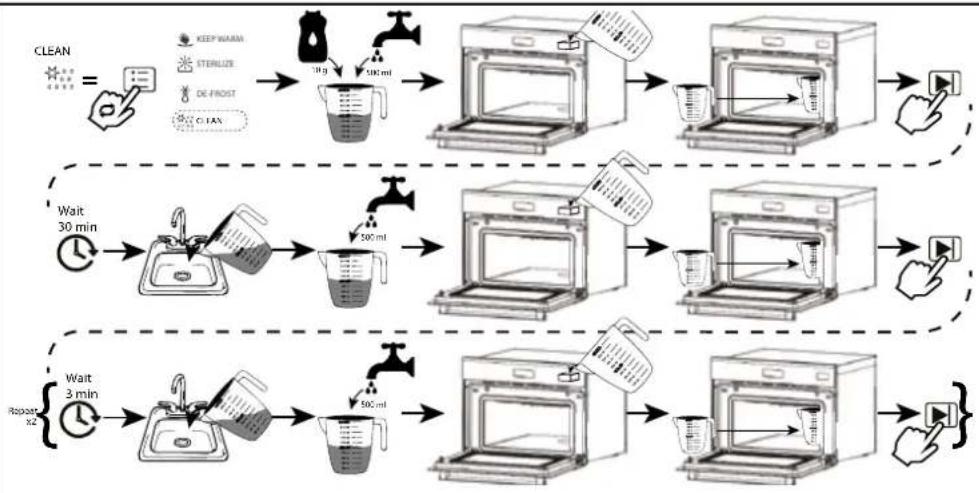
a) Press ON/OFF to activate the display.
b) Select PROGRAMS, then choose the CLEAN function.
c) Add 10g of the included cleaning agent to 500 ml of water, and pour it into the tank.
d) Place the container in the oven cavity under the valve, and press START.
e) After 20 minutes, pour out the liquid, refill with 500 ml of clean water, place the container back in, and press start. This process is repeated a total of three times to ensure the oven is clean.
NOTE: Cleaning agent similar to the one provided with the oven can be purchased in various stores.
flowchart
graph TD
    A["CLEAN"] --> B["KEEP WARM STERILIZE DE-FROST CLEAN"]
    B --> C["10 g 500 ml"]
    C --> D["Recoating oven"]
    D --> E["Recoating oven"]
    E --> F["Recoating oven"]
    F --> G["Recoating oven"]
    G --> H["Recoating oven"]
    H --> I["Recoating oven"]

    J["Wait 30 min"] --> K["Recoating tank with water drop"]
    K --> L["Recoating tank with water drop"]
    L --> M["Recoating tank with water drop"]
    M --> N["Recoating tank with water drop"]
    N --> O["Recoating tank with water drop"]
    O --> P["Recoating tank with water drop"]

    Q["Wait 3 min"] --> R["Recoating tank with water drop"]
    R --> S["Recoating tank with water drop"]
    S --> T["Recoating tank with water drop"]
    T --> U["Recoating tank with water drop"]
    U --> V["Recoating tank with water drop"]
USAGE AND FIRST USE
First use of the Thermex Combi Oven:
1. Read the User Manual:
Before you begin using your Thermex Combi Oven, it's important to thoroughly read the user manual to understand all functions, safety instructions, and operating procedures.
2. Oven Preparation:
The first time you use the oven, ensure to clean both the interior and exterior surfaces with a soft cloth and warm soapy water to remove any residues from the manufacturing process.
3. Connection and Power Supply:
Ensure that the oven is properly connected to the power supply and placed on a stable and flat surface suitable for the oven.
4. Setting Functions:
Use the oven's control panel to select the desired functions and settings according to the dish you wish to cook. The Thermex Combi Oven offers a variety of functions, such as grill, steam, microwave, and conventional oven, so be sure to select the appropriate function for your cooking.
5. Preheating:
If necessary for your recipe, you can preheat the oven to the desired temperature using the preheating function. Follow the instructions in the user manual to activate the preheating function and set the desired temperature.
6. Test Run:
Before cooking your first dish, it may be a good idea to perform a test run to ensure that the oven is operating correctly. Select a short cooking time and low temperature, and cook something simple, such as a glass of water, to check if the oven is functioning as expected.
7. Food Preparation:
Prepare the food according to your recipe and place it in suitable containers or trays suitable for the oven and the selected cooking function.
8. Cooking:
Once the oven is preheated and the food is ready, place the food in the oven and set the desired cooking time and temperature using the oven's control panel. Start cooking by pressing the start button and follow the recipe instructions carefully.
9. After Cooking:
Once the cooking time has elapsed and the food is ready, be careful when removing the food from the oven as it may be hot. Let the food rest for a few minutes before serving to allow the flavors to settle.
10. Cleaning and Maintenance:
After use, it's important to clean the oven thoroughly to remove any residues or grease splatters and ensure that the oven remains in optimal condition. Follow the cleaning instructions in the user manual to ensure proper maintenance of your Thermex Combi Oven.
CLEANING AND MAINTENANCE
Guide to Cleaning and Maintaining the Thermex Oven with Steam Function:
Cooling:
Allow the oven to cool completely before starting the cleaning process to avoid the risk of burns.
Wiping Interior Surfaces:
Dampen a soft cloth or sponge with warm soapy water and gently wipe the interior surfaces of the oven to remove any food residue, grease splatters, or stains. Avoid using abrasive cleaning products or scouring pads as they may damage the surfaces.
Cleaning the Steam System:
Regularly check and clean the steam system to ensure it functions properly. Check the water tank and any connections for limescale or dirt buildup and clean them as needed.
Cleaning Grates and Trays:
Remove the grates, trays, and other removable parts from the oven and clean them separately with warm soapy water. Rinse and dry thoroughly before reinserting them into the oven.
Cleaning the Door and Seal:
Gently wipe the internal and external surfaces of the oven door with a soft cloth or sponge and warm soapy water to remove dirt or grease splatters. Also, check the seal for any dirt or food residue and clean it as needed.
Odor Removal:
If there are unpleasant odors in the oven, you can place a bowl of water and lemon juice or vinegar in the oven and heat it for a few minutes. The steam will help eliminate the odor and freshen up the oven.
Exterior Cleaning:
Gently wipe the exterior surface of the oven with a soft cloth or sponge and warm soapy water to remove dust or dirt. Avoid using abrasive cleaning products as they may damage the finish.
Regular Maintenance:
Keep the oven clean and fresh by performing regular cleaning, such as once a week or after each use, depending on the frequency of use and type of cooking.
SERVICE AND TROUBLESHOOTING
Before you report your Thermex product for service, it is important that you have thoroughly read the installation and/or user manual. This ensures that Thermex can provide you with the best possible assistance.
The service department at Thermex can be contacted for:
- Technical support for assembly and installation of your product.
- Clarification of functionalities in your product.
• Service request under the right of complaint on your product
Always try to disconnect the power supply to the product for approx. 5 minutes. Then reconnect the power to see if the problem is resolved. If the error is not resolved, disconnect the power supply to the product for one hour. If the product still does not work properly and the points in the troubleshooting guide have been reviewed, contact the service department.
NOTE: In the event of inquiries within the right of complaint, you will be asked for documentation of your purchase in the form of a purchase receipt. Therefore, always save your purchase receipt.
Before contacting us regarding service requests within the right of complaint, it is important to have all the necessary information ready:
• Information and documentation for purchases - purchase receipt
- Error description
- Model
Service requests under the right of complaint can be made by filling in the service form at www.thermex.dk/service, where the service conditions can also be read.
Inquiries regarding technical support or clarification of functionalities can be made by sending an inquiry to service@thermex.dk or on tel. +45 9892 6233.
Troubleshooting
In rare cases, the oven may have abnormal breakdowns during cooking. You can check the error list before calling the service department, as the problem may be easily fixed.
Normal operation:
When the oven is put into use for the first time, you may experience a smell and smoke for a few hours. Until the oven at 250 degrees, and it burns through for approx. 1 hour. Then wait a while until the oven is cold, open the door and clean the oven.
If the heated food emits a lot of moisture, the heat discharge hole may blow out steam during cooking. This is normal and does not damage either the oven or the food.
The fan will start running 15 minutes after the oven has started heating. When the oven is switched off, the fan will continue to run for 35 minutes to cool down the oven.
| Problem cause Suggested solution | ||
| The oven does not work There is no power | to the oven. Connect power to the | oven and check the connection |
| The relay/switch is turned off Turn on the relay/switch | ||
| Timer function is switched on Reset the timer function | ||
| The lamp does not turn on Bulb is defective | ve Change to a new bulb | |
| There is no power to the oven. Con | nect power to the oven and check the connection | |
| The oven suddenly stops working during cooking | There is no power to the oven. Con | nect power to the oven and check the connection |
| Thermostat overheated and oven switches off | Check if the cooling fan is working. If it works and the problem persists, contact Thermex. | |
| The oven does not heat The temperature | is not set correctly | Set the temperature |
| If the model has a timer, the timer may have expired | Set the timer | |
| Heating element is damaged Change to a new heating element | ||
| There is no power to the oven. Con | nect power to the oven and check the connection | |
| Water comes out of the glass door when food is being prepared | The lid gasket is broken Change to a new gasket | |
MILJ∅HENSYN
EMBALLAGE
SKROTNING AF PRODUKTET
The packaging must be disposed of in accordance with local regulations on waste management.
SCRAPPING OF THE PRODUCT
The symbol on the product or accompanying documentation indicates that this product may not be disposed of as household waste but must be delivered to the nearest collection center for the recycling of electrical and electronic equipment.
MILIEUOVERWEGINGEN
VERPAKKING
THERMEX SCandinaVia S.I.U.
Noi del Sucre 42 ■ 08840 Viladecans ■ España
Tel. +34 936 373 003
www.thermex.es
info@thermex.es
THERMEX SCandinaVia a/S
Puhelin +358 942 454 000
www.thermex.fi
info@thermex.fi
- THERMEX THOMGS160 M 905212000224042024
- THERMEX THOMGS160 M 905212000224042024
- INDHOLD
- Ellektrisk installation
- OVERSIGT OG TILBEH∅R
- BETJENING
- Betjeningspanel
- ANVENDELSE OG F∅R F∅RSTE BRUG
- INNEHÄLLSFÖRTECKNING
- INNAN MONTERING/IDRIFTTAGNING
- Elektrisk installation
- Sähköasennus
- KÄYTTÖ
- Käyttöpaneeli
- GENERAL SAFETY AND WARNING
- BEFORE INSTALLATION/COMMISSIONING
- INSTALLATION
- USE OF THE DEVICE
- Electrical Installation
- OVERVIEW AND ACCESSORIES
- CONTROL PANEL
- USAGE AND FIRST USE
- Read the User Manual:
- Oven Preparation:
- Connection and Power Supply:
- Setting Functions:
- Preheating:
- Test Run:
- Food Preparation:
- Cooking:
- After Cooking:
- Cleaning and Maintenance:
- CLEANING AND MAINTENANCE
- SERVICE AND TROUBLESHOOTING
- Troubleshooting
- Normal operation:
- MILJ∅HENSYN
- EMBALLAGE
- SKROTNING AF PRODUKTET
- MILIEUOVERWEGINGEN
- VERPAKKING
- THERMEX SCandinaVia S.I.U.
- THERMEX SCandinaVia a/S
Brand : Thermex
Model : THOMGS1
Category : Oven