ECO pro-line 2000W - Heating Heat1 - Free user manual and instructions
Find the device manual for free ECO pro-line 2000W Heat1 in PDF.

| Product Type | Electric Fan Heater |
| Brand | Heat1 |
| Model | ECO pro-line 2000W |
| Power Output | 2000 W |
| Heating Element | PTC Ceramic |
| Dimensions (W x H x D) | 25 cm x 30 cm x 20 cm |
| Weight | 2.0 kg |
| Power Supply | 220–240 V, 50/60 Hz |
| Heat Settings | ECO (low), Medium, High |
| Thermostat Control | Adjustable thermostat with ECO mode |
| Fan Modes | Cool fan only, warm fan |
| Safety Features | Overheat protection, tip-over switch |
| Cleaning | Wipe exterior with a soft, damp cloth |
| Filter Type | Washable pre-filter |
| Noise Level | ≤ 45 dB |
| Certification | CE, RoHS |
| Warranty | 2 years |
| Included Accessories | User manual |
Frequently Asked Questions - ECO pro-line 2000W Heat1
User questions about ECO pro-line 2000W Heat1
0 question about this device. Answer the ones you know or ask your own.
Ask a new question about this device
Download the instructions for your Heating in PDF format for free! Find your manual ECO pro-line 2000W - Heat1 and take your electronic device back in hand. On this page are published all the documents necessary for the use of your device. ECO pro-line 2000W by Heat1.
USER MANUAL ECO pro-line 2000W Heat1
natural_image
Exterior view of a black rectangular heating element with internal grid pattern and red trim (no text or symbols)Instructions
Brugsanvisning
Instruktions manual
Ohjeet
General safety instructions
Read the instructions carefully before installing the patio heater and then store the instruction manual in a safe place. Keep the instructions for use for any future questions about using your product.
The patio heater is designed and manufactured in accordance with European standards: CE, RoHS.
The product complies with the essential requirements of the directives:
EN 60335-2-30:2009, EN 60335-1: 2012.
- The patio heater can be used by children from 8 years and upwards if they are supervised or have received instructions in using the patio heater safely and understand possible hazards. Children are not allowed to play with the patio heater. Cleaning and user maintenance must not be carried out by unsupervised children. Children under 3 years of age must be kept away from the patio heater unless continuously supervised. Children over 3 years of age and younger than 8 years of age may only turn the patio heater on off if they are supervised or have been trained on how to use the patio heater safely and have understood the resulting hazards;
This provided that:
- The patio heater is located or installed in its normal place of use. Children over 3 years old and younger than 8 years old should not plug the patio heater into the wall outlet, adjust the heater, clean the patio heater and/or perform any maintenance.
- Extreme caution is necessary when the patio heater is used by or near children or disabled persons, as well as whenever the patio heater is left on and unattended.
- CAUTION – Some parts of this product can get very hot and cause burns. Particular attention must be paid where children and vulnerable people are present.
- The user may only connect the patio heater to a power outlet using the standard cable of the device. If standard cable needs to be changed or if the patio heater needs to be permanently connected to an electrical outlet, the installation must be done by a licensed electrician. While the installation is being carried out, the main power should always be interrupted. Turn on the patio heater only when all cables are connected correctly.
- The patio heater must only be connected to a timer that turns off the unit after the set time. Do not connect the patio heater to a timer that starts the patio heater automatically.
- When using electrical appliances, basic safety precautions must always be followed to reduce the risk of fire, electric shock or injury, including the following;
- This patio heater is warm when in use. To avoid burns, do not let the bare skin touch the hot surfaces. If possible, use lift handles or brackets when moving the patio heater. Store flammable materials, such as furniture, pillows, bedding, papers, clothing and curtains at least 90 cm from the front of the patio heater.
• Always unplug the heater from the wall socket when not in use. - Do not use the patio heater if the cord or plug is damaged. Also, do not use the patio heater after a malfunction or if it is dropped or otherwise damaged. Discard the patio heater in case of severe damage or contact the dealer for possible repair of the damage.
- Do not run the cord under blankets. Do not cover the cord with solid blankets, runners or similar coatings. Do not run the cord under furniture or appliances. Place the cord away from hallways to avoid tripping over the wire.
- Do not use the patio heater in the immediate vicinity of a bath, shower or swimming pool.
- Do not use the patio heater outdoors in bad weather, such as rain, snow or storm.
- Connect only to grounded sockets/power outlets.
- Do not place or install the patio heater directly under an electrical outlet /power outlet.
- To disconnect the patio heater, turn off the switch and then remove the plug from the wall outlet.
- Do not insert or allow foreign objects to enter any ventilation or grille opening, as this may cause electric shock, fire or damage the patio heater.
- To prevent a possible fire, air intakes or grilles must not be blocked in any way. Do not place the patio heater on soft surfaces such as a bed where the vents may become blocked.
3
- Do not use the patio heater in areas where gasoline, paint or flammable liquids are used or stored.
- Check whether the voltage indicated on the nameplate of the appliance corresponds to the local mains voltage before connecting the patio heater.
- Do not touch the appliance. Warning! Risk of burning!
- In case of improper use, there is a risk of electric shock and / or fire hazard. The operation of the appliance must be interrupted and the plug must be unplugged immediately. Do not attempt to repair the appliance yourself. Contact the dealer or a licensed electrician for repair.
Cleaning and maintenance.
- The patio heater consists of a robust and maintenance-free aluminum / metalhousing with protective grilles. Contains no replaceable or serviceable parts.
- Before cleaning, pull the plug out of the socket. Wait for the patio heater to cool completely before starting any cleaning.
- The patio heater is wiped with lint-free cloth, skin cloth or brushed off with a soft brush.
- Never use detergents, abrasives or hard brushes for cleaning.
- Never attempt to disassemble the patio heater to clean the reflector or change pipes.
- To avoid electric shock, the cord, plug or patio heater must never come into contact with water or other liquid.
- When replacing the infrared tube, please contact the place where the item was purchased or the importer.
Troubleshooting
Follow the troubleshooting steps below:
- Make sure that the mains lead is connected correctly.
- Check if the cable is damaged.
- The ON/OFF switch must be on.
- Check if the pipe is burst.
- If the product is turned off due to improper use, disconnect the product from the wall outlet and cool. Check the product for defects after 30 minutes of cooling. If there are no visible defects, try connecting the product again. Please contact the dealer if this does not solve your problem.
Storage
Store in a dry place and free of dust. Take the patio heater inside and store it dry, possibly in a bag or get a cover, which can be purchased for most models.
Disposal
The European Directive 2002/96/EC on waste electrical and electronic equipment (WEEE) requires that old household appliances are not thrown into the normal municipal waste stream. The appliances must be assembled to maximise the recovery/recycling of materials and reduce the impact on human health and the environment. The “crossed out bin” symbol is stamped on the product to help them remember collection obligations. Consumers should contact their distributor or local authorities regarding the procedure to be followed when disposing of their product.
Customer service / Warranty
• Repairs must be carried out by a licensed installer/electrician, ensuring electrical safety.
- Please contact the dealer or an authorized installer/electrician.
- Improper repair can lead to danger to the user.
- Warranty period begins from date of purchase. Invoice or proof of purchase must be shown in all warranty cases. In case of a warranty matters, please contact dealer of the product or the place the product is purchased.
- This warranty does not cover damage caused by defects caused by alteration, accident, mis use, neglect or improper maintenance.
- In accordance with our policy on continuous product development, we reserve the right to change product and documentation specifications without notice.
Brief Introduction
This product is infrared radiant heater with remote control and IP 65 approved .It is almost unlimited used in outdoor ,such as open bars, courtyard, plaza, station, and construction site in winter etc. This patio heater is energy-efficient, convenient, environmentally friendly and for better life etc. And add the Bluetooth speakers and LED lighting. Connecting your mobile phone or PC then can play the music and control LED lighting.
Specifikationer
| Specification: | LHRR009-200KB-S |
| Voltage (V): | 220-240V~ |
| Power consumption (W): | 2000W |
| IP-code | IP65 |
| Infrared receiving Angle: | 60^ ± 5^ |
| Bluetooth receiver distance: | 10 meter |
| The speaker power: | 2 x 6 W |
Bluetooth heat connecting steps :
When you have downloaded the Sunkare APP, please make sure that the patio heater is in standby position (backside of the patio heater and the blue light goes on)
- Press ON at the remote control.
- Open the Bluetooth function in your iPhone, iPad or Android device, find the "LIANG DI" in the device lists, then connecting.
- First connecting, you need to enter passcode 12345678, this can later be changed in the APP.
- Press in the menu HEAT1 and swipe to the right, green light will turn on.
- Go back to the menu (sun symbol) and activate the green light, now you can adjust the heat.
- Timer: possibility for automatic turn on/off.
- Colour symbol: not active for this patio heater.
- Wheel menu: various setting options (change password etc)
- Press off and the heater will go to standby mode.
Bluetooth speakers connecting steps:
- In standby position, short press the remote control button, turn on the power of the Bluetooth speakers, then long press this button in order to enter into Bluetooth pairing mode.
- open the Bluetooth function in your iPhone, iPad or Android device, find the "LIANG DI" in the device lists, then connecting.
- Connecting successful indicate with a loud tone, then you can play music from your iPhone, iPad or Android device.
- Press button again and it will turn off the Bluetooth speaker.
- Some of above function will also be available by using the node character in the APP.
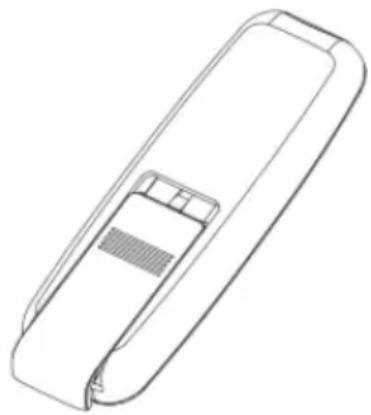
Reset Operation
- Press the Reset button shortly, the power will be adjusted accordingly (Low, Middle, High, ON/OFF)
- Press the Rest button for at least 4 seconds, the heater will restore factory settings
Remote Control Instructions
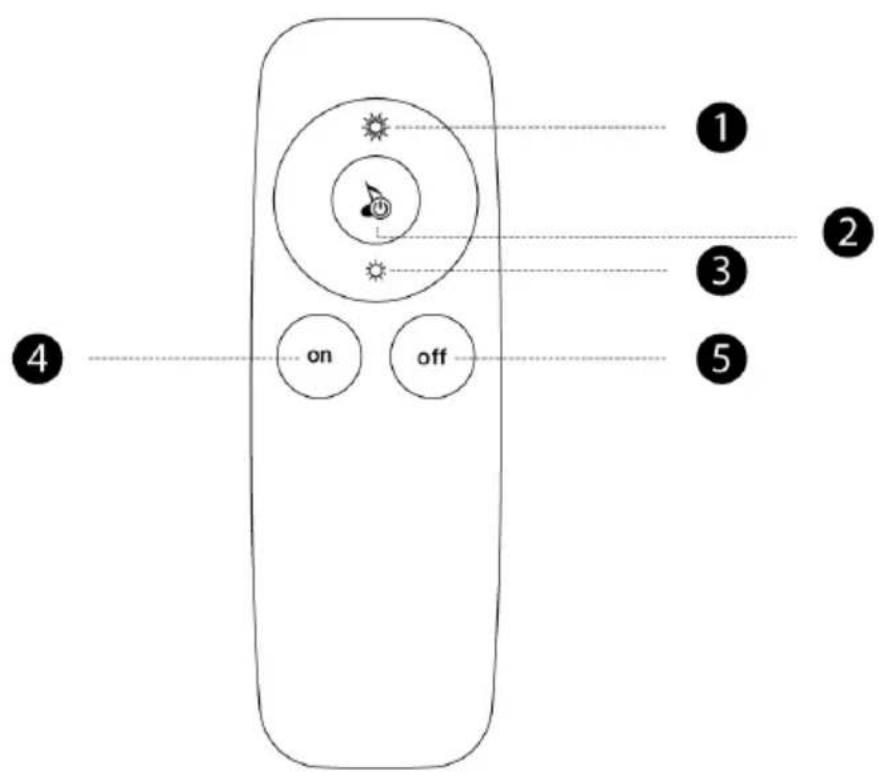
Button
Feature
| 1. Up Arrow | Up one heating level |
| 2. Turn on/off the speaker | Short press, turn on/off the speakerLong press, enter into Bluetooth pairing mode |
| 3. Down Arrow | Down one heating level |
| 4. ON | To switch the heater on:Press ON. The patio heater has a soft start function of 33% power. 4 seconds after the heater has been turned on, it will automatically switch to the last heating level used. In case of the first-time use, after 4 seconds the heater will automatically switch to 100% power. |
| 5. OFF | To switch the heater off: |
Notice:
- Use 2 pieces AAA size 1.5V batteries in the remote control. Remove the battery when not use for long time, thus the lifespan of remote control can be extended.
- Choose the same specification battery when replacing the battery inside, otherwise it may cause remote control not work, thereby affect the normal use of the heater.
- Please contact service agent for further help if you need the function.
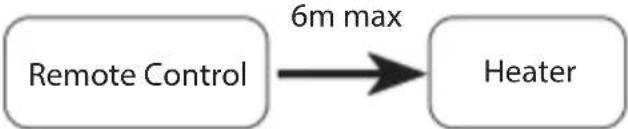
- The remote control function may be out of work if there is a barrier between the remote control and heater.
- Replacing the batteries duly so as not to affect the normal use of heater and remote control.
natural_image
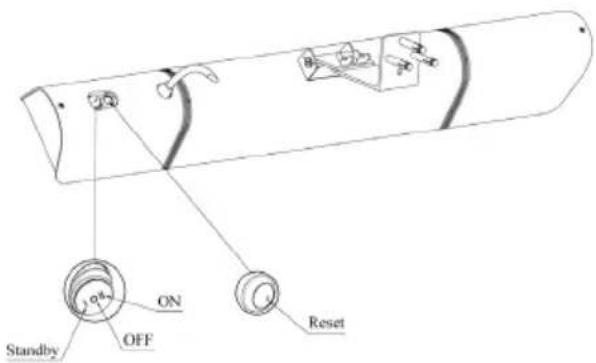
Line drawing of a rectangular electronic device with a slot and handle (no text or symbols)I O II Switch function:
- I = Standby Use the remote control to turn ON/OFF the heater.
• II = ON The heater works directly without remote control.
• O = OFF Power OFF.
Operation Instruction
- Remove all package material (including anti-vibration object of the lamp) and check the appliance, supply cord and the plug for signs of damage.
- Pay attention to the mounting place and all mounting material(dowels, screws). Ensure they are suitable and stable enough for mounting and lastingly holding of the appliance.
- Before mounting, the minimum safe mounting distances and tilt angles shown in the figures must be strictly followed.
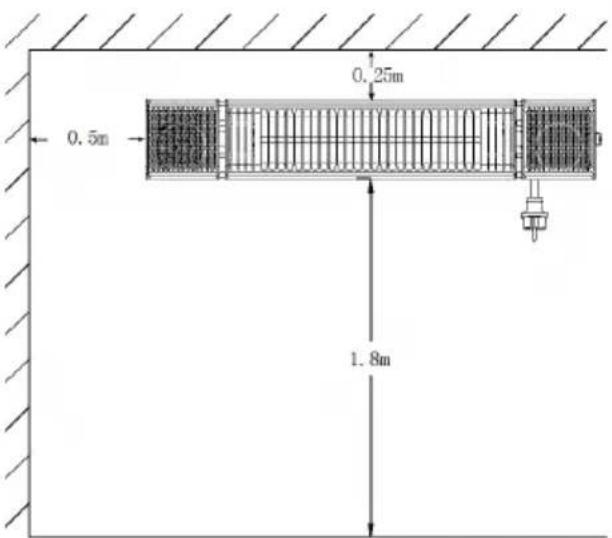
- The distance between the bottom edge of the appliance and the floor must be at least 1.8 M. See figure 2.
- There must be a distance of at least 0.25 M between the appliance and the ceilings, roofs or other covers. See figure 2.
- There must be a distance of at least 0.5 M at each side between the appliance and walls or the like. See figure 2.
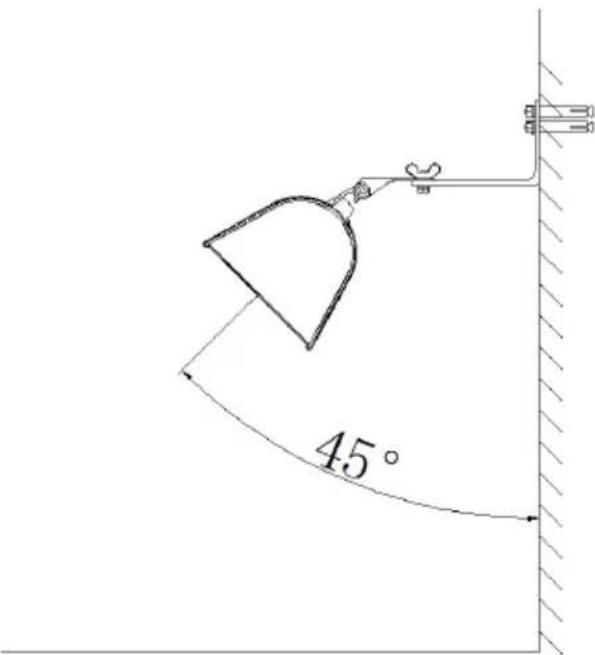
- Recommended degree to mounting surface is 45^ . See figure 3.
- Pay attention that, the installation of the appliance must not add excessive wind load.
- Fix the mounting bracket to the ceiling I first. Ensure that the place to be installed is secure and firm. Or connect the appliance to the stand.
- Adjust the desired angle of radiation and fest screw all screws. Check regularly the screw's connection. Mechanical bearing pressure and oscillation due to wind or rain could lead to loose.
- Plug in the power source and operate the remote control. Then observe, whether during the first 10-15 minutes the appliance works trouble-free.
- If you do not use, please remove battery socket.
| Figure 1: Mounting bracket and anchor dowels provided. Connection from the wall to the infrared heater. | Figure 2: Min. distance to floor, ceiling and wall. |
 |  |
| Figure 3: Tilt angle. Figure 4: Max. remote distance | |
 |  |
Knap
Funktion
natural_image
Line drawing of a rectangular electronic device with a slot and handle (no text or symbols)I O II kontakt indstillinger:
- I = Standby
Knapp
Funktion