
Innovac Essential HS1-SG - Vacuum Cleaner WILFA - Free user manual and instructions
Find the device manual for free Innovac Essential HS1-SG WILFA in PDF.


| Product Type | Cordless Stick Vacuum Cleaner |
| Brand | Wilfa |
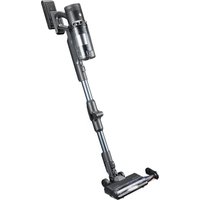
| Model | Innovac Essential HS1-SG |
| Intended Use | Indoor household, dry locations only |
| Battery Type | Rechargeable lithium-ion |
| Charging Time | 4–6 hours |
| Runtime (Low Speed) | Up to 60 minutes |
| Runtime (Medium Speed) | Up to 17 minutes |
| Runtime (Max Speed) | Up to 7 minutes |
| Runtime (Auto Mode) | 15–30 minutes (depending on dust level) |
| Display | LED with battery indicator, speed modes, and error icons |
| Speed Modes | Auto, High, Medium, Low |
| Dust Sensor | Yes (auto-adjusts suction; clean regularly) |
| Dust Cup Capacity | Removable, washable |
| Filter Type | Washable sponge filter |
| Floor Brush | Electric power brush with removable roller |
| Accessories Included | 2-in-1 brush, crevice nozzle, combo carpet brush |
| Wall Mount | Included for charging and storage |
| Charging Temperature Range | 5°C to 40°C |
| Warranty | 5 years on product, 1 year on battery |
Frequently Asked Questions - Innovac Essential HS1-SG WILFA
User questions about Innovac Essential HS1-SG WILFA
0 question about this device. Answer the ones you know or ask your own.
Ask a new question about this device
Download the instructions for your Vacuum Cleaner in PDF format for free! Find your manual Innovac Essential HS1-SG - WILFA and take your electronic device back in hand. On this page are published all the documents necessary for the use of your device. Innovac Essential HS1-SG by WILFA.
USER MANUAL Innovac Essential HS1-SG WILFA
natural_image
Black and white photo of a WILFA vacuum cleaner with a circular lens and handle (no visible text or symbols on the device body)INNOVAC ESSENTIAL
CORDLESS STICK VACUUM HS1-SG
EN · Instruction manual
NO · Bruksanvisning
SE · Bruksanvisning
IMPORTANT SAFETY INSTRUCTIONS
- This appliance can be used by children aged from 8 years and above and persons with reduced physical, sensory or mental capabilities or lack of experience and knowledge if they have been given supervision or instruction concerning use of the appliance in a safe way and understand the hazards involved. Children shall not play with the appliance. Cleaning and user maintenance shall not be made by children without supervision.
- This product is intended for indoor, non-industrial, non-commercial, household use only.
- Do not use the item outdoors or for any other purpose
- Suitable for dry locations only. Do not use outdoors or on wet surfaces.
- Do not immerse in water.
- Do not use the hose if it is damaged.
- The plug must be removed from the socket-outlet before cleaning or maintaining the appliance.
ATTENTION - BATTERY
- Do not charge the vacuum cleaner at the ambient temperature of lower than 5^ C and higher than 40^ C.
- Let the vacuum cleaner cool down after use before charging.
- If the low power icon is shown on the display after turning the vacuum cleaner on, you should charge the battery.
- When the battery is fully charged, disconnect the power supply.
- If your vacuum cleaner is not used for a long time (more than 2 months), please unplug it from the power supply. In order to ensure the battery life, it needs to be fully charged once every 2 months.
- Only use the maximum power when needed. Too much usage on max will shorten the expected battery life.
EN
ATTENTION – CLEANING AND MAINTENANCE
- To ensure the suction force of your vacuum cleaner, please clean the floor brush, brush rollers, filters, and dustbin regularly.
- Make sure that all components are installed properly, otherwise it could cause product failure.
- Do not let water get into the electric elements of your vacuum cleaner, it could cause product failure.
PRODUCT OVERVIEW
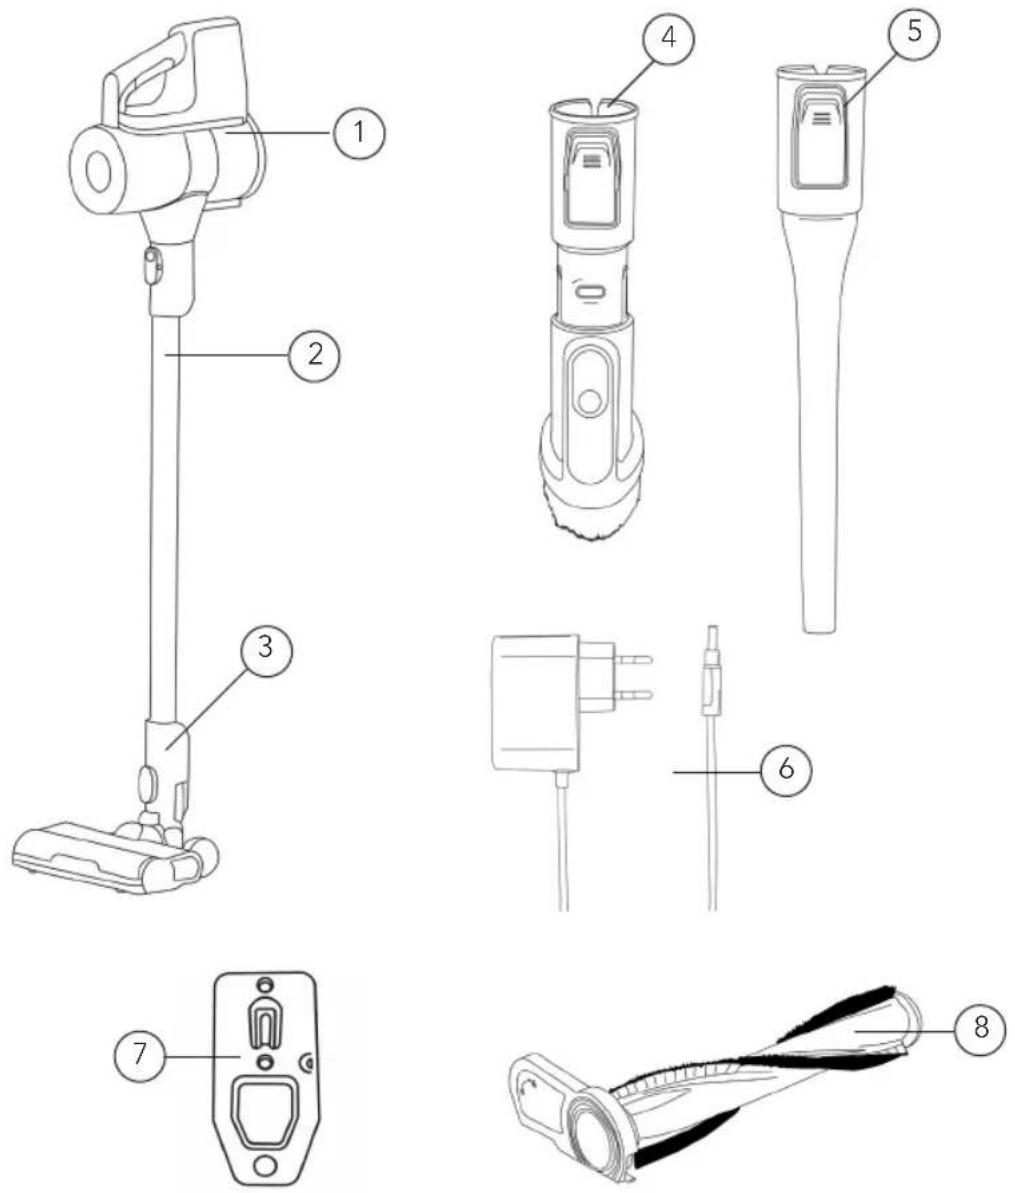
- Main unit
- Extension tube
- Electric floor brush
Components
-
2-in 1 brush
-
Crevice nozzle
- Power adapter
- Wall mount
- Combo carpet brush
EN
OPERATION
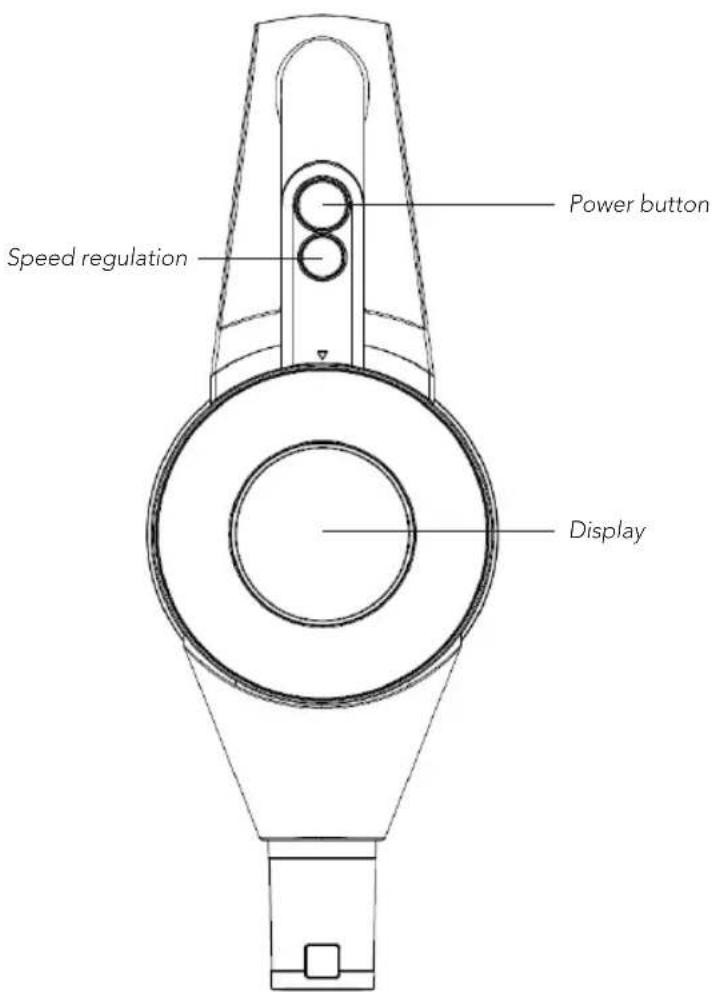
- Press the power button to start.
- After switching the vacuum cleaner on, press the speed regulation button to adjust the speed. The speed will go from Auto-High-Medium-Low.
- When using the Auto level, the dust sensing function is enabled. After sensing dust, the background animation on the display will change from blue to purple. If no dust is detected, the animation remains blue, and power will run on low.
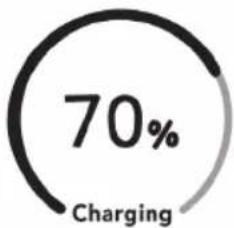
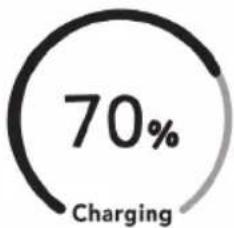
- The battery time is indicated by a circle on the display, divided into 6 sections. As the battery is consumed the circle will lower section by section. When the battery is low, the display shows "Low Power".
DISPLAY

Filter clean Dust tank blocking Roller blocking Air flow blocking

natural_image
Warning symbol with exclamation mark inside a circular frame (no text or numbers)
natural_image
Abstract diagram of intersecting curved lines and circular elements, no text or symbols present
natural_image
Abstract circular diagram with three curved arrows forming a spiral pattern (no text or symbols)
natural_image
Abstract circular diagram with three curved arrows forming a ring (no text or symbols)Air flow blocking Brush blocking Low speed Mid speed

natural_image
Abstract spiral diagram with concentric curved arrows, no text or symbols present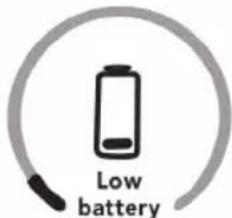

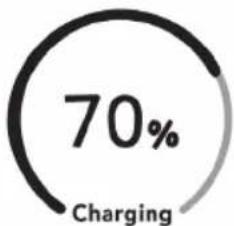
pie
| Category | Value (%) | |---|---| | Charging | 70 |High speed Low battery Charging finished Charging
EN
CHARGING
- Hang the vacuum cleaner on the wall mount
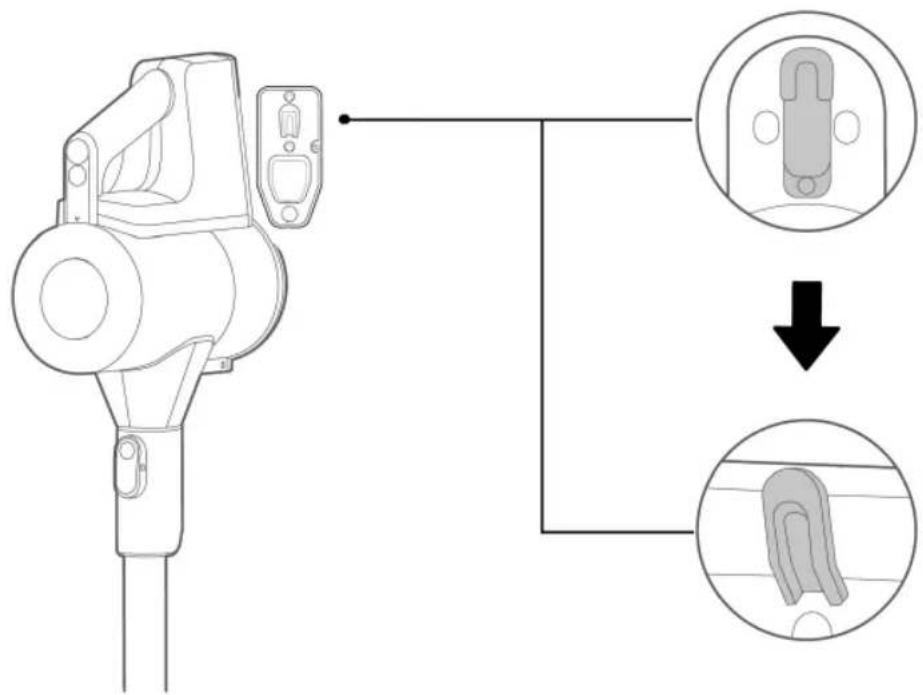
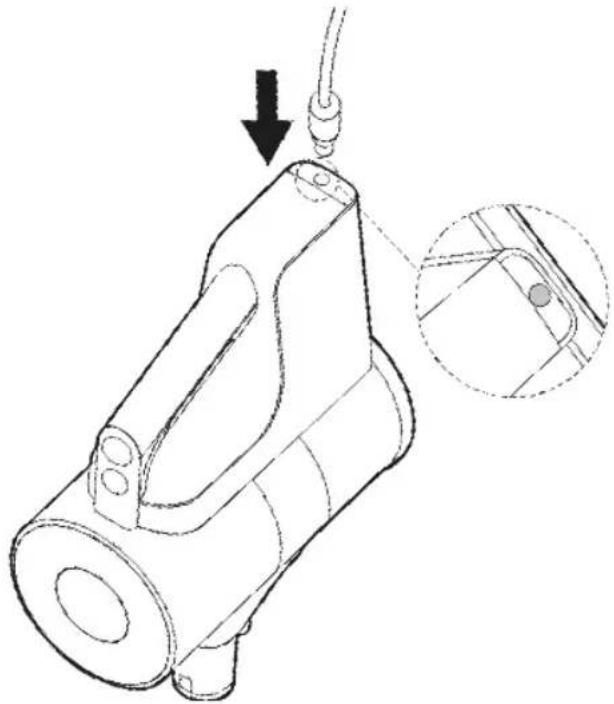
- Connect the power cord to the charging port
natural_image
Technical line drawing of a mechanical device with an arrow indicating assembly or adjustment, showing internal components and a magnified inset (no text or symbols)- Charge for 4–6 hours.
CLEANING AND MAINTENANCE
DUST CUP
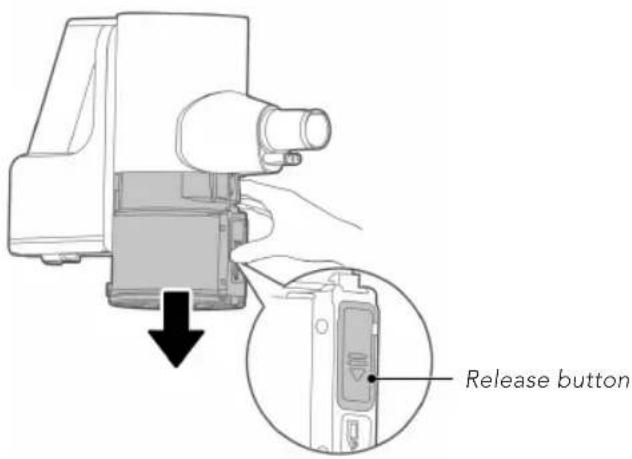
Disassembly
Hold the bottom of the dust cup. Press the release button and carefully pull the dust cup out downward.
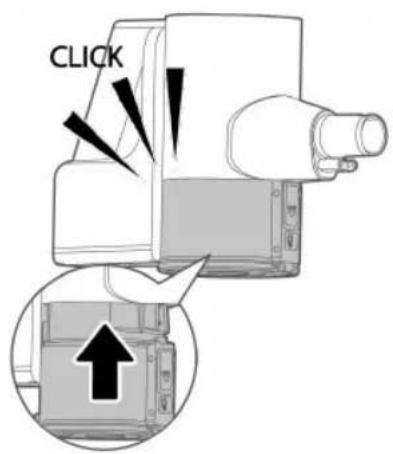
Installation
Push the dust cup up with the suction inlet facing outward.
EN
CLEANING
Press the Dust cup release button, and the bottom cover opens. Clean the dust bin with water. Make sure it is completely dry before re-assembling.
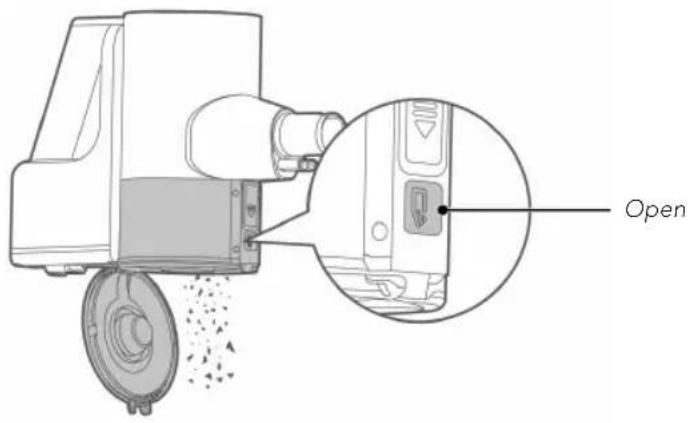
FILTER COMPONENTS
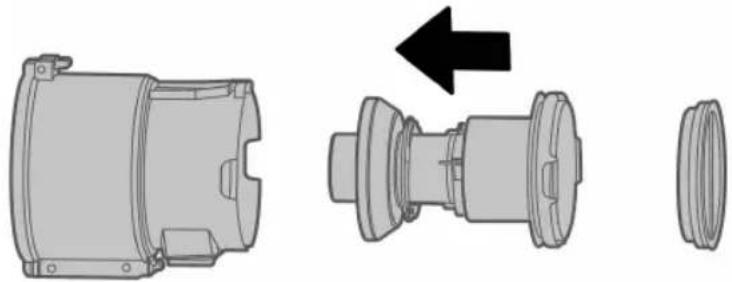
- Hold the ribs on both sides and pull upwards to remove the filter components.
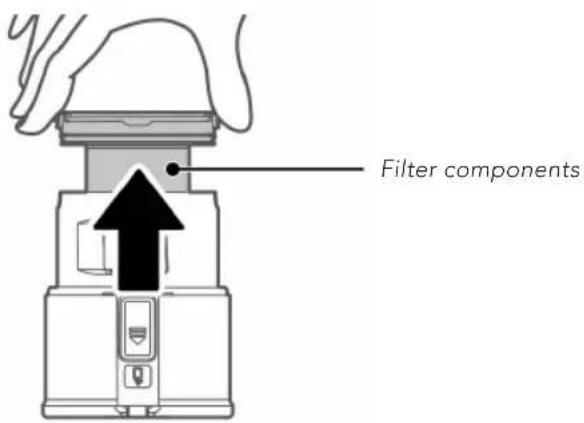
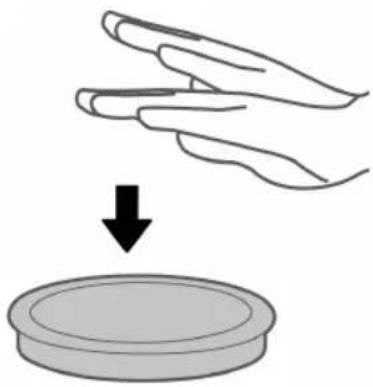
- Remove the filter sponge, lay it with the white side down and tap it to remove dust.
natural_image
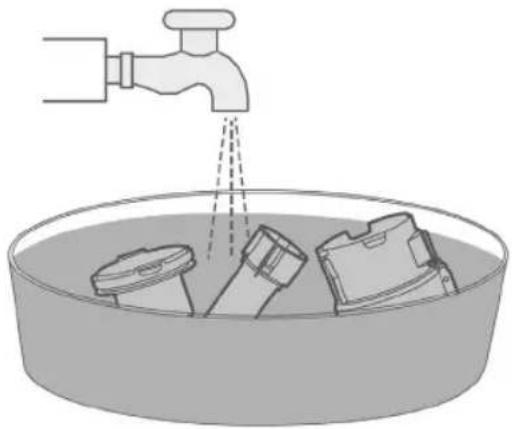
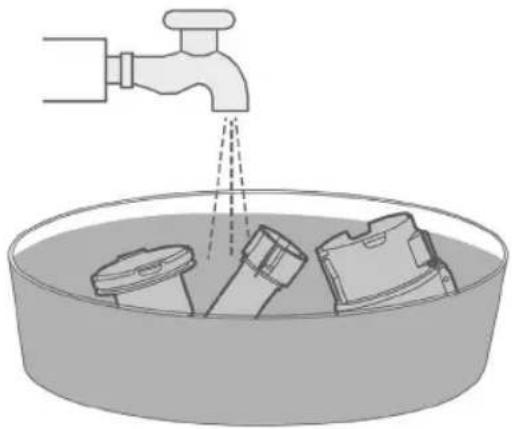
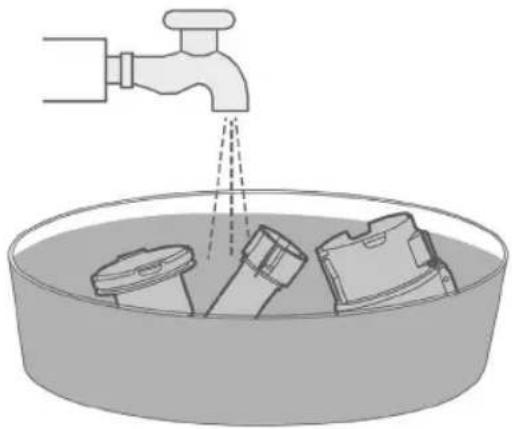
Illustration of a hand pressing down on a circular object with a downward arrow (no text or symbols)- Rinse the parts under water.
natural_image
Illustration of a faucet releasing water into a basin with plastic bottles (no text or symbols)- The parts needs to be completely dry before installing the filter components into the dust bin.
natural_image
Technical illustration of a mechanical component with exploded view and side view (no text or symbols)DUST SENSOR
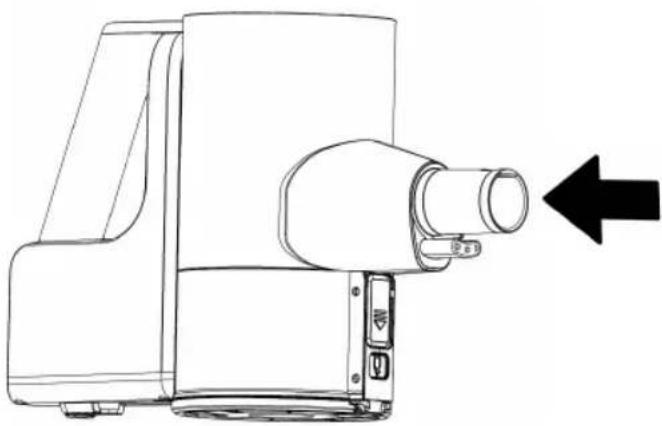
For the dust sensor to function optimally it needs to be cleaned regularly. To clean the dust sensor just use your finger and remove the dust collected on the sensor. The sensor is located inside the tube on two sides. Use your finger or a dry towel to wipe over the sensors.
natural_image
Line drawing of a portable projector with a black arrow pointing to the right side (no text or symbols present)EN
FLOOR BRUSH
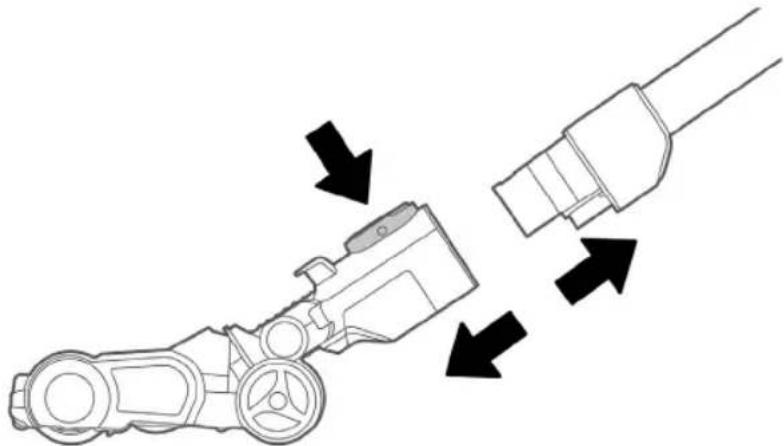
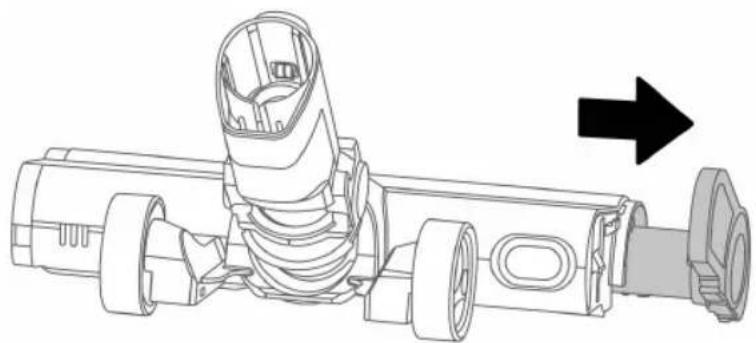
- Press the button and remove the electric floor brush from the extension tube.
natural_image
Diagram of a mechanical device with arrows indicating flow or movement, no text or symbols present- Press and hold the button and turn the end cover upwards.
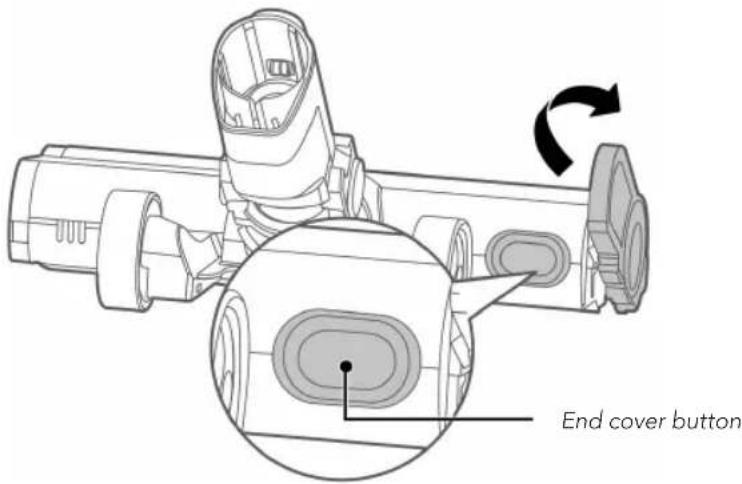
- Pull out the brush and clean it. Do not use water!
natural_image
Technical line drawing of a mechanical assembly with no visible text or symbolsTROUBLESHOOTING
| Problem Possible reason Solution | ||
| Three indicators flash | Rolling brush is tangled by hair. | Remove hair or any foreign object stuck in the rolling brush. |
| The ambient temperature for operation is too high or too low. | Use the vacuum cleaner in the proper environment. | |
| Electric floor brush is not working | Large pieces of waste have been engaged. | Disassemble the electric floor brush and remove the waste. |
| The rolling brush has been tangled with hair. | Remove the rolling brush from the electric floor brush and remove the hair from the brush. | |
| Operation duration becomes shorter | Battery aging | Contact customer service |
| The ambient temperature for operation is too high or too low | Make sure the vacuum cleaner is not placed in the sunlight if it is too warm, and make sure doors and windows are closed if it is too cold. | |
| The battery is not fully charged | Charge the battery | |
| Suction force is weakened | The filter sponge of the dust cup is blocked | Clean the filter sponge |
| The suction inlet of the floor brush or accessories is blocked | Remove the objects blocking the suction inlet | |
| The filter components are not fully dried after washing with water | Make sure the filter components are fully dried, and assembled in the correct way | |
| Charging failure Ambient temperature during charging is too high or too low | Charge the appliance at the proper temperature. Make sure the vacuum cleaner is not placed in the sunlight if it is too warm, and make sure doors and windows are closed if it is too cold. | |
| Battery liquid leakage | The vacuum cleaner has not been used for a long time. | Change the battery. Contact the store to replace the battery. |
| Error on the display | The vacuum cleaner is lacking suction power. This can be due to something stuck inside the extension tube, filter being clogged with dust, or that the rolling brush is tangled with hair. | Remove any object in the extension tube, clean the filter components, and clear the rolling brush for hair. |


GUARANTEE
Wilfa issues a 5 year guarantee on this product from the day of purchase. The guarantee covers production failure or defects that arise during the guarantee period. Your purchase receipt works as proof towards retailer if claiming your guarantee.
The guarantee is valid only for products that are bought and used in private households. The guarantee is not valid if the product is used commercially. The guarantee is not valid if the product is misused, used by negligence, if not following instructions given by Wilfa, if modified or if unauthorized reparation is done. Wilfa is not responsible for damage to third party parts and other collateral damage.
The guarantee is also not valid for normal wear of the product, misuse, lack of maintenance, use of wrong electrical voltage or:
• Overloading of product
- Parts which are normally worn down
- Parts you can expect being replaced regularly (e.g. filter, battery etc.)
- Wear parts like motor heads, nozzles, battery, brushes, filters, wheels, light.
Wilfa is also not responsible for damages occurred because of excessive use, incorrect assembly, incorrect storage, incorrect charging, lack of cleaning etc.
The battery comes with a 1 year warranty. The warranty will not be valid if the appliance has not been charged according to the manual.
PRODUCT SPECIFICATIONS
BATTERY
- Charging time: 4-6 hours.
- Battery time: up to 60 minutes on low, 17 minutes medium, 7 minutes max, 15-30 minutes auto. The battery time on auto depends on the amount of dust detected.
- Defected batteries can be replaced at our service partners.
- Battery efficiency will degrade with time and use. With normal household usage, and by following the usage, charging and maintenance guidelines you can expect around 80% of efficiency after 5 years or 390 hours of use.
SUPPORT AND SPARE PARTS
For support please visit us at wilfa.com, and see our customer service/support page. Here you will find frequently asked questions, spare parts, tips and tricks and all our contact information.
RECYCLABILITY
This marking indicates that this product should not be disposed with other household wastes throughout the EU. To prevent possible harm to the environment or human health from uncontrolled waste disposal, recycle it responsibly to promote the sustainable reuse of material resources. To return your used device, please use the return and collection systems or contact the retailer where the product was purchased. They can take this product for environmentally safe recycling free of charge.
NO
NO
INNHOLD
22 VIKTIGE SIKKERHETSANVISNINGER
23 OBS! - BATTERI
24 OBS! – RENGJ∅RING OG VEDLIKEHOLD
25 PRODUKTOVERSIKT
26 BRUK
27 DISPLAY
28 LADING
29 RENGJ∅RING OG VEDLIKEHOLD
33 FEILS∅KING
36 GARANTI
37 PRODUKTSPESIFIKASJONER
37 SUPPORT OG RESERVEDELER
37 GJENVINNING
VIKTIGE SIKKERHETSANVISNINGER
OBS! – RENGJ∅RING OG VEDLIKEHOLD
natural_image
Technical line drawing of a mechanical device with an arrow indicating assembly or adjustment, showing internal components and a magnified inset (no text or symbols)- Ladetid 4–6 timer.
RENGJ∅RING OG VEDLIKEHOLD
ST∅VBEHOLDER
Demontering
natural_image
Illustration of a hand pressing down on a circular object with a downward arrow (no text or symbols)- Skyll delene under vann.
natural_image
Illustration of a faucet pouring liquid into a basin with plastic bottles (no text or symbols)NO
natural_image
Technical illustration of a mechanical component with exploded view and side view (no text or symbols)ST∅VSENSOR
natural_image
Line drawing of a portable projector with a black arrow pointing to the right side (no text or symbols present)GULVB∅RSTE
natural_image
Diagram of a robotic device emitting black arrows from a cable, showing mechanical components and fluid flow (no text or symbols)natural_image
Technical line drawing of a mechanical assembly with no visible text or symbolsFEILS∅KING
natural_image
Technical line drawing of a mechanical device with an arrow indicating assembly or adjustment, showing internal components and a magnified inset (no text or symbols)- Ladda i 4–6 timmar.
RENGÖRING OCH UNDERHÅLL
DAMMBEHÅLLARE
Demontering
natural_image
Illustration of a hand pressing down on a circular object with a downward arrow (no text or symbols)natural_image
Illustration of a faucet pouring liquid into a basin with plastic waste (no text or symbols)SE
natural_image
Technical illustration of a mechanical component with exploded view and side view (no text or symbols)DAMMSENSOR
natural_image
Line drawing of a portable projector with a black arrow pointing to the right side (no text or symbols present)GOLVMUNSTYCKE
natural_image
Diagram of a mechanical device with arrows indicating flow or movement, no text or symbols presentnatural_image
Technical line drawing of a mechanical assembly with no visible text or symbolsSE
FELSÖKNING
natural_image
Warning symbol with exclamation mark inside a circular frame (no text or numbers)
natural_image
Abstract circular diagram with intersecting lines and shapes, no text or symbols present
natural_image
Abstract circular diagram with three curved arrows forming a spiral pattern (no text or symbols)
natural_image
Abstract circular diagram with three curved arrows forming a ring (no text or symbols)natural_image
Abstract circular diagram with concentric arcs and directional arrows, no text or symbols present

pie
| Category | Value (%) | |---|---| | Charging | 70 |natural_image
Technical line drawing of a mechanical device with an arrow indicating downward motion and an inset showing a close-up detail (no text or symbols)- Oplad i 4-6 timer.
RENG∅RING OG VEDLIGEHOLDELSE
ST∅VBEHOLDER
Demontering
natural_image
Illustration of a hand pressing down on a circular object with a downward arrow (no text or symbols)- Skyl delene under vand.
natural_image
Illustration of a faucet pouring liquid into a basin with plastic bottles (no text or symbols)natural_image
Technical illustration of a mechanical component with exploded view and side view (no text or symbols)ST∅VSENSOR
natural_image
Line drawing of a portable projector with a black arrow pointing to the right side (no text or symbols present)GULVB∅RSTE
natural_image
Diagram of a robotic device with arrows indicating flow or movement, no text or symbols presentnatural_image
Technical line drawing of a mechanical assembly with no visible text or symbolsDK
FEJLFINDING
natural_image
Simple line drawing of a mechanical device with curved arrows indicating motion (no text or symbols)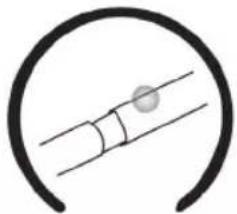
natural_image
Simple line drawing of a curved pipe with a circular end cap, no text or symbols presentnatural_image
Warning symbol with exclamation mark inside a circular frame (no text or numbers)
natural_image
Pure electrical circuit lines without any symbols
natural_image
Abstract circular diagram with three curved arrows forming a spiral pattern (no text or symbols)
natural_image
Abstract circular diagram with concentric arcs and radial arrows, no text or symbols presentnatural_image
Abstract spiral diagram with concentric curved arrows, no text or symbols presentvaraus

natural_image
Technical line drawing of a mechanical device with an arrow indicating downward motion and an inset showing a close-up detail (no text or symbols)- Lataa 4–6 tuntia.
FI
PUHDISTUS JA KUNNOSSAPITO
PÖLYSÄILIÖ
Irrottaminen
natural_image
Illustration of a hand pressing down on a circular object with a downward arrow (no text or symbols)natural_image
Illustration of a faucet pouring liquid into a basin with plastic bottles (no text or symbols)natural_image
Technical illustration of a mechanical component with exploded view and side view (no text or symbols)Fl
PÖLYTUNNISTIN
natural_image
Line drawing of a portable projector with a black arrow pointing to the right side (no text or symbols)LATTIAHARJA
natural_image
Diagram of a robotic arm with directional arrows indicating movement or force (no text or symbols present)natural_image
Technical line drawing of a mechanical assembly with no visible text or symbolsVIANMÄÄRITYS
natural_image
Simple line drawing of a mechanical lever with directional arrows indicating motion (no text or symbols)natural_image
Simple line drawing of a curved pipe or tube with a circular outline (no text or symbols)natural_image
Warning symbol with exclamation mark inside a circular outline (no text or numbers)
natural_image
Pure electrical circuit lines without any symbols
natural_image
Abstract circular diagram with three curved arrows forming a spiral pattern (no text or symbols)
natural_image
Abstract circular diagram with concentric arcs and radial arrows, no text or symbols presentnatural_image
Abstract spiral diagram with concentric curved arrows, no text or symbols present
abgeschlossen
pie
| Category | Value (%) | |---|---| | Charging | 70 |Aufladen
DE
LÄDT AUF
natural_image
Technical line drawing of a mechanical device with an arrow indicating assembly or adjustment, showing internal components and a magnified inset (no text or symbols)natural_image
Illustration of a hand pressing down on a circular object with a downward arrow (no text or symbols)natural_image
Illustration of a faucet pouring liquid into a basin with plastic bottles (no text or symbols)natural_image
Technical illustration of a mechanical component with exploded view and side view (no text or symbols)DE
STAUBSENSOR
natural_image
Line drawing of a portable projector with a black arrow pointing to the right side (no text or symbols present)BODENBÜRSTEN
natural_image
Diagram of a mechanical device with arrows indicating flow or movement, no text or symbols presentnatural_image
Technical line drawing of a mechanical assembly with no visible text or symbolsFEHLERBEHEBUNG
HS1-SG_20_01



- INNOVAC ESSENTIAL
- IMPORTANT SAFETY INSTRUCTIONS
- ATTENTION - BATTERY
- EN
- ATTENTION – CLEANING AND MAINTENANCE
- PRODUCT OVERVIEW
- OPERATION
- DISPLAY
- CHARGING
- CLEANING AND MAINTENANCE
- Disassembly
- Installation
- CLEANING
- FILTER COMPONENTS
- DUST SENSOR
- FLOOR BRUSH
- TROUBLESHOOTING
- GUARANTEE
- PRODUCT SPECIFICATIONS
- BATTERY
- SUPPORT AND SPARE PARTS
- RECYCLABILITY
- INNHOLD
- VIKTIGE SIKKERHETSANVISNINGER
- OBS! – RENGJ∅RING OG VEDLIKEHOLD
- RENGJ∅RING OG VEDLIKEHOLD
- ST∅VBEHOLDER
- Demontering
- ST∅VSENSOR
- GULVB∅RSTE
- RENGÖRING OCH UNDERHÅLL
- DAMMBEHÅLLARE
- DAMMSENSOR
- GOLVMUNSTYCKE
- RENG∅RING OG VEDLIGEHOLDELSE
- PUHDISTUS JA KUNNOSSAPITO
- PÖLYSÄILIÖ
- PÖLYTUNNISTIN
- LATTIAHARJA
- LÄDT AUF
- STAUBSENSOR
- BODENBÜRSTEN
Brand : WILFA
Model : Innovac Essential HS1-SG
Category : Vacuum Cleaner