
XO 6800 - Oven Scandomestic - Free user manual and instructions
Find the device manual for free XO 6800 Scandomestic in PDF.


| Product Type | Electric Built-in Oven |
| Brand | Scandomestic |
| Model | XO 6800 |
| Dimensions (H x W x D) | 595 x 595 x 550 mm |
| Weight | Approx. 35 kg |
| Power Supply | 230 V, 50 Hz |
| Energy Class | A+ |
| Oven Capacity | 70 L |
| Cooking Functions | Convection, Grill, Defrost, Bottom Heat, Top Heat, Light |
| Temperature Range | 50°C - 250°C |
| Control Type | Rotary knobs and digital display |
| Cleaning Method | Catalytic self-cleaning (back wall) |
| Door Type | Cool-touch, triple glazed |
| Child Safety Lock | Yes |
| Timer | Yes, with automatic shut-off |
| Interior Light | Yes, halogen |
| Accessories Included | Grill rack, baking tray, rotary spit |
| Spare Parts Availability | Through authorized service centers |
| Repairability Index | 8.5 out of 10 |
| Noise Level | < 50 dB |
Frequently Asked Questions - XO 6800 Scandomestic
User questions about XO 6800 Scandomestic
0 question about this device. Answer the ones you know or ask your own.
Ask a new question about this device
Download the instructions for your Oven in PDF format for free! Find your manual XO 6800 - Scandomestic and take your electronic device back in hand. On this page are published all the documents necessary for the use of your device. XO 6800 by Scandomestic.
USER MANUAL XO 6800 Scandomestic
PRODUKT INTRODUKTION
Ovn
natural_image
Line drawing of a hand holding a tray with a handle, no text or symbols present
natural_image
Line drawing of a hand holding a tray with a handle, no text or symbols present
natural_image
Line drawing of a rectangular tray with a grating or grating structure (no text or symbols)natural_image
Simple line drawing of a kitchen appliance with a blue circular arrow indicating rotation (no text or symbols)FEJLFINDING
natural_image
Symbol of a trash bin crossed with a diagonal line and a horizontal bar below (no text or numbers present)
Warning notices: Before using this product, please read this manual carefully and keep it for future reference. The design and specifications are subject to change without prior notice for product improvement.
Consult with your dealer or manufacturer for details.
The illustration is for reference only, please refer to the actual product appearance.
IMPORTANT SAFETY INSTRUCTIONS
THESE WARNINGS ARE PROVIDED IN THE INTEREST OF SAFETY. PLEASE READ THEM CAREFULLY BEFORE INSTALLING OR USING THE APPLIANCE.
To maintain the EFFICIENCY and SAFETY of this appliance, we recommend:
Call only the Service Centers authorized by store where you buy the cooker
Always use original Spare Parts
- When the oven is first switched on, it may give of an unpleasant smell. This is due to the bonding agent used for the insulating panels within the oven. Please run the new empty product with the conventional cooking function, 250°C, 90 minutes to clean oil impurities inside the cavity.
- During the first use, it is completely normal that there will be slight smoke and door. If it does occur, you should wait for the smell to be cleared before putting food into the oven.
- Please use the product under an open environment.
- The appliance and its accessible parts become hot during use. Care should be taken to avoid touching heating elements. Children less than 8 years of age shall be kept away unless continuously supervised.
- If the surface is cracked, switch of the appliance to avoid the possibility of electric shock.
- This appliance can be used by children aged from 8 years and above and persons with reduced physical, sensory or mental capabilities or lack of experience and knowledge if they have been given supervision or instruction concerning use of the appliance in a safe way and understand the hazards involved. Children shall not play with the appliance. Cleaning and user maintenance shall not be made by
children without supervision.
- During use, the appliance becomes very hot. Care should be taken to avoid touching heating elements inside the oven.
- Do not allow children to go near the oven when it is operating, especially when the grill is on.
- Ensure that the appliance is switched of before replacing the oven lamp to avoid the possibility of electric shock.
- The means for disconnection must be incorporated in the fixed wiring in accordance with the wiring specifications.
- Children should be supervised to ensure that they do not play with the appliance.
- This appliance is not intended for use by persons (including children) with reduced physical, sensory or mental capabilities, or lack of experience and knowledge, unless they have been given supervision or instruction concerning use of the appliance by person responsible for their safety.
- Accessible parts may become hot during use. Young children should be kept away.
- An all-pole disconnection means must be incorporated in the fixed wiring in accordance with the wiring rules.
- If the supply cord is damaged, it must be replaced by the manu-factor, its service agent or similarly qualified persons in order to avoid a hazard.
- Do not use harsh abrasive cleaners or sharp metal scrapers to clean the oven door glass since they can scratch the surface, which may result in shattering of the glass.
- Only use the temperature probe recommended for this oven.
- A steam cleaner is not to be used.
- The appliance is not intended to be operated by means of an external timer or a separate remotecontrol system.
- Do not use the oven unless you are wearing something on your feet. Do not touch the oven with wet or damp hands or feet.
- For oven: Oven door should not be opened often during the cooking period.
- The appliance must be installed by an authorized technician
and put into use. The producer is not responsible for any damage that might be caused by defective placement, and installation by unauthorized personnel.
- When the door or drawer of oven is open do not leave anything on it, or you may unbalance your appliance or break the door.
- Some parts of appliance may keep its heat for a long time; it is required to wait for it to cool down before touching onto the points that are exposed to the heat directly.
- If you will not use the appliance for a long time, it is advised to plug it of.
- Before activating the pyrolytic cleaning function, remove any excessive spillage and make sure that oven is empty. Do not leave anything inside it (e.g. pans, baking tray, dripping pan, slider bracket etc.) as this could heavily damage them.
DECLARATION OF COMPLIANCE
- When you have unpacked the oven, make sure that it has not been damaged in any way. If you have any doubts at all, do not use it: contact a professionally qualified person. Keep packing materials such as plastic bags, polystyrene, or nails out of the reach of children because these are dangerous to children.
PRODUCT INSTALLATION
If there is any discrepancy between the illustration and the actual product, please refer to the actual product.
Cupboard Diagram (Standing Cupboard)

A Air vents
B Minimum bottom ventilation area: 250 mm ^2
1 Reserve 5 mm for the door panel at the top and bottom respectively.
2 Reserve 20 mm for the door panel on the left and right respectively.
Reserve 20 mm for the door panel in thickness.
- The thickness of the cupboard board is 20 mm.
- If the power socket is installed on the back of the appliance, the depth of the cupboard opening shall be increased from a minimum of 590 mm to 620 mm.
- The dimensions in the figures are in mm.
Cupboard Diagram (Ground Cupboard)


A Minimum bottom ventilation area: 250 ~mm^2
1 Reserve 5 mm for the door panel at the top and bottom respectively.
2 Reserve 20 mm for the door panel on the left and right respectively.
3 Reserve 20 mm for the door panel in thickness.
If the appliance is installed under the hob, the minimum thickness of worktop A is shown below:
| Hob type | Worktop A |
| Induction hob | 37 mm |
| Full-surface induction hob | 47 mm |
| Gas hob | 30 mm |
| Electric hob | 27 mm |
- The thickness of the cupboard board is 20 mm.
- If the power socket is installed on the back of the appliance, the depth of the cupboard opening shall be increased from a minimum of 590 mm to 620 mm.
- The dimensions in the figures are in mm.
Installation Important Instructions
Content that means [mandatory]
- The safe operation of this appliance can only be guaranteed if it has been installed to a professional standard in accordance with these installation instructions. The installer shall be liable for any damage resulting from incorrect installation.
- The entire installation process requires two professional installers. Wear dry protective gloves during installation to avoid scratch or electric shock.
- Fitted units must be heat-resistant up to 90°C, and adjacent unit fronts up to 70°C.
- Please use a 16A socket.
![Scandomestic XO 6800 - Content that means [mandatory] - 1](/content/2026/05/1011215/images/a6b594255e5bbb8e66e9837afc20a884f774c38f185ee02335d3c9e4fc42d686.jpg)
Content that means [prohibit]
- Do not install the appliance behind a decorative door or the door of a kitchen unit, as this may cause the appliance to overheat.
- Check the appliance for damage after unpacking it. Do not connect the appliance if it has been damaged in transit.
- Do not block the vent of the appliance and the gap between the cupboard and the appliance.
- Use extreme caution when moving or installing the appliance. It is very heavy, do not lift the appliance by the door handle.
- If the power cord or power plug is damaged, stop using the appliance immediately, to avoid fire, electric shock or other injuries.
![Scandomestic XO 6800 - Content that means [prohibit] - 1](/content/2026/05/1011215/images/471b52a7e169d843d03bec0b09398e018a9f68c1c2160a462214230462cd37dd.jpg)
Content that means [note]
- Be very careful when moving or installing the appliance to avoid damage to the appliance or damage to the cupboards.
- Before starting up the appliance, remove all packaging materials and
accessories from the cavity.
- The power socket shall be accessible to users (such as next to the cupboard) for easy power-of.
- After installation is complete, make sure that the power plug is firmly inserted into the socket.
- Please refer to the "Cupboard Diagram" for the requirements of net depth of the cupboard. The clearance between the cupboard bottom board and the rear board (or wall) shall not be less than 50 mm.
Installation steps
- Please customize the cupboard according to the "Cupboard Diagram".
- Before installation, please check for normal power socket and appropriate grounding, and check whether the cupboard dimension meets the installation requirements.
- Place the appliance in designated locations in the kitchen, install it in a vertical cupboard, and connect the power supply.
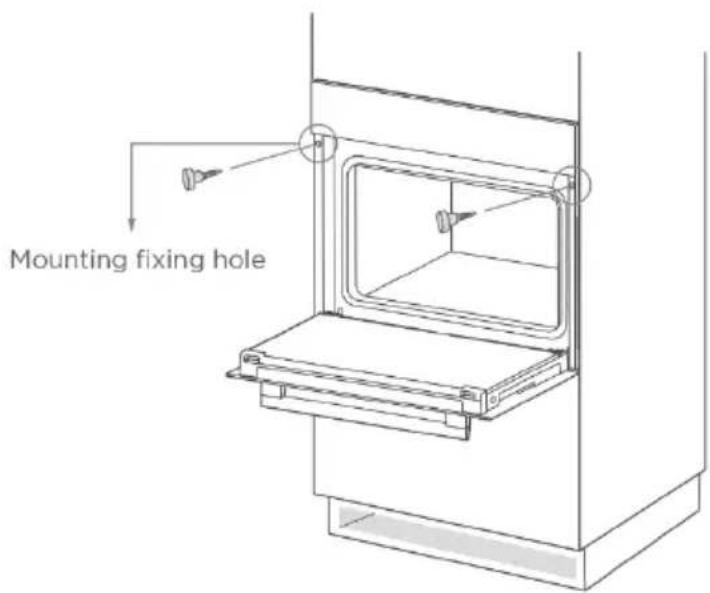
- To locate the mounting fixing holes, open the appliance door and look at the side frame of the appliance (position shown above).
- Fix the appliance to the cupboard with two rubber plugs A and screws B provided with the appliance.
PRODUCT INTRODUCTION
Oven
When removing food, please wear heat insulating gloves to prevent burns!
At the moment of opening the door of the furnace, pay attention to the steam. Please open the door at a small Angle to avoid the steam on your face.
A Controlapenel
B Mounting fixing hole
C Handle
D Ventilating openings
E Mounting fixing hole
F Glass door

Accessories

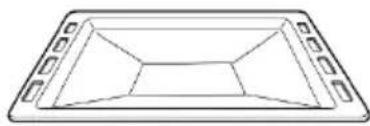
Grill rack
Grill food or place heat-resistant cooking containers
natural_image
Simple line drawing of a rectangular tray with cutouts and a central slot (no text or symbols)Cook large portions of food or catch food scraps
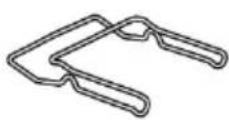
Clips
Remove the grill tray and grill rack Only for some models

Small grill rack
Cook smaller portions of food Only for some models
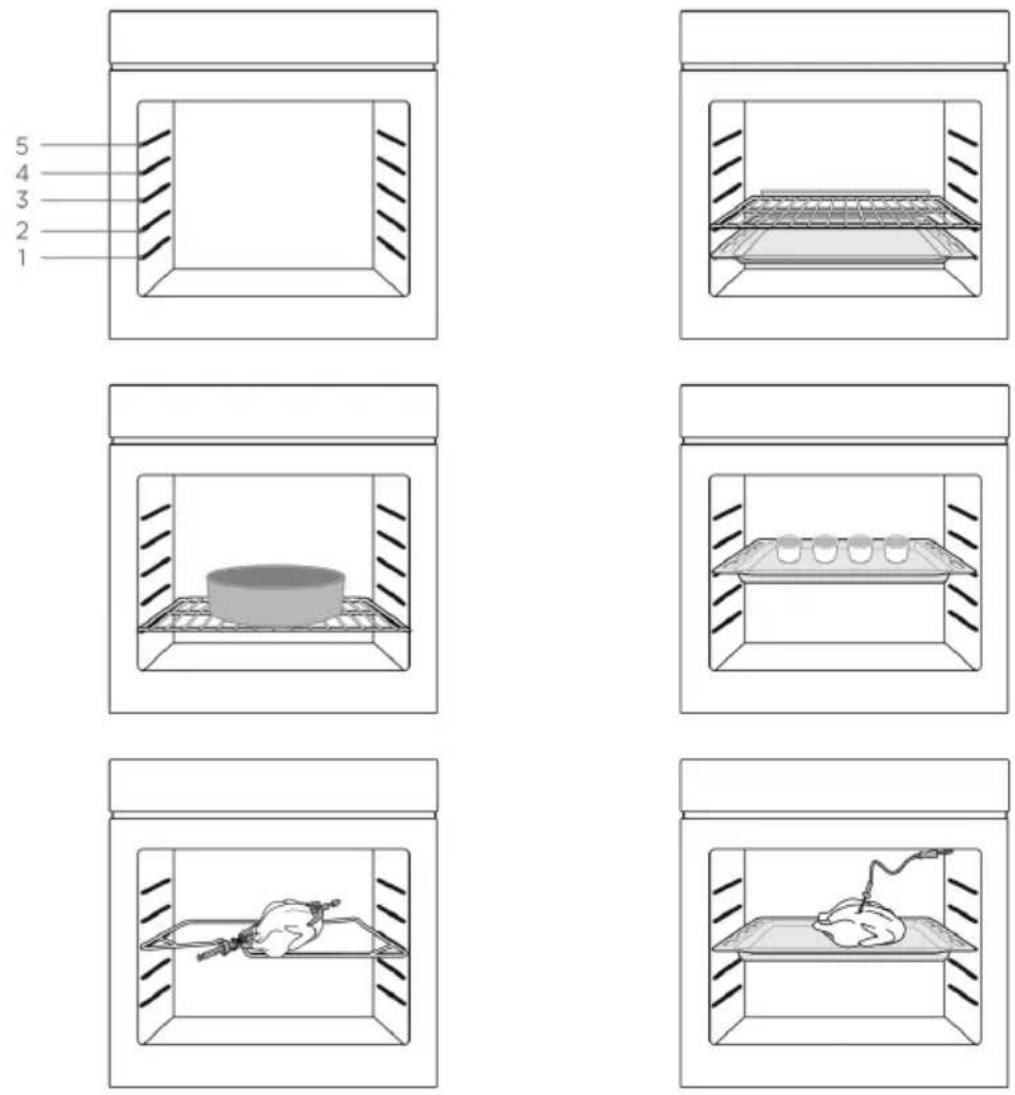
Accessories use(Only for some models)

natural_image
Line drawing of a hand holding a tray with a handle, no text or symbols present
natural_image
Line drawing of a hand holding a tray with a handle, no text or symbols present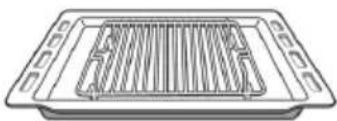
natural_image
Line drawing of a rectangular tray with a grating or grating structure (no text or symbols)For the oven to work properly, the grill rack and Grill tray should only be placed between the first and fifth levels. When used together, place the Grill tray under the grill rack.
Control Panel
A Start
B Remind
C Time setting
D Display
E Stop

| Function | Function description | |
 Lamp Lamp | The cooking process can be observed under illuminated conditions. Except Pyrolytic function and ECO function. | |
 Defrost Defrost | The circulation of air at room temperature enables quicker thawing of frozen food (without the use of any heat). | |
 Double grill with fan Double grill with fan | The radiant heating element and top heating element are working with fan. | |
 Double grill Double grill | The radiant heating element and top heating element are working. You can choose to use a rotating grill rack. | |
 Single grill Single grill | The inner grill element switches on and of to maintain temperature. Can be used to grill a small number of food.You can choose to use a rotating grill rack. | |
 Conventional + fan Conventional + fan | The combination of fan and the top and bottom heating elements provides more even heat penetration and coloration, primarily for cooking meat. | |
 Conventional Conventional | The top and bottom heating elements work together to provide convectional cooking.You can choose to use a rotating grill rack. | |
 Bottom heating Bottom heating | Heating is provided by heating pipes at the bottom of the oven. Mainly used for keeping warm and the coloring of the food. | |
| In convection mode, the fan turns on automatically to provide even heat for single or multi-layer baking. This | ||
 Convection Convection | is particularly suitable for baking foods that require even coloring. | |
| Pyrolytic | When the function set to pyrolytic mode, LED screen "PyR".The default temperature is 450°C. The timer can be set 1:30 or 2:00 hours. | |
 |  | For energy-saving cooking. Cooking the selected ingredients in a gentle manner, and the heat comes from the top and the bottom. |
Before using for the first time
1 The oven must not be operated until it has been correctly installed.
2 To avoid fire, remove all transport protection materials and ensure that the oven is free of residual packaging items and accessories (e.g. foam, cardboard, grill tray, grill rack, etc.).
3 Clean the oven cavity and accessories with soapy water and a soft cloth.
4 Open kitchen windows and cooker hoods to maintain high ventilation.
5 Do not let children or pets into the kitchen and close the doors of adjacent rooms.
6 After connecting the power, activate the oven mode, time, and temperature in the table below to remove odors in the cavity.
7 After the first use, please open the oven door at a small angle and wait for the cooling to complete.
| Function | Temperature | Time |
| Conventional | 250°C | 0.5-1 Hour |
Setting the clock
When the oven is first connected to the electrical supply and powered on, the clock will need to be set.
1 Press "☐" key, the hour digit flashes.
2 Turn knob "K2" to adjust the hour digit.
3 Press "☐" key, the minute digit flashes.
4 Turn knob "K2" to adjust the minute digit.
5 Press "☐" key to complete the clock setting.
Notes:
The clock is a 24 hour clock.
1 Before using the oven, please complete the clock setting.
2 During the clock setting process, you can press "☐" key to cancel the current clock setting.
3 If you need to reset the clock, please follow the "Setting the clock" steps in standby mode.
Function setting
1 In standby or reminder state, turn knob "K1" to select the function.
2 Turn knob "K2" to adjust the temperature.
3 Press the "start" key to start cooking.
4 If you skip step 2, press the "start" key to start cooking. The default time is 9 hours, and the display screen shows the default temperature.
Notes
1 During cooking, the time can be adjusted by turning the knob "K1". After adjusting the time, please press the "start" key within 3 seconds to confirm.
2 During cooking, the temperature can be adjusted by turning the knob "K2". After adjusting the temperature, please press the "start" key within 3 seconds to confirm.
Lamp function
Turning on the lamp can better observe the cooking situation of food. If you need to turn off or turn on the lamp, you can follow these steps:
1 Turn knob "K1" to select "💡".
2 Press the "start" key to confirm.
Reminder function
This function will help to remind you to start cooking in a certain time. Only when oven in standby mode and clock setting, the reminder can be set.
1 Press the "☐" key, and the hour digit flashes.
2 Turn knob "K2" to adjust the hour digit.
3 Press the "☐" key, and the minute digit flashes.
4 Turn knob "K2" to adjust the minute digit.
5 Press the "start" key to complete the setting, and the icon "☐" is always on, and the countdown starts. After the countdown is completed, the buzzer sounds and the icon "☐" goes out.
Notes
1 You can cancel the reminder by pressing the "☐" key during setup.
2 After setting the reminder, you can press the "☐" key twice to cancel the reminder.
Inquiring function
1 During cooking process, if the clock has been set, press the "☐" key to check the current time; If the reminder function is set, press the "☐" key to check the reminder time.
2 In reminder state, if the clock is set, press the "☐" key to check the current time.
Start/Pause/Cancel function
1 If the cooking time has been set, press the "start" key to start cooking. If the cooking is paused, press the "start" key to continue cooking.
2 During cooking process, press the "☐" key once to pause the cooking. Press the "☐" key twice to cancel the cooking.
Energy-Saving function
1 In standby or reminder state, press the "start" key for 3 seconds to turn of the LED display and enter the energy-saving mode.
2 In standby state, if there is no operation in 10 minutes, the LED display will go off and enters the energy-saving mode.
3 In the energy-saving mode, press any key or turn the knob to exit the energy-saving mode.
Child lock function
1 Enter the child lock: Press the "start" and "☐" keys for 3 seconds at the same time, the buzzer.
2 will beep, and the icon "💡" will light up, indicating that the child lock is entered.
3 Release the child lock: Press the "strat" and "☐" keys for 3 seconds at the same time, and the buzzer will beep, indicating that the child lock is released.
Reservation function
1 To use the reservation function, you must first set the clock. See "Setting the Clock" for the operation method.
2 Press the “ ” key to enter the reservation settings.
3 Turn knob "K2" to set the reserved hour time.
4 Press the “ ” key again.
5 Turn knob "K2" to set the minute time of the reservation.
6 Turn knob "K1" to select the function and press "start" to confirm.
7 Turn knob "K1" to adjust cooking and turn knob "K2" to adjust temperature.
8 Press the "start" key to start cooking, and the LED shows "☒". The appointment time can be checked by pressing the "☐" key and return to the clock display state after 3 seconds.
9 When it's time to make an appointment for cooking, the buzzer will beep and start automatic cooking, and the icon "✗" will disappear.
Notes
1 Reminder function is invalid during reservation status.
2 Lamp, defrost, probe can't be reserved.
3 If you skip step 7, you will cook according to the default temperature and time.
4 During the status of reservation, press "☐" key once, time and temperature of reservation menu will be shown with menu icon lighting constantly. Press the "☐" key again to return to the clock status, or press the "start" key to return to the reservation status.
Pyrolytic function
This function allows you to clean thoroughly the oven cavity.
1 Turn knob "K1" to select the pyrolytic function. LED will display "PyR".
2 Press the "start" key to confirm, and the default working time is 2 hours.
3 Turn knob "K1" to adjust the working time. The time can be set 1:30 or 2:00 hours.
Notes
1 When the oven door is not closed, pressing start button will be invalid, LED display "door", "PYR".
2 When the oven's center temperature is higher than 320°C, pressing start button will be invalid. The LED will display "COOL" and "PYR". When the oven's center temperature is lower than 200°C, press cancel button once, it will pause; press again, it will return to standby state. If higher than 200°C, press cancel button once, it will return to standby state directly.
3 Open the door when the oven is working, the LED will display "door" and the buzzer will sound continuously until the door was closed or press cancel button.
4 Before activating the pyrolytic cleaning function, remove any excessive spillage and make sure that oven is empty. Do not leave anything inside it (e.g. pans, baking tray, dripping pan, slider bracket etc.) as this could heavily damage them.
5 When finished pyrolytic cleaning, don't interrupt the power in an hour.
Open door detection (Only for some models)
1 When the oven door is opened during cooking, the oven will enter a pause state (except the lamp function).
2 When the oven door is opened, press the "start" key, and the screen displays "door". At this time, the oven cannot be started.
3 During the reservation process, open the oven door, When the reservation time is reached, the oven will enter a pause state (except pyrolytic, lamp and defrost functions).
4 After the booking time of pyrolytic function arrives, if the oven door is in the open state, the oven will return to the standby state.
5 Opening the oven door does not affect the operation of the alarm clock function.
Cleaning and maintenance
Cleaning
Disconnect the power supply before cleaning and maintenance.
In order to ensure the life of the oven, it should be thoroughly cleaned frequently.
Cleaning steps are as follows:
1 After cooking, wait for the oven to cool completely.
2 Remove oven accessories, rinse with warm water and dry.
3 Clean up food debris from the oven chamber.
4 Wipe the oven with a soft cloth stained with detergent, then dry with a dry soft cloth.
Notes
1 Do not use sharp cleaning tools, hard brush and corrosive cleaning products, so as not to damage the oven and its accessories.
2 Do not use rough scrubbing agent or sharp metal spatula to clean the door glass.
Lamp Replacement
1 Switch of and disconnect the power from the oven. Ensure that the internal parts are cool before touching internal parts.
2 Remove the lamp cover by turning it counter-clockwise (note, it may be stif), replace the bulb with a new one of the same type.
3 Insert the new bulb, which should be resistant to 300^ C. For replacement bulbs contact your local service center.
4 If in any doubt, consult a qualified electrician for help.
Warning
To avoid electric shocks-please ensure that the electricity supply to the appliance is switched of and the appliance is fully cold. before removing the lamp lens.

natural_image
Simple line drawing of a mechanical component with a blue circular arrow indicating rotation (no text or symbols)TROUBLESHOOTING
If the problem cannot be solved or other problems occur, please contact the after-sales service.
| Problem | Possible reason | Solution |
| Unable to start | Power is not connected | connect power supply |
| The main power switch is not turned on | Turn on the power switch | |
| Oven door not closed | Close the oven door | |
| lamp does not come on | It's broken | Contact after-sales service |
| Has a pungent odor or smoke | first use | No processing required |
| Food is not cooked | Temperature is too low | Use a higher temperature |
| Food portion is too large | Cook food in smaller pieces or extend the cooking time. | |
| Burnt or uneven food | The temperature is set too high or the heating time is too long | Adjust the cooking temperature or time |
| The food is too close to the heating tube | Adjust the placement layers of accessories | |
| The fan did not stop working after stopping the heating | Fan delays blowing for heat dissipation | No processing required |
SPECIFICATIONS
Usable Volume: 70L
Rated voltage: 220-240V\~
Rated frequency: 50Hz-60Hz
Electric power: 3.2 kW
PRODUCT RECYCLING
This appliance is marked according to the European directive 2012/19/EU on Waste Electrical and Electronic Equipment (WEEE).
By ensuring this product is disposed correctly, you will help prevent potential negative consequences for the environment and human health, which could otherwise be caused by inappropriate waste handling of this product. The symbol on the product indicates that this product may not be treated as household waste. Instead it shall be handed over to the applicable collection point for the recycling of electrical and electronic equipment. Disposal must be carried out in accordance with local environmental regulations for waste disposal. For more detailed information about treatment, recovery and recycling of this product, please contact your local city office, your household waste disposal service or the shop where you purchased the product.
This symbol on the product or instruction manual indicates that your device should be disposed of separately from your household waste at the end of its useful life.
There is a separate recycling system locally for recycling. For more information, please contact the local authority or retailer where you purchased the product.

natural_image
Symbol of a trash bin crossed with no text or numbers, representing waste sorting or disposal (no text present)
When you have unpacked the oven, make sure that it has not been damaged in any way. If you have any doubts at all, do not use it: contact a professionally qualified person. Keep packing materials such as plastic bags, polys tyren, or nails out of the reach of children because these are dangerous to children.
A Minimum bottom ventilation area: 250 ~mm^2
1 Reserve 5 mm for the door panel at the top and bottom respectively.
2 Reserve 20 mm for the door panel on the left and right respectively.
3 Reserve 20 mm for the door panel in thickness.
PRODUKT INTRODUKTION
Ugn
natural_image
Simple line drawing of a rectangular tray with cutouts and a central slot (no text or symbols)natural_image
Line drawing of a hand holding a tray with a handle, no text or symbols present
natural_image
Line drawing of a hand holding a tray with a handle, no text or symbols present
natural_image
Line drawing of a rectangular tray with a grating or grating structure (no text or symbols)natural_image
Simple line drawing of a mechanical component with a blue circular arrow indicating rotation (no text or symbols)Varning
natural_image
Symbol of a trash bin crossed with a diagonal line, no text or numbers present


- PRODUKT INTRODUKTION
- Ovn
- FEJLFINDING
- IMPORTANT SAFETY INSTRUCTIONS
- DECLARATION OF COMPLIANCE
- PRODUCT INSTALLATION
- Cupboard Diagram (Standing Cupboard)
- A Air vents
- Cupboard Diagram (Ground Cupboard)
- Installation Important Instructions
- Content that means [mandatory]
- Content that means [prohibit]
- Content that means [note]
- Installation steps
- PRODUCT INTRODUCTION
- Oven
- Accessories
- Accessories use(Only for some models)
- Control Panel
- Before using for the first time
- Setting the clock
- Notes:
- Function setting
- Notes
- Lamp function
- Reminder function
- Inquiring function
- Start/Pause/Cancel function
- Energy-Saving function
- Child lock function
- Reservation function
- Pyrolytic function
- Open door detection (Only for some models)
- Cleaning and maintenance
- Cleaning
- Lamp Replacement
- Warning
- TROUBLESHOOTING
- SPECIFICATIONS
- PRODUCT RECYCLING
- Ugn
- Varning
Brand : Scandomestic
Model : XO 6800
Category : Oven