
RRE24 - Griddle Vulcan - Free user manual and instructions
Find the device manual for free RRE24 Vulcan in PDF.


| Product Type | Gas Plancha |
| Brand | Vulcan |
| Model | RRE24 |
| Dimensions (L x D x H) | 60 x 50 x 30 cm |
| Weight | 12 kg |
| Fuel | Butane or propane gas (cylinder not included) |
| Power | 7 kW (2 burners of 3.5 kW each) |
| Cooking Surface | 50 x 35 cm |
| Plate Material | Stainless chromed steel |
| Ignition | Piezo electric |
| Main Functions | Uniform cooking, searing, grilling, keeping warm |
| Maintenance and Cleaning | Clean the plate with a scraper after use, wash with soapy water |
| Safety | Safety shutdown in case of overheating, protective cover |
| Spare Parts and Repairability | Cooking plate, burners, knobs, gas kit available |
| General Information | 2-year warranty, manufactured by Vulcan |
Frequently Asked Questions - RRE24 Vulcan
User questions about RRE24 Vulcan
0 question about this device. Answer the ones you know or ask your own.
Ask a new question about this device
Download the instructions for your Griddle in PDF format for free! Find your manual RRE24 - Vulcan and take your electronic device back in hand. On this page are published all the documents necessary for the use of your device. RRE24 by Vulcan.
USER MANUAL RRE24 Vulcan
natural_image
Exterior view of a stainless steel portable kitchen appliance with three control knobs (no text or symbols visible)RRE36E
RRE24E
RRE36E
RRE48E
For additional information on Vulcan or to locate an authorized parts and service provider in your area, visit our website at www.vulcanequipment.com
TABLE OF CONTENTS
INSTALLATION.... 3
Installation Codes And Standards.... 3
Unpacking.... 3
Leg Assembly 3
Leveling.... 4
Location 4
Electrical Connections.... 4
Phase Wiring Connections.... 5
Electrical Data.... 6
OPERATION.... 6
Before First Use.... 6
Seasoning The Griddle.... 7
Controls.... 7
Using The Griddle.... 7
Zone Cooking.... 8
Cleaning The Griddle 8
Rapid Recovery™ Griddle Plate 9
SHUTDOWN 10
EXTENDED SHUTDOWN 10
MAINTENANCE.... 10
Service And Parts Information.... 10
TROUBLESHOOTING.... 11
ACCESSORY INSTALLATION.... 12
INSTALLATION, OPERATION AND CARE OF HEAVY DUTY ELECTRIC GRIDDLES
GENERAL
Heavy Duty Electric Griddles are produced with quality workmanship and materials. Proper installation, usage and maintenance of your griddle will result in many years of satisfactory performance. Thoroughly read this entire manual and carefully follow all of the instructions provided.
INSTALLATION
Before installing, check the electrical service to make sure it agrees with the specifications on the rating plate. If the supply and equipment voltages do not agree, do not proceed with the installation. Contact your dealer or Vulcan immediately.
INSTALLATION CODES AND STANDARDS
Your Vulcan griddle must be installed in accordance with:
In the United States of America:
- State and local codes
- National Electrical Code ANSI/NFPA – 70 (latest edition) available from The National Fire Protection Association,1 Batterymarch Park,Quincy, MA 02269.
- NFPA Standard #96 Vapor Removal from Cooking Equipment, (latest edition) available From the National Fire Protection Association, Batterymarch Park, Quincy, MA 02269.
In Canada:
- Local code
- Canadian Electrical Code C22.1 Part 1 (latest edition) available from the Canadian Standard Association, 5060 Spectrum Way, Suite 100, Mississauga, Ontario, Canada, L4W 5N6.
UNPACKING
This griddle was inspected before leaving the factory. The carrier assumes full responsibility for the safe delivery upon acceptance of the shipment. Check for possible shipping damage immediately after receipt.
If the griddle is found to be damaged, complete the following steps:
- Carrier must be notified within 5 business days of receipt.
- Carrier's local terminal must be notified immediately upon discovery (note time, date, and who was spoken to), and follow up and confirm with written or electronic communication.
- All original packing materials must be kept for inspection purposes.
- The griddle cannot have been moved, installed, or modified.
- Notify Vulcan Customer Service immediately at 800-814-2028
LEG ASSEMBLY
Attach the legs to the body by threading the exposed leg stud into the threaded holes located on the underside of the unit. Tighten each leg so that the top face of the leg is pressed firmly against the body bottom. Do not operate griddle without legs or integrated stand as damage will occur.
LEVELING
Position the griddle in the desired location. Level the griddle by using a wrench to turn the adjustable feet. You must hold the leg while turning the foot so that it's attachment to the griddle is not loosened.
LOCATION
The installation location must be kept free and clear of combustibles. Do not permit air to blow directly at the griddle. Avoid open windows next to the griddle wherever possible. Avoid wall-type fans which create air cross-currents within the room.
This griddle is Design Certified for installation on a non-combustible counter with 4" legs, or combustible floor with 24" high stand.
INSTALLATION CLEARANCES
| COMBUSTIBLE CONSTRUCTION | NON-COMBUSTIBLE CONSTRUCTION | |
| Back: | 1" | 0" |
| Right | 1" | 0" |
| Left Side | 1" | 0" |
ELECTRICAL CONNECTIONS
⚠ WARNING Electrical and grounding connections must comply with the applicable portions of the National Electrical Code and/or other local electrical codes.
⚠ WARNING Disconnect the electrical power to the griddle and follow lockout / tagout procedures.
Electrical Connections
- Remove the junction box cover plate(s) at the back of the unit. This exposes the built-in junction boxes and griddle line leads.
- Select a suitable knockout on the rear or bottom of the junction box.
- Connect the griddle's line leads to the supply wires with factory supplied wire connectors as shown in the applicable wiring instructions. Do not disturb the internal griddle wiring.
- Push the excess wire into the junction box and replace the cover plate. Never operate the griddle without the junction box covers in place.
NOTICE Since the griddle is not fused, you must connect it to a fused circuit equipped with a suitable disconnecting means as required by local authorities.
Phase Wiring Connections
RRE24E
208,240 & 480 VAC 3-PHASE WIRING CONNECTIONS:
- CONNECT WIRE #5 TO "L1"
- CONNECT WIRE #6 & #11 TO "L2"
- CONNECT WIRE #10 TO "L3"
208 & 240 VAC 1-PHASE WIRING CONNECTIONS:
- CONNECT WIRE #5 & #10 TO "L1"
- CONNECT WIRE #6 & #11 TO "L2"
RRE36E
208,240 & 480 VAC 3-PHASE WIRING CONNECTIONS:
- CONNECT WIRE #10 TO "L1"
- CONNECT WIRE #11 TO "L2"
- CONNECT WIRE #5 & #6 TO "L3"
208 & 240 VAC 1-PHASE WIRING CONNECTIONS:
- CONNECT WIRE #5 & #10 TO "L1"
- CONNECT WIRE #6 & #11 TO "L2"
RRE48E
208,240 & 480 VAC 3-PHASE WIRING CONNECTIONS:
- CONNECT WIRE #10 & #11 TO "L1"
- CONNECT WIRE #8, #9 & #13 TO "L2"
- CONNECT WIRE #12 TO "L3"
208 & 240 VAC 1-PHASE WIRING CONNECTIONS:
- CONNECT WIRE #8, #12 & #13 TO "L1"
- CONNECT WIRE #9, #10 & #11 TO "L2"
| STANDARD VOLTAGES-208 VOLTS OR 240 VOLTS 50/60 Hz.-SINGLE OR THREE PHASE 480 VOLTS 50/60 Hz.-THREE PHASE ONLY | ||||||||||||||||
| MODEL NUMBER | TOTAL CONN. KW | TOTAL KW PER CONN | 3 PHASE LOADING KW PER PHASE PER CONN.* | NOMINAL AMPS PER LINE WIRE CONN. | ||||||||||||
| 3 PHASE | 1 PHASE | |||||||||||||||
| 208 VOLT | 240 VOLT | 480 VOLT | 208 | 240 | ||||||||||||
| X-Y | Y-Z | X-Z | X | Y | Z | X | Y | Z | X | Y | Z | VOLT | VOLT | |||
| RRE24E | 10.8 | 10.8 | 5.4 | 5.4 | 0.0 | 22.5 | 45.0 | 22.5 | 19.5 | 39.0 | 19.5 | 9.7 | 19.5 | 9.7 | 51.9 | 45.0 |
| RRE36E | 16.2 | 16.2 | 5.4 | 5.4 | 5.4 | 45.0 | 45.0 | 45.0 | 39.0 | 39.0 | 39.0 | 19.5 | 19.5 | 19.5 | 77.9 | 67.5 |
| RRE48E | 21.6 | 21.6 | 10.8 | 5.4 | 5.4 | 67.4 | 67.4 | 45.0 | 58.5 | 58.5 | 39.0 | 29.2 | 29.2 | 19.5 | 103.8 | 90.0 |
OPERATION
WARNING
The griddle and its parts are hot. Use care when operating, cleaning riddle.
WARNING
Disconnect power supply and follow lockout / tagout procedures and servicing the appliance.
BEFORE FIRST USE
It is recommended that you clean your Vulcan RRE griddle thoroughly with a mild soap and water. Rinse the griddle surface thoroughly with water and wipe dry with a soft clean cloth.
Before turning the unit ON, apply a high temperature cooking oil—about one ounce per square foot of surface. Do not use plain vegetable oil as it is not stabilized for high heat and may cause food stick and result in improperly cooked food. Turn the griddle ON and with a regular wipe cloth; work the oil into the whole griddle surface for two minutes.
After cleaning your griddle with chemicals, you should repeat the seasoning procedure for proper cooking.
CONTROLS
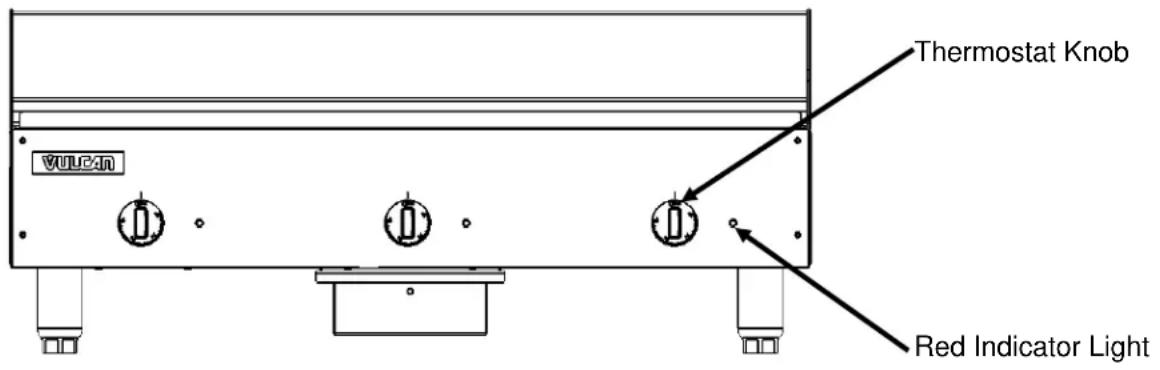
Each thermostat independently controls a 12" wide griddle section. When each thermostat is turned ON, the corresponding red indicator light will illuminate to indicate that the elements are on for that section. When the griddle plate reaches the desired temperature set point, the elements will be turned off for that section and the indicator light will go off. Indicator lights will cycle off and on as the thermostats turn the corresponding heating elements off and on to maintain the set temperatures. At the end of each day, you must turn all thermostat knobs to the OFF position to turn off the unit.
USING THE GRIDDLE
To preheat, set the thermostats for the desired temperatures 20 minutes before cooking.
A uniform and systematic approach to loading the griddle will produce the most consistent product results.
ZONE COOKING
This griddle features two tubular heating elements in each 12" section. Each section is controlled by an independent thermostat. Each 12" section is a separate cooking zone, and allows cooking a wide variety of products over a single griddle plate. The chart below is a suggested usage of zone cooking.
When zone cooking, it is suggested that you start with your lowest temperature setting at either side of the griddle, increasing the zone temperature as you move up the zone line. These zone cooking guidelines will vary depending on product temperatures, size and shape. This guide should be adjusted to suit your product and operational cooking preference.
RRE48E

natural_image
Pure diagram of vertical dashed lines with circular ends, no text or symbols present| ZONE 1(300°F) | ZONE 2(350°F) | ZONE 3(350°F) | ZONE 4(400°F) |
| PRODUCTSausageEggs (Hard Fried)Eggs (Scrambled)Burger (Well Done)Steak (Well Done)Chicken BreastFrozen FoodsPork Chops | PRODUCTPancakes French Toast Bacon Eggs (Sunny Side Up)Boiled Ham Steak (Medium Well)Fresh Burger (Medium Well)Small Frozen Burger (Medium Well)Omelet Hash Browns Canadian Bacon | PRODUCTSteak (Rare)Stir FryVegetablesSalmonFish CakesLobsterScampi | |
CLEANING THE GRIDDLE

The griddle and its parts are hot. Use care when operating, cleaning or riddle.
Clean the griddle regularly. A clean griddle always looks better, lasts longer and performs better. To produce evenly cooked, perfectly browned griddle products keep the griddle plate clean and free of carbonized grease. Carbonized grease on the surface hinders the transfer of heat from the griddle surface to the food, resulting in spotty browning and loss of cooking efficiency. Carbonized grease tends to cling to griddle foods, giving them a highly unsatisfactory and unappetizing appearance.
NOTICE Do not use a water-jet to clean the griddle as this can cause damage to internal electrical components.
The Rapid Recovery™ griddle plate is a composite material which is engineered to provide a high heat transfer rate to the food. The top surface is stainless steel and can be scored or dented by careless use of a spatula or scraper. Be careful not to dent, scratch, or gouge the plate surface. Do not try to knock off loose food that may be on the spatula by tapping the corner or the edge of the spatula on the griddle surface.
AFTER EACH USE
Clean the griddle with a griddle scraper during the work shift. Take care not to vigorously strike the back or side splashes with the scraper.
ONCE PER DAY
Thoroughly clean the griddle back splash, sides and front. Turn the griddle off and allow it to cool down between 275°F-300°F, apply some water to the cooking surface and clean it with a griddle scraper. Remove, empty and wash the grease drawer in the same manner as an ordinary cooking utensil.
Wipe the griddle exterior clean with a damp cloth to prevent grease accumulation and dry.
ONCE PER WEEK
Clean the griddle surface thoroughly with water, Scotch-Brite™ Quick Clean Griddle System or Ecolab Grease Express™ High-Temp Grill Cleaner. Be sure the cleaning agent is thoroughly removed by flushing with clear water. After cleaning, reseason the cooking surface according to the instructions in this manual.
If the griddle usage is very high, consider conducting this weekly cleaning procedure more than once per week.
Do not use a brick or griddle stone for cleaning.
Do not use chlorine sanitizer in contact with griddle. Contact can cause discoloration, corrosion and permanent damage.
Do not use cleaning agents including Sodium Hydroxide, which is common in household oven cleaners.
SHUTDOWN OF GRIDDLE
- Turn all thermostats to the OFF position. This will shut down the griddle completely.
EXTENDED SHUTDOWN
- Turn all thermostats to the OFF position.
-
Shut off the main electrical supply.
-
Apply a heavy coat of vegetable oil over the griddle plate to inhibit rust.
MAINTENANCE
WARNING The griddle and its parts are hot. Use care when operating, cleaning or servicing the griddle.
WARNING Disconnect power supply and follow lockout / tagout procedures before cleaning and servicing the appliance.
LUBRICATION
There are no parts on this unit that require lubrication.
SERVICE AND PARTS INFORMATION
Contact the Service Contractor in your area to obtain service and parts information. For a complete listing of Service and Parts depots refer to or www.vulcanequipment.com
When calling for service the following information should be available from the appliance serial plate: Model Number, Serial Number and voltage.
TROUBLESHOOTING
| PROBLEM | POSSIBLE CAUSES |
| Heat does not come on when the temperature controller is turned on | 1. Problem with thermostats. (Call for service)2. Problem with heating elements. (Call for service)3. Main power supply disconnected. (Call for service) |
| Fat appears to smoke excessively | 1. Temperature set too high.2. Moisture in food may be turning into steam |
| Food sticks to griddle or burned around edges or contains dark specs | 1. Temperature set too high.2. Griddle surface requires cleaning and/or seasoning.3. Surface under food not covered with enough cooking oil. |
| Food under-cooked inside | 1. Temperature set too low.2. Food not cooked for long enough time. |
| Food tastes greasy or has objectionable off-flavor | 1. Food itself may have off-flavor.2. Food stored improperly before cooking.3. Too much griddle fat used.4. Temperature set too low. |
| Noticeable build-up of gum on griddle | 1. Temperature set too high.2. Griddle surface needs cleaning and/or seasoning.3. Too much griddle fat used. |
ACCESSORY INSTALLATION
WARNING
The griddle and its parts are hot. Use care when operating, cleaning or griddle.

natural_image
Technical line drawing of a mechanical assembly with no visible text or symbolsSIDE VIEW

SIDE VIEW
FRONT VIEW

NOTES

natural_image
Technical line drawing of a mechanical assembly with labeled components (no text or symbols present)VUE AVANT

natural_image
Technical line drawing of a mechanical assembly with a circular label containing the number 3 (no text or symbols on the diagram itself)
natural_image
Pure diagram of repeated rectangular shapes with dashed outlines, no text or symbols presentRNE48E
CONNEXIONS ELECTROUES
od 0
od 0
od 0
od ↓
od 1
od 1
Cite
Cite
Arrige :
CONSTRUCTION INCOMBUSTIBLE
CONSTRUCTION COMBUSTIBLE
DEGAGEMENT MINIMUM
Park, Quincy, MA 02269.
edition), disponible auprès de la National Fire Protection Association, Batterymarch
- Norme no 96 de NFPA, Vapor Removal from Cooking Equipment, (plus recente
National Fire Protection Association, 1 Batterymarch Park, Quincy, MA 02269.
3600 North Point Blvd.
©ITW Food Equipment Group, LLC
natural_image
Exterior view of a metallic industrial enclosure or enclosure unit with three circular control knobs and a label 'UOJINA' on the side (no other text or symbols visible)FABRICATION ROBUSTE
PLAQUES CHAUFANTS ELECTRIOUES DE
MANUEL D.INSTALLATION ET D.UTILISATION
UNITS


- TABLE OF CONTENTS
- INSTALLATION.... 3
- OPERATION.... 6
- SHUTDOWN 10
- EXTENDED SHUTDOWN 10
- MAINTENANCE.... 10
- TROUBLESHOOTING.... 11
- ACCESSORY INSTALLATION.... 12
- INSTALLATION, OPERATION AND CARE OF HEAVY DUTY ELECTRIC GRIDDLES
- GENERAL
- INSTALLATION
- INSTALLATION CODES AND STANDARDS
- UNPACKING
- LEG ASSEMBLY
- LEVELING
- LOCATION
- ELECTRICAL CONNECTIONS
- RRE24E
- RRE36E
- RRE48E
- OPERATION
- WARNING
- BEFORE FIRST USE
- CONTROLS
- USING THE GRIDDLE
- ZONE COOKING
- CLEANING THE GRIDDLE
- AFTER EACH USE
- ONCE PER DAY
- ONCE PER WEEK
- SHUTDOWN OF GRIDDLE
- EXTENDED SHUTDOWN
- MAINTENANCE
- LUBRICATION
- SERVICE AND PARTS INFORMATION
- ACCESSORY INSTALLATION
- NOTES
Brand : Vulcan
Model : RRE24
Category : Griddle