
Phantom Premium 80 N F - Range hood EICO - Free user manual and instructions
Find the device manual for free Phantom Premium 80 N F EICO in PDF.


| Brand | Eico |
| Model | Phantom Premium 80 N F |
| Product Type | Range Hood |
| Width | 80 cm |
| Height | Approx. 100-120 cm (adjustable) |
| Depth | Approx. 50 cm |
| Weight | Approx. 15 kg |
| Power Supply | 220-240 V ~ 50 Hz |
| Total Power | 180-250 W (depending on model) |
| Extraction Capacity | Up to 650 m³/h |
| Noise Level | 42-60 dB (A) |
| Lighting | 2 x 28 W halogen or LED (depending on version) |
| Number of Speeds | 3 + intensive |
| Filter Type | Aluminum grease filter + optional charcoal filter |
| Control Type | Mechanical push buttons or electronic (depending on version) |
| Installation | Wall-mounted or ducted/recirculation |
| Duct Diameter | 150 mm |
| Energy Class | A+ (estimated) |
| Maintenance | Clean grease filter monthly; replace charcoal filter every 3-6 months |
| Safety Features | Overheat protection, anti-return flap |
| Warranty | 2 years (standard) |
| Spare Parts | Grease filters, charcoal filters, bulbs available |
Frequently Asked Questions - Phantom Premium 80 N F EICO
User questions about Phantom Premium 80 N F EICO
0 question about this device. Answer the ones you know or ask your own.
Ask a new question about this device
Download the instructions for your Range hood in PDF format for free! Find your manual Phantom Premium 80 N F - EICO and take your electronic device back in hand. On this page are published all the documents necessary for the use of your device. Phantom Premium 80 N F by EICO.
USER MANUAL Phantom Premium 80 N F EICO
natural_image
3D rendered image of a black rectangular tray with internal compartments and measurement markings (no readable text or symbols)| GB | INSTRUCTIONS ON MOUNTING AND USE |
| DK | MONTERINGS- OG BRUGSVEJLEDNING |
| NO | INSTALLASJONS INSTRUKSJONER OG BRUK |
| SV | MONTERINGS- OCH BRUKSANVISNINGAR |
| FIN | ASENNUS- JA KÄYTTÖOHJEET |

natural_image
Illustration of two gloves with textured soles (no text or symbols)EN Always wear work gloves for all installation and maintenance operations
natural_image
Pure technical diagram of a mechanical assembly with no visible text, numbers, or symbols

natural_image
Technical line drawing of two mechanical assembly components with mounting brackets and a connector (no text or symbols)
natural_image
Technical line drawing of a mechanical assembly with no visible text or symbols


natural_image
Simple geometric diagram showing two opposing arrows forming an inverted V-shape (no text or symbols)Installation A


Installation B

Installation A


Installation B

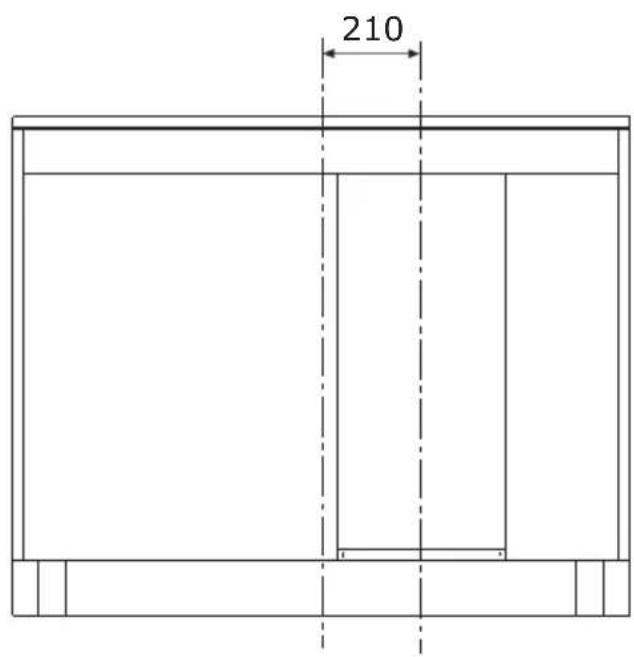
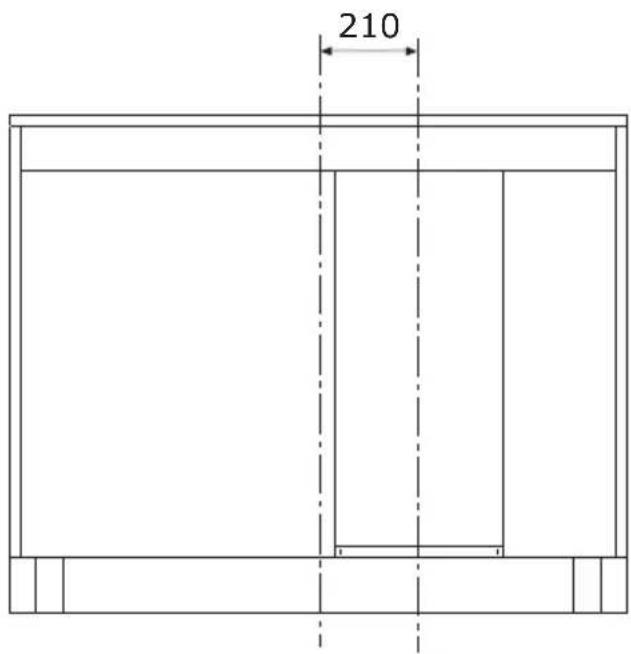


Installation A


natural_image
Simple black vertical arrow pointing downward (no text or symbols)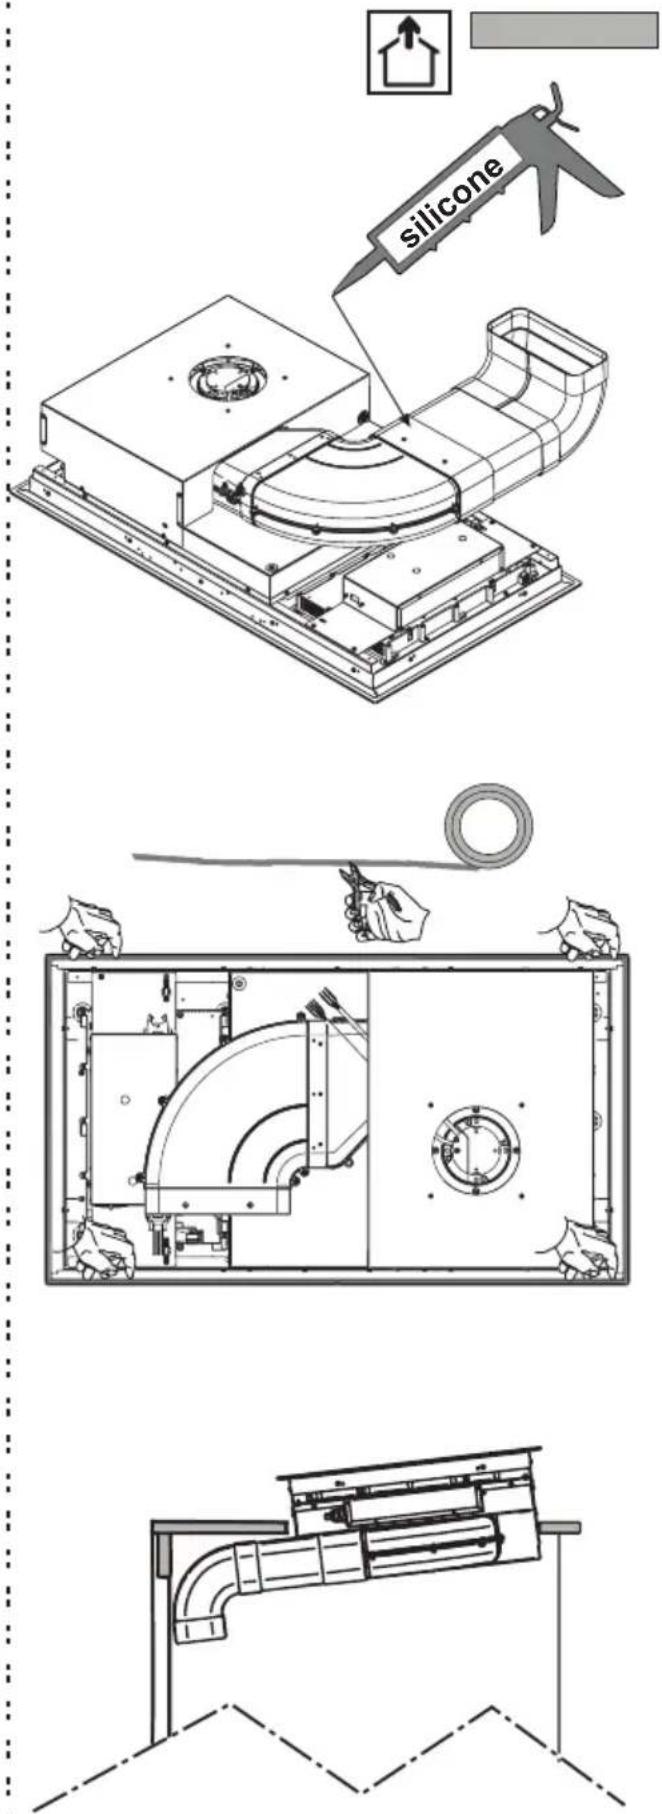



natural_image
Technical line drawing of a mechanical or electrical enclosure with internal components and mounting brackets (no text or symbols)


natural_image
3D technical illustration of a device enclosed in a transparent enclosure, showing internal components and mounting points (no text or symbols)
natural_image
Exploded view diagram of a robotic arm assembly with a home control icon at the bottom (no text or symbols on the diagram itself)
Installation C

Installation D

≤ 680

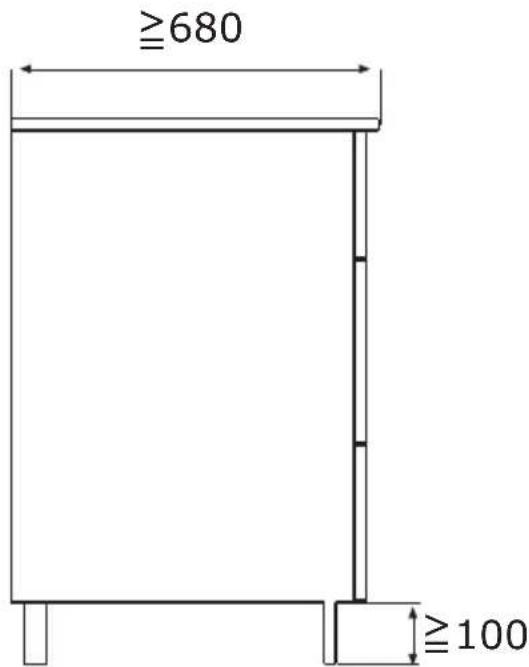
≥680


natural_image
Technical line drawing of a mechanical assembly with a housing and component, showing internal components and a directional arrow (no text or symbols)



Installation C


natural_image
Simple black vertical arrow pointing downward (no text or symbols)
Installation D


natural_image
Technical line drawing of a mechanical assembly with hands holding a coiled wire and a circular component (no text or symbols)
natural_image
Technical line drawing of a mechanical assembly with no visible text or symbols
flowchart
graph TD
    A["Installation C"] --> B["Downward Arrow"]
    B --> C["Downward Arrow"]
    C --> D["Installation D"]
    style A fill:#f9f,stroke:#333
    style D fill:#bbf,stroke:#333


natural_image
Technical line drawing of a mechanical or electrical enclosure with internal components and mounting brackets (no text or symbols)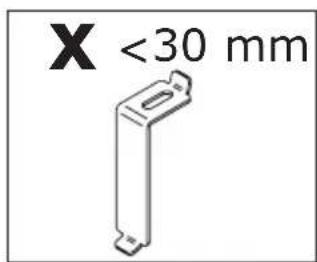

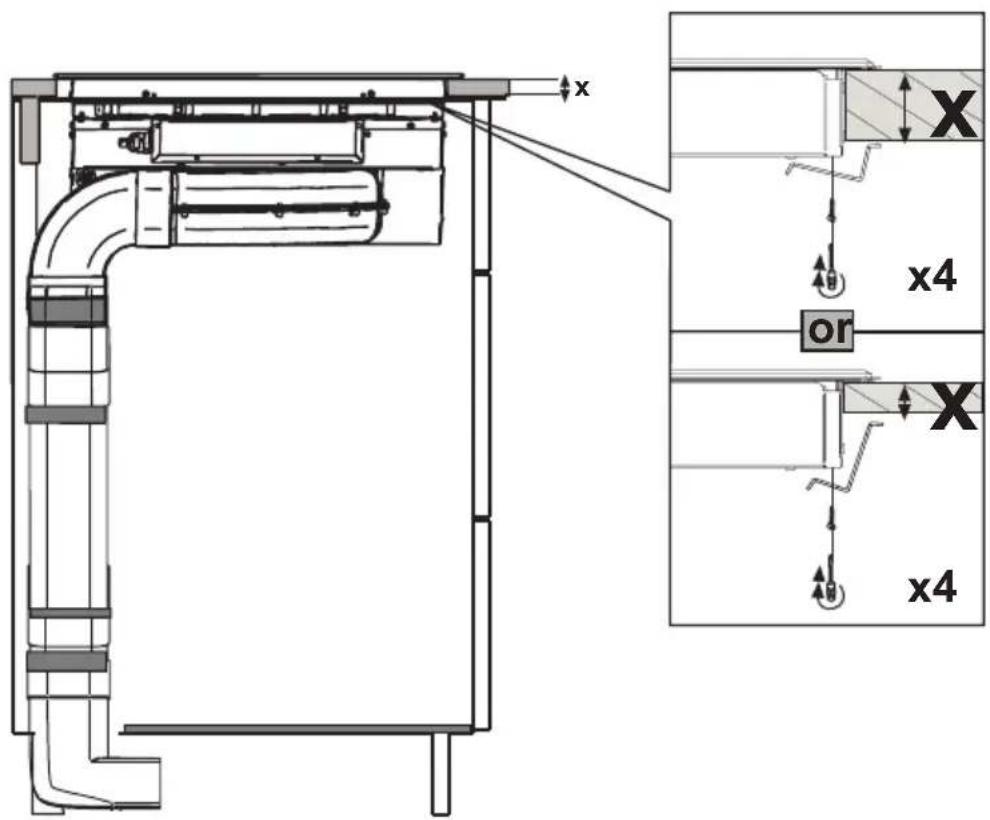


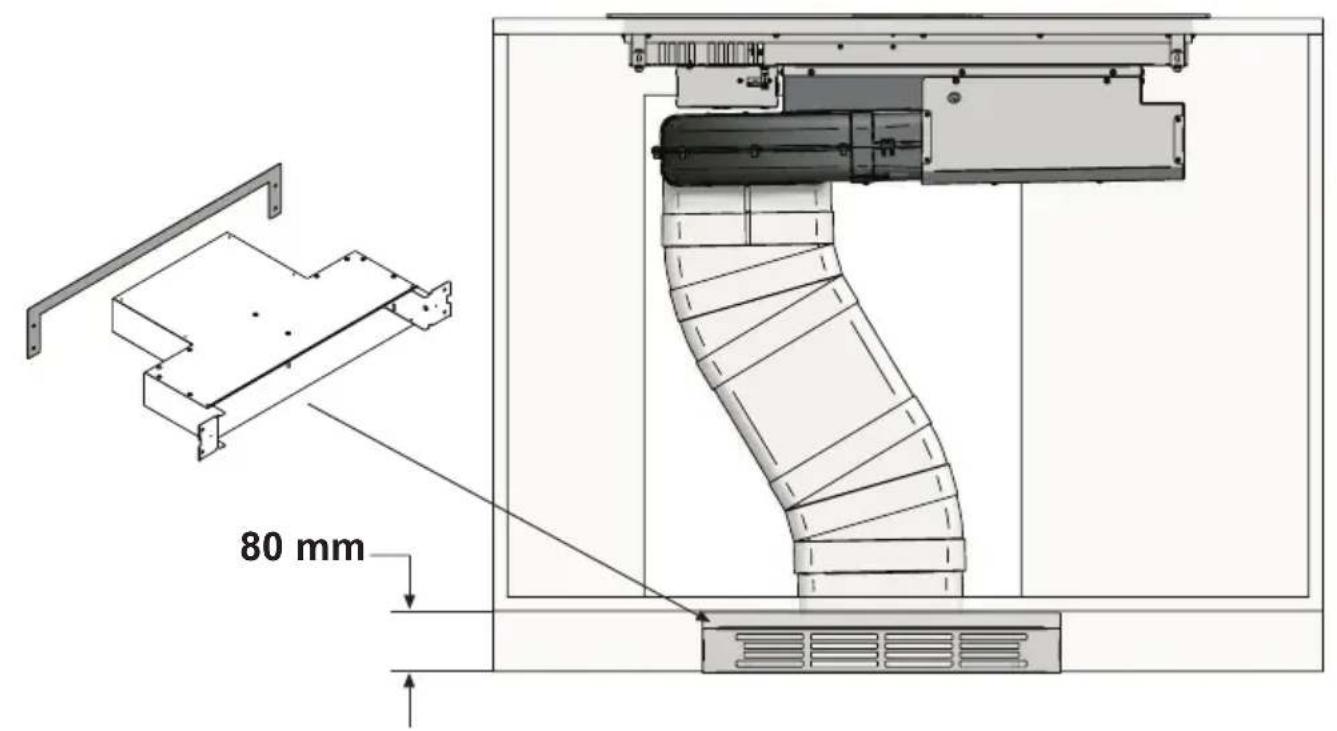


natural_image
Pure technical diagram of a pipe assembly with no text, numbers, or symbols

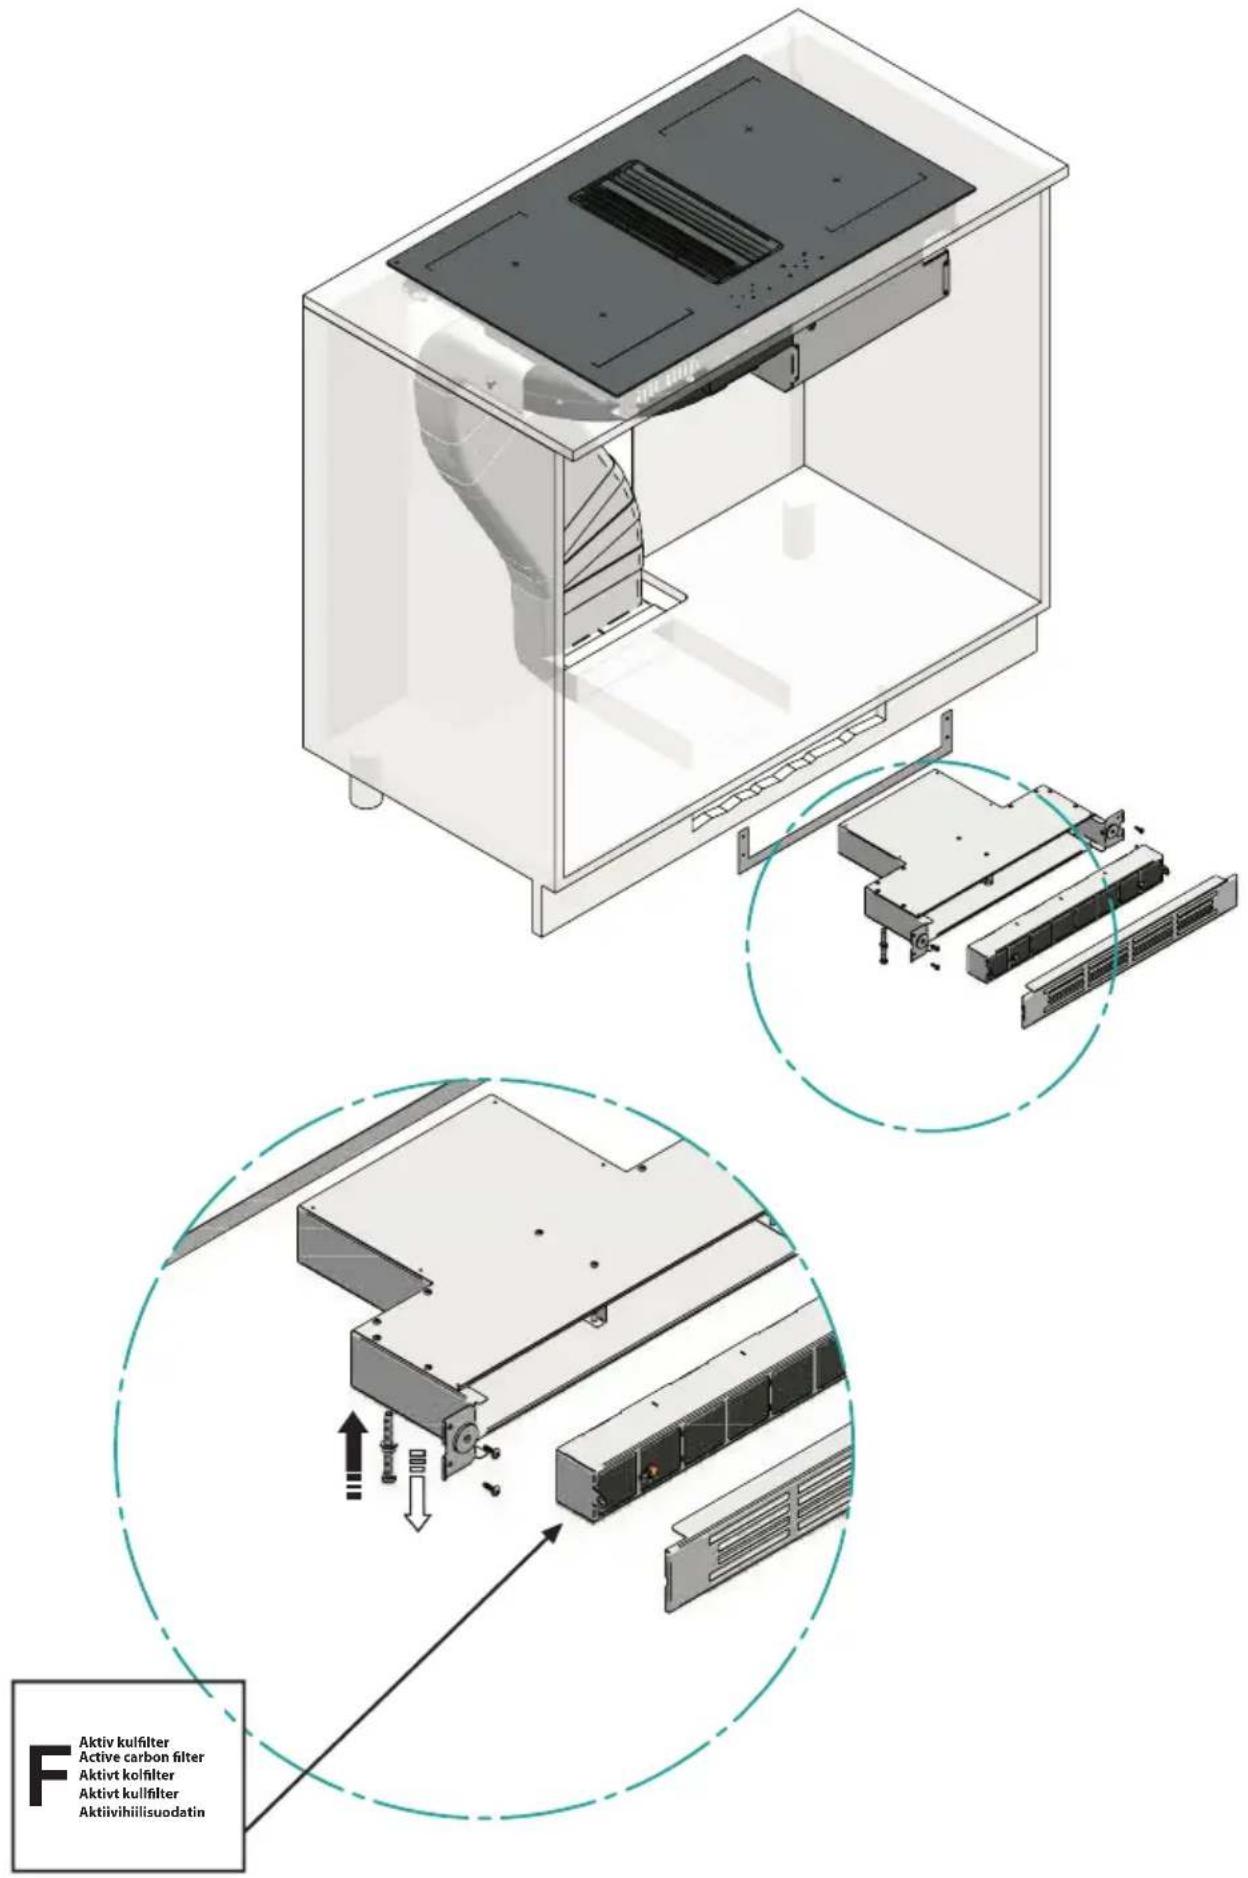

natural_image
Technical illustration of a mechanical assembly with pipes and mounting brackets (no text or symbols)
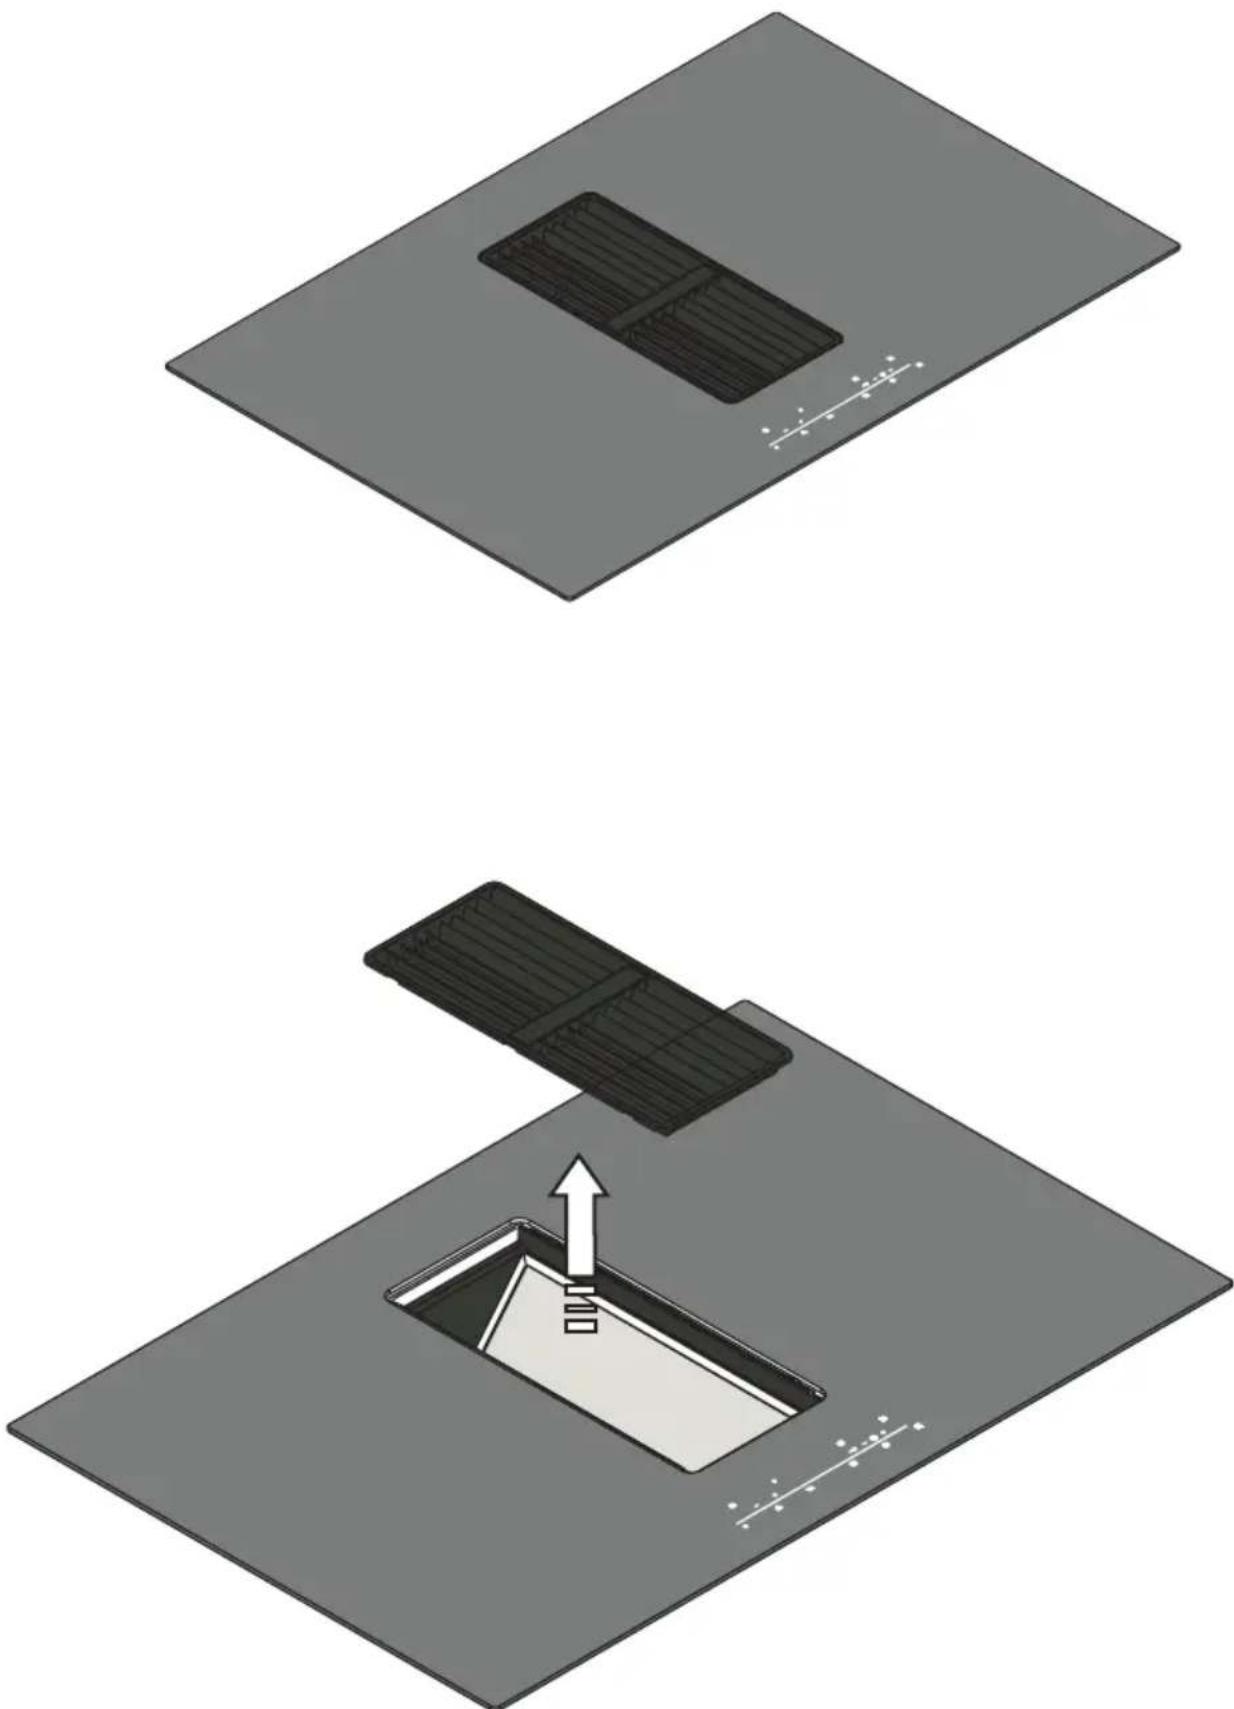


natural_image
Illustration of two hands placing a piece into a rectangular tray (no text or symbols)Fettfilter
Anti-Grease Filter
Filtre antigraisse
Vetfilter
Filtro antigrasa
Filtro antigrasso
Fettfilter
Anti-Grease Filter
Filtre antigraisse
Vetfilter
Filtro antigrasa
Filtro antigrasso

natural_image
Simple line drawing of a rectangular frame with no text or symbols
natural_image
Pure technical line drawing of a tool or bracket without any text, numbers, or symbols
natural_image
3D rendering of a mechanical bracket or housing component (no text or symbols visible)For the cleaning of aesthetic grille and grease filters, use a damp cloth and a neutral liquid detergent. DO NOT use abrasive and/or aggressive products (e.g. acid ora basic). Do not wash in the dishwasher!


GB
In case of flush-mounting, once installation is complete, verify the correct functioning of the product, then wait 24 hours to allow the silicone to dry completely.
DK
Cleaning and maintenance must not be carried out by children without proper supervision.
If the power cord is damaged, it must be replaced by a qualified service centre or technician only.
CAUTION: The hob protection devices must be only those designed by the appliance manufacturer or those indicated as suitable in the manufacturers instructions or the hob protection devices incorporated in the appliance.
The use of inappropriate protection devices may provoke accidents.
During the installation the equipment must be connected to a power source whose system impedance is matched to a value of 0.005+j0.005[Ohm].
Do not seal the area between the glass and the worktop with silicone because should the cooktop need to be replaced, the glass could break during removal.
The unit's installation and electrical connection to the power grid must be carried out by qualified service technicians only. The device's electrical safety can be guaranteed solely if a regular ground connection is provided for the cooking top. If in doubt, have the electrical system checked by a qualified electrician. Do not connect the cooking top to the mains using extension cords or multiple sockets, since they will not guarantee the required safety (e.g. risk of overheating).
Prior to connecting the cooktop, compare the connection specifications (voltage and fre quency) indicated on the unit's identification nameplate with those of the mains electricity supply.
These specifications must absolutely correspond, otherwise the unit may be subject to damage. Contact an electrician if in doubt.
D isconnect the unit from the mains when carrying out installation work, maintenance or repairs.
Comply with all air discharge regulations.
CAUTION: If the surface is cracked, switch off the appliance to avoid the possibility of electric shock.
Never open unit's outer casing. Any contact with live parts or the modification of electrical or mechanical parts can cause operating abnormalities.
The induction hob should not be used as a work surface. The rough underside of food containers can scratch the surface of the cooktop.
Always keep the cooking areas and underside of food containers perfectly dry.
Fire hazard
Oil and grease that are too hot will catch fire quickly.
Do not leave overheated oil or grease unsupervised.
If oil or grease should catch fire, do not attempt to put out the flames with water. Extinguish the flames with a lid or plate, or with a fireproof blanket. Turn off the cooking zone. Never place flammable items on the hob.
WARNING: Fire hazard: do not leave objects on the cooking surface.
Burn hazard
CAUTION: This appliance and its accessible parts become very hot during use.
Pay attention to avoid touching the heating elements.
Keep children under 8 years of age away from the appliance, unless they are continually monitored.
Do not place objects such as knives, forks, spoons or lids on the induction top, as they may overheat.
Do not heat closed containers, such as tin receptacles, on the cooking top. The excess pressure generated could blow up the container.
Suitable food containers
Only ferromagnetic containers are suitable for induction cooking; the following receptacles, in particular, are suitable: enamelled steel, cast iron, special dishes for induction cooking in stainless steel.
Use only pots and pans with a smooth bottom. Do not introduce any objects between the bottom of the pot and the glass ceramic surface, such as adapters.
| Cooking zone Minimum diameter | |
| OCTA (single) 110 mm | |
| OCTA (bridged mode) | 230 mm |
To find whether receptacles are suitable, check whether they are attracted by a magnet.
Another type of special receptacle exists for induction cooking, with a bottom that is not entirely ferromagnetic.
Non-suitable food containers
Never use recipients made of: normal finegrained steel, glass, pottery, copper and aluminium. Do not place empty containers on the cooking zone, as they may cause damage.
Do not place hot recipients on the control panel, in the area of the pilot lights or on the edge of the cooking top, as they may cause damage.
Danger of mishaps
Pots from which liquids have completely evaporated can cause damage to the glass ceramic top, for which the manufacturer does not assume any responsibility.
The appliance is equipped with a cooling fan. If a drawer is set under the recessed hob, a suitable distance must be ensured between the contents of the drawer and the lower part of the unit, in order to avoid compromising ventilation.
The worktop should be flat and horizontal. The furniture should be cut to measure before installing the appliance. Remove any chips to avoid compromising the operation of electrical components.
Do not store small objects or sheets of paper in the drawer under the cooking hob, since such objects may be aspirated and could break the fan, thus hindering the unit's cooling; likewise, do not store metal or inflammable objects, which could become very hot or catch fire.
If the cooking hob is assembled behind a cabinet door, power it on only with the door left open. Close the cabinet door only if the appliance and residual heat indicator lights are off.
If the unit is assembled above an oven or an electric pyrolytic stovetop, it should not be operated while the pyrolytic process is ongoing, as it can trigger the cooktop's overheating protection.
The cooktop should not be installed above dishwashers because the steam released by the latter may lead to faulty operation of the electronic circuit of the cooktop.
Do not make use of any steam devices, as steam can reach the appliance's live parts and cause a short circuit.
Any interventions or repairs on the unit during the warranty period must be carried out solely by the manufacturer's authorised service centre; conversely, the warranty will be is invalidated and terminated immediately. The manufacturer will not recognise any warranties under any circumstances for any problems subsequently encountered.
Replace any defective or damaged parts with original spare parts: only original spare parts can ensure compliance with safety standards.
Notice to persons with pacemakers: keep in mind that an electromagnetic field is generated in the immediate vicinity of the unit while it is in operation.
The possibility that the pacemaker's operation may be affected is very remote. If in doubt, contact the pacemaker manufacturer or your doctor.
Warning: do not pour any type of liquid into the suction slot of the hood.
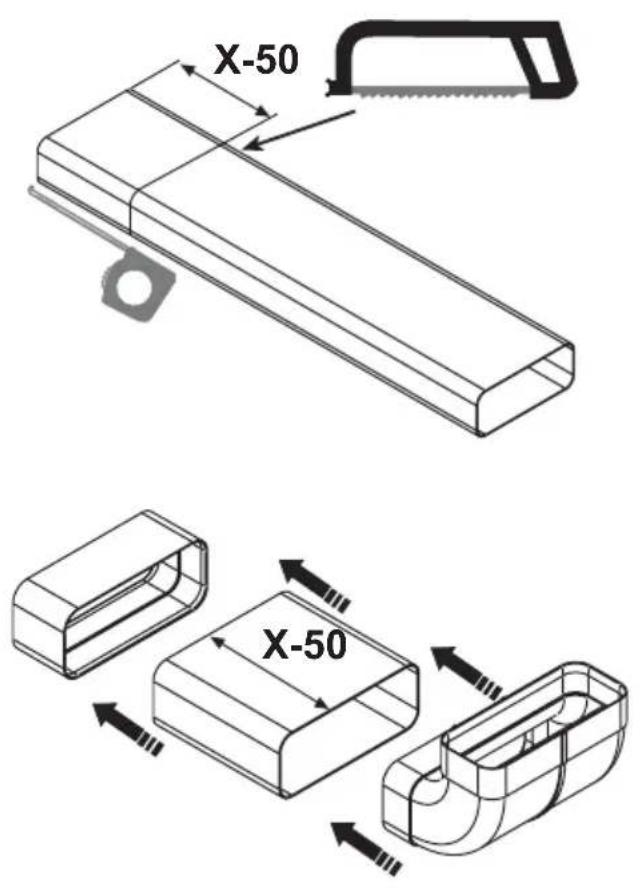
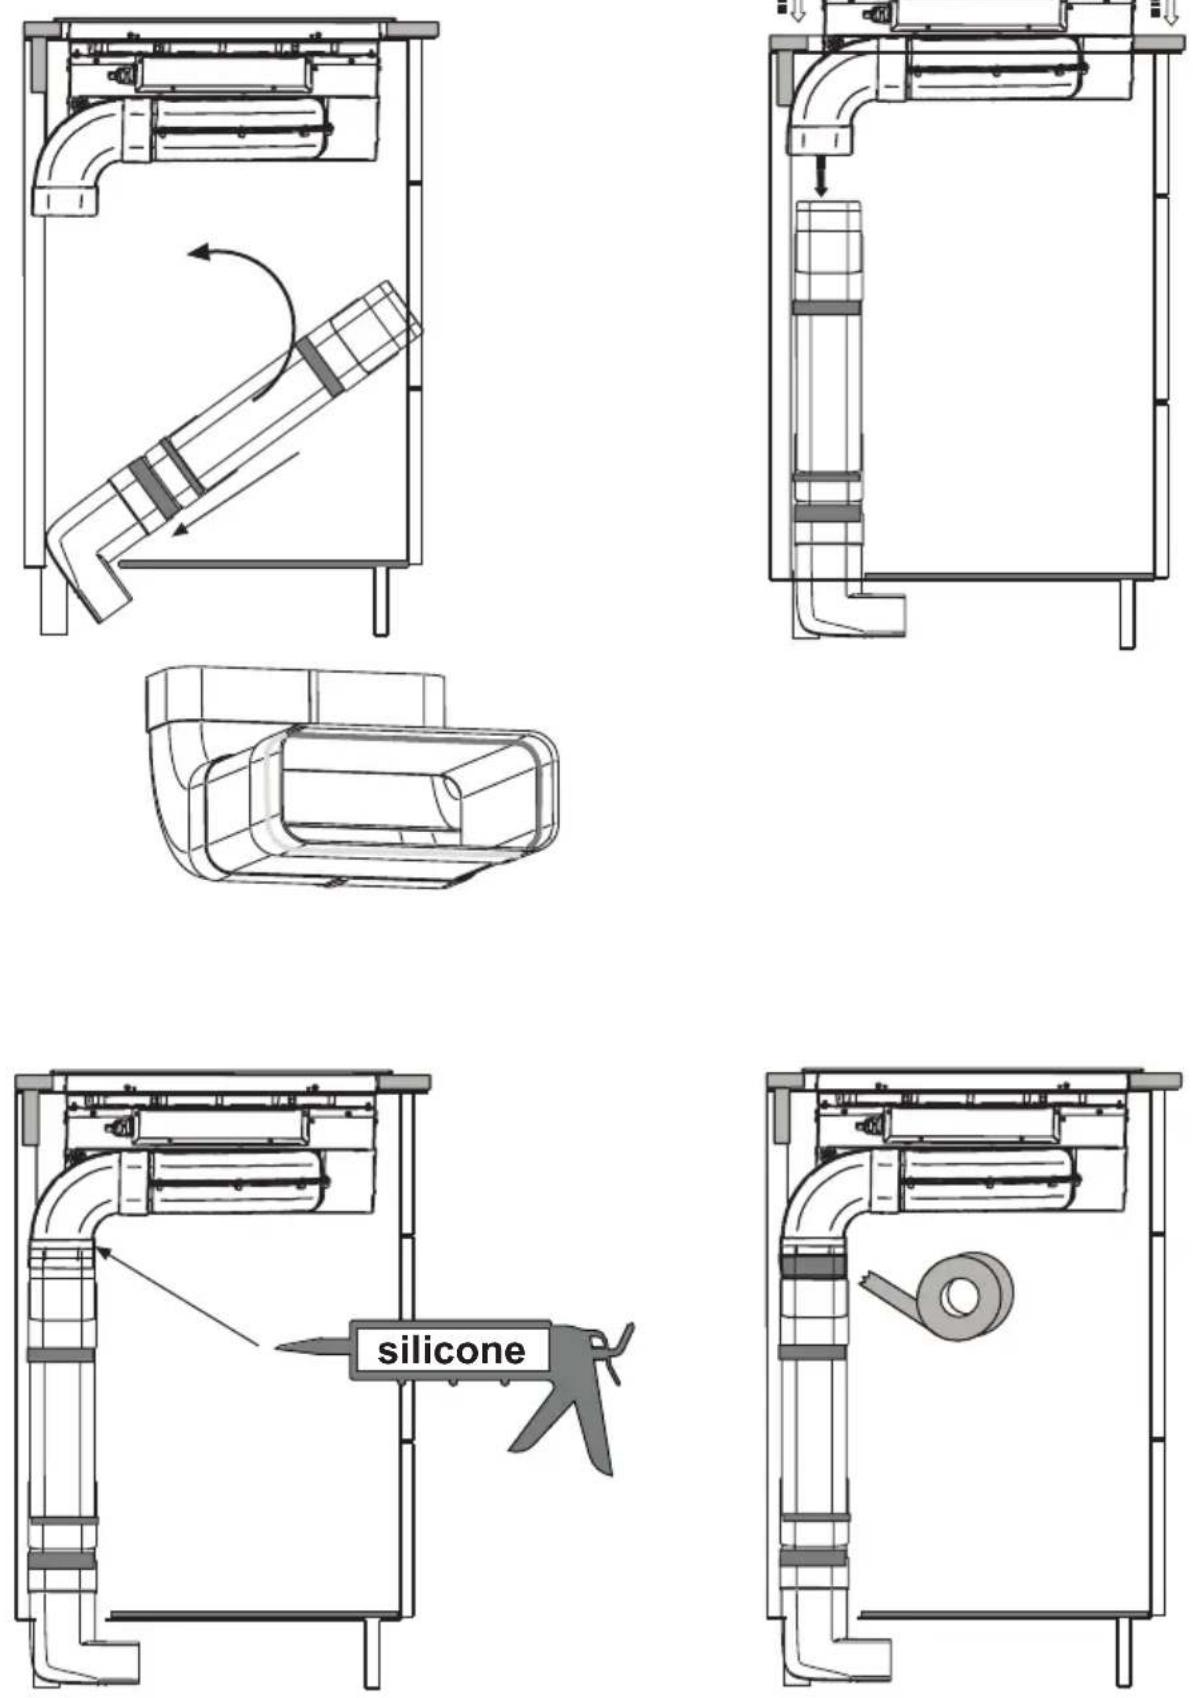
Warning: it is recommended to seal with silicone or adhesive tape all the joints of the pipes, both of the exhaust pipes and the fittings that join the various parts.
In the case of installation in filtration mode, pay particular attention to the positioning of the fume exhaust area to avoid possible turbulence, so as not to interfere either with the suction system or with the hob.
In the installations in filtration mode, place the pipes inside of the plinth of the furniture, ensuring air evacuation to the outside via a special grid, in order to prevent moisture from building up inside of the same.
The liquid collection tray must be emptied on a regular basis.
Such tray is designed to contain about 0,7 litre of water; in case of spillage or fall of fluids on the device, turn off the appliance immediately and empty the tray. If the liquid fallen on the floor is greater than the maximum capacity of the tray, turn off the device and contact the customer service immediately.
After use, turn off the cooking hob through its control device and do not rely on the cookware detector.
Noise emissions
Induction can generate slight noise emissions, which can vary depending on the material, type of pot and power setting selected.
When the cooktop is used frequently, the cooling fan turns itself on to protect the electronics, generating a buzzing sound: this is perfectly normal.
First usage
Use a damp cloth to clean and dry the cooktop before using it for the first time.
It is recommended to dry the appliance after having cleaned it with a damp cloth, in order to prevent the build-up of limescale.
When the unit is powered on for the first time, odours or fumes may be generated. The odour will diminish with each subsequent use, until it disappears altogether. Odours and any fumes are not caused by a faulty connection or damage to the appliance, and are not hazardous to health.
YOUR INDUCTION HOB
Description

- Cooking zone front left 210 x 190 mm / 2,1 kW (boost 3,0 kW)
- Cooking zone rear left 210 x 190 mm / 2,1 kW (boost 3,0 kW)
- Extractor
- Cooking zone rear right 210 x 190 mm / 2,1 kW (boost 3,0 kW)
- Cooking zone front right 210 x 190 mm / 2,1 kW (boost 3,0 kW)
- Connected cooking zones on the right 21 x 39 cm / 3.7 kW
- Control panel
YOUR INDUCTION HOB
Description

- Pause key
- Lock key
- Keep warm key
- Minute minder key
- Timer display
- Plus key timer
- Minus key timer
- Cooking zone key rear left (cooking zone display) and timer symbol
- Extraction key (extractor unit display) and timer symbol
- Cooking zone key rear right (cooking zone display) and timer symbol
- Cooking zone key front right (cooking zone display) and timer symbol
- Cooking zone key front left (cooking zone display) and timer symbol
- On/Off key
- Boost key
- Slide control (from position 0 to position 9) for:
▶ setting a value (power level/extractor speed level/minutes)
Indications in the display
| Cooking zone display Description | |
 | Power level; 1 = low level / 9 = high level. |
 | Boost level active. |
 | No (suitable) pan on cooking zone (pan detection symbol). |
  | Residual heat indicator; The hob has a residual heat indicator for each cooking zone to show those which are still hot. Although the hob is switched off, the indicator ‘H’ will remain on for as long as the cooking zone is hot! Avoid touching them when this indicator is lit.Danger! Risk of burns. |
 | Child safety lock active. |
 | Automatic heat-up function active. |
 | Keep warm function active. |
 | Pause function active. |
 | Connected Bridge induction zones active. |
 | Timer active. |
| Extractor unit display Description | |
 | Extractor speed level: 1 = low level / 9 = high level. |
 | Boost level active. |
 | ‘FG’: Grease filter saturation indication. |
 | ‘FC’: Odour filter saturation indication. |
 | Timer active. |
| Timer display Description | |
 | Timer has not been set. |
 | Timer has been set (25 minutes). |
Use of the touch keys and slide control
Place the tip of your finger flat on a key or the slide control to achieve the best results. You do not have to apply any pressure. The touch keys only react to the light pressure of a fingertip.
Do not operate the controls with any other objects.
Induction noises
A ticking sound
This is caused by the capacity limiter on the left and right zones. Ticking can also occur at lower cooking levels.
Pans are making noise
Pans can make some noise during cooking. This is caused by the energy flowing from the hob to the saucepan. At high levels, this is perfectly normal for some pans. It will not damage either the pans or the hob.
The fan is making noise
To enlarge the lifespan of the electronics, the appliance is equipped with a fan. If you use the appliance intense, the fan is activated to cool down the appliance and you will hear a buzzing sound. The fan runs on for several minutes after the hob has been switched Off.
Appropriate pans
Induction cooking requires a pan with a thick flat bottom (minimum 2.25 mm). Use pans made of magnetic material or pans with a sandwich bottom. Pans made of copper, aluminum or ceramic material are not appropriate.

Only use pans with a flat bottom. A hollow or rounded bottom can interfere with the operation of the empty cooking protection, causing the appliance to become too hot. This may lead to damages. Damage caused by using pans that are not appropriate or that boil dry is excluded from the guarantee.

Pans that have been used on a gas hob cannot be used on an induction hob.

Be careful with thin enamelled sheet-steel pans! The enamel may become damaged at high settings if the pan is too dry. High power level settings may cause the bottom of the pan to warp.
BEFORE FIRST USE

Attention
Make sure the bottom of the pan and the surface of the cooking zone are clean and dry. We recommend that you lift pans and not slide them over the hob.
Pan detection
- If the hob does not detect a (suitable)) pan after a pan is put on a cooking zone, the pan detection symbol flashes in the display. After 20 seconds, the cooking zone switches off.
- If you remove a pan from the cooking zone during cooking, the pan detection symbol shows. The cooking zone switches off. The symbol disappears when you put the pan back. The cooking zone switches on again with the power level set before.
- The automatic pan detection (adjustable: active by default) automatically detects a pan that is put on a cooking zone. The display of this cooking zone lights up more intensely.
Cooking levels
The cooking zones have 9 levels and a 'boost' level (P). Set the cooking level by touch and slide over the slide control. By slide over the slide control, the cooking setting is changed. By move to the right, the level increasing, while moving to the left decreases the level. When you move your finger away from the slide control, the cooking zone starts to operate at the level set.
Boost function
- You can use the 'boost' function to cook at the highest cooking level during a short period of time (max. 5 minutes). After the maximum boost time the power will be reduced to setting 9.
BEFORE FIRST USE
Cooking guidelines
Because the levels depend on the quantity and composition of the contents of the pan, the table below is intended as a guideline only.
Use level 'boost' to:
- bring the food or liquid to the boil quickly;
- 'shrink' greens;
- heat oil and fat;
- wok.
Use level 9 to:
- sear meats;
- cook fish;
- cook omelettes;
- fry boiled potatoes;
- deep fry foods.
Use level 7 and 8 to:
- fry thick pancakes and make French toast;
- fry thick slices of breaded meat;
- fry breaded fish;
- fry bacon (fat);
- cook raw potatoes;
- cook through pasta;
- fry thin slices of (breaded) meat.
Use level 4-6 to:
• complete the cooking of large quantities;
• defrost hard vegetables;
- fry thick slices of breaded meat.
Use level 1-3 to:
- simmer bouillon;
- stew meats;
- simmer vegetables;
- melt chocolate;
- poach;
- melt cheese.
BEFORE FIRST USE
Use of the downdraft

Place the lid at an angle on the pan with the opening to the extraction side. This ensures maximum extraction.

Please read the chapter 'Before first use' very carefully before you start cooking. This prevents incorrect use of the hob.
Start cooking
- Touch and hold the on/off key until you hear an audio signal.
All displays light up; the induction hob is in standby mode.
The cooking zones and the extraction unit have power level zero.
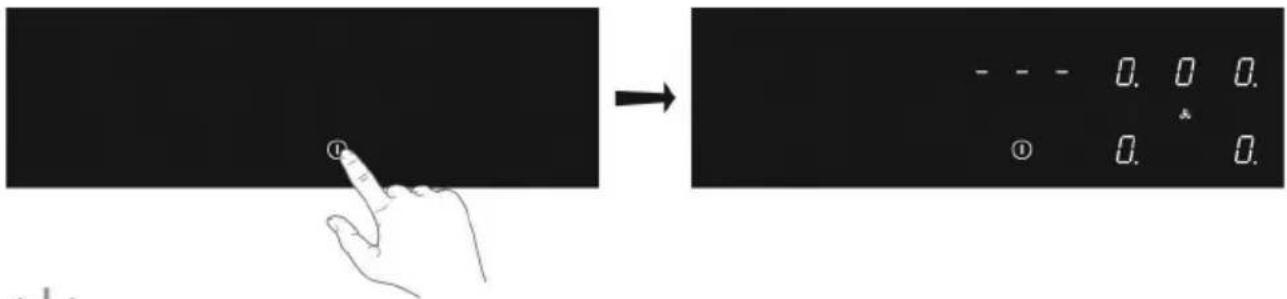

If the hob is not used for 20 seconds, it will shut off automatically.
- Place a suitable pan on the cooking zone.
The cooking zone automatically detects the pan; the display of this cooking zone lights up more intensely.

As long as the display of the cooking zone lights up brightly, the cooking zone is selected and the power level can be set.
- When the response time has elapsed, or during cooking, you can activate the cooking zone by manually selecting the display of the desired cooking zone.

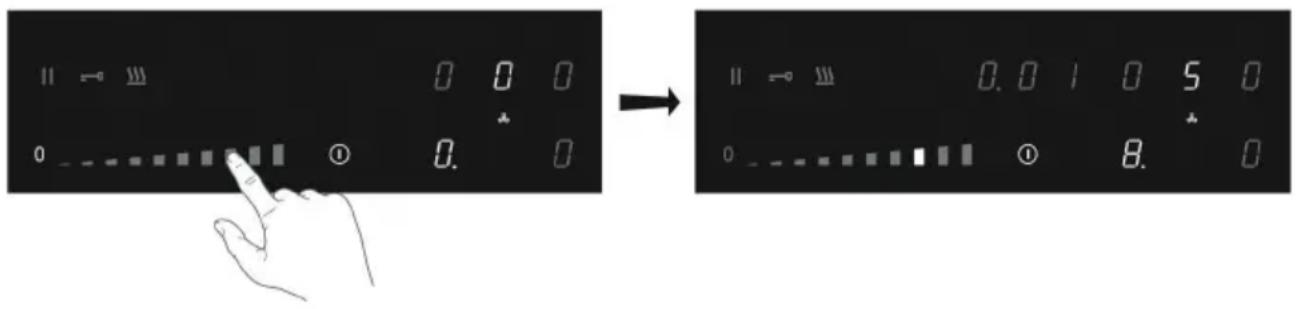
- Within 10 seconds, set the power level by touching the slide control.
The cooking zone starts at the level that has been set.
Boost
You can use the boost function to cook for max. 5 minutes at the highest cooking level. You can use the Boost function for a maximum of two cooking zones alongside each other at the same time.
- Touch power level P to select the Boost function.
▷ P' shows on the display.
▶ After the maximum boost time the power will be reduced to power level 9.
Pan detection symbol
When the pan detection symbol appears in the display:

- you have not placed a pan on the correct cooking zone;
- the pan you're using is not suitable for induction cooking;
- the pan is too small or not properly centred on the cooking zone.
The cooking zone will not work unless there is a suitable pan on the cooking zone.
- Set the power level to '0' to switch off the cooking zone.
- Switch off the induction hob by touching the On/off key.

Symbol H will appear in the display of the cooking zone which is too hot to touch. The symbol disappears when the surface has cooled down to a safe temperature. It can also be used as an energy saving function; if you want to heat other pans, use the cooking zone that is still hot.
Switch on the automatic heat-up function
This function sets the cooking zone at the highest level in order to bring your pan rapidly up to the required temperature. After a given time interval, the power level returns to the established level. This function is available for power level 1 to 8.
| Power level Heat-up time (seconds) | |
| 1 | 48 |
| 2 144 | |
| 3 230 | |
| 4 312 | |
| 5 408 | |
| 6 120 | |
| 7 168 | |
| 8 216 | |
- Switch on the hob and select the desired cooking zone.
- Touch and hold the slide control for at least 3 seconds at the desired level (from 1 to 8).
An 'A' appears in the display alternating with the selected power level. When the automatic heat-up time has expired, the cooking zone will switch automatically to the selected level which will show permanently on the display.
- To stop the automatic heat-up function, select the cooking zone and touch the slide control.
Switch on the keep warm function
- Switch on the hob and put a suitable pan on a cooking zone.
- Touch the cooking zone key of the desired cooking zone.
The '0' of the selected cooking zone will light up clearly and a single beep sounds.
- Touch the keep warm key.
The keep warm symbol 'u' appears in the display. The keep warm function is selected.

- Set the power level to '0' or touch the keep warm key to switch off the keep warm function.
Connecting the Bridge induction cooking zones
Two Bridge induction cooking zones can be connected to each other. This creates one large zone that can be used, for example, with a grill plate or a fish pan on the same power level. The pan must be large enough to cover the centres of the front and rear bridge induction cooking zone (at least 22 cm).
Connection of Bridge induction cooking zones
- Switch on the hob.
- Simultaneously touch the right-hand side cooking zone keys.
The rear cooking zone display shows a connection symbol to indicate that the two cooking zones are connected.

- Set the power level by touching the slide control.
The front cooking zone display shows the power level.
Disconnection of Bridge induction cooking zones
- Simultaneously touch the cooking zone keys of the connected cooking zones.
The connection symbol will disappear on the rear cooking zone display.

Pause cooking
This function stops the cooking activity temporarily (max. 10 minutes); the extraction will go to the lowest setting and timers are paused.
- Touch the pause key.
▷ All the displays show the pause symbol.

- To continue cooking, touch the pause key for at least 1 second until it flashes.
- Touch any other key within 10 seconds and the cooking process will continue.
The hob will automatically switch off after 10 minutes if the pause function is not switched off in the meantime.
Recall function
If the hob was switched off accidentally with the On/off key, all settings can be restored using the recall function.
- Touch the on/off key again within 6 seconds.
The pause key is flashing. - Touch the pause key within 6 seconds.
The previous settings are active again.
The minute minder is not connected to a cooking zone. The minute minder does not switch off a cooking zone or the extractor unit.
The hob is switched on.
- Touch the minute minder key to switch on the minute minder.
The timer display shows '0.00'.

- Use the ‘+’ or ‘-’ key to set the desired time (from 1 minute to 9 hours and 59 minutes).
The left position of the timer display shows the hours, the other positions the minutes.
▷ When the time is set, it will begin to countdown.
The timer display will show the remaining time.
The last 10 minutes will be displayed in minutes and seconds.
The timer flashes and the alarm beeps after the set time has passed.
- Touch the timer display to stop the alarm.
The alarm stops automatically after 2 minutes.

Touch the minute minder key and then touch the '-' key to set the time to '0.00' to switch off the minute minder before the time has passed.

When the hob is switched off; touch the on/off key twice to switch off the minute minder before the time has passed.
Using the cooking timer

The cooking timer is connected to a cooking zone. After the set time has elapsed, the cooking zone will switch off automatically.
The hob is switched on and for at least one cooking zone a power level has been set.
- Touch the desired cooking zone key.
- Touch the timer symbol.
The timer symbol of the active cooking timer lights up brightly.
The timer display shows '0.00'.

- Use the '+' or '-' key to set the desired time (from 1 minute to 9 hours and 59 minutes).
The left position of the timer display shows the hours, the other positions the minutes.
▷ When the time is set, it will begin to countdown and the timer symbol flashes slowly.
The timer display will show the remaining time.
The last 10 minutes will be displayed in minutes and seconds.
The selected cooking zone will switch off automatically once the set time has elapsed.
The timer flashes and the alarm beeps after the set time has passed.
- Touch the timer symbol to stop the alarm.
The alarm stops automatically after 2 minutes.

All the cooking zones can have a cooking timer that has been set. The display will always show the time of the cooking zone with the shortest time remaining.
Changing the pre-set cooking time
The cooking time can be changed anytime during the operation.
- Touch the relevant cooking zone key.
- Touch the timer symbol.
- Use the '+' or '-' key to change the time.
Checking the remaining cooking time
- Touch the cooking zone key to select the zone of which you want to see the remaining time.
A zone connected to the cooking timer is identified by a flashing timer symbol above the cooking zone display.
The timer will display the remaining time of the selected cooking zone.
During the last 10 minutes of countdown, the remaining time will be displayed in minutes and seconds.
Switching off the cooking timer
If you want to switch off the cooking timer before the end of pre-set time:
- Touch the cooking zone key to select the zone of which you want to switch off the cooking timer.
A zone connected to the cooking timer is identified by a flashing timer symbol above the cooking zone display. - Touch the timer symbol.
- Touch the '-' key(s) to set the time to '0.00'.
The timer symbol is no longer brightly lit. - Confirm the setting; touch the timer symbol again.
Child safety lock
To activate the child safety lock, the steps described must be completed within 10 seconds.
- Switch on the hob.
- Touch and hold any of the cooking zone keys for 3 seconds.
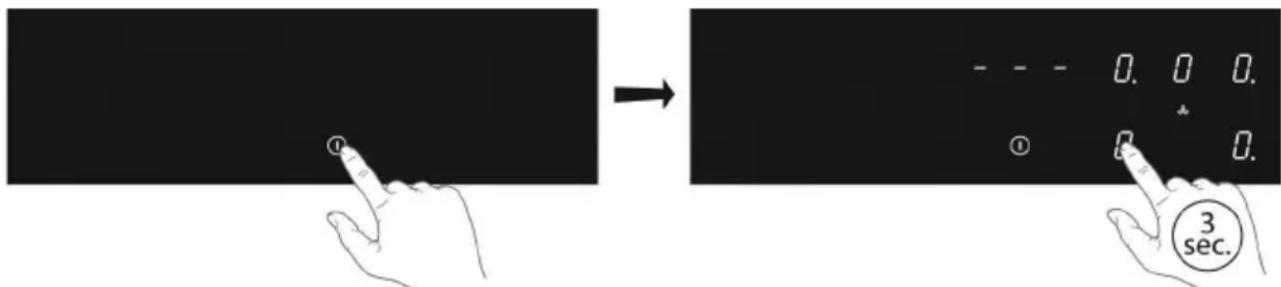
- Release and slide your finger from 0 to 9 along the slide control.
▷ All displays show the symbol 'L'.
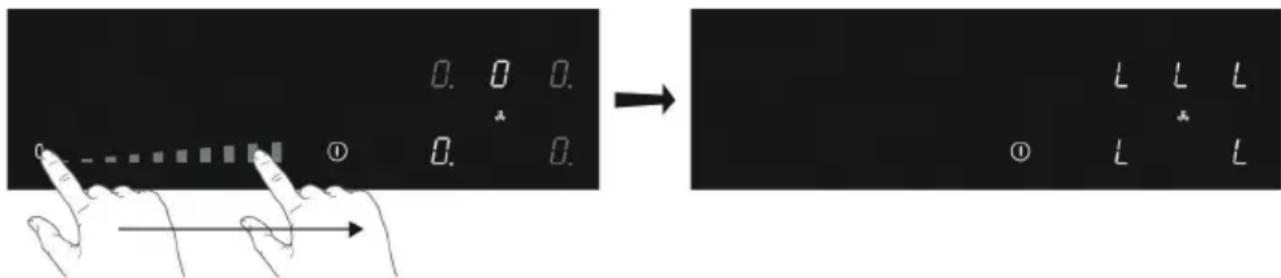
The hob is now locked. It prevents unintended switching on. After 20 seconds, the hob will switch off automatically.
To deactivate the child safety lock, the steps described must be completed within 10 seconds.
- Switch on the hob.
- Touch and hold any of the cooking zone keys for 3 seconds.
- Release and slide your finger from 9 to 0 along the slide control.

Locking function for rapid cleaning during cooking
- Touch the lock key.
The lock key lights up brightly; the settings of the hob are locked to allow rapid cleaning. - Touch the lock key again after the rapid cleaning to switch off the function.

Manually switching on and off the extractor unit
- Touch the extraction key.
The display of the extractor unit lights up.
- Set the extractor speed level within 3 seconds by touching the slide control (1 to 9).
The extractor unit switches on with the extraction speed that is set.
▷ Set a higher or lower level with the slide control.
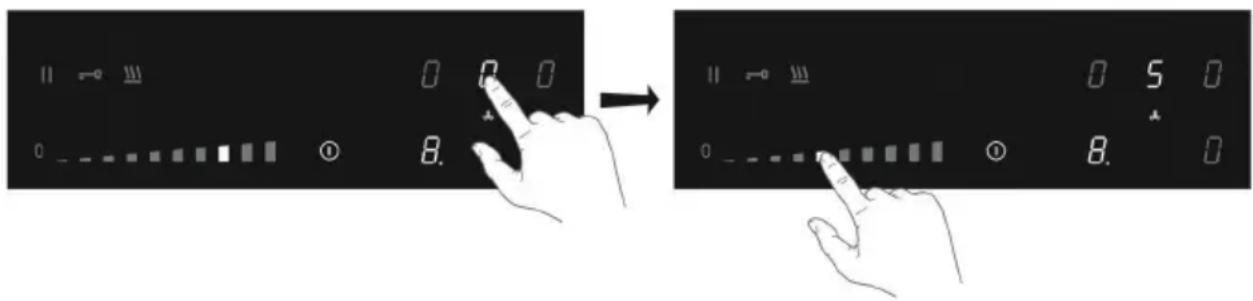
- Set the extractor speed level to '0' to switch off the extractor unit.
- Switch off the induction hob by touching the on/off key.

In recirculation mode, the extractor unit will operate in follow-up mode for another 20 minutes when the hob is switched off.
Boost
You can use the boost function to extract for max. 6 minutes at the highest level.
- Touch level P to select the boost function.
▷ 'P' shows on the display.
▶ After the maximum boost time the extractor speed level will be reduced to level 9.

In recirculation mode there is no time limit and the boost function stays active.
- Set the extractor speed level to '0' to switch off the extractor unit.
- Switch off the induction hob by touching the on/off key.
Switching on and off the automatic extraction mode

In automatic extraction mode the extraction level adjusts automatically to the use of the cooking zones.
A cooking zone is operating (level 8) and the automatic extraction mode is active (level 5).
- Touch the extraction key for three seconds.
▷ 'A' shows on the display.

- Touch the extraction key for three seconds again to switch off the automatic extraction mode.
Set a number of minutes delay time
Use this function to switch off the extractor unit with a delay of a number of minutes.

The automatic extraction mode must be switched off.
- Switch on the hob.
- Touch the extraction key and set an extractor speed level.

- Touch the timer symbol.
The timer symbol of the extractor unit lights up brightly.
- Use the '+' or '-' key to set the desired delay time.
▷ Countdown starts automatically.
The extractor unit switches off after the time that has been set.

Saturation of the grease filter
After 30 operating hours, 'F' and 'G' will be shown alternately in the display of the extraction unit; it is necessary to perform maintenance of the grease filter (see 'Maintenance/Cleaning the filters).
The grease filter saturation indication is always enabled.
Saturation of the odour filter
By default the odour filter saturation indication is deactivated (when the extraction is operating in ducted mode). Activate the odour filter saturation indication if the extraction unit is installed as a recirculation application; see 'User menu'.
After 120 operating hours, 'F' and 'C' will be shown alternately in the display of the extraction unit; it is necessary to perform maintenance of the odour filter (see 'Maintenance').
- When a combination odour/fine dust filter is used, the filter must be replaced after 1 year at the latest.
Reset the memory of the filter saturation indication
Reset the memory after replacing the grease filter and/or the odour filter
- Switch on the hob.
- Touch and hold the extraction key for 3 seconds.
On the display of the extractor unit 'F' and 'G' or 'F' and 'C' will disappear and the memory starts counting over again.
USER MENU
The user menu enables the user to set a.o. the signals on the hob as desired. This concerns both audio (tone and volume) and visual signals.
| Menu code | Discription Configuration value | |
| U0 | Total power available for the appliance | From 1400W to 7400W (default) in 100W steps |
| U1 | Ducted mode / Recirculation mode | 0: ducted mode (default) 1: recirculation mode |
| U2 Volume key sound 0 (off) - 1 - 2 - 3 max. | (default) | |
| U3 Volume alarm signal 0 (off) - 1 - 2 - 3 max. | (default) | |
| U4 Lighting level display Max. 0 (default)- 1 | - 2 - 3 - 4 - 5 - 6 - 7 - 8 - 9 Min. | |
| U5 Countdown animation 0: off (default) 1: on | ||
| U6 Automatic | pan detection | 0: off1: on (default) |
| U7 Audio signal countdown timer | 0: audio signal during 120 seconds (default) 1: audio signal during 10 seconds 2: no audio signal | |
Open the user menu
- Touch the on/off key twice within three seconds.
The pause key is blinking. - Touch and hold the pause key.
- Then, touch each cooking zone key clockwise (start with the cooking zone key on the front left).

USER MENU
4. Release the pause key.
“U” is flashing alternately with number “0” on the cooking zone display on the rear left.
- With menu code U0, the configuration value appears in the timer display.
For all other menu codes, the configuration value appears in the cooking zone display on the front left.


Menu code U0 (total maximum power)
If the electric installation in your home has different current limits, maximum power consumption of the cooking hob can be reduced.
- You have opened the user menu.
- Touch the timer display once and use the left side of the slide control to decrease the power with 0,1kW per step. Use the right side of the slide control to increase the power with 0,1kW per step.
- Confirm the setting; touch and hold the on/off key until you hear an audio signal.

Menu code U1 - U7
- You have opened the user menu.
- Touch the cooking zone key on the rear left and choose the correct number of the menu code (see table).
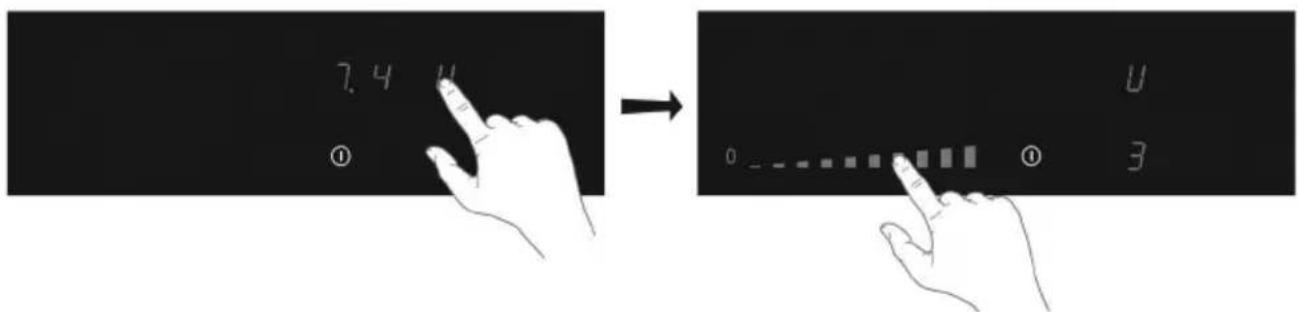
USER MENU
- Touch the cooking zone key on the front left and select the correct value (see table).
- Confirm the setting; touch and hold the on/off key until you hear an audio signal.

POWER LIMITER

Setting the power limiter should only be carried out by a registered and qualified installer. Please read the safety regulations and the installation instructions carefully.
The hob is equipped with a power limiter. If the total power of operating cooking zones exceeds the maximum available amount of power, the power is automatically reduced. The display of the cooking zone who is being reduced in its power is first flashing; the level is then automatically reduced to the highest available power.
- The limiter is set at 7400W by the factory, but it is possible to change this setting to 6000W or 4500W.
Power limiter configuration
Make sure there are no pots or pans on the hob before you start!
- Disconnect the appliance from the main power supply by removing the power connector from the socket, by removing the fuse or turning the circuit breaker off.
- Reconnect the appliance to the power supply.
The minute minder key is flashing.
- Perform, within 2 minutes after reconnecting the hob to the power supply, the following steps.
• Make sure all cooking zones are switched off.
3 Touch and hold the minute minder key. - Then, touch each cooking zone key counterclockwise (start with the cooking zone key on the front right).

POWER LIMITER
- Release the minute minder key.
“C” is flashing alternately with “0” on the cooking zone display on the rear left.
The configuration value appears in the cooking zone display on the front left.
- Touch the cooking zone key on the rear left and choose "8" by using the slide control.
“C” is flashing alternately with “8” on the cooking zone display on the rear left.

- Touch the cooking zone key on the front left and select the power limitation wanted with the slide control (see table).
- Then, touch and hold the On/off key until all the display segments disappear.
The hob is now ready for use with the selected power limiter active.

| Setting slide control Setting of the power limiter | |
| 0 7400W | |
| 1 6000W | |
| 2 4500W | |
MAINTENANCE
Cleaning
First use
- Use a damp cloth to clean and dry the glass surface before using it for the first time.
- It is recommended to dry the appliance after having cleaned it with a damp cloth, in order to prevent the build-up of limescale.
Daily cleaning
- Although food spills cannot burn into the glass, we nevertheless recommend you to clean the hob immediately after use.
- Best for daily cleaning is a damp cloth with a mild cleaning agent.
- Dry with kitchen paper or a dry teacloth.
Stubborn stains
- Stubborn stains can also be removed with a mild cleaning agent such as washing-up liquid.
- Remove watermarks and lime scale with vinegar.
- Metalmarks (caused by sliding pans) can be difficult to remove. Special agents are available.
- Use a glass scraper to remove food spills. Melted plastic and sugar is also best removed with a glass scraper.

Never use abrasives. They leave scratches in which dirt and lime scale can accumulate. Never use anything sharp such as steel wool or scourers.
Filters and collect tray
Grease filters
In the display of the extraction unit, 'F' and 'G' will be shown alternately after 30 operating hours of the extraction unit. The grease filters should now be cleaned.
These must be cleaned once a month (or when the filter saturation indication system indicates this necessity). Do not use aggressive cleaning agents and preferably clean the filter manually or in the dishwasher at a low temperature and with a short program. Place the filters with the opening downwards in the dishwasher so that the water can run out. The cleaning agents used in dishwashers make the aluminum dull faster. This is normal.
After the cleaning and replacing of the grease filters, reset the memory of the filter saturation indication.
MAINTENANCE

Odour filter (recirculation use)
In the display of the extraction unit, 'F' and 'C' will be shown alternately after 120 (downdraft) operating hours. The odour filter needs maintenance.
Depending on which filter is applied to your system, filter maintenance should be performed.
Please refer to the manual of the filter that has been installed.
After the maintenance, reset the memory of the filter saturation indication.
TROUBLESHOOTING

Attention
If you see a crack in the glass top (however small), switch off the hob immediately and disconnect it from the power mains. Contact the service department.
If the appliance does not work properly, this does not always mean that it is defective. Try to deal with the problem yourself first by checking the table below. You can also take a look on our website for more information. If the problem continues, contact the service department.
| Symptom Possible cause Solution | ||
| The display lights up when the hob is activated for the first time. | This is the standard set-up routine. | Normal operation. |
| The fan runs on for several minutes after the hob has been switched off. | The hob is cooling. Normal operation. | |
| A slight smell is noticeable the first few times the hob is used. | The new appliance is heating up. | This is normal and will disappear once it has been used a few times. Ventilate the kitchen. |
| The pans make a noise while cooking. | This is caused by the energy flowing from the hob to the saucepan. | At high levels this is perfectly normal for some pans. It will not damage either the pans or the hob. |
| You have switched on a cooking zone, but the display shows u. | The pan you are using is not suitable for induction cooking, or has a to small diameter. | Use a suitable pan. |
| A cooking zone suddenly stops working and you hear a signal. | The time that has been set for the timer has ended. | Touch the left or right timer key to stop the alarm. |
| The hob is not working and nothing appears in the display. | There is no power supply due to a defective cable or a faulty connection. | Check the fuses or the electric switch (if there is no plug). |
| A fuse blows as soon as the hob is switched on. | The hob has been wrongly connected. | Contact a professional installer. |
| L shows on the display. Child safety lock is activated. See chapter 'Operation of the hob/Child safety lock'. | ||
| Error code ER 03. You have pressed two or more keys at the same time. | Do not operate more than one key at the same time. | |
| Clean the control panel. | ||
TROUBLESHOOTING
| Symptom Possible cause Solution | ||
| Error code ER21. Overheating. | Let the hob cool down. | |
| Error code E2. Excess temperature | ure of the induction element. Empty cookware might have been used. | Do not heat empty cookware. |
| Error code E3. Wrong pan. Use | appropriate pans. | |
| Error code E8. Malfunction of the | extractor unit. The extractor unit may be blocked. | Remove any blockages and clean the extractor unit. |
| Other error codes. Contact the service | department. | |
Recirculation filters - (only for filter version)
Filters can be restored in the oven, better if fan-assisted.
Temperature of the oven should be 150irc - 180irc , higher temperatures could damage the filters. It is better to place the filter bricks on the oven's grid, non pre-heated, and let them cool down completely before removing.
The time needed to restore the filters is at least two hours or even more, depending on the cooking intensity.
Restoring should be done only in a well-ventilated place.
Do not wash the filters in the dishwasher.
Recirculation filters can be restored many times, but for a better efficiency we recommend to replace every 5 years.
OBS
| Kogezone Minimums diameter | |
| OCTA (single) 110mm | |
| OCTA (bridged mode) | 230 mm |
natural_image
Illustration of cooking pots and a dish on a black plate (no text or symbols)natural_image
Two identical cooking pots with checkmarks and X marks, one emitting smoke from a chimney (no text or symbols)BETJENING AF KOGEPLADEN


BETJENING AF KOGEPLADEN
- Indstil effektniveauet inden for 10 sekunder, ved at trykke på skydeknappen.
Boost
- Indstil effektniveauet til "0", eller tryk på knappen for Keep warm, for at deaktivere funktionen.
Sammenkobling af de forbundne kogezoner Bridge
- Indstil effektniveauet ved at trykke på skydeknappen.
▶ Displayet på den forreste kogezone angiver effektniveauet.
BETJENING AF KOGEPLADEN
Frakobling af de forbundne kogezoner Bridge
Pause tilberedning
- Brug knappen "+" eller "-" til at indstille den ønskede tid (fra 1 minut til 9 timer og 59 minutter).
BETJENING AF KOGEPLADEN
BETJENING AF UDSUGET
BRUGERMENU
EFFEKTBEGRÄNSER

▶ Knappen for timeren blinker.
EFFEKTBEGRÄNSER
5. Slip for timeren.
natural_image
Illustration of cooking pots and a kitchen appliance on a black plate (no text or symbols)natural_image
Two identical cooking pots with checkmarks and X marks, one emitting smoke from a chimney (no text or symbols)DRIFT AV PLATETOPP


DRIFT AV PLATETOPP
- Still inn effektnivået innen 10 sekunder ved å berøre glidekontrollen.
Boost
Pause i kokingen
Denne funksjonen avbryter tilberedningsaktiviteten midlertidig (maks. 10 minutter); avtrekket går til det laveste nivået og timerne settes på pause.
- Berør Pause-tasten.
- Slipp og skyv fingeren fra 0 til 9 langs glidekontrollen.
DRIFT AV PLATETOPP
DRIFT AV VENTILATOR
BRUKERMENY
- Berør tasten for fremre venstre kokesone og velg riktig verdi (se tabell).
- Bekreft innstillingen; berør og hold inne on-/off-tasten til du hører en pipelyd.

EFFEKTBEGRENSER

EFFEKTBEGRENSER
5. Slipp tidtaker-tasten.
På displayet til den bakre venstre kokesonen, blinker "C" vekselvis med tallet "0".
- Konfigurasjonsverdien vises på displayet til den fremre venstre kokesonen.
- Berør tasten på den fremre venstre kokesonen og velg ønsket effektbegrensning med glidebryteren (se tabell).
- Berør og hold deretter inne On-/Off-tasten til alle segmenter av displayet forsvinner.
| Innstilling av glidekontrollen | Innstilling av effektbegrenseren |
| 0 7400 W | |
| 1 6000 W | |
| 2 4500 W |
VEDLIKEHOLD
Rengjøring
Første gangs bruk
| Kokyta Minimum diameter | |
| OCTA (single) 110mm | |
| OCTA (bridged mode) | 230 mm |
natural_image
Illustration of cooking pots on a black tray with a griddle and kitchen utensils (no text or symbols)natural_image
Two identical cooking pots with checkmarks and X marks, one emitting smoke from a chimney (no text or symbols)HÄLLENS FUNKTION


HÄLLENS FUNKTION
Boost
Tillagningspaus
HÄLLENS FUNKTION
- Tryck på timer-symbolen.
ANVÄNDARMENY
EFFEKTBEGRÄNSARE

EFFEKTBEGRÄNSARE
natural_image
Illustration of cooking pots on a black tray with a griddle and kitchen utensils (no text or symbols)natural_image
Two identical cooking pots with checkmarks and X marks, one emitting smoke from a chimney (no text or symbols)LIESITASON TOIMINTA


LIESITASON TOIMINTA
Boost (tehoste)
Keittämistauko
LIESITASON TOIMINTA
TUULETTIMEN TOIMINTA
- Kosketa ajastimen symbolia.
KÄYTTÄJÄVALIKKO
TEHONRAJOITIN



- GB
- DK
- Fire hazard
- Burn hazard
- Suitable food containers
- Non-suitable food containers
- Danger of mishaps
- Noise emissions
- First usage
- YOUR INDUCTION HOB
- Description
- Indications in the display
- Use of the touch keys and slide control
- Induction noises
- Appropriate pans
- BEFORE FIRST USE
- Pan detection
- Cooking levels
- Boost function
- Cooking guidelines
- Use of the downdraft
- Start cooking
- Boost
- Pan detection symbol
- Switch on the automatic heat-up function
- Switch on the keep warm function
- Connecting the Bridge induction cooking zones
- Disconnection of Bridge induction cooking zones
- Pause cooking
- Recall function
- Using the cooking timer
- Checking the remaining cooking time
- Switching off the cooking timer
- Child safety lock
- Locking function for rapid cleaning during cooking
- Manually switching on and off the extractor unit
- Switching on and off the automatic extraction mode
- Set a number of minutes delay time
- Saturation of the grease filter
- Saturation of the odour filter
- Reset the memory of the filter saturation indication
- USER MENU
- Open the user menu
- Release the pause key.
- POWER LIMITER
- MAINTENANCE
- Cleaning
- First use
- Daily cleaning
- Stubborn stains
- Filters and collect tray
- Grease filters
- TROUBLESHOOTING
- Attention
- Recirculation filters - (only for filter version)
- OBS
- BETJENING AF KOGEPLADEN
- Sammenkobling af de forbundne kogezoner Bridge
- Frakobling af de forbundne kogezoner Bridge
- Pause tilberedning
- BETJENING AF UDSUGET
- BRUGERMENU
- EFFEKTBEGRÄNSER
- Slip for timeren.
- DRIFT AV PLATETOPP
- Pause i kokingen
- DRIFT AV VENTILATOR
- BRUKERMENY
- EFFEKTBEGRENSER
- Slipp tidtaker-tasten.
- VEDLIKEHOLD
- Rengjøring
- Første gangs bruk
- HÄLLENS FUNKTION
- Tillagningspaus
- ANVÄNDARMENY
- EFFEKTBEGRÄNSARE
- LIESITASON TOIMINTA
- Boost (tehoste)
- Keittämistauko
- TUULETTIMEN TOIMINTA
- KÄYTTÄJÄVALIKKO
- TEHONRAJOITIN
Brand : EICO
Model : Phantom Premium 80 N F
Category : Range hood