
Dron X-bee Drone 7.2 FPV - Drone Overmax - Free user manual and instructions
Find the device manual for free Dron X-bee Drone 7.2 FPV Overmax in PDF.


| Product Type | Quadcopter drone with FPV capability |
| Brand | Overmax |
| Model | Dron X-bee Drone 7.2 FPV (OV-X-BeeDrone 7.2 FPV) |
| Dimensions (approx.) | 30 x 30 x 10 cm (estimated) |
| Weight (approx.) | 200 g (estimated) |
| Drone Battery | Lithium rechargeable battery, 3.7V, capacity approx. 600 mAh |
| Drone Battery Charging Time | Approximately 3.5 hours |
| Transmitter Power | 4 x AA batteries (not included) |
| Monitor | 4.3 inch FPV monitor, rechargeable via USB (1.5 hours charging) |
| Camera | 720p HD camera, adjustable angle |
| Transmission System | 5.8G FPV with 80 m range |
| Flight Features | Headless Mode, One Key Return, Altitude Hold, 360° Flips, Trimming |
| Takeoff/Landing | One-key start/stop and emergency stop |
| Storage Media | Micro SD card (not included) for photo/video |
| Age Recommendation | 14 years and older with adult supervision |
| Safety Features | Protective hoods for propellers, low battery warning |
| Maintenance | Clean with soft cloth; check charger and cables regularly; store batteries properly |
| Spare Parts Available | Protective hoods, propellers, camera assembly, screws |
| Compliance | CE, R&TTE, RoHS |
Frequently Asked Questions - Dron X-bee Drone 7.2 FPV Overmax
User questions about Dron X-bee Drone 7.2 FPV Overmax
0 question about this device. Answer the ones you know or ask your own.
Ask a new question about this device
Download the instructions for your Drone in PDF format for free! Find your manual Dron X-bee Drone 7.2 FPV - Overmax and take your electronic device back in hand. On this page are published all the documents necessary for the use of your device. Dron X-bee Drone 7.2 FPV by Overmax.
USER MANUAL Dron X-bee Drone 7.2 FPV Overmax
natural_image
Black and blue quadcopter drone with extended wings and propellers, shown in flight against white background (no text or symbols)X-bee drone 7.2 FPV
Chart indicating each key function on the transmitter
EN
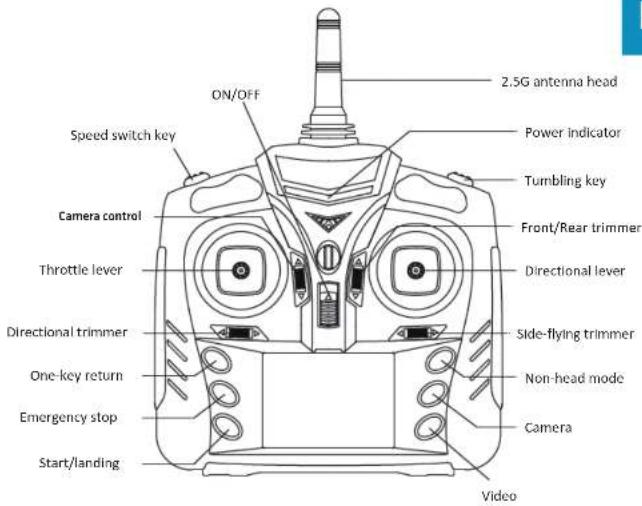
Important!
Before you begin, please read the Safety Warnings could lead to injuries. The RC aircraft is not intended for those under 14 years of age without proper adult supervision.
EN
Warnings:
*Please follow the instruction or packing instructions for proper installation and use. Some parts are assembled by the adult.
*The product contains small parts, eating or possible choking hazard.
*Please put away the packing material in time, so as not to couse harm to children.
*Need to regularly check the charger, wire, plug, shell and other components, found that damage, should stop using, until the repair.
*The charger, the battery pack, and the charging device must be inserted in the same power as the product labeling.
*Can only use the original configuration of the charger, the charger is not a toy.
*Clean toys should be disconnected from the charger.
*Non rechargeable battery.
*When charging the rechargeable battery, the need for adult guardianship.
*Do not mix old and new batteries or batteries of different types, the exhaustion of the battery should be promptly removed.
* Do not short-circuit the battery, break down, or fall into the fire.
*Long time does not control the product, please take out the battery.
*Do not touch the rotating parts, to avoid causing harm to the body.
*Please do not serious impact or drop aircraft and remote control.
*Clean the product with a clean, soft cloth.
*Users are responsible for ensuring that the product will not cause damage to itself or others, and that the manufacturer or distributor does not take any responsibility for the operation of the damage caused by improper operation of their own or other people's safety.
*The package and the instruction manual contain the important information of the product, please keep it.
Aircraft shielding installation method
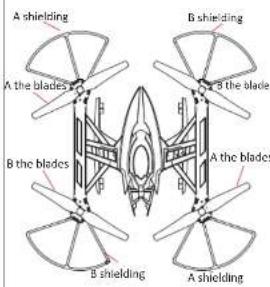
Pay attention to
The protective hood and the blade should be assembled as per the two direction of A, B indicated. Please note that the protective hood of the aircraft should be correctly loaded as per the correct loading position shown, which is corresponding to the picture above. Please DO NOT load it wrong.
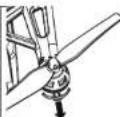
Step 1: Please pull out the decoration piece of the 4 protective hoods as the left picture shown and well keep it.
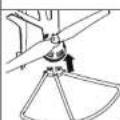
Step 2: As the left picture shown, please insert the protective hood into the groove as per the correct position shown.
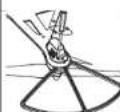
Step 3: As the left picture shown, lock the screw included into the hole position of the two screws. Following the same method to load the other 3 protective hoods, please load and well lock the screws as the correct position shown, thus finish the assembly.
Battery installation
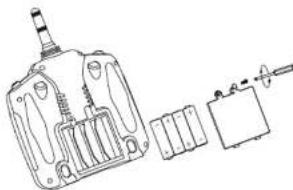
- As the picture shown, please unload battery cover of the transmitter. Load 4 PCS "AA" batteries (not included) as the correct polarity shown in the battery compartment, and then load the battery cover and tightly wrench the screw.
Caution: a. When loading batteries, please load the batteries as per the correct "+" "-" polarity shown on the battery compartment. Please DO NOT load them upside down.
b. Please DO NOT mix using the old batteries with the new ones or mix batteries of different types of brand.
natural_image
Technical line drawing of a mechanical device with internal components and a separate assembly (no text or symbols)EN
Charging instruction of lithium batteryry
(Please remove the batteries from the aircraft before charging)
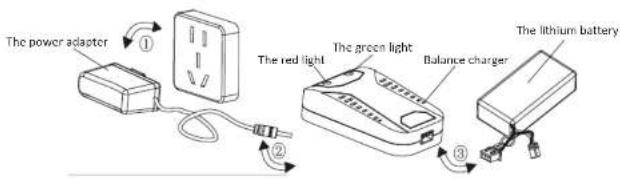
- Insert the power plug of the power adaptor into the assigned power socket.
- Insert manually the plug of the power adaptor into the bale gear, this time the green indicator of the balancing charger will show eternal blighting char.
- Insert manually another end of the balancing charger into the charging plug of the battery, this time the red indicator will turn bright "ON". Charging for about 3.5 hours, the red indicator will be OFF, which represented the charging is finish. Please disconnect all the links and put it on the safe position.
Related matters needing attention in the use of lithium batteries:
A. Charging, the staff do not leave and charging time is not too long, charging process found the battery, please stop charging, avoid battery damage or fire, etc...
B. Do not put the battery in the inflammable and explosive goods next to charge, when the battery in the use or recharging process, once the small or battery suddenly become hot, deformation, discoloration and other abnormal phenomenon, please stop using the battery.
C. If the battery leaks, avoid contact with skin and eyes. If contact with skin and eyes, rinse immediately with plenty of cold water and immediately seek medical attention.
D. Can only use the original charger to charge the product to the product, and determine the charger voltage to meet your local standards.
E. Do not put the battery into the fire, microwave or pressure tank.
F. Please do not use solvents, industrial alcohol or other flammable solvents to clean the product and the charger.
G. Products include plastic, electronic components and battery components, please do not use such items as daily garbage disposal, please according to the local garbage collection requirements, the classification process.
Preparation before operating the aircraft
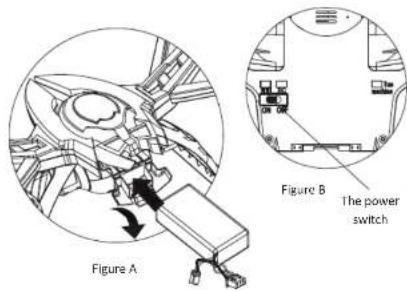
Battery loading and power connection: Load the battery into the battery compartment as the picture A shown and then well connects with the power plug.
Caution: When connecting the power plug, please do recognize well the "+" polarity, say red line to red line.
EN
Decoding operation
- When connecting correctly with the power plug, please point the tail part of the aircraft to yourself and place it on the flat ground. This time the light on the aircraft will be flashing quickly and please DO NOT move the fuselage.
- Switch on the transmitter, this time you will hear two sound of "di, di" sending ot from the transmitter. Then pleas push the throttle lever to the highest position. The LED light on the aircraft will be flashing slowly, and then please pull it to the lowest position and you will hear "di" sound sending out from the transmitter, the power indicator of the transmitter and the LED light of the aircraft will show eternal bright, which represents decoding is successfully made and you can control the aircraft.
START/STOP operating method of the aircraft
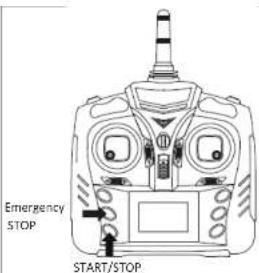
STARID/STOIH
- Press "START/STOP" key to start the aircraft. This time the motor of the aircraft will be running slowly. Push upward the throttle leaver, the aircraft will take off.
- Press "START/STOP" key during the course of flying, the aircraft will be landing slowly until landing on the ground and stop flying.
Emergency STOP
In case that the aircraft is fallen off by accident during the process of flying or meeting the danger, please press the Emergency Stop key, this time the aircraft will stop working quickly.
Tips on Height Setting: Push upward the throttle lever and the aircraft will be ascending to the assigned height. Then please loosen the throttle lever and the aircraft will be flying steadily as per this height.
Instruction on normally lying and climbing control of the aircraft
EN
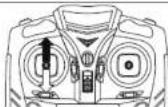
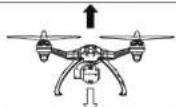
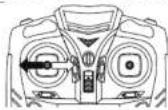
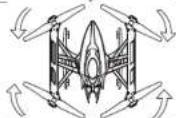
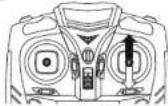
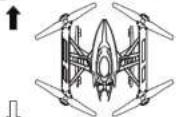
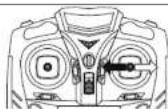
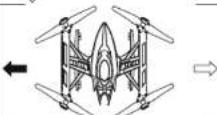
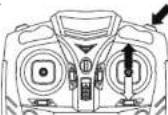
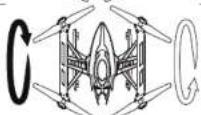
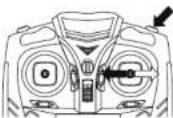
When pushing the throttle lever upward, the aircraft will be ascending; When the throttle lever is pushed down, the aircraft drops.
When pushing the throttle lever left, the aircraft will be turning left. When the throttle lever is pushed to the right, the aircraft turns right.
When pushing the direction lever upward, the aircraft will be advancing forward. When the direction of the lever back to pull down the aircraft.
When pushing the direction lever to the left, the aircraft will be flying to the left side. When the direction of the joystick to the right, aircraft fly on the right side.
When pushing the direction lever upward, the aircraft will be tumbling forward. When the direction of the lever is pulled down, the aircraft turn.
When the direction of the joystick to the left, the aircraft left turn. When the direction of the joystick to the right, aircraft right turn.
Tips: Please fly the aircraft to the height of 3 meters or above, and then make the aircraft tumbling.
Instruction on Action Trimming of the aircraft
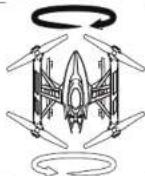
Push slowly throttle lever. When the aircraft ascending till about 1.5 meters, if the aircraft make spinning in the air or titling toward different direction, you can use Trimmer to correct the action.
Caution: When the aircraft flies 30 cm above the ground, the aircraft may become instable due to the turbulence by its own blade. This is called "Gravity Reaction". The lighter of the weight of the aircraft the bigger affection of the "Gravity Reaction" in maybe.
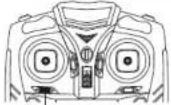 | 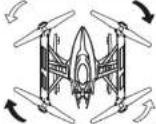 | When spinning to the left, please trim it to the right till it is well repaired.When the right spin, spinner left adjusted until repaired. | |
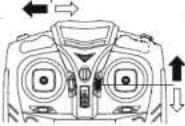 | 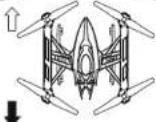 | When deviating toward forward, please trim it to the back until it is well repaired.When trimming to before adjustment, until repaired. | |
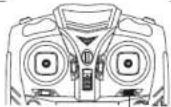 | 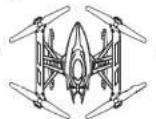 | When deviating to the left, please trim it to right until it is well repaired.The bias to the right, fine-tuning adjustments to the left, until the repair. | |
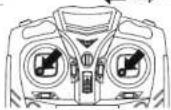 | If the aircraft cannot be ascending vertically when taking off, you can calibrate the aircraft. As the method shown in the picture, pull the throttle lever and direction lever both in the same time to the down left corner, this time the indicator of the aircraft will be flashing quickly and then release all the actions on the transmitter, wait until the indicator shows eternal bright "ON", the calibration can be finished. | ||
Operating method on the Non-head Mode of the aircraft
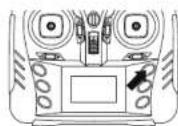
-
Before entering into Non-head Mode, please well confirm the Forward direction of the decoding. Press the key for Non-head Mode, you will hear the transmitter sending out inter-mitten sound of "Di, Di, Di", this time it enters into the Non-head Mode. No matter which direction the aircraft may rotate to, the flying direction will be as per the direction that the decoding is made.
-
If you need to exit from the Non-head Mode, please press the key for Non-head Mode once again. When hearing the sound of "Di, Di, Di" sending out from the transmitter, it will exit and enter into the Ordinary Mode.
EN
Operating instruction on Openkey Return of the aircraft
EN
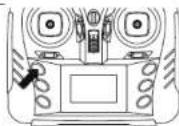
-
Press the "One key Return" key the transmitter will send out Inter-mitten sound "DI, DI", this time it has entered into the "One key Return Mode", the aircraft will be flying backward slowly as per the backward direction the decoding is made.
-
When the aircraft is flying too closed to you, please DO NOT press "One key Return" key so as to avoid being wounded by accident due to carelessness.
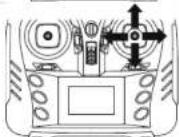
When entering "One key Return Mode", simply pushing the Direction Lever toward either direction (forward or backward or to the left or to the right) can exit from the "One key Return Mode"
Instruction on the adjustment of the Camerawingle
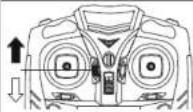
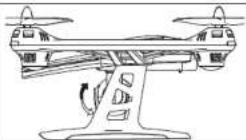
Adjusting method of the Camera angle: Press downward the Angle Adjusting key, the Camera head will turn downward; Press upward the Angle Adjusting key, the Camera head will turn upward.
Instruction on Camera/Video recording
Component installation
-
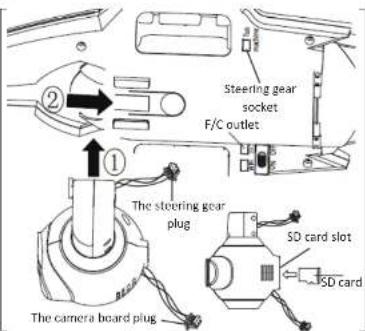
Point the Camera assembly upward to the fixing groove as the right picture "1" shown, and then push toward inside into the fixing seat as the direction of right picture "2" indicated.
-
As the position shown on the right picture, firstly please insert correctly the rudder plug into the rudder socked at the base of the aircraft, and then insert correctly the plug of the Camera board into the F/C socket.
Caution: The plug of the Camera board is not to be inserted to the WIFI socket. Otherwise it may damage to recording components. Please Do remember this! 3. As the right picture shown, please correctly load the SD card into the card groove of the Camera component, gently press it and load the SD card, and then press it gently and the SD card will pop out automatically.
Assembly of the Monitor:
As picture 1 shown, please load the monitor and the fixing parts on the root part of the 2.4G antenna in the transmitter and then fix the screws included firmly. Well assemble the monitor of the transmitter, as picture 2 shown.
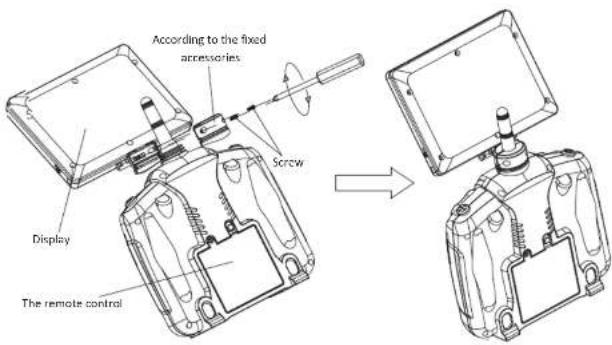
Figure 1
Figure 2
EN
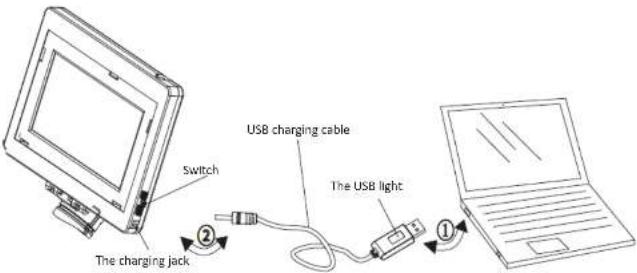
Charging Instruction of monitor (please pull the power switch to OFF position before charging).
- Insert the USB cable into the USB port of the computer, this time the USB indicator will be ON.
- Then insert another end of the USB cable into the charging port of the monitor, this time the USB indicator will be OFF.
- Charging for about 1.5 hours, the USB indicator will be ON, which represents the charging is finish.
FPV monitor operating method
- Please connect the power of the aircraft as per the correct method, switch on the power of the transmitter and make decoding successfully.
- Please pull the ON/OFF of the monitor to "ON" position, after several seconds, the screen will show the image transmitted from the Camera.
- This time you can control the aircraft, the screen will show the real-time transmitting image.
Camera & Video Recording
- When the aircraft is successfully decoded, please confirm if the TF card is well loaded into the Camera Assembly.
- Press the Camera key on the transmitter, the Camera will take picture and preserve.
- Press the Video Recording key on the transmitter, the Camera will start recording, this time the monitor will start record the recording time. Press this key once again to exit the recording and preserve.
Read the content of 50 cards
Switch off the power of the aircraft and remove the SD card. Either the SD card is put into the card reader and read on the computer or loaded directly into the mobile, then you can use the corresponding format to play the video or see the picture.
Characteristics instruction
5.8G transmitting system is applied on this product with transmitting distance reaching 80 meters. Strong anti-interference ability and no need to debug. 720p High Definition Camera is applied, 4.3 inch of screen.
Precautions
- When the remote control or the aircraft power is low, the remote distance affected.
- If the aircraft power is low, there will be flying high enough or take off difficult.
- If the aircraft appeared damaged, deformation please timely repair, severe wind leaves broken or damage do not fly, doing so may result in injury.
- The long-term is not used when the remote controller of the battery to prevent damage to the product from battery leakage.
- Cut cannot let the aircraft crashed from a height or a serious collision, this will damage the aircraft or shorten the aircraft life.
- In order to ensure the stability of the aircraft, when the aircraft hit to the real object and then fall, place the aircraft placed level ground to stay for 2-3 seconds, until the air craft automatic detection level, and then manipulate.
Used photos are illustrative and may differ from the real.
PL
natural_image
Technical line drawing of a mechanical device with internal components and a separate view (no text or symbols)natural_image
Technical diagram of a mechanical assembly with a labeled component (no readable text or symbols)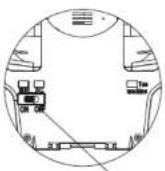
Obrazek B
Przycisk
zasilania /
Włącznik
natural_image
Technical line drawing of a mechanical assembly with no visible text or symbolsLithium element of these
START/STOP
natural_image
Technical line drawing of a mechanical device with internal components and a separate component (no text or symbols)Chinese contributing card SBD
Characteristic attribute component factor
Declaration of Conformity
Product details
For the following
Product: Drone
Model(s): OV-X-BeeDrone 7.2 FPV
Date of issue: 10/2016
Declaration & Applicable standards
We, BrandLine Group Sp. z o.o., hereby declare under our sole responsibility that the of the above referenced product complies the following directives:
R&TTE Directive 1999/5/EC
EMC Directive 2004/108/EC
Low Voltage Directive 2006/95/EC
RoHS Directive 2011/65/EU
The following harmonized standards have been applied:
Safety and Health:
EN 62479: 2010
EN 60950-1: 2006+A11: 2009+A1: 2010+A12: 2011+A2: 2013
EMC:
EN 301 489-1 V 1.9.2 (2011-09)
EN 301 489-17 V 2.2.1 (2012-09)
RF Spectrum Efficiency:
EN 300 328 V1.8.1 (2012-06)
Representative
BrandLine Group Sp. z o.o.
natural_image
Top-down view of a black and blue OVMAX drone with four propellers (no text or symbols on the aircraft body)www.overmax.eu
- X-bee drone 7.2 FPV
- EN
- Warnings:
- Aircraft shielding installation method
- Battery installation
- Charging instruction of lithium batteryry
- Related matters needing attention in the use of lithium batteries:
- Preparation before operating the aircraft
- Decoding operation
- START/STOP operating method of the aircraft
- STARID/STOIH
- Emergency STOP
- Instruction on Action Trimming of the aircraft
- Operating method on the Non-head Mode of the aircraft
- Operating instruction on Openkey Return of the aircraft
- Instruction on the adjustment of the Camerawingle
- Instruction on Camera/Video recording
- Assembly of the Monitor:
- FPV monitor operating method
- Camera & Video Recording
- Read the content of 50 cards
- Characteristics instruction
- Precautions
- PL
- Lithium element of these
- START/STOP
- Chinese contributing card SBD
- Characteristic attribute component factor
- Declaration of Conformity
- Product details
- Declaration & Applicable standards
- Safety and Health:
- EMC:
- RF Spectrum Efficiency:
- Representative
Brand : Overmax
Model : Dron X-bee Drone 7.2 FPV
Category : Drone