
Lun Miljø PLE-1000 - Uncategorized WILFA - Free user manual and instructions
Find the device manual for free Lun Miljø PLE-1000 WILFA in PDF.


| Brand | Wilfa |
| Model | Lun Miljø PLE-1000 |
| Product Type | Bagless Canister Vacuum Cleaner |
| Power Consumption | 1000 W |
| Dust Capacity | 1.5 L |
| Weight | 4.5 kg |
| Dimensions (H x W x D) | 250 x 300 x 400 mm |
| Cord Length | 6 m |
| Noise Level | 75 dB |
| Filtration | HEPA filter |
| Suction Control | Variable (electronic) |
| Washable Filter | Yes |
| Accessories Included | Crevice tool, dusting brush, upholstery tool |
| Power Cord Type | Corded, automatic rewind |
| Overheat Protection | Yes |
| Auto Shut-off | Yes |
| Color | Green/White (Eco design) |
| Energy Class | A (estimated) |
| Spare Parts Availability | Filter, brush head, hose, accessories |
| Repairability | Modular design, replaceable parts |
Frequently Asked Questions - Lun Miljø PLE-1000 WILFA
User questions about Lun Miljø PLE-1000 WILFA
0 question about this device. Answer the ones you know or ask your own.
Ask a new question about this device
Download the instructions for your Uncategorized in PDF format for free! Find your manual Lun Miljø PLE-1000 - WILFA and take your electronic device back in hand. On this page are published all the documents necessary for the use of your device. Lun Miljø PLE-1000 by WILFA.
USER MANUAL Lun Miljø PLE-1000 WILFA
natural_image
Exterior view of a white electronic device with ventilation grilles and a close-up of its side panel (no text or symbols visible)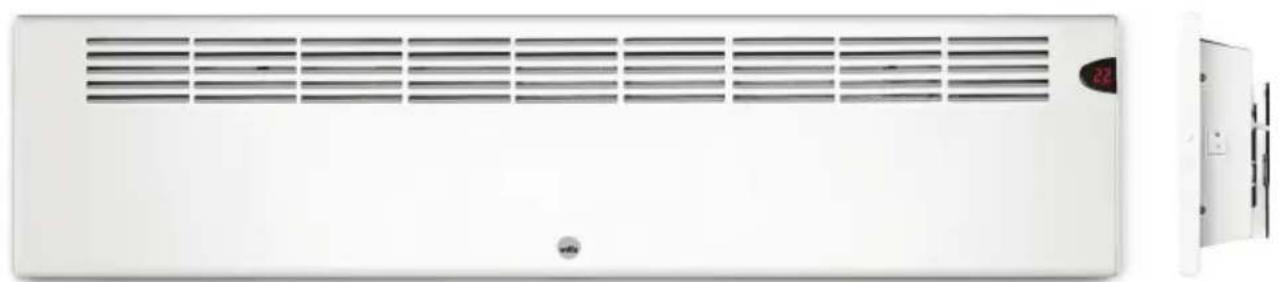
natural_image
Front view of a white air conditioner unit with ventilation grilles and a digital display (no visible text or symbols)Lun Miljø
Panel heater
Bruksanvisning
Bruksanvisning
Brugsanvisning
Käyttöohje
Instruction manual
Ugit officia porem et
PLE 500, PLE 750 ent, inctorem resent
PLE 1000,orumplei1250
POE 500, POE 750,
POE 1000, POE 1250, POE 1500
Lun Miljø
Advarsler....3
natural_image
Simple diagram with a horizontal bar and a letter 'C' at the top (no text or symbols within the bars)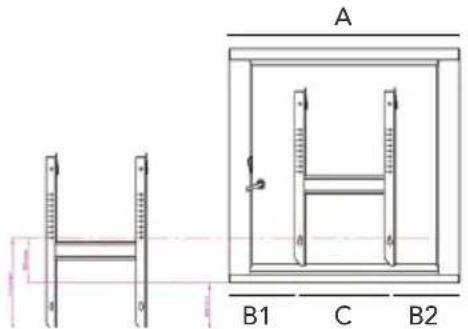
Ovn type L; panellist:
| Watt A | mm | B1/B2 mm | C mm |
| 500 700 | 243 214 | ||
| 750 810 | 298 214 | ||
| 1000 10 | 40 267/291 | 482 | |
| 1250 11 | 50 322/346 | 482 |
natural_image
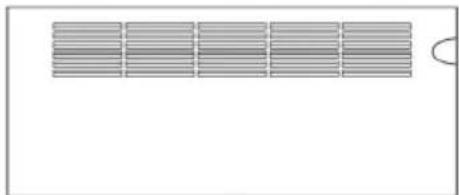
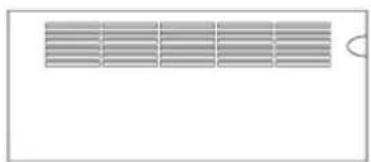
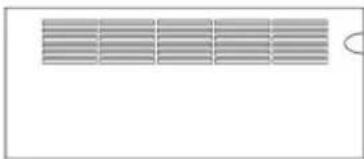
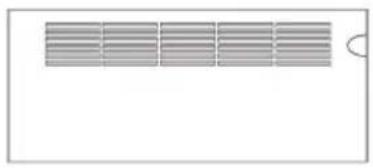
Simple diagram of a rectangular grid pattern with an oval shape at the bottom right (no text or symbols)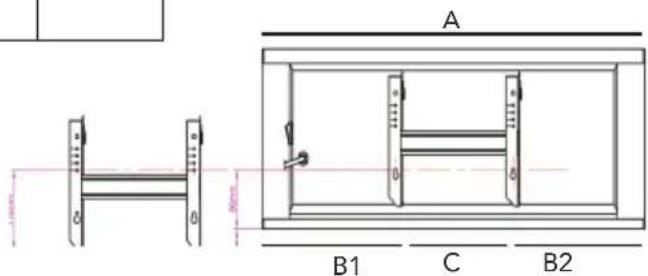
Heater type P:
| Watt A | mm | B1/B2 mm | C mm |
| 500 700 | 243 214 | ||
| 750 810 | 298 214 | ||
| 1000 104 | 0 267/291 | 482 | |
| 1250 115 | 0 322/346 | 482 |
natural_image
Pure electrical circuit lines without any symbols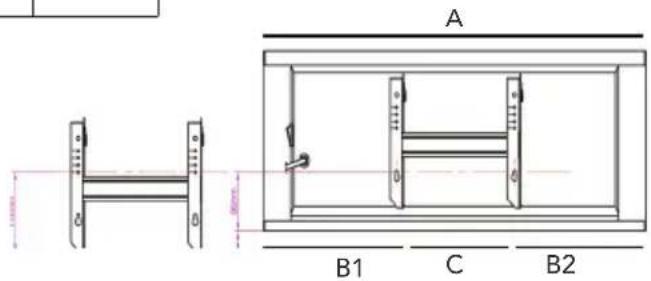
I displayen blinkar "Hr"
av
av
The image contains only background ruled lines. According to Rule 2, these lines must be ignored. There is no actual text content to extract.
Therefore, the corrected OCR output is:
[Empty String]
Ovntype L
| Watt A | mm | B1/B2 mm | C mm |
| 500 700 | 243 214 | ||
| 750 810 | 298 214 | ||
| 1000 10 | 40 267/291 | 482 | |
| 1250 11 | 50 322/346 | 482 |
natural_image
Pure electrical circuit lines without any symbols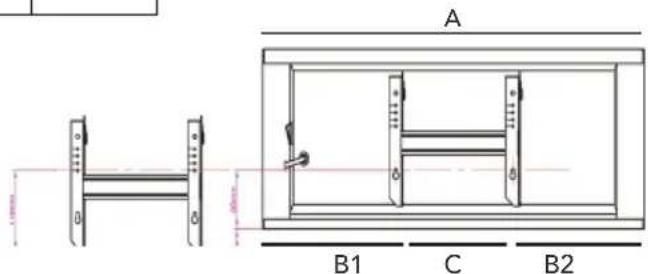
Bemærk!
Kontakt en autoriseret
elektriker ved fast installation
af ovnen.
Måleskitse
PO
PL
L-tyypin lämmitin
| Wattia A | mm | B1/B2 mm | C mm |
| 500 700 | 243 214 | ||
| 750 810 | 298 214 | ||
| 1000 10 | 40 267/291 | 482 | |
| 1250 11 | 50 322/346 | 482 |
natural_image
Pure diagram of a rectangular grid pattern with a small circular cutout at the bottom right (no text or symbols)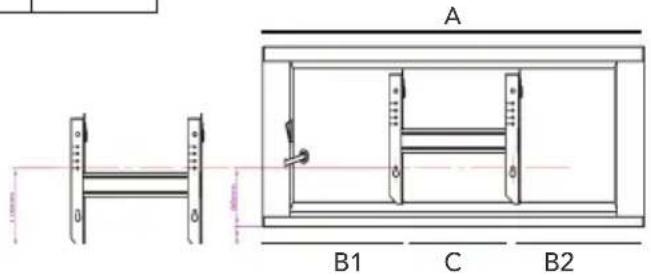
Huomaa:
PO
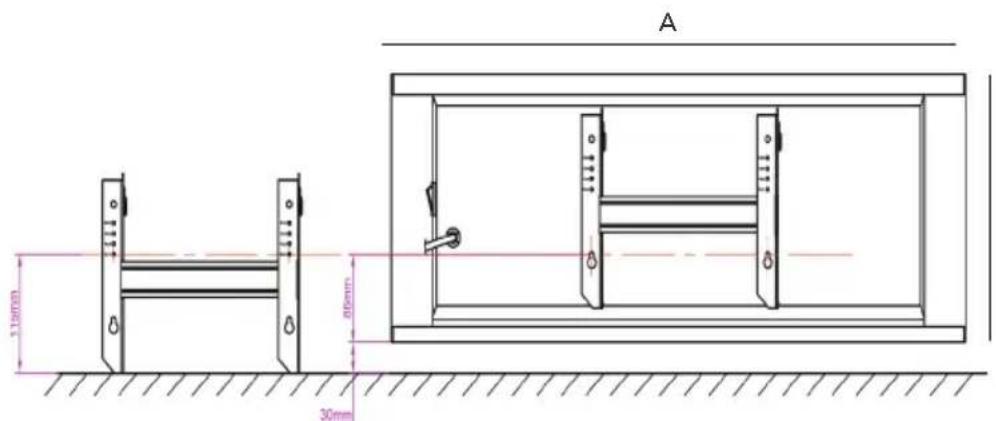
PL
The image contains only background ruled lines that are stylistic or background elements. According to Rule 2, such lines must be ignored by the OCR result. Therefore, the corrected OCR text is:
[Empty String]
Where can the heater be installed....4
Fastening the wall bracket....5
Measuring sketch......6
Control panel/LED display....7
Daytime and night time reduction......8
Programming overview....9
Maintenance....20
Specifications....20
The product you have just purchased has undergone numerous tests and quality checks in order to ensure the highest possible quality. We hope that the heater will fully meet your requirements.

PLEASE READ THE USER INSTRUCTIONS BEFORE INSTALLING THE HEATER.
KEEP HOLD OF THE USER INSTRUCTIONS, EVEN AFTER INSTALLING THE HEATER.
THE USER INSTRUCTIONS PROVIDE IMPORTANT INSTRUCTIONS FOR USE, AND SAFETY DURING INSTALLATION, USE AND MAINTENANCE.
Warnings
■ The heater must not be covered.
■ Ensure that the power has been disconnected when installing the heater.
■ Do not use the heater together with a timer or other applications that automatically turn the product on.
■ If the cord is damaged it must be replaced by the manufacturer, service representative or similarly qualified person.
■ The heater must not be installed immediately below a power socket.
■ Prevent children from leaning against the front of the heater.
- Prevent the heater's air inlet (on the underside) from being blocked or covered by cushions, curtains, etc. as this could lead to overheating and fire.
■ Prevent children from sticking objects or paper etc. into the heater.
■ The heater must not be opened. It does not contain any parts that can be repaired by the user.
This appliance is not intended for use by people (including children) with reduced physical, sensory or mental ability or lack of experience and knowledge, unless they are supervised or have received training in the use of this appliance by a person responsible for their safety. Supervise children so that they do not play with the appliance.
■ The appliance is intended only for use by private households and is not for use in restaurants, cafeterias or similar.
Where the heater can be installed
This heater is intended for installation in the home. Please contact your supplier about all other instances.
It is equipped with an earthed plug and must only be connected to an earthed socket.
■ For indoor use only.
■ Should there be any damage to the appliance, please contact your supplier.
■ The installation must be performed correctly, and in accordance with applicable national regulations and standards.
■ The heater has been designed in IP20 classification and CANNOT be installed in bathrooms and wet rooms.
■ The heater shall not be installed straight underneath a power socket.
■ The heater must not be installed on wheels, loose feet or similar.
■ When positioning the heater, the minimum distance in relation to other building installations as stated in FIG.1 must be fulfilled.
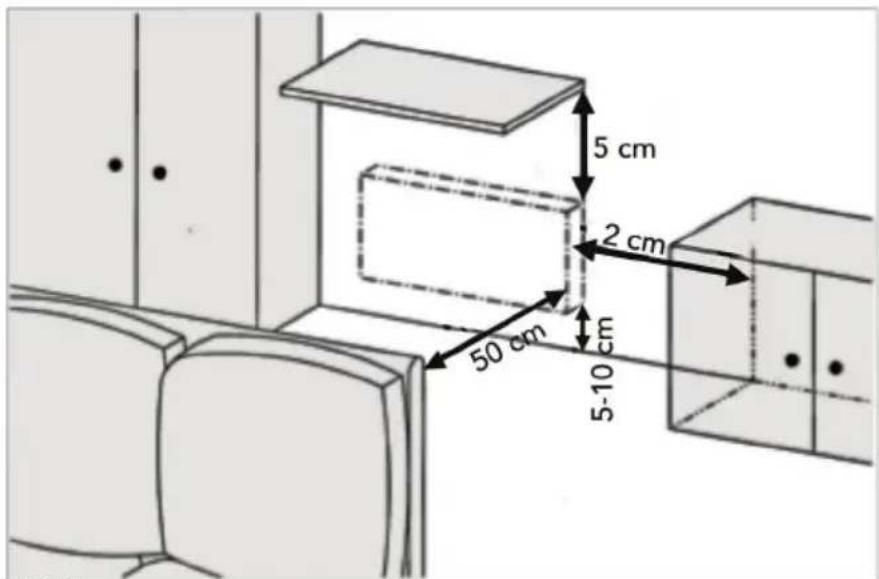
FIG.1
Fastening the wall bracket
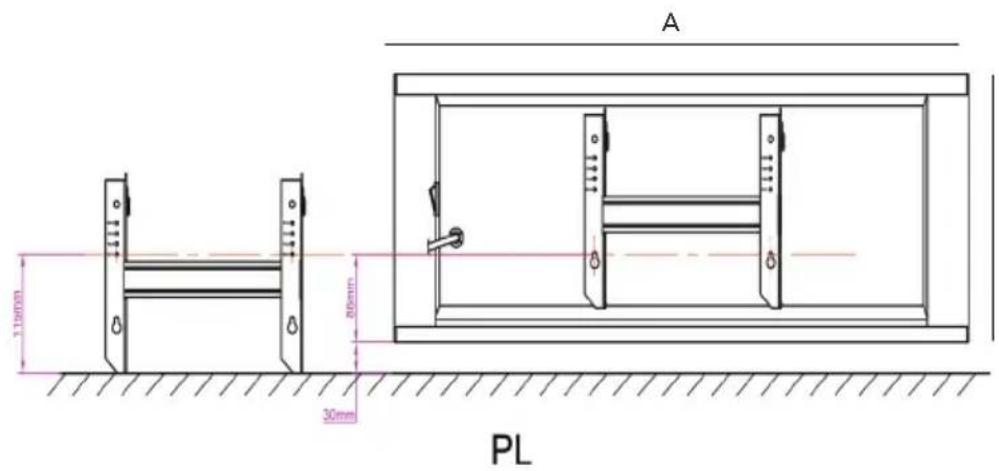
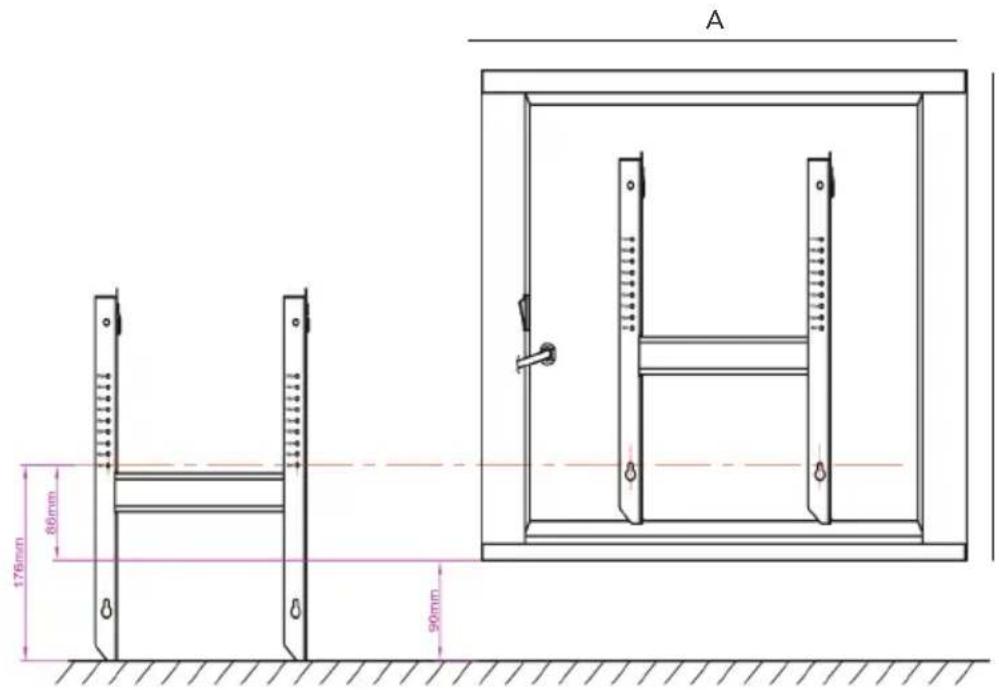
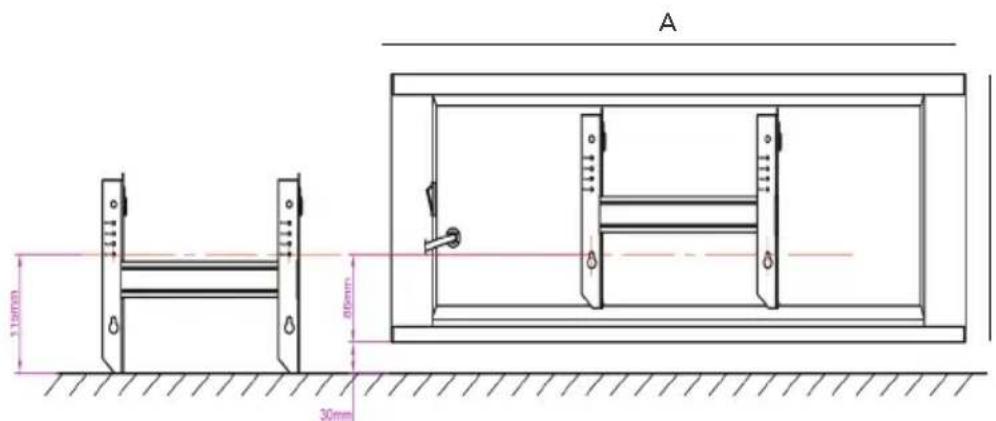
Place the wall bracket directly on the floor and mark the two lowest fixing points. Lift the bracket up onto the wall and fit the points that have already been marked in order to mark the two remaining fixing points.
For distances above and to the side, please refer to the measuring diagram below.
The accompanying screws and plugs should be used for hanging the wall bracket. Hang the heater on the wall bracket and then plug it in to the power socket.
Measuring diagram
Heater type P:
| Watt A | mm | B1/B2 mm | C mm |
| 500 440 | 113 214 | ||
| 750 440 | 113 214 | ||
| 1000 550 | 168 214 | ||
| 1250 660 | 223 214 | ||
| 1500 720 | 253 214 |
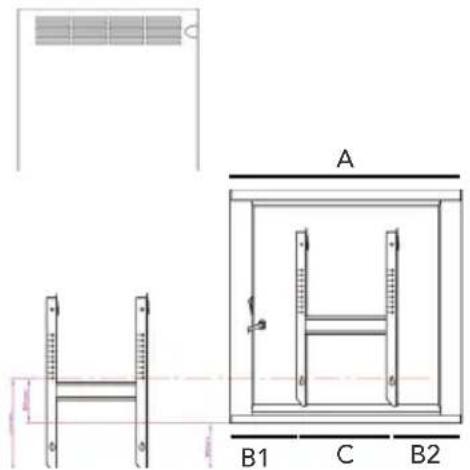
Heater type P:
| Watt A | mm | B1/B2 mm | C mm |
| 500 700 | 243 214 | ||
| 750 810 | 298 214 | ||
| 1000 10 | 40 267/291 | 482 | |
| 1250 11 | 50 322/346 | 482 |
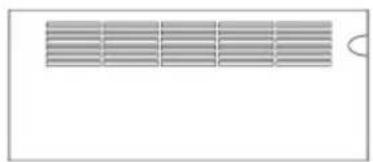
natural_image
Pure electrical circuit lines without any symbols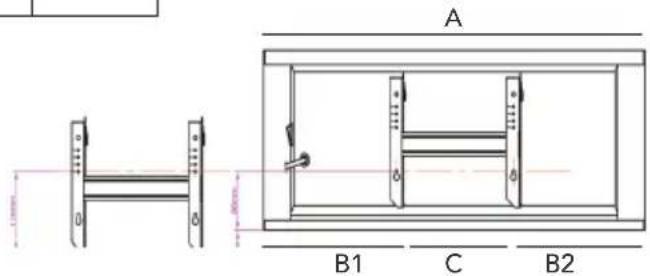
NB: For permanent installation of the heater, please contact an authorised electrician.
Measuring sketch
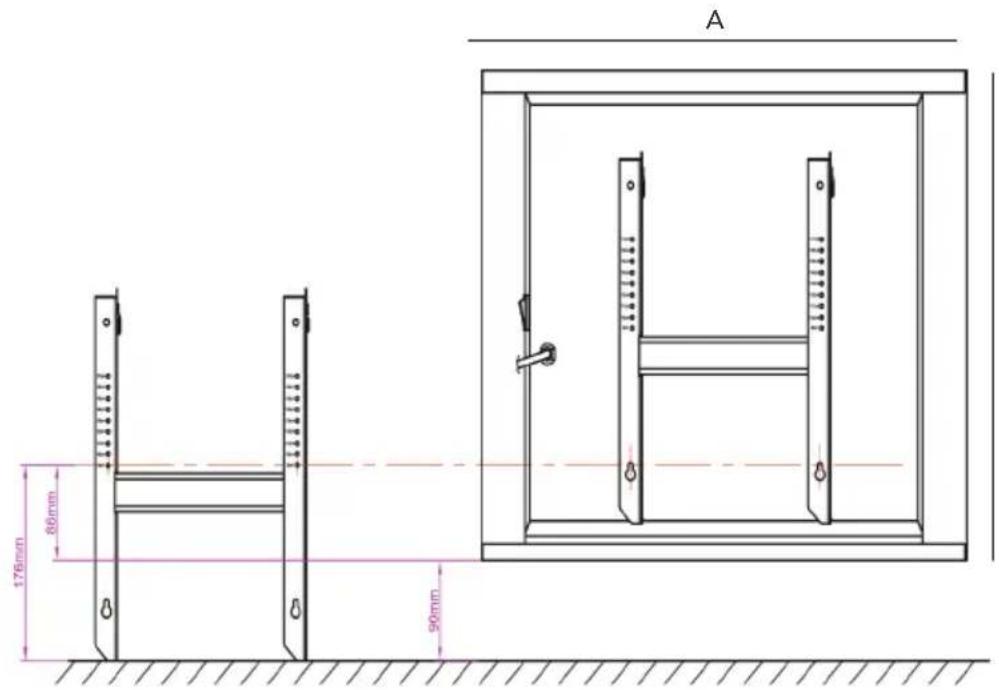
PO
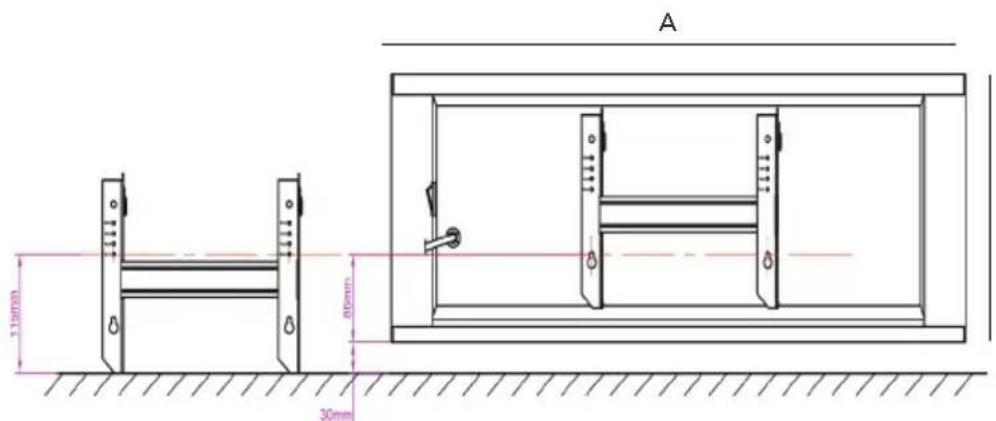
PL
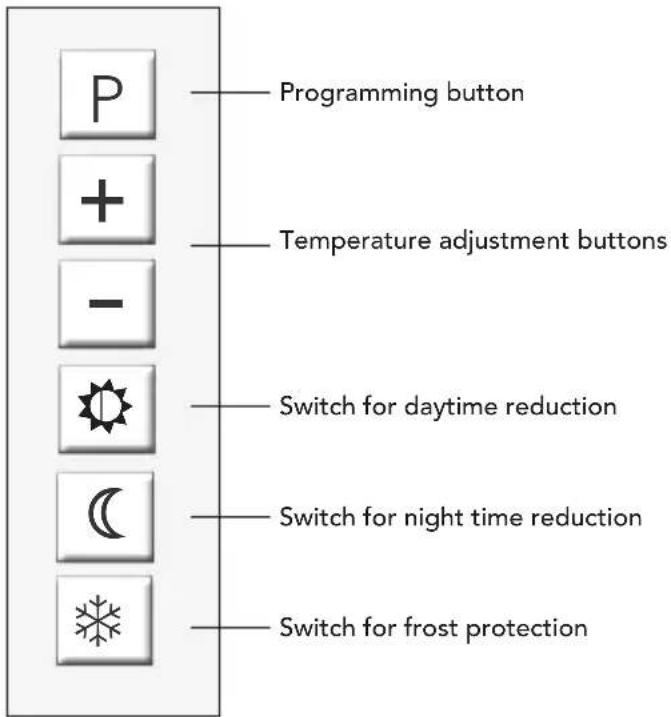
Description of the control panel
Description of the LED display
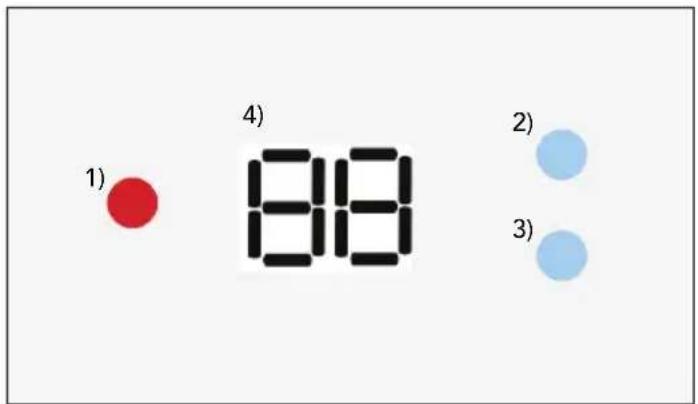
1) Indicator lamp indicating that the panel heater is heating
2) Indicator lamp for the daytime reduction mode
3) Indicator lamp for night time reduction mode
4) Temperature and programming display
Daytime and night time reduction mode
The heater is equipped with programs which make it possible to reduce the temperature during the daytime and in the night time when you are asleep. This allows you to save both the environment and electricity by having a lower temperature when you are not using the room or you are asleep. Please refer to the programming overview for daytime and night time reduction.
Child lock
It is possible to block the use of the function buttons and adjustment buttons, to prevent unwanted changes to the programming and the temperature. Please refer to the programming overview for child lock.
Frost guard
The function enables you to maintain a temperature of 8^ C in the room. This function can be used for longer absences from the home. Please refer to the programming overview for frost guard.
Memory function
The heater is equipped with a memory so that all programming is saved. This means that you do not have to re-program next season. This will save you time when you want to use the heater. The heater is not equipped with a battery, however, so the date and time have to be set for every season or every time it is turned on. (Follow the installation guidelines on page 9). If, however, you do not wish to use the various power saving functions, press "P" three times. The factory settings for time and date will then be used. The heater will then be controlled using the thermostat. When the frost guard is selected, it does not depend on the time as it is constantly on.
What to do in the event of power failure, if the power plug is disconnected or if the heater is turned off
After the heater has been without power for more than 1 minute you will need to set the time and date in order to use the heater and all functions again. (Follow the installation guidelines on page 9). This is to ensure that the power saving functions start as planned. We recommend that the heater is left on for the period during which you require heating. If you go away for prolonged periods, we recommend that you use the various settings to reduce the power consumption. However, if shorter power failures of less than 1 minute occur you will need to confirm by pressing "P" three times in order to use all functions again.
Programming overview for heaters and strip
First-time use or after a power failure with a duration of 1 min Step 1: Setting the hours
| How The display shows Check that | ||||
 | Press the + or - to set the correct hour | “12” flashes |  off off |  |
 | Confirm using P | |||
Step 2: Adjusting the minutes
| How The display shows Check that | ||||
 | Press the + or - to adjust the minutes | "00" flashes |  off off |  |
| P Confirm using P | ||||
Step 3: Adjusting the day of the week
| How The display shows Check that | ||||
 | Press the + or - to set the correct day of the week(Monday=1, Sunday=7) | "1" flashes |  off off |  |
| P Confirm using P | ||||
The night time reduction must be activated at the desired time, for example at 10PM and will reduce the temperature from the chosen
Setting the desired room temperature
| How The display shows Check that | ||||
 | Briefly press the up arrow once. Increases by one degree for each press. Min. 5°C and max. 40°C. | 22°C +1 flashes |  | Coff |
 | I Briefly press the down ar- row once. Decreases by one degree for each press. Min. 5°C and max. 40°C. | 22°C -1 flashes |  | Coff |
| The display shows the current room temperature after 5 seconds | on/off | Con/off | ||
| The indicator light returns to the previous settings. | ||||
Programming night time reduction
Step 1:
| How The display shows Check that | ||||
 | Press down once (4 sec) | Shows 17 degrees or previously programmed temperature. Flashes for 5 sec. |  /off /off | flashes |
| Programming the night reduction. | ||||
Step 2:
| The display shows Check that | ||
 splay shows the room temperature. The indicator iattip for daytime goes out. splay shows the room temperature. The indicator iattip for daytime goes out. |  | Con |
Step 3:
| The display shows Check that | ||
| The display shows the current room temperature. |  on/off on/off |  |
| When the temperature for night time reduction has been reached, the display will show the room temperature and the indicator lamp for night time shows that it is programmed for night mode.The night time reduction cannot be set whilst daytime reduction is active. | ||
Programming the daytime reduction
Step 1:
| How The display shows Check that | ||||
 | Press down once (4 sec) Shows 17 degrees or grammed temperature. Flashes for 5 sec. | flashed | on/off | |
| Program the daytime reduction. | ||||
Step 2:
| The display shows Check that | ||
| The display shows the room temperature. The indicator lamp is flashing. The indicator lamp for the daytime will be lit for as long as the daytime reduction is active (5h) | flashing | on/off |
Step 3:
| The display shows Check that | ||
| The display shows the actual room temperature. | on | on/off |
| When the temperature for daytime reduction has been reached, the display will show the room temperature and the indicator lamp for daytime shows that it is in day mode.The daytime reduction cannot be set whilst night time reduction is active.The daytime reduction will be activated at the same time from Monday to Friday. | ||
The daytime reduction must be activated at the desired time, for example 8AM and will reduce the temperature from the chosen time.
Activate the frost guard
Step 1:
| How The display shows Check that | |||
 Press down once (4 sec) Shows 8 degrees and flashes for 5 sec. Press down once (4 sec) Shows 8 degrees and flashes for 5 sec. |  flashes flashes | [40AH] | |
| The frost guard will be activated immediately and will lower the temperature to 8 degrees. | |||
Step 2:
| The display shows |
| The display shows the current room temperature. |
| The display shows the room temperature. The display for other functions has now been blocked. |
Cancel the frost guard
| How The display shows Check that | |||
 Press down once (4 sec) The Press down once (4 sec) The | display shows the current room temperature. |  on/off on/off | —[04C7] |
| The display returns to previously programmed settings. | |||
Temporary cancellation of the daytime reduction
| How The display shows Check that | |||
 Press briefly, once on each Press briefly, once on each | The display shows the current room temperature. |  |  |
| Temporary cancelling of the daytime reduction. | |||
Temporary cancellation of the night time reduction
| How The display shows Check that | |||
 Press briefly, once on each Press briefly, once on each | The display shows the current room temperature. |  'off 'off |  |
| Temporary cancelling of the night time reduction. | |||
Cancel the daytime reduction
| How The display shows Check that | |||
| [KWYS]Press down once (4 sec) The | display flashes and shows the current room temperature. |  |  |
| Delete the programmed daytime reduction. | |||
Cancel the night time reduction
| How The display shows Check that | ||||
 | Press down once (4 sec) The | display flashes and shows the current room temperature. |  'off 'off |  |
| Delete the programmed night time reduction. | ||||
Activate the child lock
| How The display shows Check that | ||||
 | Press down once (4 sec) The | display shows "Lc" after a few seconds. |  | Con/off |
| The child lock is immediately activated. The display shows "Lc" for a few seconds before showing the room temperature. | ||||
Cancel the child lock
| How The display shows Check that | ||||
 | Press down once (4 sec) The | display shows the current room temperature. |  |  |
| The child lock has been removed | ||||
Adjusting the desired duration of the daytime reduction
Step 1:
| How The display shows Check that | ||||
 | Briefly press once The display flashes "Hr" |  |  | |
| The program is now ready to change the daytime reduction time. The factory setting is 5h. | ||||
Step 2:
| How The display shows Check that | ||||
 | Briefly press once The display shows 5 or previous settings in 10 seconds |  |  | |
| Start the programming whilst the display is flashing. | ||||
Step 3: (cont. setting the desired duration of the daytime reduction)
| How Check that | |||
 | One brief press increases the temperature for 1 h | flashes | Coff |
| One brief press decreases the temperature for 1 h | |||
| Min. 1h and max. 10h | |||
Step 4:
| How The display shows Check that | |||
 One brief press confirms the new setting One brief press confirms the new setting | The display shows the current room temperature and then returns to previous settings | off | off |
| If the time is changed, the previously set start time for both day and night mode will be cancelled. | |||
Step 5:
| Check that | |
| on/off | on/off |
| If no changes are made it will return to the previous setting. | |
Setting the desired duration of the night time reduction
Step 1:
| How The display shows Check that | ||||
 | Briefly press once The display flashes "Hr" |  |  | |
| The program is now ready for changing the night time reduction time. The factory setting is 7h. | ||||
Step 2:
| How The display shows Check that | ||||
 | Briefly press once The display shows7 or previous set-tings for 10 seconds |  |  hes hes | |
| Start the programming whilst the display is flashing. | ||||
Step 3:
| How | The display shows | Check that | |
 One brief press increases the time by 1h One brief press increases the time by 1h | [0024] off |  | |
| One brief press decreases the time by 1h | |||
| Min. 1h and max. 12h | |||
Step 4:
| How The display shows Check that | ||||
 | One brief press confirms the new setting | The display shows the current room temperature and then returns to previous settings |  |  |
| If the time is changed, the previously set start time for both day and night mode will be cancelled. | ||||
Step 5:
| Check that | |
 on/off on/off |  |
| If no changes are made it will return to the previous setting. | |
Changing the factory setting or other set daytime reduction temperature
Step 1:
| How The display shows Check that | |||
 Briefly press twice on this “°C” Briefly press twice on this “°C” | will flash in the display |  off off |  |
| The program is now ready to change the daytime reduction temperature. The factory setting is 17 degrees. | |||
Step 2:
| How The display shows Check that | |||
 Briefly press once Shows 17 Briefly press once Shows 17 | degrees or previously programmed temperature. Flashes for 10 seconds | [2Y0Y] flashes |  |
| Start the programming whilst the display is flashing | |||
Step 3:
| How Check that | ||
 One brief press increases the temperature by 1°COne brief press decreases the temperature by 1°C One brief press increases the temperature by 1°COne brief press decreases the temperature by 1°C | [6X4]flashes |  |
| Min. 1 degree and 30 degrees | ||
Step 4:
| How The display shows Check that | |||
 One brief press on this confirms the new setting One brief press on this confirms the new setting | The display shows the current room temperature and then returns to previous settings | [KYCS]on/off | ###on/off |
| New day time reduction temperature has now been programmed! | |||
Congratulations! You can now enjoy comfortable and energy-saving indoor temperatures. indendørs.
Changing the factory setting or other set night time reduction temperature
Step 1:
| How The display shows Check that | ||||
 | Briefly press twice on this "°C" | will flash in the display |  |  |
| The program is now ready for changing the night time reduction temperature. The factory setting is 17 degrees. | ||||
Step 2:
| How The display shows Check that | |||
 Press briefly once on this Shows Press briefly once on this Shows | 17 degrees or previously programmed temperature. Flashes for 10 seconds |  |  |
| Start the programming while the display is flashing. | |||
Step 3:
| How Check that | |||
 | One brief press increases the temperature by 1°C |  |  |
 | One brief press decreases the temperature by 1°C | ||
| Min. 1 degree and 30 degrees | |||
Step 4:
| How The display shows Check that | ||||
 | One brief press on this confirms the new setting | The display shows the current room temperature and then returns to previous settings |  on/off on/off |  |
| New night time reduction temperature has now been programmed! | ||||
Calibrating the thermostat
Step 1:
| How The display shows Check that | |||
 Briefly press on this three times Briefly press on this three times | “CA” will flash in the display |   |  |
| The display will flash for 10 seconds | |||
Step 2:
| How Check that | ||
| The display shows the current room temperature |  [XTT7] [XTT7] |  |
| Shows the measured temperature in the room | ||
Step 3:
| How Check that | |||
 | One brief press increases the temperature by 1°C |  [AX02] [AX02] |  |
| - | One brief press decreases the temperature by 1°C | ||
| Min. 1 degree and 30 degrees | |||
Step 4:
| How The display shows Check that | |||
 One brief press on this confirms the new setting One brief press on this confirms the new setting | The display shows the current room temperature and then returns to previous settings. | [H5SH] [05WY]on/off | [403T] |
| The new current room temperature has been programmed. This does not affect any other settings. | |||
NB:
If the heater's positioning is influenced by other factors such as cold exterior walls, please follow the programming in Calibration of the thermostat termostat.
Maintenance
To maintain the heater's efficiency and prevent dust accumulation in the grates at the front and the underside, these should be vacuumed or brushed occasionally. Minimum twice a year (spring and autumn). To make it easier to clean behind the heater, the heater can be tilted forward by squeezing the locking system at the top of the wall bracket.
In polluted environments, dirt can quickly accumulate on the grates. This could be the result of poor air quality. Accumulation of dirt is not covered by warranty in accordance with the heater's warranty.
The heater's external surfaces can be cleaned using a soft, damp cloth. Never use abrasive cleaners as this could damage the heater's surface.
Specifications
| MODEL POE-500 POE-750 | POE-1000 POE-1250 POE-1500 | |||
| EFFECT 500 750 1000 1250 | 1500 | |||
| VOLTAGE 230V,AC/50Hz | ||||
| MODEL PLE-500 PLE-750 | PLE-1000 PLE-1250 | |
| EFFECT 500 750 1000 1250 | ||
| VOLTAGE 230V,AC/50Hz | ||
Troubleshooting
| PrOBLEM | Possible causes | Solution |
| The heater is not heating | — Inspect the plug — The main switch could be turned off — The thermostat has been incorrectly adjusted | — Plug into the power socket — Turn on the main switch — Ensure that the thermostat is correctly adjusted |
| The heater heats for the entire time | — The thermostat has been incorrectly adjusted — Heaters have been installed on a cold wall or are influenced by a draft | — Ensure that the thermostat is correctly adjusted — Calibrate the thermostat. See programming overview on page 9 |
Warranty
■ Warranty in accordance with consumer laws. Always keep the receipt and bring it back to the store where the product was purchased in the event of a complaint.
■ The warranty is valid for 5 years starting from the date on which the heater was purchased. Parts with defects due to material or production faults will be replaced or repaired free of charge by your Wilfa dealer.
■ Wilfa does not accept liability for loss or transport costs for returned goods that the customer has sent via any third parties.
The warranty does not cover damages that have resulted from incorrect use, incorrect installation, negligence or use in a way other than described in the user manual.
The manufacturer reserves the right to make technical changes. Manufactured and imported on behalf of Wilfa.

The image contains only background ruled lines that are stylistic or background elements. According to Rule 2, such lines must be ignored by the OCR result. Therefore, the correct OCR output is empty.
(no text)
According to the Waste Electrical and Electronic Equipment (WEEE) Directive, this type of waste must be collected and treated separately. If it becomes necessary to dispose of this product at some point, kindly make sure that it is not discarded with your everyday household refuse. Instead, bring the product to your closest WEEE collection centre.

- Lun Miljø
- Warnings
- Where the heater can be installed
- Fastening the wall bracket
- Measuring diagram
- Description of the control panel
- Description of the LED display
- Daytime and night time reduction mode
- Child lock
- Frost guard
- Memory function
- What to do in the event of power failure, if the power plug is disconnected or if the heater is turned off
- Programming overview for heaters and strip
- Programming the daytime reduction
- Activate the frost guard
- Adjusting the desired duration of the daytime reduction
- Setting the desired duration of the night time reduction
- Changing the factory setting or other set daytime reduction temperature
- Changing the factory setting or other set night time reduction temperature
- Calibrating the thermostat
- Maintenance
- Warranty
Brand : WILFA
Model : Lun Miljø PLE-1000
Category : Uncategorized