
CT 5012 - Coffee maker AMICA - Free user manual and instructions
Find the device manual for free CT 5012 AMICA in PDF.


| Product Type | Drip coffee maker |
| Brand | Amica |
| Model | CT 5012 |
| Dimensions (W x D x H) | 25 x 20 x 35 cm |
| Weight | 1.5 kg |
| Power Supply | 220-240 V, 50/60 Hz, 1000 W |
| Capacity | 12 cups (1.5 L) |
| Water Tank | Removable, 1.5 L |
| Filter Type | Permanent or paper filter (size 4) |
| Carafe | Glass, 12-cup capacity, with handle and lid |
| Warming Plate | Automatic keep-warm function |
| Functions | Auto shut-off, pause & serve, anti-drip system |
| Control Type | On/off switch with indicator light |
| Cord Length | 1.0 m |
| Housing Material | Plastic and stainless steel |
| Safety Features | Overheat protection, automatic shut-off |
| Cleaning and Maintenance | Descaling recommended every 2-3 months with vinegar or citric acid |
| Spare Parts | Carafe, filter basket, water tank (available from manufacturer) |
| Repairability | Modular design; replaceable heating element and control board |
| Included Accessories | Measuring spoon, instruction manual |
Frequently Asked Questions - CT 5012 AMICA
User questions about CT 5012 AMICA
0 question about this device. Answer the ones you know or ask your own.
Ask a new question about this device
Download the instructions for your Coffee maker in PDF format for free! Find your manual CT 5012 - AMICA and take your electronic device back in hand. On this page are published all the documents necessary for the use of your device. CT 5012 by AMICA.
USER MANUAL CT 5012 AMICA
PL INSTRUKCJA OBSŁUGI....2
EN OPERATING INSTRUCTIONS....25
CS NÁVOD K OBSLUZE....48
SZANOWNY KLIENCIE,


6

7
VIII. ULUBIONA FUNKCJA
8
WYBÓR TRYBU
Your Amica appliance is exceptionally easy to use and extremely efficient. After reading these Operating Instructions, operating the appliance will be easy.
Before using the appliance, please carefully read these Operating Instructions
By following these instructions carefully you will be able to avoid any problems in using the appliance.
It is important to keep these Operating Instructions and store them in a safe place so that they can be consulted at any time.
Follow these instructions carefully in order to avoid possible accidents.

Note!
The appliance is designed for household use only.
The manufacturer reserves the right to introduce changes, which do not affect operation of the appliance.
In doubt? Is there anything you do not understand in these Operating Instructions?
Call the Service Centre for all-round help.
CONTENTS
DISPOSING/SCRAPPING OF USED EQUIPMENT....27
SAFETY INSTRUCTIONS FOR USE....29
OPERATION 32
CLEANING AND MAINTENANCE ....39
FAULTS AND TROUBLESHOOTING....46
WARRANTY AND AFTER SALES SERVICE....47
UNPACKING

During transportation, protective packaging was used to protect the appliance against any damage. After unpacking, please dispose of all elements of packaging in a way that will not cause damage to the environment.
All materials used for packaging the appliance are environmentally friendly; they are 100% recyclable and are marked with the appropriate symbol.
Important! Packaging materials (bags, polyethylene, polystyrene, etc.) should be kept away from children during unpacking.
DISPOSAL OF OLD APPLIANCE


In accordance with European Directive 2012/19/EU and local legislation regarding used electrical and electronic goods, this appliance is marked with the symbol of the crossed-out waste container. This marking indicates that the appliance must not be disposed of together with other household waste after it has been used.
The user is obliged to hand it over to waste collection centre collecting used electrical and electronic goods. The collectors, including local collection points, shops and local authority departments provide recycling schemes.
Proper handling of used electrical and electronic goods helps avoid environmental and health hazards resulting from the presence of dangerous components and the inappropriate storage and processing of such goods.
DO:
- Ensure that the mains voltage specified on the rating plate corresponds to the voltage of the local electricity grid.
- Unwind and straighten the power cord before using the appliance.
- Place the appliance on a solid, level surface.
- Place and use the appliance on a stable surface.
- Unplug the appliance from the power socket in the following circumstances:
- Before you add water to the water tank
- Before you remove or install any parts of the appliance.
- Before cleaning or maintenance
- When the appliance malfunctions
- When you do not need to use the appliance
- Empty the water tank when the appliance is not going to be used for a long time
- Allow the appliance to cool down before installing or removing parts, and before cleaning the appliance.
- Always use cold water to make coffee. Warm water or other liquids may damage the appliance.
- If the power cord is damaged it must be replaced to prevent danger. The power cord must be replaced by a service authorised by the manufacturer or by another suitably qualified person.
- Only use the grinder to grind coffee beans.
- Children shall not play with the appliance.
- Always unplug the appliance from the power supply when leaving it unattended and before installing or removing accessories and before cleaning.
DO:
- This appliance can be used by children aged 8 years and older or by persons with physical, mental or sensory handicaps, or by those who are inexperienced or unfamiliar with the appliance, provided they are supervised or have been instructed how to safely use the appliance and are familiar with risks associated with the use of the appliance. Ensure that children do not play with the appliance. Cleaning and maintenance of the appliance should not be performed by children unless they are 8 years or older and are supervised by a competent person.
- Children do not realize the dangers that can arise when using electrical appliances; therefore keep the appliance out of reach of children.
- This appliance is for household use only.
DON'T:
- Do not let children approach the appliance or the power cord during operation.
- Do not leave the appliance unattended when it is connected to the power supply.
- Do not use the appliance outdoors.
- Do not use the appliance for purposes other than those for which it is intended.
- Do not let the power cord hang over the edge of a table, counter, or touch a hot surface.
- Do not use or place the appliance on wet or hot surfaces.
DON'T:
- Do not use the appliance if the drip tray is incorrectly inserted.
- Do not immerse the appliance in water or any liquids.
- Do not use the appliance if any parts are damaged.
- Do not use the appliance if it is not operating properly.
- Do not unplug the appliance by pulling the power cord.
- Do not place the power cord over the sharp edge of objects.
- Do not try to open the body or disassemble any parts from the appliance.
- It is not recommended to use accessories not included in the box. This can be dangerous and should be avoided.
- Do not put the appliance on or in the vicinity of a hot gas or electric burner or on an oven.
I. FEATURES AND COMPONENTS (Figure 1)
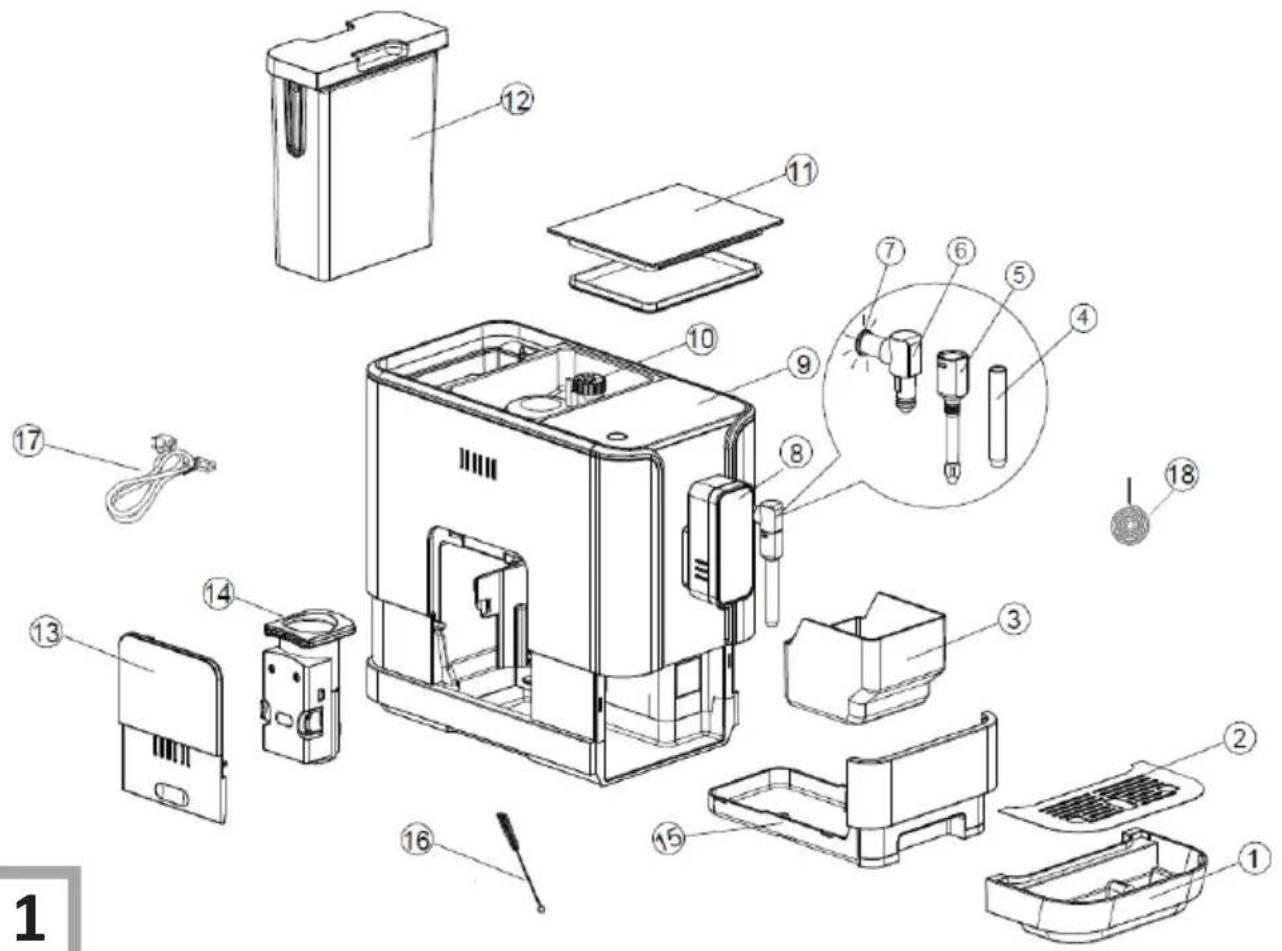
| 1. Outer drip tray 10. Coffee bean container | |
| 2. Drip tray cover 11. Coffee bean container lid | |
| 3. Coffee grounds container 12. Water tank | |
| 4. Metal extension tube 13. Service cap | |
| 5. Steam nozzle 14. Brewer | |
| 6. Nozzle cover 15. Inner drip tray | |
| 7. Steam indicator light 16. Cleaning brush | |
| 8. Adjustable coffee spout 17. Power cord | |
| 9. Control Panel 18. Pin |
II. CONTROL PANEL (fig. 2):

 | Flash: Low water level / No water tank | ||
 | Flash: No coffee beans | ||
 | Steady on: the grounds container is fullFlash: Missing inner drip tray / coffee grounds container | ||
 | Steady on: The brewing unit is missing / not installed correctlyFlash: Service cover is opened / installed incorrectly | ||
 | Steady on: Descaling requiredFlash: Descaling in progress | ||
 | The empty system function is on | ||
 | On / off switch | ||
 | Strong coffee button | ||
 | Mild coffee button | ||
 | Steam switch | ||
 | Favorite function button | ||
 | Hot water button |
III. ACCESSORIES (Fig. 3):
| 1. Remove the protective film, stickers and other packaging materials from the appliance. | |
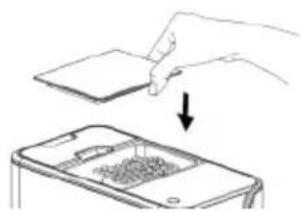
| 2. Place the appliance on a safe and stable surface with an easily accessible power socket, and ensure a minimum clearance from the sides of the appliances. |  |
| 3. Insert the outer drip tray. Make sure it is properly seated. | 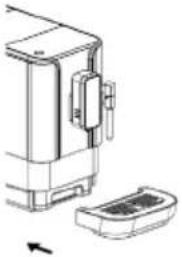 |
| 4. Fill the tank with water. |  |
| 5. Fill the container with coffee beans. | |
| 6. Unwind and straighten the power cord and insert the plug into the socket on the back of the appliance. Plug the other end of the power cord into a wall outlet with the correct voltage. | 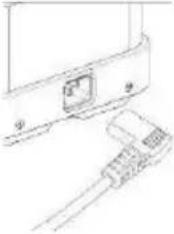 |
3
IV. FILL THE WATER TANK (Fig 4):
When the flashing, the water level in the tank is low and you need to add water.
- Lift the water tank using the lid as a handle.

- Rinse the water tank, then add water up to the Max level and place it back in the appliance. Make sure it is properly seated.

Note! To prevent water spilling from the tank, do not pour water directly into the appliance using another container.


IMPORTANT: Never fill the water tank with warm, hot, carbonated water or any other liquid that may damage the water tank and the appliance.
V. ADD COFFEE BEANS (Fig. 5):
When √lashing, you need to add coffee beans:
- Remove the lid of the bean container.
- Slowly pour in the coffee beans.
- Put the lid back on.

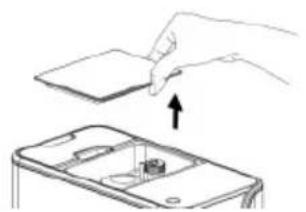
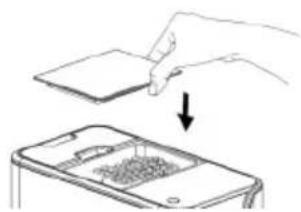
IMPORTANT: Only fill the container with coffee beans. Ground coffee, instant coffee, caramelized coffee and any other products can damage the appliance.
VI. BREW COFFEE (Fig. 6):
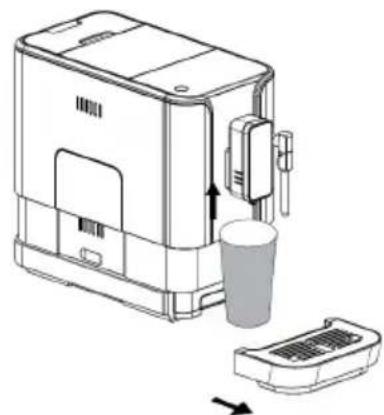
- Make sure that the drip tray and water tank are installed and then press the power on / off button to turn on the appliance. The appliance will automatically rinse the steam nozzle and then the coffee spout with a quantity of a small cup of water. Press the hot water button to stop this.
- The appliance is then on standby.
- Place a cup under the coffee spout and adjust the height to fit the cup. Depending on the size of the cup (too tall or too wide), you can remove the drip tray or adjust its position as follows:
- Depending on the desired coffee flavour, press the button for strong coffee 📋 mild coffee .
- The selected coffee button will light up and the backlight will indicate that the appliance is brewing a cup of coffee.
- When the appliance enters a standby mode, the coffee is ready to be served.

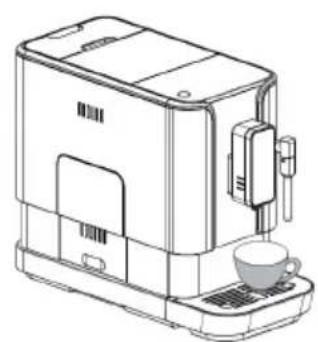
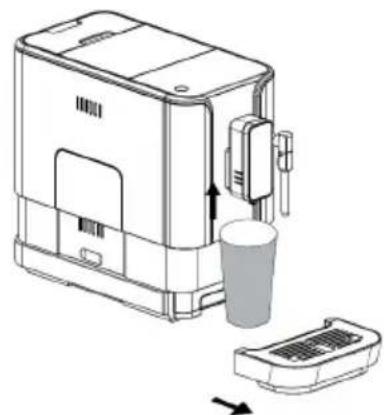
6
Tip 1: The strong coffee button is recommended for espresso Both coffee modes are adjustable.
Tip 2: Automatic rinsing will not take place if the appliance is turned off and on again. You can disable or enable this feature by following the steps below.
Step 1. Remove the service lid
Step 2. Press the on / off button until you hear a beep.
Note! Press the hot water button to rinse the inside of the coffee maker before first use.
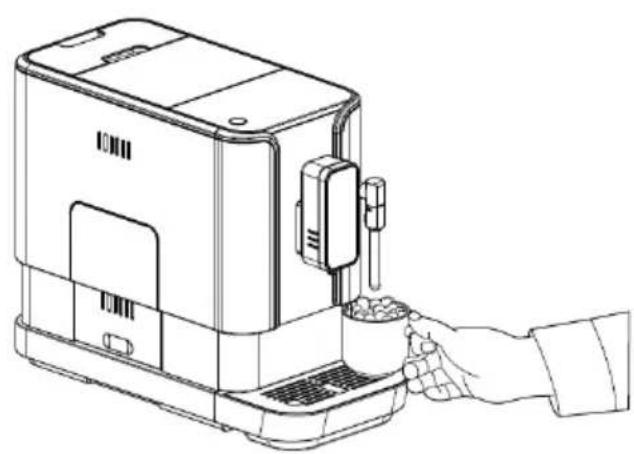
VII. MAKE FROTHED MILK FOR COFFEE (Fig. 7):
As the temperature of the steam is higher than the temperature of the espresso, prepare your coffee before making frothed milk;
- Prepare coffee in a large cup.
- Turn the steam wand towards the drip tray.
- Press the steam button ☐ one steam indicator will start flashing. The appliance then heats up and drains the remaining water into the drip tray or other container.
- When the steam indicator stops flashing, place the cup of milk under the steam wand and immerse the steam wand about 5 cm into the milk.
- Press the steam button again.
- Keep rotating the cup while the hot steam is ejected.
- When the milk is hot enough, froth will appear. Then press the steam button again to turn off the steam.
- Use a wet cloth to clean the wand cap and metal tube. (See "DAILY CLEANING")
- Pour hot frothed milk into the coffee.
- Now you can enjoy your coffee.


7
VIII. FAVORITE FUNCTION
- Configure your favourite coffee setting a) Press and hold the button for 2 seconds. The mild coffee and strong coffee buttons will flash. You can choose any to memorize the volume.
b) When you select strong or mild coffee, the drink will be dispensed. You can press and hold to continue dispensing the drink or release the button to stop. Then the quantity will be remembered.
c) Press the favourite function button, we saved favourite drinks will be shown.
IX. HOT WATER
The coffee maker can dispense hot water by pressing the and the backlight will come on to indicate that the appliance is heating the water. When the hot water button and the backlight are turned off, the water is ready to be dispensed.

water button. The hot water button
X. DAILY CLEANING
Regular cleaning and maintenance of the appliance are key to extending its life.
| 1. Remove the outer drip tray. |  |
| 2. Pour the water from the drip tray down the sink and wash it with clean water. Then dry it. | |
| 3. Pull out the inner drip tray and the coffee grounds container. | 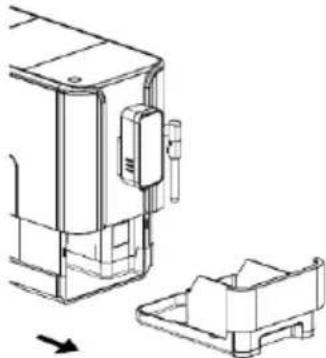 |
| 4. Empty the grounds container and rinse it with clean water. Then dry it.Note! When lights up, the grounds contain-er must be emptied. | |
| 5. Lower the service cover. | |
| 6. Remove the service cover | 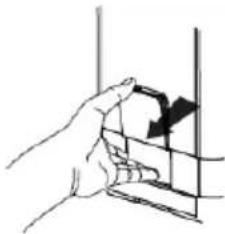 |
| 7. Press the release knob. |  |
| 8. Remove the brew unit. |  |
| 9. Rinse the brew unit with clean water. Then dry the brew unit. | |
10. Put the brew unit back in its place and replace the service cover.Note! When  on, the brew unit is not installed or not installed correctly. When on, the brew unit is not installed or not installed correctly. When  flashing, the service cover is not installed or not installed correctly. flashing, the service cover is not installed or not installed correctly. | |
11. Place the coffee grounds container on the inner drip tray and put it back in its place.Note! When  ashing, the grounds con-tainer is missing. ashing, the grounds con-tainer is missing. |  |
| 12. Place the outer drip tray in the correct position. |  |
| 13. Unlock the wand cap by turning it counter-clockwise. Then pull it down to remove it. |  |
CLEANING AND MAINTENANCE
| 14. Pull down the metal tube to remove the wand cap and metal tube. |  |
| 15. Rinse the wand cap with warm running water and use a pin or a bristle brush to clean the opening. |  |
| 16. Rinse the metal tube with warm running water and use a pin or a bristle brush to clean the opening. |  |
| 17. Install the metal tube back into the wand cap. Then press upwards to put the wand cap back on. Turn clockwise to lock. |  |
XI. TURN OFF THE APPLIANCE
Press the On / Off button to turn off the appliance.
XII. AUTO OFF
The appliance is equipped with an auto off function. Depending on the selected mode, the appliance will have different auto-off times.
XIII. ADDITIONAL SETTINGS
COFFEE / HOT WATER VOLUME ADJUSTMENT
You can adjust the desired amount of coffee for both strong and mild coffee as well as hot water, ranging from 25 ml to 250 ml.
- While brewing strong or mild coffee or dispensing hot water, press and hold the selected button. The appliance will prepare a cup of coffee.
- Release the button when the desired quantity of coffee is dispensed. You will hear two beeps to indicate that the desired quantity of coffee is memorised.
ADJUST GRINDING (Fig. 8).
Turn the bean container adjustment knob to adjust the grinder to the degree of roasting of your coffee.
- You can turn the knob and make the adjustment while the grinder is grinding the coffee beans.
NOTE: Never make grinding adjustments while the grinder is not running. This may damage the grinder.
- The dots on the grinding adjustment knob indicate the degree of grinding.

8
SELECT MODE
The appliance can be set to three modes: the normal mode, ECO mode and quick mode. In ECO mode, the appliance helps to save energy. The quick mode allows you to brew the coffee faster than in the normal mode.
| Rapid wash Normal mode ECO Mode | |||
| Lighting Yes Yes No | |||
| Pre-brewing * No Yes Yes | |||
| Auto off time 30 min. 20 min. 10 min. | |||
| Memorise the cup volume | Yes Yes Yes | ||
*Note: The pre-brewing function moistens the ground beans in the brew unit with a little water before full extraction. This increases the volume of the ground coffee to create more pressure in the brew unit which helps to extract all the oils and full flavour from the ground beans.
- With the appliance in standby, press and hold 5 seconds.
- Then 📄 I flash and the button will show the following indications for the different settings:
| Hot water button Strong coffee button Mild coffee button | |||
| ECO mode Steady on | Flash | Flash | |
| Quick mode | Flash Steady on Flash | ||
| Normal mode Flash | Flash Steady on | ||
- Press the hot water button for ECO mode, the strong coffee button for quick mode and the mild coffee button for normal mode. You will hear two beeps to indicate the mode is being selected. (Note: If you press the indicator light of the corresponding button for each mode, the appliance will not respond.) 4. If you don not wish to change the setting, press 🤊 again or simply wait 5 seconds.
AUTO-CLEAN
When 📄 on steadily, the appliance needs self-cleaning. To ensure that the appliance is in top operating condition, run self-cleaning at least once a month or more frequently depending on the hardness of the water used. Guidelines:
- Fill the water tank completely.
- Add to the water tank one pack of the cleaning agent provided in the box.
IMPORTANT: Do not use vinegar or other cleaning agents to self-clean this appliance. Incompatible cleaning agents can damage the appliance. - Plug in the appliance.
- Place a sufficiently large container under the coffee spout.
- When the appliance is on, press and hold the button and strong coffee button for 5 seconds. You will hear two beeps and the button and the button and strong coffee button will flash.
- Press the strong coffee button to confirm the self-cleaning process. Press to it.
- Flashing 📂 indicates that the appliance is in the process of self-cleaning. (Warning: Keep away from hot water.)
- When all the water in the tank has been used up, the button and strong coffee button will flash. Remove all remaining solution from the water tank and fill the tank with plain tap water to the maximum level. When water is poured into the tank, does out. After that, the appliance will continue the descaling process - first half of the water in the tank will be heated, then after about 1 minute, the remaining water in the tank will be heated.
- When the self-cleaning process is completed, the appliance will turn off automatically.
Note! Please be patient during the descaling process and make sure the appliance turns off automatically indicating the descaling process is complete, .
It is recommended that the system purge function be used before an extended period of storage, for frost protection and before calling a service technician.
- When the appliance is on, simultaneously press and hold the 🎨 button and a mild coffee for seconds.
- Will then flash.
- Remove the water tank from the appliance. 🤿 will light steadily, indicating that an system purge function is running. Before removing the water tank, you can press 🤿 to return to standby.
- When the system purge function ends, the appliance will turn off automatically.
Important: Before using the coffee maker again after the system purge function has been used, press the hot water button until water flows out of the spout.
RINSE MANUALLY
You can perform a manual rinse cycle to clean the coffee spout after use. Manual rinsing is also recommended if the appliance has not been used for a long time.
-
When the appliance is on, simultaneously press and hold the 🎨 and hot water 📞 on.
-
The hot water button will flash. First a little rinse water will pour out of the steam wand and then from the coffee spout.
Danger: The water that comes out of the steam wand and coffee spout is hot and collects in the drip tray underneath. Avoid contact with splashes of hot water.
- After rinsing, the appliance will remain on.
CLEAN THE APPLIANCE
- Disconnect the power cord from the wall socket.
- Dispose of the water from the inner and outer drip tray
- Use a damp cloth or a non-abrasive cleaner to wipe water stains on the appliance.
IMPORTANT: Never use abrasives, vinegar or descaling agents that are not provided in the box to clean the appliance.
Clean the ground coffee outlet.
After a long period of use, the ground coffee may stick to the outlet wall of the appliance. We recommend that you clean the outlet to ensure that ground coffee can enter the brew unit.
| 1. Press in the recess area of the service cover |  | |
| 2. Remove the service cover |  | |
| 3. Press the release knob of the brew unit |  | |
| 4. Remove the brew unit |  | |
| 5. Use the cleaning brush to clean the ground coffee outlet |  | |
| PROBLEM POSSIBLE CAUSE SOLUTION | ||
| The appliance does not work The | appliance is not connected to the mains power. | - Plug in and press the on/off switch. |
| -Check cable and plug. | ||
| Appliance unresponsive or delayed reaction on several attempts to press a function button on the control panel. | - The appliance is exposed to electromagnetic interference | - Unplug the appliance from power. Restart after a few minutes |
| - Dirt on the control panel - Clean | the control panel with the cloth provided | |
| The coffee is not hot enough. - The | the cups have not been preheated. | - Rinse the appliance at least 3 times before making the coffee. |
| - The brew unit is not hot enough. | ||
| Coffee does not come out of the spout. | The system purge function may have been be used previously. | Press the hot water button until water flows out of the spout. |
| The first cup of coffee is of poor quality. | When the grinder is started for the first time, it does not deliver enough coffee to the brew unit. | Pour out the coffee. The next cups of coffee will always be of good quality. |
| The coffee is without cream. - The | coffee beans are not fresh. | Change the coffee or use the correct measure of coffee beans. |
| The touch buttons are not responding. | You do not press the touch button on the front of the appliance. | Press the lower part of the touch button icon on the front of the appliance. |
| The appliance takes a long time to warm up. | An excessive layer of limescale has built up. | Descale the appliance. |
Water tank is removed or water level is very low but there is no  alarm. alarm. | The area around the water tank connector is wet. | Wipe off the water around the water tank connector |
| The inner drip tray is filled with water. | The coffee is ground too finely and the flow of water is restricted. | When the grinder is running, set the grinding setting to a larger dot. |
| The coffee runs out too slowly or comes out in drops. | The coffee is ground too finely and the flow of water is restricted. | When the grinder is running, set the grinding setting to a larger dot. |
| The empty bean container indicator flashes, but there are still many beans inside the container. | The inner ground coffee outlet is blocked. | Carry out the steps in section “Clean the ground coffee outlet.” |
| The frothed milk is not produced by the steam wand. | The wand is dirty and the opening in the wand cap or the metal tube has been damaged by milk residue. | Follow the steps described in the DAILY CLEANING to clean the steam wand. |
WARRANTY AND AFTER SALES SERVICE
Warranty
Warranty service as stated on the warranty card.
The manufacturer shall not be held liable for any damage caused by improper use of the product.
Manufacturer's Declaration
The manufacturer hereby declares that this product meets the requirements of the following European directives:
• Low Voltage Directive 2014/35/EC
• Electromagnetic Compatibility (EMC) Directive 2014/30/EC
• ErP Directive 2009/125/EC
• Directive RoHS 2011/65/EC
and has thus been marked with the C6 symbol and been issued with a declaration of compliance made available to market regulators.
Vážený kliente,



6
OBSLUHA
7
VIII. OBLÍBENÁ FUNKCE
8
VOLBA MÓDU


- SZANOWNY KLIENCIE
- ULUBIONA FUNKCJA
- WYBÓR TRYBU
- NOTE
- CONTENTS
- UNPACKING
- DISPOSAL OF OLD APPLIANCE
- DO
- DON'T
- FEATURES AND COMPONENTS (FIGURE 1)
- ACCESSORIES (FIG. 3)
- FILL THE WATER TANK (FIG 4)
- ADD COFFEE BEANS (FIG. 5)
- BREW COFFEE (FIG. 6)
- MAKE FROTHED MILK FOR COFFEE (FIG. 7)
- FAVORITE FUNCTION
- HOT WATER
- DAILY CLEANING
- CLEANING AND MAINTENANCE
- TURN OFF THE APPLIANCE
- AUTO OFF
- ADDITIONAL SETTINGS
- SELECT MODE
- AUTO-CLEAN
- RINSE MANUALLY
- CLEAN THE APPLIANCE
- WARRANTY AND AFTER SALES SERVICE
- WARRANTY
- MANUFACTURER'S DECLARATION
- VÁŽENÝ KLIENTE
- OBSLUHA
- OBLÍBENÁ FUNKCE
- VOLBA MÓDU
Brand : AMICA
Model : CT 5012
Category : Coffee maker