
EMT448ET - Switch Cotech - Free user manual and instructions
Find the device manual for free EMT448ET Cotech in PDF.


| Product Type | Digital Outdoor Timer Switch |
| Brand | Cotech |
| Model | EMT448ET |
| Rated Voltage | 230 V AC, 50 Hz |
| Max Load | 3680 W, 16 A |
| Number of Programs | 16 (ON/OFF per day) |
| Shortest Operating Time | 1 minute |
| IP Rating | IP44 (splashproof) |
| Operating Temperature | Down to -25°C |
| Summer/Winter Time Changeover | Automatic (manual adjustment via RCL button) |
| Random Function | Delays ON/OFF by 4–32 minutes |
| Countdown Function | Up to 99 hours, 59 minutes, 59 seconds |
| Manual Override | ON, AUTO-ON, OFF, AUTO-OFF |
| Display | Digital LCD with time and program indicators |
| Power Backup | Internal rechargeable battery (6h initial charge) |
| Safety Features | Safety shuttered pin sockets; do not dismantle, cover, or connect timers in series |
| Care Instructions | Wipe with dry cloth; no solvents or abrasives |
| Disposal | Recycle per local regulations (WEEE symbol) |
| Dimensions (approx.) | 120 × 60 × 70 mm (estimated for plug-in timer) |
| Weight (approx.) | 150 g |
Frequently Asked Questions - EMT448ET Cotech
User questions about EMT448ET Cotech
0 question about this device. Answer the ones you know or ask your own.
Ask a new question about this device
Download the instructions for your Switch in PDF format for free! Find your manual EMT448ET - Cotech and take your electronic device back in hand. On this page are published all the documents necessary for the use of your device. EMT448ET by Cotech.
USER MANUAL EMT448ET Cotech
Digital Outdoor Timer
Read the entire instruction manual carefully and make sure that you fully understand it before you use the equipment. Keep the manual for future reference.
Viktig information:
ART.NO 36-4284
MODEL EMT448ET
Ver. 20180925
Original instructions
Bruksanvisning i original
Digital Outdoor Timer
ART.NO 36-4284 MODEL EMT448ET
Please read the entire instruction manual before using the product and save it for future reference. We reserve the right for any errors in text or images and any necessary changes made to technical data. If you have any questions regarding technical problems please contact Customer Services.
Safety
- Never dismantle the product.
- Make sure that the electrical socket that the product is plugged into is easily accessible in case it and the connected product need to be quickly disconnected from the mains electricity.
- Do not connect products of this type to each other.
- Do not cover the product.
Product description
- Digital (electronic) timer switch. For outdoor use. Up to 16 on/off operations per day.
- Automatic summer time/winter time changeover. Random function (turns on/off at random) and countdown function.
- Safety shuttered pin sockets. 230 V / 16 A. IP44. Operates down to -25^ .
Buttons and functions
MENU: For changing mode from time of day, programme and countdown function.
OK: Confirms selections.
+1:
- Manual change
- Programme selection, forward
- Set hours and minutes, forward
-1:
- Random
- Programme selection, backward
- Set day, hours and minutes, backward
RST:
- Delete all settings
RCL:
- Delete programme Use a pointed object to access the RST and RCL buttons.
Use
- Plug the timer into a wall socket. The battery needs to be charged for 6 hours. Unplug the timer from the wall socket if you are not going to use it for a long time.
- If the display is totally clear, press in the RST button.
Setting the time
- Press MENU and select time setting.
- Press OK for about 3 seconds. The day of the week starts to flash. Adjust the day using the +1 or -1 key.
- Press OK. The hours setting starts to flash. Adjust the hours using the +1 or -1 key.
- Press OK. The minutes setting start to flash. Adjust the minutes using the +1 or -1 key.
- Press MENU to confirm.
Setting programmes
- The timer can be set for daily or weekly programmes.
- Up to 16 programmes can be set.
- Use the MENU key to access programme 1 ON.
- Use +1 and -1 to access the individual programmes 1–16.
- Set the time for 1 ON and 1 OFF.
$$ M O = M o n d a y $$
$$ F R = F r i d a y $$
$$ T U = T u e s d a y $$
$$ \mathrm{SA} = \text { S a t u r d a y } $$
$$ \mathrm{WED} = \text { Wednesday } $$
$$ \mathrm{SU} = \mathrm{Sunday} $$
$$ \mathrm{TH} = \text { Thursday } $$
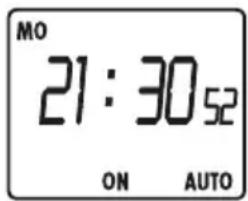
fig. 1
Setting a daily programme (example)
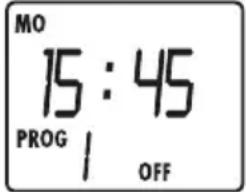
MO 08.15 ON / MO 15.45 OFF
- Press MENU until you come to programme 1 ON.
- Press OK once until day of week is flashing. Set the day using the +1 or -1 key (e.g. MO).
- Press OK, the hours will start flashing. Set the hours using the +1 or -1 key.
- Press OK, the minutes will start flashing. Set the minutes using the +1 or -1 key. See fig. 2.
- Press OK, now "1 ON" starts flashing, use +1 to set programme 1 OFF.
- Set the 1 OFF time in the same way as for the 1 ON time. See fig. 3.
Note: In order to be sure that the programme is activated, "AUTO ON" or "AUTO OFF" must be displayed in time display mode.
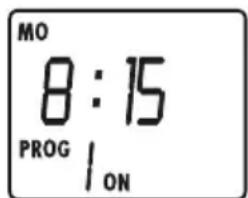
fig. 2

fig. 3
Setting a weekly programme (example)
MO - FR 08.15 ON / 15.45 OFF
- Press MENU until you come to programme 1 ON.
- Press OK once until day of week is flashing. Use +1 or -1 to select a weekly combination. For example MO, TU, WED, THU, FR.
- Press OK, the hours will start flashing. Set the hours using the +1 or -1 key.
- Press OK, the minutes will start flashing. Set the minutes using the +1 or -1 key.
- Press OK, now "1 ON" starts flashing, use +1 to select programme 1 OFF.
Note: In order to be sure that the programme is activated, "AUTO ON" or "AUTO OFF" must be displayed in time display mode.
Deactivating a programme
- Press MENU and select programme 1 ON.
-
Use the +1 (forward) or -1 (backward) key to select the programme to be deactivated.
-
Press RCL. ON and OFF programmes must be deactivated individually. See fig. 4.

fig. 4
Countdown timer
The connected device can be turned on or off after the expiration of the set time.
- In time display mode, use +1 to select ON or OFF.
- Press MENU and select programme CTD. The hours will now start to flash. Set the hours using the +1 or -1 key.
- Press OK, the minutes will start flashing. Set the minutes using the +1 or -1 key.
- Press OK, the seconds will start to flash. Set the seconds using the +1 or -1 key.
- Press OK to run.
- Press RCL to exit the countdown function. See fig. 5.

fig. 5
Random function
- In time display mode, use -1 to select ON or OFF. The display shows "RND".
- The display must show "AUTO OFF" for the programme to work.
- This causes the set on and off times to be delayed by 4–32 minutes.
- To deactivate the random function, press -1 again and "RND" disappears from the display. See fig. 6.

fig. 6
Note: To prevent programmes from overlapping, the time lag between two subsequent programmes must be at least 33 minutes.
Manual switching
This timer allows you to manually switch connected loads on and off. Press +1 in time display mode to select either:
• ON: Always switched on
• AUTO-ON: Switched on in programme
- OFF: Always off
- AUTO – OFF: Switched off in programme. See fig. 7.

fig. 7
Automatic return to time display
If no key is pressed for a duration of 2 minutes, the display returns to the time display mode.
Summer / winter time
- Press RCL. The hour display advances 1 hour and “+1 h” appears on the display to indicate summer time.
- Press RCL once more to display winter time again.
Care and maintenance
Wipe the product using a dry cloth as and when required. Never use solvents or abrasive cleaning agents.
Responsible disposal
This symbol indicates that this product should not be disposed of with general household waste. This applies throughout the entire EU. In order to prevent any harm to the environment or health hazards caused by incorrect waste disposal, the product must be handed in for recycling so that the material can be disposed of in a responsible manner. When recycling your product, take it to your local collection facility or contact the place of purchase. They will ensure that the product is disposed of in an environmentally sound manner.

natural_image
Symbol of a trash bin crossed with no text or labels, accompanied by a black rectangular block below (no readable text or symbols)Specifications
Programme 16 ×
Rated voltage 230 V AC, 50 Hz
Max load 3680 W, 16 A
Shortest operating time 1 minute
$$ F R = F r e d a g $$
$$ T U = T i s d a g $$
$$ \mathrm{SA} = \text { L o r d a g } $$
$$ W E D = O n s d a g $$
$$ \mathrm{SU} = \text { S o n d a g } $$
$$ \mathrm{TH} = \text { Torsdag } $$
bild. 2
bild. 3

natural_image
Symbol of a trash bin crossed with a diagonal line, no text or numbers presentSpecifikationer
Program 16 st
Märkspänning 230 V AC, 50 Hz
Max Belastning 3680 W, 16 A
Minsta inkopplingstid 1 minut
ART.NR. 36-4284 MODELL EMT448ET
$$ W E D = O n s d a g $$
$$ T H = T o r s d a g $$
$$ F R = F r e d a g $$
$$ S A = L \text {ordag} $$
$$ \mathrm{SU} = \text { Søndag } $$
Still inn dagsprogram (eksempel)
PÅ: Mandag 08.15 / AV: Mandag 15.45
bilde. 2

bilde. 3
natural_image
Symbol of a trash bin crossed with no text or labels, representing waste sorting or disposal (no text present)Spesifikasjoner
Program 16 stk.
Spenning 230 V AC, 50 Hz
Maks. belastning 3680 W, 16 A
Minste innkoblingstid 1 minutt
kuva 2
kuva 3
natural_image
Symbol of a trash bin crossed with no text or labels, accompanied by a solid black rectangle below (no readable text or symbols)Tekniset tiedot
Ohjelmat 16 kpl
Nimellisjännite 230 V AC, 50 Hz
ART.NR. 36-4284 MODELL EMT448ET
Abb. 2

Abb. 3
natural_image
Symbol of a trash bin crossed with no visible text or labelsTechnische Daten
Programme 16 St.
10 - 13 Market Place
Kingston upon Thames
Surrey
KT1 1JZ
DEUTSCHLAND
Kundenservice Hotline: 040 2999 78111
E-Mail: kundenservice@clasohlson.de
Homepage
www.clasohlson.de
Postanschrift
- Digital Outdoor Timer
- Viktig information:
- ART.NO 36-4284 MODEL EMT448ET
- Safety
- Product description
- Buttons and functions
- +1:
- -1:
- RST:
- RCL:
- Use
- Setting the time
- Setting programmes
- Setting a daily programme (example)
- MO 08.15 ON / MO 15.45 OFF
- Setting a weekly programme (example)
- MO - FR 08.15 ON / 15.45 OFF
- Deactivating a programme
- Countdown timer
- Random function
- Manual switching
- Automatic return to time display
- Summer / winter time
- Care and maintenance
- Responsible disposal
- Specifications
- Specifikationer
- ART.NR. 36-4284 MODELL EMT448ET
- Still inn dagsprogram (eksempel)
- PÅ: Mandag 08.15 / AV: Mandag 15.45
- Spesifikasjoner
- Tekniset tiedot
- Technische Daten
- DEUTSCHLAND
Brand : Cotech
Model : EMT448ET
Category : Switch