
TL-WN851ND - Network card / adapter TP-LINK - Free user manual and instructions
Find the device manual for free TL-WN851ND TP-LINK in PDF.
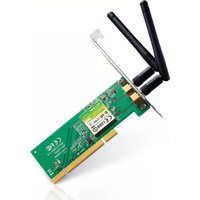


| Product Type | Wireless N PCI Adapter |
| Brand | TP-Link |
| Model | TL-WN851ND |
| Interface | 32-bit PCI |
| Standards | IEEE 802.11n, IEEE 802.11g, IEEE 802.11b |
| Frequency Band | 2.4 – 2.4835 GHz |
| Max Data Rate | 300 Mbps (theoretical) |
| Modulation | CCK, QPSK, BPSK, OFDM, 16-QAM, 64-QAM |
| Data Security | WPA/WPA2, WEP, TKIP/AES |
| Antennas | 2 x external antennas (2x2 MIMO) |
| LED Indicator | Status LED (flashing when active) |
| Operating Systems | Windows XP, Windows Vista, Windows 7 |
| Operating Temperature | 0°C to 40°C (32°F to 104°F) |
| Operating Humidity | 10% to 90% RH (non-condensing) |
| Safety & Emissions | FCC, CE |
| Wireless Modes | Infrastructure, Ad-Hoc, SoftAP (Windows 7 only) |
| Management Utility | TP-LINK Wireless Configuration Utility (TWCU) |
| Quick Secure Setup | QSS (WPS) support via PBC or PIN |
| Package Contents | Adapter, Quick Installation Guide, Resource CD |
| Hardware Installation | Insert into PCI slot, secure with screw |
| Software Installation | Run Setup Wizard from CD |
Frequently Asked Questions - TL-WN851ND TP-LINK
User questions about TL-WN851ND TP-LINK
0 question about this device. Answer the ones you know or ask your own.
Ask a new question about this device
Download the instructions for your Network card / adapter in PDF format for free! Find your manual TL-WN851ND - TP-LINK and take your electronic device back in hand. On this page are published all the documents necessary for the use of your device. TL-WN851ND by TP-LINK.
USER MANUAL TL-WN851ND TP-LINK
COPYRIGHT & TRADEMARKS
Specifications are subject to change without notice. TP-LINK® is a registered trademark of TP-LINK TECHNOLOGIES CO., LTD. Other brands and product names are trademarks or registered trademarks of their respective holders.
No part of the specifications may be reproduced in any form or by any means or used to make any derivative such as translation, transformation, or adaptation without permission from TP-LINK TECHNOLOGIES CO., LTD. Copyright © 2011 TP-LINK TECHNOLOGIES CO., LTD. All rights reserved.
http://www.tp-link.com
FCC STATEMENT
This equipment has been tested and found to comply with the limits for a Class B digital device, pursuant to part 15 of the FCC Rules. These limits are designed to provide reasonable protection against harmful interference in a residential installation. This equipment generates, uses and can radiate radio frequency energy and, if not installed and used in accordance with the instructions, may cause harmful interference to radio communications. However, there is no guarantee that interference will not occur in a particular installation. If this equipment does cause harmful interference to radio or television reception, which can be determined by turning the equipment off and on, the user is encouraged to try to correct the interference by one or more of the following measures:
- Reorient or relocate the receiving antenna.
- Increase the separation between the equipment and receiver.
- Consult the dealer or an experienced radio/TV technician for help.
Connect the equipment into an outlet on a circuit different from that to which the receiver is connected.
This device complies with part 15 of the FCC Rules. Operation is subject to the following two conditions:
1) This device may not cause harmful interference. 2) This device must accept any interference received, including interference that may cause undesired operation.
Any changes or modifications not expressly approved by the party responsible for compliance could void the user's authority to operate the equipment.
Note: The manufacturer is not responsible for any radio or TV interference caused by unauthorized modifications to this equipment. Such modifications could void the user's authority to operate the equipment.
FCC RF Radiation Exposure Statement
This equipment complies with FCC RF radiation exposure limits set forth for an uncontrolled environment. This device and its antenna must not be co-located or operating in conjunction with any other antenna or transmitter.
To comply with FCC RF exposure compliance requirements, this grant is applicable to only Mobile Configurations. The antennas used for this transmitter must be installed to provide a separation distance of at least 20 cm from all persons and must not be co-located or operating in conjunction with any other antenna or transmitter.
CE Mark Warning
CE1588
This is a class B product. In a domestic environment, this product may cause radio interference, in which case the user may be required to take adequate measures.
National Restrictions
2400.0-2483.5 MHz
| Country | Restriction | Reason/remark |
| Bulgaria | General authorization required for outdoor use and public service | |
| France | Outdoor use limited to 10 mW e.i.r.p. within the band 2454-2483.5 MHz | Military Radiolocation use. Refarming of the 2.4 GHz band has been ongoing in recent years to allow current relaxed regulation. Full implementation planned 2012 |
| Italy | If used outside of own premises, general authorization is required | |
| Luxembourg | None | General authorization required for network and service supply(not for spectrum) |
| Norway | Implemented | This subsection does not apply for the geographical area within a radius of 20 km from the centre of Ny-Ålesund |
| Russian Federation | Only for indoor applications |
Note: Please don't use the product outdoors in France.
This device has been designed to operate with the antennas listed below which have a maximum gain of 2 dBi. Antennas not included in this list or having a gain greater than 2 dBi are strictly prohibited for use with this device. The required antenna impedance is 50 ohms.
To reduce potential radio interference to other users, the antenna type and its gain should be so chosen that the equivalent isotropically radiated power (e.i.r.p.) is not more than that permitted for successful communication.
DECLARATION OF CONFORMITY
For the following equipment:
Product Description: 300Mbps Wireless N PCI Adapter
Model No.: TL-WN851ND
Trademark: TP-LINK
We declare under our own responsibility that the above products satisfy all the technical regulations applicable to the product within the scope of Council Directives:
Directives 1999/5/EC
The above product is in conformity with the following standards or other normative documents:
ETSI EN 300 328 V1.7.1: 2006
ETSI EN 301 489-1 V1.8.1:2008 & ETSI EN 301 489-17 V1.3.2:2008
EN60950-1:2006
EN62311:2008
Person is responsible for marking this declaration:

Yang Hongliang
Product Manager of International Business
CONTENTS
Chapter 1 Product Overview ...... 1
1.1 Package Contents.... 1 1.2 Introduction ...... 1 1.3 Features....2 1.4 Hardware Overview....2
Chapter 2 Installation....3
2.1 Hardware Installation 3 2.2 Software Installation.... 3
Chapter 3 Connect to a Wireless Network ....8
3.1 To connect using TWCU 8 3.2 To connect using QSS 11
3.2.1 PBC (Push Button Configuration) method.... 11 3.2.2 PIN method 13
3.3 To connect using Windows built-in wireless utility.... 16
3.3.1 In Windows 7....16 3.3.2 In Windows Vista.... 17 3.3.3 In Windows XP 19
Chapter 4 Management....22
4.1 Profile....22
4.1.1 Add a profile....22 4.1.2 Modify a profile.... 24 4.1.3 Delete a profile 24
4.2 Advanced 25 4.3 About....26
Chapter 5 AP Mode ...... 27
Chapter 6 Uninstall Software....29
6.1 Uninstall the utility software from your PC 29 6.2 Uninstall the driver software from your PC 30
Appendix A: Specifications....31
Appendix B: Glossary....32
Chapter 1 Product Overview
1.1 Package Contents
Please verify that all the package contents below are available.
One TL-WN851ND 300Mbps Wireless N PCI Adapter
Quick Installation Guide One Resource CD for TL-WN851ND, including:
- TP-LINK Wireless Configuration Utility (TWCU) and Drivers
- User Guide • Other helpful information
Make sure that the above items are contained in the package. If any of the above items are damaged or missing, please contact your distributor.

Note:
The 'adapter' mentioned in this User Guide stands for TL-WN851ND 300Mbps Wireless N PCI Adapter without any explanations.
1.2 Introduction
The adapter is a 802.11n client device designed to deliver a high-speed and unrivaled wireless performance for your desktop. With a faster wireless connection, you can get a better Internet experience, such as downloading, gaming, video streaming.
With the 802.11n technology, higher throughput improvements using MIMO (multiple input, multiple output antennas), the TL-WN851ND's auto-sensing capability allows high packet transfer rate of up to 300Mbps for maximum throughput. It has good capability on anti-jamming, and it can also interoperate with other wireless (802.11b) products. The adapter supports WEP, WPA and WPA2 encryption to prevent outside intrusion and protect your personal information from being exposed.
The adapter is easy to install and manage with the Quick Setup Wizard guiding you step-by-step through the installation process and the TP-LINK Wireless Configuration Utility instructing you to quickly set up a wireless connection.
With unmatched wireless performance, reception, and security protection, the TL-WN851ND is the best choice for easily adding or upgrading wireless connectivity to your desktop.
1.3 Features
Complies with IEEE 802.11n, IEEE 802.11g, and IEEE 802.11b standards. Supports WPA/WPA2 data security and TKIP/AES encryption. Supports high rates of up to 300Mbps for maximum throughput, and automatically adjusts to lower speeds due to distance or other operating limitations. Provides a 32-bit PCI interface. Supports Ad Hoc and Infrastructure modes. Good anti-jamming capability. Supports roaming between access points when configured in Infrastructure mode. Easy to configure and provides monitoring information. Supports Windows XP, Windows Vista, and Windows 7. Two antennas in a 2x2 configuration for two receivers and two transmitters.
1.4 Hardware Overview
LED status:
| Status Working | Status |
| Off | The driver has not been installed;The adapter's radio has been disabled. |
| Flashing Slowly | The driver has been installed but no data is being transmitted or received. |
| Flashing Quickly | Data is being transmitted or received. |
Chapter 2 Installation
Please install the PCI adapter into your computer before installing the driver software from the Resource CD.
2.1 Hardware Installation
- Turn off your computer and unplug the power cord from the computer.
- Open the case and locate an available PCI slot. Remove the metal slot cover on the back of the PC. Keep the screws. Turn to your computer manufacturer for instructions if needed.
- Insert the PCI adapter into the PCI slot. Make sure that all of its pins have touched the slot's contacts. Once the adapter has been firmly inserted, screw its fastening tab. Then, close your PC case.
- Insert the power cable back into the computer and turn on your computer.
When the Found New Hardware wizard appears, click Cancel.
2.2 Software Installation
The adapter's Setup Wizard will guide you through the installation procedures for Windows 7, Windows Vista, and Windows XP. The procedures in different systems are quite similar, therefore here takes the procedures in Windows 7 for example.
- Insert the Resource CD into your CD-ROM drive, and the window below will appear. Select model TL-WN851ND. There will be a menu including: Install Driver&Utility and User Guide. Click Install Driver&Utility to begin.

Figure 2-1
- The InstallShield Wizard window will appear. Click Next to continue.

Figure 2-2
- Choose a setup type. It is recommended to select Install TP-LINK Wireless Configuration Utility and Driver. Selecting Install Driver Only will only install driver. Click Next to continue.

Figure 2-3
- Click Change to specify the destination location for the software or you can leave it default. Click Next in the screen below to continue.

Figure 2-4
- Click Install to continue the setup.

Figure 2-5
- The utility and drivers will install. This may take 1~2 minutes.

Figure 2-6
- After all the steps above, you will see the screen below. Click Finish to complete the setup.

Figure 2-7
- After installation, the utility configuration page will automatically pop up as shown in the following figure and the icon 📁 will appear in your system tray. To connect to a network, please refer to Chapter 3 Connect to a Wireless Network.

Figure 2-8
Chapter 3 Connect to a Wireless Network
With both the hardware and software successfully installed into your computer, you can quickly connect to a wireless network using one of the following methods.
Method One:
To connect using TWCU
TL-WN851ND uses the TP-LINK Wireless Configuration Utility as the management software. The utility provides you an easy interface to connect to a network and to change any settings related to the wireless adapter.
Method Two:
To connect using QSS
By this method, you can connect to your network quickly on the condition that your router or access point supports QSS or WPS as is called by some other brands.
Method Three:
To connect using Windows built-in wireless utility
Windows users may use the built-in wireless utility to connect to a wireless network. For specific operations, please go to To connect using Windows built-in wireless utility.
3.1 To connect using TWCU
- After installation, the utility configuration page will automatically pop up on the screen. If the utility page does not pop up, you can also launch the utility by double-clicking on the icon on your desktop or the icon in your system tray.

Figure 3-1
- The Network page will display all wireless networks that are available in your area. To connect to a network, simply highlight the wireless network name and click Connect.
SSID (Service Set Identifier) is the name of the wireless network. The adapter will
automatically connect to your target network next time if you tick Connect automatically.

Figure 3-2
- If the word None appears behind the SSID, this means the network to be connected is not security-enabled and you can connect to the network without entering a key. To prevent outside intrusion and safeguard your network, it is strongly recommended to set a password to your router or access point.

Figure 3-3
If there is a "lock" icon behind the SSID, this means the wireless network is secure and the corresponding security type will display. You must know the encryption key/security settings to connect.
Input the password which can be found on the configuration page of your router or access point, then click OK to continue. Or push the QSS/WPS button on your router if your router features the QSS/WPS function to quickly build a connection without having to enter a key.

Figure 3-4
- You have now successfully connected to your network. Click Close to enjoy the Internet.

Figure 3-5
- To view more information about the network currently connected, click Status in the tools section and the page will display information such as the network type, link quality and wireless mode.

Figure 3-6
3.2 To connect using QSS
QSS (Quick Secure Setup) function allows you to add a new wireless device to an existing network quickly.
If the wireless router supports QSS or Wi-Fi Protected Setup (WPS), you can establish a wireless connection between wireless card and router using either Push Button Configuration (PBC) method or PIN method. Three QSS connection methods are listed in the following parts while the third method is only supported in Windows XP and Windows Vista.
3.2.1 PBC (Push Button Configuration) method
- Press the QSS button on the back panel of the router. Here takes router TL-WR741ND for example.

- Open TWCU and click QSS tab. Select Push the button on my access point or wireless router and then click Connect.

Figure 3-7
- The adapter will be connecting to the target network.

Figure 3-8
- When the following window appears, you have successfully connected to the network.

Figure 3-9
3.2.2 PIN method
There are two ways to configure the QSS by PIN method:
1) Enter the PIN from your AP device. 2) Enter a PIN into your AP device.
Following are detailed configuration procedures of each way.
3.2.2.1. Enter the PIN from your AP device
- Open TWCU and click QSS tab. Select Enter the PIN of my access point or wireless router. In the empty field beside PIN, enter the PIN labeled on the bottom of the router (here takes 13492564 for example). If you have generated a new PIN code for your router, please enter the new one instead. Click Connect to continue.

Figure 3-10
- The adapter will be connecting to the target network.

Figure 3-11
- When Figure 3-9 appears, you have successfully connected to the network.
3.2.2.2. Enter a PIN into your AP device
This method is only available in Windows XP and Windows Vista.
- Open TWCU and click the QSS tab. Select "Enter the PIN of this device into my access point or wireless router." In the field beside PIN, you will see the PIN value of the adapter, which is randomly generated. Click Connect to continue.

Figure 3-12
- Open your router's Web-based Utility and click the QSS link on the left of the main menu. Then click Add device, and the following figure will appear. Enter the PIN value of the adapter in the empty field beside PIN, and then click Connect.

Figure 3-13
- When "Connect successfully" appears on the screen, the QSS configuration is complete. Alternatively, you can view the adapter's utility page to see whether the connection has been successful, as shown in Figure 3-15.

Figure 3-14

Figure 3-15
3.3 To connect using Windows built-in wireless utility
3.3.1 In Windows 7
Windows 7 users may use the built-in wireless utility. Follow the steps below.
- Left-click the wireless icon in your system tray (lower-right corner). The utility will display any available wireless networks in your area. Highlight the wireless network (displayed using the SSID) to be connected and then click Connect.

- If the network you would like to connect is security-enabled, enter the same security key or passphrase that is on your router. Or push the QSS button (other brands may call it WPS) on the router or access point (You will be prompted to push the button on the window if QSS function is supported as shown in the figure below). If the network to be connected is not secure, the connection will be built without entering a key.

- You have now successfully connected to the network.

3.3.2 In Windows Vista
Windows Vista users may use the built-in wireless utility. Follow the steps below.
- Open the wireless utility by right-clicking on the wireless computer icon in your system tray as shown in the figure below. Select Connect to a network.

- The utility will display any available wireless networks in your area. Highlight the wireless network you would like to connect and then click Connect.

- If the network you would like to connect is security-enabled, enter the same security key or passphrase that is on your router. If the network to be connected is not secure, the connection will be built without entering a key.

- You have now successfully connected to the network.

Figure 3-22
3.3.3 In Windows XP
Windows XP users may use the built-in wireless utility. Follow the steps below.
- Right-click on the utility icon in your system tray (lower-right corner). Select Switch to TP-LINK Wireless configuration Utility.

Figure 3-23
Or double-click the utility icon to load the utility configuration page. Click Advanced in the tools section and then select Use Windows wireless configuration tool in the figure shown below. Click OK when Figure 3-25 appears to continue.

Figure 3-24

Figure 3-25
- Right-click on the wireless computer icon in your system tray (lower-right corner). Select View Available Wireless Networks.

Figure 3-26
- The utility will display any available wireless networks in your area. Click on a network (displayed using the SSID) and click the Connect button.

Figure 3-27
- If the network is security-enabled, you will be prompted to enter the key as shown below. If not, you will connect to the network directly without entering a key.

Figure 3-28
Chapter 4 Management
This section will show you how to configure your TL-WN851ND adapter using the TP-LINK Wireless Configuration Utility (TWCU).
The TL-WN851ND adapter uses the TP-LINK Wireless Configuration Utility as the management software. The utility provides users with an easy interface to change any settings related to the adapter. Double-clicking on the icon on your desktop will start the utility.
4.1 Profile
Your wireless networks may vary in different places like home, office or coffee shop. With Profile management, you can easily save and manage various networks to be connected, saving you the trouble of having to repeat the same configurations. Click Profile in the tools section, the following page will appear.

Figure 4-1
4.1.1 Add a profile
To add a profile, click the Add button on the bottom of the screen. Then the configuration window will appear.

Figure 4-2
The following items can be found on the screen.
Profile Name: Enter a name for your profile (e.g. Home, Office, CoffeeShop). The same name is not allowed. Please also note that no space is allowed between words. SSID: Select the target network from the drop-down list. Network Type: Select the network type. If you are connecting to a wireless router or access point, select Infrastructure. If you are connecting to another wireless client such as an adapter, select ad-hoc.
Security Type: Select the security type from the list. Three options are available: WPA-PSK/WPA2-PSK, WEP and None. The security type should be the same as on your router or access point, otherwise, you will not be able to build a successful connection.
WPA-PSK/WPA2-PSK uses a passphrase or key to authenticate your wireless connection. The key must be the exact same key entered on your wireless router or access point. None stands for no security. It is recommended to enable WPA-PSK/WPA2-PSK on your wireless router or access point before configuring your wireless adapter.
Encryption Type: From the drop-down menu, select the encryption type that is the same as on your router or access point. Security Key: Enter the passphrase exactly as it is on your wireless router or access point. Click the Show characters box to see the passphrase. Unchecking it will hide it. Start this connection automatically: check this box to automatically connect to this network next time. Save: Click Save to save your settings.
Complete the above settings, the Profile page should look like the following figure. To connect to a desired network, just highlight the network you would like to connect to and click the Connect button on the bottom of the window.

Figure 4-3
4.1.2 Modify a profile
You may edit an existing profile by clicking the Modify button from the Profile page. For instance, you may like to change the profile name from Home to Home1 or you may want to specify another SSID for profile Home. After all the changes, click Save to make the changes take effect.

Figure 4-4
4.1.3 Delete a profile
To delete an existing profile, highlight the profile name and click Remove on the bottom of the screen or press the Delete button on your keyboard. When the following figure appears, click OK to continue.

Figure 4-5
4.2 Advanced
The following configurations can be made on the Advanced page:
1) To select wireless configuration tool.
Here you can decide which tool to use, either the TP-LINK Configuration Utility or the Windows wireless configuration tool. This option is available only in Windows XP.
2) To switch to another wireless network adapter.
Here you can switch to another adapter installed in your computer. The adapters successfully installed in your computer will be listed in the drop-down menu if the adapters are supported by this utility.
3) To switch to SoftAP mode.
Once enabled, the adapter will be able to work as an AP. This option is only available in Windows 7.
4) To change the power save mode. The default option is ON.

Figure 4-6
4.3 About
The About screen gives you information about the Driver and Utility versions of the adapter.
Right-click on the 📁 icon in your system tray and select About from the list.

Figure 4-7
Chapter 5 AP Mode
In Soft AP mode, the adapter will work as an AP. This function is available only in Windows7. Suppose that only one computer in your house can access the Internet for various reasons like only one WLAN port is available on your wired broadband router, however, other wireless-capable devices also want to share the Internet. Then the adapter can be configured as an AP under the Soft AP mode, saving you the trouble of having to get a separate access point or a router.
With this feature, a computer can use a single physical wireless adapter to connect as a client to a hardware access point while at the same time acting as a software AP allowing other wireless-capable devices to connect to it.
To switch to this mode, right-click on the utility icon in your system tray and select Switch to SoftAP mode.

Figure 5-1
Or from the Advanced page of the utility, tick ON under the SoftAP mode as shown in the following figure. Click OK when prompted to confirm the setting.

Figure 5-2
The Soft AP icon should then appear beside Advanced icon in the utility.

Figure 5-3
SoftAP mode: Select to enable or disable the function. Internet Connecting Share(ICS): Specify a connection through which devices connected to your AP can access the Internet. SSID: Enter the name for your soft AP (for example, Jone) so that others can know which AP is yours when trying to connect to it. The default name (SSID) is "tp-link".
Security Type: The security type here is set to WPA2-PSK, which is based on 802.11i and uses the Advanced Encryption Standard instead of TKIP. It was designed to improve the security features of WEP. WPA2-PSK uses a passphrase or key to authenticate your wireless connection. You don't need to make any configuration here. Encryption Type: The encryption type here is set to AES. Security Key: Enter the key in the field to enable security on your AP. It is recommended that you specify a different key instead of the default key 12345678. Only by entering the corresponding key can other computers establish a successful connection with your AP. IP Address: This displays the IP address of the SoftAP.
Chapter 6 Uninstall Software
6.1 Uninstall the utility software from your PC
- On the Windows taskbar, click the Start button, click All programs→TP-LINK, and then click Uninstall-TP-LINK Wireless Configuration Utility.

Figure 6-1 Uninstall Utility
- Follow the Install Shield Wizard to uninstall the utility software from your PC.

Figure 6-2
- Click Finish when the figure below appears.

Figure 6-3
6.2 Uninstall the driver software from your PC
- On the Windows taskbar, click the Start button, click All programs→TP-LINK, and then click Uninstall-TL-WN851ND Driver.

Figure 6-4 Uninstall Driver
- Click Uninstall shown in Figure 6-4 above, and the system will uninstall the driver software of the adapter from your PC.
Appendix A: Specifications
| Normal | |
| Interface 32 bit PCI Interface | |
| Standards | IEEE 802.11n, IEEE 802.11g, IEEE 802.11b |
| Operating System Windows XP, Windows Vista, Windows 7 | |
| Throughput | 300Mbps (Maximal) |
| Radio Data Rate | 11b: 1/2/5.5/11Mbps11g: 6/9/12/18/24/36/48/54Mbps11n: Up to 300Mbps |
| Modulation | 11b:CCK,QPSK,BPSK11g:OFDM11n: QPSK, BPSK, 16-QAM, 64-QAM |
| Media Access Protocol | CSMA/CA with ACK |
| Data Security WPA/WPA | 2, WEP, TKIP/AES |
| Frequency* 2.4 ~ 2.4835GHz | |
| Spread Spectrum Direct | Sequence Spread Spectrum (DSSS) |
| Safety & Emissions FCC, CE | |
| Environmental and Physical | |
| Working Temperature | 0°C~40°C (32°F~104°F) |
| Working Humidity 10% ~ | 90% RH, Non-condensing |
| Storage Temperature | -40°C~70°C(-40°F~158°F) |
| Storage Humidity | 5% ~ 90% RH, Non-condensing |
* Only 2.412GHz~2.462GHz is allowed to be used in the USA, which means only channels 1~11 are available for American users to choose.
Appendix B: Glossary
802.11b - The 802.11b standard specifies wireless networking at 11 Mbps using direct-sequence spread-spectrum (DSSS) technology, operating in the unlicensed radio spectrum at 2.4GHz, and WEP encryption for security. 802.11b networks are also referred to as Wi-Fi networks. 802.11g - specification for wireless networking at 54 Mbps using direct-sequence spread-spectrum (DSSS) technology, using OFDM modulation and operating in the unlicensed radio spectrum at 2.4GHz, with backward compatibility with IEEE 802.11b devices, and WEP encryption for security. 802.11n - 802.11n builds upon previous 802.11 standards by adding MIMO (multiple-input multiple-output). MIMO uses multiple transmitter and receiver antennas to allow for increased data throughput via spatial multiplexing and increased range by exploiting spatial diversity, perhaps through coding schemes like Alamouti coding. The Enhanced Wireless Consortium (EWC) was formed to help accelerate the IEEE 802.11n development process and promote a technology specification for interoperability of next-generation wireless local area networking (WLAN) products. Ad hoc Network - An ad hoc network is a group of computers, each with a Wireless Adapter, connected as an independent 802.11 wireless LAN. Ad hoc wireless computers operate on a peer-to-peer basis, communicating directly with each other without the use of an access point. Ad hoc mode is also referred to as an Independent Basic Service Set (IBSS) or as peer-to-peer mode, and is useful at a departmental scale or SOHO operation. DSSS - (Direct-Sequence Spread Spectrum) - DSSS generates a redundant bit pattern for all data transmitted. This bit pattern is called a chip (or chipping code). Even if one or more bits in the chip are damaged during transmission, statistical techniques embedded in the receiver can recover the original data without the need for retransmission. To an unintended receiver, DSSS appears as low power wideband noise and is rejected (ignored) by most narrowband receivers. However, to an intended receiver (i.e., another wireless LAN endpoint), the DSSS signal is recognized as the only valid signal, and interference is inherently rejected (ignored). FHSS - (Frequency Hopping Spread Spectrum) - FHSS continuously changes (hops) the carrier frequency of a conventional carrier several times per second according to a pseudo-random set of channels. Because a fixed frequency is not used, and only the transmitter and receiver know the hop patterns, interception of FHSS is extremely difficult. Infrastructure Network - An infrastructure network is a group of computers or other devices, each with a Wireless Adapter, connected as an 802.11 wireless LAN. In infrastructure mode, the wireless devices communicate with each other and to a wired network by first going through an access point. An infrastructure wireless network connected to a wired network is referred to as a Basic Service Set (BSS). A set of two or more BSS in a single network is referred to as an Extended Service Set (ESS). Infrastructure mode is useful at a corporate scale, or when it is necessary to connect the wired and wireless networks.
Spread Spectrum - Spread Spectrum technology is a wideband radio frequency technique developed by the military for use in reliable, secure, mission-critical communications systems. It is designed to trade off bandwidth efficiency for reliability, integrity, and security. In other words, more bandwidth is consumed than in the case of narrowband transmission, but the trade off produces a signal that is, in effect, louder and thus easier to detect, provided that the receiver knows the parameters of the spread-spectrum signal being broadcast. If a receiver is not tuned to the right frequency, a spread-spectrum signal looks like background noise. There are two main alternatives, Direct Sequence Spread Spectrum (DSSS) and Frequency Hopping Spread Spectrum (FHSS). SSID - A Service Set Identification is a thirty-two character (maximum) alphanumeric key identifying a wireless local area network. For the wireless devices in a network to communicate with each other, all devices must be configured with the same SSID. This is typically the configuration parameter for a wireless PC card. It corresponds to the ESSID in the wireless Access Point and to the wireless network name. See also Wireless Network Name and ESSID. WEP - (Wired Equivalent Privacy) - A data privacy mechanism based on a 64-bit or 128-bit or 152-bit shared key algorithm, as described in the IEEE 802.11 standard. To gain access to a WEP network, you must know the key. The key is a string of characters that you create. When using WEP, you must determine the level of encryption. The type of encryption determines the key length. 128-bit encryption requires a longer key than 64-bit encryption. Keys are defined by entering in a string in HEX (hexadecimal - using characters 0-9, A-F) or ASCII (American Standard Code for Information Interchange – alphanumeric characters) format. ASCII format is provided so you can enter a string that is easier to remember. The ASCII string is converted to HEX for use over the network. Four keys can be defined so that you can change keys easily. Wi-Fi - A trade name for the 802.11b wireless networking standard, given by the Wireless Ethernet Compatibility Alliance (WECA, see http://www.wi-fi.net), an industry standards group promoting interoperability among 802.11b devices. WLAN - (Wireless Local Area Network) - A group of computers and associated devices communicate with each other wirelessly, which network serving users are limited in a local area. WPA - (Wi-Fi Protected Access) - A wireless security protocol uses TKIP (Temporal Key Integrity Protocol) encryption, which can be used in conjunction with a RADIUS server.
- COPYRIGHT & TRADEMARKS
- FCC STATEMENT
- FCC RF RADIATION EXPOSURE STATEMENT
- CE MARK WARNING
- CE
- NATIONAL RESTRICTIONS
- DECLARATION OF CONFORMITY
- CONTENTS
- CHAPTER 1 PRODUCT OVERVIEW
- CHAPTER 2 INSTALLATION
- CHAPTER 3 CONNECT TO A WIRELESS NETWORK
- CHAPTER 4 MANAGEMENT
- CHAPTER 5 AP MODE
- CHAPTER 6 UNINSTALL SOFTWARE
- APPENDIX A: SPECIFICATIONS
- APPENDIX B: GLOSSARY
- PACKAGE CONTENTS
- NOTE
- INTRODUCTION
- FEATURES
- HARDWARE OVERVIEW
- HARDWARE INSTALLATION
- SOFTWARE INSTALLATION
- TO CONNECT USING TWCU
- TO CONNECT USING QSS
- TO CONNECT USING WINDOWS BUILT-IN WIRELESS UTILITY
- PBC (PUSH BUTTON CONFIGURATION) METHOD
- PIN METHOD
- ENTER THE PIN FROM YOUR AP DEVICE
- ENTER A PIN INTO YOUR AP DEVICE
- IN WINDOWS
- IN WINDOWS VISTA
- IN WINDOWS XP
- PROFILE
- ADD A PROFILE
- MODIFY A PROFILE
- DELETE A PROFILE
- ADVANCED
- ABOUT
- UNINSTALL THE UTILITY SOFTWARE FROM YOUR PC
- UNINSTALL THE DRIVER SOFTWARE FROM YOUR PC
Brand : TP-LINK
Model : TL-WN851ND
Category : Network card / adapter