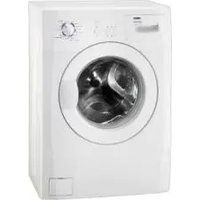
ZWO 1101 - Washing machine ZANUSSI - Free user manual and instructions
Find the device manual for free ZWO 1101 ZANUSSI in PDF.


| Brand | Zanussi |
| Model | ZWO 1101 |
| Product Type | Washing Machine |
| Installation Type | Freestanding |
| Width | 60 cm |
| Height | 85 cm |
| Depth | 60 cm |
| Net Weight | 70 kg |
| Power Supply | 220-240 V, 50 Hz, 10 A |
| Energy Class | A+++ |
| Spin Speed | 1100 rpm |
| Load Capacity | 7 kg |
| Wash Programs | Cotton, Synthetics, Delicates, Wool, Quick 30', Eco, Rinse & Spin, Drain & Spin |
| Temperature Settings | Cold to 90°C |
| Display | LED |
| Delay Start | Up to 24 hours |
| Child Lock | Yes |
| Overflow Protection | Yes |
| Noise Level (Wash) | 58 dB(A) |
| Noise Level (Spin) | 76 dB(A) |
| Water Consumption | 52 L/cycle |
| Annual Energy Consumption | 184 kWh |
| Maintenance | Clean pump filter, descale periodically, clean detergent drawer |
| Spare Parts | Drum, belt, pump, heater, door seal, control board |
Frequently Asked Questions - ZWO 1101 ZANUSSI
User questions about ZWO 1101 ZANUSSI
0 question about this device. Answer the ones you know or ask your own.
Ask a new question about this device
Download the instructions for your Washing machine in PDF format for free! Find your manual ZWO 1101 - ZANUSSI and take your electronic device back in hand. On this page are published all the documents necessary for the use of your device. ZWO 1101 by ZANUSSI.
USER MANUAL ZWO 1101 ZANUSSI
Hints and tips ____ 8
Before first use ____ 9
Daily use ____ 9
Care and cleaning 11
Troubleshooting 13
Installation ____ 15
Subject to change without notice

Safety information
Before the installation and use, read this manual carefully:
- For your safety and the safety of your property
- To help the environment
- For the correct operation of the appliance.
Always keep these instructions with the appliance also if you move or give it to a different person.
The manufacturer is not responsible if an incorrect installation and use causes damage.
Children and vulnerable person safety
- Do not let persons, children included, with reduced physical sensory, reduced mental functions or lack of experience and knowledge use the appliance. They must have supervision or instruction for the operation of the appliance by a person who is responsible for their safety. Do not let children play with the appliance.
- Keep all packaging away from children. There is the risk of suffocation or injury.
- Keep all detergents away from children.
- Keep children and pets away from the appliance when the door is open.
- Before you close the appliance door, make sure that children and pets are not into the drum.
- If the appliance has a child safety device, we recommend to activate it.
General safety
- Do not use the appliance for professional use. The appliance is only for domestic use.
- Do not change the specifications of this appliance. There is the risk of injury and damage to the appliance.
-
Do not put flammable products or items that are wet with flammable products in, near or on the appliance. Risk of explosion or fire.
-
Obey the safety instructions on the detergent packaging to prevent burns to eyes, mouth and throat.
- Make sure that you remove all metal objects from the laundry. Hard and sharp material can cause damage to the appliance.
- Do not touch the glass of the door while a programme operates. The glass can be hot (only for front-loading appliances).
Care and cleaning
- Deactivate the appliance and disconnect the mains plug from the mains socket.
- Do not use the appliance without the filters. Make sure that the installation of the filters is correct. An incorrect installation causes water leakages.
Installation
- The appliance is heavy, be careful when you move it.
- Do not transport your appliance without the transit bolts, you can damage internal components and cause leakages or malfunctions.
- Do not install and connect a damaged appliance.
- Make sure to remove all packaging and transport bolts.
- Make sure that the mains plug is disconnected from the mains socket during installation.
- Only a qualified person must do the electrical installation, the plumbing and the installation of the appliance. This to prevent the risks of structural damage or injury.
- Do not install or use the appliance where the temperature is less than 0 °C.
- When you install the appliance on a carpet floor, make sure that there is air circulation between the appliance and the carpet. Adjust the feet to have the necessary space between the appliance and the carpet.
Water connection
- Do not connect the appliance with old hoses already used. Only use new hoses.
- Make sure not to cause damage to the water hoses.
- Do not connect the appliance to new pipes or pipes not used for a long time. Let the water flow for some minutes, then connect the inlet hose.
- The first time you use the appliance, make sure that the water hoses and the couplings do not have leakages.
Electrical connection
- Make sure that the appliance is earthed.
- Make sure that the electrical information on the rating plate agrees with the power supply.
- Always use a correctly installed shockproof socket.
-
Do not use multiple plugs and extension cables. There is a risk of fire.
-
Do not replace or change the mains cable. Contact the service centre.
- Make sure not to cause damage to the mains plug and cable.
- Connect the mains plug to the mains socket only at the end of the installation. Make sure that there is access to the mains plug after the installation.
- Do not pull the mains cable to disconnect the appliance. Always pull the mains plug.
Discard the appliance
- Disconnect the mains plug from the mains socket.
- Cut off the mains cable and discard it.
- Discard the door catch. This prevents children or pets to be closed in the appliance. There is a risk of suffocation (only for front-loading appliances).
Environment concerns
The symbol on the product or on its packaging indicates that this product may not be treated as household waste. Instead it should be taken to the appropriate collection point for the recycling of electrical and electronic equipment. By ensuring this product is disposed of correctly, you will help prevent potential negative consequences for the environment and human health, which could otherwise be caused by inappropriate waste handling of this product. For more detailed information about recycling of this product, please contact your local council, your household waste disposal service or the shop where you purchased the product.
Packaging materials
Recycle the materials with the symbol

Technical information
Put the packaging in applicable containers to recycle it.
Ecological hints
To help the environment, use less water and energy, obey these instructions:
- Set a programme without the prewash phase to wash laundry with normal soil.
- Always start a washing programme with the maximum load of laundry.
- If necessary, use a stain remover when you set a programme with a low temperature.
- To use the correct quantity of the detergent, check the water hardness of your domestic system
| Dimensions Width / Height / Depth 595 / 850 / 330 mm | ||
| Electrical connection: Voltage | 220-240 V | |
| Overall power | 2100 W | |
| Fuse | 10 A | |
| Frequency | 50 Hz | |
| Level of protection against ingress of solid particles and moisture ensured by the protective cover, except where the low voltage equipment has no protection against moisture | IPX4 | |
Water supply pressure Minimum 0,5 bar (0,05 MPa)
| Water supply1) | Maximum 10 bar (1 MPa) |
| Cold water | |
| Maximum load Cotton 3.5 kg | |
| Spin speed Maximum 1000 rpm |
1) Connect the water inlet hose to a water tap with a 3/4" thread.
Product description

1 Worktop
2 Detergent dispenser
3 Control panel
4 Door handle
5 Drain pump
6 Rating plate
Accessories

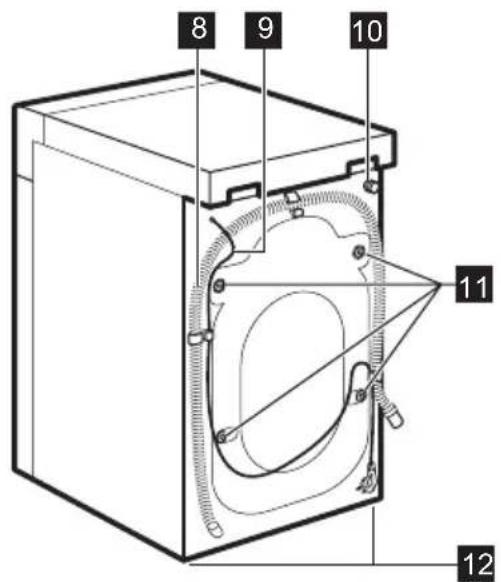
7 Feet for the appliance level
8 Water drain hose
9 Mains cable
10 Water inlet valve
11 Transit bolts
12 Feet for the appliance level
1 Inlet hose
To connect the appliance to the cold water tap.
2 Large plastic caps
To close the holes on the rear side of the cabinet after the removal of the transit bolts.
3 Plastic hose guide
To connect the drain hose on the edge of a sink.
4 Small plastic caps
To attach the protection cover to the bottom of the appliance.

1 Programme knob
2 Start button ▶
3 Easy iron button
4 Extra rinse button
5 Prewash button
Programme knob 1
Turn this knob to set a programme.
Start button 2
Press this button to start a programme.
Easy Iron button 3
Press this button to prevent the creases in the fabrics.
When you press this button, the appliance decrease the intensity of the washing phase and spin speed.
Automatically, the spin speed is set to 500 rpm.
Set this function to iron the laundry easily and quickly.
Extra rinse button 4
Press this button to add rinsing phases to a programme.
Use this function for persons allergic to detergents and in areas where the water is soft.
Prewash button 5
Press this button to add a prewash phase at 40^ C before the washing programme.
We recommend that you use this function when you have laundry with a high level of soil.
The set of this function increases the programme duration.
Programmes
| Programme Temperature | Type of load and soil Weight of load | Programme phases | Possible functions |
| ^13H72 Cottons90°C | White cotton with heavy soil. This pro-grammes add also the phase of hygiene to the laundry.max. 3.5 kg | WashRinsesSpin phase at the maxi-mum speed | |
| ^1DC4W +Cottons Economy60°C | White and fast coloured cotton with nor-mal soil.max. 3.5 kg | WashRinsesSpin phase at the maxi-mum speed | |
| ^12DSG +Cottons Economy40°C | White and coloured cotton with normal or light soil.max. 3.5 kg | WashRinsesSpin phase at the maxi-mum speed | |
| ^1ACCK Cottons30°C | White and coloured cotton with light soil.max. 3.5 kg | WashRinsesSpin phase at the maxi-mum speed | |
| ^1SDWD Synthetics60°C | Synthetic or mixed fabric items with nor-mal level of soilmax. 1.7 kg | WashRinsesSpin phase at 800 rpm | |
| ^148CS Sport40°C | Special programme for sport and casual items with normal or light level of soil.Set this programme and the easy iron function not to iron the laundry.max. 1.7 kg | WashRinsesSpin phase at 800 rpm | |
| ^1HETK Synthetic mixed30°C | Cotton, synthetic or mixed fabric items with light level of soil or worn once.max. 1.7 kg | WashRinsesSpin phase at 800 rpm | |
| ^1X08Z DelicatesShirts40°C | Delicate fabrics as acrylics, viscose, pol-yester items with normal soil.max. 1.7 kg | WashRinsesSpin phase at 500 rpm | |
| ^1X56B Wool40°C – Cold | Machine washable wool. Hand washable wool and delicate fabrics with «hand washing» care symbol.max. 0.8 kg | WashRinsesSpin phase at 800 rpm | |
| ^167KT Handwash30°C | Hand washable delicate fabrics with «hand washing» care symbol.max. 0.8 kg | WashRinsesSpin phase at 800 rpm | |
| Quick wash 35°C | Quick wash of cotton, synthetic, delicate or mixed fabric items with light level of soil or worn once. max. 1.7 kg | WashRinsesSpin phase at the maximum speed | |
| Cold wash | White and coloured cotton with light soil. max. 3.5 kg | WashRinsesSpin phase at the maximum speed | |
| Rinse | All fabrics. max. 3.5 kg | Rinse with additive Spin phase at the maximum speed | |
| Spin | Spin phase for hand washed laundry. Drainage of the water Spin phase at the maximum speed | ||
To cancel the programme that it operates or to deactivate the appliance.
Consumption values
| Programme Energy consumption | (KWh)1) | Water consumption (litre)1) | Programme duration (minutes)1) |
| White Cottons 90 °C 1.5 43.5 102.5 | |||
| Cottons 30 °C 0.26 28 87 | |||
| Synthetics 60 °C 0.7 44 97 | |||
| Synthetics 40 °C 0.38 38.5 88 | |||
| Delicates 40 °C 0.4 41.5 47 | |||
| Wool 40 °C | 0.25 44.5 39 | ||
| Handwash 30 °C 0.17 51 46 |
1) The consumption information shown in this chart is indicative. It can vary depending on the quantity and the type of laundry, on the temperature of the water supply and on the ambient temperature.
Standard programmes for the Energy Label consumption values
The cotton 60 °C economy and cotton 40 °C economy are the standard cotton programmes for normally soiled cotton laundry. They are suitable to clean normally soiled cotton laundry and they are the most efficient programmes
in terms of combined energy and water consumption for washing that type of cotton laundry.
They agree with EN60456.
The actual water temperature may differ from the declared cycle temperature.
The laundry load
- Divide the laundry in: white, coloured, synthetics, deli-cates and wool.
- Obey the washing instructions that are on the laundry care labels.
- Do not wash together white and coloured items.
- Some coloured items can discolour with the first wash. We recommend that you wash them separately for the first times.
- Button up pillowcases, close zippers, hooks and poppers. Tie up belts.
- Empty the pockets and unfold the items.
- Turn inside out multilayered fabrics, wool and items with painted illustrations.
- Remove hard stains.
- Wash with a special detergent heavy soil stains.
- Be careful with the curtains. Remove the hooks or put the curtains in a washing bag or pillowcase.
- Do not wash in the appliance :
– Laundry without hems or with cuts - Underwired bras.
– Use a washing bag to wash small items. - A very small load can cause balance problems with the spin phase. If this occurs, adjust manually the items in the tub and start the spin phase again.
Stubborn stains
For some stains, water and detergent is not sufficient.
We recommend that you remove these stains before you put the items in the appliance.
Special stain removers are available. Use the special stain remover that is applicable to the type of stain and fabric.
Detergents and additives
- Only use detergents and additives specially made for washing machines.
- Do not mix different types of detergents.
- To help the environment, do not use more than the correct quantity of detergent.
- Obey the instructions that you find on the on packaging of these products.
- Use the correct products for the type and colour of the fabric, the programme temperature and the level of soil.
- If you use liquid detergents, do not set the prewash phase.
- If your appliance has not the detergent dispenser with the flap device, add the liquid detergents with a dosing ball.
Water hardness
If the water hardness in your area is high or moderate, we recommend that you use a water softener for washing machines. In areas where the water hardness is soft it is not necessary to use a water softener.
To know the water hardness in your area, contact your local water authority.
Obey the instructions that you find on the packaging of the products.
Equivalent scales measure the water hardness:
- German degrees (°dH).
- French degrees (°TH).
- mmol/l (millimol for each litre – international unit for the hardness of water).
- Clarke degrees.
Water hardness table
| Level Type | Water hardness | ||||
| °dH °T.H. mmol/l Clarke | |||||
| 1 soft 0-7 0-15 0-1.5 0-9 | |||||
| 2 medium 8-14 16-25 1.6-2.5 10-16 | |||||
| 3 | hard | 15-21 | 26-37 | 2.6-3.7 | 17-25 |
| 4 | very hard | >21 | >37 | >3.7 | >25 |
Before first use
- To activate the drain system, put 2 litre of water in the main wash compartment of the detergent dispenser.
- Put a small quantity of detergent in the main wash compartment of the detergent dispenser. Set and
Daily use
- Open the water tap.
- Connect the mains plug to the mains socket.
- Put the laundry in the appliance.
- Use the correct quantity of detergent and additives.
- Set and start the correct programme for the type of laundry and soil.
Loading the laundry
- Open the appliance door.
- Put the laundry in the drum, one item at a time. Shake the items before you put them in the appliance. Make sure not to put too much laundry in the drum.
- Close the door.

Caution! Make sure that no laundry stays between the seal and the door. There is a risk of water leakage or damage to the laundry.
Filling the detergent and additives

Caution! Use only specified detergents for washing machine.
start a programme for cotton at the highest temperature without laundry. This removes all possible dirt from the drum and the tub.

| 1 | The detergent compartment for the prewash phase or for the soak programme.Add the detergent for prewash and soak before the start of the programme. |
| 2 | The detergent compartment for the washing phase.If you use a liquid detergent, put it immediately before you start the programme. |
| Liquid additives compartment (fabric conditioner, starch).Put the product in the compartment before you start the programme. |
i Always obey the instructions that you find on the packaging of the detergent products.
Using the liquid detergent
natural_image
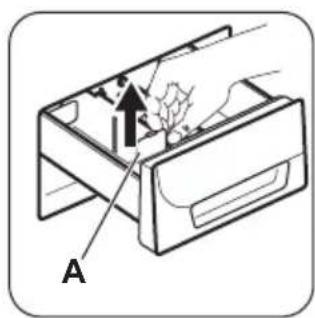
Diagram of a device with labeled parts and an arrow indicating direction (no text or symbols present)• Pull out the detergent dispenser until it stops.
• Pull out the detergent divider from its position (A).

natural_image
Illustration of a hand placing a leaf into a drawer with an arrow indicating the process (no text or symbols present)- Put it into the special guides in the middle of the compartment for the washing phase.
• Measure out the detergent and the fabric conditioner.
- Carefully close the detergent dispenser.
When you use the detergent divider:
— Do not use gelatinous or thick liquid detergents.
- Do not put more liquid detergent than the edge of the detergent divider.
- Do not set the prewash phase.
- Do not set the delay start function, if it is available.
Setting and starting a programme
- Turn the programme knob and set the washing programme.
- The Start button indicator is off.
- Set the available functions. When you press the relevant button, the indicator of the set function comes on.
- Press the Start button to start the programme until the button indicator is on.
Cancel a programme
- Turn the programme knob to ○ to cancel the programme and to deactivate the appliance.
- Turn the programme knob again to activate the appliance. Now, you can set a new washing programme.
The appliance does not drain the water.
Open the door
While a programme operates, the appliance door is locked.
To open the appliance door:
- Turn the programme knob to ○ to deactivate the appliance.
- Wait for some minutes before to open the appliance door.
- Close the appliance door.
- Set the programme again.
If the temperature and level of the water in the drum are too high, you cannot open the door.
To open the appliance door:
- Do the steps 1 and 2 again.
- Wait for some minutes.
• Make sure that no water is in the drum.
At the end of the programme
• The appliance stops automatically.
- The start button indicator flashes or the End indicator is on.
- Turn the programme knob to to deactivate the appliance.
- Remove the laundry from the appliance. Make sure that the drum is empty.
- Keep the door ajar, to prevent mildew and odours.
- Close the water tap.
The washing programme is completed, but there is water in the drum:
- The Rinse Hold option or a programme that stops with water in the drum is set.
- The door stays locked and the start button indicator flashes.
- You must drain the water before to open the door.
To drain the water:
- If the spin speed option is available, you can decrease the spin speed.
- Press the start button. The appliance drain the water and spin.
- When the programme is completed:
- The start button indicator flashes or the End indicator is on.
-
You can open the door.
-
Turn the programme knob to to deactivate the appliance.
Care and cleaning

Warning!
Disconnect the appliance from the mains supply before you clean it.
External cleaning
Clean the appliance only with soap and warm water. Fully dry all the surfaces.

Caution! Do not use alcohol, solvents or chemical products.
Descaling
The water we use contains limescale. If it becomes necessary, use a water softener to remove limescales.
Use a special product made for washing machines. Obey the instructions that you find on the packaging of the manufacturer.
Do this separately from the laundry wash.
Maintenance wash
With the low temperature programmes it is possible that some detergent stays in the drum. Make regularly a maintenance wash. To do this:
• Empty the laundry from the drum.
- Set the hottest cotton wash programme
- Use a correct quantity of powder detergent with biological properties.
After each wash, keep the door open for a while to prevent mould and to let unpleasant smells go out.
Drum
Regularly examine the drum to prevent limescale and rust particles.
Only use special products to remove rust particles from the drum.
To do this:
- Clean the drum with special product for stainless steel.
- Start a short programme for cotton at the maximum temperature with a small quantity of detergent.
Door seal

natural_image
Illustration of a hand holding a bag with an arrow pointing to three oval objects inside a container (no text or symbols)Regularly examine the seal and remove all objects from the inner part.
Detergent dispenser
To clean the dispenser:

natural_image
Illustration of hands using a tool to press or install a device, with arrows indicating process direction (no text or symbols)- Press the lever and pull the dispenser out.
natural_image
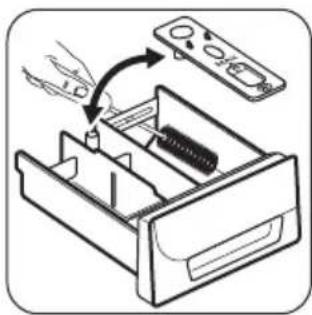
Diagram of a hand holding a tool inside a drawer with a remote control panel (no text or symbols)- Remove the top part of the liquid additive compartment. Clean all the parts with water.

natural_image
Diagram showing a hand inserting a screw into a housing, with no text or symbols present.- Clean the dispenser recess with a brush.
- Put back the dispenser in the recess.
Drain pump

Regularly examine the drain pump and make sure that it is clean.
Clean the pump if:
- The appliance does not drain the water.
- The drum cannot turn.
- The appliance makes an unusual noise because of the blockage of the drain pump.

Warning!
- Disconnect the mains plug from the mains socket.
- Do not remove the filter while the appliance operates. Do not clean the drain pump if the water in the appliance is hot. The water must be cold before you clean the drain pump.
To clean the drain pump:

natural_image
Hand holding a device with a circular button and arrow indicating rotation (no text or symbols)- Open the pump door.

natural_image
Illustration of a hand using a tool to press or interact with a device (no text or symbols visible)- Put a container below the recess of the drain pump to collect the water that flows out.
-
Unscrew the filter to let the water flow out.
-
When the container is full of water, screw the filter again and empty the container. Do steps 3 and 4 again and again until no more water flows out from the drain pump.

- Unscrew the filter and remove it.
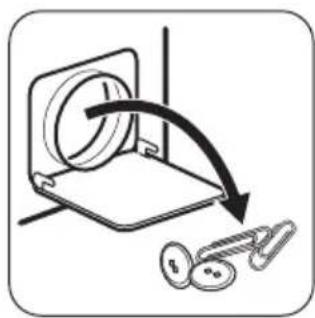
natural_image
Diagram showing a device with a rotating screen and a falling tool, no text or symbols present- Remove fluff and objects from the pump.
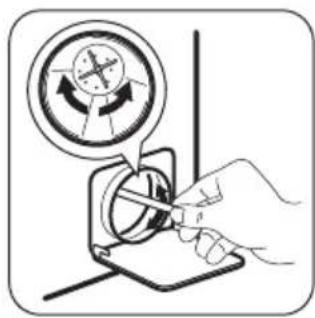
natural_image
Illustration of a hand using a tool to adjust or install a circular gauge or dial (no text or symbols present)- Make sure that the impeller of the pump can turn. If this does not occur, contact the service centre.

- Clean the filter under the water tap and put it back in the pump.

Caution! Make sure that you tighten cor- the filter to prevent ges.
- Close the drain pump door.
Clean the inlet valve filter
It could be necessary to clean the filter when:
• The appliance does not fill with water.
- The appliance fills with the water for a long time.

Warning! Disconnect the mains plug from the mains socket.
To clean the filter:
- Close the water tap.
- Remove the inlet hose behind the appliance.

natural_image
Diagram showing a washing machine with a close-up of its internal component being inserted, no text or symbols present.- Clean the filter in the valve with a stiff brush or a towel.

natural_image
Diagram showing a washing machine with a hand operating a rotary switch, illustrating the process (no text or symbols present)• Install again the inlet hose. Make sure that the couplings are tight to prevent leakages.
- Open the water tap.
Emergency drain
Because of a malfunction, the appliance cannot drain the water.
If this occurs, do steps (1) through (5) of 'To clean the drain pump'.
If necessary, clean the pump.
When you drain the water with the emergency drain procedure, you must activate again the drain system:
Troubleshooting
The start of the appliance does not occur or it stops during operation.
First try to find a solution to the problem (refer to the table). If not, contact the service centre.
- Put 2 litres of water in the main wash compartment of the detergent dispenser.
- Start the programme to drain the water.
Frost precautions
If the appliance is installed in an area where the temperature can be less than 0 °C, remove the remaining water from the inlet hose and the drain pump.
- Disconnect the mains plug from the mains socket.
- Close the water tap.
- Remove the water inlet hose
- Put the two ends of the inlet hose in a container and let the water flow out of the hose.
- Empty the drain pump. Refer to the emergency drain procedure
- When the drain pump is empty, install the inlet hose again.

Warning! Make sure that the temperature is more than 0 °C before you use the appliance again.
The manufacturer is not responsible for damages caused by low temperatures.

Warning! Deactivate the appliance before you do the checks.
| Problem Possible cause Possible solution | ||
| The appliance does not start. | The mains plug is not connected in the mains socket. | Put in the mains plug. |
| The fuse in the box fuse is damage. Replace the fuse. | ||
| The appliance door is open. Close the door firmly. | ||
| You do not press the start button Press the start button. | ||
| The programme knob is not in the correct position. | Turn the programme knob in the correct position. | |
| The delay start is set. | It is available only for models with the Delay start. | To start immediately the programme, cancel the delay start. |
| The appliance does not fill with water. | The water tap is closed. Open the water tap.The water inlet hose is damaged. | Make sure that the water inlet hose has no damages. |
| The filter in the water inlet hose is blocked. | Clean the filter. Refer to 'Care and cleaning'. | |
| The water tap is blocked or there is limescale on it. | Clean the water tap. | |
| The connection of the water inlet hose is not correct. | Make sure that the connection is correct. | |
| The water pressure is too low. | Contact your local water authority. | |
| The appliance does not drain the water. | The water drain hose is damaged. Make sure that the water drain hose has no damages. | |
| The filter of the drain pump is blocked. | Clean the filter of the drain pump. Refer to 'Care and cleaning'. | |
| The connection of the water drain hose is not correct. | Make sure that the connection is correct. | |
| A washing programme without the drain phase is set. | Set the drain programme. | |
| The function Rinse Hold is on. Set the drain programme. | ||
| The spin phase does not operate. | The spin phase is off. Set the spin programme. | |
| The filter of the drain pump is blocked. | Clean the filter of the drain pump. Refer to 'Care and cleaning'. | |
| Balance problems with the laundry load. | Adjust manually the items in the tub and start the spin phase again. | |
| There is water on the floor. Leakage from the couplings of the water hoses. | Make sure that the couplings are tight. | |
| Leakages from the drain pump. | Make sure that the drain pump filter is tight. | |
| The water drain hose is damaged. | Make sure that the water inlet hose has no damages. | |
| You cannot open the appli-ance door. | The washing programme is in operation. | Let the washing programme end. |
| There is water in the drum. Set the drain or the spin programme. | ||
| The appliance makes an unusual noise. | Incorrect level of the appliance. Adjust the level of the appliance. Refer to 'Instal-lation'. | |
| You did not remove the packaging and/or the transit bolts. | Remove the packaging and/or the transit bolts. Refer to 'Installation'. | |
| The load is very small. Add more laundry in the drum. | ||
| The appliance fills with water and drain immediately. | The end of the drain hose is too low. | Make sure that the drain hose is in the correct position. Refer to 'Installation'. |
| The washing results are not satisfactory. | The detergent you used was not sufficient or correct. | Increase the detergent quantity or use a different one. |
| You did not remove the stubborn stains before you wash the laundry. | Use special products to remove the stubborn stains. | |
| Incorrect temperature was set. | Make sure that you set the correct temperature. | |
| Too much laundry load. Decrease the laundry load. | ||
After the check, activate the appliance. The programme continues from the point of interruption.
If the problem occurs again, contact the service centre.
Service
Refer to the information supplied with this appliance for guarantee condition and point of contact. The information to give to the service is on the rating plate.
We recommend that you write the information here:
Model ......
Product number 914......
Serial number
(S.N.)
Installation
Unpacking
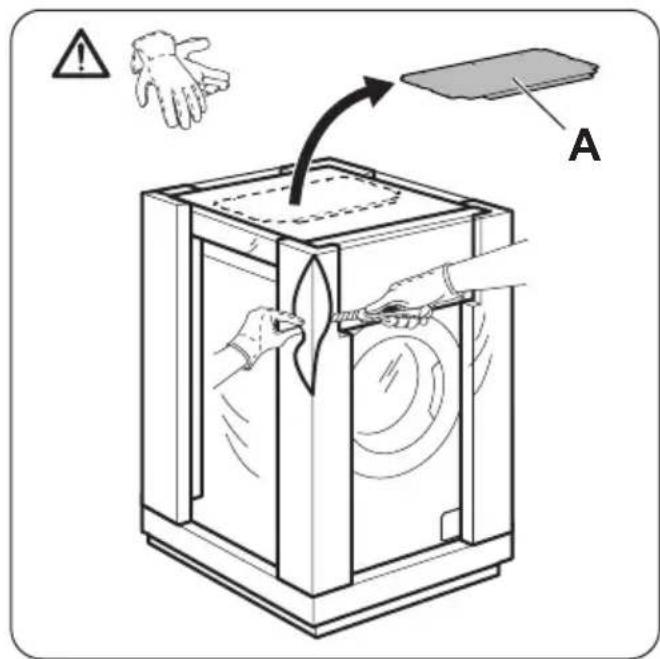
- Use the gloves. With a cutter remove the external film.
Do not to discard the plastic cover (A).

natural_image
Line drawing of a washing machine with directional arrows indicating motion or assembly (no text or symbols)- Remove the polystyrene packaging materials.
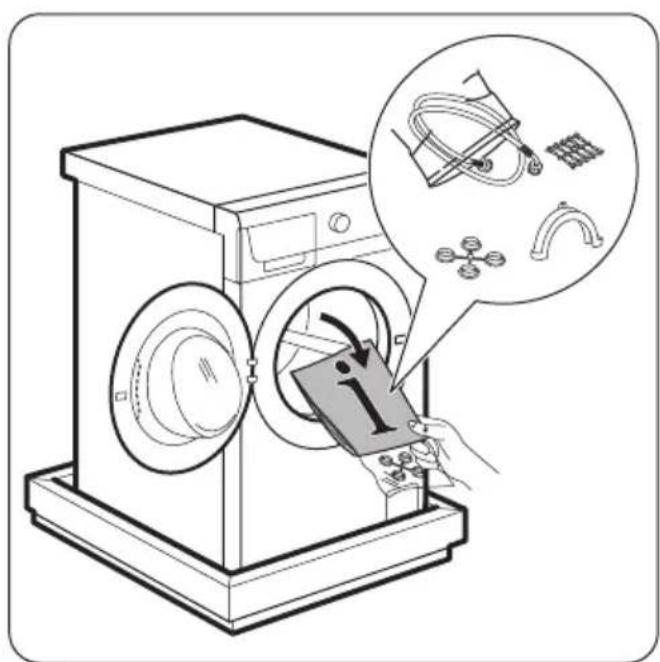
- Open the door and remove all the items from the drum.

natural_image
Line drawing of hands installing or adjusting a clothesbag on a washing machine (no text or symbols)- Remove the internal film.
natural_image
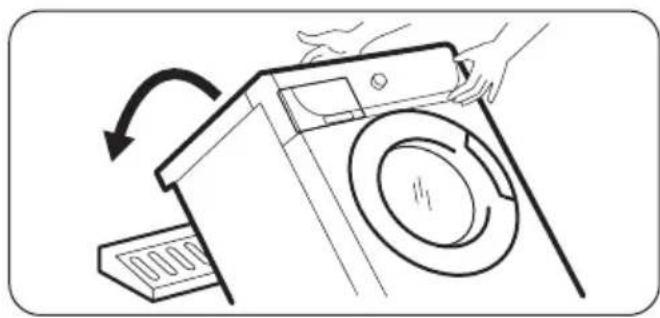
Line drawing of a hand opening a washing machine with a cooling fan (no text or symbols)- Put the front piece on the floor behind the appliance. Carefully put down the appliance with the rear side on it. Make sure not to damage the hoses.

- Remove the polystyrene protection from the bottom.

natural_image
Technical diagram of a mechanical housing with an inset showing a close-up view of a component labeled A (no text or symbols present)- Install the plastic cover (A), removed from the top of the packaging, to the bottom of the appliance. Remove the adhesive strip and close the bottom of the appliance. Attach permanently the plastic cover to the bottom of the appliance with the small plastic caps that you can find in the user manual bag.
- Pull up the appliance in vertical position.
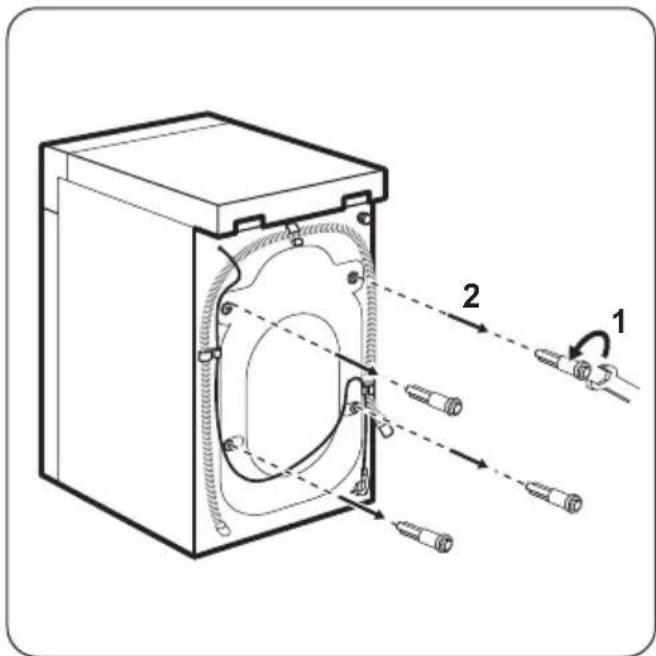
- Remove the four bolts with a key. Pull out the plastic spacers. Remove the power supply cable and the drain hose from the hose holders.
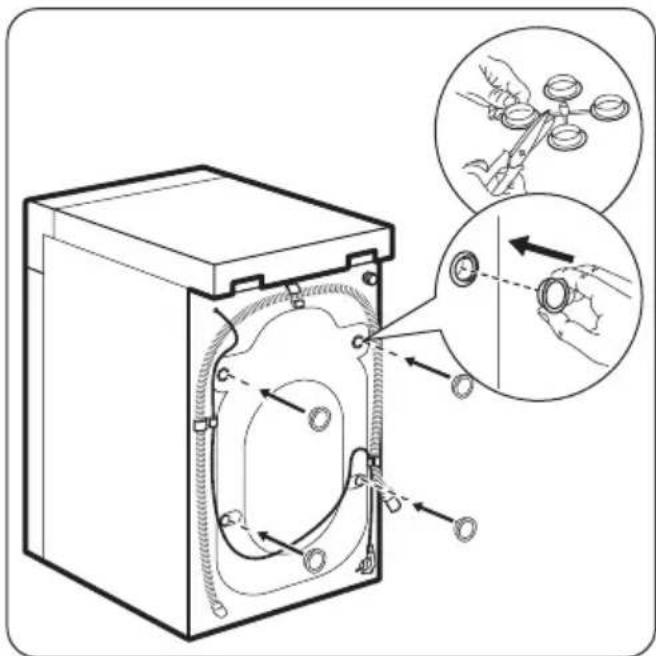
- Put the plastic caps in the holes. You can find these caps in the user manual bag.
Warning! Remove all the packaging and the transit bolts before you install the appliance.
We recommend that you keep the packaging and the transit bolts for when you move the appliance.
Positioning and levelling
• Install the appliance on a flat hard floor.
- Make sure that carpets do not stop the air circulation below the appliance.
- Make sure that the appliance does not touch the wall or other units

- Loosen or tighten the feet to adjust the level. A correct adjustment of the appliance level prevents the vibration, noise and the movement of the appliance when in operation.

• The appliance must be level and stable.
Caution! Do not put cardboard, wood or equivalent materials below the appliance feet to adjust the level.
The inlet hose
natural_image
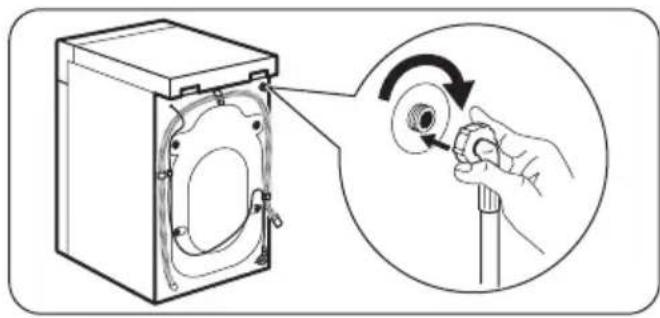
Diagram showing a washing machine with a close-up of its internal components being adjusted by a hand using a tool (no text or symbols present)- Connect the hose to the appliance. Loose the ring nut to set it in the correct position.

natural_image
Illustration of a hand holding a faucet with a rotating valve (no text or symbols)- Connect the water inlet hose to the cold water tap with 3/4 thread.
Caution! Make sure that there are no leaks from the couplings.
Do not use an extension hose if the inlet hose is too short. Contact the service centre for the replacement of the inlet hose.
Water drainage
There are different procedures to connect the drain hose:
With the plastic hose guide

natural_image
Diagram showing a curved pipe fitting transforming into a U-shaped tube (no text or symbols present)
- On the edge of a sink.
Make sure that the plastic guide cannot move when the appliance drains. Attach the guide to the water tap or the wall.
natural_image
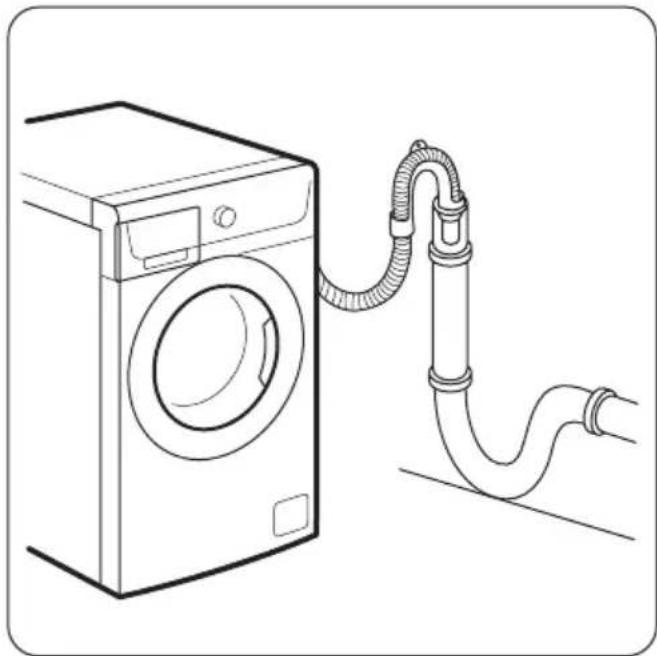
Line drawing of a washing machine connected to a piping bag (no text or symbols)- To a stand pipe with vent-hole.
Refer to the illustration. Directly into a drain pipe at a height of not less than 60 cm and not more than 90 cm. The end of the drain hose must always be ventilated, i.e. the inner diameter of the drainpipe must be larger than the external diameter of the drain hose.
Without the plastic hose guide

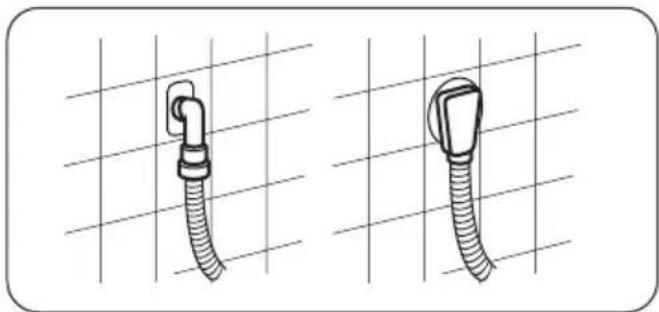
- To a sink spigot.
Refer to the illustration. Put the drain hose in the spigot and tighten it with a clip. Make sure that the drain hose makes a loop to prevent that remaining particles go in the appliance from the sink.
natural_image
Two types of hose connectors shown on grid paper, no text or symbols present- Directly to a built-in drain pipe in the room wall and tighten it with a clip.
Sisukord

Ettevaatust
natural_image
Diagram of a hand holding a device with an arrow pointing to a leaf inside, labeled 'A' (no text or symbols on the diagram itself)natural_image
Line drawing of a hand placing a tree into a file drawer with an arrow indicating the process (no text or symbols)natural_image
Illustration of a hand holding a bag with a circular arrow pointing to three oval objects inside, no text or symbols present.natural_image
Illustration of hands using a tool to press or install a device (no text or symbols visible)natural_image
Illustration of a hand holding a device into a drawer with a control panel (no text or symbols)natural_image
Diagram of a screw being inserted into a rectangular housing, with a tool partially visible (no text or symbols)natural_image
Hand holding a device with a circular button and arrow indicating rotation (no text or symbols)- Avage pumba uks.

natural_image
Illustration of a hand using a tool to lift or lift a surface, with no visible text or symbolsnatural_image
Diagram showing a device with a rotating disc and falling weights, no text or symbols presentnatural_image
Illustration of a hand using a tool to adjust or install a circular gauge or dial (no text or symbols present)- Puhastage filter kraani all ja pan- ge see pumba sisse tagasi.
natural_image
Diagram showing a washing machine with a close-up of its internal component being inserted into it (no text or symbols present)natural_image
Diagram showing a washing machine with a close-up of its internal components being adjusted by a hand using a tool (no text or symbols present)natural_image
Line drawing of a washing machine with directional arrows indicating motion or assembly (no text or symbols)natural_image
Line drawing of hands connecting a clothes washing machine to a box, showing fabric deformation (no text or symbols)natural_image
Technical illustration of a mechanical housing with an inset showing a close-up view of a component labeled A (no text or symbols present)natural_image
Line drawing of a hand placing a washing machine into a rack, with an arrow indicating the process (no text or symbols present)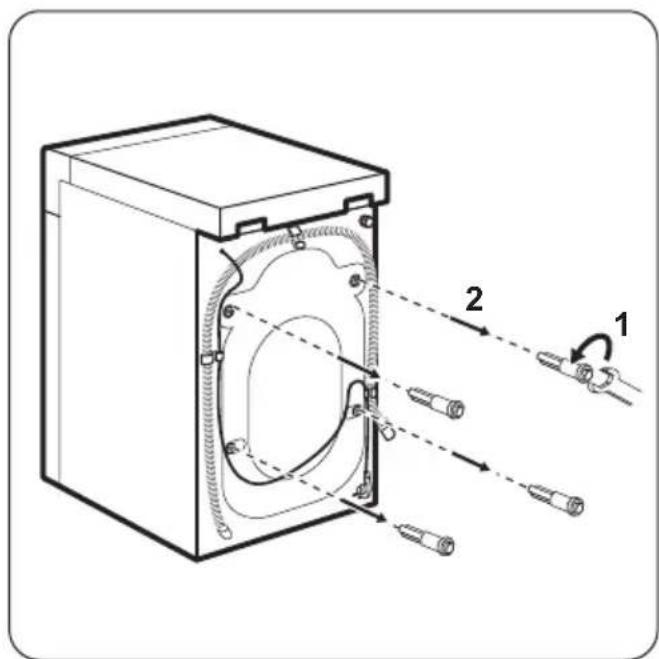
- Pange plastist korgid aukudesse. Korgid leiate kasutusjuhendi kotist.
Hoiatus Enne seadme paigaldamist eemaldage köik pakkematerjalid ning transpordipoldid.
natural_image
Diagram showing a washing machine with a hand adjusting a circular component, illustrating the process (no text or symbols present)natural_image
Illustration of a hand holding a faucet with a circular arrow indicating rotation (no text or symbols)natural_image
Diagram showing a curved pipe or tube being bent into a U-shaped opening, with an arrow indicating direction (no text or symbols present)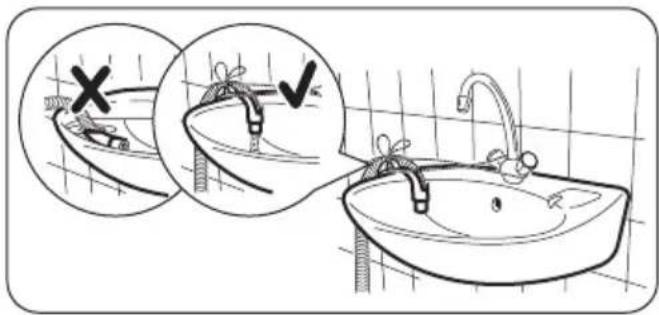
- Üle valamu serva.
natural_image
Line drawing of a washing machine connected to a piping bag (no text or symbols)natural_image
Two types of hose connectors shown on grid paper, no text or symbols presentnatural_image
Diagram of a device with labeled parts and an arrow indicating direction (no text or symbols present)natural_image
Illustration of a hand placing a leaf into a file organizer with an arrow indicating the process (no text or symbols present)natural_image
Illustration of a hand holding a bag with arrows indicating process (no text or symbols)natural_image
Illustration of hands using a mechanical device to press or install a component (no text or symbols visible)natural_image
Illustration of a hand holding a device into a drawer with an open control panel (no text or symbols)natural_image
Illustration of a hand using a screwdriver to insert a cylindrical component into a rectangular housing (no text or symbols)natural_image
Hand holding a device with a circular button and arrow indicating rotation (no text or symbols)- Atveriet sūkna durvis.

natural_image
Illustration of a hand using a tool to press or install a device, no text or symbols presentnatural_image
Diagram showing a mechanical device with a rotating shaft and a falling screw, illustrating the process (no text or symbols)- Iznemiet no sūk-
na pūkas un
sveškermenus.

natural_image
Illustration of a hand using a tool to cut a circular component with directional arrows (no text or symbols)natural_image
Diagram showing a washing machine with a close-up of its internal component being inserted into it (no text or symbols present)natural_image
Diagram showing a washing machine with a close-up of its internal components being adjusted by a hand using a tool (no text or symbols present)natural_image
Line drawing of a washing machine with directional arrows indicating movement or force (no text or symbols)- Atveriet luku un iznemiet no vejas tilpnes visus piederumus.

natural_image
Line drawing of hands connecting a clothesbag to a washing machine, showing fabric deformation (no text or symbols)natural_image
Line drawing of a hand opening a washing machine with a cooling rack nearby (no text or symbols)- Noņemiet no apakšas polistirola pamatni.

natural_image
Technical diagram of a mechanical housing with an inset showing a close-up view of a component (no text or symbols present)natural_image
Diagram showing a washing machine with a close-up of its internal components being adjusted by a hand using a tool (no text or symbols present)natural_image
Illustration of a hand holding a faucet with a circular arrow indicating rotation (no text or symbols)natural_image
Diagram showing a curved pipe or tube being bent into a U-shaped opening, with an arrow indicating direction (no text or symbols present)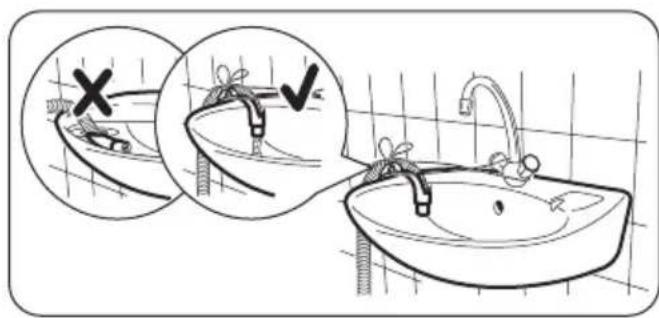
• Uz izlietnes malas.
natural_image
Line drawing of a washing machine connected to a piping bag (no text or symbols)- Izlietnes sifonam.
natural_image
Two identical line drawings of a flexible hose with a loop, placed on grid paper (no text or symbols)natural_image
Diagram of a device with labeled parts and an arrow indicating direction (no text or symbols present)natural_image
Line drawing of a hand placing a leaf into a drawer with an arrow indicating the process (no text or symbols)natural_image
Illustration of a hand holding a curved object with an arrow pointing to three oval objects inside a circle (no text or symbols)natural_image
Illustration of hands using a tool to press or install a device into a tray (no text or symbols present)natural_image
Diagram of a hand holding a tool inside a device with an arrow indicating motion (no text or symbols present)natural_image
Illustration of a hand using a screwdriver to insert a spring inside a rectangular frame (no text or symbols)natural_image
Hand holding a device with a circular button and arrow indicating rotation (no text or symbols)- Atidarykite siur- blio dureles.

natural_image
Illustration of a hand using a tool to press or install a device, no text or symbols presentnatural_image
Diagram showing a mechanical device with a rotating ring and a separate view of two tools (no text or symbols)natural_image
Illustration of a hand using a tool to adjust or install a circular component with a pointer (no text or symbols present)natural_image
Diagram showing a washing machine with a close-up of its internal component being inserted, no text or symbols present.natural_image
Diagram showing a washing machine with a close-up of its internal components being adjusted by a hand using a tool (no text or symbols present)natural_image
Line drawing of a washing machine with directional arrows indicating motion or assembly (no text or symbols)natural_image
Line drawing of hands connecting a clothes washing machine to a box, showing fabric deformation (no text or symbols)natural_image
Technical illustration of a mechanical housing with an inset showing a close-up of a component (no text or symbols present)natural_image
Line drawing of a hand placing a washing machine into a rack, with an arrow indicating the process (no text or symbols present)- Uždenkite skyles plastikiniais gaubteliais. Gaubtelius rasite maišelyje, kartu su naudojimo instrukcija.
natural_image
Diagram showing a washing machine with a hand adjusting a circular component, illustrating the process (no text or symbols present)natural_image
Illustration of a hand holding a faucet with a circular arrow indicating rotation (no text or symbols)natural_image
Diagram showing a curved pipe fitting transforming into a U-shaped tube (no text or symbols present)
natural_image
Line drawing of a washing machine connected to a pipe with tubing (no text or symbols)natural_image
Two types of hose connectors shown on grid paper, no text or symbols presentwww.zanussi.com/shop


- Safety information
- Children and vulnerable person safety
- General safety
- Care and cleaning
- Installation
- Water connection
- Electrical connection
- Discard the appliance
- Environment concerns
- Packaging materials
- Technical information
- Ecological hints
- Programme knob 1
- Start button 2
- Easy Iron button 3
- Extra rinse button 4
- Prewash button 5
- Standard programmes for the Energy Label consumption values
- The laundry load
- Stubborn stains
- Detergents and additives
- Water hardness
- Before first use
- Daily use
- Loading the laundry
- Filling the detergent and additives
- Using the liquid detergent
- When you use the detergent divider:
- Setting and starting a programme
- Cancel a programme
- Open the door
- If the temperature and level of the water in the drum are too high, you cannot open the door.
- At the end of the programme
- The washing programme is completed, but there is water in the drum:
- Warning!
- External cleaning
- Descaling
- Maintenance wash
- Drum
- Door seal
- Detergent dispenser
- Drain pump
- Clean the pump if:
- Clean the inlet valve filter
- Emergency drain
- Troubleshooting
- Frost precautions
- Service
- We recommend that you write the information here:
- Positioning and levelling
- The inlet hose
- Water drainage
- With the plastic hose guide
- Sisukord
- Ettevaatust
Brand : ZANUSSI
Model : ZWO 1101
Category : Washing machine