
GBD309PV - Built-in oven WHIRLPOOL - Free user manual and instructions
Find the device manual for free GBD309PV WHIRLPOOL in PDF.

| Product Type | Built-in Oven |
| Brand | Whirlpool |
| Model | GBD309PV |
| Built-in Dimensions (H x W x D) | 70.5 x 76.2 x 61 cm (for 30" model) |
| Opening Dimensions (W) | 72,4 cm (28,5") |
| Cabinet Depth | 61 cm (24") |
| Power Supply | 240 V, 40 A (recommended) |
| Power | 3.5 kW (estimated) |
| Cooking Functions | Convection, grill, conventional, steam injection (depending on model) |
| Cleaning | Manual cleaning (no pyrolytic indicated) |
| Safety | Compliant with UL and CSA standards |
| Cooktop Compatibility | Approved for use above an oven |
| Steam Injection | Available on some models (hole of 1.3 cm for water line) |
| Weight | Approximately 45 kg |
| Repairability Index | 7.5/10 (user rating) |
| Spare Parts | Available from customer service |
Frequently Asked Questions - GBD309PV WHIRLPOOL
User questions about GBD309PV WHIRLPOOL
0 question about this device. Answer the ones you know or ask your own.
Ask a new question about this device
Download the instructions for your Built-in oven in PDF format for free! Find your manual GBD309PV - WHIRLPOOL and take your electronic device back in hand. On this page are published all the documents necessary for the use of your device. GBD309PV by WHIRLPOOL.
USER MANUAL GBD309PV WHIRLPOOL
PRODUCT MODEL SERIES
GBD309PV
GBS309PV
RBD305PV
RBD307PV
RBS305PV
RBS307PV
Electrical Requirements: Oven must be connected to the proper electrical voltage and frequency as specified on the model/serial number rating plate. The model/serial number rating plate is located at the bottom of the right-hand mounting rail. See the following illustrations.
Single Oven
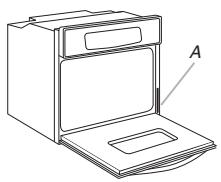
A. Model/serial number plate
Double Oven
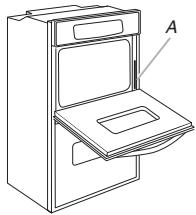
A. Model/serial number plate
Models rated from 7.3 to 9.6kW at 240 volts (5.5 to 7.2kW at 208 volts) require a separate 40-amp circuit. Models rated at 7.2kW and below at 240 volts (5.4 kW and below at 208 volts) require a separate 30-amp circuit.
A circuit breaker is recommended. Connect directly to the circuit breaker box (or fused disconnect) through flexible, armored or nonmetallic, sheathed copper cable (with grounding wire).
Flexible conduit from the oven should be connected directly to the junction box. Do not cut the conduit. The length of conduit provided is for serviceability of the oven. A UL-listed or CSA-approved conduit connector must be provided.
If the house has aluminum wiring, follow the procedure below:
- Connect a section of solid copper wire to the pigtail leads.
- Connect the aluminum wiring to the added section of copper wire using special connectors and/or tools designed and UL-listed for joining copper to aluminum.
Follow the electrical connector manufacturer's recommended procedure. Aluminum/copper connection must conform with local codes and industry-accepted wiring practices.
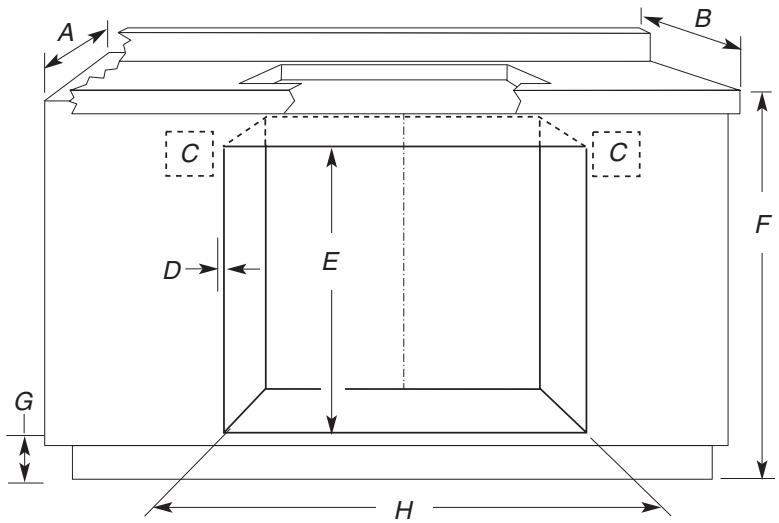
PRODUCT DIMENSIONS
Single Oven
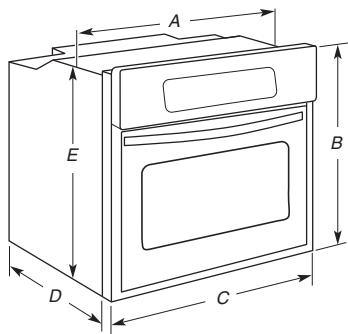
A. 28^5 / 16 (71.9 cm) max. recessed width
B. 29'' (73.7 cm) max. overall height
C. 29% (75.6 cm) overall width
D. 23^ (58.4 cm) max. recessed depth
E. 27% (69.9 cm) recessed height
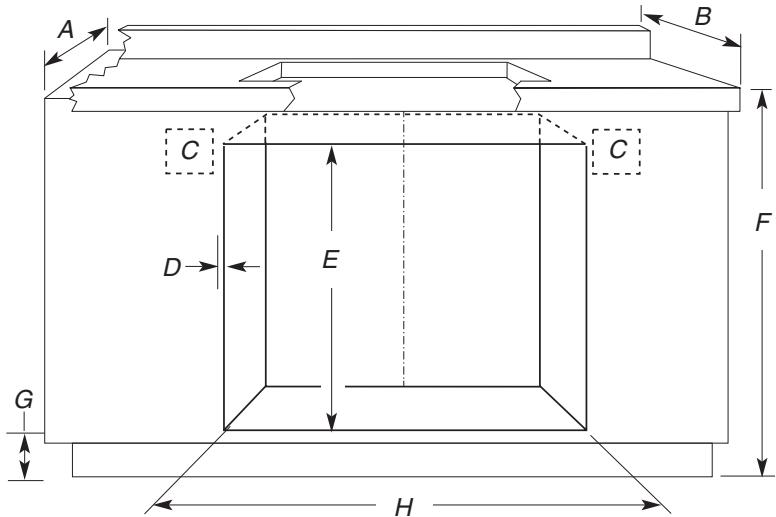
Double Oven
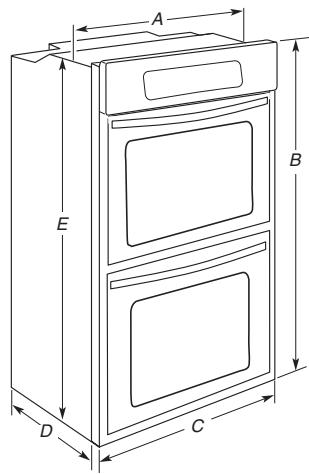
A. 28% (71.9 cm) max. recessed width
B. 51^ (129.5 cm) max. overall height
C. 29% (75.6 cm) overall width
D. 23^ (58.4 cm) max. recessed depth
E. 49%^16 (125.9 cm) recessed height
CABINET DIMENSIONS
Single Oven Installed in Cabinet
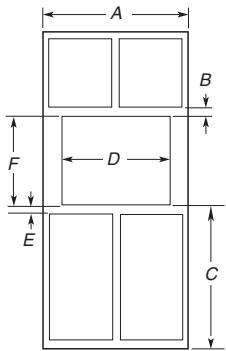
A. 30'' (76.2 cm) min. cabinet width
B. 1'' (2.5 cm) top of cutout to bottom
of upper cabinet door
C. 32'' (81.3 cm) bottom of cutout to floor
D. 28% (72.4 cm) cutout width
E. 112 (3.8 cm) min. bottom of cutout to top of cabinet door
F. 27% (70.5 cm) cutout height
Cabinet Side View - Single or Double Oven
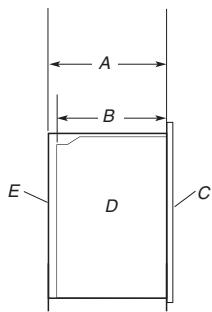
A. 23% (59.1 cm) min. cutout depth
B. 23^ (58.4 cm) recessed oven depth
C.Oven front
D. Recessed oven
E. Cabinet
Double Ovens Installed in Cabinet
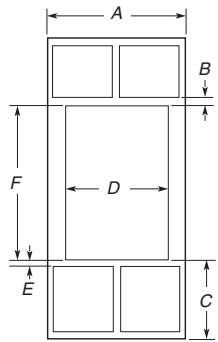
A. 30^ (76.2 cm) min. cabinet width
B. 1'' (2.5 cm) top of cutout to bottom of upper cabinet door
C. 14% (37.5 cm) bottom of cutout to floor
D. 28 12'' (72.4 cm) cutout width
E. 112 (3.8 cm) min. bottom of cutout to top of cabinet door
F. 4934 (126.4 cm) min. cutout height
Single Oven Undercounter (without cooktop installed above)
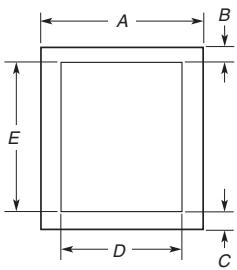
A. 30^ (76.2 cm) min. cabinet width
B. 112''(3.8cm) min. top of cutout to underside of countertop
C. 51 / 4^n (13.3 cm) bottom of cutout to floor
D. 28% (72.4 cm) cutout width
E. 27% (70.5 cm) min. cutout height
CUTOUT DIMENSIONS FOR OVENS INSTALLED UNDER COOKTOP
IMPORTANT: Observe all governing codes and ordinances. Cooktop must be approved for use over an oven. See Cooktop Installation Instructions for cutout dimensions. Center the cooktop cutout over oven cutout.
To avoid damage to your cabinets, check with your builder or cabinet supplier to make sure that the materials used will not discolor, delaminate or sustain other damage. This oven has been designed in accordance with UL and CSA International and complies with the maximum allowable wood cabinet temperatures of 194^ (90^) .
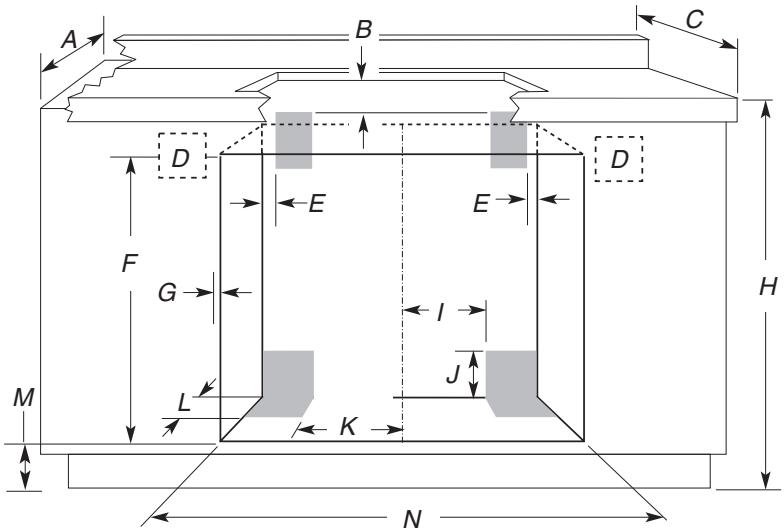
Approved Built-In Oven and Electric Cooktop Combinations
A. 24^ (61 cm) cabinet depth
B. 25^ (63.5 cm) countertop depth
C. Recommended oven and cooktop junction box locations
D. Allow 5 / 8'' (1.6 cm) for oven trim to overlap on each side.
E. 27% (70.5 cm) minimum cutout height
F. 36^ (91.4 cm) from cabinet base to countertop
G. 45% (11.7 cm) from floor
H. See Cutout Dimensions chart.
CUTOUT DIMENSIONS
| Oven Size | Oven Cutout Dimension |
| 24" (61 cm) | 22½" (57.2 cm) |
| 27" (68.6 cm) | 25½" (64.8 cm) |
| 30" (76.2 cm) | 28½" (72.4 cm) |
| 36" (91.4 cm) | 34½" (87.6 cm) |
For the approved model number combinations, refer to the undercounter label located on top of the oven chassis and on the bottom of the cooktop burner box.
NOTE: For undercover installation, it is recommended that the junction boxes for oven and cooktop be located in the adjacent right or left cabinet. A 1" (2.5 cm) minimum diameter hole should have been drilled in the upper rear right or left corner of the side wall surface to pass the appliance cable through to the junction box. On models with Steam-Assist, it will be necessary to drill a 12 " (1.3 cm) minimum diameter hole in the upper right or left rear corner of the side wall to pass the water supply tubing through to the undersink water filter. If water supply tubing hole is drilled on the same side as the oven cable hole, a minimum of 2" (5.1 cm) is required between the 2 holes.
Approved Built-In Oven and Induction Cooktop Combinations
A. 24^ (61 cm) cabinet depth
B. 25^ (63.5 cm) countertop depth
C. Recommended oven and cooktop junction box locations
D. Allow 5 / 8 (1.6 cm) for oven trim to overlap on each side.
E. 27% (70.5 cm) minimum cutout height
F. 36'' (91.4 cm) from cabinet base to countertop
G. 35% (9.2 cm) from floor
H. See Cutout Dimensions chart.
CUTOUT DIMENSIONS
| Oven Size | Oven Cutout Dimension |
| 24" (61 cm) | 22½" (57.2 cm) |
| 27" (68.6 cm) | 25½" (64.8 cm) |
| 30" (76.2 cm) | 28½" (72.4 cm) |
For the approved model number combinations, refer to the undercounter label located on top of the oven chassis and on the bottom of the cooktop burner box.
NOTE: For undercounter installation, it is recommended that the junction boxes for oven and cooktop be located in the adjacent right or left cabinet. A 1" (2.5 cm) minimum diameter hole should have been drilled in the upper rear right or left corner of the side wall surface to pass the appliance cable through to the junction box. On models with Steam-Assist, it will be necessary to drill a 1" (1.3 cm) minimum diameter hole in the upper right or left rear corner of the side wall to pass the water supply tubing through to the undersink water filter. If water supply tubing hole is drilled on the same side as the oven cable hole, a minimum of 2" (5.1 cm) is required between the 2 holes.
Approved Built-In Oven and Gas Cooktop Combinations
A. 24^ (61 cm) cabinet depth
B. 1'' (2.5 cm) clearance to bottom of countertop
C. 25^ (63.5 cm) countertop depth
D. Recommended oven junction box locations
E. 1" (2.5 cm) clearance to cabinet
F. 2734 (70.5 cm) minimum cutout height
G. Allow 5 / 8'' (1.6 cm) for oven trim to overlap on each side.
H. 36^ (91.4 cm) from cabinet base to countertop
I. Gas line through wall 1012 (26.7 cm) to center of cutout
J. 314 (8.3 cm)
K. Gas line through floor 1012 (26.7 cm) to center of cutout
L. 312 (8.9 cm)
M. 45 18 (11.7 cm) from floor
N. See Cutout Dimensions chart.
CUTOUT DIMENSIONS
| Oven Size | Oven Cutout Dimension |
| 24" (61 cm) | 22½" (57.2 cm) |
| 27" (68.6 cm) | 25½" (64.8 cm) |
| 30" (76.2 cm) | 28½" (72.4 cm) |
| 36" (91.4 cm) | 34½" (87.6 cm) |
For the approved model number combination refer to the undercounter label located on top of the oven chassis.
NOTE: For undercounter installation, it is recommended that the junction box for oven be located in the adjacent right or left cabinet. A 1'' (2.5 cm) minimum diameter hole should have been drilled in the upper rear right or left corner of the side wall surface to pass the appliance cable through to the junction box.
On models with Steam-Assist, it will be necessary to drill a 12 (1.3 cm) minimum diameter hole in the upper right or left rear corner of the side wall to pass the water supply tubing through to the undersink water filter. If water supply tubing hole is drilled on the same side as the oven cable hole, a minimum of 2" (5.1 cm) is required between the 2 holes.
The upper shaded areas are recommended locations for recessed junction box for 120-volt grounded outlet for cooktop.
Lower shaded areas are recommended locations for flexible or rigid gas pipe installation. The gas pipe can be installed on either side of the cutout, and either through the floor or through the wall.
Notes