LF-D5930S - ηχείο LG - Δωρεάν εγχειρίδιο χρήσης
Βρείτε δωρεάν το εγχειρίδιο της συσκευής LF-D5930S LG σε μορφή PDF.

Ερωτήσεις χρηστών για LF-D5930S LG
0 ερώτηση για αυτή τη συσκευή. Απαντήστε σε αυτές που γνωρίζετε ή κάντε τη δική σας.
Κάντε μια νέα ερώτηση σχετικά με αυτή τη συσκευή
Κατεβάστε τις οδηγίες για το ηχείο σε μορφή PDF δωρεάν! Βρείτε το εγχειρίδιό σας LF-D5930S - LG και πάρτε ξανά την ηλεκτρονική σας συσκευή στα χέρια σας. Σε αυτή τη σελίδα δημοσιεύονται όλα τα έγγραφα που απαιτούνται για τη χρήση της συσκευής σας. LF-D5930S της μάρκας LG.
ΕΓΧΕΙΡΊΔΙΟ ΧΡΉΣΗΣ LF-D5930S LG

LG
DVD MINI HOME THEATER SYSTEM
OWNER'S MANUAL
MODEL : KR-7400SDV


This p# (WALV) manufactured to comply with the radio interference requirements of EEC DIRECTIVE 89/336/EEC, 93/68/EEC and 73/23/EEC.
Please read this manual carefully before operating your set. Retain it for future reference.
Designs and specifications are subject to change without notice for improvement.
Safety Precautions

CAUTION
RISK OF ELECTRIC SHOCK DO NOT OPEN

WARNING: TO REDUCE THE RISK OF ELECTRIC SHOCK
DO NOT REMOVE COVER (OR BACK) NO USER-SERVICEABLE PARTS INSIDE REFER SERVICING TO QUALIFIED SERVICE PERSONNEL.

This lightning flash with arrowhead symbol within an equilateral triangle is intended to alert the user to the presence of uninsulated dangerous voltage within the product's enclosure that may be of sufficient magnitude to constitute a risk of electric shock to persons.

The exclamation point within an equilateral triangle is intended to alert the user to the presence of important operating and maintenance (servicing) instructions in the literature accompanying the appliance.
WARNING: TO REDUCE THE RISK OF FIRE OR ELECTRIC SHOCK, DO NOT EXPOSE THIS PRODUCT TO RAIN OR MOISTURE.
CLASS 1 LASER PRODUCT KLASSE 1 LASER PRODUKT LUOKAN 1 LASER LAITE KLASS 1 LASER APPARAT CLASSE 1 PRODUIT LASER
CAUTION:
This unit employs a Laser System.
To ensure proper use of this product, please read this owner's manual carefully and retain for future reference, should the unit require maintenance, contact an authorized service location-see service procedure.
Use of controls, adjustments or the performance of procedures other than those specified herein may result in hazardous radiation exposure.
To prevent direct exposure to laser beam, do not try to open the enclosure. Visible laser radiation when open. DO NOT STARE INTO BEAM.
CAUTION: The apparatus shall not be exposed to water, dripping or splashing and that no objects filled with liquids, such as vases, shall be placed on the apparatus.

This product is manufactured to comply with the radio interference requirements of EEC DIRECTIVE 89/336/EEC, 93/68/EEC and 73/23/EEC.

Notes on copyrights:
It is forbidden by law to copy, broadcast, show, broadcast via cable, play in public, or rent copyright material without permission.
This product is equipped with copy protection measures developed by Macrovision. Copy protection signals are recorded on some discs. When recording these discs on a VCR, picture noise will appear during playback.
This product incorporates copyright protection technology that is protected by certain U.S. patent claims and other intellectual property rights owned by Macrovision Corporation and other rights owners. Use of this copyright protection technology must be authorized by Macrovision Corporation, and is intended for home and other limited viewing uses only unless otherwise authorized by Macrovision Corporation. Reverse engineering or disassembly is prohibited.
SERIAL NUMBER: The serial number is found on the back of this unit. This number is unique to this unit and not available to others. You should record requested information here and retain this guide as a permanent record of your purchase.
Model No.
Serial No.
Table of Contents
Introduction
Safety Precautions....2
Table of Contents....3
Before Use 4-5
Playable Discs....4
Precautions 5
Notes on Discs 5
About Symbols 5
Front Panel....6
Rear Panel 7
Remote Control 8
Display Window....9
Preparation
Connections 10-15
Fitting the system connection cables ..... 10
Connecting to a TV 11
Connecting to Antenna 12
Connecting to Auxiliary Equipment 13
Connecting to Optional Equipment 13
Speaker System Connection 14
Speaker Positioning....15
Before Operation....16-25
Volume Adjustment 16
Sound Quality Adjustment 16
MUTE 16
SURROUND 16
XDSS (Extreme Dynamic Sound System) ..... 16
OAO (Orientation Acoustic Optimizer) ON/OFF ..... 16
SPECTRUM Effect....16
DIMMER 16
DEMO 16
Setting the Clock....17
Sleep Timer Function....17
Using Microphone 17
Timer Function....18
Mini Glossary for Audio Stream & Surround Mode .... 19
Sound Mode 19
General Explanation 20
On-Screen Display....20
Initial Settings....21-25
- General Operation....21
- LANGUAGE 21
• DISPLAY....22
• AUDIO 23-24
- OTHERS....24
- LOCK (Parental Control) 25
Operation
Operation with RADIO 26
Presetting the radio stations....26
Listening to the radio 26
Operation with TAPE 27
Basic Playback 27
To Stop Play 27
Tape Counter Reset 27
To Play Rewind or Fast Forward 27
Dubbing....27
Recording 27
Basic Setting 27
Recording from Radio, CD or Auxiliary source ..... 27
CD to Tape Synchronized Recording ..... 27
Operation with DVD and Video CD 28-30
Playing a DVD and Video CD....28
General Features 28-29
- Moving to another TITLE....28
- Moving to another CHAPTER/TRACK ..... 28
- Search 28
- Still Picture and Frame-by-Frame Playback ..... 29
- Slow Motion 29
- Repeat 29
- Repeat A-B 29
• Time Search 29
- Last Scene Memory 29
- Zoom 30
- Marker Search .... 30
Special DVD Features 30
- Title Menu....30
- Disc Menu.... 30
- Camera Angle....30
- Changing the Audio Language. 30
- Changing the Audio Channel 30
- Subtitle 30
Operation with Audio CD and MP3/WMA Disc ..... 31-32
Playing an Audio CD and MP3/WMA Disc ..... 31
- Pause 32
- Moving to another Track 32
- Repeat Track/ All/ Off 32
- Search 32
Operation with JPEG Disc 33
Viewing a JPEG disc 33
- Slide Show 33
- Moving to another File....33
- Still Picture 33
Programmed Playback 34
- Repeat Programmed Tracks .... 34
- Erasing a Track from Program List. 34
- Erasing the Complete Program List....34
Operation with DivX Disc 35
Reference
Troubleshooting....36
Language Code List....37
Country Code List 38
Specifications 39
About the symbols for instructions
⚠️ Indicates hazards likely to cause harm to the unit itself or other material damage.
N Indicates special operating features of this unit.
Indicates tips and hints for making the task easier.
Before Use
playable Discs
 | DVD(8 cm / 12 cm disc) |
 | Video CD (VCD)(8 cm / 12 cm disc) |
 | Audio CD(8 cm / 12 cm disc) |
In addition, this unit can play a DVD±R, DVD±RW, Kodak PICTURE CD, SVCD, and CD-R or CD-RW that contains audio titles, MP3, WMA, JPEG or DivX files.

Notes
- Depending on the conditions of the recording equipment or the CD-R/RW (or DVD±R/RW) disc itself, some CD-R/RW (or DVD±R/RW) discs cannot be played on the unit.
- Do not attach any seal or label to either side (the labeled side or the recorded side) of a disc.
- Do not use irregularly shaped CDs (e.g., heart-shaped or octagonal). It may result in malfunctions.

Notes on DVDs and Video CDs
Some playback operations of DVDs and Video CDs may be intentionally fixed by software manufacturers. As this unit plays DVDs and Video CDs according to disc content designed by the software manufacturer, some playback features of the unit may not be available or other functions may be added. Refer also to the instructions supplied with the DVDs and Video CDs. Some DVDs made for business purposes may not be played on the unit.
Regional code of the DVD player and DVDs
This DVD player is designed and manufactured for play-back of region "2" encoded DVD software. The region code on the labels of some DVD discs indicates which type of player can play those discs. This unit can play only DVD discs labeled "2" or
"ALL". If you try to play any other discs, the message "Check Regional Code" will appear on the TV screen. Some DVD discs may not have a region code label even though their playback is prohibited by area limits.


ote on DTS-encoded CDs
When playing DTS-encoded CDs, excessive audio level may be heard from the analog stereo output. To avoid possible damage to the audio system, turn down the volume before playing back such discs, adjust the volume gradually, and keep the volume level low. To enjoy DTS Digital Surround™ playback, an external 5.1 channel DTS Digital Surround™ decoder system must be connected to the digital output of the unit.
Disc-related terms
Title (DVD only)
The main film content or accompanying feature content or additional feature content, or music album. Each title is assigned a title reference number enabling you to locate it easily.
Chapter (DVD only)
Sections of a picture or a musical piece that are smaller than titles. A title is composed of one or several chapters. Each chapter is assigned a chapter number, enabling you to locate the chapter you want. Depending on the disc, chapters may not be recorded.
Track (Video CD and audio CD only)
Sections of a picture or a musical piece on a video CD or an audio CD. Each track is assigned a track number, enabling you to locate the track you want.
Scene
On a video CD with PBC (Playback control) functions, moving pictures and still pictures are divided into sections called "Scenes". Each scene is displayed in the menu screen and assigned a scene number, enabling you to locate the scene you want.
A scene is composed of one or several tracks.
Types of video CDs
There are two types of video CDs:
Video CDs equipped with PBC (Version 2.0)
PBC (Playback control) functions allow you to interact with the system via menus, search functions, or other typical computer-like operations. Moreover, still pictures of high resolution can be played if they are included in the disc.
Video CDs not equipped with PBC (Version 1.1)
Operated in the same way as audio CDs, these discs allow playback of video pictures as well as sound, but they are not equipped with PBC.
Before Use (Cont'd)
Precautions
Handling the unit
When shipping the unit
The original shipping carton and packing materials come in handy. For maximum protection, re-pack the unit as it was originally packed at the factory.
When setting up the unit
The picture and sound of a nearby TV, VCR, or radio may be distorted during playback. In this case, position the unit away from the TV, VCR, or radio, or turn off the unit after removing the disc.
To keep the exterior surfaces clean
Do not use volatile liquids, such as insecticide spray, near the unit. Do not leave rubber or plastic products in contact with the unit for a long period of time. They will leave marks on the surface.
Cleaning the unit
To clean the cabinet
Use a soft, dry cloth. If the surfaces are extremely dirty, use a soft cloth lightly moistened with a mild detergent solution. Do not use strong solvents such as alcohol, benzine, or thinner, as these might damage the surface of the unit.
To obtain a clear picture
The DVD player is a high-tech, precision device. If the optical pick-up lens and disc drive parts are dirty or worn, the picture quality will be poor.
Regular inspection and maintenance are recommended after every 1,000 hours of use. (This depends on the operating environment.)
For details, please contact your nearest dealer.
Notes on Discs
Handling discs
Do not touch the playback side of the disc.
Hold the disc by the edges so that fingerprints will not get on the surface.
Do not stick paper or tape on the disc.


Storing discs
After playing, store the disc in its case.
Do not expose the disc to direct sunlight or sources of heat, or leave it in a parked car exposed to direct sunlight, as there may be a considerable temperature increase inside the car.
Cleaning discs
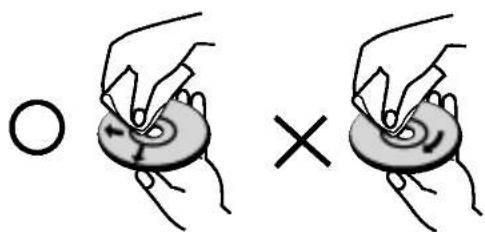
Fingerprints and dust on the disc can cause poor picture quality and sound distortion. Before playing, clean the disc with a clean cloth. Wipe the disc from the center out.
Do not use strong solvents such as alcohol, benzine, thinner, commercially available cleaners, or anti-static spray intended for older vinyl records.
About Symbols
About the 🔊 symbol display
“ 🔊 ” may appear on the TV screen during operation. This icon means the function explained in this owner's manual is not available on that specific DVD video disc.
About the disc symbols for instructions
A section whose title has one of the following symbol is applicable only to the disc represented by the symbol.
DVD DVD
VCD Video CDs
CD Audio CDs
MP3 MP3 disc
WMA WMA disc
JPEG JPEG disc
DivX DivX disc
Front Panel
Cassette tape player/ DVD/VCD/CD player
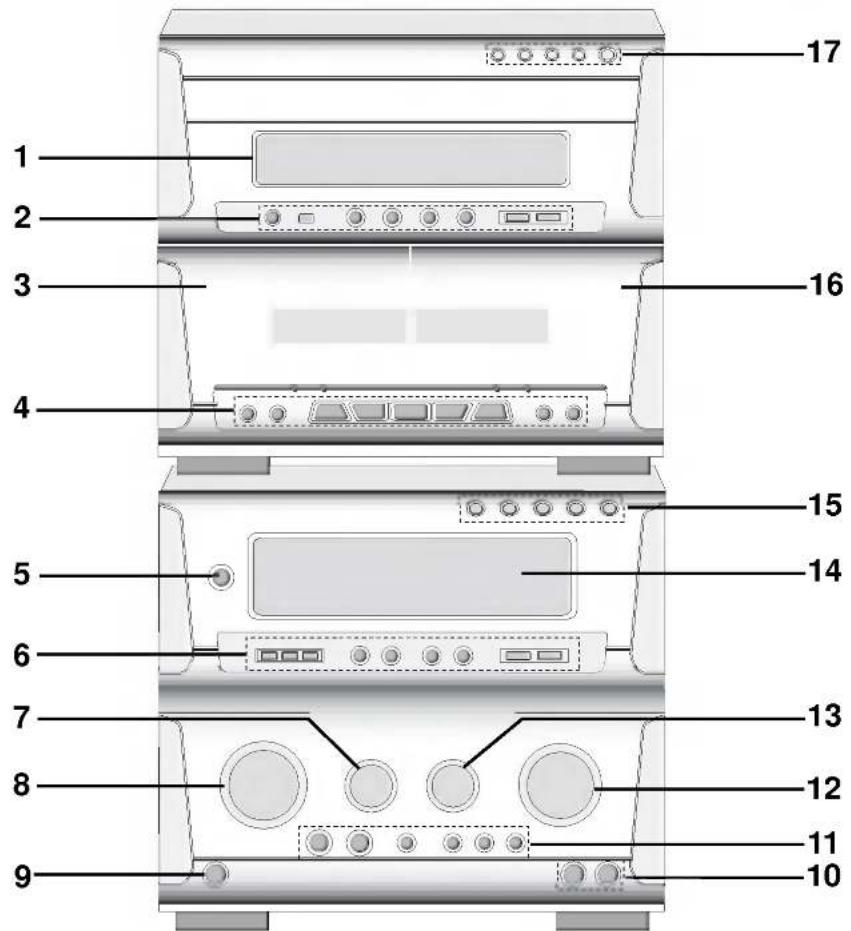
Tuner/ Amplifier
- DISPLAY WINDOW
-
• PLAY MODE/ REPEAT buttons
-
CD SEARCH (◀◀/▶▶) buttons
- CD STOP (■STOP)/ CD PLAY (▶) buttons
-
CD PAUSE (II)/ PROGRAM button
-
▲ PUSH EJECT position (TAPE 1)
- TAPE FUNCTION buttons
• COUNTER RESET (COUNT. RESET) button
- RECORD/ RECORD PAUSE (●REC/II) button
- REWIND/ FAST FORWARD (◀◀/▶▶) buttons
- REVERE PLAY (◀)/ PLAY (▶) buttons
- STOP (■) button
- NORMAL DUBBING/ CD SYNCHRO RECORDING (CD SYNC.) button
• HIGH DUBBING button
- POWER (○STANDBY/ON) button
- • CLOCK/ TIMER/ MEMORY/ CLEAR buttons
- PRESET (▼/▲) buttons
• AUTO TUNING (▼/▲) buttons
• RDS (OPTIONAL)/SET button
• MODE/RIF/DEMO button
- ECHO VOLUME KNOB (ECHO VOL.)
-
MULTI JOG DIAL
-
CD SKIP (◀◀/▶◀)
• MANUAL TUNING -
CLOCK ADJUST
-
HEADPHONE SOCKET (Ω PHONES) -∅6.3mm
-
MIC JACKS (MIC1, MIC2)
- XDSS/ OAO/ SURROUND/ MUSIC/ DANCE/ USER buttons
- VOLUME knob
- MIC VOLUME KNOB (MIC VOL.)
- DISPLAY WINDOW
- FUNCTION SELECT buttons (TUNER/BAND, TAPE 1-2, DVD/CD, AUX1/AUX2)
- ▲ PUSH EJECT position (TAPE 2)
- • DISC DIRECT PLAY buttons (DISC1, DISC2, DISC3)
• DISC SKIP button (D. SKIP)
- CD OPEN/CLOSE button (▲ OPEN/CLOSE)
Rear Panel
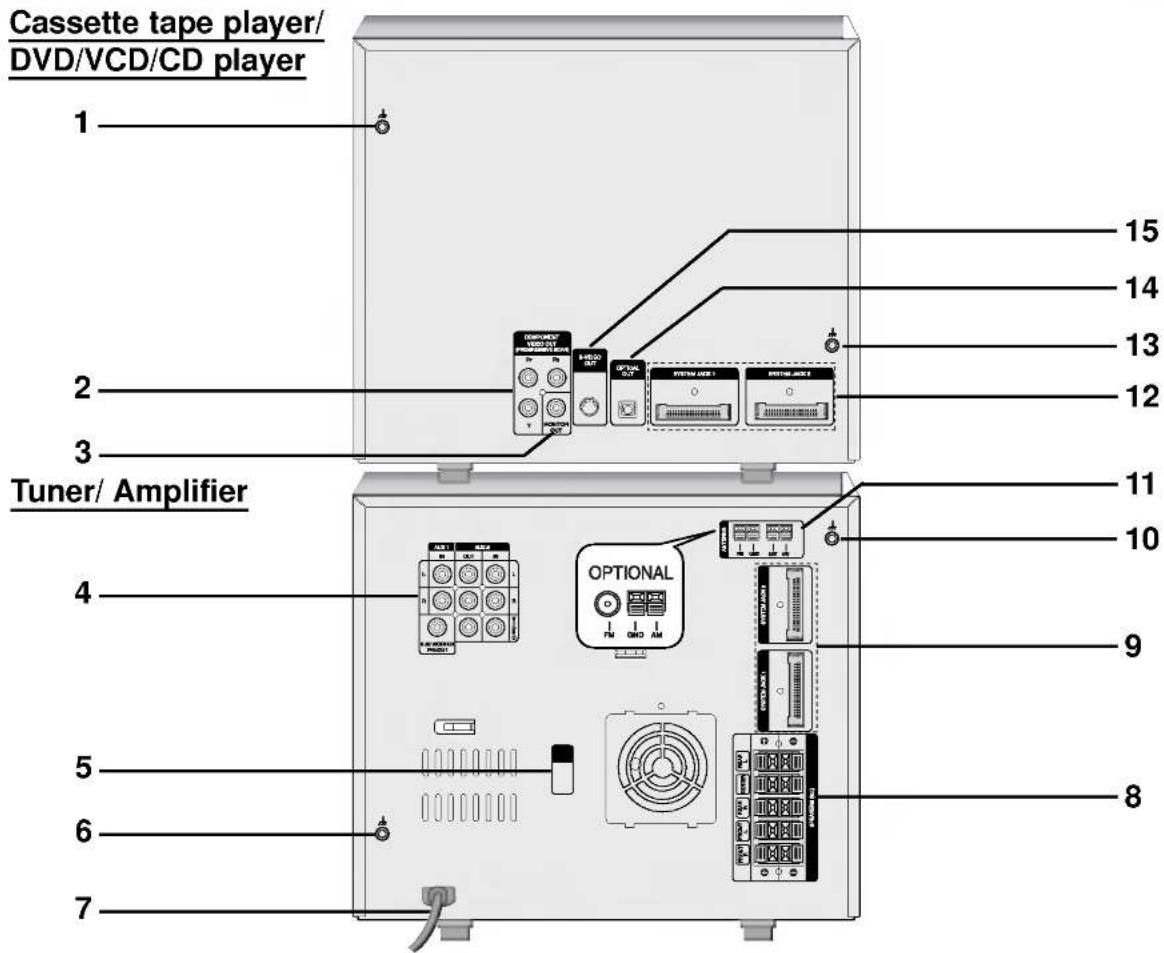
- LUG Connector
- COMPONENT VIDEO OUT/ PROGRESSIVE SCAN (Y Pb Pr) Connector
- MONITOR OUT Connector
- • VIDEO INPUT/OUTPUT
• AUX 1 INPUT (L/R)
• AUX 2 INPUT/OUTPUT (L/R)
• SUB WOOFER OUTPUT - VOLTAGE SELECTOR : OPTIONAL
- LUG Connector
-
POWER CORD
-
SPEAKER Connector
- SYSTEM Connector (SYSTEM JACK1/ SYSTEM JACK2)
- LUG Connector
- ANTENNA Connector
- SYSTEM Connector (SYSTEM JACK1/ SYSTEM JACK2)
- LUG Connector
- OPTICAL OUT Connector
- S-VIDEO OUT Connector
Remote Control
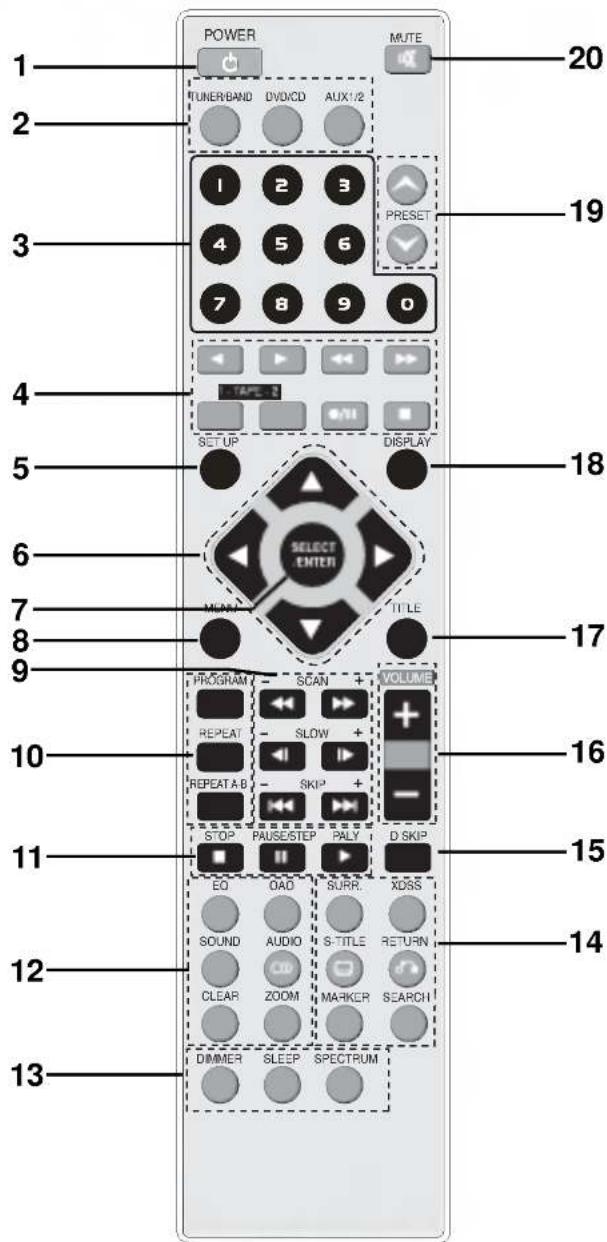
Remote Control Operation Range
Point the remote control at the remote sensor and press the buttons.
- Distance: About 23 ft (7 m) from the front of the remote sensor
-
Angle: About 30° in each direction of the front of the remote sensor
-
POWER button
- FUNCTION SELECT buttons (TUNER/BAND, DVD/CD, AUX1/2)
- NUMERIC buttons (0-9)
-
TAPE FUNCTION buttons
-
REVERSE PLAY (◀)
- PLAY (▶)
- REWIND/ FAST FORWARD PLAY (◀◀/▶▶)
- TAPE 1/2 SELECT buttons
- RECORD/ RECORD PAUSE (●/II)
-
TAPE STOP (■)
-
SET UP button
- ARROW buttons (▲ / ▼ / ◀ / ▶)
(For use in highlighting a selection on a GUI menu screen, TITLE and MENU screen.)
- SELECT/ENTER button
- MENU button
(Use the MENU button to display the menu screen included on DVD video discs.)
- SCAN (◀◀/▶▶)/ SLOW (◀I/▶)/SKIP (I◀◀/▶▶I) buttons
- PROGRAM/ REPEAT/ REPEAT A-B buttons
- STOP (■), PAUSE(Ⅱ)/ STEP, PLAY (▶) buttons
- EQUALIZER (EQ)/ OAO/ SOUND/ AUDIO/CLEAR/ZOOM buttons
- DIMMER/ SLEEP/ SPECTRUM buttons
- SURROUND (SURR.)/ XDSS/ SUBTITLE (S-TITLE) RETURN / MARKER/ SEARCH buttons
- DISC SKIP (D.SKIP) buttons
- VOLUME -/+ buttons
- TITLE button (Use the TITLE button to display the title screen included on DVD video discs.)
- DISPLAY button
- PRESET (▼/▲) buttons
- MUTE button
Remote control battery installation
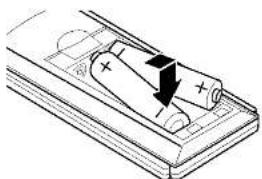
natural_image
Diagram of a battery cell with an arrow indicating electron flow (no text or symbols)Detach the battery cover on the rear of the remote control, and insert two R03 (size AAA) batteries with + and - aligned correctly.
Caution
Do not mix old and new batteries. Never mix different types of batteries (standard, alkaline, etc.).
Display Window
Cassette tape player/ DVD/VCD/CD player
![TITLE PROG. CHP/TRK AUTO MEMORY [10:11] SLEEP MONO DOWNMIX REPEAT 1 DISC TIMER REC CD SYNC. HI-SP. DUBB 2 CD DVD MP3 VCD 3 4 MHZ kHz CON](/content/2026/06/1226976/images/0b17744cf4274239d33d438d10e506085c346a7f6a48950e7ff22b879f38e7c0.jpg)
PREPARATION
- • TITLE indicator
• PROGRAM (PROG.) indicator
• CHAPTER/ TRACK indicator
• AUTO SEARCH indicator
- MEMORY indicator
• FM STEREO RECEIVING indicator
• SLEEP indicator
- MONO indicator
- · DISC NUMBER indicator
• DISC TYPE indicator (MP3/DVD/CD/VCD)
- PLAY/ PAUSE indicator
- · DOWNMIX indicator
- REPEAT indicator
-
· TIMER indicator
-
RECORD/ RECORD PAUSE indicator
• CD SYNCHRO RECORDING indicator
• DUBBING indicator -
• TAPE 1/2 SELECT indicator
-
PLAY MODE indicator
• TAPE PLAY DIRECTION indicator
Tuner/ Amplifier
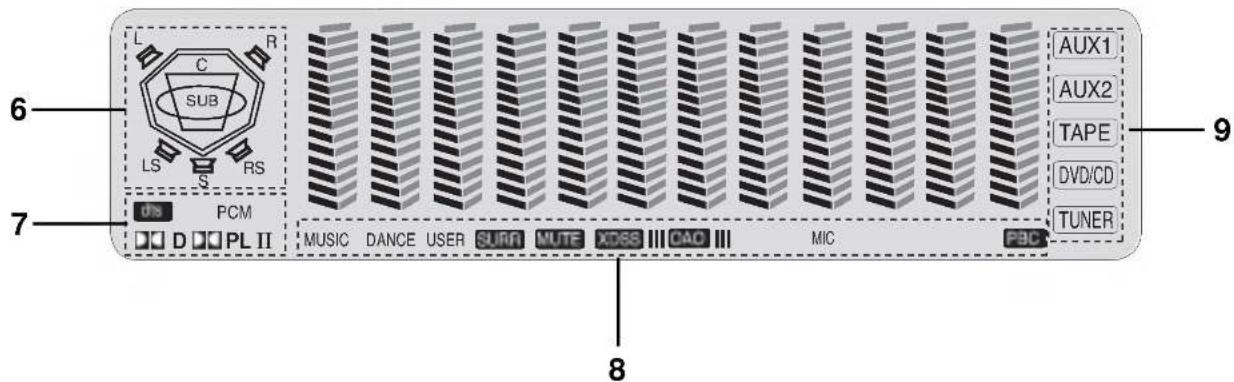
- • LEFT FRONT SPEAKER indicator (L)
• RIGHT FRONT SPEAKER indicator (R)
• RIGHT SURROUND SPEAKER indicator (RS)
• LEFT SURROUND SPEAKER indicator (LS)
• SUB WOOFER indicator (SUB)
• CENTER SPEAKER indicator (C)
- • DTS/ PCM indicator
• DOLBY DIGITAL/ DOLBY PRO LOGIC (II) indicator
- • MUSIC/ DANCE/ USER indicator
• SURROUND/ MUTE/ XDSS/ OAO indicator
• MICROPHONE/ PBC indicator
- FUNCTION SELECT indicator
(AUX1, AUX2, TAPE, DVD/CD, TUNER)
Connections
Fitting the system connection cables
- Your unit consists of two separate parts, Cassette tape player/DVD/VCD/CD player and an integrated Tuner/Amplifier.
- Before you can use your unit, the separate parts must be connected with the supplied system connection cables.
- Make sure that all connections are made with your unit unplugged from the mains supply.
Cassette tape player/ DVD/VCD/CD player
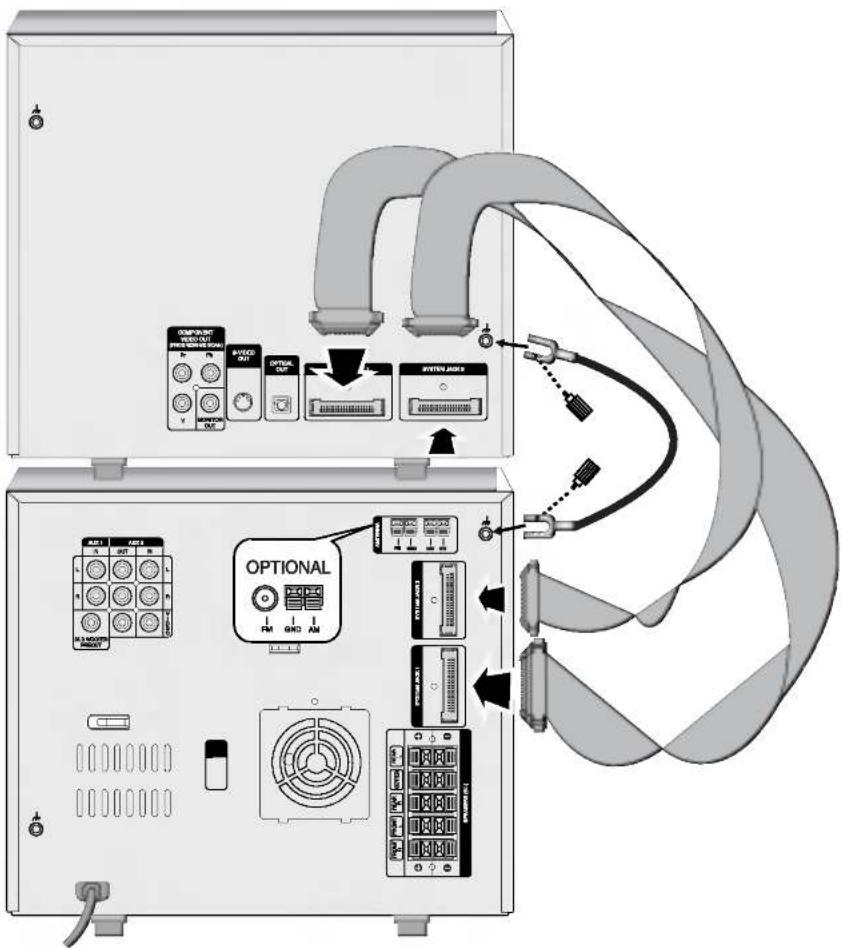
Tuner/ Amplifier
1 Stack the parts of your unit in the order shown above.
Position your unit so that you have easy access to the rear of it.
2 Connect the SYSTEM JACK1 on the Cassette tape player/DVD/VCD/ CD player to the SYSTEM JACK1 connector on the Tuner/ Amplifier.
3 Connect the SYSTEM JACK2 connector on the Cassette tape player/DVD/VCD/CD player to the SYSTEM JACK2 connector on the tuner/ Amplifier.
4 Connect the LUG cable to the LUG connector on the unit with the supplied hand screw.
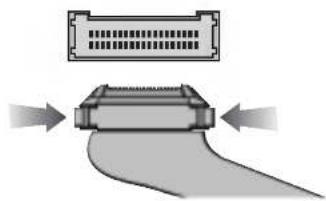
Notes
- The system connection cables will only connect and should 'click' into place, do not try to force them.
- If you need to unplug the system connection cables, squeeze both sides of each plug before pulling it out - this will 'unlock' the plug and allow it to be released.
natural_image
Diagram showing a connector with an external cable or cable passing through it, emitting light (no text or symbols present)Connections
Connecting to a TV
- Make one of the following connections, depending on the capabilities of your existing equipment.

ips
- Depending on your TV and other equipment you wish to connect, there are various ways you could connect the unit. Use one of the connections described below.
- Please refer to the manuals of your TV, VCR, Stereo System or other devices as necessary to make the best connections.

Caution
- Make sure the unit is connected directly to the TV. Select the correct AV input on your TV.
- Do not connect your unit to TV via your VCR. The DVD image could be distorted by the copy protection system.
Video connection
Connect the MONITOR OUT jack from the unit to the VIDEO IN jack on the TV using the video cable supplied (V).
S-Video connection
Connect the S-VIDEO OUT jack on the unit to the S-VIDEO IN jack on the TV using the S-Video cable (S).
Component Video (Color Stream®) connection
Connect the COMPONENT VIDEO OUT/ PROGRESSIVE SCAN jacks from the unit to the corresponding in jacks on the TV using an Y Pb Pr cable (C).
Progressive Scan (ColorStream® pro) connection
- If your television is a high-definition or "digital ready" television, you may take advantage of the unit's progressive scan output for the highest video resolution possible.
- If your TV does not accept the Progressive Scan format, the picture will appear scrambled if you try Progressive Scan on the unit.
Connect the COMPONENT VIDEO OUT/ PROGRESSIVE SCAN jacks from the unit to the corresponding in jacks on the TV using an optional Y Pb Pr cable (C).

ote
- Set the Progressive to "On" on the Setup menu for progressive signal, see page 22.

Rear of TV
Connections
Connecting to Antenna
Connect the supplied FM/MW(AM) or SW (optional) antennas for listening to the radio.
- Connect the MW(AM) loop antenna to the MW(AM) antenna connector.
- Connect the FM wire antenna to the FM antenna connector.

flowchart
graph TD
    A["FM external antenna (aerial) (not supplied)"] --> B["FM indoor antenna (aerial)"]
    B --> C["FM wire antenna (supplied)"]
    D["SW Antenna (not supplied)"] --> E["OPTIONAL"]
    E --> F["MW(AM) loop antenna (aerial) (Supplied)"]
    G["FM antenna"] --> H["MW(AM) loop antenna (aerial) (Supplied)"]
    I["FM antenna"] --> J["MW(AM) loop antenna (aerial) (Supplied)"]
    K["FM antenna"] --> L["MW(AM) loop antenna (aerial) (Supplied)"]
    M["FM antenna"] --> N["MW(AM) loop antenna (aerial) (Supplied)"]
    O["FM antenna"] --> P["MW(AM) loop antenna (aerial) (Supplied)"]
    Q["FM antenna"] --> R["MW(AM) loop antenna (aerial) (Supplied)"]
    S["FM antenna"] --> T["MW(AM) loop antenna (aerial) (Supplied)"]
    U["FM antenna"] --> V["MW(AM) loop antenna (aerial) (Supplied)"]
    W["FM antenna"] --> X["MW(AM) loop antenna (aerial) (Supplied)"]
    Y["FM antenna"] --> Z["MW(AM) loop antenna (aerial) (Supplied)"]
    AA["FM antenna"] --> AB["MW(AM) loop antenna (aerial) (Supplied)"]
    AC["FM antenna"] --> AD["MW(AM) loop antenna (aerial) (Supplied)"]
    AE["FM antenna"] --> AF["MW(AM) loop antenna (aerial) (Supplied)"]
    AG["FM antenna"] --> AH["MW(AM) loop antenna (aerial) (Supplied)"]
    AI["FM antenna"] --> AJ["MW(AM) loop antenna (aerial) (Supplied)"]
    AK["FM antenna"] --> AL["MW(AM) loop antenna (aerial) (Supplied)"]
    AM["FM antenna"] --> AN["MW(AM) loop antenna (aerial) (Supplied)"]
    AO["FM antenna"] --> AP["MW(AM) loop antenna (aerial) (Supplied)"]
    AQ["FM antenna"] --> AR["MW(AM) loop antenna (aerial) (Supplied)"]
    AS["FM antenna"] --> AT["MW(AM) loop antenna (aerial) (Supplied)"]
    AU["FM antenna"] --> AV["MW(AM) loop antenna (aerial) (Supplied)"]
    AW["FM antenna"] --> AX["MW(AM) loop antenna (aerial) (Supplied)"]
    AY["Position it for the best reception"] --> AZ["FM external antenna (aerial) (not supplied)"]
    BA["Position it for the best reception"] --> BB["Position it for the best reception"]

otes
- To prevent noise pickup, keep the MW(AM) loop antenna away from the unit and other component.
- Be sure to fully extend the FM wire antenna.
- After connecting the FM wire antenna, keep it as horizontal as possible.
Connections
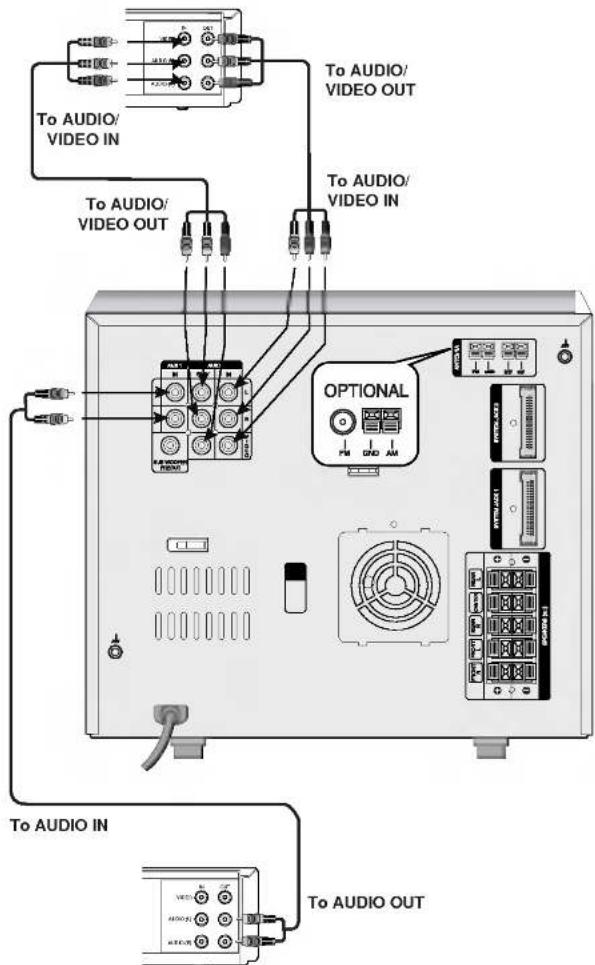
Connecting to Auxiliary Equipment
You can use VCR or other unit connected to the AUX1, AUX2 connector.
VCR (or Auxiliary Device, etc)
Additional VCR (or Auxiliary Device, etc)
1 Connect a VCR or auxiliary device, etc to the AUX 1 connector.
2 Connect a additional VCR or auxiliary device, etc to the AUX 2 connector.
3 Select AUX1 or AUX2 pressing the AUX button on the Tuner/ Amplifier or the AUX1/2 button on the remote control.
Connecting to Optional Equipment
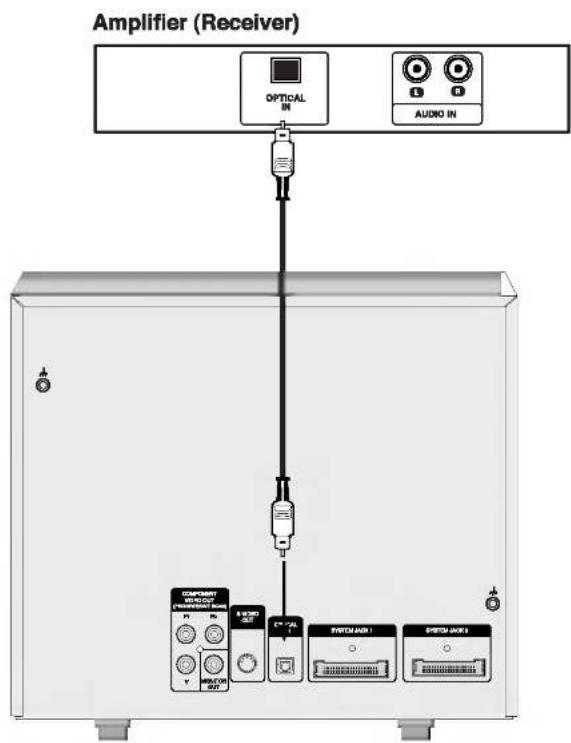
[Connecting to an amplifier equipped with two channel digital stereo (PCM) or to an Audio/Video receiver equipped with a multi-channel decoder (Dolby Digital™, MPEG 2 or DTS)]
Connect the OPTICAL OUT jack on the unit to the OPTICAL IN jack on your amplifier. Use an optional audio cable.

Caution:
Due to the DTS Licensing agreement, the digital output will be in DTS digital out when DTS audio stream is selected.
The sound is muted during playback on an audio CD recorded in dts.

Notes
- If the audio format of the digital output does not match the capabilities of your unit, the DVD Karaoke will produce a strong, distorted sound or no sound at all.
- Six Channel Digital Surround Sound via digital connection can only be obtained if your unit is equipped with a Digital Multi-channel decoder.
- To see the audio format of the current unit in the On-Screen Display, press AUDIO.
Connections
Speaker System Connection
Connect the speakers using the supplied speaker cords by matching the colors of the terminals and those of the cords. To obtain the best possible surround sound, adjust the speaker parameters (distance, level, etc.).
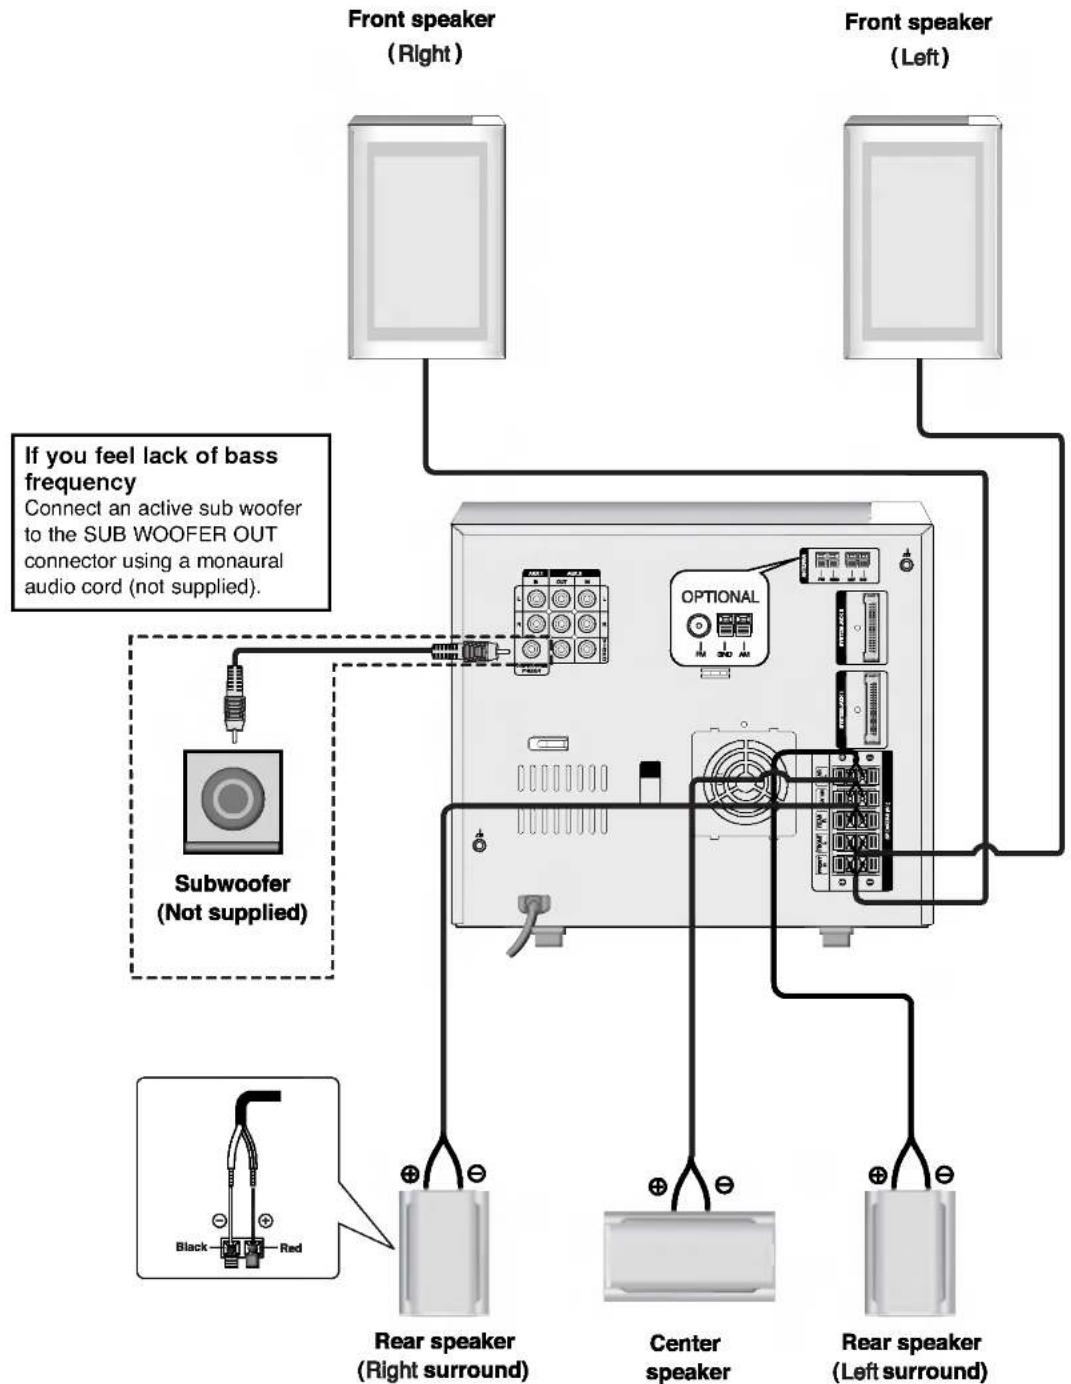

otes
- Be sure to match the speaker cord to the appropriate terminal on the components: + to + and - to -. If the cords are reversed, the sound will be distorted and will lack base.
- If you use front speakers with low maximum input rating, adjust the volume carefully to avoid excessive output on the speakers.
Connections
Speaker Positioning
In the case of normal position use the 6 speakers (2 front speakers, center speaker, 2 rear speakers and subwoofer).
If you want to play the excellent bass sound or Dolby Digital surround, you should connect a subwoofer.
- Front speakers
According to your listening position set up the speakers for equal distance. And by hearing position set up the interval between speakers to 45 degree.
- Center speaker
It is ideal that the center speakers and front speakers are same height. But normally place it above or below the television.
- Rear speakers
Place left and right behind the listening area.
These speakers recreate sound motion and atmosphere required for surround playback. For best results, do not install the rear speakers too far behind the listening position and install them at or above the level of the listener's ears. It is also effective to direct the rear speakers towards a wall or ceiling to further disperse the sound.
In the case of a smaller room size, if the audience is near to the rear wall set the rear speakers opposite each other, and set the rear speakers above 60-90cm than the listener's ears.
- Subwoofer
This can be placed in any front position.
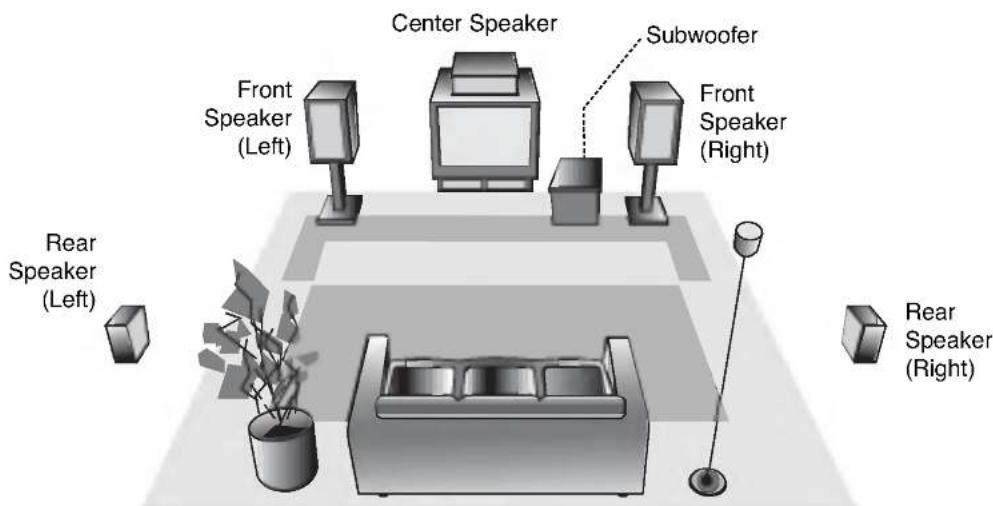
Speaker Positioning Example
Before Operation
Volume Adjustment
- Turn VOLUME knob clockwise to increase the sound level, or counterclockwise to decrease it.
- Press VOLUME + to increase the sound level, or use VOLUME - to decrease it on the remote control.
Sound Quality Adjustment
• b activate stereo sound
- You can choose between 8 fixed sound impressions and 1 USER MODE. Select a desired sound mode by using the EQ button on the remote control.
- Each you press the button the indication changes as follows in the display window.
$$ \text { USER } \rightarrow \text { FLAT } \rightarrow \text { POP } \rightarrow \text { CLASSIC } \rightarrow \text { ROCK } $$
$$ \begin{array}{c c c c c} \uparrow & & & & \downarrow \ \text { SAMBA } & \leftarrow & \text { JAZZ } & \leftarrow & \text { SALSA } \ \hline \end{array} $$
- If you press the MUSIC button, the indication changes as follows in the display window.
$$ \begin{array}{c}\text { FLAT } \rightarrow \text { POP } \rightarrow \text { CLASSIC } \rightarrow \text { ROCK } \rightarrow \text { VOCAL }\\uparrow\end{array} $$
- If you press the DANCE button, the indication changes as follows in the display window.
$$ \mathrm{SALSA} \rightarrow \mathrm{JAZZ} \rightarrow \mathrm{SAMBA} $$


ote
This function is only available to the "BYPASS" sound mode.
- Headphone Jack
Connect a stereo headphone plug ( 6.3mm) into the headphone jack.
The speakers are automatically disconnected when you plug in the headphones (not supplied).
MUTE
Press MUTE to turn off the sound, press again to restore. You can mute your unit in order, for example, to answer the telephone, "MUTE" indicator flashes in the display window.
SURROUND
To activate surround mode
- You can choose between 6 fixed sound impressions.
- Select a desired surround mode by using the SURROUND button on the front panel or the SURR. button on the display window.
• Each you press the button the indication changes as follows.
$$ \text { SURROUND OFF } \rightarrow \text { SIMULATED LOW } \rightarrow \text { SIMULATED HIGH } $$
$$ \begin{array}{c} \uparrow \ \text {MOVIE HIGH} \leftarrow \text {MOVIE LOW} \leftarrow \text {MUSIC HIGH} \leftarrow \text {MUSIC LOW} \end{array} $$

ote
This function is only available to the "BYPASS" sound mode.
XDSS (Extreme Dynamic Sound System)
Press XDSS button repeatedly to reinforce treble and bass.
$$ X D S S 1 O N \rightarrow X D S S 2 O N \rightarrow X D S S O F F $$

ote
This function is only available to the "BYPASS" sound mode.
OAO (Orientation Acoustic Optimizer) ON/OFF
Press OAO to reinforce the bass sound.
The "OAO ON" or "OAO OFF" indicator lights. To cancel, press OAO again.
SPECTRUM Effect
Whenever you press the SPECTRUM button on the remote control, you can enjoy the spectrum change with 6 types in the display.
DIMMER
This function will change the brightness of the display window on the front panel in power-on status.
Press the DIMMER button on the remote control.
DEMO
Press DEMO in power off state to demonstrate the function in the display window.
To cancel it, press POWER or DEMO again. During demonstration in power-on status you can cancel it by using the other buttons.
Before Operation
Setting the Clock
1 Press CLOCK. (If the clock requires setting, press and hold CLOCK for more than 2 seconds.) - The hours display begins to blink.
2 Select either the 12 hour cycle or the 24 hour cycle by turning MULTI JOG DIAL.

(12HR)
or

(24HR)
3 Press SET to confirm the selected hour cycle.
4 Use MULTI JOG DIAL to set the current hour.
5 Press SET.
6 Use MULTI JOG DIAL to set current minutes.
7 Press SET and the correct time is shown on the display.
8 Press CLOCK at any time to show the time on the display, for about 5 seconds.
Sleep Timer Function
When the sleep timer is set, the unit automatically turns off after the specified time has elapsed.
1 To specify the time delay before the power is turned off, press SLEEP.
In the display window you can see SLEEP 90 for about 5 seconds. This means that the system turns off automatically after 90 minutes. Each time the button is pressed the time interval before it turns off is reduced by 10 minutes. i.e. 80...70... etc. Select the desired time to turn off.
2 To check the remaining time until the power is turned off.
While the sleep function is active press SLEEP briefly. The time remaining until the unit turns off is displayed for about 5 seconds.
Note
If you press SLEEP while the sleep time is displayed, the SLEEP time is reset.
To cancel Sleep Timer setting
If you wish to stop the function, press the SLEEP button repeatedly until "SLEEP 10" appears, and then press SLEEP once again after "SLEEP 10" shows on the display.
Using Microphone
You can sing to a music source by connecting a microphone to the unit.
1 Connect your microphone to the MIC socket. "MIC" will be shown in the display window.
2 Play a music you want.
3 Sing along with the accompaniment. Adjust the microphone volume by turning MIC VOLUME KNOB.
For your reference
You can record during using microphone. Refer to the "Recording" explanation section.
Notes
- When not using the microphone, set the MIC volume knob to minimum or turn off the MIC and remove the microphone from the MIC socket.
- If the microphone is set too near the speaker, a howling sound may be produced. In this case, move the microphone away from the speaker or decrease the sound level by using the MIC volume control.
- If sound through the microphone is extremely loud, it may be distorted. In this case, turn the MIC volume control toward minimum.
To Adjust ECHO Volume
You can give an echo effect to the sound from the microphones.
Turn ECHO VOLUME KNOB (ECHO VOL.) clockwise to increase the sound level, or counterclockwise to decrease it.
Before Operation
Timer Function
With the TIMER function you can have the radio reception and recording, CD or tape playing turned on and off at the time desired.
1 Press CLOCK to check the current time.
For your reference
If you don't set clock, timer function doesn't work.
2 Press TIMER to enter the timer setting mode. TUNER-CD-TAPE flash in the display window in turn.
For your reference
If you want to correct the previous memorized TIMER setting, press and hold the TIMER button more than 2 seconds.
- The previous memorized timer setting for on Time and "TIMER" indicators appear in the display.
3 Press SET when the desired function flashes.
4 1. a. When you select TUNER function, 'PLAY' and 'REC' indicator flash in the display window alternately for about 3 seconds.
'PLAY' indicator : TUNER play only
'REC' indicator : TUNER play and recording
b. Select the previous memorized preset number with MULTI JOG DIAL on the front panel and press SET.
'ON TIME' indicator appears for about 0.5 seconds in the display window and then disappears.
- When you select CD or TAPE function, 'ON TIME' indicator appears for about 0.5 seconds in the display window and then disappears.
5 Set the turn on hour turning MULTI JOG DIAL.
6 Press SET to confirm the turn on hour time.
7 Set the turn on minutes time turning MULTI JOG DIAL.
8 Press SET to confirm the turn on minutes time.
'OFF TIME' indicator appears for about 0.5 seconds in the display window and then disappears.
9 Set the turn off hour time turning MULTI JOG DIAL.
10 Press SET.
11 Set the turn off minutes turning MULTI JOG DIAL.
12 Press SET.
13 Adjust the volume level turning MULTI JOG DIAL.
14 Press SET. "TIMER" appear in the display window and the timer setting has been completed.
15 Turn the system off. The selected timer functions are automatically switched on and off at the preset times.
To cancel or check the timer
Each time the TIMER button is pressed you can select the timer set or cancel. You can also check the timer setting status.
To activate or check the timer, press the TIMER button repeatedly so that "TIMER" appears in the display window.
To cancel the TIMER, press the TIMER button repeatedly so that "TIMER" disappears from the display window.
Note
If the disc is inserted the DVD, VCD or MP3 except audio CD on the DVD/VCD/CD player, the timer function plays to the TUNER.
Before Operation
Mini Glossary for Audio Stream & Surround mode
dts
Allows you to enjoy 5.1(or 6) discrete channels of high quality digital audio from DTS program sources such as discs, DVD and compact discs, etc.bearing the trademark. DTS Digital Surround delivers up to 6 channels of transparent audio(which means identical to the original masters) and results in exceptional clarity throughout a true 360 degree sound field. "DTS" and "DTS Digital Surround" are registered trademarks of Digital Theater Systems, Inc.
□□ DIGITAL
The Dolby Digital surround format lets you enjoy up to 5.1 channels of digital surround sound from a Dolby Digital program source. If you play DVDs with “####” mark, you can enjoy even better sound quality, greater spatial accuracy, and improved dynamic range.
Manufactured under license from Dolby Laboratories. "Dolby", "Pro Logic" and double-D symbol are trademarks of Dolby Laboratories.
PROLOGIC II
Dolby Pro Logic II creates five full-bandwidth output channels from two-channel sources. This is done using an advanced, high-purity matrix surround decoder that extracts the spatial properties of the original recording without adding any new sounds or tonal colorations.
MOVIE mode:
The Movie mode is for use with stereo television shows and all programs encoded in Dolby Surround. The result is enhanced soundfield directionality that approaches the quality of discrete 5.1-channel sound.
BYPASS
Outputs the sound from the front left and right speakers and subwoofer.
Sound Mode DVD VCD CD
You can enjoy surround sound simply by selecting one of the pre-programmed sound fields according to the program you want to listen to.
When DVD is inserted
You can change the Digital Audio Output mode by pressing the AUDIO button on the remote control during playback. Although the DVD contents differ from disc to disc, the following explains the basic operation when this feature is used.
a) After you select 2 channel (For example 📄 or 📋) by pressing AUDIO button, press SOUND button repeatedly.

b) After you select 5.1 channel (For example 📄 or 📋) by pressing AUDIO button, press SOUND button. - “💡” indicator will be displayed on the TV screen. - “NORMAL (BYPASS)” indicator will be only displayed on the display window.
When Video CD is inserted
Each time you press SOUND button, the sound mode of Video CD is changed on the display window as the following order.
NORMAL (BYPASS) → STUDIO → CLUB → HALL → THEATER 1 → CHURCH → PL 2 MOVIE → NORMAL (BYPASS)...
Note
After you select the "Bypass" of sound mode by pressing SOUND button, press AUDIO button. The Left, Right and Stereo of audio channel will be displayed on the TV screen.
When CD is inserted
Each time you press SOUND button, the sound mode of Audio CD is changed on the display window as the following order.
NORMAL (BYPASS) → STUDIO → CLUB → HALL → THEATER 1 → CHURCH → PL 2 MOVIE → NORMAL (BYPASS)...
For your reference
- The unit memorizes the last mode settings for each source individually.
- You can identify the encoding format of program software by looking at its packaging.
- Dolby Digital discs are labelled with the logo.
- Dolby Surround encoded programs are labelled with the ☐ Dolby logo.
- DTS Digital Surround discs are marked with DTS.
Note
When you play sound tracks with 96kHz sampling frequency, the output signals will be converted to 48kHz (sampling frequency).
Before Operation

Caution:
Before using the remote control, press the DVD/CD button to select the device to be operated.
General Explanation
This manual gives basic instructions for operating the unit. Some DVDs require specific operation or allow only limited operation during playback.
When this occurs, the symbol 🔔 appears on the TV screen, indicating that the operation is not permitted by the unit or is not available on the disc.
On-Screen Display
General playback status can be displayed on the TV screen. Some items can be changed on the menu.
On-screen display operation

Press DISPLAY during playback.

Press ▲ / ▼ to select an item. The selected item will be highlighted.

Press ◄ or ▶ to change the setting of an item. The number buttons can be also be used for setting numbers (e.g., title number). For some functions, press SELECT/ENTER to execute the setting.
Temporary Feedback Field Icons

Title
Repeat title

A-B
Repeat sequence

R
assume play from this point

Action prohibited or not available

Notes
- Some discs may not provide all of the features on the on-screen display example shown below.
- If no button is pressed for 10 seconds, the on-screen display disappears.
Example: On-Screen Display during playing DVD
| Items | Function / Action using ↗ / ↙ to select item | Selection Method | ||
| Title Number |  | 1/3▶ | Shows the current title number and total number of titles / skips to the desired title number. | ◀/ ▶, Numbers, or SELECT/ENTER |
| Chapter Number |  | 1/12▶ | Shows the current chapter number and total number of chapters / skips to the desired chapter number. | ◀/ ▶, Numbers, or SELECT/ENTER |
| Time search |  | 0:20:09 | Shows the elapsed playing time / searches by elapsed time. | Numbers, SELECT/ENTER |
| Audio language and Digital Audio Output mode |  | 1 ENG DOD ▶ 5.1 CH | Shows the current audio soundtrack language, encoding method, and channel number / changes the setting. | ◀/ ▶ or AUDIO |
| Subtitle language |  | 1 ENG ▶ | Shows the current subtitle language / changes the setting. | ◀/ ▶ or S-TITLE |
| Angle |  | 1/3 ▶ | Shows the current angle number and total number of angles / changes the angle. | ◀/ ▶ |
| Sound |  | Bypass ▶ | Shows the current sound mode / changes the setting. | ◀/ ▶ or SOUND |
Example: On-Screen Display during playing VCD
| Items | Function / Action using ▲/▽ to select item | Selection Method | ||
| Track Number |  | 1/3▶ | Shows the current track number, total number of tracks and PBC On mode / skips to the desired track number. | ◀/ ▶, Numbers, or SELECT/ENTER |
| Time |  | 0:20:09 | Shows the elapsed playing time (display only). | - |
| Audio Channel |  | Stereo ▶ | Shows the audio channel / changes the audio channel. | ◀/ ▶ or AUDIO |
| Sound |  | Bypass ▶ | Shows the current sound mode / changes the setting. | ◀/ ▶ or SOUND |

Before Operation
Initial Settings
By using the Setup menu, you can make various adjustments to items such as picture and sound. You can also set a language for the subtitles and the Setup menu, among other things. For details on each Setup menu item, see pages 21 to 25.
To display and exit the Menu:
Press SETUP to display the menu. A second press of SETUP will take you back to initial screen.
To go to the next level:
Press ▶ on the remote control.
To go back to the previous level:
Press ◀ on the remote control.
General Operation
1 Press SETUP.
The setup menu appears.
2 Use ▲ / ▼ to select the desired option then press ▶ to move to the second level.
The screen will be shown the current setting for the selected item, as well as alternate setting(s).
3 Use ▲ / ▼ to select the second desired option then press ▶ to move to the third level.
4 Use ▲ / ▼ to select the desired setting then press SELECT/ENTER to confirm your selection. Some items require additional steps.
5 Press SETUP or PLAY to exit the setup menu.
LANGUAGE
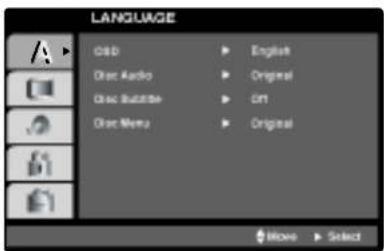
OSD
Select a language for the Setup menu and on-screen display.
Disc Audio / Subtitle / Menu DVD
Select the language you prefer for the audio track (disc audio), subtitles, and the disc menu.
Original: Refers to the original language in which the disc was recorded.
Other: To select another language, press number buttons to enter the corresponding 4-digit number according to the language code list on page 37. If you enter the wrong language code, press CLEAR on the remote control.
Before Operation
DISPLAY
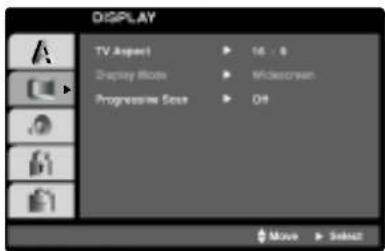
TV Aspect DVD
4:3: Select when a standard 4:3 TV is connected. 16:9: Select when a 16:9 wide TV is connected.
Display Mode DVD
Display Mode setting works only when the TV Aspect mode is set to "4:3".
Letterbox: Displays a wide picture with bands on the upper and lower portions of the screen.
Panscan: Automatically displays the wide picture on the entire screen and cuts off the portions that do not fit.
Progressive Scan DVD
Progressive Scan Video provides the highest quality pictures with less flickering.
If you are using the Component Video jacks for connection to a TV or monitor that is compatible with a progressive scan signal, set Progressive Scan to On.
To Turn ON progressive scan:
Connect component out of the DVD to the input of your monitor/television, set your television or monitor to Component Input.
-
Select "Progressive Scan" on the DISPLAY menu then press ▶.
-
Select "On" using the ▲ / ▼ buttons.
-
Press SELECT/ENTER to confirm your selection. The confirm menu will appear.
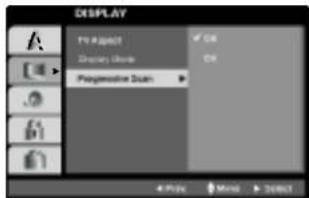
-
When the confirm menu appears on your screen Cancel is highlighted as default. Use the 🔊/▶ buttons to highlight Enter.
-
Pressing ENTER will set the player to Progressive scan mode.
Caution
Once the setting for progressive scan output is entered, an image will only be visible on a progressive scan compatible TV or monitor. If you set Progressive Scan to On in error, you must reset the unit.
1) Remove any disc from the unit and close the disc tray. See that "NO DISC" is displayed on the display window
2) Press and hold STOP (■) for five seconds then release it. The video output will be restored to the standard setting, and a picture will once again be visible on a conventional analog TV or monitor.
Before Operation
AUDIO
Each DVD disc has a variety of audio output options. Set the player's AUDIO options according to the type of audio system you use.
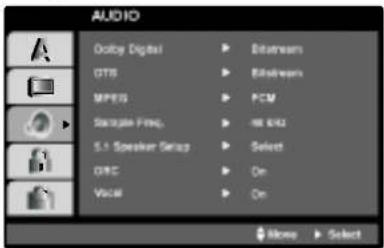
Dolby Digital / DTS / MPEG DVD
Bitstream: Select "Bitstream" if you connect the DVD Player's DIGITAL OUT jack to an amplifier or other equipment with a Dolby Digital, DTS or MPEG decoder.
PCM : Select when connected to a two-channel digital stereo amplifier. DVDs encoded in Dolby Digital or MPEG will be automatically downmixed to two-channel PCM audio.
Sample Freq. (Frequency) DVD
If your receiver or amplifier is NOT capable of handling 96 kHz signals, select 48 kHz. When this choice is made, this unit automatically converts any 96 kHz signals to 48 kHz so your system can decode them.
If your receiver or amplifier is capable of handling 96 kHz signals, select 96 kHz. When this choice is made, this unit passes each type of signal through without any further processing.
Check the documentation for your amplifier to verify its capabilities.
Dynamic Range Control (DRC)
With the DVD format, you can hear a program's sound-track in the most accurate and realistic presentation possible, thanks to digital audio technology. However, you may wish to compress the dynamic range of the audio output (the difference between the loudest sounds and the quietest ones). Then, you may listen to a movie at a lower volume without losing dialog intelligibility. Set DRC to On for this effect.

Notes
- The DRC function works only during playback of Dolby Digital recorded discs.
- The level of Dynamic Range Compression may differ depending on the DVD disc.
Vocal
Set Vocal to On only when a multi-channel Karaoke DVD is playing. The karaoke channels on the disc will mix into a normal stereo sound.
5.1 Speaker Setup DVD
Select speaker settings, including volume balance and distance, or test the speaker settings.
Speaker settings are only active on the Analog Multi-Channel Output.
Speaker Setup
Make the following settings for the built-in 5.1 channel surround decoder.
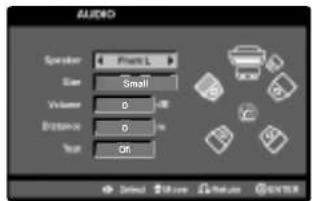
- Press SETUP. The setup menu appears.
- Use ▲ / ▼ to select the AUDIO option then press ▶ to move to the second level.
- Use ▲ / ▼ to select the Speaker Setup option then press ▶ to move to the third level. "Select" is highlighted.
- Press SELECT/ENTER and 5.1 Speaker Setup menu appears.
- Use ◄/▶ to select the desired speaker.
- Adjust options using ▲ / ▼ / ◀ / ▶ buttons.
- Press SELECT/ENTER to confirm your selection. Returns to the previous menu.
Speaker selection
Select a speaker that you want to adjust. [Front speaker (Front L), Center Speaker (Center), Front speaker (Front R), , Rear speaker (Rear R), Rear speaker (Rear L) or Subwoofer (Woofer)]
Size
Press ◄/▶ to set a mode. (Large, Small or None)
- The size of the Front L/R speaker can be selected to "Large" or "Small".
- The size of the Subwoofer can be selected to "Large" or "None".
- Since the size of the Center and Rear L/R speaker are fixed to "Small", you can not change settings.
- If you have connected the system to a speaker with low frequency of 100Hz or below, select to "Large" the size of the Front L/R speaker. The size of the Subwoofer is selected to "None" automatically.
- If you have connected the system to a speaker without low frequency of 100Hz or below, select to "Small" the size of the Front L/R speaker. The size of the Subwoofer is selected to "Large" automatically. But if you haven't connected to subwoofer, always select to "Large" the size of Front L/R Speaker.
Before Operation
Volume
Press ◄/▶ to adjust the output level of the selected speaker. (-5dB \~ 5dB)
Distance
If you have connected speakers to your DVD Player, setting the Distance lets the speakers know how far the sound has to travel to reach your set listening point. This allows the sound from each speaker to reach the listener at the same time.
Press ◄/▶ to adjust the Distance of the selected speaker (Center, Rear L and Rear R).
Test
Select "All" to test the signals of each speaker. Adjust the volume to match the volume of test signals memorized in the system.
(When the size of the Front L/R speaker is selected to "Large", the subwoofer (Woofer) is not available.)
Front L → Center → Front R → Rear R → Rear L → Woofer
You can adjust the volume during operating the test tone, first use 🔊/▼ to select Volume or Speaker option then use ◀/▼ buttons to select volume or speaker, so that all speaker's volume is same from the listener's position.
OTHERS

PBC VCD
Set Playback Control (PBC) to On or Off.
On: Video CDs with PBC are played according to the PBC.
Off:Video CDs with PBC are played the same way as Audio CDs.
DivX(R) Registration
DivX
You can show the DivX DRM (Digital Right Management) Registration code for your unit only.
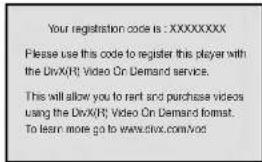
The Registration code is used for VOD (Video-On-Demand) service agent. You can purchase or rental an encrypt movie file.
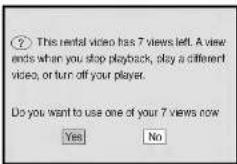
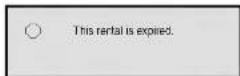
Notes
If you rent the DivX VOD file, it has several options of viewing limits as show below.
• Display the number which you can watch the file.
• The rental has been expired.
• Display the authorization error.

Before Operation
LOCK (Parental Control)
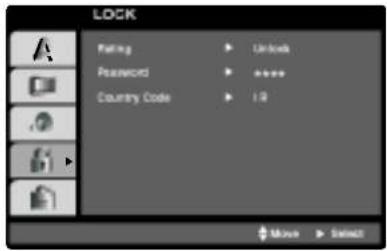
Rating DVD
Some movies contain scenes that may not be suitable for children to view. Many of these discs contain parental control information that applies to the complete disc or to certain scenes on the disc. Movies and scenes are rated from 1 to 8, depending on the country. Some discs offer more suitable scenes as an alternative.
The parental control feature allows you to block access to scenes below the rating you input, thereby preventing your children from being able to view material you believe is unsuitable.
1 Select "Rating" on the LOCK menu then press
2 To access the Rating, Password and Country Code features, you must input the 4-digit security code you created.
If you have not yet entered a security code you are prompted to do so.
Input a 4-digit code and press SELECT/ENTER. Enter it again and press SELECT/ENTER to verify. If you make a mistake before pressing SELECT/ENTER, press CLEAR.
3 Select a rating from 1 to 8 using the ▲ / ▼ buttons.
Rating 1-8: Rating one (1) has the most restrictions and rating eight (8) is the least restrictive.
Unlock
If you select unlock, parental control is not active and the disc plays in full.
Note
If you set a rating for the player, all disc scenes with the same rating or lower are played. Higher rated scenes are not played unless an alternate scene is available on the disc. The alternative must have the same rating or a lower one. If no suitable alternative is found, playback stops. You must enter the 4-digit password or change the rating level in order to play the disc.
4 Press SELECT/ENTER to confirm your rating selection, then press SETUP to exit the menu.
Password (Security Code)
You can enter or change password.
1 Select Password on the LOCK menu then press ▶.
2 Follow step 2 as shown left (Rating). "Change" or "New" is highlighted.
3 Enter the new 4-digit code, then press SELECT/ENTER. Input it again to verify.
4 Press SETUP to exit the menu.
If you forget your Security Code
If you forget your security code you can clear it using the following steps:
1 Input the 6-digit number "210499" on the setup menu and the security code is cleared.
2 Enter a new code as described above.
Note
When "INPUT PASSWD ■ ■ ■ ■ ■" appears on the TV screen, press STOP (■) and then press SETUP to move to the setup menu.
Country Code DVD
Enter the code of the country/area whose standards were used to rate the DVD video disc, based on the list in the reference chapter.
1 Select "Country Code" on the LOCK menu then press ▶.
2 Follow step 2 as shown left (Rating).
3 Select the first character using ▲ / ▼ buttons.
4 Shift the cursor using ▶ button and select the second character using △ / ▽ buttons.
5 Press SELECT/ENTER to confirm your country code selection.
Operation with RADIO
Presetting the radio stations
You can preset 50 stations for FM, MW(AM) and SW (optional).
Before tuning, make sure that you have turned the volume down to the minimum level.
1 Press TUNER/BAND to show either FM, MW(AM) or SW (optional) in the display window. Every time you press this button, MW(AM), FM and SW (optional) changes alternately.
2 Turn the MULTI JOG DIAL on the front panel until the frequency indication starts to change.
Notes
• Automatic Tuning
Press the AUTO TUNING (▼/▲) buttons.
- Scanning stops when the unit tunes in a station.
- Manual Tuning
Use the MULTI JOG DIAL.
Press MEMORY on the front panel.
3 A preset number will flash in the display window.
4 Press PRESET ▲/▼ (or PRESET ▼/▲ on the remote control) to select the preset number you want.
Press MEMORY again.
5 The station is stored.
6 Repeat steps 2 to 5 to store other stations.
To clear all memorized stations
Press and hold MEMORY on the front panel for about two seconds, "CLEAR" appears in the display window and then press CLEAR on the front panel, the stations are cleared.
For your reference
If all stations have already been entered, "FULL" message will appear in the display window for a moment and then a preset number will flash.
To change the preset number, follow the steps 4-5.
To recall preset numbers
Press and hold PRESET ▲/▼ (or PRESET ▼/▲ on the remote control) until the desired preset number appears or press the button repeatedly.
Listening to the radio
1 Press TUNER/BAND to select either FM, MW(AM) or SW (optional) in the display window. The last received station is tuned in.
2 Press PRESET ▲/▼ (or PRESET ▼/▲ on the remote control) repeatedly to select the preset station you want.
Each time you press this button, the unit tunes in the next preset station.
3 Adjust the volume by rotating VOLUME knob (or pressing VOLUME -/+ on the remote control) repeatedly.
To listen to non-preset radio stations
- For manual tuning, see "Manual Tuning".
- For automatic tuning, see "Automatic Tuning".
To turn the radio off
Press POWER to turn off the unit or select another function mode (TAPE, DVD/CD or AUX).
For your reference
• If a FM program is noisy
Press MODE/RIF repeatedly so that “III” disappears in the display window. There will be no stereo effect, but the reception will improve. Press MODE/RIF again to restore the stereo effect.
• To improve reception
Reposition the supplied antennas.
Notes
- Use MODE/RIF (Radio Interference Filter) function to switch to Mono reception if stereo reception is distorted by noise.
- While recording weak MW(AM) broadcasts, if noises occurs, press MODE/RIF once.
Operation with TAPE
Basic Playback
1 Press TAPE1-2 to select tape function. ("NO TAPE" appears in the display window.)
2 Open cassette TAPE1-2 by pushing to the ▲PUSH EJECT position.
3 Insert one or two cassettes with the tape side to the bottom and then close the TAPE 1 (and/or 2) door.
4 Press ▶ (or ◀: OPTIONAL).
AUTO REVERSE DECK (TAPE 1 or 2): OPTIONAL
You can select direction of the cassette you want by pressing PLAY MODE.
| Pressing | Display | Function |
| - | After the cassette of TAPE 1 or 2 plays front or reverse (backward play) side, stops automatically. | |
| Once | After the cassette of TAPE 1 or 2 plays front and reverse side, stops automatically. | |
| Twice | After the cassette of TAPE 1 or 2 plays six times repeatedly front and reverse side, stops automatically. | |
| Three times | After a cassette of TAPE 1 and 2 plays six times repeatedly front and reverse side, stops automatically. |
To Stop Play
Press STOP(■) on the front panel or TAPE STOP(■) on the remote control during playback.
Tape Counter Reset
Press COUNT. RESET during playback. Playing time appears "TAP -1 (or 2) 0000" in display window.
To Play Rewind or Fast Forward
After press ◀◀/▶▶ on the front panel or on the remote control during playback, press ▶ (or ◀ optional) at the tape position you want.
Dubbing
This function shows how to record from tape to tape.
1 Press TAPE1-2. • Cassette TAPE 1- Insert the playback tape to dub. • Cassette TAPE 2- Insert a blank tape to copy on.
2 Press NORMAL DUBBING/HIGH DUBBING. • NORMAL DUBBING - Normal speed copying • HIGH DUBBING - Double speed copying
To stop recording, press STOP (■).
Recording
Basic Setting
1 Press CD or TUNER to select source.
2 Open the cassette deck TAPE 2 and insert a blank cassette into the cassette compartment. Set the recording direction : OPTIONAL Press PLAY MODE repeatedly to set the recording direction.
Recording from Radio, CD or Auxiliary source
1 Press ●REC/II on the front panel. "REC" flashes and holds the cassette in pause mode.
2 Press ▶ (or ◀: OPTIONAL). The recording is begun.
To pause the recording
Press ●REC/II.
To Stop the recording
Press STOP(■).
CD to Tape Synchronized Recording
The CD synchro recording function dubs a complete CD and programmed titles automatically into a cassette.
1 Press CD SYNC. in stop mode. "REC" flashes and "CD SYNCHRO" displays in the display window.
2 The synchronized recording is started automatically after about 7 seconds.
Notes
- If you wish to record from the desired track, select the desired track with MULTI JOG DIAL before commencing CD synchro recording.
- A function change is not possible during recording.
Operation with DVD and Video CD
Playing a DVD and Video CD
Playback Setup
- Turn on the TV and select the video input source connected to the unit.
- Audio system: Turn on the audio system and select the input source connected to the unit.
1 Press ▲ OPEN/CLOSE button to open the disc tray.
2 Load your chosen disc in the tray, with the playback side facing down.
Number 1 disc
Number 2 disc
- Playing one or two discs Place discs on trays 1 and 2. - Playing three discs After placing two discs, press the D.SKIP button to rotate the trays. Place the next disc on tray 3.
3 Press ▲ OPEN/CLOSE button to close the tray. Playback starts automatically. If playback does not start, press PLAY.
In some cases, the disc menu might appear instead.
DVD
Use the 🔊/▽/◀/▶ buttons to select the title/chapter you want to view, then press SELECT/ENTER to start. Press TITLE or MENU to return to the menu screen.
VCD
Use the number buttons to select the track you want to view and press RETURN to return to the menu screen. Menu settings and operating procedures may differ. Follow the instructions on the each menu screen. You also may set PBC to Off (See "PBC" on page 24).
Notes
- If parental control is set and the disc is not within the rating settings you must input the password. (See "Lock Menu" on page 25.)
– DVDs may have a region code. Your player will not play discs that have a region code different from your player. The region code for this player is 2 (two).
To Select a disc directly
Press DISC 1, DISC 2 or DISC 3 during playing or stopping. When you press DISC 1,2 or 3 before playing a disc, the unit will automatically start playing the selected disc.
General Features
Note
Unless stated otherwise, all operations described use the remote control. Some features may also be available on the Setup menu.
Moving to another TITLE DVD
When a disc has more than one title, you can move to another title. Press DISPLAY while playback is stopped then the appropriate number (0-9) or use 🔔/▶ to move to another title.
You can play any title by inputting its number while play-back is stopped.
Moving to another CHAPTER/TRACK
DVD
VCD
When a title on a disc has more than one chapter or a disc has more than one track, you can move to another chapter/track as follows:
- Press ◀◀◀ or ▶▶◀ briefly during playback to select the next chapter/track or to return to the beginning of the current chapter/track.
- Press I◄◄ twice briefly to step back to the previous chapter/track.
- To go directly to any chapter during DVD playback, press DISPLAY and press 🔒 / 🔑 to select the chapter/track icon. Then, input the chapter/track number or use 🔒 / 🔑.
Search
DVD
VCD
1 Press ◀◀ or ▶▶ during playback.
The player will now go into SEARCH mode.
2 Press ◀◀ or ▶▶ repeatedly to select the required speed: ◀◀X2, ◀◀X4, ◀◀X8, ◀◀X16, ◀◀X100 (backward) or ▶▶X2, ▶▶X4, ▶▶X8, ▶▶X16, ▶▶X100 (forward).
With a Video CD, the Search speed changes: ◀◀X2, ◀◀X4, ◀◀X8, ◀◀X16 (backward) or ▶▶X2, ▶▶X4, ▶▶X8, ▶▶X16 (forward).
3 To exit SEARCH mode, press PLAY.
Operation with DVD and Video CD
General Features (continued)
Still Picture and Frame-by-frame playback
DVD VCD
1 Press PAUSE/STEP on the remote control during playback.
The player will now go into PAUSE mode.
2 You can advance the picture frame-by-frame by pressing PAUSE/STEP repeatedly on the remote control.
3 To exit still motion mode, press PLAY.
Slow Motion DVD VCD
1 Press PAUSE/STEP on the remote control during playback.
The player will enter SLOW mode.
2 Use the ◀ or ▶ to select the required speed: ◀ 1/2, ◀ 1/4, ◀ 1/8 or ◀ 1/16 [(backward) - DVD only] or ▶ 1/2, ▶ 1/4, ▶ 1/8 or ▶ 1/16 (forward).
3 To return to normal PLAY, press PLAY.
Note
Slow motion playback in reverse is not applicable for Video CD.
Repeat DVD VCD
You can play a title/chapter/all/track on a disc.
Press REPEAT during playback to select a desired repeat mode.
DVD Video Discs - Repeat Chapter/Title/Off
• Chapter: repeats the current chapter.
• Title: repeats the current title.
- Off: does not play repeatedly.
Video CDs - Repeat Track/All/Off
- Track : repeats the current track
• All : repeats all the tracks on a disc. - Off: does not play repeatedly.
Note
- On a Video CD with PBC, you must set PBC to Off on the setup menu to use the repeat function (See "PBC" on page 24).
Repeat A-B DVD VCD
To repeat a sequence in a title:
1 Press REPEAT A-B at your chosen starting point. "A - " appears briefly on the TV screen.
2 Press REPEAT A-B again at your chosen end point. "A - B" appears briefly on the TV screen, and the repeat sequence begins.
3 To cancel the sequence, press REPEAT A-B.
Time Search DVD VCD
The Time Search function allows you to start playing at any chosen time on the disc.
1 Press DISPLAY during playback. The on-screen display appears on the screen.
The Time Search box shows the elapsed playing time of the current disc.
2 Within 10 seconds, press ▲ / ▼ to select the Time Search icon in the on-screen display.
The “-:-:-” appears in the Time Search box.
3 Within 10 seconds, use the number buttons to enter the required start time. Enter hours, minutes, and seconds from left to right in the box.
If you enter the wrong numbers, press CLEAR to remove the numbers you entered. Then enter the correct numbers.
4 Within 10 seconds, press SELECT/ENTER to confirm the start time.
Playback starts from the selected time on the disc. If you enter an invalid time, playback will continue from the current point.
Last Scene Memory DVD
This player memorizes last scene from the last disc that is viewed. The last scene remains in memory even if you remove the disc from the player or switch off the player. If you load a disc that has the scene memorized, the scene is automatically recalled.
Note
This player does not memorize the scene of a disc if you switch off the player before commencing to play the disc.
Operation with DVD and Video CD
General Features (continued)
Zoom DVD VCD
The Zoom function allows you to enlarge the video image and to move through the enlarged image.
1 Press ZOOM during playback or still playback to activate the Zoom function. If you press ZOOM repeatedly, the magnification level increases up to four steps. 100% size (screen fit mode) → 400% size → 800% size → 1600% size → 100% size (screen fit mode)
2 Use the ▲ / ▼ / ◀ / ▶ buttons to move through the zoomed picture.
Note
The zoom function may not work for some DVDs.
Marker Search DVD VCD
You can start playback from a memorized point. Up to nine points can be memorized. To enter a mark, follow these steps.
1 During disc playback, press MARKER when playback reaches the spot that you want to memorize. The Marker icon will appear on the TV screen briefly.
2 Repeat step 1 to enter up to nine Marker points on a disc.
To Recall a Marked Scene
1 During disc playback, press SEARCH.
The MARKER SEARCH menu will appear on the screen.
2 Within 10 seconds, press 🔊/▶ to select a Marker number that you want to recall.
3 Press SELECT/ENTER.
Playback will start from the Marked scene.
4 To remove the MARKER SEARCH menu, press SEARCH.
To clear a Marked Scene
1 During disc playback, press SEARCH.
The MARKER SEARCH menu will appear on the screen.
2 Press ◄/▶ to select the Marker number that you want to erase.
3 Press CLEAR.
The Marker number will be erased from the list.
4 Repeat steps 2 and 3 to erase additional Marker numbers.
5 To remove the MARKER SEARCH menu, press SEARCH.
Special DVD Features DVD
Checking the contents of DVD Video discs: Menus
DVDs may offer menus that allow you to access special features. To use the disc menu, press MENU. Then, press the appropriate number button to select an option. Or, use the / / / / buttons to highlight your selection, then press SELECT/ENTER.
Title Menu DVD
1 Press TITLE.
If the current title has a menu, the menu will appear on the screen. Otherwise, the disc menu may appear.
2 The menu can list camera angles, spoken language and subtitle options, and chapters for the title.
3 To remove the title menu, press TITLE again.
Disc Menu DVD
Press MENU. The disc menu is displayed.
Camera Angle DVD
If the disc contains scenes recorded at different camera angles, you can change to a different camera angle during playback.
1 Press DISPLAY and then press the ▲ / ▼ to select a angle.
The number of the current angle appears on the display window.
2 Select a desired angle pressing the ◄/▶ buttons.
Changing the Audio Language DVD
Press AUDIO repeatedly during playback to hear a different audio language or audio track.
Changing the Audio Channel VCD
Press AUDIO repeatedly during playback to hear a different audio channel (STER., LEFT or RIGHT).
Subtitle DVD
Press S-TITLE repeatedly during playback to see the different subtitle languages.
Note
If 🖼 appears, the feature is not available on the disc.
Operation with Audio CD and MP3/WMA Disc
Playing an Audio CD and MP3/WMA
Disc CD MP3 WMA
The unit can play MP3/WMA formatted recordings on CD-ROM, CD-R, or CD-RW discs.
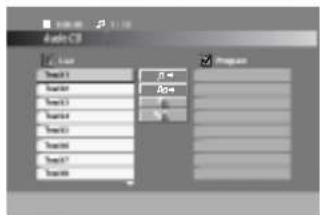
Audio CD
Once you insert an audio CD a menu appears on the TV screen. Press ▲ / ▼ to select a track then press PLAY or SELECT/ENTER and playback starts.
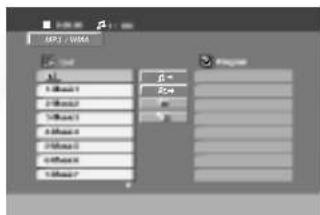
MP3 / WMA
- Press ▲ / ▼ to select a folder, and press SELECT/ENTER to see the folder contents.
- Press ▲ / ▼ to select a track then press PLAY or SELECT/ENTER. Playback starts.

otes
- If you are in a file list on the MP3/WMA menu and want to return to the Folder list, use the ▲ / ▼ to highlight ▲ on the stop mode and press SELECT/ENTER.
- Press and hold ▲ / ▼ to go to the next / previous page.
- On a CD with MP3/WMA file and JPEG file, you can switch MP3/WMA and JPEG menu. Press TITLE on the stop mode and MP3/WMA or JPEG word on top of the menu is highlighted. Then, use ◄/▶ to select MP3/WMA or JPEG then press SELECT/ENTER.
MP3 / WMA disc compatibility with this player is limited as follows:
- Sampling frequency: within 32 - 48 kHz (MP3), within 24 - 48kHz (WMA)
- Bit rate: within 32 - 320kbps (MP3), 40 - 192kbps (WMA)
- The player cannot read an MP3/WMA file that has a file extension other than “.mp3” / “.wma”.
• CD-R physical format should be ISO 9660 - If you record MP3 / WMA files using software that cannot create a file system (eg. Direct-CD) it is impossible to playback MP3 / WMA files. We recommend that you use Easy-CD Creator, which creates an ISO 9660 file system.
- File names should have a maximum of 8 letters and must incorporate an .mp3 or .wma extension.
- They should not contain special letters such as / ? * : "< > I etc.
- The total number of files on the disc should be less than 999.
This unit requires discs and recordings to meet certain technical standards in order to achieve optimal playback quality. Pre-recorded DVDs are automatically set to these standards. There are many different types of recordable disc formats (including CD-R containing MP3 or WMA files) and these require certain pre-existing conditions (see above) to ensure compatible playback.
Customers should note that permission is required in order to download MP3 / WMA files and music from the Internet. Our company has no right to grant such permission. Permission should always be sought from the copyright owner.
Operation with Audio CD and MP3/WMA Disc
Pause CD MP3 WMA
1 Press PAUSE/STEP during playback.
2 To return to playback, press PLAY or press PAUSE/STEP again.
Moving to another Track CD MP3 WMA
- Press ◀◀◀ or ▶▶◀ briefly during playback to go to the next track or to return to the beginning of the current track.
- Press I◄◄ twice briefly to step back to the previous track.
- In case of audio CD, to go directly to any track, enter the track number using the numbered buttons (0-9) during playback.
Repeat Track/All/Off CD MP3 WMA
You can play a title/chapter/all/track on a disc.
1 Press REPEAT when playing a disc. The repeat icon appears.
2 Press REPEAT to select a desired repeat mode.
- Track: repeats the current track
• All: repeats all the tracks on a disc.
- Off(No display): does not play repeatedly.
Search CD MP3 WMA
1 Press ◀◀ or ▶▶ during playback.
The player will now go into SEARCH mode.
2 Press ◀◀ or ▶▶ repeatedly to select the required
speed: ◀◀X2, ◀◀X4, ◀◀X8 (backward) or ▶▶X2, ▶▶X4, ▶▶X8 (forward).
3 To exit SEARCH mode, press PLAY.
Operation with JPEG Disc
Viewing a JPEG disc
JPEG
This unit can play discs with JPEG files and Kodak picture CD. Before playing JPEG recordings, read the notes on JPEG Recordings on right.
1 Insert a disc and close the tray.
The JPEG menu appears on the TV screen.
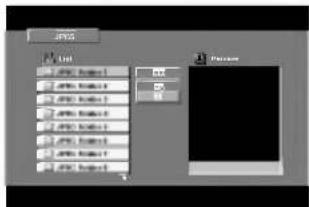
2 Press ▲ / ▼ to select a folder, and press SELECT/ENTER. A list of files in the folder appears.
Tip
If you are in a file list and want to return to the Folder list, use the ▲ / ▼ buttons on the remote to highlight
“→” and press SELECT/ENTER to return to the previous menu screen.
3 If you want to view a particular file, press ▲ / ▼ to highlight a file and press SELECT/ENTER or PLAY.
Slide Show starts from the selected file if Speed option is not Off.
While viewing a file, you can press STOP(■) to move to the previous menu (JPEG menu).
Tip
- Press MENU to move to the next page.
- There are four Slide Speed options: ☑ : > (Slow), >> (Normal), >>> (Fast) and II (off). Use ⚠️ / ⚡️ / ⚣️ to highlight the Speed. Then, use ⚣️ / ⚣️ to select the option you want to use then press SELECT/ENTER.
- If you set Speed option to Off, Slide Show is not active.
Slide Show
Use ▲ / ▼ / ▶ / ▶ to highlight the ■ (Slide Show) then press SELECT/ENTER.
Moving to another File
Press ◀◀◀ or ▶▶▶ once during viewing a picture to advance to the next file or to the previous file.
Still Picture
1 Press PAUSE/STEP during slide show. The player will now go into PAUSE mode.
2 To return to the slide show, press PLAY or press PAUSE/STEP again.
JPEG disc compatibility with this player is limited as follows:
- Depending upon the size and number of JPEG files, it could take a long time for the DVD player to read the disc's contents. If you don't see an on-screen display after several minutes, some of the files may be too large — reduce the resolution of the JPEG files to less than 2760 x 2048 pixels and burn another disc.
- The total number of files and folders on the disc should be less than 999.
- Some discs may be incompatible due to a different recording format or the condition of disc.
- Ensure that all the selected files have the ".jpg" extensions when copying into the CD layout.
- If the files have ".jpe" or ".jpeg" extensions, please rename them as ".jpg" file.
- File names without ".jpg" extension will not be able to be read by this DVD player. Even though the files are shown as JPEG image files in Windows Explorer.
Operation with DivX Disc
The unit can play the MPEG4 encoded files (.avi, mpg, .mpeg, .divx etc) and subtitle files (.srt, .smi, .sub).
1 Insert the MPEG4 encoded disc and close the tray.
The DivX menu appears on the TV screen.
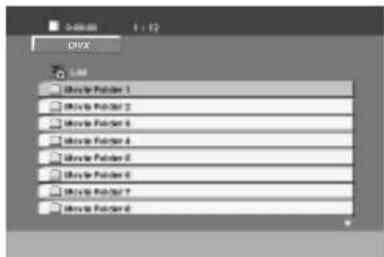
2 Press ▲ / ▼ to select a folder, and press SELECT/ENTER to see the folder contents.
3 Press ▲ / ▼ to select a track then press PLAY or SELECT/ENTER.
Playback starts.
Pause DivX
- Press PAUSE/STEP during playback.
- To return to playback, press PLAY.
Repeat Track/All/Off DivX
You can play a title/chapter/all/track on a disc.
1 Press REPEAT when playing a disc. The repeat icon appears.
2 Press REPEAT to select a desired repeat mode.
- Track: repeats the current track
- All: repeats all the tracks on a disc.
- Off (No display): does not play repeatedly.
Subtitle DivX
Press S-TITLE repeatedly during playback to see the different subtitle language.
Search DivX
1 Press SCAN◀◀ or ▶▶ during playback.
2 Press SCAN◀◀ or ▶▶ repeatedly to select the required speed.
3 To exit SEARCH mode, press PLAY.
Display DivX
Press DISPLAY during playback.
General playback status can be displayed on the TV screen.
DivX disc compatibility with this player is limited as follows:
• Available resolution size of the DivX file is under 720x576 (W x H) pixel.
- The file name of the DivX subtitle is available by 20-40 characters (differs from language).
- If there is impossible code to express in the DivX file, it may be displayed as " _ " mark on the display.
- If the number of the screen frame is over 30 per 1 second, this unit may not operate normally.
- If the video and audio structure of recorded file is not interleaved, either video or audio is outputted.
- If the file is recorded with GMC, the unit supports some of 1-point of the record level.
* GMC?
GMC is the acronym for Global Motion Compensation. It is an encoding tool specified in MPEG4 standard. Some MPEG4 encoders, like DivX or Xvid, have this option. There are different levels of GMC encoding, usually called 1-point, 2-point, or 3-point GMC.
playable DivX subtitle file
● ".srt ", ".smi ", ".sub".
playable DivX file
● ".avi ", ".mpg ", ".mpeg "
playable Codec format
● "DIVX3.xx", "DIVX4.xx", "DIVX5.xx", "XVID", "MP43", "3IVX", "MP42".
playable Audio format
● "AC3", "DTS", "PCM", "MP3", "WMA".
- Sampling frequency: within 32 - 48 kHz (MP3), within 24 - 48kHz (WMA)
- Bit rate: within 8 - 320kbps (MP3), 32 - 192kbps (WMA)
Troubleshooting
Check the following guide for the possible cause of a problem before contacting service.
| Symptom | Cause | Correction |
| No power. | The power cord is disconnected. | Plug the power cord into the wall outlet securely. |
| The power is on, but the unit does not work. | No disc is inserted. | Insert a disc. (Check that the DVD or, audio CD indicator in the DVD display is lit.) |
| No picture. | The TV is not set to receive DVD signal output. | Select the appropriate video input mode on the TV so the picture from the unit appears on the TV screen. |
| The video cable is not connected securely. | Connect the video cable into the jacks securely. | |
| The connected TV power is turned off. | Turn on the TV. | |
| There is no sound or only a very low-level sound is heard. | The equipment connected with the audio cable is not set to receive DVD signal output. | Select the correct input mode of the audio so you can listen to the sound from the unit. |
| The audio cables are not connected securely. | Connect the audio cable into the jacks securely. | |
| The power of the equipment connected with the audio cable is turned off. | Turn on the equipment connected with the audio cable. | |
| The audio connecting cord is damaged. | Replace it with new one. | |
| The playback picture is poor. | The disc is dirty. | Clean the disc. |
| The unit does not start playback. | No disc is inserted. | Insert a disc. (Check that the DVD, or audio CD indicator in the DVD display is lit.) |
| An unplayable disc is inserted. | Insert a playable disc. (Check the disc type, color system and Regional code.) | |
| The disc is placed upside down. | Place the disc with the playback side down. | |
| The disc is not placed within the guide. | Place the disc on the disc tray correctly inside the guide. | |
| The disc is dirty. | Clean the disc. | |
| A menu is on the TV screen. | Press the SET-UP button to turn off the menu screen. | |
| The Rating level is set. | Cancel the Rating function or change the rating level. | |
| Severe hum or noise is heard. | The plugs and jacks are dirty. | Wipe them with a cloth slightly moistened with alcohol. |
| The disc is dirty. | Clean the disc. | |
| The speakers and components are connected poorly. | Connect the speakers and components securely. | |
| The unit is located with too close to the TV. | Move your TV away from the audio components. | |
| Radio stations cannot be tuned in. | The antenna is positioned or connected poorly. | Connect the antenna securely. |
| Adjust the antennas and connect an external antenna if necessary. | ||
| The signal strength of the stations is too weak (when tuning in with automatic tuning). | Tune in the station manually. | |
| No stations have been preset or preset stations have been cleared (when tuning by scanning preset stations). | Preset the stations. | |
| The remote control does not work properly. | The remote control is not pointed at the remote sensor of the unit. | Point the remote control at the remote sensor of the unit. |
| The remote control is too far from the unit. | Operate the remote control within about 23 ft (7 m). | |
| There is an obstacle in the path of the remote control and the unit. | Remove the obstacle. | |
| The batteries in the remote control are exhausted. | Replace the batteries with new ones. | |
| The sound mode or Pro Logic II mode cannot be changed. | The system cannot change while playing a MP3 or WMA disc. | Insert such a CD disc. |
Language Code List
Enter the appropriate code number for the initial settings "Disc Audio", "Disc Subtitle" and/or "Disc Menu" (See page 21).
| Code | Language | Code | Language | Code | Language | Code | Language |
| 6566 | Abkhazian | 7074 | Fiji | 7678 | Lingala | 8373 | Singhalese |
| 6565 | Afar | 7073 | Finnish | 7684 | Lithuanian | 8375 | Slovak |
| 6570 | Afrikaans | 7082 | French | 7775 | Macedonian | 8376 | Slovenian |
| 8381 | Albanian | 7089 | Frisian | 7771 | Malagasy | 8379 | Somali |
| 6577 | Ameharic | 7176 | Galician | 7783 | Malay | 6983 | Spanish |
| 6582 | Arabic | 7565 | Georgian | 7776 | Malayalam | 8385 | Sudanese |
| 7289 | Armenian | 6869 | German | 7784 | Maltese | 8387 | Swahili |
| 6583 | Assamese | 6976 | Greek | 7773 | Maori | 8386 | Swedish |
| 6588 | Aymara | 7576 | Greenlandic | 7782 | Marathi | 8476 | Tagalog |
| 6590 | Azerbaijani | 7178 | Guarani | 7779 | Moldavian | 8471 | Tajik |
| 6665 | Bashkir | 7185 | Gujarati | 7778 | Mongolian | 8465 | Tamil |
| 6985 | Basque | 7265 | Hausa | 7865 | Nauru | 8484 | Tatar |
| 6678 | Bengali; Bangla | 7387 | Hebrew | 7869 | Nepali | 8469 | Telugu |
| 6890 | Bhutani | 7273 | Hindi | 7879 | Norwegian | 8472 | Thai |
| 6672 | Bihari | 7285 | Hungarian | 7982 | Oriya | 6679 | Tibetan |
| 6682 | Breton | 7383 | Icelandic | 8065 | Panjabi | 8473 | Tigrinya |
| 6671 | Bulgarian | 7378 | Indonesian | 8083 | Pashto, Pushto | 8479 | Tonga |
| 7789 | Burmese | 7365 | Interlingua | 7065 | Persian | 8482 | Turkish |
| 6669 | Byelorussian | 7165 | Irish | 8076 | Polish | 8475 | Turkmen |
| 7577 | Cambodian | 7384 | Italian | 8084 | Portuguese | 8487 | Twi |
| 6765 | Catalan | 7465 | Japanese | 8185 | Quechua | 8575 | Ukrainian |
| 9072 | Chinese | 7487 | Javanese | 8277 | Rhaeto-Romance | 8582 | Urdu |
| 6779 | Corsican | 7578 | Kannada | 8279 | Rumanian | 8590 | Uzbek |
| 7282 | Croatian | 7583 | Kashmiri | 8285 | Russian | 8673 | Vietnamese |
| 6783 | Czech | 7575 | Kazakh | 8377 | Samoan | 8679 | Volapuk |
| 6865 | Danish | 7589 | Kirghiz | 8365 | Sanskrit | 6789 | Welsh |
| 7876 | Dutch | 7579 | Korean | 7168 | Scots Gaelic | 8779 | Wolof |
| 6978 | English | 7585 | Kurdish | 8382 | Serbian | 8872 | Xhosa |
| 6979 | Esperanto | 7679 | Laothian | 8372 | Serbo-Croatian | 7473 | Yiddish |
| 6984 | Estonian | 7665 | Latin | 8378 | Shona | 8979 | Yoruba |
| 7079 | Faroese | 7686 | Latvian, Lettish | 8368 | Sindhi | 9085 | Zulu |
Country Code List
Enter the appropriate code number for the initial setting "Country Code" (See page 25).
| Code | Country | Code | Country | Code | Country | Code | Country |
| AD | Andorra | ER | Eritrea | LC | Saint Lucia | SC | Seychelles |
| AE | United Arab Emirates | ES | Spain | LI | Liechtenstein | SD | Sudan |
| AF | Afghanistan | ET | Ethiopia | LK | Sri Lanka | SE | Sweden |
| AG | Antigua and Barbuda | FI | Finland | LR | Liberia | SG | Singapore |
| AI | Anguilla | FJ | Fiji | LS | Lesotho | SH | Saint Helena |
| AL | Albania | FK | Falkland Islands | LT | Lithuania | SI | Slovenia |
| AM | Armenia | FM | Micronesia | LU | Luxembourg | SJ | Svalbard and Jan Mayen Islands |
| AN | Netherlands Antilles | FO | Faroe Islands | LV | Latvia | ||
| AO | Angola | FR | France | LY | Libya | SK | Slovak Republic |
| AQ | Antarctica | FX | France (European Territory) | MA | Morocco | SL | Sierra Leone |
| AR | Argentina | MC | Monaco | SM | San Marino | ||
| AS | American Samoa | GA | Gabon | MD | Moldavia | SN | Senegal |
| AT | Austria | GB | Great Britain | MG | Madagascar | SO | Somalia |
| AU | Australia | GD | Grenada | MH | Marshall Islands | SR | Suriname |
| AW | Aruba | GE | Georgia | MK | Macedonia | ST | Saint Tome and Principe |
| AZ | Azerbaidjan | GF | French Guyana | ML | Mali | SU | Former USSR |
| BA | Bosnia-Herzegovina | GH | Ghana | MM | Myanmar | SV | El Salvador |
| BB | Barbados | GI | Gibraltar | MN | Mongolia | SY | Syria |
| BD | Bangladesh | GL | Greenland | MO | Macau | SZ | Swaziland |
| BE | Belgium | GM | Gambia | MP | Northern Mariana Islands | TC | Turks and Caicos Islands |
| BF | Burkina Faso | GN | Guinea | MQ | Martinique (French) | TD | Chad |
| BG | Bulgaria | GP | Guadeloupe (French) | MR | Mauritania | TF | French Southern Territories |
| BH | Bahrain | GQ | Equatorial Guinea | MS | Montserrat | ||
| BI | Burundi | GR | Greece | MT | Malta | TG | Togo |
| BJ | Benin | GS | S. Georgia & S. Sandwich Isls. | MU | Mauritius | TH | Thailand |
| BM | Bermuda | MV | Maldives | TJ | Tadjikistan | ||
| BN | Brunei Darussalam | GT | Guatemala | MW | Malawi | TK | Tokelau |
| BO | Bolivia | GU | Guam (USA) | MX | Mexico | TM | Turkmenistan |
| BR | Brazil | GW | Guinea Bissau | MY | Malaysia | TN | Tunisia |
| BS | Bahamas | GY | Guyana | MZ | Mozambique | TO | Tonga |
| BT | Bhutan | HK | Hong Kong | NA | Namibia | TP | East Timor |
| BV | Bouvet Island | HM | Heard and McDonald Islands | NC | New Caledonia (French) | TR | Turkey |
| BW | Botswana | NE | Niger | TT | Trinidad and Tobago | ||
| BY | Belarus | HN | Honduras | NF | Norfolk Island | TV | Tuvalu |
| BZ | Belize | HR | Croatia | NG | Nigeria | TW | Taiwan |
| CA | Canada | HT | Haiti | NI | Nicaragua | TZ | Tanzania |
| CC | Cocos (Keeling) Islands | HU | Hungary | NL | Netherlands | UA | Ukraine |
| CF | Central African Republic | ID | Indonesia | NO | Norway | UG | Uganda |
| CG | Congo | IE | Ireland | NP | Nepal | UK | United Kingdom |
| CH | Switzerland | IL | Israel | NR | Nauru | UM | USA Minor Outlying Islands |
| CI | Ivory Coast | IN | India | NU | Niue | ||
| CK | Cook Islands | IO | British Indian Ocean Territory | NZ | New Zealand | US | United States |
| CL | Chile | OM | Oman | UY | Uruguay | ||
| CM | Cameroon | IQ | Iraq | PA | Panama | UZ | Uzbekistan |
| CN | China | IR | Iran | PE | Peru | VA | Vatican City State |
| CO | Colombia | IS | Iceland | PF | Polynesia (French) | VC | Saint Vincent & Grenadines |
| CR | Costa Rica | IT | Italy | PG | Papua New Guinea | ||
| CS | Former Czechoslovakia | JM | Jamaica | PH | Philippines | VE | Venezuela |
| CU | Cuba | JO | Jordan | PK | Pakistan | VG | Virgin Islands (British) |
| CV | Cape Verde | JP | Japan | PL | Poland | VI | Virgin Islands (USA) |
| CX | Christmas Island | KE | Kenya | PM | Saint Pierre and Miquelon | VN | Vietnam |
| CY | Cyprus | KG | Kyrgyzstan | PN | Pitcairn Island | VU | Vanuatu |
| CZ | Czech Republic | KH | Cambodia6 | PR | Puerto Rico | WF | Wallis and Futuna Islands |
| DE | Germany | KI | Kiribati | PT | Portugal | WS | Samoa |
| DJ | Djibouti | KM | Comoros | PW | Palau | YE | Yemen |
| DK | Denmark | KN | Saint Kitts & Nevis Anguilla | PY | Paraguay | YT | Mayotte |
| DM | Dominica | KP | North Korea | QA | Qatar | YU | Yugoslavia |
| DO | Dominican Republic | KR | South Korea | RE | Reunion (French) | ZA | South Africa |
| DZ | Algeria | KW | Kuwait | RO | Romania | ZM | Zambia |
| EC | Ecuador | KY | Cayman Islands | RU | Russian Federation | ZR | Zaire |
| EE | Estonia | KZ | Kazakhstan | RW | Rwanda | ZW | Zimbabwe |
| EG | Egypt | LA | Laos | SA | Saudi Arabia | ||
| EH | Western Sahara | LB | Lebanon | SB | Solomon Islands |
Specifications
General
| Power supply | Refer to the main label. |
| Power consumption | 210W |
Tuner/Amplifier
| FM | Tuning Range | 87.5 - 108.0 MHz or 65 -74 MHz, 87.5 -108.0 MHz |
| Intermediate Frequency | 10.7 MHz | |
| Signal to Noise Ratio | 60/55 dB (Mono/Stereo) | |
| Frequency Response | 60 - 10000 Hz | |
| AM | Tuning Range | 522 - 1611 kHz or 530 - 1610 kHz or 530 - 1720 kHz |
| Intermediate Frequency | 450 kHz | |
| Signal to Noise Ratio | 35 dB | |
| Frequency Response | 100 - 1800 Hz | |
| SW(optional) | Tuning Range | 5.8 -18.0 MHz |
| Intermediate Frequency | 450 kHz | |
| Signal to Noise Ratio | 35 dB | |
| Output Power | Front: 100W + 100W (6Ω, THD 10 %), Center: 40W (6Ω, THD 10%) | |
| Rear: 40W + 40W (6Ω, THD 10 %) | ||
| T.H.D | 0.2% | |
| Frequency Response | 42 - 25000 Hz | |
| Signal-to-noise ratio | 80 dB | |
| Mass | 5.5kg | |
| External dimensions (W x H x D) | 272 x 225 x 330 mm |
Cassette tape player/DVD/VCD/CD player
| Mass | 6.5kg |
| External dimensions (W x H x D) | 272 x 225 x 330 mm |
| DVD/VCD/CD player | |
| Frequency response (audio) | 40 - 18000 Hz |
| Signal-to-noise ratio (audio) | More than 70 dB (1 kHz) |
| Signal-to-noise ratio (video) | More than 60 dB (1 kHz) |
| Dynamic range (audio) | More than 70 dB |
| Video output | 1.0 V (p-p), 75 Ω |
| S-video output | (Y) 1.0 V (p-p), 75 Ω(C) 0.3 V (p-p), 75 Ω |
| Component Video output | (Y) 1.0 V (p-p), 75 Ω(Pb)/(Pr) 0.7 V (p-p), 75 Ω |
| Cassette tape player | |
| Tape Speed | 3 kHz ± 3% |
| Wow Flutter | 0.25% (MTT -111, JIS-WTD) |
| F.F/REW. Time | 120sec (C-60) |
| Frequency Response | 125 - 8000Hz |
| Signal to Noise Ratio | 43dB(P/B)/43dB(R/B) |
| Channel Separation | 45dB(P/B)/42dB(R/P) |
| Erase Ratio | 52dB (MTT-5511) |
Speakers
| Speaker Name | Front Speaker (L/R) | Center Speaker | Rear Speaker (L/R) |
| Type | 3 Way 3 Speaker | 2 Way 2 Speaker | 2 Way 2 Speaker |
| Impedance | 6 Ω | 6 Ω | 6 Ω |
| Frequency Response | 60 - 20000 Hz | 120 - 20000 Hz | 150 - 20000 Hz |
| Sound Pressure Level | 86 dB/W (1m) | 84 dB/W (1m) | 84 dB/W (1m) |
| Rated Input Power | 100 W | 40 W | 40 W |
| Max. Input Power | 200 W | 80 W | 80 W |
| Net Dimensions (W x H x D) | 260X470X235.5mm | 200X108X110mm | 108X150X110mm |
| Net Weight | 6.31 kg | 0.85 kg | 0.80 kg |