RC-0001 - Regler Zephyr - Kostenlose Bedienungsanleitung
Finden Sie kostenlos die Bedienungsanleitung des Geräts RC-0001 Zephyr als PDF.


| Produkttyp | Regler (Fernbedienung) |
| Marke | Zephyr |
| Modell | RC-0001 |
| Kompatibilität | Zephyr Dunstabzugshauben |
| Fernbedienungstyp | RF (Radiofrequenz) |
| Reichweite | max. 4,5 m (15 ft) |
| Batterietyp | A23 12V |
| Lüftergeschwindigkeiten | 6 Stufen |
| Lichtsteuerung | Ein/Aus/Dimmen |
| Verzögerungsabschaltung | Ja, 5 Minuten |
| Montage | Magnethalterung oder Steckdosenhalter |
| Abmessungen (ca.) | 80 x 40 x 15 mm |
| Gewicht (mit Batterie) | ca. 50 g |
| Farbe | Schwarz |
| Material | Kunststoff |
| Lieferumfang | Fernbedienung, Halter, Batterie, Schrauben, Anleitung |
| Sicherheitshinweise | FCC Teil 15, nicht nass verwenden |
| Reinigung | Mit nicht scheuernden Reinigungsmitteln |
| Herstellergarantie | 1 Jahr |
Häufig gestellte Fragen - RC-0001 Zephyr
Benutzerfragen zu RC-0001 Zephyr
0 Frage zu diesem Gerät. Beantworten Sie die, die Sie kennen, oder stellen Sie Ihre eigene.
Eine neue Frage zu diesem Gerät stellen
Laden Sie die Anleitung für Ihr Regler kostenlos im PDF-Format! Finden Sie Ihr Handbuch RC-0001 - Zephyr und nehmen Sie Ihr elektronisches Gerät wieder in die Hand. Auf dieser Seite sind alle Dokumente veröffentlicht, die für die Verwendung Ihres Geräts notwendig sind. RC-0001 von der Marke Zephyr.
BEDIENUNGSANLEITUNG RC-0001 Zephyr
RC-0001 DCBL Remote Installation Instructions
CAUTION: Hood must be disconnected from main power prior to performing the conversion instructions listed below. Failure to do so could result in personal injury or damage the hood.

natural_image
Electronic circuit board components including a resistor, capacitors, and a ZEPHE detector (no visible text or symbols)Inclided Materials: 1 Remote Module w/antenna wire, 1 Remote control, 1 Remote control holder, 1 battery, 2 screws.
natural_image
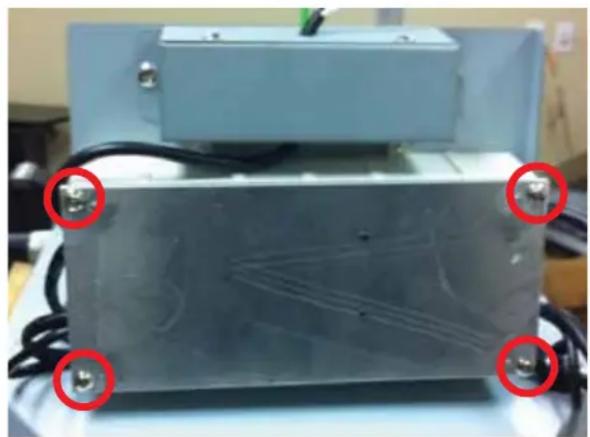
Close-up of a metallic electronic device with four red-circled mounting points on its side (no visible text or symbols)- Locate Main PC Board on top of blower housing of hood body. Remove (4) Main PC Board cover screws.

natural_image
Interior view of an electronic device showing a circuit board with exposed wiring and components (no visible text or symbols)- Remove Main PC Board from PC Board box. Use caution when removing Main PC Board as to not disconnect any wires

natural_image
Close-up of an electronic circuit board with wires and connectors, labeled A and B (no readable text or symbols beyond labels)- Disconnect black switch cable A from Main PC board and connect it to the Remote Module terminal. Connect white cable B from Remote Module to Main PC board switch terminal.

natural_image
Close-up of an electronic device showing exposed wiring and components, with two red circles highlighting specific points of interest (no text or symbols visible)- Install Remote Module into Main PC Board box by (2) screws.

natural_image
Interior view of an electronic device enclosure with blue cables and mounting screws (no visible text or symbols)- Re-install Main PC Board into PC Board box. Be sure blue antenna wire from Remote Module is outside of PC Board box. Turn to page 2 for remote synchronization & features.
FCC Caution: To assure continued compliance, any changes or modifications not expressly approved by the party responsible for compliance could void the user's authority to operate this equipment. (Example - use only shielded interface cables when connecting to computer or peripheral device. This device complies with Part 15 of the FCC Rules. Operation is subject to the following two conditions. (1) This device may not cause harmful interference, and (2) This device must accept any interference received, including interference that may cause undesired operation. This remote control may operate in humid environments, but not when placed on a wet surface.
SYNCHRONIZATION: To create a unique link between your range hood and remote control please follow the below steps:
- With range hood off, press and hold the "lights" button on the range hood until the LCD screen blinks on and off.
- Press the "lights" button on the remote, the lights on the hood will turn on. The synchronization is complete.
RF REMOTE FUNCTIONS:

① Blower On / Speed Selection
Press ↗ to power on blower and cycle through all six blower speeds.
② Blower On / Power Off
By pressing ⏻, the blowers will power on at the last speed setting. Press ⏻ again and the entire hood will power off, including lights.
③ Delay Off
By pressing ⏻, the blower and lights will enter Delay Off mode. The ⏻ graphic will illuminate on the hood indicating the function is on. The blower will change to speed 1 and shut down after 5 minutes.
4 Lights On / Dim / Off
Switch lights On by pressing ⚙ once, again to dim and again to switch Off.
RF REMOTE FEATURES:
The RF remote control is equipped with a magnet on the back for easy storage. The remote may be placed on any magnetic surface such as a refrigerator or the Zephyr remote holder, FIG. 1. The remote holder can be inserted into a standard electrical outlet for easy storage. Note: The remote holder does not charge the RF remote.
Maximum remote control communication distance is 15 feet from the hood.
RF REMOTE MAINTENANCE:
Clean the remote control using non abrasive detergents
Follow instructions below for replacing battery.
Using a small flat head screwdriver, raise the cover of the battery door (A) in order to access the battery compartment. FIG. 2.
Remove the battery and replace with battery type A23 12V.
Negative end of battery should face the spring inside the remote.
Re-install battery door and recycle old battery.
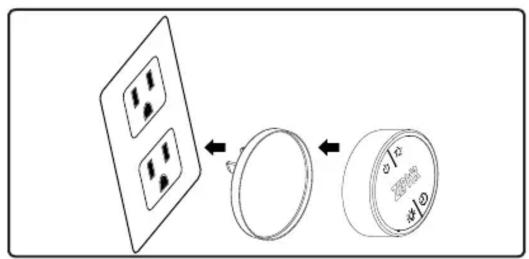
FIG. 1

FIG. 2
Marke : Zephyr
Modell : RC-0001
Kategorie : Regler