S4844 - Wandhalterung Ricoo - Kostenlose Bedienungsanleitung
Finden Sie kostenlos die Bedienungsanleitung des Geräts S4844 Ricoo als PDF.


Benutzerfragen zu S4844 Ricoo
0 Frage zu diesem Gerät. Beantworten Sie die, die Sie kennen, oder stellen Sie Ihre eigene.
Eine neue Frage zu diesem Gerät stellen
Laden Sie die Anleitung für Ihr Wandhalterung kostenlos im PDF-Format! Finden Sie Ihr Handbuch S4844 - Ricoo und nehmen Sie Ihr elektronisches Gerät wieder in die Hand. Auf dieser Seite sind alle Dokumente veröffentlicht, die für die Verwendung Ihres Geräts notwendig sind. S4844 von der Marke Ricoo.
BEDIENUNGSANLEITUNG S4844 Ricoo

Installation Instructions
Montageanleitung
For model: Für Modell:
RW-R48
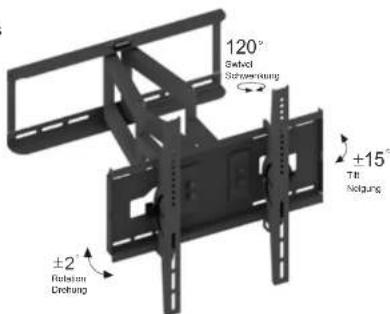
text_image
120° Switch Sitzwaltung ±2° Risiktor Erdigung ±15° Til Erdigung
STEP 2
SCHRITT 2
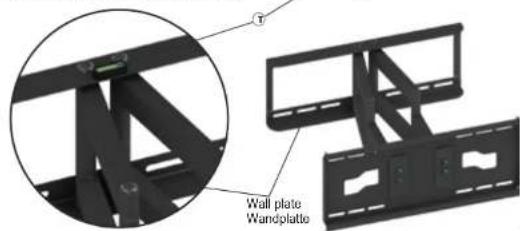
Affixing the bubble level
Anbringung der Wasserwaage
Bringen Sie die Wasserwaage zentral oben auf der Wandplatte an.
text_image
Wall plate WandplatePlastic bag (big) / Plasticbeutel (groß)
text_image
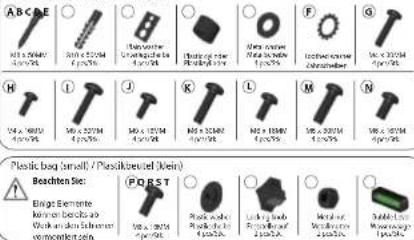
ABCDE Mn x 20404 45%78% H 14 x 20304 45%78% I 56 x 22704 45%78% J 56 x 18704 45%78% K Mn x 20404 45%78% L Mn x 18704 45%78% M 56 x 20304 45%78% N 56 x 18704 45%78% Plastic bag (small) / Plasifikbireted (Nein) Beachten Sie: Binge Elemente Nein von Becken an Rück und Anleihen vermögen nicht. POST Mn x 20304 45%78% Rock and Rock and Rock and Rock and Rock and Rock and Rock and Rock and Rock and Rock and Rock and Rock and Rock and Rock and Rock and Rock and Rock and Rock and Rock and Rock and Rock and Rock and Rock and Rock and Rock and Rock and Rock and Rock and Rock and Rock and Rock and Rock and Rock and Rock and Rück und Rück und Rück und Rück und Rück und Rück und Rück und Rück und Rück und Rück und Rück und Rück und Rück und Rück und Rück und Rück und Rück und Rück und Rück und Rück und Rück und Rück und Rück und Rück und Rück und Rück and⚠️ Please note the numbering on the post-hag may be filled Title: brackhore die Dachshummerung und dem Postbedel, tel osse behand ⚠️ Please note Post-hag compartment, ^2 C is empty Bit: brackhore Postbedels Fach, ^3 C is ex.
STEP 3
SCHRITT 3
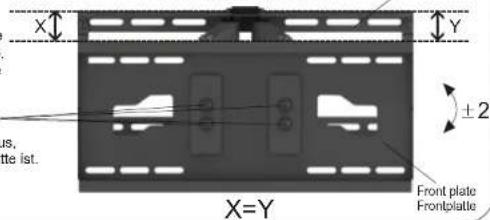
Alignment of front panel Ausrichtung der Frontplatte
Richten Sie die Frontplatte so aus, dass diese parallel zur Wandplatte ist. Dazu müssen Sie die Muttem in der Mitte lockern.
STEP 1
SCHRITT 1
Please measure distance between mounting holes!
Bitte den Lochabstand vor der Montage nachmessen!
Mounting holes
Befestigungslöcher
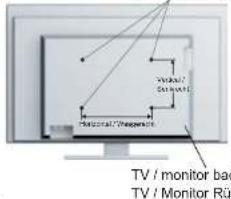
Bitte überprüfen Sie VOR der Montage den Lochabstand zwischen den Befestigungslöchern an Ihrem TV / Monitor!
This wall mount supports the following distance between holes: Diese Wandhalterung unterstützt folgende Lochabstände:
Vertical / Senkrecht: Horizontal / Waagerecht:
min. 50 mm - max. 400 mm min. 55 mm - max. 400 mm
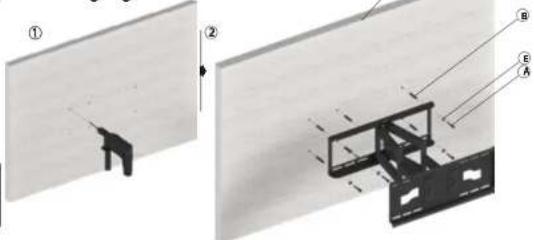
STEP 4 A
SCHRITT 4 A
Solid concrete mounting
Befestigung an der Massiv
text_image
STEP 4 B SCHRITT 4 B Wood stud mounting Befestigung an der Holzbalkenwand Drilling Bohrung 50 mm Ø4 mm Stud finder Balkenfinder Wood stud Holzbalken A B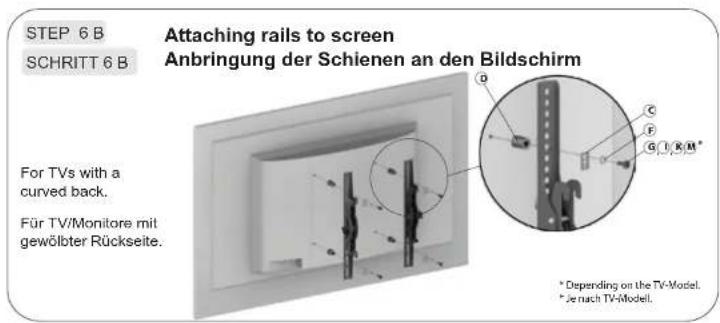
text_image
STEP 6 B SCHRITT 6 B Attaching rails to screen Anbringung der Schienen an den Bildschirm For TVs with a curved back. Für TV/Monitore mit gewölbter Rückseite. * Depending on the TV-Model. * Je nach TV-Model.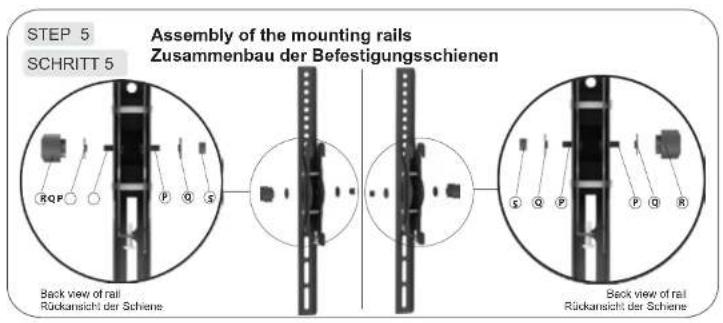
text_image
STEP 5 SCHRITT 5 Assembly of the mounting rails Zusammenbau der Befestigungsschienen Back view of rail Rückansicht der Schiene Back view of rail Rückansicht der Schiene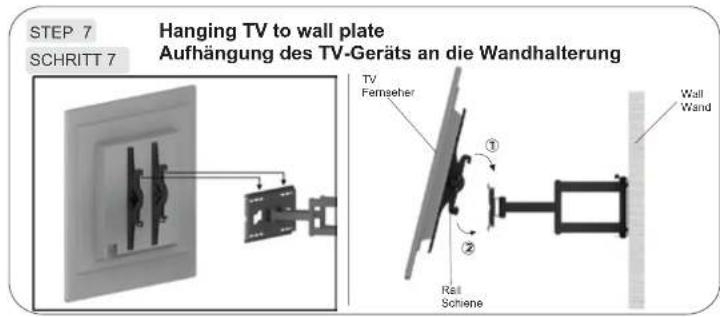
text_image
STEP 7 SCHRITT 7 Hanging TV to wall plate Aufhängung des TV-Geräts an die Wandhalterung TV Femgeher Wall Wand 1 2 Rail Schene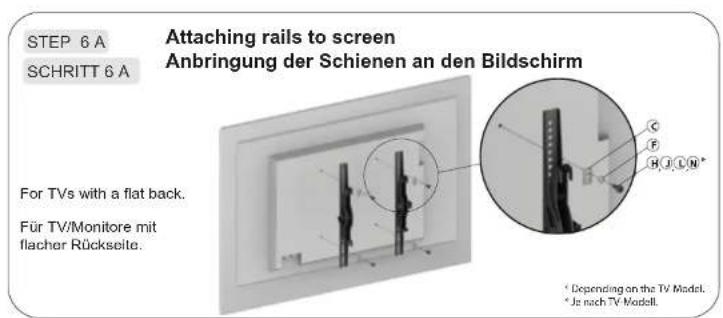
text_image
STEP 6 A SCHRITT 6 A Attaching rails to screen Anbringung der Schienen an den Bildschirm For TVs with a flat back. Für TV/Monitore mit flacher Rückseite. * Depending on the TV Model. * Je nach TV Modell.