CMS391 - Fäste för platt skärm Chief - Gratis bruksanvisning och manual
Hitta enhetens manual gratis CMS391 Chief i PDF-format.

Användarfrågor om CMS391 Chief
0 fråga om denna apparat. Svara på dem du kan eller ställ din egen.
Ställ en ny fråga om denna apparat
Ladda ner instruktionerna för din Fäste för platt skärm i PDF-format gratis! Hitta din manual CMS391 - Chief och ta tillbaka ditt elektroniska enhet i hand. På denna sida publiceras alla dokument som behövs för att använda din enhet. CMS391 av märket Chief.
BRUKSANVISNING CMS391 Chief
INSTALLATION INSTRUCTIONS
natural_image
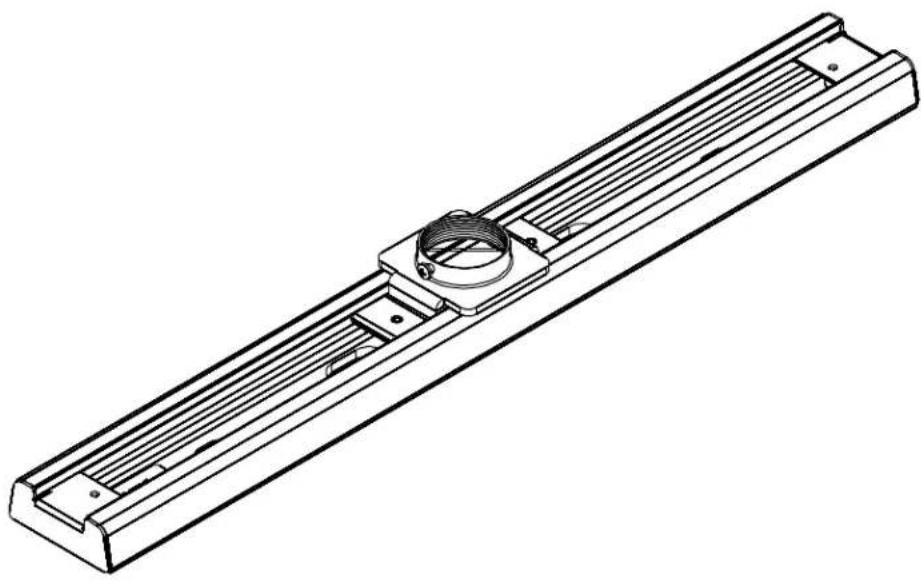
Technical line drawing of a mechanical assembly with ribbed metal frame and central coil (no text or symbols)16"/24" Adjustable On-Center Ceiling Plate
DISCLAIMER
Milestone AV Technologies, Inc., and its affiliated corporations and subsidiaries, intend to make this manual accurate and complete. However, Milestone makes no claim that the information contained herein covers all details, conditions or variations, nor does it provide for every possible contingency in connection with the installation or use of this product. The information contained in this document is subject to change without notice or obligation of any kind. Milestone makes no representation of warranty, expressed or implied, regarding the information contained herein. Milestone assumes no responsibility for accuracy, completeness or sufficiency of the information contained in this document.

IMPORTANT WARNINGS AND TIONS!

WARNING: A WARNING alerts you to the possibility of serious injury or death if you do not follow the instructions.

CAUTION: A CAUTION alerts you to the possibility of damage or destruction of equipment if you do not follow the corresponding instructions.

WARNING: Failure to read, thoroughly understand, and follow all instructions can result in serious personal injury, damage to equipment, or voiding of factory warranty! It is the installer's responsibility to make sure all components are properly assembled and installed using the instructions provided.

WARNING: Failure to provide adequate structural strength for this component can result in serious personal injury or damage to equipment! It is the installer's responsibility to make sure the structure to which this component is attached can support five times the combined weight of all equipment. Reinforce the structure as required before installing the component.

WARNING: Exceeding the weight capacity can result in serious personal injury or damage to equipment! It is the installer's responsibility to make sure the combined weight of all components attached to the CMS390/391 up to (and including) the display/projector does not exceed 500 lbs (226.80kg).
DIMENSIONS
![[224.147] 8.825 [95.250] 3.750 1.1/2" - 11.5 NPT TREADS [119.063] 2X 4.688 ADJUSTABLE BOTH DIRECTIONS [66.675] 2.625 [41.275] 2X 1.625 [22.225] 2X .875 [14.597] .575 [190.500] 7.500 [9.906] Ø.390 [12.700] 2X .500 [371.475] 14.625 [406.400] 16.000 [9.906] Ø.390 10 - 24 UNC THREADS [81.332] 3.202 [49.181] 1.936 [79.742] 2X 3.139 MOUNTS TO 16" ON CENTER JOIST. [448.295] 17 649 CMS-390](/content/2026/05/1137702/images/d29eabb08adfc76b215b2469371c10f96e9df15e0116e7b1c8242612a2c109f6.jpg)
DIMENSIONS...cont'd
![[325.747] 12.825 [220.663] 2X 8.688 ADJUSTABLE BOTH DIRECTIONS [66.675] 2.625 [95.250] 3.750 1.1/2" - 11.5 NPT TREADS [41.275] 2X 1.625 [22.225] 2X .875 [14.597] .575 [12.700] 4X .500 [190.500] 7.500 [406.400] 16.000 [574.675] 22.625 [609.600] 24.000 [9.906] Ø.390 [10 - 24 UNC THREAD] [81.332] 3.202 [49.181] 1.936 [79.742] 2X 3.139 MOUNTS TO 16" OR 24" ON CENTER JOIST. [651.495] 25.649 CMS-391](/content/2026/05/1137702/images/f045429b5cd238921046b485927f4c92b7f83dd522b6ca636e0a3a445d1ea9c5.jpg)
LEGEND
 | Tighten Fastener |  | Security Wrench |
| Apretar elemento de fijación | Llave de seguridad | ||
| Befestigungsteil festziehen | Sicherheitsschlüssel | ||
| Apertar fixador | Chave de segurança | ||
| Serrare il fissaggio | Chiave di sicurezza | ||
| Bevestiging vastdraaien | Veiligheidssleutel | ||
| Serrez les fixations | Clé de sécurité | ||
 | Loosen Fastener |  | By Hand |
| Aflojar elemento de fijación | A mano | ||
| Befestigungsteil lösen | Von Hand | ||
| Desapertar fixador | Com a mão | ||
| Allentare il fissaggio | A mano | ||
| Bevestiging losdraaien | Met de hand | ||
| Desserrez les fixations | À la main | ||
 | Phillips Screwdriver |  | Open-Ended Wrench |
| Destornillador Phillips | Llave de boca | ||
| Kreuzschlitzschraubendreher | Gabelschlüssel | ||
| Chave de fendas Phillips | Chave de bocas | ||
| Cacciavite a stella | Chiave a punte aperte | ||
| Kruiskopschroevendraaier | Steeksleutel | ||
| Tournevis à pointe cruciforme | Clé à fourche |
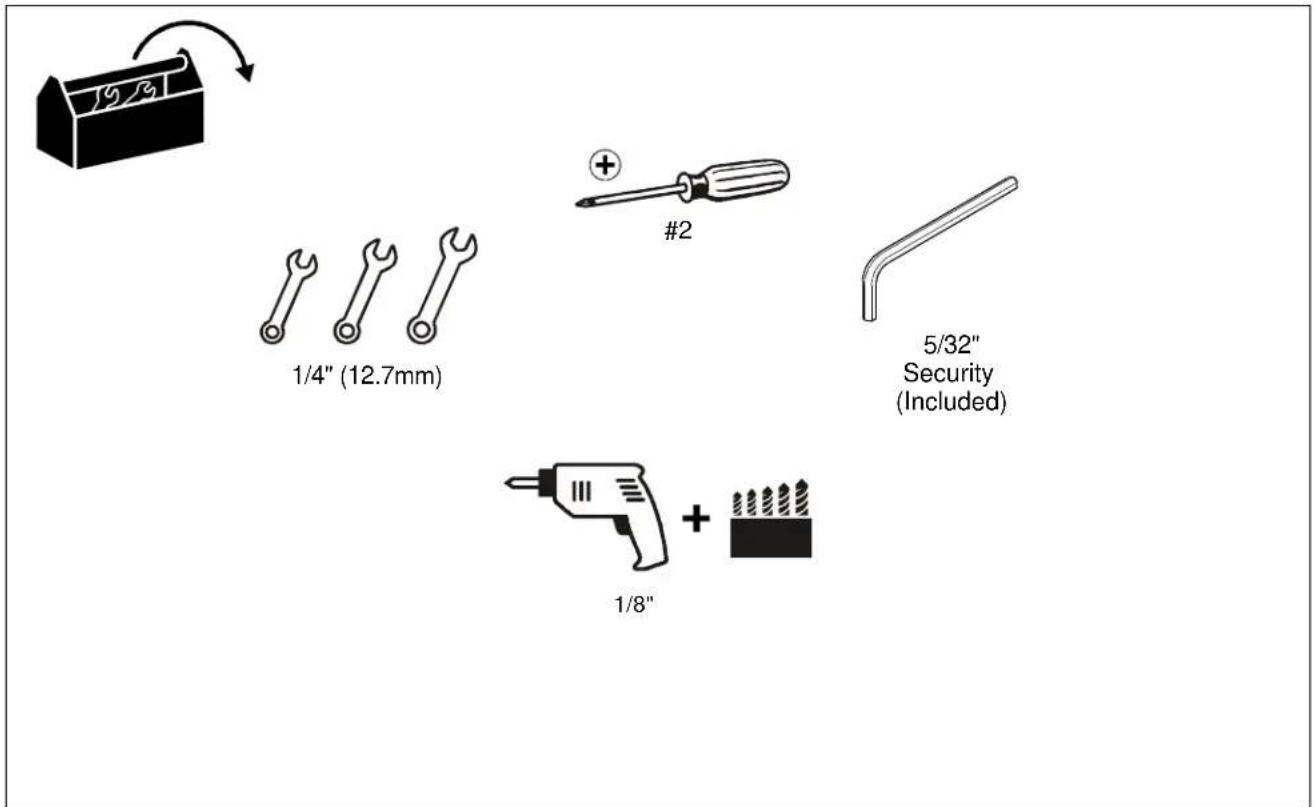
TOOLS REQUIRED FOR INSTALLATION
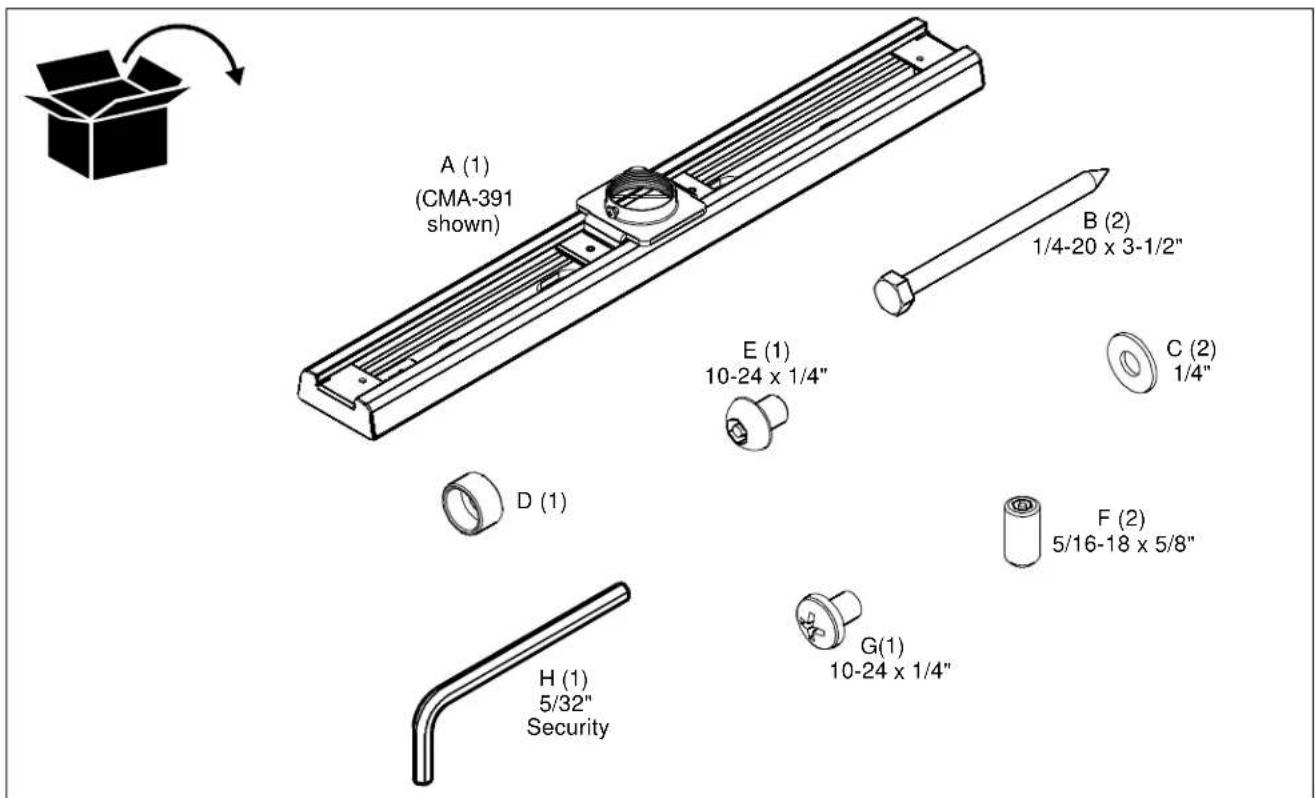
PARTS
INSTALLATION
NOTE: The CMS-390 and CMS-391 attach to a 1-1/2" NPT threaded column in a finished ceiling with 16" on-center (CMS-390) or 24" on-center (CMS-391) wood joists. In addition, both the CMS-390 and CMS-391 can be installed in line on a single joist.
- Remove end caps from ceiling plate (A). (See Figure 1)
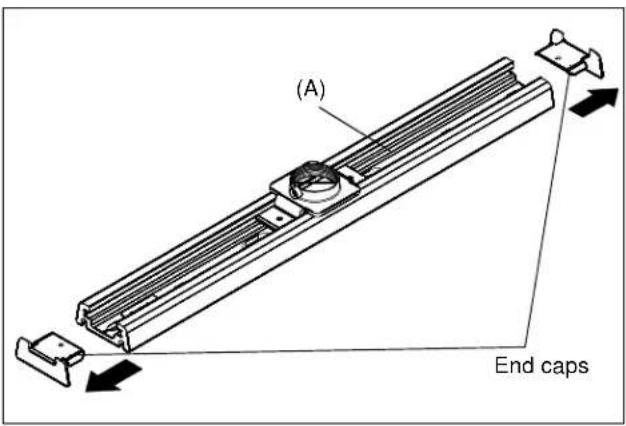
Figure 1
- Drill two 1/8" pilot holes into wood joists.
- Install ceiling plate (A) to ceiling using two 1/4-20 x 3-1/2" lag bolts (B) and two 1/4" flat washers (C). (See Figure 2)
- Re-install end caps onto ceiling plate (A). (See Figure 2)
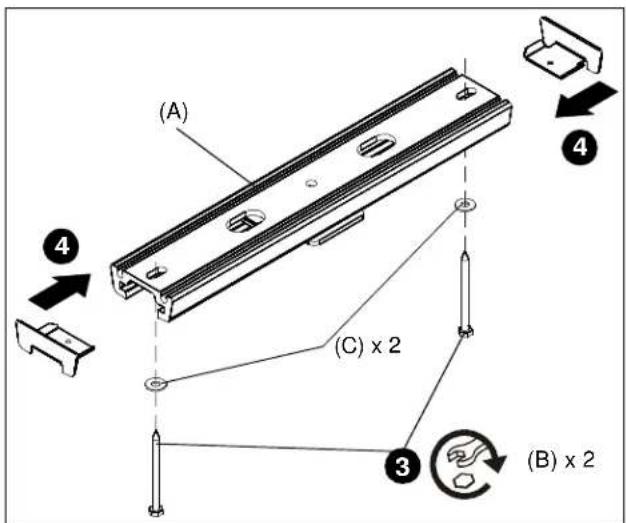
Figure 2
- Install 1-1/2" NPT threaded column (not included) into threaded collar on ceiling plate (A).
- Install one 10-24 x 1/4" Phillips head screw (G) into threaded collar and tighten. (See Figure 3)
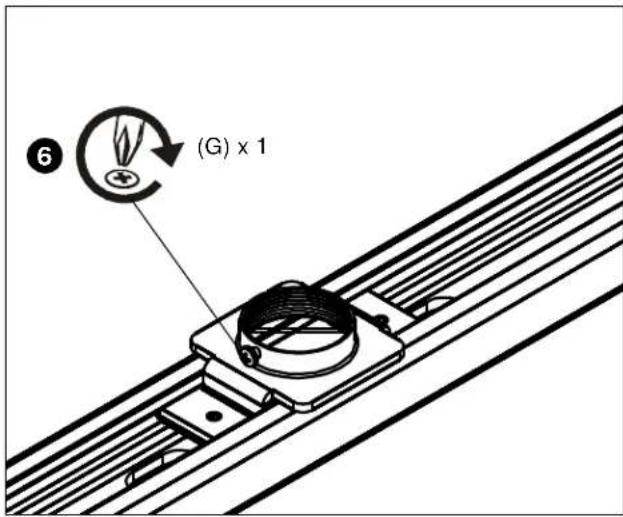
Figure 3
Security
- For increased security, remove two set screws from ceiling plate and replace with two 5/16-18 x 5/8" security set screws (F). Tighten with 5/32" security hex wrench (H). (See Figure 4)
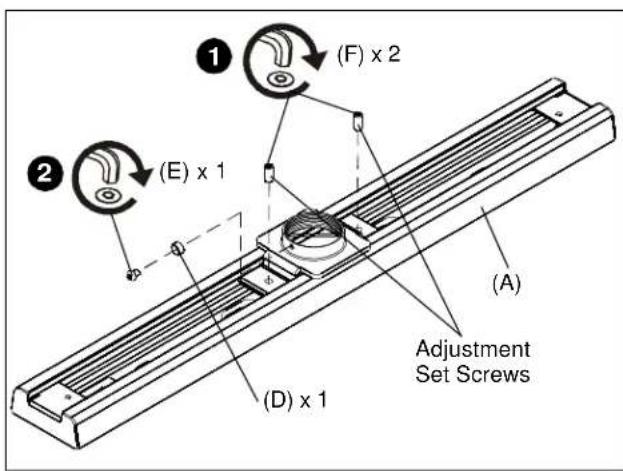
Figure 4
- For additional security, remove Phillips screw in threaded collar of ceiling plate and replace with one 10-24 x 1/4" button head security cap screw (E) through security spinner (D). Tighten with 5/32" security hex wrench (H). (See Figure 4)
Adjustment
To adjust position of ceiling plate, loosen adjustment set screws, adjust plate to position, and tighten screws. (See Figure 4)
CMS390/CMS391
Installation Instructions