DataTraveler 4000 G2 - USB флешка KINGSTON - Бесплатное руководство пользователя
Найдите руководство к устройству бесплатно DataTraveler 4000 G2 KINGSTON в формате PDF.

Вопросы пользователей о DataTraveler 4000 G2 KINGSTON
0 вопрос об этом устройстве. Ответьте на те, что знаете, или задайте свой.
Задать новый вопрос об этом устройстве
Скачайте инструкцию для вашего USB флешка в формате PDF бесплатно! Найдите своё руководство DataTraveler 4000 G2 - KINGSTON и возьмите своё электронное устройство обратно в руки. На этой странице опубликованы все документы, необходимые для использования вашего устройства. DataTraveler 4000 G2 бренда KINGSTON.
РУКОВОДСТВО ПОЛЬЗОВАТЕЛЯ DataTraveler 4000 G2 KINGSTON
DataTraveler 4000 G2
Find the language and latest documentation for your Kingston® DT4000G2 here.
DT4000G2 Installation Guide
For instructions in English
Para instrucciones en español
Für Anleitungen in Deutsch
Pour des instructions en français
...... Per le istruzioni in italiano
Por as instruções em português
Instrukcje w języku polskim
Для инструкции на русском
Turkce talimatlar icin
Japanese
Thai
Vietnamese
Simplified Chinese ..... 中文说明
Traditional Chinese .... 中文說明
DataTraveler® 4000 G2 G2 User Manual
text_image
DataTraveler® 4000 G2 FIPS 140-2 LEVEL 3 CERTIFIED Kingston® TECHNOLOGY ©2014 Kingston Technology Corporation. D7600 Newhope Street, Fountain Valley, CA 927.08 USA All rights reserved. All registered trademarks and trademarks are the property of their respective owners.
natural_image
Black USB flash drive with open lid, no visible text or symbols on bodyTable of Contents
TOCABOUT THIS MANUAL
This user manual covers the FIPS-Validated DataTraveler ^® 4000 G2 (referred to simply as DT4000 G2 from this point forward) based on the factory image with no implemented customisations.
System Requirements
PC Platform
- Pentium III processor or equivalent (or faster)
• 15MB free disk space
• Available USB 2.0 / 3.0 port - Two consecutive drive letters after the last physical drive*
Mac Platform
• 15MB free disk space
- USB 2.0/3.0
Supported PC Operating Systems
- Windows ^ 8, 8.1 (not RT)
- Windows ^ 7 SP1
- Windows ^ Vista SP2
Supported Operating Systems
• Mac OS X 10.8.x -10.10x
Recommendations
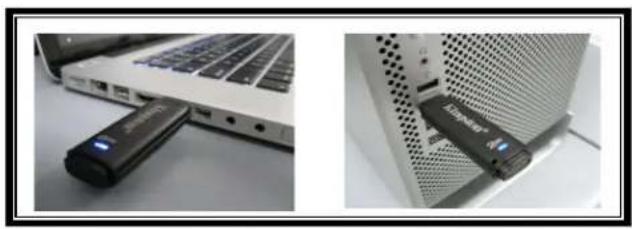
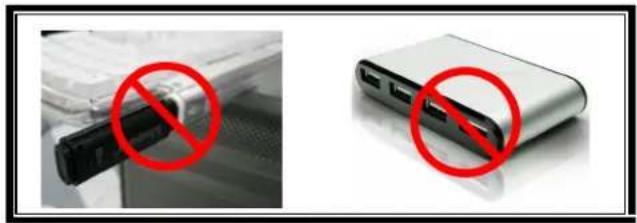
To ensure that ample power is provided to the DT4000 G2 device, insert it directly into a USB port on your notebook or desktop, as seen in Figure 1.1. Avoid connecting the DT4000 G2 to any peripheral device(s) that may feature a USB port, such as a keyboard or USB-powered hub, as seen in Figure 1.2.
natural_image
Two photos showing a laptop and a device with a black USB flash, both placed on a white surface (no visible text or symbols)Figure 1.1 – Recommended Usage
natural_image
Two photos showing a device with a black connector and red prohibition symbols, no readable text or labels present.Figure 1.2 – Not Recommended
*Note: See 'Drive Letter Conflict' on page 26.
Setup (Windows Environment)
-
Insert the DT4000 G2 into an available USB port on your notebook or desktop and wait for Windows to detect it.
-
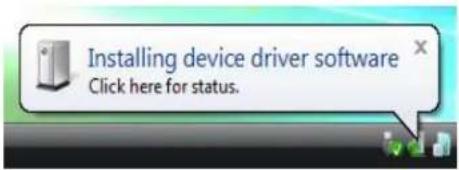
Windows Vista users will receive a device driver notification as seen in Figure 2.2.
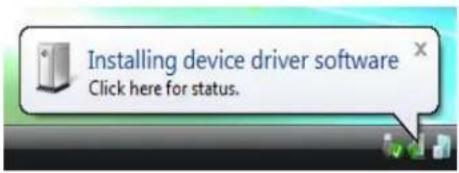
- Windows 7 users will receive a device driver notification as seen in Figure 2.2.
Once the new hardware detection is complete, Windows will prompt you to begin the initialisation process.
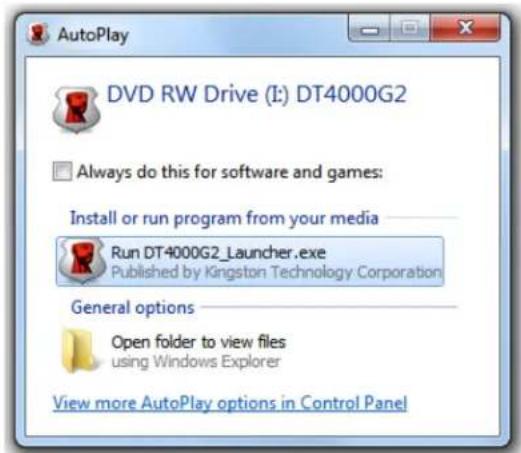
- Windows Vista users will see an AutoPlay window similar to the one in Figure 2.3.
-
Windows 7 users will see an AutoPlay window similar to the one in Figure 2.3.
-
Select the option 'Run DT4000 G2_Launcher.exe'.
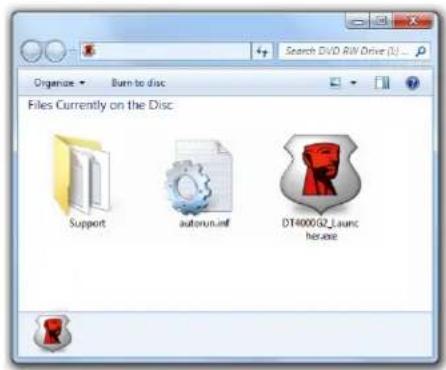
If Windows does not AutoPlay, you can browse to the CD-ROM partition (Figure 2.4) and manually execute the DT4000 G2_Launcher program. This will also start the initialisation process.
text_image
Installing device driver software Click here for status.Figure 2.1 – Found New Hardware (Windows Vista)
text_image
Installing device driver software Click here for status.Figure 2.2 – Device Driver Installation (Windows 7)
text_image
Organize Burn to disc Files Currently on the Disc: Support autoraun.inf DT400G2_launch heraseFigure 2.4 - DT4000 G2 Contents
text_image
AutoPlay DVD RW Drive (I:) DT4000G2 Always do this for software and games: Install or run program from your media Run DT4000G2_Launcher.exe Published by Kingston Technology Corporation General options Open folder to view files using Windows Explorer View more AutoPlay options in Control PanelFigure 2.3 – AutoPlay Window (Windows Vista/7)
(Note: Menu options in the AutoPlay window may vary depending on what programs are currently installed on your computer. AutoRun will start the initialisation process automatically.)
Device Initialisation (Windows Environment)
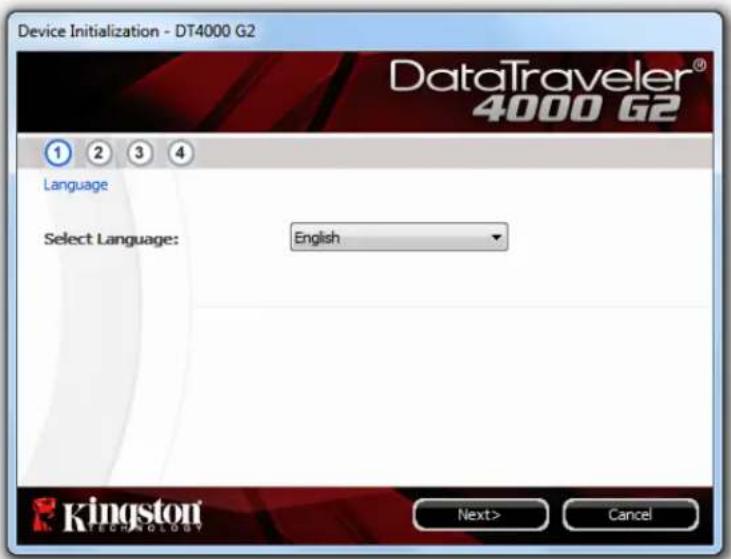
- Select your language preference from the drop-down menu and click 'Next' (Figure 3.1.)
text_image
Device Initialization - DT4000 G2 DataTraveler® 4000 G2 Language Select Language: English Kingston Technology Next> CancelFigure 3.1 – Language Selection
- Review the licence agreement and click 'Next' (Figure 3.2.) (Note: You must accept the licence agreement before continuing; otherwise the 'Next' button will remain disabled).

text_image
Device Initialization - DT4000 G2 DataTraveler® 4000 G2 License Agreement SOFTWARE LICENSE AGREEMENT IMPORTANT - READ CAREFULLY: THIS SOFTWARE LICENSE AGREEMENT ("Agreement") is a legal agreement between you (either an individual or a single entity) and Kingston Technology Company Inc. ("Kingston"). This Agreement relates to the software accompanying this Agreement, which includes computer software and may include associated media, printed materials, and "online" or electronic Accept Decline Kingston TECHNOLOGYFigure 3.2 – Licence Agreement
-
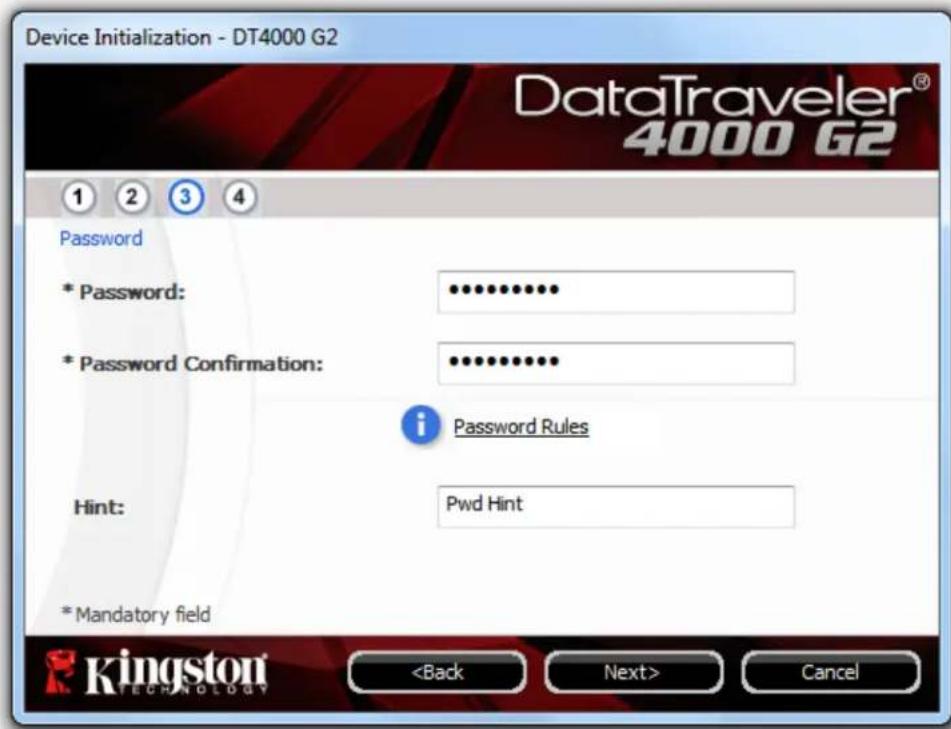
Create a password to protect your data on the DT4000 G2. Enter it in the 'Password' field, then re-enter it in the 'Password Confirmation' field, as seen below in Figure 3.3. The password that you create must meet the following criteria before the initialisation process will allow you to continue:
-
Passwords must contain 8 characters or more (up to 16 characters).
- Passwords must contain three (3) of the following:
- UPPER CASE, lower case, numeric and/or special characters (!, \$, etc.)
You may also enter a password hint, but it is not a mandatory field. The hint field can be useful in providing a clue as to what the password is, should the password ever be forgotten. (Note: The hint CANNOT be an exact match to the password.)
text_image
Device Initialization - DT4000 G2 DataTraveler® 4000 G2 Password * Password: ••••••••••• * Password Confirmation: •••••••••• i Password Rules Hint: Pwd Hint *Mandatory fieldFigure 3.3 – Password Setup
-
Enter your contact information in the text boxes provided (see Figure 3.4). (Note: The information that you enter in these fields may NOT contain the password string that you created in Step 3. However, these fields are optional and can be left blank, if so desired).
-
The 'Name' field may contain up to 32 characters, but cannot contain the exact password.
- The 'Company' field may contain up to 32 characters, but cannot contain the exact password.
- The 'Details' field may contain up to 156 characters, but cannot contain the exact password.

text_image
Device Initialization - DT4000 G2 DataTraveler® 4000 G2 Contact Information Name: Test Name Company: Test Company Details: Test Details & Other Info Kingston TECHNOLOGYtext_image
Format - DT4000 G2 DataTraveler® 4000 G2 Formatting DT4000 G2 (I:)...text_image
Format - DT4000 G2 DataTraveler® 4000 G2 Format Complete. Kingston TECHNOLOGY OKDevice Usage (Windows Environment)
Once the DT4000 G2 has been initialised, you can access the secure data partition and us the device options by logging in to the device with your password. To do so, follow these steps: 1. Insert the DT4000 G2 into a USB port or your notebook or desktop and enter your password (see Figure 4.1). - Once you have typed your password, click the 'Login' button to continue. - If the correct password is entered, the DT4000 G2 will unlock and you can begin using the device. text_image
Login device DT4000 G2 DataTraveler® 4000 G2 Password: Hint Forgot Password Contact Information Read-Only Mode Kingston TECHNOLOGY Login CancelDevice Options (Windows Environment)
While you are logged in to the device, a 'DT4000 G2' icon is shown in the right-hand corner of the Windows taskbar (Figure 5.1). (Note: Windows 7 users will need to click on the Up arrow in the taskbar to access the 'DT4000' icon (Figure 5.2). Clicking once on the DT4000 G2 icon will display the following menu: text_image
DT4000 G2 Settings Browse DT4000 G2 Format DT4000 G2 Online Support About DT4000 G2 Shut down DT4000 G2text_image
Customize... 9:26 AM 12/3/2010DT4000 G2 Settings
- Allows you to change your password and/or hint (Figure 5.3) - Allows you to add/view/change your contact information (Figure 5.4) - Allows you to change your current language selection (Figure 5.5) (Note: For security purposes, your current DT4000 G2 password is required to update and/or modify any of these settings). text_image
Settings DataTraveler® 4000 62 Password | Contact Information | Language | * Current Password: * New Password: * Password Confirmation: i Password Sales Hint: Red Hint * Mandatory field Kingston OK FREE Canceltext_image
Settings DataTraveler® 4000 62 Features | Contact Information | Language | Name: Test Name Company: Test Company Details: Test Details & Other Info Kingston OK Canceltext_image
Settings DataTraveler® 4000 62 Password | Contact Information | Language | Select Language: English Kingston OK Apply CancelBrowse DT4000 G2
\- Allows you to browse the contents of the secure data partition while you are logged in.Format DT4000 G2\*
\- Allows you to format the secure data partition (warning: all data will be erased). (Figure 5.6)Online support (requires Internet access)
\- Opens your Internet browser and navigates to http://www.kingston.com/support/ where you can access additional support information text_image
Format - DT4000 G2 DataTraveler® 4000 G2 WARNING: Formatting will erase ALL data on this disk. To format the disk (2), click OK. To quit, click CANCEL. Your password is required to complete format. Passwords: Kingston TECHNOLOGY OK CancelAbout DT4000 G2
\- Provides specific details about the DT4000 G2, including information about the application and firmware version (Figure 5.7).Shut Down DT4000 G2
\- Properly shuts down the DT4000 G2, allowing you to safely remove it from your system. text_image
About - DT4000 G2 DataTraveler® 4000 G2 Copyright (c) 2011 Kingston Technology Company, Inc. Modules Version Information DT4000 G2 K40 00PFPE2DC7ECBF1080000JD2 Application K4.0.0.5 FW Version 3.05 Crypto Library FW 1.00 Kingston TECHNOLOGY Close-Windows Section Complete-
Setup (Mac Environment)
Insert the DT4000 G2 into an available USB port on your notebook or desktop and wait for the Mac operating system to detect it. When does, you will see a DT4000 G2 volume appear on the desktop, as seen in Figure 6.1.  Figure 6.1 - DT4000 G2 1. Double-click the DT4000 G2 CD-ROM icon. 2. Double-click the Mac folder found in the window displayed in 3. Double-click the DT4000 G2 application icon found in the window displayed in Figure 6.3. This will start the initialisation process.Figure 6.2.
text_image
DT4000G2 autorun.inf DT4000G2_Launcher.axe Linux Mac rr_moved Supporttext_image
DT4000G2_Launchertext_image
DataTraveler® 4000 G2 FIPS 140-2 LEVEL 3 CERTIFIED Kingston® TECHNOLOGY ©2014 Kingstone Technology Corporation, D7600 Newshope Street, Fountain Valley, CA 922/8 USA All rights reserved. All registered trademarks and trademarks are the property of their respective owners.Device Initialization (Mac Environment)
1. Select your language preference from the drop-down menu and click 'Next' (Figure 7.1.) text_image
Device Initialization - DT4000 G2 DataTraveler® 4000 G2 Language Select Language: English Kingston TECHNOLOGY Next> Canceltext_image
Device Initialization - DT4000 G2 DataTraveler® 4000 G2 License Agreement SOFTWARE LICENSE AGREEMENT IMPORTANT - READ CAREFULLY: THIS SOFTWARE LICENSE AGREEMENT ("Agreement") is a legal agreement between you (either an individual or a single entity) and Kingston Technology Company Inc. ("Kingston"). This Agreement relates to the software accompanying this Agreement, which includes computer software and may include associated media, printed materials, and "online" or electronic Accept Decline Kingston TECHNOLOGYtext_image
Device Initialization - DT4000 G2 DataTraveler® 4000 G2 ① ② ③ ④ Password * Password: ********** * Password Confirmation: ********** i Password Rules Hint: Pwd Hint * Mandatory field Kingston TECHNOLOGYtext_image
Device Initialization - DT4000 G2 DataTraveler® 4000 G2 ① ② ③ ④ Contact Information Name: Test Name Company: Test Company Details: Test Details & Other Info Kingston TECHNOLOGYtext_image
Format - DT4000 G2 DataTraveler® 4000 G2 Formatting DT4000 G2 ... Kingston TECHNOLOGY OK Canceltext_image
Format - DT4000 G2 DataTraveler® 4000 G2 Format Complete. Kingston OK CancelDevice Usage (Mac Environment)
Once the DT4000 G2 has been initialised, you can access the secure data partition and us the device options by logging in to the device with your password. To do so, follow these steps: 1. Insert the DT4000 G2 into a USB port or your notebook or desktop and enter your password (see Figure 8.1). 2. Once you have typed your password, click the 'Login' button to continue. \- If the correct password is entered, the DT4000 G2 will unlock and you can begin using the device. \- If an incorrect password is entered, an error message will appear just below the 'Hint' field, indicating a login failure (see Figure 8.2). text_image
Format - DT4000 G2 DataTraveler® 4000 G2 Password: Hint Forgot Password Contact Information Read-Only Mode Kingston Tecnaboss Login CancelDevice Options (Mac Environment)
While you are logged into the device, a 'DT4000 G2\_Launcher' icon is displayed in the Mac OS X Dock as seen in Figure 9.1 below: text_image
DT4000G2_LauncherDT4000 G2 Settings
- Allows you to change your password and/or hint (Figure 9.3) - Allows you to add/view/change your contact information (Figure 9.4) - Allows you to change your language preference (Figure 9.5) text_image
DT4000 G2 Settings Browse DT4000 G2 Format DT4000 G2 Online Support About DT4000 G2 Shut down DT4000 G2 Options Show All Windows Hide Quittext_image
Settings DataTraveler® 4000 G2 Password Contact Information Language * Current Password: * New Password: * Password Confirmation: i Password Rules Hint: * Mandatory field Kingston OK Canceltext_image
Settings DataTraveler® 4000 62 Password Contact InformationLanguage Name: Company: Details: Kingston OK Canceltext_image
Settings DataTraveler® 4000 G2 Password Contact Information Language? Select Language: English Kingston OK Cancel CancelBrowse DT4000 G2
\- Allows you to browse the contents of the secure data partition while you are logged in.Format DT4000 G2
\- Allows you to format the secure data partition (warning: all data will be erased). (Figure 9.6)Online Support (requires Internet access)
\- Opens your Internet browser and navigates to http://www.kingston.com/support/ where you can access additional support informationAbout DT4000 G2
\- Provides specific details about the DT4000 G2, including information about the application and firmware version (Figure 9.7).Shut Down DT4000 G2
\- Properly shuts down the DT4000 G2, allowing you to safely remove it from your system. text_image
Format - DT4000 G2 DataTraveler® 4000 G2 WARNING: Formatting will erase ALL data on this disk. To format the disk, click OK. To quit, click CANCEL.text_image
About - DT4000 G2 DataTraveler® 4000 G2 Copyright (c) 2007 Kingston Technology Company, Inc. Modules Version Information DT4000 G2 3.0 000FFE23C7ECBF108000102 Application 4.0.0.1 FW Version 3.05 Crypto Library FW 1.00 Kingston Close-Mac Section Complete-
Setup (Linux Environment)
(NOTE: Due to the various distributions of Linux available today, the look and feel of the interface may vary from one version to the next. However, the general command set used in the terminal application is very similar and can be referenced in the Linux instructions that follow. The screenshot examples in this section were created in a 64-bit environment.)  Certain distributions of Linux will require super-user (root) privileges in order to execute the DT4000 G2 commands properly in the terminal application window. Insert the DT4000 G2 into an available USB port on your notebook or desktop and wait for the Linux operating system to detect it. When it does, a DT4000 G2 volume icon will appear\* on the desktop, as seen in Figure 10.1. The DT4000 G2 comes with 5 commands that can be used in Linux:  DT4000G2 Figure 10.1 - DT4000G2 Volume dt4000g2\_about, dt4000g2\_forgotpassword, dt4000g2\_initialize, dt4000g2\_login and dt4000g2\_logout (Note: To execute these commands, you must open a "Terminal" application window and navigate to the folder where each of the files exist. Each command must be preceded by the following two characters: 'J' (a full stop and a forward slash). For 32-bit users, open a "Terminal" application window and change the current directory to /media/DT4000G2/linux/linux32\$ by typing the following command at the prompt: cd /media/DT4000G2/linux/linux32 (and then press ENTER) For 64-bit users, open a "Terminal" application window and change the current directory to /media/DT4000G2/linux/linux64\$ by typing the following command at the prompt: cd /media/DT4000G2/linux/linux64 (and then press ENTER) \*Note: If the DT4000 G2 volume is not loaded automatically by the operating system, you will need to load the volume manually in a terminal window using the Linux 'mount' command. Please refer to the Linux documentation for your specific OS distribution or favourite on-line support site for proper syntax and command options.Device Initialisation (Linux Environment)
Once the DT4000 G2 is connected to your computer and has been recognised by the operating system, the device will need to be initialised prior to first use. To do so, open the 'Terminal' application (or command-line window) and follow these steps: (Note: The screenshots and instructions in this section use the linux32 folder (signifying 32-bit) for purposes of demonstrating use of the DT4000 G2 device in the Linux OS. If you are using the 64-bit version of Linux, simply navigate to and use the respective 64-bit folder in place of the 32-bit folder, i.e. linux64 rather than linux32.) 1. Change directory to the DT4000 G2 volume by typing the following command at the terminal prompt (as seen in Figure 10.2): cd /media/DT4000G2/linux/linux32 text_image
[root@localhost /]# cd /media/dt4000g2/linux/linux64 [root@localhost linux64]# _text_image
[root@localhost /]# cd /media/dt4000g2/linux/linux64 [root@localhost linux64]# ls dt4000g2_about dt4000g2_initialize dt4000g2_logout dt4000g2Forgotpassword dt4000g2_login [root@localhost linux64]# _text_image
[root@localhost /]# cd /media/dt4000g2/linux/linux64 [root@localhost linux64]# ls dt4000g2_about dt4000g2_initialize dt4000g2_logout dt4000g2_forgotpassword dt4000g2_login [root@localhost linux64]# ./dt4000g2_initializeDevice Usage (Linux Environment)
Once the DT4000 G2 has been initialised, you can access the secure data partition by logging in to the device using the DT4000 G2 password that you created on page 22. To do so, follow these steps: 1. Open a 'Terminal' application window. 2. Type the following command at the terminal prompt: cd /media/DT4000G2/linux/linux32 3. With the command prompt now at /media/DT4000G2/linux/linux32\$, type the following command to log in to the device: ./dt4000g2\_login\* and press ENTER. (Note: Commands and folder names are case-sensitive and syntax must be exact.) 4. Enter your DT4000 G2 password and press ENTER. After a successful login, the secure data volume will open on your desktop and you can proceed to use the DT4000 G2. If you enter a bad password during the login process, you will be given another opportunity to enter the correct password by repeating step 3. However, there is a built-in security feature that tracks the number of failed login attempts. If this number reaches the pre-configured value of 10 failed attempts, the DT4000 G2 will lock and require you to initialise the device by executing the dt4000g2\_forgotpassword command prior to next use. This process will allow you to create a new password, but in order to protect the privacy of your data, the DT4000 G2 will format the secure data partition. This means that all of your data will be lost. Once the dt4000g2\_forgotpassword process is complete and you have successfully set up a new password, the built-in security counter that tracks failed login attempts will be reset (Note: A successful login prior to reaching the maximum number of attempts (MaxNoA, for short) will also reset the failed-login counter.) When you have finished using the DT4000 G2, log out of the device and secure your data. To do so, follow these steps: 1. Open a 'Terminal' application window. 2. Type the following command at the terminal prompt: cd /media/DT4000G2/linux/linux32 3. With the command prompt now at /media/DT4000G2/linux/linux32\$, type the following command to log out of the device properly: ./dt4000g2\_logout\* and press ENTER. (Note: Commands and folder names are case-sensitive and syntax must be exact.) 4. Remove the DT4000 G2 from your system and store it in a safe place. \*Note: Certain distributions of Linux will require super-user (root) privileges in order to execute the DT4000 G2 commands properly in the terminal application window.Help and Troubleshooting
Device Lockout
The DT4000 G2 includes a security feature that prevents unauthorised access to the data partition once a maximum number of consecutive failed login attempts (MaxNoA for short) has been made; the default "out-of-box" configuration has a pre-configured value of 10 (no. of attempts.) The 'lock-out' counter tracks each failed login and is reset one of two ways: 1) A successful login prior to reaching MaxNoA or 2) reaching MaxNoA and performing a device format.\* If an incorrect password is entered, an error message will appear just below the 'Hint' field indicating a login failure. See Figure 10.1. If and when a 7^th failed attempt is made, you will see an additional error message indicating that you have 3 attempts left before reaching MaxNoA (which is set to 10 by default). See Figure 10.2. After a 10 ^th failed login attempt, the DT4000 G2 will permanently block the data partition and require a device format prior to next use. This means that all data stored on the DT4000 G2 will be lost and you will need to create a new password. This security measure limits someone (who does not have your password) from attempting countless login attempts and gaining access to your sensitive data. If you are the owner of the DT4000 G2 and have forgotten your password, the same security measures will be enforced, including a device format.\* For more on this feature, see 'Forgot Password' on page 25. text_image
Login device DT4000G2 DataTraveler® 4000 G2 Password: Hint: Failed to Login: The password is incorrect. Please try again. Forget Password Contact Information Kingston TECHNOLOGY Login Canceltext_image
Login device DT4000G2 DataTraveler® 4000 G2 Password: Hind Failed to Login: The password is incorrect. Please try again. 3 Attempts left before your DT4000 is blocked permanently. Forget Password Contact Information Kingston KINGSTOCKEET Login CancelForgot Password
If you forget your password, you can click on the 'Forgot Password' link that appears in the login window when DT4000 G2\_Launcher is executed (see Figure 10.3). This option will allow you to create a new password but, in order to protect the privacy of your data, the DT4000 G2 will be formatted. This means that all of your data will be erased in the process.\* When you click on 'Forgot Password', a message box (Figure 10.4) will appear and ask if you want to enter a new password prior to executing the format. At this point, you can either 1) click 'OK' to confirm or 2) click Cancel' to return to the login window. If you opt to continue, you will be prompted to create a new complex password and a new hint. The hint is not a mandatory field, but it can be useful in providing a clue as to what the password is, should you ever forget the password. (Note: The hint CANNOT be an exact match to the DT4000 G2 password.) text_image
Login device DT4000G2 DataTraveler® 4000 G2 Password: Hint Forgot Password ContextInformation Kingston TECHNOLOGY Login Canceltext_image
Forgot Password In order to protect your data, your DT4000G2 will be formatted and all data will be erased. Do you want to enter a new password and format your DT4000G2? OK CancelDrive Letter Conflict (Windows Operating Systems)
As mentioned in the ‘System Requirements’ section of this manual (on page 3), the DT4000 G2 requires two consecutive drive letters AFTER the last physical disk that appears before the ‘gap’ in drive letter assignments (see Figure 10.5.) This does NOT pertain to network shares because they are specific to user profiles and not the system hardware profile itself, thus appearing available to the OS. This means that Windows may assign the DT4000 G2 a drive letter that is already in use by a network share or Universal Naming Convention (UNC) path, causing a drive letter conflict. If this happens, please consult your administrator or helpdesk department for information on changing drive letter assignments in Windows Disk Management (administrator privileges required.) text_image
My Computer File Edit View Favorites Tools Help Back Search Folders Address Go System Tasks View system information Add or remove programs Change a setting Local Disk (CC) DVD/CD-R/W Drive (D:) Local Disk (E:) Other Places My Network Places My Documents Control Panel DT4000GZ (F:) Network Share (G:) Local Disk (H:) Details System FolderError Messages
Unable to create file – This error message will appear when attempting to CREATE a file or folder ON the secure data partition while logged in under read-only mode. text_image
Unable to create file Unable to create the file 'New Text Document.txt' The media is write protected. OKtext_image
Error Copying File or Folder Cannot copy File1: The disk is write-protected. Remove the write-protection or use another disk. OKtext_image
Error Deleting File or Folder Cannot delete File1: The disk is write-protected. Remove the write-protection or use another disk. OKDataTraveler® Manual de usuario de 4000 G2 G2
text_image
DataTraveler® 4000 G2 FIPS 140-2 LEVEL 3 CERTIFIED Kingston® TECHNOLOGY ©2014 Kingston Technology Corporation. D7600 Newhope Street, Fountain Valley, CA 927.08 USA All rights reserved. All registered trademarks and trademarks are the property of their respective owners.natural_image
Black USB flash drive with open lid, no visible text or symbols on bodyÍndice
TOCACERCA DE ESTE MANUAL
Este es el manual de usuario del dispositivo DataTraveler 4000 G2 (con el fin de simplificar, se denominará DT4000 G2 a partir de ahora) basada en la imagen de fábrica sin personalizaciones implementadas.Requisitos del sistema
Plataforma PC
- Procesador Pentium III o equivalente (o más rápido) • 15 MB de espacio disponible en disco - Puerto USB 2.0 / 3.0 disponible - Dos letras de unidad consecutivas tras la última unidad física\*.Sistemas operativos para PC compatibles
- Windows ^ 8, 8.1 (se excluye RT) - Windows ^ 7 SP1 - Windows ^ Vista SP2Plataforma Mac
• 15 MB de espacio disponible en disco \- USB 2.0/3.0Sistemas operativos compatibles
• Mac OS X 10.8.x -10.10xRecomendaciones
Para garantizar que el dispositivo DT4000 G2 reciba suficiente alimentación eléctrica, insértelo directamente en un puerto USB de su ordenador portátil o de sobremesa, tal y como puede verse en la Figura 1.1. Evite conectar el DT4000 G2 a algún dispositivo periférico que pueda disponer de puerto USB, como un teclado o un concentrador alimentados por USB, tal y como puede verse en la Figura 1.2. natural_image
Two electronic devices: a battery and an Ethernet card, both placed on a laptop keyboard (no visible text or symbols)natural_image
Two photos showing a device with a black connector and red prohibition symbols, no readable text or symbols present.Configuración (entorno Windows)
1. Inserte el DT4000 G2 en un puerto USB disponible de su ordenador portátil o de sobremesa, y espere a que Windows lo detecte. - Los usuarios de Windows Vista recibirán una notificación desde el controlador de dispositivo, tal y como puede verse en la Figura 2.2. - Los usuarios de Windows 7 recibirán una notificación desde el controlador de dispositivo, tal y como puede verse en la Figura 2.2. Una vez detectado el hardware, Windows le indicará que ponga en marcha el proceso de inicialización. - Los usuarios de Windows Vista verán una ventana AutoPlay similar a la que se muestra en la Figura 2.3. - Los usuarios de Windows 7 verán una ventana AutoPlay similar a la que se muestra en la Figura 2.3. 2. Seleccione la opción 'Run DT4000 G2\_Launcher.exe'. text_image
Installing device driver software Click here for status.text_image
Installing device driver software Click here for status.text_image
Organize Burn to disc Files Currently on the Disc Support autorun.inf DT800G2 Leanc her.exetext_image
AutoPlay DVD RW Drive (I): DT4000G2 Always do this for software and games: Install or run program from your media Run DT4000G2_Launcher.exe Published by Kingston Technology Corporation General options Open folder to view files using Windows Explorer View more AutoPlay options in Control PanelInicialización de dispositivo (entorno Windows)
1. Seleccione el idioma que desee en el menú desplegable y haga clic en 'Siguiente' (Figura 3.1.) text_image
Device Initialization - DT4000 G2 DataTraveler® 4000 G2 Language Select Language: English Kingston Technology Next> Canceltext_image
Device Initialization - DT4000 G2 DataTraveler® 4000 G2 License Agreement SOFTWARE LICENSE AGREEMENT IMPORTANT - READ CAREFULLY: THIS SOFTWARE LICENSE AGREEMENT ("Agreement") is a legal agreement between you (either an individual or a single entity) and Kingston Technology Company Inc. ("Kingston"). This Agreement relates to the software accompanying this Agreement, which includes computer software and may include associated media, printed materials, and "online" or electronic Accept Decline Kingston TECHNOLOGYtext_image
Device Initialization - DT4000 G2 DataTraveler® 4000 G2 Password * Password: ••••••••••• * Password Confirmation: •••••••••• i Password Rules Hint: Pwd Hint *Mandatory fieldtext_image
Device Initialization - DT4000 G2 DataTraveler® 4000 G2 Contact Information Name: Test Name Company: Test Company Details: Test Details & Other Info Kingston TECHNOLOGYtext_image
Format - DT4000 G2 DataTraveler® 4000 G2 Formatting DT4000 G2 (I:)...text_image
Format - DT4000 G2 DataTraveler® 4000 G2 Format Complete. Kingston TECHNOLOGY OKtext_image
Login device DT4000 G2 DataTraveler® 4000 G2 Password: Hint Forgot Password Contact Information Read-Only Mode Kingston TECHNOLOGY Login CancelOpciones del dispositivo (Entorno de Windows)
Mientras tenga la sesión iniciada en el dispositivo, se mostrará un icono «DT4000 G2» en la esquina inferior derecha de la barra de tareas de Windows (Figura 5.1). (Nota: Los usuarios de Windows 7 tendrán que hacer clic en el botón de flecha arriba en la barra de tareas para poder acceder al icono [DT4000 G2' (Figura 5.2.) Al hacer clic una vez en el icono DT4000 G2 se abrirá el siguiente menú: text_image
DT4000 G2 Settings Browse DT4000 G2 Format DT4000 G2 Online Support About DT4000 G2 Shut down DT4000 G2text_image
Customize... 9:26 AM 12/3/2010Ajustes de la DT4000 G2
- Permite cambiar la contraseña y/o indicio (Figura 5.3) - Permite agregar, ver o cambiar la información de contacto (Figura 5.4) - Permite cambiar la selección de idioma actual (Figura 5.5) (Nota: por motivos de seguridad tendrá que volver a introducir la contraseña del dispositivo DT4000 G2 para actualizar y/o modificar cualquiera de estas opciones). text_image
Settings DataTraveler® 4000 62 Password | Contact Information | Language | * Current Password: * New Password: * Password Confirmation: i Passport Status Hint: Pred Hint * Mandatory field Kingston OK Apply Canceltext_image
Settings DataTraveler® 4000 62 Password Contact Information Language Name: Test Name Company: Test Company Details: Test Details & Other Info Kingston OK Apply Canceltext_image
Settings DataTraveler® 4000 62 Password | Contact Information | Language | Select Language: English Kingston OK Buy CancelExplorar en DT4000 G2
\- Permite explorar el contenido de la partición de datos protegidos, siempre y cuando tenga una sesión en curso.Formatear DT4000 G2\*
\- Permite formatear la partición de datos protegidos (advertencia: se borrarán todos los datos). (Figura 5.6) Asistencia en línea (Es necesario disponer de acceso a Internet) \- Abra el explorador de Internet y acceda a http://www.kingston.com/support/, donde podrá consultar información de asistencia adicional text_image
Format - DT4000 G2 DataTraveler® 4000 G2 WARNING: Formatting will erase ALL data on this disk. To format the disk (s), click OK. To quit, click CANCEL. Your password is required to complete format. Passwords: Kingston KIMCOLOSET OK CancelAcerca de DT4000 G2
\- Proporciona detalles específicos sobre la unidad DT4000 G2, incluida la información de versión de la aplicación y del firmware (Figura 5.7)Apagar DT4000 G2
\- Apaga correctamente la unidad DT4000 G2, lo que le permite extraerla de forma segura del sistema. text_image
About - DT4000 G2 DataTraveler® 4000 G2 Copyright (c) 2011 Kingston Technology Company, Inc. Modules Version Information DT4000 G2 K40 000FFE23C7ECBF10800001D2 Application K4.0.0.5 FW Version 3.05 Crypto Library FW 1.00 Kingston TECHNOLOGY Case-Sección de Windows concluida-
Configuración (entorno Mac)
Inserte la unidad DT4000 G2 en un puerto USB disponible de su ordenador portátil o de sobremesa, y espere a que el sistema operativo Mac lo detecte. Cuando lo detecte, en el escritorio se abrirá un volumen DT4000 G2, tal y como se indica en la Figura 6.1. 1. Haga doble clic en el icono DT4000 G2 CD-ROM. 2. Haga doble clic en la carpeta de Mac que encontrará en la ventana que se muestra en la Figura 6.2. 3. Haga doble clic en el icono de la aplicación DT4000 G2 que encontrará en la ventana mostrada en la Figura 6.3. De este modo comenzará el proceso de inicialización.  Figura 6.1: DT4000 G2 text_image
DT4000G2 autorun.inf DT4000G2_Launcher.exe Linux Mac rr_moved Supporttext_image
DT4000G2_Launcher Mactext_image
DataTraveler® 4000 G2 FIPS 140-2 LEVEL 3 CERTIFIED Kingston® TECHNOLOGY ©(14Kingston Technology Corporation, 1769) Newshape Street, Fountain Valley, CA 9218E USA All rights reserved. All registered trademarks and trademarks are the property of their respective owners.Inicialización de dispositivo (Entorno de Mac)
1. Seleccione el idioma que desee en el menú desplegable y haga clic en 'Siguiente' (Figura 7.1.) text_image
Device Initialization - DT4000 G2 DataTraveler® 4000 G2 Language Select Language: English Kingston TECNOLOGY Next> Canceltext_image
Device Initialization - DT4000 G2 DataTraveler® 4000 G2 License Agreement SOFTWARE LICENSE AGREEMENT IMPORTANT - READ CAREFULLY: THIS SOFTWARE LICENSE AGREEMENT ("Agreement") is a legal agreement between you (either an individual or a single entity) and Kingston Technology Company Inc. ("Kingston"). This Agreement relates to the software accompanying this Agreement, which includes computer software and may include associated media, printed materials, and "online" or electronic Accept Decline Kingston TECHNOLOGYtext_image
Device Initialization - DT4000 G2 DataTraveler® 4000 G2 ① ② ③ ④ Password * Password: ********** * Password Confirmation: ********** i Password Rules Hint: Pwd Hint * Mandatory field Kingston TECHNOLOGYtext_image
Device Initialization - DT4000 G2 DataTraveler® 4000 G2 ① ② ③ ④ Contact Information Name: Test Name Company: Test Company Details: Test Details & Other Info Kingston TECHNOLOGYtext_image
Format - DT4000 G2 DataTraveler® 4000 G2 Formatting DT4000 G2 ... Kingston TECHNOLOGY OK Canceltext_image
Format - DT4000 G2 DataTraveler® 4000 G2 Format Complete. Kingston OK CancelUso del dispositivo (entorno Mac)
Una vez que se haya inicializado la unidad DT4000 G2, podrá acceder a la partición de datos protegidos y utilizar las opciones del dispositivo iniciando sesión del dispositivo mediante su contraseña. Para ello, efectúe el siguiente procedimiento: 1. Inserte el DT4000 G2 en un puerto USB de su ordenador portátil o de sobremesa y, a continuación, introduzca la contraseña (véase la Figura 8.1). 2. Una vez que haya escrito su contraseña, haga clic en el botón 'Login' (iniciar sesión) para continuar. \- Si introduce la contraseña correcta, el DT4000 G2 quedará desbloqueado y podrá comenzar a utilizar el dispositivo. \- Si se introduce una contraseña incorrecta, se muestra un mensaje de error bajo el campo «Sugerencia», que indica que se produjo un error al iniciar sesión (consulte la Figura 8.2). text_image
Format - DT4000 G2 DataTraveler® 4000 G2 Password: Hint Forgot Password Contact Information Read-Only Mode Kingston Login CancelOpciones del dispositivo (Entorno de Mac)
Mientras haya una sesión activa en el dispositivo, aparecerá un icono 'DT4000 G2\_Launcher' en el X Dock de Mac OS, como se muestra a continuación en la Figura 9.1: text_image
DT4000G2_LauncherAjustes de la DT4000 G2
- Permite cambiar la contraseña y/o indicio (Figura 9.3) - Permite agregar, ver o cambiar la información de contacto (Figura 9.4) - Permite cambiar el idioma seleccionado (Figura 9.5) text_image
DT4000 G2 Settings Browse DT4000 G2 Format DT4000 G2 Online Support About DT4000 G2 Shut down DT4000 G2 Options Show All Windows Hide Quittext_image
Settings DataTraveler® 4000 G2 Password Contact Information Language * Current Password: * New Password: * Password Confirmation: Password Rules Hint: * Mandatory field Kingston OK Canceltext_image
Settings DataTraveler® 4000 62 Password Contact InformationLanguage Name: Company: Details: Kingston OK Canceltext_image
Settings DataTraveler® 4000 G2 Password Contact Information Language Select Language: English Kingston Cancel CancelNavegar en DT4000 G2
\- Permite explorar el contenido de la partición de datos protegidos, siempre y cuando tenga una sesión en curso.Formatear DT4000 G2
\- Permite formatear la partición de datos protegidos (advertencia: se borrarán todos los datos). (Figura 9.6) Asistencia en línea (Es necesario disponer de acceso a Internet) \- Abre el explorador de Internet y accede a http://www.kingston.com/support/, donde podrá consultar información de asistencia adicional text_image
Format - DT4000 G2 DataTraveler® 4000 G2 WARNING: Formatting will erase ALL data on this disk. To format the disk, click OK. To quit, click CANCEL. Kingston OK CancelAcerca de DT4000 G2
\- Proporciona detalles específicos sobre la unidad DT4000 G2, incluida la información de versión de la aplicación y del firmware (Figura 9.7)Apagar DT4000 G2
\- Apaga correctamente la unidad DT4000 G2, lo que le permite extraerla de forma segura del sistema. text_image
About - DT4000 G2 DataTraveler® 4000 G2 Copyright (c) 2007 Kingston Technology Company, Inc. Modules Version Information DT4000 G2 3.0 030FFE23C7ECBF10B0001D2 Application 4.0.0.1 FW Version 3.05 Crypto Library FW 1.00-Sección de Mac completada-
Configuración (entorno Linux)
(NOTA: Existen hoy en día diversas distribuciones de Linux, de modo que el 'diseño y aspecto' de las interfaces pueden variar de una versión a otra. Sin embargo, el conjunto de comandos generales que se emplean en la aplicación de terminal es muy similar y se puede hacer referencia a dicho conjunto en las instrucciones para Linux que siguen. Las imágenes de pantalla utilizadas en esta sección fueron creadas en un entorno de 64 bits.)  En ciertas distribuciones de Linux será necesario disponer de derechos de superusuario (root, o usuario raíz) para ejecutar los comandos de la unidad DT4000G2 en la ventana de la aplicación Terminal. Inserte la unidad DT4000 G2 en un puerto USB disponible de su ordenador portátil o de sobremesa, y espere a que el sistema operativo Linux lo detecte. Cuando sea detectado, aparecerá\* un icono de volumen DT4000 G2 en el escritorio como se muestra en la Figura 10.1.  DT4000G2 Figura 10.1: Volumen DT4000G2El DT4000 G2 viene con 5 comandos que pueden utilizarse en Linux:
dt4000g2\_about, dt4000g2\_forgotpassword, dt4000g2\_initialize, dt4000g2\_login, and dt4000g2\_logout (Nota: Para ejecutar estos comandos debe abrir una ventana de aplicación "Terminal" y navegar hasta las carpetas en las que se encuentran estos archivos. Cada comando debe empezar con los siguientes dos caracteres: './' (un punto seguido de una barra diagonal.) Los usuarios de sistemas de 32 bits deben abrir una ventana de aplicación «Terminal» y cambiar el directorio actual a /media/DTVP30/linux/linux64\$ escribiendo el siguiente comando junto al prompt del sistema: cd /media/adminuser/DTVP30/linux/linux32 (luego presione INTRO.) Los usuarios de sistemas de 64 bits deben abrir una ventana de aplicación «Terminal» y cambiar el directorio actual a /media/DT4000G2/linux/linux64\$ escribiendo el siguiente comando junto al prompt del sistema: cd /media/adminuser/DTVP30/linux/linux64 (luego presione INTRO.) \*Nota: Si el sistema operativo no carga el volumen DT4000 G2 de forma automática, deberá cargarlo manualmente en una ventana de terminal mediante el uso del comando 'mount' de Linux. Para obtener las opciones correctas de sintaxis y de comandos, consulte la documentación de su distribución específica del SO Linux o su página web de soporte preferida.Inicialización del dispositivo (entorno Linux)
Una vez que el DT4000 G2 esté conectado a su ordenador y lo haya reconocido el sistema operativo, será necesario iniciar el dispositivo antes del primer uso. Para ello, abra la aplicación 'Terminal' (o ventana de línea de comando) y realice los siguientes pasos: (Nota: Las imágenes de pantalla e instrucciones de esta sección emplean la carpeta linux32 (que significa 32 bits) con el fin de demostrar el uso del dispositivo DT4000 G2 en el SO Linux. Tenga presente que si usa la versión de 64 bits de Linux, simplemente tiene que navegar a la carpeta correspondiente de 64 bits en lugar de la de 32 bits (p. ej.:linux64 en lugar de linux32.) 1. Cambie al directorio del volumen DT4000 G2 escribiendo el siguiente comando junto al prompt de terminal (como se muestra en la Figura 10.2.): cd /media/DT4000G2/linux/linux32 (Nota: En los nombres de los comandos y carpetas (directorios) se hace distinción entre las letras mayúsculas y minúsculas. Por ejemplo, 'linux32' NO es lo mismo que 'Linux32.' Al escribir el comando se debe respetar también la sintaxis exacta mostrada.) text_image
[root@localhost /]# cd /media/dt4000g2/linux/linux64 [root@localhost linux64]#_text_image
[root@localhost /]# cd /media/dt4000g2/linux/linux64 [root@localhost linux64]# ls dt4000g2_about dt4000g2_initialize dt4000g2_logout dt4000g2Forgotpassword dt4000g2_login [root@localhost linux64]# _text_image
[root@localhost /]# cd /media/dt4000g2/linux/linux64 [root@localhost linux64]# ls dt4000g2_about dt4000g2_initialize dt4000g2_logout dt4000g2_forgotpassword dt4000g2_login [root@localhost linux64]# ./dt4000g2_initializeUso del dispositivo (entorno Linux)
Una vez que se haya inicializado el DT4000 G2, podrá acceder a la partición de datos de seguridad iniciando una sesión en el dispositivo mediante el uso de la contraseña del DT4000 G2 que creó en la página 22. Para ello, realice los siguientes pasos. 1. Abra una ventana de aplicación 'Terminal'. 2. Escriba el siguiente comando junto al prompt de terminal: cd /media/DT4000G2/linux/linux32 3. Ahora que el prompt de comandos se encuentra en/media/DT4000G2/linux/linux32\$, escriba el siguiente comando para iniciar sesión en el dispositivo: ./dt4000g2\_login\* y pulse INTRO. (Nota: En los nombres de los comandos y carpetas se hace distinción entre las letras mayúsculas y minúsculas, y la sintaxis de los comandos debe respetarse con exactitud.) 4. Introduzca su contraseña DT4000 G2 y pulse INTRO. Una vez que haya iniciado la sesión correctamente, el volumen de datos de seguridad se abrirá y podrá utilizar el DT4000 G2. Si se introduce una contraseña incorrecta durante el proceso de inicio de sesión, se le dará otra oportunidad de introducir la contraseña correcta repitiendo el paso 3; sin embargo hay una característica de seguridad que lleva un control del número de intentos de inicio de sesión fallidos. Si este número alcanza el valor preconfigurado de 10 intentos fallidos, el DTVP 3.0 se bloqueará y le requerirá inicializar el dispositivo ejecutando el comando dt4000g2\_forgotpassword antes del siguiente uso. Este proceso le permitirá crear una nueva contraseña, pero para proteger la privacidad de sus datos, el DT4000 G2 formateará la partición de datos de seguridad. Esto significa que se perderán todos sus datos. Una vez que finalice el proceso dt4000g2\_forgotpassword y haya configurado correctamente una nueva contraseña, se restablecerá en cero el contador de seguridad incorporado que lleva el control de la cantidad de intentos fallidos de inicio de sesión (Nota: Si inicia una sesión correctamente antes de alcanzar la cantidad máxima de intentos (abreviatura: MaxNoA), esto también restablecerá en cero el contador de intentos fallidos de inicio de sesión.) Cuando termine de usar el DT4000 G2, termine la sesión en el dispositivo y asegure los datos. Para ello, efectúe el siguiente procedimiento: 1. Abra una ventana de aplicación 'Terminal'. 2. Escriba el siguiente comando junto al prompt de terminal: cd /media/DT4000G2/linux/linux32 3. Ahora que el prompt de comandos se encuentra en/media/DT4000G2/linux/linux32\$, escriba el siguiente comando para cerrar la sesión en el dispositivo: ./dt4000g2\_logout\* y pulse INTRO. (Nota: En los nombres de los comandos y carpetas se hace distinción entre las letras mayúsculas y minúsculas, y la sintaxis de los comandos debe respetarse con exactitud.) 4. Retire el DT4000 G2 del sistema y guárdelo en un lugar seguro. \*Nota: En ciertas distribuciones de Linux será necesario disponer de derechos de superusuario (root, o usuario raíz) para ejecutar los comandos de la unidad DT4000 G2 en la ventana de la aplicación Terminal.Ayuda y solución de problemas
Bloqueo del dispositivo
La unidad DT4000 G2 incluye una función de seguridad que impide el acceso no autorizado a la partición de datos si se ha realizado un número máximo de intentos fallidos de inicio de sesión consecutivos (MaxNoA para abreviar). El valor predeterminado de esta función es de 10 (n°. de intentos). El contador de «bloqueo» registra cada intento fallido de inicio de sesión y se reinicia mediante una de las dos maneras siguientes: 1) Se logra iniciar sesión correctamente antes de que se alcance el valor de MaxNoA, o bien 2) se alcanza el valor de MaxNoA y el dispositivo se formatea.\* Si se introduce una contraseña incorrecta, aparecerá un mensaje de error abajo del campo 'Hint' (pista), lo cual indica que el inicio de sesión falló. Consulte la Figura 10.1. Si se lleva a cabo un 7 ° intento fallido, aparecerá un mensaje de error adicional avisando que le quedan 3 intentos antes de alcanzar el valor de MaxNoA (cuyo valor predeterminado es de 10). Consulte la Figura 10.2. Después de realizar el 10° intento fallido de inicio de sesión, el dispositivo DT4000 G2 bloqueará la partición de datos protegidos, y deberá reformatearlo para poder volver a usarlo. Esto implica que se perderán todos los datos almacenados en la unidad DT4000 G2 y que deberá crear una contraseña nueva. Esta medida de seguridad evita que una persona que no tenga su contraseña intente iniciar sesión tantas veces como quiera, y acabe logrando acceder a su información confidencial. Si es el propietario de la unidad DT4000 G2 y ha olvidado de la contraseña se aplicarán las mismas medidas de seguridad, incluyendo el text_image
Login device DT4000G2 DataTraveler® 4000 G2 Password: Hint Failed to Login: The password is incorrect. Please try again. Forget Password Contact Information Kingston Login Canceltext_image
Login devices DT4000G2 DataTraveler® 4000 G2 Password: Hint: Failed to Login: The password is incorrect. Please try again. 3. Attempts left before your DT4000 is blocked permanently. Forget Password Contact Information Kingston Kingston Buy Login Cancel¿Ha olvidado la contraseña?
Si olvida su contraseña puede hacer clic en el enlace 'Forgot Password' (contraseña olvidada) que aparece en la ventana de inicio de sesión al ejecutar DT4000 G2\_Launcher (vea la Figura 10.3.) Esta opción le permitirá crear una contraseña nueva. No obstante, para proteger la privacidad de sus datos, el dispositivo DT4000 G2 volverá a formatearse. Esto implica que se borrarán todos sus datos durante el proceso.\* Cuando haga clic en 'Forgot Password' (contraseña olvidada) (Figura 10.4), aparecerá un cuadro de mensaje preguntándole si desea introducir una nueva contraseña antes de realizar el formateo. Al llegar a este punto puede 1) hacer clic en 'OK' (aceptar) para confirmar o 2) hacer clic en 'Cancel' (cancelar) para regresar a la ventana de inicio de sesión. Si decide continuar, se le pedirá que cree text_image
Login device DT4000G2 DataTraveler® 4000 G2 Password: Hint Forgot Password Context information Kingston TECHNOLOGY Login Canceltext_image
Forgot Password In order to protect your data, your DT4000G2 will be formatted and all data will be erased. Do you want to enter a new password and format your DT4000G2? OK Canceltext_image
My Computer File Edit View Favorites Tools Help Back Search Folders Address Go System Tasks View system information Add or Remove programs Change a setting Local Disk (CC) D:\D\CD-R.W Drive (DC) Local Disk (E:) Other Places My Network Places My Documents Control Panel DT4000GZ (F:) Network Share (G:) Local Disk (H:) Details System FolderMensajes de error
Unable to create file (Imposible crear archivo) – Este mensaje de error aparece cuando se intenta CREATE (crear) un archivo o una carpeta ON (en) la partición de datos de seguridad mientras hay una sesión activa en modo de solo lectura. text_image
Unable to create file Unable to create the file 'New Text Document.txt' The media is write protected. OKtext_image
Error Copying File or Folder Cannot copy File1: The disk is write-protected. Remove the write-protection or use another disk. OKtext_image
Error Deleting File or Folder Cannot delete File1: The disk is write-protected. Remove the write-protection or use another disk. OKDataTraveler® 4000 G2 G2 Benutzerhandbuch
text_image
DataTraveler® 4000 G2 FIPS 140-2 LEVEL 3 CERTIFIED Kingston® TECHNOLOGY ©2014 Kingston Technology Corporation. D7600 Newhope Street, Fountain Valley, CA 927.08 USA All rights reserved. All registered trademarks and trademarks are the property of their respective owners.natural_image
Black USB flash drive with open lid, no visible text or symbols on bodyInhalt
TOCÜBER DIESES HANDBUCH
Dieses Benutzerhandbuch bezieht sich auf den FIPS-validierten DataTraveler® 4000 G2 (im Folgenden als DT4000 G2 bezeichnet) auf Basis des Factory Image ohne kundenspezifische Einstellungen.Systemvoraussetzungen
PC-Plattform
- Mindestens Pentium III Prozessor, äquivalent oder schneller • 15MB freier Festplattenspeicher • Freier USB 2.0- / 3.0-Anschluss - Zwei freie, aufeinanderfolgende Laufwerksbuchstaben nach dem letzten physischen Speicher\*Unterstützte PC-Betriebssysteme
- Windows ^ 8, 8.1 (Nicht RT) - Windows ^ 7 SP1 - Windows ^ Vista SP2Mac Plattform
• 15MB freier Festplattenspeicher - USB 2.0 / 3.0Unterstütztes Betriebssystem
• Mac OS X 10.8.x -10.10xEmpfehlungen
Um die ausreichende Stromversorgung des DT4000 G2 sicherzustellen, stecken Sie ihn direkt in einen USB-Anschluss Ihres Notebooks oder PCs ein, siehe Abb. 1.1. Vermeiden Sie den Anschluss des DT4000 G2 in Peripheriegeräte mit einem USB-Anschluss, wie beispielsweise eine Tastatur oder ein USB-Hub, siehe Abb. 1.2. natural_image
Two electronic devices: one with a USB flash and the other with a network card, both placed on a white surface next to a laptop (no visible text or symbols)natural_image
Two electronic devices with no visible text or symbols, one showing a black connector and the other a silver case (no readable text or symbols)Installation & Einrichtung (Windows-Umgebung)
1. Stecken Sie den DT4000 G2 in einen freien USB-Anschluss Ihres Notebooks oder PCs und warten Sie, bis Windows ihn erkannt hat. - Windows Vista Anwendern wird eine Gerätetreiber-Meldung angezeigt, siehe Abb. 2.2. - Windows 7 Anwendern wird eine Gerätetreiber-Meldung angezeigt, siehe Abb. 2.2. Windows fordert Sie nach Abschluss der Hardware-Erkennung zum Starten der Geräteinstallation auf. - In Windows Vista wird ein AutoPlay-Fenster ähnlich wie in Abb. 2.3angezeigt. - Windows Vista 7 Anwendern wird ein AutoPlay-Fenster angezeigt, ähnlich wie in Abb. 2.3 abgebildet. 2. Wählen Sie die Option 'Run DT4000 G2\_Launcher.exe'. Wenn Windows AutoPlay nicht startet, rufen Sie die CD-ROM-Partition (Abb. 2.4) auf und starten Sie das DT4000 G2\_Launcher-Programm manuell. Dadurch wird auch der Installationsprozess gestartet. text_image
Installing device driver software Click here for status.text_image
Installing device driver software Click here for status.text_image
DVD RW Drive (I:) DT4000G2 Always do this for software and games: Install or run program from your media Run DT4000G2_Launcher.exe Published by Kingston Technology Corporation General options Open folder to view files using Windows Explorer View more AutoPlay options in Control Paneltext_image
Organize Burn to disc Files Currently on the Disc: Support autorun.inf DT4000G2_Launch her.exeGeräteinstallation (Windows-Umgebung)
1. Wählen Sie die von Ihnen gewünschte Sprache aus dem Drop-Down-Menü und klicken Sie auf 'Next' (Weiter) (Abb. 3.1.) text_image
Device Initialization - DT4000 G2 DataTraveler® 4000 G2 Language Select Language: English Kingston TECNOLOGY Next> Canceltext_image
Device Initialization - DT4000 G2 DataTraveler® 4000 G2 License Agreement SOFTWARE LICENSE AGREEMENT IMPORTANT - READ CAREFULLY: THIS SOFTWARE LICENSE AGREEMENT ("Agreement") is a legal agreement between you (either an individual or a single entity) and Kingston Technology Company Inc. ("Kingston"). This Agreement relates to the software accompanying this Agreement, which includes computer software and may include associated media, printed materials, and "online" or electronic Accept Decline Kingston TECNOLOGYtext_image
Device Initialization - DT4000 G2 DataTraveler® 4000 G2 Password * Password: •••••••••••• * Password Confirmation: ••••••••••• i Password Rules Hint: Pwd Hint *Mandatory fieldtext_image
Device Initialization - DT4000 G2 DataTraveler® 4000 G2 Contact Information Name: Test Name Company: Test Company Details: Test Details & Other Info Kingston TECHNOLOGYtext_image
Format - DT4000 G2 DataTraveler® 4000 G2 Formatting DT4000 G2 (1):... Kingston TECHNOLOGYtext_image
Format - DT4000 G2 DataTraveler® 4000 G2 Format Complete. Kingston TECHNOLOGY OKVerwendung des Geräts (Windows-Umgebung)
Nach Abschluss der Installation des DT4000 G2 können Sie sich mit Ihrem Passwort im Gerät anmelden, haben Zugriff auf die sichere Datenpartition und können mit dem Speicherstick arbeiten. Führen Sie dazu folgende Schritte aus: 1. Stecken Sie den DT4000 G2 in einen USB-Anschluss Ihres Notebooks oder PCs ein und geben Sie Ihr Passwort ein (siehe Abb. 4.1.) \- Geben Sie Ihr Passwort ein und klicken Sie zum Fortfahren auf 'Login' (Anmelden). \- Wenn das eingegebene Passwort korrekt ist, wird der DT4000 G2 freigegeben und Sie können ihn verwenden. text_image
Login device DT4000 G2 DataTraveler® 4000 G2 Password: Hint Forgot Password Contact Information Read-Only Mode Kingston TECHOLABY Login CancelGeräteoptionen (Windows-Umgebung)
Solange Sie im Gerät eingeloggt sind, wird das Symbol 'DT4000 G2' in der rechten Ecke der Windows Task-Leiste (Abb. 5.1) angezeigt. (Hinweis: Windows 7 Anwender müssen zum Aufrufen des 'DT4000 G2' Symbols in der Taskleiste auf den Pfeil nach oben klicken (Abb. 5.2.) Nach einmaligem Klicken auf das DT4000 G2 Symbol wird folgendes Menü angezeigt: text_image
DT4000 G2 Settings Browse DT4000 G2 Format DT4000 G2 Online Support About DT4000 G2 Shut down DT4000 G2text_image
Customize... 9:26 AM 12/3/2010DT4000 G2 Einstellungen
• Sie können Ihr Passwort bzw. Ihren Hinweis ändern (Abb. 5.3) - Sie können Ihre Kontaktangaben hinzufügen, ansehen oder ändern (Abb. 5.4) • Sie können die gewählte Sprache ändern (Abb. 5.5) (Hinweis: Aus Sicherheitsgründen müssen Sie zum Aktualisieren bzw. Modifizieren dieser Einstellungen jeweils Ihr aktuelles DT4000 G2 Passwort eingeben.) text_image
Settings DataTraveler® 4000 62 Password | Contact Information | Language | * Current Password: * New Passwords: * Password Confirmations: Hint: * Mandatory field: Password Rules Find Hint Kingston OK Canceltext_image
Settings DataTraveler® 4000 62 Features Contact Information Language Name: Test Name Company: Test Company Details: Test Details & Other Info Kingston OK Apply Canceltext_image
Settings DataTraveler® 4000 62 Password | Contact Information | Language | Select Language: English Kingston OK Buy CancelDT4000 G2 durchsuchen
\- Solange Sie angemeldet sind, können Sie mit dieser Funktion den Inhalt der sicheren Datenpartition durchsuchen.DT4000 G2\* formatieren
\- Mit dieser Funktion können Sie die sichere Datenpartition formatieren (Achtung: Hierbei werden alle Daten gelöscht.) (Abb. 5.6)Online Support (Nur mit Internetanschluss)
\- Öffnet Ihren Internet-Browser und navigiert Sie zu http://www.kingston.com/support/, wo Sie Zugang zu weiteren Support-Informationen haben. text_image
Format - DT4000 G2 DataTraveler® 4000 G2 WARNING: Formatting will erase ALL data on this disk. To format the disk (2), click OK. To exit, click CANCEL. Your password is required to complete format. Password: Kingston OK CancelÜber den DT4000 G2
\- Enthält spezifische Angaben über den DT4000 G2, einschließlich Versionsangaben über die Anwendung und die Firmware (Abb. 5.7)DT4000 G2 Herunterfahren
\- Fährt den DT4000 G2 ordnungsgemäß herunter, damit Sie ihn sicher aus Ihrem System entfernen können text_image
About - DT4000 G2 DataTraveler® 4000 G2 Copyright (c) 2011 Kingston Technology Company, Inc. Modules Version Information DT4000 G2 K40 000PFE23C75CBF108000JD2 Application K1.0.0.5 PW Version 3.05 Crypto Library FW 1.00 Kingston Close- Abschnitt Windows abgeschlossen -
Installation & Einrichtung (Mac-Umgebung)
Stecken Sie den DT4000 G2 in einen freien USB-Anschluss Ihres Notebooks oder PCs ein und warten Sie, bis das Mac Betriebssystem ihn erkannt hat. Dies wird durch das DT4000 G2 Volumensymbol am Desktop angezeigt, siehe Abb. 6.1. 1. Doppelklicken Sie auf das CD-ROM-Symbol des DT4000 G2. 2. Doppelklicken Sie auf die im Fenster angezeigte Mac Datei, siehe Abb. 6.2. 3. Doppelklicken Sie auf die im Fenster angezeigte DT4000 G2 Anwendungssymbol, siehe Abb. 6.3. Dadurch wird der Installationsprozess gestartet.  Abb. 6.1 - DT4000 G2 text_image
DT4000G2 autorun.inf DT4000G2_Launcher.exe Linux Mac rr_moved Supporttext_image
DT4000G2_Launcher Mactext_image
DataTraveler® 4000 G2 FIPS 140-2 LEVEL 3 CERTIFIED Kingston® TECHNOLOGY ©2014 Kingston Technology Corporation. T7600 Northape Street, Fountain Valley, CA 92780 USA. All rights reserved. All registered trademarks and trademarks are the property of their respective owners.Installationseinrichtung (Mac-Umgebung)
1. Wählen Sie die von Ihnen gewünschte Sprache aus dem Drop-Down-Menü und klicken Sie auf 'Next' (Abb. 7.1.) text_image
Device Initialization - DT4000 G2 DataTraveler® 4000 G2 Language Select Language: English Kingston TECNOLOGY Next> Canceltext_image
Device Initialization - DT4000 G2 DataTraveler® 4000 G2 License Agreement SOFTWARE LICENSE AGREEMENT IMPORTANT - READ CAREFULLY: THIS SOFTWARE LICENSE AGREEMENT ("Agreement") is a legal agreement between you (either an individual or a single entity) and Kingston Technology Company Inc. ("Kingston"). This Agreement relates to the software accompanying this Agreement, which includes computer software and may include associated media, printed materials, and "online" or electronic Accept Decline Kingston TECHNOLOGYtext_image
Device Initialization - DT4000 G2 DataTraveler® 4000 G2 ① ② ③ ④ Password * Password: ********** * Password Confirmation: ********** Hint: Pwd Hint * Mandatory field Kingston® TECHNOLOGYtext_image
Device Initialization - DT4000 G2 DataTraveler® 4000 G2 ① ② ③ ④ Contact Information Name: Test Name Company: Test Company Details: Test Details & Other Info Kingston TECHNOLOGYtext_image
Format - DT4000 G2 DataTraveler® 4000 G2 Formatting DT4000 G2 ... Kingston SITOMOLOGYtext_image
Format - DT4000 G2 DataTraveler® 4000 G2 Format Complete. Kingston OK CancelVerwendung des Geräts (Mac-Umgebung)
Nach Abschluss der Installation des DT4000 G2 können Sie sich mit Ihrem Passwort im Gerät anmelden, haben Zugriff auf die sichere Datenpartition und können mit dem Speicherstick arbeiten. Führen Sie dazu folgende Schritte aus: 1. Stecken Sie den DT4000 G2 in einen USB-Anschluss Ihres Notebooks oder PCs ein und geben Sie Ihr Passwort ein (siehe Abb. 8.1.) 2. Geben Sie Ihr Passwort ein und klicken Sie zum Fortfahren auf 'Login' (Anmelden). \- Wenn das eingegebene Passwort korrekt ist, wird der DT4000 G2 freigegeben und Sie können ihn verwenden. \- Wenn ein falsches Passwort eingegeben wurde, wird mit einer Fehlernachricht unter dem Feld 'Hint' (Hinweis) angezeigt, dass das Anmelden fehlgeschlagen ist (siehe text_image
Format - DT4000 G2 DataTraveler® 4000 G2 Password: Hint Forgot Password Contact Information Read-Only Mode Kingston TECHNOLOGY Login CancelAbb. 8.2.)
(HINWEIS: Wenn das Passwort zum Anmelden falsch war, haben Sie die Möglichkeit, es erneut einzugeben. Das integrierte Sicherheitsmodul registriert jedoch alle fehlgeschlagenen Anmeldeversuche\*. Wenn die voreingestellte Anzahl von 10 fehlgeschlagenen Anmeldeversuchen erreicht wurde, wird der DT4000 G2 gesperrt und die sichere Datenpartition muss vor der erneuten Verwendung neu formatiert werden. DIES BEDEUTET, DASS ALLE AUF DEM DT4000 G2 GESPEICHERTEN DATEN GELÖSCHT WERDEN. Weitere Einzelheiten zu dieser Funktion siehe 'Device Lockout' (Sperrfunktion) auf Seite 24.) 3. Sie können die sichere Datenpartition im schreibgeschützten Modus, auch als "Nur-Lesen" bezeichnet, öffnen, indem Sie vor dem Anmelden das Kästchen 'Read-Only Mode' (Schreibgeschützter Modus) markieren. Wenn Sie im schreibgeschützten Modus angemeldet sind, können Sie Inhalt im DT4000 G2 zwar öffnen oder ansehen, jedoch nicht aktualisieren, ändern oder löschen. (Hinweis: Im schreibgeschützten Modus können Sie auch nicht auf die Option Formatierung im DT4000 G2 zugreifen, auf die auf Seite 10 Bezug genommen wird.) Wenn Sie im schreibgeschützten Modus angemeldet sind und das Gerät entsperren möchten, um vollen Lese-/Schreibzugriff auf die sichere Datenpartition zu erhalten, müssen Sie den DT4000 G2 herunterfahren und sich erneut anmelden, wobei das Kontrollkästchen 'Read-Only Mode' nicht markiert sein darf. \* Der Zähler für fehlgeschlagene Anmeldeversuche wird nach Eingabe des korrekten Passworts zurückgesetzt.Geräteoptionen (Mac-Umgebung)
Wenn Sie im Gerät angemeldet sind, wird im Mac OS X Dock das Symbol 'DT4000 G2\_Launcher' angezeigt, siehe nachstehende Abb. 9.1: text_image
DT4000G2_LauncherDT4000 G2 Einstellungen
- Sie können Ihr Passwort bzw. Ihren Hinweis ändern (Abb. 9.3) - Sie können Ihre Kontaktangaben hinzufügen, ansehen oder ändern (Abb. 9.4) • Sie können die gewünschte Sprache ändern (Abb. 9.5) text_image
Settings DataTraveler® 4000 G2 Password Contact Information LambLanguage * Current Password: * New Password: * Password Confirmation: i Password Rules Hint: * Mandatory field Kingston OK Canceltext_image
Settings DataTraveler® 4000 62 Password Contact Information Language Name: Company: Details: Kingston OK Apply Canceltext_image
DT4000 G2 Settings Browse DT4000 G2 Format DT4000 G2 Online Support About DT4000 G2 Shut down DT4000 G2 Options Show All Windows Hide Quittext_image
Settings DataTraveler® 4000 G2 Password Contact Information Language Select Language: English Kingston OK CancelDT4000 G2 durchsuchen
\- Solange Sie angemeldet sind, können Sie mit dieser Funktion den Inhalt der sicheren Datenpartition durchsuchen.DT4000 G2 formatieren
\- Mit dieser Funktion können Sie die sichere Datenpartition formatieren (Achtung: Hierbei werden alle Daten gelöscht.) (Abb. 9.6)Online Support (Nur mit Internetanschluss)
\- Öffnet Ihren Internet-Browser und navigiert Sie zu http://www.kingston.com/support/, wo Sie Zugang zu weiteren Support-Informationen haben.Über den DT4000 G2
\- Enthält spezifische Angaben über den DT4000 G2, einschließlich Versionsangaben über die Anwendung und die Firmware (Abb. 9.7)DT4000 G2 Herunterfahren
\- Fährt den DT4000 G2 ordnungsgemäß herunter, damit Sie ihn sicher aus Ihrem System entfernen können text_image
Format - DT4000 G2 DataTraveler® 4000 G2 WARNING: Formatting will erase ALL data on this disk. To format the disk, click OK. To quit, click CANCEL. Kingston OK Canceltext_image
About - DT4000 G2 DataTraveler® 4000 G2 Copyright (c) 2007 Kingston Technology Company, Inc. Modules Version Information DT4000 G2 5.0 DS0FFE23C7ECBF1080001D2 Application 4.0.0.1 FW Version 3.05 Crypto Library FW 1.00 Kingston Close- Abschnitt Mac abgeschlossen -
Installation & Einrichtung (Linux-Umgebung)
(HINWEIS: Aufgrund der unterschiedlichen Linux-Distributionen im Markt kann das 'Aussehen' der Schnittstellen in den einzelnen Versionen unterschiedlich sein. Jedoch sind die in der Terminalanwendung verwendeten allgemeinen Befehle einander ähnlich und dienen als Referenz für die nachstehende Anleitung für Linux. Die Screenshot-Beispiele wurden in einer 64-Bit-Umgebung erstellt.)  In einigen Linux-Distributionen sind Superuser-Rechte (Root) erforderlich, um die DT4000 G2 Befehle im Fenster der Terminalanwendung korrekt ausführen zu können. Stecken Sie den DT4000 G2 in einen freien USB-Anschluss Ihres Notebooks oder PCs ein und warten Sie, bis das Linux Betriebssystem ihn erkannt hat. Dies wir durch das DT4000 G2 Volumensymbol am Desktop angezeigt\*, siehe Abb. 10.1.  DT4000G2 Abb. 10.1 - DT4000 G2 Volumen Der DT4000 G2 ist mit 5 Befehlen ausgestattet, die für Linux verwendet werden können: dt4000g2\_about, dt4000g2\_forgotpassword, dt4000g2\_initialize, dt4000g2\_login, and dt4000g2\_logout (Hinweis: Zur Ausführung dieser Befehle müssen Sie das Anwendungsfenster "Terminal" öffnen und zu dem Ordner navigieren, der alle fünf Dateien enthält. Jedem Befehl müssen die beiden folgenden Zeichen vorangestellt werden: '/' (ein Punkt und ein Schrägstrich.) Benutzer mit einer 32-Bit Version müssen ein Anwendungsfenster "Terminal" öffnen und das aktuelle Verzeichnis durch Eingabe des nachstehenden Befehls in der Eingabeaufforderung auf /media/DT4000G2/linux/linux32\$ ändern: cd /media/DT4000G2/linux/linux32 (und dann mit EINGABE bestätigen.) Benutzer mit einer 64-Bit Version müssen ein Anwendungsfenster "Terminal" öffnen und das aktuelle Verzeichnis durch Eingabe des nachstehenden Befehls in der Eingabeaufforderung auf /media/DT4000G2/linux/linux64\$ ändern: cd /media/DT4000G2/linux/linux64 (und dann mit EINGABE bestätigen.) \*Hinweis: Wenn das DT4000 G2 Volumen nicht automatisch vom Betriebssystem geladen wird, müssen Sie das Volumen manuell mit dem Linux-Befehl 'mount' in einem Terminal Fensterladen. Entnehmen Sie Ihre spezielle BS-Distribution bitte Ihrer Linux Dokumentation oder Ihrer bevorzugten Online-Supportseite für die richtigen Syntax- und Befehlsoptionen.Installationseinrichtung (Linux Umgebung)
Nachdem der DT4000 G2 an Ihrem Computer angeschlossen und vom Betriebssystem erkannt wurde, muss das Gerät vor der ersten Verwendung noch eingerichtet werden. Öffnen Sie dazu die Anbindung 'Terminal' (oder das Fenster Befehlszeile) und führen Sie folgende Schritte durch: (Hinweis: Die in diesem Abschnitt enthaltenen Screenshots und Anweisungen verwenden den Ordner linux32 (für 32-Bit) für die Darstellung der Verwendung des DT4000 G2 im Linux BS. Wenn Sie mit einer 64-Bit-Version von Linux arbeiten, müssen Sie nur den 64-Bit-Ordner anstatt des 32-Bit-Ordners aufrufen, d. h. linux64 anstatt von linux32.) 1. Sie können das Verzeichnis für das DT4000 G2 Volumen durch Eingabe des nachstehenden Befehls in der Terminal-Aufforderung ändern (siehe Abb. 10.2.): cd /media/DT4000G2/linux/linux32 (Hinweis: Beachten Sie die Groß- und Kleinschreibung bei der Eingabe von Befehlen und Ordnernamen (Verzeichnis), d. h. 'linux32' und 'Linux32 sind NICHT dasselbe.' Auch die Schreibweise muss genauso sein wie abgebildet.) text_image
[root@localhost /]# cd /media/dt4000g2/linux/linux64 [root@localhost linux64]# _text_image
[root@localhost /]# cd /media/dt4000g2/linux/linux64 [root@localhost linux64]# ls dt4000g2_about dt4000g2_initialize dt4000g2_logout dt4000g2Forgotpassword dt4000g2_login [root@localhost linux64]# _text_image
[root@localhost /]# cd /media/dt4000g2/linux/linux64 [root@localhost linux64]# ls dt4000g2_about dt4000g2_initialize dt4000g2_logout dt4000g2Forgotpassword dt4000g2_login [root@localhost linux64]# ./dt4000g2_initializeVerwendung des Geräts (Linux Umgebung)
Nach der Installation des DT4000 G2 können Sie durch Anmelden im Gerät mit dem auf Seite 22 erstellten DT4000 G2 Passwort auf die sichere Datenpartition zugreifen. Führen Sie dazu folgende Schritte durch: 1. Öffnen Sie ein Fenster der Anwendung 'Terminal'. 2. Geben Sie in der Terminal-Aufforderung folgenden Befehl ein: cd /media/DT4000G2/linux/linux32 3. Geben Sie in der Eingabeaufforderung /media/DT4000G2/linux/linux32\$folgenden Befehl zum Anmelden im Gerät ein: ./dt4000g2\_login\* und drücken Sie auf EINGABE. (Hinweis: Bei Befehlen und Ordnereingaben muss die Groß- und Kleinschreibung beachtet werden und die Schreibweise muss genau eingehalten werden.) 4. Geben Sie Ihr DT4000 G2 Passwort ein und drücken Sie auf EINGABE. Nach dem erfolgreichen Anmelden wird das sichere Datenvolumen auf Ihrem Computer geöffnet und Sie können Ihren DT4000 G2 verwenden. Wenn das Passwort zum Anmelden falsch war, haben Sie die Möglichkeit, es erneut durch Wiederholung des 3. Schrittes einzugeben. Das integrierte Sicherheitsmodul registriert jedoch alle fehlgeschlagenen Anmeldeversuche. Wenn die voreingestellte Anzahl von 10 fehlgeschlagenen Loginversuchen erreicht wurde, wird der DT4000 G2 gesperrt und vor der weiteren Benutzung muss das Gerät über den Befehl dt4000g2\_forgotpassword erneut eingerichtet werden. Mit dieser Verfahrensweise können Sie ein neues Passwort erstellen, jedoch wird die sichere Datenpartition des DT4000 G2 zum Schutz Ihrer Daten formatiert. Dies bedeutet, dass Ihre gesamten Daten gelöscht werden. Nach Durchführung des dt4000g2\_forgotpassword Verfahrens und erfolgreich abgeschlossener Eingabe eines neuen Passworts wird der Zähler für fehlgeschlagene Loginversuche zurückgesetzt (Hinweis: Der Zähler für fehlgeschlagene Loginversuche wird auch nach dem erfolgreichem Anmelden vor dem Erreichen der maximalen Versuchsanzahl (MaxNoA in Kurzform) zurückgesetzt..) Wenn Sie Ihren DT4000 G2 nicht mehr verwenden, sichern Sie Ihre Daten und melden Sie sich ab. Führen Sie dazu folgende Schritte durch: 1. Öffnen Sie ein Fenster der Anwendung 'Terminal'. 2. Geben Sie in der Terminal-Aufforderung folgenden Befehl ein: cd /media/DT4000G2/linux/linux32 3. Geben Sie in der Eingabeaufforderung /media/DT4000G2/linux/linux32\$folgenden Befehl zum Ausloggen aus dem Gerät ein: ./dt4000g2\_logout\* und drücken Sie auf EINGABE. (Hinweis: Bei Befehlen und Ordnereingaben muss die Groß- und Kleinschreibung beachtet werden und die Schreibweise muss genau eingehalten werden.) 4. Entfernen Sie den DT4000 die zwei aus Ihrem System und bewahren Sie ihn an einem sicheren Ort auf. \*Hinweis: In einigen Linux-Distributionen sind Superuser-Rechte (Root) erforderlich, um die DT4000 G2 Befehle im Fenster der Terminalanwendung korrekt ausführen zu können.Hilfe und Fehlerbehebung
Sperrfunktion
Der DT4000 G2 enthält eine Sicherheitsfunktion, die den unbefugten Zugriff auf die Datenpartition verhindert, wenn die maximale Anzahl aufeinanderfolgender fehlgeschlagener Loginversuche (Kurzform MaxNoA) erreicht wurde; standardmäßig ist die "Out-of-Box" Konfiguration auf einen Wert von 10 (Anzahl der Versuche) festgelegt. Der 'Sperrzähler' registriert jeden fehlgeschlagenen Anmeldeversuch und kann auf zwei Wegen zurückgesetzt werden: 1) Durch erfolgreiches Anmelden vor Erreichen des MaxNoA, oder 2) Erreichen des MaxNoA und Durchführen einer Geräteformatierung.\* Wenn ein falsches Passwort eingegeben wurde, wird mit einer Fehlernachricht unter dem Feld 'Hint' angezeigt, dass die Anmeldung fehlgeschlagen ist. Siehe Abb. 10.1. Wenn der Anmeldeversuch zum 7- Mal fehlgeschlagen ist, wird eine weitere Fehlernachricht mit der Mitteilung angezeigt, dass Ihnen noch 3 Versuche bis zum Erreichen des MaxNoA bleiben (der standardmäßig auf 10 eingestellt ist). Sie Abb. 10.2. Nach dem 10. fehlgeschlagenen Anmeldeversuch wird der DT4000 G2 die text_image
Login device DT4000G2 DataTraveler® 4000 G2 Password: Hint Failed to Login: The password is incorrect. Please try again. Forget Password Contact Information Kingston WINSTOCKS.COM Login Canceltext_image
Login device DT4000G2 DataTraveler® 4000 G2 Password: Hinc Failed to Login: The password is incorrect. Please try again. 3 Attempts left before your DT4000 is blocked permanently. Forget Password Contact Information Kingston Login CancelPasswort vergessen
Wenn Sie Ihr Passwort vergessen haben, können Sie auf den Link 'Forgot Password' Klicken, der beim Starten des DT4000 G2\_Launcher angezeigt wird (siehe Abb. 10.3.) Mit dieser Option können Sie ein neues Passwort erstellen, jedoch wird der DT4000 G2 zum Schutz Ihrer Daten formatiert. Dies bedeutet, dass Ihre gesamten Daten bei der Durchführung gelöscht werden.\* Wenn Sie auf 'Forgot Password' klicken, wird eine Nachricht (Abb. 10.4) mit der Frage angezeigt, ob Sie vor dem Durchführen der Formatierung ein neues Passwort eingeben möchten. Sie können text_image
Login device DT4000G2 DataTraveler® 4000 G2 Password: Hint Forgot Password ContextInformation Kingston TECHNOLOGY Login Canceltext_image
Forgot Password In order to protect your data, your DT4000G2 will be formatted and all data will be erased. Do you want to enter a new password and format your DT4000G2? OK CancelKonflikt von Laufwerksbuchstaben (Windows Betriebssystem)
Wie im Abschnitt 'Systemanforderungen' dieses Handbuchs (auf Seite 3) erwähnt, benötigt der DT4000 G2 zwei freie, aufeinanderfolgende Laufwerksbuchstaben NACH dem letzten physischen Speicher, der vor der 'Lücke' in den Laufwerksbuchstabenzuweisungen erscheint (siehe Abb. 10.5.) Dies bezieht sich NICHT auf Netzwerkfreigaben, da diese speziell für Benutzerprofile sind und sich nicht auf das System-Hardwareprofil selbst beziehen und daher im Betriebssystem als verfügbar erscheinen. Dies bedeutet, dass Windows dem DT4000 G2 einen Laufwerksbuchstaben zuordnen kann, der bereits durch eine Netzwerkfreigabe oder einen Universal Naming Convention (UNC) Pfad verwendet wird, wodurch ein Laufwerksbuchstabenkonflikt entsteht. Wenden Sie sich für die Änderung von Laufwerkbuchstabenzuweisungen im Windows Disk Management (Administratorrechte erforderlich) in diesem Fall bitte an Ihren Administrator oder an die Helpdesk-Abteilung. text_image
My Computer File Edit View Favorites Tools Help Back Search Folders Address Go System Tasks View system information Add or Remove programs Change a setting Local Disk (CC) DVY/CD-R/W Drive (DC) Local Disk (E:) Other Places My Network Places My Documents Control Panel DT4000G2 (F:) Network Share (G:) Local Disk (H:) Details System FolderFehlermeldungen
Datei kann nicht erstellt werden – Diese Fehlermeldung wird angezeigt, wenn Sie im schreibgeschützten Modus eingeloggt sind und versuchen, eine Datei oder einen Ordner IN einer sicheren Datenpartition zu ERSTELLEN. text_image
Unable to create file Unable to create the file 'New Text Document.txt' The media is write protected. OKAbb. 10.6 – Fehlermeldung: Datei kann nicht erstellt werden
Datei oder Ordner kann nicht kopiert werden – Diese Fehlermeldung wird angezeigt, wenn Sie im schreibgeschützten Modus eingeloggt sind und versuchen, eine Datei oder einen Ordner IN DIE sichere Datenpartition zu KOPIEREN. text_image
Error Copying File or Folder Cannot copy File1: The disk is write-protected. Remove the write-protection or use another disk. OKtext_image
Error Deleting File or Folder Cannot delete File1: The disk is write-protected. Remove the write-protection or use another disk. OKDataTraveler® 4000 G2 Manuel d'utilisation G2
text_image
DataTraveler® 4000 G2 FIPS 140-2 LEVEL 3 CERTIFIED Kingston® TECHNOLOGY ©2014 Kingston Technology Corporation. D7600 Newhope Street, Fountain Valley, CA 927.08 USA All rights reserved. All registered trademarks and trademarks are the property of their respective owners.natural_image
Black USB flash drive with open lid, no visible text or symbols on bodyTable des Matières
TOCÀ PROPOS DE CE MANUEL
Ce manuel d'utilisation est destiné à la clé USB DataTraveler4000 G2 (ou DT4000 G2 dans ce document) validée FIPS et basée sur la version en sortie d'usine, sans personnalisation.Configuration système
Plateforme PC
- Processeur Pentium III ou équivalent (ou plus rapide) • 15Mo d'espace disque libre - Port USB 2.0/3.0 disponible - Deux lettres de lecteur consécutives après le dernier disque physique\*Systèmes d'exploitation supportés
- Windows ^ 8, 8.1 (RT exclus) - Windows ^ 7 SP1 - Windows ^ Vista SP2Plateforme Mac
• 15Mo d'espace disque libre - USB 2.0/3.0Prise en charge des systèmes d'exploitation
• Mac OS X 10.8.x -10.10xRecommendations
Pour que la clé DT4000 G2 bénéficie d'une alimentation suffisante, elle doit être insérée sur un port USB directement sur un ordinateur portable ou de bureau, comme indiqué dans la Figure 1.1. Évitez de brancher la clé DT4000 G2 sur un périphérique équipé d'un port USB, par exemple un clavier ou un concentrateur USB alimenté, comme indiqué dans la Figure 1.2. natural_image
Two photos showing a laptop and a device with a black USB flash, both placed on a white surface (no visible text or symbols)natural_image
Two photos showing a device with a black connector and red prohibition symbols, no readable text or labels present.Configuration (Environment Windows)
1. Connectez la DT4000 G2 à un port USB disponible de votre ordinateur de bureau ou portable et attendez que Windows la détecte. - Les utilisateurs de Windows Vista verront s'afficher une notification de pilote de périphérique, comme indiquée à la Figure 2.2. - Les utilisateurs de Windows 7 verront s'afficher une notification de pilote de périphérique, comme indiquée à la Figure 2.2. Lorsque la détection du nouveau matériel est terminée, Windows vous demande de lancer le processus d'initialisation. - Windows Vista affiche une fenêtre AutoPlay, similaire à celle indiquée à la Figure 2.3. - Windows 7 affiche une fenêtre AutoPlay, similaire à celle indiquée à la Figure 2.3. 2. Sélectionnez l'option : Exécutez DT4000 G2\_Launcher.exe. Si la fonction AutoPlay de Windows ne démarre pas, naviguez sur le CD-ROM (Figure 2.4) et lancez manuellement le programmeDT4000 G2\_Launcher. text_image
Installing device driver software Click here for status.text_image
Installing device driver software Click here for status.text_image
Organize Burn to disc Search DVD RW Drive (R) Files Currently on the Disc Support auton.inf DT400G2_Launch herdisetext_image
AutoPlay DVD RW Drive (I): DT4000G2 Always do this for software and games: Install or run program from your media Run DT4000G2_Launcher.exe Published by Kingston Technology Corporation General options Open folder to view files using Windows Explorer View more AutoPlay options in Control PanelInitialisation du périphérique (Environnement Windows)
1. Sélectionnez votre langue préférée dans le menu déroulant, puis cliquez sur Suivant (Figure 3.1.) text_image
Device Initialization - DT4000 G2 DataTraveler® 4000 G2 Language Select Language: English Kingston TECNOLOGY Next> Canceltext_image
Device Initialization - DT4000 G2 DataTraveler® 4000 G2 License Agreement SOFTWARE LICENSE AGREEMENT IMPORTANT - READ CAREFULLY: THIS SOFTWARE LICENSE AGREEMENT ("Agreement") is a legal agreement between you (either an individual or a single entity) and Kingston Technology Company Inc. ("Kingston"). This Agreement relates to the software accompanying this Agreement, which includes computer software and may include associated media, printed materials, and "online" or electronic Accept Decline Kingston TECHNOLOGYtext_image
Device Initialization - DT4000 G2 DataTraveler® 4000 G2 Password * Password: •••••••••••• * Password Confirmation: ••••••••••• i Password Rules Hint: Pwd Hint *Mandatory fieldtext_image
Device Initialization - DT4000 G2 DataTraveler® 4000 G2 Contact Information Name: Test Name Company: Test Company Details: Test Details & Other Info Kingston TECHNOLOGYtext_image
Format - DT4000 G2 DataTraveler® 4000 G2 Formatting DT4000 G2 (I:)...text_image
Format - DT4000 G2 DataTraveler® 4000 G2 Format Complete. Kingston TECHNOLOGY OKtext_image
Login device DT4000 G2 DataTraveler® 4000 G2 Password: Hint Forgot Password Contact Information Read-Only Mode Kingston TECHNOLOGY Login CancelOptions du périphérique (Environnement Windows)
Tant que vous êtes connecté au périphérique, une icône DT4000 G2 est affichée dans le coin supérieur droit de la barre des tâches Windows (Figure 5.1). (Remarque : Les utilisateurs de Windows 7 doivent cliquer sur le bouton Flèche haute dans la barre des tâches pour accéder à l'icône DT4000 G2 (Figure 5.2). Cliquez une fois sur l'icône DT4000 G2 pour afficher le menu suivant : text_image
DT4000 G2 Settings Browse DT4000 G2 Format DT4000 G2 Online Support About DT4000 G2 Shut down DT4000 G2text_image
Customize... 9:26 AM 12/3/2010Paramètres DT4000 G2
- Vous pouvez modifier votre mot de passe et/ou l'indice (Figure 5.3) - Vous pouvez ajouter/ afficher/ modifier vos informations personnelles (Figure 5.4) - Vous pouvez modifier la langue sélectionnée (Figure 5.5) Remarque : Pour des raisons de sécurité, le mot de passe actuel de votre DT4000 G2 vous sera demandé lorsque vous souhaitez actualiser ou modifier ces paramètres.) text_image
Settings DataTraveler® 4000 62 Password | Contact information | Language | * Current Passwords: * New Passwords: * Password Confirmations: i Password Rules Hint: Fwd Hint * Mandatory field Kingston OK Apply Canceltext_image
Settings DataTraveler® 4000 62 Password | Contact Information | Language | Name: Test Name Company: Test Company Details: Test Details & Other Info Kingston OK Canceltext_image
Settings DataTraveler® 4000 62 Password | Contact Information | Language Select Language: English Kingston OK CancelParcourir la DT4000 G2
\- Vous pouvez parcourir le contenu de la partition sécurisée pendant que vous êtes connecté.Formater la DT4000 G2\*
\- Vous pouvez formater la partition sécurisée (Avertissement : Toutes les données seront détruites). (Figure 5.6) Assistance en ligne (nécessite une connexion internet) \- Cette fonction ouvre votre navigateur internet et affiche la page http://www.kingston.com/support/ pour vous permettre de consulter les informations supplémentaires de l'assistance. text_image
Format - DT4000 G2 DataTraveler® 4000 G2 WARNING: Formatting will erase ALL data on this disk. To format the disk (3), click OK. To suit, click CANCEL. Your password is required to complete format. Password: Kingston OK CancelÀ propos de la DT4000 G2
\- Cette section affiche des informations spécifiques à la DT4000 G2, incluant les données des versions de l'application et du firmware (Figure 5.7)Fermeture de la clé DT4000 G2
\- Cette fonction permet de fermer correctement la DT4000 G2 avant de la déconnecter physiquement du système en toute sécurité. text_image
About - DT4000 G2 DataTraveler® 4000 G2 Copyright (c) 2011 Kingston Technology Company, Inc. Modules Version Information DT4000 G2 K40 00FFE23C7ECBF1080001D2 Application K4.0.0.5 FW Version 3.05 Crypto Library FW 1.00 Kingston TECHNOLOGY Close- Fin de la section Windows -
Configuration (Environment Mac)
Insérez la DT4000 G2 dans un port USB disponible sur votre ordinateur de bureau ou portable et attendez que le système d'exploitation Mac la détecte. Lorsque la clé USB est détectée, un volume DT4000 G2 est affiché sur le bureau (voir la Figure 6.1). 1. Double-cliquez sur l'icône CD-ROM DT4000 G2. 2. Double-cliquez sur le dossier Mac affiché dans la fenêtre indiquée à la Figure 6.2. 3. Double-cliquez sur l'icône d'application DT4000 G2 affichée dans la fenêtre indiquée à la Figure 6.3. Le processus d'initialisation démarrera aussi.  Figure 6.1 - DT4000 G2 text_image
DT4000G2 autorun.inf DT4000G2_Launcher.exe Linux Mao rr_moved Supporttext_image
DT4000G2_Launchertext_image
DataTraveler® 4000 G2 FIPS 140-2 LEVEL 3 CERTIFIED Kingston® TECHNOLOGY ©2014 Kingston Technology Corporation, 17505 Newshape Street, Fountain/Verlag, CA 19206 USA All rights reserved. All registered trademarks and trademarks are the property of their respective owners.Initialisation du périphérique (Environnement Mac)
1. Sélectionnez votre langue préférée dans le menu déroulant, puis cliquez sur Suivant (Figure 7.1.) text_image
Device Initialization - DT4000 G2 DataTraveler® 4000 G2 Language Select Language: English Kingston TECHNOLOGY Next> Canceltext_image
Device Initialization - DT4000 G2 DataTraveler® 4000 G2 License Agreement SOFTWARE LICENSE AGREEMENT IMPORTANT - READ CAREFULLY: THIS SOFTWARE LICENSE AGREEMENT ("Agreement") is a legal agreement between you (either an individual or a single entity) and Kingston Technology Company Inc. ("Kingston"). This Agreement relates to the software accompanying this Agreement, which includes computer software and may include associated media, printed materials, and "online" or electronic Accept Decline Kingstontext_image
Device Initialization - DT4000 G2 DataTraveler® 4000 G2 ① ② ③ ④ Password * Password: ********** * Password Confirmation: ********** i Password Rules Hint: Pwd Hint * Mandatory field Kingston TECHNOLOGYtext_image
Device Initialization - DT4000 G2 DataTraveler® 4000 G2 ① ② ③ ④ Contact Information Name: Test Name Company: Test Company Details: Test Details & Other Info Kingston TECHNOLOGYtext_image
Format - DT4000 G2 DataTraveler® 4000 G2 Formatting DT4000 G2 ... Kingston OK Canceltext_image
Format - DT4000 G2 DataTraveler® 4000 G2 Format Complete. Kingston OK Canceltext_image
Format - DT4000 G2 DataTraveler® 4000 G2 Password: Hint Forgot Password Contact Information Read-Only Mode Kingston EPLAAGLISY Login CancelOptions du périphérique (Environnement Mac)
Tant que vous êtes connecté au périphérique, une icône DT4000 G2\_Launcher est affichée dans le Dock Mac OS X (Figure 9.1). DT4000G2\_Launcher text_image
Screenshot of a software toolbar with icons for apps, documents, and toolsParamètres DT4000 G2
- Vous pouvez modifier votre mot de passe et/ou l'indice (Figure 9.3) - Vous pouvez ajouter/ afficher/ modifier vos informations personnelles (Figure 9.4) - Vous pouvez modifier la langue sélectionnée (Figure 9.5) text_image
DT4000 G2 Settings Browse DT4000 G2 Format DT4000 G2 Online Support About DT4000 G2 Shut down DT4000 G2 Options Show All Windows Hide Quittext_image
Settings DataTraveler® 4000 62 Password Contact Information Language * Current Password: * New Password: * Password Confirmation: i Password Rules Hint: * Mandatory field Kingston OK Canceltext_image
Settings DataTraveler® 4000 62 Password Contact InformationLanguage Name: Company: Details: Kingston OK Canceltext_image
Settings DataTraveler® 4000 G2 Password Contact Information Language Select Language: English Kingston OK CancelParcourir la DT4000 G2
\- Vous pouvez parcourir le contenu de la partition sécurisée pendant que vous êtes connecté.Formater la DT4000 G2
\- Vous pouvez formater la partition sécurisée (Avertissement : Toutes les données seront détruites). (Figure 9.6)Assistance en ligne (nécessite une connexion internet)
\- Cette fonction ouvre votre navigateur internet et affiche la page http://www.kingston.com/support/ pour vous permettre de consulter les informations supplémentaires de l'assistance.À propos de la DT4000 G2
\- Cette section affiche des informations spécifiques à la DT4000 G2, incluant les données des versions de l'application et du firmware (Figure 9.7)Fermeture de la clé DT4000 G2
\- Cette fonction permet de fermer correctement la DT4000 G2 avant de la déconnecter physiquement du système en toute sécurité. text_image
Format - OT4000 G2 DataTraveler® 4000 G2 WARNING: Formatting will erase ALL data on this disk. To format the disk, click OK. To quit, click CANCEL.text_image
About - DT4000 G2 DataTraveler® 4000 G2 Copyright (c) 2007 Kingston Technology Company, Inc. Modules Version Information DT4000 G2 3.0 050PFE23C7ECBP1060001D2 Application 4.0.0.1 FW Version 3.05 Crypto Library FW 1.00 Kingston Close- Fin de la section Mac -
Configuration (Environnement Linux)
Remarque : Compte tenu des différentes distributions de Linux actuellement disponibles, l'apparence de l'interface peut varier. Cependant, les commandes générales utilisées dans l'application Terminal restent très similaires et peuvent être reconnues dans les instructions qui suivent. Les images d'écran dans cette section proviennent de l'environnement 64 bits.  Certaines versions de Linux nécessitent des privilèges de super utilisateur (ou utilisateur racine) pour exécuter correctement les commandes de la DT4000 G2 dans la fenêtre de l'application Terminal. Insérez la DT4000 G2 dans un port USB disponible su votre ordinateur de bureau ou portable et attendez que le système d'exploitation Linux la détecte. Lorsque la clé USB est détectée, une icône de volume DT4000 G2 est affichée\* sur le bureau, comme indiqué à la Figure 10.1.  DT4000G2 Figure 10.1 - Volume DT4000G2 La DT4000 G2 inclut 5 commandes utilisables dans l'environnement Linux : dt4000g2\_about, dt4000g2\_logout dt4000g2\_forgotpassword, dt4000g2\_initialize, dt4000g2\_login, Remarque : Pour exécuter ces commandes, vous devez ouvrir une fenêtre de l'application Terminal et parcourir le volume jusqu'au répertoire contenant les fichiers. Chaque commande doit commencer par les deux caractères suivants : "./" (un point et une barre oblique.) Sur un système 32 bits, ouvrez une fenêtre de l'application Terminal, puis allez au répertoire /media/DT4000G2/linux/linux32\$ en saisissant la commande suivante : cd /media/DT4000G2/linux/linux32 (puis appuyez sur la touche ENTRÉE). Sur un système 64 bits, ouvrez une fenêtre de l'application Terminal, puis allez au répertoire /media/DT4000G2/linux/linux64\$ en saisissant la commande suivante : cd /media/DT4000G2/linux/linux64 (puis appuyez sur la touche ENTRÉE.) \*Remarque : Si le volume DT4000 G2 n'est pas automatiquement chargé par le système d'exploitation, vous devez le charger manuellement dans une fenêtre de l'application Terminal, avec la commande Linux : mount. Veuillez consulter la documentation Linux de votre distribution ou votre site d'assistance habituel pour utiliser la syntaxe et les options de commande appropriées.Initialisation du périphérique (Environnement Linux)
Lorsque la DT4000 G2 est connectée à votre ordinateur et reconnue par le système d'exploitation, elle doit être initialisée pour être utilisable. Pour cela, ouvrez l'application Terminal (ou la fenêtre de Ligne de commande), puis suivez les instructions ci-dessous : Remarque : Les images d'écran et les instructions de cette section sont basées sur le répertoire linux32 (32 bits) afin d'illustrer l'utilisation de la DT4000 G2 sur un système Linux. Si vous utilisez la version 64 bits de Linux, il vous suffit d'utiliser le répertoire 64 bits : linux64 à la place du répertoire 32 bits (linux32). 1. Pour accéder au volume DT4000 G2, saisissez la commande suivante dans Terminal (Figure 10.2): cd /media/DT4000G2/linux/linux32 Remarque : Les commandes et les noms de répertoire (dossier) sont sensibles aux majuscules et aux minuscules. Donc "linux32" n'est pas le même répertoire que "Linux32". La syntaxe doit aussi être exactement reproduite. text_image
[root@localhost /]# cd /media/dt4000g2/linux/linux64 [root@localhost linux64]# _text_image
[root@localhost /]# cd /media/dt4000g2/linux/linux64 [root@localhost linux64]# ls dt4000g2_about dt4000g2_initialize dt4000g2_logout dt4000g2Forgotpassword dt4000g2_login [root@localhost linux64]# _text_image
[root@localhost /]# cd /media/dt4000g2/linux/linux64 [root@localhost linux64]# ls dt4000g2_about dt4000g2_initialize dt4000g2_logout dt4000g2_forgotpassword dt4000g2_login [root@localhost linux64]# ./dt4000g2_initializeUtilisation du périphérique (Environnement Linux)
Lorsque DT4000 G2 est initialisée, vous pouvez accéder au contenu de la partition des données sécurisées en accédant à la clé à l'aide de votre mot de passe DT4000 G2, créé en suivant les instructions à la page 22. Pour cela, suivez les instructions suivantes. 1. Ouvrez une fenêtre de l'application "Terminal". 2. À l'invite, saisissez la commande suivante : cd /media/DT4000G2/linux/linux32 3. L'invite affiche maintenant la commande /media/DT4000G2/linux/linux32\$, saisissez la commande suivante pour accéder à votre clé DT4000 G2 : ./dt4000g2\_login\* puis appuyez sur ENTRÉE Remarque : Les commandes et les noms de répertoires sont sensibles aux majuscules et aux minuscules et la syntaxe doit être rigoureusement respectée. 4. Saisissez votre mot de passe DT4000 G2 puis appuyez sur ENTRÉE. Le volume des données sécurisées est affiché sur votre bureau et vous pouvez utiliser la DT4000 G2. Pendant la procédure d'accès, si un mot de passe erroné est saisi, vous pouvez immédiatement ressayer. Mais une fonction de sécurité intégrée gère le nombre de tentatives d'accès. Après 10 tentatives d'accès erronées, la DT4000 G2 se verrouille et vous devrez réinitialiser la clé en exécutant la commande dt4000g2Forgotpassword pour pouvoir utiliser votre clé. Cette option vous permet de créer un mot de passe, mais pour protéger vos données, la DT4000 G2 formatera le volume des données sécurisées. Par conséquent, toutes vos données seront définitivement effacées. Lorsque le processus dt4000g2\_forgotpassword est terminé et que vous avez correctement créé un mot de passe, le compteur de tentatives d'accès est remis à zéro. (Remarque : Ce compteur est également remis à zéro lorsque l'accès à la clé est autorisé par la saisie d'un mot de passe correct avant d'atteindre le nombre maximal de tentatives d'accès (MaxNoA). Pour sécuriser vos données lorsque vous avez terminé d'utiliser votre DT4000 G2, vous devez fermer la connexion. Pour cela, suivez les instructions ci-dessous : 1. Ouvrez une fenêtre de l'application "Terminal". 2. À l'invite, saisissez la commande suivante : cd /media/DT4000G2/linux/linux32 3. L'invite affiche maintenant la commande /media/DT4000G2/linux/linux32\$, saisissez la commande suivante pour fermer l'accès à votre clé : ./dt4000g2\_logout\* puis appuyez sur ENTRÉE (Remarque : Les commandes et les noms de répertoires sont sensibles aux majuscules et aux minuscules et la syntaxe doit être rigoureusement respectée.) 4. Débranchez la DT4000 G2 du port USB de votre ordinateur et mettez-la en lieu sûr. \*Remarque : Certaines versions de Linux nécessitent des privilèges de super utilisateur (ou utilisateur racine) pour exécuter correctement les commandes de la DT4000 G2 dans la fenêtre de l'application Terminal.Aide et dépannage
Verrouillage du périphérique
La DT4000 G2 est dotée d'une fonction de sécurité qui bloque tout accès non autorisé à la partition des données après un nombre prédéterminé de tentatives erronées consécutives (cette valeur est désignée par l'abréviation MaxNoA [max number of access]). La limite par défaut définie en usine est de 10 tentatives. Le compteur de tentatives enregistre chaque échec de connexion. Il est remis à zéro dans deux cas : 1) Le mot de passe saisi est correct et la connexion à la clé est établie avant d'atteindre la limite MaxNoA ; ou 2) La limite MaxNoA est atteinte et le formatage de la clé USB a été exécuté.\* Si le mot de passe est erroné, un message d'erreur s'affiche sous le champ Indice, indiquant un échec de la connexion. Voir Figure 10.1. Après la septième tentative erronée consécutive, un message d'erreur supplémentaire avertit l'utilisateur qu'il lui reste trois tentatives avant d'atteindre la limite MaxNoA (définie à 10 tentatives par défaut). Voir la Figure 10.2. Après la dixième tentative de connexion erronée, la DT4000 G2 verrouille définitivement la partition des données et ne pourra être utilisée qu'après un formatage. Par conséquent, toutes les données présentes sur la DT4000 G2 seront détruites et vous devrez saisir un nouveau mot de passe. text_image
Login device DT4000G2 DataTraveler® 4000 G2 Password: Hint: Failed to Login: The password is incorrect. Please try again. Forget Password Contact Information Kingston WINSTOCKS.COM Login Canceltext_image
Login devices DT4000G2 DataTraveler® 4000 G2 Password: Hint: Failed to Login: The password is incorrect. Please try again. 3. Attempts left before your DT4000 is blocked permanently. Forget Password Contact Information Kingston Login CancelMot de passe oublié
Si vous avez oublié votre mot de passe, vous pouvez cliquer sur le lien Mot de passe oublié, qui est affiché dans la fenêtre de connexion après exécution du fichier DT4000 G2\_Launcher (voir la Figure 10.3). Cette option vous permet de créer un mo de passe, mais pour protéger vos données, la DT4000 G2 sera formatée. Par conséquent, ce processus effacera définitivement toutes vos données.\* Lorsque vous cliquez sur le bouton Mot de passe oublié, un message (Figure 10.4) vous demande si vous souhaitez saisir un nouveau mot de passe avant le lancement du formatage. Vous pouvez alors 1) cliquer sur OK pour confirmer, ou 2) cliquer sur "Annuler" pour revenir à la fenêtre de connexion. Si vous choisissez de continuer, vous pourrez saisir un nouveau mot de passe complexe et un nouvel indice. L'indice n'est text_image
Login device DT4000G2 DataTraveler® 4000 G2 Password: Hint Forgot Password Context information Kingston TECHNOLOGY Login Canceltext_image
Forgot Password In order to protect your data, your DT4000G2 will be formatted and all data will be erased. Do you want to enter a new password and format your DT4000G2? OK CancelConflit de lettres de lecteur (Environnement Windows)
Comme indiqué dans la section Configuration système (page 3), la clé DT4000 G2 nécessite deux lettres de lecteur consécutives APRÈS le dernier disque physique affiché avant "l'écart" d'attribution des lettres de lecteur (voir la Figure 10.5). Cette attribution est indépendante des partages de réseau parce que ces partages sont spécifiques aux profils d'utilisateur et pas au profil matériel du système. Une lettre attribuée à un volume du réseau peut donc apparaître comme disponible pour le système d'exploitation. Par conséquent, Windows peut attribuer à la DT4000 G2 une lettre de lecteur qui est déjà utilisée par un élément connecté au réseau ou sur un chemin UNC (Universal Naming Convention/ Convention de nommage universel). Cela provoque un conflit de lettres de lecteur. Dans ce cas, veuillez consulter votre administrateur ou le service d'assistance pour modifier l'attribution des lettres de lecteur dans le gestionnaire des disques Windows Disk Management (les droits d'administrateur sont nécessaires). text_image
My Computer File Edit View Favorites Tools Help Back Search Folders Address Go System Tasks View system information Add or Remove programs Change a setting Local Disk (CC) D:\D\CD-R.W Drive (DC) Local Disk (E:) Other Places My Network Places My Documents Control Panel DT4000GZ (F:) Network Share (G:) Local Disk (H:) Details System FolderMessages d'erreur
Le fichier ne peut pas être créé. Ce message d'erreur apparaît lorsque vous tentez de CRÉER un fichier ou un dossier SUR la partition sécurisée alors que son accès est en mode Lecture uniquement. text_image
Unable to create file Unable to create the file 'New Text Document.txt' The media is write protected. OKtext_image
Error Copying File or Folder Cannot copy File1: The disk is write-protected. Remove the write-protection or use another disk. OKtext_image
Error Deleting File or Folder Cannot delete File1: The disk is write-protected. Remove the write-protection or use another disk. OKManuale d'uso del drive DataTraveler® 4000 G2
text_image
DataTraveler® 4000 G2 FIPS 140-2 LEVEL 3 CERTIFIED Kingston® TECHNOLOGY ©2014 Kingston Technology Corporation. D7600 Newhope Street, Fountain Valley, CA 927.08 USA All rights reserved. All registered trademarks and trademarks are the property of their respective owners.natural_image
Black USB flash drive with open lid, no visible text or symbols on bodyIndice dei contenuti
TOCINFORMAZIONI SULLA GUIDA
Questo manuale d'uso contiene le istruzioni per l'uso del drive DataTraveler ^® 4000 G2 certificato FIPS (di seguito denominato per semplicità DT4000 G2); tali istruzioni sono riferite all'unità in configurazione standard di fabbrica e pertanto priva di qualunque tipo di personalizzazione.Requisiti di sistema
Piattaforma PC
- Processore Pentium III o equivalente (oppure superiore) • 15MB di spazio libero su disco - porta USB 2.0 / 3.0 disponibile - Due lettere di unità libere consecutive dopo quella associata all'ultimo drive fisico presente sull'unità\*Piattaforma Mac
• 15MB di spazio libero su disco - USB 2.0/3.0Sistemi operativi supportati
- Windows ^ 8, 8.1 (No RT) - Windows ^ 7 SP1 - Windows ^ Vista SP2Raccomandazioni
Per garantire una potenza adeguata al funzionamento del drive DT4000 G2, collegarlo direttamente a una porta USB sul computer notebook o desktop, come illustrato in Figura 1.1. Evitare di collegare il drive DT4000 G2 a qualunque tipo di periferica dotata di porta USB, come tastiere o hub USB, come illustrato in Figura 1.2. natural_image
Two electronic devices: a battery and an Ethernet card, both placed on a laptop keyboard (no visible text or symbols)natural_image
Two photos showing a device with a black connector and red prohibition symbols, no readable text or labels present.Configurazione (ambienti Windows)
1. Inserire il drive DT4000 G2 in una delle porte USB disponibili sul computer notebook o desktop in uso e attendere il rilevamento da parte di Windows. - Gli utenti di Windows Vista riceveranno la notifica dell'installazione del driver software per il nuovo hardware, come illustrato in Figura 2.2. - Gli utenti di Windows 7 riceveranno la notifica dell'installazione del driver software per il nuovo hardware, come illustrato in Figura 2.2. Una volta completata la fase di rilevamento del nuovo hardware, Windows chiederà all'utente di avviare la procedura di inizializzazione. - Per gli utenti di Windows Vista verrà visualizzata la finestra di esecuzione automatica della funzione AutoPlay, simile a quella illustrata in Figura 2.3. - Per gli utenti di Windows 7 verrà visualizzata la finestra di esecuzione automatica della funzione AutoPlay, simile a quella illustrata in Figura 2.3. text_image
Installing device driver software Click here for status.text_image
Installing device driver software Click here for status.text_image
Organize Burn to disc Files Currently on the Disc Support autorun.inf DT4000G2_Launch heronetext_image
AutoPlay DVD RW Drive (I): DT4000G2 Always do this for software and games: Install or run program from your media Run DT4000G2_Launcher.exe Published by Kingston Technology Corporation General options Open folder to view files using Windows Explorer View more AutoPlay options in Control PanelInizializzazione del dispositivo (ambienti Windows)
1. Selezionare la lingua preferita dal menu a comparsa e fare clic sulla voce "Next" (Successivo) come riportato in Figura 3.1. text_image
Device Initialization - DT4000 G2 DataTraveler® 4000 G2 Language Select Language: English Kingston Technology Next> Canceltext_image
Device Initialization - DT4000 G2 DataTraveler® 4000 G2 License Agreement SOFTWARE LICENSE AGREEMENT IMPORTANT - READ CAREFULLY: THIS SOFTWARE LICENSE AGREEMENT ("Agreement") is a legal agreement between you (either an individual or a single entity) and Kingston Technology Company Inc. ("Kingston"). This Agreement relates to the software accompanying this Agreement, which includes computer software and may include associated media, printed materials, and "online" or electronic Accept Decline Kingstontext_image
Device Initialization - DT4000 G2 DataTraveler® 4000 G2 ① ② ③ ④ Password * Password: ••••••••••• * Password Confirmation: ••••••••••• i Password Rules Hint: Pwd Hint *Mandatory fieldtext_image
Device Initialization - DT4000 G2 DataTraveler® 4000 G2 Contact Information Name: Test Name Company: Test Company Details: Test Details & Other Info Kingston TECHNOLOGYtext_image
Format - DT4000 G2 DataTraveler® 4000 G2 Formatting DT4000 G2 (1):... Kingston TECHNOLOGY OKtext_image
Format - DT4000 G2 DataTraveler® 4000 G2 Format Complete. Kingston TECHNOLOGY OKUtilizzo del dispositivo (ambienti Windows)
Una volta che il drive DT4000 G2 è stato inizializzato, sarà possibile accedere alla partizione dati sicura e utilizzare le opzioni del dispositivo, accedendovi mediante la propria password utente. A questo scopo, seguire la procedura riportata sotto: 1. Inserire il drive DT4000 G2 in una delle porte USB del computer notebook o desktop in uso e quindi inserire la password (vedere Figura 4.1). \- Una volta inserita la password, fare clic sul pulsante "Login" (Login) per proseguire. \- Se è stata inserita la password corretta, il drive DT4000 G2 verrà sbloccato e sarà possibile iniziare a utilizzare il dispositivo. \- Se viene inserita una password errata, sotto il campo "Hint" (Suggerimento) verrà visualizzato un messaggio di errore indicante il tentativo di accesso fallito. text_image
Login device DT4000 G2 DataTraveler® 4000 G2 Password: Hint Forgot Password Contact Information Read-Only Mode Kingston TECHNOLOGY Login CancelOpzioni del dispositivo (ambienti Windows)
Durante l'accesso al dispositivo, nell'angolo destro della barra delle applicazioni di Windows verrà visualizzata l'icona del drive "DT4000 G2" (Figura 5.1). (Nota: gli utenti di Windows 7 devono fare clic sul pulsante "Freccia in alto" della barra delle applicazioni, per poter accedere all'icona del drive "DT4000 G2" (Figura 5.2.) Facendo clic una volta sull'icona del drive DT4000 G2 verrà visualizzato il menu seguente: text_image
DT4000 G2 Settings Browse DT4000 G2 Format DT4000 G2 Online Support About DT4000 G2 Shut down DT4000 G2text_image
Customize... 9:26 AM 12/3/2010Menu "Settings" (Impostazioni) del drive DT4000 G2
- Consente di modificare la password e/o il suggerimento (Figura 5.3) - Consente di aggiungere/visualizzare/modificare le informazioni di contatto dell'utente (Figura 5.4) - Consente di modificare le impostazioni della lingua corrente (Figura 5.5) (Nota: per motivi di sicurezza, l'aggiornamento e la modifica di queste impostazioni richiedono sempre l'inserimento della password di accesso all'unità DT4000.) text_image
Settings DataTraveler® 4000 62 Password | Contact Information | Language | * Current Password: * New Passwords: * Password Confirmations: Hint: * Mandatory field i Password Rules Find Hint Kingston OK Apply Canceltext_image
Settings DataTraveler® 4000 62 Features | Contact Information | Language | Name: Test Name Company: Test Company Details: Test Details & Other Info Kingston OK Canceltext_image
Settings DataTraveler® 4000 62 Password | Contact Information | Language | Select Language: English Kingston OK Buy CancelMenu "Browse" (Esplora unità) del drive DT4000 G2
\- Consente di navigare all'interno dei contenuti della partizione dati sicura, dopo aver effettuato l'accesso al dispositivoMenu "Format"(Formatta) del drive DT4000 G2\*
\- Consente di formattare la partizione dati sicura (Attenzione: tutti i dati contenuti nell'unità verranno eliminati). (Figura 5.6)Supporto Online (Richiede un accesso a Internet)
\- Questa funzione esegue automaticamente il browser Internet e apre il link http://www.kingston.com/support/, dal quale è possibile accedere a una serie di informazioni di supporto aggiuntive text_image
Format - DT4000 G2 DataTraveler® 4000 G2 WARNING: Formatting will erase ALL data on this disk. To format the disk (3s), click OK. To quit, click CANCEL. Your password is required to complete format. Password: Kingston OK CancelMenu "About" (Informazioni su) del drive DT4000 G2
\- Questa sezione contiene dettagli specifici sul drive DT4000 G2, tra cui i dati relativi alle applicazioni e alla versione del firmware (Figura 5.7)Menu "Shutdown" (Disattiva unità) del drive DT4000 G2
\- Questa funzione permette di arrestare correttamente l'unità DT4000 G2, consentendo all'utente di scollegare il drive dal computer in tutta sicurezza. text_image
About - DT4000 G2 DataTraveler® 4000 G2 Copyright (c) 2011 Kingston Technology Company, Inc. Modules Version Information DT4000 G2 K40 000FFE23C7ECBF10800001D2 Application K4.0.0.5 FW Version 3.05 Crypto Library FW 1.00 Kingston Technology Close-Fine sezione Windows-
Configurazione (ambienti Mac)
Inserire il drive DT4000 G2 in una delle porte USB disponibili nel computer notebook o desktop in uso e attendere il rilevamento da parte del sistema operativo Mac. Una volta che il drive viene rilevato, s desktop del computer Mac in uso verrà visualizzata l'icona del volume DT4000 G2, come illustrato in Figura 6.1.  Figura 6.1 - DT4000 G2 1. Fare doppio clic sull'icona del CD-ROM dell'unità DT4000 G2. 2. Fare doppio clic sulla cartella "Mac" visualizzata nella finestra raffigurata in Figura 6.2. 3. Fare doppio clic sull'icona dell'applicazione DT4000 G2 visualizzata nella finestra riportata in Figura 6.3. Verrà avviata la procedura di inizializzazione. text_image
DT4000G2 autorun.inf DT4000G2_Launcher.exe Linux Mac rr_moved Supporttext_image
DT4000G2_Launcher Mactext_image
DataTraveler® 4000 G2 FIPS 140-2 LEVEL 3 CERTIFIED Kingston® TECHNOLOGY ©(14Kingston Technology Corporation, 1769) Newshape Street, Fountain Valley, CA 9218E USA All rights reserved. All registered trademarks and trademarks are the property of their respective owners.Inizializzazione del dispositivo (ambienti Mac)
1. Selezionare la lingua preferita dal menu a comparsa e fare clic sulla voce "Next" (Successivo) come riportato in Figura 7.1. text_image
Device Initialization - DT4000 G2 DataTraveler® 4000 G2 Language Select Language: English Kingston TECNOLOGY Next> Canceltext_image
Device Initialization - DT4000 G2 DataTraveler® 4000 G2 License Agreement SOFTWARE LICENSE AGREEMENT IMPORTANT - READ CAREFULLY: THIS SOFTWARE LICENSE AGREEMENT ("Agreement") is a legal agreement between you (either an individual or a single entity) and Kingston Technology Company Inc. ("Kingston"). This Agreement relates to the software accompanying this Agreement, which includes computer software and may include associated media, printed materials, and "online" or electronic Accept Decline Kingston TECHNOLOGYtext_image
Device Initialization - DT4000 G2 DataTraveler® 4000 G2 ① ② ③ ④ Password * Password: ********** * Password Confirmation: ********** i Password Rules Hint: Pwd Hint * Mandatory field Kingston TECHNOLOGYtext_image
Device Initialization - DT4000 G2 DataTraveler® 4000 G2 ① ② ③ ④ Contact Information Name: Test Name Company: Test Company Details: Test Details & Other Info Kingston TECHNOLOGYtext_image
Format - DT4000 G2 DataTraveler® 4000 G2 Formatting DT4000 G2 ... Kingston OK Canceltext_image
Format - DT4000 G2 DataTraveler® 4000 G2 Format Complete. Kingston OK CancelUtilizzo del dispositivo (ambienti Mac)
Una volta che il drive DT4000 G2 è stato inizializzato, sarà possibile accedere alla partizione dati sicura e utilizzare le opzioni del dispositivo, accedendovi mediante la propria password utente. A questo scopo, seguire la procedura riportata sotto: 1. Inserire il drive DT4000 G2 in una delle porte USB del computer notebook o desktop in uso e quindi inserire la password (vedere Figura 8.1). 2. Una volta inserita la password, fare clic sul pulsante "Login" (Login) per proseguire. \- Se è stata inserita la password corretta, il drive DT4000 G2 verrà sbloccato e sarà possibile iniziare a utilizzare il dispositivo. \- Se viene inserita una password errata, sotto il campo "Hint" (Suggerimento) verrà visualizzato un messaggio di errore indicante il tentativo di accesso fallito (vedere Figura 8.2). text_image
Format - DT4000 G2 DataTraveler® 4000 G2 Password: Hint Forgot Password Contact Information Read-Only Mode Kingston LOGICAL Login CancelOpzioni del dispositivo (ambienti Mac)
Durante l'accesso al dispositivo, nel Dock di Mac OS X verrà visualizzata l'icona "DT4000 G2\_Launcher", come illustrato di seguito in Figura 9.1: text_image
DT4000G2_LauncherMenu "Settings" (Impostazioni) del drive DT4000 G2
- Consente di modificare la password e/o il suggerimento (Figura 9.3) - Consente di aggiungere/visualizzare/modificare le informazioni di contatto dell'utente (Figura 9.4) - Consente di modificare le impostazioni della lingua (Figura 9.5) text_image
DT4000 G2 Settings Browse DT4000 G2 Format DT4000 G2 Online Support About DT4000 G2 Shut down DT4000 G2 Options Show All Windows Hide Quittext_image
Settings DataTraveler® 4000 G2 Password Contact Information Language * Current Password: * New Password: * Password Confirmation: Password Rules Hint: * Mandatory field Kingston OK Canceltext_image
Settings DataTraveler® 4000 62 Password Contact InformationLanguage Name: Company: Details: Kingston OK Canceltext_image
Settings DataTraveler® 4000 G2 Password Contact Information Language Select Language: English Kingston OK CancelMenu "Browse" (Esplora unità) del drive DT4000 G2
\- Consente di navigare all'interno dei contenuti della partizione dati sicura, dopo aver effettuato l'accesso al dispositivoMenu "Format" (Formatta) del drive DT4000 G2
\- Consente di formattare la partizione dati sicura (Attenzione: tutti i dati contenuti nell'unità verranno eliminati). (Figura 9.6)Supporto Online (Richiede un accesso a Internet)
\- Questa funzione esegue automaticamente il browser Internet e apre il link http://www.kingston.com/support/, dal quale è possibile accedere a una serie di informazioni di supporto aggiuntive text_image
Format - DT4000 G2 DataTraveler® 4000 G2 WARNING: Formatting will erase ALL data on this disk. To format the disk, click OK. To quit, click CANCEL. Kingston OK CancelMenu "About" (Informazioni su) del drive DT4000 G2
\- Questa sezione contiene dettagli specifici sul drive DT4000 G2, tra cui i dati relativi alle applicazioni e alla versione del firmware (Figura 9.7)Menu "Shutdown" (Disattiva unità) del drive DT4000 G2
\- Questa funzione permette di arrestare correttamente l'unità DT4000 G2, consentendo all'utente di scollegare il drive dal computer in tutta sicurezza. text_image
About - DT4000 G2 DataTraveler® 4000 G2 Copyright (c) 2007 Kingston Technology Company, Inc. Modules Version Information DT4000 G2 3.0 050RFE23C7ECBF1060001D2 Application 4.0.0.1 FW Version 3.05 Crypto Library FW 1.00 Kingston Close-Fine sezione Mac-
Configurazione (ambienti Linux)
(NOTA: data la grande varietà di distribuzioni Linux attualmente disponibili sul mercato, l'aspetto e le modalità d'uso delle interfacce utilizzate dalle differenti versioni disponibili possono variare notevolmente. Tuttavia, il set di comandi normalmente utilizzati all'interno dell'applicazione terminale è simile per tutte le versioni; tali comandi Linux sono descritti in sezione sotto. Le immagini di esempio raffigurate in questa sezione rappresentano un ambiente a 64 bit.)  Su alcune distribuzioni di Linux, l'esecuzione dei comandi dell'unità DT4000G dalla finestra terminale dell'applicazione, richiede l'accesso con privilegi di super-user (root). Inserire il drive DT4000 G2 in una delle porte USB disponibili sul computer notebook o desktop in uso e attendere il rilevamento da parte del sistema operativo Linux. Una volta che il drive viene rilevato, sul desktop verrà visualizzata l'icona del volume DT4000 G2\*, come illustrato in Figura 10.1.  DT4000G2 Figura 10.1 – Icona del volume dell'unità DT4000G2L'unità DT4000 G2 integra 5 comandi che possono essere utilizzati nei sistemi Linux:
dt4000g2\_about, dt4000g2\_logout dt4000g2\_forgotpassword, dt4000g2\_initialize, dt4000g2\_login e (Note: l'esecuzione di questi comandi richiede l'apertura di una finestra dell'applicazione "Terminale" e l'accesso alle cartelle specifiche in cui risiede ogni singolo file. Ogni comando deve essere preceduto dai due caratteri seguenti: "./" ovvero un punto e uno slash in avanti.) Per gli utenti delle piattaforme a 32-bit è richiesta l'apertura di una finestra dell'applicazione "Terminale", da cui modificare la directory corrente, impostandola su /media/DT4000G2/linux/linux32\$, immettendo il comando seguente dal prompt: cd /media/DT4000G2/linux/linux32 (e successivamente premere INVIO) Per gli utenti delle piattaforme a 64-bit è richiesta l'apertura di una finestra dell'applicazione "Terminale", da cui modificare la directory corrente, impostandola su /media/DT4000G2/linux/linux64\$, immettendo il comando seguente dal prompt: cd /media/DT4000G2/linux/linux64 (e successivamente premere INVIO) \*Nota: Se il volume dell'unità DT4000 G2 non viene caricato automaticamente dal sistema operativo, l'utente dovrà effettuare il caricamento manuale da una finestra del terminale, mediante il comando "mount" di Linux. Fare riferimento alla documentazione di Linux riferita alla distribuzione utilizzata, oppure accedere al proprio sito di supporto online preferito per ottenere ulteriori dettagli sulle opzioni relative a sintassi e comandi disponibili.Inizializzazione del dispositivo (ambienti Linux)
Una volta che l'unità DT4000 G2 viene collegata al computer e rilevata dal sistema operativo, il dispositivo dovrà essere inizializzato prima di essere utilizzato per la prima volta. Per fare ciò, aprire l'applicazione "Terminale" (o la finestra della riga di comando) e seguire la procedura illustrata sotto: (Nota: gli screenshot e le istruzioni riportate in questa sezione utilizzano la cartella linux32 (a indicare una piattaforma a 32-bit), al solo fine di dimostrare le modalità di utilizzo del dispositivo DT4000 G2 negli ambienti dotati di sistema operativo Linux. Pertanto, è opportuno tenere a mente che se si sta utilizzando la versione a 64-bit di Linux, sarà sufficiente accedere alla rispettiva cartella "64-bit" anziché a quella a 32-bit, specificando la cartella linux64 anziché quella denominata linux32.) 1. È possibile modificare la directory del volume DT4000 G2 immettendo il comando seguente dal prompt del terminale (come illustrato in Figura 10.2): cd /media/DT4000G2/linux/linux32 (Nota: i nomi di comandi e cartelle (directory) sono sensibili alle maiuscole e pertanto digitare "linux32" NON equivale a digitare "Linux32". Anche la sintassi deve essere immessa nel modo esatto in cui essa è rappresentata.) text_image
[root@localhost /]# cd /media/dt4000g2/linux/linux64 [root@localhost linux64]# _text_image
[root@localhost /]# cd /media/dt4000g2/linux/linux64 [root@localhost linux64]# ls dt4000g2_about dt4000g2_initialize dt4000g2_logout dt4000g2Forgotpassword dt4000g2_login [root@localhost linux64]# _text_image
[root@localhost /]# cd /media/dt4000g2/linux/linux64 [root@localhost linux64]# ls dt4000g2_about dt4000g2_initialize dt4000g2_logout dt4000g2Forgotpassword dt4000g2_login [root@localhost linux64]# ./dt4000g2_initializeUtilizzo del dispositivo (ambienti Linux)
Una volta che il drive DT4000 G2 è stato inizializzato, sarà possibile accedere alla partizione dati sicura, utilizzando la password creata durante la procedura descritta a pagina 22. A questo scopo, seguire la procedura riportata sotto: 1. Aprire una finestra dell'applicazione "Terminale". 2. Inserire il comando seguente dal prompt del terminale: cd /media/DT4000G2/linux/linux32 3. Posizionando il prompt dei comandi sulla stringa /media/DT4000G2/linux/linux32\$, digitare il comando seguente per accedere al dispositivo: ./dt4000g2\_login\* e premere INVIO. (Nota: comandi e nomi delle cartelle sono sensibili alle maiuscole e la sintassi utilizzata deve essere esattamente quella qui indicata.) 4. Inserire la password del drive DT4000 G2 e premere INVIO. Dopo aver effettuato l'accesso, sul desktop del computer in uso si aprirà la schermata che visualizza il volume dati sicuro, da cui sarà possibile iniziare a utilizzare l'unità DT4000 G2. Se durante il processo di login viene inserita una password non corretta, l'utente avrà a disposizione un'altra possibilità per inserire la password corretta, ripetendo le operazioni del punto 3 della procedura; tuttavia, il drive dispone di una funzione di sicurezza integrata che conta il numero di tentativi di accesso falliti. Se il numero di tentativi falliti supera il valore preimpostato di default (10 tentativi), il drive DT4000 G2 verrà bloccato e per poterlo riutilizzare sarà necessario ripetere la procedura di inizializzazione, eseguendo il comando dt4000g2\_forgotpassword. Questa procedura consente di creare una nuova password. Tuttavia, al fine di garantire la privacy dei dati contenuti nel drive DT4000 G2, la partizione dati sicura verrà formattata. Ciò significa che tutti i dati precedentemente archiviati andranno persi. Una volta completata la procedura prevista dal comando dt4000g2\_forgotpassword e dopo aver impostato una nuova password, il contatore di sicurezza integrato che effettua il conteggio dei tentativi di accesso falliti verrà azzerato. (Nota: l'azzeramento del contatore dei tentativi di accesso viene effettuato anche quando si esegue un accesso corretto prima di aver raggiunto il numero massimo di tentativi (MaxNoA, in forma abbreviata.) Dopo aver terminato di utilizzare l'unità DT4000 G2, effettuare l'uscita dal dispositivo e mettere i dati in sicurezza. A questo copo, seguire la procedura riportata sotto: 1. Aprire una finestra dell'applicazione "Terminale". 2. Inserire il comando seguente dal prompt del terminale: cd /media/DT4000G2/linux/linux32 3. Posizionando il prompt dei comandi sulla stringa /media/DT4000G2/linux/linux32\$, digitare il comando seguente per effettuare l'uscita dal dispositivo in modo corretto: ./dt4000g2\_logout\* e premere INVIO. (Nota: comandi e nomi delle cartelle sono sensibili alle maiuscole e la sintassi utilizzata deve essere esattamente quella qui indicata.) 4. Rimuovere l'unità DT4000 G2 dal sistema e conservarla in un luogo sicuro. \*Nota: su alcune distribuzioni di Linux, l'esecuzione dei comandi di DT4000 G2 dalla finestra terminale dell'applicazione richiede l'accesso con privilegi di super-user (root).Guida alla risoluzione dei problemi
Blocco del dispositivo
Il drive DT4000 G2 è dotato di una funzionalità di sicurezza che impedisce di accedere alla partizione dati quando si supera un determinato numero di tentativi di accesso falliti consecutivi (MaxNoA, in forma abbreviata); il numero massimo di tentativi consecutivi ammessi preimpostato in fabbrica è pari a 10. Il contatore che attiva il blocco tiene traccia di ogni tentativo di accesso fallito e può essere resettato in due modi: 1) Inserendo la password di accesso corretta prima di raggiungere il valore MaxNoA prestabilito, oppure 2) Formattando il dispositivo dopo aver superato il numero di tentativi specificati dal valore MaxNoA.\* Se viene inserita una password errata, sotto i campo "Hint" (Suggerimento) verrà visualizzato un messaggio di errore indicante il tentativo d'accesso fallito. Vedere Figura 10.1. Raggiunto il 7° tentativo fallito, verrà visualizzato un ulteriore messaggio di errore che informa l'utente che ha a disposizione solo altri 3 tentativi prima di raggiungere il numero di tentativi specificati dal valore MaxNoA (impostato su 10 per default). Vedere Figura 10.2. Raggiunto il 10° tentativo di accesso fallito, l'accesso ai dati contenuti nel drive DT4000 G2 verrà bloccato permanentemente e per poter utilizzare nuovamente il dispositivo sarà necessario formattare il dispositivo. Ciò implica che tutti i dati memorizzati nel drive DT4000 text_image
Login device DT4000G2 DataTraveler® 4000 G2 Password: Hint: Failed to Login: The password is incorrect. Please try again. Forget Password Contact Information Kingston KINGDAO G2 Login Canceltext_image
Login device DT4000G2 DataTraveler® 4000 G2 Password: Hint: Failed to Login: The password is incorrect. Please try again. 3 Attempts left before your DT4000 is blocked permanently. Forget Password Contact Information Kingston Login CancelPassword dimenticata
Se l'utente dimentica la password, può fare clic sul link "Forgot Password" (Password dimenticata), che viene visualizzato nella finestra di login quando viene eseguito il file DT4000 G2\_Launcher (vedere Figura 10.3). Questa opzione consente di creare una nuova password. Tuttavia, al fine di garantire la privacy dei dati contenuti nel drive DT4000 G2, l'unità verrà formattata. Ciò significa che durante tale procedura tutti i dati precedentemente archiviati andranno persi.\* Facendo clic sul pulsante "Forgot Password" (Password dimenticata), verrà visualizzata una finestra di notifica che richiede all'utente se desidera inserire una nuova password prima della formattazione (Figura 10.4). A questo punto, è possibile 1) text_image
Login device DT4000G2 DataTraveler® 4000 G2 Password: Hint Forgot Password ContextInformation Kingston TECHNOLOGY Login Canceltext_image
Forgot Password In order to protect your data, your DT4000G2 will be formatted and all data will be erased. Do you want to enter a new password and format your DT4000G2? OK CancelConflitti con le lettere di unità (Sistemi operativi Windows)
Come citato nella sezione "Requisiti di sistema" di questo manuale (a pagina 3), il drive DT4000 G2 richiede due lettere di unità consecutive DOPO quella assegnata all'ultimo disco fisico che appare prima delle lettere di unità assegnate ai profili non hardware (vedere Figura 10.5). L'assegnazione delle lettere di unità in ordine cronologico NON interessa le unità di rete condivise, in quanto queste sono unità associate a profili utente specifici e non al profilo hardware di sistema e pertanto appaiono disponibili per il sistema operativo. Ciò significa che Windows potrebbe assegnare al drive DT4000 G2 una lettera di unità che è già utilizzata da una unità di rete condivisa o già assegnata a un percorso UNC (Universal Naming Convention), causando un conflitto tra le lettere assegnate ai vari drive. In tal caso, sarà necessario contattare l'amministratore di rete o il reparto assistenza, chiedendo di modificare le lettere di unità assegnate da Gestione Disco di Windows (l'operazione richiede l'accesso con diritti di amministratore). text_image
My Computer File Edit View Favorites Tools Help Back Search Folders System Tasks View system information Add or remove programs Change a setting Local Disk (CC) DVD/CD-RW Drive (DC) Local Disk (E:) Other Places My Network Places My Documents Control Panel DT4000GZ (H:) Network Share (G:) Local Disk (H:) Details System FolderMessaggi di errore
Unable to create file (impossibile creare il file) – Questo messaggio di errore viene visualizzato quando si tenta di CREARE un file o una cartella NELLA partizione dati sicura, durante l'accesso in modalità di sola lettura. text_image
Unable to create file Unable to create the file 'New Text Document.txt' The media is write protected. OKtext_image
Error Copying File or Folder Cannot copy File1: The disk is write-protected. Remove the write-protection or use another disk. OKtext_image
Error Deleting File or Folder Cannot delete File1: The disk is write-protected. Remove the write-protection or use another disk. OKManual do Usuário DataTraveler® 4000 G2
text_image
DataTraveler® 4000 G2 FIPS 140-2 LEVEL 3 CERTIFIED Kingston® TECHNOLOGY ©2014 Kingston Technology Corporation. D7600 Newhope Street, Fountain Valley, CA 927.08 USA All rights reserved. All registered trademarks and trademarks are the property of their respective owners.natural_image
Black USB flash drive with open lid, no visible text or symbols on bodyÍndice
TOCSOBRE ESTE MANUAL
Este manual do usuário abrange o DataTraveler® 4000 G2 certificado pela FIPS (daqui em diante mencionado simplesmente como DT4000 G2) com base na imagem padrão de fábrica, sem qualquer customização implementada.Requisitos do Sistema
Plataforma de PC
- Processador Pentium III ou equivalente (ou mais rápido) • 15MB de espaço livre no disco - Porta USB 2.0 / 3.0 disponível - Duas letras consecutivas de drives após o último drive físico\*Suporte do Sistema Operacional do PC
- Windows ^ 8, 8.1 (RT não suportado) - Windows ^ 7 SP1 - Windows ^ Vista SP2Plataforma Mac
• 15MB de espaço livre no disco \- USB 2.0 / 3.0Suporte do Sistema Operacional
• Mac OS X 10.8.x -10.10xRecomendações
Para garantir que haja energia bastante para o dispositivo DT4000 G2, encaixe-o diretamente em uma porta USB em seu notebook ou computador, como mostrado na Figura 1.1. Evite conectar o DT4000 G2 a um dispositivo periférico que possua uma porta USB, como um teclado ou hub USB, como mostrado na Figura 1.2. natural_image
Two electronic devices: a battery and an Ethernet card, both placed on a laptop keyboard (no visible text or symbols)natural_image
Two photos showing a device with a black connector and red prohibition symbols, no readable text or symbols present.Instalação (Ambiente Windows)
1. Insira o DT4000 G2 em uma porta USB disponível em seu notebook ou computador e aguarde o Windows detectá-lo. - Os usuários de Windows Vista receberão um aviso de driver de dispositivo como mostrado na Figura 2.2. - Os usuários de Windows 7 receberão um aviso de driver de dispositivo como mostrado na Figura 2.2. Quando o novo hardware tiver sido detectado, o Windows irá solicitar que você comece o process de inicialização. - Usuários do Windows Vista verão uma janela AutoPlay similar àquela da Figura 2.3. - Usuários do Windows 7 verão uma janela AutoPlay similar àquela da Figura 2.3. 2. Seleccione a opção 'Run DT4000 G2\_Launcher.exe'. Se o Windows não executar automaticamente em AutoPlay, navegue até a partição de CD-ROM (Figura 2.4) e execute manualmente o programa DT4000 G2\_Launcher. Isso também fará começar text_image
Installing device driver software Click here for status.text_image
Installing device driver software Click here for status.text_image
Organize Burn to disc Files Currently on the Disc Support autorun.inf DT400G2_Launch herdasetext_image
AutoPlay DVD RW Drive (I): DT4000G2 Always do this for software and games: Install or run program from your media Run DT4000G2_Launcher.exe Published by Kingston Technology Corporation General options Open folder to view files using Windows Explorer View more AutoPlay options in Control PanelInicialização do dispositivo (Ambiente Windows)
1. Seleccione o idioma de sua preferência a partir do menu suspenso e clique em 'Próximo' (Figura 3.1.) text_image
Device Initialization - DT4000 G2 DataTraveler® 4000 G2 Language Select Language: English Kingston TECHNOLOGY Next> Canceltext_image
Device Initialization - DT4000 G2 DataTraveler® 4000 G2 License Agreement SOFTWARE LICENSE AGREEMENT IMPORTANT - READ CAREFULLY: THIS SOFTWARE LICENSE AGREEMENT ("Agreement") is a legal agreement between you (either an individual or a single entity) and Kingston Technology Company Inc. ("Kingston"). This Agreement relates to the software accompanying this Agreement, which includes computer software and may include associated media, printed materials, and "online" or electronic Accept Decline Kingston TECHNOLOGYtext_image
Device Initialization - DT4000 G2 DataTraveler® 4000 G2 Password * Password: ••••••••••• * Password Confirmation: •••••••••• i Password Rules Hint: Pwd Hint *Mandatory fieldtext_image
Device Initialization - DT4000 G2 DataTraveler® 4000 G2 Contact Information Name: Test Name Company: Test Company Details: Test Details & Other Info Kingston TECHNOLOGYtext_image
Format - DT4000 G2 DataTraveler® 4000 G2 Formatting DT4000 G2 (I:)...text_image
Format - DT4000 G2 DataTraveler® 4000 G2 Format Complete. Kingston TECNOLOGY OKtext_image
Login device DT4000 G2 DataTraveler® 4000 G2 Password: Hint Forgot Password Contact Information Read-Only Mode Kingston TESTOLOGY Login CancelOpções do Dispositivo (Ambiente Windows)
Enquanto você estiver conectado ao dispositivo, haverá um ícone do 'DT4000 G2' localizado no canto direito da barra de tarefas do Windows (Figura 5.1). (Observação: Os usuários do Windows 7 precisarão clicar no botão seta para cima na barra de tarefas para acessar o ícone DT4000 G2' (Figura 5.2). Ao clicar uma vez no ícone DT4000 G2 será exibido o seguinte menu: text_image
DT4000 G2 Settings Browse DT4000 G2 Format DT4000 G2 Online Support About DT4000 G2 Shut down DT4000 G2text_image
Customize... 9:26 AM 12/3/2010Configurações do DT4000 G2
- Permite que você altere sua senha e/ou dica (Figura 5.3) - Permite que você adicione/visualize/altere suas informações de contato (Figura 5.4) - Permite que você altere sua seleção de idioma atual (Figura 5.5) (Observação: Para finalidades de segurança, sua senha atual do DT4000 G2 é necessária para atualizar e/ou modificar qualquer uma dessas configurações). text_image
Settings DataTraveler® 4000 62 Password | Contact Information | Language | * Current Password: * New Passwords: * Password Confirmations: i Password Rules Hint: Find Hint * Mandatory field Kingston OK Buy Canceltext_image
Settings DataTraveler® 4000 62 Features | Contact Information | Language Name: Test Name Company: Test Company Details: Test Details & Other Info Kingston OK Buy Canceltext_image
Settings DataTraveler® 4000 62 Password | Contact Information | Language | Select Languages: English Kingston OK Buy CancelExplore o DT4000 G2
\- Permite que você navegue pelo conteúdo da partição de dados de segurança enquanto está conectadoFormatar o DT4000 G2\*
\- Permite que você formate a partição de dados de segurança (Aviso: Todos os dados serão apagados). (Figura 5.6)Suporte on-line (É necessário acesso à Internet)
\- Abra seu navegador na Internet e navegue para http://www.kingston.com/support/ onde você poderá acessar mais informações de suporte text_image
Format - DT4000 G2 DataTraveler® 4000 G2 WARNING: Formatting will erase ALL data on this disk. To format the disk (S), click OK. To quit, click CANCEL. Your password is required to complete format. Passwords: Kingston OK CancelSobre o DT4000 G2
\- Fornece detalhes específicos sobre o DT4000 G2, incluindo informações sobre a versão do Aplicativo e do Firmware (Figura 5.7)Encerrar o DT4000 G2
\- Encerra de modo apropriado o DT4000 G2, permitindo que seja removido com segurança de seu sistema text_image
About - DT4000 G2 DataTraveler® 4000 G2 Copyright (c) 2011 Kingston Technology Company, Inc. Modules Version Information DT4000 G2 K40 000FFE23C7ECBF1080001D2 Application K4.0.0.5 FW Version 3.05 Crypto Library FW 1.00 Kingston TRECOLOGY Close-Seção Windows concluída-
Configuração (Ambiente Mac)
Insira o DT4000 G2 em uma porta USB disponível em seu notebook ou computador e aguarde o sistema operacional Mac detectá-lo. Quando reconhecido, você verá um volume DT4000 G2 aparecer na área de trabalho, como mostrado na Figura 6.1. 1. Clique duas vezes no ícone do CD-ROM DT4000 G2. 2. Clique duas vezes na pasta Mac encontrada na janela exibida na Figura 6.2. 3. Clique duas vezes no ícone do aplicativo DT4000 G2 encontrado na janela exibida na Figura 6.3. Isso fará começar o processo de inicialização.  Figura 6.1 - DT4000 G2 text_image
DT4000G2 autorun.inf DT4000G2_Launcher.exe Linux Mac rr_moved Supporttext_image
DT4000G2_Launcher Mactext_image
DataTraveler® 4000 G2 FIPS 140-2 LEVEL 3 CERTIFIED Kingston® TECHNOLOGY ©2014 Kingston Technology Corporation, 17600 Newhaven Street, Fountain Valley, CA 10270 USA All rights reserved. All registered trademarks and trademarks are the property of their respective owners.Inicialização do dispositivo (Ambiente Mac)
1. Seleccione o idioma de sua preferência a partir do menu suspenso e clique em 'Próximo' (Figura 7.1.) text_image
Device Initialization - DT4000 G2 DataTraveler® 4000 G2 Language Select Language: English Kingston TECHNOLOGY Next> Canceltext_image
Device Initialization - DT4000 G2 DataTraveler® 4000 G2 License Agreement SOFTWARE LICENSE AGREEMENT IMPORTANT - READ CAREFULLY: THIS SOFTWARE LICENSE AGREEMENT ("Agreement") is a legal agreement between you (either an individual or a single entity) and Kingston Technology Company Inc. ("Kingston"). This Agreement relates to the software accompanying this Agreement, which includes computer software and may include associated media, printed materials, and "online" or electronic Accept Decline Kingston TECHNOLOGYtext_image
Device Initialization - DT4000 G2 DataTraveler® 4000 G2 ① ② ③ ④ Password * Password: ********** * Password Confirmation: ********** i Password Rules Hint: Pwd Hint * Mandatory field Kingston TECHNOLOGYtext_image
Device Initialization - DT4000 G2 DataTraveler® 4000 G2 ① ② ③ ④ Contact Information Name: Test Name Company: Test Company Details: Test Details & Other Info Kingston TECHNOLOGYtext_image
Format - DT4000 G2 DataTraveler® 4000 G2 Formatting DT4000 G2 ... Kingston SINFORMATION OK Canceltext_image
Format - DT4000 G2 DataTraveler® 4000 G2 Format Complete. Kingston OK CancelUso do Dispositivo (Ambiente Mac)
Depois do DT4000 G2 ter sido inicializado, você pode acessar a partição de dados de segurança e utilizar as opções do dispositivo fazendo o login no dispositivo com sua senha. Para isso, siga estas etapas: 1. Insira o DT4000 G2 em uma porta USB em seu notebook ou computador e digite sua senha (ver a Figura 8.1). 2. Depois de digitar sua senha, clique no botão 'Login' para continuar. - Se a senha correta for digitada, o DT4000 G2 será desbloqueado e você poderá começar a usar o dispositivo. - Se for digitada uma senha incorreta, uma mensagem de erro irá aparecer logo abaixo do campo ‘Dica’ indicando uma falha no login (veja Figura 8.2). text_image
Format - DT4000 G2 DataTraveler® 4000 G2 Password: Hint Forgot Password Contact Information Read-Only Mode Kingston TECNOLOGY Login CancelOpções do dispositivo (Ambiente Mac)
Enquanto você estiver conectado ao dispositivo, haverá um ícone 'DT4000 G2\_Launcher' localizado no Dock do Mac OS X como visto na Figura 9.1 abaixo: text_image
DT4000G2_LauncherConfigurações do DT4000 G2
- Permite que você altere sua senha e/ou dica (Figura 9.3) - Permite que você adicione/visualize/altere suas informações de contato (Figura 9.4) - Permite que você altere sua seleção de idioma(Figura 9.5) text_image
DT4000 G2 Settings Browse DT4000 G2 Format DT4000 G2 Online Support About DT4000 G2 Shut down DT4000 G2 Options Show All Windows Hide Quittext_image
Settings DataTraveler® 4000 G2 Password Contact Information Language * Current Password: * New Password: * Password Confirmation: i Password Rules Hint: * Mandatory field Kingston OK Canceltext_image
Settings DataTraveler® 4000 62 Password Contact Information Language Name: Company: Details: Kingston OK Canceltext_image
Settings DataTraveler® 4000 G2 Password Contact Information Language Select Language: English Kingston OK CancelExplore o DT4000 G2
\- Permite que você navegue pelo conteúdo da partição de dados de segurança enquanto está conectadoFormatar o DT4000 G2
\- Permite que você formate a partição de dados de segurança (Aviso: Todos os dados serão apagados.) (Figura 9.6)Suporte on-line (É necessário acesso à Internet)
\- Abra seu navegador na Internet e navegue para http://www.kingston.com/support/ onde você poderá acessar mais informações de suporteSobre o DT4000 G2
\- Fornece detalhes específicos sobre o DT4000 G2, incluindo informações sobre a versão do Aplicativo e do Firmware (Figura 9.7)Encerrar o DT4000 G2
\- Encerra de modo apropriado o DT4000 G2, permitindo que seja removido com segurança de seu sistema text_image
Format - DT4000 G2 DataTraveler® 4000 G2 WARNING: Formatting will erase ALL data on this disk. To format the disk, click OK. To quit, click CANCEL.text_image
About - DT4000 G2 DataTraveler® 4000 G2 Copyright (c) 2007 Kingston Technology Company, Inc. Modules Version Information DT4000 G2 3.0 050FTE23C7EC8F1080001D2 Application 4.0.0.1 FW Version 3.09 Crypto Library FW 1.00 Kingston Close-Seção Mac concluída-
Configuração (Ambiente Linux)
(OBSERVAÇÃO: Com as várias distribuições de Linux disponíveis atualmente, a 'aparência' de suas interfaces pode variar de uma versão para a outra. Entretanto, o conjunto de comandos gerais usados no aplicativo do terminal é bastante similar e pode ser consultado nas instruções do Linux que se seguem. As capturas de tela usadas como exemplos nesta seção foram criadas em um ambiente de 64 bits.)  Certas distribuições de Linux irão exigir privilégios (raiz) de usuário especial a fim de executar os comandos DT4000G2 de modo adequado na janela do terminal do aplicativo. Insira o DT4000 G2 em uma porta USB disponível em seu notebook ou computador e aguarde o sistema operacional Linux detectá-lo. Quando o fizer, você verá o ícone de volume DT4000G2 aparecer\* na área de trabalho, como mostrado na Figura 10.1.  DT4000G2 Figura 10.1 - Volume DT4000G2 O DT4000 G2 vem com 5 comandos que podem ser usados no Linux: dt4000g2\_about, dt4000g2\_logout dt4000g2\_forgotpassword, dt4000g2\_initialize, dt4000g2\_login, e (Observação: Para executar esses comandos você deve abrir uma janela do aplicativo no “Terminal” e navegar até a pasta onde está cada arquivo. Cada comando deve ser precedido pelos dois caracteres a seguir: ‘./’ (um ponto e uma barra). Para usuários de 32 bits, abra uma janela do aplicativo no “Terminal” e altere o diretório atual para /media/DT4000G2/linux/linux32\$ digitando o seguinte comando no prompt: cd /media/DT4000G2/linux/linux32 (em seguida pressione ENTER). Para usuários de 64 bits, abra uma janela do aplicativo no “Terminal” e altere o diretório atual para /media/DT4000G2/linux/linux64\$ digitando o seguinte comando no prompt: cd /media/DT4000G2/linux/linux64 (em seguida pressione ENTER). \*Observação: Se o volume DT4000 G2 não for carregado automaticamente pelo sistema operacional você precisará carregar o volume manualmente em uma janela do terminal usando o comando 'montar' do Linux. Consulte a documentação Linux para sua distribuição específica do Sistema Operacional, ou site favorito de suporte on-line, para a sintaxe apropriada e opções de comando.Inicialização do dispositivo (Ambiente Linux)
Depois que o DT4000 G2 estiver conectado a seu computador e for reconhecido pelo sistema operacional, o dispositivo precisará ser inicializado antes da primeira utilização. Para fazê-lo, abra o aplicativo do 'Terminal' (ou janela de linha de comando) e siga estas etapas: (Observação: As capturas de telas e instruções nesta seção utilizam a pasta linux32 (o que significa 32 bits) para a finalidade de demonstrar o uso do dispositivo DT4000 G2 no Sistema Operacional Linux. Tenha em mente que, caso esteja usando a versão de 64 bits do Linux, precisará simplesmente navegar para a pasta respectiva de 64 bits em lugar da pasta de 32 bits, i.e. linux64 em vez de linux32). 1. Altere o diretório para o volume DT4000 G2 digitando o comando a seguir no prompt do terminal (como visto na Figura 10.2): cd /media/DT4000G2/linux/linux32 (Observação: Nomes de comandos e pastas (diretório) diferenciam letras maiúsculas de minúsculas, i.e. 'linux32' NÃO é o mesmo que 'Linux32' A sintaxe também deve ser digitada exatamente como mostrada). text_image
[root@localhost /]# cd /media/dt4000g2/linux/linux64 [root@localhost linux64]# _text_image
[root@localhost /]# cd /media/dt4000g2/linux/linux64 [root@localhost linux64]# ls dt4000g2_about dt4000g2_initialize dt4000g2_logout dt4000g2Forgotpassword dt4000g2_login [root@localhost linux64]# _text_image
[root@localhost /]# cd /media/dt4000g2/linux/linux64 [root@localhost linux64]# ls dt4000g2_about dt4000g2_initialize dt4000g2_logout dt4000g2Forgotpassword dt4000g2_login [root@localhost linux64]# ./dt4000g2_initializeUso do dispositivo (Ambiente Linux)
Depois que o DT4000 G2 tiver sido inicializado você pode acessar a partição de dados de segurança fazendo login no dispositivo usando a senha do DT4000 G2 criada na página 22. Para fazê-lo, siga estas etapas: 1. Abra uma janela do aplicativo do 'Terminal'. 2. Digite o comando a seguir no prompt do terminal: cd /media/DT4000G2/linux/linux32 3. Com o prompt de comando agora em /media/DT4000G2/linux/linux32\$, digite o comando a seguir para se conectar ao dispositivo: ./dt4000g2\_login\* e pressione ENTER. (Observação: Nomes de comandos e pastas diferenciam letras maiúsculas de minúsculas e a sintaxe deve ser exata.) 4. Digite a senha do seu DT4000 G2 e pressione ENTER. Após a conexão bem-sucedida, o volume de dados de segurança será aberto em seu desktop e você poderá prosseguir e usar o DT4000 G2. Durante o processo de login, se for digitada uma senha incorreta, você terá outra oportunidade para digitar a senha correta repetindo a etapa 3; entretanto, há um recurso de segurança integrado que monitora o número de tentativas erradas de login. Se esse número alcançar o valor predefinido de 10 tentativas erradas, o DT4000 G2 será bloqueado e será necessário inicializar o dispositivo executando o comando dt4000g2Forgotpassword, antes do próximo uso. Este processo irá permitir que você crie uma nova senha, mas para proteger a privacidade de seus dados, o DT4000 G2 irá formatar a partição de dados de segurança. Isso significa que todos os seus dados serão perdidos. Depois que o processo dt4000g2\_forgotpassword estiver concluído e você configurar com sucesso uma nova senha, o contador de segurança incorporado que monitora as falhas de tentativas de login será reiniciado (Observação: Uma conexão bem-sucedida antes de atingir o número máximo de tentativas (MaxNoA, abreviado) também irá reiniciar o contador de erros de login.) Quando terminar de usar o DT4000 G2, desconecte-se do dispositivo e proteja seus dados. Para isso, siga estas etapas: 1. Abra uma janela do aplicativo no 'Terminal'. 2. Digite o comando a seguir no prompt do terminal: cd /media/DT4000G2/linux/linux32 3. Com o prompt de comando agora em /media/DT4000G2/linux/linux32\$, digite o comando a seguir para se desconectar do dispositivo: ./dt4000g2\_logout\* e pressione ENTER. (Observação: Nomes de comandos e pastas diferenciam letras maiúsculas de minúsculas e a sintaxe deve ser exata.) 4. Remova o DT4000 G2 do seu sistema e guarde-o em local seguro. \*Observação: Certas distribuições de Linux irão exigir privilégios (raiz) de usuário especial a fim de executar os comandos do DT4000 G2 de modo adequado na janela do aplicativo no terminal.Ajuda e Resolução de Problemas
Bloqueio do dispositivo
O DT4000 G2 inclui um recurso de segurança que impede o acesso não-autorizado à partição de dados quando o número máximo de tentativas erradasconsecutivas (MaxNoA) for atingido; a configuração padrão de fábrica tem o valor predefinido em 10 (nº de tentativas). O contador de bloqueio monitora cada login errado e pode ser reiniciado de duas maneiras: 1) Um login correto antes de atingir o MaxNoA ou 2) Atingindo o MaxNoA e realizando uma formatação no dispositivo.\* Se for digitada uma senha incorreta, uma mensagem de erro irá aparecer logo abaixo do campo 'Dica', indicando uma falha no login. Ver Figura 10.1. Se e quando for feita uma 7 tentativa errada, você verá uma mensagem de erro adicional indicando que só tem 3 tentativas restantes antes de atingir o MaxNoA (que é definido em 10 por padrão). Consulte a Figura 10.2. Após a 10ª tentativa errada de login, o DT4000 G2 irá bloquear permanentemente a partição de dados e será necessária uma formatação do dispositivo antes da próxima utilização. Isso significa que todos os dados armazenados no DT4000 G2 serão perdidos e você precisará criar uma nova senha. Essa medida de segurança impede que alguém (que não tenha a sua senha) faça incontáveis tentativas de login e consiga acesso aos seus dados confidenciais. Se você for o proprietário do DT4000 G2 e esquecer sua senha, as mesmas medidas de segurança serão aplicadas, incluindo a formatação do dispositivo.\* Para mais detalhes sobre esse recurso, veja 'Esqueci a senha' na página 25. text_image
Login devices DT4000G2 DataTraveler® 4000 G2 Password: Hint: Failed to Login: The password is incorrect. Please try again. Forgot Password Contact Information Kingston Login Canceltext_image
Login device DT4000G2 DataTraveler® 4000 G2 Password: Hint: Failed to Login: The password is incorrect. Please try again. 3 Attempts left before your DT4000 is blocked permanently. Forget Password Contact Information Kingston Login CancelEsqueci a senha
Se esquecer sua senha, você pode clicar no link ‘Esqueci a senha’ que aparece na janela de login do dispositivo quando o DT4000 G2\_Launcher é executado (ver Figura 10.3.) Esta opção irá permitir que você crie uma nova senha, mas para proteger a privacidade de seus dados, o DT4000 G2 será formatado. Isso significa que todos os seus dados serão apagados no processo.\* Quando você clicar em ‘Esqueci a senha’, uma caixa de mensagem (Figura 10.4) irá aparecer e perguntar se você deseja digitar uma nova senha antes de executar a formatação. Neste momento, você pode 1) clicar em ‘OK’ para confirmar ou 2) clica em ‘Cancelar’ para retornar à página de login. Se você optar por continuar, você será solicitado a criar uma nova senha complexa e uma nova dica. A dica não é um campo obrigatório, mas pode ser útil para fornecer uma pista sobre a senha, se algum dia ela for esquecida. (Observação: A dica NÃO PODE ser exatamente igual à senha do DT4000 G2.) text_image
Login device DT4000G2 DataTraveler® 4000 G2 Password: Hint Forgot Password ContextInformation Kingston TECHNOLOGY Login Canceltext_image
Forgot Password In order to protect your data, your DT4000G2 will be formatted and all data will be erased. Do you want to enter a new password and format your DT4000G2? OK CancelConflito de Letra de Drive (Sistemas Operacionais Windows)
Como mencionado na seção Requisitos do Sistema' deste manual (na página 3), o DT4000 G2 exige duas letras consecutivas de drive APÓS o último disco físico que aparece antes do espaço' na designação de letras de drives (ver Figura 10.5.) Isto NÃO está relacionado com compartilhamentos de rede porque eles são específicos aos perfis de usuário e não ao próprio perfil de hardware de sistema, assim aparecendo disponível no Sistema Operacional. Isto significa que o Windows pode atribuir ao DT4000 G2 uma letra de unidade que já está sendo utilizada por um compartilhamento de rede ou caminho de Convenção de Nomenclatura Universal (UNC), causando um conflito de letra de drive. Se isto ocorrer, consulte o seu administrador ou departamento de assistência técnica para alterar a atribuição das letras de drive no Gerenciamento do Disco do Windows (necessários privilégios de administrador). text_image
My Computer File Edit View Favorites Tools Help Back Search Polders Address System Tasks View system information Add or remove programs Change a setting Other Places My Network Places My Documents Control Panel Details System Folder Local Disk (C:) DVD/CD-R/W Drive (D:) Local Disk (E:) DT400G2 (F:) Network Share (G:) Local Disk (H:) Red ArrowMensagens de Erro
Não foi possível criar arquivo – Esta mensagem de erro irá aparecer ao tentar CRIAR um arquivo ou pastaNA partição de dados de segurança enquanto estiver conectado no modo somente leitura. text_image
Unable to create file Unable to create the file 'New Text Document.txt' The media is write protected. OKtext_image
Error Copying File or Folder Cannot copy File1: The disk is write-protected. Remove the write-protection or use another disk. OKtext_image
Error Deleting File or Folder Cannot delete File1: The disk is write-protected. Remove the write-protection or use another disk. OKInstrukcja obsługi pamięci DataTraveler® 4000 G2
text_image
DataTraveler® 4000 G2 FIPS 140-2 LEVEL 3 CERTIFIED Kingston® TECHNOLOGY ©2014 Kingston Technology Corporation. D7600 Newhope Street, Fountain Valley, CA 927.08 USA All rights reserved. All registered trademarks and trademarks are the property of their respective owners.natural_image
Black USB flash drive with open lid, no visible text or symbols on bodySpis treści
TOCINFORMACJE O TEJ INSTRUKCJI
Ta instrukcja obsługi dotyczy pamięci DataTraveler ^® 4000 G2 z certyfikatem FIPS (nazywanej dalej w skrócie DT4000 G2) w formie fabrycznej, bez wprowadzonych zmian dokonanych na zlecenie klienta.Wymagania systemowe
Platforma PC
- Procesor Pentium III lub odpowiednik (lub szybszy) • 15 MB wolnego miejsca na dysku • Dostępny port USB 2.0/3.0 - Dwie kolejne litery dysku po ostatnim dysku fizycznym\*Obsługiwane systemy operacyjne komputerów PC
- Windows ^ 8, 8.1 (system RT nie jest obsługiwany) - Windows ^ 7 SP1 - Windows ^ Vista SP2Platforma Mac
• 15 MB wolnego miejsca na dysku - USB 2.0 / 3.0Obsługiwane systemy operacyjne
• Mac OS X 10.8.x - 10.10xZalecenia
Aby zagwarantować odpowiednie zasilanie pamięci DT4000 G2, należy włożyć ją bezpośrednio do portu USB w notebooku lub komputerze stacjonarnym, tak jak pokazano na Ilustracji 1.1. Należy unikać podłączania pamięci DT4000 G2 do urządzeń peryferyjnych z portem USB, takich jak klawiatura czy koncentrator USB, tak jak pokazano na Ilustracji 1.2. natural_image
Two electronic devices: a battery and an Ethernet card, both placed on a laptop keyboard (no visible text or symbols)natural_image
Two photos showing a device with a black connector and red prohibition symbols, no readable text or labels present.Instalacja (środowisko Windows)
1. Wóż pamięć DT4000 G2 do dostępnego portu USB w notebooku lub komputerze stacjonarnym i poczekaj, aż system Windows ją wykryje. - Użytkownicy systemu Windows Vista zobaczyć powiadomienie dotyczące sterownika urządzenia, tak jak pokazano na Ilustracji 2.2. - Użytkownicy systemu Windows 7 zobaczyć powiadomienie dotyczące sterownika urządzenia, tak jak pokazano na Ilustracji 2.2. Po zakończeniu wykrywania nowego sprzętu system Windows wyświetli monit o rozpoczęcie procesu inicjowania. - Użytkownicy systemu Windows Vista zobaczyć okno autoodtwarzania, podobne do pokazanego na Ilustracji 2.3. - Użytkownicy systemu Windows 7 zobaczyć okno autoodtwarzania, podobne do pokazanego na Ilustracji 2.3. 2. Wybierz opcję Uruchom DT4000 G2\_Launcher.exe. Jeżeli system Windows nie wyświetli okna autoodtwarzania, możesz przejść do partycji dysku text_image
Installing device driver software Click here for status.text_image
Installing device driver software Click here for status.text_image
Organize Burn to disc Files Currently on the Disc Support autonun.inf DT4000G2_Launch her.exetext_image
AutoPlay DVD RW Drive (I): DT4000G2 Always do this for software and games: Install or run program from your media Run DT4000G2_Launcher.exe Published by Kingston Technology Corporation General options Open folder to view files using Windows Explorer View more AutoPlay options in Control PanelInicjowanie urządzenia (środowisko Windows)
1. Wybierz preferowany język z menu rozwijanego i kliknij przycisk 'Next (Dalej) (Ilustracja 3.1). text_image
Device Initialization - DT4000 G2 DataTraveler® 4000 G2 Language Select Language: English Kingston TECNOLOGY Next> CancelIlustracja 3.1. Wybór języka
2. Zapoznaj się z umową licencyjną i kliknij przycisk 'Next (Dalej) (Ilustracja 3.2). (Uwaga: Aby kontynuować proces inicjowania należy zaakceptować umowę licencyjną; w przeciwnym razie przycisk 'Next (Dalej) pozostanie wyłączony.) text_image
Device Initialization - DT4000 G2 DataTraveler® 4000 G2 License Agreement SOFTWARE LICENSE AGREEMENT IMPORTANT - READ CAREFULLY: THIS SOFTWARE LICENSE AGREEMENT ("Agreement") is a legal agreement between you (either an individual or a single entity) and Kingston Technology Company Inc. ("Kingston"). This Agreement relates to the software accompanying this Agreement, which includes computer software and may include associated media, printed materials, and "online" or electronic Accept Decline Kingston TECHNOLOGYIlustracja 3.2. Umowa licencyjna
3. Utwórz hasło, aby zabezpieczyć dane w pamięci DT4000 G2. Wprowadź je w polu ☐Password (Hasło), a następnie wprowadź je ponownie w polu 'Password Confirmation (Potwierdzenie hasta), tak jak pokazano na Ilustracji 3.3. Utworzone hasło musi spełniać poniższe kryteria, aby można było kontynuować proces inicjowania: 1. Hasło musi zawierać co najmniej 8 znaków (maks. 16 znaków). 2. Hasło musi zawierać znaki należące do trzech (3) z następujących kategorii: - WIELKIE LITERY, małe litery, cyfry i/lub znaki specjalne (!, \$ itp.). Można również wprowadzić wskazówkę dotyczącą hasła, ale nie jest to obowiązkowe. Pole wskazówki może pomóc w przypomnieniu zapomnianego hasła. (Uwaga: Wskazówka NIE MOŻE być taka sama jak hasło). text_image
Device Initialization - DT4000 G2 DataTraveler® 4000 G2 Password * Password: ••••••••••• * Password Confirmation: •••••••••• i Password Rules Hint: Pwd Hint *Mandatory fieldtext_image
Device Initialization - DT4000 G2 DataTraveler® 4000 G2 Contact Information Name: Test Name Company: Test Company Details: Test Details & Other Info Kingston TECHNOLOGYtext_image
Format - DT4000 G2 DataTraveler® 4000 G2 Formatting DT4000 G2 (I:)...text_image
Format - DT4000 G2 DataTraveler® 4000 G2 Format Complete. Kingston TECHNOLOGY OKtext_image
Login device DT4000 G2 DataTraveler® 4000 G2 Password: Hint Forgot Password Contact Information Read-Only Mode Kingston TECHNOLOGY Login CancelOpcje urządzenia (środowisko Windows)
Po zalogowaniu się do urządzenia w prawym rogu paska zadań systemu Windows będzie wyświetlana ikona 'DT4000 G2 (Ilustracja 5.1). (Uwaga: Użytkownicy systemu Windows 7 muszą kliknąć przycisk strzałki w górę na pasku zadań, aby uzyskać dostęp do ikony 'DT4000 G2 (Ilustracja 5.2.) Kliknięcie ikony DT4000 G2 spowoduje wyświetlenie następującego menu: text_image
DT4000 G2 Settings Browse DT4000 G2 Format DT4000 G2 Online Support About DT4000 G2 Shut down DT4000 G2text_image
Customize... 9:26 AM 12/3/2010Opcja DT4000 G2 Settings (Ustawienia pamięci DT4000 G2)
- Umożliwia zmianę hasta i/lub wskazówki (llustracja 5.3). - Umożliwia dodanie/wyświetlenie/zmianę informacji kontaktowych (Ilustracja 5.4). - Umożliwia zmianę aktualnie używanego języka (Ilustracja 5.5). (Uwaga: Ze względów bezpieczeństwa aktualizacja i/lub modyfikacja tych ustawień wymaga podania aktualnego hasta pamięci DT4000 G2). text_image
Settings DataTraveler® 4000 62 Password | Contact Information | Language * Current Password: * New Password: * Password Confirmation: i SearchSules Hint: Find Hint: * Mandatory field Kingston OK Buy Canceltext_image
Settings DataTraveler® 4000 62 Password Contact Information Language Names: Test Name Company: Test Company Details: Test Details & Other Info Kingston OK Apply Canceltext_image
Settings DataTraveler® 4000 62 Password | Contact Information | Language | Select Language: English Kingston OK Buy CancelPolecenie Browse DT4000 G2 (Przeglądaj pamięć DT4000 G2)
\- Umożliwia przeglądanie danych na zabezpieczonej partycji (po załogowaniu się).Polecenie Format DT4000 G2 (Formatuj pamięć DT4000 G2)\*
\- Umożliwia sformatowanie zabezpieczonej partycji danych. (Uwaga: Wszystkie dane zostaną wymazane.) (Ilustracja 5.6)Online Support (Pomoc techniczna online) (wymaga dostępu do Internetu)
\- Umożliwia otwarcie przeglądarki internetowej i przejście do strony http://www.kingston.com/support/, gdzie dostępne są dodatkowe informacje.Opcja About DT4000 G2 (Informacje o pamięci DT4000 G2)
\- Wyświetla szczegółowe informacje dotyczące pamięci DT4000 G2, w tym informacje o wersjach aplikacji i oprogramowania sprzętowego (Ilustracja 5.7).Polecenie Shutdown DT4000 G2 (Wyłącz pamięć DT4000 G2)
\- Prawidłowo wyłącza pamięć DT4000 G2, umożliwiając bezpieczne odłączenie jej od komputera. text_image
Format - DT4000 G2 DataTraveler® 4000 G2 WARNING: Formatting will erase ALL data on this disk. To format the disk (3), click OK. To quit, click CANCEL. Your password is required to complete format. Passwords: Kingston OK Canceltext_image
About - DT4000 G2 DataTraveler® 4000 G2 Copyright (c) 2011 Kingston Technology Company, Inc. Modules Version Information DT4000 G2 K40 00FFE23C7ECBF1080000:ID2 Application K4.0.0.5 FW Version 3.05 Crypto Library FW 1.00 Kingston Technology Universe Case-Koniec sekcji dotyczącej systemu Windows-
Instalacja (środowisko Mac)
Włóż pamięć DT4000 G2 do dostępnego portu w notebooku lub komputerze stacjonarnym i poczekaj, aż system operacyjny komputera Mac ją wykryje. Gdy pamięć zostanie wykryta, na pulpicie zostanie wyświetlony wolumin DT4000 G2, tak jak pokazano na Ilustracji 6.1. 1. Kliknij dwukrotnie ikonę dysku CD-ROM pamięci DT4000 G2. 2. Kliknij dwukrotnie folder komputera Mac widoczny w oknie pokazanym na Ilustracji 6.2. 3. Kliknij dwukrotnie ikonę aplikacji DT4000 G2 widoczną w oknie pokazanym na Ilustracji 6.3. Spowoduje to rozpoczęcie procesu inicjowania. text_image
DT4000G2 autorun.inf DT4000G2_Launcher.exe Linux Mac rr_moved Supporttext_image
DT4000G2_Launchertext_image
DataTraveler® 4000 G2 FIPS 140-2 LEVEL 3 CERTIFIED Kingston® TECHNOLOGY ©2018 Kingston Technology Corporation, 17605 Newshope Street, Columbus Valley, CA 102708 USA. All rights reserved. All registered trademarks and trademarks are the property of their respective owners.Inicjowanie urządzenia (środowisko Mac)
1. Wybierz preferowany język z menu rozwijanego i kliknij przycisk 'Next (Dalej) (Ilustracja 7.1). text_image
Device Initialization - DT4000 G2 DataTraveler® 4000 G2 Language Select Language: English Kingston TECHNOLOGY Next> Canceltext_image
Device Initialization - DT4000 G2 DataTraveler® 4000 G2 License Agreement SOFTWARE LICENSE AGREEMENT IMPORTANT - READ CAREFULLY: THIS SOFTWARE LICENSE AGREEMENT ("Agreement") is a legal agreement between you (either an individual or a single entity) and Kingston Technology Company Inc. ("Kingston"). This Agreement relates to the software accompanying this Agreement, which includes computer software and may include associated media, printed materials, and "online" or electronic Accept Decline Kingstontext_image
Device Initialization - DT4000 G2 DataTraveler® 4000 G2 ① ② ③ ④ Password * Password: ********** * Password Confirmation: ********** i Password Rules Hint: Pwd Hint * Mandatory field Kingston TECHNOLOGYtext_image
Device Initialization - DT4000 G2 DataTraveler® 4000 G2 ① ② ③ ④ Contact Information Name: Test Name Company: Test Company Details: Test Details & Other Info Kingston TECHNOLOGYtext_image
Format - DT4000 G2 DataTraveler® 4000 G2 Formatting DT4000 G2 ... Kingston OK Canceltext_image
Format - DT4000 G2 DataTraveler® 4000 G2 Format Complete. Kingston OK Canceltext_image
Format - DT4000 G2 DataTraveler® 4000 G2 Password: Hint Forgot Password Contact Information Read-Only Mode Kingston TECHNOLOGY Login CancelOpcje urządzenia (środowisko Mac)
Po zalogowaniu się do urządzenia w doku systemu Mac OS X będzie widoczna ikona ☐DT4000 G2\_Launcher, tak jak pokazano na Ilustracji 9.1 poniżej: text_image
DT4000G2_LauncherOpcja DT4000 G2 Settings (Ustawienia pamięci DT4000 G2)
- Umożliwia zmianę hasła i/lub wskazówki (Ilustracja 9.3). - Umożliwia dodanie/wyświetlenie/zmianę informacji kontaktowych (Ilustracja 9.4). - Umożliwia zmianę używanego języka (Ilustracja 9.5). text_image
DT4000 G2 Settings Browse DT4000 G2 Format DT4000 G2 Online Support About DT4000 G2 Shut down DT4000 G2 Options Show All Windows Hide Quittext_image
Settings DataTraveler® 4000 G2 Password Contact Information Lambanguage * Current Password: * New Password: * Password Confirmation: i Password Rules Hint: * Mandatory field Kingston OK Canceltext_image
Settings DataTraveler® 4000 62 Password Contact InformationLanguage Name: Company: Details: Kingston OK Canceltext_image
Settings DataTraveler® 4000 GE Password Contact Information Language Select Language: English Kingston OK CancelPolecenie Browse DT4000 G2 (Przeglądaj pamięć DT4000 G2)
\- Umożliwia przeglądanie zawartości zabezpieczonej partycji danych (po zalogowaniu się).Polecenie Format DT4000 G2 (Formatuj pamięć DT4000 G2)
\- Umożliwia sformatowanie zabezpieczonej partycji danych. (Uwaga: Wszystkie dane zostaną wymazane.) (Ilustracja 9.6)Online Support (Pomoc techniczna online) (wymaga dostępu do Internetu)
\- Umożliwia otwarcie przeglądarki internetowej i przejście do strony http://www.kingston.com/support/, gdzie dostępne są dodatkowe informacje.Opcja About DT4000 G2 (Informacje o pamięci DT4000 G2)
\- Wyświetła szczegółowe informacje dotyczące pamięci DT4000 G2, w tym informacje o wersjach aplikacji i oprogramowania sprzętowego (Ilustracja 9.7).Polecenie Shutdown DT4000 G2 (Wyłącz pamięć DT4000 G2)
\- Prawidłowo wyłącza pamięć DT4000 G2, umożliwiając bezpieczne odłączenie jej od komputera. text_image
Format - DT4000 G2 DataTraveler® 4000 G2 WARNING: Formatting will erase ALL data on this disk. To format the disk, click OK. To quit, click CANCEL.text_image
About - DT4000 G2 DataTraveler® 4000 G2 Copyright (c) 2007 Kingston Technology Company, Inc. Modules Version Information DT4000 G2 3.0 009FFE23C7ECBF10B0000102 Application 4.0.0.1 FW Version 3.05 Crypto Library FW 1.00 Kingston Close-Koniec sekcji dotyczącej systemu Mac-
Instalacja (środowisko Linux)
(UWAGA: Obecnie dostępnych jest wiele różnych dystrybucji systemu Linux, a Ⅱwygląd i działanie interfejsów w poszczególnych wersjach może być różne. Jednak ogólny zestaw poleceń używanych w aplikacji Terminal jest bardzo podobny, dzięki czemu można było go użyć w poniższych instrukcjach dotyczących systemu Linux. Przykładowe zrzuty ekranu pokazane w tej sekcji zostały utworzone w środowisku Linux w wersji 64-bitowej.)  W niektórych dystrybucjach systemu Linux do prawidłowego wykonania poleceń pamięci DT4000G2 w oknie aplikacji Terminal potrzebne są uprawnienia administratora (root). Wlóż pamięć DT4000 G2 do dostępnego portu w notebooku lub komputerze stacjonarnym i poczekaj, aż system operacyjny Linux ją wykryje. Gdy tak się stanie, na pulpicie lub pasku bocznym zostanie wyświetlona ikona DT4000 G2, tak jak pokazano na Ilustracji 10.1.  DT4000G2 Ilustracja 10.1. Wolumin DT4000G2 Pamięć DT4000G2 udostępnia 5 poleceń, których można użyć w systemie Linux: dt4000g2\_about, dt4000g2\_forgotpassword, dt4000g2\_initialize, dt4000g2\_login oraz dt4000g2\_logout (Uwaga: Aby wykonać te polecenia, należy otworzyć okno aplikacji Terminal i przejść do folderu, w którym znajdują się te pliki. Każde polecenie musi być poprzedzone następującymi dwoma znakami: 'J' (kropka i ukośnik)). Użytkownicy systemów 32-bitowych powinni otworzyć okno aplikacji Terminal i zmienić bieżący katalog na katalog /media/DT4000G2/linux/linux32\$, wpisując w wierszu polecenia następujące polecenie: cd /media/DT4000G2/linux/linux32 (a następnie naciskając klawisz ENTER.) Użytkownicy systemów 64-bitowych powinni otworzyć okno aplikacji Terminal i zmienić bieżący katalog na katalog /media/DT4000G2/linux/linux64\$, wpisując w wierszu polecenia następujące polecenie: cd /media/DT4000G2/linux/linux64 (a następnie naciskając klawisz ENTER.) \*Uwaga: Jeśli system operacyjny nie załaduje automatycznie woluminu pamięci DT4000 G2, należy załadować go ręcznie w oknie Terminal, używając polecenia 'mount systemu Linux. Prawidłową składnię i opcje polecenia należy sprawdzić w dokumentacji posiadanej dystrybucji systemu Linux lub ulubionej witrynie pomocy technicznej online.Inicjowanie urządzenia (środowisko Linux)
Gdy pamięć DT4000 G2 zostanie podłączona do komputera i rozpoznana przez system operacyjny, należy ją zainicjować, aby można było jej używać. W tym celu otwórz aplikację Terminal (lub okno wiersza polecenia) i wykonaj następujące kroki: (Uwaga: W zrzutach ekranu i instrukcjach podanych w tej sekcji w celu pokazania sposobu użycia pamięci DT4000 G2 w systemie operacyjnym Linux jest używany folder linux32 (wskazujący na użycie systemu 32-bitowego). Należy pamiętać, że w przypadku posiadania 64-bitowej wersji systemu Linux należy po prostu przejść do folderu odpowiedniego dla wersji 64-bitowych, czyli zamiast używać folderu dla wersji 32-bitowych, używać folderu linux64, a nie linux32.) 1. Zmień katalog na woluminDT4000 G2, wpisując w wierszu polecenia terminala następujące polecenie (tak jak pokazano na Ilustracji 10.2): cd /media/DT4000G2/linux/linux32 (Uwaga: W poleceniach i nazwach folderów (katalogów) jest rozróżniana wielkość liter, a więc 'linux32'" to NIE to samo, co „Linux32". Składnię także trzeba wpisać dokładnie tak, jak pokazano). text_image
[root@localhost /]# cd /media/dt4000g2/linux/linux64 [root@localhost linux64]# _text_image
[root@localhost /]# cd /media/dt4000g2/linux/linux64 [root@localhost linux64]# ls dt4000g2_about dt4000g2_initialize dt4000g2_logout dt4000g2Forgotpassword dt4000g2_login [root@localhost linux64]# _text_image
[root@localhost /]# cd /media/dt4000g2/linux/linux64 [root@localhost linux64]# ls dt4000g2_about dt4000g2_initialize dt4000g2_logout dt4000g2Forgotpassword dt4000g2_login [root@localhost linux64]# ./dt4000g2_initializeUżytkowanie urządzenia (środowisko Linux)
Po zainicjowaniu pamięci DT4000 G2 można uzyskać dostęp do bezpiecznej partycji danych, logując się do niej przy użyciu hasła utworzonego zgodnie z opisem na stronie 22. W tym celu wykonaj następujące czynności: 1. Otwórz okno aplikacji 'Terminal. 2. Wpisz w wierszu polecenia terminala następujące polecenie: cd /media/DT4000G2/linux/linux32 3. W wierszu polecenia w folderze /media/DT4000G2/linux/linux32\$ wpisz następujące polecenie, aby zalogować się do pamięci: ./dt4000g2\_login\* i naciśnij klawisz ENTER. (Uwaga: W poleceniach i nazwach folderów jest rozróżniana wielkość liter, a używana składnia musi być dokładnie taka sama, jak pokazano.) 4. Wprowadź hasło pamięci DT4000 G2 i naciśnij klawisz ENTER. Po pomyślnym zalogowaniu się na pulpicie zostanie otwarty bezpieczny wolumin danych i będzie można zacząć używać pamięci DT4000 G2. Jeżeli podczas logowania zostanie wprowadzone błędne hasło, będzie można ponownie spróbować wprowadzić poprawne hasło, powtarzając krok 3, ale wbudowana funkcja zabezpieczeń zlicza nieudane próby logowania. Po 10 (wstępnie skonfigurowana liczba) nieudanych próbach logowania pamięć DT4000 G2 zostanie zablokowana i przed ponownym jej użyciem będzie konieczne zainicjowanie pamięci przez wykonanie polecenia dt4000g2\_forgotpassword. Ten proces umożliwia utworzenie nowego hasła, ale w celu ochrony poufności danych pamięć DT4000 G2 sformatuje bezpieczną partycję danych. Oznacza to, że wszystkie dane zostaną utracone. Po zakończeniu procesu dt4000g2\_forgotpassword i pomyślnym skonfigurowaniu nowego hasła wbudowany licznik zabezpieczeń śledzący nieudane próby logowania zostanie zresetowany. (Uwaga: Pomyślne zalogowanie się przed osiągnięciem maksymalnej liczby prób (w skrócie MaxNoA) także spowoduje zresetowanie licznika nieudanych prób logowania). Po zakończeniu używania pamięci DT4000 G2 należy się wylogować i zabezpieczyć dane. W tym celu wykonaj następujące czynności: 1. Otwórz okno aplikacji 'Terminal. 2. Wpisz w wierszu polecenia terminala następujące polecenie: cd /media/DT4000G2/linux/linux32 3. W wierszu polecenia w folderze /media/DT4000G2/linux/linux32\$ wpisz następujące polecenie, aby wylogować się z pamięci: ./dt4000g2\_logout\* i naciśnij klawisz ENTER. (Uwaga: W poleceniach i nazwach folderów jest rozróżniana wielkość liter, a używana składnia musi być dokładnie taka sama, jak pokazano.) 4. Wyjmij pamięć DT4000 G2 z komputera i umieść ją w bezpiecznym miejscu. \*Uwaga: W niektórych dystrybucjach systemu Linux do prawidłowego wykonania poleceń pamięci DT4000 G2 w oknie aplikacji Terminal są potrzebne uprawnienia administratora (root).Pomoc i rozwiązywanie problemów
Blokada urządzenia
Pamięć DT4000 G2 zawiera funkcję zabezpieczeń zapobiegającą nieautoryzowanemu dostępowi do partycji danych po maksymalnej liczbie następujących po sobie nieudanych prób logowania (w skrócie MaxNoA). Domyślna liczba dozwolonych nieudanych prób to 10. Licznik 'blokady zlicza nieudane logowania i można go zresetować na jeden z dwóch sposobów: 1) logując się przed osiągnięciem limitu MaxNoA lub 2) osiągając limit MaxNoA i formatując pamięć.\* Jeżeli zostanie wprowadzone nieprawidłowe hasło, tuż pod polem 'Hint (Wskazówka) zostanie wyświetlony komunikat o błędzie wskazujący na niepowodzenie logowania. Patrz Ilustracja 10.1. Po siódmej nieudanej próbie zostanie wyświetlony dodatkowy komunikat o błędzie informujący o tym, że pozostały trzy próby przed osiągnięciem limitu MaxNoA (ustawionego domyślnie na 10). Patrz Ilustracja 10.2. Po dziesiątej nieudanej próbie logowania pamięć DT4000 G2 trwale zablokuje partycję danych, przez co dalsze używanie pamięci będzie wymagało jej sformatowania. Oznacza to, że wszystkie dane przechowywane w pamięci DT4000 G2 zostaną utracone i trzeba będzie utworzyć nowe hasło. To zabezpieczenie ma na celu uniemożliwienie osobom, które nie znają hasła, podjęcia nieograniczonej liczby prób logowania i uzyskania dostępu do poufnych danych. text_image
Login device DT4000G2 DataTraveler® 4000 G2 Password: Hint Failed to Login: The password is incorrect. Please try again. Forget Password Contact Information Kingston EPCADRESS Login Canceltext_image
Login device DT4000G2 DataTraveler® 4000 G2 Password: Hint Failed to Login: The password is incorrect. Please try again. 3 Attempts left before your DT4000 is blocked permanently. Forgot Password Contact Information Kingston TECHNOLOGY Login CancelNie pamiętam hasta
W przypadku zapomnienia hasła można kliknąć łącze 'Reset Password (Resetuj hasło), które jest wyświetlane w oknie logowania do urządzenia po uruchomieniu programu DT4000 G2\_Launcher (patrz Ilustracja 10.3). Ta opcja umożliwia utworzenie nowego hasła, ale w celu ochrony poufności danych pamięć DT4000 G2 zostanie sformatowana. Oznacza to, że wszystkie dane zostaną usunięte\*. Po kliknięciu łącza Forgot Password (Nie pamiętam hasła) zostanie wyświetlony komunikat (Ilustracja 10.4) z pytaniem, czy chcesz wprowadzić nowe hasło przed rozpoczęciem formatowania. Na tym etapie można 1) kliknąć przycisk 'OK, aby potwierdzić, lub 2) kliknąć przycisk Cancel (Anuluj), aby wrócić do okna logowania. W przypadku wybrania opcji kontynuowania text_image
Login device DT4000G2 DataTraveler® 4000 G2 Password: Hint Forgot Password Context information Kingston TECHNOLOGY Login Canceltext_image
Forgot Password In order to protect your data, your DT4000G2 will be formatted and all data will be erased. Do you want to enter a new password and format your DT4000G2? OK Canceltext_image
My Computer File Edit View Favorites Tools Help Back Search Polders Address System Tasks View system information Add or remove programs Change a setting Local Disk (C:) DVD/CD-RW Drive (D:) Local Disk (E:) Other Places My Network Places My Documents Control Panel Details System Folder DT4300GZ (F:) Network Share (G:) Local Disk (H:) Red ArrowKomunikaty o błędach
Unable to create file (Nie można utworzyć pliku) — Ten komunikat o błędzie jest wyświetlany podczas próby utworzenia pliku lub folderu na bezpiecznej partycji danych po załogowaniu się w trybie tylko do odczytu. text_image
Unable to create file Unable to create the file 'New Text Document.txt' The media is write protected. OKtext_image
Error Copying File or Folder Cannot copy File1: The disk is write-protected. Remove the write-protection or use another disk. OKtext_image
Error Deleting File or Folder Cannot delete File1: The disk is write-protected. Remove the write-protection or use another disk. OKРуководство пользователя USB-накопителя DataTraveler® 4000 G2
text_image
DataTraveler® 4000 G2 FIPS 140-2 LEVEL 3 CERTIFIED Kingston® TECHNOLOGY ©2014 Kingston Technology Corporation, 17600 Newshope Street, Fountain Valley, CA 92700 USA All rights reserved. All registered trademarks and trademarks are the property of their respective owners.natural_image
Black USB drive with open lid, no visible text or symbols on bodyОглавление
ТОСО ДАННОМ РУКОВОДСТВЕ
В настоящем руководстве содержится информация о USB-накопителе DataTraveler® 4000 G2 (далее - DT4000 G2), сертифицированном на соответствие требованиям стандарта FIPS и созданном на основании заводской конфигурации без адаптаций.Системные требования
Платформа ПК
- Процессор Pentium III или аналогичный (или более быстрый) • 15МБ свободного пространства на диске - Свободный разъем USB 2.0/3.0 - Две последующие буквы обозначения приводов после последнего физического привода диска\*Поддерживаемые операционные системы ПК
- Windows ^ 8, 8.1 (RT не поддерживается) - Windows ^ 7 (SP1) - Windows ^ Vista (SP2)Платформа Мас
• 15МБ свободного пространства на диске - USB 2.0/3.0Поддержка операционных систем
• Mac OS X 10.8.x -10.10xРекомендации
Чтобы проверить наличие достаточного питания для накопителя DT4000 G2, его следует вставить напрямую в порт USB ноутбука или настольного компьютера, как показано на Рус. 1.1. Не следует подключать накопитель DT4000 G2 к каким-либо периферийным устройствам, имеющим порт USB, таким как клавиатура или концентратор с питанием через USB, как изображено на Рус. 1.2. natural_image
Two electronic devices: a battery and an Ethernet card, both placed on a laptop keyboard (no visible text or symbols)natural_image
Two photos showing a device with a black connector and red prohibition symbols, no readable text or labels present.Настройка (среда Windows)
1. Вставьте накопитель DT4000 G2 в свободный порт USB на ноутбуке или настольном компьютере и дождитесь, когда Windows обнаружит его. - В случае OC Windows Vista появится сообщение драйвера устройства, как показано на Puc. 2.2. - В случае OC Windows 7 появится сообщение драйвера устройства, как показано на Puc. 2.2. После обнаружения нового оборудования Windows предложит начать процесс инициализации. - У пользователей Windows Vista появится окно автозапуска, наподобие того, которое изображено на Рис. 2.3. - У пользователей Windows 7 на экране появится окно автозапуска, наподобие того, которое показано на Рис. 2.3. text_image
Installing device driver software Click here for status.text_image
Installing device driver software Click here for status.text_image
Organize Burn to disc Files Currently on the Disc Support autorun.inf DT4000G2 Leunc her.exetext_image
AutoPlay DVD RW Drive (I:) DT4000G2 Always do this for software and games: Install or run program from your media Run DT4000G2_Launcher.exe Published by Kingston Technology Corporation General options Open folder to view files using Windows Explorer View more AutoPlay options in Control PanelИнициализация устройства (среда Windows)
1. Выберите язык в раскрывающемся меню и щелкните 'Next (Далее)' (Рус. 3.1.) text_image
Device Initialization - DT4000 G2 DataTraveler® 4000 G2 Language Select Language: English Kingston TECNOLOGY Next> Canceltext_image
Device Initialization - DT4000 G2 DataTraveler® 4000 G2 License Agreement SOFTWARE LICENSE AGREEMENT IMPORTANT - READ CAREFULLY: THIS SOFTWARE LICENSE AGREEMENT ("Agreement") is a legal agreement between you (either an individual or a single entity) and Kingston Technology Company Inc. ("Kingston"). This Agreement relates to the software accompanying this Agreement, which includes computer software and may include associated media, printed materials, and "online" or electronic Accept Decline Kingston TECHNOLOGYtext_image
Device Initialization - DT4000 G2 DataTraveler® 4000 G2 Password * Password: •••••••••••• * Password Confirmation: ••••••••••• i Password Rules Hint: Pwd Hint *Mandatory fieldtext_image
Device Initialization - DT4000 G2 DataTraveler® 4000 G2 Contact Information Name: Test Name Company: Test Company Details: Test Details & Other Info Kingston TECHNOLOGYtext_image
Format - DT4000 G2 DataTraveler® 4000 G2 Formatting DT4000 G2 (I:)...text_image
Format - DT4000 G2 DataTraveler® 4000 G2 Format Complete. Kingston TECHNOLOGY OKЭксплуатация устройства (среда Windows)
После инициализации накопителя DT4000 G2 пользователь может получить доступ к защищенному разделу данных и использовать функции устройства, выполнив вход со своим паролем. Для этого необходимо выполнить следующие действия: 1. Вставьте устройство DT4000 G2 в порт USB ноутбука или настольного ПК и введите пароль (см. Рис. 4.1). \- Наберите пароль и щелкните по кнопке 'Login (Войти), чтобы продолжить. \- Если введен правильный пароль, накопитель DT4000 G2 будет разблокирован, и пользователь может приступить к его использованию. \- Если введен неправильный пароль непосредственно под полем 'Hint (Подсказка) появится сообщение об ошибке, указывающее на неправильные действия при входе. (ПРИМЕЧАНИЕ. Если в процессе входа вводится неправильный пароль, пользователю предоставляются дополнительные возможности ввести правильный пароль, однако предусмотрена функция защиты, которая отслеживает число попыток безуспешного входа\*. Если это число достигает заданного значения (10 безуспешных попыток), устройство DT4000 G2 будет заблокировано, и для его дальнейшего использования потребуется форматирование раздела защищенных данных. ЭТО ОЗНАЧАЕТ, ЧТО ВСЕ ДАННЫЕ, СОХРАНЕННЫЕ НА УСТРОЙСТВЕ DT4000 G2, БУДУТ УДАЛЕНЫ. Более подробно об этом см. в разделе 'Блокировка устройства' на стр. 24. 2. Пользователь может разблокировать раздел защищенных данных в режиме "только чтение", иногда он называется "write-protect mode" ("защищенный режим для чтения"), выбрав поле с названием 'Read-Only Mode (Режим "только чтение") перед входом в устройство. После входа в режиме "только чтение" для пользователя будет предоставлена возможность просматривать содержимое DT4000 G2, но в этом режиме нет возможности обновлять, изменять или удалять это содержимое. (Примечание: в режиме "только чтение" в меню устройства DT4000 G2 нет функции форматирования, см. стр. 10.) text_image
Login device DT4000 G2 DataTraveler® 4000 G2 Password: Hint Forgot Password Contact Information Read-Only Mode Kingston Technology Login CancelФункции устройства (среда Windows)
При входе в устройство в правом углу панели задач Windows появляется пиктограмма устройства 'DT4000 G2' (Рус. 5.1.) (Примечание: пользователям OC Windows 7 нужно будет щелкнуть по кнопке со стрелкой вверх для того, чтобы получить доступ к пиктограмме 'DT4000 G2' (Рус. 5.2.) После однократного щелчка по пиктограмме DT4000 G2 появляется следующее меню: text_image
DT4000 G2 Settings Browse DT4000 G2 Format DT4000 G2 Online Support About DT4000 G2 Shut down DT4000 G2text_image
Customize... 9:26 AM 12/3/2010Настройки DT4000 G2
- Позволяет изменять пароль и (или) подсказку (Рус. 5.3) - Позволяет добавлять/просматривать/изменять контактную информацию (Рус. 5.4) • Позволяет изменять выбранный язык (Рус. 5.5) (Примечание: из соображений безопасности для обновления и (или) модификации данных настроек необходим ввод пароля устройства DT4000 G2.) text_image
Settings DataTraveler® 4000 62 Password | Contact Information | Language | * Current Password: * New Password: * Password Confirmation: i Passport/Nulls Hint: Put Hint * Mandatory field Kingston OK Buy Canceltext_image
Settings DataTraveler® 4000 62 Password Contact Information Language Name: Test Name Company: Test Company Details: Test Details & Other Info Kingston OK Apply Canceltext_image
Settings DataTraveler® 4000 62 Password | Contact Information | Language | Select Language: English Kingston OK Buy CancelПросмотр содержимого DT4000 G2
\- Позволяет просматривать содержимое защищенного раздела данных после входаФорматирование DT4000 G2\*
\- Позволяет форматировать защищенный раздел данных (Предупреждение: все данные будут удалены.) (Рис. 5.6) Поддержка через Интернет (необходим доступ в сеть Интернет) \- Открывает Интернет-браузер и выполняет переход на сайт http://www.kingston.com/support/, где можно получить доступ к дополнительной информации, связанной с поддержкой text_image
Format - DT4000 G2 DataTraveler® 4000 G2 WARNING: Formatting will erase ALL data on this disk. To format the disk (2s), click OK. To quit, click CANCEL. Your password is required to complete format. Password: Kingston OK CancelО накопителе DT4000 G2
\- Предоставляет возможность получить информацию об устройстве DT4000 G2, включая информацию о приложении и версии встроенного ПО (Рус. 5.7)Отключение DT4000 G2
\- В штатном режиме отключает устройство DT4000 G2, чтобы безопасно удалить его из системы text_image
About - DT4000 G2 DataTraveler® 4000 G2 Copyright (c) 2011 Kingston Technology Company, Inc. Modules Version Information DT4000 G2 K40 000FFE23C7ECBF10800001D2 Application K4.0.0.5 FW Version 3.05 Crypto Library FW 1.00 Kingston TECHNOLOGY Case-Конец раздела Windows-
Настройка (среда Мас)
Вставьте накопитель DT4000 G2 в свободный порт USB на ноутбуке или настольном ПК и дождитесь, когда OC Mas обнаружит его. Когда это произойдет, на экране появится изображение тома DT4000 G2, см. Рис. 6.1. 1. Дважды щелкните по пиктограмме компакт-диска DT4000 G2. 2. Дважды щелкните по отображаемой в окне папке Мас, см. Рис. 6.2. 3. Дважды щелкните пиктограмму приложения DT4000 G2 в окне, см. Рис. 6.3. Запустится процесс инициализации.  Puc. 6.1 - DT4000 G2 text_image
DT4000G2 autorun.inf DT4000G2_Launcher.exe Linux Mac rr_moved Supporttext_image
DT4000G2_Launcher Mactext_image
DataTraveler® 4000 G2 FIPS 140-2 LEVEL 3 CERTIFIED Kingston® TECHNOLOGY ©2014Kingston Technology Corporation, 17907 Newhaven Street, Fountain Valley, CA 9278E USA All rights reserved. All registered trademarks and trademarks are the property of their respective owners.Инициализация устройства (Среда Мас)
1. Выберите язык в раскрывающемся меню и щелкните Next (Далее)' (Рус. 7.1.) text_image
Device Initialization - DT4000 G2 DataTraveler® 4000 G2 Language Select Language: English Kingston TECNOLOGY Next> Canceltext_image
Device Initialization - DT4000 G2 DataTraveler® 4000 G2 License Agreement SOFTWARE LICENSE AGREEMENT IMPORTANT - READ CAREFULLY: THIS SOFTWARE LICENSE AGREEMENT ("Agreement") is a legal agreement between you (either an individual or a single entity) and Kingston Technology Company Inc. ("Kingston"). This Agreement relates to the software accompanying this Agreement, which includes computer software and may include associated media, printed materials, and "online" or electronic Accept Decline Kingston TECHNOLOGYtext_image
Device Initialization - DT4000 G2 DataTraveler® 4000 G2 ① ② ③ ④ Password * Password: ********** * Password Confirmation: ********** i Password Rules Hint: Pwd Hint * Mandatory field Kingston TECHNOLOGYtext_image
Device Initialization - DT4000 G2 DataTraveler® 4000 G2 ① ② ③ ④ Contact Information Name: Test Name Company: Test Company Details: Test Details & Other Info Kingston TECNOLOGYtext_image
Format - DT4000 G2 DataTraveler® 4000 G2 Formatting DT4000 G2 ... Kingston TECHNOLOGY OK Canceltext_image
Format - DT4000 G2 DataTraveler® 4000 G2 Format Complete. Kingston OK CancelИспользование устройства (среда Mac)
После инициализации накопителя DT4000 G2 пользователь может получить доступ к защищенному разделу данных и использовать функции устройства, выполнив вход со своим паролем. Для этого необходимо выполнить следующие действия: 1. Вставьте устройство DT4000 G2 в порт USB ноутбука или настольного ПК и введите пароль (см. Рус. 8.1). 2. Наберите пароль и щелкните по кнопке Login (Boïmu), чтобы продолжить. \- Если введен правильный пароль, накопитель DT4000 G2 будет разблокирован, и пользователь может приступить к его использованию. \- Если введен неправильный пароль, непосредственно под полем Hint (Подсказка) появится сообщение об ошибке, указывающее на неправильные действия при входе (см Рис. 8.2.). text_image
Format - DT4000 G2 DataTraveler® 4000 G2 Password: Hint Forgot Password Contact Information Read-Only Mode Kingston Login CancelФункции устройства (Среда Мас)
При входе в устройство появится пиктограмма 'DT4000 G2\_Launcher', располагающаяся в строке Mac OS X Dock, см. Puc. 9.1: text_image
DT4000G2_LauncherНастройки DT4000 G2
- Позволяет изменять пароль и (или) подсказку (Рис. 9.3) - Позволяет добавлять/просматривать/изменять контактную информацию (Рус. 9.4) - Позволяет изменять выбранный язык (Рус. 9.5) text_image
DT4000 G2 Settings Browse DT4000 G2 Format DT4000 G2 Online Support About DT4000 G2 Shut down DT4000 G2 Options Show All Windows Hide Quittext_image
Settings DataTraveler® 4000 62 Password Contact Information Language * Current Password: * New Password: * Password Confirmation: i Password Rules Hint: * Mandatory field Kingston OK Canceltext_image
Settings DataTraveler® 4000 62 Password Contact Information Language Name: Company: Details: Kingston OK Canceltext_image
Settings DataTraveler® 4000 G2 Password Contact Information Language Select Language: English Kingston OK Cancel CancelПросмотр содержимого DT4000 G2
\- Позволяет просмотривать содержимое защищенного раздела данных после входаФорматирование DT4000 G2
\- Позволяет форматировать защищенный раздел данных (Предупреждение: все данные будут удалены.) (Рис. 9.6) Поддержка через Интернет (необходим доступ в сеть Интернет) \- Открывает Интернет-браузер и выполняет переход на сайт http://www.kingston.com/support/, где можно получить доступ к дополнительной информации, связанной с поддержкой text_image
Format - DT4000 G2 DataTraveler® 4000 G2 WARNING: Formatting will erase ALL data on this disk. To format the disk, click OK. To quit, click CANCEL.О накопителе DT4000 G2
\- Предоставляет возможность получить информацию об устройстве DT4000 G2, включая информацию о приложении и версии встроенного ПО (Рус. 9.7)Отключение DT4000 G2
\- В штатном режиме отключает устройство DT4000 G2, чтобы безопасно удалить его из системы text_image
About - DT4000 G2 DataTraveler® 4000 G2 Copyright (c) 2007 Kingston Technology Company, Inc. Modules Version Information DT4000 G2 3.0 030FFE23C7ECBF10B0001D2 Application 4.0.0.1 FW Version 3.05 Crypto Library FW 1.00-Конец раздела Мас-
Настройка (Среда Linux)
(ПРИМЕЧАНИЕ. В настоящее время имеется много различных версий OC Linux, интерфейсы которых могут несколько отличаться друг от друга. Тем не менее, основные команды для выполнения настроек очень похожи в разных версиях, при необходимости можно делать уточнения по руководству к OC Linux. Приведенные в данном разделе примеры относятся к 64-битной среде.)  Для некоторых дистрибутивов Linux требуется наличие прав пользователя super-user (root) для корректного выполнения команд DT4000G2 в окне терминального приложения. Вставьте накопитель DT4000 G2 в свободный порт USB на ноутбуке или настольном ПК и дождитесь, когда OC Linux обнаружит его. Когда это произойдет, на экране появится изображение тома DT4000 G2\*, см. Рис. 10.1.  DT4000G2 Puc. 10.1 - Tom DT4000G2В устройстве DT4000 G2 имеются 5 команд, которые могут использоваться в Linux:
dt4000g2\_about, dt4000g2\_forgotpassword, dt4000g2\_initialize, dt4000g2\_login и dt4000g2\_logout (Примечание: для выполнения этих команд необходимо открыть окно "Terminal" и перейти к папке с нужными файлами. Каждой команде должны предшествовать следующие два символа: '/' (точка и косая черта.) В случае 32-битной версии открыть окно "Terminal" и перейти из текущего каталога к /media/DT4000G2/linux/linux32\$, набрав нижеуказанную команду: cd /media/DT4000G2/linux/linux32 (затем нажать на ENTER.) В случае 64-битной версии открыть окно "Terminal" и перейти из текущей директории к /media/DT4000G2/linux/linux64\$, набрав нижеуказанную команду: cd /media/DT4000G2/linux/linux64 (затем нажать на ENTER.) \*Примечание: Если том DT4000 G2 не загружается автоматически при открытии системы, следует загрузить том вручную в окне терминала, воспользовавшись командой Linux [mount]. Если синтаксис и команды имеющейся версии Linux отличаются от описанных здесь, следует обратиться к документации по Linux или зайти на сайт поддержки в Интернете.Инициализация устройства (Среда Linux)
После подключения устройства DT4000 G2 к компьютеру и распознавания его операционной системой, устройство должно быть инициировано перед началом его первой эксплуатации. Чтобы сделать это, следует открыть приложение 'Terminal' (или окно с командной строкой) и выполнить следующие действия: (Примечание: при демонстрации использования устройства DT4000 G2 в OC Linux в скриншотах и указаниях данной секции используется папка linux32 (32-битная версия). При работе с 64-битной версией Linux нужно просто зайти в папку 64-битной системы вместо 32-битной, т.е. linux64 вместо linux32.) 1. Изменить директорию в томе DT4000 G2, набрав следующую команду (см. Рис. 10.2.): cd /media/DT4000G2/linux/linux32 (Примечание: при указании названий команд и папок (каталогов) необходимо учитывать регистр, т.е. 'linux32' НЕ то же самое, что 'Linux32'. При наборе следует также точно соблюдать синтаксис). text_image
[root@localhost /]# cd /media/dt4000g2/linux/linux64 [root@localhost linux64]# _text_image
[root@localhost /]# cd /media/dt4000g2/linux/linux64 [root@localhost linux64]# ls dt4000g2_about dt4000g2_initialize dt4000g2_logout dt4000g2Forgotpassword dt4000g2_login [root@localhost linux64]# _text_image
[root@localhost /]# cd /media/dt4000g2/linux/linux64 [root@localhost linux64]# ls dt4000g2_about dt4000g2_initialize dt4000g2_logout dt4000g2Forgotpassword dt4000g2_login [root@localhost linux64]# ./dt4000g2_initializeИспользование устройства (среда Linux)
После инициализации устройства DT4000 G2 пользователь может получить доступ к защищенному разделу данных, войдя в устройства с помощью пароля для DT4000 G2, создание которого описывается на стр. 22. Чтобы сделать это, необходимо выполнить следующие действия: 1. Откройте окно приложения 'Terminal'. 2. Введите следующую команду в строку терминала: cd /media/DT4000G2/linux/linux32 3. Командная строка будет выглядеть как /media/DT4000G2/linux/linux32\$, введите следующую команду для выполнения входа в устройство: ./dt4000g2\_login\* и нажмите на ENTER. (Примечание: при вводе команд и названий папок следует учитывать регистр и проверять синтаксис.) 4. Введите пароль для DT4000 G2 и нажмите на ENTER. После успешного входа откроется защищенный раздел данных и можно будет продолжать работу с DT4000 G2. Если в процессе входа вводится неправильный пароль, пользователю предоставляются дополнительные возможности ввести правильный пароль повтором пункта 3, однако имеется встроенная функция защиты, которая отслеживает число попыток безуспешного входа. Если это число достигает заданного значения (10 безуспешных попыток), устройство DT4000 G2 будет заблокировано и понадобится инициализация устройства при помощи команды dt4000g2\_forgotpassword, чтобы можно было использовать устройство дальше. Этот процесс дает возможность пользователю создать новый пароль, но для защиты конфиденциальных данных пользователя устройство DT4000 G2 отформатирует защищенный раздел данных. Это означает, что все данные пользователя будут потеряны. После завершения процесса dt4000g2\_forgotpassword и установки нового пароля встроенный счетчик защиты, отслеживающий количество неправильных попыток ввода пароля, будет сброшен (Примечание: вход, совершенный до достижения максимального количества попыток (сокращенно MaxNoA), также сбрасывает счетчик неправильных попыток входа.) После завершения работы с устройством DT4000 G2 необходимо выйти из устройства и сохранить данные. Для этого необходимо выполнить следующие действия: 1. Откройте окно приложения 'Terminal'. 2. Введите следующую команду в строку терминала: cd /media/DT4000G2/linux/linux32 3. Командная строка будет выглядеть как /media/DT4000G2/linux/linux32\$, введите следующую команду для выполнения выхода из устройства: ./dt4000g2\_logout\* и нажмите на ENTER. (Примечание: при вводе команд и названий папок следует учитывать регистр и проверять синтаксис.) 4. Извлеките устройство DT4000 G2 и положите его на хранение в надежное место. \*Примечание: для некоторых дистрибутивов Linux требуется наличие прав пользователя super-user (root) для корректного выполнения команд DT4000 G2 в окне терминального приложения.Помощь и поиск неисправностей
Блокировка устройства
Устройство DT4000 G2 имеет защиту, предотвращающую несанкционированный доступ к разделу данных при достижении заданного количества последовательных безуспешных попыток входа (сокращенно MaxNoA), по умолчанию для конфигурации “интегрированный” это заданное значение равно 10 (число попыток). Счетчик блокировки отслеживает каждую неправильную попытку входа и сбрасывается в двух случаях: 1) Успешный вход до достижения MaxNoA или 2) достижение MaxNoA и выполнение форматирования устройства.\* Если введен неправильный пароль, непосредственно под полем 'Hint (Подсказка) появится сообщение об ошибке, указывающее на неправильные действия при входе. См. Рис. 10.1. После седьмой неудачной попытке входа появится дополнительное сообщение о том, что до достижения MaxNoA осталось всего 3 попытки (по умолчанию имеется 10 попыток). См. Рис. 10.2. После десятой неудачной попытки входа устройство DT4000 G2 заблокирует раздел с данными и понадобится форматирование устройства перед его дальнейшим использованием. Это означает, что все данные, сохраненные на устройстве DT4000 G2, будут потеряны, и понадобится создание нового пароля. Данная мера безопасности предотвращает неограниченное количество попыток ввода пароля сторонними людьми (не имеющими пароля). Если вы является владельцем устройства DT4000 G2 и забыли пароль, то такие же меры безопасности будут активированы, включая форматирование устройства.\* Более подробнее об этом см. в разделе text_image
Login device DT4000G2 DataTraveler® 4000 G2 Password: Hint: Failed to Login: The password is incorrect. Please try again. Forget Password Contact Information Kingston TECHNOLOGY Login Canceltext_image
Login devices DT4000G2 DataTraveler® 4000 G2 Password: Hint: Failed to Login: The password is incorrect. Please try again. 3. Attempts left before your DT4000 is blocked permanently. Forget Password Contact Information Kingston Login CancelПароль забыт
Если пользователь забыл пароль, он может щелкнуть по опции 'Forgot Password (Пароль забыт), которая появляется в окне входа при выполнении программы DT4000 G2\_Launcher (см.Рус.10.3.) Это дает возможность пользователю создать новый пароль, но для защиты конфиденциальных данных пользователя устройство DT4000 G2 произведет форматирование. Это означает, что будут удалены все данные.\* Если пользователь щелкнет по 'Forgot Password (Пароль забыт), появится поле с сообщением (Рус. 10.4), и устройство спросит, не желает ли пользователь ввести новый пароль, прежде чем приступить к форматированию. В этом месте можно: 1) щелкнуть по 'OK' для подтверждения или 2) щелкнуть по Cancel', чтобы вернуться в окно входа. text_image
Login device DT4000G2 DataTraveler® 4000 G2 Password: Hint Forgot Password Contact Information Kingston TECHNOLOGY Login Canceltext_image
Forgot Password In order to protect your data, your DT4000G2 will be formatted and all data will be erased. Do you want to enter a new password and format your DT4000G2? OK Canceltext_image
My Computer File Edit View Favorites Tools Help Back Search Folders Address Go System Tasks View system information Add or Remove programs Change a setting Local Disk (CC) D:\D\CD-R.W Drive (DC) Local Disk (E:) Other Places My Network Places My Documents Control Panel DT4000GZ (F:) Network Share (G:) Local Disk (H:) Details System FolderСообщения об ошибках
Unable to create file (Невозможно создать файл) – Данное сообщение об ошибке появляется при попытке СОЗДАТЬ файл или папку В в защищенном разделе данных после входа в режиме "только чтение". text_image
Unable to create file Unable to create the file 'New Text Document.txt' The media is write protected. OKtext_image
Error Copying File or Folder Cannot copy File1: The disk is write-protected. Remove the write-protection or use another disk. OKtext_image
Error Deleting File or Folder Cannot delete File1: The disk is write-protected. Remove the write-protection or use another disk. OKDataTraveler® 4000 G2 G2 Kullanıcı Kılavuzu
text_image
DataTraveler® 4000 G2 FIPS 140-2 LEVEL 3 CERTIFIED Kingston® TECHNOLOGY ©2014 Kingston Technology Corporation, 17600 Newhope Street, Fountain Valley, CA 927.08 USA All rights reserved. All registered trademarks and trademarks are the property of their respective owners.natural_image
Black USB flash drive with open lid, no visible text or symbols on bodyİçindekiler
TOCBU KILAVUZ HAKKINDA
Bu kullanıcı kılavuzu, hiçbir uygulanmış özelleştirme içermeden fabrika görüntü sü temel alınarak FIPS Onaylı DataTraveler® 4000 G2'nin (bu noktadan sonra kısaca DT4000 G2 olarak adlandırılacak) kapsamaktadır.Sistem Gereksinimleri
PC Platformu
- Pentium III İşlemci veya muadili (veya daha hızlı bir işlemci) • 15 MB kullanılabilir disk alanı - Kullanılabilir USB 2.0 / 3.0 bağlantı noktası - En son fiziki sürücüden sonra iki ardışık sürücü harfi\*PC İşletim Sistemi Desteği
- Windows ^ 8, 8.1 (RT değil) - Windows ^ 7 SP1 - Windows ^ Vista SP2Mac Platformu
• 15 MB kullanılabilir disk alanı - USB 2.0 / 3.0İşletim Sistemi Desteği
• Mac OS X 10.8.x -10.10xÖneriler
DT4000 G2 aygıtına yeterince güç sağlandığından emin olmak için, aygıtı Şekil 1.1'de gösterildiği gibi doğrudan dizüstü veya masaüstü bilgisayarınızdaki bir USB bağlantı noktasına takın. DT4000 G2'yi Şekil 1.2'de gösterildiği gibi bir klavye veya USB beslemeli bir veri aktarım merkezi gibi USB bağlantı noktasına sahip herhangi bir çevresel aygıta bağlamaktan kaçının. natural_image
Two electronic devices: a battery and an Ethernet card, both placed on a laptop keyboard (no visible text or symbols)natural_image
Two photos showing a device with a black connector and red prohibition symbols, no readable text or symbols present.Kurulum (Windows Ortamı)
1. DT4000 G2 cihazını dizüstü veya masaüstü bilgisayarınızdaki kullanılabilir bir USB bağlantı noktasına takın ve Windows'un aygıtı algılamasını bekleyin. - Windows Vista kullanıcıları Şekil 2.2'de gösterildiği gibi bir aygıt sürücüsü bildirimi alacaktır. - Windows 7 kullanıcıları Şekil 2.2'de gösterildiği gibi bir aygıt sürücüsü bildirimi alacaktır. Yeni donanım algılama işlemi tamamlandığında Windows, başlatma işlemini başlatmanızı isteyecektir. - Windows Vista kullanıcıları Şekil 2.3'te görülene benzer bir AutoPlay (Otomatik Yürütme) penceresi göreceklerdir. - Windows 7 kullanıcıları Şekil 2.3'te görülene benzer bir AutoPlay (Otomatik Yürütme) penceresi göreceklerdir. 2. 'Run DT4000 G2\_Launcher.exe' (DT4000 G2\_Launcher.exe'yi çalıştır) öğesini seçin. Windows AutoPlay (Otomatik Yürütme) özelliğini text_image
Installing device driver software Click here for status.text_image
Installing device driver software Click here for status.text_image
Organize Burn to disc Files Currently on the Disc. Support autorun.inf DT4000GZ Leunc her.exetext_image
AutoPlay DVD RW Drive (I): DT4000G2 Always do this for software and games: Install or run program from your media Run DT4000G2_Launcher.exe Published by Kingston Technology Corporation General options Open folder to view files using Windows Explorer View more AutoPlay options in Control PanelAygıt Başlatma İşlemi (Windows Ortamı)
1. Aşağı açılır menüden dil tercihinizi belirleyin ve 'Next'i (İleri) tıklatın (Şekil 3,1.) text_image
Device Initialization - DT4000 G2 DataTraveler® 4000 G2 Language Select Language: English Kingston TECNOLOGY Next> CancelŞekil 3.1 – Dil Seçimi
2. Lisans sözleşmesini gözden geçirin ve 'Next'i (İleri) (Şekil 3.2) tıklatın. (Not: Devam etmeden önce lisans sözleşmesini kabul etmeniz gerekir; aksi takdirde 'Next' (İleri) düğmesi devre dışı durumda kalacaktır.) text_image
Device Initialization - DT4000 G2 DataTraveler® 4000 G2 License Agreement SOFTWARE LICENSE AGREEMENT IMPORTANT - READ CAREFULLY: THIS SOFTWARE LICENSE AGREEMENT ("Agreement") is a legal agreement between you (either an individual or a single entity) and Kingston Technology Company Inc. ("Kingston"). This Agreement relates to the software accompanying this Agreement, which includes computer software and may include associated media, printed materials, and "online" or electronic Accept Decline Kingston TECHNOLOGYtext_image
Device Initialization - DT4000 G2 DataTraveler® 4000 G2 Password * Password: ••••••••••• * Password Confirmation: •••••••••• i Password Rules Hint: Pwd Hint *Mandatory fieldtext_image
Device Initialization - DT4000 G2 DataTraveler® 4000 G2 Contact Information Name: Test Name Company: Test Company Details: Test Details & Other Info Kingston TECHNOLOGYtext_image
Format - DT4000 G2 DataTraveler® 4000 G2 Formatting DT4000 G2 (I:)...text_image
Format - DT4000 G2 DataTraveler® 4000 G2 Format Complete. Kingston TECHNOLOGY OKAygıt Kullanımı (Windows Ortamı)
DT4000 G2 başlatıldığında, parolanızla cihazda oturum açarak güvenli veri bölümüne erişebilir ve cihaz seçeneklerini kullanabilirsiniz. Bunu yapmak için aşağıdaki adımları uygulayın: 1. DT4000 G2'yi dizüstü ya da masaüstü bilgisayarınızın USB bağlantı noktasına takın ve parolanızı girin (bkz. Şekil 4.1.) - Parolanızı yazdıktan sonra devam etmek için 'Login' (Oturum aç) düğmesini tıklatın. - Eğer doğru parola girilirse DT4000 G2'nin kilidi açılır ve cihazı kullanmaya başlayabilirsiniz. - Eğer yanlış bir parola girilirse, 'Hint' (İpucu) alanının hemen altında, oturum açılamadığını gösteren bir hata mesajı açılacaktır. text_image
Login device DT4000 G2 DataTraveler® 4000 G2 Password: Hint Forgot Password Contact Information Read-Only Mode Kingston TESTOLOGY Login CancelCihaz Seçenekleri (Windows Ortamı)
Cihazda oturumunuz açıklken Windows görev çubuğunun sağ köşesinde bir 'DT4000 G2' simgesi bulunacaktır (Şekil 5.1.) (Not: Windows 7 kullanıcılarının, 'DT4000 G2' simgesine erişmek için (Şekil 5.2) görev çubuğundaki yukarı ok düğmesini tıklatması gerekecektir. DT4000 G2 simgesine bir kez daha tıklatılması aşağıdaki menünün açılmasını sağlayacaktır: text_image
DT4000 G2 Settings Browse DT4000 G2 Format DT4000 G2 Online Support About DT4000 G2 Shut down DT4000 G2text_image
Customize... 9:26 AM 12/3/2010DT4000 G2 Ayarları
- Parolanızı ve/veya ipucunuzu değiştirmenizi sağlar (Şekil 5.3) - İletişim bilgilerini eklemenizi/görüntülemenizi/değiştirmenizi sağlar (Şekil 5.4) - Geçerli dil seçiminizi değiştirmenizi sağlar (Şekil 5.5) (Not: Güvenlik nedenlerinden dolayı bu ayarlardan herhangi birini güncellemek ve/veya değiştirmek için geçerli DT4000 G2 parolanızı girmeniz gerekmektedir.) text_image
Settings DataTraveler® 4000 62 Password | Contact Information | Lncuane | * Current Password: * New Password: * Password Confirmation: i Password Rules Hint: Past Hint * Mandatory field Kingston OK Canceltext_image
Settings DataTraveler® 4000 62 Features | Contact Information | Language | Name: Test Name Company: Test Company Details: Test Details & Other Info Kingston OK Canceltext_image
Settings DataTraveler® 4000 62 Password | Contact Information | Language | Select Language: English Kingston OK Buy CancelBrowse DT4000 G2 (DT4000 G2'ye Gözat)
\- Oturum açmış haldeyken güvenli veri bölümünün içeriklerine göz atmanızı sağlarFormat DT4000 G2 (DT4000 G2'yi Biçimlendir)\*
\- Güvenli veri bölümünü biçimlendirmenizi sağlar (Uyarı: Tüm veriler silinecektir.) (Şekil 5.6)Online Support (Çevrimiçi Destek) (İnternet erişimi gerektirir)
\- Internet tarayıcınızı açar ve ek destek bilgilerine ulaşabileceğiniz http://www.kingston.com/support/adresine gider text_image
Format - DT4000 G2 DataTraveler® 4000 G2 WARNING: Formatting will erase ALL data on this disk. To format the disk (3), click OK. To quit, click CANCEL. Your password is required to complete format. Passwords: Kingston OK CancelAbout DT4000 G2 (DT4000 G2 Hakkında)
\- Uygulama ve Yazılım (Firmware) sürümü bilgileri dahil olmak üzere DT4000 G2 hakkında özel bilgiler sağlar (Şekil 5.7)Shutdown DT4000 G2 (DT4000 G2'yi Kapat)
\- Sistemden güvenli biçimde kaldırmanızı sağlayacak şekilde DT4000 G2'yi düzgün biçimde kapatır text_image
About - DT4000 G2 DataTraveler® 4000 G2 Copyright (c) 2011 Kingston Technology Company, Inc. Modules Version Information DT4000 G2 K40 00FFE23C7ECBF1080001D2 Application K4.0.0.5 FW Version 3.05 Crypto Library FW 1.00 Kingston TECHNOLOGY Close-Windows Bölümü Tamamlandı-
Kurulum (Mac Ortamı)
DT4000 G2 cihazını Mac dizüstü veya masaüstü bilgisayarınızdaki kullanılabilir bir USB bağlantı noktasına takın ve Mac işletim sisteminin cihazı algılamasını bekleyin. Algıladığına masaustünde Şekil 6.1'de görüldüğü gibi bir DT4000 G2 birimi görüntülenir.  Şekil 6.1 - DT4000 G2 1. DT4000 G2 CD-ROM simgesini çift tıklatın. 2. Şekil 6.2'de gösterilen pencerede bulunan Mac klasörünü çift tıklatın. 3. Şekil 6.3'de gösterilen pencerede bulunan DT4000 G2 uygulama simgesini çift tıklatın. Bu şekilde başlatma işlemi başlatılacaktır. text_image
DT4000G2 autorun.inf DT4000G2_Launcher.exe linux Mac rr_moved Supporttext_image
DT4000G2_Launchertext_image
DataTraveler® 4000 G2 FIPS 140-2 LEVEL 3 CERTIFIED Kingston® TECHNOLOGY ©2014 Kingston Technology Corporation, CT600 Newhouse Street, Fountain Valley, CA 927 98 USA All rights reserved. All registered trademarks and trademarks are the property of their respective owners.Aygıt Başlatma İşlemi (Mac Ortamı)
1. Aşağı açılır menüden dil tercihinizi belirleyin ve 'Next'i (İleri) tıklatın (Şekil 7,1.) text_image
Device Initialization - DT4000 G2 DataTraveler® 4000 G2 Language Select Language: English Kingston TECHNOLOGY Next> Canceltext_image
Device Initialization - DT4000 G2 DataTraveler® 4000 G2 License Agreement SOFTWARE LICENSE AGREEMENT IMPORTANT - READ CAREFULLY: THIS SOFTWARE LICENSE AGREEMENT ("Agreement") is a legal agreement between you (either an individual or a single entity) and Kingston Technology Company Inc. ("Kingston"). This Agreement relates to the software accompanying this Agreement, which includes computer software and may include associated media, printed materials, and "online" or electronic Accept Decline Kingstontext_image
Device Initialization - DT4000 G2 DataTraveler® 4000 G2 ① ② ③ ④ Password * Password: ********** * Password Confirmation: ********** i Password Rules Hint: Pwd Hint * Mandatory field Kingston TECHNOLOGYtext_image
Device Initialization - DT4000 G2 DataTraveler® 4000 G2 ① ② ③ ④ Contact Information Name: Test Name Company: Test Company Details: Test Details & Other Info Kingston TECHNOLOGYtext_image
Format - DT4000 G2 DataTraveler® 4000 G2 Formatting DT4000 G2 ... Kingston OK Canceltext_image
Format - DT4000 G2 DataTraveler® 4000 G2 Format Complete. Kingston OK CancelAygıt Kullanımı (Mac Ortamı)
DT4000 G2 başlatıldığında, parolanızla cihazda oturum açarak güvenli veri bölümüne erişebilir ve cihaz seçeneklerini kullanabilirsiniz. Bunu yapmak için aşağıdaki adımları uygulayın: 1. DT4000 G2'yi dizüstü ya da masaüstü bilgisayarınızın USB bağlantı noktasına takın ve parolanızı girin (bkz. Şekil 8.1.) 2. Parolanızı yazdıktan sonra devam etmek için 'Login' (Oturum aç) düğmesini tıklatın. - Eğer doğru parola girilirse DT4000 G2'nin kilidi açılır ve cihazı kullanmaya başlayabilirsiniz. - Eğer yanlış bir parola girilirse, 'Hint' (İpucu) alanının hemen altında, oturum açılamadığını gösteren bir hata mesajı açılacaktır (bkz. Şekil 8.2.) text_image
Format - DT4000 G2 DataTraveler® 4000 G2 Password: Hint Forgot Password Contact Information Read-Only Mode Kingston TECHNOLOGY Login CancelAygıt Seçenekleri (Mac Ortamı)
Cihazda oturumunuz açıklken Mac OS X Dock'ta bir 'DT4000 G2\_Launcher' simgesi bulunacaktır (Bkz. aşağıdaki Şekil 9.1): text_image
DT4000G2 LauncherDT4000 G2 Ayarları
- Parolanızı ve/veya ipucunuzu değiştirmenizi sağlar (Şekil 9.3) - İletişim bilgilerini eklemenizi/görüntülemenizi/değiştirmenizi sağlar (Şekil 9.4) - Dil tercihinizi değiştirmenizi sağlar (Şekil 9.5) text_image
DT4000 G2 Settings Browse DT4000 G2 Format DT4000 G2 Online Support About DT4000 G2 Shut down DT4000 G2 Options Show All Windows Hide Quittext_image
Settings DataTraveler® 4000 G2 Password Contact Information Lambanguage * Current Password: * New Password: * Password Confirmation: i Password Rules Hint: * Mandatory field Kingston OK Canceltext_image
Settings DataTraveler® 4000 G2 Password Contact Information Language Name: Company: Details: Kingston OK Canceltext_image
Settings DataTraveler® 4000 G2 Password Contact InformationLanguage Select Language: English Kingston OK CancelBrowse DT4000 G2 (DT4000 G2'ye Gözat)
\- Oturum açmış haldeyken güvenli veri bölümünün içeriklerine göz atmanızı sağlarFormat DT4000 G2 (DT4000 G2'yi Biçimlendir)
\- Güvenli veri bölümünü biçimlendirmenizi sağlar (Uyarı: Tüm veriler silinecektir.) (Şekil 9.6)Online Support (Çevrimiçi Destek) (İnternet erişimi gerektirir)
\- Internet tarayıcınızı açar ve ek destek bilgilerine ulaşabileceğiniz http://www.kingston.com/support/adresine giderAbout DT4000 G2 (DT4000 G2 Hakkında)
\- Uygulama ve Yazılım (Firmware) sürümü bilgileri dahil olmak üzere DT4000 G2 hakkında özel bilgiler sağlar (Şekil 9.7)Shutdown DT4000 G2 (DT4000 G2'yi Kapat)
\- Sistemden güvenli biçimde kaldırmanızı sağlayacak şekilde DT4000 G2'yi düzgün biçimde kapatır text_image
Format - DT4006 G2 DataTraveler® 4000 G2 WARNING: Formatting will erase ALL data on this disk. To format the disk, click OK. To quit, click CANCEL.text_image
About - DT4000 G2 DataTraveler® 4000 G2 Copyright (c) 2007 Kingston Technology Company, Inc. Modules Version Information DT4000 G2 3.0 039FFE23C75CBF1080001C2 Application 4.0.0.1 FW Version 3.05 Crypto Library FW 1.00 Kingston Close-Mac Bölümü Tamamlandı-
Kurulum (Linux Ortamı)
(NOT: Günümüzde Linux'ın çok çeşitli dağıtımları olduğundan arayüzlerinin görünümü ve kullanımı' bir sürümden diğerine farklılık gösterebilir. Ancak terminal uygulamasında kullanılan genel komut seti birbirine çok benzer ve bu amaçla aşağıdaki Linux talimatlarına bakılabilir. Bu bölümdeki örneklerde verilen ekran görüntüleri 64-bit ortamında oluşturulmuştur.)  Linux'un bazı dağıtımları, terminal uygulaması penceresinde DT4000G2'nin komutlarını düzgün bir şekilde gerçekleştirmek için süper kullanıcı (root) öncelikleri gerektirir. DT4000 G2 cihazını Linux dizüstü veya masaüstü bilgisayarınızdaki kullanılabilir bir USB bağlantı noktasına takın ve Mac işletim sisteminin cihazı algılamasını bekleyin. Algıladığına masaustünde Şekil 10.1'de görüldüğü gibi bir DT4000 G2 birimi simgesi görüntülenir.  DT4000G2 Şekil 10.1 – DT4000G2 Birimi DT4000 G2, Linux'ta kullanılabilecek 5 komuta sahiptir: dt4000g2\_about, dt4000g2\_logout dt4000g2\_forgotpassword, dt4000g2\_initialize, dt4000g2\_login ve (Not: Bu komutları çalıştırmak için bir "Terminal" uygulaması penceresi açmanız ve dosyaların her birinin bulunduğu klasöre ilerlemeniz gerekmektedir. Her komuttan önce bu iki karakterin bulunması gerekmektedir: /' (bir nokta ve öne yatırım çizgi.) 32-bit kullanıcıları için bir "Terminal" uygulaması penceresi açın ve istem kısmında aşağıdaki komutu yazarak dizini /media/DT4000G2/linux/linux32\$ olarak değiştirin: cd /media/DT4000G2/linux/linux32 (daha sonra ENTER'a basin.) 64-bit kullanıcıları için bir "Terminal" uygulaması penceresi açın ve istem kısmında aşağıdaki komutu yazarak dizini /media/DT4000G2/linux/linux64\$ olarak değiştirin: cd /media/DT4000G2/linux/linux64 (daha sonra ENTER'a basin.) \*Not: Eğer DT4000 G2 birimi işletim sistemi tarafından otomatik olarak yüklenmezse Linux [mount' komutunu kullanarak birimi bir terminal penceresinden manuel olarak yüklemeniz gerekecektir. Lütfen ilgili OS dağıtımınızla ilgili bilgi için Linux belgelerine ya da uygun yazım ve komut seçenekleri için istediğiniz on-line destek sitesine bakın.Aygıt Başlatma İşlemi (Linux Ortamı)
DT4000 G2 bilgisayarınıza bağlandıktan ve işletim sisteminiz tarafından tanındıktan sonra cihazın ilk kullanım öncesinde başlatılması gerekmektedir. Bunu yapmak için 'Terminal' uygulamasını (ya da komut satırı penceresini) açın ve aşağıdaki adımları gerçekleştirin: (Not: Bu bölümdeki ekran görüntüleri ve talimatlarda, DT4000 G2 cihazının Linux OS'de kullanımını göstermek için linux32 klasörü (32-bit olduğunu göstermektedir) kullanılmaktadır. Linux'un 64-bit sürümünü kullanıyorsanız, 32 bit klasörü yerine ilgili 64 bit klasörüne gidin ve burayı kullanın (yani linux32 yerine linux64.) 1. Terminal isteminde aşağıdaki komutu yazarak dizini DT4000 G2 birimine değiştirin (Şekil 10.2'de gösterildiği gibi.): cd /media/DT4000G2/linux/linux32 (Not: Komutlar ve klasör (dizin) adları, büyük-küçük harf duyarlıdır. Yani 'linux32' ile 'Linux32' aynı DEĞİLDİR. Sözdizimlerinin de tam gösterildiği gibi yazılması gerekmektedir.) text_image
[root@localhost /]# cd /media/dt4000g2/linux/linux64 [root@localhost linux64]# _text_image
[root@localhost /]# cd /media/dt4000g2/linux/linux64 [root@localhost linux64]# ls dt4000g2_about dt4000g2_initialize dt4000g2_logout dt4000g2Forgotpassword dt4000g2_login [root@localhost linux64]# _text_image
[root@localhost /]# cd /media/dt4000g2/linux/linux64 [root@localhost linux64]# ls dt4000g2_about dt4000g2_initialize dt4000g2_logout dt4000g2_forgotpassword dt4000g2_login [root@localhost linux64]# ./dt4000g2_initializeAygıt Kullanımı (Linux Ortamı)
DT4000 G2 başlatıldıktan sonra 22. sayfada oluşturduğunuz DT4000 G2 parolası ile cihazda oturum açarak güvenli veri bölümüne erişebilirsiniz. Bunu yapmak için aşağıdaki adımları uygulayın: 1. Bir 'Terminal' uygulama penceresi açın. 2. Terminal istemine aşağıdaki komutu yazın: cd /media/DT4000G2/linux/linux32 3. Cihazda oturum açmak için komut istemi artık /media/DT4000G2/linux/linux32\$ iken bu komutu yazın: ./dt4000g2\_login\* ve ENTER'a basın. (Not: Komutlar ve klasör adları büyük- küçük harf duyarlıdır ve aynen gösterildiği gibi yazılmaları gerekir.) 4. DT4000 G2 parolanızı girin ve ENTER'a basın. Başarılı biçimde oturum açıktan sonra masaüstünüzde güvenli veri birimi açılır ve DT4000 G2'yi kullanmaya başlayabilirsiniz. Oturum açma işlemi sırasında yanlış parola girilirse 3. adım tekrarlanarak doğru parolayı girme şansı verilecektir ancak hatalı oturum açma girişimlerinin sayısını takip eden dahili bir güvenlik özelliği bulunmaktadır\*. Eğer bu sayı, önceden belirlenmiş 10 başarısız girişim değerine ulaşırsa DT4000 G2 kilitlenir ve bir sonraki kullanımdan önce dt4000g2\_forgotpassword komutu ile cihaz başlatma işlemlerini tekrarlamanız gerekecektir. Bu işlem, yeni bir parola oluşturmanızı sağlar ancak verilerinizin gizliliğini korumak için DT4000 G2'nin güvenli veri bölümü biçimlendirilecektir. Yani tüm verilerinizi kaybedersiniz. dt4000g2\_forgotpassword işlemi tamamlandığında ve başarıyla yeni bir parola belirledikten sonra başarısız oturum açma girişimlerini takip eden dahili güvenlik sayacı sıfırlanır (Not: Maksimum deneme sayısına ulaşmadan önce başarılı biçimde oturum açtığınızda da başarısız oturum açma sayacı sıfırlanır.) DT4000 G2'yi kullanmayı tamamladığınızda cihazdan çıkış yapın ve verilerinizi güvenceye alın. Bunu yapmak için aşağıdaki adımları uygulayın: 1. Bir 'Terminal' uygulama penceresi açın. 2. Terminal istemine aşağıdaki komutu yazın: cd /media/DT4000G2/linux/linux32 3. Komut istemi /media/DT4000G2/linux/linux32\$ iken cihazdan düzgün biçimde çıkmak için bu komutu yazın: .ldt4000g2\_logout\* ve ENTER'a basın (Not: Komutlar ve klasör adları büyük- küçük harf duyarlıdır ve aynen gösterildiği gibi yazılmaları gerekir.) 4. DT4000 G2'yi sisteminizden kaldırın ve güvenli bir yerde saklayın. \*Not: Linux'un bazı dağıtımları, terminal uygulaması penceresinde DT4000 G2'nin komutlarını düzgün bir şekilde gerçekleştirmek için süper kullanıcı (root) öncelikleri gerektirir.Yardım ve Sorun Giderme
Cihazın Kilitlenmesi
DT4000 G2'de, arka arkaya maksimum başarısız oturum açma girişiminden sonra (kısaca MaxNoA) yetkisiz erişimleri önleyen bir güvenlik özelliği yer almaktadır; fabrika varsayılan değeri 10'dur (girişim sayısı.) 'Kilitleme' sayacı, her başarısız oturum açmayı sayar ve aşağıdaki iki yöntemden biriyle sıfırlanır: 1) MaxNoA'ya ulaşmadan önce başarılı bir oturum açma ya da 2) MaxNoA'ya ulaşma ve cihazı biçimlendirme.\* Eğer yanlış bir parola girilirse, 'Hint' (İpucu) alanının hemen altında, oturum açılamadığını gösteren bir hata mesajı açılacaktır. Bkz. Şekil 10.1. 7. başarısız oturum açma girişimi yapıldığında, MaxNoA'ya (varsayılan olarak 10'a ayarlanmıştır) ulaşmadan önce 3 girişiminiz kaldığını gösteren ek bir hata mesajı görürsünüz. Bkz. Şekil 10.2. Eğer bu sayı, önceden belirlenmiş 10. başarısız girişim değerine ulaşırsa DT4000 G2 kalıcı biçimde veri bölmesini bloke edecektir ve bir sonraki kullanım için cihazın biçimlendirilmesini gerektirecektir. Bu durum DT4000 G2 üzerindeki tüm verilerin kaybolacağı ve yeni bir parola oluşturmanız gerekeceği anlamına gelir. Bu güvenlik önlemi, bir kişinin (parolanızı bilmeyen) çok sayıda oturum açma girişimi ile hassas verilerinize erişim olanağı elde etmesini önler. Eğer DT4000 G2'nin sahibiyseniz ve parolanızı unutursanız, cihazın biçimlendirilmesi dahil olmak üzere aynı güvenlik önlemleri uygulanacaktır.\* Bu özellikle ilgili daha fazla bilgi için 25. sayfadaki ‘Parolayı Unutma’ konusuna bakın. text_image
Login device DT4000G2 DataTraveler® 4000 G2 Password: Hint Failed to Login: The password is incorrect. Please try again. Forgot Password Contact Information Kingston TECHNOLOGY Login Canceltext_image
Login device DT4000G2 DataTraveler® 4000 G2 Password: Hint Failed to Login: The password is incorrect. Please try again. 3 Attempts left before your DT4000 is blocked permanently. Forgot Password Contact Information Kingston TECHNOLOGY Login CancelParolayı Unutma
Eğer parolanızı unutursanız, DT4000 G2\_Launcher çalıştırıldığında cihazın oturum açma penceresinde gösterilen 'Forgot Password' (Parolayı Unuttum) bağlantısını tıklatabilirsiniz (bkz. Şekil 10.3.) Bu seçenek, yeni bir parola oluşturmanızı sağlar ancak verilerinizin gizliliğini korumak için DT4000 G2'yi biçimlendirilecektir. Yani bu işlemde verilerinizin tümü silinecektir.\* 'Forgot Password'ü (Parolayı Unuttum) tıklattığınızda bir mesaj kutusu (Şekil 10.4) görüntülenir ve bu biçimlendirmeyi gerçekleştirmeden önce yeni bir parola girmek isteyip istemediğiniz sorulur. Bu noktada 1) onaylamak için 'OK'i (Tamam) tıklatabilir ya da oturum açma penceresine geri dönmek için 'Cancel'ı (İptal) tıklatabilirsiniz. Eğer devam etmeyi seçerseniz, yeni bir karmaşık parola ve yeni bir ipucu girmeniz istenecektir. İpucu zorunlu bir alan değildir ancak parolayı unutmanız durumunda parolanın ne olduğuyla ilgili bir ipucu sağlayacaktır. (Not: İpucu, DT4000 G2 parolası ile aynı OLAMAZ.) text_image
Login device DT4000G2 DataTraveler® 4000 G2 Password: Hint Forgot Password Contexted information Kingston TECHNOLOGY Login Canceltext_image
Forgot Password In order to protect your data, your DT4000G2 will be formatted and all data will be erased. Do you want to enter a new password and format your DT4000G2? OK Canceltext_image
My Computer File Edit View Favorites Tools Help Back Search Folders Address Go System Tasks View system information Add or remove programs Change a setting Local Disk (C:) DVD/CD-RW Drive (D:) Local Disk (E:) Other Places My Network Places My Documents Control Panel DT400G2 (F:) Network Share (G:) Local Disk (H:) Details System FolderHata Mesajları
Unable to create file (Dosya oluşturulamıyor) – Bu hata mesajı salt okunur modda oturum açtığınızda güvenli veri bölümü ÜZERİNDE bir dosya ya da klasör OLUŞTURMAYA çalıştığınızda görüntülenir. text_image
Unable to create file Unable to create the file 'New Text Document.txt' The media is write protected. OKtext_image
Error Copying File or Folder Cannot copy File1: The disk is write-protected. Remove the write-protection or use another disk. OKtext_image
Error Deleting File or Folder Cannot delete File1: The disk is write-protected. Remove the write-protection or use another disk. OKDataTraveler® 4000 G2 G2 ユーザーマニュアル
text_image
DataTraveler® 4000 G2 FIPS 140-2 LEVEL 3 CERTIFIED Kingston® TECHNOLOGY ©2014 Kingston Technology Corporation, 17600 Newhope Street, Fountain Valley, CA 92708 USA All rights reserved. All registered trademarks and trademarks are the property of their respective owners.natural_image
Exterior view of a black Logitrocvise USB flash drive (no text or symbols visible on body)目次
TOC 本書について
このユーザーマニュアル (以降は「本書」と略します) は、FIPS 認証済み DataTraveler® 4000 G2 (以降は、「DT4000 G2」と略します) について、カスタマイズを行っていない製造時の状態を基にして説明しています。システム要件
PC プラットフォーム
- Pentium III プロセッサ (またはそれ以上) - 15MB のディスク空き容量 - USB 2.0/3.0 ポート対応 - 最後の物理ドライブの後の、2つの連続したドライブ・レター\*対応オペレーティングシステム (OS)
- Windows ^ 8、8.1 (RT を除く) - Windows ^ 7 SP1 - Windows ® Vista SP2Mac プラットフォーム
- 15MB のディスク空き容量 - USB 2.0/3.0対応オペレーティングシステム(OS)
• Mac OS X 10.8.x \~ 10.10x推獎事項
DT4000 G2 デバイスに十分な電力を供給するために、以下の図 1.1 に示すように、ノートパソコンまたはデスクトップパソコン本体の USB ポートに直接、差し込んでください。図 1.2 に示すようなキーボードや USB から給電するハブなどのように、USB ポートを持つ周辺機器には、DT4000 G2 を接続しないでください。 natural_image
Two photos showing a laptop and a USB flash drive on a perforated surface (no visible text or symbols)natural_image
Two photos showing a device with a black connector and red prohibition symbols, no readable text or labels present.設定 (Windows 環境の場合)
1. DT4000 G2 を、ノートパソコンまたはデスクトップパソコンの空いている USB ポートに差し込み、Windows がこのドライブを検出するまで待ちます。 - Windows Vista のユーザーに対しては、図2.2 に示すように、デバイスドライバーの通知メッセージが表示されます。 - Windows 7 のユーザーに対しては、図2.2 に示すように、デバイスドライバーの通知メッセージが表示されます。 新しいハードウェアの検出が終わると、Windowsは初期化プロセスの開始を要求します。 text_image
Installing device driver software Click here for status.text_image
Installing device driver software Click here for status.text_image
Organize Burn to disc Files Currently on the Disc Support autorun.inf DT4000G2_Launch hardwareデバイスの初期化 (Windows 環境の場合)
1. ドロップダウンメニューで、使用する言語を選択し、[次へ](図3.1)をクリックします。 text_image
AutoPlay DVD RW Drive (I): DT4000G2 Always do this for software and games: Install or run program from your media Run DT4000G2_Launcher.exe Published by Kingston Technology Corporation General options Open folder to view files using Windows Explorer View more AutoPlay options in Control Paneltext_image
Device Initialization - DT4000 G2 DataTraveler® 4000 G2 Language Select Language: English Kingston Technology Next> Canceltext_image
Device Initialization - DT4000 G2 DataTraveler® 4000 G2 License Agreement SOFTWARE LICENSE AGREEMENT IMPORTANT - READ CAREFULLY: THIS SOFTWARE LICENSE AGREEMENT ("Agreement") is a legal agreement between you (either an individual or a single entity) and Kingston Technology Company Inc. ("Kingston"). This Agreement relates to the software accompanying this Agreement, which includes computer software and may include associated media, printed materials, and "online" or electronic Accept Decline Kingston TECHNOLOGYtext_image
Device Initialization - DT4000 G2 DataTraveler® 4000 G2 Password * Password: ••••••••••• * Password Confirmation: ••••••••••• Password Rules Hint: Pwd Hint *Mandatory fieldtext_image
Device Initialization - DT4000 G2 DataTraveler® 4000 G2 Contact Information Name: Test Name Company: Test Company Details: Test Details & Other Info Kingston TECHNOLOGYtext_image
Format - DT4000 G2 DataTraveler® 4000 G2 Formatting DT4000 G2 (1:)...text_image
Format - DT4000 G2 DataTraveler® 4000 G2 Format Complete. Kingston TECHNOLOGY OKデバイスの使用 (Windows 環境の場合)
DT4000 G2 を初期化した後、ユーザーはセキュリティで保護されたデータパーティションにアクセスし、パスワードを使ってデバイスにログインして、デバイスの各種オプションを利用できます。これを行うには、以下の手順に従ってください。 1. DT4000 G2 をノートパソコンまたはデスクトップパソコンの USB ポートに差し込み、パスワードを入力します (図 4.1 を参照)。 \- パスワードを入力し、[ログイン] ボタンをクリックして続行します。 \- 正しいパスワードが入力されると、DT4000 G2 はロックを解除し、ユーザーはこのデバイスを使用できるようになります。 \- 間違ったパスワードが入力された場合は、「ヒント」フィールドの下にエラーメッセージが表示され、ログインが失敗したことを示します。 text_image
Login device DT4000 G2 DataTraveler® 4000 G2 Password: Hint Forgot Password Contact Information Read-Only Mode Kingston TECHNOLOGY Login Cancelデバイスの各種オプション (Windows 環境の場合)
デバイスにログインすると、Windows のタスクバーの右端に [DT4000 G2] アイコンが表示されます (図 5.1)。(注:Windows 7 をご使用の場合、[DT4000 G2] アイコンにアクセスするには、タスクバーの上矢印のボタンをクリックする必要があります (図 5.2)。 DT4000 G2 のアイコンを一度クリックすると、以下のようなメニューが表示されます。 text_image
DT4000 G2 Settings Browse DT4000 G2 Format DT4000 G2 Online Support About DT4000 G2 Shut down DT4000 G2text_image
Customize... 9:26 AM 12/3/2010DT4000 G2 の設定
- パスワードとヒントの変更が可能になります (図 5.3) - 連絡先の情報の追加/表示/変更が可能になります (図5.4) - 言語選択の変更が可能になります (図 5.5) (注:安全性を確保するために、あらかじめ設定されている DT4000 G2 のパスワードを別のものに更新または変更する必要があります。) text_image
Settings DataTraveler® 4000 62 Password | Contact Information | Language | * Current Password: * New Passwords: * Password Confirmations: i Password Rules Hint: Put Hint * Mandatory field Kingston OK Apply Canceltext_image
Settings DataTraveler® 4000 62 Password Contact Information Language Name: Test Name Company: Test Company Details: Test Details & Other Info Kingston OK Buy Canceltext_image
Settings DataTraveler® 4000 62 Password | Contact Information | Language | Select Languages: English Kingston OK Buy CancelDT4000 G2 の閲覧
\- ログイン時に、セキュリティで保護されたデータパーティションの内容を閲覧できます。DT4000 G2 の初期化\*
\- セキュリティで保護されたデータパーティションの初期化が可能です(警告:すべてのデータが消去されます)。(図5.6) オンライン・サポート(インターネットアクセスが必要です) \- インターネット・ブラウザを開き、追加のサポート情報にアクセス可能なhttp://www.kingston.com/jp/support/にアクセスしてください。DT4000 G2 について
\- アプリケーションやファームウェアバージョンの情報を含む DT4000 G2 の詳細が示されます (図 5.7)。DT4000 G2 のシャットダウン
\- DT4000 G2 を正常にシャットダウンすることにより、ユーザーシステムから安全に切り離すことができます。 text_image
Format - DT4000 G2 DataTraveler® 4000 G2 WARNING: Formatting will erase ALL data on this disk. To format the disk (3), click OK. To suit, click CANCEL. Your password is required to complete format. Passwords: Kingston TECHNOLOGY OK Canceltext_image
About - DT4000 G2 DataTraveler® 4000 G2 Copyright (c) 2011 Kingston Technology Company, Inc. Modules Version Information DT4000 G2 K40 000FPE23C/ECBP1280000.D2 Application K1.0.0.5 FW Version 3.05 Crypts Library FW 1.00 Kingston TECHNOLOGY Close設定 (Mac 環境の場合)
DT4000 G2 を、ノートパソコンまたはデスクトップパソコンの空きのUSBポートに差し込み、Macがこのドライブを検出するまで待ちます。検出が終わると、図6.1に示すように、DT4000 G2 のボリュームがデスクトップに表示されます。 1. [DT4000 G2 CD-ROM] アイコンをダブルクリックします。 2. 図 6.2 に示すウィンドウ内で、Mac フォルダをダブルクリックします。 3. 図 6.3 に示すウィンドウ内で、DT4000 G2 のアプリケーションアイコンをダブルクリックします。これにより、初期化プロセスが開始されます。 text_image
DT4000G2 autorun.inf DT400G2_Launcheraxe linux Mac rr_moved Supporttext_image
DT4000G2_Launch ertext_image
DataTraveler® 4000 G2 FIPS 140-2 LEVEL 3 CERTIFIED Kingston® TECHNOLOGY ©2016 Kingston Technology Corporation, 17609 Newshope Street, Fountainville, CA 1027 98 USA All rights reserved. All registered trademarks and trademarks are the property of their respective owners.デバイスの初期化 (Mac 環境の場合)
1. ドロップダウンメニューで、使用する言語を選択し、[次へ](図7.1)をクリックします。 text_image
Device Initialization - DT4000 G2 DataTraveler® 4000 G2 Language Select Language: English Kingston TECHNOLOGY Next> Canceltext_image
Device Initialization - DT4000 G2 DataTraveler® 4000 G2 License Agreement SOFTWARE LICENSE AGREEMENT IMPORTANT - READ CAREFULLY: THIS SOFTWARE LICENSE AGREEMENT ("Agreement") is a legal agreement between you (either an individual or a single entity) and Kingston Technology Company Inc. ("Kingston"). This Agreement relates to the software accompanying this Agreement, which includes computer software and may include associated media, printed materials, and "online" or electronic Accept Decline Kingston TECHNOLOGYtext_image
Device Initialization - DT4000 G2 DataTraveler® 4000 G2 ① ② ③ ④ Password * Password: ********** * Password Confirmation: ********** i Password Rules Hint: Pwd Hint * Mandatory field Kingston TECHNOLOGYtext_image
Device Initialization - DT4000 G2 DataTraveler® 4000 G2 ① ② ③ ④ Contact Information Name: Test Name Company: Test Company Details: Test Details & Other Info Kingston TECHNOLOGYtext_image
Format - DT4000 G2 DataTraveler® 4000 G2 Formatting DT4000 G2 ... Kingston OK Canceltext_image
Format - DT4000 G2 DataTraveler® 4000 G2 Format Complete. Kingston OK Cancelデバイスの使用 (Mac 環境の場合)
DT4000 G2 を初期化した後、ユーザーはセキュリティで保護されたデータパーティションにアクセスし、パスワードを使ってデバイスにログインして、デバイスの各種オプションを利用できます。これを行うには、以下の手順に従ってください。 1. DT4000 G2 をノートパソコンまたはデスクトップパソコンの USB ポートに差し込み、パスワードを入力します (図 8.1 を参照)。 2. パスワードを入力し、[ログイン] ボタンをクリックして続行します。 \- 正しいパスワードが入力されると、DT4000 G2 はロックを解除し、ユーザーはこのデバイスを使用できるようになります。 \- 間違ったパスワードが入力された場合は、「ヒント」フィールドの下に次のようなエラーメッセージが表示されます (図8.2を参照)。 text_image
Format - DT4000 G2 DataTraveler® 4000 G2 Password: Hint Forgot Password Contact Information Read-Only Mode Kingston FESAGLDSH Login Cancelデバイスの各種オプション (Mac 環境の場合)
デバイスにログオンすると、以下の図 9.1 に示すように、Mac OS X Dock 内に [DT4000 G2\_Launcher] アイコンが表示されます。 text_image
DT4000G2_LauncherDT4000 G2 の設定
- パスワードとヒントの変更が可能になります (図9.3) - 連絡先の情報の追加/表示/変更が可能になります (図9.4) - 使用する言語の選択が可能になります(図9.5) text_image
DT4000 G2 Settings Browse DT4000 G2 Format DT4000 G2 Online Support About DT4000 G2 Shut down DT4000 G2 Options Show All Windows Hide Quittext_image
Settings DataTraveler® 4000 G2 Password Contact Information Language * Current Password: * New Password: * Password Confirmation: Password Rules Hint: * Mandatory field Kingston OK Canceltext_image
Settings DataTraveler® 4000 62 Password Contact InformationLanguage Name: Company: Details: Kingston OK Canceltext_image
DataTraveler® 4000 G2 Password Contact Information Language Select Language: English Kingston OK CancelDT4000 G2 の閲覧
\- ログイン時に、セキュリティで保護されたデータパーティションの内容を閲覧できます。DT4000 G2 の初期化
\- セキュリティで保護されたデータパーティションの初期化が可能です(警告:すべてのデータが消去されます)。(図9.6) オンライン・サポート(インターネットアクセスが必要です) \- インターネット・ブラウザを開き、追加のサポート情報にアクセス可能なhttp://www.kingston.com/jp/support/にアクセスしてください。 text_image
Format - DT4000 G2 DataTraveler® 4000 G2 WARNING: Formatting will erase ALL data on this disk. To format the disk, click OK. To quit, click CANCEL.text_image
About - DT4000 G2 DataTraveler® 4000 G2 Copyright (c) 2007 Kingston Technology Company, Inc. Modules Version Information DT4000 G2 3.0 030FFE23C7ECBF1080001G2 Application 4.0.0.1 FW Version 3.05 Crypto Library FW 1.00設定 (Linux 環境の場合)
(注:現在利用可能な各種の Linux バージョンでは、インターフェイスの外観と雰囲気がバージョンによって異なる場合があります。しかしターミナルアプリケーションで使用する一般的なコマンドセットはとても良く似ており、以下のような Linux の命令で参照することができます。この項のスクリーンショットの例は、64 ビット環境で作成されたものです。)  Linux のディストリビューションによっては、端末のアプリケーションウィンドウで各 DT4000 G2 コマンドを正しく実行するために、スーパーユーザー(ルート)の権限が必要な場合があります。 DT4000 G2 を、ノートパソコンまたはデスクトップパソコンの空いている USB ポートに差し込み、Linux OS がこのドライブを検出するまで待ちます。検出が終わると、図10.1 が示すように、DT4000 G2 ボリュームのアイコンがデスクトップに表示されます。\*  DT4000G2 図 10.1 - DT4000 G2 のボリユーム DT4000 G2 には、Linux で使用できる以下の 5 つのコマンドが同梱されています: dt4000g2\_about、dt4000g2\_forgotpassword、dt4000g2\_initialize、dt4000g2\_login、dt4000g2\_logout (注:これらのコマンドを実行するには、「ターミナル」アプリケーションウィンドウを開き、各ファイルが存在するフォルダを開く必要があります。各コマンドの前に「./」(ピリオドとスラッシュ)の2文字を追加する必要があります。 32 ビットユーザーの場合は、「ターミナル」アプリケーションウィンドウを開き、プロンプトレベルで以下のコマンドをキー入力して、カレントディレクトリを /media/DT4000G2/linux/linux32\$ に変更してください。 cd /media/DT4000G2/linux/linux32 (このキー入力の後、ENTER を押してください。) 64 ビットユーザーの場合は、「ターミナル」アプリケーションウィンドウを開き、プロンプトレベルで以下のコマンドをキー入力して、カレントディレクトリを /media/DT4000G2/linux/linux64\$ に変更してください。 cd /media/DT4000G2/linux/linux64 (このキー入力の後、ENTER を押してください。) \*注:DT4000 G2 ボリュームが OS で自動的にロードされない場合は、Linux の「mount」コマンドを使って、ターミナルウィンドウにそのボリュームをマニュアルでロードする必要があります。お使いの OS ディストリビューションの Linux ドキュメントを参照するか、お気に入りのオンラインサポートのサイトにアクセスして、正しいコマンド構文とコマンドオプションを調べてください。デバイスの初期化 (Linux 環境の場合)
DT4000 G2 がパソコンに接続され、OS によって認識された後、DT4000 G2 を初めて使用する場合は、初期化する必要があります。これを行うには、「ターミナル」アプリケーション(またはコマンド行のウィンドウ)を開き、以下の手順を行ってください。 (注:この項で示すスクリーンショットや命令は、Linux OS での DT4000 G2 デバイスのデモ使用を目的とした linux32 フォルダ (32 ビット版) を使用しています。64 ビット版の Linux をお使いの場合は、32 ビットフォルダではなく、該当する 64 ビットフォルダを、例えば linux32 ではなく linux64 を使用してください。) 1. (図 10.2) に示すように、ターミナルのプロンプトレベルで以下のコマンドをキー入力して、ディレクトリを DT4000 G2 ボリュームに変更してください。 cd /media/DT4000G2/linux/linux32 (注:コマンドとフォルダ (ディレクトリ)名は、大文字と小文字が区別されます。例えば、“linux32”と“Linux32”は異なるものとして認識されます。コマンド構文も、ここに示す通りに、正確に入力しなければなりません。) text_image
[root@localhost /]# cd /media/dt4000g2/linux/Linux64 [root@localhost linux64]# _text_image
[root@localhost /]# cd /media/dt4000g2/linux/linux64 [root@localhost linux64]# ls dt4000g2_about dt4000g2_initialize dt4000g2_logout dt4000g2Forgotpassword dt4000g2_login [root@localhost linux64]# _text_image
[root@localhost /]# cd /media/dt4000g2/linux/linux64 [root@localhost linux64]# ls dt4000g2_about dt4000g2_initialize dt4000g2_logout dt4000g2_forgotpassword dt4000g2_login [root@localhost linux64]# ./dt4000g2_initializeデバイスの使用 (Linux 環境の場合)
DT4000 G2 を初期化した後、ユーザーはセキュリティで保護されたデータパーティションにアクセスし、(22 ページで作成した) パスワードを使ってデバイスにログインすることができます。これを行うには、以下の手順に従ってください。 1. 「ターミナル」のアプリケーション画面を開きます。 2. ターミナルのプロンプトレベルで以下のコマンドをキー入力します。cd /media/DT4000G2/linux/linux32 3. /media/DT4000G2/linux/linux32\$ のコマンドのプロンプトレベルで、以下のコマンドをキー入力してデバイスにログインします。./dt4000g2\_login\* そして ENTER を押します。(注:コマンドとフォルダ名は、大文字と小文字が区別されますので、構文は正確にキー入力する必要があります。) 4. DT4000 G2 のユーザーパスワードを入力し、ENTER を押します。ログインに成功すると、セキュリティで保護されたデータボリュームが開かれ、DT4000 G2 を使用可能になります。 ログインプロセスの実行中に、間違ったパスワードを入力した場合、ユーザーはステップ3を繰り返すことにより、正しいパスワードの入力をやり直すことができます。しかし、不正アクセス回数を記録するセキュリティ機能が内蔵されています。あらかじめ設定されている10回の不正アクセス回数に達した場合、DT4000 G2はロックされ、次に使用する前に、dt4000 g 2 \_forgotpassword コマンドを実行してセキュリティで保護されたデータパーティションを初期化する必要があります。このオプションを選択して新しいパスワードを作成できますが、ユーザーデータのプライバシーを保護するために、DT4000 G2は初期化されます。これは、ユーザーデータがすべて消去されることを意味します。 dt4000g2\_forgotpassword プロセスが完了すると、新しいパスワードが正常に設定され、不正アクセス回数を記録するセキュリティ機能がリセットされます。(注:不正アクセス回数 (MaxNoA) に達する前に正常にログインした場合も、ログイン失敗カウンタの値はリセットされます。) DT4000 G2 の使用を終了する時は、このデバイスとセキュリティで保護されたデータからログアウトしてください。これを行うには、以下の手順に従ってください。 1. 「ターミナル」のアプリケーション画面を開きます。 2. ターミナルのプロンプトレベルで以下のコマンドをキー入力します。cd /media/DT4000G2/linux/linux32 3. /media/DT4000G2/linux/linux32\$ のコマンドのプロンプトレベルで、以下のコマンドをキー入力してデバイスからログアウトします。./dt4000g2\_logout\* そして ENTER を押します。(注:コマンドとフォルダ名は、大文字と小文字が区別されますので、構文は正確にキー入力する必要があります。) 4. DT4000 G2 を USB ポートから抜いて、安全な場所に保管してください。 \*注:Linux のディストリビューションによっては、端末のアプリケーションウィンドウで各 DT4000 G2 コマンドを正しく実行するために、スーパーユーザー(ルート)の権限が必要な場合があります。ヘルプとトラブルシューティング
デバイスのロック DT4000 G2 には、連続した不正アクセス回数 (MaxNoA) に達した場合に、不正アクセスを防止するセキュリティ機能が内蔵されています。規定のアクセス回数は、10 回にデフォルト設定されています。 「ロック」カウンタは不正アクセス回数を記録しますが、以下の2つの方法のいずれかでリセットされます。1) MaxNoA に達する前に正常にログインする、または2) MaxNoA に達し、デバイスの初期化を実行する。\* 間違ったパスワードが入力された場合は、「ヒント」フィールドの下にエラーメッセージが表示され、ログインが失敗したことを示します。図10.1を参照。 ログインが続けて 7 回失敗した場合、あと 3 回で MaxNoA の回数 (これは 10 回にデフォルト設定されています) に達することを示す追加のエラーメッセージが表示されます。図 10.2 を参照。 あらかじめ設定された 10 回の不正アクセス回数に達した場合、DT4000 G2 はデータパーティション text_image
Login device DT4000G2 DataTraveler® 4000 G2 Password: Hint: Failed to Login: The password is incorrect. Please try again. Forget Password Contact Information Kingston Login Canceltext_image
Login device DT4000G2 DataTraveler® 4000 G2 Password: Hint: Failed to Login: The password is incorrect. Please try again. 3 Attempts left before your DT4000 is blocked permanently. Forget Password Contact Information Kingston Kingsa Login Cancelパスワードを忘れた場合
パスワードを忘れた場合は、DT4000 G2\_Launcher の起動時にデバイスのログインウィンドウに表示される「パスワードを忘れた場合」リンクをクリックしてください (図 10.3 を参照)。 このオプションを選択して新しいパスワードを作成できますが、ユーザーデータのプライバシーを保護するために、DT4000 G2は初期化されます。これは、上記のプロセス時にユーザーデータがすべて消去されることを意味します。\* [パスワードを忘れた場合] をクリックすると text_image
Login device DT4000G2 DataTraveler® 4000 G2 Password: Hint Forgot Password Context information Kingston TECHNOLOGY Login Canceltext_image
Forgot Password In order to protect your data, your DT4000G2 will be formatted and all data will be erased. Do you want to enter a new password and format your DT4000G2? OK Canceltext_image
My Computer File Edit View Favorites Tools Help Back Search Folders Address Go System Tasks View system information Add or remove programs Change a setting Local Disk (CC) D:\D\CD-R.W Drive (DC) Local Disk (E:) Other Places My Network Places My Documents Control Panel DT4000GZ (F:) Network Share (G:) Local Disk (H:) Details System Folderエラーメッセージ
ファイルを作成できない - このエラーメッセージは、読取り専用モードでログインし、セキュリティで保護されたデータのパーティション上で ファイルまたはフォルダの作成をしようとした時に表示されます。 text_image
Unable to create file Unable to create the file 'New Text Document.txt' The media is write protected. OKtext_image
Error Copying File or Folder Cannot copy File1: The disk is write-protected. Remove the write-protection or use another disk. OKtext_image
Error Deleting File or Folder Cannot delete File1: The disk is write-protected. Remove the write-protection or use another disk. OKtext_image
DataTraveler® 4000 G2 FIPS 140-2 LEVEL 3 CERTIFIED Kingston® TECHNOLOGY ©2014 Kingston Technology Corporation, 17600 Newhope Street, Fountain Valley, CA 92708 USA All rights reserved. All registered trademarks and trademarks are the property of their respective owners.natural_image
Exterior view of a black Logitrocvise USB flash drive (no text or symbols visible on body)สารบัญ
TOC เกี่ยวกับคู่มือชุดนี้
คู่มือผู้ใช้ชุดนี้จัดทำขึ้นสำหรับ FIPS-Validated DataTraveler ^® 4000 G2 (เรียกเป็น DT4000 G2 ต่อจากนี้) โดยใช้ภาพที่ได้จากโรงงานโดยไม่มีการปรับแต่งเพิ่มเติมใด ๆเงื่อนไขทางระบบ
ระบบ PC
- โปรแกรมเซอร์ Pentium III หรือเทียบเท่า (หรือเร็วกว่า) - ฟื้นที่ว่างบนติสก์ 15MB - พอร์ต USB 2.0 / 3.0 ใช้งาน - öttöttöttöttöttöttöttöttöttöttöttöttöttöttöttöttöttöttöttöttöttöttöttöttöttöttöttöttöttöttöttöttöttöttöttöttöttöttöttöttöttöttöttöttöttöttöttöttöttöttöttöttöttöttöttöttöttöttöttöttöttöttöttöttöttöttöttöttöttöttöttöttöttöttöttöttöttöttöttöttöttöttöttöttöttöttöttöttöttöttöttöttöttöttöttöttöttöttöttöttTTT - öttöttöttöttöttöttöttöttöttöttöttöttöttöttöttöttöttöttöttöttöttöttöttöttöttöttöttöttöttöttöttöttöttöttöttöttöttöttöttöttöttöttöttöttöttöttöttöttöttöttöttöttöttöttöttöttöttöttöttöttöttöttöttöttöttöttöttöttöttöttöttöttöttöttöttöttöttöttöttöttöttöttöttöttöttöttöttöttöttöttöttöttöttöttöttöttöttTTTการรองรับระบบปฏิบัติการ สำหรับ PC
- Windows ^ 8, 8.1 (No RT) - Windows ® 7 SP1 - Windows ® Vista SP2ระบบ Mac
- ฟื้นที่ว่างบนดิสก์ 15MB - USB 2.0/3.0ระบบปฏิบัติการที่รองรับ
- Mac OS X 10.8.x -10.10xConnectivity
เพื่อให้แน่ใจว่าคุณจะสามารถใช้งาน DT4000 G2 ได้อย่างเต็มประสิทธิภาพ ให้เสียบไตรฟีเข้าที่พอร์ต USB ของโนัตน์กหรือเครื่องเดลก์ทอปโดยตรงตาม ภาพที่ 1.1 หลักเลี่ยงการต่อ DT4000 G2 กับอุปกรณ์ต่อฟ่วงที่มีพอร์ต USB เช่น แป้นพิมพ์หรืออับ USB ตามภาพที่ 1.2 natural_image
Two photos showing a laptop and a device with a USB flash, both placed on a white surface (no visible text or symbols)natural_image
Two photos showing a device with a black connector and red prohibition symbols, no readable text or symbols present.การติดตั้ง (ระบบ Windows)
1. เลียบ DT4000 G2 เข้าที่พอร์ต USB ในโน้ตบุกหรือเดสก์ทอป จากนั้นรอให้ Windows ทําการตรวจหา - ผู้ใช้ Windows Vista จะได้รับการแจ้งเตือนเกี่ยวกับไดร์เวอร์อุปกรณ์ตามภาพที่ 2.2 - ผู้ใช้ Windows 7 จะได้รับการแจ้งเตือนเกี่ยวกับไดร์เวอร์อุปกรณ์ตามภาพที่ 2.2 หลังจากตรวจสอบหายาร์ตแวร์ใหม่เสร็จสิ้น Windows จะแจ้งให้คุณเริ่มขั้นตอนการทำงาน \- ผู้ใช้ Windows Vista จะพบหน้าต่าง AutoPlay คล้าย ๆ กับที่ปรากฏในภาพที่2.3 text_image
Installing device driver software Click here for status.text_image
Installing device driver software Click here for status.text_image
Organize Burn to disc Files Currently on the Disc: Support autorus.inf DT4000G2_Launch housetext_image
DVD RW Drive (I): DT4000G2 Always do this for software and games: Install or run program from your media Run DT4000G2_Launcher.exe Published by Kingston Technology Corporation General options Open folder to view files using Windows Explorer View more AutoPlay options in Control Paneltext_image
Device Initialization - DT4000 G2 DataTraveler® 4000 G2 Language Select Language: English Kingston Technology Next> Canceltext_image
Device Initialization - DT4000 G2 DataTraveler® 4000 G2 License Agreement SOFTWARE LICENSE AGREEMENT IMPORTANT - READ CAREFULLY: THIS SOFTWARE LICENSE AGREEMENT ("Agreement") is a legal agreement between you (either an individual or a single entity) and Kingston Technology Company Inc. ("Kingston"). This Agreement relates to the software accompanying this Agreement, which includes computer software and may include associated media, printed materials, and "online" or electronic Accept Decline Kingston TECHNOLOGYtext_image
Device Initialization - DT4000 G2 DataTraveler® 4000 G2 Password * Password: •••••••••• * Password Confirmation: •••••••••• Password Rules Hint: Pwd Hint *Mandatory fieldtext_image
Device Initialization - DT4000 G2 DataTraveler® 4000 G2 Contact Information Name: Test Name Company: Test Company Details: Test Details & Other Info Kingston TECHNOLOGYtext_image
Format - DT4000 G2 DataTraveler® 4000 G2 Formatting DT4000 G2 (1):... Kingston TECNOLOGYtext_image
Format - DT4000 G2 DataTraveler® 4000 G2 Format Complete. Kingston TECHNOLOGY OKการใช้งานอุปกรณ์ (ระบบ Windows)
หลังจากเริ่มการทำงานของ DT4000 G2 แล้ว คุณจะสามารถเรียกค้นพาร์ติชั่นนิรถัยและใช้ฟังก์ซึ่น ต่าง ๆ ของอุปกรณ์โดยล็อกอินด้วยรหัสผ่านของคุณ ทำได้ง่าย ๆ ตามขั้นตอนต่อไปนี้ 1. เสียบ DT4000 G2 เข้าที่พอร์ต USB ของโน้ตบุ๊กหรือเดสก์ทอป จากนั้นกรอกรหัสผ่าน (ดูในภาพที่ 4.1) - หลังจากพิมพ์รหัสผ่านแล้ว ให้คลิกที่ปุ่ม Login' เพื่อดำเนินการต่อ - หากกรอกรหัสผ่านถูกต้อง DT4000 G2 จะปลดล็อกและคุณจะสามารถเริ่มใช้งานอุปกรณ์ได้ text_image
Login device DT4000 G2 DataTraveler® 4000 G2 Password: Hint Forgot Password Contact Information Read-Only Mode Kingston TESTOLOGY Login Cancel| 2. | สามารถปลดล็อคพาร์ติชั่นนิจรัยสำหรับข้อมูลได้ในโหมดอ่านอย่างเดียว "โหมดป้องกันการเขียน" โดยทาเครื่องหมายที่ Read-Only Mode ’ ก่อนลือกอินใช้งานอุปกรณ์ หลังจากตรวจรับรองแบบอ่านอย่างเดียวแล้ว คุณจะสามารถเปิดหรือดูข้อมูลใน แต่จะไม่สามารถอัพเดต เปลี่ยนแปลงหรือลบข้อมูลขณะอยู่ในโหมดนี้ได้ PTSD4000 G2 (หมายเหตุ: โหมดอ่านอย่างเดียวยังป้องกันการฟอร์แมต โดยจะไม่แสดงตัวเลือกนี้ในเมนู PTSD4000 G2 ซึ่งมีแจ้งไว้ต่อไปในหน้า 10) | ||
ฟังก์ชั้นการทำงานของอุปกรณ์ (ระบบ Windows)
ขณะล็อกอินเข้าที่อุปกรณ์ จะพบไอคอน DT4000 G2' ที่มุมด้านขวาของทาสก์บาร์ของ Windows (ภาพที่ 5.1) (หมายเหตุ: ผู้ใช้ Windows 7 จะต้องคลิกที่ปุ่มลูกศรชิ้นในทาสก์บาร์เพื่อเข้าถึงไอคอน DT4000 G2' (ภาพที่ 5.2) คลิกหนึ่งครั้งที่ไอคอน DT4000 G2 เพื่อแสดงเมนูต่อไปนี้ text_image
DT4000 G2 Settings Browse DT4000 G2 Format DT4000 G2 Online Support About DT4000 G2 Shut down DT4000 G2text_image
Customize... 9:26 AM 12/3/2010ค่าปรับตั้งสำหรับ DT4000 G2
- ช่วยให้คุณสามารถเปลี่ยนรหัสผ่านและ/หรือค่าใบ (ภาพที่ 5.3) - ช่วยให้สามารถเพิ่ม/ดู/แก้ไขข้อมูลติดต่อของคุณ (ภาพที่ 5.4) - ช่วยให้สามารถแก้ไขค่าภาษาที่เลือกในปัจจุบัน (ภาพที่ 5.5) (หมายเหตุ: เพื่อความปลอดภัย ในปัจจุบันเพื่ออัพเดตและ/หรือปรับแต่งค่าเหล่านี้) คุณจะต้องใช้รหัสผ่าน DT4000 G2 text_image
Settings DataTraveler® 4000 G2 Password | Contact Information | Language * Current Password: * New Passwords: * Password Confirmation: i Password Rules Hint: Find Hint * Mandatory field Kingston OK Apply Canceltext_image
Settings DataTraveler® 4000 G2 Password | Contact Information | Language | Name: Test Name Company: Test Company Details: Test Details & Other Info Kingston OK Canceltext_image
Settings DataTraveler® 4000 62 Password | Contact Information | Language Select Language: English Kingston OK Buy CancelBrowse DT4000 G2
\- ใช้เพื่อเรียกค้นข้อมูลในพาร์ติชั่นนิรถัยขณะลือกอินFormat DT4000 G2\*
\- ใช้เพื่อฟอร์แมตพาร์ติชั่นนิ glycัย (คำเตือน: ข้อมูลทั้งหมดจะถูกลบทั้ง) (ภาพ 5.6)Online Support (ต้องมีการเชื่อมต่ออินเทอร์เน็ต)
\- เปิดอินเทอร์เน็ตเบราเซอร์และเข้าไปที่ http://www.kingston.com/support/ โดยคุณสามารถแทรกข้อมูลการให้บริการเพิ่มเติม text_image
Format - DT4000 G2 DataTraveler® 4000 G2 WARNING: Formatting will erase ALL data on this disk. To format the disk (3s), click OK. To quit, click CANCEL. Your password is required to complete format. Password: Kingston OK CancelAbout DT4000 G2
\- ระบุรายละเอียดเกี่ยวกับ DT4000 G2 รวมทั้งข้อมูลเวอร์ชั้นแอพพลิเคชั้นและเพิร์มแวร์ (ภาพที่ 5.7)Shutdown DT4000 G2
\- ปิด DT4000 G2 ให้ถูกตามขั้นตอน speื่อให้สามารถถอดแยกจากเครื่อง text_image
About - DT4000 G2 DataTraveler® 4000 G2 Copyright (c) 2011 Kingston Technology Company, Inc. Modules Version Information DT4000 G2 K40 000FFE23C7ECBF10800001D2 Application K4.0.0.5 FW Version 3.05 Crypto Library FW 1.00 Kingston Technology Close-สิ้นสุดเนื้อหาสำหรับ Windows-
การติดตั้ง (ระบบ Mac)
เสียบ DT4000 G2 เข้าที่พอร์ต USB ในโน้ตบุ๊กหรือเดสก์ทอปจากนั้นรอให้ระบบปฏิบัติการ Mac ทําการตรวจสอบหา หลังจากตรวจสอบคุณจะพบไตรฟี DT4000 G2 ที่เดสก์ทอป ตามภาพที่ 6.1 1. ดับเบิลคลิกที่ไอคอน DT4000 G2 CD-ROM 2. ตับเบิลคลิกที่โฟลเตอร์ Mac ที่พบในหน้าต่างที่ปรากฏขั้นใน 6.2 3. DT4000 G2 6.3  6.1-DT4000 G2 text_image
DT4000G2 autorun.inf DT4000G2_Launcher.exe Linux Mac rr_moved Supporttext_image
DT4000G2_Launcher Mactext_image
DataTraveler® 4000 G2 FIPS 140-2 LEVEL 3 CERTIFIED Kingston® TECHNOLOGY ©2014Kingstone Technology Corporation, (ENIX)Newshape Street, Fountain Valley, CA 927/8 USA, All rights reserved. All registered trademarks and trademarks are the property of their respective owners.การเริ่มการทำงานของอุปกรณ์ (ระบบ Mac)
1. เลือกภาษาของคุณจากเมนูแสดงรายการจากนั้นคลิกที่ Next (ภาพที่ 7.1) text_image
Device Initialization - DT4000 G2 DataTraveler® 4000 G2 Language Select Language: English Kingston TECNOLOGY Next> Canceltext_image
Device Initialization - DT4000 G2 DataTraveler® 4000 G2 License Agreement SOFTWARE LICENSE AGREEMENT IMPORTANT - READ CAREFULLY: THIS SOFTWARE LICENSE AGREEMENT ("Agreement") is a legal agreement between you (either an individual or a single entity) and Kingston Technology Company Inc. ("Kingston"). This Agreement relates to the software accompanying this Agreement, which includes computer software and may include associated media, printed materials, and "online" or electronic Accept Decline Kingston TECHNOLOGYtext_image
Device Initialization - DT4000 G2 DataTraveler® 4000 G2 ① ② ③ ④ Password * Password: ********** * Password Confirmation: ********** Hint: Pwd Hint * Mandatory field Kingston TECHNOLOGYtext_image
Device Initialization - DT4000 G2 DataTraveler® 4000 G2 ① ② ③ ④ Contact Information Name: Test Name Company: Test Company Details: Test Details & Other Info Kingston TECNOLOGYtext_image
Format - DT4000 G2 DataTraveler® 4000 G2 Formatting DT4000 G2 ... Kingston TECHNOLOGY OK Canceltext_image
Format - DT4000 G2 DataTraveler® 4000 G2 Format Complete. Kingston OK Cancelฟังก์ชั่นการทำงานของอุปกรณ์ (ระบบ Mac)
หลังจากเริ่มการทำงานของ DT4000 G2 แล้ว คุณจะสามารถเรียกค้นพาร์ติชั่นนิรถัยและใช้ฟังก์ชั่น ต่าง ๆ ของอุปกรณ์โดยล็อกอินด้วยรหัสผ่านของคุณ ทำได้ง่าย ๆ ตามขั้นตอนต่อไปนี้ 1. เสียบ DT4000 G2 เข้าที่พอร์ต USB ของโน้ตบุ๊กหรือเดสก์ทอป จากนั้นกรอกรหัสผ่าน (ดูในภาพที่ 8.1) 2. หลังจากพิมพ์รหัสผ่านแล้ว ให้คลิกที่ปุ่ม Login' เพื่อดำเนินการต่อ - หากกรอกรหัสผ่านลูกต้อง DT4000 G2 จะปลดล็อคและคุณจะสามารถเริ่มใช้งานอุปกรณ์ได้ - หากกรอกรหัสผ่านไม่ถูกต้อง ข้อความแจ้งข้อผิดพลาดจะปรากฏขึ้นด้าน ล่างฟิลด์ Hint เพื่อแจ้งว่าไม่ผ่านการลือกอิน (ดูใน ภาพที่ 8.2) (หมายเหตุ: ระหว่างขึ้นตอนการลือกอิน หากกรอกรหัสผ่านไม่ถูกต้อง คุณจะสามารถกรอกรหัสผ่านที่ถูกต้องได้ใหม่ ทั้งนี้ระบบความปลอดภัยจะตรวจสอบจํานวนการกรอกรหัสลือกอินที่ล้มเหลวไว้\* หากจำนวนเกินค่าที่กำหนดไว้เบื้องต้นที่ 10 ครั้ง DT4000 G2 จะล็อคการทํางาน โดยคุณจะต้องฟอร์แมตอุปกรณ์สำหรับพาร์ติชั่นนิรภัยก่อนการใช้งานต่อไป ซึ่งหมายความว่าข้อมูลทั้งหมดที่เก็บใน DT4000 G2 จะถูกลบทึ้ง ตรวจสอบรายละเอียดเพิ่มเติมเกี่ยวกับคุณสมบัตินี้ได้จาก Device Lockout' ในหน้า 24) text_image
Format - DT4000 G2 DataTraveler® 4000 G2 Password: Hint Forgot Password Contact Information Read-Only Mode Kingston TRENOGIST Login Cancelฟังก์ชั่นการทำงานของอุปกรณ์ (ระบบ Mac)
ขณะลือกอินอยู่ในอุปกรณ์ ไอคอน DT4000 G2\_Launcher' จะปรากฏชั้นที่ Dock ของ Mac OS X ตามภาพที่ 9.1 ด้านล่าง: text_image
DT4000G2_Launcherค่าปรับตั้งสำหรับ DT4000 G2
- ช่วยให้คุณสามารถเปลี่ยนรหัสผ่านและ/หรือคำใบ้ (ภาพที่ 9.3) - ช่วยให้สามารถเพิ่ม/ดู/แก่ไขข้อมูลติดต่อของคุณ (ภาพที่ 9.4) - ช่วยให้สามารถแก้ไขค่าภาษาที่เลือก (ภาพที่ 9.5) text_image
DT4000 G2 Settings Browse DT4000 G2 Format DT4000 G2 Online Support About DT4000 G2 Shut down DT4000 G2 Options Show All Windows Hide Quittext_image
Settings DataTraveler® 4000 G2 Password Contact Information Lambanguage * Current Password: * New Password: * Password Confirmation: i Password Rate Hints: * Mandatory field Kingston OK Canceltext_image
Settings DataTraveler® 4000 G2 Password Contact Information Language Name: Company: Details: Kingston OK Canceltext_image
Settings DataTraveler® 4000 G2 Password Contact Information Language Select Language: English Kingston OK CancelBrowse DT4000 G2
\- ใช้เพื่อเรียกค้นข้อมูลในพาร์ติชั่นนิรถัยขณะล็อกอินFormat DT4000 G2
\- ใช้เพื่อฟอร์แมตพาร์ติชั่นนิ glycัย (คำเตือน: ข้อมูลทั้งหมดจะถูกลบทั้ง) (ภาพ 9.6)Online Support (ต้องมีการเชื่อมต่ออินเทอร์เน็ต)
\- เปิดอินเทอร์เน็ตเบราเซอร์และเข้าไปที่ http://www.kingston.com/support/ โดยคุณสามารถแทรกข้อมูลการให้บริการเพิ่มเติม text_image
Format - DT4000 G2 DataTraveler® 4000 G2 WARNING: Formatting will erase ALL data on this disk. To format the disk, click OK. To quit, click CANCEL.About DT4000 G2
\- ระบุรายละเอียดเกี่ยวกับ DT4000 G2 รวมทั้งข้อมูลเวอร์ซั้นแอพพลิเคซั้นและเพิร์มแวร์ (ภาพที่ 9.7)Shutdown DT4000 G2
\- ปิด DT4000 G2 ให้ถูกตามขั้นตอนเพื่อให้สามารถถอดแยกจากเครื่อง text_image
About - DT4000 G2 DataTraveler® 4000 G2 Copyright (c) 2007 Kingston Technology Company, Inc. Modules Version Information DT4000 G2 3.0 050FFE23C7ECBF1080001G2 Application 4.0.0.1 FW Version 3.05 Crypto Library FW 1.00 Kingston Close-ลิ้นสุดเนื้อหาสำหรับ Mac-
การติดตั้ง (ระบบ Linux)
(NOTE: เนื่องจากมี Linux ที่ใช้งานอยู่ในปัจจุบันหลายรุ่น อินเทอร์เพชรการใช้งานจึงอาจ แตกต่างกันไป ในแต่ละเวอร์ชั่น ทั้งนี้ชุดค่าสั่งทั่วไปที่ใช่ในแอพพลิเคชั่นจะค่อนข้างใกล้เคียงกัน และสามารถอ้างอิงได้จากค่าแนะนําสำหรับระบบ Linux ดังต่อไปนี้ ตัวอย่างภาพหน้าจอในหัวข้อนี้จัดทำซื้นสำหรับระบบ 64 บิต)  ระบบ Linux บางส่วนต้องมิสิทธิ์ซุปเปอร์ยุสเซอร์ (razil) เพื่อลั่งการค่าสั่ง DT4000G2 ในหน้าต่างแอพพลิเคชั่น terminal เสียบ DT4000 G2 เข้าที่พอร์ต USB ในโน้ตบุ๊กหรือเดスク์ทอปจากนั้นรอให้ระบบปฏิบัติการ Linux ทําการตรวจหาหลังจากตรวจสอบ ไอคอนไตรฟี DT4000 G2 จะปรากฏขึ้น\*  DT4000G2 ที่เดสก์ทอป ตามภาพที่ 10.1 ภาพ 10.1 - ไตรฟี้ DT4000G2 DT4000 G2 มีชุดศาสตร์ 5 ชุดที่สามารถใช้กับระบบ Linux: dt4000g2\_about, dt4000g2\_forgotpassword, dt4000g2\_initialize, dt4000g2\_login และ dt4000g2\_logout (หมายเหตุ: สั่งการคําสั่งเหล่านี้โดยเปิดแอพพลิเคชั่น "Terminal" จากนั้นไปที่Flowเดอร์ที่เกิดไฟล์แต่ละตัว ค่าสั่งแต่ละตัวจะต้องนําหน้าด้วยอักษะสองตัวต่อไปนี้ ./ (จุดและชิดเอียงขวา) สำหรับระบบ 32 บิต ให้เปิดหน้าต่างแอพพลิเคชั่น "Terminal" จากนั้นเปลี่ยนใดเรคทอรี่ปัจจุบันเป็น /media/DT4000G2/linux/linux32\$ โดยพิมพ์ค่าสั่งนี้ที่พรอมต์: cd /media/DT4000G2/linux/linux32 (จากนั้นกด ENTER) สำหรับระบบ 64 บิด ให้เปิดหน้าต่างแอพพลิเคชั่น "Terminal" จากนั้นเปลี่ยนใดเรคทอรี่ปัจจุบันเป็น /media/DT4000G2/linux/linux64\$ โดยพิมพ์คำสั่งนี้ที่พรอมต์: cd /media/DT4000G2/linux/linux64 (จากนี้เกต ENTER) \*หมายเหตุ: หากไตรฟี DT4000 G2 ไม่โหลดอัตโนมัติโดยระบบปฏิบัติการ จะต้องโหลดไตรฟีเองจากหน้าต่าง terminal โดยใช้ค่าสั่ง mount' ของ Linux ดูไวยากรณ์และชุดค่าสั่งได้จากเอกสารกำหนด Fresh Linux เฉพาะรุ่นจากเว็บไซต์หรือแหล่งข้อมูลออนไลน์การเริ่มการทำงานของอุปกรณ์ (ระบบ Linux)
หลังจาก DT4000 G2 เชื่อมต่อกับคอมพิวเตอร์และระบบปฏิบัติการตรวจพบแล้ว อุปกรณ์จะต้องเริ่มการทํางานในเบื้องต้นก่อนการใช้งานในครั้งแรก ทำได้โดยเปิดแอพพลิเคชั่น Terminal' (หรือหน้าต่างบรรทัดค่าสั่ง) จากนั้นทําตามขั้นตอนต่อไปนี้ (หมายเหตุ: ภาพหน้าจอและค่าแนะนําในหัวข้อนี้ใช้โฟลเตอร์ linux32 (32 บิต) เพื่อการสาธิตการใช้งานอุปกรณ์ DT4000 G2 ใน Linux OS หากคุณใช้ Linux 64 บิต ให้ใช้โฟลเตอร์ 64 บิตแทนโฟลเตอร์ 32 บิต เช่น linux64 แทน linux32) 1.เปลี่ยนไตเรคทอรี่เป็นใครฟี DT4000 G2 โดยพิมพ์ค่าสั่งต่อไปนี้ที่พรอมต์ของ terminal (ตามภาพที่ 10.2): cd /media/DT4000G2/linux/linux32 (หมายเหตุ: คำสั่งและซื่อโฟลเตอร์ (ไตเรคทอรี่) จะต้องตรงตามตัวพิมพ์ เช่น Linux32' ไม่เหมือนกันกับ Linux32' 马来西亚กรณ์จะต้องพิมพ์ให้ถูกต้องตามที่แจ้ง) text_image
[root@localhost /]# cd /media/dt4000g2/linux/linux64 [root@localhost linux64]# _text_image
[root@localhost /]# cd /media/dt4000g2/linux/linux64 [root@localhost linux64]# ls dt4000g2_about dt4000g2_initialize dt4000g2_logout dt4000g2Forgotpassword dt4000g2_login [root@localhost linux64]# _text_image
[root@localhost /]# cd /media/dt4000g2/linux/linux64 [root@localhost linux64]# ls dt4000g2_about dt4000g2_initialize dt4000g2_logout dt4000g2Forgotpassword dt4000g2_login [root@localhost linux64]# ./dt4000g2_initializeวิธีใช้และการแก้ไขปัญหา
Device Lockout DT4000 G2 มีระบบความปลอดภัยที่ช่วยป้องกันการเรียกค้นพาร์ติชั้นข้อมูลที่ไม่ได้รับอนุญาตเมื่อมีการลือกอินล้มเหลว ต่อเนื่องเกินจำนวนครั้งที่กำหนด (เรียกลั่น ๆ ว่า MaxNoA) ค่าเริ่มต้นของผลิตภัณฑ์ "ที่จำหน่าย" กำหนดจำนวนการลือกอินไว้ที่ 10 ครั้ง ตัวนับจำนวน lock-out' จะตรวจสอบจำนวนการลือกอินที่สัมเหลว โดยสามารถรีเซิตได้สองวิธีได้แก่ 1) ลือกอินตามขั้นตอนก่อนเกิด MaxNoA หรือ 2) เกิด MaxNoA จากนั้นทำการฟอร์แมตอุปกรณ์\* หากกรอกรหัสผ่านไม่ถูกต้อง ข้อความแจ้งข้อผิดพลาดจะปรากฏชั้นต้านล่างฟิลด์ Hint เพื่อแจ้งว่าไม่ผ่านการลือกอิน ดูในภาพที่ 10.1 หากลือกอินผิดพลาดครั้งที่ 7 คุณจะพบข้อความแจ้งเตือนแจ้งให้ทราบว่าเหลือเวลาล็อกอินอีก 3 ครั้งก่อน MaxNoA (ตั้งค่าเริ่มต้นไวร์ที่ 10 ครั้ง) ดูในภาพที่ 10.2 หลังล็อกอินผิดพลาด 10 ครั้ง DT4000 G2 จะปล็อคพาร์ติชั้นข้อมูลและกำหนดให้ต้องฟอร์แมตอุปกรณ์ก่อนการ ใช้งานครั้งถัดไป ซึ่งหมายความว่าข้อมูลทั้งหมดที่จัดเก็บใน DT4000 G2 จะสุญหาย โดยคุณจะต้องกำหนดรหัสผ่านใหม่ขึ้นมา ระบบความปลอดภัยนี้เป็นการจำกัดความพยายามของบุคคล (ที่ไม่มีรหัสผ่าน) ในการทดลองลือกอินเพื่อเรียกค้นข้อมูลที่สำคัญแบบไม่มีข้อจำกัด หากคุณมี DT4000 G2 และลีมรหัสผ่าน ระบบความปลอดภัยลักษณะเดียวกันนี้จะถูกเปิดใช้ รวมทั้งระบบฟอร์แมตอุปกรณ์\* ตรวจสอบรายละเอียดเพิ่มเติมเกี่ยวกับคุณสมบัตินี้ได้จาก Forgot text_image
Login device DT4000G2 DataTrav 4000 Password: Hint Failed to Login: The password is incorrect. Please try again. Forget Password Contact Information Kingstontext_image
Login device DT4000G2 DataTrav 4000 Password: Hint Failed to Login: The password is incorrect. Please try again. 3 Attempts left before your DT4000 is blocked permanently. Forget Password Contact Information Kingstonลีมรหัสผ่าน
หากคุณลีมรหัสผ่าน สามารถคลิกที่ลิงค์ Forgot Password' ที่ปรากฏขึ้นที่หน้าต่างล็อกอินของอุปกรณ์ขณะเรียกใช้ DT4000 G2\_Launcher (ดูในภาพที่ 10.3) ตัวเลือกนี้ช่วยให้สามารถกำหนดหัสผ่านใหม่ แต่เพื่อเป็นการป้องกันข้อมูลส่วนตัวของคุณ DT4000 G2 จะถูกฟอร์แมต ซึ่งหมายความว่าข้อมูลทั้งหมดของคุณจะถูกลบทั้งในขั้นตอนนี้\* หลังจากคลิกที่ Forgot Password' กล่องข้อความ (ภาพที่ 10.4) จะปรากฏขึ้นและถามว่าคุณต้องการกรอกรหัสผ่านใหม่ก่อนทำการ รฟอร์แมตหรือไม่ ถึงตอนนี้คุณสามารถ 1) คลิก OK เพื่อยืนยันหรือ 2) คลิก Cancel' เพื่อกลับไปที่หน้าต่างล็อกอิน หากคุณเลือกดำเนินการต่อ คุณจะได้รับแจ้งให้จัดทหารหัสผ่านใหม่ที่ชับซ้อนกว่าพร้อมคำใบชุดใหม่ คาใบไม่ใช่ฟิลด์บังคับแต่จะเป็นประโยชน์ในการช่วยเตารหัสผ่าน text_image
Login device DT4000G2 Password: Hint Forgot Password Context information Kingston TECHNOLOGY Login DataTrd 400text_image
Forgot Password In order to protect your data, your DT4000G2 will be formatted and all you want to enter a new password and format your DT4000G2? OK Canceltext_image
My Computer File Edit View Favorites Tools Help Back Search Folders Address Go System Tasks View system information Add or remove programs Change a setting Local Disk (C:) DVD/CD-R/W Drive (D:) Local Disk (E:) Other Places My Network Places My Documents Control Panel Details System Folder DT400G2 (F:) Network Share (G:) Local Disk (H:) Red ArrowError Messages
Unable to create file - ข้อความแจ้งข้อผิดพลาดนี้จะปรากฏขึ้นเมื่อพยายาม สร้างไฟล์หรือโฟลเตอร์ในพาร์ติชั่นนิรภัยสำหรับข้อมูลขณะล้อ กอินแบบอ่านอย่างเดียว text_image
Unable to create file Unable to create the file 'New Text Document.txt' The media is write protected. OKtext_image
Error Copying File or Folder Cannot copy File1: The disk is write-protected. Remove the write-protection or use another disk. OKtext_image
Error Deleting File or Folder Cannot delete File1: The disk is write-protected. Remove the write-protection or use another disk. OKHướng dẫn sử dụng DataTraveler® 4000 G2
text_image
DataTraveler® 4000 G2 FIPS 140-2 LEVEL 3 CERTIFIED Kingston® TECHNOLOGY ©2014 Kingston Technology Corporation. D7600 Newhope Street, Fountain Valley, CA 927.08 USA All rights reserved. All registered trademarks and trademarks are the property of their respective owners.natural_image
Black USB flash drive with open lid, no visible text or symbols on bodyMục lục
TOC GIÓI THIỆU VỀ TÀI LIỆU NÀY
Hướng dẫn sử dụng này dành cho DataTraveler® 4000 G2 đã được xác thực FIPS (từ đây gọi ngắn gọn là DT4000 G2) với cấu hình gốc ban đầu mà không có tùy biển nào.Yêu cầu hệ thống
Nền tàng PC
- Bộ xử lý Pentium III hoặc tương đương (hoặc nhanh hơn) • 15MB dung lượng trống trên đĩa • Hiện có công USB 2.0/3.0 - Hai ký tự liên tiếp sau ô vật lý cuối cùng\*Hỗ trợ Hệ điều hành PC
- Windows ^ 8, 8.1 (Không RT) - Windows ^ 7 SP1 - Windows ^ Vista SP2Nền tàng Mac
• 15MB dung lượng trống trên đã - USB 2.0/3.0Hỗ trợ hệ điều hành
• Mac OS X 10.8.x -10.10xKhuyến cáo
Đề bảo đảm đủ điện năng cung cấp cho thiết bị DT4000 G2, cấm thiết bị trực tiếp vào công USB trên máy tính xách tay hoặc máy tính để bản như Hình 1.1. Không nên kết nối DT4000 G2 với thiết bị ngoại vi có trang bị công USB như bản phẩm hoặc nguồn cắm USB như Hình 1.2. natural_image
Two-panel image showing a laptop and a device with a black USB flash, both placed on a white surface (no visible text or symbols)natural_image
Two photos showing a device with a black connector and red prohibition symbols, no readable text or labels present.Hình 1.1 – Khuyên dùng
\*Lưu ý: Xem |Xung đột ký tự ô đĩa trên trang 26.Cài đặt (Môi trường Windows)
1. Cẩm DT4000 G2 vào một công USB trống trên máy tính xách tay hoặc máy tính để bàn và chờ Windows phát hiện. - Người dùng Windows Vista sẽ nhận được một thông báo về trình điều khiển thiết bị như Hình 2.2. - Người dùng Windows 7 sẽ nhận được một thông báo về trình điều khiển thiết bị như Hinh 2.2. Khi việc phát hiện phần cứng mới đã hoàn tất, Windows sẽ nhắc bạn bắt đầu quá trình khởi tạo. - Người dùng Windows Vista sẽ thấy cửa sở AutoPlay như Hình 2.3. - Người dùng Windows 7 sẽ thấy cửa số AutoPlay như Hình 2.3. 2. Chọn tùy chọn 'Run DT4000 G2\_Launcher.exe'. Nếu Windows không tự chạy, bạn có thể duyệt đến phân vùng CD-ROM (Hinh 2.4) và chạy chương trình DT4000 G2\_Launcher một cách thủ công. Thao tác này sẽ bắt đầu quá trình khởi tạo.Hình 1.2 – Không khuyến dùng
text_image
Installing device driver software Click here for status.text_image
Installing device driver software Click here for status.text_image
DVD RW Drive (I:) DT4000G2 Always do this for software and games: Install or run program from your media Run DT4000G2_Launcher.exe Published by Kingston Technology Corporation General options Open folder to view files using Windows Explorer View more AutoPlay options in Control Paneltext_image
Organize Burn to disc Files Currently on the Disc: Support autorus.inf DT400G2_Launch her.exeKhôi tạo thiết bị (Môi trường Windows)
1. Chọn ngôn ngữ yêu thích của bạn từ trình đơn đồ xuống và nhân 'Next' (Hình 3.1.) text_image
Device Initialization - DT4000 G2 DataTraveler® 4000 G2 Language Select Language: English Kingston TECHNOLOGY Next> Canceltext_image
Device Initialization - DT4000 G2 DataTraveler® 4000 G2 License Agreement SOFTWARE LICENSE AGREEMENT IMPORTANT - READ CAREFULLY: THIS SOFTWARE LICENSE AGREEMENT ("Agreement") is a legal agreement between you (either an individual or a single entity) and Kingston Technology Company Inc. ("Kingston"). This Agreement relates to the software accompanying this Agreement, which includes computer software and may include associated media, printed materials, and "online" or electronic Accept Decline Kingston TECNOLOGYtext_image
Device Initialization - DT4000 G2 DataTraveler® 4000 G2 Password * Password: •••••••••••• * Password Confirmation: ••••••••••• i Password Rules Hint: Pwd Hint *Mandatory fieldtext_image
Device Initialization - DT4000 G2 DataTraveler® 4000 G2 Contact Information Name: Test Name Company: Test Company Details: Test Details & Other Info Kingston TECHNOLOGYtext_image
Format - DT4000 G2 DataTraveler® 4000 G2 Formatting DT4000 G2 (I:)...text_image
Format - DT4000 G2 DataTraveler® 4000 G2 Format Complete. Kingston TECHNOLOGY OKtext_image
Login device DT4000 G2 DataTraveler® 4000 G2 Password: Hint Forgot Password Contact Information Read-Only Mode Kingston TECHNOLOGY Login CancelTùy chọn thiết bị (Môi trường Windows)
Khi bạn đã đăng nhập vào thiết bị, sẽ có một biểu tượng 'DT4000 G2' nằm ở góc bên phải của thanh tác vụ Windows (Hình 5.1.) (Lưu ý: Người dùng Windows 7 sẽ cần phải nhân vào nút mũi tên lên trên thanh tác vụ để truy cập biểu tượng 'DT4000 G2' (Hình 5.2.) Nhân một lần vào biểu tượng DT4000 G2 sẽ hiển thị trình đơn sau đây: text_image
DT4000 G2 Settings Browse DT4000 G2 Format DT4000 G2 Online Support About DT4000 G2 Shut down DT4000 G2text_image
Customize... 9:26 AM 12/3/2010Cài đặt cho DT4000 G2
• Cho phép bạn thay đổi mật khẩu và/hoặc gọi ý (Hình 5.3) • Cho phép bạn thêm/xem/thay đổi thông tin liên hệ (Hình 5.4) • Cho phép bạn thay đổi ngôn ngữ sử dụng hiện tại (Hình 5.5) (Lưu ý: Vì lý do bảo mật, cần nhập mật khấu của DT4000 G2 để cập nhật và hoặc sửa đổi bất kỳ cải đặt nào.) text_image
Settings DataTraveler® 4000 62 Password | Contact Information | Locusae | * Current Password: * New Password: * Password Confirmation: i Password Rules Hint: Past Hint * Mandatory field Kingston OK Canceltext_image
Settings DataTraveler® 4000 62 Features | Contact Information | Language | Name: Test Name Company: Test Company Details: Test Details & Other Info Kingston OK Canceltext_image
Settings DataTraveler® 4000 62 Password | Contact Information | Language | Select Language: English Kingston OK Buy CancelDuyêt DT4000 G2
\- Cho phép bạn duyệt nội dung của phân vùng dữ liệu bảo mật khi bạn đã đăng nhậpĐịnh dạng DT4000 G2\*
\- Cho phép bạn định dạng phân vùng dữ liệu bảo mật (Cảnh báo: Tất cả dữ liệu sẽ bị xóa.) (Hình 5.6) Hỗ trợ trực tuyến (Yêu cầu kết nối Internet) \- Mở trình duyệt Internet của bạn và truy cập http://www.kingston.com/support/ tại đó bạn có thể truy cập thông tin hỗ trợ bổ sung text_image
Format - DT4000 G2 DataTraveler® 4000 G2 WARNING: Formatting will erase ALL data on this disk. To format the disk (3), click OK. To quit, click CANCEL. Your password is required to complete format. Passwords: Kingston OK CancelGiới thiệu về DT4000 G2
\- Cung cấp thông tin chi tiết về DT4000 G2, bao gồm thông tin về phiên bản ứng dụng và phần mềm mặc định (firmware) (Hình 5.7)Tát DT4000 G2
\- Tất DT4000 G2 đúng cách, cho phép bạn gỗ bờ thiết bị ra khởi hệ thống một cách an toàn text_image
About - DT4000 G2 DataTraveler® 4000 G2 Copyright (c) 2011 Kingston Technology Company, Inc. Modules Version Information DT4000 G2 K40 100FPE23C75CBF1080001D2 Application K4.0.0.5 FW Version 3.05 Crypto Library FW 1.00 Kingston TREMARKS CloseCài đặt (Môi trường Mac)
Cấm DT4000 G2 vào một công USB trống trên máy tính xách tay hoặc máy tính để bàn và chờ hệ điều hành Mac phát hiện ra. Khi hệ thống đã nhận ra, bạn sẽ thấy một phân vùng DT4000 G2 xuất hiện trên màn hình chính như Hình 6.1. 1. Nhân đúp vào biểu tương CD-ROM DT4000 G2. 2. Nhân đúp vào thư mục Mac trên cửa sổ hiển thị như Hinh 6.2. 3. Nhân dûp vào biểu tượng ứng dụng DT4000 G2 trên cửa sở hiện thị như Hinh 6.3. Thao tác này sẽ bắt đầu quá trình khởi tạo.  Hình 6.1 - DT4000 G2 text_image
DT4000G2 autorun.inf DT4000G2_Launcher.exe Linux Mac rr_moved Supporttext_image
DT4000G2_Launcher Mactext_image
DataTraveler® 4000 G2 FIPS 140-2 LEVEL 3 CERTIFIED Kingston® TECHNOLOGY ©2014 Kingston Technology Corporation, (17500) Newshope Street, Fountain Valley, CA 122708 USA, All rights reserved. All registered trademarks and trademarks are the property of their respective owners.Khời tạo thiết bị (Môi trường Mac)
1. Chọn ngôn ngữ yêu thích của bạn từ trình đơn đồ xuống và nhân 'Next' (Hình 7.1.) text_image
Device Initialization - DT4000 G2 DataTraveler® 4000 G2 Language Select Language: English Kingston TECNOLOGY Next> Canceltext_image
Device Initialization - DT4000 G2 DataTraveler® 4000 G2 License Agreement SOFTWARE LICENSE AGREEMENT IMPORTANT - READ CAREFULLY: THIS SOFTWARE LICENSE AGREEMENT ("Agreement") is a legal agreement between you (either an individual or a single entity) and Kingston Technology Company Inc. ("Kingston"). This Agreement relates to the software accompanying this Agreement, which includes computer software and may include associated media, printed materials, and "online" or electronic Accept Decline Kingston TECHNOLOGYtext_image
Device Initialization - DT4000 G2 DataTraveler® 4000 G2 ① ② ③ ④ Password * Password: ********** * Password Confirmation: ********** Hint: Pwd Hint * Mandatory field Kingston TECHNOLOGYtext_image
Device Initialization - DT4000 G2 DataTraveler® 4000 G2 ① ② ③ ④ Contact Information Name: Test Name Company: Test Company Details: Test Details & Other Info Kingston TECHNOLOGYtext_image
Format - DT4000 G2 DataTraveler® 4000 G2 Formatting DT4000 G2 ... Kingston TECHNOLOGY OK Canceltext_image
Format - DT4000 G2 DataTraveler® 4000 G2 Format Complete. Kingston OK CancelSử dụng thiết bị (Môi trường Mac)
Khi thiết bị DT4000 G2 đã được khởi tạo, bạn có thể truy cập phân vùng dữ liệu bảo mật và sử dụng các tùy chọn thiết bị bằng cách đăng nhập vào thiết bị với mật khẩu của mình. Để thực hiện điều này, hãy làm theo các bước sau: 1. Cẩm DT4000 G2 vào cổng USB trên máy tính xách tay hoặc máy tính để bàn và nhập mật khẩu của bạn (xem Hình 8.1.) 2. Sau khi đã nhập xong mật khẩu, nhân vào nút 'Login' để tiếp tục. \- Nếu bạn nhập đúng mật khẩu, DT4000 G2 sẽ mở khóa và bạn có thể bắt đầu sử dụng thiết bị. \- Néu bạn nhập sai mật khẩu, một thông báo lỗi sẽ xuất hiện dưới trường 'Hint', thông báo rằng việc đăng nhập không thành công (xem Hình 8.2.) text_image
Format - DT4000 G2 DataTraveler® 4000 G2 Password: Hint Forgot Password Contact Information Read-Only Mode Kingston Login CancelTùy chọn thiết bị (Môi trường Mac)
Khi bạn đăng nhập vào thiết bị, sẽ có một biểu tượng 'DT4000 G2\_Launcher' nằm ở trên Mac OS X Dock như Hình 9.1 dưới đây: text_image
DT4000G2_LauncherCài đặt cho DT4000 G2
• Cho phép bạn thay đổi mật khẩu và/hoặc gọi ý (Hình 9.3) • Cho phép bạn thêm/xem/thay đổi thông tin liên hệ (Hình 9.4) • Cho phép bạn thay đổi ngôn ngữ sử dụng (Hình 9.5) text_image
DT4000 G2 Settings Browse DT4000 G2 Format DT4000 G2 Online Support About DT4000 G2 Shut down DT4000 G2 Options Show All Windows Hide Quittext_image
Settings DataTraveler® 4000 G2 Password Contact Information LambLanguage * Current Password: * New Password: * Password Confirmation: i Password Rules Hint: * Mandatory field Kingston OK Canceltext_image
Settings DataTraveler® 4000 62 Password Contact InformationLanguage Name: Company: Details: Kingston OK Canceltext_image
Settings DataTraveler® 4000 G2 Password Contact Information Lambanguage Select Language: English Kingston CancelDuyêt DT4000 G2
• Cho phép bạn duyệt nội dung của phân vùng dữ liệu bảo mật khi bạn đã đăng nhậpĐịnh dạng DT4000 G2
\- Cho phép bạn định dạng phân vùng dữ liệu bảo mật (Cảnh báo: Tất cả dữ liệu sẽ bị xóa.) (Hình 9.6) Hỗ trợ trực tuyến (Yêu cầu kết nối Internet) \- Mở trình duyệt Internet của bạn và truy cập http://www.kingston.com/support/ tại đó bạn có thể truy cập thông tin hỗ trợ bổ sungGiới thiệu về DT4000 G2
\- Cung cấp thông tin chi tiết về DT4000 G2, bao gồm thông tin về phiên bản ứng dụng và phần mềm cố định (firmware) (Hình 9.7)Tát DT4000 G2
\- Tất DT4000 G2 đúng cách, cho phép bạn rút thiết bị ra khởi hệ thống một cách an toàn text_image
Format - DT4000 G2 DataTraveler® 4000 G2 WARNING: Formatting will erase ALL data on this disk. To format the disk, click OK. To quit, click CANCEL.text_image
About - DT4000 G2 DataTraveler® 4000 G2 Copyright (c) 2007 Kingston Technology Company, Inc. Modules Version Information DT4000 G2 3.0 DS0FFE23C7ECBF1080001G2 Application 4.0.0.1 FW Version 3.09 Crypto Library FW 1.00 Kingston CloseCài đặt (Môi trường Linux)
(LƯU Ý: Với rất nhiều bản phân phối Linux khác nhau hiện có trên thị trường, ‘giao diện và trải nghiệm’ có thể khác nhau giữa các phiên bản này. Tuy nhiên tập lệnh chung được sử dụng trong ứng dụng dòng lệnh rất giống nhau và bạn có thể tham khảo trong phần hướng dẫn về Linux sau đây. Ảnh chụp màn hình trong phần này được tạo ra trên môi trường 64 bit.)  Một số bản phân phối Linux sẽ yêu cầu các đặc quyền của người dùng siêu cấp (gốc) để có thể thực hiện đúng lệnh DT4000G2 trong của sổ ứng dụng dòng lệnh. Cấm DT4000 G2 vào một công USB trống trên máy tính xách tay hoặc máy tính để bàn và chờ hệ điều hành Linux phát hiện ra. Khi hệ thống đã nhận ra, một biểu tượng phân vùng DT4000 G2 sẽ xuất hiện\* trên màn hình chính như Hình 10.1.  DT4000G2 Hình 10.1 – Phân vùng DT4000G2 DT4000 G2 có 5 lệnh có thể được sử dụng trên Linux: dt4000g2\_about, dt4000g2\_forgotpassword, dt4000g2\_initialize, dt4000g2\_login, và dt4000g2\_logout (Lưu ý: Để thực thi những lệnh này, bạn phải mở ứng dụng “Terminal” và tìm đến từng thư mục chứa các tập tin. Trước mỗi lệnh phải có hai ký tự sau: ‘/’ (một dấu chấm và một dấu gạch chéo) Đối với người dùng 32 bit, mở ứng dụng “Terminal” và thay đổi thư mục hiện tại thành /media/DT4000G2/linux/linux32\$ bằng cách gỗ lệnh sau: cd /media/DT4000G2/linux/linux32 (và sau đó ấn ENTER.) Đối với người dùng 64 bit, mở ứng dụng “Terminal” và thay đổi thư mục hiện tại thành /media/DT4000G2/linux/linux64\$ bằng cách gỗ lệnh sau: cd /media/DT4000G2/linux/linux64 (và sau đó ấn ENTER.) \*Lưu ý: Nếu hệ điều hành không tự động tải phân vùng DT4000 G2, bạn sẽ cần phải tải phân vùng này một cách thủ công trong cửa sổ dòng lệnh bằng cách sử dụng lệnh ‘mount’ của Linux. Vui lòng tham khảo tài liệu dành cho bản phân phối hệ điều hành Linux của bạn hoặc trang web hỗ trợ trực tuyến yêu thích để biết chính xác cú pháp và các tùy chọn lệnh.Khôi tạo thiết bị (Môi trường Linux)
Khi DT4000 G2 đã được kết nối với máy tính của bạn và được hệ điều hành nhận ra, thiết bị sẽ cần phải được khởi tạo trước lần sử dụng đầu tiên. Để thực hiện điều đó, mở ứng dụng 'Terminal' (hay cửa sổ dòng lệnh) và làm theo các bước sau: (Lưu ý: Ảnh chụp màn hình và hướng dẫn trong phần này sử dụng thư mục linux32 (thể hiện đây là 32 bit) với mục đích trình bày cách sử dụng thiết bị DT4000 G2 trên hệ điều hành Linux. Xin lưu ý rằng nếu bạn đang sử dụng phiên bản Linux 64 bit, chỉ cần tìm đến và sử dụng thư mục 64 bit thay vì thư mục 32 bit, ví dụ linux64 thay vi linux32.) 1. Thay đổi thư mục sang phân vùng DT4000 G2 bằng cách gỗ lệnh sau trong cửa sổ dòng lệnh (như Hinh 10.2.): cd /media/DT4000G2/linux/linux32 (Lưu ý: Tên lệnh và thư mục có phân biệt chữ hoa và chữ thường, ví dụ 'linux32' KHÔNG giống với Linux32.' Bạn cũng phải gõ chính xác cứ pháp như hướng dẫn.) text_image
[root@localhost /]# cd /media/dt4000g2/linux/linux64 [root@localhost linux64]# _text_image
[root@localhost /]# cd /media/dt4000g2/linux/linux64 [root@localhost linux64]# ls dt4000g2_about dt4000g2_initialize dt4000g2_logout dt4000g2Forgotpassword dt4000g2_login [root@localhost linux64]# _text_image
[root@localhost /]# cd /media/dt4000g2/linux/linux64 [root@localhost linux64]# ls dt4000g2_about dt4000g2_initialize dt4000g2_logout dt4000g2_forgotpassword dt4000g2_login [root@localhost linux64]# ./dt4000g2_initializeSử dụng thiết bị (Môi trường Linux)
Một khi DT4000 G2 đã được khởi tạo, bạn có thể truy cập phân vùng dữ liệu bảo mật bằng cách đăng nhập vào thiết bị với mật khẩu DT4000 G2 mà bạn đã tạo ở trang 22. Để thực hiện điều này, hãy làm theo các bước sau: 1. Mở cửa sở ứng dụng 'Terminal'. 2. Gõ lệnh sau vào dấu nhắc dòng lệnh: cd /media/DT4000G2/linux/linux32 3. Khi dấu nhắc dòng lệnh đã ở /media/DT4000G2/linux/linux32\$, gỗ lệnh sau đề đăng nhập vào thiết bị: ./dt4000g2\_login\* và ấn ENTER. (Lưu ý: Các lệnh và tên thư mục phân biệt chữ hoa và chữ thường và cú pháp phải gỗ chính xác.) 4. Nhập mật khẩu cho DT4000 G2 và ấn ENTER. Sau khi đăng nhập thành công, phân vùng dữ liệu bảo mật sẽ mở ra trên màn hình chính và bạn có thể bắt đầu sử dụng DT4000 G2. Trong quá trình đăng nhập, nếu bạn nhập sai mật khẩu, bạn sẽ có thêm một cơ hội nữa để nhập đúng mật khẩu bằng cách lập lại bước 3; tuy nhiên có một tính năng bảo mật tích hợp sẵn nhằm theo dõi số lần đăng nhập không thành công. Nếu số lần đăng nhập đạt đến giá trị thiết lập sẵn là 10, ố DT4000 G2 sẽ khóa và yêu cầu bạn khởi tạo thiết bị bằng cách thực thi lệnh dt4000g2Forgotpassword trước khi bạn có thể tiếp tục sử dụng. Quá trình này sẽ cho phép bạn tạo một mật khẩu mới, nhưng để bảo vệ sự riêng tư cho dữ liệu của bạn, DT4000 G2 sẽ định dạng phân vùng dữ liệu bảo mật. Điều này có nghĩa là tất cả dữ liệu của bạn sẽ bị mất. Khi quá trình dt4000g2\_forgotpassword đã hoàn tất và bạn đã thiết lập một mật khẩu mới thành công, bộ đếm bảo mật tích hợp sẵn có theo dõi số lần đăng nhập không thành công sẽ được đặt lại (Lưu ý: Một lần đăng nhập thành công trước khi đạt đến số lần đăng nhập tối đa (gọi tất là MaxNoA) cũng sẽ đặt lại bộ đếm số lần đăng nhập không thành công.) Khi bạn kết thúc việc sử dụng DT4000 G2, hãy đăng xuất khởi thiết bị để bảo vệ an toàn dữ liệu của mình. Để thực hiện điều này, hãy làm theo các bước sau: 1. Mở cửa sở ứng dụng 'Terminal'. 2. Gõ lệnh sau vào dấu nhắc dòng lệnh: cd /media/DT4000G2/linux/linux32 3. Khi dấu nhắc dòng lệnh đã ở /media/DT4000G2/linux/linux32\$, gỗ lệnh sau đề đăng xuất khởi vào thiết bị đúng cách: ./dt4000g2\_logout\* và ấn ENTER. (Lưu ý: Các lệnh và tên thư mục phân biệt chữ hoa và chữ thường và cú pháp phải gỗ chính xác.) 4. Rút DT4000 G2 ra khởi hệ thống và lưu trữ ở một nơi an toàn. \*Luru ý: Một số bản phân phối Linux sẽ yếu cầu các đặc quyền của người dùng siêu cấp (gốc) để có thể thực hiện đúng lệnh DT4000 G2 trong cửa sổ ứng dụng dòng lệnh.Trợ giúp và Xử lý sự cố
Khóa thiết bị
DT4000 G2 có một tính năng bảo mật nhằm ngăn chặn việc truy cập trái phép vào phân vùng dữ liệu khi đã đạt đến số lần đăng nhập không thành công liên tiếp (gọi tất là MaxNoA); cấu hình mặc định có giá trị đặt trước là 10 (lần đăng nhập.) Bộ đếm ‘lock-out’ theo dõi mỗi lần đăng nhập không thành công và sẽ được đặt lại theo một trong hai cách sau: 1) Một lần đăng nhập thành công trước khi đạt đến MaxNoA hoặc 2) đạt đến MaxNoA và thực hiện định dạng thiết bị.\* Nếu bạn nhập sai mật khẩu, một thông báo lỗi sẽ xuất hiện dưới trường 'Hint', thông báo rằng việc đăng nhập không thành công. Xem Hình 10.1. Và sau lần đăng nhập không thành công thứ 7, bạn sẽ thấy một thông báo lỗi khác cho biết rằng bạn còn lại 3 lần đăng nhập trước khi đạt đến MaxNoA (đặt là 10 theo mặc định.) Xem Hinh 10.2. Sau làn đăng nhập không thành công thứ 10, DT4000 G2 sẽ vĩnh viễn chặn phân vùng dữ liệu và yêu cầu định dạng thiết bị trước khi bạn có thể tiếp tục sử dụng. Điều này có nghĩa là tất cả dữ liệu lưu trữ trên DT4000 G2 sẽ bị mất và bạn sẽ cần tạo một mật khẩu mới. Biện pháp bảo mật này ngăn chặn một ai đó (không có mật khẩu của bạn) cố gắng đăng nhập với một số lần vô hạn và truy cập vào dữ liệu riêng tư của bạn. Nếu bạn là chủ sở hữu của DT4000 G2 và quên mật khẩu của mình, các biện pháp bảo mật tương tự cũng sẽ được áp dụng, bao gồm việc định dạng thiết bị.\* Để biết thêm về tính năng này, xem phần ‘Quên Mật khẩu’ ở trang 25. text_image
Login device DT4000G2 DataTraveler® 4000 G2 Password: Hint: Failed to Login: The password is incorrect. Please try again. Forgot Password Contact Information Kingston KINGAOUT Login Canceltext_image
Login device DT4000G2 DataTraveler® 4000 G2 Password: Hint: Failed to Login: The password is incorrect. Please try again. 3 Attempts left before your DT4000 is blocked permanently. Forget Password Contact Information Kingston KingskubouQuên mật khẩu
Nếu bạn quên mật khẩu của mình, bạn có thể nhân vào liên kết ‘Forgot Password’ xuất hiện trên cửa sổ đăng nhập thiết bị khi chạy DT4000 G2\_Launcher (xem Hinh 10.3.) Tùy chọn này sẽ cho phép bạn tạo một mật khẩu mới, nhưng để bảo vệ sự riêng tư cho dữ liệu của bạn, DT4000 G2 sẽ được định dạng. Điều này có nghĩa là tất cả dữ liệu của bạn sẽ bị xóa khi tiến hành định dạng.\* Khi bạn nhân vào ‘Forgot Password’, một hộp thông báo (Hinh 10.4) sẽ xuất hiện và hồi bạn có muốn nhập một mật khẩu mới trước khi thực hiện việc định dạng không. Vào lúc này bạn có thể 1) nhân OK’ để xác nhận hoặc 2) nhân Cancel’ để quay lại cửa sổ đăng nhập. Nếu bạn chọn tiếp tục, bạn sẽ được yêu cầu tạo một mật khẩu phúc tạp mới và một gọi ý mới. Gọi ý không phải là một trường bắt buộc nhưng có thể hữu ích giúp bạn nhớ lại mật khẩu nếu như bạn quên mật khẩu. (Lưu ý: Gọi ý KHÔNG THỂ giống hệt mật khẩu DT4000 G2.) text_image
Login device DT4000G2 DataTraveler® 4000 G2 Password: Hint Forgot Password Contact information Kingston Login Canceltext_image
Forgot Password In order to protect your data, your DT4000G2 will be formatted and all data will be erased. Do you want to enter a new password and format your DT4000G2? OK CancelXung đột ký tự ô đĩa (Hệ điều hành Windows)
Như đã đề cập trong phần ‘Yêu cầu hệ thống’ của hướng dẫn sử dụng này (ở trang 3), DT4000 G2 yêu cầu hai ký tự ô đĩa liên tiếp SAU ô đĩa vật lý cuối cùng xuất hiện trước ‘khoảng trống’ trong danh sách gán ký tự ô đĩa (xem Hinh 10.5.) Điều này KHÔNG liên quan đến các phần chia mạng vì các phần chia này dành riêng cho cấu hình người dùng và không phải là bản thân cấu hình phần cứng hệ thống, do đó đường như sẵn có với hệ điều hành. Điều này có nghĩa là, Windows có thể gán cho DT4000 G2 một ký tự ố đĩa đã được phần chia mạng hoặc đường dẫn Quy ước Đặt tên Chung (Universal Naming Convention - UNC) sử dụng, gây ra xung đột ký tự ố đĩa. Nếu điều này xảy ra, vui lòng tham khảo ý kiến quản trị viên của bạn hoặc bộ phận hỗ trợ về việc thay đổi phép gán ký tự ố cứng trong Disk Management của Windows (phải có quyền quản trị.) text_image
My Computer File Edit View Favorites Tools Help Back Search Folders Address Go System Tasks View system information Add or remove programs Change a setting Local Disk (C:) DVD/CD-R/W Drive (D:) Local Disk (E:) Other Places My Network Places My Documents Control Panel DT4000G2 (F:) Network Share (G:) Local Disk (H:) Details System FolderThông báo lỗi
Unable to create file – Thông báo lỗi này xuất hiện khi cố gắng TẠO một tập tin hoặc thư mục TRÊN phân vùng dữ liệu bảo mật khi đăng nhập theo chế độ chỉ đọc. text_image
Unable to create file Unable to create the file 'New Text Document.txt' The media is write protected. OKtext_image
Error Copying File or Folder Cannot copy File1: The disk is write-protected. Remove the write-protection or use another disk. OKtext_image
Error Deleting File or Folder Cannot delete File1: The disk is write-protected. Remove the write-protection or use another disk. OKDataTraveler® 4000 G2 G2 用户手册
text_image
DataTraveler® 4000 G2 FIPS 140-2 LEVEL 3 CERTIFIED Kingston® TECHNOLOGY ©2014 Kingston Technology Corporation. 17600 Newhope Street, Fountain Valley, CA 92708 USA. All rights reserved. All registered trademarks and trademarks are the property of their respective owners.natural_image
Black USB flash drive with open lid, no visible text or symbols on body目录
TOC 关于本手册
本用户手册适用于以出厂镜像为基础、没有进行定制的 FIPS 认证 DataTraveler ^® 4000 G2(下文简称为 DT4000 G2)。系统要求
PC 平台
- 奔腾3处理器(或更快的处理器) - 15MB 可用磁盘空间 - 可用的 USB 2.0 / 3.0 接口 - 在最后一个物理驱动器之后有两个连续的驱动器盘符\*Mac 平台
- 15MB 可用磁盘空间 - USB 2.0 / 3.0PC 操作系统支持
- Windows ^® 8、8.1(不包括RT) - Windows ^ 7 SP1 - Windows ^ Vista SP2操作系统支持
• Mac OS X 10.8.x -10.10x建议
为了确保 DT4000 G2 设备供电充足,请将其直接插在笔记本电脑或台式机所带的 USB 接口中,如图 1.1 所示。避免将 DT4000 G2 连接到任何带 USB 接口的外围设备中,如键盘或 USB 供电集线器,如图 1.2 所示。 natural_image
Two photos showing a laptop and a device with a USB flash, both placed on a white surface (no visible text or symbols)natural_image
Two photos showing a device with a black connector and red prohibition symbols, no readable text or labels present.安装(Windows 环境)
1. 将 DT4000 G2 插入笔记本电脑或台式机的可用 USB 接口,等待 Windows 检测到该闪存盘。 - Windows Vista 用户将收到设备驱动程序通知,如图 2.2 所示。 - Windows 7 用户将收到设备驱动程序通知,如图 2.2 所示。 新硬件检测完成之后,Windows 会提示您开始初始化过程。 - Windows Vista 用户将看到 AutoPlay(自动播放)窗口,与图 2.3 中的类似。 - Windows 7 用户将看到 AutoPlay(自动播放)窗口,与图 2.3 中的类似。 text_image
Installing device driver software Click here for status.text_image
Installing device driver software Click here for status.text_image
Organize Burn to disc Files Currently on the Disc Support autorun.inf DT4000G2 Launch hardwaretext_image
AutoPlay DVD RW Drive (I): DT4000G2 Always do this for software and games: Install or run program from your media Run DT4000G2_Launcher.exe Published by Kingston Technology Corporation General options Open folder to view files using Windows Explorer View more AutoPlay options in Control Panel设备初始化(Windows 环境)
1. 从下拉菜单中选择首选语言并单击 “Next” (下一步)(图 3.1。) text_image
Device Initialization - DT4000 G2 DataTraveler® 4000 G2 Language Select Language: English Kingston TECHNOLOGY Next> Canceltext_image
Device Initialization - DT4000 G2 DataTraveler® 4000 G2 License Agreement SOFTWARE LICENSE AGREEMENT IMPORTANT - READ CAREFULLY: THIS SOFTWARE LICENSE AGREEMENT ("Agreement") is a legal agreement between you (either an individual or a single entity) and Kingston Technology Company Inc. ("Kingston"). This Agreement relates to the software accompanying this Agreement, which includes computer software and may include associated media, printed materials, and "online" or electronic Accept Decline Kingston TECHNOLOGYtext_image
Device Initialization - DT4000 G2 DataTraveler® 4000 G2 Password * Password: ••••••••••• * Password Confirmation: •••••••••• i Password Rules Hint: Pwd Hint *Mandatory fieldtext_image
Device Initialization - DT4000 G2 DataTraveler® 4000 G2 Contact Information Name: Test Name Company: Test Company Details: Test Details & Other Info Kingston TECHNOLOGYtext_image
Format - DT4000 G2 DataTraveler® 4000 G2 Formatting DT4000 G2 (1):... Kingston TECHNOLOGY OKtext_image
Format - DT4000 G2 DataTraveler® 4000 G2 Format Complete. Kingston TECHNOLOGY OKtext_image
Login device DT4000 G2 DataTraveler® 4000 G2 Password: Hint Forgot Password Contact Information Read-Only Mode Kingston TECHNOLOGY Login Cancel设备选项(Windows 环境)
登录到设备之后,在 Windows 任务栏的右下角将出现一个 “DT4000 G2” 图标(图 5.1)。(注意:Windows 7 用户需要单击任务栏中向上箭头按钮才能访问 “DT4000 G2” 图标(图 5.2)。 单击 DT4000 G2 图标将显示以下菜单: text_image
DT4000 G2 Settings Browse DT4000 G2 Format DT4000 G2 Online Support About DT4000 G2 Shut down DT4000 G2text_image
Customize... 9:26 AM 12/3/2010DT4000 G2 设置
- 允许您更改密码和/或提示(图 5.3) - 允许您添加/查看/更改联系信息(图 5.4) - 允许您更改当前语言选择(图 5.5) (注意:出于安全考虑,在更新和/或修改上述设置时需要提供目前使用的 DT4000 G2 密码)。 text_image
Settings DataTraveler® 4000 62 Password | Contact Information | Language | * Current Password: * New Password: * Password Confirmation: i Password Rules Hint: Put Hint * Mandatory field Kingston OK Buy Canceltext_image
Settings DataTraveler® 4000 62 Password | Contact Information | Language | Name: Test Name Company: Test Company Details: Test Details & Other Info Kingston OK Buy Canceltext_image
Settings DataTraveler® 4000 62 Password | Contact Information | Language | Select Language: English Kingston OK Buy Canceltext_image
Format - DT4000 G2 DataTraveler® 4000 G2 WARNING: Formatting will erase ALL data on this disk. To format the disk (2), click OK. To quit, click CANCEL. Your password is required to complete format. Passwords: Kingston TECHNOLOGY OK Canceltext_image
About - D14000 G2 DataTraveler® 4000 G2 Copyright (c) 2011 Kingston Technology Company, Inc. Modules Version Information DT4000 G2 K40 00FFE23C7ECBF1080001D2 Application K4.0.0.5 FW Version 3.05 Crypto Library FW 1.00 Kingston Close安装(Mac 环境)
将 DT4000 G2 插入笔记本电脑或台式机的 USB 接口,等待 Mac 操作系统检测到该闪存盘。检测到之后,您将看到 DT4000 G2 卷出现在桌面上,如图 6.1 所示。 1. 双击 DT4000 G2 CD-ROM 图标。 2. 双击在图 6.2 所示窗口中出现的 Mac 文件夹。 3. 双击在图 6.3 所示窗口中找到的 DT4000 G2 应用程序图标。这将开始初始化过程。 text_image
DT4000G2 autorun.inf DT4000G2_Launcher.exe Linux Mac rr_moved Supporttext_image
DT4000G2_Launcher Mactext_image
DataTraveler® 4000 G2 FIPS 140-2 LEVEL 3 CERTIFIED. Kingston® TECHNOLOGY ©2014 Kingston Technology Corporation, D7600 Newshape Street, Fountain Living, CA 927 08 USA All rights reserved. All registered trademarks and trademarks are the property of both respective owners.设备初始化(Mac 环境)
1. 从下拉菜单中选择首选语言并单击 “Next” (下一步)(图 7.1。) text_image
Device Initialization - DT4000 G2 DataTraveler® 4000 G2 Language Select Language: English Kingston TECHNOLOGY Next> Canceltext_image
Device Initialization - DT4000 G2 DataTraveler® 4000 G2 License Agreement SOFTWARE LICENSE AGREEMENT IMPORTANT - READ CAREFULLY: THIS SOFTWARE LICENSE AGREEMENT ("Agreement") is a legal agreement between you (either an individual or a single entity) and Kingston Technology Company Inc. ("Kingston"). This Agreement relates to the software accompanying this Agreement, which includes computer software and may include associated media, printed materials, and "online" or electronic Accept Decline Kingston TECHNOLOGYtext_image
Device Initialization - DT4000 G2 DataTraveler® 4000 G2 ① ② ③ ④ Password * Password: ********** * Password Confirmation: ********** Hint: Pwd Hint * Mandatory field Kingston TECHNOLOGYtext_image
Device Initialization - DT4000 G2 DataTraveler® 4000 G2 ① ② ③ ④ Contact Information Name: Test Name Company: Test Company Details: Test Details & Other Info Kingston TECHNOLOGYtext_image
Format - DT4000 G2 DataTraveler® 4000 G2 Formatting DT4000 G2 ... Kingston OK Canceltext_image
Format - DT4000 G2 DataTraveler® 4000 G2 Format Complete. Kingston OK Cancel设备使用(Mac 环境)
对 DT4000 G2 进行初始化之后,便可以访问安全数据分区并使用密码登录设备以便运用设备选项。为此,请执行以下步骤: 1. 将 DT4000 G2 插入笔记本电脑或台式机的 USB 接口,并输入密码(见图 8.1)。 2. 键入密码后,单击 “Login” (登录)按钮继续。 \- 如果输入了正确的密码,DT4000 G2 将解锁,您便可以开始使用设备。 \- 如果输入了错误的密码,将在“Hint”(提示)字段下方出现一条错误消息,说明登录失败(见图8.2)。 text_image
Format - DT4000 G2 DataTraveler® 4000 G2 Password: Hint Forgot Password Contact Information Read - Only Mode Kingston TECHNOLOGY Login Cancel设备选项(Mac 环境)
登录到设备之后,Mac OS X Dock 上将出现一个 “DT4000 G2\_Launcher” 图标,如下图 9.1 所示: text_image
DT4000G2_LauncherDT4000 G2 设置
- 允许您更改密码和/或提示(图 9.3) - 允许您添加/查看/更改联系信息(图9.4) - 允许您更改语言首选项(图 9.5) text_image
DT4000 G2 Settings Browse DT4000 G2 Format DT4000 G2 Online Support About DT4000 G2 Shut down DT4000 G2 Options Show All Windows Hide Quittext_image
Settings DataTraveler® 4000 G2 Password Contact Information Language * Current Password: * New Password: * Password Confirmation: Password Rules Hint: * Mandatory field Kingston OK Canceltext_image
Settings DataTraveler® 4000 62 Password Contact Information Language Name: Company: Details: Kingston OK Apply Canceltext_image
Settings DataTraveler® 4000 G2 Password Contact Information Language Select Language: English Kingston OK Canceltext_image
Format - DT4000 G2 DataTraveler® 4000 G2 WARNING: Formatting will erase ALL data on this disk. To format the disk, click OK. To quit, click CANCEL.text_image
About - DT4000 G2 DataTraveler® 4000 G2 Copyright (c) 2007 Kingston Technology Company, Inc. Modules Version Information DT4000 G2 3.0 050PFE23CTECBP1060001D2 Application 4.0.0.1 FW Version 3.05 Crypto Library FW 1.00 Kingston Close设备初始化(Linux 环境)
将DT4000G2连接到计算机并由操作系统识别之后,在第一次使用之前需要初始化该设备。为此,请打开“终端”应用(或命令行窗口)并按这些步骤操作: (注意:该部分的屏幕快照和指令使用 linux32 文件夹(表示 32 位)来演示 DT4000 G2 设备在 Linux 操作系统下的使用情况。请记住,如果您使用 64 位版本的 Linux,只需导航至并使用相应的 64 位文件夹来替代 32 位文件夹,即使用 linux64 而不是 linux32。) 1. 在终端提示符处键入以下命令,将目录更改为 DT4000 G2 卷(如图 10.2 所示。)cd /media/DT4000G2/linux/linux32
text_image
[root@localhost /]# cd /media/dt4000g2/linux/linux64 [root@localhost linux64]# _text_image
[root@localhost /]# cd /media/dt4000g2/linux/linux64 [root@localhost linux64]# ls dt4000g2_about dt4000g2_initialize dt4000g2_logout dt4000g2Forgotpassword dt4000g2_login [root@localhost linux64]# _text_image
[root@localhost /]# cd /media/dt4000g2/linux/linux64 [root@localhost linux64]# ls dt4000g2_about dt4000g2_initialize dt4000g2_logout dt4000g2Forgotpassword dt4000g2_login [root@localhost linux64]# ./dt4000g2_initialize设备使用(Linux 环境)
DT4000 G2 经过初始化之后,您可以使用第 22 页中创建的 DT4000 G2 密码登录设备,进而访问安全数据分区。为此,请执行以下步骤: 1. 打开“终端”应用窗口。 2. 在终端提示符处键入以下命令:cd /media/DT4000G2/linux/linux32 3. 命令提示符现在位于 /media/DT4000G2/linux/linux32\$,键入以下命令登录设备:./dt4000g2\_login\* 然后按 ENTER。(注意:命令和文件夹名称区分大小写,语法必须准确无误。) 4. 输入您的 DT4000 G2 密码并按 ENTER。在成功登录之后,安全数据卷将在桌面上打开,您可以继续使用 DT4000 G2。 在登录期间,如果输入了错误的密码,您还有机会重复步骤3来输入正确的密码;但是,有一项内置安全功能会记录尝试登录失败的次数。如果失败尝试次数达到了预先配置的10次,DT4000 G2将锁定并要求您执行dt4000g2\_forgotpassword命令初始化设备,之后才能再次使用。您可以通过这一过程新建密码,但是为了保护您数据的隐私,DT4000 G2将格式化安全数据分区。这意味着您的所有数据都将丢失。 dt4000g2\_forgotpassword 过程完成且成功设置了新密码之后,跟踪尝试登录失败的内置安全计数器将被重置(注意:在达到最大登录尝试次数(简写为 MaxNoA)之前成功登录也会重置失败登录计数器。) 使用完 DT4000 G2 之后,注销设备并保护您的数据。为此,请执行以下步骤: 1. 打开“终端”应用窗口。 2. 在终端提示符处键入以下命令:cd /media/DT4000G2/linux/linux32 3. 命令提示符现在位于 /media/DT4000G2/linux/linux32\$,键入以下命令正确注销设备登录:./dt4000g2\_logout\* 然后按 ENTER。(注意:命令和文件夹名称区分大小写,语法必须准确无误。) 4. 将 DT4000 G2 从系统上删除并保存在安全位置。 \*注意:某些 Linux 发行版需要超级用户 (root) 权限才能在终端应用窗口中正确执行 DT4000 G2 命令。帮助和故障排除
设备锁定
DT4000 G2 具备一项安全功能,可以在达到最大连续尝试登录失败次数(简称为 MaxNoA)之后禁止未授权访问数据分区;默认的“实际”配置采用了预配置的值 10(尝试次数)。 “锁定”计数器记录每次的失败登录,并且在满足下列两种条件之一时重置:1)达到 MaxNoA 之前成功登录或 2) 达到 MaxNoA 并格式化设备。\* 如果输入了错误的密码,将在“Hint”(提示)字段下方出现一条错误消息,说明登录失败。参见图10.1。 如果出现第 7 次失败尝试,您将看到另外一条错误消息,提醒您在达到 MaxNoA 之前还可以尝试 3 次(默认被设置为 10)。参见图 10.2。 在第 10 次登录尝试失败之后,DT4000 G2 将永久性地隔离数据分区,并要求设备进行格式化,之后才能再次使用。这意味着 DT4000 G2 上存储的所有数据都将丢失,并且您需要新建一个密码。 这一安全措施限制了他人(没有您的密码)无休止地尝试登录并取得您的敏感数据访问权。 如果您是 DT4000 G2 的所有者,但忘记了密码,那么相同的安全措施将同样会生效,包括设备格式化。\* 更多有关该功能的信息,请参见第 25 页的“忘记密码”。 text_image
Login device DT4000G2 DataTraveler® 4000 G2 Password: Hint: Failed to Login: The password is incorrect. Please try again. Forget Password Contact Information Kingston Kingsa.com Login Canceltext_image
Login device DT4000G2 DataTraveler® 4000 G2 Password: Hint: Failed to Login: The password is incorrect. Please try again. 3 Attempts left before your DT4000 is blocked permanently. Forget Password Contact Information Kingston Login Canceltext_image
Login device DT4000G2 DataTraveler® 4000 G2 Password: Hint Forgot Password Context automation Kingston TECHNOLOGY Login Canceltext_image
Forgot Password In order to protect your data, your DT4000G2 will be formatted and all data will be erased. Do you want to enter a new password and format your DT4000G2? OK Canceltext_image
My Computer File Edit View Favorites Tools Help Back Search Folders Address Go System Tasks View system information Add or remove programs Change a setting Local Disk (CC) DVD/CD-RW Drive (D:) Local Disk (E:) Other Places My Network Places My Documents Control Panel DT4000GZ (F:) Network Share (G:) Local Disk (H:) Details System Foldertext_image
Unable to create file Unable to create the file 'New Text Document.txt' The media is write protected. OKtext_image
Error Copying File or Folder Cannot copy File1: The disk is write-protected. Remove the write-protection or use another disk. OKtext_image
Error Deleting File or Folder Cannot delete File1: The disk is write-protected. Remove the write-protection or use another disk. OKDataTraveler® 4000 G2 G2 使用手册
text_image
DataTraveler® 4000 G2 FIPS 140-2 LEVEL 3 CERTIFIED Kingston® TECHNOLOGY ©2014 Kingston Technology Corporation. 17600 Newhope Street, Fountain Valley, CA 92708 USA. All rights reserved. All registered trademarks and trademarks are the property of their respective owners.natural_image
Black USB flash drive with open lid, no visible text or symbols on body目錄
TOC 關於本使用手冊
此使用者手冊適用於 FIPS-Validated DataTraveler® 4000 G2 4000 (下文簡稱 DT4000),係依據原廠影像且不含自訂配置。系統需求
電腦平台
- Pentium III 處理器或同等級 (或更快) 的處理器 - 15 MB 可用硬碟空間 - 可用的 USB 2.0/3.0 连接埠 - 最後一個實體磁碟之後的兩個連續磁碟機代號\*PC 作業系統支援
- Windows ^ 8、8.1 (非 RT) - Windows ^ 7 SP1 - Windows ^ Vista SP2Mac 平台
- 15 MB 可用硬碟空間 - USB 2.0/3.0作業系統支援
• Mac OS X 10.8.x -10.10x建議
為確保提供充分電力給 DT4000 G2 裝置,請直接將之插入筆記型電腦或桌上型電腦的 USB 連接埠中,如圖 1.1 所示。避免將 DT4000 G2 連接至任何具有 USB 連接埠的週邊裝置(如鍵盤或 USB 供電的集線器),如圖 1.2 所示。 natural_image
Two electronic devices: a battery and an Ethernet drive, both placed on a laptop keyboard (no visible text or symbols)natural_image
Two photos showing a device with a black connector and red prohibition symbols, no readable text or labels present.設定 (Windows 環境)
1. 將 DT4000 G2 插入至筆記型電腦或桌上型電腦的 USB 連接埠,然後由 Windows 自動偵測。 - Windows Vista 使用者將會收到裝置驅動程式通知,如圖 2.2 所示。 - Windows 7 使用者將會收到裝置驅動程式通知,如圖 2.2 所示。 完成新硬體的偵測之後,Windows 會提示您開始初始化程序。 - Windows Vista 使用者將會看到類似於圖 2.3 中的「自動播放」視窗。 - Windows 7 使用者將會看到類似 7 圖 2.3 中的「自動播放」視窗。 2. 選取選項「 Run DT4000 G2\_Launcher.exe」選項。 如果 Windows 未自動播放,只要瀏覽至 CD-ROM 磁碟分割 (圖 2.4) 並手動執行 DT4000 G2\_Launcher text_image
Installing device driver software Click here for status.text_image
Installing device driver software Click here for status.text_image
Organize Burn to disc Files Currently on the Disc Support autorun.inf DT4000G2_Launc herousetext_image
AutoPlay DVD RW Drive (I:) DT4000G2 Always do this for software and games: Install or run program from your media Run DT4000G2_Launcher.exe Published by Kingston Technology Corporation General options Open folder to view files using Windows Explorer View more AutoPlay options in Control Panel装置初始化 (Windows 環境)
1. 從下拉式選單中選取語言偏好並按一下「Next」(下一步)(圖 3.1)。 text_image
Device Initialization - DT4000 G2 DataTraveler® 4000 G2 Language Select Language: English Kingston TECHNOLOGY Next> Canceltext_image
Device Initialization - DT4000 G2 DataTraveler® 4000 G2 License Agreement SOFTWARE LICENSE AGREEMENT IMPORTANT - READ CAREFULLY: THIS SOFTWARE LICENSE AGREEMENT ("Agreement") is a legal agreement between you (either an individual or a single entity) and Kingston Technology Company Inc. ("Kingston"). This Agreement relates to the software accompanying this Agreement, which includes computer software and may include associated media, printed materials, and "online" or electronic Accept Decline Kingston TECHNOLOGYtext_image
Device Initialization - DT4000 G2 DataTraveler® 4000 G2 Password * Password: ••••••••••• * Password Confirmation: •••••••••• i Password Rules Hint: Pwd Hint *Mandatory fieldtext_image
Device Initialization - DT4000 G2 DataTraveler® 4000 G2 Contact Information Name: Test Name Company: Test Company Details: Test Details & Other Info Kingston TECHNOLOGYtext_image
Format - DT4000 G2 DataTraveler® 4000 G2 Formatting DT4000 G2 (1):... Kingston TECHNOLOGY OKtext_image
Format - DT4000 G2 DataTraveler® 4000 G2 Format Complete. Kingston TECHNOLOGY OKtext_image
Login device DT4000 G2 DataTraveler® 4000 G2 Password: Hint Forgot Password Contact Information Read-Only Mode Kingston TECHNOLOGY Login Cancel裝置選項(Windows 環境)
登入裝置時,「DT4000 G2」圖示會出現在 Windows 工作列右側 (圖 5.1)。(注意:Windows 7 使用者必須按下工作列的向上箭號按鈕,才能存取「DT4000 G2'」圖示 (圖 5.2)。 在「DT4000 G2」圖示上按一下可顯示下列功能表: text_image
DT4000 G2 Settings Browse DT4000 G2 Format DT4000 G2 Online Support About DT4000 G2 Shut down DT4000 G2text_image
Customize... 9:26 AM 12/3/2010DT4000 G2 設定
- 可讓您變更密碼及/或提示 (圖 5.3) • 可讓您新增/檢視/變更聯絡資訊 (圖 5.4) - 可讓您變更目前語言選項 (圖 5.5) (注意:基於安全考量,您目前的 DT4000 G2 密碼需要更新及/或修改其中任一設定。) text_image
Settings DataTraveler® 4000 62 Password | Contact Information | Language | * Current Password: * New Password: * Password Confirmations: i Password Rules Hint: Paid Hint * Mandatory field: Kingston OK Buy Canceltext_image
Settings DataTraveler® 4000 62 Features | Contact Information | Language | Name: Test Name Company: Test Company Details: Test Details & Other Info Kingston OK Canceltext_image
Settings DataTraveler® 4000 62 Password | Contact Information | Language Select languages: English Kingston OK Canceltext_image
Format - DT4000 G2 DataTraveler® 4000 G2 WARNING: Formatting will erase ALL data on this disk. To format the disk (3), click OK. To suit, click CANCEL. Your password is required to complete format. Passwords: Kingston OK Canceltext_image
About - DT4000 G2 DataTraveler® 4000 G2 Copyright (c) 2011 Kingston Technology Company, Inc. Modules Version Information DT4000 G2 K40 DDPPE23C75CBF1D80000JD2 Application K4.0.0.5 FW Version 3.05 Crypto Library FW 1.00 Kingston Technology Close設定 (Mac 環境)
將 DT4000 G2 插入至筆記型電腦或桌上型電腦上的 USB 連接埠,或是由 Mac 作業系統自動偵測。偵測到裝置時,您將會看到 DT4000 G2 磁碟區出現在桌面上,如圖 6.1 所示。 1. 連按兩下 DT4000 G2 CD-ROM 圖示。 2. 連按兩下圖 6.2 中所顯示之視窗的 Mac 資料夾。 3. 連按兩下圖 6.3 中顯示視窗的 DT4000 G2 應用程式圖示。將開啟初始化程序。 text_image
DT4000G2 autorun.inf DT4000G2_Launcher.exe Linux Mac rr_moved Supporttext_image
DT4000G2_Launcher Mactext_image
DataTraveler® 4000 G2 FIPS 140-2 LEVEL 3 CERTIFIED Kingston® TECHNOLOGY ©2014 Kingston Technology Corporation, TP500 Newshape Street, Fountain Valley, CA 927 98 USA All rights reserved. All registered trademarks and trademarks are the property of their respective owners.裝置初始化 (Mac 環境)
1. 從下拉式選單中選取語言偏好並按一下「Next」(下一步)(圖 7.1)。 text_image
Device Initialization - DT4000 G2 DataTraveler® 4000 G2 Language Select Language: English Kingston TECHNOLOGY Next> Canceltext_image
Device Initialization - DT4000 G2 DataTraveler® 4000 G2 License Agreement SOFTWARE LICENSE AGREEMENT IMPORTANT - READ CAREFULLY: THIS SOFTWARE LICENSE AGREEMENT ("Agreement") is a legal agreement between you (either an individual or a single entity) and Kingston Technology Company Inc. ("Kingston"). This Agreement relates to the software accompanying this Agreement, which includes computer software and may include associated media, printed materials, and "online" or electronic Accept Decline Kingston TECHNOLOGYtext_image
Device Initialization - DT4000 G2 DataTraveler® 4000 G2 ① ② ③ ④ Password * Password: ********** * Password Confirmation: ********** Hint: Pwd Hint * Mandatory field Kingston TECHNOLOGYtext_image
Device Initialization - DT4000 G2 DataTraveler® 4000 G2 ① ② ③ ④ Contact Information Name: Test Name Company: Test Company Details: Test Details & Other Info Kingston TECHNOLOGYtext_image
Format - DT4000 G2 DataTraveler® 4000 G2 Formatting DT4000 G2 ... Kingston OK Canceltext_image
Format - DT4000 G2 DataTraveler® 4000 G2 Format Complete. Kingston OK Cancel裝置使用(Mac 作業環境)
初始化 DT4000 G2 之後,您就能以密碼登入裝置,然後存取安全資料分割區和使用裝置選項。請依下列步驟進行: 1. 將 DT4000 G2 插入筆記型電腦或桌上型電腦的 USB 連接埠,然後輸入密碼 (請參閱圖 8.1。) 2. 輸入密碼之後,按一下「Login」(登入) 按鈕以繼續。 \- 如果輸入的密碼正確無誤,DT4000 G2 便會解鎖,您就可以開始使用裝置。 \- 如果輸入密碼不正確,「Hint」(提示)欄位下方便會顯示錯誤訊息,表示發生登入錯誤(參閱圖8.2)。 text_image
Format - DT4000 G2 DataTraveler® 4000 G2 Password: Hint Forgot Password Contact Information Read - Only Mode Kingston TECHNOLOGY Login Cancel裝置選項 (Mac 環境)
登入裝置時,「DT4000 G2\_Launcher」圖示會出現在 Mac OS X 停駐區中 (如圖 9.1 所示)。 text_image
DT4000G2 LauncherDT4000 G2 設定
- 可讓您變更密碼及/或提示 (圖 9.3) - 可讓您新增/檢視/變更聯絡資訊 (圖 9.4) - 可讓您變更語言偏好 (圖 9.5) text_image
DT4000 G2 Settings Browse DT4000 G2 Format DT4000 G2 Online Support About DT4000 G2 Shut down DT4000 G2 Options Show All Windows Hide Quittext_image
Settings DataTraveler® 4000 G2 Password Contact Information Lambanguage • Current Password: • New Password: • Password Confirmation: i Password Rules Hints: • Mandatory field Kingston On Canceltext_image
Settings DataTraveler® 4000 62 Password Contact InformationLanguage Name: Company: Details: Kingston OK Canceltext_image
Settings DataTraveler® 4000 G2 Password Contact Information Language Select Language: English Kingston OK Canceltext_image
Format - DT4000 G2 DataTraveler® 4000 G2 WARNING: Formatting will erase ALL data on this disk. To format the disk, click OK. To quit, click CANCEL.text_image
About - DT4000 G2 DataTraveler® 4000 G2 Copyright (c) 2007 Kingston Technology Company, Inc. Modules Version Information DT4000 G2 3.0 050FFE23C7ECBF1080001D3 Application 4.0.0.1 FW Version 3.09 Crypto Library FW 1.00 Kingston Close設定 (Linux 環境)
(注意:由於現今 Linux 有多種版本可供使用,其介面的「外觀與操作」可能因版本而有所不同。然而,在終端機應用程式中使用的一般指令集是非常類似的,而且可在之後的 Linux 指令使用中作為參考。此螢幕畫面範例是從 64 位元環境中擷取。)  某些 Linux 版本需要超級使用者 (root) 身份,才能在終端機應用程式視窗正確執行 DT4000G2 指令。 將 DT4000 G2 插入至筆記型電腦或桌上型電腦上的 USB 連接埠,或是由 Linux 作業系統自動偵測。偵測到裝置時,您將會看到 DT4000 G2 磁碟區圖示出現\* 在桌面上,如圖 10.1 所示。  DT4000G2 圖 10.1 - DT4000G2 磁碟區 可在 Linux 中使用 DT4000 G2 的 5 個指令: dt4000g2\_about、dt4000g2\_forgotpassword、dt4000g2\_initialize、dt4000g2\_login 及 dt4000g2\_logout (注意:若要執行這些指令,您必須開啟「終端機」應用程式視窗並導覽至每個檔案所在的資料夾。每個指令之前必須加上下列2個字元:「./」(1個句點和1個正斜線。) 對於 32 位元使用者,請開啟「終端機」應用程式視窗並將目前目錄變更為 /media/DT4000G2/linux/linux32\$,方法是在提示字元處輸入下列指令: cd /media/DT4000G2/linux/linux32 (之後按下 ENTER 鍵。) 對於 64 位元使用者,請開啟「終端機」應用程式視窗並將目前目錄變更為 /media/DT4000G2/linux/linux64\$,方法是在提示字元處輸入下列指令: cd /media/DT4000G2/linux/linux64 (之後按下 ENTER 鍵。) \*注意:如果作業系統未自動載入 DT4000 G2 磁碟區,您將必須在終端機視窗中使用 Linux 「mount」指令手動載入磁碟區。請參閱 Linux 文件來查看您特定的作業系統版本,或是到最愛的線上支援網站以了解語法及指令選項。裝置初始化 (Linux 環境)
將 DT4000 G2 連線到您的電腦並由作業系統加以識別之後,您必須先將裝置初始化,才能進行第一次使用。若要執行此操作,請開啟「終端機」應用程式(或指令行視窗)然後依照下列步驟執行: (注意:此螢幕擷取畫面和指示採用 linux32 資料夾 (32 位元),展示 DT4000 G2 在 Linux 作業系統中的使用情形。請記住,如果您使用的是 64 位元版本的 Linux,只要導覽至並使用個別的 64 位元資料夾來取代 32 位元資料夾,例如:linux64,而非 linux32。) 1. 將目錄變更為 DT4000 G2 磁碟區,方法是在終端機提示字元處輸入下列指令(如圖 10.2 所示。):cd /media/DT4000G2/linux/linux32