
RUE-4191-SPACE-REMOTE-SPACE-FOR-SPACE-NVE-N077PS - Télécommande ALPINE - Notice d'utilisation et mode d'emploi gratuit
Retrouvez gratuitement la notice de l'appareil RUE-4191-SPACE-REMOTE-SPACE-FOR-SPACE-NVE-N077PS ALPINE au format PDF.
| Type de batterie | Piles AAA |
| Quantité de batteries | 2 |
| Dimensions (L x H x P) | 56 x 142,5 x 37 mm |
| Poids (sans batterie) | 72 g |
| Nombre de télécommandes fournies | 1 |
| Accessoires inclus | Support télécommande, ruban adhésif double-face, vis |
| Fonction principale | Navigation vocale |
| Mode contrôle carte/flèche | Oui |
| Mode contrôle TV/moniteur | Oui |
| Mode contrôle lecteur DVD/changeur | Oui |
| Touches principales | Volume, mode, mute, menu, voix, numérique, power ON/OFF |
| Indicateur de statut | Oui |
| Compatibilité | Produits Alpine compatibles |
| Installation | Support mural avec vis et ruban adhésif double-face |
| Précautions d'utilisation | Ne pas démonter, éviter chocs, éviter mélange piles neuves et usagées |
| Remplacement des piles | Ouverture par glissement, insertion correcte polarité |
| Nettoyage | Chiffon doux légèrement humide |
FOIRE AUX QUESTIONS - RUE-4191-SPACE-REMOTE-SPACE-FOR-SPACE-NVE-N077PS ALPINE
Questions des utilisateurs sur RUE-4191-SPACE-REMOTE-SPACE-FOR-SPACE-NVE-N077PS ALPINE
0 question sur cet appareil. Repondez a celles que vous connaissez ou posez la votre.
Poser une nouvelle question sur cet appareil
Téléchargez la notice de votre Télécommande au format PDF gratuitement ! Retrouvez votre notice RUE-4191-SPACE-REMOTE-SPACE-FOR-SPACE-NVE-N077PS - ALPINE et reprennez votre appareil électronique en main. Sur cette page sont publiés tous les documents nécessaires à l'utilisation de votre appareil RUE-4191-SPACE-REMOTE-SPACE-FOR-SPACE-NVE-N077PS de la marque ALPINE.
MODE D'EMPLOI RUE-4191-SPACE-REMOTE-SPACE-FOR-SPACE-NVE-N077PS ALPINE
ALPINE
Voice Navigation System
NVE-N077PS
Remote control (RUE-4191) Reference Guide
Printed in Japan (S) 68P50520Y75-A
To the Users
- The remote control "RUE-4191" is supplied with the unit.
- For operations with "RUE-4191", refer to this Guide.
Notes:
- The "RUE-4135" is not supplied with the unit.
- Although "RUE-4135" is mentioned in the "Owner's Manual" and "Guide for Installation and Connections", actually "RUE-4191" is supplied instead. Please take care.
In Case of Difficulty
| Problem | Cause | Solution |
| Remote Control Inoperative. | Reverse placement of battery. | Place the battery correctly into its cradle in the compartment. |
| Dead battery. | Replace the battery with a new one. | |
| Remote Control not pointed toward the head unit or monitor. | Point the remote control directly toward your head unit or monitor. |
Specifications
| Battery Type | AAA size batteries |
| Battery Quantity | 2 |
| Dimensions (W × H × D) | 56 × 142.5 × 37 mm |
| (2-1/4" × 5-5/8" × 1-7/16") | |
| Weight (without battery) | 72 gr (2.6 oz) |
Accessories
| Battery (AAA) | 2 |
| Remote Control Holder | 1 set |
| Double-Sided Adhesive Tape | 1 set |
| Screw | 2 |

WARNING
This symbol means important instructions. Failure to heed them can result in serious injury or death.
DO NOT DISASSEMBLE OR ALTER.
Doing so may result in an accident, fire or electric shock.
KEEP SMALL OBJECTS SUCH AS BATTERIES OUT OF THE REACH OF CHILDREN.
Swallowing them may result in serious injury. If swallowed, consult a physician immediately.
DO NOT OPERATE ANY FUNCTION THAT TAKES YOUR ATTENTION AWAY FROM SAFELY DRIVING YOUR VEHICLE.
Any function that requires your prolonged attention should only be performed after coming to a complete stop. Always stop the vehicle in a safe location before performing these functions. Failure to do so may result in an accident.
- KEEP THE VOLUME AT A LEVEL WHERE YOU CAN STILL HEAR OUTSIDE NOISE WHILE DRIVING.
Failure to do so may result in an accident.

CAUTION
This symbol means important instructions. Failure to heed them can result in injury or material property damage.
DO NOT MIX NEW BATTERIES WITH OLD BATTERIES. INSERT WITH THE CORRECT BATTERY POLARITY.
When inserting the batteries, be sure to observe proper polarity (+ and -) as
instructed. Rupture or chemical leakage from the battery may cause fire or personal injury.
Handling Precautions
Do not drop or apply shock to the unit. It may get permanently damaged.
Keep the unit away from water and moisture, direct sun and heat, and excessive dust.
Never use scouring pads, steel wool, abrasive powders or harsh chemical agents, such as lye solution, for cleaning.
Clean with a soft, lint-free cloth or cotton swab slightly dampened with a mild solution of detergent and water.
Do not operate this unit in a manner that could distract you from driving safely.
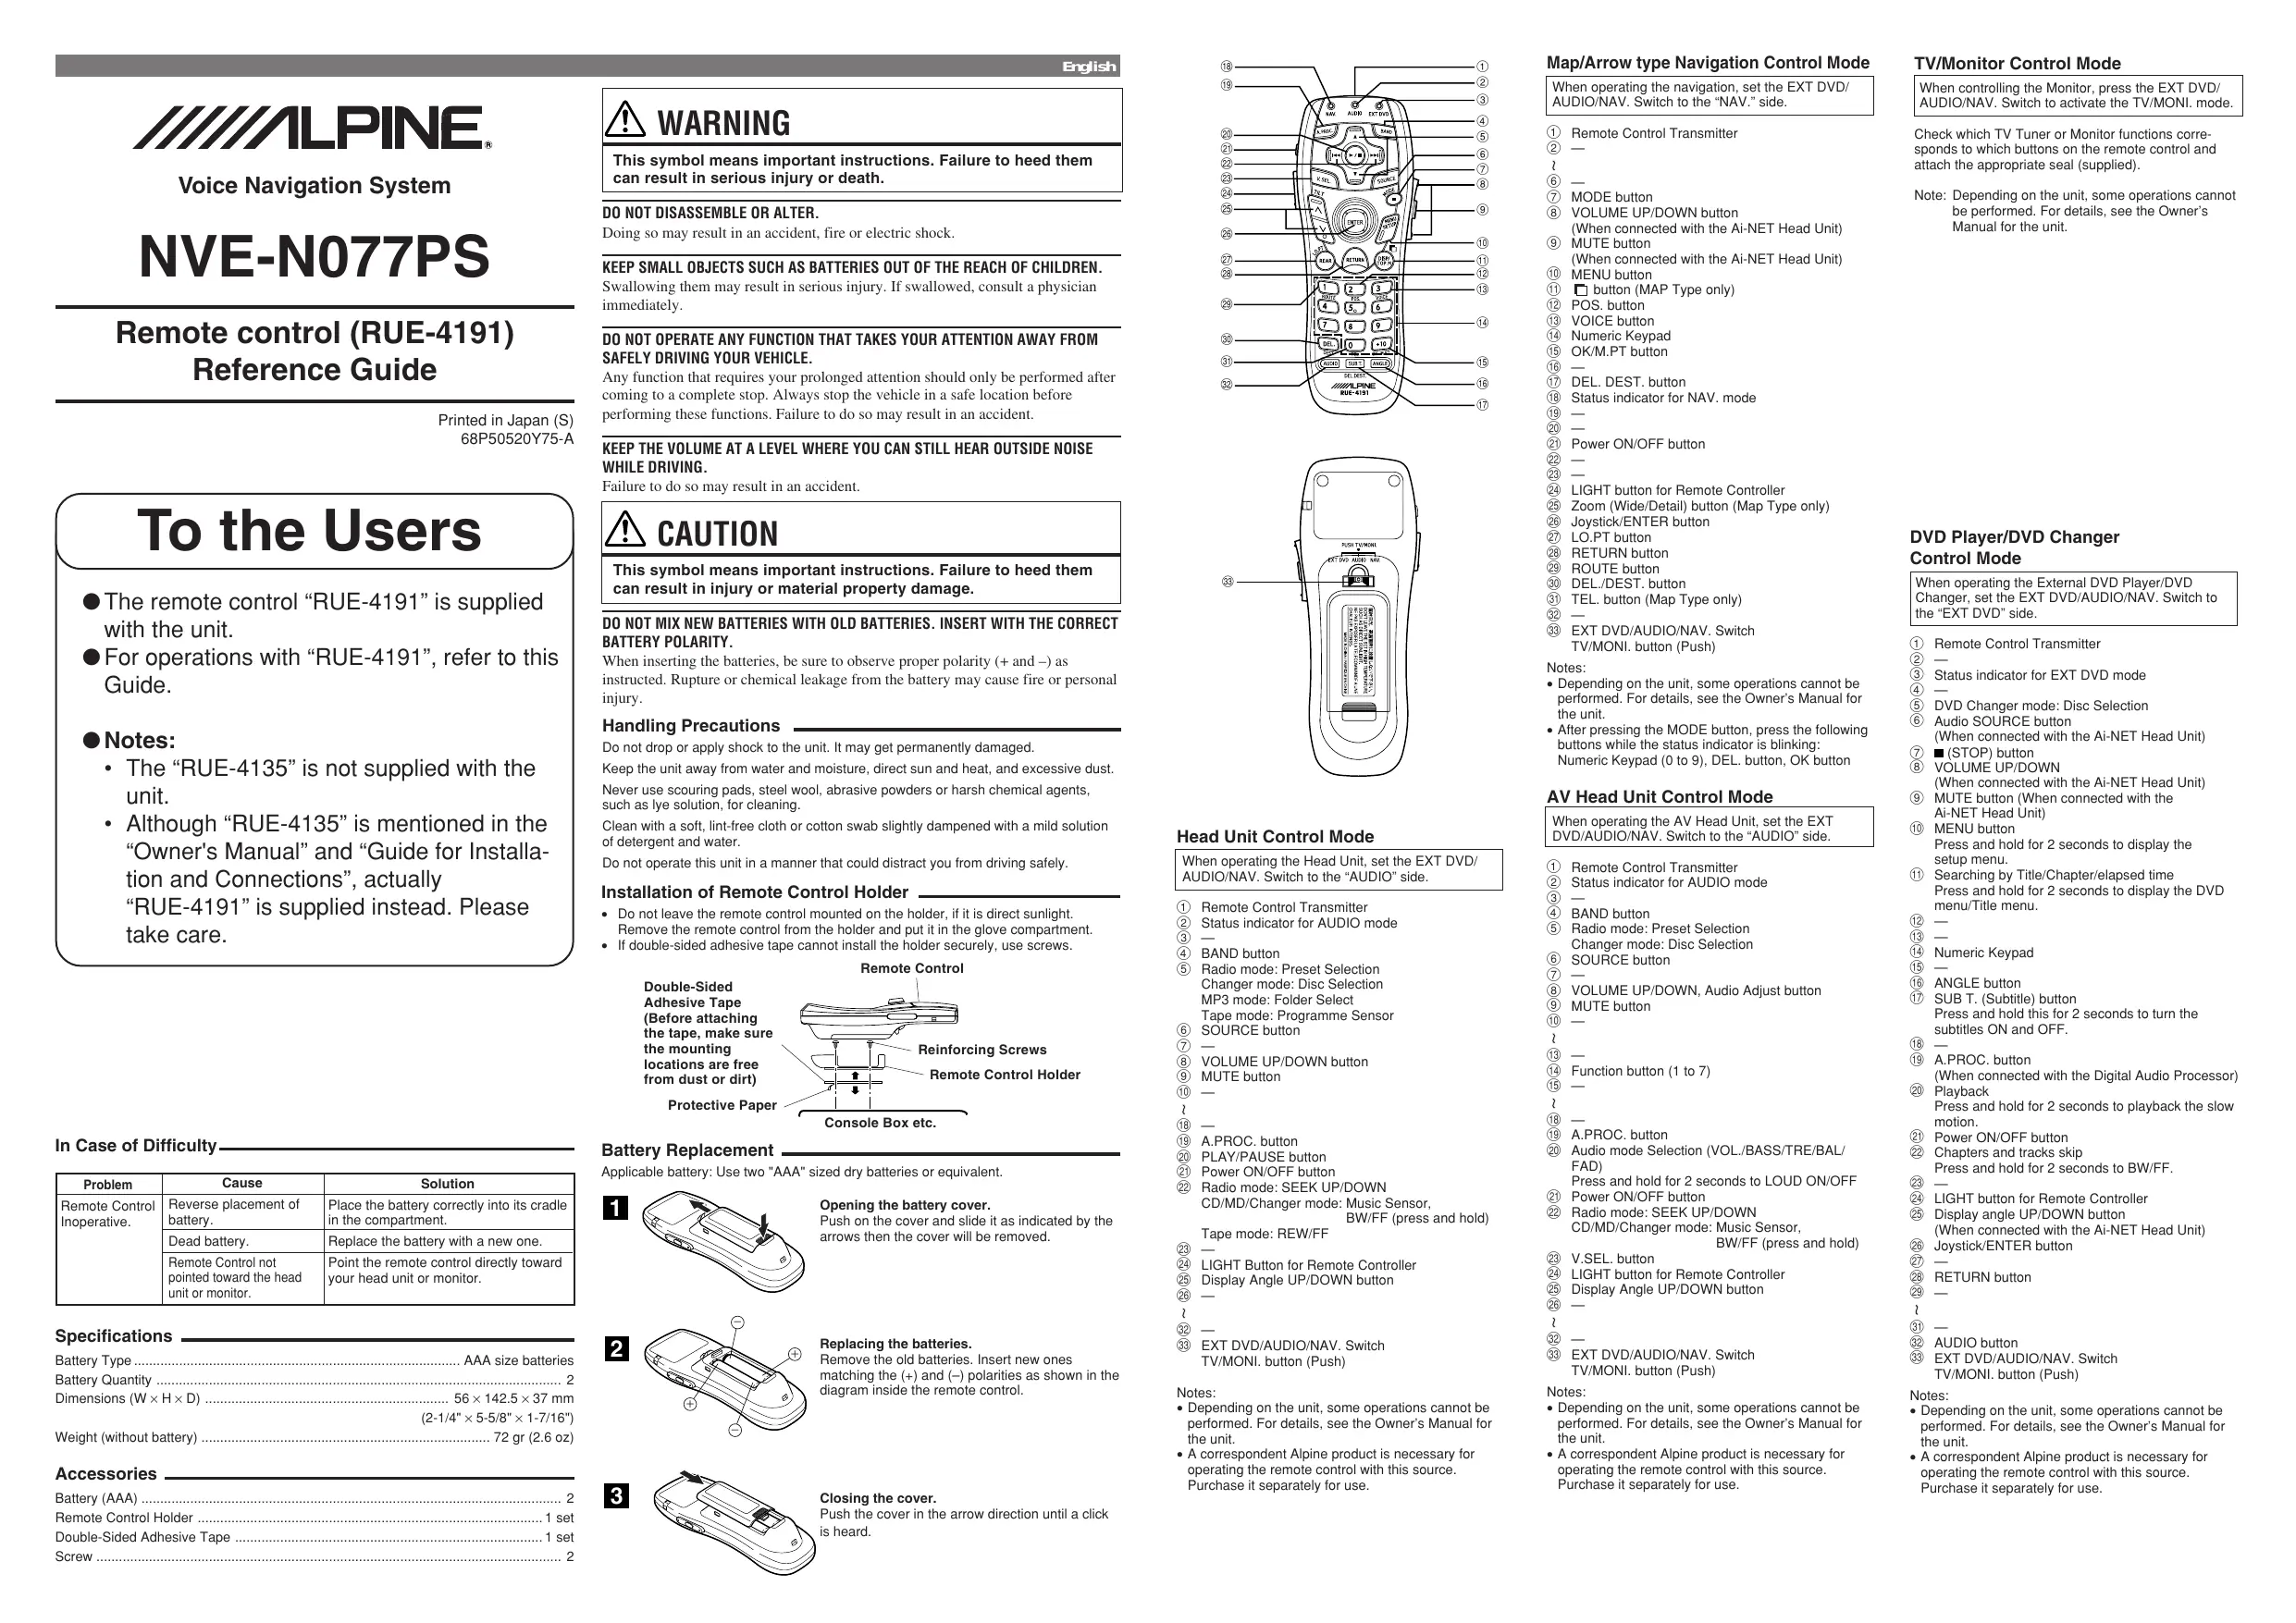
Installation of Remote Control Holder
- Do not leave the remote control mounted on the holder, if it is direct sunlight. Remove the remote control from the holder and put it in the glove compartment.
- If double-sided adhesive tape cannot install the holder securely, use screws.
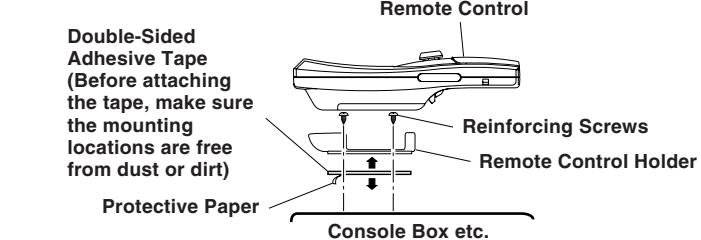
Battery Replacement
Applicable battery: Use two "AAA" sized dry batteries or equivalent.
Opening the battery cover.
Push on the cover and slide it as indicated by the arrows then the cover will be removed.

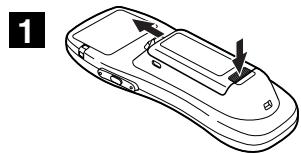
Replacing the batteries
Remove the old batteries. Insert new ones matching the (+) and (-) polarities as shown in the diagram inside the remote control.

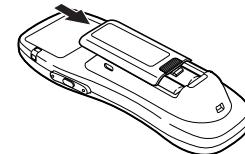
Closing the cover.
Push the cover in the arrow direction until a click is heard.

Head Unit Control Mode
When operating the Head Unit, set the EXT DVD/ AUDIO/NAV. Switch to the "AUDIO" side.
① Remote Control Transmitter
② Status indicator for AUDIO mode
(3)
(4) BAND button
⑤ Radio mode: Preset Selection
Changer mode:Disc Selection
MP3 mode: Folder Select
Tape mode:Programme Sensor
(6) SOURCE button
⑦
⑧ VOLUME UP/DOWN button
MUTE button
(10)
1
(18)
19 A PROC button
20 PLAY/PAUSE button
(21) Power ON/OFF button
22 Radio mode: SEEK UP/DOWN
CD/MD/Changer mode: Music Sensor,
BW/FF (press and hold)
Tape mode: REW/FF
(23)
24 LIGHT Button for Remote Controller
25 Display Angle UP/DOWN button
(26)
)
22
2
EXT DVD/AUDIO/NAV. Switch TV/MONI. button (Push)
Notes:
- Depending on the unit, some operations cannot be performed. For details, see the Owner's Manual for the unit.
- A correspondent Alpine product is necessary for operating the remote control with this source. Purchase it separately for use.
Map/Arrow type Navigation Control Mode
When operating the navigation, set the EXT DVD/ AUDIO/NAV. Switch to the "NAV." side.
① Remote Control Transmitter
(2)
)
C
6
⑦ MODE button
(8) VOLUME UP/DOWN button
(When connected with the Ai-NET Head Unit)
MUTE button
(When connected with the Ai-NET Head Unit)
10 MENU button
⑪ button (MAP Type only)
POS. button
13 VOICE button
14 Numeric Keypad
15 OK/M.PT button
16
DEL. DEST. button
18 Status indicator for NAV. mode
19
(20)
② Power ON/OFF button
(22)
(23)
24 LIGHT button for Remote Controller
25 Zoom (Wide/Detail) button (Map Type only)
Joystick/ENTER button
27 LO.PT button
28 RETURN button
29 ROUTE button
DEL./DEST. button
③1 TEL. button (Map Type only)
32
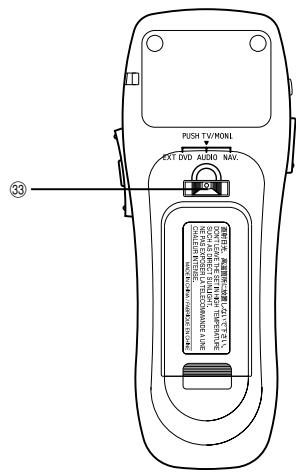
33 EXT DVD/AUDIO/NAV. Switch
TV/MONI. button (Push)
Notes:
- Depending on the unit, some operations cannot be performed. For details, see the Owner's Manual for the unit.
- After pressing the MODE button, press the following buttons while the status indicator is blinking:
Numeric Keypad (0 to 9), DEL. button, OK button
AV Head Unit Control Mode
When operating the AV Head Unit, set the EXT DVD/AUDIO/NAV. Switch to the "AUDIO" side.
① Remote Control Transmitter
② Status indicator for AUDIO mode
④ BAND button
(5) Radio mode: Preset Selection
Changer mode:Disc Selection
⑥ SOURCE button
7
(8) VOLUME UP/DOWN. Audio Adjust button
MUTE button
(10)
)
(10)
15
14 Function button (1 to /)
(15)
)
(18)
19
A:Audio mode Sals
29 Audio mode Selection (VOL/.BASS/TRE/BAL/FAD)
Press and hold for 2 seconds to LOUD ON/OFF
② Power ON/OFF button
22 Radio mode: SEEK UP/DOWN
CD/MD/Changer mode: Music Sensor,
BW/FF (press and hold)
23 V.SEL. button
24 LIGHT button for Remote Controller
25 Display Angle UP/DOWN button
(26)
)
32
33 EXT DVD/AUDIO/NAV. Switch
TV/MONI. button (Push)
Notes:
-
Depending on the unit, some operations cannot be performed. For details, see the Owner's Manual for the unit.
-
A correspondent Alpine product is necessary for
operating the remote control with this source.
Purchase it separately for use.
TV/Monitor Control Mode
When controlling the Monitor, press the EXT DVD/
AUDIO/NAV. Switch to activate the TV/MONI mode
Check which TV Tuner or Monitor functions corresponds to which buttons on the remote control and attach the appropriate seal (supplied).
Note: Depending on the unit, some operations cannot
be performed. For details, see the Owner's
Manual for the unit.
DVD Player/DVD Changer
Control Mode
When operating the External DVD Player/DVD
Changer, set the EXT DVD/AUDIO/NAV. Switch to
the "EXT DVD" side.
① Remote Control Transmitter
② 一
③ Status indicator for EXT DVD mode
④ —
(5) DVD Changer mode: Disc Selection
⑥ Audio SOURCE button
(When connected with the Ai-NET Head Unit)
(7) ■ (STOP) button
(8) VOLUME UP/DOWN
(When connected with the Ai-NET Head Unit)
MUTE button (When connected with the
Ai-NET Head Unit)
(10) MENU button
Press and hold for 2 seconds to display the
se
(1) Searching by Title/Chapter/Elapsed time
Press and hold for 2 seconds to display the DVD.
menu/Title menu.
12 一
13
④ N1
15
16 AN
ANGLE button ② SURT Subtit
SUB1: Subtitle button
Press and hold this for 2 seconds to turn the dial to ON and L95.
subtiies ON and OFF
18
19 A.PROC. button
(When connected with the Digital Audio Processor)
② Playback
Press and hold for 2 seconds to playback the slow
mc
(2) Power ON/OFF button
(22) Chapters and tracks skip
Press and hold for 2 seconds to BW/FF.
23 一
24 LIGHT button for Remote Controller
② Display angle UP/DOWN button
(When connected with the Ai-NET Head Unit)
② Joystick/ENTER button
27
28 RETURN button
29 一
)
③ —
32 AUDIO button
33 EXT DVD/AUDIO/NAV. Switch
TV/MONI. button (Push)
Notes:
Depending on the unit, some operations cannot be performed. For details, see the Owner's Manual for the unit.
- A correspondent Alpine product is necessary for
operating the remote control with this source.
Purchase it separately for use.