
RUE-4135 - Télécommande ALPINE - Notice d'utilisation et mode d'emploi gratuit
Retrouvez gratuitement la notice de l'appareil RUE-4135 ALPINE au format PDF.
| Type de produit | Télécommande pour système de navigation DVD Alpine |
| Marque | ALPINE |
| Modèle | RUE-4135 |
| Dimensions (L × H × P) | 51 × 36 × 118 mm |
| Poids (sans pile) | 60 g |
| Alimentation | 2 piles AAA (1,5 V) |
| Fonctions principales | Contrôle de la navigation (type carte ou flèche), contrôle de l'unité principale et de l'unité AV, touches numériques, joystick, touches de navigation (MENU, MODE, VOICE, etc.) |
| Portée infrarouge | Environ 5 m (pointé directement vers l'unité) |
| Entretien et nettoyage | Nettoyer avec un chiffon doux non pelucheux légèrement humidifié avec une solution douce de détergent et d'eau. Ne pas utiliser de produits abrasifs. |
| Sécurité | Ne pas exposer à la lumière directe du soleil, à la chaleur, à l'humidité ou à la poussière excessive. Ne pas faire tomber. Ne pas utiliser d'une manière qui distrait de la conduite. |
| Pièces détachées et réparabilité | Piles standard AAA facilement remplaçables. Pas de pièces détachées spécifiques fournies. En cas de panne, contacter le support Alpine. |
| Informations générales | Télécommande livrée avec un support de fixation (adhésif double face ou vis). Utiliser deux piles AAA. Vérifier la polarité lors du remplacement. |
FOIRE AUX QUESTIONS - RUE-4135 ALPINE
Questions des utilisateurs sur RUE-4135 ALPINE
0 question sur cet appareil. Repondez a celles que vous connaissez ou posez la votre.
Poser une nouvelle question sur cet appareil
Téléchargez la notice de votre Télécommande au format PDF gratuitement ! Retrouvez votre notice RUE-4135 - ALPINE et reprennez votre appareil électronique en main. Sur cette page sont publiés tous les documents nécessaires à l'utilisation de votre appareil RUE-4135 de la marque ALPINE.
MODE D'EMPLOI RUE-4135 ALPINE
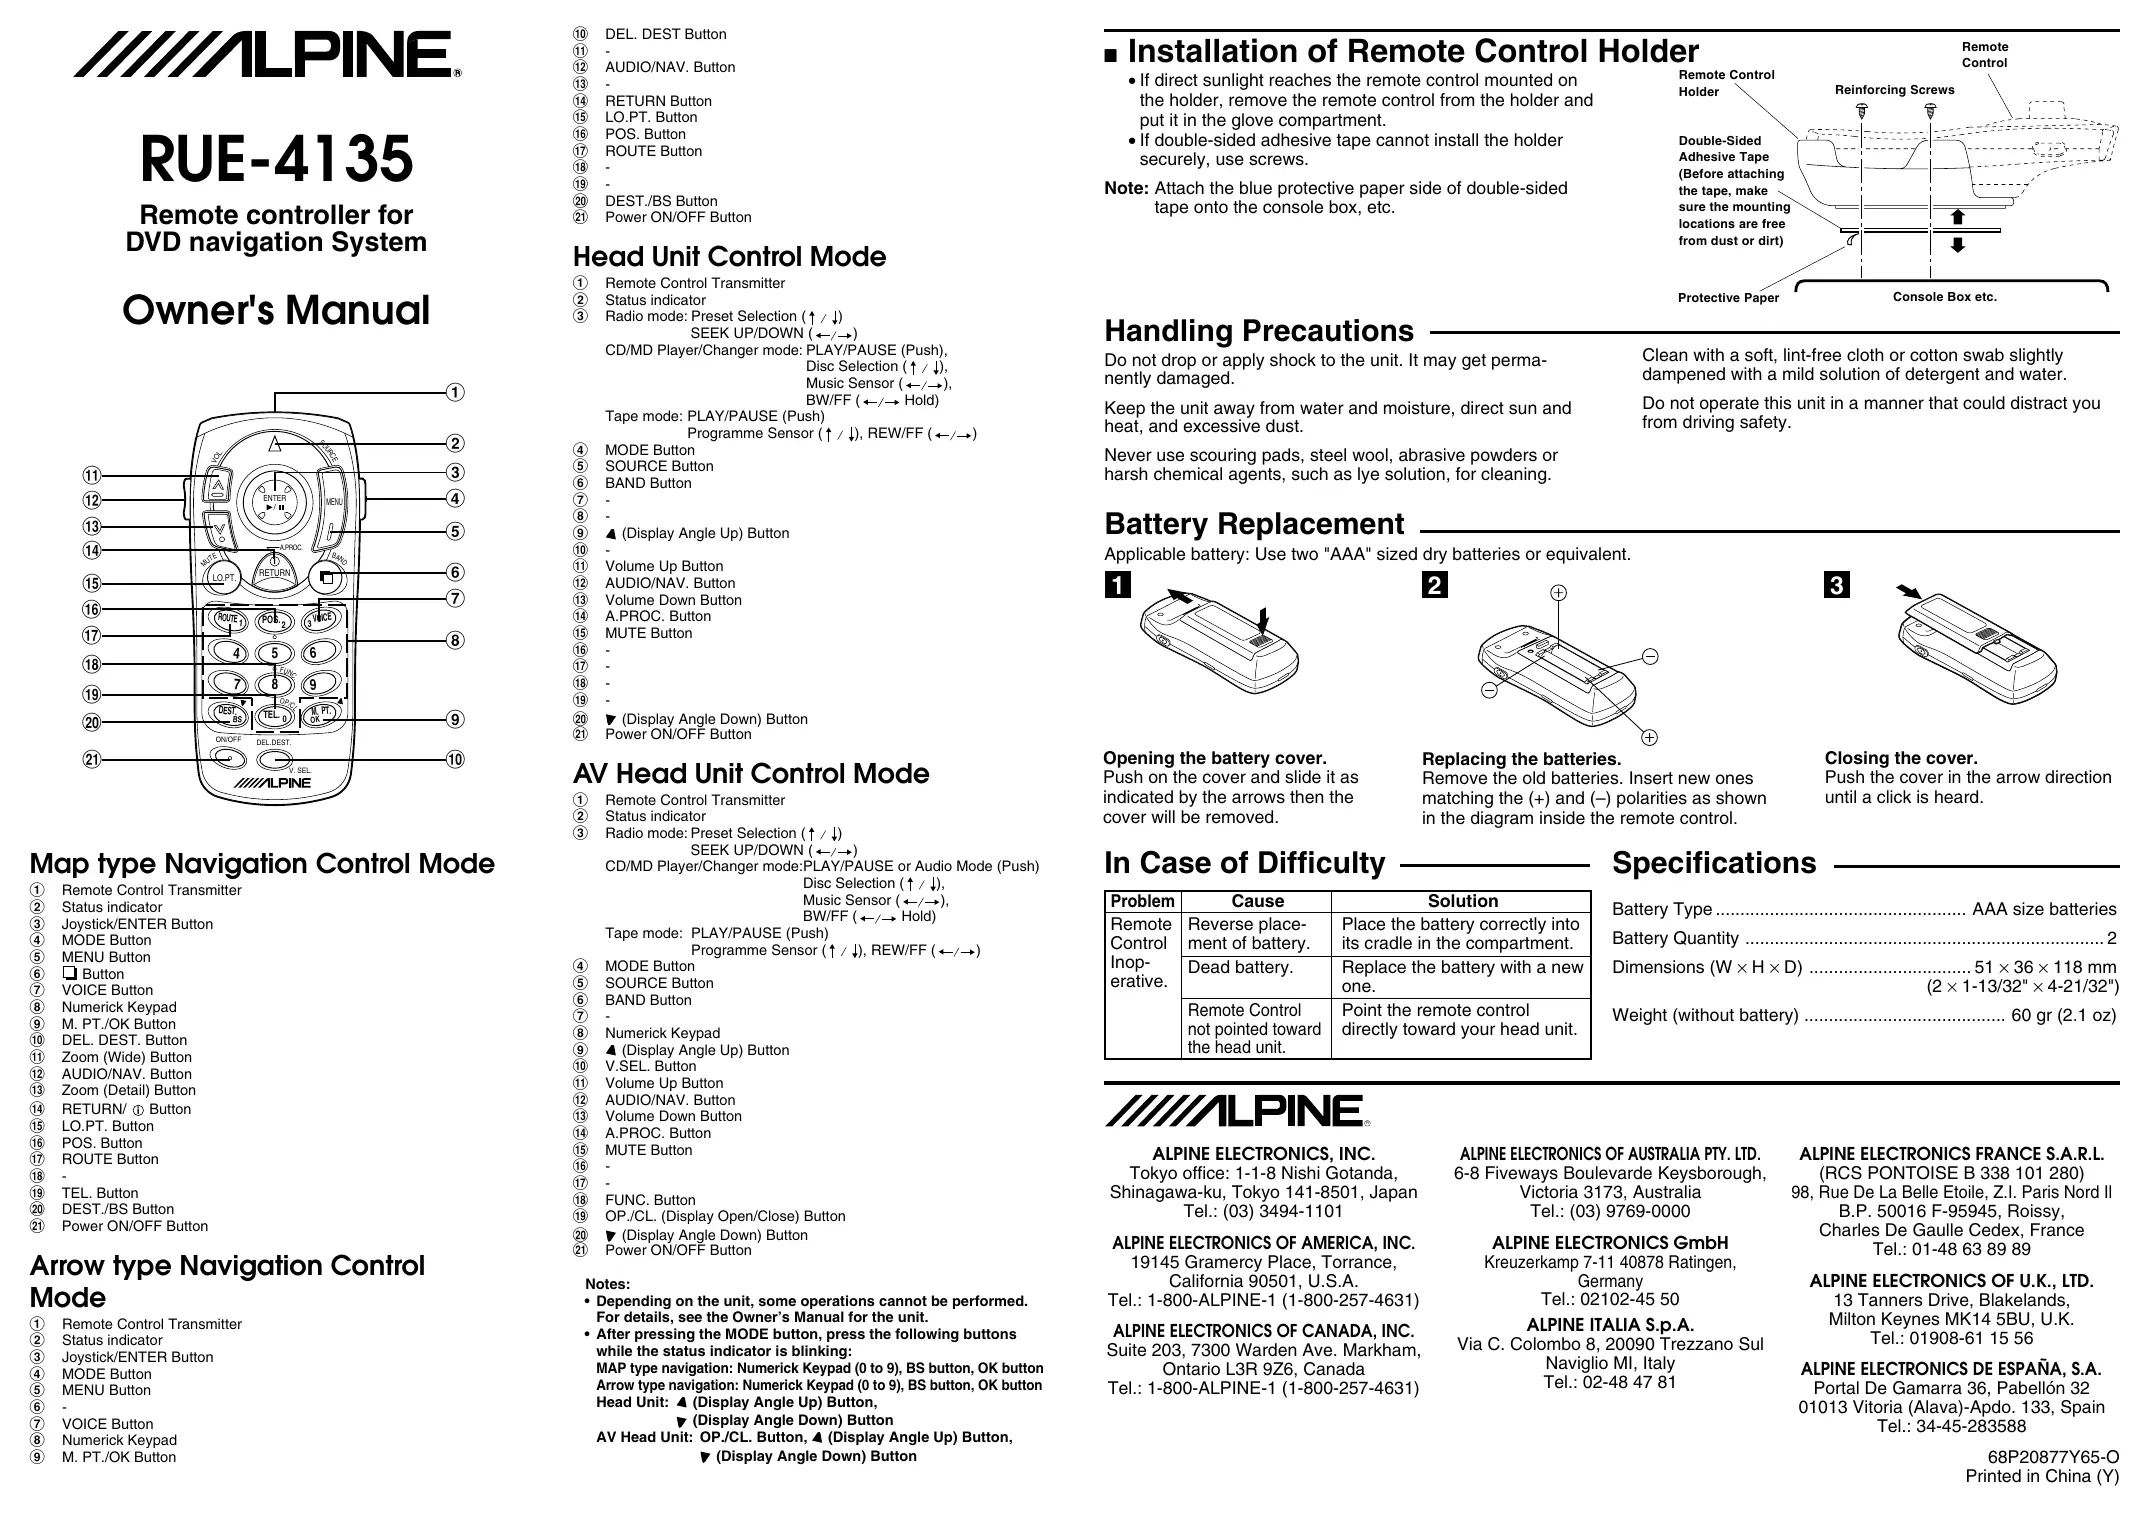
RUE-4135
Remote controller for DVD navigation System
Owner's Manual
text_image
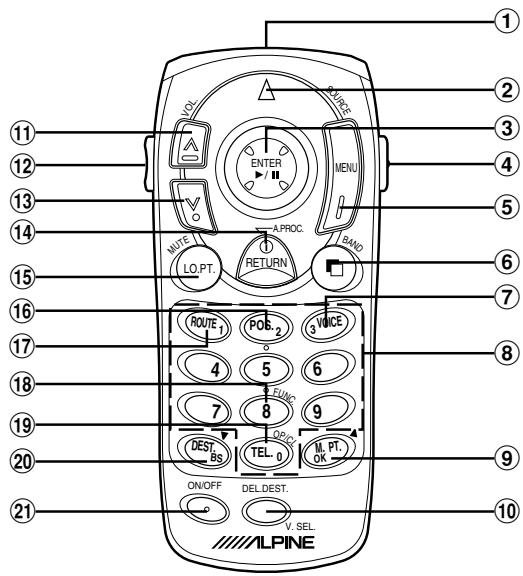
1 2 3 4 5 6 7 8 9 10 VOL VIME ENTER MENU A.PROC. MUTE LO.PT. RETURN BAND ROUTE.1 POE.2 3 VOICE 4 5 6 7 8 OPIC DEST BS TEL.0 IL PT. OK ON/OFF DEL DEST. V. SEL. ALPINEMap type Navigation Control Mode
① Remote Control Transmitter
② Status indicator
③ Joystick/ENTER Button
④ MODE Button
⑤ MENU Button
⑥ Button
⑦ VOICE Button
⑧ Numerick Keypad
⑨ M. PT./OK Button
⑩ DEL. DEST. Button
⑪ Zoom (Wide) Button
⑫ AUDIO/NAV. Button
⑬ Zoom (Detail) Button
⑭ RETURN/ ⓘ Button
⑮ LO.PT. Button
⑯ POS. Button
⑰ ROUTE Button
⑱ -
⑲ TEL. Button
⑳ DEST./BS Button
②1 Power ON/OFF Button
Arrow type Navigation Control Mode
① Remote Control Transmitter
② Status indicator
③ Joystick/ENTER Button
④ MODE Button
⑤ MENU Button
⑥
⑦ VOICE Button
⑧ Numerick Keypad
⑨ M. PT./OK Button
⑩ DEL. DEST Button
⑪
⑫ AUDIO/NAV. Button
⑬
⑭ RETURN Button
⑮ LO.PT. Button
⑯ POS. Button
⑰ ROUTE Button
18
19
⑳ DEST./BS Button
②1 Power ON/OFF Button
Head Unit Control Mode
① Remote Control Transmitter
② Status indicator
③ Radio mode: Preset Selection ( / )
SEEK UP/DOWN (←/→)
CD/MD Player/Changer mode: PLAY/PAUSE (Push),
Disc Selection (↑ / ↓),
Music Sensor (←/→),
BW/FF (←/→ Hold)
Tape mode: PLAY/PAUSE (Push)
Programme Sensor (↑ / ↓), REW/FF (←/→)
④
⑤ SOURCE Button
⑥ BAND Button
⑦
⑧
▲ (Display Angle Up) Button
10
⑪ Volume Up Button
⑫ AUDIO/NAV. Button
⑬ Volume Down Button
⑭ A.PROC. Button
⑮ MUTE Button
16
17
18
19
⑳ ▼ (Display Angle Down) Button
②1 Power ON/OFF Button
AV Head Unit Control Mode
① Remote Control Transmitter
② Status indicator
③ Radio mode: Preset Selection (↑ / ↓)
SEEK UP/DOWN (←/→)
CD/MD Player/Changer mode:PLAY/PAUSE or Audio Mode (Push)
Disc Selection ( / ),
Music Sensor (←/→),
BW/FF (←/→ Hold)
Tape mode: PLAY/PAUSE (Push)
Programme Sensor (↑ / ↓), REW/FF (←/→)
④
⑤ SOURCE Button
⑥
⑦
⑧ Numerick Keypad
⑨ ▲ (Display Angle Up) Button
⑩ V.SEL. Button
⑪ Volume Up Button
⑫ AUDIO/NAV. Button
⑬ Volume Down Button
⑭ A.PROC. Button
⑮ MUTE Button
16
⑰
⑱ FUNC. Button
⑲ OP./CL. (Display Open/Close) Button
⑳ ▼ (Display Angle Down) Button
②1 Power ON/OFF Button
Notes:
- Depending on the unit, some operations cannot be performed.
For details, see the Owner's Manual for the unit.
• After pressing the MODE button, press the following buttons
while the status indicator is blinking:
MAP type navigation: Numerick Keypad (0 to 9), BS button, OK button
Arrow type navigation: Numerick Keypad (0 to 9), BS button, OK button
Head Unit: ▲ (Display Angle Up) Button,
▶ (Display Angle Down) Button
AV Head Unit: OP./CL. Button, ▲ (Display Angle Up) Button,
▶ (Display Angle Down) Button
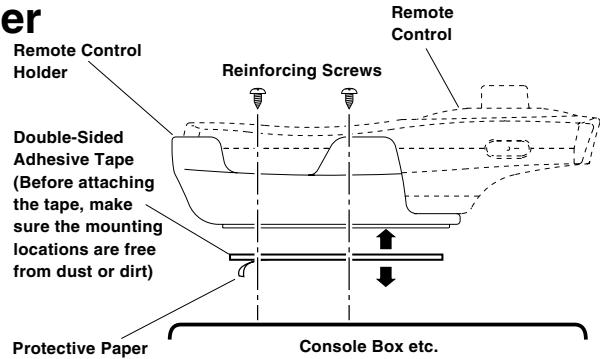
■ Installation of Remote Control Holder
- If direct sunlight reaches the remote control mounted on the holder, remove the remote control from the holder and put it in the glove compartment.
- If double-sided adhesive tape cannot install the holder securely, use screws.
Note: Attach the blue protective paper side of double-sided tape onto the console box, etc.
text_image
er Remote Control Holder Double-Sided Adhesive Tape (Before attaching the tape, make sure the mounting locations are free from dust or dirt) Protective Paper Reinforcing Screws Remote Control Console Box etc.Handling Precautions
Do not drop or apply shock to the unit. It may get permanently damaged.
Keep the unit away from water and moisture, direct sun and heat, and excessive dust.
Never use scouring pads, steel wool, abrasive powders or harsh chemical agents, such as lye solution, for cleaning.
Clean with a soft, lint-free cloth or cotton swab slightly dampened with a mild solution of detergent and water.
Do not operate this unit in a manner that could distract you from driving safety.
Battery Replacement
Applicable battery: Use two "AAA" sized dry batteries or equivalent.

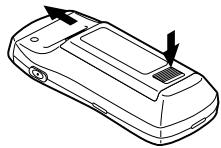

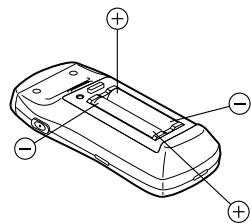
Opening the battery cover.
Push on the cover and slide it as indicated by the arrows then the cover will be removed.
Replacing the batteries.
Remove the old batteries. Insert new ones matching the (+) and (−) polarities as shown in the diagram inside the remote control.

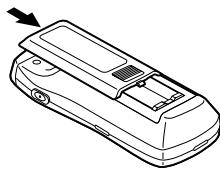
Closing the cover.
Push the cover in the arrow direction until a click is heard.
In Case of Difficulty
| Problem | Cause | Solution |
| Remote Control Inoperative. | Reverse placement of battery. | Place the battery correctly into its cradle in the compartment. |
| Dead battery. | Replace the battery with a new one. | |
| Remote Control not pointed toward the head unit. | Point the remote control directly toward your head unit. |
Specifications
Battery Type .... AAA size batteries
Battery Quantity 2
Dimensions (W × H × D) 51 × 36 × 118 mm
(2 × 1-13/32" × 4-21/32")
Weight (without battery) 60 gr (2.1 oz)
ALPINE®
ALPINE ELECTRONICS, INC.
Tokyo office: 1-1-8 Nishi Gotanda,
Shinagawa-ku, Tokyo 141-8501, Japan
Tel.: (03) 3494-1101
ALPINE ELECTRONICS OF AMERICA, INC.
19145 Gramercy Place, Torrance,
California 90501, U.S.A.
Tel.: 1-800-ALPINE-1 (1-800-257-4631)
ALPINE ELECTRONICS OF CANADA, INC.
Suite 203, 7300 Warden Ave. Markham.
Ontario L3R 9Z6, Canada
Tel.: 1-800-ALPINE-1 (1-800-257-4631)
ALPINE ELECTRONICS OF AUSTRALIA PTY. LTD.
6-8 Fifeways Boulevard Keysborough,
Victoria 3173, Australia
Tel.: (03) 9769-0000
ALPINE ELECTRONICS GmbH
Kreuzerkamp 7-11 40878 Ratingen,
Germany
Tel.: 02102-45 50
ALPINE ITALIA S.p.A.
Via C. Colombo 8, 20090 Trezzano Sul
Naviglio MI, Italy
Tel.: 02-48 47 81
ALPINE ELECTRONICS FRANCE S.A.R.L.
(RCS PONTOISE B 338 101 280)
98, Rue De La Belle Etoile, Z.I. Paris Nord Il
B.P. 50016 F-95945, Roissy,
Charles De Gaulle Cedex, France
Tel.: 01-48 63 89 89
ALPINE ELECTRONICS OF U.K., LTD.
13 Tanners Drive, Blakelands,
Milton Keynes MK14 5BU, U.K.
Tel.: 01908-61 15 56
ALPINE ELECTRONICS DE ESPAÑA, S.A.
Portal De Gamarra 36, Pabellón 32
01013 Vitoria (Alava)-Apdo. 133, Spain
Tel.: 34-45-283588