
HEC-DR7750 - Fauteuil de massage SANYO - Notice d'utilisation et mode d'emploi gratuit
Retrouvez gratuitement la notice de l'appareil HEC-DR7750 SANYO au format PDF.


| Type de produit | Fauteuil de massage |
| Marque | SANYO |
| Modèle | HEC-DR7750 |
| Dimensions (non incliné) | 730 mm (L) × 1 350 mm (P) × 1 220 mm (H) |
| Dimensions (incliné) | 730 mm (L) × 1 840 mm (P) × 760 mm (H) |
| Poids | Environ 83 kg |
| Alimentation | 120 V, 60 Hz, 290 W (chauffage semelles : 33 W) |
| Poids maximal de l'utilisateur | 120 kg |
| Programmes automatiques | Sensoriel (Rigidité, Récupération, Relaxation, Fin) et Automatiques (Cou/Épaules, Bas du dos, Bas du corps, Air Confort) |
| Programmes manuels | Haut du corps (Prise, Shiatsu, Pétrissage, Tapotement, Combo, Étirements) et Bas du corps (Air : Taille/Jambes, Dos/Assise, Mollets/Pieds) |
| Réglages | Intensité (5 niveaux pour haut du corps, 3 pour air), vitesse, largeur des rouleaux, position |
| Positions zéro gravité | 2 positions préréglées |
| Chauffage des semelles | Oui, activable/désactivable |
| Minuterie | 20 min max conseillées par session ; arrêt automatique après 15-20 min selon programme |
| Entretien et nettoyage | Nettoyer avec un chiffon doux sec ou légèrement humide (détergent neutre). Ne pas utiliser de benzène, solvant, alcool, détergent alcalin ou javellisant. Ne pas laver les coussins. |
| Sécurité | Verrouillage enfant (interrupteur LOCK), arrêt d'urgence, mise à la terre obligatoire |
| Accessoires inclus | Support pour télécommande et capteur, vis d'installation (3) |
FOIRE AUX QUESTIONS - HEC-DR7750 SANYO
Questions des utilisateurs sur HEC-DR7750 SANYO
0 question sur cet appareil. Repondez a celles que vous connaissez ou posez la votre.
Poser une nouvelle question sur cet appareil
Téléchargez la notice de votre Fauteuil de massage au format PDF gratuitement ! Retrouvez votre notice HEC-DR7750 - SANYO et reprennez votre appareil électronique en main. Sur cette page sont publiés tous les documents nécessaires à l'utilisation de votre appareil HEC-DR7750 de la marque SANYO.
MODE D'EMPLOI HEC-DR7750 SANYO
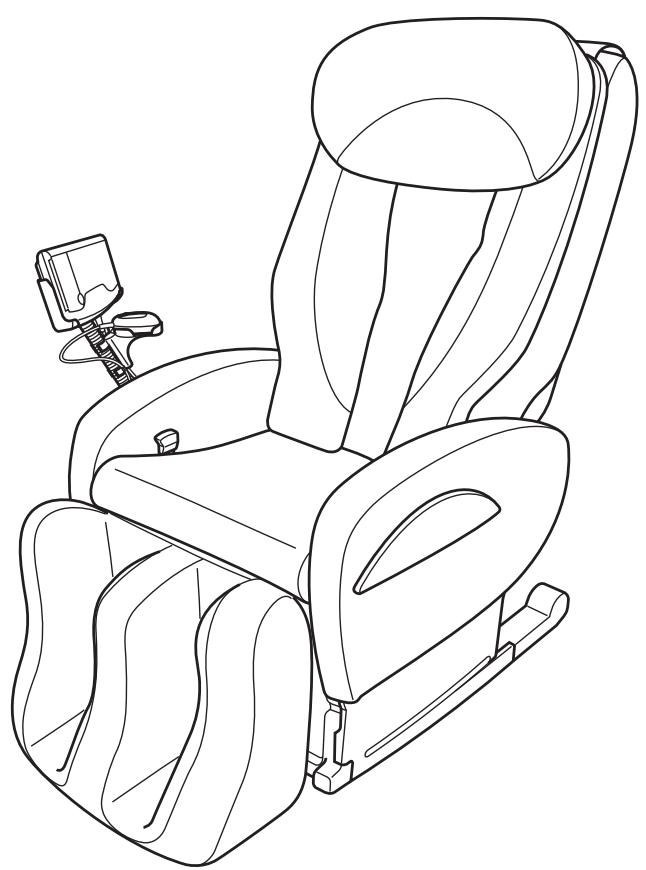
INSTRUCTION MANUAL Massage Lounger
HEC-DR7750
CONTENTS
PAGE
IMPORTANT SAFETY INSTRUCTIONS 1~4
NAME/FUNCTION OF EACH PART 5~7
HOW TO PLACE THE MASSAGER 8
HOW TO INSTALL THE STAND 9\~10
HOW TO USE 11
PREPARATIONS PRIOR TO USE 12
ADJUSTMENT OF CHAIR 13\~15
MASSAGING 16~24
WHOLEBODYSENSORAUTOMATIC COURSES 16\~18
AUTOMATIC COURSES 19~20
MANUAL COURSES 21~24
ADJUSTING MASSAGE INTENSITY 25
AFTER USE 26
MAINTENANCE PROCEDURES 26
CONTENTS OF MASSAGING 27~28
TROUBLE-SHOOTING 29
SPECIFICATIONS 30
Be sure to read this manual thoroughly in order to ensure proper use. In particular, make certain to read the section
"IMPORTANT SAFETY INSTRUCTIONS".
Keep this manual in a safe place so that it can be found easily.
When using an electrical appliance, basic precautions should always be followed, including the following:
Read all instructions before using this appliance.
DANGER
To reduce the risk of electric shock:
Always unplug this appliance from the electrical outlet immediately after using and before cleaning. Improper connection of the equipment-grounding conductor can result in a risk of electric shock. Check with a qualified electrician or serviceman if you are in doubt as to whether the product is properly grounded. Do not modify the plug provided with the product – if it will not fit outlet, have a proper outlet installed by a qualified electrician.
WARNING
To reduce the risk of burns, fire, electric shock, or injury to persons:
An appliance should never be left unattended when plugged in. Unplug from outlet when not in use, and before putting on or taking off parts.
Do not operate under blanket or pillow. Excessive heating can occur and cause fire, electric shock, or injury to persons.
Close supervision is necessary when this appliance is used by, on, or near children, invalids, or disabled persons.
Use this appliance only for its intended use as described in this manual. Do not use attachments not recommended by the manufacturer.
Never operate this appliance if it has a damaged cord or plug, if it is not working properly, if it has been dropped or damaged, or dropped into water. Return the appliance to a service center for examination and repair.
Do not carry this appliance by supply cord or use cord as a handle.
Keep the cord away from heated surfaces.
Never operate the appliance with the air openings blocked. Keep the air openings free of lint, hair, and the like.
Never drop or insert any object into any opening.
Do not use outdoors.
Do not operate where aerosol (spray) products are being used or where oxygen is being administered.
To disconnect, turn all controls to the off position, then remove the plug from the outlet.
This product is for Household Use Only.
Polarization Instructions
To reduce the risk of electric shock, this appliance has a polarized plug (one blade is wider than the other). This plug will fit in a polarized outlet only one way. If the plug does not fit fully in the outlet, reverse the plug. If it still does not fit, contact a qualified electrician to install the proper outlet. Do not change the plug in any way.
Be sure to check that there is no-one (children in particular), or any pets around the massager prior to adjusting the back rest.
Otherwise, an injury may occur.
Be careful not to put your hand or foot into the space between the back rest and arm rest or into the space at the underside of the back rest or between the foot rest and the seat or into the space under the foot rest.
Otherwise, an injury may occur.
Do not wind the power cord, remote control cord or sensor controller cord around the main unit, remote control, sensor controller, or remote control stand.
Moreover, be careful not to operate the back rest with the cord hooked on some obstruction.
Otherwise, unreasonable force may be applied to the cord, possibly resulting in fire or electric shock.
Do not allow any children to use the massager, play on or around it. Also, while in use, keep children away from the massager. Lock the plug with the paddle lock provided when not in use and store key out of reach of children.
Otherwise, an injury may occur.
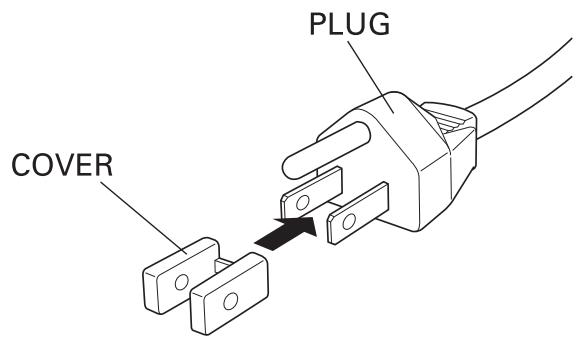
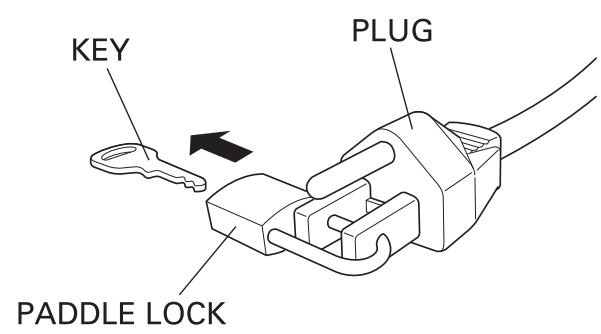
Be sure to check that there is no-one (children in particular), or any pets under the foot rest prior to lowering the foot rest. In addition, do not leave the foot rest in the raised position.
Otherwise, an injury may occur.
Do not attempt to stand on the arm rest, foot rest, back rest, or remote control stand.
Otherwise, the user may fall over, resulting in injury.
Do not use the massager on the head, the chest, the abdomen or on bones (elbow, knee, etc). In addition, do not put your hand, foot or arm between the massaging rollers.
Otherwise, the user may feel sick or an injury may occur. (When massaging the nape of the neck, put a soft towel on the neck in order to avoid strong stimulation.)
Be careful not to use the massager when the cord or the power plug is damaged or the plug socket is loose.
Otherwise, electric shock, short circuit or fire may occur.
The following persons are requested to consult a doctor prior to use.
Otherwise, the user may feel sick or an injury may occur.
- Those who are undergoing medical treatment and particularly those who complain of indisposition
- Those who have malignant tumors
- Those who suffer from heart trouble
- Those who are in menstrual period or pregnant
- Those who require complete rest
- Those whose spine is abnormal or bent
- Those who desire to use the massager on a part of the body that was previously diseased or receiving medical treatment
- Those who are feverish (38°C or over)
- Those who have weak bones (osteoporosis etc.)
- Those who use a medical electronic device implanted into the body (e.g. a pacemaker)
- Those who have a serious blood circulation disorder in the legs
Never attempt to dismantle the massager. Do not allow any personnel other than a qualified repair technician to dismantle or repair the massager.
Otherwise, fire, electric shock or injury may occur. Ask the sales agent if repairs are required.
Do not attempt to damage, break, modify, bend forcibly, pull, twist or bundle the cord. In addition, do not put heavy objects on the cord or jam the cord between objects.
Otherwise the cord may break, resulting in fire or electric shock.
Do not use the massager at any current other than the designated voltage.
Otherwise, fire or electric shock may occur.
Be sure to disconnect the power plug from the outlet prior to maintenance. Also, do not attempt to plug/unplug the power plug with wet hands.
Otherwise, injury or electric shock may occur.
WARNING
Be careful not to spill water over the remote control, sensor controller, seat, or foot rest. Otherwise, electric shock, short circuit or fire may occur.
Do not suddenly release your hand, while raising the foot rest. Otherwise, an injury may occur.
Prior to use, be sure to raise the back pad in order to check that the cover cloth or the cloth of other parts is not torn. If a tear is found, however small, stop using the massager immediately, unplug the power source, and obtain service.
If the massager is used with torn cloth, it may result in injury or electric shock.
Use only under careful medical supervision if you have or there is a possibility that you have a medical condition that may possibly, in any way, be affected by massager.
If discomfort or pain is felt during use, stop using the massager and consult a doctor immediately. In addition, when the massage force is felt strongly, stop using it earlier than planned. Otherwise, if the user continues using in such a way, an unexpected accident may occur.
For safety, check the position of the massaging rollers before leaning slowly back on the massager. Do not twist the body, but lean straight back on the massager, so that the massaging rollers are in position on either side of the spine. Otherwise, leaning abruptly on the massager may injure the spine or result in some other injury.
After use, be sure to set the POWER switch to the [OFF] position, and the LOCK switch to the [LOCK] position. Otherwise, it may result in accident or injury due to a child's mischief.
Do not use the massager on top of a heated carpet or other heater, or near a stove or other heat sources. Otherwise, it may result in fire.
Do not attempt to hang from the back pad or head cover, or pull the back pad or head cover forcibly. Otherwise, the back pad or head cover may come off, possibly resulting in injury.
Aim to use the massager for up to 20 minutes each time. Limit the use of the massager on one point to 5 minutes or less. Otherwise, the continuous use of the massager on one point for an extended period may result in adverse effects or injury.
Be careful not to fall asleep during massage. Otherwise, an injury may occur.
Place the massager main unit on a level floor surface. Otherwise, if it is placed at an unstable place, the main unit may fall over, possibly resulting in injury.
Do not use the massager in the bathroom, or places with high humidity. Otherwise, electric shock may occur.
Do not place anything other than the remote control and the sensor controller respectively on the remote control stand. Otherwise, the stand may break, resulting in injury.
Do not use the massager on bare skin. Otherwise, an injury may occur.
Do not use for any purposes other than as a massager or as a chair. Otherwise, an accident or injury may occur.
Avoid use by those who are unable to clearly indicate their intentions, as well as by physically disabled people. Otherwise, an injury may occur.
Do not attempt to disconnect the power plug by pulling the cord, but always by holding the power plug and pulling it out. Also, clean the dust off the power plug periodically.
Otherwise, electric shock, short circuit or fire may occur.
Switch the power [OFF] instantly if there is a power failure, and also pull the power plug out from the outlet.
Otherwise, it may become dangerous when the power is restored.
Do not move the massager with a person on it.
Otherwise, the massager may fall over, resulting in injury.
At first, do not attempt to recline the seat deeply, lean on the back rest forcibly or massage without the back pad (until you have become accustomed to massaging).
Otherwise, if the massaging force is too strong at the outset, it may result in adverse effects or injury.
Do not use the massager with other medical instruments (e.g. a low frequency medical instrument).
Otherwise, the user may feel sick or, it may cause other health problems.
If the massager becomes inoperative, disconnect the power plug immediately to prevent accidents, and ask the sales agent for inspection/repair information.
Otherwise, it may result in fire due to electric shock, current leakage, short circuit, etc.
When the equipment will not be used for an extended period, be sure to disconnect the power plug from the outlet.
Otherwise, it may result in electric shock, current leakage or fire due to damaged insulation.
WARNING: Connect this appliance to a properly grounded outlet only. See Grounding Instructions.
Grounding Instructions
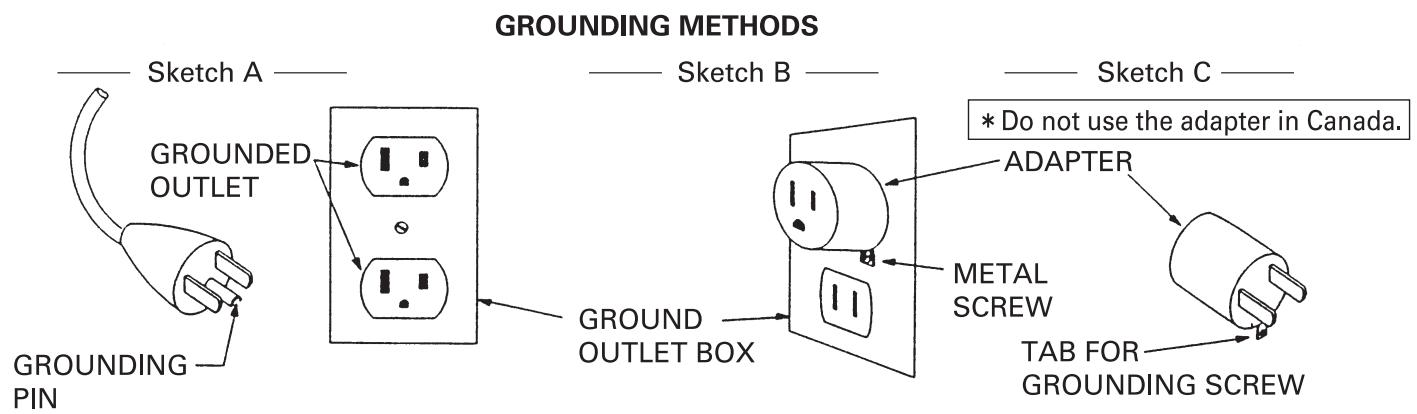
This product must be grounded. If it should malfunction or breakdown, grounding provides a path of least resistance for electric current to reduce the risk of electric shock. This product is equipped with a cord having an equipment-grounding conductor and a grounding plug. The plug must be plugged into an appropriate outlet that is properly installed and grounded in accordance with all local codes and ordinances.
This product is for use on a nominal 120-volt circuit, and has a grounding plug that looks like the plug illustrated in sketch A. Make sure that the product is connected to an outlet having the same configuration as the plug. No adapter should be used with this product.
The maximum permissible weight of the user is 120 kilograms(264 lbs).
Otherwise, an accident may happen or damage to the machine may result.
SAVE THESE INSTRUCTIONS
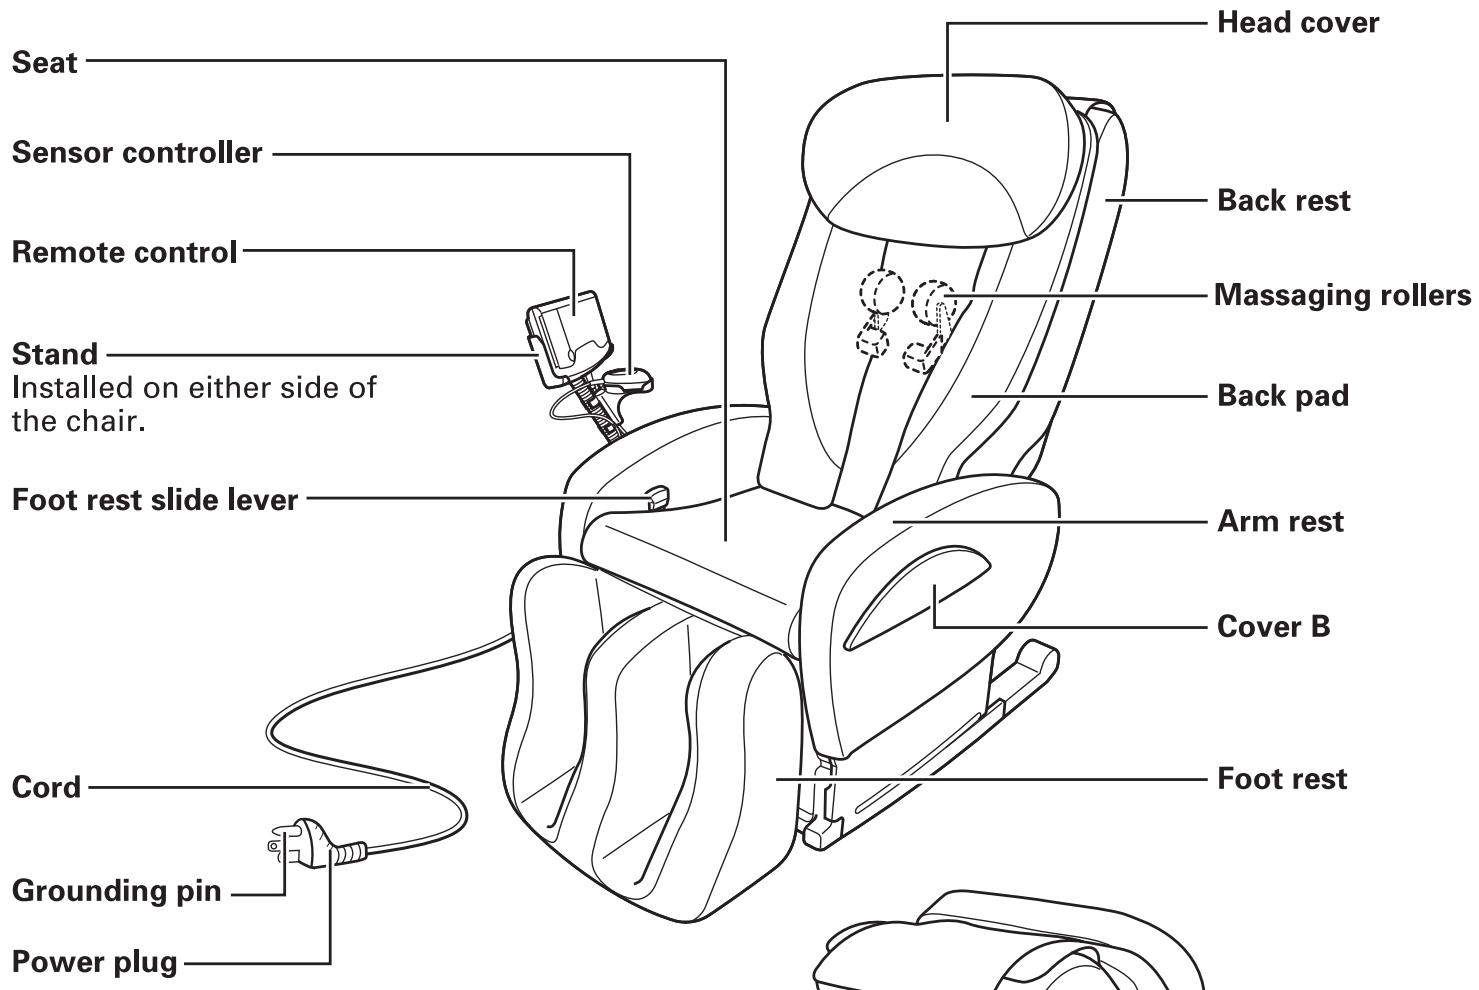
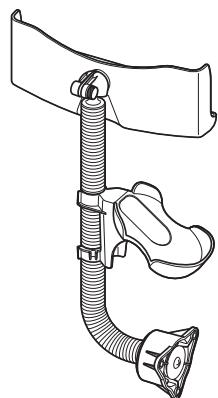
Check the accessories at first.
Stand

Installation screws (3 screws)
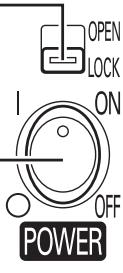
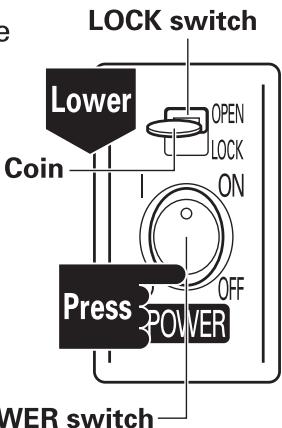
POWER switch
LOCK switch
Used to lock the power switch for safety, chair will not operate.
Used to turn on/off the power source.
Remote control
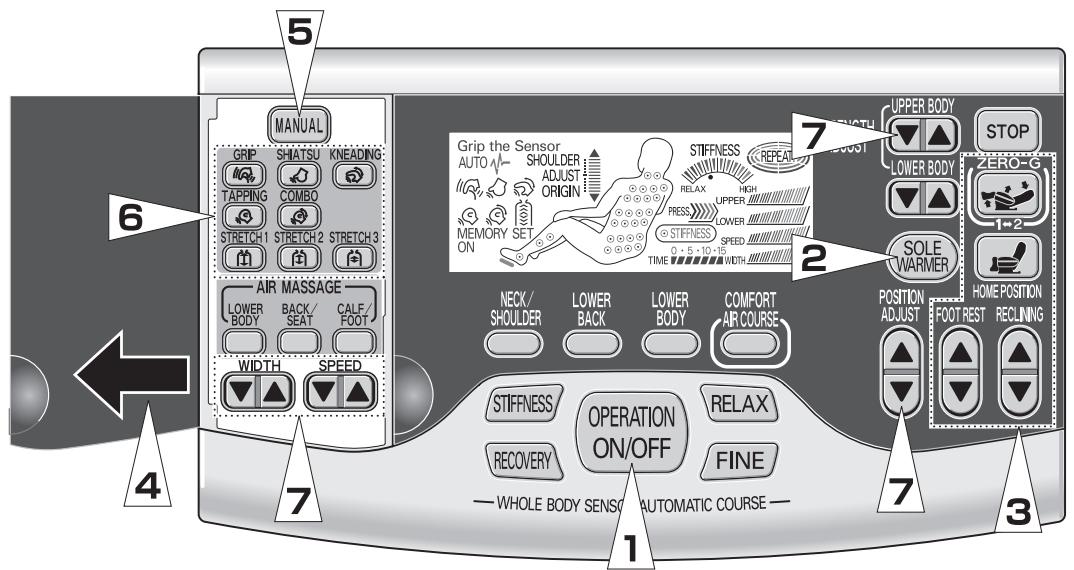
- All display icons are shown here for explanation.
MANUAL SELECT button
Used for manual massaging.
MANUAL (UPPER BODY)
MASSAGE buttons
Used to select the desired type of upper body massaging.
MANUAL (LOWER BODY)
MASSAGE buttons
Used to select the desired type of lower body air massaging.
COVER
Opened to activate manual massaging.
HOME POSITION button
Used to return the back rest, foot rest and seat to their home positions.
ZERO-G button
Used to adjust the back rest, foot rest and seat to the two preset zero gravity positions.
INSTANT STOP button
Used if you have felt abnormal physical sensation or want to stop the massager immediately.
UPPER BODY STRENGTH ADJUST buttons
Adjusts the strength of upper body massaging in five stages.
LOWER BODY STRENGTH ADJUST buttons
Adjusts the strength of lower body and air course massaging in three stages.
Only during the Whole Body Sensor Automatic Course, the lower body massaging can be turned off.
SOLE WARMER button
Used for switching the sole heater operation ON/OFF. (When the heater switch is "ON", the lamp is illuminated.)
WIDTH ADJUST buttons
Adjusts the width of the massaging rollers in five stages.
SPEED ADJUST buttons
Adjusts the speed of the massaging rollers in five stages.
AUTOMATIC COURSE buttons
Used to select the desired type of Automatic Course.
WHOLE BODY SENSOR AUTOMATIC COURSE buttons
Used to select the desired type of Whole Body Sensor Automatic Course.
OPERATION ON/OFF button
Used for switching the massaging operation ON/OFF.
POSITION ADJUST buttons
Used to adjust the UP/DOWN position of massaging rollers.
FOOT REST buttons
Adjusts the angle of the foot rest.
RECLINING buttons
Adjusts the angle between the back rest and the foot rest.
The back rest and foot rest are moved in conjunction with each other.
- Positions that can be massaged.
Positions where stiffness has been detected.
Shoulder position measurement / Original position display The "SHOULDER" icon flickers when the figure (the shoulder position) is being measured, and the "ADJUST" lights up when the measurement is over.
Illuminates if the fingers are not placed on the sensor during a measurement of stiffness in the Whole Body Sensor Automatic Course.
WHOLE BODY SENSOR AUTOMATIC COURSE display
Turns on during a Whole Body Sensor Automatic Course.
(flickers) AUTO does not light up if the fingers are not placed on the sensor.
MASSAGE OPERATION display
Displays the operation of the current massage technique.
SOLE WARMER display
Turns on when the sole heater is on.
(Sensor controller
Sensor lamp
The lamp flickers if the fingers are not placed on the sensor during a Whole Body Sensor Automatic Course.
Moreover, the lamp is illuminated while stiffness is detected during a Whole Body Sensor Automatic Course.
Sensor
The degree of perspiration and pulse rate are measured if the fingers are placed on the sensor during a Whole Body Sensor Automatic Course.
PRESSURE display
Displays the strength of the pressure placed on the massaging rollers (the pressure from the body).
STIFFNESS display
The right side of the lamp indicates the degree of stiffness, and the left side of the lamp indicates the degree of relaxation. The more the right side of the lamp is illuminated, the higher the degree of stiffness.
REPEAT! display
Turns on during Whole Body Sensor Automatic Courses and Automatic Courses. The ring lights up by pressing the REPEAT! button when you want to repeat your desired massage during the course of massaging. While the degree of stiffness is being measured in a Whole Body Sensor Automatic Course, the result is displayed with the color of the ring.
Green: Relax
Orange: Slight degree of stiffness
No display: High degree of stiffness
(Remote control display)
MASSAGE ADJUST display
Display the adjusted level of the strength and speed of massaging and the width of massaging rollers. When these displays turn on, you can adjust them with each adjust button.
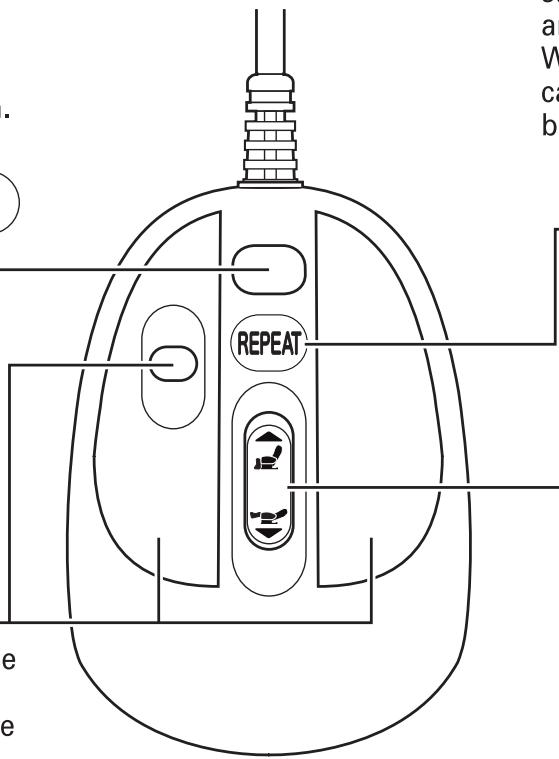
Repeat button
If this button is pressed during Whole Body Sensor Automatic Courses or Automatic Courses, the current massage will be repeated once.
RECLINING buttons
Adjusts the angle between the back rest and the foot rest.
The back rest and foot rest are moved in conjunction with each other.
How to move the massager
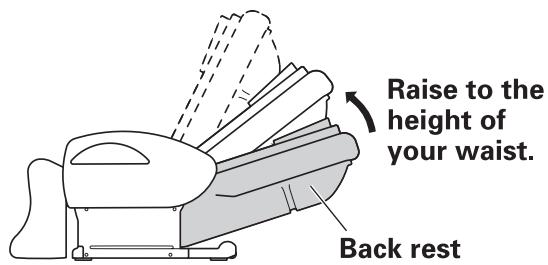
1 Raise the back rest.
- Movement is easier when the back rest is raised to the height of your waist with the RECLINING button. (See page 14)
NOTE
- Before moving the massager, be sure to remove the power plug from the outlet.
- Be careful not to step on the power cord, remote control or sensor during movement.
- Be sure to move the massager with the assistance of another person on an easily damaged floor surface or concrete surface.
Moreover, when moving the massager like this, be sure not to move it with the foot rest extended.
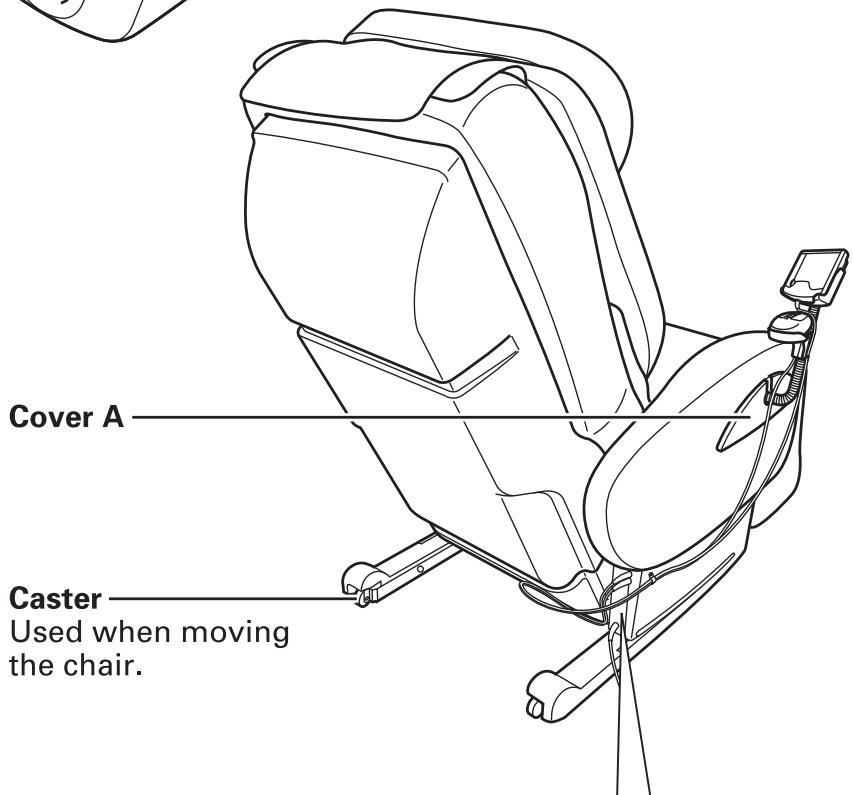
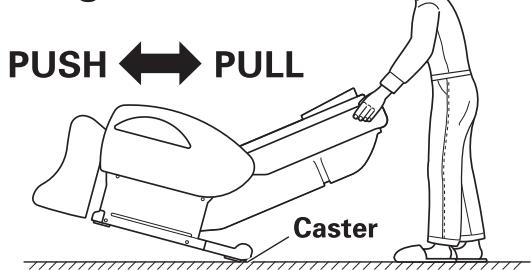
2 Raise the front side of the massager, and move it using the casters.
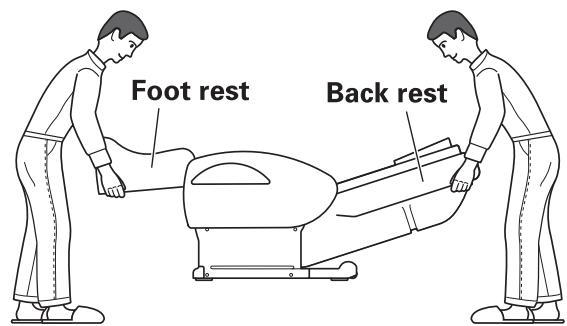
To move the massager, one person should hold the foot rest and the other should hold the back rest with the back rest reclined.
Decide where to place it
1 Lay a carpet, etc. on the set-up place.
- To prevent damaging the floor and muffle the noise while massaging.
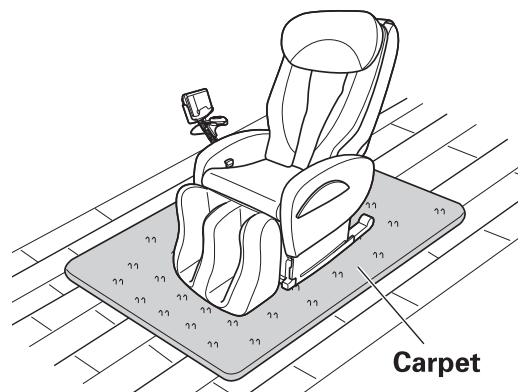
2 Ensure there is sufficient space to allow the massager to recline.
- In order not to touch the wall or other things when reclined, allow a clearance of 50cm(20^ ) or more to the front and 60cm(24^ ) or more to the back.
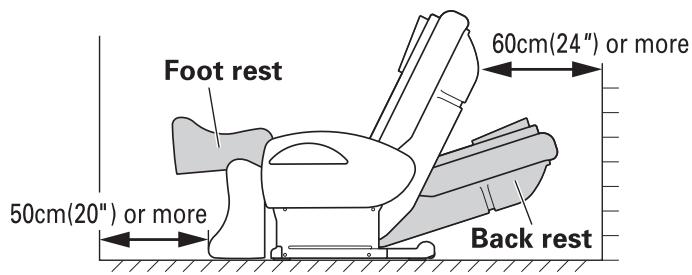
NOTE
- Place the massager on a level floor surface.
- Keep the massager at least 1 meter(3 ft) away from AV machines like a TV or radio. Otherwise, the program may be disturbed by noise.
- Do not keep the massager in a place with high humidity like a bathroom.
- Do not keep the massager in a place where it will be exposed to direct sunshine for an extended period, or in a place near a heater where the temperature may reach high levels.
Installation on the right-hand side of the chair
Tools needed: Phillips (crosshead) screwdriver, flathead screwdriver (* screwdrivers are not included)
1 Remove the cover of the right-hand side of the arm rest.
Insert the flathead screwdriver into the holes under the cover and pull toward you. (4 places)
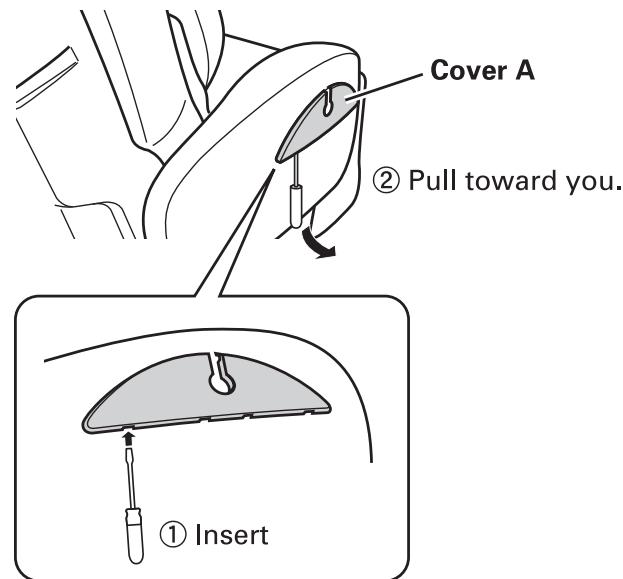
2 Secure the stand on the right-hand side of the arm rest, using the installation screws (3 screws).
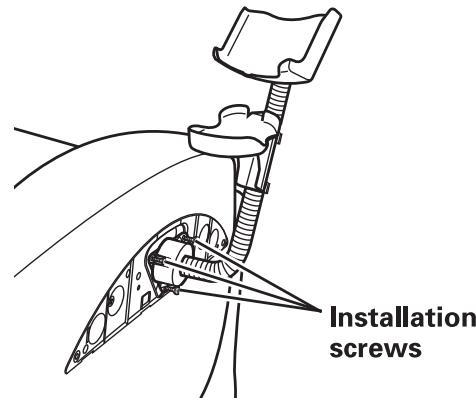
3 Place the cover on the right-hand side of the arm rest.
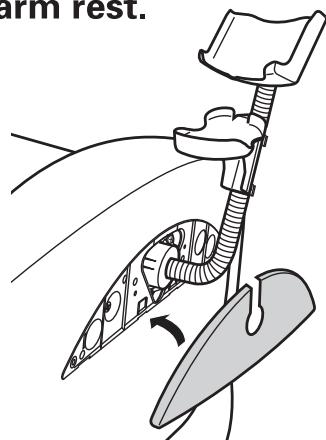
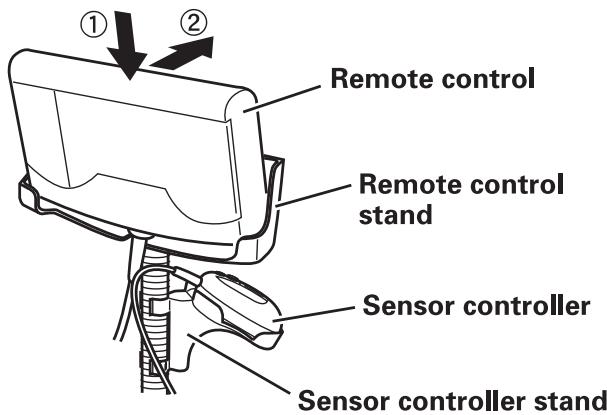
4 Put the remote control on the remote control stand (upper part). Put the sensor controller on the sensor controller stand (lower part).
Put the remote control on the remote control stand in a tilted position as the arrow ① shows, and then push it in the direction of arrow ②
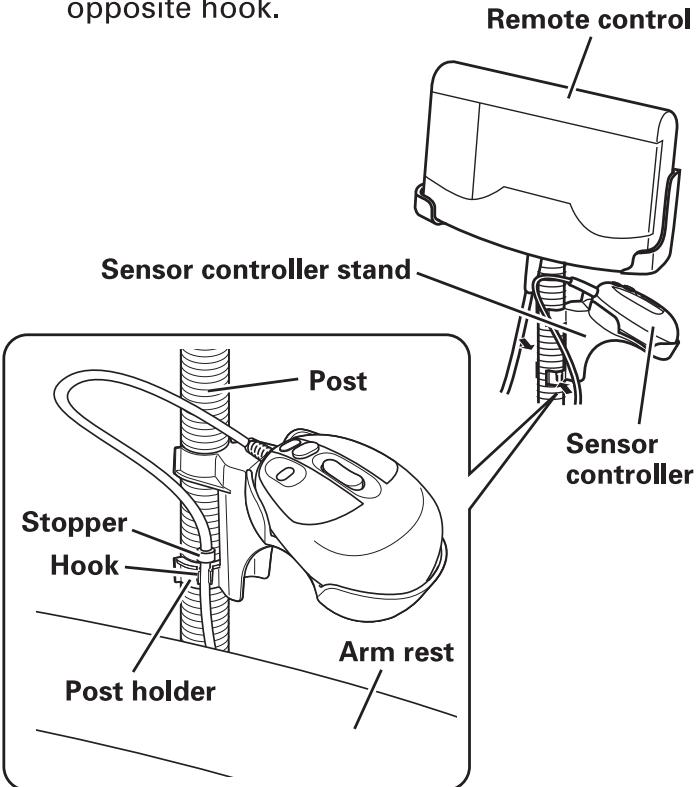
5 Put the cords of the remote control and the sensor controller in the hooks of the sensor controller stand.
The post holder in the lower part of the sensor controller stand has hooks on both sides. Place the sensor controller cord with the stopper in the hook closer to the arm rest. Place the remote control cord in the opposite hook. Remote control
Installation on the left-hand side of the chair
Tools needed: Phillips (crosshead) screwdriver, flathead screwdriver (* screwdrivers are not included)
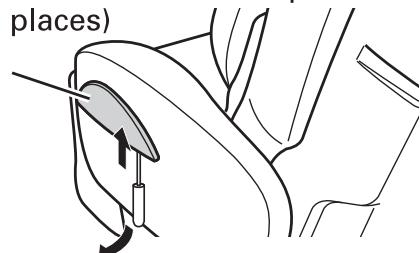
1 Remove the covers on the outer sides of the arm rests.
Insert the flathead screwdriver into the holes under the cover and pull toward you. (4 places)
Cover B
2 Secure the stand on the left-hand side of the arm rest, using the installation screws (3 screws).
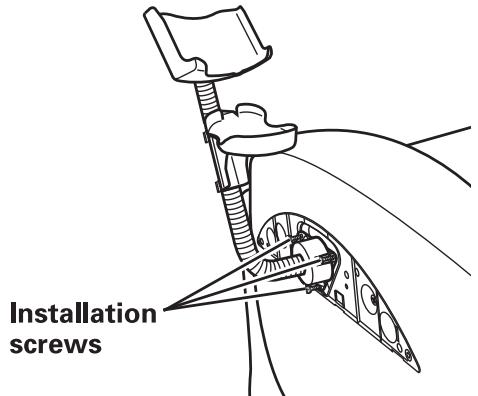
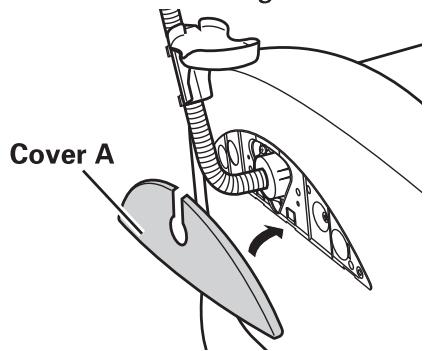
3 Place the covers on the outer sides of the arm rests.
Install the cover A on the left-hand side, and cover B on the right-hand side.
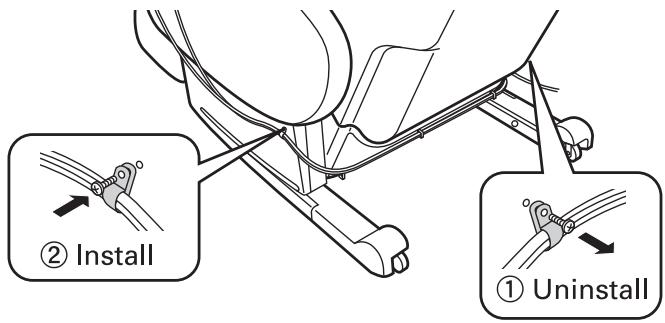
4 Uninstall the cord hook from the right-hand side of the arm rest, and install it on the left-hand side.
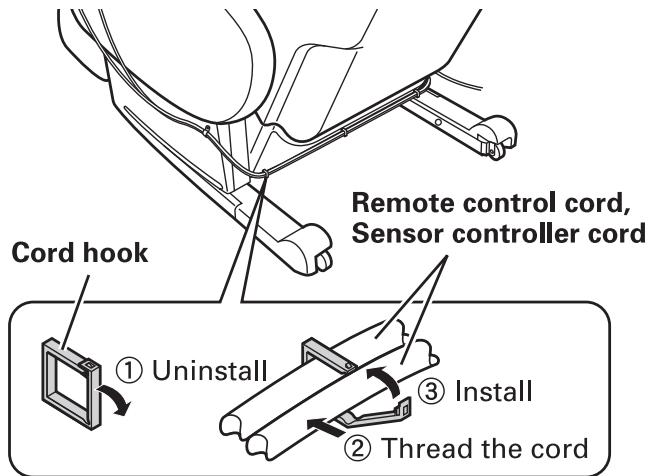
5 Put the cords of the remote control and sensor controller in the cord hook on the back of the body.
6 Put the remote control on the remote control stand (upper part). Put the sensor controller on the sensor controller stand (lower part).
Put the remote control on the remote control stand in a tilted position as the arrow ① shows, and then push it in the direction of arrow ② 1
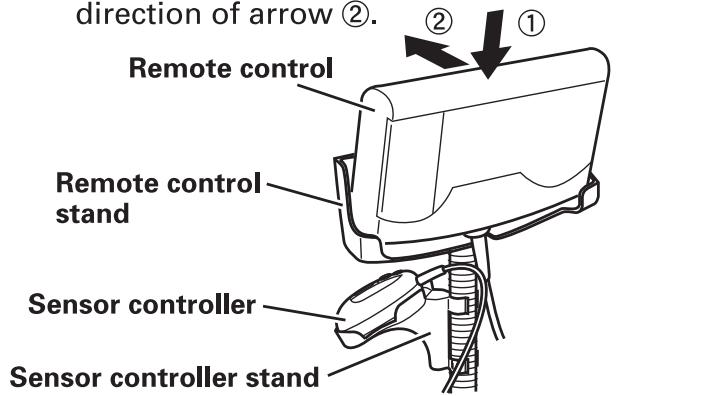
7 Put the cords of the remote control and the sensor controller in the hooks of the sensor controller stand.
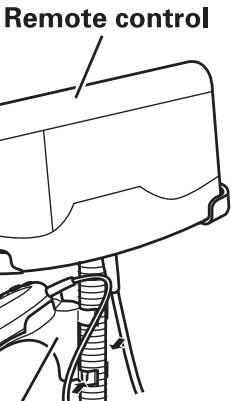
The post holder in the lower part of the sensor controller stand has hooks on both sides.
Place the sensor controller cord with the stopper in the hook closer to the arm rest. Place the remote control cord in the opposite hook.
Sensor controller
Sensor controller stand
The procedure for use of the massager is explained here. See the referred pages for details.
Prior to use, make certain to read the "IMPORTANT SAFETY INSTRUCTIONS". (Page 1-4)
1 Turn on the power. (See page 12)
2 Massaging.
(1) Press the OPERATION ON/OFF button.
- When the button is pressed, the lamp of the remote control illuminates and the sole warmer will turn on.
- When the foot rest is fully lowered, the foot rest will rise a little.
- When the massaging rollers are not located in the upper section, the massaging rollers will move to the upper section and stop.
(During the movement, the characters of "ORIGIN" on the remote control flicker.)
② Adjust the angle of back rest and foot rest with the ZERO-G button, RECLINING button and FOOT REST UP and DOWN button. (See page 13-15)
(3) Select a massaging course. (See page 16-24)
| Type of course | Features of course | Sub-courses | Features of program |
| WHOLE BODY SENSOR AUTOMATIC COURSES Custom whole body massage focused on areas of detected stiffness | Measures the degree of stiffness in each part of the body when the fingers are placed on the sensor, and massages automatically according to the result. * Massaging of each course is possible without placing fingers on the sensor. In this case the degree of stiffness is not detected. | STIFFNESS RECOVERY RELAX FINE | Firm shiatsu massage Tapping massage to ease muscle fatigue Kneading massage to relax the whole body Massage to promote blood circulation (See page 16 to 18) |
| AUTOMATIC COURSES Easy 1 or 2-button operation | Massages automatically by effective combination of grasping shoulder massaging, shiatsu, kneading, tapping, spine stretching, and lower body (air) massage. | NECK / SHOULDER course LOWER BACK course LOWER BODY course COMFORT AIR course | Massages mainly the neck and shoulders Massages mainly the waist and lower back Air massage mainly on the legs and soles of the feet When wanting to operate air massage mainly on the waist and legs (See page 19 to 20) |
| MANUAL COURSES Full programmable upper and lower body massage | Massages with your own adjustment of massage types such as grasping shoulder massaging, shiatsu, kneading, tapping, spine stretching, and lower body (air) massage. | Multiple massages for upper body, and air massaging for waist, legs, and soles. (See page 21 to 24) | |
CAUTION
- When the massaging rollers detach from the body during the Whole Body Sensor Automatic Course or the Automatic Course, the body pressure sensor will stop the operation by retracting the massaging rollers for safety. In such a case, begin the operation again from the start.
3 Turn off the power and finish the massage. (See page 26)
1 Check the cloth of the chair.
- Prior to use, be sure to raise the back pad in order to check that the cover cloth or the cloth of other parts is not torn. If a tear is found, however small, stop using the massager immediately, unplug the power source, and obtain service. If the massager is used with torn cloth, it may result in injury or electric shock.
2 Check the power cord, remote control cord and sensor controller cord.
- Check that there is neither breakage nor damage to the cords.
- Check that the cords are not caught between the back rest and the arm rest, and that they are not placed beneath the massager.
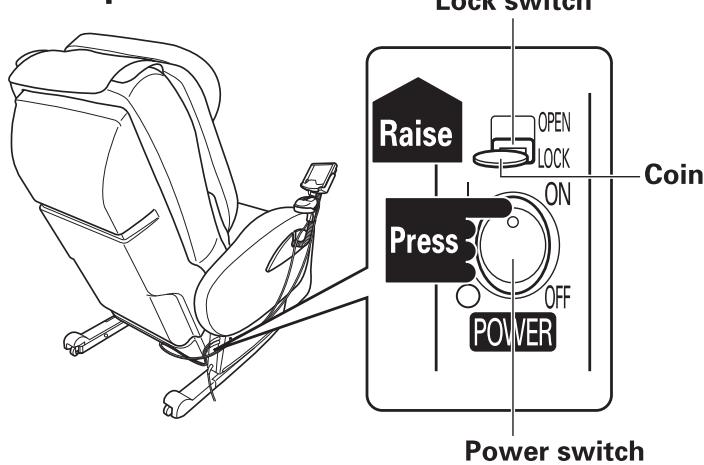
3 How to connect the power source.
① Connect the power plug to an outlet.
(2) Set the LOCK switch to the "OPEN" position, using a coin.
③ Set the POWER switch to the "ON" position. Lock switch
CAUTION when massaging
At first, do not attempt to select a strong method of massaging (until you are accustomed to massaging).
- Do not attempt to recline the back rest deeply, lean on the back rest forcibly or massage without the back pad.
- Do not attempt to continuously use the massager on one place for an extended period.
- Do not attempt to speed up the movement of the massaging rollers or increase the strength of massage. Otherwise, strong massaging at first may result in injury. Particularly, aged persons and those who have weak bones need to use the massager with great care.
WARNING
The following persons are requested to consult a doctor prior to use. Otherwise, the user may feel sick or an injury may occur.
- Those who are using self-contained medical electronic equipment that is likely to be affected by electromagnetic interference (e.g. a pacemaker)
- Those who have malignant tumors
- Those who suffer from heart trouble
- Those who have lost temperature sensitivity
- Those who are in the early-pregnancy period or in the post-delivery period
- Those who suffer from sensory disturbance caused by an advanced peripheral circulatory disturbance such as diabetes
- Those who have skin lesions
- Those who require complete rest
- Those who have a body temperature of 38^ or more (at the fever stage)
Example: those who are suffering from strong acute inflammation symptoms (fatigue, chill, blood pressure change, etc.), and from weakness
- Those who suffer from osteoporosis, and from acute painful conditions such as fracture of spine, sprain, pulled muscle, etc.
- Those who are forbidden by a doctor to receive massage Example: Those who suffer from thrombosis (embolism), severe aneurysm, acute varicose veins, various types of dermatitis, skin infections (including inflammation of subcutaneous tissue), etc.
- Those whose spine is abnormal or bent
-
Those who desire to use the massager on a part of the body that is diseased or receiving medical treatment
-
Do not use the massager on the head, the chest, the abdomen or on bones (elbow, knee, etc). In addition, do not put your hand, foot or arm between the massaging rollers. Otherwise, the user may feel sick or an injury may occur. (When massaging the nape of the neck, put a soft towel on the neck in order to avoid strong stimulation.)
CAUTION
- If discomfort or pain is felt during use, stop using the massager and consult a doctor immediately. In addition, when the massage force is felt strongly, stop using it earlier than planned. Otherwise, if the user continues using in such a way, an unexpected accident may occur.
- Aim to use the massager for up to 20 minutes each time. Limit the use of the massager on one point to 5 minutes or less. Also, the total time to massage in one day should be not more than 30 minutes in total. Otherwise, the continuous use of the massager on one point for an extended period may result in adverse effects or injury.
- Do not use the massager on bare skin.
Otherwise, an injury may occur. - Be careful not to fall asleep during massage. Otherwise, an injury may occur.
Before sitting on the massage chair
Bring all parts of the massage chair to their home position by pressing the HOME POSITION button.
- Sitting on the massage chair while the foot rest is being raised is dangerous. Be sure to lower the foot rest completely before sitting on the massage chair.
- The chair will be automatically brought to its home position by pressing the HOME POSITION button.
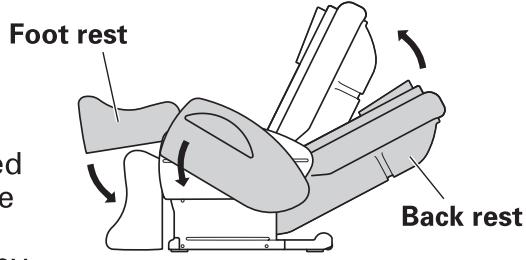
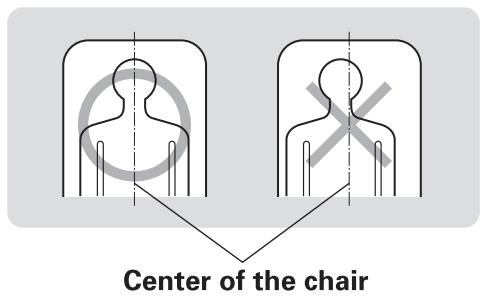
1 Sit on the center of massage chair.
- Sit deeply in the massage chair so that the waist touches the back rest.
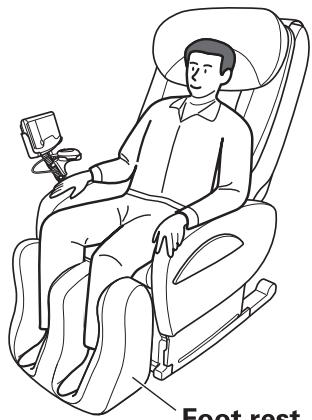
Foot rest
NOTE
- Do not attempt to climb onto or off the seat by stepping on the foot rest. Do not attempt to place anything upon or sit on the foot rest. The user may fall over, resulting in an accident or injury.
CAUTION
- For safety, check the position of the massaging rollers before leaning slowly back on the massager. Do not twist the body, but lean straight back on the massager, so that the massaging rollers are in position on either side of the spine.
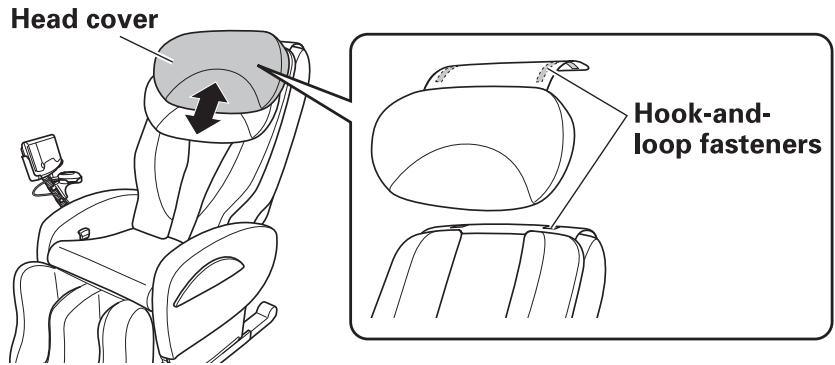
2 Adjust the position of head cover.
- Adjust the attaching position with hook-and-loop fasteners.
- During the massage, adjust the head cover not to touch the shoulders.
3 Press the OPERATION ON/OFF button.
- When the button is pressed, the lamp of the remote control illuminates and the sole warmer will turn on.
- When the foot rest is fully lowered, the foot rest will rise a little.
- When the massaging rollers are not located in the upper section, the massaging rollers will move to the upper section and stop. (During the movement, the characters of "ORIGIN" on the remote control flicker.)
4 Press ZERO-G button to move the back rest, foot rest, and the seat to achieve the desired reclining position.
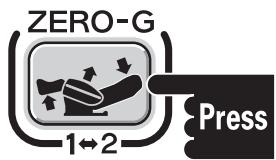
- Reclining positions change automatically at each press of the button. (Button illuminates while reclining and flickers when in position)
ZERO-G1
(Slow flickering)
ZERO-G 2
(Rapid flickering)
ZERO-G 1 (Zero gravity position 1)
Posture suited for whole body massaging
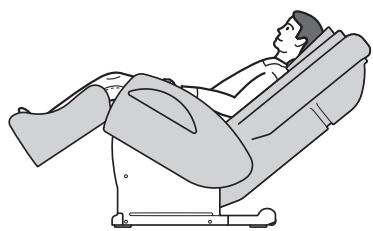
ZERO-G 2 (Zero gravity position 2)
Posture suited for lower body massaging * Automatically starts massaging in Air Course (Massaging besides Air Course cannot be selected)
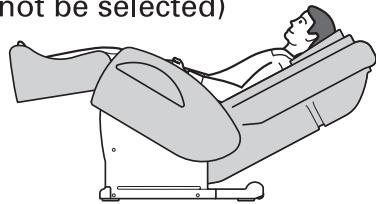
- When switched from ZERO-G 1 to 2, the foot rest is raised first, and moves to the set angle.
- When switched form ZERO-G 2 to 1, the back rest is raised first, and moves to the set angle.
- Reclining can be stopped during the reclining motion by pressing either the ZERO-G button, HOME POSITION button, RECLINING button, FOOT REST button, OPERATION ON/OFF button, or STOP button.
When the reclining motion is stopped by pressing the STOP button, press the OPERATION ON/OFF button to resume the operation.
When the reclining motion is stopped by pressing buttons other than the STOP button, press he desired button for motion.
- When back rest angle is adjusted from the ZERO-G 2, massaging other than Air Course can be selected.
5 Adjust the angle of the back rest.
The back rest and foot rest are moved in conjunction with each other.
- Keep the RECLINING button pressed until the desired angle is achieved.
RECLINING
(Remote control)
OR
(Sensor controller)
Raise the back rest, and lower the foot rest by continuously pressing the UP (▲) button.
Recline the back rest, and raise the foot rest by continuously pressing the DOWN (▶) button.
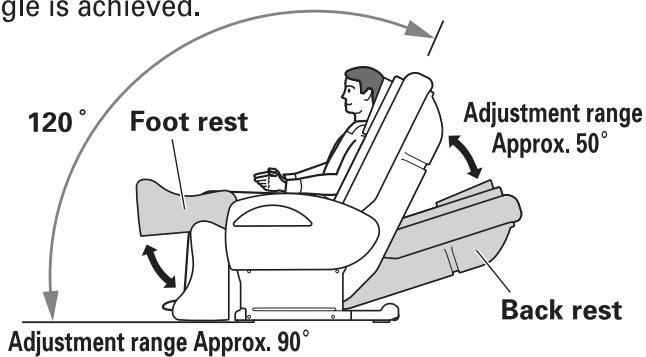
- When adjusted at ZERO-G, the seat is lowered together with the above mentioned movement. (It is not possible to adjust only the seat.)
- For the sake of safety, if the UP (▲) button is pressed with the seat raised, the foot rest may be raised briefly before going down.
NOTE
- Do not attempt to recline the back rest deeply at first (until the body is accustomed to massaging), so that the massage force may be too strong.
- Be sure to check that there is no-one or any pets around the massager prior to adjusting the back rest. It may result in an accident or injury.
- While massaging the legs, do not attempt to recline the back rest when the legs are squeezed by the air bags. Do not pull the legs out forcibly, this may result in injury to the legs.
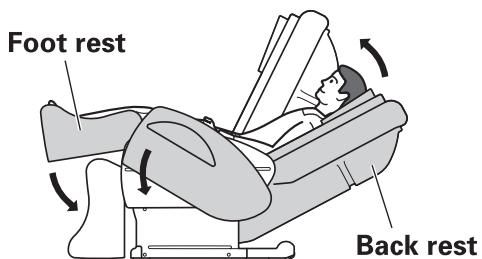
6 Adjust the angle of the foot rest.
Foot rest can be adjusted independently.
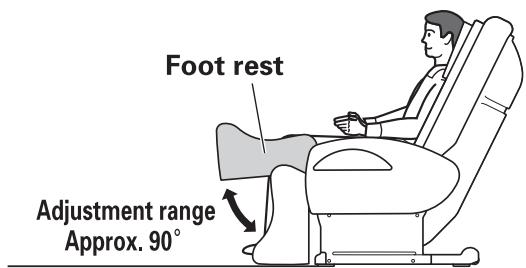
- Keep the FOOT REST button pressed until the desired angle is achieved.
- When massaging the soles or calves, adjust the angle so that the massaging part of the foot rest touches the soles or calves.
WARNING
- When the foot rest is suddenly released after being raised by hand, it will return forcibly to the previous position. For safety, be sure to lower the foot rest slowly using your hand.
FOOT REST
(Remote control)
Raise the foot rest by continuously pressing the UP (▲) button.
Lower the foot rest by continuously pressing the DOWN (▶) button.
7 Adjustment of foot rest position (length).
If the knees or the calves do not fit the foot rest, its position (length) can be adjusted.
- Keep the foot rest slide lever pulled while adjusting the foot rest. When the foot rest slide lever is released, the foot rest position is fixed. (Sliding length of foot rest: approx. 11cm(4.3"))
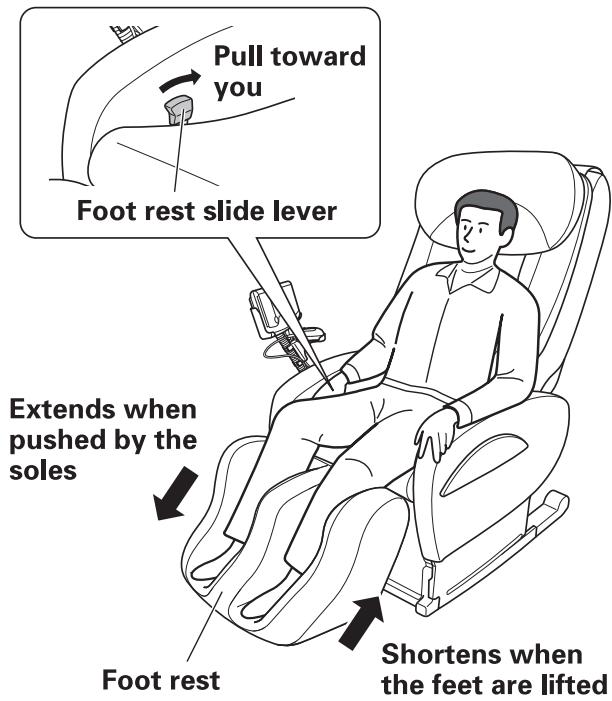
CAUTION
- Do not attempt to adjust the foot rest slide during the operation of reclining. Otherwise, the floor may be damaged.
- Do not attempt to stand on the foot rest when the foot rest slide position and angle are not completely returned to the home positions.
Otherwise, the user may fall over, resulting in an accident or an injury, and the floor may be damaged.
8 Position is returned automatically to the home position when the HOME POSITION button is pressed.
- The foot rest is raised first, and then goes down completely.

Press the OPERATION ON/OFF button.
- When the button is pressed, the lamp of the remote control illuminates and the sole warmer will turn on.
- When the foot rest is fully lowered, the foot rest will rise a little.
- When the massaging rollers are not located in the upper section, the massaging rollers will move to the upper section and stop. (During the movement, the characters of "ORIGIN" on the remote control flicker.)
2 Turn the sole warmer on or off.
-
Sole warmer will be turned on or off each time the SOLE WARMER button is pressed. (The button is illuminated while the sole warmer is on.)
-
If you feel that the sole warmer is too hot, turn it off by pressing the SOLE WARMER button.
-
When the room temperature is low such as in winter, it takes some time to warm up or you may barely feel heat.
3 Adjust the positions of the back rest and the foot rest. (See page 13-15)
4 Press the desired Whole Body Sensor Automatic Course button.
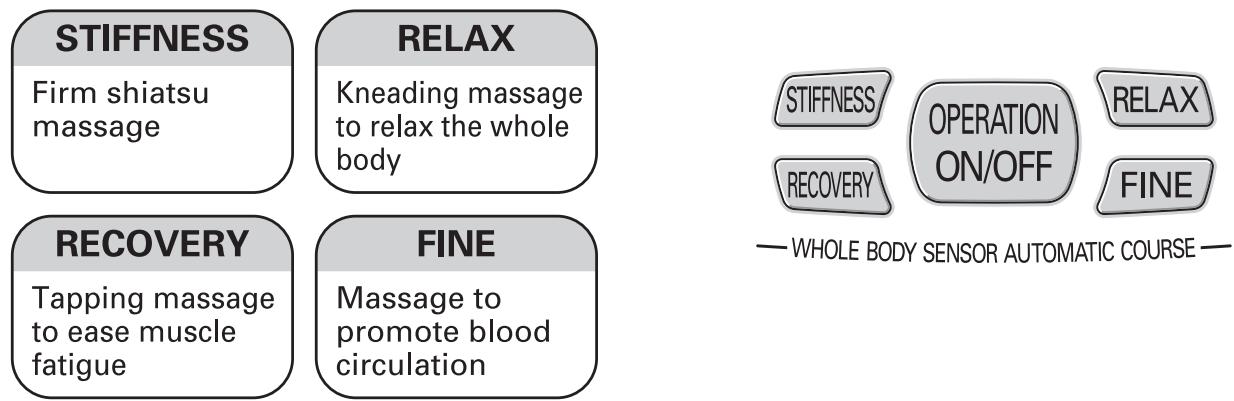
Refer to the page 27 and 28 regarding the massaging contents of Whole Body Sensor Automatic Courses.
- Change of course during massaging, or change to the Automatic Course or the Manual Course, is possible.
5 Set the sensor controller on the arm rest and place your fingers on the sensor.
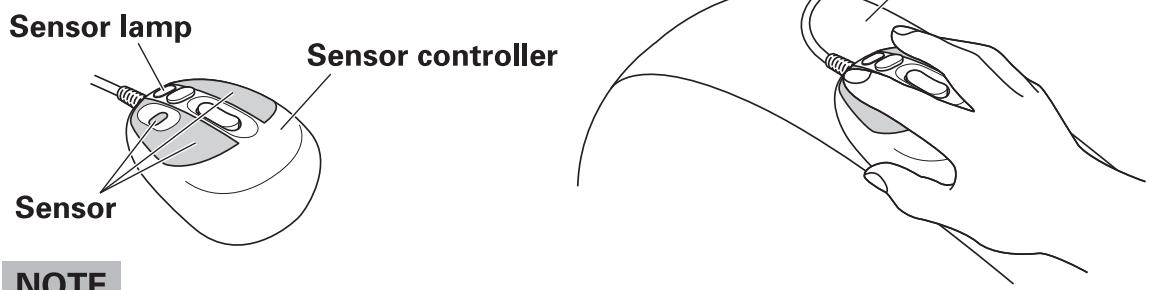
- Be sure to place your fingers on the sensor. The degree of stiffness cannot be measured if your fingers are not placed on the sensor. (The sensor lamp will flicker and the characters of "Grip the sensor" on the remote control will be illuminated.) In such a case, massages will be carried out according to the standard operation of the selected course.
- When the user's skin is dry, the degree of stiffness may not be measured correctly. In such a case, slightly moisten the fingers using hand cream and place the fingers on the sensor again.
6 Starts massaging automatically.
(1) Measure the position of shoulder.
- Check if the position of shoulder is correct. If not, adjust the position using the POSITION ADJUST button. (See page18)
② Start sensor massage.
Measures the degree of stiffness in each part of body with the sensor and informs of the degree of stiffness.
Massaging operation and the display of remote control. (See page 18)
③ Massages according to the stiffness.
Adjusts the operation and strength of standard massaging according to the measured degree of stiffness. Massaging operation and the display of remote control. (See page 18)
7 Adjust the strength of massage. (See page 18)
■ Finishes the massaging automatically by timer operation.
- Massaging rollers are moved to the upper position, and stop massaging automatically. The buzzer sounds and the lamp on the remote control will turn off.
- The massaging time differs according to the detected stiffness, but the maximum is approx. 20 minutes.
NOTE
- Massage in relaxed condition as much as possible during massage. The degree of stiffness may not be measured correctly when the user is given stimulation other than sensor massage. Examples of this are if the user massages immediately after taking a bath or while watching TV.
- The measurement result indicates the stiffness according to the body's biological reaction (the amount of perspiration from fingers or pulse) to the sensor massage, so it may differ from the stiffness the user actually feels.
To stop the massage during massaging operation.
Press the OPERATION ON/OFF button.
- All the massaging will stop and the chair will be automatically brought to its home position. (The massaging rollers are moved to the upper position and remain in that position.)
Press the button for the current operation.
- The massaging that corresponds to the pressed button will stop. (The Massaging rollers will stop at that point.)
If you have felt abnormal physical sensation or want to stop the massager immediately.
Press the INSTANT STOP button.
- All the massaging will stop and the lamp of the remote control will turn off.
- When you want to restart massaging, press the OPERATION ON/OFF button. (The massaging rollers move to the upper position and remain in that position.)
After the movement, repeat the operation from the beginning of each massage.
Measurement of shoulder position
Measure the position of shoulder and match the position of massaging rollers to that of shoulder.
Massaging rollers move up and down to measure the position of shoulder.
(Sit deeply on the massage chair and raise your head slightly. The matching of the position of shoulders may not be possible if the head is leaning on the back rest.)

Massaging operation at recognized position of shoulder.
Check that massaging rollers match
the position of your shoulder. If not, when the lamp of is flickering (a buzzer sounds), adjust the position by pressing the POSITION ADJUST button
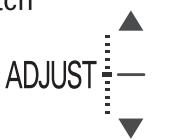
(Remote control display)
The massaging rollers are moved up or down by 1cm(0.4^ ) each time the POSITION ADJUST button is pressed.
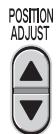
When it is difficult to adjust with POSITION ADJUST button, move your body for adjustment. The height that can be adjusted is between approx. 150cm(59") to 180cm(70.8").
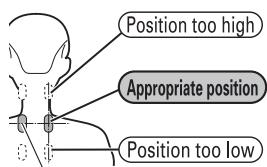
Massaging rollers

Decides the position of shoulder.
Massaging operation and display of remote control
- Displays the aim of massaging positions, the type of massaging, the stiffness, body pressure and the remaining massaging time on the remote control.
Explanation with an example of STIFFNESS
SENSOR MASSAGE
Measurement of the degree of stiffness.
The sensor will display the positions of stiffness (those where stiffness has been felt) by measuring the amount of perspiration from fingers and pulse in reaction to sensor massage.
When measuring the degree of stiffness, the result is displayed by the ring around the REPEAT! (See page 7) When the measurement is over, a buzzer sounds.
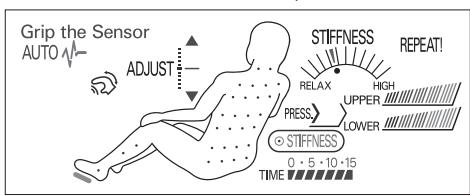

Displays the position where the stiffness has been detected.
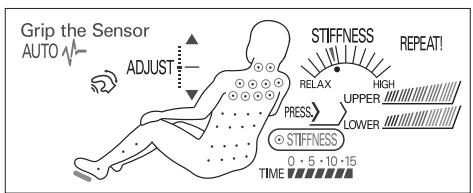

Massaging according to the degree of stiffness
Shiatsu massaging
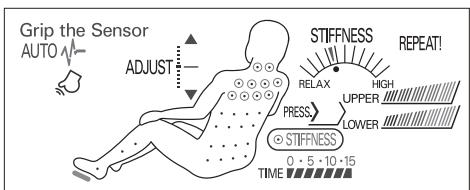
Adjusting the strength of massage


- Each time the UPPER BODY STRENGTH ADJUST button is pressed, the strength of upper body massaging can be adjusted in five stages. (The strength is displayed by the lamp on the remote control.)
Each time the LOWER BODY STRENGTH ADJUST button is pressed, the strength of lower body massaging (air) can be adjusted in three stages. (The strength is displayed by the lamp on the remote control.) - If you continue to press the "▼" button until the illumination of the lower body strength scale turns off, you can turn off the massaging of the lower body. If you press the "▲" button, the massaging will resume.
UPPER
LOWER
LOWER
NOTE
- When it is felt that the massaging on the soles or calves is too strong even when reducing the strength of lower body (air) massaging, put a towel etc. on those massaged parts.
Press the OPERATION ON/OFF button.
- When the button is pressed, the lamp of the remote control illuminates and the sole warmer will turn on.
- When the foot rest is fully lowered, the foot rest will rise a little.
- When the massaging rollers are not located in the upper section, the massaging rollers will move to the upper section and stop. (During the movement, the characters of "ORIGIN" on the remote control flicker.)
2 Turn the sole warmer on or off.
- Sole warmer will be turned on or off each time the SOLE WARMER button is pressed. (The button is
-
illuminated while the sole warmer is on.) If you feel that the sole warmer is too hot, turn it off by pressing the SOLE WARMER button.
-
When the room temperature is low such as in winter, it takes some time to warm up or you may barely feel warm.
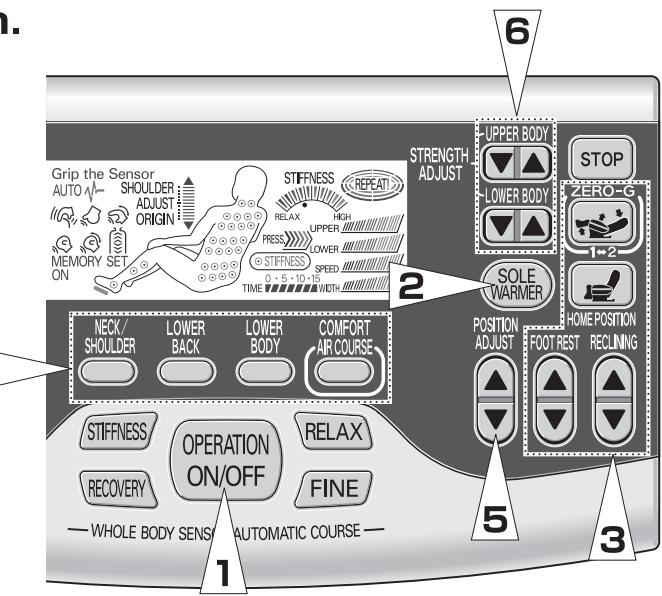
3 Adjust the positions of the back rest and the foot rest. (See page 13-15)
4 Press the desired Automatic Course button.
NECK/SHOULDER
Massages mainly the neck and shoulders.
LOWER BACK
Massages mainly the waist and lower back.
LOWER BODY
Air massage mainly on the legs and soles of the feet.
COMFORT AIR COURSE
Air massage mainly on the waist and legs.
- Lower Body can be operated simultaneously with Neck/Shoulder or Waist.
- Air Course cannot be operated simultaneously with any other courses.
Refer to the page 28 regarding the massaging contents of Automatic Course. - Change of course during massaging, or change to the Whole Body Sensor Automatic Course or the Manual Course, is possible.
5 Starts the massaging automatically.
(1) Measure the position of shoulder.
- Check if the position of shoulder is correct. If not, adjust the position using the POSITION ADJUST button. (See page 20)
(2)Starts the massaging of selected course.
6 Adjust the strength of massage. (See page 20)
■ Finishes the massaging automatically by timer operation.
- The massaging rollers are moved to the upper position and are stopped automatically approx. 15 minutes after starting the operation. The buzzer sounds and the lamp on the remote control will turn off.
To stop the massage during massaging operation.
Press the OPERATION ON/OFF button.
- All the massaging will stop and the chair will be automatically brought to its home position. (The massaging rollers are moved to the upper position and remain in that position.)
Press the button for the current operation.
- The massaging that corresponds to the pressed button will stop. (The Massaging rollers will stop at that point.)
If you have felt abnormal physical sensation or want to stop the massager immediately
Press the INSTANT STOP button.
- All the massaging will stop and the lamp of the remote control will turn off.
- When you want to restart massaging, press the OPERATION ON/OFF button. (The massaging rollers move to the upper position and remain in that position.)
After the movement, repeat the operation from the beginning of each massage.
Measurement of shoulder position
Measure the position of shoulder and match the position of massaging rollers to that of shoulder.
Massaging rollers move up and down to measure the position of shoulder.
(Sit deeply on the massage chair and raise your head slightly. The matching of the position of shoulders may not be possible if the head is leaning on the back rest.)

Massaging operation at recognized position of shoulder.
Check that massaging rollers match
the position of your shoulder.
If not, when the lamp of is flickering (a buzzer sounds), adjust the position by pressing the POSITION ADJUST button.
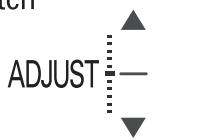
(Remote control display)
The massaging rollers are moved up or down by 1cm(0.4^ ) each time the POSITION ADJUST button is pressed.

When it is difficult to adjust with POSITION ADJUST button, move your body for adjustment. The height that can be adjusted is between approx. 150cm(59^ ) to 180cm(70.8^ )
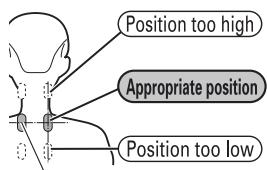
Massaging rollers

Decides the position of shoulder.
Massaging operation and display of remote control
- Displays the aim of massaging positions, the type of massaging, body pressure and the remaining massaging time on the remote control.
Explanation with an example of NECK/SHOULDER
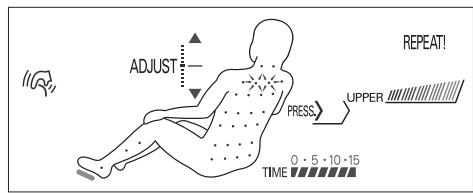
The position of current massage flickers

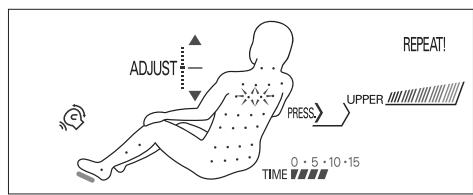
Massaging neck/shoulder mainly

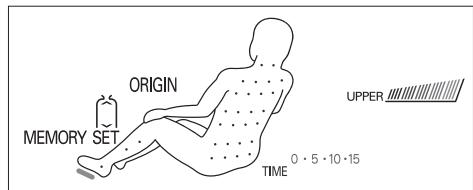
Finishes the massaging by the operation of the timer. (After the massaging rollers return to the origin, the lamp on the remote control will turn off)
Adjusting the strength of massage

- Each time the UPPER BODY STRENGTH ADJUST button is pressed, the strength of upper body massaging can be adjusted in five stages. (The strength is displayed by the lamp on the remote control.)
UPPER

- Each time the LOWER BODY STRENGTH ADJUST button is pressed, the strength of lower body massaging (air) can be adjusted in three stages. (The strength is displayed by the lamp on the remote control.)
LOWER
NOTE
- When it is felt that the massaging on the soles or calves is too strong even when reducing the strength of lower body (air) massaging, put a towel etc. on those massaged parts.
Massaging of upper body
Press the OPERATION ON/OFF button.
- When the button is pressed, the lamp of the remote control illuminates and the sole warmer will turn on.
- When the foot rest is fully lowered, the foot rest will rise a little.
- When the massaging rollers are not located in the upper section, the massaging rollers will move to the upper section and stop.
(During the movement, the characters of "ORIGIN" on the remote control flicker.)
2 Turn the sole warmer on or off.
- Sole warmer will be turned on or off each time the SOLE WARMER button is pressed.
(The button is illuminated while the sole warmer is on.) -
If you feel that the sole warmer is too hot, turn it off by pressing the SOLE WARMER button.
-
When the room temperature is low such as in winter, it takes some time to warm up or you may barely feel warm.
3 Adjust the positions of the back rest and the foot rest. (See page 13-15)
4 Open the cover of the remote control.
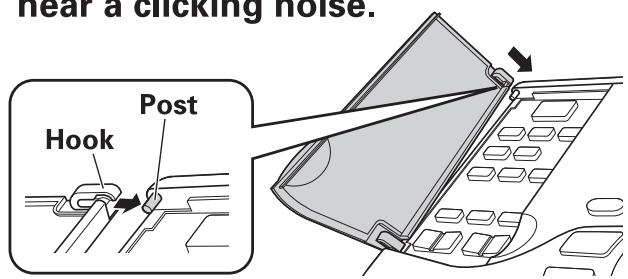
- If an excessive force is applied to the cover, it may be detached. In such a case, re-attach the cover according to the following procedure.
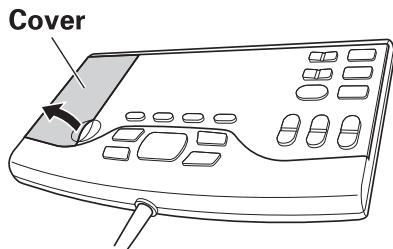
How to attach the cover
(1) Place the hook on the underside of
cover around the on the underside of the remote control.
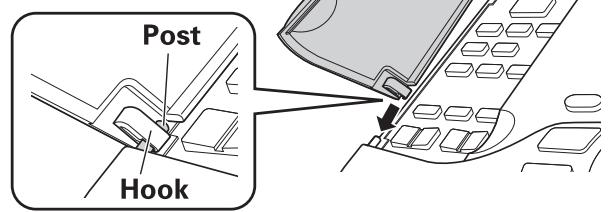
② Slide the hook on the upper side of cover around the post on the upper side of the remote control until you hear a clicking noise.
5 Press the MANUAL button.
MANUAL button
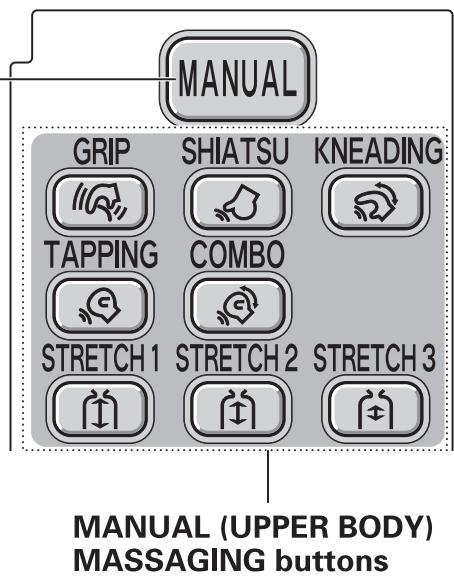
6 Press the desired MANUAL (UPPER BODY) MASSAGING button.
Refer to page 23 for details of the contents of massage.
- For grasping shoulder massaging and spine stretching, shoulder position is first measured. When the position of shoulder is not correct, adjust the position of massaging rollers. (See page 18)
- During massaging operation, the operation can be changed to other manual massage, Whole Body Sensor Automatic Course or Automatic Course.
- It is possible to operate the upper body massage and lower body massage simultaneously.
* The massage will not start without pressing MANUAL button, even if the MANUAL (UPPER BODY) MASSAGING buttons are pressed. (In such a case, the MANUAL button flickers five times.)
7 Adjust the height, width, speed, and strength of the massaging rollers.
- There are some adjustments which are not possible, depending on the type of massage chosen. (See page 23)
Adjusting the height of massaging rollers.

POSITION ADJUST
Press the button.
The massaging rollers will move up if the UP(▲) button is pressed continuously and move down if the DOWN(▼) button is pressed continuously.
- The approximate position of the massaging rollers is indicated by the lamp on the remote control.
Adjusting the movement speed of massaging rollers.

Press the button.
- The speed of the massaging rollers will change each time the button is pressed, and is indicated by the lamp on the remote control. (in five stages)
Adjusting the width of the massaging rollers.

Press the button.
- The width of the massaging rollers will change each time the button is pressed and is indicated by the lamp on the remote control. (in five stages)
WIDTH
Adjusting the strength of the massage.

UPPERBODY
Press the button.
- The strength of the massage will change each time the button is pressed, and is indicated by the lamp on the remote control. (in five stages) UPPER
■ Finishes the massaging automatically by timer operation.
- The massaging rollers are moved to the upper position and are stopped automatically approx. 15 minutes after starting the operation. The buzzer sounds and the lamp on the remote control will turn off.
- If a different course button (manual) is pressed during the course of operation, the massage will be completed by operation of the timer approx. 30 minutes after starting the massage selected first.
To stop the massage during massaging operation.
Press the OPERATION ON/OFF button.
- All the massaging will stop and the chair will be automatically brought to its home position. (The massaging rollers are moved to the upper position and remain in that position.)
Press the button for the current operation.
- The massaging that corresponds to the pressed button will stop. (The Massaging rollers will stop at that point.)
If you have felt abnormal physical sensation or want to stop the massager immediately.
Press the INSTANT STOP button.
- All the massaging will stop and the lamp of the remote control will turn off.
- When you want to restart massaging, press the OPERATION ON/OFF button. (The massaging rollers move to the upper position and remain in that position.)
After the movement, repeat the operation from the beginning of each massage.
Kinds of massages and adjustments of massaging rollers
Several types of desired massage can be selected.
It is possible to adjust the movement speed, height position and width of massaging rollers and the strength of massage.
(There are some adjustments that are not possible, depending on the kind of massaging. Refer to the table below.)
| Kinds of massage | Operation | Adjustment of massaging rollers |
| GRIP | Massaging by grasping the shoulders. | Height, speed and strength are adjustable. |
| SHIATSU | Shiatsu massaging. | Height, speed, width and strength are adjustable. |
| KNEADING | Kneading. | Height, speed and strength are adjustable. |
| TAPPING | Tapping. | Height, speed, width and strength are adjustable. |
| COMBO | Combined tapping and kneading actions. | Height, speed and strength are adjustable. |
| STRETCH1 | Spinal stretch along the entire length of back. | Height, width and strength are adjustable. |
| STRETCH2 | Spinal stretch along 20cm(8") region of back. | Height, width and strength are adjustable. |
| STRETCH3 | Spinal stretch along 10cm(4") region of back. | Height, width and strength are adjustable. |
| SHIATSU + STRETCH1 | Massaging by spine stretching, while executing shiatsu operation. | Height, speed, width and strength are adjustable. |
| SHIATSU + STRETCH2 | Massaging by partial stretching (long), while executing shiatsu operation. | Height, speed, width and strength are adjustable. |
| SHIATSU + STRETCH3 | Massaging by partial stretching (short), while executing shiatsu operation. | Height, speed, width and strength are adjustable. |
| KNEADING + STRETCH1 | Massaging by spine stretching, while executing kneading operation. | Height, speed and strength are adjustable. |
| KNEADING + STRETCH2 | Massaging by partial stretching (long), while executing kneading operation. | Height, speed and strength are adjustable. |
| KNEADING + STRETCH3 | Massaging by partial stretching (short), while executing kneading operation. | Height, speed and strength are adjustable. |
| TAPPING + STRETCH1 | Massaging by spine stretching, while executing tapping operation. | Height, speed, width and strength are adjustable. |
| TAPPING + STRETCH2 | Massaging by partial stretching (long), while executing tapping operation. | Height, speed, width and strength are adjustable. |
| TAPPING + STRETCH3 | Massaging by partial stretching (short), while executing tapping operation. | Height, speed, width and strength are adjustable. |
| COMBO + STRETCH1 | Massaging by spine stretching, while executing tapping and kneading operation. | Height, speed and strength are adjustable. |
| COMBO + STRETCH2 | Massaging by partial stretching (long), while executing tapping and kneading operation. | Height, speed and strength are adjustable. |
| COMBO + STRETCH3 | Massaging by partial stretching (short), while executing tapping and kneading operation. | Height, speed and strength are adjustable. |
Massaging of lower body
- Simultaneous massaging of any part of "upper body" and "lower body (air)" is possible.
Independent massaging of "upper body" and "lower body (air)" is possible. - 1 to 5 are the same operation for massaging the upper body. When massaging the upper body, start from operation 6.
Press the OPERATION ON/OFF button.
- When the button is pressed, the lamp of the remote control illuminates and the sole warmer will turn on.
- When the foot rest is fully lowered, the foot rest will rise a little.
- When the massaging rollers are not located in the upper section, the massaging rollers will move to the upper section and stop. (During the movement, the characters of "ORIGIN" on the remote control flicker.)
2 Turn the sole warmer on or off.
- Sole warmer will be turned on or off each time the SOLE WARMER button is pressed. (The button is illuminated while the sole warmer is on.)
-
If you feel that the sole warmer is too hot, turn it off by pressing the SOLE WARMER button.
-
When the room temperature is low such as in winter, it takes some time to warm up or you may barely feel warm.
3 Adjust the positions of the back rest and the foot rest. (See page 13-15)
4 Open the cover of the remote control.
Press the MANUAL button.
6 Press the desired MANUAL (LOWER BODY) MASSAGING button.
- During massaging operation, you can change to a different manual massage, Whole Body Sensor Automatic Course, or Automatic Course.
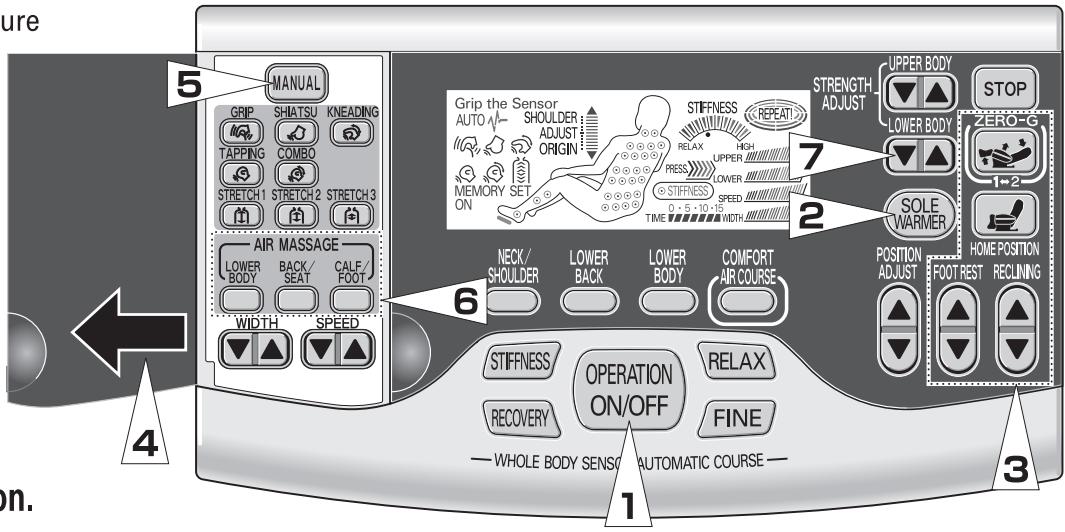
LOWER BODY
Air massage of the waist, legs and soles of the feet.
BACK/SEAT
Air massage of the seat and lower back.
CALF/FOOT
Air massage of the legs and soles of the feet.
7 By pressing the LOWER BODY strength adjustment button, adjust the strength of massage.
- The strength of massage will change each time the button is pressed, and is indicated by the lamp on the remote control.
LOWER
■ Finishes the massaging automatically by timer operation.
- It will stop automatically approx. 15 minutes after starting the operation. The buzzer sounds, and the display part of the remote control turns off.
To stop the massage during massaging operation.
Press the OPERATION ON/OFF button.
- All the massaging will stop and the chair will be automatically brought to its home position.
Press the button for the current operation.
- The massaging that corresponds to the pressed button will stop.
If you have felt abnormal physical sensation or want to stop the massager immediately
Press the INSTANT STOP button.
- All the massaging will stop and the lamp of the remote control will turn off.
- When you want to restart massaging, press the OPERATION ON/OFF button and repeat the operation from the beginning of each massage.
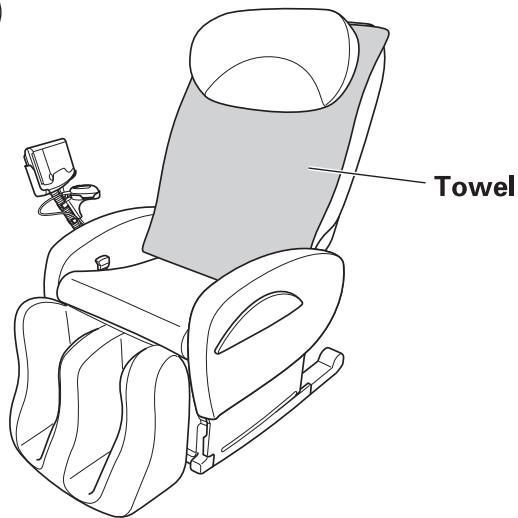
When the massage is too strong
Use the massager after placing a towel, etc., on the back pad.
When the massage is too weak
Flip the back pad to the rear.
(1) Take off the head cover from the back pad.
② Flip the back pad to the rear.
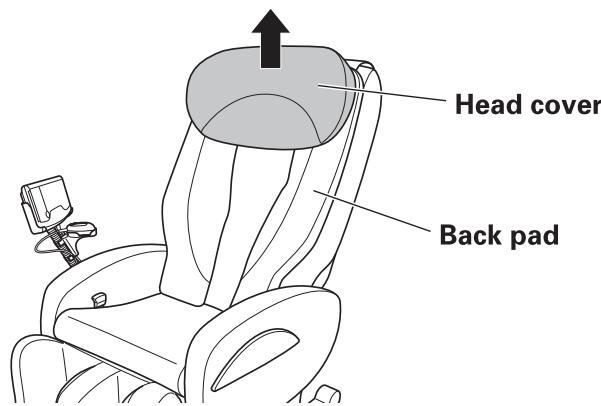
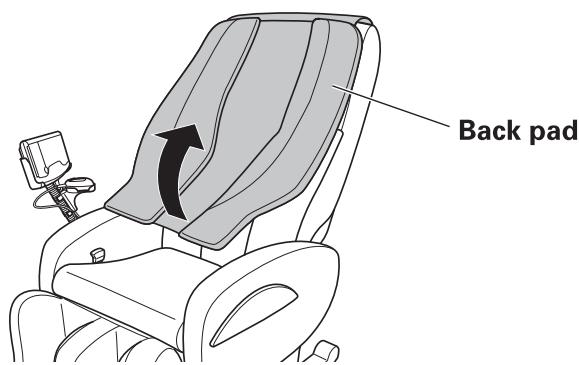
(3) Attach the head cover to the back rest.
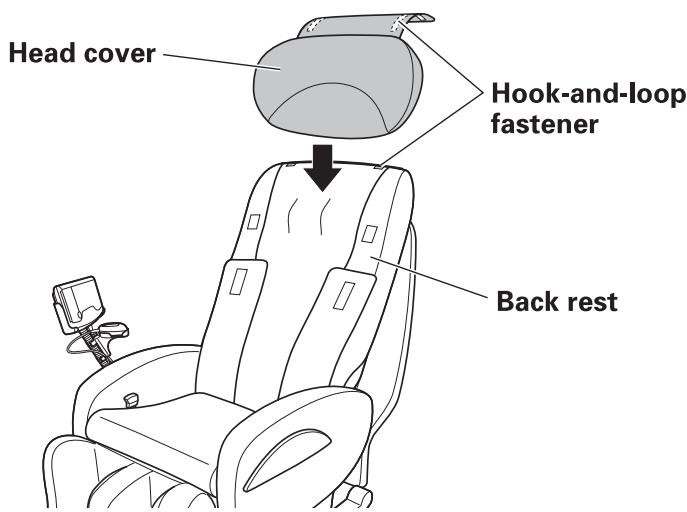
CAUTION
- After use, be sure to set the POWER switch to the [OFF] position, and the LOCK switch to the [LOCK] position.
- When the equipment will not be used for an extended period, be sure to disconnect the power plug from the outlet.
1 Set the back rest and the foot rest to the starting position.
① When the foot rest is extended, return the foot rest to the home position by pulling the foot rest slide lever.
(2) Bring all parts of the massage chair to their home position by pressing the HOME POSITION button.
- Be sure to check that there are no children, pets, or any obstacles around the massager.
2 Turn off the POWER.
① When the display part of the remote control does not turn off, press the OERATION ON/OFF button.
- Close the cover of remote control.
- Put the remote control and the sensor controller back on the stand.
② Set the POWER switch to the [OFF] position, and the LOCK switch to the [LOCK] position using a coin.
MAINTENANCE PROCEDURES
WARNING
- Be sure to disconnect the power plug from the outlet prior to maintenance.
NOTE
- Do not attempt to use benzene, thinner, alcohol, alkaline detergent or bleaching agent for cleaning, as this may result in deformation, discoloration or cracking.
- Do not wash the head cover or the back pad. This may cause discoloration or deformation.
HEAD COVER, BACK PAD, SEAT COVER, ARM REST
- Perform daily maintenance by wiping with a soft dry cloth. When they are badly soiled, adopt the following maintenance procedure:
① Soak a soft cloth in diluted neutral kitchen detergent, and squeeze it well. Wipe the main unit with the damp cloth in a tapping motion.
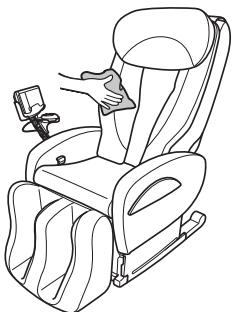
(2) Soak a cloth in clean water, and squeeze it well. Wipe off the remaining detergent with the damp cloth.
③ Wipe it with a dry cloth afterwards.
- Do not force-dry with a drier.
- Do not make contact with vinyl products for an extended period. It may cause discoloration.
MAIN UNIT (Plastic parts and frame)
- Soak a soft cloth in diluted neutral kitchen detergent, and squeeze it well. Wipe the main unit with the damp cloth, and wipe it with a dry cloth afterwards.
REMOTE CONTROL, SENSOR CONTROLLER
- Wipe with a soft dry cloth.
- Do not wipe with a damp cloth.
Standard massage in STIFFNESS Course
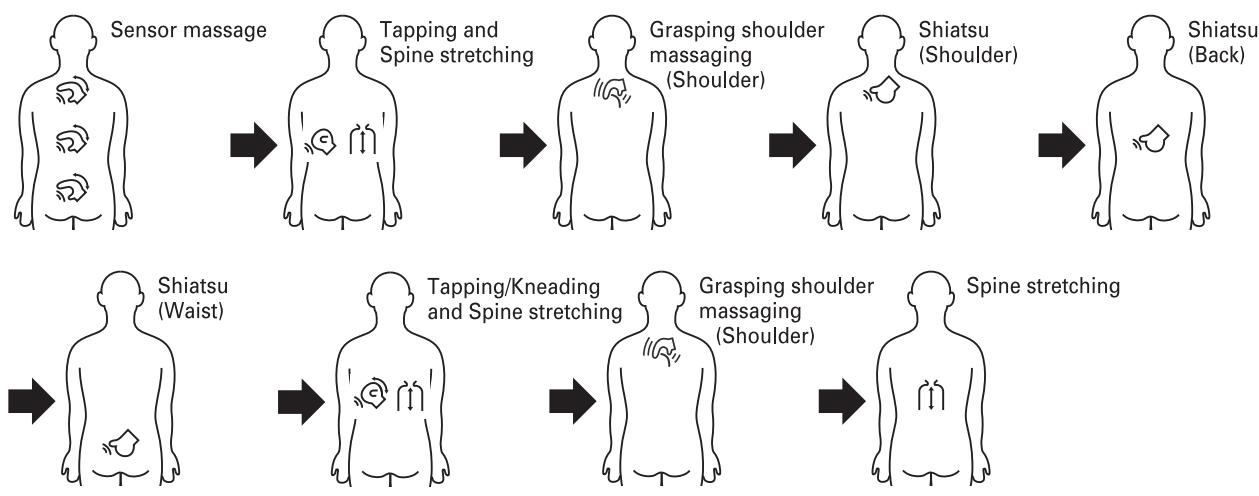
Standard massage in RECOVERY Course

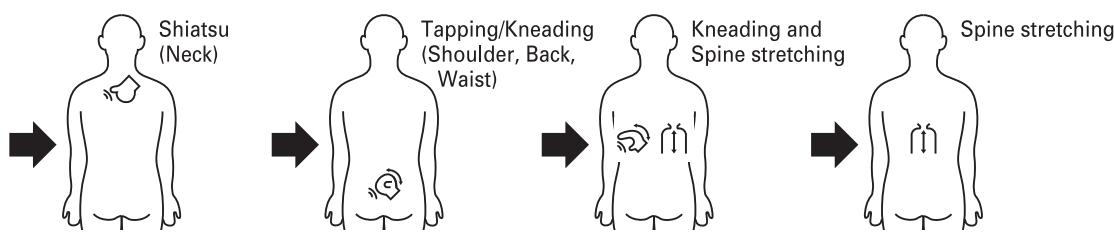
Standard massage in RELAX Course

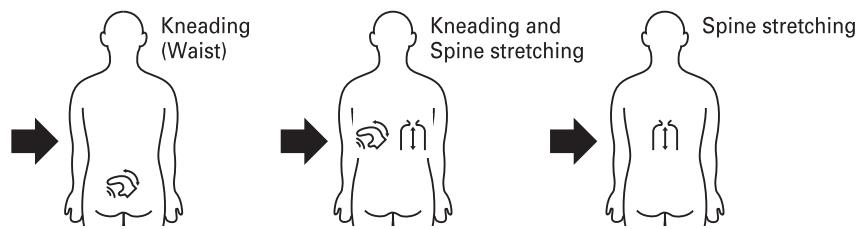
Standard massage in FINE Course
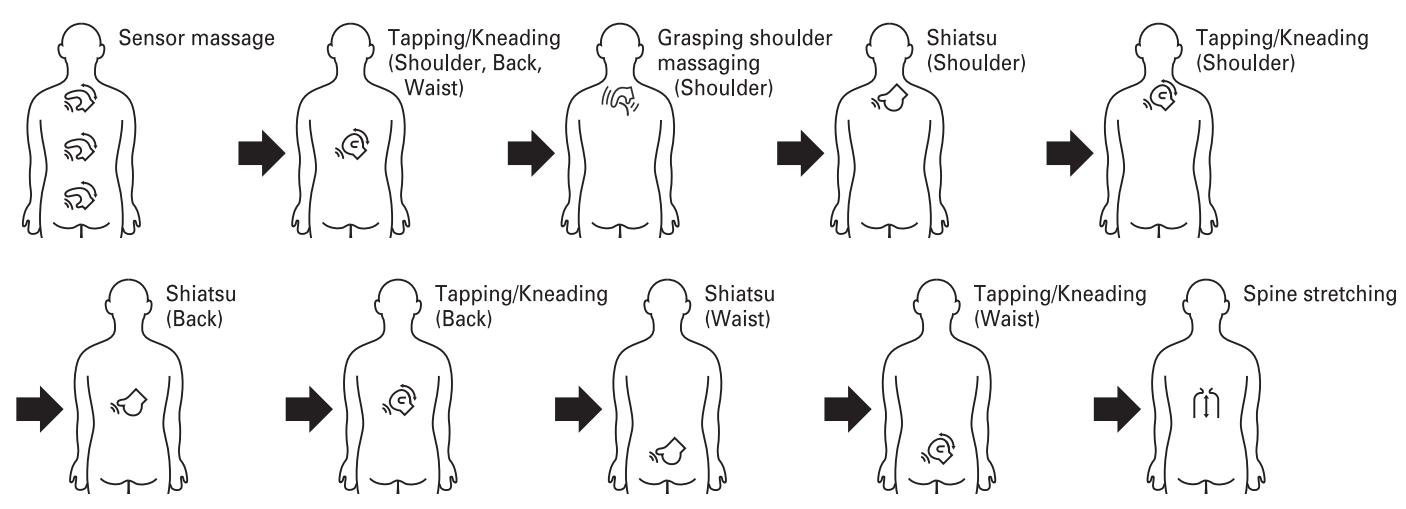
NECK/SHOULDER Course
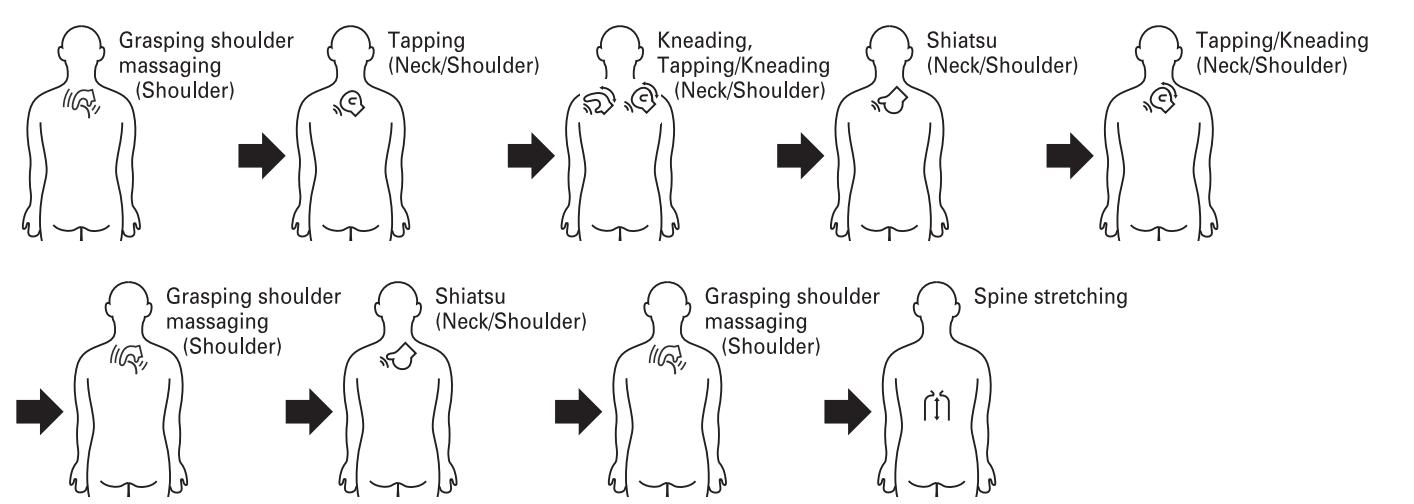
LOWER BACK Course
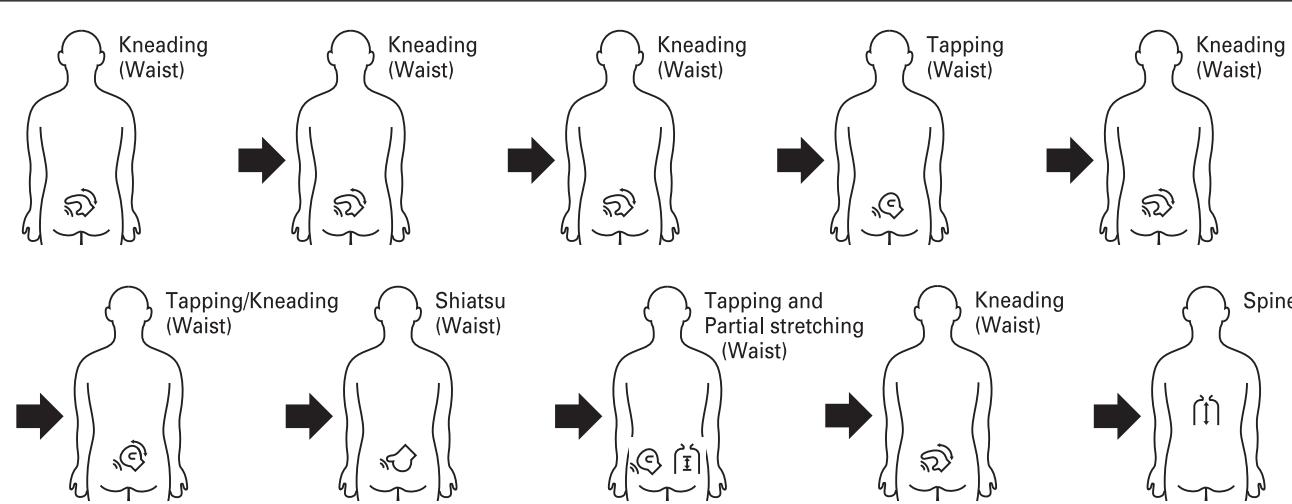
WARNING
- If the trouble still persists even after the following proper countermeasures have been taken, stop using the massager to avoid possible accidents. Disconnect the power plug from the outlet and consult an authorized service center. Do not attempt to repair the equipment at home by yourself, as it is very dangerous.
Sound and sensation during operation
During use, the following sounds or sensation may be unavoidably generated because of its structure, but they are not problems. (They will not affect the function, etc.)
Rattling sound during tapping
- Noise during UP/DOWN operation of massaging rollers and clinking sound during massaging operation
- Creaking sound caused by massaging rollers and cloth during massaging operation.
Gear meshing sound
Wobbling foot rest
"Gee" sound when reclined
Sound of air massage
"Pusshu" sound (Change valve sound)
Hisping sound (Exhaust sound)
"Buu" sound (Sound of pump operation)
"Pako" sound (Sound when the air bag fills)
- When massaging the waist, slight sounds or shock being generated from the massaging rollers
- Bouncing movement of the massaging rollers when they move from the back to the shoulder
| Type of Trouble | Check points | Countermeasure |
| Operation failure | Check that the power plug is securely plugged into the outlet. | Push the power plug into the outlet securely.(See page 12) |
| Check that the POWER switch is set to the ON position. | With the LOCK switch set to unlock, turn on the POWER switch.(See page 12) | |
| Make sure that no more than one button is being pressed at any one time. | Please press each button separately. | |
| Courses other than Air Course cannot be selected. | Check if the chair is set to the ZERO-G 2. | After adjusting the angle of back rest, select the massaging button. |
| Movement of massaging rollers in upward direction, causing operation to stop | This phenomenon is caused by the operation of the timer, but is not a problem. | |
| The operation stops in the middle of massaging in the Whole Body Sensor Automatic Course or Automatic Course | When the massaging rollers detach from the body, the body pressure sensor will work to stop the operation automatically. | Begin the operation again from the start.(See page 11) |
| The foot rest cannot be extended. | Check if you attempt to adjust the foot rest with the foot rest slide lever pulled. | Adjust the foot rest with the foot rest slide lever pulled. |
| The foot rest cannot be stored. | Check that the foot rest is not extended. | Return the foot rest by pulling the foot rest slide lever. |
| You feel discomfort during the operation of reclining.(Move toward to the opposite direction temporarily, or do not move smoothly.) | This operation is conducted for safety, but is not a problem. | |
| The position of massaging rollers differ between right and left. | This phenomenon is caused by the adoption of the function of alternative tapping on the right and left sides, but is not a problem. | |
| The display of stiffness differs from the degree of stiffness actually felt. | Check if your fingers are placed on the sensor. | Place your fingers on the sensor.(See page 16) |
| The measurement result indicates the stiffness according to the body's biological reaction to the sensor massage, so it may differ from the stiffness the user actually feels. | ||
| Massage in relaxed condition as much as possible during massage. The degree of stiffness may not be measured correctly when the user massages immediately after taking a bath or is given stimulation other than sensor massage, like watching TV. | ||
| The degree of stiffness cannot be measured correctly. | Check your skin for dryness. | Slightly moisten the fingers using hand cream and place the fingers on the sensor again. |
| Power consumption | 290 W |
| Power dissipation of electric heating equipment | 33 W |
| Rated time | 30 min. |
| Timer | WHOLE BODY SENSOR AUTOMATIC COURSE · · · Approx. 15 minutes (Maximum of approx. 20 minutes due to stiffness detection)AUTOMATIC COURSE · · · · · · · · · · · · · · · · · · · · · · · · · · · · · · · · · · · · · · · · · · · · · · · · · · · · · · · · · · · · · · · · · · · · · · · · · · · · · · · · · · · · · · · · · · · · · · · · · · · · |
| Dimensions | 730 mm(28 3/4") [width] × 1,350 mm(53 1/8") [depth] × 1,220 mm(48") [height] * When not reclined (with foot rest retracted) |
| 730 mm(28 3/4") [width] × 1,840 mm(72 7/16") [depth] × 760 mm(29 15/16") [height] * When reclined (with foot rest set horizontally) | |
| Weight | Approx. 83 kg(183 lbs.) |
| Accessories | Stand, Installation screws (Three) |
| Exterior cloth | Synthetic leather |
| Kneading frequency | (5 stages) Approx. 10 ~ 30 times/min. |
| Tapping frequency | (5 stages) Approx. 300 ~ 600 times/min. |
| Tapping width | (5 stages) Approx. 70 ~ 130 mm(3 ~ 5") |
| Vertical movement speed | One up/down pass in approx. 35 sec. |
| Spine stretching width | (5 stages) Approx. 70 ~ 130 mm(3 ~ 5") |
| Range of partial stretching | Partial stretching (Long): Repetition within Approx. 200 mm(8") Partial stretching (Short): Repetition within Approx. 100 mm(4") |
| Vertical stroke length | Approx. 790 mm(31") |
| Height adjustment of massaging rollers | No gradation or 1 cm(3/8")/one press of button |
| Reclining angle | Approx. 120 ~ 170° |
| Reclining method | Back rest: Motor-driven type (Linked with foot rest) Foot rest: Motor-driven type (Foot rest only) Seat surface: Motor-driven type (Linked with back rest and foot rest) |
| Lower body massaging (Air pressure) | (3 stages) Approx. 23 ~ 32 kPa * There is a slight difference according to the part. |
Do not use the massager on other than the designated voltage.
- INSTRUCTION MANUAL Massage Lounger
- HEC-DR7750
- CONTENTS
- PAGE
- DANGER
- WARNING
- Polarization Instructions
- Grounding Instructions
- Remote control
- MANUAL SELECT button
- MANUAL (UPPER BODY)
- MASSAGE buttons
- MANUAL (LOWER BODY)
- COVER
- HOME POSITION button
- ZERO-G button
- INSTANT STOP button
- UPPER BODY STRENGTH ADJUST buttons
- LOWER BODY STRENGTH ADJUST buttons
- SOLE WARMER button
- WIDTH ADJUST buttons
- SPEED ADJUST buttons
- AUTOMATIC COURSE buttons
- WHOLE BODY SENSOR AUTOMATIC COURSE buttons
- OPERATION ON/OFF button
- POSITION ADJUST buttons
- FOOT REST buttons
- RECLINING buttons
- WHOLE BODY SENSOR AUTOMATIC COURSE display
- MASSAGE OPERATION display
- SOLE WARMER display
- (Sensor controller
- Sensor lamp
- Sensor
- PRESSURE display
- STIFFNESS display
- REPEAT! display
- MASSAGE ADJUST display
- Repeat button
- How to move the massager
- Raise the back rest.
- NOTE
- Raise the front side of the massager, and move it using the casters.
- Decide where to place it
- Lay a carpet, etc. on the set-up place.
- Ensure there is sufficient space to allow the massager to recline.
- Installation on the right-hand side of the chair
- Remove the cover of the right-hand side of the arm rest.
- Secure the stand on the right-hand side of the arm rest, using the installation screws (3 screws).
- Place the cover on the right-hand side of the arm rest.
- Put the remote control on the remote control stand (upper part). Put the sensor controller on the sensor controller stand (lower part).
- Put the cords of the remote control and the sensor controller in the hooks of the sensor controller stand.
- Installation on the left-hand side of the chair
- Remove the covers on the outer sides of the arm rests.
- Secure the stand on the left-hand side of the arm rest, using the installation screws (3 screws).
- Place the covers on the outer sides of the arm rests.
- Uninstall the cord hook from the right-hand side of the arm rest, and install it on the left-hand side.
- Put the cords of the remote control and sensor controller in the cord hook on the back of the body.
- Put the remote control on the remote control stand (upper part). Put the sensor controller on the sensor controller stand (lower part).
- Put the cords of the remote control and the sensor controller in the hooks of the sensor controller stand.
- Turn on the power. (See page 12)
- Massaging.
- CAUTION
- Turn off the power and finish the massage. (See page 26)
- Check the cloth of the chair.
- Check the power cord, remote control cord and sensor controller cord.
- How to connect the power source.
- CAUTION when massaging
- Before sitting on the massage chair
- Bring all parts of the massage chair to their home position by pressing the HOME POSITION button.
- Sit on the center of massage chair.
- Adjust the position of head cover.
- Press the OPERATION ON/OFF button.
- Press ZERO-G button to move the back rest, foot rest, and the seat to achieve the desired reclining position.
- Adjust the angle of the back rest.
- The back rest and foot rest are moved in conjunction with each other.
- Adjust the angle of the foot rest.
- Foot rest can be adjusted independently.
- Adjustment of foot rest position (length).
- If the knees or the calves do not fit the foot rest, its position (length) can be adjusted.
- Position is returned automatically to the home position when the HOME POSITION button is pressed.
- Press the OPERATION ON/OFF button.
- Turn the sole warmer on or off.
- Adjust the positions of the back rest and the foot rest. (See page 13-15)
- Press the desired Whole Body Sensor Automatic Course button.
- Set the sensor controller on the arm rest and place your fingers on the sensor.
- Starts massaging automatically.
- Adjust the strength of massage. (See page 18)
- ■ Finishes the massaging automatically by timer operation.
- To stop the massage during massaging operation.
- Press the button for the current operation.
- If you have felt abnormal physical sensation or want to stop the massager immediately.
- Press the INSTANT STOP button.
- Measurement of shoulder position
- Massaging operation and display of remote control
- SENSOR MASSAGE
- Adjusting the strength of massage
- Press the desired Automatic Course button.
- NECK/SHOULDER
- LOWER BACK
- LOWER BODY
- COMFORT AIR COURSE
- Starts the massaging automatically.
- Adjust the strength of massage. (See page 20)
- If you have felt abnormal physical sensation or want to stop the massager immediately
- Massaging of upper body
- Open the cover of the remote control.
- How to attach the cover
- Press the MANUAL button.
- Press the desired MANUAL (UPPER BODY) MASSAGING button.
- Adjust the height, width, speed, and strength of the massaging rollers.
- Adjusting the height of massaging rollers.
- Press the button.
- Adjusting the movement speed of massaging rollers.
- Adjusting the width of the massaging rollers.
- Adjusting the strength of the massage.
- Kinds of massages and adjustments of massaging rollers
- Several types of desired massage can be selected.
- Massaging of lower body
- Press the desired MANUAL (LOWER BODY) MASSAGING button.
- BACK/SEAT
- CALF/FOOT
- By pressing the LOWER BODY strength adjustment button, adjust the strength of massage.
- When the massage is too strong
- When the massage is too weak
- Set the back rest and the foot rest to the starting position.
- Turn off the POWER.
- MAINTENANCE PROCEDURES
- HEAD COVER, BACK PAD, SEAT COVER, ARM REST
- MAIN UNIT (Plastic parts and frame)
- REMOTE CONTROL, SENSOR CONTROLLER
- Standard massage in STIFFNESS Course
- Standard massage in RECOVERY Course
- Standard massage in RELAX Course
- Standard massage in FINE Course
- NECK/SHOULDER Course
- LOWER BACK Course
- Sound and sensation during operation
- During use, the following sounds or sensation may be unavoidably generated because of its structure, but they are not problems. (They will not affect the function, etc.)
Marque : SANYO
Modèle : HEC-DR7750
Catégorie : Fauteuil de massage