
VPC-CS1P - Caméscope numérique SANYO - Notice d'utilisation et mode d'emploi gratuit
Retrouvez gratuitement la notice de l'appareil VPC-CS1P SANYO au format PDF.


| Type de produit | Caméscope numérique |
| Marque | SANYO |
| Modèle | VPC-CS1P |
| Dimensions (L x H x P) | 62,5 x 123,5 x 26,8 mm |
| Poids (sans batterie ni carte) | 142 g |
| Poids (avec batterie et carte) | 159 g |
| Alimentation | Batterie Li-ion rechargeable DB-L80 (3,7 V, 700 mAh) |
| Chargeur | VAR-L80 (sortie DC 4,2 V, 550 mA) |
| Capteur | CMOS 1/5 pouce, 3,3 Mpx effectifs (photo) |
| Résolution photo max | 8M (3264 x 2448 pixels) |
| Résolution vidéo max | Full-HD 1920 x 1080 (60i) |
| Zoom optique | 9x |
| Zoom numérique | Jusqu'à 10x |
| Écran | 2,7 pouces TFT couleur, 230 000 points |
| Stabilisateur d'image | Électronique (vidéo et photo) |
| Mémoire interne | Environ 50 Mo |
| Support mémoire | SD / SDHC / SDXC (jusqu'à 64 Go) |
| Connectivité | USB 2.0 High Speed, HDMI, sortie AV composite |
| Fonctions principales | Enregistrement vidéo, photo, double enregistrement, macro, LED lumière, Eye-Fi |
| Entretien et nettoyage | Nettoyer avec un chiffon doux et sec ; éviter l'humidité |
| Sécurité | Ne pas exposer à la pluie ou à l'humidité ; utiliser uniquement les accessoires recommandés |
| Pièces détachées et réparabilité | Batterie DB-L80, chargeur VAR-L80, adaptateur secteur VAR-A3, câbles USB/AV. Réparation par un technicien agréé. |
| Informations générales | Fabricant : SANYO Electric Co., Ltd. (Japon). Notice disponible en PDF. |
FOIRE AUX QUESTIONS - VPC-CS1P SANYO
Questions des utilisateurs sur VPC-CS1P SANYO
0 question sur cet appareil. Repondez a celles que vous connaissez ou posez la votre.
Poser une nouvelle question sur cet appareil
Téléchargez la notice de votre Caméscope numérique au format PDF gratuitement ! Retrouvez votre notice VPC-CS1P - SANYO et reprennez votre appareil électronique en main. Sur cette page sont publiés tous les documents nécessaires à l'utilisation de votre appareil VPC-CS1P de la marque SANYO.
MODE D'EMPLOI VPC-CS1P SANYO
GUIDE FOR
BASIC OPERATION
Dual Camera
Xacti

VPC-CS1EX
VPC-CS1
VPC-CS1GX
VPC-CS1PX
VPC-CS1TA
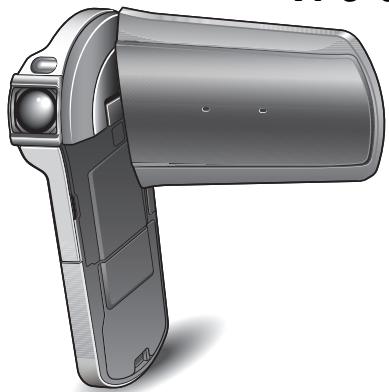
natural_image
3D rendering of a handheld device with cylindrical body and side panels (no text or symbols visible)
HDMI ^TM
HIGH-DEFINITION MULTIMEDIA INTERFACE
Important note
This manual explains how to safely operate the VPC-CS1EX, VPC-CS1, VPC-CS1GX, VPC-CS1PX and VPC-CS1TA.
Any information regarding only one of these products will be labeled as such.
Warning
TO PREVENT THE RISK OF FIRE OR ELECTRIC SHOCK, DO NOT EXPOSE THIS APPLIANCE TO RAIN OR MOISTURE
■FOR AMERICAN USERS
The following advisory is included in accordance with the laws of the State of California (USA):
WARNING:
This product contains chemicals, including lead, known to the State of California to cause cancer, birth defects or other reproductive harm. Wash hands after handling.
- This equipment has been tested and found to comply with the limits for a Class B digital device, pursuant to Part 15 of the FCC Rules. These limits are designed to provide reasonable protection against harmful interference in a residential installation. This equipment generates, uses and can radiate radio frequency energy and, if not installed and used in accordance with the instructions, may cause harmful interference to radio communications. However, there is no guarantee that interference will not occur in a particular installation. If this equipment does cause harmful interference to radio or television reception, which can be determined by turning the equipment off and on, the user is encouraged to try to correct the interference by one or more of the following measures:
- Reorient or relocate the receiving antenna.
- Increase the separation between the equipment and receiver.
- Connect the equipment into an outlet on a circuit different from that to which the receiver is connected.
- Consult the dealer or an experienced radio/TV technician for help.
- Changes or modifications not expressly approved by the party responsible for compliance could void the user's authority to operate the equipment.
Declaration of Conformity
Model number: VPC-CS1
Trade Name: SANYO
Responsible party: SANYO North America Corporation
Address: 21605 Plummer Street, Chatsworth, California 91311
Telephone No.: (818) 998-7322
This device complies with Part 15 of the FCC Rules. Operation is subject to the following two conditions:
(1) this device may not cause harmful interference, and
(2) this device must accept any interference received, including interference that may cause undesired operation.
FOR USERS IN THE USA
About the battery charger
IMPORTANT SAFETY INSTRUCTIONS – SAVE THESE INSTRUCTIONS DANGER – TO REDUCE THE RISK OF FIRE OR ELECTRIC SHOCK, CAREFULLY FOLLOW THESE INSTRUCTIONS
- For connection to a supply not in the U.S.A., use an attachment plug adapter of the proper configuration for the power outlet.
• Power Supply Cord:
Use UL Listed detachable power supply cord - No. 18 AWG, two conductors, rated 10 A, VW-1, 105 °C, 125/250 V, minimum 1.8 m, maximum 3 m long. Provided with a molded-on, non-polarized attachment plug with a 15 A, 250 V (NEMA 2-15P) configuration or a 15 A, 125 V (NEMA 1-15P) configuration and a molded-on connector which mates with the Power Inlet.
Cord Type
| Basic Cord Type | Other Suitable Types |
| TS | TST |
| SP-2 | SPE-2, SPT-2 |
| SP-3 | SPE-3, SPT-3 |
| SV | SVE, SVO, SVOO, SVT, SVTO, SVTOO |
| SJ | SJE, SJO, SJOO, SJT, SJTO, SJTOO |
| S | SE, SO, SOO, ST, STO, STOO |
- This device complies with Part 15 of the FCC Rules. Operation is subject to the following two conditions: (1) this device may not cause harmful interference, and (2) this device must accept any interference received, including interference that may cause undesired operation.
PARA LOS USUARIOS DE EE.UU.
Acerca del cargador de baterías
INSTRUCCIONES IMPORTANTE SOBRE DE SEGURIDAD - GUARDE ESTAS INSTRUCCIONES PELIGRO - PARA REDUCIR EL RIESGO DE INCENDIO O DESCARGAS ELÉCTRICAS, SIGA CUIDADOSAMENTE ESTAS INSTRUCCIONES
- Para la conexión a una red de alimentación que no sea de EE.UU., utilice el adaptador de enchufe apropiado para la toma de la red.
- Cable de alimentación:
Utilice el cable de alimentación UL desenchufable indicado en la lista - N.° 18 AWG, dos conductores, amperaje nominal de 10 A, VW-1, 105 °C, 125/250 V, mínimo 1,8 m, máximo 3 m de longitud. Provisto de enchufe moldeado, adaptador de enchufe no polarizado con configuración de 15 A, 250 V (NEMA 2-15P), o configuración de 15 A, 125 V (NEMA 1-15P) y conector moldeado que se adapta a la toma de corriente de la red.
Tipo de cable
| Tipo de cable básico | Otros tipos adecuados |
| TS | TST |
| SP-2 | SPE-2, SPT-2 |
| SP-3 | SPE-3, SPT-3 |
| SV | SVE, SVO, SVOO, SVT, SVTO, SVTOO |
| SJ | SJE, SJO, SJOO, SJT, SJTO, SJTOO |
| S | SE, SO, SOO, ST, STO, STOO |
- Este dispositivo cumple con lo estipulado en la Parte 15 de las Normativas de la FCC. La operación está sujeta a las dos condiciones siguientes: (1) este dispositivo no puede provocar interferencias nocivas, y (2) este dispositivo debe aceptar las interferencias recibidas, incluidas las interferencias que puedan provocar un funcionamiento no deseado.
■FOR CANADIAN USERS
- This Class B digital apparatus complies with Canadian ICES-003.
■FOR EU USERS
The symbol mark and recycling systems described below apply to EU countries and do not apply to countries in other areas of the world.
Your SANYO product is designed and manufactured with high quality materials and components which can be recycled and/or reused.
The symbol mark means that electrical and electronic equipment, batteries and accumulators, at their end-of-life, should be disposed of separately from your household waste.
Note:
If a chemical symbol is printed beneath the symbol mark, this chemical symbol means that the battery or accumulator contains a heavy metal at a certain concentration. This will be indicated as follows: Hg: mercury, Cd: cadmium, Pb: lead
In the European Union there are separate collection systems for used electrical and electronic equipment, batteries and accumulators.
Please, dispose of them correctly at your local community waste collection/recycling centre.
Please, help us to conserve the environment we live in!

natural_image
Symbol of a trash bin crossed out by two diagonal lines (no text or numbers present)SANYO Sales & Marketing Europe GmbH
Stahlgruberring 4, D-81829 München, Germany
SANYO Electric Co., Ltd.
1-1, Sanyo-cho, Daito City, Osaka 574-8534, Japan
■FOR RUSSIAN USERS

АЯ46
This product is certified by an official certification company which is authorized by the Russian Federation.
HOW TO READ THIS MANUAL
For first-time users
Please read this manual to familiarize yourself with your camera's operation.
↓
To use the various camera features
The Instruction Manual that explains the features in detail can be obtained from our website (page 45).
↓
To use additional features
Visit the Sanyo website to learn how to adjust the camera settings for various shooting scenes. There you'll also find information about the software for playing back data recorded with your camera and for burning (recording) DVDs.
You may find the answers to questions or problems concerning camera operation in the sections “COMMONLY ASKED QUESTIONS” (page 51).
Symbols used in this manual
HINT Points giving some extended instructions or special points to pay attention to.
CAUTION Points that require special attention.
(page xx) Refer to the page indicated for detailed information.
SHOOT, PLAY BACK AND SAVE
Preparing the camera
1 Insert the battery pack.
① Open the monitor unit.
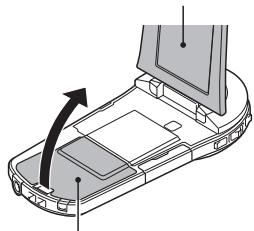
natural_image
Diagram of a device's internal components with an arrow indicating rotation (no text or symbols present)② Open the battery cover.
③ Insert the battery pack.
*The battery must be correctly oriented in relation to the terminals.
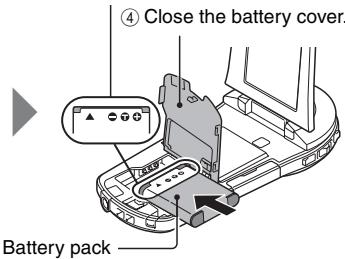
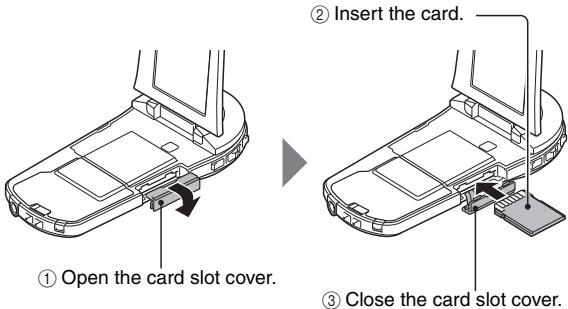
2 Insert the SD Memory Card.
- An SD Memory Card is not included with your camera. Please purchase a commercially sold card.
- In this manual, the SD Memory Card is referred to as the "card".
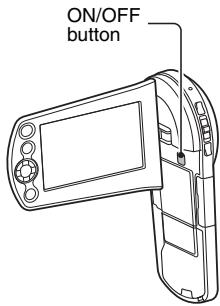
1 Press the ON/OFF button for at least 1 second to turn the camera on.
- If the screen to set the date and time appears, press the MENU button 2 times to cancel it. For how to set the date and time, see page 22.
2 Record.
To record a video clip:
- Press the [ ] button to begin recording a video clip. - Press the [ ] button again to end the recording.
To take a photo:
- Press the [icon] button. - A still image is captured.
![ON/OFF button MENU button [ ] button [ ] button](/content/2025/01/96638/images/62cf6be6abc9b755a397b8c6d3be432d4f5692b1f8a872b2d3d6f1f132f5666a.jpg)
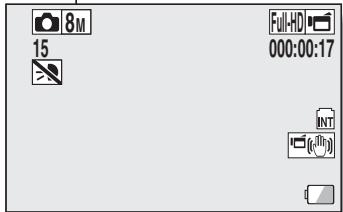
Before capturing those important shots, be sure to first take a test shot to confirm that your camera is set up and ready to go
- Sanyo declines any claim for compensation for recorded contents etc. in case of photographing or recording failure due to a chance camera or card flaw.
Playback
1 Press the REC/PLAY button.
- The display changes to the Playback Screen.
2 Select the image to play back.
- Use the arrow keys to move the orange frame to the image you wish to play back. - The image information for the framed image is shown in the bottom part of the monitor.
3 Press the SET button.
- Playback begins.
Deleting files
1 On the screen in step 2, move the orange frame to the file you wish to delete, and press the MENU button.
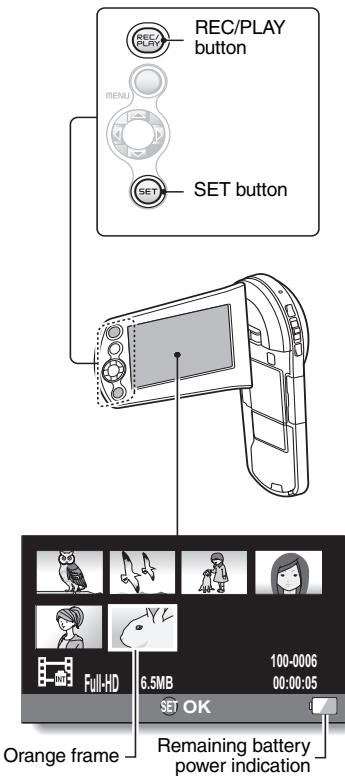
2 Select "DELETE", and press the SET button.
3 Select "DELETE SINGLE", and press the SET button.
4 Select "DELETE", and press the SET button.
- If you press [◀] or [▶], the screen to delete a different file will appear.
5 When you are finished deleting files, press the MENU button.
- Pressing the MENU button 3 times will return you to the screen in step 2.
When you are finished using the camera...
Press the ON/OFF button for at least 1 second to turn the camera off.
To continue to the next operation...
Please confirm that your computer is connected to the Internet.
Burn your recorded video clips onto a DVD
Using the supplied CD-ROM (Xacti Software CD), you can store your captured images on a DVD.
Install application program
1 Set the supplied CD-ROM in your computer's DVD drive.
- The installation window opens.
2 Click on [TotalMedia Extreme for SANYO].
- After clicking on the application program, follow the instructions shown on the monitor to install the program.
- When the window appears requesting to restart your computer, click the [Finish] button to reboot.
3 Remove the CD-ROM from the computer's DVD drive.
- When the installation window closes, a dialog box to connect to the website introducing Kodak's online service appears. Check the [No thanks !] option button, and then click on the [OK] button.
Copy data from your camera to the computer
Connect your camera to a computer, and copy the desired data to the computer.
1 Turn on the computer, and use the supplied dedicated USB interface cable to connect your camera to the computer.
- Connect the cable between the camera's USB/AV terminal and the computer's USB connector.
2 Turn on the camera (page 19).
- The USB Connection Screen appears on the camera's monitor.
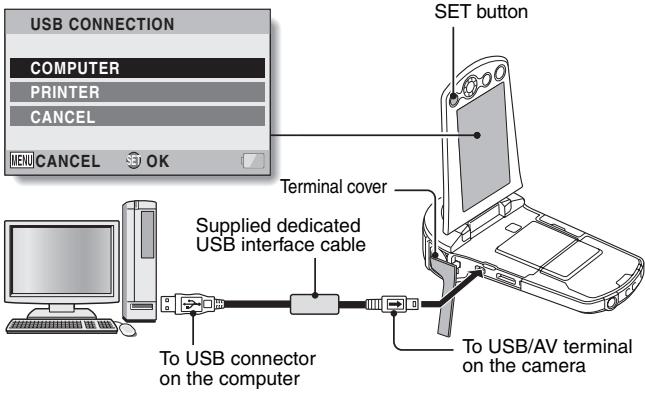
3 Select "COMPUTER", and press the SET button.
- The screen to select the computer connection mode appears.
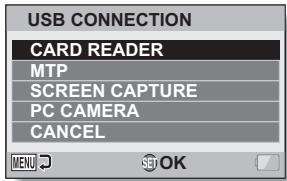
4 Select "CARD READER", and press the SET button.
5 Copy data from your camera to a computer.
- The CD-ROM (Xacti Software CD) includes “TotalMedia Extreme for SANYO” with which photo and video files can be imported en bloc.
HINT
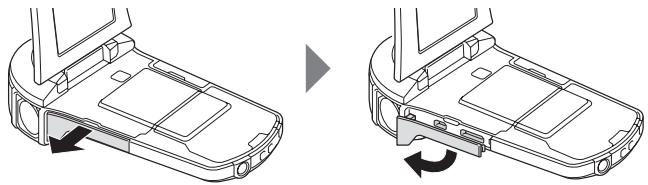
How to open the terminal cover
natural_image
Technical illustration of a car's front panel showing internal components and a close-up view of the interior (no text or symbols)Burn video clips onto a DVD (for Windows Vista users)
Here's how to write your recorded data onto a DVD in the MPEG2 format. For information on other operations, please see the Help file for TotalMedia Extreme.
1 Insert a blank DVD in your computer's DVD drive.
2 Double-click the desktop [TotalMedia Extreme for SANYO] icon.
- TotalMedia Extreme for SANYO is launched, and the startup page appears.
![[Create video] icon ArcSoft TotalMedia® Extreme for SANYO Copyright © 2009, ArcSoft, Inc. All rights reserved.](/content/2025/01/96638/images/a21ce5b4863e7b25a42af91800a676b57f3a890d554ed568221db119e02640a7.jpg)
3
Click the [Create video] icon.
• The TotalMedia Studio screen appears.
![[New DVD project] New DVD Project Open Project Recent Projects ArcSoft TotalMedia® Studio](/content/2025/01/96638/images/be342bf3fd6d3d43249854f4d0a6a09f58e4c66deb65ee1bca38ccb753a7f002.jpg)
4 Click [New DVD project].
- The screen to create a video clip to burn to DVD appears.
![[Insert video] AT/CAST SocialMedia Studio is islando Start Get Media Design Printer Produce Option Insert Video Insert Slideshow Insert PowerPoint Create New Slideshow 00:00:00:00 00:00:00:00 Remove Remove All Cutting History Edit Slideshow Enter: 00:00:00 (4.716) 0:00: 4.716 (2) R to do.](/content/2025/01/96638/images/fea9905c2abf82ffbe66f2f31311e4444732ebe9eb3b2b78c02ce7e3e59d498a.jpg)
5 Click [Insert video].
- The screen to select the video clip file to burn to DVD appears.
- Click on the file you wish to burn to DVD.
- To select multiple files, keep the [Ctrl] key pressed while selecting files.
6 Click the [Open] button.
- The files you selected in step 5 and the total size of the files to burn to DVD are shown in the lower part of the window.
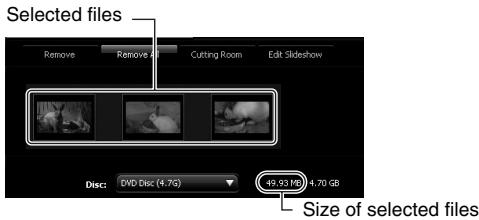
7
Click the [Design] tab.
- The screen to design the title menu that is shown when the DVD is played appears.
- Select one of the designs.
[Produce] tab
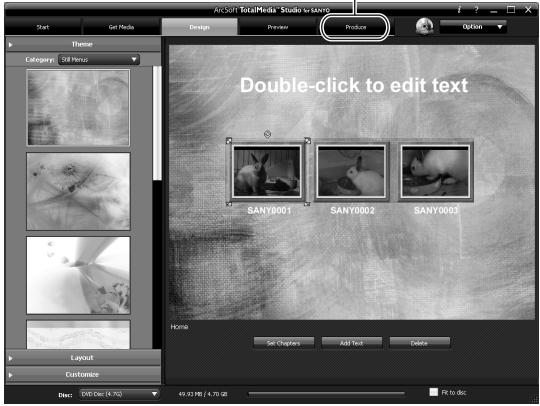
8 Click the [Produce] tab.
- The screen to burn files to the DVD appears.
![ANC267/ TotalMedia * Studio to w10 Start Get Media Design Preview Product Option Label: 13:18:2009 Driver: 0 TEAC DV-W20E Speed: 45 ■ Create a disc without a menu TV standard: NTSC Audio encoder: MPDS-2 Frame size: 7.07 x 4.90 Frame rate: 29.27 Video (strates: S200A) Audio encoder: PCM - Uncompressed audio; highly compatible File to disc: No Burn Disc: 5NO Disc (4.15) 43.51.18 / 4.70.02 F1 to disc [Burn] button](/content/2025/01/96638/images/ba0627a02d49e197e6e7a47ea42acad3cffa84ab68b220c896c6349f2e1bfb2c.jpg)
9 Click the [Burn] button.
- A window appears asking if you wish to save the project.
- Saving the project will save your settings from steps 5 through 7.
- It is recommended that you save the project if you intend to again edit the same video clips that you burned to DVD.
10 Click the [Yes] button.
- The screen to save the project appears.
- Assign a suitable file name for the project.
11 Click the [Save] button.
- The current project is saved, and the DVD burn process begins.
- When the burn process is completed, a window appears to inform you that the process is done. Remove the DVD from the computer's DVD drive.
12 Click the [OK] button.
- You are returned to the screen to burn files to DVD.
13 Click the [×] close button in the upper right corner.
- You are returned to the top page.
14 Click the [×] close button in the upper right corner.
• TotalMedia Extreme for SANYO is exited.
HINT
About software upgrades
- For information concerning TotalMedia Extreme upgrades, please go to the following website:
http://www.arcsoft.com/en-us/index.asp - If TotalMedia Extreme is launched while you are connected to the Internet, automatic program update notifications may appear.
To use Blu-ray Disc or AVCHD
- The version of TotalMedia Extreme that accompanies your camera cannot be used to burn these formats. To purchase a different version, please refer to the following website.
http://sanyo.com/xacti/english/
CAUTION
Does the window requesting confirmation to enable the MPEG-2 Codec appear?
When using TotalMedia Extreme for the first time, a window requesting you to confirm activation of the MPEG-2 Codec appears during the procedure. The MPEG-2 Codec must be activated in order to burn files to a DVD. Complete the following procedure to activate the MPEG-2 Codec.
- Note that your computer must be connected to the Internet in order to complete this procedure. Please confirm that your computer is connected to the Internet.
① When the window requesting confirmation to activate the MPEG-2 Codec appears, click the [Yes] button.
• The ArcSoft website appears.
② Click on [Special downloads].
- The window appears for you to enter your email address, name, license ID, etc.
- Enter the correct information.
- The license ID is located on the back card of the supplied CD-ROM.
③ Click the [Submit] button.
- Soon thereafter, the URL for the download to activate the MPEG-2 Codec will be sent to the email address you entered in step ②.
④ Click the download URL link.
- The program will be downloaded to your computer.
⑤ Double-click the icon for the downloaded program.
- Follow the instructions to activate the MPEG-2 Codec.
• DVD burning via the TotalMedia Extreme program is now enabled. - When the procedure above has been completed, continue to the procedure to burn to DVD.
United States/Canada
Tel: +1-510-979-5599
Web: http://www.arcsoft.com/support/
E-mail Support: http://www.arcsoft.com/public/
content_page.asp?pageID=83
Hours: M-F from 9:00am - 5:00pm
(Pacific Standard Time, excluding holidays observed by ArcSoft)
Language: English
Europe
Tel: +353 (0) 61-702087
Web: http://www.arcsoft.com/en/support
Email Support: eurosupport@arcsoft.com
Hours: M-Th from 8:30am - 5:30pm GMT
(excluding holidays observed by ArcSofts Affiliate)
F from 8:30am - 5:00pm GMT
(excluding holidays observed by ArcSoft's Affiliate)
(Adjusted for daylight savings time when applicable)
Language: English, French, Italian, German, Spanish and Dutch
China
Tel: +86 (0) 571-88210575
Web: http://www.arcsoft.com.cn/support
E-Mail Support: support@arcsoft.com.cn
Hours: M-F 8:30am-5:30pm
(Beijing local time) (excluding holidays observed by ArcSoft)
Language: Chinese
CONTENTS
HOW TO READ THIS MANUAL ...... v
CHECKING THE INCLUDED ACCESSORIES 3
How to use the accessories 5
ABOUT THE CARD 7
Media cards that can be used with this camera 7
What "card" means in this manual 7
SETUP
PARTS NAMES 8
CHARGING THE BATTERY PACK 10
Charging the battery pack 11
INSTALLING THE CARD 13
INSTALLING THE BATTERY PACK 15
Installing the DC adaptor (sold separately: VAR-A3U/A3EX) ..... 16
About the temperature alert icon 🖼️ 18
TURNING THE CAMERA ON AND OFF 19
Turning on the camera 19
Turning off the camera 19
Turning on the camera when the power save (sleep) mode is active 20
DATE AND TIME SETTING 22
SWITCHING BETWEEN THE RECORDING MODE AND PLAYBACK MODE 25
SWITCHING THE OPERATING MODE 26
Switching between the SIMPLE and NORMAL modes 26
Accessing/exiting the SIMPLE/NORMAL Mode Menu Screen ..... 27
■ SHOOTING
VIDEO CLIP RECORDING 31
SHOOTING SINGLE SHOTS 32
Using the LED light 34
SHOOT A STILL IMAGE WHILE RECORDING A VIDEO CLIP ...... 36
MACRO-PHOTOGRAPHY (ZOOM) 38
■ PLAYBACK
PLAYING BACK VIDEO CLIPS AND STILL IMAGES ....39
How to save one frame from a video clip as a still image .....41
■ CONNECTING TO A TV
CONNECTING TO A TV 42
Connecting to a video input terminal 43
Connecting to the HDMI terminal 43
PLAYING BACK ON A TV 44
■ OBTAINING THE INSTRUCTION MANUAL
OBTAINING THE INSTRUCTION MANUAL 45
Contents of the Instruction Manual 45
How to obtain the Instruction Manual ....49
■ ABOUT THE EYE-FI TRANSFER FEATURE
About the Eye-Fi transfer feature ....50
■ APPENDICES
COMMONLY ASKED QUESTIONS ....51
SPECIFICATIONS ....59
Camera 59
Camera connectors 63
Battery life 63
Possible No. of Images/Possible Shooting Time/
Possible Recording Time 64
Concerning the multi-indicator ....65
Supplied battery pack charger 66
Supplied Li-ion battery pack 66
Others 67
Before capturing those important shots, be sure to first take a test shot to confirm that your camera is set up and ready to go ....68
CHECKING THE INCLUDED ACCESSORIES
• Xacti Software CD (CD-ROM) (page x): 1

natural_image
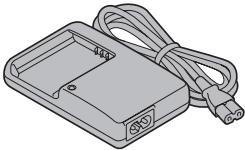
Circular diagram with radial segments and concentric circles, resembling a CD or DVD (no text or symbols)• Lithium-ion battery pack charger and power cord: 1
natural_image
Illustration of a rectangular electronic device with a cable and two ports, no text or symbols present.• Dedicated AV interface cable (page 43): 1
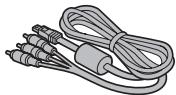
natural_image
Illustration of a coiled cable with three connectors (no text or symbols)- Lens cap (page 6): 1
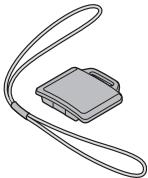
natural_image
Illustration of a gray rectangular device with a coiled cable, no text or symbols present- Li-ion battery pack: 1
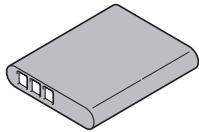
natural_image
Illustration of a gray rectangular electronic device with three ports, no text or symbols present.• Dedicated USB interface cable (page xi): 1
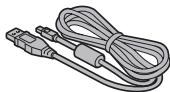
natural_image
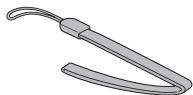
Illustration of a USB cable with connector and connectors (no text or symbols)- Handstrap (page 5): 1
* To prevent from dropping the camera, be sure to attach the handstrap.
natural_image
Illustration of a U-shaped tool or clamp with a loop handle (no text or symbols)• GUIDE FOR BASIC OPERATION
- SAFETY MANUAL (safety precautions booklet) Please read this booklet carefully before using the camera.
- QUICK GUIDE
natural_image
Illustration of two identical electronic devices with 'Xocti' branding and circuit symbols (no readable text or labels)How to use the accessories
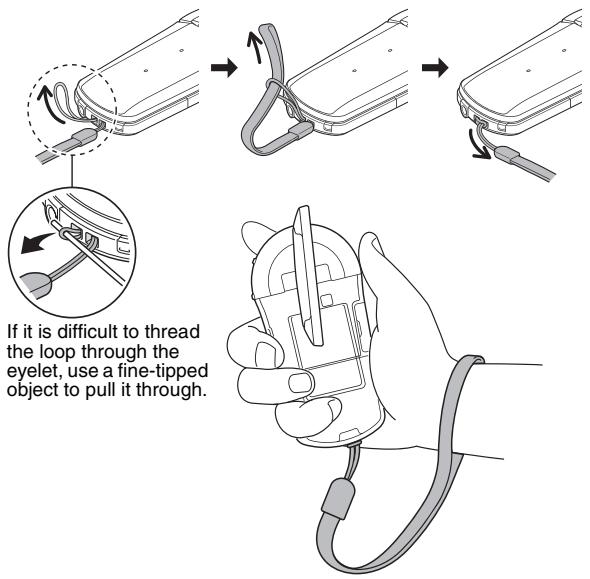
■ Handstrap
■ How to attach the lens cap
1
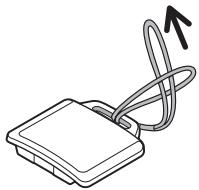
natural_image
Simple line drawing of a device with a coiled cable and an upward arrow, no text or symbols present.
2
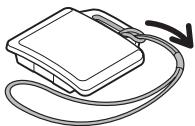
natural_image
Simple line drawing of a rectangular device connected to a cable with a curved arrow indicating rotation (no text or symbols)③
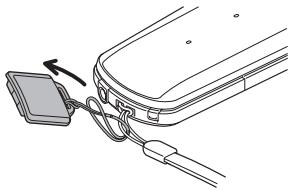
natural_image
Line drawing of a device with cable and connector, no text or symbols present
4
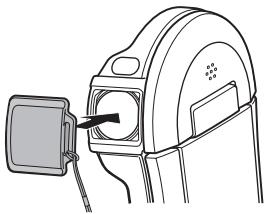
natural_image
Line drawing of a device with a black arrow pointing to a component, no text or symbols presentMedia cards that can be used with this camera
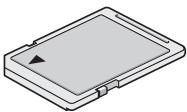
The type of card that can be inserted into and used with this camera is:
- SD Memory Card
- SDHC Memory Card
- SDXC Memory Card
natural_image
Isometric view of a rectangular electronic device with a black triangular pointer on the top surface (no text or symbols)What "card" means in this manual
- In this manual, SD Memory Cards, SDHC Memory Cards and SDXC Memory Cards that can be used in this dual camera are referred to as "card".
Front
Bottom
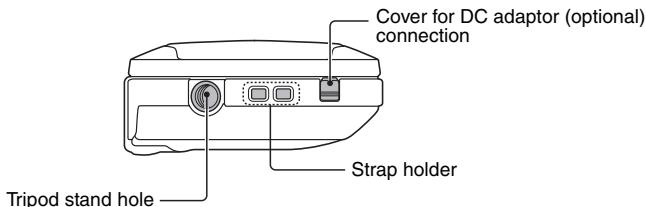
- Affix the camera to the tripod before opening the monitor unit.
- When closing the monitor unit, be sure to first detach it from the tripod.
Rear
![Monitor ON/OFF button Multi-indicator Card slot cover REC/PLAY button MENU button MENU Arrow keys SET button [ ] button Photo shooting button Zoom switch [T]/[W] [ ] button Video recording button](/content/2025/01/96638/images/6284c7fd09f2fdd43695bedfafd4a48537dc50cceee3ef19d72fb1d74a37cba0.jpg)
CHARGING THE BATTERY PACK
Please charge the supplied battery pack before using it.
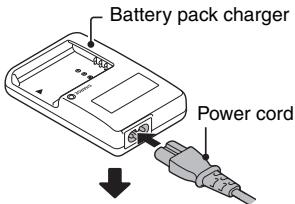
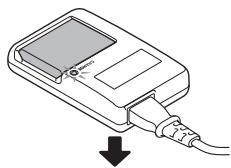
1 Connect the supplied power cord to the socket on the battery pack charger.
- Insert the connector straight and securely.
2 Insert the battery pack in the battery charger.
- Insert it in the direction indicated by the [△] mark on the battery pack.
3 Plug the power plug into a power outlet (AC 100 V to 240 V).
- Charging begins.
- The CHARGE indicator is lit during charging.
4 When the CHARGE indicator turns off, unplug the power cord from the power outlet, and remove the battery pack from the charger.
![Battery pack charger Battery pack [△] mark CHARGE indicator To power outlet](/content/2025/01/96638/images/e7f740829ef93addf945d523fd783453607e7dba590fb79567a24f18b4d2af39.jpg)
natural_image
Illustration of a medical device with a plug inserted into a housing, showing a downward arrow (no text or symbols present)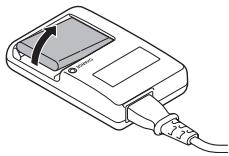
natural_image
Illustration of a handheld electronic device with a cable and a switch, no text or symbols presentHINT
- Charging takes approximately 120 min.
Charging the battery pack
Be sure to fully charge the supplied or separately sold battery pack before using it in your camera. For charging the battery pack, use the supplied charger.
Charge the battery pack if it is being used for the first time, and recharge it whenever the remaining charge is low.
Does the battery pack feel hot?
- During charging, the charger and battery pack will be warm. This is normal and does not indicate a malfunction.
If there is interference to your TV or radio during charging...
- Move the battery pack and charger further away from the TV or radio.
Ambient temperature during charging
- It is recommended that the ambient temperature during charging be between about 10 °C and 35 °C (50 °F and 95 °F). Due to the characteristics of the battery pack, at temperatures below 0 °C (32 °F), it may not be possible to sufficiently charge it.
- When the battery pack temperature is high, the safety function may be activated and halt charging.
Charge a battery pack in the following cases
- A battery pack which has not been used for a long time
- Newly purchased battery pack
FOR AMERICAN USERS:
- Use a UL Listed, 1.8 to 3 m (6 to 10 ft.), Type SPT-2 or NiSPT-2, AWG No.18 power supply cord, rated for 125 V 7 A, with a non-polarized NEMA 1-15P plug rated for 125 V 15 A.
About the CHARGE indicator
The CHARGE indicator shows the status of the battery pack and the charger. Please refer to the following table if the indicator flashes abnormally.
| CHARGE indicator | |
| Not lit | Not connected properlyTo recharge the battery pack, the power cord of the charger must be connected to a power outlet, and the plug at the other end inserted in the charger's power socket (page 10).The battery pack is not installed, or it is not installed correctly (page 10).Charging finished |
| Lit | Charging |
| Flashing | Problem with the battery pack or battery pack chargerImmediately remove the battery pack from the charger.Do not use an abnormal battery pack. (The usable life of the battery pack has probably expired.) |
CAUTION
Do not charge the battery pack immediately after the camera has been in continuous use for a long time
- The battery pack becomes hot when the camera is used continuously for a long time. If you attempt to charge the battery pack in this state, the safety function may be activated and it may not be possible to charge the battery pack. Wait until the battery pack has cooled down before attempting to charge it.
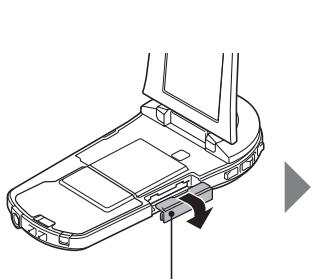
INSTALLING THE CARD
Be sure to format a newly purchased card or one that was used in another device before using it in your camera (page 14). If an unformatted card is used, the card itself may become unusable.
natural_image
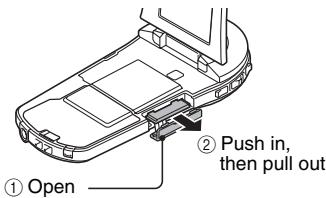
Technical line drawing of a mobile phone rear panel with a cable inserted (no text or symbols)① Open the card slot cover.
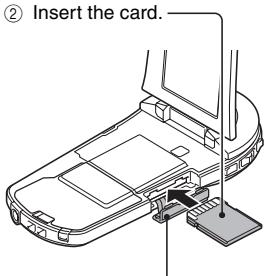
③ Close the card slot cover.
- To remove the card, press it in, and then release. The card will protrude slightly, and you can then pull it out.
CAUTION
Do not attempt to forcibly remove the card
- Doing so may damage the card or the stored files.
If the multi-indicator is flashing red...
- Never remove the card when the multi-indicator is flashing red, as doing so may result in loss of files stored in the card.
HINT
To format a card
① Insert the card in the camera, and press the ON/OFF button (pages 13 and 19).
② Set the camera to the NORMAL mode (page 26).
③ Press the MENU button.
④ Select the [→] tab, and press the SET button.
⑤ Select "FORMAT" and press the SET button.
- The Format Screen appears. Follow the instructions on the screen to format the card.
Shooting without a card installed
- When a card is installed, images are recorded to and played back from the card. When no card is installed, images are recorded to and played back from the camera's internal memory. When the camera is turned on with no card installed, the internal memory icon 📄 is shown on the monitor to let you know that the images you capture will be saved to the camera's internal memory.
INSTALLING THE BATTERY PACK
Please charge the supplied battery pack before using it.
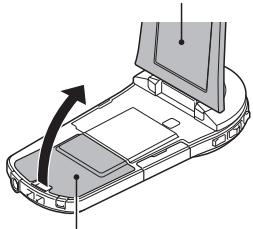
① Open the monitor unit.
natural_image
Diagram of a mobile phone casing with an arrow indicating rotation or movement (no text or symbols present)② Open the battery cover.
③ Insert the battery pack. *The battery must be correctly oriented in relation to the terminals.
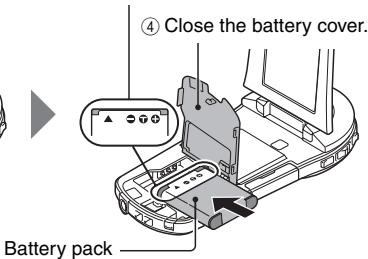
Installing the DC adaptor (sold separately: VAR-A3U/A3EX)

CAUTION
Does the battery pack appear swollen?
- The lithium-ion battery used in this camera may expand slightly when stored in a hot environment or repeatedly used, but this is not a safety hazard. However, a battery that is difficult to insert because it has become swollen may then be impossible to extract from the battery compartment. In this case, please discontinue its use and replace it with a new battery.
Do not use the battery with the outer covering or label removed
- Doing so may result in malfunction.
HINT
About the internal backup battery
- This camera's internal battery serves to maintain the date and time settings, as well as the shooting settings. The backup battery will be fully charged when the battery pack is kept in the camera continuously for about 2 days. In the fully charged state, the backup battery will maintain the camera settings for about 7 days.
When not using the camera for a long time, remove the battery pack
- A small amount of power is still used even if the camera is turned off, and it is therefore recommended that the battery pack be removed from the camera if it is not going to be used for a long time. Note that when the battery pack is removed for a long period, the time and date settings may be cleared. Before using your camera again, be sure to confirm that the camera settings are correct.
To prolong the life of the battery pack
- Although the battery pack is an expendable item, you can maximize the life of the battery by heeding the following suggestions.
- Do not leave the battery under the hot summer sun or exposed to other high-temperature environments.
- Do not continually recharge the battery when it is already fully charged. After fully charging it once, for example, use it for a while to partially discharge it before recharging it again.
- When the battery is not to be used for a long time, if possible store the partially charged (not fully charged) battery in a cool environment.
About the temperature alert icon

During camera use, if the temperature of the battery or inside the camera (excluding the battery) rises, a temperature alert icon ⚡️ will appear as described below.
■ When the battery or internal camera (excluding battery) temperature rises during use
- During camera use, if the temperature of the battery or inside the camera (excluding the battery) rises, a 🖱️ icon lights on the monitor. It is still possible to record and play back even when the 🖱️ icon is lit; however it is advised that you discontinue use as soon as possible and turn the camera off.
- If the temperature rises further, the ⚡️ icon will start to flash, and the camera will turn off automatically.
The camera cannot be turned on until the temperature has dropped (or as long as the ⚙️ icon remains flashing). Please wait until the temperature has dropped before resuming use.
- During video recording, a countdown indicator will show the time starting about 15 seconds before shutdown. When the indicator shows 0 seconds, recording stops.
- If the camera is turned off while the temperature is high (that is, while the 📄️ icon is flashing), it cannot be turned on again until the temperature has dropped (or as long as the 📄️ icon remains flashing).
TURNING THE CAMERA ON AND OFF
Turning on the camera
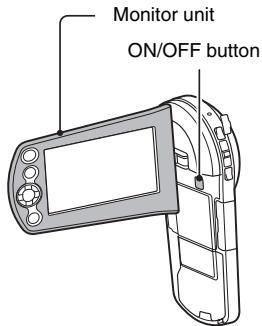
1 Open the monitor unit, and press the ON/OFF button for at least 1 second.
- If you briefly press the ON/OFF button, once, the camera will switch to the power save mode.
Turning off the camera
1 Press the ON/OFF button for at least 1 second.
• The camera turns off.
Turning on the camera when the power save (sleep) mode is active
In order to preserve battery pack power, the power save (sleep) function will automatically turn off the camera after about 1 minute of no use during shooting, or about 5 minutes of no use during playback (factory-preset setting).
- When the power save mode is active, you can restore the power by any of the following methods:
- Press the ON/OFF button.
- Press the [ ] button.
- Open the monitor unit.
- After the power save mode has been active for about 1 hour, the camera will switch to the standby mode. In this case, you can restore the power by pressing the ON/OFF button, or by closing and then opening the monitor unit.
- When the AC adaptor is connected, the power save mode will become active about 5 minutes after the camera is turned on (factory-preset setting).
- When the camera is connected to a computer or printer, the power save mode becomes active after about 12 hours.
HINT
To immediately activate the power save mode
- Press the ON/OFF button briefly to activate the power save function.
About the standby mode
- To turn off the camera only briefly, you can close the monitor unit to put the camera in the standby mode. The standby mode uses almost no power. When the monitor unit is opened again, the camera turns on immediately and you are ready to shoot or view images without any delay.
CAUTION
If the ⓣ? icon appears...
- When a picture is taken, the date and time it was captured are recorded with it. If the date and time settings have not been completed (page 22), the date and time cannot be recorded with the captured images. For this reason, immediately after the camera is turned on, the "Set date and time" reminder briefly appears, after which the Ⓞ? icon is shown on the Recording Screen. To have the date and time recorded with the images, please complete this setting before capturing images.
- Due to the characteristics of the camera, the outer surface may become warm during use, but this does not indicate a malfunction.
- If the camera starts to feel uncomfortably hot during use, you might temporarily discontinue use until it cools down, or try holding it in your other hand for a while.
Please use a tripod or other support when using the camera for a long time.
DATE AND TIME SETTING
The camera will record the date and time an image or audio recording is taken so that you can display them during playback. Therefore, before capturing images, make sure the correct date and time are set.
- To correct the date and time setting, please see under HINT on page 24.
Example: To set the clock to 7:30 p.m. on December 24, 2010
1 Turn on the camera (page 19), and press the SET button.
• The Clock Set Screen appears.
- Follow the procedures below to enable or disable the date display during playback, to set the display format for the date, and to set the date and time.
- To display the Recording or Playback Screen, press the MENU button 2 times.
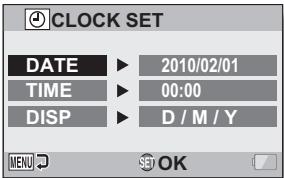
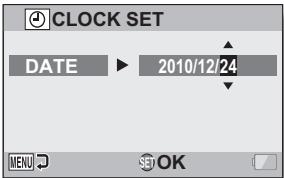
2 Set the date.
① Select "DATE".
② Press the SET button.
- The Set Date Screen appears.
③ Set the date to "2010/12/24".
- The date is set in the following order: Set the year → Set the month → Set the day.
- Press [◀] or [▶] to select year, month or day. Press [▲] or [▼] to increase or decrease the number.
④ Press the SET button.
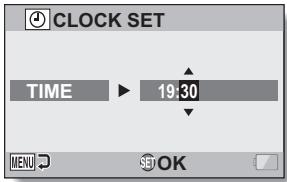
3 Set the clock.
① Select "TIME".
② Press the SET button.
- The Set Time Screen appears.
③ Set the time to "19:30".
- The time is set in the following order: Set the hour Set the minute.
- A 24-hour clock is used for the time display.
④ Press the SET button.
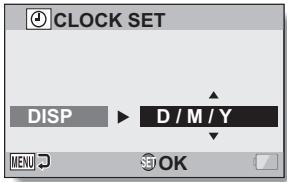
4 Set the order in which the date is displayed during playback.
① Select "DISP".
② Press the SET button.
- The Set Date Format Screen appears.
③ Press [▲] or [▼].
- Press [▲] to change the displayed date order as follows:

flowchart
graph LR
    A["D/M/Y"] --> B["Y/M/D"]
    B --> C["M/D/Y"]
Press [▼] to change it in the reverse order.
④ Press the SET button.
5 Press the MENU button.
- The date and time setting is completed.
- To display the Recording or Playback Screen, press the MENU button.
HINT
- Under normal conditions, while the battery pack is being replaced, an internal battery will maintain the date and time settings. However, there is a small chance the settings may be lost (the backup will last for about 7 days). It is recommended to check that the date and time settings are still correct after replacing the battery pack and before shooting or recording of any type (follow step 1).
To correct the date and time settings
① Turn on the camera.
② Display the Option Setting Menu 1 (page 29).
③ Select "CLOCK SET" and press the SET button.
- The screen to set the date and time appears.
- The current date and time settings are shown.
④ Select the line you wish to change, and make the correction.
SWITCHING BETWEEN THE RECORDING MODE AND PLAYBACK MODE
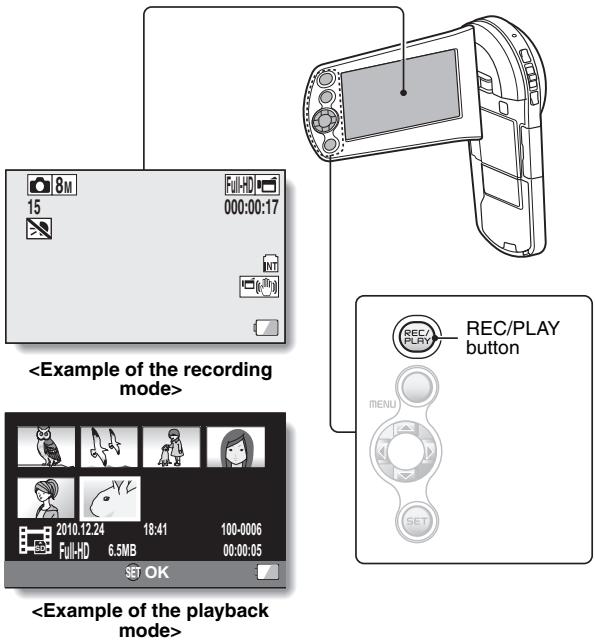
Switch between the recording mode (for recording) and the playback mode (for viewing your recorded images).
1 Turn on the camera (page 19).
2 Press the REC/PLAY button.
- The mode changes.
- The mode changes each time the REC/PLAY button is pressed.
SWITCHING THE OPERATING MODE
The “SIMPLE mode” comprises only those functions that are most often used and necessary to operate the camera, while the “NORMAL mode” enables full use of all the camera’s many functions. Select the mode that is suitable for your purposes.
Switching between the SIMPLE and NORMAL modes
1 Turn on the camera (page 19).
• The previous mode is active.
2 Press the MENU button.
- The Menu Screen for the active mode appears.
3 Select the operating mode icon, and press the SET button.
- Switch from the SIMPLE mode to the NORMAL mode, or from the NORMAL mode to the SIMPLE mode.
- Press the MENU button to cancel the Menu Screen.
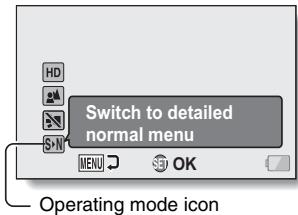
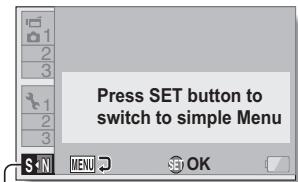
Operating mode icon
Accessing/exiting the SIMPLE/NORMAL Mode Menu Screen
1 Set the camera to the recording or playback mode (page 25).
2 Select the desired operating mode (page 26).
3 If the Menu Screen is not displayed, press the MENU button.
• The Menu Screen appears.
- To cancel the Menu Screen, press the MENU button.
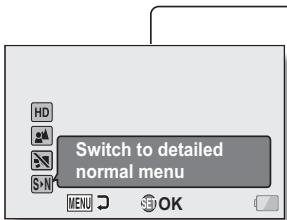
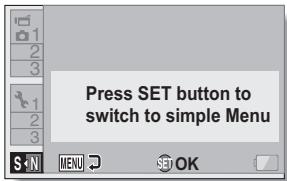
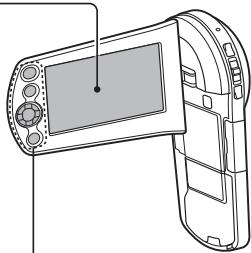
natural_image
Line drawing of a handheld electronic device with control panel and display screen (no text or symbols)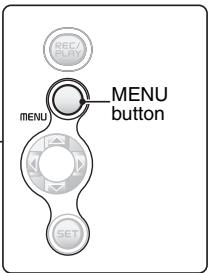
4 Press [▲] or [▼] to select the item you wish to change, and press the SET button.
- The Setting Screen for the selected item appears.
![Press [▲] Press [▼] Press Select an item to change Description of selected item Select video and photo size To keep in HDTV size HDTV size 8M [4:3] MENU SET OK](/content/2025/01/96638/images/f14361bb77b8b7c8a0e3c0993e68c4141b77dd565ff0d47a24a9939674867666.jpg)
4 Press [▲] or [▼] to select a tab.
- The Menu Screen for the selected tab appears.
![Press [▲] Press [▼] Tab RECORDING MENU 1 VIDEO PHOTO SCENE SELECT FILTER LED LIGHT SELF-TIMER S N MENU OK Option tab](/content/2025/01/96638/images/7163aa32f3b0dc3d9f74ca6981654fa831ee9659b54339191c4bf463aa0f3091.jpg)
5 Press [▶].
![Press [▶] RECORDING MENU1 1 2 3 1 2 3 VIDEO ▶ Full-HO PHOTO ▶ 8M SCENE SELECT ▶ AUTO FILTER ▶ LED LIGHT ▶ SELF-TIMER ▶ MENU OK](/content/2025/01/96638/images/e80197e6c353564f18158c0a4b4065e53cbeca3f0a947b0485f62941ff0aa893.jpg)
6
Press [▲] or [▼] to select the item you wish to change, and press the SET button.
- The Setting Screen for the selected item appears.
- To return to the Menu Screen, press the MENU button.
![Select an item to change RECORDING MENU 1 VIDEO PHOTO SCENE SELECT FILTER LED LIGHT SELF-TIMER MENU OK Applicable mode PHOTO 8M 3264x2448 6M 3328x1872[16:9] ✓ 2048x1536 3M 2048x1536 3M 2288x1288[16:9] 2M 1920x1080[16:9] MENU SET OK](/content/2025/01/96638/images/caad1d2c218da12b7bb5987bc4ea91231cb61664cb1afaf9f2e3b6dcb479a705.jpg)
HINT
About the applicable mode indicator
- This indicator shows the shooting mode(s) for which the selected setting is effective.
: This setting is effective during still image shooting.
: This setting is effective during video clip recording.
: This setting is effective during still image shooting and video clip recording.
VIDEO CLIP RECORDING
1 Turn on the camera (page 19), and set it to the recording mode (page 25).
2 Press the [ ] button.
- Recording begins.
- It is not necessary to keep the [ ] button pressed while recording.
- When the remaining recording time available for the currently recording clip becomes little, a countdown of the remaining recording time appears on the display.
3 End the recording.
- Press the [ ] button again to stop recording.
![[ ] button Recording time 24 ●REC 000:00:09 5 Available recording time remaining](/content/2025/01/96638/images/7bd29485740095243fae21921862971bfa9c15f93514ab82fdaeb910dc671d27.jpg)
SHOOTING SINGLE SHOTS
Capture a still image (single-shot).
1 Turn on the camera (page 19), and set it to the recording mode (page 25).
2 Press the [ ] button.
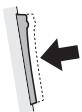
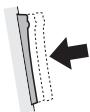
① Press the [ ] button halfway.
- The autofocus operates, and the image is focused (focus lock).
② Continue to gently press the [ ] button all the way.
- The shutter releases and the image is captured.
- You can view the captured image on the monitor by keeping the [ ] button depressed when you capture the image.
①
②
natural_image
Pure diagram of a vertical bar with a dashed line and arrow, no text or symbols present![[ ] button 8M Target mark](/content/2025/01/96638/images/087093c17cce02bd14d3fb3093d23e97b17ea1088e2e64dcda619e9354e7b55a.jpg)
HINT
Adjusting the monitor brightness
- While the Recording Screen is active, you can quickly access the screen for adjusting the brightness of the monitor by pressing the MENU button for at least 1 second.
What is the camera focusing on?
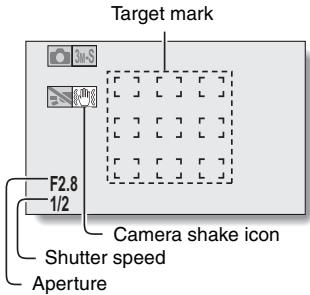
- A target mark [] on the monitor shows the area the camera is focusing on.
- The camera automatically determines the correct focus by measuring from 9 different focus points within the shooting area. If the target mark is at a position that is different from the point you wish to focus on, you can refocus, for example, by changing the shooting angle.
- The large target mark appears when the camera focuses on a wide area in the center of the screen.
The focus and exposure can be locked (in the NORMAL mode)
- By assigning an operation shortcut to an arrow key (page 45), you can set the autofocus or the exposure to a fixed setting. When the exposure setting is fixed, the AF icon appears on the monitor; when the autofocus setting is fixed, the AF icon appears on the monitor.
- When the focus range (page 45) setting or scene select setting is changed, the focus lock is released.
The shutter speed and aperture are displayed (in the NORMAL mode)
- The shutter speed and aperture settings are shown on the Recording Screen. You can use them as a reference when shooting.
If the camera shake icon 📋 appears... (in the NORMAL mode)
- During still image shooting, if the shutter speed is slow and the possibility that the image may be blurred due to camera shake becomes high, the camera shake icon may appear on the monitor. In this case, use a tripod to stabilize the camera when shooting.
- When shooting with the scene select function set to the fireworks mode, the camera shake icon always appears, but this is normal.
Does it seem to take a long time to save images?
- When shooting in dimly lit conditions, it may take some time to save the data to the card.
Using the LED light
The LED light can be used for macro photography to illuminate close-up subjects in dimly lit surroundings.
When using the LED light, set the focus range (page 45) to super macro 🖼️.
1 Display the SIMPLE Mode Recording Menu (page 27), select the LED light setting, and press the SET button.
- The screen to select the LED light operation appears.
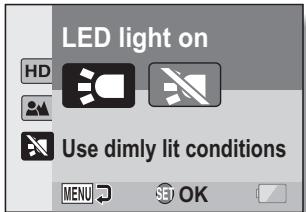
☐: The LED light operates regardless of the shooting conditions.
: The LED light is disabled regardless of the shooting conditions.
2 Select the desired LED light operation, and press the SET button.
- This completes the LED light operation setting.
3 Press the [ ] button to take the picture or the [ ] button to begin recording.
CAUTION
Is the recorded image dark?
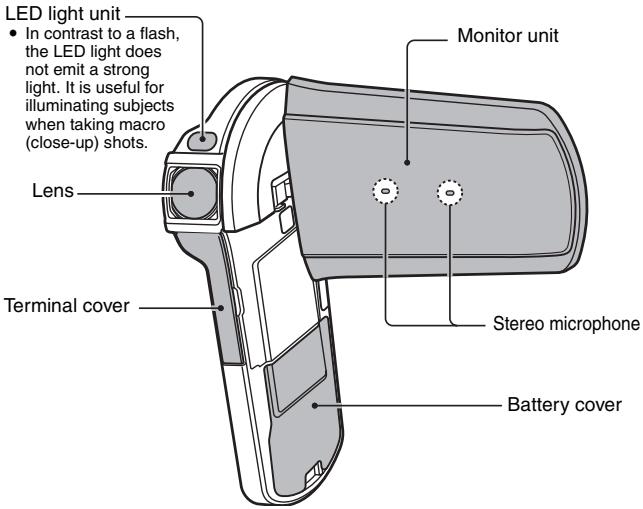
- In contrast to a flash, the LED light does not emit a strong light. It is useful for illuminating subjects when taking macro (close-up) shots.
- When the LED light is used, the edges of the captured image may appear dark.
Do not touch the LED light unit when shooting
- The LED light becomes very hot and may cause a burn. Avoid touching the LED light when shooting.
HINT
About using the LED light
- The LED light turns off after about 8 minutes.
- A video clip using the LED light continuously can be recorded for about 8 minutes. About 30 seconds before recording ends, a countdown display is shown in the monitor.
- By assigning an operation shortcut to an arrow key (page 45), you will be able to change the LED light mode from the Recording Screen (in the NORMAL mode).
SHOOT A STILL IMAGE WHILE RECORDING A VIDEO CLIP
You can capture a still image (a single-shot) while recording a video clip.
1 Turn on the camera (page 19), and set it to the recording mode (page 25).
2 Press the [ ] button.
3 When you see a scene you'd like to capture as a still image, press the [icon] button.
4 Press the [图标] button to end the video clip recording.
![[ ] button [ ] button 2M Full-HD REC 000:00:09](/content/2025/01/96638/images/6936cd8b85b6725137e8585f69532549981a428a0a35d9f3ec9852c62777d58c.jpg)
HINT
- When the remaining video recording time becomes approximately 50 seconds, it will no longer be possible to capture a still image while recording a video clip. The exact remaining recording time at which this occurs will differ depending on the subject and on the recording size (page 45), as well as on the video clip recording mode (page 45). If you intend to capture a still image while recording a video clip, it is suggested that you take note of the remaining video recording time.
About the recording size of still images
- The size of a still image captured during video clip recording depends on the video clip recording size.
| Video clip recording size setting | Still image recording size |
| Full-HD Full-SHQ | 2M |
| HD-HR HD-SHQ | 0.9M |
| TV-SHQ | 0.3M |
- It is not possible to capture a still image when recording a video clip in the ☆ mode.
- It is not possible to capture sequential shots.
MACRO-PHOTOGRAPHY (ZOOM)
Your camera has two zoom functions: optical zoom and digital zoom.
1 Point the camera lens at the subject.
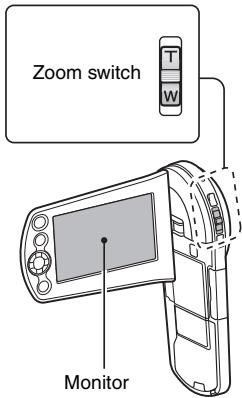
2 Push the zoom switch toward [T/○] or [W/□□] to compose the desired image.
[T/○]: Zoom in on the subject. [W/■]: Zoom out.
- When the zoom switch is pushed, the zoom bar appears on the monitor.
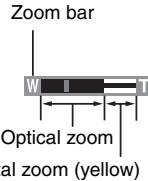
- When the optical zoom factor is at maximum, zooming stops temporarily. When the zoom switch is pushed toward the [T/○] side again, the mode changes to the digital zoom mode and zooming continues.
3 Take the picture.
For video clip recording, see page 31.
For shooting single shots, see page 32.
For shooting sequential shots, see page 45.
When both optical and digital zoom are enabled
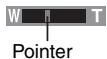
When optical zoom only is enabled
PLAYING BACK VIDEO CLIPS AND STILL IMAGES
1 Set the camera to the playback mode (page 25).
2 Select the image to play back.
- Use the arrow keys to move the orange frame to the file you wish to play back.
- The image information for the framed image is shown at the bottom of the screen.
3 Press the SET button.
- The image you selected in step 2 is displayed fullscreen.
- If a video clip was selected, playback begins.
Press [▼].

Video clip playback operation
| To do this... | Do this | |
| Normal forward playback | Press the SET button. | |
| Stop playback | During playback, press [▼]. | |
| Pause | During playback, press the SET button or press [▲].During accelerated playback, press [▲]. | |
| To play back one image at a time (single-frame step) | Forward playback | After pausing playback, press [▶]. |
| Reverse playback | After pausing playback, press [◀]. | |
| Slow playback | Forward playback | After pausing playback, press and hold [▶]. |
| Reverse playback | After pausing playback, press and hold [◀]. | |
| To accelerate playback | Forward playback | During forward playback, press [▶].The playback speed changes each time [▶] is pressed, as follows:Normal playback → 2× → 5× → 10× → 15×Press [◀] to resume normal playback speed. |
| Reverse playback | During forward playback, press [◀].The playback speed changes each time [◀] is pressed, as follows:15× ← 10× ← 5×Press [▶] to resume normal playback speed. | |
| Return to normal playback speed | Press the SET button. | |
| Adjusting the volume | Louder: During playback, push the zoom switch toward the [T] side.Softer: During playback, push the zoom switch toward the [W] side. | |
HINT
If the 📄 appears on the playback Screen...
- The 📁icon appears when playing back a file that was saved in segments (page 45).
How to save one frame from a video clip as a still image
1 Play back the video clip. Pause the playback at the point you wish to "snap" a photo.
2 Press the [ ] button.
- The screen to select the aspect ratio of the still image appears. Select the desired aspect ratio, and press the [ ] button. Note, however, that if the video clip aspect ratio is 4:3, you cannot select 16:9.
HINT
The file size for a video clip is very large
- Therefore, be aware that if the video clip is uploaded to a computer to be played back, the computer may not be able to play back the video fast enough, making it appear jerky. (The video will always be displayed properly on the camera monitor or a television.)
- Depending on the card, recording may end even before the possible recording time indicated.
Display the video clip playback point
- During video clip playback, press the MENU button for at least 1 second to display a bar showing the current playback point in the video clip.
- Press the MENU button for about 1 second to cancel the bar.
CAUTION
During video clip playback, the sound of a motor is audible...
- During recording, the sound of the optical zoom movement or autofocus movement was recorded. This is not a malfunction.
If no audio is heard...
- The audio is not played back when the video clip is played back in the frame-by-frame, slow-motion, fast playback or reverse playback mode.
CONNECTING TO A TV
By connecting the camera to a TV, you can play back the recorded files on the TV.
CAUTION
Insert and pull out the cable carefully
- When connecting the cables, make sure that the cable plugs are correctly oriented and that they match the shapes of the terminal sockets on the devices. Push the plugs in straight when connecting them. If undue force is used to connect a cable, it may permanently damage the connector pins in the terminal socket.
- Do not use excessive force when connecting and disconnecting cables.
About image output: The image output destination differs depending on the camera status.
| Connection cable | Image output destination | Recording mode | Playback mode | |
| Standby | Recording | |||
| Dedicated AV interface cable | Camera monitor | NTSC: ×PAL: ○ | ○ | × |
| TV | NTSC: ○PAL: × | × | ○ | |
| HDMI cable | Camera monitor | × | ○ | × |
| TV | ○ | × | ○ | |
○: Images are output ✗: Images are not output
HINT
- HDMI, the HDMI logo and High-Definition Multimedia Interface are trademarks or registered trademarks of HDMI Licensing, LLC.

HIGH-DEFINITION MULTIMEDIA INTERFACE
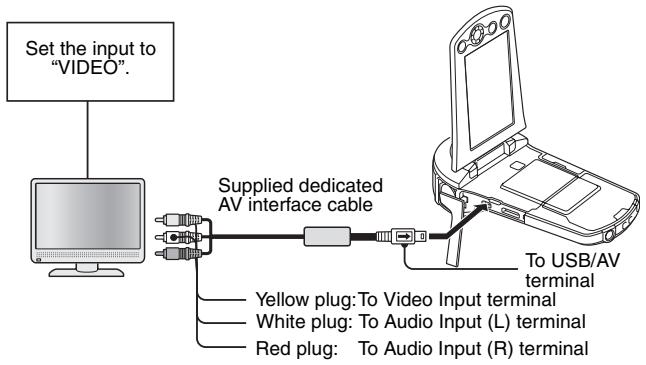
Connecting to a video input terminal
Use the supplied dedicated AV interface cable to connect to a TV.
Connecting to the HDMI terminal
Use a separately sold mini-HDMI cable to connect to a TV.
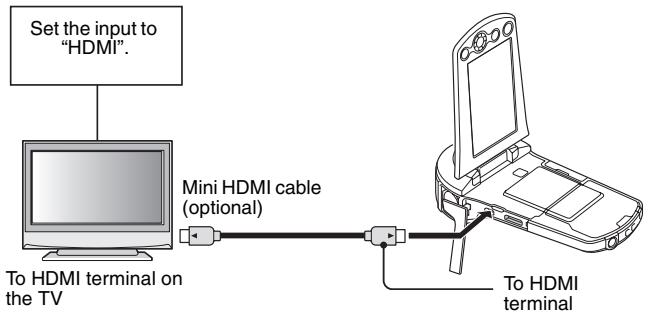
PLAYING BACK ON A TV
- After connecting the camera to the television, switch the TV input to the terminal to which the camera is connected.
- The playback method is the same as when viewing images on the camera's monitor. (Use the TV controls to adjust the volume.)
- The same playback procedure as when playing back with the camera is used to play back audio recordings as well.
CAUTION
Insert and pull out the cable carefully
- When connecting the cables, make sure that the cable plugs are correctly oriented and that they match the shapes of the terminal sockets on the devices. Push the plugs in straight when connecting them. If undue force is used to connect a cable, it may permanently damage the connector pins in the terminal socket.
- Do not use excessive force when connecting and disconnecting cables.
OBTAINING THE INSTRUCTION MANUAL
The Instruction Manual that explains the features in detail can be downloaded from our website.
- “Adobe Reader” is required to view the Instruction Manual. If Adobe Reader is not already installed on your computer, a link to the website from which you can download it can be found on our website.
Contents of the Instruction Manual
Explanations for the functions indicated below can be found in the downloadable Instruction Manual.
Please be sure to obtain and use the Instruction Manual.
HOW TO READ THIS MANUAL
QUICK SEARCH BY OPERATION
CHECKING THE INCLUDED ACCESSORIES
How to use the accessories
ABOUT THE CARD
Media cards that can be used with this camera
What "card" means in this manual
GETTING THE MOST OUT OF YOUR CAMERA
High-quality images with "Full High Definition*"
Includes SIMPLE mode for quick-and-easy operation
Image stabilizer for sharp pictures
Capture clear images of the targeted subject
Eye-Fi smart
SYSTEM MAP
SETUP
PARTS NAMES
CHARGING THE BATTERY PACK
Charging the battery pack
INSTALLING THE CARD
INSTALLING THE BATTERY PACK
Installing the DC adaptor (sold separately: VAR-A3U/A3EX)
About the temperature alert icon 📋
TURNING THE CAMERA ON AND OFF
Turning on the camera
Turning off the camera
Turning on the camera when the power save (sleep) mode is active
DATE AND TIME SETTING
SWITCHING BETWEEN THE RECORDING MODE AND PLAYBACK MODE SWITCHING THE OPERATING MODE
Switching between the SIMPLE and NORMAL modes
Accessing/exiting the SIMPLE/NORMAL Mode Menu Screen
Overview of the SIMPLE Mode Setting Screen
Overview of the NORMAL Mode Setting Screen
■ SIMPLE
SHOOTING
BEFORE TAKING PICTURES
For best results
Using the autofocus
Select the recording size
Select the focus setting
Hints for taking pictures
VIDEO CLIP RECORDING
SHOOTING SINGLE SHOTS
Using the LED light
SHOOT A STILL IMAGE WHILE RECORDING A VIDEO CLIP
MACRO-PHOTOGRAPHY (ZOOM)
PLAYBACK
PLAYING BACK VIDEO CLIPS AND STILL IMAGES
How to save one frame from a video clip as a still image
SLIDESHOW PLAYBACK
PLAYBACK VOLUME
DELETING FILES
Delete single/delete all/delete folder
Delete selected
PLAYBACK MODES
21-image display playback
Selecting the playback folder
Magnifying (zooming in) the image
NORMAL
SHOOTING
RECORDING MENU 1
Video setting
Still image setting
Scene select setting
Filter setting
Self-timer setting
RECORDING MENU 2
Motion compensation (image stabilizer) setting
Focus range setting
Focus mode setting
Light-measuring mode setting
ISO sensitivity setting
RECORDING MENU 3
White balance setting
Exposure setting
Subject chaser settings
High sensitivity mode setting
Digital zoom setting
Exposure compensation
Storage folder setting
PLAYBACK
PLAYBACK MENU 1
Slideshow settings
File protect setting
Resize
Rotate
PLAYBACK MENU 2
Correcting the image
Editing video clips
Printing instructions
FILE INFO DISPLAY
■ OPTION SETTINGS
DISPLAY THE OPTION SETTING MENU
INTRODUCTION TO THE OPTION SETTING MENU
Shortcut setting
TV output setting
File No. continued setting
Formatting (initializing)
CHECKING THE REMAINING CARD MEMORY
Checking the remaining number of images and video recording time
For audio recordings
CHECKING THE REMAINING BATTERY PACK CHARGE
■ OTHER DEVICES AND CONNECTIONS
CONNECTING TO A TV
CONNECTING TO A TV
Connecting to a video input terminal
Connecting to the HDMI terminal
PLAYING BACK ON A TV
CONNECTING TO A PRINTER
PRINTING
■ APPENDICES
COMMONLY ASKED QUESTIONS
TROUBLESHOOTING
Camera
Notes regarding the Scene Select feature and filters
SPECIFICATIONS
Camera
Camera connectors
Battery life
Possible No. of Images/Possible Shooting Time/Possible Recording Time
Concerning the multi-indicator
Supplied battery pack charger
Supplied Li-ion battery pack
Others
Before capturing those important shots, be sure to first take a test shot to confirm that your camera is set up and ready to go
HINTS FOR TAKING PICTURES
How to obtain the Instruction Manual
The Instruction Manual that explains the camera functions in detail can be obtained from the SANYO website.
1 Insert the supplied Xacti Software CD in your computer's CD drive.
2 On the installation screen, click [Go to Xacti CS1 Web Support Page].
3 Follow the instructions on the screen to download the Instruction Manual.
- “Adobe Reader” is required to view the Instruction Manual. Adobe Reader can be found in the Xacti Software CD.
ABOUT THE EYE-FI TRANSFER FEATURE
By inserting a commercially sold Eye-Fi card (SD card with wireless LAN) in your camera, you can easily upload photos to your computer, a sharing site, etc. automatically via a Wi-Fi network. Also, you can transfer video files if your Eye-Fi card has a video upload function. The Eye-Fi card settings can be performed using the Eye-Fi Manager, but in addition, the settings below can be performed with this camera.
- Eye-Fi automatic transfer ON/OFF
• Automatic halt of Eye-Fi operation when battery is low - AC adaptor connection restrictions (may or may not be supported, depending on the camera)
- SSID setup/delete
HINT
- The Instruction Manual for the Eye-Fi transfer feature can be obtained from the Sanyo website (page 49).
* "Adobe Reader" is required to view the Instruction Manual. Adobe Reader can be found in the Xacti Software CD.
COMMONLY ASKED QUESTIONS
If you have a question about the camera operation, you might find the answer in this compilation of commonly asked questions.
| Question | Answer | Action | |
| Power | Why doesn't the power turn on? | Due to cold temperatures, the battery pack temporarily lost its power. | Place the camera in your pocket to warm it up before using it. |
| Why is the battery pack consumed so quickly even after it was fully recharged? | The ambient temperature is very low. | Keep the battery pack in an environment of 10 to 40 °C (50 to 104 °F). | |
| The battery pack life has expired. | If a battery becomes depleted quickly even after it was sufficiently charged, it should be assumed that the battery has reached the end of its service life. Please replace it with a new battery. | ||
| Why doesn't recharging end? | The battery pack life has expired. | Replace with a new battery pack. If this is not effective, consult your dealer. | |
Why does the  icon appear? icon appear? | The remaining battery pack power is low. | Use the AC adaptor, and DC adaptor (optional) or replace the battery pack with a fully charged one. | |
| Shooting | Why does the multi-indicator flash red? | A recorded file is being saved on the card. | Not a malfunction. Wait until the multi-indicator turns off. |
| Shooting | Are the settings retained even after the camera is turned off? | — | All settings except the self-timer and the exposure compensation are retained even after the camera is turned off. |
| Which resolution setting should I use? | — | Select the resolution setting according to the intended use. 8M , 6M , 3M-H , 3M-S , 3M , 0 , 0 :Appropriate for printing letter-size or larger, and for printing a close-up of part of a photo (trimming). 2M , 2M : For printing standard photo (photo service) sizes. 0.9M , 0.3M : For photos displayed on a web page, or sent as e-mail attachments. | |
| Shooting | What is the difference between the digital zoom and the optical zoom? | — | Because shooting with the optical zoom uses the optics of a physical lens, you can shoot without losing minute details in the image. The digital zoom, on the other hand, works by magnifying a portion of the image that hits the image sensor and may produce a coarser image. |
| How can I get the distant view into focus? | — | Set the scene select function to the landscape [icon] mode when photographing. Or, set the focus range setting to manual focus [MF], and set the distance to ∞. | |
| Monitor | When used in cold weather, why does the image seem to leave traces as it moves? | Condition due to the monitor characteristics. | Not a malfunction. Spots that appear in the monitor only appear in the monitor and will not be recorded with the images. |
| Why does the displayed image contain some red, blue and green dots, or why are black spots visible? | |||
| Viewing images | Why is the image too bright? | The subject was too bright. | When capturing an image, devise a way to compensate for a bright subject, for example, by changing the shooting angle. |
| Why is the image out of focus? | The focus is not locked properly. | Hold the camera correctly and slowly press the [ ] button halfway to lock the focus. Then press the [ ] button all the way to capture the image. | |
| Viewing images | Why is there no image (?] is shown)? | This may happen when trying to play back images stored on a card from a different digital camera. | Play back images that were recorded on a card using this camera. |
| Why is the playback image distorted? | If the subject moves or the camera is moved during recording, a distorted image may sometimes occur. | Not a malfunction. This is a characteristic of the CMOS sensor. | |
| Viewing images | Why isn't the magnified image clear? | Due to the characteristics of the camera, magnified images appear less clear. | Not a malfunction. |
| Why isn't the captured image clear? | The image was captured using the digital zoom. | Not a malfunction. | |
| Can I play back image and sound files that I edited using my computer? | — | We cannot guarantee the accurate playback of files that have been edited using a computer. | |
| Why is there a motor-like sound during video clip playback? | The sound of the camera's mechanical action was recorded. | Not a malfunction. | |
| Connecting to a TV | Why is there no sound? | The volume on the TV is set to the minimum. | Adjust the volume on the TV. |
| Printing | Why does a message appear during PictBridge printing? | There is a problem with the printer. | Please refer to the instruction manual for your printer. |
| Misc. | The “Cannot edit video clips with unlike settings” message appears. | You have attempted to join video clips having different resolutions or frame rates. | Select video clips that have the same resolution or frame rate. |
| Why is a noise heard from a nearby TV or radio during battery recharging? | Electromagnetic waves are emitted from the charger. | Move the AC adaptor further away from the TV or radio when recharging the battery pack. | |
| Why does the “Insufficient card memory” or “Insufficient internal memory” message appear? | There is no more available memory on the card or in the camera’s internal memory. | Delete unnecessary files, or use a card that has more memory available. | |
| Why does the “Card is protected” message appear? | The lock switch on the card is in the locked (protect) position. | Move the lock switch to the unlocked position. | |
| Why can’t the camera be operated? | A temporary internal circuitry problem may be the cause. | Remove the AC adaptor and the battery pack from the camera, wait a few minutes, then reinstall the battery pack and try again. | |
| A problem such as inability to record or play back occurs. | The card contains files that were saved using a device other than this camera. | After saving your files to a different medium, format the card. | |
| Misc. | Can I use my camera abroad? | — | When the camera is connected to a TV, you can switch the camera's video output to NTSC or PAL. If you have questions about accessories etc., please consult with a dealer near you for advice. |
| Why does the “System error” message appear? | A problem has occurred within the camera or card. | Check the following items:1 Remove the card and then install it again.2 Remove the battery pack and then install it again.3 Install a different card.If “System error” still appears after performing the above steps, then take the camera to the dealer for service. |
SPECIFICATIONS
Camera
| Recorded image file format | Still images:JPEG format (DCF, DPOF, Exif 2.2 compliant)Note: Designed mainly by the Japan Electronics and Information Technology Industries Association (JEITA), DCF (Design rule for Camera File system) is standard for digital still camera image files to provide interoperability between digital photography devices for the images stored on removable memory cards. However, it is not guaranteed that all devices will support the DCF standard.Video clips:Conforms to ISO-standard MPEG-4 AVC/H.264*Audio:MPEG-4 audio (AAC compression)48 kHz sampling rate, 16-bit stereo format |
| Data storage media | Internal memory: Approx. 50 MBSD Memory CardSDHC Memory Card (up to 32 GB)SDXC Memory Card (up to 64 GB) |
| Image sensor/camera effective number of pixels | 1/5-inch (0.5 cm) CMOS sensorStill images: Approx. 3.3 million pixelsVideos (HD mode): Approx. 2.8 million pixelsVideos (SD mode): Approx. 3.3 million pixels |
* Video clip files recorded with models VPC-CA65 and VPC-CG65 are in the same H.264 format as this model. However, such files cannot be played back, since they are not compatible due to differences such as the data compression method.
| Still image shooting mode (recording resolution) | 8M: 3264 × 2448 pixels (approx. 8 million pixels)6M: 3328 × 1872 pixels (approx. 6 million pixels, 16:9 aspect ratio)3M-H: 2048 × 1536 pixels (approx. 3 million pixels, low compression)3M-S: 2048 × 1536 pixels (approx. 3 million pixels, normal compression)3M: 2288 × 1288 pixels (approx. 3 million pixels, 16:9 aspect ratio)2M: 1920 × 1080 pixels (approx. 2 million pixels, 16:9 aspect ratio)2M: 1600 × 1200 pixels (approx. 2 million pixels)0.3M: 1280 × 720 pixels (approx. 900,000 pixels, 16:9 aspect ratio)0.3M: 640 × 480 pixels (approx. 300,000 pixels)0.7M: 3264 × 2448 pixels (approx. 8 million pixels, sequential shots)3M: 2048 × 1536 pixels (approx. 3 million pixels, sequential shots) | |
| Video clip recording mode (recording resolution) | Full-HD: 1920 × 1080 pixels, 60 fields/s (60i)Full-SH: 1920 × 1080 pixels, 30 fps (30p)HD-HR: 1280 × 720 pixels, 60 fps (60p)HD-SH: 1280 × 720 pixels, 30 fps (30p)☆T: 960 × 540 pixels, 30 fps (30p)TV-SH: 640 × 480 pixels, 30 fps (30p)• The 60 fps frame rate of this camera is 59.94 fps, and the 30 fps frame rate is 29.97 fps. | |
| White balance | Full-auto TTL; manual setting available | |
| Lens | Focal length: f = 3.2 mm to 28.8 mm, Optical 9× zoomOpen: F = 2.8 (wide) to 3.0 (tele)9 groups, 12 elements (including three with six aspheric surfaces)Galvanometer irisInternal ND filter35 mm film camera conversionStill image shooting: 38 mm to 342 mm(9× optical zoom)Video clip recording: 38 mm to 380 mm(10× advanced zoom) | |
| Exposure control type | Programmable AE/Shutter speed priority AE/Aperture priority AE/Manual exposure control Exposure compensation available (0 ±1.8 EV in 0.3 EV steps) | |
| Light-measuring mode | Multi-section measuring, center-weighted measuring, spot measuring | |
| Range | Normal mode:50 cm (19.69 in.) to infinitySuper macro mode:1 cm (0.39 in.) to 1 m (3.28 ft.) (wide end only) | |
| Digital zoom | For shooting:1× to approx. 10×For playback:1× to 51× (varies with resolution) | |
| Shutter speed | Still image shooting mode: 1/2 to 1/1,000 sec.(Maximum approx. 1 sec. when scene select function set to lamp ☐☐☐)Sequential shots mode: 1/15 to 1/1,000 sec.Video clip recording mode: 1/30 to 1/10,000 sec.(1/15 sec. max.: when scene select function is set to the lamp ☐☐ or high sensitivity mode) | |
| Sensitivity | Still image shooting (standard output sensitivity*)/video clip recording mode:AutoStill image shootingLED light off: ISO 50 to 400LED light on: ISO 50 to 800Video clip recording: ISO 50 to 800ISO 50, 100, 200, 400, 800, 1600(Switchable from the Recording Menu)* Sensitivity measured in compliance with the ISO standard (ISO 12232:2006).* Maximum ISO sensitivity up to 1600 equivalent when Scene Select function is set to ☐☐☐. | |
| Minimum subject illumination | Approx. 15 lux (1/30 sec in the scene select AUTO mode)Approx. 4 lux (1/15 sec in the lamp or HIGH SENSITIVITY mode) | |
| Image stabilizer | Video: ElectronicStill image: Multi-calculation electronic | |
| Monitor | 2.7" (6.9 cm) low-temperature polysilicon TFT color wide liquid crystal (transmissive), approx. 230,000 pixels | |
| Built-in flash | No | |
| LED light working range | Approx. 10 cm (3.94 in.) to 1 m (3.28 ft.) Super macro mode (wide side only) | |
| LED light modes | ON, OFF | |
| Focus | TTL-type AF (still image shooting mode: 9-point range finder/spot focus; video clip recording mode: Continuous focus), manual focus | |
| Self-timer | Approx. 2-second delay, 10-second delay | |
| Ambient environment | Temperature | 0 to 40 °C (32 to 104 °F) (operation) -20 to 60 °C (-4 to 140 °F) (storage) |
| Humidity | 30 to 90% (operating, no condensation) 10 to 90% (storage, no condensation) | |
| Power supply | Battery pack (supplied) | Li-ion battery pack (DB-L80) ×1 |
| AC adaptor (optional) | VAR-G9 For use with DC adaptor (VAR-A3: sold separately) | |
| Power consumption | 3.5 W (When using the Li-ion battery during recording) | |
| Dimensions (excluding protrusions) | 62.5 (W) × 26.8 (D) × 123.5 (H) mm 2.46 (W) × 1.06 (D) × 4.86 (H) in. (Maximum dimensions) Volumetric capacity: Approx. 126 cc | |
| Weight | Approx. 142 g (5.0 oz.) (camera only [without battery pack and card]) Approx. 159 g (5.6 oz.) (including battery pack and card) | |
Camera connectors
| USB/AV(communication/audio and video output) terminal | Dedicated regrouped jack | |
| Audio output | Stereo | |
| Video output | Composite video, NTSC color TV system/PAL TV system (switchable from the Option Setting Menu) | |
| USB | USB 2.0 High SpeedPC camera: USB video class | |
| HDMI terminal | Video outputTotal number of scan lines (effective number of scan lines): 750p (720p)/1125i (1080i)/525p (480p)Audio output: L-PCM 48 kHz sampling | |
Battery life
| Shooting | Still image shooting mode | Approx. 200 images: CIPA standard (when a SanDisk 2 GB SD Memory Card is used) |
| Video clip recording mode | Approx. 60 minutes: Recorded in [FHD] mode (When LED light is OFF) Approx. 70 minutes: Recorded in [FHK] mode (When LED light is OFF) | |
| Playback | Approx. 210 minutes: Monitor on, continuous playback | |
- Until battery pack runs out when using a fully charged battery pack at a 25 °C (77 °F) ambient temperature.
- The operation time may vary depending on the conditions of the battery pack and the conditions of use. Especially when used at temperatures below 10 °C (50 °F), the battery pack operation time is significantly reduced.
Possible No. of Images/Possible Shooting Time/ Possible Recording Time
| Shooting/ recording mode | Resolution setting | Internal Memory | SD Memory Card | |
| 8 GB | 16 GB | |||
| Still image mode | 8M | 19 images | 2,960 images | 5,940 images |
| 6M | 24 images | 3,770 images | 7,560 images | |
| 3M-H | 32 images | 4,980 images | 9,980 images | |
| 3M-S | 48 images | 7,320 images | 14,600 images | |
| 3L | 51 images | 7,780 images | 15,600 images | |
| 2L | 71 images | 10,800 images | 21,700 images | |
| 2M | 76 images | 11,300 images | 22,700 images | |
| 0.9M | 142 images | 20,700 images | 41,600 images | |
| 0.3M | 327 images | 49,800 images | 99,800 images | |
| 8M | 19 images | 2,960 images | 5,940 images | |
| 3M | 48 images | 7,320 images | 14,600 images | |
| Video clip mode | Full-HD | 22 sec. | 1 hr. 1 min. | 2 hr. 4 min. |
| Full-SHD | 29 sec. | 1 hr. 21 min. | 2 hr. 43 min. | |
| HD-HR | 29 sec. | 1 hr. 21 min. | 2 hr. 43 min. | |
| HD-SHD | 38 sec. | 1 hr. 46 min. | 3 hr. 33 min. | |
| ☆ | 15 sec. | 42 min. | 1 hr. 24 min. | |
| TV-SHD | 1 min. 34 sec. | 4 hr. 19 min. | 8 hr. 39 min. | |
| Audio recording mode | 26 min. 10 sec. | 67 hr. | 134 hr. | |
- If the continuous recording time of a voice memo exceeds about 13 hours, the recorded file is saved once, and then recording continues in a new file. In the video clip recording mode, when the size of the file being recorded exceeds 4 GB, the recorded file is saved once, and then recording continues in a new file. (These 4 GB segments are automatically created. The recording session continues until you stop recording, but voice memo recording is temporarily interrupted while the file is being saved.)
- The above values apply when an SD Memory Card by SanDisk is used.
- Even with cards of the same capacity, the amount of data that can actually be stored may differ depending on the card brand, etc.
- The continuous shooting time for each video clip will differ depending, for example, on the card capacity, environmental conditions (temperature and shooting conditions, etc.).
Concerning the multi-indicator
The camera's multi-indicator will light, flash, or be off, depending on the different camera operations.
| Color | Multi-indicator status | Camera status | |
| Green | Lit | Connected to a computer or printer | |
| Flashing | Power save mode active | ||
| Orange | Lit | Connected to a TV | |
| Red | Flashing | Slow | Rise in internal temperature |
| Fast | During self-timer photography | ||
| Very fast | Accessing card | ||
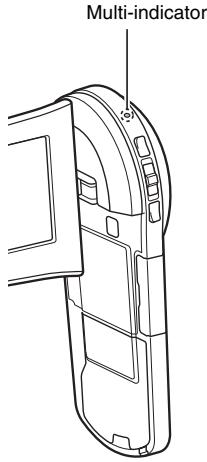
Supplied battery pack charger
| Part No. | VAR-L80 | |
| Power source | AC 100 to 240 V, 50 to 60 Hz, 5 W | |
| Rated output | DC 4.2 V, 550 mA | |
| Compatible batteries | Supplied or separately sold Lithium-ion battery pack (DB-L80) | |
| Ambient environment | Temperature | 0 to 40 °C (32 to 104 °F) (when charging) -20 to 60 °C (-4 to 140 °F) (storage) |
| Humidity | 20 to 80% (no condensation) | |
| Dimensions | 84.0 (W) × 50.5 (D) × 22.5 (H) mm3.31" (W) × 1.99" (D) × 0.89" (H) | |
| Weight (without power cord) | Approx. 49 g (1.7 oz.) | |
- When using the supplied battery pack charger abroad, the power cord may need to be replaced in accordance with local requirements. Please contact your local dealer for details.
Supplied Li-ion battery pack
| Model number | DB-L80 | |
| Voltage | 3.7 V | |
| Capacity | 700 mAh | |
| Ambient environment | Temperature | 0 to 40 °C (32 to 104 °F) (during use)-10 to 30 °C (14 to 86 °F) (storage) |
| Humidity | 10 to 90% (no condensation) | |
| Dimensions | 39.2 (W) × 31.4 (D) × 5.9 (H) mm1.54 (W) × 1.24 (D) × 0.23 (H) in. | |
| Weight | Approx. 15 g (0.5 oz.) | |
Others
Mac OS is a trademark of Apple Inc., registered in the U.S. and other countries.
Microsoft and Windows are registered trademarks of Microsoft Corporation in the USA and other countries.
Intel and Pentium are registered trademarks of Intel Corporation (USA). In this manual, the Microsoft® Windows® 2000 operating system, Microsoft® Windows® XP operating system, Microsoft® Windows® Vista operating system, and Microsoft® Windows® 7 operating system are collectively referred to as "Windows".
Software Red Eye by FotoNation™ 2003-2005 is a trademark of FotoNation® Inc.
Red Eye software ^© 2003-2005 FotoNation In Camera Red Eye - covered by U.S. Patent No. 6,407,777. Other patents Pending.

FotoNation®
SDXC logo is a trademark.

HDMI, the HDMI logo and High-Definition Multimedia Interface are trademarks or registered trademarks of HDMI Licensing, LLC.
HDMI ^TM
HIGH-DEFINITION MULTIMEDIA INTERFACE
Eye-Fi is a registered trademark of Eye-Fi, Inc.
All other company and product names are registered trademarks or trademarks of their respective owners.
CAUTION
- It is forbidden to copy this manual, whole or in part, without prior written permission.
- All images and illustrations given in this manual are for explanation purposes and may differ slightly from that of the actual product. Also, actual specifications are subject to change without prior notice and therefore may differ from the contents of this manual.
Before capturing those important shots, be sure to first take a test shot to confirm that your camera is set up and ready to go
- Sanyo Electric shall not be held responsible for any problems resulting from the use of this camera.
- Sanyo Electric declines all responsibility for damages due to improper use of the camera, failure to adhere to the instructions given in this manual, or repairs or changes done by those other than a technician authorized by the manufacturer.
- Sanyo Electric shall not be held responsible for any damage caused by optional devices or consumable items used with the camera other than those supplied with the camera or those specified by Sanyo Electric.
- Sanyo Electric shall not be held responsible for any losses or loss of revenue resulting from the loss of data caused by the malfunction, or the repairing of a malfunction, of the camera.
- The images captured with this camera will differ in quality from pictures taken with a standard film camera.
SANYO
SANYO Electric Co., Ltd.
- Important note
- Warning
- ■FOR AMERICAN USERS
- WARNING:
- Declaration of Conformity
- FOR USERS IN THE USA
- IMPORTANT SAFETY INSTRUCTIONS – SAVE THESE INSTRUCTIONS DANGER – TO REDUCE THE RISK OF FIRE OR ELECTRIC SHOCK, CAREFULLY FOLLOW THESE INSTRUCTIONS
- PARA LOS USUARIOS DE EE.UU.
- INSTRUCCIONES IMPORTANTE SOBRE DE SEGURIDAD - GUARDE ESTAS INSTRUCCIONES PELIGRO - PARA REDUCIR EL RIESGO DE INCENDIO O DESCARGAS ELÉCTRICAS, SIGA CUIDADOSAMENTE ESTAS INSTRUCCIONES
- ■FOR CANADIAN USERS
- ■FOR EU USERS
- Note:
- ■FOR RUSSIAN USERS
- HOW TO READ THIS MANUAL
- For first-time users
- To use the various camera features
- To use additional features
- Symbols used in this manual
- SHOOT, PLAY BACK AND SAVE
- Preparing the camera
- Insert the battery pack.
- Insert the SD Memory Card.
- Press the ON/OFF button for at least 1 second to turn the camera on.
- Record.
- To record a video clip:
- To take a photo:
- Before capturing those important shots, be sure to first take a test shot to confirm that your camera is set up and ready to go
- Playback
- Press the REC/PLAY button.
- Select the image to play back.
- Press the SET button.
- Deleting files
- When you are finished using the camera...
- To continue to the next operation...
- Burn your recorded video clips onto a DVD
- Install application program
- Set the supplied CD-ROM in your computer's DVD drive.
- Click on [TotalMedia Extreme for SANYO].
- Remove the CD-ROM from the computer's DVD drive.
- Copy data from your camera to the computer
- Turn on the computer, and use the supplied dedicated USB interface cable to connect your camera to the computer.
- Turn on the camera (page 19).
- Select "COMPUTER", and press the SET button.
- Select "CARD READER", and press the SET button.
- Copy data from your camera to a computer.
- HINT
- Burn video clips onto a DVD (for Windows Vista users)
- Insert a blank DVD in your computer's DVD drive.
- Double-click the desktop [TotalMedia Extreme for SANYO] icon.
- 3
- Click the [Create video] icon.
- Click [New DVD project].
- Click [Insert video].
- Click the [Open] button.
- 7
- Click the [Design] tab.
- Click the [Produce] tab.
- Click the [Burn] button.
- Click the [Yes] button.
- Click the [Save] button.
- Click the [OK] button.
- Click the [×] close button in the upper right corner.
- Click the [×] close button in the upper right corner.
- About software upgrades
- To use Blu-ray Disc or AVCHD
- CAUTION
- United States/Canada
- Europe
- China
- CONTENTS
- SETUP
- ■ SHOOTING
- ■ PLAYBACK
- ■ CONNECTING TO A TV
- ■ OBTAINING THE INSTRUCTION MANUAL
- ■ ABOUT THE EYE-FI TRANSFER FEATURE
- ■ APPENDICES
- CHECKING THE INCLUDED ACCESSORIES
- How to use the accessories
- ■ Handstrap
- ■ How to attach the lens cap
- Media cards that can be used with this camera
- What "card" means in this manual
- Front
- Bottom
- CHARGING THE BATTERY PACK
- Connect the supplied power cord to the socket on the battery pack charger.
- Insert the battery pack in the battery charger.
- Plug the power plug into a power outlet (AC 100 V to 240 V).
- When the CHARGE indicator turns off, unplug the power cord from the power outlet, and remove the battery pack from the charger.
- Does the battery pack feel hot?
- If there is interference to your TV or radio during charging...
- Ambient temperature during charging
- Charge a battery pack in the following cases
- FOR AMERICAN USERS:
- About the CHARGE indicator
- INSTALLING THE CARD
- Do not attempt to forcibly remove the card
- If the multi-indicator is flashing red...
- To format a card
- Shooting without a card installed
- INSTALLING THE BATTERY PACK
- Installing the DC adaptor (sold separately: VAR-A3U/A3EX)
- Does the battery pack appear swollen?
- Do not use the battery with the outer covering or label removed
- About the internal backup battery
- When not using the camera for a long time, remove the battery pack
- To prolong the life of the battery pack
- About the temperature alert icon
- ■ When the battery or internal camera (excluding battery) temperature rises during use
- TURNING THE CAMERA ON AND OFF
- Turning on the camera
- Open the monitor unit, and press the ON/OFF button for at least 1 second.
- Turning off the camera
- Press the ON/OFF button for at least 1 second.
- Turning on the camera when the power save (sleep) mode is active
- To immediately activate the power save mode
- About the standby mode
- If the ⓣ? icon appears...
- DATE AND TIME SETTING
- Turn on the camera (page 19), and press the SET button.
- Set the date.
- Set the clock.
- Set the order in which the date is displayed during playback.
- Press the MENU button.
- To correct the date and time settings
- SWITCHING BETWEEN THE RECORDING MODE AND PLAYBACK MODE
- Turn on the camera (page 19).
- Press the REC/PLAY button.
- SWITCHING THE OPERATING MODE
- Switching between the SIMPLE and NORMAL modes
- Press the MENU button.
- Select the operating mode icon, and press the SET button.
- Accessing/exiting the SIMPLE/NORMAL Mode Menu Screen
- Press [▲] or [▼] to select the item you wish to change, and press the SET button.
- Press [▲] or [▼] to select a tab.
- Press [▶].
- 6
- Press [▲] or [▼] to select the item you wish to change, and press the SET button.
- About the applicable mode indicator
- VIDEO CLIP RECORDING
- SHOOTING SINGLE SHOTS
- Adjusting the monitor brightness
- What is the camera focusing on?
- The focus and exposure can be locked (in the NORMAL mode)
- The shutter speed and aperture are displayed (in the NORMAL mode)
- If the camera shake icon 📋 appears... (in the NORMAL mode)
- Does it seem to take a long time to save images?
- Using the LED light
- Is the recorded image dark?
- Do not touch the LED light unit when shooting
- About using the LED light
- SHOOT A STILL IMAGE WHILE RECORDING A VIDEO CLIP
- About the recording size of still images
- MACRO-PHOTOGRAPHY (ZOOM)
- Point the camera lens at the subject.
- Push the zoom switch toward [T/○] or [W/□□] to compose the desired image.
- Take the picture.
- PLAYING BACK VIDEO CLIPS AND STILL IMAGES
- Set the camera to the playback mode (page 25).
- How to save one frame from a video clip as a still image
- Play back the video clip. Pause the playback at the point you wish to "snap" a photo.
- Press the [ ] button.
- The file size for a video clip is very large
- Display the video clip playback point
- During video clip playback, the sound of a motor is audible...
- If no audio is heard...
- CONNECTING TO A TV
- Insert and pull out the cable carefully
- Connecting to a video input terminal
- Connecting to the HDMI terminal
- PLAYING BACK ON A TV
- OBTAINING THE INSTRUCTION MANUAL
- Contents of the Instruction Manual
- SWITCHING BETWEEN THE RECORDING MODE AND PLAYBACK MODE SWITCHING THE OPERATING MODE
- ■ SIMPLE
- SHOOTING
- BEFORE TAKING PICTURES
- NORMAL
- RECORDING MENU 1
- CONNECTING TO A PRINTER
- How to obtain the Instruction Manual
- ABOUT THE EYE-FI TRANSFER FEATURE
- COMMONLY ASKED QUESTIONS
- SPECIFICATIONS
- Camera connectors
- Battery life
- Possible No. of Images/Possible Shooting Time/ Possible Recording Time
- Concerning the multi-indicator
- Others
- SANYO
Marque : SANYO
Modèle : VPC-CS1P
Catégorie : Caméscope numérique