
HPS-SG4 - Gril électrique SANYO - Notice d'utilisation et mode d'emploi gratuit
Retrouvez gratuitement la notice de l'appareil HPS-SG4 SANYO au format PDF.


| Type de produit | Gril électrique intérieur avec fonction gril et plancha |
| Marque et modèle | SANYO HPS-SG4 |
| Dimensions (L x l x H) | Environ 60,3 x 36,8 x 16,5 cm (23,75 x 14,5 x 6,5 po) |
| Poids | Environ 3,4 kg (7,5 lb) |
| Alimentation | 120 V, 60 Hz |
| Puissance | 1300 W |
| Surface de cuisson | Plaque antiadhésive pour gril et plancha |
| Réglage de température | Commande rotative avec voyant lumineux, de 275 °F à 350 °F |
| Sécurité | Poignées et base Cool-Touch, fiche polarisée, arrêt automatique en position OFF |
| Entretien | Plaque antiadhésive lavable à la main, bac à graisse et couvercle lavables au lave-vaisselle. Ne pas immerger le thermostat. |
| Accessoires inclus | Bac de récupération des graisses, couvercle, thermostat amovible |
| Garantie | 1 an pièces et main d'œuvre (États-Unis uniquement) |
| Utilisation | Intérieur uniquement, sur surface résistante à la chaleur |
| Capacité | Convient pour environ 6 steaks ou 2 lb de poulet |
| Pays de fabrication | Chine |
| Service client | Téléphone : 1-800-421-5013 (lun-ven, 8h-17h PAC) / Site : www.sanyoservice.com |
FOIRE AUX QUESTIONS - HPS-SG4 SANYO
Questions des utilisateurs sur HPS-SG4 SANYO
0 question sur cet appareil. Repondez a celles que vous connaissez ou posez la votre.
Poser une nouvelle question sur cet appareil
Téléchargez la notice de votre Gril électrique au format PDF gratuitement ! Retrouvez votre notice HPS-SG4 - SANYO et reprennez votre appareil électronique en main. Sur cette page sont publiés tous les documents nécessaires à l'utilisation de votre appareil HPS-SG4 de la marque SANYO.
MODE D'EMPLOI HPS-SG4 SANYO
INSTRUCTION MANUAL
MANUAL DE INSTRUCCIONES
Indoor Barbecue Grill & Griddle
Parrilla y plancha para el uso interior
HPS-SG4
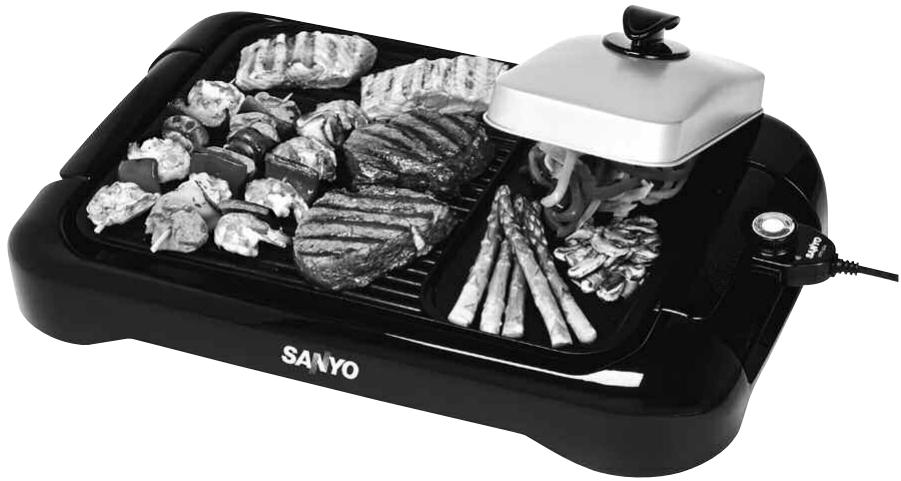
Thank you for your purchase of a SANYO INDOOR BARBECUE GRILL & GRIDDLE.
Please read these instructions carefully before use and be sure to keep the manual in a safe place for future reference.
Table of Contents
Important Safeguards. 2
Names of Parts 3
Set Up 4
Instructions for Grilling. 4
Cooking Guide 4
Temperature Guide. 5
Grilling Tips 5
Care and Cleaning. 5
■ Recipes 6
■ Warranty 7
■ Spanish. 8-14
WARNING:
Handling the cord on this product or cords associated with accessories sold with this product, will expose you to lead, a chemical known to the State of California to cause cancer, and birth defects or other reproductive harm.
Wash hands after handling.
IMPORTANT SAFEGUARDS
When using electrical appliances, follow basic safety precautions to reduce the risk of fire, electrical shock, and/or injury:
- Read all instructions.
- Do not touch HOT surfaces. Use handles or knobs.
- To protect against electrical shock, do not immerse cord, plug or the appliance itself in water or other liquid.
- Close supervision is necessary when the appliance is used near children.
- Prior to plugging appliance into the wall outlet, ensure temperature control is set to OFF position. To disconnect completely, set temperature control to OFF and unplug the appliance.
- Unplug from outlet when not in use and before cleaning. Allow unit to cool before putting on or taking off parts, and before cleaning the appliance.
- Do not operate any appliance with a damaged cord or plug or after the appliance malfunctions or has been damaged in any manner. Return appliance to the nearest authorized service facility for examination, repair or adjustment.
- Using attachments or accessories other than those supplied by the manufacturer can create a HAZARD. DO NOT use incompatible parts.
- Do not use outdoors.
- Do not let cord hang over edge of table or counter, or touch hot surfaces.
-
Do not place on or near a hot burner or in a heated oven.
-
Do not use the appliance for other than intended use. This product is designed for household use only.
- Do not clean with metal scouring pads. Pieces can break off the pad and touch electrical parts, creating a risk of electric shock. Besides, metal-scouring pads may damage the finish.
- When in use, keep grill a minimum of 10-12 inches away from walls and clear on top. Place on a stable, heat-resistant surface and in a well-ventilated area. Place the appliance on a dry and horizontal surface.
- A fire may occur if the appliance is covered or touching flammable material, such as curtains, draperies, walls and the like when in operation.
- Do not place any of the following or similar materials in or on the appliance, such as: paper, cardboard, plastic, etc.
- For long-life performance of the hot plate, avoid dropping anything on the heating element.
- Electric Power: If the electric circuit is overloaded with other appliances, this appliance may not operate properly. The appliance should be operated on a separate electrical circuit from other appliances.
- Clean the appliance regularly as built-up grease may cause fire.
- ALWAYS ALLOW THE APPLIANCE TO COOL COMPLETELY BEFORE CLEANING.
SAVE THESE INSTRUCTIONS
Note:
A. A short power-supply cord is provided to reduce risks of becoming entangled in or tripping over a longer cord.
B. Extension cords are available and may be used if care is exercised in their use.
C. If extension cord is used:
(1) The marked electrical rating of the extension cord should be at least as great as the electrical rating of the appliance.
(2) The longer cord should be arranged so that it will not drape over the countertop or tabletop where it can be pulled on by children or tripped over.
The appliance has a polarized plug (one blade is wider than the other is).
As a safety feature, this plug will fit in a polarized outlet only one way. If the plug does not fit fully in the outlet, reverse the plug. If it still does not fit, contact a qualified electrician.
Do not attempt to override this safety feature.
BEFORE USE
- Remove packaging material.
- Clean the grill with a damp cloth.
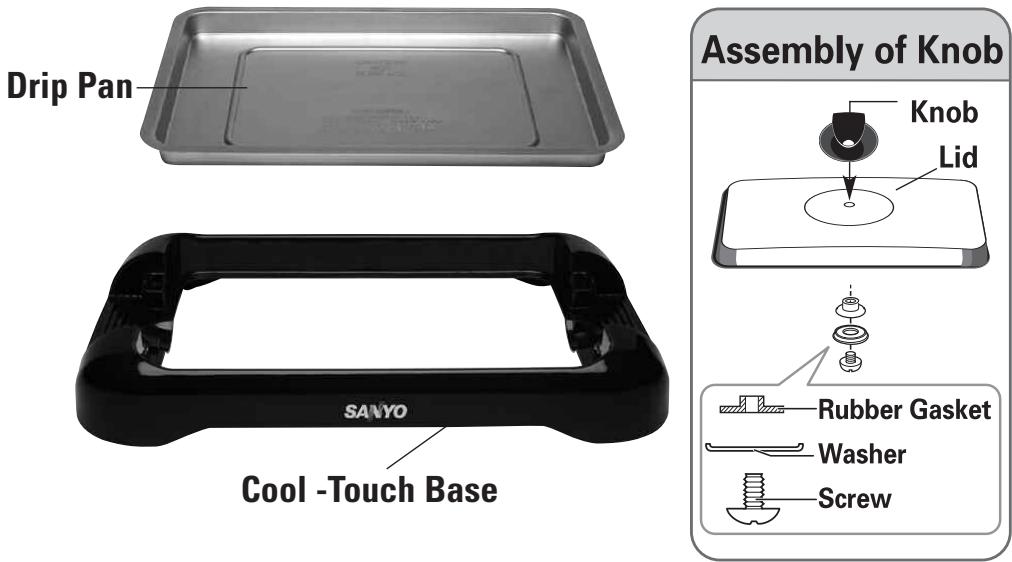
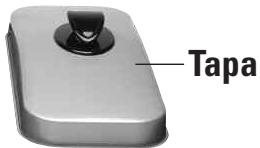
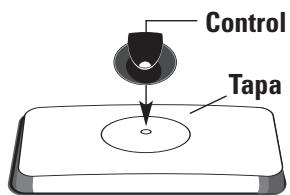
- Assemble the knob to the lid as pictured above.
-
During the first use, the appliance may give off a slight odor.
-
This is due to the newness of the product.
SET UP PRIOR TO USING GRILL
- Place cool-touch base on a heat-resistant countertop in a well-ventilated area.
- Place drip pan on the bottom of the base.
- Add water to drip pan, fully covering bottom of pan.
-
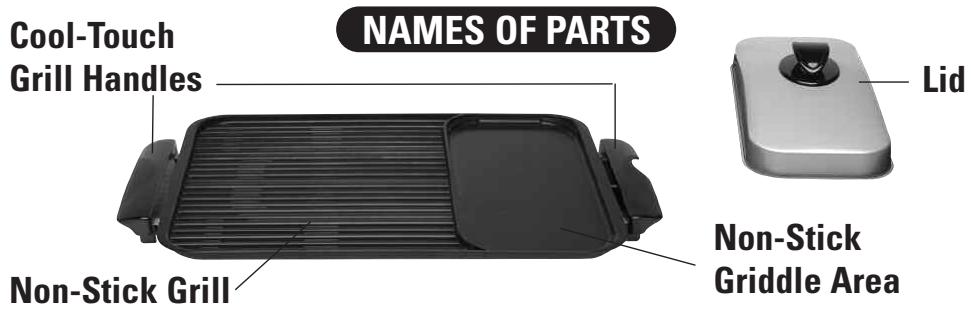
Using the cool-touch handles, place non-stick grill on top of the base.
-
Make sure the drip pan and grill are sitting properly on the base.
-
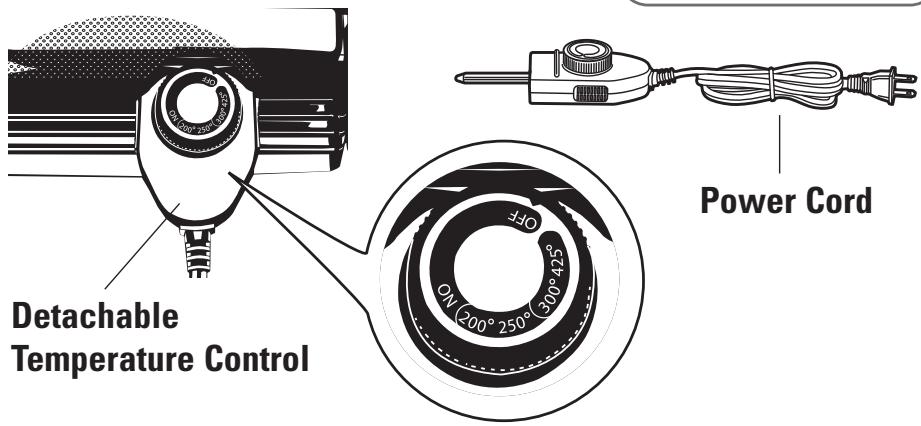
Connect the temperature control to the receptacle on the side of the grill.
-
Use only the temperature control provided with grill. Model number is printed on temperature control and the base of grill, these numbers should match.
-
Plug the cord into a standard outlet.
INSTRUCTIONS FOR GRILLING
- Coat the grill surface with cooking spray.
- Adjust the temperature control to desired temperature.
-
Allow unit to preheat.
-
The light will come on indicating the power is on. The light will go off when the grill has reached the selected temperature.
-
Place food directly on grill. Grill food to desired doneness.
-
See COOKING GUIDE for suggestions. See TEMPERATURE GUIDE to ensure food safety.
-
Add water to drip pan to maintain coverage. Do not overflow.
COOKING GUIDE
| FOOD | APPROXIMATE COOKING TIME | TEMPERATURE |
| Fish/Salmon | 10-15 minutes | 300°F |
| Bacon | 10-15 minutes | 275°F |
| Sausage Links | 20 minutes | 275°F |
| Hamburgers | 15-20 minutes | 325°F |
| Hot Dogs | 15 minutes | 300°F |
| Chicken Breast | 15-20 minutes each side | 325°F |
| Bone in Pork Chops | 10-12 minutes each side | 300°F |
| Steak (rare) | 4-6 minutes each side (depending on thickness) | 350°F |
| Steak (well done) | 7-9 minutes each side (depending on thickness) | 350°F |
| Lamb Cutlets | 6-7 minutes each side | 325°F |
Note: This chart is for your reference only. You may need to adjust the cooking time and temperature according to the type, size, and thickness of food.
CAUTION
- Hot oil and liquid may splash as grease or juices hit the drip pan. Be careful while grilling.
- Do not touch any hot surfaces while cooking. Certain parts of this appliance become extremely hot while cooking and remain hot while the unit is cooling off.
- Do not overload the grill surface.
- For your safety, do not move the appliance when in use.
TEMPERATURE GUIDE
| Beef (rare) | Internal temperature of 140°F |
| Beef (medium) | Internal temperature of 160°F |
| Beef (well done) | Internal temperature of 170°F |
| Ground Beef | Internal temperature of 160°F |
| Chicken Breasts | Internal temperature of 170°F |
| Chicken Pieces | Internal temperature of 180°F |
| Hot Dogs | Internal temperature of 165°F |
| Fish | Internal temperature of 165°F |
| Pork | Internal temperature of 185°F |
| Lamb (medium) | Internal temperature of 160°F |
GRILLING TIPS
- Soak bamboo or wooden skewers in water at least 30 minutes before using to prevent burning.
- Turn food with tongs or spatulas. Do not scratch the non-stick grill surface.
- Cut food into small and equal pieces to ensure more even cooking.
- Follow temperature guide to ensure food safety.
CARE AND CLEANING
CAUTION: LET UNIT COOL COMPLETELY BEFORE BEGINNING ANY CLEANING.
-
Turn temperature control to "OFF" position and unplug the cord from the outlet.
-
Remove the temperature control from unit.
-
Do not immerse the temperature control in water or allow it to get wet.
-
Using the cool-touch handles, remove the non-stick grill and clean with warm, soapy water. Use a soft sponge or cloth to clean the grill surface.
-
Do not clean grill in the dishwasher.
-
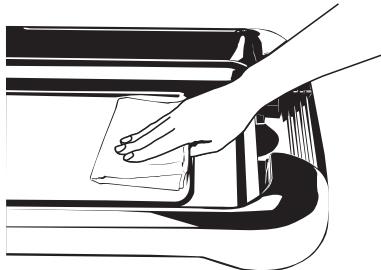
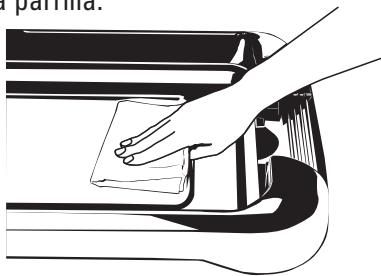
Absorb any excess water or grease from drip pan with a paper towel. (see illustration)
-
Holding the sides of the cool-touch base, you may move the unit close to the sink.
-
Be careful not to spill any water or grease that is remaining in the drip pan.
-
Carefully remove the drip pan from the cool-touch base and wash with warm, soapy water.
-
You may clean the drip pan in the dishwasher.
-
Wipe the unit dry with a clean cloth.
-
Wash the lid with warm, soapy water.
-
You may clean the lid in the dishwasher.
RECIPIES
Herb-Rubbed Steak
Seasoning:
3 garlic cloves, finely chopped
1/2 cup finely chopped onion
2 teaspoons dried, crushed herbs (basil, oregano, rosemary, or thyme leaves)
1/4 teaspoon ground black pepper
Meat:
1-2 lbs. boneless beef sirloin steak
Directions:
- Mix seasonings in a small bowl.
- Evenly rub the seasoning mixture onto both sides of meat.
- Place steak on preheated grill, at 350^ . Cook for approximately 5-10 minutes on each side.
Teriyaki Chicken Kabobs
Marinade:
1/2 cup soy sauce
1/4 cup sherry
3/4 cup brown sugar
2 tablespoons vegetable oil
1 garlic clove, pressed
1/2 teaspoon ground ginger
1 teaspoon chopped green onions
Meat and Vegetables:
Approximately 2 lbs. boneless, skinless chicken breasts
1 red bell pepper
1 green bell pepper
1 red onion
1 can pineapple chunks
Directions:
- Mix ingredients for marinade together.
- Cut chicken, red onion, and bell peppers into approximately 1-inch squares.
- Marinade chicken for at least 30 minutes.
- Soak bamboo or wooden skewers in water at least 30 minutes before using to prevent burning.
- Place chicken and vegetables on skewers.
- Place skewers on preheated grill, at 350^ . Cook for approximately 25 minutes, rotating frequently.
Salmon with Herbs
Seasoning:
2 tablespoons finely chopped shallots
1 tablespoon chopped parsley
1/4 teaspoon thyme
1/2 teaspoon tarragon
1/4 teaspoon basil
1 tablespoon lemon juice
6 tablespoons butter salt and pepper
Meat:
2 salmon steaks
Directions:
- Melt the butter and sauté the shallots until tender.
- Add thyme, tarragon, basil and lemon juice.
- Brush the steaks with the herb butter and sprinkle with parsley.
- Place salmon steaks on preheated grill, at 300^ . Cook for approximately 5-7 minutes each side.
SPECIFICATIONS
| HPS-SG4 | |
| Power Source | 120V 60 Hz |
| Power Consumption | 1300W |
| Dimensions (w x d x h) | 23%'' x 14½'' x 6½" |
| Weight | 7.5 lbs. |
OBLIGATIONS
In order to obtain factory warranty service, call the toll-free number below. The unit must be packed in the original carton or a well padded sturdy carton in order to avoid shipping damage.
Note: Do not return this unit to the retail store for service.
To obtain factory warranty service, product operation information or for problem resolution, call
1-800-421-5013
Weekdays 8:00 AM - 5:00 PM Pacific Time
Or visit our web site at www.sanyoservice.com
THIS WARRANTY IS VALID ONLY ON SANYO PRODUCTS PURCHASED AND USED IN THE UNITED STATES OF AMERICA.
THIS WARRANTY APPLIES ONLY TO THE ORIGINAL RETAIL USER AND DOES NOT APPLY TO PRODUCTS USED FOR ANY INDUSTRIAL, PROFESSIONAL OR COMMERCIAL PURPOSE. THE ORIGINAL DATED BILL OF SALE OR SALES SLIP MUST BE SUBMITTED TO THE AUTHORIZED SANYO SERVICE CENTER AT THE TIME WARRANTY SERVICE IS REQUESTED.
Subject to the OBLIGATIONS above and EXCLUSIONS below, SANYO FISHER COMPANY (SFC) warrants this SANYO product against defects in materials and workmanship for the periods of LABOR and PARTS specified below. SFC will repair or replace (at its option) the product and any of its parts which fail to conform to this warranty. The warranty period commences on the date the product was first purchased at retail.
| LABOR | PARTS |
| 1 YEAR | 1 YEAR |
EXCLUSIONS
This warranty does not cover (A) the adjustment of customer-operated controls as explained in the appropriate model's instruction manual, or (B) the repair of any product whose serial number has been altered, defaced or removed.
This warranty shall not apply to setup, installation, removal or the product for repair or reinstallation of the product after repair.
This warranty does not apply to repairs or replacements necessitated by any cause beyond the control of SFC including, but not limited to, any malfunction, defect or failure caused by or resulting from unauthorized service or parts, improper maintenance, operation contrary to furnished instructions, shipping or transit accidents, modification or repair by the user, abuse, misuse, neglect, accident, incorrect power line voltage, fire, flood or other Acts of God, or normal wear and tear.
The foregoing is in lieu of all other expressed warranties and SFC does not assume or authorize any party to assume for it any other obligation or liability.
THE DURATION OF ANY WARRANTYES WHICH MAY BE IMPLIED BY LAW (INCLUDING THE WARRANTYES OF MERCHANTABILITY AND FITNESS) IS LIMITED TO THE TERM OF THIS WARRANTY. IN NO EVENT SHALL SFC BE LIABLE FOR SPECIAL, INCIDENTAL OR CONSEQUENTIAL DAMAGES ASING FROM OWNERSHIP OR USE OF THIS PRODUCT, OR FOR ANY DELAY IN THE PERFORMANCE OF ITS OBLIGATIONS UNDER THIS WARRANTY DUE TO CAUSES BEYOND ITS CONTROL. SOME STATES DO NOT ALLOW LIMITATIONS ON HOW LONG AN IMPLIED WARRANTY LASTS AND/OR DO NOT ALLOW THE EXCLUSION OR LIMITATION OF CONSEQUENTIAL DAMAGES, SO THE ABOVE LIMITATIONS AND EXCLUSIONS MAY NOT APPLY TO YOU.
THIS WARRANTY GIVES YOU SPECIFIC LEGAL RIGHTS. YOU MAY HAVE OTHER RIGHTS, WHICH VARY FROM STATE TO STATE.
For your protection in the event of theft or loss of this product, please fill in the information below for your own personal records.
Model No. Serial No.
(Located on back or bottom side of unit)
Date of Purchase Purchase Price
Where Purchased
Gracias por su compra de la SANYO PARRILLA Y PLANCHA PARA USO INTERIOR.
Por favor lea todas las instrucciones antes de usar y conserve este manual en un lugar seguro para futura referencia.
Tabla de Contenidos
Instruetiones de Seguidad 9
Nombres de Partes 10
Disposión 11
Instrucciones para Asar 11
Guia para Cocinar 11
Guia de Temperatura 12
Consejos para Asar 12
Cuidado y Limpieza 12
Recetas 13
Garantía 14
ADVERTENCIA:
El manejo del cable de este producto o cables asociados con accesorios vendidos con este producto, leonia exponer a plomo, un quimico conocido por el estado de California que Causecancer, y anomalidades relacionadas de nacimiento humano u other daño reproductivo.
Lávese las manos afterwards del manejo.
INSTRUCCIONES DE SEGURIDAD
Cuando se usesan aparatos electronicos, siempre deben tomarse的一些 precauciones bássicas de seguridad para reducir el riesgo de incendio,是如何 electrolytico y/o lesión:
- Por favor lea todas las instrucciones.
- No toque superficies CALIENTES. Utilice las asas o las perillas.
- Para protegerse contra el riesgo de unCHOque electrico, nosumerj el cable,el enchufe o ninguna parte de esta parrilla en agua oequalquier othero liquido.
- Se requiere la supervisión de unadultocuando el aparato está siendo uso cercade un niño.
- Antes de enchufar el aparato, asegúrese que la perilla de temperatura está en la posición "OFF"(apagada). Para desenchufar, ajuste la perilla de temperatura en la posición "OFF" y desenchufe el aparato.
- Desconecte launidad del tomacorriente antes de limpiarla y cuando no está en uso. Permita que se enfié antes deponerle o quitarle partes y antes de limpiarla.
- No opere ningún aparato que presente daños en el enchufe o al cable, o si la unidad no funciona bien o ha sido dañada en alguna forma. Devuelvala a un centro de servicios autorizzato para que la Examiner, reparen o ajusten.
- El uso dethers accesos no incluidos por el fabricante del producto pueda causar LESIONES PERSONALES.NO USE partes incompatibles.
- No use aparato a la intemperie.
- No permitted that el cable cuelgue del borde de una mesa o mostrador o que entre en contacto con superficies calientes.
-
No coloque sobre nioca de una hornilla de gas o eletrica, nioca de un horno caliente.
-
No use el aparato con otro fin más que para lo que ha sido disñana.
- No limpie la unidad con almohadillas de fibras metálicas, o cualquier(other abrasivo que poderan分开 y tocar las partes electricas, causando un riesgo de unCHOque electrolyico. Internacional, almohadillas de fibras metálicas poderen dañar el acabado.
- Use la parrilla a 10 a 12 pulgadas de distancia por lo menos deequalquier pared o superficie. Colquela sobre una superficie resistente al calor y en una area bien ventilada. Coloque el aparato en una superficie secay nivelada.
- Un incendio puede occurrir si el aparato esta cubierto o si toca materiales inflamables como cortinas y paredes cuando está en operación.
- No Coloque los siguientes materiales en ni sobre del aparato como: papel, cartulina, plástico, etc.
- Para Maintener la funciona duradora de su planta calefactor, envite de caer cualquier casa en el elemento de calefacción.
- Poder Eléctrico: Si el circuito électrico es sobrecargado con otros aparatos, este aparato no funciona apropiamente. Este aparato tiene que ser operado en un circuito électrico Separado.
- Limpie el aparato regularmente para registrar la acumulación de grasa que pueda causar un incendio.
- SIEMPRE PERMITA QUE LA PARRILLA SE ENFRIÉ POR COMPLETO ANTES DE LIMPIARLA.
CONSERVE ESTAS INSTRUCCIONES
Nota:
A. Un cable electrico corto se ha seleccionado para reducir el peligro que pueda occasionar un cable más largo.
B. Cables de extension está disponible y pueda ser utilizados si el cuidado se ejercite en su uso.
C. Si se use un cable de extension:
(1) La extension deverá estar calificada para no menos del grado electrico marcado del aparato.
(2) Cuando se use un cable más largo asegúrese que no interfiera con la area de trabajo ni que(caque de modo que alguien pueda tirar de el o tropezarse.
Se employan enchufes polarizados con un contacto más ancho que el(other para reducir los riesgos deCHOque electrico.Cuando el cableiene este tipo de enchufe,seajusta unicamentea uncontacto polarizzato.Si el enchufe no seAJusta en sucontacto,inviertalo.Si aun asi no seajusta, busque laaida de un electricista calificado para que instale uncontacto polarizzato apropiado. Por ningun punto trate de modifier o hacerlechangios a la enchufe.
"Cool-Touch"
Asas de la Parrilla
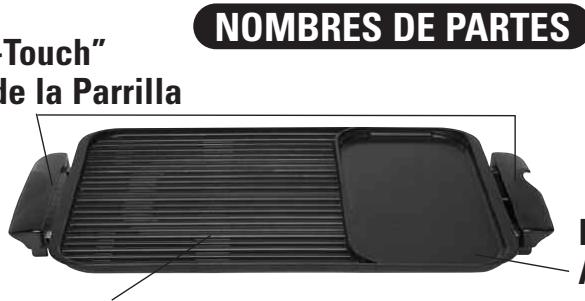
Plancha de Acabado Antiadherente
Parrilla de Acabado Antiadherente
Bandeja de Grasa
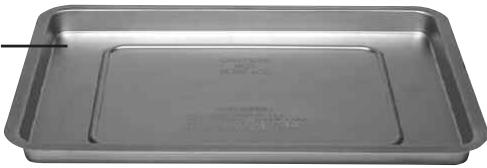
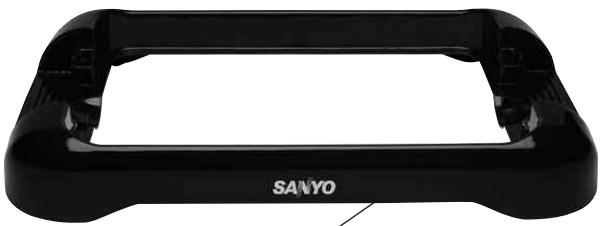
"Cool-Touch" Base
Ensamblaje del control

Empaque de plastico


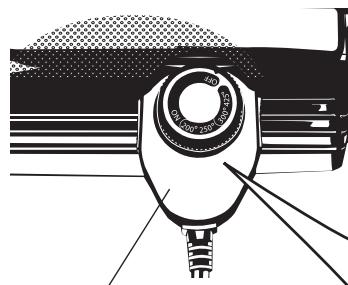
Perilla de Temperatura Desmontable
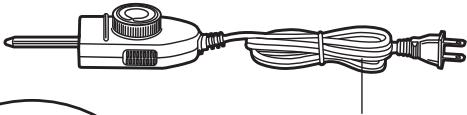
Cable de Poder
ANTES DE USAR POR PRIMERA VEZ
- Retire todo material de empaque.
- Limpie la parrilla con un paño humedecido.
- Instale el control a la tapa como indicada arriba.
-
Durante el primer uso, el aparato pueda emitir un olor leve.
-
Esto esdeferado alanovedad del producto.
DISPOSICION ANTIES DE USAR
-
Coloque el "Cool-Touch" base sobre una superficie resistente al calor y en una area bien ventilada.
-
Coloque la bandeja de grasa en el fondo de la base.
-
Añadir agua en la bandeja de goteo hasta que el fondo quede cubierto de agua.
-
Usando las "Cool-Touch" asas de la parrilla, coloque la parrilla de acabado antiadherente sobre la base.
-
Asegurese que la bandeja de grasa y la parrilla esten reunidas correctamente sobre la base.
-
Conectar el control de temperatura en el costo de la parrilla.
-
Usar solo el control de temperatura queiene con la parrilla. El número de modelos está impreso en el control de temperatura y en la base de la parrilla; el número debe ser identi co enamble Lugares.
-
Enchufe el cable a un tomacorriente regular.
INSTRUCCIONES PARA ASAR
- Antes de precalentar para usar por vez primera, Cure la superficie cepillando o pasando con papel de toalla aceite vegetal o bien rociándolo.
- Ajuste el control de la temperatura a temperatura deseada.
-
Precaliente la unidad.
-
La luz indicaora se encenderá indicando que el poder está encendido. La luz se apagará cuando la parrilla haya alcancazo su temperatura elegida.
-
Coloque la comida directamente sobre la parrilla. Cocine sobre la parrilla a su gusto.
-
Refiera a la GUIA PARA COCINAR para sugerencias. Refiera a la GUIA DE TEMPERATURA para asegurar la calidad del alimento.
-
Añadir agua en la bandeja de goteo para mantener el nivel. Procurar que el agua no desborde.
GUI PARA COCINAR
| ALIMENTO | TIEMPO | TEMPERATURA |
| Pescado/Salmón | 10-15 Minutes | 300°F |
| Tocino | 10-15 Minutes | 275°F |
| Salchichas Largas | 20 Minutes | 275°F |
| Hamburguesas | 15-20 Minutes | 325°F |
| Salchichas | 15 Minutes | 300°F |
| Pechugas de Pollo | 15-20 Minutes por cada lado | 325°F |
| Chuletas de CerdoCon Hueso | 10-12 Minutes por cada lado | 300°F |
| Bistec (poco cocido) | 4-6 Minutes por cada lado (dependiendo del grueso) | 350°F |
| Bistec (bien cocido) | 7-9 Minutes por cada lado (dependiendo del grueso) | 350°F |
| Chuletas de Cordero | 6-7 Minutes por cada lado | 325°F |
Note:Esta guía es solamente para su referencia. Es posible que necesite ajustar el tiempo de cocinar y la temperatura dependiendo del tipo,ullan y grueso del alimento.
PRECAUCION
- Aceite caliente y liquido能把 salpimar cuando que la grasa o los jugos golpean la bandeja de grasa. Tenga cuidado cuando que asa.
- No toque ninguna superficie caliente cuando cocina. Ciertas partes de este aparato se hacen extremadamente caliente cuando que cocina, y se quedan calientes cuando que launidad se está enfriando.
- No sobrecargue la superficie de la parrilla.
- Para su seguridad, no mueva el aparato cuando en uso.
GUIA DE TEMPERATURA
| Carne (poca cucida) | Temperatura Interna de 140°F |
| Carne (media cucida) | Temperatura Interna de 160°F |
| Carne (bien cucida) | Temperatura Interna de 170°F |
| Carne Molida | Temperatura Interna de 160°F |
| Pechugas de Pollo | Temperatura Interna de 170°F |
| Tiras de Pollo | Temperatura Interna de 180°F |
| Salchichas | Temperatura Interna de 165°F |
| Pescado | Temperatura Interna de 165°F |
| Cerdo | Temperatura Interna de 185°F |
| Cordero (medio cucido) | Temperatura Interna de 160°F |
CONSEJOS PARA ASAR
- Remoje las broquetas de bambú o de madera en agua por lo menos de 30 Minutes antes de usar para estar de quemarse.
- Dé vuelta los alimentos con tenazas o con una espátula. No raye la superficie antiadherente de la parrilla.
- Corte los alimentos en pedazos pequeños e iguales para asegurar el asado igual.
- Utilice la guía de temperatura para asegurar la seguridad del alimento.
CUIDADO Y LIMPIEZA
PRECAUCION: PERMITA QUE SE ENFRIÉ POR COMPLETO ANTES DE LIMPIARLA.
-
Ajuste la perilla de temperatura en la posicion "OFF" (apagada) y desenchufe el cable del tomacorriente.
-
Retire la perilla de temperatura de la unidad.
-
Nosumerja la perilla de temperatura y no permita que se moje.
-
Usando las "Cool-Touch" asas de la parrilla, quite la parrilla de acabado antiadherente y limpiela con agua tibia y enjabonada. Use una esponja o un pañoh humedecido para limpar la superficie de la parrilla.
-
No limpie la parrilla en laquina lavaplatos.
-
Absorbarialquierexceso de agua o grasa de la bandeja de grasa con un papel de toalla.
-
Agarrando los lados del "Cool-Touch" base, puede mover la unidad cerca del fregadero.
-
Tenga cuidado de no cerramar agua o-grasa que está en la bandeja de grasa.
-
Retire la bandeja de grasa del "Cool-Touch" base con cuidado y lávelo con agua tibia y enjabonada.
-
La bandeja puede lavarse en laquina lavaplatos.
-
Seque la unidad con un pamo limpio.
-
Lave la tapa con agua tibia y enjabonada.
-
La tapa puede lavarse en laquina lavaplatos.
RECETAS
Bistec a las Hierbas
Condimento:
3 dientes de ajo bien picado
1/2 taza de cebolla bien picada
2 cdtas de hierbas secas (albahaca, orégano, romero, o hojas del tomillo)
1/4 chta pimenta negra
Carne:
1-2 lbs. (454-907 g) de solomillo sin hues
Preparación:
- Mezcile los condimientos en un tzón(PC)pequeño.
- Frote uniformemente la mezcla del condimento porodos lados de la carne.
- Coloque el bistec sobre la parrilla precalentada a una temperatura de 350^ . Cocine de 5-10 Minutes porodos lados de la carne.
Kabobs de Pollo de Teriyaki
Marinada:
1/2 taza salsa de soya
1/4 taza jerez
3/4 taza azúcar moreno
2 cdas aceite vegetal
1 diente de ajo exprimido
1/2 ctda de jengibre molido
1 chta cebolla verde picada
Carney Vegetales:
Aproximamente 2 lbs.(907 g) de pechugas de pollo sin hues ypiel
1 pimiento rojo
1 pimiento verde
1 cebolla roja
1 lata de piña en piezas
Salmon con Hierbas
Condimento:
2 cdas de chalote bien picado
1 cda de perejil picado
1/4 ctda de tomillo
1/2 ctda de estragón
1/4 ctda de albahaca
1 cda de jugo de limón
6 cdas de mantequilla
sal y pimiento
Carne:
2 bistecs de salmon
Preparación:
- Mezcle todos los ingredientes+juntos para la marinada.
- Parta las pechugas de pollo, la cebolla roja y los pimentos en cuadrados de aproximadamente 1 pulgada.
- Marine por lo menos de 30 horas.
- Remoje las broquetas de bambú o de madera en agua por lo menos de 30 horas antes de usar para estar que le marse.
- Coloque el pollo y los vegetales en las brochetas dividendo el pollo y los vegetales por parejo.
- Coloque las brochetas sobre la parrilla y cocine aproximadamente de 25 instantos a una temperatura de 350^ . Voltee las brochetas frecuentemente cuando se cocinan.
Preparación:
- Derrita la mantequilla, y cocine los chalotes hasta que estén blandos.
- Agregue el tomillo, estragón, y jugo de limón.
- Pase los bistecs con la mantequilla de hierba y rocie con perejil.
- Coloque los bistecs de salmón sobre la parrilla precalentada a una temperatura de 300^ F. Cocine aproximadamente de 5-7关键时刻 por también lados.
ESPECIFICACIONES
| HPS-SG4 | |
| Power Source | 120V 60 Hz |
| Power Consumption | 1300W |
| Dimensions (w x d x h) | 23%'' x 14½'' x 6½" |
| Weight | 7.5 lbs. |
SANYO GARANTIA LIMITADA DE PARRILLA Y PLANCHA PARA EL USO INTERIOR
MODELO HPS-SG4
OBLIGACIONES
Para Obtener servicios garantizados por fábrica, llama el número de téléphone de llamada gratis abajo. La unidad de ser embalada en el cartón original o en un cartón firme y bien acolchonado para evitar daños durante el envío.
Nota: No devuelva esta unidad a la Tienda de vente al por menor para servicios.
Para Obtener servicios garantizo por fábrica, información sobre funciona de un producto o para la resolved de problemas, llame
1-800-421-5013
Días HÁBILES de 8:00 AM hasta 5:00 PM hora del Pacífico de los Estados Unidos o visite nuestra páginade Internet en www.sanyoservice.com
ESTA GARANTÍA ES VÁLIDA UNICAMENTE PARA PRODUCTOS SANYO COMPRADOS Y USADOS EN LOS ESTADOS UNIDOS DE AMÉRICA.
ESTA GARANTÍA APLICADA UNICAMENTE AL USUARIO AL POR MENOR ORIGINAL Y NO APLICADA A PRODUCTOS USADOS PARA CUALQUIER OBJETO INDUSTRIAL, PROFESIONAL O COMERCIAL. EL CONTRATO DE COMPA Y VENTA O RECIBO DE VENTÀ CON FECHA ORIGINAL DEBE SER PRESENTADO AL CENTRO DE SERVICIO DE SANYO AUTORIZADO EN EL MOMENO EN QUE SE SOLTIDA SERVICIO DE GARANTÍA.
Sujeto a las OBLIGACIONES arriba y las EXCLUSIONES abajo, SANYO FISHER COMPANY (SFC) garantiza este producto SANYO contra defectos en materiales y mano de obstructa para los periodos de MANO DE OBRA y PIEZAS espocificadas abajo. SFC reparar o reemplazar (a la optacion de SFC) el producto y cualesera de sus piezas que no conforman con this guarantia. El periodo de garantia comienza en la fecha en que el producto fue comprado por primera vez al nivel de venta al por menor.
| MANO DE OBRA | PIEZAS |
| UN AÑO | UN AÑO |
EXCLUSIONES
Esta garantía no cubre (A) el ajuste de controlles operados por el cliente tal como explicados en el manual de instrucción del Modelo apropiado, o (B) la reparación de cualquier productoswitho número de series ha sido alterado, desfigurado oretirado.
Esta garantía no aplicará a la configuración, instalación, retro del producto para reparación o reinstalación del productouponés de reparación.
Esta garantia no aplica a reparacion o reemplazos necessidades por qualquier causa mas alla del control de SFC incluyendo, pero no limitandose, a qualquier funcion defectuosa, defecto fallo causado por o como resultado de service o piezas no autorizados, mantenimiento inapropiado, functiomento contrario a las instruetiones proporcionadas, accidentes de envio o de transito, modificacion o reparacion por el usuario, abuso, uso indebido, negligencia, accidentes, voltaje de linea de potencia incorrecta, incendio, inundacion o otheras Acciones de Dios (fuerza mayor), o desgaste debido a uso normal.
Lo antedicho replaza todas las otheras garantias expresas y SFC no asume ni autoriza ninguna parte a asumir por lacoma quialquer othria obligacion o responsabilidad.
LA DURACION DE CUALQUIER GARANTIA QUE PUEDE SER IMPLICITA POR LA LEY (INCLUYENDO LAS GARANTIAS DE COMERCIABILIDAD E IDONEIDAD) SE LIMITA AL PERIODO DE esta GARANTIA. EN NINGUN CASO SFC TENDRA RESPONSABILIDAD POR DANOS ESPECIALIES, INCIDENTALES O CONSECUENTES QUE SURGEN DE LA POSESION O USO DE Este PRODUCTO, O POR CUALQUIER DEMORA EN EL DESEMPENO DE SUS OBLIGACIONES BAJO ESTA GARANTIA DEBIDO A CAUSAS MAS ALLA DE SU CONTROL. ALGUNOS ESTADOS NO PERMITEN LIMITACIONES SOBRE CUANTO TIempo DURA UNA GARANTIA IMPLICITA Y/O NO PERMITEN LA EXCLUSION O LIMITACION DE DANOS CONSECUYentes, ASI QUE LAS LIMITACIONES Y EXCLUSIONES ARRIBA POSIBLEMENT NO APLICAN A USTED.
ESTA GARANTIA LE DA A USTED DERECHOS LEGALES ESPECIFICOS. ES POSIBLE QUE USTED TENGA OTROS DERECHOS, QUE VARIAN DE ESTADO A ESTADO.
Para su proteccion en el caso de robo o perdida de este producto, por favor llene la informacion abajo para sus propios registros.
| Número de Modelo | Número de Serie (Ubicado en el lado atrás o de abajo de launities) |
| Fecha de Compra | Precio de Compra |
| Donde fue Comprado |
SANYO
SANYO Fisher Company
21605 Plummer Street
Chatsworth, CA 91311
www.sanyousa.com
Printed in China
- Thank you for your purchase of a SANYO INDOOR BARBECUE GRILL & GRIDDLE.
- Table of Contents
- WARNING:
- IMPORTANT SAFEGUARDS
- SAVE THESE INSTRUCTIONS
- Note:
- BEFORE USE
- SET UP PRIOR TO USING GRILL
- INSTRUCTIONS FOR GRILLING
- COOKING GUIDE
- CAUTION
- TEMPERATURE GUIDE
- GRILLING TIPS
- CARE AND CLEANING
- CAUTION: LET UNIT COOL COMPLETELY BEFORE BEGINNING ANY CLEANING.
- RECIPIES
- Herb-Rubbed Steak
- Seasoning:
- Meat:
- Directions:
- Teriyaki Chicken Kabobs
- Marinade:
- Meat and Vegetables:
- Salmon with Herbs
- OBLIGATIONS
- EXCLUSIONS
- Gracias por su compra de la SANYO PARRILLA Y PLANCHA PARA USO INTERIOR.
- ADVERTENCIA:
- INSTRUCCIONES DE SEGURIDAD
- CONSERVE ESTAS INSTRUCCIONES
- Nota:
- "Cool-Touch"
- Asas de la Parrilla
- Plancha de Acabado Antiadherente
- Parrilla de Acabado Antiadherente
- Bandeja de Grasa
- Ensamblaje del control
- ANTES DE USAR POR PRIMERA VEZ
- DISPOSICION ANTIES DE USAR
- INSTRUCCIONES PARA ASAR
- PRECAUCION
- GUIA DE TEMPERATURA
- CONSEJOS PARA ASAR
- CUIDADO Y LIMPIEZA
- PRECAUCION: PERMITA QUE SE ENFRIÉ POR COMPLETO ANTES DE LIMPIARLA.
- RECETAS
- Bistec a las Hierbas
- Condimento:
- Carne:
- Preparación:
- Kabobs de Pollo de Teriyaki
- Marinada:
- Carney Vegetales:
- Salmon con Hierbas
- ESPECIFICACIONES
- SANYO GARANTIA LIMITADA DE PARRILLA Y PLANCHA PARA EL USO INTERIOR
- OBLIGACIONES
- EXCLUSIONES
Marque : SANYO
Modèle : HPS-SG4
Catégorie : Gril électrique