SE985X - Mini-four SMEG - Notice d'utilisation et mode d'emploi gratuit
Retrouvez gratuitement la notice de l'appareil SE985X SMEG au format PDF.
| Type de produit | Mini-four encastrable |
| Marque | SMEG |
| Modèle | SE985X |
| Couleur | Inox |
| Capacité | Environ 40 litres (estimation) |
| Dimensions (L x H x P) | 595 x 455 x 535 mm (estimation) |
| Poids | Environ 25 kg (estimation) |
| Alimentation électrique | 230-240 V~, 50/60 Hz, puissance max environ 2500 W |
| Type de raccordement | Prise ou raccordement fixe avec disjoncteur omnipolaire |
| Fonctions de cuisson | Chaleur tournante, convection naturelle, gril, gril ventilé, décongélation, rotissoire |
| Plage de température | De 50 °C à 250 °C |
| Programmateur | Électronique avec minuterie, cuisson semi-automatique et automatique, fin de cuisson programmable |
| Éclairage intérieur | Oui, ampoule spéciale four (T 300 °C) |
| Accessoires fournis | Grille, lèchefrite, plat à pâtisserie, tournebroche |
| Niveaux de cuisson | 4 positions de grille |
| Porte | Amovible pour nettoyage, vitre |
| Nettoyage | Surfaces en inox : produits non abrasifs, grilles et guides lavables à l'eau chaude |
| Sécurité | Mise à la terre obligatoire, arrêt automatique en fin de cuisson, sonnerie de fin |
| Réparabilité | Ampoule et joint de porte remplaçables, assistance technique agréée |
| Consommation énergétique | Classe A (estimation) |
FOIRE AUX QUESTIONS - SE985X SMEG
Questions des utilisateurs sur SE985X SMEG
0 question sur cet appareil. Repondez a celles que vous connaissez ou posez la votre.
Poser une nouvelle question sur cet appareil
Téléchargez la notice de votre Mini-four au format PDF gratuitement ! Retrouvez votre notice SE985X - SMEG et reprennez votre appareil électronique en main. Sur cette page sont publiés tous les documents nécessaires à l'utilisation de votre appareil SE985X de la marque SMEG.
MODE D'EMPLOI SE985X SMEG
Contents
- INSTRUCTIONS FOR SAFE AND PROPER USE 26
- INSTALLATION 28
- DESCRIPTION OF CONTROLS 30
- USE OF THE OVEN 35
- AVAILABLE ACCESSORIES 36
- COOKING HINTS 37
- CLEANING AND MAINTENANCE 43
- EXTRAORDINARY MAINTENANCE 45

INSTRUCTIONS FOR THE INSTALLER: these are intended for the qualified technician who must install the appliance, set it functioning and carry out an inspection test.

INSTRUCTIONS FOR THE USER: these contain user advice, description of the commands and the correct procedures for cleaning and maintenance of the appliance.
1. INSTRUCTIONS FOR SAFE AND PROPER USE

THIS MANUAL IS AN INTEGRAL PART OF THE APPLIANCE AND THEREFORE MUST BE KEPT IN ITS ENTIRETY AND IN AN ACCESSIBLE PLACE FOR THE WHOLE WORKING LIFE OF THE OVEN. WE ADVISE CAREFUL READING OF THIS MANUAL AND ALL THE INSTRUCTIONS THEREIN BEFORE USING THE OVEN. INSTALLATION MUST BE CARRIED OUT BY QUALIFIED PERSONNEL IN ACCORDANCE WITH THE REGULATIONS IN FORCE. THIS APPLIANCE IS INTENDED FOR DOMESTIC USES AND CONFORMS TO CURRENT REGULATIONS IN FORCE. THE APPLIANCE HAS BEEN BUILT TO CARRY OUT THE FOLLOWING FUNCTIONS: COOKING AND HEATING-UP OF FOOD. ALL OTHER USES ARE CONSIDERED IMPROPER.
THE MANUFACTURER DECLINES ALL RESPONSIBILITY FOR IMPROPER USE.

DO NOT LEAVE THE PACKING IN THE HOME ENVIRONMENT. SEPARATE THE VARIOUS WASTE MATERIALS AND TAKE THEM TO THE NEAREST SPECIAL GARBAGE COLLECTION CENTRE.

IT IS OBLIGATORY FOR THE ELECTRICAL SYSTEM TO BE GROUNDED ACCORDING TO THE METHODS REQUIRED BY SAFETY RULES.

WHEN LINKING UP TO MAINS BY PLUG AND SOCKET, MAKE SURE THAT BOTH ARE COMPATIBLE AND CONNECT BY MEANS OF A POWER CABLE COMPLYING WITH APPLICABLE REGULATIONS.
THE SOCKET MUST BE ACCESSIBLE AFTER THE APPLIANCE HAS BEEN BUILT IN.
NEVER UNPLUG BY PULLING ON THE CABLE.

DO NOT OBSTRUCT VENTILATION OPENINGS AND HEAT DISPERSAL SLITS.

IMMEDIATELY AFTER INSTALLATION CARRY OUT A BRIEF INSPECTION TEST OF THE OVEN, FOLLOWING THE INSTRUCTIONS BELOW. SHOULD THE APPLIANCE NOT FUNCTION, DISCONNECT IT FROM THE SUPPLY AND CALL THE NEAREST TECHNICAL ASSISTANCE CENTRE.
NEVER ATTEMPT TO REPAIR THE APPLIANCE.
ALWAYS CHECK THAT THE CONTROL KNOBS ARE IN THE "ZERO" (OFF) POSITION WHEN YOU FINISH USING THE OVEN.

NEVER PUT INFLAMMABLE OBJECTS IN THE OVEN: THEY COULD BE ACCIDENTALLY LIGHTED AND CAUSE FIRES.

DURING USE THE APPLIANCE BECOMES VERY HOT. TAKE CARE NOT TO TOUCH THE HEATING ELEMENTS INSIDE THE OVEN.

THE I.D. PLATE WITH TECHNICAL DATA, REGISTRATION NUMBER AND BRAND NAME IS POSITIONED VISIBLEY ON THE OVEN DOOR FRAME. THE PLATE MUST NOT BE REMOVED.

THE OVEN IS DESIGNED FOR USE BY ADULTS. DO NOT ALLOW CHILDREN TO GO NEAR OR PLAY WITH IT.

THIS APPLIANCE IS MARKED ACCORDING TO THE EUROPEAN DIRECTIVE 2002/96/EC ON WASTE ELECTRICAL AND ELECTRONIC EQUIPMENT (WEEE).
THIS GUIDELINE IS THE FRAME OF A EUROPEAN-WIDE VALIDITY OF RETURN AND RECYCLING ON WASTE ELECTRICAL AND ELECTRONIC EQUIPMENT.

BEFORE THE APPLIANCE IS PUT INTO OPERATION, ALL THE LABELS AND PROTECTIVE FILMS APPLIED INSIDE OR OUTSIDE MUST BE REMOVED.

The manufacturer declines all responsibility for damage to persons or things caused by non-observance of the above prescriptions or by interference with any part of the appliance or by the use of non-original spares.
2. INSTALLATION
2.1 Electrical connection
Check that mains voltage and power cable ratings are as per the indications provided on the label attached to the oven door frame.
This label must never be removed.

It is obligatory for the electrical system to be grounded according to the methods required by safety rules.
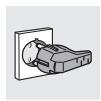
If a plug and socket connection is being used make sure that the plug and socket are compatible. Avoid use of adapters and shunts as these could cause overheating and risk of burns.
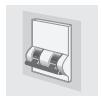
If a fixed connection is being used fit power line with an omnipolar circuit breaker with a contact opening gap equal to or greater than 3 mm in an easily accessible position in proximity to the oven.

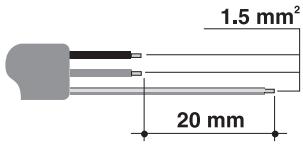
For operation on 230-240V\~: use an H05RR-F / H05RN-F type three-core cable (3 x 1.5 mm²).
The cable end to be connected to the appliance must be provided with an ground wire (yellow-green) at least 20 mm longer.
text_image
1.5 mm² 20 mm
The manufacturer declines all responsibility for damage to persons or things caused by non-observance of the above prescriptions or by interference with any part of the appliance.
2.2 Mounting the oven
The oven is designed for mounting into any piece of furniture as long as heat-resistant. Proceed according to the dimensions shown in Figures 1, 2.
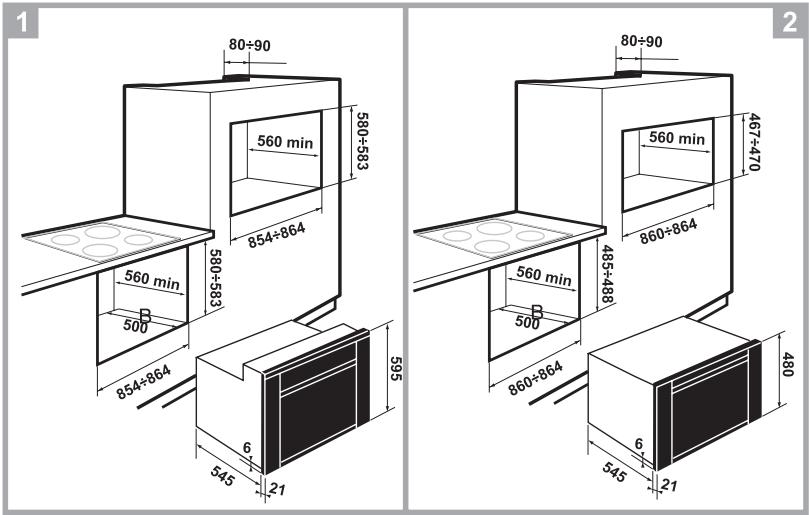
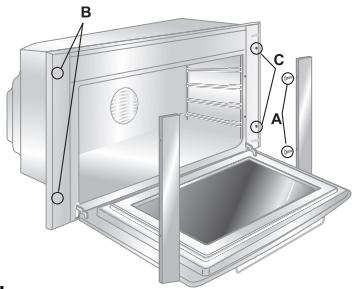
Fixing is carried out using 4 screws at the corners "C" of the oven door frame, after removing the side panels secured by the screws "A" and the supports "B" as shown in figure 3. To replace the side panels, take care to engage the pins inside them correctly with the supports "B", then retighten the screws "A".
text_image
B C A3.

Never use the oven door to lever the oven into place when fitting.
Avoid exerting too much pressure on the oven door when open.
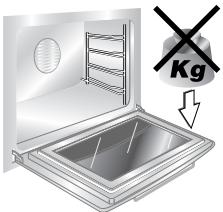
text_image
Kg3. DESCRIPTION OF CONTROLS
3.1 Front control panel
All the oven controls are grouped together on the front panel.
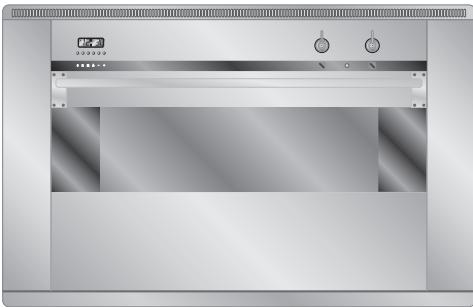
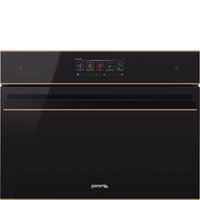
natural_image
Exterior view of a stainless steel kitchen oven (no visible text or symbols)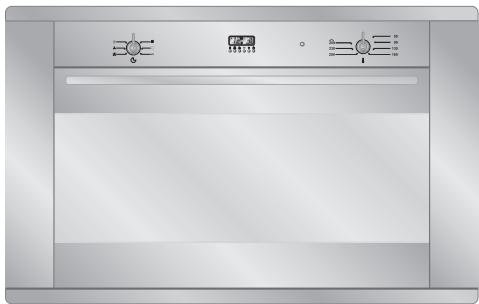
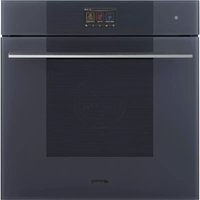
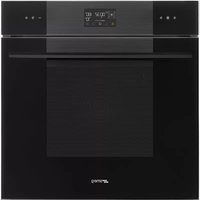
natural_image
Front view of a stainless steel kitchen oven with control knobs and indicator lights (no text or symbols visible)FUNCTION SWITCH KNOB
Rotate the knob in either direction to select desired function from the following:
natural_image
Circular diagram with a central knob and surrounding icons (no text or labels)
natural_image
Close-up of a metallic circular switch with a handle and central hub, mounted on a square base (no text or symbols visible)

NO FUNCTION SET


UPPER AND LOWER HEATING ELEMENT + VENTILATION

OVEN LIGHT

VENTILATED HEATING ELEMENT + VENTILATION


UPPER AND LOWER HEATING ELEMENT

LOWER HEATING ELEMENT + VENTILATED HEATING ELEMENT


WIDE GRILL ELEMENT

LOWER HEATING ELEMENT + VENTILATION


GRILL ELEMENT

DEFROSTING


WIDE GRILL ELEMENT + VENTILATION
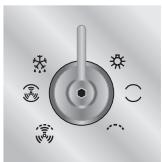
THERMOSTAT KNOB
Cooking temperature is selected by turning the knob clockwise to the desired setting, between 50^ and 250^ C.

text_image
250 230 200 160 120 90 50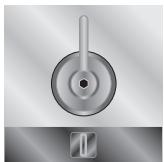
natural_image
Close-up of a metallic circular switch with a handle and central hub, no visible text or symbolsTHERMOSTAT INDICATOR LIGHT
When this light comes on, the oven is heating up.
When this light goes out, the preset heating temperature has been reached.
When the light flashes, the temperature inside the oven is steady at the set temperature.

natural_image
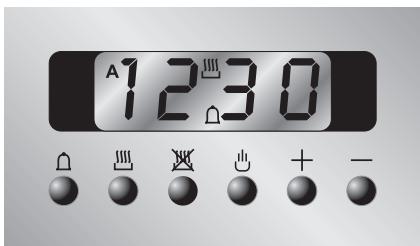
Simple grayscale circular shape with gradient shading (no text or symbols)3.2 Electronic programmer
text_image
A 12:30 + -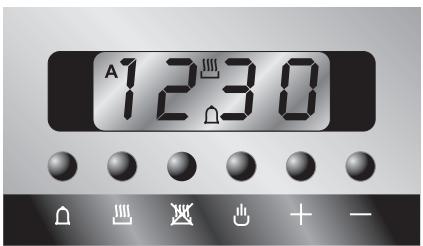
text_image
A 12:30LIST OF FUNCTIONS
MINUTE-COUNTER KEY
COOKING TIME KEY
END-OF-COOKING KEY
MANUAL OPERATION KEY
TIME BACK KEY
TIME FORWARD KEY


3.2.1 Clock adjustment
When using the oven for the first time, or after a power failure, the display flashes regularly and indicates 0.00. To stop flashing, press key ⏻ on the display. By pressing keys + or - each single press changes the time by 1 minute either up or down.
Press one of the two keys until the right time appears.

Before setting the programmer activate the desired function and temperature.
3.2.2 Semiautomatic cooking
Use this setting for automatic oven switch-off at the end of cooking time.
By pressing key ☐, the display lights up, showing 0:00; keep the key pressed and at the same time, press keys + or - to set the cooking time.
Release key 🐎 to start the programmed cooking time count. The display will now show the right time together with symbols A and 🐎.
3.2.3 Automatic cooking
Use this setting to automatically start and stop the oven.
By pressing key ☐, the display lights up showing 0.00 ; keep the key pressed and at the same time, press keys + or - to set the cooking time.
By pressing key ☑ the sum of the right time + cooking time will appear; keep the key pressed and at the same time, press keys + or - to regulate the end of cooking time.
Release key 📋 to start the programmed count and the display will show the right time together with symbols AUTO and 📋.

After setting, to see how much cooking time is left, press key ☐; to see end of cooking time, press key ☐.
3.2.4 End of cooking
When cooking is over, the oven will automatically switch off and, at the same time, an intermittent alarm will sound. After switching off the alarm, the display will once again show the right time together with the symbol ☐, indicating that the oven has returned to manual operation mode.
3.2.5 Adjusting alarm volume
The acoustic alarm has three different settings. These can be operated, while the alarm is sounding, by pressing key —.
3.2.6 Switching off the alarm
The alarm switches off automatically after seven minutes. It can be manually turned off by pressing key 🔊.
3.2.7 Minute-counter
The programmer can also be used as a simple minute counter.

The use of the minute-counter will not interrupt oven operation at the end of the set time.
By pressing key Ⓞ, the display shows 0:00 ; keep the key pressed and at the same time press keys + or - By releasing the key Ⓞ, the programmed count starts and the symbols Ⓞ and 🏠 appear on the monitor.

After programming the minute-counter, the display will show the right time. to display remaining time, press key 🔊.

Wrong settings are prevented logically (e.g., any conflict between end of cooking time and a longer time will not be accepted by the programmer).
3.2.8 Cancellation of set data
Once the programme has been set, keep the key of the function to be cancelled pressed, while at the same time 0:00 is reached by means of variation keys + or - Time cancellation will be considered as end-of-cooking time by the programmer.
3.2.9 Changing the set data
The cooking data entered can be changed at any time by keeping the function key pressed and at the same time adjusting the keys + or -.
4. USE OF THE OVEN

Make sure that you have either turned the minute minder knob to the ⏻ symbol or set a cooking time. If the timer knob is on 0, no heating elements will come on.
4.1 Warnings and general advice
Before using the oven for the first time, pre-heat it to maximum temperature (250°C) long enough to burn any manufacturing oily residues which could give the food a bad taste.

During cooking, do not cover the bottom of the oven with aluminium or tin foil and do not place pans or oven trays on it as this may damage the enamel coating. If you wish to use greaseproof paper, place it so that it will not interfere with the hot air circulation inside the oven.

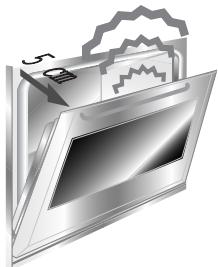
To prevent any steam in the oven creating problems, open the door in two stages: half open (5 cm approx.) for 4-5 seconds and then fully open. To access food, always leave the door open as short a time as possible to prevent the temperature in the oven from falling and ruining the food.
natural_image
Illustration of a computer monitor with a file icon and folder (no text or symbols)4.2 Cooling system
The oven is equipped with a cooling system which automatically comes on upon the oven being turned on.
Fans cause a steady outflow of air from above the door which may continue for a brief period of time even after the oven has been turned off.

natural_image
Pure diagram of a rectangular chamber with directional arrows indicating flow or movement, no text or symbols present.4.3 Oven light
To turn on the oven light in models with static oven, rotate the temperature knob clockwise to the first setting aligned with the lamp symbol ( ^★ ). The light will remain on throughout entire oven operation.
5. AVAILABLE ACCESSORIES
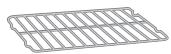
The oven features 4 support positions for plates and racks of different height.
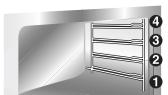

Some models do not feature all accessories.
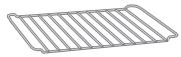
Grill: useful for holding cooking vessels.
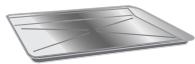
Plate grill: for placing above plate for cooking foods that might drip.
Oven plate: useful for catching fat from foods on the grill above.
Pastry plate: for baking cakes, pizza and oven desserts.
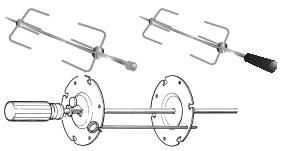
Roasting spit: useful for cooking chicken, sausages and anything else requiring uniform cooking over the whole surface. Only for auxiliary oven.
Main oven rotisserie frame: to be fitted into the holes provided in the oven dish.

natural_image
Technical line drawings of three different types of stirators or levers (no text or symbols present)
natural_image
Two abstract line drawings with jagged ends, no text or symbols present
Accessories available on request
Original accessories may be ordered from any Authorised Service Centre.
6. COOKING HINTS

In fan-assisted mode preheating should be carried out at 30/40^ C above the cooking temperature. This considerably shortens cooking times and reduces power consumption, as well as giving better cooking results.

Keep the oven door closed during cooking
6.1 Traditional cooking (multifunction models)

natural_image
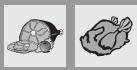
Five grayscale icons representing different food and beverage items: turtle, plate with fish, roasted chicken, cake, and instant noodles (no text or symbols)FUNCTION SWITCH

THERMOSTAT SWITCH
$$ 5 0 \div 2 5 0 ^ {\circ} \mathrm{C} $$
natural_image
3D rendering of a stainless steel rack cabinet with horizontal shelves (no text or symbols visible)This traditional cooking method, in which heat comes from above and below, is suitable for cooking food on a single level. You have to preheat the oven until the set temperature is reached. Place the food in the oven only after the thermostat indicator light has turned off. very fatty meats may be put in when the oven is still cold. Put frozen meat in immediately, without waiting for it to thaw. The only precaution you need to take is to set the temperature about 20^ C lower and cooking time about 1/4 longer than you would for fresh meat.
6.2 Hot-air cooking (multifunction models)

natural_image
Six grayscale icons representing different food and beverage items: turtle, plate with fish, roasted chicken, cake, and instant noodles (no text or symbols)FUNCTION SWITCH

natural_image
Five black-and-white icons representing fan and radar systems, no text or symbols presentTHERMOSTAT SWITCH
$$ 5 0 \div 2 5 0 ^ {\circ} \mathrm{C} $$
natural_image
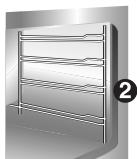
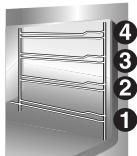
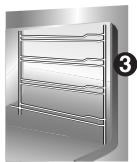
Illustration of a rack-mounted refrigerator with numbered labels (1-4) on the side, no text or symbols on the frame itself.This system is suitable for cooking on several levels, including different types of food (fish, meat etc.), without the tastes and smells mingling. Air circulation in the oven ensures a uniform distribution of heat. Pre-heating is not necessary.

Multiple cooking is possible as long as the cooking temperature of the different foods is the same.
6.3 Grill cooking
| ### | |
| FUNCTION SWITCH | |
| THERMOSTAT SWITCH | 225 |
natural_image
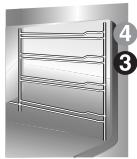
Illustration of a multi-tiered rack or shelf structure with no visible text or symbolsPermits rapid browning of foods. You are advised to place the pan in the highest guide. For short-term cooking of small quantities, place the grid in the fourth guide from the bottom. For long-term cooking and grills, put the grid in the lowest guide in accordance with the size of the pieces.
6.4 Hot-air grilling (multifunction models)
| FUNCTION SWITCH | |
| THERMOSTAT SWITCH | 200 |
natural_image
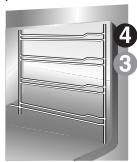
Illustration of a stainless steel rack with numbered callouts (4 and 3) indicating components, no text or symbols present.Ensures uniform heat distribution with greater heat penetration into the food. Food will be lightly browned on the outside and remain soft inside. Keep the oven door closed during cooking. Heating up time must not exceed 60 minutes.
6.5 Defrosting (multifunction models)
| FUNCTION SWITCH | |
| THERMOSTAT SWITCH IN POSITION | 0 |
natural_image
Illustration of a multi-tiered stainless steel rack cabinet with no text or symbolsThe flow of air produced by the fan ensures quicker defrosting. The air circulating inside the oven is at room temperature.

The advantage of defrosting at room temperature is that it does not alter the taste and appearance of the food.
6.6 Spit roasting (models with static oven)
FUNCTION SWITCH

natural_image
Five black-and-white icons representing different signal or sensor symbols (no text or labels)THERMOSTAT SWITCH IN POSITION
200
natural_image
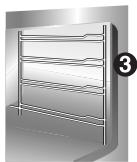
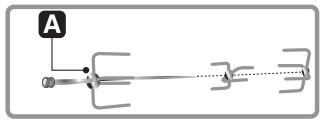
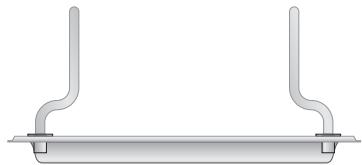
3D rendering of a stainless steel rack with horizontal shelves and a numbered label (3) in the corner, no text or symbols on the rack itself.Prepare the spit with the food, blocking fork screws A. Insert frame B into the third guide from the bottom. Remove handle D and position the spit shaft so that pulley E is guided on the link of frame B in the right side. Insert the drip tray into the oven as far as it will go until the tip of the rod is in line with the hole C. Now rock the frames B to insert the tip of the rod into the drive connection C of the rotisserie motor on the side of the oven. Pour a bit of water into the pan to avoid smoke from the dripping.

It is normal for the thermostat light to flash during cooking. This indicates the temperature inside the oven is regular.
natural_image
Pure electrical circuit lines without any symbols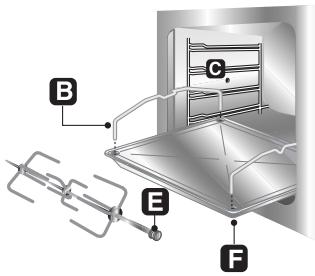
text_image
Technical diagram of a mechanical assembly with labeled components A through F, showing internal structure and connections.
natural_image
Mechanical assembly diagram showing a shaft and flange assembly with directional arrows (no text or labels)
CAUTION: the frames B must be fitted as shown in the diagram
natural_image
Pure diagram of a mechanical support structure without any text, numbers, or symbols6.7 Recommended cooking table
Cooking times, especially meat, vary according to the thickness and quality of the food and to consumer taste.
TRADITIONAL COOKING


| LEVELFROM BELOW | TEMPERATURE(°C) | TIMEIN MINUTES (*) | |
| FIRST COURSES | |||
| OVEN-BAKED PASTA | 2 | 200 | 30-35 |
| MEAT | |||
| ROAST VEAL | 2 | 200 | 60-65 |
| ROAST PORK | 2 | 225 | 70-75 |
| CHICKEN | 2 | 200 | 60-65 |
| DUCK | 2 | 200 | 120-125 |
| RABBIT | 2 | 200 | 90-95 |
| FISH | 2 | 200 | ACCORDINGTO DIMENSIONS |
| PIZZA | 2 | 250 | 15-20 |
| DESSERTS | |||
| MERINGUES | 2 | 125 | 55-60 |
| BISCUITS | 2 | 200 | 20-25 |
| PASTRY | 1 | 200 | 25-30 |
| SPONGE CAKE | 2 | 175 | 35-45 |
| FRUIT PIE | 1 | 200 | 30-35 |
(*) = WITH PREHEATED OVEN
GRILLING


| LEVELFROM BELOW | TIME IN MINUTES | ||
| FIRST SURFACE | SECOND SURFACE | ||
| TOAST | 3 | 5 | 5 |
| CHICKEN | 3 | 30 | 30 |
| FISH | 3 | 18 | 18 |
| TOMATOES OR COURGETTES | 3 | 8 | 8 |
HOT-AIR COOKING


| LEVELFROM BELOW | TEMPERATURE(°C) | TIMEIN MINUTES | |
| FIRST COURSES | |||
| OVEN-BAKED PASTA | 2 | 175 | 30-35 |
| MEAT | |||
| ROAST VEAL | 2 | 175 | 60-65 |
| ROAST PORK | 2 | 200 | 70-75 |
| CHICKEN | 2 | 200 | 60-65 |
| DUCK | 2 | 175 | 120-125 |
| RABBIT | 2 | 175 | 90-95 |
| FISH | 2 | 175 | ACCORDINGTO DIMENSIONS |
| PIZZA | 2 | 225 | 15-20 |
| DESSERTS | |||
| MERINGUES | 2 | 125 | 55-60 |
| BISCUITS | 2 | 175 | 20-25 |
| PASTRY | 1 | 175 | 25-30 |
| SPONGE CAKE | 2 | 175 | 35-45 |
| FRUIT PIE | 1 | 175 | 30-35 |
7. CLEANING AND MAINTENANCE

Before performing any operations requiring access to powered parts, switch off the power supply to the machine.
7.1 Cleaning stainless steel

To keep stainless steel in good condition it should be cleaned regularly after use. Let it cool first.
7.1.1 Ordinary Daily Cleaning
To clean and preserve the stainless steel surfaces, always use only specific products that do not contain abrasives or chlorine-based acids.
How to use: pour the product on a damp cloth and wipe the surface, rinse thoroughly and dry with a soft cloth or deerskin.
7.1.2 Food stains or residues
Do not use metallic sponges or sharp scrapers: they will damage the surface.
Use normal non-abrasive products for steel, and a wooden or plastic tool if necessary.
Rinse thoroughly and dry with a soft cloth or deerskin.
Do not allow residues of sugary foods (such as jam) to set inside the oven. If left to set for too long, they might damage the enamel lining of the oven.

7.2 Cleaning of the oven

For best oven upkeep clean regularly after having allowed to cool. Take out all removable parts.
text_image
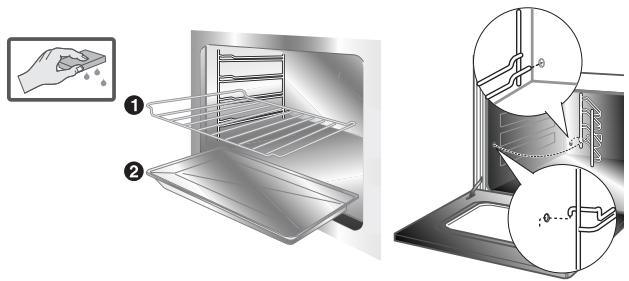
Diagram illustrating the step-by-step installation of a kitchen oven, showing steps from cleaning to cleaning and drying.- Clean the oven grill and side guides with hot water and non-abrasive detergent. Rinse and dry.
- The oven should be operated at the maximum temperature for about 15/20 minutes after using specific products, to eliminate the residues deposited inside the oven.
- For easier cleaning, the door can be removed (see P. 8.2)
7.3 Door glass
The door glass should always be kept clean. Use absorbent kitchen paper to clean. In case of tough spots, clean with a damp sponge using regular detergent.
8. EXTRAORDINARY MAINTENANCE
The oven may require extraordinary maintenance or replacement of parts subject to wear such as seals, bulbs, and so on. The following instructions describe how to carry out these minor maintenance operations.

Before any intervention, disconnect the power supply of the device.
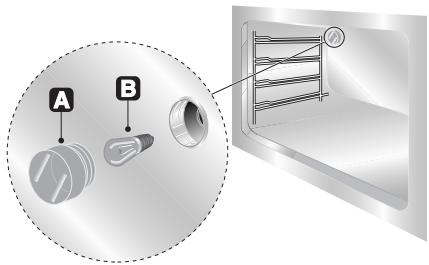
8.1 Replacement of light bulb
Remove the bulb protector A by turning anticlockwise and change bulb B (in the 8-function model with front glass panel change the halogen bulb C) with a similar one. Re-fit the bulb protector A.
text_image
A B
Only use oven bulbs (T 300°C).
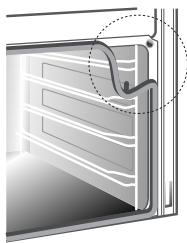
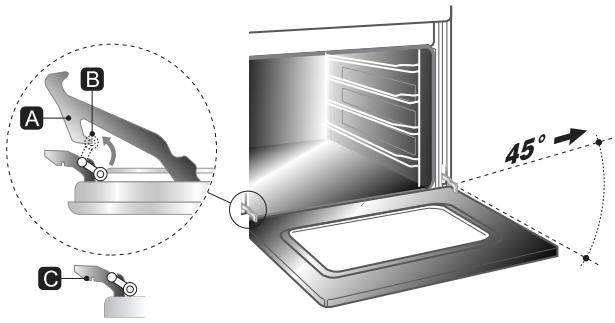
8.2 Removing
Hold the door on both sides with both hands near hinges A and raise levers B. Lift up the door forming an angle of about 45^ and remove. To refit, slide the hinges A in the grooves, drop the door and release levers B.
text_image
A B C 45°8.3 Oven door seal
To permit thorough cleaning of the oven, the seal may be removed. Before removing the seal, take off the door as described above. Once the door has been taken off, lift the tabs at the corners as shown in the figure.
After cleaning, refit the seal with the longer side horizontal and insert the tabs into the appropriate holes starting from the top ones.